1
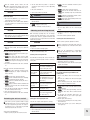
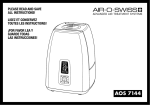
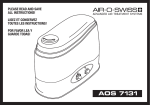
REad and save all instructions!
lisez et conservez toutes les instructions!
¡por favor lea y guarde todas las instrucciones!
AOS E2441
Evaporator
Évaporateur
Evaporatore
Operating instructions English
3
Mode d’emploi Français
8
Instrucciones de Operación Español
13
A 1
A 2
A 3
A 4
A 5
A 6
A 7
A 8
A 9
A 10
A 11
A 12
A 13
A 14
4ft
1ft
A
B3
B 15
B 16
B1
B2
B 17
B3
B 18
B 19
B4
B7
B5
B6
B7
B 13
B8
B9
B 20
B 21
B 10
B 11
B 14
B 12
B 13
B 14
B 14
B
C1
C2
C3
C4
C5
C6
C7
C
D 1
D
D 2
D 3
!
P
O
ST
E 1
E 2
E 3
E 4
STOP!
E
F 1
F 2
F 3
F 4
F 5
F 6
G 1
G 2
G 3
H 1
H 2
H 3
H 4
H 5
F
G
H
operating instructions
There are the following warning levels:
Warning level
English
Page
3
3
4
4
4
4
4
5
5
6
6
6
6
7
7
Chapter
About this document
Safety instructions
Technical data
Description of the unit
Humidification system
Unpacking the unit
Putting the unit into operation
Switching the unit on and off
Cleaning and servicing the unit
Transporting the unit
Storing the unit
Spare parts and accessories
Frequently asked questions
Air humidification general
information
Troubleshooting
about this document
These operating instructions are a component of the product and describe its safe use. The operating instructions apply exclusively to the product described within.
• Read through the instructions thoroughly prior to putting the unit into operation.
• Save the instructions for use throughout the lifespan of the product.
• Pass the instructions for use onto each successive owner or operator of the product and include any supplements received from the manufacturer.
WARNING
CAUTION
CAUTION
The unit is only intended to humidify the air in living areas up to 430 sq ft / 120 m³. In areas larger than 430 sq ft / 120 m³, optimum air moisture for humans and animals is not guaranteed. The unit may not be used for other purposes. No foreign objects may be put into the unit.
Applicable standards
The unit is ETL-listed. It complies with the following standards:
• UL998
• CSA C22.2 No. 104-01
For furhter information contact:
www.intertek-sc.com
Warnings and symbols in this document
In this document, warnings are used to prevent injuries and material damage. They are set up as follows:
WARNING LEVEL
Cause and result of the danger
▶ Precautions to prevent danger Dangerous situation.
Non-observance could result in slight injury.
Critical situation.
Non-observance could result in material damage.
In this document, the following symbols are used to facilitate fast access to information:
Symbol
✔ ▶ 1. 2. • - ➥ (see...)
A 1
Intended use
Description
Possible danger.
Non-observance could result in death or serious injury.
Description
Condition which must be met before beginning an action
Action with one or more step(s) whose order is not relevant
Action with several steps whose order is relevant
Listing of first level
Listing of second level
Result of one or more actions
Reference to a chapter, a paragraph or a drawing
Important information
Reference to an item number in a drawing e.g. item number 1 in drawing A
safety instructions
The unit is built according to the state-of-the-art in technology and in accordance with the safety and accident prevention regulations. Nevertheless, dangers can result from its use which can lead to injuries to the user and others, or to damage to the unit or other property if the unit is not used according to these safety instructions.
• Prior to using the appliance, read through the instructions for complete use and retain in a safe place for later reference.
• Those unfamiliar with the operating instructions as well as children, and people under the influence of medicine, alcohol or drugs may not operate the unit.
• The unit may only be operated for its intended use and within the specified technical data. Unintended use can be a danger to health or life.
• A 1 Children cannot recognize the danger in handling electric appliances. Therefore always supervise children who are near the unit.
• Do not use the unit in rooms in which there are flammable goods, gases or vapors.
• Do not alter the unit or put foreign objects into the unit.
When using electricity, electrical shock poses a danger to life. Observe the following precautions:
• Do not place the unit in the rain.
• Do not use the unit in damp rooms.
• Unplug the power plug when not in use.
• A 2 Never pull the power plug out of the electrical socket by the cord.
• A 3 Never pull the power plug out of or plug it into the electrical socket with wet hands.
• A 4 Only plug the unit into an AC supply. • B 14 Operate the unit only at the voltage according to rating plate on the unit. • Do not operate the unit:
- A 5 if cord or plug are damaged. - following a malfunction. - A 6 if it has fallen down or has been otherwise damaged.
• A 7 Repairs and changes on electric appliances and cables may only be carried out by specialists.
• Unplug the power plug from the electrical socket in the following cases:
- before each emptying the unit,
- before each cleaning,
- before each replacement of the evaporator wick or the Ionic Silver Stick®, - before installing/uninstalling individual components,
- before taking off the upper part,
- before each move of the unit.
• A 8 Never submerge the lower part with the electrical part and fan in water or other liquids or rinse it off with water or other liquids. Observe the following precautions to prevent injury:
• A 9 Place the unit in such a way that you do not trip over the cord.
• Place the unit in such a way that it cannot be knocked over.
• A 10 Do not get the cord stuck in the door or clamp it with other objects. • Do not cover the cord. Observe the following precautions to prevent material damage:
• A 11 Do not sit on the unit or place any objects on it.
• A 12 Only place the unit on a flat, dry surface. • The unit's air inlet and air outlet must be kept clear.
• Only use clean containers for filling the unit. • Ensure that the watering can has not been filled with fertilizer or similar substances. • Do not fill additives into the unit or the removable water base. • Do not use water additives (e.g. essential oils, fragrances, water conditioners). The material is not suitable for the use of additives. • A 13 When the unit is filled, do not push down the float tip since this causes the unit to overflow.
• Operate the unit only when fully assembled and completely operational.
• The appliance has a polarized plug (one blade is wider than the other). To reduce risk of shock, this plug is intended to fit in a polarized outlet, only one way. If the plug does not fit fully in the outlet, reverse the plug. If it still does not fit, contact a qualified electrician. DO NOT attempt to undo this safety feature.
• A loose fit between the plug and the AC outlet (receptacle) may cause overheating and a distortion of the plug. Contact a qualified electrician to replace loose or worn receptacles.
3
Operating light
technical data
Value
Electrical voltage
100–120 V / 50–60 Hz
Power consumption
Humidity output Suitable for rooms
Dimensions LxWxH
Weight (empty)
Operation noise level 24 W
up to 1.4 gallons/24 hrs up to 220 g/h
up to 430 sq ft
up to 40 m²
12.6” x 12.6” x 15.7”
320 x 320 x 400 mm 8.4 lbs 3.8 kg
< 25 dB(A)
description of the unit
The unit consists of the following components:
• B 1 Filling opening
• B 2 Top assembly
• B 3 Float assembly (B 16–19)
• B 4 Ionic Silver Stick® (ISS)
• B 5 Removable water base (B 5–7)
• B 6 Water capacity fill line
• B 7 Base handles
• B 8 Spout
• B 9 Lifecycle indicator for Ionic Silver Stick®
• B 10 Power cord/plug
• B 11 Base (B 11–14)
• B 12 Fan
• B 13 Slide switch (B 20–21)
• B 14 Power rating plate (on the underside of the unit)
Power rating plate
B 14
Among other things the following information is displayed on the power rating plate:
• Product name (Model number)
• Electrical voltage
• Power consumption
• Sign of conformity
The information on the power rating plate displayed in the illustrations is only an example. Check the information displayed on the power rating plate of your unit.
Humidification system
When filling the unit using the filling opening. The float tip closes the filling opening as soon as the fill capacity is reached. The evaporator wick soaks up water. The fan pushes the dry room air through the moist wick and emits it as a sufficiently moisturized air. Through the directed guiding of the airflow, nearly constant humidification is possible at every water level. Therefore, the unit creates optimum air moisture, without additional control units being necessary.
Ionic Silver Stick® for water quality maintenance
The float assembly consists of the following parts:
• B 15 Float tip = Water level indicator
• B 16 Water level indicator ring
• B 17 Evaporator wick AOS 7018
• B 18 Float basket
• B 19 Float body (styrofoam)
B 4
The specially adapted anti-microbial protection system Ionic Silver Stick® prevents microbial growth in the removable water base. Therefore, no chemical additives are necessary for the water quality maintenance.
The Ionic Silver Stick® is self-renewing, service free and can be used for a year.
The slide switch consists of the following parts:
• B 20 Slide switch
• B 21 Operating light
Lifecycle indicator
Operating modes
The following operating modes can be set on the slide switch:
4
The green indicator light illuminates when the unit is switched on. If the removable water base is taken off the base, the green LED changes to red and unit operation is interrupted, but the unit is not currentless. Only when the removable water base is returned to the base, the red LED turn green again and the unit resumes operation.
Position
0
I
Function
The unit is switched off
The unit is operating in night mode (low noise level)
The operating light turns green
II
The unit is operating in normal mode (maximum humidity output)
The operating light turns green
B 9
The unit is equipped with a lifecycle indicator for the Ionic Silver Stick®. Please cross off the current month on the label and write the current year on the line provided.
unpacking the unit
CAUTION
Risk of injury by falling parts!
▶ Always handle the unit by the base when unpacking and lifting. CAUTION
Damage to the unit due to removal of the float
body (styrofoam) inside the unit!
▶ C 7
Do not remove the float body (styrofoam) when unpacking the unit. 1. Open the packaging.
2. C 1 Remove the upper part of the styrofoam packaging.
3. C 2 Reach into the filling opening and grasp the upper end of the plastic bag securely.
4. C 3 Carefully pull the plastic bag with the unit out of the packaging. When doing so, grasp the plastic bag securely and do not let go of the plastic bag when removing.
5. C 5 Place the plastic bag with the unit on the floor and push the plastic bag down along the unit.
6. C 6 Hold the unit by the base and lift up out of the plastic bag.
➥ All packaging components as well as the plastic bag are removed from the unit.
7. B 14 Check data regarding the power supply on the power rating plate.
8. B Check that all components of the unit are included.
putting the unit into operation
Positioning the unit
CAUTION
Damage to the plastic due to high temperatures!
▶ Do not expose the unit to temperatures > 122 °F / 50 °C. Observe the following precautions when positioning the unit:
• A 14 Remember to ensure easy accessibility and sufficient room for servicing and cleaning the unit.
• Only operate the unit when it is filled!
1. Place the unit on the floor or on a flat, dry surface in the room.
2. Fill the unit (see section "Filling the unit").
Filling the unit
At delivery the unit is completely assembled and already equipped with an evaporator wick.
The float body is a component of the float assembly and does not belong to the packaging. Please do not dispose of the float body. This is not a replaceable accessory.
There are the following possibilities for filling the unit with water:
• using the filling opening on the upper part or
• directly into the removed water base from a faucet.
✔ There are no foreign objects in the unit.
✔ B The unit is assembled properly.
After an extended period of disuse, the unit should be emptied. Ensure that the unit ist clean prior to resuming operation. Otherwise an unpleasant odor can result.
CAUTION
Damage and cracks in plastic caused by additives in the water!
▶ Do not put any additives (e.g. essential oils or other fragrances) into the water.
▶ Ensure that there are no water-soluble additives (e.g. plant fertilizer) in a container before using it to fill the unit.
CAUTION
Water damage due to overfilling!
▶ When filling, do not exceed the maximum filling capacity indicated by the filling line.
CAUTION
Water leaking from the unit!
▶ When the unit is filled, do not press down the float tip.
Filling the unit at the filling opening:
1. D 1 Fill the unit using a clean container (e.g. a jar or a watering can).
2. D 2 Pour fresh, cold water into the filling opening of the upper part with a clean container.
3. D 3 Stop filling the unit as soon as the water level indicator ring of the float appears in the top assembly. ➥ The unit is filled with water and can be switched on.
Filling the unit at the removable water base:
✔ E 1 The unit is switched off and the power plug is unplugged (see chapter "Switching the unit on and off").
1. E 2 Lift the upper part from the base.
2. E 3 Lift the removable water base including the float assembly by the base handles.
3. E 4 Fill fresh, cold water directly into the removable water base.
4. E 4 Only pour water in until the maximum fill capacity on the inner side of the removable water base is reached. 5. Place the filled removable water base including the float assembly onto the base.
6. Place the upper part on the base. ➥ The unit is filled with water and can be switched on.
switching the unit on and off
If the unit is put into operation with an empty removable water base or if the removable water base goes empty during operation, the evaporator wick dries out, no evaporation is generated and an unpleasant odor can result.
✔ The unit is filled with water.
1. Plug the power plug into the electrical socket. 2. Set the slide switch to position I or position II according to your needs (see section "Operating modes").
➥ The unit is switched on. 1. Set the slide switch to position 0.
WARNING
Danger to life through electrical shock!
▶ Do not unplug the unit from the electrical socket with wet hands. 2. E 1 Unplug the power plug. ➥ The unit is switched off and currentless.
cleaning and servicing the unit
With increasing operating time, the air throughput and evaporator performance of the evaporator wick decrease. Therefore, regular maintenance and cleaning of the unit is a requirement for smooth and trouble-free operation.
CAUTION
Damage to the plastic due to unsuitable cleaning agents!
▶ Do not use acidic cleaning agents.
▶ Wipe the unit with a damp cloth.
✔ F 1 The unit is switched off and the power plug is unplugged.
1. F 3 Lift the upper part from the base.
2. F 4 Remove the removable water base including float assembly using the provided base handles.
3. F 5 Empty the residual water from the removable water base using the spout.
4. F 6 Remove the float assembly from the empty removable water base. WARNING
Danger to life through electrical shock!
▶ Do not empty water over the electrical part (base). 5. If water is in the base: empty the water and dry the base.
➥ The unit is taken apart and emptied.
Cleaning the removable water base
✔ Unit is taken apart and emptied from water.
Before cleaning the removable water base the float assembly has to be removed from the water base.
Only use the manufacturer´s recommended cleaning agent EZCal (see chaper “Spare parts and accessories”).
Cleaning and servicing intervals
Recommended cleaning and service intervals depend on air and water quality as well as actual operating time.
Interval
once a day
Activity
Check the water level, if necessary, refill water (see chapter "Filling the unit")
WARNING
Danger to life through electrical shock!
▶ Unplug the unit prior to cleaning.
▶ Never submerge the base with the electrical part and the fan in water. CAUTION
1 week or more without operation
Empty and clean the unit (see section "Taking apart and emptying the unit")
Damage to the unit due to the use of the cleaning and decalcification agent EZCal on the
running unit!
every 2 weeks
Clean the removable water base with EZCal only (see section "Cleaning the removable water base")
every 10–12 weeks (or as needed)
Replace the evaporator wick (see section "Replacing the evaporator wick")
▶ Before using EZCal, switch off and unplug the unit.
▶ After the use of EZCal, rinse the base thoroughly with tap water.
▶ Before switching on the unit, ensure that there are no residues of EZCal in the base. 1–2 times a year
Clean the fan (see section "Cleaning the fan")
once a year
Replace Ionic Silver Stick® (see section "Replacing the Ionic Silver Stick®")
Taking apart and emptying the unit
The unit can easily be taken apart for cleaning.
WARNING
1. G 1 Rinse out the removable water base with lukewarm water. 2. G 2 For more thorough cleaning, clean the removable water base with a commercial dish brush.
3. To decalcify the removable water base, use EZCal AOS 7417 only (see section "Spare parts and accessories").
4. Dry the parts after cleaning.
5. Insert the float assembly into the empty removable water base.
6. Put the unit together (see section "Putting the unit together"). Danger to life through electrical shock!
▶ Do not unplug the unit from the electrical socket with wet hands. 5
Cleaning the fan
Putting the unit together
✔ Unit is taken apart and emptied from water.
✔ Unit is taken apart and emptied.
Only use the manufacturer's recommendet cleaning agent EZCal (see chapter "Spare parts and accessories").
1. G 3 Wipe off the fan with a slightly damp cloth or cleaning rag.
2. Dry the parts after cleaning.
3. Put the unit together (see section "Putting the unit together"). Replacing the evaporator wick
The evaporator wick should be replaced in the case of heavy pollution, calcification, unpleasant odor, reduced air throughput, etc. Evaporator wicks are available from retailers, where the unit was purchased from.
✔ Unit is taken apart and emptied from water.
Only use the manufacturer's original evaporator wicks (see chapter "Spare parts and accessories").
CAUTION
transporting the unit
CAUTION
▶ Always handle the unit by the base when unpacking and lifting. CAUTION
Water damage due to water spilling over!
▶ Empty the unit before transporting.
▶ Do not rinse or wring out the evaporator wick.
1. Empty the unit (see section "Taking apart and emptying the unit").
2. Dry the unit.
3. Pick the unit up by the base and carry it to the desired location.
CAUTION
Damage to the unit due to removal of the float
body (styrofoam)!
▶ Do not remove the float body (styrofoam) when unpacking the unit. 3. H 3 Install the new evaporator wick onto the float basket. 4. H 4 To close the float assembly, place the float tip on the float basket and the evaporator wick, push down and turn clockwise (CLOSE arrow). 5. To check, gently pull the float tip upwards. In doing so, it should not lift off the float basket.
6. If necessary, turn the float tip again and recheck.
Insert the float assembly into the empty removable water base.
7. Put the unit together (see section "Putting the unit together").
Replacing the Ionic Silver Stick®
✔ Unit is taken apart and emptied from water.
1. Remove the Ionic Silver Stick® from the bottom of the removable water base and discard it.
2. Place the new Ionic Silver Stick® in the holder at the bottom of the removable water base.
3. Insert the float assembly into the empty removable water base.
4. Put the unit together (see section "Putting the unit together").
storing the unit
1. Clean the unit (see chapter "Servicing and cleaning the unit").
2. Dry the unit completely.
3. Pack the unit, preferably in the original packaging.
4. Store the unit in a dry, cool place.
spare parts and accessories
You can purchase spare parts and accessories from specialized retailers and replace them on the unit yourself. Only original parts from the manufacturer can be used. Repairs can only be carried out by professionals. This also applies to a faulty power cord.
Please check with the retailer the humidifier was purchased from.
Accessories
Evaporator wick
Ionic Silver Stick®
EZCal (decalcification and cleaning agent)
Q. Should I leave my door open or closed when
the unit is running?
A. Leaving the door open allows moisture to leave the room and go into other areas of the house. If you would like the moisture to stay within one specific room you should consider closing the door while the unit is running.
Q. How much moisture do I need in my room?
A. Suggested humidity level is between 40–60%.
Risk of injury by falling parts!
Damage to the damp evaporator wicks due to
rinsing or wringing!
1. H 1 To open the float assembly, turn the float tip counter-clockwise (OPEN arrow) and pull up. 2. H 2 Pull the used evaporator wick up and remove from the float basket and discard.
6
1. Insert the float assembly into the removable water base.
2. B 5 Place the removable water base including the float assembly on the base handles into the base. 3. Place the upper part onto the base. 4. B Ensure that the unit is put together correctly. 5. Ensure that there are no foreign objects in the unit.
➥ The unit is put together.
A. Wood, leather, carpet, curtains, and other types of fabric soak up a lot of moisture, thus not leaving enough moisture in the air. If the window is left open, then this allows moisture to escape from the room. A common reason is that the unit is placed next to a heating device in order to distribute quickly the moisture around the room with the hot air. Unfortunately, this concept does not work because the hot air coming out of a vent will soak up most of the moisture, and none of the air within the room will receive any.
Description
7018
7017
7417
frequently asked questions
Q. Why isn't there enough moisture in my
room?
A. How often do you run the unit? If the unit is only run at night, then during the day the moisture level will drop if moisture is not constantly added to the air.
Q. What are the effects of too little or too much
humidity?
A. Dry air can cause dry skin, static electricity, out of tune musical instruments, increased levels of dust (dry air causes dust to rise), damage to wooden objects (dry out and eventually cracks appear), discomfort, sickness, and dries out nasal membranes. Over-humidifying the air can cause mold and peeling of wallpaper.
Q. Why do I need a humidifier when I can just
open my window?
A. The amount of moisture within the outside air is not high enough to humidify a heated room.
Q. Where should I place my humidifier?
A. The unit should be free-standing, on a flat surface and not close to a wall, window, door, or thermal bridge so that air can circulate around and underneath the unit. Q. If my unit runs dry is that ok?
A. If there is a possibility that you will be unable to add water to the unit and it will run dry, turn the unit off before you leave. The unit will not be able to humidify the air if there is no water in it, and you may notice a foul odor. Q. Can this unit be used all year round?
A. Yes, the unit can be used all year round. The unit produces relative humidity which means that the air will only take as much moisture as it can hold. The unit will not over-humidify the air.
Q. Is it ok to put the removable water base in the
dishwasher?
A. Do not place the removable water base in the dishwasher. The removable water base will melt. Fill the removable water base with the prescribed ratio of water an EZCal as described on the packaging of EZCal. EZCal will remove mineral deposits from the removable water base.
Q. Can I use distilled water?
A. Yes you can. The evaporator does not need the minerals in the tap water to function properly.
Q. What is EZCal?
A. There is a sample packet of EZCal included in the packaging of your humidifier. EZCal from AIR-O-SWISS is an easy and safe cleaning and descaling agent recommended for all humidifiers. It removes mineral deposits from the water base. It is available at selected retail stores.
Customer Service Phone Number: 1-800-336-0326 (USA and Canada only)
troubleshooting
Repairs on electric appliances can only be carried out by specialists. Through improper repairs, considerable danger for the operator can result and voids warranty claims. WARNING
Danger to life through electrical shock!
▶ Do not carry out any repairs on electrical parts.
air humidification general
information
Did you know that air that is too dry
• dries out mucous membranes and additionally causes chapped lips and stinging eyes?
• promotes infections and sicknesses of the respiratory passages?
• leads to a lack of energy, exhaustion and concentration weakness?
• burdens pets and room plants?
• encourages dust development and the electrostatic charge of synthetic textiles, carpets and synthetic flooring?
• damages wooden fixtures, especially hardwood floors?
• puts musical instruments out of tune?
The physical comfort of human and animal is dependent on many influences. One of those is correctly humidified air. During the heating period, the cold outside area which streams into living spaces through the windows is warmed. This results in a plummet in the relative air moisture. An adverse climate for plants and animals, wooden objects and furniture dry out and people feel uncomfortable and are susceptible to colds in higher numbers. As a rule, room climate is comfortable when the relative moisture is between 40% and 60%. Air humidification is especially wise in the winter.
Fault
The unit is not working
Cause
Solution
Power plug is not plugged ▶ Plug in the power plug and switch on the unit.
in.
Removable water base is ▶ Insert the removable water base (see section not inserted when putting "Putting the unit together").
the unit together.
Grinding noises
Water base is not in▶ Insert the removable water base correctly (see serted correctly.
section "Putting the unit together").
No air humidification
No water in the remov▶ Fill the removable water base (see section able water base.
"Filling the unit").
Calcified evaporator wick.
▶ Replace the evaporator wick (see section "Replacing the evaporator wick").
Float tip with fill level ring Unit component forgotten ▶ Unplug the power plug.
not visible when filling
when putting the unit ▶ Check if the unit is put together correctly together.
(drawing B).
Unit put together incorrectly.
Unit is losing water
Unit causes unpleasant odor
Unit was overfilled.
▶ Empty the water (see section "Taking apart the unit").
▶ Dry the unit.
Unit component forgotten ▶ Unplug the power plug
when putting the unit ▶ Check if the unit is put together correctly together.
(drawing B).
Unit put together incorrectly.
Unit is not filled in opera▶ Fill the unit (see paragraph "Filling the unit").
tion.
Evaporator wick is dirty.
▶ Replace the evaporator wick (see section "Replacing the evaporator wick").
7
Thank you for choosing an AIR-O-SWISS Evaporator!
For further product information, visit www.airoswiss.net or call 1-800-336-0326 (USA and Canada only).
Merci d’avoir choisi un évaporateur AIR-O-SWISS!
Pour de plus amples renseignements sur le produit, visitez www.airoswiss.net ou composez le
1-800-336-0326 (États-Unis et Canada seulement).
¡Gracias por elegir el Evaporador AIR-O-SWISS!
Para más informaciones sobre este producto, visite www.airoswiss.net o llame al
1-800-336-0326 (Solamente para Estados Unidos y Canadá).
AIR-O-SWISS is a registered trademark of PLASTON AG, Switzerland
PLASTON International Corp., Naperville, IL, USA
Version: 1
Edition: 04/08
34614-00