1
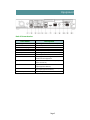
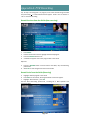
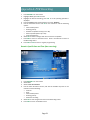
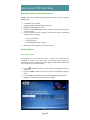
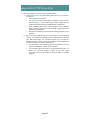
Entone Set Top Box User’s Guide “Totally Local, Simply Brilliant” INTRODUCTION Welcome to CommVision IPTV! KPU is committed to bringing you state‐of‐the‐art technology and exceptional value. With KPU CommVision IPTV you get 100% digital quality programming, an interactive program guide, CD‐quality music channels, on‐screen Caller ID, parental controls and more! Please review the information on the next page with our technician. This information will insure that you have been provided the materials and instruction to start enjoying your new service. KPU CommVision Customer Support 907‐228‐5474 Billing and Account Information Monday – Friday: 9:00 am – 6:00 pm Saturday: 10:00 am – 4:00 pm Technical Support 611 or 907‐225‐2111 Ext 1 or email: [email protected] Monday – Friday: 8:00 am – 9:00 pm Saturday ‐ Sunday: 11:00 am – 9:00 pm Office Location 2417 Tongass Ave. (The Plaza) Monday – Friday: 9:00 am – 6:00 pm Saturday: 10:00 am – 4:00 pm Website www.kpunet.net Welcome Your TVs are programmed as follows: TV TV 1 TV 2 TV 3 TV 4 Location Channel/Input TV Programming Code Modem: Model Location Wired/Wireless Set Top Boxes: TV TV 1 TV 2 TV 3 TV 4 Model SD/HD PVR Your PINs are currently set to: Purchasing PIN Installation Checklist: □ Installation Summary Sheet □ TV Locations and Setup □ Personal Identification Numbers (PIN) □ Remote Control Quick Reference Guide □ Turning System On/Off □ Common Remote Functions • Guide • Menu • Music • VOD □ Caller ID (if applicable) □ Channel Lineup □ DSL Authentication/ Speed Test: _______________ □ HD Setup • Aspect Ratio and Resolution • Stream Enablement □ Customer Support □ Help Table of Contents Introduction Equipment ................................................................ 1‐2 The Remote .............................................................. 3‐4 Getting Started ......................................................... 5‐6 Parental Controls ...................................................... 7‐8 PIN Settings............................................................... 8 Menu ........................................................................ 9 Interactive Program Guide (IPG)............................... 10‐11 Favorites ................................................................... 12 Auto Tune & Reminders ........................................... 12 Music ........................................................................ 13 Video‐On‐Demand (VOD) ......................................... 13‐14 Pay‐Per‐View (PPV)................................................... 14 Caller ID .................................................................... 15‐16 Closed Captioning ..................................................... 16 HDTV: Aspect Ratio & Resolution ............................. 16‐17 Personal Settings System Features Appendix A: PVR Recording ................................. 18‐26 Appendix B: Troubleshooting............................... 27‐29 Introduction Front of Entone Amulet Part Name 1. 2. Standby Switch Standby/On Indicator 3. Front Panel Display 4. 5. IR receiver Arrow keys 6. 7. OK button Reset Pin Hole Description Power up or put Amulet in standby mode. Amber in standby mode and starting Green when started. Start‐up messages Clock after starting Remote control IR receiver UP arrow for setting HDMI and Component resolution. Trigger remote registration mode. Restart Amulet. Cables 1. 2. 3. 4. 5. Ethernet Coaxial Cable Telephone Cord Left and Right Audio and Component Video Power Cord Page 1 Equipment Back of Entone Amulet Part Name Description 1. 2. 3. 4. 5. 6. 7. 8. Digital Audio S‐Video Audio Left/Right Video Y Pb Pr Optical Audio HDMI Ethernet 9. RF TV S/PDIF digital coaxial RCA audio output S‐Video output Composite audio output Composite video output Component video output S/PDIF digital optical audio TOSLINK output HDMI output RJ45 plug for connecting to ADSL modem or network access equipment Type‐F connector for RF TV output (factory set to channel 10) Type‐F connector for HomePNA coaxial output (optional feature) RJ11 plug for connecting HomePNA phone wire output (optional feature) DC power jack 10. Coax out 11. To Line 12. DC input Page 2 Equipment Remote Remote Buttons Description Special Key reserved for remote programming functions Changes the current A/V input of the selected device. INPUT + MENU triggers STB User Menu. Displays on‐screen information about the current INFO television program. Reserved for future use. LANG Displays the on‐screen television guide which provides GUIDE information about current and future television programming. Buttons used for VCR/DVD play/stop/ffwd/rwd/pause. VCR/DVD Controls These buttons can be also be used for VCR‐like controls with VOD services. Executes the currently selected menu option. OK Confirms the channel number entered. ENTER Displays the VOD menu. MOVIES Returns user to live programming. DTV Displays the PVR Menu. RECORD‐IT Reserved for future use. RESERVED USE KEY Turns the currently selected service on or off. POWER Selects the device that you would like to control. DEVICE KEYS (STB/TV/AUX) Displays the on‐screen menu. MENU Exits the current menu option. EXIT Changes the channel up/down. Page up/down in the CH Guide. Changes channel to the most recently viewed channel. LAST Raises or lowers volume of the currently selected device. VOL Navigates right, left, up, down in the on‐screen guide. NAVIGATION KEYS SPECIAL FUNCTION Access to special menu items and views. 1. SETUP 2. INPUT 3. 4. 5. 6. 7. 8. 9. 10. 11. 12. 13. 14. 15. 16. 17. 18. 19. 20. 21. KEYS 22. NUMBERED BUTTONS 23. MUTE 24. MEDIA 25. MUSIC 26. PHONE 27. HELP Allows direct access to specific channels and menu items. Turns off the volume of the currently selected device. Not used. Displays available music channels. Displays the Caller ID menu. Displays the on‐screen help menu. Page 3 The Remote 1 13 14 2 15 3 16 4 17 5 18 6 19 7 20 21 22 8 23 24 9 10 25 11 26 12 27 Page 4 Getting Started Turning on the System The universal remote provided allows you to navigate through the Digital TV functions and also control the volume and power on your television. entone URC Plus – B Series 1. 2. 1. 2. To turn the system ON: Press TV, then PWR on the remote to turn on the television. Press the STB button then PWR to initiate control of KPU Commvision functions. To turn the system OFF: Press the STB button then PWR to turn off the Set Top Box. Press TV, then PWR to turn off the TV. URC Plus Troubleshooting: When turning on the system, if a screen appears prompting you to press PWR, verify that you are in STB mode by pressing the STB button. Then point the remote away from the TV and press PWR again, to activate the Set Top Box. Page 5 Getting Started Remote Control Use the remote arrow keys to navigate interactive, on‐screen menus. When the curser moves, a highlight appears around selected items. Feature buttons on the remote (DTV, Music, etc.) jump directly to a particular service. See page 3 for a complete description. Navigating with the Remote 1. Use the remote arrow keys to move the cursor. The selected item will be highlighted in white. 2. Press the OK button on the remote. An action occurs and the screen changes. Remote Codes The remote is capable of controlling additional home electronics such as your TV, DVD or Stereo. Refer to the included Remote Programming instructions for additional information on how to program the remote. Programming instructions are also available at www.entone.com/assets/File/Reference_Guides/Amulet_User_Guide_v1_6_1.pdf Personal Identification Number A 4‐digit personal identification number (PIN) is issued at the time of installation (See Welcome page). Your PIN is used to rent movies and set parental controls for TV programs and movie ratings. When required, an on‐screen message prompts you to enter the PIN using the remote. As a security measure, asterisks appear as the numbers are entered. If the wrong PIN is entered, a message prompts re‐entry. Note: You can change or inactivate the PIN. See page 8 for details. Page 6 Personal Settings Parental Controls Use Parental Controls to set maximum viewable ratings for movies and TV programs, as well as prevent unrated TV shows from displaying. A valid PIN is required to alter Parental Controls. Set Parental Controls 1. 2. 3. 4. Press MENU on the remote. Select ACCOUNT INFO/SETTINGS, then PARENTAL CONTROL. Select SETTINGS. Enable or Disable – Select NO to disable parental controls. Select YES to activate parental control features throughout the system. 5. Edit preferences using the directional arrows and OK on the remote for the following: Movie Rating – Control viewing of programs below the selected MPAA ratings level (PG‐13, etc.). Television Rating – Control viewing of programs below the selected VCHIP rating level (TV‐14, etc.). Lock Unrated Shows – Select Yes or No to restrict viewing of shows that are not assigned a rating. Show titles under Parental Control – Select YES or NO to restrict showing titles in the guide. 6. Select OK to save changes and return to the main menu. Hide and Unhide Channels from the Guide 1. 2. 3. 4. Press MENU on the remote. Select ACCOUNT INFO/SETTINGS, then PARENTAL CONTROL. Select HIDE CHANNELS. Use the directional arrows on the remote to browse through a list of available channels. Press OK on the remote to select or deselect specific channels. 5. Select OK to save channels and return to the Parental Control menu. Movie Ratings G PG PG‐ 13 R NC‐17 NR General audience Parental guidance suggested Parents strongly cautioned Restricted No one 17 and under admitted Not Rated Page 7 Parental Controls, PIN Settings TV Ratings V S L D FV TV‐Y TV‐Y7 TV‐G TV‐PG TV‐14 TV‐MA Violence Sexual Conditions Coarse or Crude Indecent Language Suggestive Dialog Fantasy Violence All Children Directed to Older Children General Audience Parental Guidance Suggested Parents Strongly Cautioned Mature Audience Only PIN Settings A 4‐digit personal identification number (PIN) is issued at the time of installation (see Welcome page). When required, an onscreen message prompts you to enter the PIN using the remote. As a security measure, asterisks appear as the numbers are entered. Change the Current PIN 1. 2. 3. 4. Press MENU on the remote control Select ACCOUNT INFO/SETTINGS, and then PIN OPTIONS. Highlight the PIN you want to change and press OK. Use the number keypad to enter the new PIN. Press OK to confirm the change. Press the right directional arrow ( ) on the remote control to leave the number field. 5. Select OK to save changes and return to the menu. Enable/Disable the PIN Warning: When the PIN is disabled you will no longer be required to enter a PIN when accessing and changing System Settings or when making purchases such as Video on Demand (VOD) movies. 1. Press MENU on the remote control. 2. Select ACCOUNT INFO/SETTINGS, and then PIN OPTIONS. 3. Select YES to Disable or NO to enable the selected PIN. 4. Select OK to save changes and return to the menu. Page 8 System Features On‐Screen Menu Navigate system functions two ways: the on‐screen main menu or the remote feature buttons. The menu displays: • List of main features (DTV, Music, etc.) available on the system. • Options for controlling how and if the system displays certain information (Parental Controls, Favorites, System Settings, Change PIN). • Account history and more. Using the Menu 1. Press MENU on the remote. 2. Use the directional arrows on your remote to navigate program titles one channel at a time. Menu Structure Watch DTV Search DTV • • • • • Movies • • Recordings • *With subscription to • PVR • Promotions • • • • • • • Account Info/Settings • • • • • • • Web on TV • Music • Phone • • Help • Return to Regular DTV Programming Program Guide By Category By Title By Keyword Direct Access to VOD Movies Finished Scheduled Series New Future Use Parental Control Favorites Channel Renumbering System Settings Account PVR Settings (with subscription to PVR) PIN Options Subtitling Picture Settings Closed Captioning Caller ID Settings System Info Contacts (currently unavailable) Future Use Direct Access to Digital Music Phone History Phone Book Direct access to system help topics Page 9 Interactive Program Guide (IPG) Interactive Program Guide (IPG) Press GUIDE on the remote to access detailed information for the selected entertainment feature (DTV, Music, etc.). The last channel viewed appears on a smaller screen (screen‐in‐screen) within the Guide so you never miss what’s happening while you search for what’s on, schedule feature programs or get more information. TV listings appear in a grid format with channel numbers and network call letters down the left side and times along the top. Listings are color coded to help you identify different types of programs. Light Green/Blue Dark Green Red Light Green Dark Blue Purple Normal Programming No Information Sports News Children’s Movies There are two preset guides, “All” and “Subscribed.” Press GUIDE multiple times to toggle between them. “Subscribed” displays the channels available in your subscribed package. “All” will display all channels available. Navigating Guide Listings Use the numeric keypad to advance directly to a specific channel or use the Directional arrows on your remote to navigate program titles one channel at a time. Use the CH up/down button to advance a full page of listings. Use the directional arrows to see program listings in 30‐minute increments, for up to one week in advance. Use the keys to advance an entire day. Highlight a program title and press OK. If the program is on now, you will tune to it. If the program will air later, you will be given options to tune to the channel now or set a reminder. Use the directional arrows and OK to select desired action or press EXIT to return to the guide. Page 10 System Features Guide by Channel 1. 2. 3. 4. Press GUIDE on the remote, use the directional arrows on the remote to highlight a program title that appears in the desired channel. Press the RED circled button in the middle of the remote (above the number key pad). Use the directional arrows to browse program listings in chronological order. Use the keys to switch to the next channel. Press the RED circled button again to return to the main Guide. Program Information Highlight a program title and press INFO on your remote to see detailed program information. Use the direction arrow to highlight one of the following options: • Watch CHANNEL. • Add REMINDER. (With PVR subscription) • SERIES EPISODES (displays list of all program occurrences). • Press EXIT or on the remote to return to Guide. Detailed program information can also be accessed when not in the Guide. While watching a program, press INFO on the remote to display title and duration of the current program. Press INFO a second time to display the full program description. Favorites The Favorites feature allows quick access to your most frequently viewed channels. Use the default Guide to create one for each person in your household (up to 5)! Create a Favorites List 1. 2. 3. 4. 5. 6. 7. 8. Press MENU on the remote Select ACCOUNT/INFO/SETTINGS, then FAVORITES. Highlight NEW FAVORITE, press OK. Use the displayed keyboard to enter a name, then select OK. Use the directional arrows to access and scroll through the available channels. Highlight a specific channel and press OK on the remote to select desired channels. Select OK to save and return to the menu. Press the GUIDE multiple times or Blue function button to toggle between each created list – including “All” and “Subscribed.” Page 11 Favorites & Auto Tune and Reminders Channels not selected in your favorites list will be unavailable to watch or see in the Guide when using the selected favorites list. Switch to subscribed to view or watch all available channels. Delete a Favorites List 1. 2. 3. 4. 5. 6. Press MENU on the remote. Select ACCOUNT INFO/SETTINGS, then FAVORITES. Select EDIT FAVORITE. Use the directional arrows to toggle between and highlight the list you want to delete. Press OK. Press Red function button. The CONFIRM dialog box appears. Select YES. Auto Tune and Reminders Never forget when your favorite program starts. Schedule a Reminder to notify you before the show starts or schedule an Auto Tune to have it change the channel for you! 1. 2. 3. Press the Guide button to access the DTV Guide. Highlight the future program and press OK. Arrow to ADD REMINDER and press OK. 4. To set a REMINDER: Use the directional arrows on the remote to highlight NO and press OK. To schedule an AUTO TUNE: Use the directional arrows on the remote to highlight YES and press OK. 5. 6. 7. Set the notification or auto‐tune time. Arrow down to “Time before program starts” to highlight and select the +/‐ buttons to set a time period from 1 to 99 minutes. Select OK to save your settings and return to the menu. Press EXIT or directional arrow to return to the Guide. A small clock will appear next to the program you have selected. When the reminder appears, select WATCH NOW to accept or DISMISS to ignore. Page 12 Music & VideoOnDemand Music Access over 40 different channels that feature continuous, commercial free, digital quality music in a variety of genres. 1. 2. 3. Press the MUSIC button (bottom of remote). Press the GUIDE button while in this feature to see a complete listing of music channels by genre. Select the desired channel or genre using the directional arrows and OK on the remote. Press the DTV button on the bottom of the remote to return to regular TV programming. Note: You can also access the music channels by pressing the MENU button and selecting MUSIC. Video‐On‐Demand Video‐On‐Demand movies and programs are paid for at the time of airing and may be watched for up to 24 hours. Complete Video‐On‐Demand listings are available in the Interactive Program Guide. Renting a VOD Movie Get current movies and local programming at the touch of a button. 1. Press the MOVIE button the remote (bottom left). 2. Use the directional arrows to highlight the desired category, press OK: Menu By Category By Title By Actor By Director Rented Movie List Alphabetical Category Events Free On Demand HD KPU VOD Movies Premium Channels (Search for movie titles) (Search by actor’s name) (Search by director) Previously viewed movies (Search for movies alphabetically Page 13 Events Specials Kids Music Abient.TV Discovery Networks HD Movies Kayhi Sports Celebrity Chef LiveinKetchikan Special Events HomeGrown Hometown Heroes Monthly Grind New Releases Library Independent En Espanol Passion Zone Bonus Footage Box Office Preview Foreign Flix Filipino VideoOnDemand & PayPerView 3. 4. 5. Use the directional arrows to select a subject from the displayed list, press OK on the remote. Continue to use the directional arrows and the OK button to navigate through all of the screens. To return to regular TV viewing, press the DTV button or EXIT. Pay‐Per‐View Pay‐Per‐View movies and programs are paid for at the time of airing and may be watched once. Complete Pay‐Per‐View listings are available in the Interactive Program Guide (channels 970 and above). Renting a PPV Event 1. 2. 3. 4. Press DTV on the remote, then press GUIDE. Navigate using remote arrow keys or Page up/down to a PPV channel. Press OK on the remote. Select RENT PPV. • If the movie is in progress, a warning box appears to confirm the purchase. Options are YES or NO. Select YES to continue with the purchase. Select NO to cancel and return to regular programming. Enter your PIN. Note: Movies and events are not available to purchase until 15 minutes before the start time. Cancel a PPV Purchase You can cancel a PPV purchase before the program begins. Once the program has started, you will not be able to cancel the purchase. 1. 2. 3. 4. 5. Press DTV on the remote, then press GUIDE. Use the directional arrow keys or Page up/down on the remote to navigate to the movie or event purchase you want to cancel. Once the program is highlighted, press INFO on the remote. Select CANCEL PPV. Use the directional arrow keys and the OK to select EXIT to return to the Main Menu. Select DTV in the Menu or press the DTV button on the bottom of the remote to return to regular programming. Purchase History The Account section of Account Info/Settings displays a detailed record of your movie rentals (both VOD and PPV) and costs for the last 30 days. This information is for explanatory purposes only. 1. 2. Press MENU on your remote. Select ACCOUNT INFO/SETTINGS and then ACCOUNT. The Enter PIN dialog box appears. Enter your PIN. 3. Your subscription name is displayed. Review the purchased movies, view charges, titles and dates for the last 30 days. 4. Use the directional arrows and OK to select EXIT to return to the main menu. 5. Select DTV in the menu or press DTV button near the bottom of the remote to return to regular programming. Note: Setup Parental Controls to block and/or hide undesired channels and titles. See page 7 for details. Page 14 Caller ID Caller ID Caller ID on your TV is available with a subscription to the Caller ID feature on your KPU phone account. Enable or Disable Caller ID • • • • Press MENU on the remote. Select ACCOUNT INFO/SETTINGS, then CALLER ID SETTINGS. The Caller ID Settings screen appears, with the following options: Display only custom list (only displays number saved to the PHONE BOOK). Enable/Disable Display only calling number Turn options on or off, as desired, and then select OK to save changes and return to the menu. Caller ID History You can determine which numbers appear and how the information is displayed. 1. 2. 3. 4. Press PHONE on the remote, or press MENU and select PHONE. Press PHONE HISTORY. The Caller ID History screen appears in reverse chronological order. Scroll through the list to review incoming calls. Press EXIT or directional arrow to return to the previous menu. Phone Book/Custom List (Create a personal list of frequently used numbers) Save Numbers from Caller ID History 1. 2. 3. 4. 5. Press PHONE on the remote, or press MENU and select PHONE. Select PHONE HISTORY. The Caller ID History screen appears. Scroll through the list to highlight the desired call. Press the Yellow special function button on the remote to add the number to the phone book. Use the displayed keyboard to edit the name (if desired) the select OK. Press EXIT or directional arrow to return to the previous menu. Manually Add Numbers 1. 2. 3. 4. 5. 6. Press PHONE on the remote, or press MENU and select PHONE. Select PHONE BOOK. Press the Blue special function key on the remote. The Enter Name dialog box appears. Enter a name using the onscreen keyboard or the number keypad on the remote. Select OK. The Enter Number dialog box appears. Enter the 10‐digit phone number using the onscreen keyboard or the number keypad on the remote. Select OK to save and return to the Phone Book list. Page 15 Caller ID, Closed Captioning & HDTV Delete Caller ID History When the maximum number of calls is exceeded, the oldest calls in the History will automatically drop off. However, you can delete specific calls from the list at any time. 1. 2. 3. 4. 5. Press PHONE on the remote, or press MENU and select PHONE. Select Phone History. The Caller ID History screen appears. Scroll through the list to highlight the call you want to remove from Caller ID History. Press the Red special function key. A confirmation box appears. Select YES to confirm and delete or NO to cancel. Closed Captioning To Enable/Disable Closed Captioning: 1. 2. 3. 4. Press MENU on the remote Select ACCOUNT INFO/SETTINGS, and then CLOSED CAPTIONING. Use the directional arrows and OK on the remote to Basic Captioning (EIA‐ 608) – Select CC1 to enable or OFF to disable. Select OK to save and return to the previous menu. HDTV High Definition brings TV viewing to an entirely different level. The picture is crystal clear and brings the smallest detail to life. In order to view true HD you must have a HD compatible television, access or subscription to HD channels and the appropriate equipment, such as the Entone STB and preferred cabling. Setting the Aspect Ratio and Resolution For optimal picture quality for HD programming it is recommended that the aspect ratio be set to 16:9 and the resolution set to 780p*. 1. 2. 3. • Press MENU on the remote. Select ACCOUNT INFO/SETTINGS, and then PICTURE SETTINGS. Use available options to change TV aspect ratio and HDMI output. Select OK to save changes and return to the main menu. HDMI (Screen Resolution) ‐ For Standard‐Def (SD), choose from 480i or 480p. For High‐Def (HD), choose 780p. • TV Aspect Ratio ‐ Select the appropriate option on your TV to preserve the complete image. Widescreen HDTVs have a 16:9 ratio, analog or SDTVs are typically 4:3. • 16:9 or 4:3 Handling ‐ Use the following settings to maintain the original image or prevent shrinking or stretching of the picture. *Note: If there is no video or an error message is displayed after a new resolution is selected, your TV may not support the selected resolution. Refer to your TV owner’s manual for verification. Repeat the above procedures to find a resolution supported by your TV. Page 16 HDTV: Aspect Ratio & Resolution TV Aspect Ratio 4:3 Description Image Handling: Center Cut‐Out 16:9 Broadcast: Crops the left and right sides of the picture, filling the screen with a 4: image. TV Aspect Ratio 4:3 Description Image Handling: Letterbox 16:9 Broadcast: Shrinks the picture to preserve its aspect ratio on a 4:3 screen. The image is full width with black bars at the top and bottom. TV Aspect Ratio 16:9, 4:3 Description Image Handling: Pillarbox 4:3 Broadcast: Preserves the aspect ratio on a 16:9 screen. The image is full height with black bars at the left and right. Page 17 Appendix A: PVR Recording Convenience. Choice. Control. KPU Commvision Personal Video Recorder (PVR) provides you the ability to record and play back television programs, movies and events – all at the touch of a button. Manage your own instant replays or pause the action when the phone rings, Pause Live TV puts TV view into your schedule. The Remote 1. 2. 3. 4. 5. 6. 7. 8. 9. RECORD – Automatically record live TV – use while watching a live program or when programming is selected in the guide. STOP – Stops playback of recorded program or returns program to real‐ time if Pause Live TV is in use. PLAY – Use with recorded or paused live TV. PAUSE – Pause Live TV or recorded program. REWIND – Rewind a recorded program or time‐shifted live TV. Press up to 5 times to rewind at increasing speeds (4x, 8x, 16x, 32x and 64x). Press PLAY to resume normal play. FAST FORWARD – Fast forward a recorded program or time‐shifted live TV. Press up to 5 times to rewind at increasing speeds (4x, 8x, 16x, 32x and 64x). Press PLAY to resume normal play. OK – Selects a currently highlighted option in the menu. RECORD IT – Access the PVR menu to see a list of Recorded and Future Recordings. SPECIAL FUNCTION KEYS – Access to special menu items and views. Page 18 Appendix A: PVR Recording Introduction Common PVR Symbols GREEN Program was successfully recorded and ready for playback. RED Program is being recorded. RED Program is scheduled to record. GRAY Program scheduled to records has been canceled. GRAY Program failed to record. Access and Manage Recordings and Settings Access the PVR menu to play‐back and/or delete existing recordings, edit and manage future recordings and schedule new recordings. Recordings are separated into Finished and Scheduled. To access the PVR menu: 1. 2. 3. Press MENU on the remote. Highlight RECORDINGS, press OK on the remote. ‐ or – Press RECORD IT on the remote (bottom, left button, below the number key pad) for direct access to the Recordings menu. Record Record the program you’re watching 1. 2. 3. 4. Tune to the desired program. Press the RECORD button once. A red dot will appear in the on‐screen Information line of the program being recorded and the Entone STB will display “Recording.” Only one program can be recorded at a time. If more than one program is selected to record, an error will appear. See “Resolving Conflicts” (pg. 30) for more information. Page 19 Appendix A: PVR Recording Tip: To stop a recording that is in progress, tune to the channel being recorded and press Stop( ). A confirmation box will appear. Select “Yes” to confirm or “No” to continue recording. Record One‐time from the Guilde (Non‐recurring) 1. 2. 3. 4. Press GUIDE. Use the directional arrows to highlight the desired program. Press the RECORD button once. A red dot will appear next to the program title in the Guide. Optional: 5. 6. Press the RECORD button a second time to edit Start, Stop and Deleting preferences. Select OK to save changes and return to the Guide. Record Series from the Guide (Recurring) 5. Highlight desired program in the Guide 6. Press INFO on the remote, the Program Details screen will appear. 7. Highlight “Record Series”, press OK. Edit the Series Recording preferences, including All or New episodes and channel number: Page 20 Appendix A: PVR Recording 1. 2. 3. 4. 5. 6. 7. 8. Press RECORD IT on the remote. Highlight SERIES, press OK to select. Highlight the desired recording, press OK. A list of upcoming episodes is displayed. Press the Green special function button to access “Options.” Use the directional arrows and OK on the remote to edit the following options: • Start and Stop times • Deleting priority • Number of episodes to keep (1‐5 or All) • Which episodes (New only or All) • Channel preference Select OK to save the changes and return to the list of episodes. Press EXIT to return to the Series menu. Press a second time to return to the Recordings menu. Press EXIT or DTV to return to regular programming. Record a Specific Date and Time (Non‐recurring) 1. 2. 3. 4. 5. 6. Press RECORD IT on the remote. Select NEW. Select TIMED RECORDINGS. Use the black directional arrows, OK and the Number Key Pad on the remote to set the following: • Channel • Date • Start and Stop times • Deleting priority • Name the recording Select OK to save changes and return to the Recordings menu. Press EXIT to return to the Main menu. Page 21 Appendix A: PVR Recording Record a Specific Date and Time (Recurring) 1. 2. 3. 4. 5. 6. Press RECORD IT on the remote. Select NEW. Select RECURRING RECORDINGS. Use the black directional arrows, OK and the Number Key Pad on the remote to set the following: • Channel • Date • Start and Stop times • Number of episodes to keep • Deleting priority • Name the recording Select OK to save changes and return to the Recordings menu. Press EXIT to return to the Main menu. Edit Scheduled Recordings 1. 2. 3. Press RECORD IT on the remote. Select SCHEDULED, press OK. Highlight the program you want to edit, press OK. Page 22 Appendix A: PVR Recording 4. Choose from the following options: • • • 5. • • EDIT – Adjust the start and stop times and set the deleting priority. RECORD SERIES – Turns a non‐recurring recording into a Series Recording. See page 20 for more details on Series Recordings. ADD REMINDER – Schedule a reminder or Auto Tune. See page 12 for more information on Reminders. DELETE – Deletes the selected program. ALL EPISODES – Displays a list of all upcoming episodes. Press Exit to return to the previous menus. Watch a Recorded Program 1. 2. 3. 4. 5. Press RECORD IT on the remote. Select FINISHED, press OK. A list of completed recordings is displayed (Most recent to oldest). Highlight desired program, press PLAY ( ) or OK on the remote. Normal DVD‐like functions are available during playback, including Pause, Rewind and Fast Forward. When finished watching a recorded program you will be given the option to Delete the recording. Select “Yes” to delete or “No” to save. Jump Time During playback, you can jump forward or back by a specified amount of time. 1. 2. 3. Follow steps to Watch a Recorded Program. During playback, use the number key pad on the remote to enter the amount of time you want to advance or rewind (H:MM:SS). Press the FAST FORWARD ( ) button on the remote to advance or the REWIND ( ) button to go back. For Example: To advance 1 minute 15 seconds, press 1, 1, 5, then press FAST FORWARD ( ). To go back 45 seconds, press 4, 5, then press REWIND ( ). Deleting Recordings 1. 2. 3. 4. 5. 6. 7. Press RECORD IT on the remote. Highlight SCHEDULED or FINISHED for single episodes or SERIES for entire series recordings. Press OK to select. Highlight the program or series you want to delete. Press the Red special function key. A confirmation box appears. Select YES to confirm or NO to cancel and return to the recordings list. Press EXIT to return to the previous menu. Page 23 Appendix A: PVR Recording Recording Preferences and Available Space Available disk space and global recording preferences can be found in the PVR Settings Menu. 1. 2. 3. 4. 5. Press MENU on the remote. Highlight ACCOUNT INFO/SETTINGS, press OK. Highlight PVR SETTINGS, press OK. Use the available PVR storage as listed. (remaining hours and space listed are approximate) Use the directional arrows and OK on the remote to adjust the following settings for ALL recordings: 6. • • • Start and Stop times Deleting priority Save Failed Recordings (1‐5 days) Select OK to save changes and return to the menu. Resolve Conflicts Recording Conflict One program can be recorded at a time. If two or more programs are scheduled to record at the same time, a screen will appear listing the conflicting programs. The program on top is given priority and the second item will not record. To resolve this conflict: 1. 2. 3. 4. Use the directional arrow on your remote to highlight the desired program. Press the Yellow special function key to move the highlighted program Down. Press the Blue special feature key to move the highlighted program Up. Highlight and select OK to confirm and save changes. Page 24 Appendix A: PVR Recording Pause Live TV Pause Live TV gives you pause, playback and rewind capability. As soon as you tune to a channel, it starts storing live TV content into a buffer that contains up to 100 minutes of SD or 60 minutes of HD content. (Note: This content is not available for later playback.) Pause Live TV enables you to: • • • • Watch a live broadcast. Pause the live broadcast (Pause Live TV) by pressing Pause ( ). To resume normal play press Pause again or Play ( ) . While in normal play mode, press REW button ( ) or FFW ( ) to rewind or fast forward. Press multiple times to increase the speed up to 64x. Stop Pause Live TV and resume the live TV broadcast by pressing STOP ( ). Note: Changing channels will erase the buffer and cause it to start over from the time the new channel is tuned to. Viewing the guide, setting future recordings or managing menu options will not impact the buffer. PVR and Parental Controls If Parental Controls are enabled a password is required to watch a recorded program that exceeds the parental settings. The password is not required to schedule a recording if parental controls are enabled. However, if the program is currently recording, the channel will not be displayed unless the appropriate password is provided. Refer to page 7 for more information on Parental Controls. PVR and Pay‐Per‐View PVR recording is not available on pay‐per‐view or video‐on‐demand channels. Troubleshooting and FAQs 1. When trying to record a program, the following error appears: “Recording is Not Enabled on the Channel.” • PVR functions (recording and time‐shifting) are not permitted on Pay‐ Per‐View or Video‐On‐Demand channels. Verify that the program you are trying to record is not a Pay‐Per‐View or Video‐On‐Demand program. Page 25 Appendix A: PVR Recording 2. Recorded programs are missing from the Recorded List. A. Verify that you are in the ‘Subscribed’ guide and not in a ‘Favorites’ channel list. • Press GUIDE on the remote. • The name of the active guide will be displayed on the top, left, above the date. (i.e. All or Subscribed) – Refer to pages 9‐10 for additional information about available guides and favorites. • Press the Blue special function key to display a list of available guides and select ‘Subscribed’ or press GUIDE multiple times until ‘Subscribed’ is displayed. • Check your recorded list to verify that the missing program is now available. B. Access to PVR recordings requires a subscription to the originating channel. For example, if recorded a movie on HBO but later canceled your HBO subscription, the recorded program will no longer be available to watch. Please contact our Customer Service department for assistance with your channel subscriptions. • Re‐subscribing to the originating channel will allow you to view the recorded program if it has not been deleted. • The recorded program may still be using available disk space. To delete the recorded program, switch to the ‘All’ guide (instructions above) and follow the steps to delete a recorded program. Page 26 Appendix B: Troubleshooting No Picture / Service is Not Working The Standby indicator light is not lit. 1. 2. 3. Check the power cord, making sure it is plugged in all the way and securely connected to the back of the Entone Set Top Box. If it is plugged into an outlet that is controlled by a wall switch, make sure the switch is in the “On” position. For additional help, please contact our Repair Department at 611 or 225‐ 2111, option 1. The Standby indicator is Amber and the service is not working. 1. 2. 3. 4. Press the TV, then PWR on the remote to turn on the television. Press the STB button then PWR to initiate control of KPU Commvision functions to verify that the Entone Set Top Box is turned on. Reboot the Entone Set Top Box if the Standby light does not turn Green after a few minutes. (Instructions below) If the problem persists after rebooting, please contact our Repair Department at 611 or 225‐2111, option 1. The Standby indicator is Green but there is no picture. 1. 2. 3. 4. Check the connections on the back of the Entone Set Top Box, making sure they are correct and secure. Verify that the TV itself is set to the right channel or input. Refer to the Welcome page for information specific to your installation. Press the TV button and then the INPUT button on your remote to cycle through the input options. Match the input on the Welcome page to the input on the television. Reboot the Entone Set Top Box if there is still no picture. (Instructions below) If the problem persists after rebooting, please contact our Repair Department at 611 or 225‐2111, option 1. Reboot the Entone Set Top Box 1. 2. Unplug the Entone Set Top Box for 10‐20 seconds and plug it back in. The Standby light should turn green within one (1) minute, followed by a series of loading screens. It may take several minutes for this process to complete. Page 27 Appendix B: Troubleshooting Troubleshooting the Ruckus Wireless KPU Commvision is an Internet Protocol service. The video signal can be delivered to the television from the modem via coax or wirelessly. If your service is wireless, KPU will have installed a Ruckus Master at the modem to deliver the IP signal to a Ruckus Adapter which is then plugged in with an Ethernet cord to your Entone Set Top Boxes. Label LED Activity Green 1 Power Off Green 2 WAN Connectivity Flashing Green Off Amber 3 Wireless Device Association Green Off Green 4 Signal Quality Flashing Green Off Page 28 Description Power is supplied to the Ruckus. Power is not supplied to the Ruckus. The WAN port has detected link. Data is being transmitted or received on the WAN port. No link connectivity. The WLAN interface is up, but no station is connected. A station is connected to the WLAN (either the home WLAN or the KPU WLAN). WLAN is not up. Good signal quality at the KPU WLAN interface. Marginally acceptable signal quality at the KPU WLAN interface. No station associated with KPU WLAN. Appendix B: Troubleshooting Troubleshooting the Ruckus Wireless A typical installation consists of a 7800 connected to a DSL modem. The 7811 sends wireless signals to an adapter (7111) that is connected to a set top box. One 7811 can send wireless signals to multiple adapters throughout the home. Troubleshooting Setup If you cannot see video on your TV, follow these troubleshooting tips: 1. Disconnect the 7111 power adapter (the unit connected to the STB). 2. Re‐connect the 7111 power adapter. 3. From the TV connected to the set top box, check to see if you can watch IPTV channels. 4. If not, turn off the set top box. 5. Turn on the set top box. 6. Re‐check the TV channel. 7. Disconnect the 7811 power adapter (the unit connected to the DSL modem). 8. Reconnect the 7811 power adapter. 9. Turn on the set top box. 10. Check the LED status lights to verify correct operation (see above). 11. Make sure you are using the power adapter supplied by Ruckus Wireless. 12. Make sure the Power LED is lit. If it is not lit, make sure the power cord is properly connected to the 7111 and that the power supply adapter is properly connected to a functioning power outlet. If the problem persists, you have a hardware problem and should contact our Repair Department at 611 or 225‐2111, option 1. 13. Make sure your Network LED is lit. Make sure the Ethernet cable connections are secure at the 7111 adapter and your set top box. The Network LED on the 7111 adapter indicates a link when the adapter is fully seated in the port. 14. Make sure the Wireless LED is either steady or flashing Green. If it is not lit, the Wireless settings may be incorrect between the 7111 adapter and the 7811 Master. Contact our Repair Department at 611 or 225‐2111, option 1. Enjoy your Locally Owned and Operated KPU Commvision Service! Call 611 or 225‐2111 option 1 if you have any questions concerning our service. For billing or to add new services contact Customer Service at 228‐5474. Page 29