1
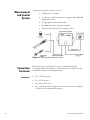
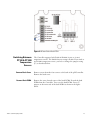
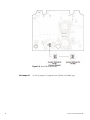
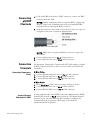
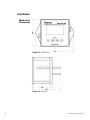
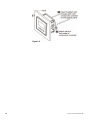
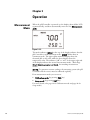
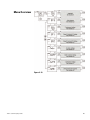
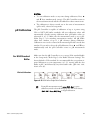
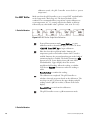
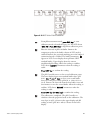
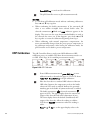
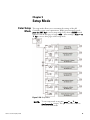
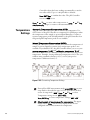
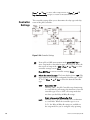
Alpha pH 560
pH Controller
pH/mV/ºC meter
Preface
This manual serves to explain the use of the Thermo
Scientific Alpha pH 560 Controller. The manual functions in
two ways, firstly as a step by step guide to help the user
operate the instrument. Secondly, it serves as a handy
reference guide. This instruction manual is written to cover
many anticipated applications of the Alpha pH 560 Controller.
If you have doubts in the use of the instrument, please do not
hesitate to contact the nearest Authorised Distributor.
The information presented in this manual is subject to change
without notice as improvements are made, and does not
represent a commitment on part of Thermo Fisher Scientific.
Thermo Fisher Scientific cannot accept any responsibility for
damage or malfunction of the unit due to improper use of the
instrument.
Copyright ©2006 All rights reserved.
Thermo Fisher Scientific Pte Ltd.
Thermo Scientific Alpha pH 560
Contents
Chapter 1
Introduction ..................................................................................................... 1
Before You Begin .............................................................................. 1
Intended Use..................................................................................... 1
Safety Instructions............................................................................. 1
Taking Out of Service ....................................................................... 2
Correct Disposal of the Unit ............................................................. 2
Chapter 2
Getting Started................................................................................................ 3
Description of Instrument................................................................. 3
Measurement and Control System .................................................... 4
Connection Terminals ...................................................................... 4
Connectors:................................................................................. 4
Switching Between PT100 & PT1000 Temperature Sensors ......... 5
Remove Back Cover .................................................................... 5
Remove Back PCBA ................................................................... 5
Set Jumper J7.............................................................................. 6
Connecting pH/ORP Electrode ........................................................ 7
Connection Terminals ...................................................................... 7
Connecting Temperature Probe .................................................. 7
Connect Potential Matching Pin (PMP) ..................................... 7
Installation ........................................................................................ 8
Mechanical Dimensions ................................................................. 8
Wall Mount ................................................................................... 9
Panel Mount .................................................................................. 9
Display & Keypad........................................................................... 11
Display Overview......................................................................... 11
Mode Indicators........................................................................... 11
Status Annunciators ..................................................................... 12
Units of Measurement Indicators ................................................ 12
Key Functions ................................................................................. 13
Chapter 3
Operation........................................................................................................14
Measurement Mode ........................................................................ 14
Menu Overview .............................................................................. 15
Chapter 4
Calibration Mode..........................................................................................16
Preparing the Controller & Electrode for Calibration ..................... 16
Entering pH/ORP Calibration Mode.............................................. 16
pH Calibration................................................................................ 17
For USA Standard Buffer ............................................................. 17
1-Point Calibration: .................................................................. 17
2-Point Calibration: .................................................................. 18
Thermo Scientific Alpha pH 560
For NIST Buffer .......................................................................... 20
1-Point Calibration: .................................................................. 20
2-Point Calibration: .................................................................. 20
ORP Calibration............................................................................. 22
Temperature Calibration................................................................. 23
Chapter 5
Setup Mode ................................................................................................... 24
Temperature Settings ...................................................................... 26
Configuration Settings ................................................................. 32
Chapter 6
Technical Specifications ........................................................................... 36
Chapter 7
List of Accessories ...................................................................................... 38
Chapter 8
Troubleshooting ........................................................................................... 40
Chapter 9
General Information .................................................................................... 41
Appendices ................................................................................................... 42
pH Buffer Values at Various Temperatures .................................. 42
Graphical Representation of the Function of Hysteresis ............... 43
General Instructions Concerning Controller Settings ................... 43
Abbreviations Used in LCD ......................................................... 44
Thermo Fisher Scientific
iii
Chapter 1
Introduction
Before You
Begin
Thank you for purchasing the Alpha pH 560 Controller.
The construction of the pH 560 Controller employs leading edge technology and complies with safety regulations currently in force.
Notwithstanding this, improper use could lead to hazards for the user
or a third-party, and/or adverse effects on the plant or other equipment.
Therefore, the operating instructions must be read and understood by
the persons involved before working with the pH Controller.
The instruction manual must always be stored close at hand, in a place
accessible to all people working with the pH Controller.
If you have questions, which are not or insufficiently answered in this
instruction manual, please contact your authorized supplier. They will
be glad to assist you.
Intended Use
Alpha pH 560 Controllers are intended solely for pH or ORP and
temperature measurement, as described in this instruction manual.
Any other use, or use not mentioned here, that is incompatible with the
technical specifications is deemed inappropriate. The operator is solely
responsible for any damage arising from such use.
Other prerequisites for appropriate use include:
Safety
Instructions
Thermo Scientific Alpha pH 560
•
Comply with the instructions, notes and requirements set out in
this instruction manual.
•
Comply with all local safety regulations concerning safety at
work.
•
Comply with all information and warnings in the
documentation dealing with the products used together with
the pH Controller (housings, sensors, etc.).
•
Comply with local environmental and operational conditions.
•
The Alpha pH 560 Controller should be installed and operated
only by personnel familiar with the instrument and who are
qualified for such work.
•
A defective pH Controller must neither be installed nor put
into service.
1
Taking Out of
Service
Correct Disposal
of the Unit
2
•
The Alpha pH 560 must only be operated under the specified
operating conditions (see Page 36).
•
The Alpha pH 560 must not be repaired by the customer.
•
No modifications to the Alpha pH 560 are allowed. The
manufacturer/supplier accepts no responsibility for damage
caused by unauthorized modifications. The risk is borne entirely
by the user.
•
First disconnect the unit from the power supply and then undo
all electrical connections.
•
Remove the unit from the wall / panel.
When the Alpha pH 560 Controller is permanently taken out of
service, obey the local environmental regulations for correct disposal or
send the instrument to your local distributor, they will take care of
proper disposal.
Thermo Scientific Alpha pH 560
Chapter 2
Getting Started
Description of
Instrument
The Thermo Scientific Alpha pH 560 Controller is used for
measuring pH and temperature values. The pH values can be measured
using industrial combination pH sensors. The temperature values can
be measured using 3-wire Pt100 / Pt1000 sensors. The Controller can
be used for applications such as water treatment and controlling,
galvanic-decontamination, chemical processing, food processing, clean
or wastewater control and neutralization processes.
The pH Controller has many user-friendly and safety features which
include:
Thermo Scientific Alpha pH 560
•
Push-button keypad for calibration and setup
•
Built-in non-volatile memory to ensure that calibration
and other information are not erased if power supply fails
•
Menu-driven program that simplifies setup
•
1 or 2 point calibration with selectable USA or NIST
standard pH buffer set
•
Automatic temperature compensation (ATC)
•
Manual temperature compensation setting without the
ATC probe, with independent setting for calibration and
process temperature
•
High resolution ADC for precise measurement
•
Large dual display LCD for easy reading with clear
multiple annunciators, operational mode indicators and
error indicators.
•
Two switching contacts as set-point relays
•
Limit (on/off) control mode
•
Separately adjustable high and low set-point hysteresis
(dead bands) to prevent chattering of relays around the set
points
•
0 to 2000 seconds time delay adjustment on all relays –
minimizes false alarms
•
Backlight LCD display
3
Measurement
and Control
System
A typical measurement system consists of:
•
A pH process Controller
•
A pH sensor with integrated or separate Pt100/Pt1000
temperature sensor
•
An appropriate measurement cable
•
An immersion, flow or process assembly
•
A final control element such as pump or valve
Figure 2–1. Measurement and Control System
Connection
Terminals
Connectors:
4
Remove the screws from the four corners at the back of the pH
Controller. Remove the back cover. The connectors are exposed on the
back PCBA as shown in the diagram below.
•
J11 – 24V DC power
•
J8 – 9V DC power
•
J9 – Relay connections
•
J10 – pH electrode & Temperature probe connections (wiring has
to be done in the detachable connector
Thermo Scientific Alpha pH 560
Figure 2–2. Outer Side of Back PCBA
Switching Between
PT100 & PT1000
Temperature
Sensors
The Controller supports both Pt100 & Pt1000 (2-wire or 3-wire)
temperature sensors. The default factory setting is Pt100. If you need to
use Pt1000 temperature sensor, you have to change the jumper setting
(J7) as described below.
Remove Back Cover
Remove screws from the four corners at the back of the pH Controller.
Remove the back cover.
Remove Back PCBA
Remove the screw located center of the back PCBA. Detach the back
PCBA from the Controller. Turn over the back PCBA. Locate J7
jumper on the inner side of the back PCBA as shown in the figure
below.
Thermo Scientific Alpha pH 560
5
Figure 2–3. Inner Side of Back PCBA
Set Jumper J7
6
Set the J7 jumper to required sensor (Pt100 or Pt1000) type.
Thermo Scientific Alpha pH 560
Connecting
pH/ORP
Electrode
1. If the pH/ORP electrode has a BNC connector, remove the BNC
connector from the cable.
NOTE: Oakton Instruments offers an optional ‘BNC to Spade Lug
adapter’ (Order code: 05994-90) that can be used with pH/ORP
electrode without removing the BNC connector.
2. Strip the insulation of the cable so that the bare wires are exposed
enough for connection as shown in diagram below.
Figure 2–4. pH/ORP Electrode Cable
NOTE: Make sure to strip inner black layer (screen) to expose the
clear sheath.
3. Connect pH sensing wire to Pin 1 of J10 connector
4. Connect pH reference wire to Pin 2 of J10 connector
Connection
Terminals
Connecting Temperature
Probe
For Automatic Temperature Compensated (ATC) pH readings, a 100Ω
Pt RTD temperature probe (2-wire or 3-wire) can be connected to the
Controller.
3-Wire Probe:
1. Connect PT100 compensate wire to Pin 5 of J10 connector
2. Connect PT100 sense wire to Pin 6 of J10 connector
3. Connect PT100 GND wire to Pin 7 of J10 connector
2-Wire Probe:
1. Short Pin 5 & 6 of J10 connector using a small piece of wire.
2. Connect PT100 sense wire to Pin 6 of J10 connector
3. Connect PT100 GND wire to Pin 7 of J10 connector
Connect Potential
Matching Pin (PMP)
Thermo Scientific Alpha pH 560
If using a pH electrode with a PMP, connect the additional wire (PMP)
from the pH electrode to Pin 8 of J10 connector. This liquid electrical
reference wire is only used when the pH Controller is configured to
‘Symmetrical mode of operation’. Refer page 14 for details on
symmetrical mode of operation.
7
Installation
Mechanical
Dimensions
Figure 2–5. Frontal View
Figure 2–6. Side View
8
Thermo Scientific Alpha pH 560
Wall Mount
Figure 2–7.
Panel Mount
Figure 2–8.
Thermo Scientific Alpha pH 560
9
Figure 2–9.
10
Thermo Scientific Alpha pH 560
Display &
Keypad
Display Overview
The Liquid Crystal Display (LCD) of Alpha pH 560 Controller has
two alpha-numerical displays (Upper and a Lower).
•
Upper display: Measured pH, mV or relative mV value are
displayed when the Controller is in normal operation
(measurement) mode.
•
Lower display: Measured temperature value is displayed when the
Controller is in normal operation (measurement) mode. In pH
Calibration mode, standard pH buffer values are displayed here:
while measured mV values are displayed in the ORP Calibration
mode.
The two displays indicate function names, options & settings in Setup
mode. Refer page 24 for more details.
The LCD also consists of various mode indicators, status annunciators
and unit of measurement indicators.
Figure 2–10. LCD Display
Mode Indicators
Thermo Scientific Alpha pH 560
MEAS
Measurement mode; blinks in Symmetric mode (Refer
Page 14 )
SETUP
Setup mode (Refer Page 24)
CAL
Calibration mode (Refer Page16)
11
Status Annunciators
READY
Appears when the reading is stable
HOLD
Appears in Setup mode and Calibration mode to
indicate that the relay function is frozen
Appears when Automatic Temperature Compensation
(ATC) is enabled.
ATC
Not visible when Manual Temperature Compensation
(MTC) is enabled.
Flashes if the temperature probe is faulty in its ATC
mode. (Refer Page 26)
ERR
Appears when an error occurs
Electrode annunciator. Appears when viewing
electrode properties or during calibration error
Buffer annunciator. Appears in calibration mode
Units of
Measurement
Indicators
12
mV
Millivolt. Appears in ORP measurement/calibration
modes (Refer Page 14 & 22)
R.mV
Relative Millivolt
pH
Appears in pH measurement/calibration modes (Refer
Page 14 & 17)
ºC
Temperature in Celsius (Refer Page 26)
ºF
Temperature in Fahrenheit (Refer Page 26)
Thermo Scientific Alpha pH 560
Key Functions
Figure 2–11.
The Liquid Crystal Display (LCD) of Alpha pH 560 Controller has
two alpha-numerical displays (Upper and a Lower).
CAL
Enter Calibration mode
Enter Setup mode
ENT
Access sub screens (parameters) within a group of
settings in Setup mode
Confirm (save) setup parameters and numerical values
Start/Confirm calibration in Calibration mode.
Select a group of settings in Setup mode.
Select parameters and increment/decrement numerical
values in Setup and Calibration modes.
(When pressed continuously, speed of value
increment/decrement increases)
Returns to Measurement mode when both keys are
pressed simultaneously.
Thermo Scientific Alpha pH 560
13
Chapter 3
Operation
Measurement
Mode
When the pH Controller is powered on, the display shows all the LCD
segments briefly, and then automatically enters into the Measurement
mode.
Figure 3–12.
The mode indicator ‘MEAS’ at the top of the display indicates that the
pH Controller is in Measurement mode; ‘MEAS’ blinks when in
Symmetric mode. The upper alpha-numerical display shows the
measured pH or mV value, while the lower display shows the
temperature value. The indicator “pH” or “mV” at the upper right side
of the display indicates the current measurement mode. (Refer Page
Error! Reference source not found. for switching measurement
modes)
NOTE: To guarantee accurate readings, the measuring system (the pH
Controller and the sensor) must be calibrated regularly.
From measurement mode you can access:
•
Calibration mode (by pressing CAL key)
•
Setup mode (by pressing ENT key)
For more details, refer page 16 for Calibration mode and page 24 for
Setup mode.)
14
Thermo Scientific Alpha pH 560
Menu Overview
Figure 3–13.
Thermo Scientific Alpha pH 560
15
Chapter 4
Calibration Mode
Preparing the
Controller &
Electrode for
Calibration
Before starting calibration, make sure that the pH Controller is in
appropriate measurement mode (pH or ORP). When the Controller is
switched on, it starts up with the measurement mode last used. For
example, if the pH Controller is switched off in ORP measurement
mode, it starts up in ORP mode when it is switched on. (Refer Page 5.7
for switching measurement modes)
Be sure to remove the protective electrode storage bottle or rubber cap
of the electrode before calibration or measurement. If the electrode has
been stored dry, wet the electrode in tap water for 10 minutes before
calibrating or taking readings to saturate the pH electrode surface and
minimize drift.
Rinse the electrode in de-ionized water after use, and store in electrode
storage solution. If storage solution is not available, use pH 4.01 or 7.00
buffer solution.
Do not reuse buffer solutions after calibration. Contaminants in the
solution can affect the calibration, and the accuracy of the
measurements.
The pH Controller features two internationally recognized pH buffer
standards. Select the buffer standard you require in the setup mode.
(Refer Page 5.6) Available buffer options are:
Entering pH/ORP
Calibration
Mode
•
USA buffers --- pH 4.01, 1.68, 7.00, 10.01 and 12.45
•
NIST buffers --- pH 4.01, 1.68, 6.86, 9.18 and 12.45
While in measurement mode, press the CAL key to access calibration
mode. LCD indicates ‘CAL PH’ (when measurement mode is pH) or
‘CAL OrP’ (when measurement mode is ORP).
Figure 4–14. Entering Calibration Mode
Thermo Scientific Alpha pH 560
16
NOTES:
pH Calibration
For USA Standard
Buffer
•
To exit calibration mode at any time during calibration, Press ▲
and ▼ keys simultaneously (escape). The pH Controller returns to
the measurement mode and the old calibration values remain active
•
The calibration is always carried out in the units of measurement
(pH or mV), selected in setup mode
The pH Controller is capable of calibration of up to 2 points using
USA or NIST pH buffer standards. All new calibration values will
automatically override existing calibration data. pH buffer values are
referenced to 25 °C. Make sure the measurement mode is set to pH.
(Refer Page 5.7 for switching measurement modes). All pH buffer
values have window of up to 1 pH tolerance during calibration.
Calibration error can be occurred if the measured pH value exceeds this
window. If you wish to abort the pH calibration, Press ▲ and ▼ keys
simultaneously and the pH Controller reverts to pH measurement
mode.
Make sure that the pH Controller is set to accept USA standard buffer
in the Setup mode. (Refer Page 5.6 for Buffer Selection Settings) The
factory default is USA standard. It is recommended that you perform 2point calibration at room temperature (25 °C), starting with the first
buffer at pH 7.00 followed by any other buffer value. (pH 4.01, 1.68,
10.01 or 12.45).
1-Point Calibration:
Figure 4–15. USA Buffer Single-Point Calibration
1
Thermo Scientific Alpha pH 560
From pH measurement mode press CAL key to enter
calibration mode as described in page 16. The LCD shows
‘CAL PH’. Press ENT key to begin calibration.
17
2
Place the electrode in pH 7.00 buffer. Immerse the
temperature probe in the buffer solution if ATC mode is
enabled. Immerse the potential matching pin in the buffer if
symmetrical mode is enabled. The buffer annunciator
appears in LCD. Lower display shows pH 7.00 (USA
standard buffer). Upper display shows the current
uncalibrated pH reading. Allow the reading to stabilize.
LCD shows ‘READY’ annunciator when the reading is
stable.
Press CAL key to confirm the reading.
3
The calibration is completed. The pH Controller recalculates electrode properties based on the calibration. The
new slope (in mV) is shown in the upper display and pH
reading at 0mV (pH7.00 ± offset) is shown in the lower
display.
Press ENT key to exit from the calibration.
4
The pH Controller reverts to pH measurement mode.
Note: Refer notes at the end of this section for additional information
and possible error indicators of calibration process
2-Point Calibration:
Figure 4–16. USA Buffer 2-Point Calibration
1
18
From pH measurement mode press CAL key to enter
calibration mode as described in page 16. The LCD shows
‘CAL PH’. Press ENT key to begin first calibration point.
Thermo Scientific Alpha pH 560
Place the electrode in pH 7.00 buffer. Immerse the
temperature probe in the buffer solution if ATC mode is
enabled. Immerse the potential matching pin in the buffer if
symmetrical mode is enabled. The buffer annunciator
appears in LCD. Lower display shows pH 7.00 (USA
standard buffer). Upper display shows the current
uncalibrated pH reading. Allow the reading to stabilize. LCD
shows ‘READY’ annunciator when the reading is stable.
2
Press ENT key to confirm the reading.
The pH Controller moves to the second calibration point.
The lower display shows next standard buffer value (pH
4.01). Use ▲ and ▼ keys to select your second buffer from
one of the preset values: pH 4.01 or 1.68 or 10.01 or 12.45.
Remove the electrode from the first buffer, rinse and then
immerse it into the second buffer. Allow the reading to
stabilize. LCD shows ‘READY’ annunciator when the reading
is stable.
3
Press ENT key (or CAL key) to confirm the reading.
4
The calibration is completed. The pH Controller re-calculates
electrode properties based on the calibration. The new slope
(in mV) is shown in the upper display and pH reading at
0mV (pH7.00 ± offset) is shown in the lower display.
Press ENT key to exit from the calibration.
5
The pH Controller reverts to pH measurement mode.
NOTES:
• To exit from pH calibration mode without confirming
calibration, Press ▲ and ▼ keys together.
•
When confirming the buffer measurement, if the measured pH
value is not within ±1.00pH from selected buffer value, the
electrode annunciator blinks and ERR indicator appears in
the display. This error can also occur if non-standard buffers are
used or the electrode has worn out. If this happens, press both
▲and ▼ keys together to restart the calibration beginning from
Step1.
•
Thermo Scientific Alpha pH 560
When calibrating with manual temperature compensation, the
meter automatically changes from the preset ‘process
temperature’ to the ‘calibration temperature’. After leaving the
19
calibration mode, the pH Controller reverts back to ‘process
temperature’.
For NIST Buffer
Make sure that the pH Controller is set to accept NIST standard buffer
in the Setup mode. (Refer Page 16) The factory default is USA
standard. It is recommended that you perform 2-point calibration at
room temperature (25 oC), starting with the first buffer at pH 6.86
followed by any other buffer value. (pH 4.01, 1.68, 9.18 or 12.45)
1-Point Calibration:
Figure 4–17. NIST Buffer Single-Point Calibration
1
From pH measurement mode press CAL key to enter
calibration mode as described in page 16. The LCD shows
‘CAL PH’. Press ENT key to begin calibration.
2
Place the electrode in pH 6.86 buffer. Immerse the
temperature probe in the buffer solution if ATC mode is
enabled. Immerse the potential matching pin in the buffer if
symmetrical mode is enabled. The buffer annunciator
appears in LCD. Lower display shows pH 6.86 (NIST
standard buffer). Upper display shows the current
uncalibrated pH reading. Allow the reading to stabilize.
LCD shows ‘READY’ annunciator when the reading is
stable.
Press CAL key to confirm the reading.
3
The calibration is completed. The pH Controller recalculates electrode properties based on the calibration. The
new slope (in mV) is shown in the upper display and pH
reading at 0mV (pH7.00 ± offset) is shown in the lower
display.
Press ENT key to exit from the calibration.
4
The pH Controller reverts to pH measurement mode.
2-Point Calibration:
20
Thermo Scientific Alpha pH 560
Figure 4–18. NIST Buffer 2-Point Calibration
1
From pH measurement mode press CAL key to enter
calibration mode as described in page 16. The LCD shows
‘CAL PH’. Press ENT key to begin first calibration point.
2
Place the electrode in pH 6.86 buffer. Immerse the
temperature probe in the buffer solution if ATC mode is
enabled. Immerse the potential matching pin in the buffer if
symmetrical mode is enabled. The buffer annunciator
appears in LCD. Lower display shows pH 6.86 (NIST
standard buffer). Upper display shows the current
uncalibrated pH reading. Allow the reading to stabilize.
LCD shows ‘READY’ annunciator when the reading is
stable.
Press ENT key to confirm the reading.
3
The pH Controller moves to the second calibration point.
The lower display shows next standard buffer value (pH
4.01). Use ▲ and ▼ keys to select your second buffer
from one of the preset values: pH 4.01 or 1.68 or 9.18 or
12.45. Remove the electrode from the first buffer, rinse and
then immerse it into the second buffer. Allow the reading to
stabilize. LCD shows ‘READY’ annunciator when the
reading is stable.
Press ENT key (or CAL key) to confirm the reading.
4
Thermo Scientific Alpha pH 560
The calibration is completed. The pH Controller recalculates electrode properties based on the calibration. The
new slope (in mV) is shown in the upper display and pH
reading at 0mV (pH7.00 ± offset) is shown in the lower
display.
21
Press ENT key to exit from the calibration.
5
The pH Controller reverts to pH measurement mode.
NOTES:
• To exit from pH calibration mode without confirming calibration,
Press ▲ and ▼ keys together
•
When confirming the buffer measurement, if the measured pH
value is not within ±1.00pH from selected buffer value, the
electrode annunciator blinks and ERR indicator appears in the
display. This error can also occur if non-standard buffers are used or
the electrode has worn out. If this happens, press both ▲and ▼
keys together to restart the calibration beginning from Step1
•
ORP Calibration
When calibrating with manual temperature compensation, the
meter automatically changes from the preset process temperature to
the calibration temperature. After leaving the calibration mode, the
pH Controller reverts back to process temperature
The pH Controller allows a single point ORP calibration. ORP
calibration process is available only when the measurement mode is set
to ORP. (Refer Page 32 for switching measurement modes).
Figure 4–19. ORP Calibration
1
From ORP measurement mode press CAL key to enter
calibration mode as described in page 16. The LCD shows
‘CAL OrP’. Press ENT key to begin calibration.
2
Place the electrode in a standard ORP solution of known
OPR value. Immerse the temperature probe in the buffer
solution if ATC mode is enabled. Immerse the potential
matching pin in the buffer if symmetrical mode is enabled.
& electrode annunciator
The buffer annunciator
appear in LCD. The upper display shows the current mV
output of the electrode with offset adjustment (if any).
The lower display shows the default (uncalibrated) mV
output of the electrode. Allow the reading to stabilize.
LCD shows ‘READY’ annunciator when the reading is
stable.
Press ▲ or ▼ key to set the upper display value to the
22
Thermo Scientific Alpha pH 560
ORP value of the solution. Allowable range: -150mV to
150mV.
Temperature
Calibration
Thermo Scientific Alpha pH 560
3
Press ENT key to confirm the value.
4
The pH Controller reverts to ORP measurement mode.
Calibrate temperature probe only if temperature value displayed on the
pH Controller is different from that of a calibrated thermometer. Refer
to page 26 for further information temperature settings.
23
Chapter 5
Setup Mode
Enter Setup
Mode
The setup mode allows you to customize the settings of the pH
Controller to suite your requirements. While in measurement mode,
press the ENT key to access setup mode. LCD shows ‘SETUP’ mode
indicator and the first page of setup (OFS – offset settings). Press ▲ or
▼ key to access other pages of the setup mode.
Figure 5–20. Setup Menu
NOTE:
Thermo Scientific Alpha pH 560
To exit setup mode at any time press ▲ or ▼ keys
simultaneously (escape). The pH Controller returns to
the measurement mode
24
Electrode Offset
Settings
NOTE:
‘Electrode Offset Setting’ is not available when the pH
Controller is configured for ORP measurement mode.
(Refer Page 32 for switching measurement modes)
In applications where continuous pH measurement is required, it may
not be convenient to remove the electrode for calibration. In such cases,
an on-line offset adjustment is recommended. The pH Controller
allows you set an offset of up to ± 2.00pH to compensate for errors in
the pH electrode.
The pH Controller adds or subtracts the offset value from the measured
pH value and displays the corrected value. However, if you need to
offset the value beyond the average offset you would expect in your
application type, consider a full calibration or even electrode
replacement.
To Determine the
Offset Value:
1. Take a sample from the liquid of pH measurement. Record the pH
reading of the pH Controller at the time the sample was taken.
2. Measure the pH value of your sample using another calibrated pH
meter having its own electrode (pH tester, hand-held meter or
bench meter)
3. The difference between these two readings is the offset
Figure 5–21. Electrode Offset Settings
1
From pH measurement mode press ENT key to enter setup
mode as described in page 24. The LCD shows the first
screen of setup mode (OFS). Press ENT key to access
electrode offset setting (OFS).
2
The upper display shows the last configured offset value (if
any), otherwise zero. The lower display shows currently
measured pH reading (including last configured offset value).
Allow the reading to stabilize. LCD shows ‘READY’
annunciator when the reading is stable.
Press ▲ or ▼ key to set the upper display to the newly
calculated offset value.
3
Thermo Scientific Alpha pH 560
As the upper display value (offset) changes, the pH
25
Controller adjust the lower reading automatically to suit the
new offset value. Up to ± 2.00 pH offset is allowed.
Press ENT key to confirm the value. The pH Controller
reverts to OFS screen.
Press ▲ or ▼ key to access other setup screens or press ▲ or ▼ key
simultaneously (escape) to return to measurement mode.
Temperature
Settings
Automatic Temperature Compensation (ATC):
The pH values other than pH 7.00 are affected by temperature. Use
ATC feature of the pH Controller to compensate for pH changes when
the temperature of the sample or process liquid fluctuates. Connect a
separate temperature probe (Pt100/pt1000) to the pH Controller if an
integrated pH/Temperature probe is not available.
Manual Temperature Compensation (MTC):
Set the pH Controller to MTC (disable ATC) when the temperature of
sample or process liquid is constant and a temperature probe is not
available. If you disable ATC, the pH Controller allows you to set your
process temperature (P.ºC) and calibration temperature (C.ºC).
This allows calibration at a different temperature other than the process
temperature. Example: Setting calibration temperature of 25°C lets you
calibrate using standard solutions at 25°C, even if your process
temperature is different from 25°C.
Figure 5–22. Customising Temperature Settings
1
From pH or ORP measurement mode press ENT key to enter
setup mode as described in page 24. The LCD shows the first
screen of setup mode (OFS). Press ▲ or ▼ key to select
Temperature settings screen (SET ºCF).
Press ENT key to access temperature settings (SET ºCF).
2
26
Selecting unit of measurement for temperature: The upper
display shows ‘Unit’ and the lower display shows the last
configured unit of measurement for temperature.
Thermo Scientific Alpha pH 560
Press ▲ or ▼ key to select the desired units for temperature
(ºC or ºF). Press ENT key to confirm your selection.
3
Enable/disable ATC: The lower display shows ‘AtC’ and the
upper display shows the last configured ATC selection (‘On’ or
‘OFF’).
Press ▲ or ▼ key to enable (ATC On) or disable (ATC OFF)
automatic temperature compensation. Press ENT key to
confirm your selection.
If ATC enabled (ATC On):
4
Selecting temperature offset: The upper display shows
the last configured temperature offset value (if any),
otherwise the default is zero. The lower display shows
currently measured temperature reading (including last
configured offset value). LCD shows ‘ATC’ annunciator
in lower-right corner.
Place a thermometer, which is known to be accurate, in
your sample or process liquid. Make sure your
temperature probe is placed in the same liquid. Compare
the stabilized temperature reading displayed on the
monitor with the thermometer. If there is a difference
between the two readings (offset), you can adjust the
reading of the monitor. Press ▲ or ▼ key to adjust the
lower display to the correct temperature value.
5
As the lower display value changes, the pH Monitor
adjust the upper display reading automatically to suit the
new offset value. Up to ± 10 ºC/ ± 18 ºF offset is
allowed.
Press ENT key to confirm the value. The pH Controller
reverts to SET ºCF screen.
If ATC disabled (ATC OFF):
6
Setting process temperature: The lower display shows
‘P.ºC’ and the upper display shows the last configured
process temperature. Press ▲ or ▼ key to adjust the
upper display to desired process temperature. Allowable
range: –10.0 to 125.0°C / 14.0 to 257°F.
Press ENT key to confirm the process temperature.
7
Thermo Scientific Alpha pH 560
Setting calibration temperature: The lower display
shows ‘C.ºC’ and the upper display shows the last
configured calibration temperature. Press ▲ or ▼ key
27
to adjust the upper display to desired calibration
temperature. Allowable range: –10.0 to 125.0°C / 14.0 to
257°F.
Press ENT key to confirm the calibration temperature.
The pH Controller reverts to SET ºCF screen.
Press ▲ or ▼ key to access other setup screens or Press ▲ and ▼
key simultaneously (escape) to return to measurement mode.
To exit from any intermediate steps, press ▲ and ▼ keys
simultaneously (escape). The pH Controller returns to the first screen
of temperature settings SET ºCF.
Relay A/Relay B
Setting
NOTE:
If Controller type is set to ‘OFF’ (Refer page 32 for
Controller settings), the ‘Relay A/Relay B Setting’ is not
available.
The SP1 settings determine the operating parameters for Relay A; while
SP2 settings define the operating parameters for Relay B. Since these
two settings have identical setup parameters, only SP1 is described here.
The pH Controller allows you to configure two independent sets of
operating parameters for each relay (Relay A & B) for each
measurement mode (pH & ORP). However, when you switch
measurement modes, the relay operating parameters will be reset
automatically to their default values for that particular measurement
mode.
Figure 5–23. Setting Relays
1
From pH (or ORP) measurement mode press ENT key to
enter setup mode as described in page 38 The LCD shows the
first screen of setup mode (OFS). Press ▲ or ▼ key to select
relay A (Set point 1) settings screen (SP1).
Press ENT key to access control relay settings (SP1).
2
28
Setting set point value: The upper display shows the last
Thermo Scientific Alpha pH 560
configured set point value, otherwise the default value. Press
▲ or ▼ key to enter the value for set point 1, at which control
function of the pH Controller should activate.
Press ENT key to confirm your set point value.
3
Select relay function: The upper display shows the last
configured relay function (LO = Low or HI=High). Press ▲
or ▼ key to select the desired function.
Press ENT key to confirm your selection.
NOTE: This parameter lets you choose the relay function.
Select ‘LO’ to activate the relay when the pH
reading undershoots the set point (SP1) or select
‘HI’ to activate the relay when the pH reading
overshoots the set point (SP1). SP1 and SP2 can be
selected as ‘LO/LO’, ‘LO/HI’, ‘HI/LO’, or ‘HI/HI’.
4
Setting hysteresis value: The lower display shows ‘HYS’. The
upper display shows the last configured value, otherwise the
default value. Press ▲ or ▼ key to enter the hysteresis value
for set point 1. Allowable range: 0 to 1.00 pH.
Press ENT key to confirm your hysteresis value.
NOTE: Hysteresis prevents rapid relay contact switching if
the pH reading is fluctuating near the set point.
Refer to Appendix IV for a graphical representation
of the hysteresis.
5
Setting on-delay time: The lower display shows ‘On.d’. The
upper display shows last configured on-delay value. Press ▲ or
▼ key to enter the on-delay time for set point 1. Allowable
range: 0 to 2000 seconds. When the pH reading is reached the
set point 1, the pH Controller delays the relay activation
(switch on) by the on-delay time you set here.
Press ENT key to confirm your on-delay time.
6
Setting off-delay time: The lower display shows ‘OF.d’. The
upper display shows last configured off-delay value. Press ▲ or
▼ key to enter the off-delay time for set point 1. Allowable
range: 0 to 2000 seconds. When the pH reading is reached the
set point 1 plus hysteresis value, the pH Controller delays the
relay deactivation (switch off) by the off-delay time you set
here.
Press ENT key to confirm your off-delay time. The pH
Controller reverts to SP1 screen.
Thermo Scientific Alpha pH 560
29
Press ▲ or ▼ key to access other setup screens or Press ▲ and ▼
key simultaneously (escape) to return to measurement mode.
Controller
Settings
The controller settings allow you to determine the relay type and relay
status of the pH Controller.
Figure 5–24. Controller Settings
1
From pH (or ORP) measurement mode press ENT key to
enter setup mode as described in page 30. The LCD shows the
first screen of setup mode (OFS). Press ▲ or ▼ key to select
controller settings screen (Cntr).
Press ENT key to access controller settings (Cntr).
2
Select the controller type: The lower display shows ‘tyP’. The
upper display shows the last configured controller type. (‘OFF’
or ‘L.Ct’). Press ▲ or ▼ key to select the desired controller
type.
OFF:
L.Ct:
30
Controller Off
Selecting ‘OFF’, the pH Controller stops functioning
as a controller by preventing relay functions. Once the
controller type is set to ‘OFF’, the setup mode does
not show you the Relay A/Relay B settings.
Limit value control (Controller On)
Selecting ‘L.Ct’, the pH Controller is set to function
as a controller. When the controller type is set to
‘L.Ct’, the Relay A/Relay B settings are available in
the setup mode for you to configure relay operating
Thermo Scientific Alpha pH 560
parameters.
Press ENT key to confirm your selection.
If Controller type was set to Off (OFF)
The pH Controller reverts to Cntr screen.
If Controller type was set to On (L.Ct)
3 Select the relay status under Non-Alarm condition:
The lower display shows ‘rEL’. The upper display shows
the last configured relay status. (‘dEEn’ or ‘En’). Press ▲
or ▼ key to select the desired relay status.
EEn:
De-energized
En:
Energized
Press ENT key to confirm your selection. The pH
Controller reverts to Cntr screen.
Press ▲ or ▼ key to access other setup screens or Press ▲ and ▼
key simultaneously (escape) to return to measurement mode.
Buffer Selection
Settings
NOTE: The buffer selection setting is only available if the Controller is
configured for pH measurement mode.
This allows you to set the pH Controller to accept either USA or NIST
pH buffer standard group during pH calibration.
Buffer Group
USA
NIST
pH Buffer Points
pH 4.01, 1.68, 7.00, 10.01 & 12.45
pH 4.01, 1.68, 6.86, 9.18 & 12.45
Figure 5–25. Buffer Selection Settings
Thermo Scientific Alpha pH 560
31
1
From pH measurement mode press ENT key to enter setup
mode as described in page 24. The LCD shows the first screen
of setup mode (OFS). Press ▲ or ▼ key to select buffer
settings screen (bUFF).
Press ENT key to access buffer settings (bUFF).
2
Selecting buffer group: The lower display shows the last
configured buffer group. Press ▲ or ▼ key to select the
required buffer group (‘USA’ or ‘nST’).
Press ENT key to confirm your selection. The pH Controller
reverts to bUFF screen.
Press ▲ or ▼ key to access other setup screens or Press ▲ and ▼
key simultaneously (escape) to return to measurement mode.
Configuration
Settings
Configuration settings let you configure the pH Controller to different
measurement & operation modes, enable/disable backlight of the LCD
& reset the pH Controller to factory defaults.
Asymmetrical Operation Mode (ASY):
This is the default mode of operation of the pH Controller, which is
suitable for most applications where sample (or process) liquid is not
interfered by adjacent electrical noise.
Symmetrical Operation Mode (SY):
This is mode of operation is recommended for applications where
sample (or process) liquid is subjected to high electrical interference and
therefore the pH reading becomes unstable. When the pH Controller is
set to symmetrical mode, you should immerse the potential matching
pin (PMP) in the sample (or process) liquid or use a pH electrode with
built-in potential matching pin. The ‘MEAS’ indicator blinks when the
pH Controller is set to Symmetric mode.
32
Thermo Scientific Alpha pH 560
Figure 5–26. Configuration Settings
1
From pH (or ORP) measurement mode press ENT key to
enter setup mode as described in page 24. The LCD shows the
first screen of setup mode (OFS). Press ▲ or ▼ key to select
configuration settings screen (Cnfg).
Press ENT key to access configuration settings (Cnfg).
2
Enable/disable LCD backlight: The upper display shows
‘LitE’. The lower display shows last configured backlight
selection (‘On’ or ‘OFF’).
Press ▲ or ▼ key to enable (LitE On) or disable (LitE OFF)
backlight of the LCD.
Press ENT key to confirm your selection.
3
Select measurement mode: The upper display shows the last
configured measurement mode (‘PH’ or ‘OrP’).
Press ▲ or ▼ key to select your desired measurement mode.
Press ENT key to confirm your selection.
NOTE: When the measurement mode is changed, the relay
operation parameters (described in page 28) will be reset back
Thermo Scientific Alpha pH 560
33
to their default values.
4
Select operation mode: The upper display shows the last
configured operation mode. (‘ASY’ or ‘SY’).
Press ▲ or ▼ key to select your desired operational mode.
Press ENT key to confirm your selection.
5
Reset to factory defaults: The display shows ‘nO dEF’.
Press ▲ or ▼ key to select:
nO
dEF:
Not default reset of the pH Controller. User configured
values remain active, when confirmed by pressing ENT
key.
FCt
dEF:
Reset all settings of the pH Controller to factory
defaults, when confirmed by pressing ENT key.
CAL
dEF:
Reset all calibration settings of the pH Controller to
factory defaults, when confirmed by pressing ENT key.
Press ENT key to confirm your selection.
If ‘nO dEF’ was selected, the pH Controller reverts to Cnfg
screen. Press ▲ or ▼ key to access other setup screens or
Press ▲ and ▼ key simultaneously (escape) to return to
measurement mode.
If ‘FCt dEF’ or ‘CAL dEF’ was selected, the pH Controller
performs the selected reset and returns to measurement mode.
Press ▲ or ▼ key to access other setup screens or Press ▲ and ▼
key simultaneously (escape) to return to measurement mode.
To exit from any intermediate steps, Press ▲ and ▼ keys
simultaneously (escape). The pH Controller returns to the first screen
configuration settings (Cnfg).
Press ▲ or ▼ key to access other setup screens or Press ▲ and ▼
key simultaneously (escape) to return to measurement mode.
To exit from any intermediate steps, Press ▲ and ▼ keys
simultaneously (escape). The pH Controller returns to the first screen
configuration settings (Cnfg).
34
Thermo Scientific Alpha pH 560
Viewing
Electrode
Properties
Each time you calibrate your pH electrode, the pH Controller recalculates slope & offset of the electrode and shown in the LCD at the
end of calibration. The setup mode allows you to view slope & offset
values at any time.
NOTE:
When the measurement mode is set to ORP, only the
offset value of the electrode is displayed.
Figure 5–27. Viewing Electrode Properties
1
From pH (or ORP) measurement mode press ENT key to enter
setup mode as described in page 24. The LCD shows the first
screen of setup mode (OFS). Press ▲ or ▼ key to select
viewing electrode properties screen (CdAt).
Press ENT key to view electrode properties (CdAt).
2
Electrode status: The electrode annunciator appears in the
LCD. For pH measurement mode, the slope (in mV) is shown
in the upper display and pH reading at 0mV (pH7.00 ± offset) is
shown in the lower display.
For ORP measurement mode, the offset value (in mV) of the
electrode is shown in the upper display.
Press ENT key to quit from electrode properties screen. The
pH Controller reverts to CdAt screen.
Press ▲ or ▼ key to access other setup screens or Press ▲ and ▼
key simultaneously (escape) to return to measurement mode.
Thermo Scientific Alpha pH 560
35
Chapter 6
Technical Specifications
Product Technical Specification
GENERAL SPECIFICATIONS
(a) pH
Measuring Range
0.00 to 14.00 pH
Resolution
0.01 pH
Accuracy
± 0.01 pH
(b) mV
Measuring Range
-1000 to 1000 mV
Resolution
1 mV
Accuracy
± 1 mV
(c) Temperature
Measuring range
-10.0 to +125.0 oC or +14.0 to +257
o
F
Resolution
0.1 oC
0.1 oF (Resolution is 0.1 oF up to
199.9 oF and 1 oF for 200 oF and
above)
Relative accuracy
±0.5 oC
±1.0 oF
Sensor
2 wire / 3 wire - Pt100 or Pt1000
(Jumper Selectable)
Compensation
Automatic or Manual
CALIBRATION
(a) pH
Thermo Scientific Alpha pH 560
36
Product Technical Specification
Number of calibration
points
1 or 2 points
Number of calibration
buffers
USA: 1.68,4.01, 7.00, 0.01,12.45
NIST: 1.68,4.01, 6.86, 9.18 ,12.45
(b) Temperature
Offset Adjustment
± 10 ˚C/ ± 18 ˚F
INPUT / OUTPUT
Input
Asymmetrical / Symmetrical
Output
2 SPST Relays
DISPLAY
LCD
7 segments display with symbols for
status information
Back light
On/Off selectable
ELECTRICAL DATA AND CONNECTIONS
pH/mV Input
Screw Terminal (3.5mm pitch)
Connection terminal
8-pin, 2-pin & 5-pin terminal blocks
OTHERS
Thermo Scientific Alpha pH 560
Power Input
Universal +9 V DC Adaptor and 24V
DC Supply
Dimensions (W x H x D)
96mm x 96mm x 66 mm
Weight (Estimated)
210g
Ambient Temp. operating
range
0 to 40 oC
Maximum Relative
Humidity
80% up to 31 oC decreasing linearly to
50% at 40oC
37
Chapter 7
List of Accessories
Thermo
Scientific
Controller Replacement and Accessories
Item Description
Order Code
Alpha-pH 560 Controller
TSPHCP0560
Combination pH electrode with 5m cable
ECARTSO05B
Combination pH electrode with PMP and 5m
cable
ECARGTSO05B
Combination pH electrode with PT 100, PMP
and 5m cable
EC100GTSO05B
Combination pH electrode, submersible, with
5m cable
ECDA9350605B
Combination Gold ORP electrode with PMP
and 5m cable
ECHTAUTSO05B
Combination Platinum ORP electrode with
PMP and 5m cable
ECHTPTTSO05B
Calibration Solutions
Item Description
Thermo Scientific Alpha pH 560
Order Code
pH 4.01 buffer solution, 480 ml bottle
EC-BU-4BT
pH 7.00 buffer solution, 480 ml bottle
EC-BU-7BT
pH 10.01 buffer solution, 480 ml bottle
EC-BU-10BT
pH 4.01 buffer sachets, 20 ml x 20 pcs.
EC-BU-4BS
pH 7.00 buffer sachets, 20 ml x 20 pcs.
EC-BU-7BS
pH 10.01 buffer sachets, 20 ml x 20 pcs.
EC-BU-10BS
pH De-ionized water rinse sachets, 20 ml x 20 pcs
EC-RIN-WT
pH sachet assortment pack – 5 each of pH 4.01,
pH 7.00, pH 10.01 and de-ionized water sachets
per box.
EC-AST-PK
Protein cleaning solution for pH electrode
EC-DPC-BT
Storage solution for pH electrode
EC-RE-005
38
NOTE:
Eutech
Instruments
•
pH buffer solutions (480 ml bottle) have ±0.01 pH accuracy at
25 °C
•
pH buffer sachets are individually sealed, single use pouch
containing 20 ml of fresh, contamination free calibration
solution
•
pH buffer sachets have ±0.01 pH accuracy at 25°C
Controller Replacement and Accessories
Item Description
Order Code
Alpha-pH 560 Controller
56717-32
pH/Temp electrode with PMP and 10-ft cable
35807-20
Platinum ORP electrode with 10-ft cable
35801-21
BNC to spade lug adapter
05994-90
Calibration Solutions
Item Description
Order Code
pH 4.01 calibration buffer, 500 mL
00654-00
pH 7.01 calibration buffer, 500 mL
00654-04
pH 10.01 calibration buffer, 500 mL
00654-08
pH 4.01 calibration buffer solution pouches,
20/box
35653-01
pH 7.00 calibration buffer solution pouches,
20/box
35653-02
pH 10.00 calibration buffer solution pouches,
20/box
35653-03
pH De-ionized water rinse sachets, 20 ml x 20 pcs
35653-00
Assortment pack – 5 each of pH 4.01, pH 7.00
and pH 10.00 solution pouches.
35653-04
Electrode cleaning solution
00653-06
Electrode storage solution
00653-04
NOTE:
•
Thermo Scientific Alpha pH 560
To order Oakton accessories, contact the nearest Oakton
distributor
39
Chapter 8
Troubleshooting
Problem
Power on, but
no display
Cause
a) Loose connections
b) Incorrect output
voltage of the
power adaptor
Unstable pH
reading
a) Dirty electrode
b) Electrical noise
interference
Oscillating
temperature
readings
a) Electrical noise
interference
Slow response
a) Dirty / Oily
electrode
a) No temperature
probe connection
during ATC mode
a) Error in calibration
Blinking ATC
Blinking
electrode
annunciator
Thermo Scientific Alpha pH 560
Or (pH)
a) pH electrode is not
connected
Or
(Temperature)
a) Temperature probe
is not connected
when ATC enabled
Solution
a) Ensure cables make
good contact
b) Use an power
adaptor with
specified output
voltage
a) Clean electrode and
recalibrate
b) Switch to Symmetric
mode
a) Ensure shield wire is
properly connected
to pin 7
a) Clean electrode
a) Ensure temperature
sensing cable makes
good contact
a) Ensure calibration
standard solution is
not contaminated.
Ensure electrode is
clean.
a) Ensure electrode
makes good contact
with Transmitter
a) Ensure electrode
makes good contact
with Transmitter
40
Chapter 9
General Information
Warranty
Return of Goods
Guidelines for
Returning Unit for
Repair
Thermo Fisher Scientific warrants this product to be free from
significant deviations in material and workmanship for a period of one
year from the date of purchase. If repair is necessary and not the result
of abuse or misuse within the warranty period, please return by freight
pre-paid and amendment will be made without any charge. Eutech
Instrument Customer Service Dept. will determine if the product
problem is due to deviations or customer abuse. Out-of-warranty
products will be repaired on an exchange basis at cost.
Before returning goods for any reason whatsoever, the Customer Service
Dept. has to be informed in advance. Items must be carefully packed to
prevent damage during shipment, and insured against possible damage
or loss. Thermo Fisher Scientific/ Oakton Instruments will not be
responsible for any damage resulting from careless or insufficient
packing.
Warning: Shipping damage as a result of inadequate packaging is the
user's/distributor’s responsibility. Please follow the guidelines below
before shipment.
Use the original packaging material if possible when shipping the unit
for repair. Otherwise wrap it with bubble pack and use a corrugated box
for additional protection. Include a brief description of any faults
suspected for the convenience of Customer Service Dept., if possible.
Maintenance
and Cleaning
The Alpha pH 560 Controller contains no user repairable components.
Please contact Thermo Fisher Scientific or its distributor if there is any
problem with the unit.
To remove dust, dirt and spots, the external surfaces of the pH
Controller may be wiped with a damp, lint-free cloth. A mild
household cleaner can also be used if necessary.
Thermo Scientific Alpha pH 560
41
Appendices
Appendix 1
pH Buffer Values at
Various
Temperatures
42
The following table shows the various pH values at different
temperature of the solution during calibration.
Temperature
pH 4.01 pH 6.86 pH 7.00 pH 9.18 pH 10.01
(oC)
0
4.01
6.98
7.12
9.47
10.32
5
4.01
6.95
7.09
9.38
10.25
10
4.00
6.92
7.06
9.32
10.18
15
4.00
6.90
7.04
9.27
10.12
20
4.00
6.88
7.02
9.22
10.06
25
4.01
6.86
7.00
9.18
10.01
30
4.01
6.85
6.99
9.14
9.97
35
4.02
6.84
6.98
9.10
9.93
40
4.03
6.84
6.97
9.07
9.89
45
4.04
6.83
6.97
9.04
9.86
50
4.06
6.83
6.97
9.01
9.83
55
4.08
6.83
6.97
8.99
9.81
60
4.10
6.84
6.98
8.96
9.79
70
4.12
6.85
6.99
8.92
9.76
80
4.16
6.86
7.00
8.89
9.74
90
4.20
6.88
7.02
8.85
9.73
Thermo Scientific Alpha pH 560
Index: Error! No text of specified style in document.
Appendix 2
Graphical
Representation of
the Function of
Hysteresis
The relay of the pH Controller activates when the set-point is reached
(forward direction). In the reverse direction, it does not de-activate
when the value reaches the set-point. Instead, it continues to be active
till the value reaches the amount set by the Hysteresis band.
Example: You have set your high set point at pH 10.0 and your
hysteresis value at pH 0.5. If your measured value overshoots pH 10.0,
the pH Controller’s relay activates. The actions of the external device
will cause the solution’s pH to drop. The relay will deactivate, when the
pH value drops below 9.5 pH.
Appendix 3
Control characteristics of pH Controller used as a limit value switch
General Instructions
Concerning
Controller Settings
Figure 0–28.
Thermo Scientific Alpha pH 560
43
Appendix 4
Abbreviations Used
in LCD
Abbreviation
ASy
Asymmetrical mode
AtC
Automatic Temperature
Compensation
bUFF
Buffer
CAL
Calibration
C.ºC
Calibration temperature
CdAt
Electrode properties
CnFg
Configuration
Cntr
Controller
dEF
Default values
dEEn
De-energized
En
Energized
FCt
Factory (defaults)
HI
High limit
HyS
Hysteresis
LitE
Backlight
LO
Low limit
OFS
Offset
OF.d
Off delay
On.d
On delay
Or
44
Description
Reading is over range
OrP
Oxidation Reduction Potential
P.ºC
Process temperature
PH
pH
Thermo Scientific Alpha pH 560
Index: Error! No text of specified style in document.
Abbreviation
Thermo Scientific Alpha pH 560
Description
Set
Setting
SP1
1st Set point
SP2
2nd Set point
Sy
Symmetrical mode
tyP
Type
Ur
Reading is under range
45
46
Thermo Scientific Alpha pH 560
Water Analysis Instruments
North America
166 Cummings Center
Beverly, MA 01915 USA
Toll Free: 1-800-225-1480
Tel: 1-978-232-6000
Dom. Fax: 1-978-232-6015
Int’l Fax: 978-232-6031
Europe
P.O. Box 254, 3860 AG Nijkerk
Wallerstraat 125K, 3862 CN Nijkerk,
Netherlands
Tel: (31) 033-2463887
Fax: (31) 033-2460832
Asia Pacific
Blk 55, Ayer Rajah Crescent
#04-16/24, Singapore 139949
Tel: 65-6778-6876
Fax: 65-6773-0836
www.thermo.com/process
© 2009 Thermo Fisher Scientific Inc.
All rights reserved. Thermo Fisher Scientific Inc.
68X216877 Rev 3