1
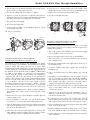
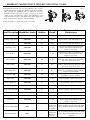
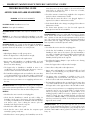
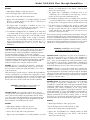
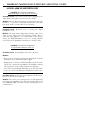
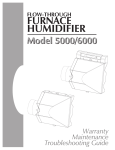
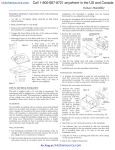
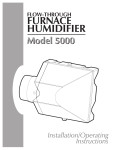
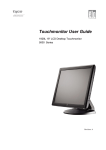
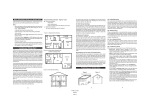
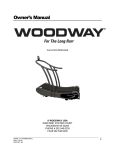
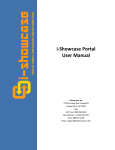
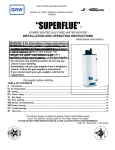
FLOW-THROUGH
FURNACE
HUMIDIFIER
Model 5000/6000
Warranty
Maintenance
Troubleshooting Guide
2
WARRANTY/MAINTENANCE/TROUBLE SHOOTING GUIDE
WARRANTY
The manufacturer guarantees the for the period of one year from
the date of purchase, the product will be free of defects in
workmanship and/or material. As well the manufacturer offers a
life time warranty on the flow through humidifier body. During
the warranty period, we will replace or repair any defective part
at no charge if the product is returned prepaid to our factory.
This warranty does not cover any labor or shipping costs, or the
cost of replacement components as part of routine maintenance
(such as Flow Through Humidifier Evaporator Pads, Inlet water
Filters, or Orifice Fittings). Any damage or failure caused by
abuse, misuse, abnormal usage, faulty installation, or improper
maintenance will not be covered by this warranty.
In order to make a claim on this warranty you must be the
original consumer of the product and you must contact the
manufacturer 1-800-465-7300 between 8 AM and 3:30 PM EST
Monday to Friday at the first sign of a defect. You will be required
to present to the manufacturer the original bill of sale showing
date of purchase, place of purchase, and model purchased.
Failure to meet these requirements will void your warranty.
The manufacturer will not be held responsible for any bodily
injuries or damages to personal property or real estate whether
caused directly or indirectly by the product. Some states and
provinces do not allow the exclusion or limitation of incidental or
consequential damages and some states or provinces do not
allow limitations on how long an implied warranty lasts, so these
exclusions or limitations may not apply to you. This warranty
gives you specific legal rights and you may have other rights
which vary from state to state and province to province.
SAVE THIS DOCUMENT AND ATTACH YOUR RECEIPT.
a plastic thumb screw.
3. Remove the black flexible water tube from the nozzle at the
top of the distribution tray (it is a push fit.), which supplies
water to the distribution tray.
4. Remove the evaporator pad assembly, lift the assembly up and
then out of the humidifier body.
5. Disassembly the evaporator pad assembly, The distribution tray
is secured to the filter frame via 4 integral tabs.
6. Once the distribution tray is off you will be able to remove the
evaporator pad.
7. Clean the distribution tray and filter frame using a mild soap
and warm water solution if required and replace the
evaporator pad.
8. Reattach the distribution tray to the filter frame, ensure all four
tabs are locked.
9. Reinstall the evaporator pad assembly into the humidifier
body, ensure the nozzle for the water tube (located on the top
of the distribution tray) is pointing out. The filter frame secures
to the humidifier body via slanted hooks on the filter frame
fitting into tabs on the humidifier body.
10. Firmly push the black flexible water tube back into the
nozzle.
11. Replace the humidifier front cover, and secure in place with
the plastic thumb screw.
12. Turn the power and water back on to the humidifier and turn
your furnace back on.
13. Check for and repair any leaks.
Figure 1.
Date of Purchase
Date Of Installation
Place of Purchase
Brand and Model#
A
B
C
See attached table regards specific component warranty periods.
REPLACING/REMOVING THE INLET WATER FILTER
(REFER TO FIGURES 2 A, B, C)
MAINTENANCE
REPLACING/REMOVING THE EVAPORATOR PAD. (REFER TO
FIGURES 1 A, B, C)
In order to ensure maximum performance you should replace the
evaporator pad at least once a year, Depending on the condition
of your water you may want to consider more frequent
replacement.
1. Turn off the power to the humidifier, Turn off the water supply
to the humidifier, Turn off your furnace.
2. Remove the humidifiers front cover, it is secured in place with
The purpose of the inlet water filter is to protect the humidifier’s
orifice fitting and the solenoid valve, it is not cleaning or
disinfecting the water in any way, it is only stopping solids from
plugging these components. This filter should be checked if you
notice that the amount of water being supplied to the humidifier
has reduced. If you live in a area with hard (high mineral content)
water you may want to consider replacing this filter yearly.
1. Turn off the power to the humidifier, turn off the water supply
to the humidifier, Turn off your furnace.
2. Remove the bypass tube from the side of the humidifier.
3. Using a wrench disconnect the water supply.
Model 5000/6000 Flow Through Humidifiers
3
4. The inlet filter is located inside the black orifice fitting. Using a
pointy object (i.e. nail), remove the inlet.
6. After the test is complete firmly replace the flexible water
supply tube into the nozzle on the top of the distribution tray.
5. The filter should be fairly clean and free of depree,
7. Replace the front and secure with thumb screw.
6. Replace or clean the inlet filter if required. If punctured or
damaged, replace before operating the humidifier. Remember
this filter protects the orifice fitting and solenoid valve.
8. Check for and repair any leaks.
Figure 3.
7. Reconnect the water supply.
8. Reconnect the bypass tube.
9. Turn the power and water to the humidifier back on. Check
for and repair any leaks.
10. Turn on your furnace.
A
B
C
Figure 2.
REPLACING A SOLENOID VALVE OR AN ORIFICE
CONNECTOR (REFER TO FIGURES 4 A, B, C)
At some point it may become necessary to replace or check the
solenoid valve and or the orifice fitting. Follow the steps below to
complete this operation.
A
B
C
1. Turn off the power to the humidifier, turn off the water supply
to the humidifier, Turn off your furnace.
2. Remove the bypass tube from the side of the humidifier.
CHECKING WATER FLOW TO THE HUMIDIFIER
DISTRIBUTION TRAY (REFER TO FIGURES 3 A, B, C)
3. Remove the front cover from the humidifier (secured in place
with a thumb screw).
The amount of water flowing to the distribution tray directly
affects the output of the humidifier. The humidifier has a built in
restrictor which will ensure efficient use of water while
maintaining maximum output. In the average home the amount
of water flowing out of the flexible water tube (supplying water to
the distribution tray) should be between 300 ml – 600 ml (10 fl
oz – 20 fl oz, US) in approx. 3 to 5 minutes. If necessary and you
want to check the amount of water flowing to the humidifier’s
evaporator pad follow the steps below. If you find that the
amount of water flowing is not enough you should check that the
self pierce needle valve is fully open and water is flowing freely
to the humidifier (disconnect the water supply from the
humidifier and allow the water to flow into a bucket – it should
be a relatively heavy stream), Check that there is no blockage
within the unit (ie the inlet water filter or the orifice connector.).
4. Remove the flexible black water supply tube from the top of
the distribution tray.
1. Get a 300 ml to 600 ml (10 oz – 20 oz) container (old pop or
water bottle) and a watch, clock or stop watch and a water
bucket.
2. Remove the front cover of the humidifier, it is held in place via
a plastic thumb screw.
3. Get the humidifier to cycle ON, - you can do this by getting
your furnace to go into heating mode and blowing hot air.
4. Once the Water starts to flow remove the flexible water supply
tube from the distribution tray, it is push fit into the nozzle on
the top of the distribution tray.
5. Allow the water from the water supply tube to flow into the
300 – 600 ml container and time how long it takes to fill the
container. Any overflow or spillage run into a bucket.
5. Feed the flexible black water supply tube through the
humidifier side.
6. Using a wrench disconnect the water supply to the solenoid
valve.
7. Depending on your installation in order to get better access it
may be a good idea to remove the side from the humidifier,
this is done by removing the 2 screws on the inside of the unit
which hold the side in place. However you should be able to
complete this replacement without removing the side.
8. Remove the 2 solenoid valve wires from their terminals and
using a screw driver remove the 2 screws which hold the
solenoid valve in place.
9. Remove the solenoid valve from the humidifier’s side – If
replacing a solenoid valve, replace the orifice fitting and water
inlet filter at the same time.
10. If replacing the orifice fitting only securely fix the solenoid
valve in place (place gently in a vise or hold with a wrench)
and using a wrench remove the orifice fitting from the valve.
11. Before installing the new orifice fitting ensure the threads are
clean on the solenoid valve.
12. When installing the new orifice fitting ensure you use Teflon
tape (white plumber’s tape) on the threads of the new fitting.
13. When replacing the orifice fitting replace the inlet water filter
at the same time.
4
WARRANTY/MAINTENANCE/TROUBLE SHOOTING GUIDE
Figure 4.
14. Reinstall the solenoid valve onto the humidifier side, feed the
flexible black water supply tube back through the humidifier
side, reinstall the humidifier side (if removed) onto the
humidifier body and secure in place, reconnect the water
supply to the solenoid valve, replace the humidifier’s front
cover and secure in place, turn back on the water supply, turn
back on the furnace, and turn on the humidifier
15. Test your repair for leaks and repair if necessary.
A
Component
Parts List/
Component Warranty
Item Description Humidifier Model Number
Period
B
C
Recommended
Maintenance
Humidifier Body
5000/6000
2
Lifetime
Inspect yearly, clean with damp cloth.
Humidifier Side Panel
5000/6000
17
Lifetime
Inspect yearly, clean with damp cloth.
Front Cover
5000/6000
16
Lifetime
Inspect yearly, clean with damp cloth.
Distribution Tray
5000/6000
11
1 Year
Inspect when replacing evaporator pad,
clean in warm water and mild soap.
Replace if necessary.
Filter Holder
5000/6000
9
1 Year
Solenoid Valve
5000/6000
20
1 Year
Orifice Fitting
5000/6000
21
N/A
Inlet Water Filter
5000/6000
23
N/A
Evaporator Pad
5000/6000
10
N/A
Bypass tube
5000/6000
8
1 Year
Inspect regularly; replace if necessary.
Water Supply Tube
5000/6000
27
1 Year
Inspect regularly; replace if necessary.
Water Drainage Tube
5000/6000
4
1 Year
Inspect regularly; replace if necessary.
Needle Valve Assembly
5000/6000
15
1 Year
Inspect regularly; replace if necessary.
24 Volt Transformer
5000/6000
13
1 Year
Inspect regularly; replace if necessary.
Flexible Water Tube
5000/6000
14
1 Year
Drain Insert
5000/6000
3
1 Year
Inspect regularly; replace if necessary.
Inspect when replacing evaporator pad,
clean in warm water and mild soap.
Replace if necessary.
Mechanical Humidistat
5000
1
Digital Humidistat
6000
1
Inspect when replacing evaporator pad,
clean in warm water and mild soap.
Replace if necessary.
Replace as required When replacing
replace the orifice fitting (item 21) and inlet
water filter (item 23) as well.
Replace if plugged, dependant on water
condition. When replacing change the inlet
water filter (item 23) as well.
Replace as required, dependant on water
condition. Good idea to replace with the
evaporator pad (item 10)
Inspect regularly, replace at least yearly,
dependant on water condition.
1 year
mechanism, Inspect regularly, Clean housing with damp
lifetime on
cloth – Replace mechanism as required
housing.
1 year
Inspect regularly, Clean housing with damp
mechanism,
cloth – Replace humidistat electronics as
lifetime on
required
housing.
Model 5000/6000 Flow Through Humidifiers
Component
Parts List/
Component Warranty
Item Description Humidifier Model Number
Period
Duct Mount Humidity
Sensor
Humidisense Electronic
Humidifier Control
5
Recommended
Maintenance
6000
29
1 year
Replace as required.
5000/6000
Not Shown
1 year
Replace as required. – PN 011109001
Solenoid Valve Assembly
5000/6000
Not Shown –
Service Assembly
Side Panel Assembly
5000/6000
Not Shown –
Service Assembly
Evaporator Pad
Assembly
5000/6000
Not Shown –
Service Assembly
Service
Service Assembly – Replacement Solenoid
Assembly –
Valve (item 20), Orifice Fitting (item 21),
PN
Barbed Fitting (item 19), and Water Inlet
010913104
Fitting (item 23) – Ready for installation.
Service
Service Assembly – Replacement
Assembly –
Humidifier Side Panel (item 17), and
PN
Humidisense Electronic Humidifier Control
011139101
(not shown) – Ready for installation
Service
Service Assembly – Replacement
Assembly – Evaporator Pad (item 10), Distribution Tray
PN
(item 11), Filter Holder (item 9) – Ready for
010910102
installation
6
WARRANTY/MAINTENANCE/TROUBLE SHOOTING GUIDE
EFFECTIVE 2003/2004
1
12
13
11
2
14
15
5
10
24
3
16
6
17
9
4
7
18
19
7
8
20
21
22
28
23
24
27
25
26
MODEL 5000 EC
ITEM NUMBER
*1
*
Specify brand
DESCRIPTION
QTY/UNIT
PART NUMBER
humidistat
1/per
01A000015
2
flow through body
1/per
010908002
3
drain insert
1/per
010912000
4
drain hose
15 feet/unit
010930002
5
air damper
1/per
01A170930
6
collar
1/per
01A172107
7
6" spring wire clamp
2/per
010938000
8
bypass tube
3 feet/unit
010917000
9
filter holder
1/per
010910002
10
evaporator pad
1/per
010918002
11
water distribution tray
1/per
010911002
12
nozzle
1/per
011120001
010916001
13
120/24VAC transformer
1/per
14
flex water tube 1/4"x20"
1/per
010933001
15
needle valve assembly
1/per
0PB132055
16
flow through cover
1/per
010907001
17
side panel assembly
1/per
011139101
18
grommet
1/per
910283003
19
barbed fitting
1/per
010935000
20
solenoid
1/per
010913004
21
male orifice connector
1/per
010927001
22
washer
2/per
010283004
23
inlet water filter
1/per
010937000
24
brass insert
2/per
01A930041
25
nylon ferrule
2/per
010926001
26
brass compression nut
2/per
010932000
27
1/4" water tube
10 feet/unit
01A930040
28
10-32 plastic screw
1/per
019001067
25
26
Model 5000/6000 Flow Through Humidifiers
EFFECTIVE 2003/2004
1
29
12
13
11
2
14
15
5
10
24
3
16
6
17
9
4
7
18
19
7
8
20
21
22
28
23
24
27
25
26
MODEL 6000 DEC
*
PART NUMBER
ITEM NUMBER
DESCRIPTION
QTY/UNIT
*1
digital humidistat assembly
1/per
011138001
2
flow through body
1/per
010908002
3
drain insert
1/per
010912000
4
drain hose
15 feet/unit
010930002
5
air damper
1/per
01A170930
6
collar
1/per
01A172107
7
6" spring wire clamp
2/per
010938000
8
bypass tube
3 feet/unit
010917000
9
filter holder
1/per
010910002
10
evaporator pad
1/per
010918002
11
water distribution tray
1/per
010911002
12
nozzle
1/per
011120001
010916001
Specify brand
13
120/24VAC transformer
1/per
14
flex water tube 1/4"x20"
1/per
010933001
15
needle valve assembly
1/per
0PB132055
16
flow through cover
1/per
010907001
17
side panel assembly
1/per
011139101
18
grommet
1/per
910283003
19
barbed fitting
1/per
010935000
20
solenoid
1/per
010913004
21
male orifice connector
1/per
010927001
22
washer
2/per
010283004
23
inlet water filter
1/per
010937000
24
brass insert
2/per
01A930041
25
nylon ferrule
2/per
010926001
26
brass compression nut
2/per
010932000
27
1/4" water tube
10 feet/unit
01A930040
28
10-32 plastic screw
1/per
019001067
29
Duct Mounting Humidity Sensor
1/per
010266000
25
26
7
8
WARRANTY/MAINTENANCE/TROUBLE SHOOTING GUIDE
TROUBLE SHOOTING GUIDE
MODEL 5000 AND 6000 HUMIDIFIERS
water disconnect the water supply to the unit and turn the
water back on. Allow the water to flow into a bucket,
reconnect the water after test.
• Check the amount of water being supplied to the evaporator
pad. (Procedure in Maintenance Guide)
PROBLEM: NOT ENOUGH HUMIDITY
POSSIBLE CAUSE: Humidistat set too low.
REMEDY: Turn up the humidistat.
POSSIBLE CAUSE: Humidifier has only been installed for a few
days.
• Check that the water inlet filter is not plugged. Replace if
required. (Procedure in Maintenance Guide)
• Check that the black orifice fitting is not plugged. (Procedure in
Maintenance Guide)
• The homes water pressure is too low. For rated output the
water pressure must be at least 60 PSI.
REMEDY: If you have just installed the humidifier it can take
anywhere from 3 to 4 weeks to build up the humidity level in the
home.
POSSIBLE CAUSE: Unit is not cycling with the furnace in heating
mode. For this unit to work it must sense a 4°C temperature rise
over 1 minute of time and the air temperature must be at least
30°C. This ensures that the humidifier is using water efficiently. If
your furnace does not supply the require temperatures you will
have to purchase and install a pressure switch.
POSSIBLE CAUSE: Not enough air flow through the humidifier.
For the maximum performance of 12 us gallons in 24 hrs of
operation there must be at least 0.5” static pressure.
REMEDY:
REMEDY:
• Adjust bypass damper to fully open position.
• Ensure the bypass tube is fully stretched out tight.
• Furnace filter is dirty and needs replacement.
• Bypass tube and humidifier not installed parallel, use hard
ducting – use hard ducting for any elbows – take the most
direct route when ducting.
• The bypass tube or humidifier is installed in front of airconditioning coils or is blocked in some other way – move to
another location and ensure maximum air flow.
• The humidifier and bypass tube are installed on the same duct
– you must install the unit on either the supply or return and
the bypass tube on the opposite duct or the unit will not work.
• For some reason your furnace is not supplying sufficient air to
the unit.
POSSIBLE CAUSE: Not enough water is getting to the evaporator
pad. For the maximum performance of 12 US gallons in 24 hours
of operation there must be at least 60 PSI of water pressure.
REMEDY:
• Check that the unit is turned on and plugged in.
• Check that the humidistat is turned up and is calling for
humidity. If at the start of the furnace cycle the humidistat is
not calling for humidity then the humidifier will wait until the
next furnace cycle, even if during the furnace cycle the
humidity level drops below the set point.
• Check that the saddle valve is open.
• Check that the unit is level and that the evaporator pad
assembly is getting evenly wet.
• Check that there is water getting to the humidifier, turn off the
• Check that the unit is turned on and plugged in.
• Check that the humidistat is turned up and is calling for
humidity. If at the start of the furnace cycle the humidistat is
not calling for humidity then the humidifier will wait until the
next furnace cycle, even if during the furnace cycle the
humidity level drops below the setpoint.
• Check that the bypass damper is open and hot air is flowing
through the humidifier.
• Ensure the bypass tube is fully stretched out tight.
• Furnace filter is dirty and needs replacement.
• Bypass tube and humidifier not installed parallel, use hard
ducting – use hard ducting for any elbows – take the most
direct route when ducting.
• The bypass tube or humidifier is installed in front of airconditioning coils or is blocked in some other way – move to
another location and ensure maximum air flow.
• The humidifier and bypass tube are installed on the same duct
– you must install the unit on either the supply or return and
the bypass tube on the opposite duct or the unit will not work.
• For some reason your furnace is not supplying sufficient heat to
activate the unit. If you use a heat pump or a high efficient
furnace you may see this problem, or if your furnace is not
working properly. It will be necessary to purchase a pressure
switch to activate the unit (available through our parts and
service line 1-800-465-7300), or you may have the unit hard
wired to your furnace by a HVAC or electrical professional and
bypass the unit's control.
POSSIBLE CAUSE: The air going through the unit is not hot
enough. For the maximum performance of 12 US gallons in 24
hours of operation the air temperature going through the filter
should be 120°F. 100°F=10 US gal/24 hours, 80°F=7 US gal/24
hours, etc.
Model 5000/6000 Flow Through Humidifiers
REMEDY:
• Adjust bypass damper to fully open position.
9
ducting – use hard ducting for any elbows – take the most
direct route when ducting.
• Furnace filter is dirty and needs replacement.
• The bypass tube or humidifier is installed in front of airconditioning coils or is blocked in some other way – move to
another location and ensure maximum air flow.
• Bypass tube and humidifier not installed parallel, use hard
ducting – use hard ducting for any elbows – take the most
direct route when ducting.
• The humidifier and bypass tube are installed on the same duct
– you must install the unit on either the supply or return and
the bypass tube on the opposite duct or the unit will not work.
• The bypass tube or humidifier is installed in front of airconditioning coils or is blocked in some other way – move to
another location and ensure maximum air flow.
• Your furnace does not supply air hot enough to activate the
control – you will have to install a flow through pressure switch
(through our parts and service line) or bypass the humidifiers
control and have the unit hardwired to your furnace by an
electrician or hvac professional.
• Ensure the bypass tube is fully stretched out tight.
• The humidifier and bypass tube are installed on the same duct
– you must install the unit on either the supply or return and
the bypass tube on the opposite duct or the unit will not work.
• Your furnace does not supply air hot enough to maximize
output. If you use a heat pump or a high efficient furnace you
may see this problem. You may want to consider the use of
supplemental humidification such as floor or table top
humidifiers.
POSSIBLE CAUSE: The outside conditions have been extremely
cold -15°C to -20°C for extended periods. During extended
periods of extreme cold your humidifier is working to replenish
the moisture which is being lost in the home’s structure,
furniture, and other household items. As the humidifier is working
the cold weather is continually drying out the house. Because the
temperature drop outside the water temperature being supplied
to the unit is also low, a 5°F drop in water temperature will
reduce the output of the unit by as much as 15-25%
REMEDY: There is no remedy for this situation – except time.
Your humidifier has a stated output. All you can do is ensure
that your unit is working at its peak performance. (See section
in the instructions.)
All homes bring in outside fresh air – whether through infiltration
(cracks) or through the use of HRV’s. This is imperative to ensure
proper indoor air quality. The amount of outside air brought in will
directly affect the humidity levels in your home, and the colder
that air is the more moisture it will take from the humidifier.
PROBLEM: HUMIDIFIER IS NOT CYCLING ON
WHEN THE FURNACE TURNS ON
POSSIBLE CAUSE: The air going through the unit is not hot
enough. For this unit to work it must sense a 4°C temperature rise
over 1 minute of time and the air temperature must be at least
30°C. This ensures that the humidifier is using water efficiently. If
your furnace does not supply the require temperatures you will
have to purchase and install a pressure switch.
There may be a time lag occurring between your furnace turning on
and the humidifier turning on. Anything ranging from 60 to 120
seconds is considered acceptable, as the unit is waiting to sense the
minimum air temperature required to evaporate water. As well it is
waiting for a minimum temperature rise to occur over a one minute
period. This is a safeguard to ensure the efficient use of water.
PROBLEM: HUMIDIFIER IS NOT CYCLING
OFF WHEN THE FURNACE TURNS OFF
POSSIBLE CAUSE: Temperature set point on the “humidisense”
control is not set properly for your furnace. The “humidisense”
control has 4 different set points to activate the humidifier’s off
cycle – these are easily adjusted to match your furnace’s cycles
(see instructions). The off cycle is activated when, depending on
your setting: 1) a minimum temperature is met, or 2) a minimum
temperature drop occurs over a one minute time period.
REMEDY: Follow the section in the instructions to customize the
humidifier’s control to your furnace’s cycles. There may be a time
lag occurring between your furnace turning off and the humidifier
turning off. Anything ranging from 30 to 90 seconds is considered
acceptable, as the unit is sensing air temperature hot enough to
continue to evaporate water.
POSSIBLE CAUSE: The temperature in the furnace is not dropping
fast enough to activate the “humidisense” off cycle. The
“humidisense” control will work on all typical residential furnace
installations available today. However if for some reason you have
customized your furnace installation, or are using various
supplemental heating apparatus for your home (fire place – gas or
wood, radiant floor, etc.), have made additions or renovations to
your home without up grading your heating system, or have not
properly maintained your home’s heating system, it may by
necessary to use our pressure switch or have the unit interlocked
with your furnace by an electrical or HVAC professional.
REMEDY:
REMEDY:
• Adjust bypass damper to fully open position.
• Adjust bypass damper to fully open position.
• Ensure the bypass tube is fully stretched out tight.
• Ensure the bypass tube is fully stretched out tight.
• Furnace filter is dirty and needs replacement.
• Furnace filter is dirty and needs replacement.
• Bypass tube and humidifier not installed parallel, use hard
ducting – use hard ducting for any elbows – take the most
direct route when ducting.
• Bypass tube and humidifier not installed parallel, use hard
10
WARRANTY/MAINTENANCE/TROUBLE SHOOTING GUIDE
• The bypass tube or humidifier is installed in front of airconditioning coils or is blocked in some other way – move to
another location and ensure maximum air flow.
• The fan delay on your furnace is not set properly and the
furnace fan is shutting off too early when the air is still hot. You
should discuss with a HVAC professional to have your
furnace’s fan cycle adjusted so you are maximizing the heat
delivered to your home. If the furnace is not adjusted you will
have to consider the use of a flow through pressure switch
(through our parts and service line) or bypass the humidifiers
control and have the unit hardwired to your furnace by an
electrician or HVAC professional.
• Your furnace is located in an enclosed space like a closet, and as
a result the temperature in that space is very hot , this is not a
good condition. Proper ventilation is necessary for your furnace
to operate properly you should consult a HVAC professional. If
this is the case you will have to consider the use of a flow
through pressure switch (through our parts and service line) or
bypass the humidifiers control and have the unit hardwired to
your furnace by an electrician or HVAC professional.
• Your furnace is not operating properly and running too hot –
consult a HVAC professional.
REMEDY: Wait for the furnace to be in heating mode and the green
“humidisense” light on the side to turn on. The solenoid will click.
POSSIBLE CAUSE: After the furnace has gone into heating mode
the humidistat was turned down or the humidity level rose above
the set point.
REMEDY: No water will run if at the beginning of the heating or
if during the heating cycle the humidistat is not calling for
humidity. The unit will wait for the next heating cycle and if the
humidistat is calling for humidity then allow water to flow.
POSSIBLE CAUSE: Water supply is not turned on.
REMEDY: Ensure that the self piercing valve is installed correctly
(see section in instructions) and open fully.
POSSIBLE CAUSE: Water is blocked at either the water inlet filter
or at the orifice fitting. It is not common for the inlet filter or
orifice fitting to become blocked. To ensure against this, when
installing the unit do not use any existing water tubing from old
units as there may be some sort of build up in the line. When you
replace your humidifiers evaporator pad you should also replace
the water inlet filter (see maintenance schedule).
REMEDY:
PROBLEM: THE HUMIDISTAT READING DOES NOT
SEEM TO MATCH THE HUMIDITY LEVEL IN THE HOME;
IT IS HIGHER OR LOWER
POSSIBLE CAUSE: Humidistat is not located in the proper
location. Sensing the humidity level in the duct is usually an
accurate and easy way to read the humidity level in the home –
however depending on the home, and the home’s ventilation
system, the unit may be sensing a false humidity level
• To check that there is water getting to the humidifier, turn off
the water, disconnect the water supply to the unit, and turn
the water back on. Allow the water to flow into a bucket, and
then reconnect the water after test.
• Check that the water inlet filter is not plugged. Replace if
required. (Procedure in Maintenance Guide)
• Check that the black orifice fitting is not plugged. (Procedure in
Maintenance Guide)
REMEDY:
• Model 5000 humidifier comes with a humidistat which can be
duct mounted or wall mounted. For model 6000 humidifier you
may purchase a wired remote humidistat sensor. You should
relocate your humidity sensor to a central location perhaps close
to the home’s thermostat to give you a better indication of the
humidity level.
PROBLEM: NO WATER GETTING TO THE EVAPORATOR PAD
POSSIBLE CAUSE: Humidistat is not turned up.
REMEDY: Turn up the humidistat, wait for the furnace to be in
heating mode and the green “humidisense” light to turn on. You
will hear the solenoid valve click.
POSSIBLE CAUSE: No power to the unit.
REMEDY: Turn on the power, turn up the humidistat, wait for the
furnace to be in heating mode and the green “humidisense” light
to turn on. You will hear the solenoid valve click.
POSSIBLE CAUSE: The furnace is not in heating mode.
PROBLEM: THERE IS TOO MUCH WATER
GOING DOWN THE DRAIN
POSSIBLE CAUSE: The unit is installed improperly and is not
performing efficiently.
REMEDY: Check your installation in the appropriate section in
the instructions and make any necessary adjustments.
POSSIBLE CAUSE: The home’s furnace is not supplying the
design conditions for the humidifier. In order to maximize the
humidifier’s output and ensure efficient operation the following
conditions should be maintained
• Air temp to the evaporator pad – 120°F
• Water temperature to the evaporator pad – 60°F
• Air pressure through the unit 0.5” wg sp.
These conditions are A.R.I. standards and all humidifier
manufacturers use them.
REMEDY: If you suspect that the furnace or that conditions at the
humidifier cannot be maintained to ensure maximum output
efficiency replace the supplied self piercing water valve with a
proper shut off valve and back off the water supplied to the unit
until the amount of water being drained is acceptable for you.
Model 5000/6000 Flow Through Humidifiers
POSSIBLE CAUSE: The humidifier is not turning off when the
furnace is turning off.
REMEDY: See section above for solution. If the unit is running
when the furnace is not in heating mode then very little water will
be evaporated and most of the water will be going down the
drain.
POSSIBLE CAUSE: The unit is working properly and the furnace
is supplying the proper conditions – just not happy with the water
usage.
REMEDY: Flow thru humidifiers will use water – this unit has a
restrictor inline to keep the water usage to the minimum required
to achieve the rated output – based on testing this unit will use
totally approx. 37 US gallons of water in 24 hours of total
humidifier operation – if this is unacceptable for you, replace the
supplied self piercing water valve with a proper shut off valve and
back off the water supplied to the unit until the amount of water
being drained is acceptable for you.
PROBLEM: TOO MUCH HUMIDITY IN THE HOME
11
POSSIBLE CAUSE: Using a copper water supply tube and the
water tube is touching some part of the furnace.
REMEDY: If using copper water tube ensure it is not touching
some part of the furnace – you may have to use cushioned pipe
clamps to stop humming or buzzing. We recommend that you
use the supplied plastic water supply tube.
POSSIBLE CAUSE: No water is present at the valve when
activated.
REMEDY:
• Ensure the water supply valve is open and supplying water to
the unit.
• Check that the water inlet filter is not plugged. Replace if
required. (Procedure on page 3)
• Check that the black orifice fitting is not plugged. (Procedure
on page 3)
PROBLEM: LEAKING WATER
POSSIBLE CAUSE: Humidistat set too high.
REMEDY: Turn humidistat down.
POSSIBLE CAUSE: Humidistat not located in the proper position.
REMEDY: Locate the humidistat in a central location and adjust
accordingly.
POSSIBLE CAUSE: Water connection to the unit not properly
done.
REMEDY: Check your water connections at the self piercing valve
and to the humidifier’s solenoid valve – ensure that the ends of
the plastic tube were sanded – ensure that you have installed all
the proper hardware (see section instructions - water supply
connection), ensure that you have not cross threaded the fittings
– you will have to replace them if you have.
POSSIBLE CAUSE: Secondary humidity sources.
REMEDY: Humidity levels vary greatly from home to home – the
time of year your home was built will affect the levels – the
amount of showers taken, cooking, the amount of ventilation a
home has, as well the amount of people living in a home will
affect the humidity level – turn the humidistat down or turn off
the humidifier until required.
PROBLEM: SOLENOID VALVE BUZZING OR HUMMING
POSSIBLE CAUSE: The 6” spring clamp used to hold the bypass
tube is touching the valve.
REMEDY: Adjust the position of the 6” spring clamp so the valve
does not buzz or hum.
POSSIBLE CAUSE: Loose screws holding the solenoid valve.
REMEDY: Tighten the two screws which hold the solenoid valve
in place.
POSSIBLE CAUSE: The humidifier body is not secured to the
furnace duct properly.
REMEDY: Ensure all 4 screws which hold the humidifier body in
place are installed and are tightened.
POSSIBLE CAUSE: Flexible water supply tube to the humidifier’s
distribution tray not installed.
REMEDY: After the installing the humidifier’s evaporator pad
assembly into the unit and before putting the front cover on it is
important that you firmly install the flexible black tube into fitting
at the top of the distribution tray.
POSSIBLE CAUSE: Water supply tube has a leak.
REMEDY: The tube is in contact with a heat source or has been
pierced with a staple or nail – replace the tube as required –
regularly inspect the water supply tube and the water drain tube
for wear or leaks.
POSSIBLE CAUSE: Evaporator pad assembly is not installed
correctly.
REMEDY: Ensure that the evaporator pad assembly is installed as
per the instructions and that the bottom spout is allowing the
water to flow our of the unit via the drain fitting.
12
WARRANTY/MAINTENANCE/TROUBLE SHOOTING GUIDE
MODEL 6000 HUMIDIFIERS ONLY
PROBLEM: THE DIGITAL HUMIDISTAT
KEEPS RESETTING TO THE DEFAULT SETTINGS.
POSSIBLE CAUSE: Power source (transformer) is plugged into an
outlet which is being shut off or turns off via a switch.
REMEDY: Relocate the transformer to an outlet which cannot be
turned off – if you have a renovated basement the outlet may
have been wired to a switch with out you knowing.
POSSIBLE CAUSE: Electrical noise is causing the digital
humidistat to reset.
REMEDY: The transformer is plugged into the same outlet, or the
outlet is in the same circuit as a refrigerator, washer, dryer or
some other large appliance – the current draw on the circuit is
causing the digital humidistat to reset or is causing electrical
noise. Relocate the humidifier’s transformer to another outlet.
PROBLEM: THE DIGITAL HUMIDISTAT
IS CONSTANTLY READING LOW 15%
POSSIBLE CAUSE: The humidity in the house is that low.
REMEDY:
• Refer to the section about getting peak performance from the
humidifier. Try to maximize the units output.
• During times of extreme cold the humidity level in the home
will be low. moisture being added by the humidifier is being
taken up by the wood work and other home furnatings.
• If you have just installed the humidifier it can take any where
from 3 to 4 weeks to build up the humidity level in the home.
POSSIBLE CAUSE: Fresh air is being brought into the duct via an
hrv, erv or other fresh air make up.
REMEDY: If this is the case you may want to consider purchasing
a wired remote humidistat sensor (through our parts and service
line 1-800-465-7300). Locate the sensor in the living space in a
central location.