1
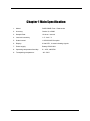
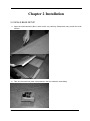
Floor / Pallet Scale
DWP-1000R
DWP-5500R (Floor Scale)
DWP-10000R
DWP-102E (Indicator)
DWP-11KR
User Manual
A12-51007 V1.0
Content
CHAPTER 1 MAIN SPECIFICATION
CHAPTER 2 INSTALLATION
2.0 SCALE BASE SET UP
2.1 FRONT AND BACK VIEW OF INDICATOR
2.2 KEY FUNCTIONS
2.3 CONNECTING LOAD CELL TO INDICATOR
CHAPTER 3 OPERATION
3.1 POWER ON & ZERO SETTING
3.2 MANUAL ZERO SETTING
3.3 TARE
3.4 ACCUMULATING
3.5 COUNTING
3.6 USER FUNCTION STEETING
3.7 CONNECT SCOREBOARD TO INDICATOR
3.8 SERIAL COMMUNICATION AND INDICATOR COMMECTION
CHAPTER 4 SETTING PARAMETERS
CHAPTER 5 CALIBRATION
CHAPTER 6 ERROR INDICATION
Floor / Pallet Scale
-1-
Chapter 1 Main Specification
1. Model:
DWP-5500R Floor / Pallet scale
2. Accuracy:
Grade Ⅲ, n=5000
3. Sample Rate:
10 times / second
4. Load cell sensitivity
1.5~3mV / V
5. Scale interval:
1/2/5/10/20/50 for option
6. Display:
6 bits LED,6 state indicating signals
7. Power supply:
Battery DC6V/4AH
8. Operating temperature/humidity:
0~40℃; ≤90%RH
9. Transporting temperature:
-20~50℃
Floor / Pallet Scale
-2-
Chapter 2 Installation
2.0 SCALE BASE SETUP
a. Open the scale base box (Box 1) with a knife very carefully. Sharp blade may scratch the scale
surface.
b. Take out the scale feet (total 4 feet packed in the box inside the scale base)
Floor / Pallet Scale
-3-
c. Screw each foot onto the load cell at each corner of the scale base.
d. Take out the indicator from Box 2. Plug the scale serial cable into the socket on the back of the
indicator. And use a screw driver to tighten the two screws of the plug.
e. Plug in power to recharge the battery for 20 hours (recommended).
Turn on the indicator by pressing the ON/OFF button on the front of the indicator.
Now your scale is ready to use. For advanced operations, please refer to the following pages.
2.2 KEY FUNCTIONS
[UNIT]
[FUN]
Switch between weighing units.
Select or enter the function and save the setting values of parameters.
In counting mode, press to view unit weight, counts and total weight when “F3 Key”=1.
In the accumulation mode, press to view numbers when “F3 Key”=2.
Press to enter/exit animal mode when “F3 key”=5
[MOD]
Enter/exit counting mode when in weighing mode when “F3 Key”=1.
Accumulate and print when “F3 Key”=2.
Hold/release the readout when “F3 Key”=3.
Enter pre-tare value when “F3 Key”=4.
Parameter setting for animal weighing when “F3 Key”=5
[TARE]
Enter fast calibration when pressed in warming up.
Tare off the container weight.
When setting parameters press to change the value.
[ZERO]
Press to enter parameter setting during warming up.
Zero the readout
When setting parameters, press to move the cursor.
[ON/OFF] Turn on/off the scale.
Floor / Pallet Scale
-4-
2.3 CONNECTING LOAD CELL TO INDICATOR
1. The 9-pin socket is used to hook up load cell, please refer to graph 2-3.
2. The 4-pin shielded cable is used, and the indicator does not have the function of long distance
compensation.
3. Indicator must be reliably connected to Load cell and shielded-cable of load cell must be reliably
grounded.
4. Sensor and indicator are static sensitive devices. Soldering operation is prohibited.
-V
Port of Indicator
Port of load cell
⑥+V
①- V
Excitation Voltage+
Excitation Voltage-
Shielded
① ② ③ ④ ⑤
⑥ ⑦ ⑧ ⑨
+V
⑨+IN
⑧-IN
⑤shielded
-IN +IN
Output Signal+
Output Signal -
(Graph 2-3) Drawing of connecting of load cell
Chapter 3 Operation
3.1 POWER ON AND AUTO ZERO-SETTING
3.1.1 The indicator will perform countdown self-checking when turned on. Then it will enter weighing
mode.
3.1.2 When powered on, if loading weight on the scale deviates from the zero point, but still within
zero set range, the indicator will set zero automatically; if it is out of range, it is necessary to
adjust the zero point or recalibrate or reset.
3.1.3 Press UNIT button to select your weighing unit. There is indication on the readout panel
showing the current weighing mode.
3.2 MANUAL ZERO SETTING
3.2.1 In weighing mode, you can press [Zero] anytime to zero the readout.
3.2.2 If the displayed value deviates from zero point, but still within zero-range, pressing [Zero] key is
available. Otherwise, [Zero] key is invalid. (In this status, please recalibrate or reset zero
parameters)
3.2.3 Zero function works only when the STAB sign is on.
3.3 TARE FUNCTION
When Indicator is in weighing mode, press the [Tare] key, the indicator will deduct the displayed weight
value as tare weight. Then indicator displays net weight as “0”, and Tare sign is on.
Floor / Pallet Scale
-5-
3.4 COUNTING FUNCTION (WHEN F3 KEY=1)
Sampling: Tare the weight of any container that is used and leave the container on the scale. Place
samples on the scale. The quantity of the samples should match the options for the pre-set
values: 10, 20, 50, 100 or 200 pieces. Press [MOD] key and the screen will show “P10”, which
means the requirement of the sample size. If the sample quantity on the scale is not 10 pieces,
press [TARE] key to select the according sample size. Press [FUN] key to confirm.
Counting: Remove the samples from the container and place the items need to count into the container.
You can see the counts on the display. Press [FUN] key to view Unit Weight (in gram), Counts
and Total Weight. You may exit counting mode anytime by pressing [MOD] key.
3.5 ACCUMULATING FUNCTION (WHEN F3 KEY=2)
In weighing mode, press [FUN] key to enter accumulating mode. Place the first item onto the scale
and wait until the STAB sign on. Press MOD key to store the weight into memory. Remove the
first item and place the second item onto the scale then repeat the previous procedure. Maximum
loads for one accumulating is 200.
Clear the scale platform and press [FUN] key to view the number of loads and total weight. Press
[ZERO] key to clear the memory.
3.6 WEIGHT HOLDING FUNCTION (WHEN F3 KEY=3)
Press [MOD] key to hold the readout, press [MOD] again to release.
3.7 PRE-TARE FUNCTION (WHEN F3 KEY=4)
Press [MOD] key to enter Pre-pare Setting. Press [ZERO] to move the editable digit (blinking) and
press [TARE] to change the value. Make the displayed value equal to the container which needs to
be tare for every load. Press [FUN] to confirm. The display will show the negative number for tare
value.
3.8 ANIMAL WEIGHING (WHEN F3 KEY=5)
Press [MOD] key to set parameters of animal weighing.
1. Stable time: “Fil
n” (n value can be changed). “n” value options: 1/2/3/4/5. 1 is the fastest
and 5 is the lowest. Press [TARE] to select the desired value and press [FUN] to confirm and
move to the next parameter.
2. Display Range: “Rang n”. “n” value options: 1/2/3. 2 is recommended. Press [TARE] to
select the desired value and press [FUN] to confirm and move to the next parameter.
3. Lock Range: If the change of weight exceeds the input value, the indicator will refresh the
display. Press [FUN] to confirm.
4. Press [FUN] to start animal weighing. Press [FUN] again to exit.
3.9 CHECK-WEIGHING
Check-weighing is a function to control the items to be weighed within or without the pre-set range. If
Floor / Pallet Scale
-6-
the high-limit and the low-limit are set as same value, the indicator will set alarm for one key point. If
the high-limit is set higher than the low-limit, the indicator will set alarm for a weighing range.
To set check-weighing parameters: when the indicator is off, turn it on and press [ZERO] key when
the indicator is still warming up. You will see “F1 CLK” on the screen. Press [TARE] key 3 times
and the screen will show “F4
CHK”. Press [FUN] key to enter beep mode setting:
Beep 1: No beep. When the weight is higher than the high-limit, HI will be on. When the weight is
lower than the low-limit, LO will be on. Otherwise both HI and LO will be on.
Beep 2: Beep when the weight falls into the weight range.
Beep 3: Beep when the weight falls out of the weight range.
Press [TARE] key to select desired mode then press [FUN] key to set High-limit:
Now there are 6 zeros on the screen. Press [ZERO] key to move the editable digit (blinking) and
press [TARE] to change the value. When you are done, press [FUN] to set Low-limit. When you are
done, press [FUN] to confirm. The screen will go back to “F4 CHK”
To disable the check-weighing function, press [UNIT] key to set both high-limit and low-limit to zero.
3.10 PRINTING (WHEN F3 KEY=2)
Set P 10 as “RS” (We will show to how to set P value later on.)
In the weighing mode, press [MOD] to print.
Chapter 4 Setting Parameters
To enter parameter setting: Turn on the indicator and press [ZERO] key when the indicator is still
warming up.
4.1 “F1 CLK” DATE AND TIME SETTING
Press [FUN] key to show the current time. If it is not correct, adjust it as following:
Press [ZERO] key to change hour (the hour is blinking). Press [TARE] to add up until it shows the
correct hour. Press [ZERO] to move to the minutes (the minutes are blinking). Press [TARE] to add
up until it shows the correct minute. Press [ZERO] to move to the seconds (the seconds are blinking).
Press [TARE] to add up until it shows the correct second.
Press [FUN] to confirm and move to date mode setting. There are 3 date showing modes:
“YY-MM-DD”, “MM-DD-YY” and “DD-MM-YY”. Press [TARE] key to switch between and press [FUN]
to confirm then move to date setting. Use the same way as timing setting to set the date. Press
[FUN] to confirm and exit. During the time or date setting, you may press [MOD] anytime to cancel
and exit. System will not save the changes. Press [TARE] to move to the next parameter.
4.2 “F2 SLP” SLEEP SETTING
Press [FUN] and press [TARE] to select the desired setting from the available modes as following:
SLP OF: The indicator will never enter sleep mode.
SLP 1: The indicator will enter sleep mode if it is idle for 1 minute.
Floor / Pallet Scale
-7-
SLP 5: The indicator will enter sleep mode if it is idle for 5 minutes.
SLP 10: The indicator will enter sleep mode if it is idle for 10 minutes.
Press [FUN] to select and [TARE] to move to the next parameter.
4.3 “F3 KEY” FUNCTION SWITCH
Press [FUN] to enter function select. Press [TARE] key to switch among:
Key1: Counting, Gross/Net Weight Display
Key2: Accumulation & Print
Key3: Weight Holding
Key4: Pre-tare Function
Key5: Animal Weighing
4.4 “F4 CHK” CHECKING WEIGHING SETTING
Options: BEEP 1/2/3
4.5 “F5 BRT” BRIGHTNESS
Press [FUN] to change LED brightness. Press [TARE] to switch from 1-8. 8 is the most bright and
most power-consuming.
4.6 “F6 INP” INTERNAL COUNT DISPLAY
Press [FUN] to display the scale internal count.
4.7 “F7 CAL” CALIBRATION
Press [FUN] to enter calibration.
PN: Password. Press [TARE] to change the first digit to be 0, then press [ZERO] to move to the next
digit…in this way enter the password 0000. Then press [FUN] to enter the calibration.
“P1 SP”: Set AD converting speed. Options: 1/2/3/4/5. 1 is the fastest and 5 is the slowest
“P2 AUT”: Set Power-on Zero Range. Options: 0/2/5/10/20/50/100% of the capacity
“P3 RAN”: Set Manual Zero Range. Options: 2/4/10/20/50/100% of the capacity
“P4 AZ”: Set Auto Zero Range. Options: 0.25d/0.5d/1d/2d/4d/Off d=division
“P5 DEC”: Set the decimal points. Options: 0/0.0/0.00/0.000/0.0000
“P6 CAP”: Set Full Capacity.
“P7 INC”: Set Division Increment. Options: 1/2/5/10/20/50
“P8 CAL”: Calibration. We recommend complete the set up before calibration. So we skip the details
of calibration here and we will show to how to calibrate in Chapter 5. For now press [TARE] to go to
the next parameter.
“P9 INT”: Factory Setting. Please do not set this parameter if you are not sure to do so.
“P10 RS”: Communication Mode. This is for RS232 output setting. Press [FUN] to set up baud rate:
1200/2400/4800/9600/19200 Press [FUN] to confirm and go to print mode selection:
RS
PRT: Used for serial printer
RS
AUT: Used for transmission after each load
RS
COT: Used for continuous transmission to PC or remote display
Floor / Pallet Scale
-8-
Press [FUN] to confirm and go to label format selection. Options: 1/2
“P11 FL”: Weight adjustment for acceleration of gravity change.
“P12 KB”: on: keyboard beep is on; off: keyboard beep is off
“P13 UT”: Unit Setting.
Default unit: lb/kg
Lb on/off
U1 on/off
U2 on/off (Unit 1 or Unit 2 setting)
“P14 Pn”: Password Setting.
P1: Enter new password Press [FUN] to confirm.
P2: Re-enter the new password
Press [FUN] to confirm. Screen will show “done”.
Chapter 5 Calibration
Enter Parameter setting P8.
“Unload”: Empty the scale platform. Wait until the STAB sign is on, press [FUN].
Input the calibration weight value and press [FUN]
“Load”: Place the calibration weight on the platform, wait until the STAB sign is on, press [FUN]
The indicator will go to weighing mode when the calibration is completed.
Chapter 6 Error Indication
--OL-Err 1 / Err 2
Err 4
Floor / Pallet Scale
The scale is overloaded. Empty the scale platform.
Date and Time are not right. Reset the date and time.
The zero point is out of range upon powering-on.
-9-


![[ENG] CE16-2 Manuale v2-8](http://vs1.manualzilla.com/store/data/005660444_1-7046d8e9760149eb635bc594076a0e4d-150x150.png)