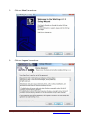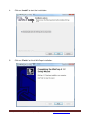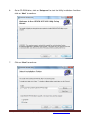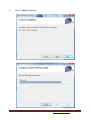
1
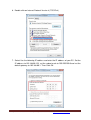
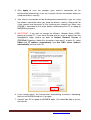
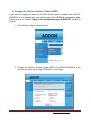
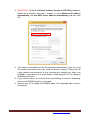
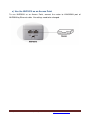
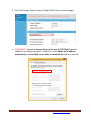
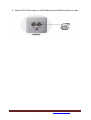
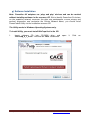
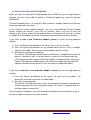
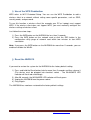
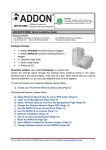
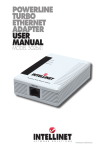
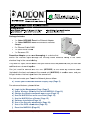
Package Includes:
•
•
•
•
•
1 x Addon HP5100S Powerline Ethernet Adapter
1 x Addon NHP5010 Powerline Wireless/Ethernet
Adapter
2 x Ethernet Cable RJ45
1 x Quick Install Guide
1 x Resource CD
Powerline Adapter (also called Homeplug) is a device that
carries the internet signal through the existing home electrical wiring in the same
electrical ring in the same building.
They work as a pair, which means that you need at least two powerline, but you can add
additional ones to work together.
You just need to connect the first unit (HP5100S) to the router by Ethernet cable
(included in the box) and connect the second unit (NHP5010) in another room, and you
will get wireless internet signal from the second unit.
For start and create your
our Powerline Network,
Network please follow:
a) Create your Powerline Network step by step (Page 2)
For advanced features,, please follow:
follow
b)
c)
d)
e)
f)
g)
h)
i)
j)
Login to the Management Page (Page 5)
Setup Wireless Security Key for the NHP5010 (Page 10)
Change the Wireless
s Network Name SSID (Page 12)
Use the NHP5010 as an Access Point (Page 14)
Use the NHP5010 as a Router (Page 15)
Software Installation (Page 18)
Use of the Security Pushbutton
Push
(Page 24)
Use of the WPS Pushbutton
Push
(Page 25)
Reset the NHP5010 (Page 25)
2
For any further information on ADDON product, please visit our website: http://www.addon-tech.com
tech.com
1
a) Create your Powerline Network step by step
Figure 1 Hardware Connection
To establish Home Network with ADDON NHP5010, it needs one NHP5010 and one
HP5100S. One is connected to computer and the other one is connected the router, as
shown in Figure 1
1. Connect the HP5100 to your router
- Plug Ethernet cable into the Ethernet port of HP5100.
- Make sure your ADSL/Cable/DSL modem router is working correctly and plug the other
end of the cable into the Ethernet port of the router.
- Plug HP5100 into your home wall outlet.
2. Connect the NHP5010 to your computer/device by Ethernet Cable or by
Wireless (Page 3)
How to connect the NHP5010 by Ethernet Cable:
- Plug Ethernet cable into the Ethernet port of NHP5010.
- Plug the other end of the cable into the Ethernet port of the computer.
- Plug NHP5010 into your home wall outlet.
For any further information on ADDON product, please visit our website: http://www.addon-tech.com
2
How to connect the NHP5010 by Wireless:
1. Scan the available wireless networks around you by using the Wireless LAN Utility of
your wireless LAN adapter or click on the WLAN icon (
)on the bottom-right corner.
Windows 7:
Windows 8:
2. You will see one of the networks SSID called ADDON NHP5010. Highlight it and
click on Connect.
Windows 7
For any further information on ADDON product, please visit our website: http://www.addon-tech.com
3
Note: If you see the following message “Do you want to set up your network?”
please click on “Connect to the network without setting it up”
Windows 8
3. Get Internet access immediately
Note: You do not need to follow the next steps, unless you want to login to the
management page and set up the Wireless Security Key for the NHP5010.
For any further information on ADDON product, please visit our website: http://www.addon-tech.com
4
b) Login to the management page:
By default, the DHCP server is disabled. You need to set the IP address manually
before you can login to NHP5010 management page.
Note: The configuration steps and figures on Windows 7 / Windows 8 / 8.1 are shown as
an example. The configuration process may be different, depending on operating system
of your PC.
To set the IP address manually, please follow the instruction below:
1. Connect your computer to the NHP5010 by Ethernet cable or by Wireless (follow
the steps at page 3 and page 4)
2. Open Control Panel
Windows 7:
Click Start -> Control Panel
Windows 8:
Swipe in from the right edge of the screen, then tap Settings->Control Panel
(If you're using a mouse, point to the bottom-right corner of the screen, move the
mouse pointer up, then click Settings.)
For any further information on ADDON product, please visit our website: http://www.addon-tech.com
5
3. Click Network and Sharing Center
4. Click Change adapter settings
For any further information on ADDON product, please visit our website: http://www.addon-tech.com
6
5. Open Connection Properties
If you are connected to the NHP5010 by Ethernet cable
Right click on Local Area Connection (or Ethernet in Windows 8) -> Properties
OR If you are connected to the NHP5010 by Wireless
Right click on the Wireless Network Connection->select Properties
For any further information on ADDON product, please visit our website: http://www.addon-tech.com
7
6. Double click on Internet Protocol Version 4 (TCP/IPv4)
7. Select Use the following IP address and enter the IP address of your PC. Set the
IP address to 192.168.99.123, set the subnet mask to 255.255.255.0 and set the
default gateway to 192.168.99.1. Then Click OK.
For any further information on ADDON product, please visit our website: http://www.addon-tech.com
8
8. Open the web browser; enter 192.168.99.1 in the address bar and press ENTER,
9. Login by using the default username: admin and the password: admin.
10. Click Login and the following page appears
You are now into the NHP5010 Management page.
If you want to setup the Wireless Security Key, please go to page 10.
If you want to change the Wireless Network Name (SSID), please go to page 12.
For any further information on ADDON product, please visit our website: http://www.addon-tech.com
9
c) Setup Wireless Security Key for the NHP5010:
1. If you want to setup a Wireless Security Key for the NHP5010, you need to
login to the NHP5010 management page. Please refer to the section “Login
to the management page of NHP5010” (Page 5 to 9).
2. Click Wireless Setup-> Wireless Security
You can choose different security type from dropdown list. For example, you can
choose Security Mode WPA2-Personal, select AES for WPA Algorithms and enter
your network key into “Pre-Shared Key” field.
You can type the same password of your wireless router or choose a different one.
This password would be the password that you will use to connect to the NHP5010.
For any further information on ADDON product, please visit our website: http://www.addon-tech.com
10
3. Click Apply to save the changes (your wireless connection will be
disconnected automatically if you are using the wireless connection when you
setup the wireless security).
4. Your wireless connection will be disconnected automatically if you are using
the wireless connection when you setup the wireless security. Please wait for
a few seconds and reconnect to it by entering your network key. Make sure
HP5100 is connected to the router before reconnecting the PC or laptop to
NHP5010 by wireless.
5. IMPORTANT: If you want to change the Wireless Network Name (SSID),
please go to page 12. If you have finished and you want to logout from the
management page, please go back to Internet Protocol Version 4
(TCP/IPv4) Properties (follow the instructions from point 1 to point 5), select
Obtain an IP address automatically and Use DNS server address
automatically and then click OK.
6. If you cannot access the Internet after reconnecting to wireless Homeplug,
then turn off NHP5010 and turn it on again.
7. Connect your PC or laptop to NHP5010 again. You should be able to access
the Internet.
For any further information on ADDON product, please visit our website: http://www.addon-tech.com
11
d) Change the Wireless Network Name (SSID):
If you want to change the name of the SSID of the wireless network from “ADDONNHP5010” to a customized one, you need to login to the NHP5010 management page.
Please refer to the section “Login to the management page of NHP5010” (Page 5 to
Page 9).
1. Click Wireless Setup-> Wireless Basic
2. Change the Wireless Network Name (SSID) from ADDON-NHP5010 to the
one that you want (for example MYROOM) -> click Apply
For any further information on ADDON product, please visit our website: http://www.addon-tech.com
12
3. IMPORTANT: Go back to Internet Protocol Version 4 (TCP/IPv4) Properties
(follow the instructions from point 1 to point 5), select Obtain an IP address
automatically and Use DNS server address automatically and then click
OK.
4. Your wireless connection will be disconnected automatically if you are using
the wireless connection when you setup the wireless security. Please wait for
a few seconds and reconnect to it by entering your network key. Make sure
HP5100 is connected to the router before reconnecting the PC or laptop to
NHP5010 by wireless.
5. If you cannot access the Internet after reconnecting to wireless Homeplug,
then turn off NHP5010 and turn it on again.
6. Connect your PC or laptop to NHP5010 again. You should be able to access
the Internet.
For any further information on ADDON product, please visit our website: http://www.addon-tech.com
13
e) Use the NHP5010 as an Access Point
To use NHP5010 as an Access Point, connect the router to LAN2/WAN port of
NHP5010 by Ethernet cable. No settings need to be changed.
For any further information on ADDON product, please visit our website: http://www.addon-tech.com
14
f) Use the NHP5010 as an Access Point
To use NHP5010 as a router, you need to login to its management page. Please refer to
the section “How to login to the management page of NHP5010” (Page 5 to 9).
1. Login to the management page of NHP5010->Click Internet Setup->Click Edit
2. Change the Connection Type to DHCP and click Apply
For any further information on ADDON product, please visit our website: http://www.addon-tech.com
15
3. Click LAN Setup->Check the box to Enable DHCP Server and click Apply
4. IMPORTANT: Go back to Internet Protocol Version 4 (TCP/IPv4) Properties
(follow the instructions from point 1 to point 5), select Obtain an IP address
automatically and Use DNS server address automatically and then click OK.
For any further information on ADDON product, please visit our website: http://www.addon-tech.com
16
5. Connect DSL/Cable modem to LAN2/WAN port of NHP5010 by Ethernet cable.
For any further information on ADDON product, please visit our website: http://www.addon-tech.com
17
g) Software Installation
Note: Powerline AV adapters are ‘plug and play’ devices and can be worked
without installing software in the resource CD. But to identify Powerline AV devices
on the powerline network, measures the data rate performance, ensure privacy and
perform diagnostics and customize the Private Network Name, you should install
PowerPacket Utility via the installation resource CD.
The Utility works in Windows Operating Systems only.
To install Utility, you must install WinPcap first in the CD.
1.
Insert software CD into CD-ROM drive and
“WinPcap_4_1_2.exe”. And click on “Next” to continue.
open
it.
For any further information on ADDON product, please visit our website: http://www.addon-tech.com
Click
on
18
2.
Click on “Next” to continue.
3.
Click on “I agree” to continue
For any further information on ADDON product, please visit our website: http://www.addon-tech.com
19
4.
Click on “Install” to start the installation.
5.
Click on “Finish” to finish WinPcap installation.
For any further information on ADDON product, please visit our website: http://www.addon-tech.com
20
6.
Go to CD-ROM drive, click on “Setup.exe” to start the Utility installation. And then
click on “Next” to continue.
7.
Click on “Next” to continue.
For any further information on ADDON product, please visit our website: http://www.addon-tech.com
21
8.
Click on “Next” to continue.
For any further information on ADDON product, please visit our website: http://www.addon-tech.com
22
9.
Click on “Close” to finish Utility installation.
For any further information or advanced settings on ADDON NHP5010 500Mbps
Powerline AV Wireless N AP Router, please refer to user’s manual in the CD.
For any further information on ADDON product, please visit our website: http://www.addon-tech.com
23
h) Use of the Security Pushbutton
When you have a customized Private Network Name (PPN) for your existing Powerline
Network, you can easily add or remove a Powerline adapter by using the Security
Pushbutton.
A Private Network Name is a string of 8 to 64 characters enables Powerline AV devices
to communicate with each other.
If you intend to create multiple networks, you can assign different Private Network
Names among your devices. You have to, however, make sure that at least two
Powerline AVs have a similar Private Network Name. A Powerline AV that uses a unique
or random Private Network Name will not be able to communicate with other devices.
If you want to add a new Powerline adapter (‘joiner’) to your existing powerline
network:
1) Press the Security pushbutton on the ‘joiner’ for less than 3 seconds.
2) Press the Security pushbutton on any network device for less than 3 seconds,
making it the ‘adder’. Please press this pushbutton within 1 minute.
3) Wait for the connection to complete.
(The Power LED indicators on both devices will flash at 1-second interval until the
process succeeds or fails. If the connection is successful, the Power and Data
LED indicators on both devices illuminate steadily. If the connection is failed, the
Power LED indicators on both devices still illuminate steadily, but the Data LED
indicators on both devices go out. In that case please repeat from Step1.)
If you want to remove a new Powerline adapter (‘leaver’) to your existing powerline
network:
1) Press the Security pushbutton on the ‘leaver’ for more than 10 seconds. The
device will reset and restart with a random NMK.
2) Wait for reset to complete.
(The Power LED indicator on the ‘leaver’ will momentarily extinguish during reset
and flash during restart, then illuminate steadily. The ‘leaver’ is removed from the
existing network successfully.)
Once the process completes, you may disconnect the device from the medium or join it
to another logical network on the same medium.
For any further information on ADDON product, please visit our website: http://www.addon-tech.com
24
i) Use of the WPS Pushbutton
WPS refers to Wi-Fi Protected Setup. You can use the WPS Pushbutton to add a
wireless client to a network, without setting some specific parameters, such as SSID,
security mode, and password.
To use this function, a wireless client (for example your PC or Laptop) must support
WPS. If the wireless client does not support WPS, you must manually configure the
wireless settings of wireless client.
Just follow these two steps:
1) Press the WPS button on the NHP5010 for less than 3 seconds
2) Press the WPS button on the network card or click the PBC button in the
configuration utility page of network card within two minutes to start WPS
connection.
Note: If you press the WPS button on the NHP5010 for more than 5 seconds, you can
enable or disable the WLAN.
j) Reset the NHP5010
If you want to restore the system for the NHP5010 to the factory default setting:
1) Press and hold the Reset button-hole for more than 3 seconds and then release it
(The device must be plugged into electrical socket - The WLAN/WPS LED
indicator will flash red and orange)
2) After 30 seconds, the WLAN/WPS LED indicator will flash green.
3) Unplug the NHP5010 from the power socket
4) Plug it again.
The NHP5010 has now been restored to the factory default settings.
For any further information on ADDON product, please visit our website: http://www.addon-tech.com
25