1
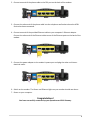
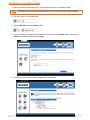
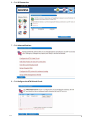
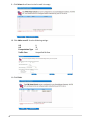
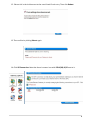
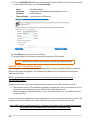
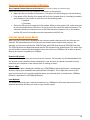
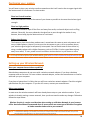
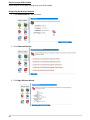
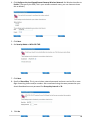
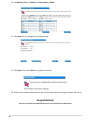
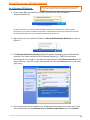
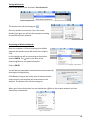
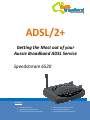
ADSL/2+
Getting the Most out of your
Aussie Broadband ADSL Service
Speedstream 6520
Included:
•
•
•
Getting Connected
Configuring your ADSL modem
Common Setup Connection Difficulties
•
•
•
Filters and why they are needed
Internet Speeds Explained
DSL Troubleshooting Tips and more…
1
2
Table of Contents
The Welcome Letter ...........................................................................4
Filters – Why are they Needed?..........................................................4
Getting Connected… ...........................................................................4
Configuring your ADSL modem ...........................................................6
ADSL & Your Telephone Service ........................................................10
Common Setup Connection Difficulties.............................................11
Internet Speed: Some Basics.............................................................11
Internet Speed: How to Carry out A Speed Test................................12
Internet Speed: What Affects It?.......................................................12
Positioning your modem ..................................................................13
Setting up your Wireless Network ....................................................13
Connecting to your Wireless Network ..............................................17
DSL Troubleshooting Tips..................................................................20
Before Contacting the Helpdesk, Please Carry Out the following......24
Contact Aussie Broadband ................................................................24
3
The welcome letter
If you have not already, you will receive a Welcome Letter from Aussie Broadband. This includes
details such as your username, passwords and email addresses. We recommend that you keep this
letter in a safe place near your computer, as it holds important information that you may need in
the future.
Filters – why are they needed?
Connecting line filters to your ADSL service may be one of the most tedious parts of the setup but it
is also one of the most important! An ADSL filter is a small plastic box with a short lead that plugs
into your phone socket and has two outputs, one for your ADSL modem and the other for a
telephone.
Due to the fact that your Aussie Broadband ADSL service and normal Voice Telephone Service
operate on the same copper cable, an ADSL Filter is required to keep these systems apart to stop
the signals from interfering with each other. Aussie Broadband recommends the Australian
manufactured C10 Communications Pty Ltd filters, which can be obtained by contacting us.
You will need to install one line filter for each device that is connected to a telephone socket
Aussie Broadband recommends that a centrally located filter/splitter is installed if you have:
• More than 3 telephone devices connected to the one telephone line (i.e. all on the same
telephone number).
• Answering machines.
• Fax machines.
• A home alarm system.
• Any other device that could potentially cause interference on the line.
The Central filter/splitter will isolate the premises cabling from your ADSL modem. A Centrally
located splitter must be installed by a suitably qualified installation technician.
Getting Connected
Your existing ADSL modem needs to be configured for your new ADSL service.
To connect your modem:
1. Make sure that all the devices that you are working with are powered down. This includes
your computer and the modem. If you have a modem connected that is not the one originally
specified during your application, please disconnect it.
NOTE: Line Filters must be installed onto all telephone wall sockets before you proceed with this Process.
For More Information on Line Filters, see the “Filters – Why are they needed?” section above.
4
2. Connect one end of the phone cable to the DSL port on the back of the modem.
3. Connect the other end of the phone cable into the telephone wall socket where the ADSL
Service has been connected.
4. Connect one end of the provided Ethernet cable to your computer’s Ethernet adapter.
Connect the other end of the Ethernet cable to one of the Ethernet ports on the back of the
modem.
5. Connect the power adapter to the modem’s power port and plug the other end into an
electrical outlet.
6. Switch on the modem. The Power and Ethernet lights on your modem should now be on.
7. Power on your computer.
Congratulations!
You have successfully connected up your Speedstream ADSL Gateway.
5
Configuring your ADSL modem
1. Open your preferred browser (EG: Internet Explorer, Safari, or Mozilla Firefox).
NOTE: The images below are shown using Internet Explorer. Your browser may appear slightly different.
2. Put your cursor in the address bar.
3. Type 10.0.0.138 then press Enter or Go.
4. You will be taken to a login screen. By default the username is admin and the password is
admin (CaSe SeNsItIvE). Then press Login.
5. You will be taken to the modem configuration home page.
6
6. Click ISP Connection.
7. Click Advanced Settings.
8. Click Configure the ATM Virtual Circuit.
7
9. Click Delete for all items in the list until it is empty.
10. Click Add a new VC. Use the following settings.
VPI
VCI
Encapsulation Type
Traffic Class
11. Click Finish.
8
8
35
LLC
Unspecified Bit Rate
12. Place a tick in the tick box next to the new Virtual Circuit entry. Then click Reboot
13. Then confirm by clicking Reboot again.
14. Click ISP Connection. Note that there is now an icon with PPPoE(00) 8/35 next to it.
9
15. Click on PPPoE(00) 8/35 and insert the following information (Note: This information is found
on your Welcome Letter). Then click Save Settings.
Name
Username
Password
Time-out Mode
AussieBroadband
[email protected]
CaSe SeNsItIvE
Auto-Connect on Disconnect
16. Click Reboot on the left menu, and confirm.
17. Congratulations! You have now successfully setup your ADSL modem.
NOTE: It can take up to 5 minutes after settings are saved for your modem to connect.
ADSL & Your Telephone Service
Even though your telephone voice service and your ADSL may be provided by different companies,
they are still closely tied together. This is because the ADSL Service and Voice Service share the
same telephone line.
Before you make any changes to your voice service always ask if the change will interfere
with your ADSL service.
Changes to your voice service that could potentially interrupt your ADSL connection include:
• Non Payment of Bill – If the telephone company interrupts your voice service because of nonpayment or other billing issues, your ADSL service will be disconnected.
• Disconnecting your Telephone Service – If you cancel your phone line, your ADSL Service will
be disconnected.
If there are temporary telephone service outages due to storms or other unusual occurrences, In the
majority of cases, the ADSL service will be restored at the same time as your voice service.
If your ADSL service gets disconnected, to reconnect it may take a couple of weeks depending on
the situation. Aussie Broadband may also charge a reconnection fee.
10
Common Setup Connection Difficulties
Your Computer Cannot Connect to the Internet (If connected to modem via an Ethernet Cable)
Follow the instructions until your computer can connect to the Internet:
• Make sure that the modem is powered on. The power LED should be green and not flashing.
• If the power LED is flashing, then power off all of your network devices, including the modem
and computers. Then power on each device in the following order:
1. Modem
2. Computer
• Check the LEDs on the front panel of the modem. Make sure the power, DSL, and at least one
of the numbered Ethernet LEDs are lit. If they are not, then check the cable connections. The
computer should be connected to one of the Ethernet ports numbered 1-4 on the modem,
and the DSL port of the modem must be connected to the ADSL line.
Internet Speed: Some Basics
When you sign up with Aussie Broadband your internet speed is determined by the Plan that you
selected. This speed determines how fast you can transfer data to and from the internet. For
example, you may have selected the 1500/256 plan with 10GB Peak data and 10GB Off-Peak data.
The 1500 represents the download speed and the 256 represents the upload speed. This means that
you will be able to potentially download data from the internet at 1500kbps and be able to upload
data to the internet at speeds up to 256kbps.
Download & Uploads
A download is any data that you receive from the internet. This includes any files downloaded from
the internet and any websites that are displayed in your browser. An upload is any data that you
send from your computer to the internet such as sending an email.
kbps vs. KBps
Your broadband plan is displayed in kilobits (e.g. 1500/256Kbps). Most applications, including your
browser, display your download and upload speeds in kilobytes. This is important to note as it is
easy to misinterpret your internet speeds based on your selected plan. In simple terms, 1500kbps
(kilobits) is equivalent to 187.5KBps (Kilobytes).
Local Network
The speed displayed by your network connections (e.g. 100Mbps for Ethernet) represents the local
network speed only and does not relate to your internet speed.
11
Internet Speed: How to Carry out A Speed Test
If you are experiencing any connection issues relating to speeds it is recommended that you carry
out a speed test. Before starting the test please make sure that you have no other programs running
that may be using the internet connection as this will cause the results to be inaccurate. Please
ensure that you are not currently shaped, this can be check by accessing your account details from
our homepage.
To carry out a speed test go to:
http://speedcheck.aussiebroadband.com.au/SpeedCheck.php
Select a file to download (preferably a file larger than 10Mb). Save this file to your desktop or
somewhere that you can easily find to delete it later on. Wait for a minute or two until the transfer
rate settles somewhat and take note of it. This is your current download speed.
Internet Speed: What Affects It?
The speed of your ADSL connection can be affected by numerous factors, as shown below. Some of
these you may be able to improve yourself, while others you have no control over.
• Distance from the exchange: One of the main factors that determine the speed of your ADSL
connection is the cable distance from the telephone exchange to your property. The closer
you are to the exchange, the faster your broadband connection speed can be.
• Number of people sharing the connection & how many tasks are being carried out online at
once: If there are multiple computers or other devices connected to the ADSL service within
your home, it’s possible that one of them may be causing slow speeds. When a computer
downloads large files or updates they can effectively slow down all other internet traffic on
your network. This also applies if you are attempting to carry out multiple tasks online at the
same time.
• The Quality of your cables and modem: The cabling, both to your house and inside it, play a
significant role in determining your internet speed. If the phone lines are in good condition,
your internet speeds will increase. Similarly, the better the quality of the modem or router,
the faster your internet connection. Hence good quality wiring and short cables should be
used.
• The Website you are looking at: If there are a lot of people attempting to access the same
website at the same time (such as bank sites) this will affect your internet speed. The server
that hosts the website has to work harder to serve the requests, hence if more people
request the site than the server can handle then the speed of that site will decrease. If this
happens, try accessing the website at a less busy time.
• Spyware, Viruses & Adware: If there is any form of infection on your computer, this can
seriously slow down your internet speed. Make sure that you have an anti-virus program
installed onto your computer and that you regularly remove any spyware or adware that may
be on your PC.
12
Positioning your modem
You will want to place your wireless modem somewhere that it will receive the strongest signal with
the least amount of interference. For best results:
Place in a Central Location:
Place the modem as close to the centre of your home as possible to increase the wireless signal
strength.
Place in a High position:
The modem should be kept off the floor and away from walls, and metal objects such as filing
cabinets. Generally, the more obstacles the signal has to pass through the weaker it may
become, hence keep physical obstructions to a minimum.
Reduce Interference:
The frequency that the wireless modem uses is sometimes the same as most microwaves and
many cordless phones. Hence if you turn on the microwave or get a call on a cordless phone,
your wireless signal might be temporarily interrupted. You can avoid most of these issues by
using a cordless phone with a higher frequency, such as 5.8 GHz. It’s also a good idea to keep
away from radios, TV sets, power sources and other wireless devices in your home or office
TIP: For tips on how to improve your wireless network, go to: www.microsoft.com/athome/setup/wirelesstips.aspx
Setting up your Wireless Network
Does your computer have wireless capability?
Most desktop computers do not come with a wireless network adapter. If you have a desktop
computer and are not sure if it has a wireless network adapter, contact the manufacturer or retailer
who sold you your computer.
If you have a laptop then it is likely that you will have a wireless network adapter. Check the original
specifications for your computer. If you are still unsure, contact your manufacturer.
Before you continue
In most cases the wireless network will have already been setup on your wireless modem. If your
wireless is already running a secure network, then you do not need to make any changes. Otherwise
follow the steps below.
Wireless Security is a major consideration when setting up a Wireless Network in your home or
office. Aussie Broadband recommends that all access points use some type of Wireless Encryption
to hinder unauthorized access to your network.
NOTE:
To Setup Wireless Settings in your modem, first connect your computer to the modem with an Ethernet Cable. Once you have
finished Configuring the Settings you can remove the cable and connect wirelessly.
13
Connect to your ADSL modem
Follow steps 1 to 4 on page 6 to log onto your ADSL modem
Configuring the Wireless Network
1. Click Home Network in the left menu.
2. Click Advanced Settings.
3. Click Begin Wireless Wizard.
14
4. Click Configure the Local SpeedStream Gateway Wireless Network. Set Wireless Interface to
Enable. Then specify the SSID (This is your wireless network name, you can choose to leave
this as default).
5. Click Next.
6. Set Security Mode to WPA-PSK TKIP.
7. Click Next.
8. Specify a Shared Key. This is your wireless network password and must consist of 8 or more
digits containing letters and/or numbers. We recommend using the same password as your
Aussie Broadband account password. Set Group Key Interval to 30.
9. Click Next.
15
10. Set Wireless Filter to Disable and Filter Mode to Allow.
11. Click Next. Do not change any of these settings.
12. Click Next. Then click Finish to complete the wizard
13. Restart your modem. Remember to wait 10 seconds between turning the modem off and on.
Congratulations!
You have successfully Setup WPA-PSK Security on your Speedstream modem Router.
16
Connecting to your Wireless Network
On a Windows XP Machine
If Windows is not your wireless connectivity tool you will need to contact
your computer manufacturer to find out how to connect wirelessly to a
network
1. On the Lower Right hand side of the screen, near the time, there should be a
Wireless Network icon.
Fig 3.1 – Wireless Network Icon
If unable to find this icon, Left click on the Start Menu and select the Control Panel. Choose Network
Connections. (If you cannot see Network Connections, choose Network and Internet Connections and then
Choose Network Connections.) Find the Wireless Network Connection icon.
2. Right click on this icon and then left click on View Available Wireless Networks as shown in
figure 3.2.
Fig 3.2 – View Available Wireless Networks
3. The Wireless Network Connection window will appears and display the available wireless
networks. This should include the SSID or Network Name (E.g.: SMITH) that has been
preconfigured in the modem. If you don't see your network, click Refresh network list in the
upper left corner. Left click on your network and then click the Connect button on the lower
right corner.
Fig 3.3 – Choose a wireless network
4. If the network has security enabled on it, Windows XP will prompt you to enter a key. Type
the encryption key into the Network Key and Confirm network Key boxes. Click Connect.
17
Fig 3.4 – Type in Network Key & Confirm
5. The progress will be shown as the computer connects to the network. If the Wireless
Network Connection window continues to show acquiring Network Address, the pre-shared
key or encryption key may have been mistyped. Click Cancel and return to Step 3.
Once you are connected, close the Wireless Network Connection window. You should now be
connected to your network and have internet access.
On a Windows Vista Machine
1. Go to Start and click on Connect to.
2. A Connect to a network window will appear. This window
will show all available connections. Focus on the wireless
connections and scroll down the list and select the
wireless network that you wish to connect to.
Click on the Connect button.
Fig 3.5 – Windows Vista
3. Type in the Pre-Shared Key/Encryption Key.
4. Once the wireless connection has been established, the connection will display connected.
5. Right click the connected wireless network and click properties. The connection settings of
this network will be displayed and you can make further configuration changes, such as set it
as the preferred network to connect to automatically.
On a Mac – OS X
Connecting Via the Wireless Menu
(This menu item can be hidden)
The wireless menu is located in the top right hand corner of the screen in the menu bar.
Fig 3.6 – Menu Bar
This menu bar is highly customizable so may not display all these icons.
The Wireless Menu icon has three states, as show below in figure 3.7.
- Off
- On, not connected to a network
- On, connected to a network
Fig 3.7 – Wireless States
18
Turning Wireless On
Click on the Wireless icon and Select Turn Airport On.
Fig 3.8 – Turning Airport on
The wireless icon will then change to
Once the wireless is turned on, if you click on the
wireless icon again you will see the computer searching
for available wireless networks.
Fig 3.9 – Searching for Available Networks
Connecting to Wireless Networks
Once the computer is finished scanning for available
networks the wireless menu will look similar to figure
3.10.
In this example we will be connecting to the wireless
network SMITH. The next to the name of the
network signifies an encrypted connection.
Fig 3.10 – SMITH Network
Click on SMITH.
You will then be prompted to authenticate on the network by
entering the Encryption key.
Click OK and as long as the access point is functional and is
setup correctly, the computer will now connect to the
network. The wireless icon will then change to.
Fig 3.11 – Password Box
When you click on the wireless icon you should see a
successfully connected to.
next to the wireless network you have
Fig 3.12 – Password Box
19
DSL Troubleshooting Tips
If you ever have problems with your ADSL connections try the following tips to help you get back on
line faster:
• Power Cycle Everything: It may seem trivial, but you should always turn your computer, ADSL
modem and any other networking equipment off for a minimum of 1 minute at least once a
week. Once done, turn your Networking Equipment and ADSL modem back on. Wait for 1 minute
and then power up your computer and try connecting again. This solves a lot of connection
problems. If your modem does not have an on/off switch, unplug it from the power outlet.
• Check all connections: Check all cabling and Power Adapters. All Telephone and Network cabling
including the filters will audibly “Click” when they have been connected correctly.
Check that the Power LED located on the front of the modem is lit. Make sure that there are C10
filters on each device connected to the phone lines except for the modem.
•
Check for sync: The DSL Light should be lit solid. If the DSL Light flashes this indicates that the
modem is trying to connect to your ADSL Service . In Most cases when you power up your
modem the DSL light will flash for 15 seconds to a minute and then display a solid light. If the DSL
light is flashing, carry out an isolation test (as described on the rear of this booklet).
If the DSL light continues to flash after the isolation, plug a known working telephone into the
first phone line in to your property and check the phone line for dial tone and line noise. If there
is audible phone line noise, this may be interfering with your ADSL service. This noise will need to
be checked out by your Telephone Company as they may need to repair your house wiring or
wiring from the exchange to your house.
• Check your LAN: One of the LAN or Ethernet lights should be lit solidly or flashing when it is
connected to a computer via an Ethernet cable. When the LED light flashes this indicates that
your computer is sending or receiving data. While it remains solid this shows that no data is being
passed.
If there is no LED Light on, check that there is an Ethernet cable plugged in correctly between
your computer and modem. Try un-plugging the cable and plugging it back in to check the
connection. Remove or bypass any network device that is between your computer and your ADSL
modem (such as a switch or router). Connect the Ethernet cable directly to the modem.
Try connecting with a different Ethernet cable if possible.
• Try a different program: Sometimes problems can be caused by specific programs and not the
connection itself. Hence if you can’t open any websites try checking your email and vice versa.
• Check Firewall settings: If you are running a third-party firewall program on your computer such
as Zone Alarm, Norton or Vet, these may be interfering with your Internet Service. Try Disabling
them and trying your connection again.
20
Notes
__________________________________________________________________
__________________________________________________________________
__________________________________________________________________
__________________________________________________________________
__________________________________________________________________
__________________________________________________________________
__________________________________________________________________
__________________________________________________________________
__________________________________________________________________
__________________________________________________________________
__________________________________________________________________
__________________________________________________________________
__________________________________________________________________
__________________________________________________________________
__________________________________________________________________
__________________________________________________________________
__________________________________________________________________
__________________________________________________________________
__________________________________________________________________
__________________________________________________________________
__________________________________________________________________
__________________________________________________________________
__________________________________________________________________
__________________________________________________________________
__________________________________________________________________
__________________________________________________________________
__________________________________________________________________
__________________________________________________________________
__________________________________________________________________
__________________________________________________________________
__________________________________________________________________
__________________________________________________________________
__________________________________________________________________
__________________________________________________________________
__________________________________________________________________
__________________________________________________________________
__________________________________________________________________
__________________________________________________________________
21
Notes
__________________________________________________________________
__________________________________________________________________
__________________________________________________________________
__________________________________________________________________
__________________________________________________________________
__________________________________________________________________
__________________________________________________________________
__________________________________________________________________
__________________________________________________________________
__________________________________________________________________
__________________________________________________________________
__________________________________________________________________
__________________________________________________________________
__________________________________________________________________
__________________________________________________________________
__________________________________________________________________
__________________________________________________________________
__________________________________________________________________
__________________________________________________________________
__________________________________________________________________
__________________________________________________________________
__________________________________________________________________
__________________________________________________________________
__________________________________________________________________
__________________________________________________________________
__________________________________________________________________
__________________________________________________________________
__________________________________________________________________
__________________________________________________________________
__________________________________________________________________
__________________________________________________________________
__________________________________________________________________
__________________________________________________________________
__________________________________________________________________
__________________________________________________________________
__________________________________________________________________
__________________________________________________________________
__________________________________________________________________
22
Notes
__________________________________________________________________
__________________________________________________________________
__________________________________________________________________
__________________________________________________________________
__________________________________________________________________
__________________________________________________________________
__________________________________________________________________
__________________________________________________________________
__________________________________________________________________
__________________________________________________________________
__________________________________________________________________
__________________________________________________________________
__________________________________________________________________
__________________________________________________________________
__________________________________________________________________
__________________________________________________________________
__________________________________________________________________
__________________________________________________________________
__________________________________________________________________
__________________________________________________________________
__________________________________________________________________
__________________________________________________________________
__________________________________________________________________
__________________________________________________________________
__________________________________________________________________
__________________________________________________________________
__________________________________________________________________
__________________________________________________________________
__________________________________________________________________
__________________________________________________________________
__________________________________________________________________
__________________________________________________________________
__________________________________________________________________
__________________________________________________________________
__________________________________________________________________
__________________________________________________________________
__________________________________________________________________
__________________________________________________________________
23
Before Contacting the Helpdesk, Please Carry Out the following
An Isolation Test:
To do this, unplug all devices such as phones, answering machines, fax
machines, home alarm system etc from your telephone line. Test your
Internet with only your ADSL2+ modem/router plugged into the first
telephone line into the property.
If the problem has disappeared, sequentially plug devices back in and
test until you locate the interfering device or phone point. Check to
make sure suitable filters are installed. You may need a qualified
technician to repair your problem.
If Possible, test the ADSL connection with another working ADSL modem.
Look for Patterns:
Please take notice of what happens to your ADSL connection and at what
time it occurs. If your modem’s DSL light flashes every day at 12:04pm
this provides us with more information than the “service drops out”.
The more specific the information you provide, the more readily our
technicians can diagnose the fault.
Contact Aussie Broadband
Email
Sales & Support Phone:
1300 880 905
Fax:
1300 121 677
Sales:
[email protected]
Accounts:
[email protected]
Support:
[email protected]
Plan Changes:
[email protected]
Support Hours:
8am to 8:30pm Monday to Friday
10am to 4pm Weekends & Public Holidays AEST
Sales & Account Hours:
9am to 5:30pm Monday to Friday
10am to 4pm Saturday & Sunday AEST
http://aussiebroadband.com.au/
24