1
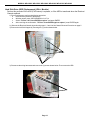
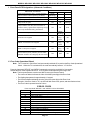
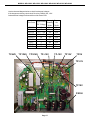
2004
Down to1
™
HIGH SPEED TROUBLESHOOTING
V26 CHASSIS
V26
WD-52525
WD-62525
V26+
WD-52725
WD-62725
V26++
WD-52825
WD-62825
Second Edition
Includes PWB Level Troubleshooting
MITSUBISHI DIGITAL ELECTRONICS AMERICA, INC.
9351 Jeronimo Road, Irvine, CA 92618-1904
Copyright © 2005 Mitsubishi Digital Electronics America, Inc.
All Rights Reserved
V26 CHASSIS
Down to 1 - High Speed Troubleshooting
TABLE of CONTENTS
Safety Precautions ......................................................................................................................... 4
Cabinet Disassembly ...................................................................................................................... 5
Chassis Removal ............................................................................................................................ 8
Lamp Ballast Removal .................................................................................................................... 9
Optical Engine Removal ................................................................................................................ 10
Data Copy Procedure .................................................................................................................... 12
HDD Replacement ........................................................................................................................ 13
Troubleshooting ............................................................................................................................ 14
Front Panel LED Designations ...................................................................................................... 15
Error Codes .................................................................................................................................. 15
Lamp Troubleshooting ................................................................................................................... 16
Power PWB Troubleshooting ........................................................................................................ 16
PWB Level Troubleshooting .......................................................................................................... 18
Parts Quick Reference .................................................................................................................. 19
MODELS: WD-52525 / WD-52725 / WD-52825 / WD-62525 / WD-62725 / WD-62825
PRODUCT SAFETY NOTICE
Many electrical and mechanical parts in television receivers have special safety related characteristics. These characteristics are often not evident from visual inspection nor can the protection afforded by them necessarily be obtained by
using replacement components rated for higher voltage, wattage, etc.
Replacement parts which have special safety characteristics are identified in this manual.
Electrical components having such features are identified by bold type in the parts list of this manual. Therefore, the
replacement for any safety part should be identical in value and characteristics.
SAFETY PRECAUTIONS
NOTICE:
WARNING:
1.
2.
Observe all cautions and safety related notes located inside the receiver cabinet and on the
receiver chassis.
Operation of this receiver outside the cabinet or with the cover removed presents a shock hazard
from the receiver's power supplies. Work on the receiver should not be attempted by anyone who is
not thoroughly familiar with the precautions necessary when working on high voltage equipment.
When service is required, observe the original lead dress. Extra precaution should be taken to
assure correct lead dress in the high voltage area. Where a short-circuit has occurred, replace those
components that indicate evidence of overheating.
WARNING ... RISK OF EYE INJURY
Do not look into the light source, lens or mirror when operating the TV
Leakage current check
Before returning the receiver to the customer, it is recommended that leakage current be measured according to the
following methods.
1. Cold Check
With the alternating current (AC) plug removed from the AC source, place a jumper across the two AC plug
prongs. Connect one lead of an ohm meter to the AC plug and touch the other lead to each exposed metal part
(i.e. antennas, handle bracket, metal cabinet, screw heads, metal overlay, control shafts, etc.), particularly any
exposed metal part that has a return path to the chassis. The resistance of the exposed metal parts having a
return path to the chassis should be a minimum of 1 Meg Ohm. Any resistance below this value indicates an
abnormal condition and requires corrective action.
2. Hot Check ...Use the circuit shown below to perform the hot check test.
1. Keep switch S1 open and connect the receiver to the measuring circuit. Immediately after
connection, and with the switching devices of the receiver in their operating positions, measure the
leakage current for both positions of switch S2.
2. Close switch S1, energizing the receiver. Immediately after closing switch S1, and with the
switching devices of the receiver in their operating positions, measure the leakage current for both
positions of switch S2. Repeat the current measurements of items 1 and 2 after the receiver has
reached thermal stabilization. The leakage current must not exceed 0.5 milliampere (mA).
Page 4
MODELS: WD-52525 / WD-52725 / WD-52825 / WD-62525 / WD-62725 / WD-62825
Reusable Wire Ties
Lift Tab to Release
Do not cut wire ties during disassembly. Reusable wire
ties are used in these models. Lift the tab to release the
wire tie. During reassembly, re-use wire ties to ensure all
wiring harnesses are properly bundled and dressed.
Wire Tie
CABINET DISASSEMBLY (FRONT VIEW)
WD-52525 / WD-62525 / WD-52725 / WD-62725
*Refer to the Parts List for Part Numbers
Front Cabinet Disassembly
1.
2.
3.
4.
5.
6.
Remove the SPEAKER-GRILLE by pulling forward.
Remove screws (a) to remove the COVER-FRONT.
Remove screws (b) on the rear of the upper back cover (4 across the top and 3 on each side)..
Remove the 4 screws (c) holding the bottom of the Screen Assembly.
Unplug connector LN from the Control Panel.
Lift the Screen Assembly up slightly then pull towards the front to remove the assembly
Page 5
MODELS: WD-52525 / WD-52725 / WD-52825 / WD-62525 / WD-62725 / WD-62825
CABINET DISASSEMBLY (FRONT VIEW)
WD-52825 /WD-62825
*Refer to the Parts List for Part Numbers
Front Cabinet Disassembly
1.
2.
3.
4.
5.
6.
7.
8.
Remove the SPEAKER-GRILLES by pulling forward.
Remove screws (a) to remove the COVER-FRONT.
Remove screws (b) to remove the GRILLE-BASE.
Remove screws (d) on the rear of the upper back cover (3 on each side and 4 across the top).
Remove the 4 screws (c) holding the bottom of the Screen Assembly.
Unplug connector LN from the Control Panel.
Lift the Screen Assembly up slightly then pull towards the front to remove the assembly
To disconnect the Card Reader and the Front Inputs:
• Unplug the Card Reader USB connector from the PCB-DM.
• Unplug the Front 1394 cable from the HDD Module (Hard Drive).
• Unplug the CC connector from the Front Inputs.
Page 6
MODELS: WD-52525 / WD-52725 / WD-52825 / WD-62525 / WD-62725 / WD-62825
CABINET BACK REMOVAL
FILTER-COVER Removal
Remove 2 screws (d) to remove the Filter Cover.
COVER-BACK Removal
1)
2)
3)
4)
Remove 9 screws (a)
Remove 5 screws (b)
Remove 2 screws (c)
Pull the COVER-BACK
from the cabinet.
Inner Cover Removal
1) Remove 6 screws (a)
2 Remove 10 screws (b)
3) Pull the Inner Cover from
the cabinet.
(b)
(a)
(a)
(b)
(b)
Page 7
MODELS: WD-52525 / WD-52725 / WD-52825 / WD-62525 / WD-62725 / WD-62825
Chassis Removal
1) Remove the 4 black screws (a) securing the chassis shown in the two diagrams below.
2) Unplug the USB and 1394 connectors from the Card Reader.
NOTE: In the V26++ chassis, the Card Reader 1394 connector plugs into the Hard Drive Module.
3) Disconnect all cables to the front of the cabinet, the Optical Engine and the Lamp Ballast (See Page 9).
4) Carefully slide the chassis from the cabinet.
5) IMPORTANT: After Electrical Chassis replacement, perform the Data Copy Procedure described on page 12.
Page 8
MODELS: WD-52525 / WD-52725 / WD-52825 / WD-62525 / WD-62725 / WD-62825
NOTE: To remove the chassis, the two connectors to the Lamp Ballast must be
disconnected at the Lamp Ballast.
Accessing & Disconnecting The Lamp Ballast
Removing the Right Support
Remove the 3 screws shown below.
3 Screws
Unplug CN1 & CN2
Connectors
Unplug
Connectors
Removing the Lamp Ballast Shield
(4 screws)
4 Screws
Page 9
MODELS: WD-52525 / WD-52725 / WD-52825 / WD-62525 / WD-62725 / WD-62825
Removing the Optical Engine
1)
2)
3)
4)
Remove the Cover-Back and Rear Metal Cover (refer to Cabinet Back Removal).
Disconnect all connectors from the Optical Engine, Lamp Cartridge Housing and the PCB-DMD.
From the rear of the TV, remove the 4 screws (c), to remove the COVER-DUCT and DMD Fan cover.
From the rear of the TV, remove the 4 brass colored screws (a), shown below, securing the bottom plate to
the Adjuster assembly.
5) Slide the Optical Engine/Lamp Cartridge Housing towards the rear to remove the unit from the TV.
(a)
Optical Engine (Rear View / Airduct & DMD Fan Cover Removed)
Page 10
MODELS: WD-52525 / WD-52725 / WD-52825 / WD-62525 / WD-62725 / WD-62825
Removing the following parts from the Optical Engine
•
•
DMD Heat Sensor
The Optical Engine bottom plate and black bracket
DMD Thermal (Heat) Sensor Removal (Figure 1)
1) Remove screw (a) on the top of the DMD Fan.
2) Set the Thermal Sensor aside to install on the replacement Optical Engine.
(a)
Heat Sensor
Figure 1: DMD Thermal Sensor
Bottom Plate & Black Bracket Removal
1) Remove the 4 screws (B) from the Bottom Plate (Figure 2)
2) Remove the two screws (c), holding the Black Bracket to the Lamp Box. (Figure 3)
Bottom Plate
(B)
Bottom View
Figure 2: Bottom Plate
Page 11
MODELS: WD-52525 / WD-52725 / WD-52825 / WD-62525 / WD-62725 / WD-62825
Black Bracket
(C)
Front View
Figure 3: Black Support Bracket
Installing the Optical Engine
1) Install the Bottom Plate, Black Support Bracket and the Heat Sensor, removed from the original Optical
Engine, on the replacement Engine.
2) Reverse the removal procedure to install the replacement Optical Engine in the cabinet.
3) The following adjustments may have to be performed after the installation. (See Service Manual)
• Horizontal and Vertical Electrical Centering Adjustment.
• Optical Unit Rotation Adjustment
• Optical Unit Keystone Distortion Adjustments.
4) IMPORTANT: After Optical Engine replacement, perform the Data Copy Procedure described on below.
Data Copy Procedure
This procedure must be performed after replacing either the Electrical Chassis or Optical Engine.
1) To display the data copy menu press <TV MENU> <2-4-5-7> <0>
2) Use the cursor keys to yellow highlight “Copy Light Engine EEPROM to DM”
3) Press <ENTer>
4) After the copy procedure has been completed, exit the menu by pressing <HOME>
Copy Light Engine EEPROM to DM
Restore backup
UPLOAD TERMINAL BOARD DATA
Figure 4: Data Copy Menu
Page 12
MODELS: WD-52525 / WD-52725 / WD-52825 / WD-62525 / WD-62725 / WD-62825
Hard Disk Drive (HDD) Replacement (V26++ Models)
Perform this procedure if the HDD (PVR feature) is replaced, or if the HDD is transferred when the Electrical
Chassis.replaced.
1) Prior to replacement, perform the following procedure:
a.
Disconnect any external 1394 devices.
b.
With the remote, press <DEVICE MENU><2-4-7-0>
c.
Select “TV Disc: OK. Press ENTER to replace” and press ENTER.
d.
After receiving the confirmation “TV Disc: Press ENTER again to replace” press ENTER again.
2) Slide out the Electrical Chassis by performing steps 1, 2 and 4 of the Chassis Removal Procedure on page 5.
3) Remove the Left Side Support by removing the (7) screws shown below.
3) Disconnect the wiring harnesses and remove the (3) screws shown below. Then remove the HDD
Page 13
MODELS: WD-52525 / WD-52725 / WD-52825 / WD-62525 / WD-62725 / WD-62825
Troubleshooting the V26 Chassis
The V26 Chassis uses Digital Light Processing™ technology. Troubleshooting this chassis only requires the service
technician to make a determination of failure down to the following components:
• Lamp Cartridge
Note: The Lamp Cartridge is customer replaceable. Warranty claims for labor will not be accepted.
• Lamp Ballast (Lamp Power Supply)
• Optical Engine (Includes the Optics, DMD™ PCB, Lamp Cartridge Housing, Lamp Thermal Sensor, Lamp Fan
and DMD Fan)
• Hard Disk Drive (V26++ Models use this for the Personal Video Recorder feature)
• Electrical Chassis (Includes all other electronics other than peripheral components.)
• PWB’s: POWER, SIGNAL, FORMATTER, DM, TERMINAL-1, TERMINAL-2
• Peripheral Components - Includes 5 Fans (Chassis, DMD, Exhaust, Lamp and Lamp Ballast), Memory Card
Reader, IR Receiver, L & R Speaker PCBs, Control PCB, Front PCB, Lamp Cover Detect Switch, Filter Cover
Detect Switch, DMD Thermal Sensor.)
Adjustments:
The nature of DLP™ technology eliminates the need for routine service adjustments. For instance, Focus is preset
and should never require touch up. If a focus symptom does exist, look for causes other than adjustment such as
physical damage or a dirty lens, screen or mirror. When replacing the Optical Engine, the adjust procedures provided
in the Service Manual may be used for precise geometry adjustments.
Troubleshooting Steps:
1. If the Power LED is continuously flashing or if other TV controls seem locked, perform a System Reset by
pressing the front panel button or by removing and re-applying AC power.
2. If the sets Status, Lamp or Power LEDs are abnormal, use the chart on the following page to determine the
abnormal condition. Perform the Error Code Operational Check to further determine if a problem is with a
peripheral component.
3 If the problem is not the Lamp Ballast or Peripheral Component, always suspect the Electrical Chassis first.
4. Other Problems:
• For picture and/or audio complaints that may be related an improper customer setting or adjustment, use
the A/V Memory Reset feature to restore factory default settings. Press <TV MENU> select “Audio Video”
and the Device Input to be reset. Then press <ENTer>.
• For other feature complaints, reset all user controlled functions by pressing <TV MENU><1-2-3>. Then at
the Reset System Defaults screen, press <ENTer>. Note: All customer settings, including NetCommand
will be reset.
• If the cable company is requesting information to enable CableCARD™ service, press <TV MENU> <9-9-9>
to display the host and CableCARD identification. (CableCARD must be installed)
• To place the remote in the NetCommand™ mode, hold the <POWER> button & press <9-3-5>.
• To place the remote back into the standard mode, hold the <POWER> button & press <0-0-0>.
Digital Light Processing™, DLP™, Digital Micromirror Device™ and DMD™ are trademarks of Texas Instruments.
CableCARD™ is a trademark of Cable Television Laboratories, Inc.
Page 14
MODELS: WD-52525 / WD-52725 / WD-52825 / WD-62525 / WD-62725 / WD-62825
I. Front Panel LED Designations (Abnormal Conditions)
Abnorm a l Conditions
Continuous B link ing over 1 m inute (P erform
S ys tem Res et before replac ing Chas s is )
Tem perature Hot (Chec k A ir Filter)
Lam p us age over 4000 hours
P OW ER
Green
(B link ing)
Off
-
LEDs
S TATUS
Y ellow
Off
Lam p Cover is open
Off
Off
Lam p Failed to turn On (Turn s et off for 2
m inutes and try again before replac ing Lam p)
S ee Lam p Troubles hooting P roc edure
Off
Off
Filter Cover is open
Off
Chass is Fan stopped
Off
B allas t or E xhaus t Fan s topped
Off
DM D or Lam p Fan s topped
Off
Circ uit Failure (s hort problem ) or DV I Cable
(between Chas sis and E ngine) dis c onnec ted
Off
Y ellow
(blink ing)
Red B link
1 Long - 1
S hort
Red B link
1 Long - 2
S hort
Red B link
1 Long - 3
S hort
Red
LAM P
Off
Y ellow
Y ellow
(blink ing)
Red
Off
Off
Off
Off
Off
S ys tem Res et by front panel button or by rem oving and re-apply ing A C P ower.
II. Error Code Operational Check
Note: The TV must be in “Shut Down” and not manually switched Off, to perform the Error Code Operational
Check. When the TV is switched Off, the code automatically resets to “12” No Error.
Press the front panel “DEVICE” and “MENU” buttons at the same time, and hold for 5 seconds to
activate the Error Code Operational Check. The LED will then flash denoting a two digit Code.
Note: The front panel buttons must be used, NOT those on the Remote Control.
• The number of flashes indicates the value of the MSD (tens digit) of the Error Code.
• The flashing then pauses for approximately 1/2 second.
• The LED then flashes indicating the value of the LSD (ones digit) of the Error Code.
Example: If the Error Code is “32”, the LED will flash three times, pause, and then flash two times.
• The Error Code is repeated a total of 5 times.
ERROR CODES
Press and Hold "DEVICE" and "MENU" FOR 5 SECONDS
Error Code Proba ble Ca use
12
No error detected
22
Recovery from momentary Reset
32
Lamp Cover open
33
Air Filter Cover open
34
Lamp abnormality (See Lamp Troubleshooting)
35
Chassis Fan failure
36
Exhaust (Back Cover) or Lamp Ballast Fan failure
37
Engine (DMD or Lamp) Fan failure
38
Excess Lamp Temperature
39
Excess DMD Temperature
41
Short Detected
44
DVI Cable (between Chassis and Engine) disconnected
Page 15
MODELS: WD-52525 / WD-52725 / WD-52825 / WD-62525 / WD-62725 / WD-62825
Note: To operate the set with the back cover removed, the Filter Cover must be installed and the
Exhaust Fan must be connected.
III. Lamp Troubleshooting Procedure
If a Lamp Abnormality is indicated and a replacement Lamp Cartridge does not correct the problem, the problem can
be due to either the Lamp Ballast or the Electrical Chassis.
• Connect a DVM across pins 1 and 3 of connector CN2 on the Lamp Ballast (See Page 9).
• When the set is first powered On, check for 340 VDC.
• If voltage is good, suspect the Lamp Ballast
• If the voltage is bad, suspect the POWER PWB in the Electrical Chassis.
IV. Power PWB Troubleshooting
To access the Power PWB in the Electrical Chassis:
1. Slide out the Electrical Chassis by performing steps 1, 2 and 4 of the Chassis Removal Procedure on Page 8.
2. Remove the screws indicated below and remove the Power PWB Shield.
Page 16
MODELS: WD-52525 / WD-52725 / WD-52825 / WD-62525 / WD-62725 / WD-62825
Use the chart and diagram below to check for abnormal voltages.
If all voltages are missing, check the AC line fuse, F9D00, 10A, 125V.
Other abnormal voltages indicate a failure of the Power PCB.
Bootup/ Power
Approximate
Standby
On
Test Point
DC Voltage
Mode Mode
TP6VS
7
Yes
Yes
TP12VS
12
Yes
Yes
TP+15V
+15 ~ +20
Yes
Yes
TP-15V
-15 ~ -20
Yes
Yes
TP30VS
30
Yes
Yes
TP3.3V
3.3
No
Yes
TP5V
5
No
Yes
TP10V
10
No
Yes
TP12V
12
No
Yes
TP6VS
TP12VS
TP30VS
TP+15V
TP-15V
TP12V
TP5V
TP3.3V
TP10V
F9D00
Page 17
MODELS: WD-52525 / WD-52725 / WD-52825 / WD-62525 / WD-62725 / WD-62825
V. PWB Level Troubleshooting
Use the Symptom/Cause information below to aid troubleshooting to the PCB level. While this method will not be
100% accurate, checking all items listed in the Symptom column will increase the probability of a successful
diagnosis. Symptoms can also be caused by poor or mis-seated connections beween the related PWB’s.
Symptom
Video Problems. All signals bad
except PC Input is OK
Video Problems, all Inputs & Menu
bad. Audio OK
Analog Tuning problems. External
Inputs & Digital OK
Analog Tuning & External Inputs
Problems. Digital OK
Most Likely
PWB-DM
PWB-FMT
PWB-SIGNAL
PWB-TERMINAL-2
PWB-FMT
Digital Tuning problems. Analog OK PWB-SIGNAL
Analog & Digital Tuning Problems.
External Inputs OK
External Input Problems. Tuning
OK
No Sync
Digital noise, lines or artifacts in
picture
Card Reader Problems
1394 Problems
Audio Problems. Speakers, Monitor
A/V 1 & Audio 2 Bad
Audio Problems. Speakers, Monitor
A/V 1 Bad. Audio 2 Good
Audio Problems. Speakers Bad.
Monitor A/V 1 & Audio 2 Good
Power LED blinking constantly.
Won't power on.
Control problems
Control problems (Front Panel)
Other Possibility
PWB-Terminal-1 or 2
PWB-FMT
PWB-DM
PWB-SIGNAL
PWB-TERMINAL-1
PWB-TERMINAL-2
PWB-FMT
PWB-FMT
Optical Engine
Memory Card Reader
PWB-DM
PWB-DM
PWB-SIGNAL
PWB-DM
PWB-SIGNAL
PWB-SIGNAL
PWB-SPEAKER<L><R>
PWB-DM
PWB-DM
PWB-DM
PWB-Control
Control problems (Remote)
Remote or PWB-Preamp
IR Output problems, both jacks
No Power. Status LED Red. Error
Code 41
PWB-TERMINAL-2
PWB-POWER
Page 18
PWB-Preamp connectors
reversed.
PWB-DM
DVI connection between
Chassis & Engine
MODELS: WD-52525 / WD-52725 / WD-52825 / WD-62525 / WD-62725 / WD-62825
V26 Chassis - Parts Quick Reference
Part Name
Lamp Cartridge
Dust Filter
Remote Control
Part Name
Optical Engine
Electrical Chassis (Complete)
Lamp Ballast PCB
Memory Card PCB
Preamp PCB
Front PCB
Control PCB
Right Speaker PCB
Left Speaker PCB
Hard Disk Drive
Lamp Ballast Fan
Lamp Fan
DMD Fan
Chassis Fan
Exhaust Fan
Lamp Cover Detect Switch
Filter Cover Detect Switch
DMD Thermal Sensor
Lamp Thermal Sensor
Bold Type = Safety Critical
Description
LAMP - CARTRIDGE
FILTER - DUST
REMOTE
Service Parts
WD-52525
WD-62525
939P977010 939P977020
955B298001 955B298001
939P978010 939P978010
MEMORY-CARD-READER-PWB 299P271010
299P271010
ASSY-PWB-PREAMP
935D774001 935D774001
ASSY-PWB-FRONT
935D775001 935D775001
ASSY-PWB-CONTROL
935D776001 935D776001
ASSY-PWB-SPEAKER-R 935D806001 935D806001
ASSY-PWB-SPEAKER-L
935D807001 935D807001
ASSY-HDD-UNIT
FAN-BALLAST
299P278020 299P278020
299P282010 299P282010
FAN-LAMP
FAN-DMD
299P283010 299P283010
299P103050 299P103050
FAN-COOLING
FAN-COOLING
299P103050 299P103050
SW-MICRO
436P021010 436P021010
SW-MICRO
436P021010 436P021010
SENSOR – THERMAL
299P280010 299P280010
299P285010 299P285010
SENSOR-THERMAL (LAMP)
Description
OPTICAL-ENGINE
ASSY-CHASSIS
UNIT-POWER-LAMP
Part Name
DiamondShield
Lenticular Screen
Fresnel Lens
DIAMOND - SHIELD
LENS - LENTICULAR
LENS - FRESNEL
PWB Name
Description
Power
Signal
Format
DM
Terminal-1
Terminal-2
Customer Replaceable Parts
WD-52525
WD-62525
WD-52725
915P020010 915P020010 915P020010
620D144010 620D144010 620D144010
290P123010 290P123010 290P123020
Description
PWB-POWER
PWB-SIGNAL
PWB-FMT
PWB-DM
PWB-TERMINAL 1
PWG-TERMINAL-2
Screen Parts
WD-52525
WD-62525
WD-62725
915P020010
620D144010
290P123020
WD-52825
915P020010
620D144010
290P123020
WD-62825
915P020010
620D144010
290P123020
WD-52725
939P977010
955B298002
939P978010
299P271010
935D774001
935D775001
935D776001
935D806001
935D807001
299P278020
299P282010
299P283010
299P103050
299P103050
436P021010
436P021010
299P280010
299P285010
WD-62725
939P977020
955B298002
939P978010
299P271010
935D774001
935D775001
935D776001
935D806001
935D807001
299P278020
299P282010
299P283010
299P103050
299P103050
436P021010
436P021010
299P280010
299P285010
WD-52825
939P977010
955B298003
939P978010
299P271010
935D774001
935D779001
935D776001
935D806001
935D807001
939P989010
299P278020
299P282010
299P283010
299P103050
299P103050
436P021010
436P021010
299P280010
299P285010
WD-62825
939P977020
955B298003
939P978010
299P271010
935D774001
935D779001
935D776001
935D806001
935D807001
939P989010
299P278020
299P282010
299P283010
299P103050
299P103050
436P021010
436P021010
299P280010
299P285010
WD-52725
WD-62725
WD-52825
WD-62825
KIT-WD52525 DS KIT-WD62525 DS KIT-WD52725 DS KIT-WD62725 DS KIT-WD52825 DS KIT-WD62825 DS
491P178020
491P177020
491P174020
491P173020
491P178020
491P177020
491P176020
491P175020
491P178020
491P177020
491P176020
491P175020
Chassis PWBs
WD-52525
WD-62525
930B921002 930B921002
930B923002 930B923002
930B924002 930B924002
934C116002 934C116002
934C117001 934C117001
934C118001 934C118001
WD-52725
930B921002
930B923001
930B924003
934C116003
934C117001
934C118001
WD-62725
930B921002
930B923001
930B924003
934C116003
934C117001
934C118001
WD-52825
930B921001
930B923003
930B924001
934C116001
934C117002
934C118001
WD-62825
930B921001
930B923003
930B924001
934C116001
934C117002
934C118001
Page 19