1
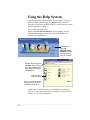
H
............
...................................................................................................
HP OfficeJet Series 700
User’s Guide
.........................................................................................................................................................
© Copyright Hewlett-Packard Company 1998
All rights are reserved. No part of the document may be
photocopied, reproduced, or translated to another
language without the prior written consent of HewlettPackard Company.
Safety Information
Always follow basic safety
precautions when using this product to
reduce risk of injury from fire or
electric shock.
1. Read and understand all instructions in the Setup
Guide.
Microsoft®, Windows®, and Windows NT® are U.S.
WARNING:
Potential Shock Hazard
registered trademarks of Microsoft Corporation.
2. Use only a grounded electrical outlet when
OmniPage® Limited Edition is a U.S. registered
connecting the HP OfficeJet to a power source. If
trademark of Caere Corporation.
you don’t know whether the outlet is grounded,
check with a qualified electrician.
Publication number: C6661-90001
3.
Telephone lines can develop hazardous voltages. To
First Edition, October 1998
avoid electrical shock, do not touch the contacts on
Printed in Singapore
the end of the cord, or any of the sockets on the HP
OfficeJet. Replace damaged cords immediately.
Notice
4.
Never install telephone wiring during a lightning
The information contained in this document is subject to
storm.
change without notice.
5. Observe all warnings and instructions marked on the
product.
Hewlett-Packard shall not be liable for errors contained
herein or for consequential damages in connection with 6. Unplug this product from wall outlets and telephone
the furnishing, performance, or use of this material.
jacks before cleaning.
7. Do not install or use this product near water or when
Governmental regulations regarding communication can
you are wet.
be found in the More Information guide.
8. Install the product securely on a stable surface.
9. Install the product in a protected location where no
one can step on or trip over the line cord, and where
the line cord will not be damaged.
10. If the product does not operate normally, see
Troubleshooting.
11. No operator-serviceable parts inside. Refer servicing
to qualified service personnel.
.......................................................................................................................................................
Table of Contents
1
Using Your HP OfficeJet . . . . . . . . . . . . . . . . . . .1-1
2
Using the HP OfficeJet Manager . . . . . . . . . . . . . . . . . . . . . . 1-1
Loading the Paper Supply . . . . . . . . . . . . . . . . . . . . . . . . . . . . 1-2
Using a scan/copy sleeve to protect your original . . . . . . 1-2
Loading plain and special papers . . . . . . . . . . . . . . . . . . . 1-3
Loading letterhead paper . . . . . . . . . . . . . . . . . . . . . . 1-3
Loading a single envelope . . . . . . . . . . . . . . . . . . . . . 1-4
Loading multiple envelopes . . . . . . . . . . . . . . . . . . . . 1-4
Loading transparencies . . . . . . . . . . . . . . . . . . . . . . . 1-4
Faxing . . . . . . . . . . . . . . . . . . . . . . . . . . . . . . . . . . . . . . . . . . . 1-5
Faxing paper documents . . . . . . . . . . . . . . . . . . . . . . . . . . 1-5
Faxing from the keypad . . . . . . . . . . . . . . . . . . . . . . . 1-5
Faxing from the HP OfficeJet Manager . . . . . . . . . . . 1-6
Faxing from your software application . . . . . . . . . . . . . . 1-7
Speed dialing . . . . . . . . . . . . . . . . . . . . . . . . . . . . . . . . . . 1-7
Receiving faxes . . . . . . . . . . . . . . . . . . . . . . . . . . . . . . . . 1-7
Choosing automatic versus manual fax receiving . . . 1-8
Manually receiving faxes . . . . . . . . . . . . . . . . . . . . . . . . . 1-9
Receiving faxes to your PC . . . . . . . . . . . . . . . . . . . . . . 1-10
Copying . . . . . . . . . . . . . . . . . . . . . . . . . . . . . . . . . . . . . . . . . 1-11
Copying from the keypad . . . . . . . . . . . . . . . . . . . . . . . . 1-11
Copying from the HP OfficeJet Manager . . . . . . . . . . . . 1-12
Scanning . . . . . . . . . . . . . . . . . . . . . . . . . . . . . . . . . . . . . . . . 1-13
Scanning images . . . . . . . . . . . . . . . . . . . . . . . . . . . . . . . 1-13
Using the image viewer . . . . . . . . . . . . . . . . . . . . . . . . . 1-14
Selecting the area you want to edit . . . . . . . . . . . . . 1-14
Editing images with the image viewer . . . . . . . . . . . 1-14
Scanning text for editing (OCR) . . . . . . . . . . . . . . . . . . 1-15
Scanning to Email . . . . . . . . . . . . . . . . . . . . . . . . . . . . . . . . . 1-16
Printing . . . . . . . . . . . . . . . . . . . . . . . . . . . . . . . . . . . . . . . . . 1-17
Printing a document . . . . . . . . . . . . . . . . . . . . . . . . . . . . 1-17
Changing the Print Settings . . . . . . . . . . . . . . . . . . . . . . 1-17
Using the photo cartridge . . . . . . . . . . . . . . . . . . . . . . . . 1-19
Using the Help System . . . . . . . . . . . . . . . . . . . . . . . . . . . . . 1-20
Stand-Alone Use . . . . . . . . . . . . . . . . . . . . . . . . . .2-1
Faxing and Copying . . . . . . . . . . . . . . . . . . . . . . . . . . . . . . . .
Speed dialing . . . . . . . . . . . . . . . . . . . . . . . . . . . . . . . . . .
Using The Menu System . . . . . . . . . . . . . . . . . . . . . . . . . . . . .
Navigating the menus . . . . . . . . . . . . . . . . . . . . . . . . . . . .
Menu outline . . . . . . . . . . . . . . . . . . . . . . . . . . . . . . . . . . .
2-1
2-1
2-2
2-2
2-3
.............................................................................................................................
i
Adjusting Settings . . . . . . . . . . . . . . . . . . . . . . . . . . . . . . . . . .
Copy Setup . . . . . . . . . . . . . . . . . . . . . . . . . . . . . . . . . . . .
Copy Resolution . . . . . . . . . . . . . . . . . . . . . . . . . . . .
Reduce to Fit . . . . . . . . . . . . . . . . . . . . . . . . . . . . . . .
Fax Resolution . . . . . . . . . . . . . . . . . . . . . . . . . . . . . . . . .
Contrast . . . . . . . . . . . . . . . . . . . . . . . . . . . . . . . . . . . . . .
Print Report . . . . . . . . . . . . . . . . . . . . . . . . . . . . . . . . . . .
Basic Fax Setup . . . . . . . . . . . . . . . . . . . . . . . . . . . . . . . .
Advanced Fax Setup . . . . . . . . . . . . . . . . . . . . . . . . . . . . .
Automatic Reports . . . . . . . . . . . . . . . . . . . . . . . . . . .
Busy Redial . . . . . . . . . . . . . . . . . . . . . . . . . . . . . . . .
No Answer Redial . . . . . . . . . . . . . . . . . . . . . . . . . . .
Answer Ring Pattern . . . . . . . . . . . . . . . . . . . . . . . . .
Error Correction Mode . . . . . . . . . . . . . . . . . . . . . . . .
Ring and Beep Volume . . . . . . . . . . . . . . . . . . . . . . .
Automatic Reduction . . . . . . . . . . . . . . . . . . . . . . . . .
Silent Detect . . . . . . . . . . . . . . . . . . . . . . . . . . . . . . . .
Country and Language . . . . . . . . . . . . . . . . . . . . . . . .
Speed Dial Setup . . . . . . . . . . . . . . . . . . . . . . . . . . . . . . .
Individual Speed Dial . . . . . . . . . . . . . . . . . . . . . . . .
Group Speed Dial . . . . . . . . . . . . . . . . . . . . . . . . . . . .
Delete Speed Dial . . . . . . . . . . . . . . . . . . . . . . . . . . .
Maintenance . . . . . . . . . . . . . . . . . . . . . . . . . . . . . . . . . . .
Print Faxes in Memory . . . . . . . . . . . . . . . . . . . . . . .
Clean Print Cartridge . . . . . . . . . . . . . . . . . . . . . . . . .
3
2-3
2-3
2-3
2-3
2-3
2-4
2-4
2-4
2-4
2-4
2-5
2-5
2-5
2-5
2-6
2-6
2-6
2-6
2-7
2-7
2-7
2-8
2-8
2-8
2-8
Maintenance and Troubleshooting . . . . . . . . . . .3-1
Maintenance . . . . . . . . . . . . . . . . . . . . . . . . . . . . . . . . . . . . . .
Maintenance tasks (PC-connected) . . . . . . . . . . . . . . . . .
Cleaning the HP OfficeJet . . . . . . . . . . . . . . . . . . . . . . . .
Cleaning the exterior . . . . . . . . . . . . . . . . . . . . . . . . .
Cleaning the scanner glass . . . . . . . . . . . . . . . . . . . . .
Cleaning the print cartridges and surrounding areas .
Cleaning the paper rollers . . . . . . . . . . . . . . . . . . . . .
Uninstalling the software . . . . . . . . . . . . . . . . . . . . . . . . .
Troubleshooting . . . . . . . . . . . . . . . . . . . . . . . . . . . . . . . . . . .
Common problems . . . . . . . . . . . . . . . . . . . . . . . . . . . . . .
Error messages . . . . . . . . . . . . . . . . . . . . . . . . . . . . . . . . .
3-1
3-1
3-2
3-2
3-2
3-2
3-4
3-5
3-6
3-7
3-8
.........................................................................................................................................
ii
............................................................................................................
This chapter explains how to use your HP OfficeJet and
how to find help using the online Help system.
Using the HP OfficeJet
Manager
The HP OfficeJet Manager controls what happens to your document.
Double-click the HP OfficeJet Manager icon on your Windows®
desktop. If the HP OfficeJet Manager does not appear, minimize open
applications. Use the overview below to explore the many features
available through the HP OfficeJet Manager.
Click Fax to fax in black and
white or color, to change fax
resolution, or make a cover
sheet. See page 1-6.
Click Scan to scan an
image (page 1-13) or to
scan text to edit using
OCR (page 1-15).
Click Help for online
help, trouble-shooting, or
to see information about
your HP OfficeJet.
Click Settings to change
fax, print, and scan to
email settings, or to see
the phone book, fax log,
or maintenance tasks.
Click Copy to copy in black
and white or color or to
change copy settings or
adjustments. See page 1-12.
Click Email to scan
directly into email.
See page 1-16.
Click My Images to open
the default folder for your
scanned images.
.........................................................................................................................................
One
1
Using Your HP
OfficeJet
Loading the Paper Supply
The HP OfficeJet prints on a variety of papers. (See “Paper Types and
Sizes” in the More Information guide.) For best results, adjust the
paper settings each time you change paper types. To adjust paper
settings, see “Printing” on page 1-17.
Using a scan/copy sleeve to protect your
original
Several scan/copy sleeves are provided to protect fragile or damaged
originals during faxing, copying, or scanning. The sleeves have a
transparent plastic front and white paper back.
Place your originals inside a scan/copy sleeve when they are:
Smaller than standard letter size (8.5 x 11 inches). Nonstandard
pages could jam.
l
Torn. Rough edges may cause a paper jam.
l
Precious or fragile, for example, a photograph or legal document.
l
Very thin paper. Less than 20-lb weight paper could jam.
Place the scan/copy sleeve into the document tray with the sealed
edge down and the transparent side away from you.
l
Caution: To avoid damaging the HP OfficeJet, do not use scan/copy
sleeves to protect anything thicker than a photograph.
.........................................................................................................................................
1-2
Loading plain and special papers
snaps into the upright position.
Paper
extension
2 Pull up the Paper Extension at the back of the HP
OfficeJet to support the paper.
3 Load about a 1/2-inch stack of paper, print side
Stack
guides
forward, into the Paper Tray. Fit the paper behind
the Stack Guides as shown.
Tips:
When loading specialty paper like photo paper, letterhead, or a card, pull out the entire stack of regular paper, place the specialty paper on top, then
return the entire stack to the Paper Tray.
After loading paper in the Paper Tray, tap the top
edge of the stack to settle it into the tray.
l
l
4 Push the Document Tray back to its normal
position, resting in front of the Paper Tray.
5 Extend the Output Tray slowly until it stops.
Output Tray
Loading letterhead paper
l
Load letterhead paper with the letterhead edge
down and facing you.
.........................................................................................................................................
1-3
One
1 Pull the Document Tray forward all the way until it
Loading a single envelope
l
l
To print a single envelope, use the SingleEnvelope Slot so you don’t have to remove the
paper from the Paper Tray.
Load a single envelope as shown, address side
facing you and stamp edge down.
Loading multiple envelopes
l
l
Pull the Document Tray forward and remove any
paper from the Paper Tray.
Pinch and slide the right Paper Guide to the
envelope position inscribed on the Paper Tray.
l
Load up to ten envelopes with the address side
facing you and the stamp edge down. Align the
right edge of the stack with the right Paper
Guide.
l
Pinch and slide the left Paper Guide until it just
touches the left edge of the envelope stack.
Push the Document Tray back until it rests
against the Paper Tray.
l
Loading transparencies
l
Load transparencies (up to 50) with the adhesivestrip down and facing away from you, and the
rough side toward you. The arrows on the adhesive strip will be on the side of the transparency
away from you.
.........................................................................................................................................
1-4
Faxing
Note: You can fax in color through the HP OfficeJet Manager if the
fax recipient also has color fax capability.
Faxing paper documents
You can fax paper documents using either the keypad on the HP
OfficeJet or the HP OfficeJet Manager on your PC. Use the keypad
for black and white faxing; use the HP OfficeJet Manager for color
faxing or for additional options like attaching a cover sheet.
Faxing from the keypad
1
Load your document (up to 20 pages) in the
document tray top down with the printed side
facing away from you. If necessary, adjust the
document guides on the tray for the width of your
document.
Note: Always remove staples and paper clips from
your original before faxing.
2
Dial the fax number on the keypad, or press the
Speed Dial button and enter a speed dial code.
Note: Enter all the numbers you would if you were
dialing the number from a phone. For example,
enter 1 and the area code for long-distance calls.
3
Press the Start button to begin faxing.
To cancel a fax in progress, press the Stop button
on the HP OfficeJet keypad.
.........................................................................................................................................
1-5
One
With the HP OfficeJet, you can fax paper documents or you can send
faxes directly from your PC.
Faxing from the HP OfficeJet Manager
1 Load your document (up to 20 pages) in the document tray top
down with the printed side away from you.
The HP OfficeJet
Manager asks what
you want to do.
If you don’t see the
HP OfficeJet Manager
on your PC screen,
minimize open
applications.
2 Click Fax and explore the additional options in the Send Fax
dialog box, such as attaching a cover sheet.
The Send Fax dialog
box has additional
faxing features.
Check this box to
send color faxes.
To find out more
about fax settings,
click Help.
3 Enter the fax number and any other necessary information, then
click Send Fax Now to begin faxing.
Notes:
l
l
Sending black and white text in color is not recommended.
If you send a color fax to a recipient without color fax capability,
you’ll receive an error message and the recipient may also. Then
the HP OfficeJet will redial and send your fax in black and white.
.........................................................................................................................................
1-6
Faxing from your software application
displayed on your PC screen, select Print from the File menu.
2 Select HP OfficeJet Series 700 Fax as the printer and click OK.
Note: Make this selection from wherever your software applica-
tion stores the printer list. For example, in Microsoft® Word you
can find the printer list in the Print dialog box.
3 Print the document. The Send Fax dialog box appears.
4 Enter the fax number or select an entry in your phone book. Enter
any other necessary information, then click Send Fax Now to
begin faxing.
Speed dialing
For help assigning speed dial codes, click Help on the HP OfficeJet
Manager, and select Faxing. Then click Managing frequently used
numbers with the Phone Book. Stand-alone fax/copier users should
refer to “Speed Dial Setup” on page 2-7.
Note: PC-connected users should always assign speed dial codes
through the software.
Note for Austrian users: In Austrian PBX systems (where you dial a
number to get an outside line) you must enter the character w between
the outside access number and the public phone number. To enter a w
from software, type a w into your number. To enter a w from the
keypad, refer to the box at the bottom of page 2-7.
Receiving faxes
Depending on how you set up your HP OfficeJet, you will either
receive faxes automatically or you will need to receive faxes
manually. If you have been receiving faxes successfully and have not
changed your office equipment, don’t make any changes now. If you
do decide to change a setting, do it temporarily (for one fax only),
then change it back.
If you change your office equipment setup, be sure to update your fax
receive settings or you may not receive faxes properly. Refer to “If
You Change Your Office Equipment” in the Setup Guide.
.........................................................................................................................................
1-7
One
1 With your PC software application open and your document file
Choosing automatic versus manual fax receiving
Press the Auto Answer button on the front panel to switch between
automatic and manual answering.
If the green Auto Answer light is off, your HP OfficeJet will
never answer incoming calls. You must answer fax calls manually
(see “Manually receiving faxes” on page 1-9).
l
If the green Auto Answer light is on, your HP OfficeJet will
automatically answer every call you receive at you fax number.
You can change the number of rings before the HP OfficeJet
answers the phone, either through the software or from the front
panel. Here’s how:
For PC-connected users
l
1 On your Windows desktop, double-click HP OfficeJet Manager,
and click Settings.
2 Select Fax Setup, then select Receive Settings.
Click the Answering tab.
In the Number of Rings
to Answer box, enter or
select the number of times
the fax line should ring
before it is answered.
For stand-alone users
To change the number of rings setting from the keypad, refer to “Set
the rings to answer setting” in the Setup Guide.
.........................................................................................................................................
1-8
Manually receiving faxes
Make sure there are no documents in the document tray, or they may
be faxed after the next steps.
1 When the HP OfficeJet rings, pick up the handset
of a telephone that’s on the same telephone line as
the HP OfficeJet.
2 If you hear fax tones, press Start on the HP
OfficeJet’s keypad, or, if you’re receiving from an
extension phone (one that’s on the same telephone
line as the HP OfficeJet, but not connected directly
to it), dial 123.
Press
Start
or
Dial 123 from an
extension phone
Now you can hang up the phone or stay on the line
to talk after the fax finishes.
.........................................................................................................................................
1-9
One
If you’re set up to receive faxes manually (Auto Answer light on
keypad is off), use the following procedure to receive faxes.
Receiving faxes to your PC
The HP OfficeJet is factory set to print faxes. To receive faxes to your
PC (also called PC faxes), change the Receive Faxes setting.
1 On your Windows desktop,
double-click HP OfficeJet
Manager, and click Settings.
2 Select Fax Setup, then select
Receive Settings.
3 Click the Receiving tab.
4 Select To PC, and click OK.
Notes:
Your PC must be on or your received faxes will be printed.
l
If you’re set up to receive faxes manually, follow the instructions
under “Manually receiving faxes.”
For more information about faxing, refer to the Help system: Doubleclick HP OfficeJet Manager on your Windows desktop and click
Help, then select HP OfficeJet Series 700 Help. Click Faxing, and
select from a menu of topics including:
l
l
l
l
l
l
l
Printing an incoming fax or saving it to a PC file.
Managing frequently used numbers with the Phone Book.
Managing faxes with the Fax Log. (See the Fax Log to view and
print faxes received to your PC.)
Creating and editing PC cover pages.
Checking the status of a fax.
Troubleshooting.
.........................................................................................................................................
1-10
Copying
Make sure blank paper is loaded in the paper tray. Only
letter- and legal-size paper may be used for copying.
Copying from the keypad
1 Load your document (up to 20 pages) in the document tray
with the printed side away from you. If necessary, adjust
the document guides for the width of your document.
2 Press the Copy button, then enter the number of copies you
want.
3 Press the Copy button again to begin copying.
Note: To stop copying at any time, press the Stop button.
.........................................................................................................................................
1-11
One
Use the keypad to copy in black and white only. Use the HP OfficeJet
Manager for color copying, or for more copying options.
Copying from the HP OfficeJet Manager
1 Load your document in the HP OfficeJet document tray with the
printed side away from you. The HP OfficeJet Manager will
appear on your PC screen.
Note: If you don’t see the HP OfficeJet Manager, minimize open
applications.
2 Click Copy on the HP OfficeJet Manager and explore the options
in the Copy Settings dialog box, such as collating.
Click
Adjustments
to change
brightness,
copy quality,
and to reduce
or enlarge.
Enter number
of copies.
Select color or
black & white
copy.
Turn collating
on or off.
Select the
paper type
loaded in the
paper tray.
To find out more
about a setting,
click Help.
3 When finished making your selections, click Start Copy to begin
copying.
For more information about copying, refer to the Help system:
Double-click HP OfficeJet Manager on your Windows desktop and
click Help, then select HP OfficeJet Series 700 Help. Click
Copying, and select from the menu of topics.
.........................................................................................................................................
1-12
Scanning
Scanning images
1 Load your original (up to 20 pages) in the document tray, top
down with the printed side away from you. If necessary, adjust
the document guides for the width of your original. The HP
OfficeJet Manager appears on your PC screen. If you don’t see it,
minimize open applications.
2 Click Scan on the HP OfficeJet Manager and explore the settings
in the Scan Settings dialog box. To find out more about a setting,
click Help in the lower right corner of the dialog box.
Note: Consider using a scan/copy sleeve (discussed on page 1-2)
to protect your original.
Select the appropriate
setting for your image.
Explore Optical Character
Recognition.
Discover approximate file sizes.
Read a brief description of
each scan setting.
3 Click Start Scan to begin scanning. The image appears on your
PC screen as it is scanned.
Now you can edit your image in the HP Image Viewer.
.........................................................................................................................................
1-13
One
You can scan photographs, drawings, and text in color, black and white,
or shades of gray. You can also scan to email and scan text for editing.
Using the image viewer
When you scan a document or photo, the scanned image appears in
the HP OfficeJet Image Viewer.
Use the Image Viewer
to edit, print, or save an
image, or to copy it to
another application.
Selecting the area you want to edit
Most of the tools in the Image Viewer affect the selected area of the
image. With no area selected, the entire image is affected.
l
l
To select an area, press the left mouse button and hold it as you
drag across the part of the image you want to select. Release the
mouse button and the selected area has a dashed line around it.
To deselect the area, click anywhere in the image. The dashed
line disappears, indicating that the entire image is selected.
Editing images with the image viewer
Use the Image Viewer to edit your image in the following ways:
cut
l crop
l adjust color
l
l
copy
l
resize
l
adjust brightness
l
paste
l
rotate image
l
sharpen image
For a description of each of these editing features and how to use
them, click Help in the menu bar of the Image Viewer, then click
Help Topics for a list of tools.
.........................................................................................................................................
1-14
Scanning text for editing (OCR)
Note: To scan text for editing, you must already have installed your
OCR software, such as the one provided with the HP OfficeJet. Refer
to step 8 in the Setup Guide.
To scan your document using OCR:
1 Load your original (up to 20 pages) in the document tray, top
down with the printed side away from you. The HP OfficeJet
Manager will appear on your PC screen. If you don’t see it,
minimize open applications.
2 Click Scan on the HP OfficeJet Manager and the Scan Settings
dialog box appears.
3 Click Text Only, then the Scan
text for editing (OCR) checkbox.
4 Click Start Scan.
Your document will be scanned
into the word processing program
you selected when you installed
the OmniPage® LE software.
Note: To change the selected word
processing program, double-click
HP OfficeJet Manager on your
Windows desktop, click Settings,
then select Settings and Maintenance. Click the Software tab,
and select from the File format
for OCR results menu.
Important: After scanning, proofread your document to make sure
the OCR software did not misinterpret any letters or characters.
For more information about the OmniPage LE software, refer to the
Caere documentation provided with the HP OfficeJet.
.........................................................................................................................................
1-15
One
Scan using Optical Character Recognition (OCR) when you want to
edit your original document in your word processing application.
Scanning to Email
To scan directly to email:
1 Load your original (up to 20 pages) in the document tray, top
down with the printed side away from you. If the HP OfficeJet
Manager does not appear on your PC screen, minimize open
applications.
You must set up your email application as the default MAPI
client.1 For information on MAPI setup, refer to your email user’s
manual, or look under “Email” in the HP OfficeJet Help index.
With your email application as the default MAPI client, continue
with step 2.
2 Click Email on the HP OfficeJet Manager. The image appears in
the HP OfficeJet Image Viewer on your PC screen as it is
scanned.
For information on the features of the Image
Viewer, click the Help button.
3 When ready, click Send.
Your email application will appear with the
scanned image as an attachment.
For more information about scanning, refer to the Help system:
Double-click HP OfficeJet Manager on your Windows desktop and
click Help, then select HP OfficeJet Series 700 Help. Click
Scanning, and select from a menu of topics.
1
This step is not necessary for those in the United States using
AmericaOnLine. Continue with step 2.
.........................................................................................................................................
1-16
Printing
Printing a document
You can print directly from the software application you use to create
your document.
1 From your application’s File menu, select Print.
2 Make sure the HP OfficeJet Series 700 Printer is the selected
printer. Specify which pages and number of copies to print.
3 Change any other print settings, if necessary, as discussed in the
following section.
4 Click Print or OK to begin printing.
For more information about printing, refer to the Help system:
Double-click HP OfficeJet Manager on your Windows desktop and
click Help, then select HP OfficeJet Series 700 Help. Click
Printing, and select from the menu of topics.
Changing the Print Settings
Correct print settings ensure that your printed document looks its
best. You can access print settings three ways:
From within your Windows application. Use this method to make
temporary changes to the settings.
Most applications have a Page Setup or Print Settings option from
which you can adjust print settings. If not, select Print, then look for
Properties in the Print dialog box.
.........................................................................................................................................
1-17
One
The HP OfficeJet can print on many types of paper and other media.
Refer to “Paper Types and Sizes” in the More Information guide for
supported paper types.
From the HP OfficeJet Manager. Use this method to change the
default settings, which will be applied to all print jobs until you
change the setting.
Double-click HP OfficeJet Manager on your Windows desktop. On
the HP OfficeJet Manager, click Settings, then select Print Settings.
The Print Settings dialog box appears.
Explore all four Print Settings
tabs: Setup, Features, Color,
and Services.
For information about a
setting, click Help at the
bottom of each screen.
Make your selections
and click OK.
From the front panel (stand-alone fax/copier use). To change paper
size, refer to “Set the paper size” in the Setup Guide. To change other
print settings, refer to “Adjusting Settings” in Chapter 2 of this guide.
.........................................................................................................................................
1-18
Using the photo cartridge
Final prints look better on high-quality paper. See “Paper Types
and Sizes” in the More Information guide.
l
Reserve the photo cartridge for final prints. Print rough drafts
using the black and color print cartridges, then replace the black
cartridge with the photo cartridge for your final print.
Note: The first time you purchase a photo cartridge, get the HP Photo
Color Kit. The kit includes the HP photo cartridge and a cartridge
storage container to store cartridges (black or photo) while they are
not being used.
l
When you use the photo cartridge:
l
First remove the black print cartridge (in the left cartridge
holder). Store it in the storage container (that came in the photo
color kit) when not in use.
Insert the photo cartridge into the
left cartridge holder.
l
First, slide the bottom in until
it clicks into place.
l
Then, push the top forward
until the cartridge snaps into
place.
Note: After you print your final
project, remember to replace the photo
cartridge with the black cartridge for
regular printing.
l
2
1
If you would like to order a photo
cartridge kit, refer to the More Information guide for ordering
information.
.........................................................................................................................................
1-19
One
You can use an optional photo cartridge to produce very high quality
color prints. The photo cartridge is especially good for printing
photos. When using the photo cartridge, keep in mind the following:
Using the Help System
The Help system provides information on every aspect of your HP
OfficeJet. When you need help, click Help on any HP OfficeJet
dialog box to learn more about its features, or explore the many topics
from the main menu of Help.
To access the main Help menu:
Double-click HP OfficeJet Manager on your desktop. The HP
OfficeJet Manager appears on your screen. If you do not see it,
minimize open applications.
Click Help, then
select HP
OfficeJet Series
700 Help to display
the Help system
Table of Contents.
Explore Help through the
Contents (this screen) or
through the Index (which
also contains a contains
a Find button).
Click a button to
explore a topic.
Click on underlined words
and phrases to see more
information about them.
?-Help is also available in almost every HP OfficeJet dialog box.
Click the ? in the upper right corner of a dialog box. Then click any
setting to see a brief description of it.
.........................................................................................................................................
1-20
2
Stand-Alone Use
..............................................................................................................
Faxing and Copying
Note: As a stand-alone fax/copier, the HP OfficeJet faxes and
copies only in black and white.
As a stand-alone tool, the HP OfficeJet provides fax and copy
capability. To fax, refer to “Faxing from the keypad” on page 1-5. To
receive faxes, refer to “Receiving faxes” on page 1-7 and “Manually
receiving faxes” on page 1-9. To copy, refer to “Copying from the
keypad” on page 1-11.
Speed dialing
Once you’ve assigned speed dial codes to your fax numbers (refer to
“Speed Dial Setup” on page 2-7), you can quickly dial using the
Speed Dial button and a speed dial code. To speed dial:
1 Load your document in the document tray.
2 Press the Speed Dial button on the HP OfficeJet keypad.
3 Dial the 1- or 2-digit speed dial code.
4 Press Start on the HP OfficeJet keypad.
.........................................................................................................................................
Two
This chapter explains how to use your HP OfficeJet as a
stand-alone fax/copier.
Using The Menu System
The HP OfficeJet uses a menu system enabling you to customize
settings to control how your copies and faxes look.
Navigating the menus
With a little practice, using the menus is simple. Just remember these
basic principles:
Stop
l
l
Menu
l
l
The following instructions all start from the time and date screen.
To get to the time and date screen from anywhere in the menu
system, simply press Stop.
Press Menu to enter the menu. Once in the menu, the top-level
choices alternately appear. Select a choice by entering its number
on the keypad or pressing Start while the choice is displayed.
Use the arrow buttons to move through menu choices.
Within a menu, you can perform three operations:
View/change selections: Most settings are lists from which you
select your choice. When you enter a list, the currently set item
displays briefly, then alternates with a display telling what
action(s) to perform. Take, for example, selecting paper size:
Paper Size
*Letter
Use and
press START
The asterisk (*) in the first display indicates that the current paper
size setting is Letter. The second display directs you to use the
right arrow button to scroll through the list until your choice is
displayed, then press Start. An asterisk will appear in front of
your selection, and the time and date screen will reappear.
Start
Start an action: The Start button also starts an action, for example printing a report. With the name of your report displayed,
press Start to print it.
Enter information: Sometimes you will be asked to enter names
or numbers. Step 9 in the Setup guide gives complete instructions
for entering characters and numbers.
l
To exit the menu, or to start over, press Stop.
.........................................................................................................................................
2-2
Menu outline
To print an outline of the entire menu system:
Press Menu on the front panel, then press 4, then press 3.
Adjusting Settings
Menu
then
press
Menu
then
press
Menu
1
1
1
2
2
Copy Setup
There are two Copy settings: Copy Resolution and Reduce to Fit:
Copy Resolution
Copy Resolution has two settings:
Text: Best for text and line drawings; copies in black and white
Photo: Best for photos; copies in shades of gray
Reduce to Fit
Reduce to Fit has six settings:
Actual-100%:
Full page-95%:
Ltr to A4-93%:
A4 to Ltr-89%:
Lgl to Ltr-74%:
Minimum-50%:
Copies at actual size
Reduces full page original 5% for print margins
Reduces letter-size original to fit A4-size width
Reduces A4-size original to fit letter-size length
Reduces legal-size original to letter-size
Reduces an original to half size
Fax Resolution
The resolution setting affects the transmission speed and quality of
your faxed documents. Fax Resolution has four settings:
Standard:
Fine:
300 DPI:
Photo:
For text if transmission speed is more important than quality
Good all-around quality and transmission speed for text
Best quality for text, but slower transmission speed
Best quality for photos/graphics; slowest transmission speed
The first three settings are black and white only. Photo supports the
gray scale. Remember, the HP OfficeJet will only fax at the highest
resolution supported by the receiving fax machine.
.........................................................................................................................................
2-3
Two
First then
press press
First then
press press
Menu
Menu
3
4
Contrast
Change this setting if you want your copy or fax to be darker or
lighter than your original.
Print Report
The HP OfficeJet enables you to print four reports:
Fax Log Report:
Speed Dial Report:
Menu Report:
Self Test Report:
Menu
5
Lists your last 30 faxes sent and received
Lists your speed dial/group speed dial numbers
Lists in outline form the entire menu system
Helps diagnose print cartridge problems
Basic Fax Setup
During setup, you already defined your basic fax settings: Time &
Date, Fax Header, Dial Mode, Rings to Answer, and Paper Size.
If you need help changing any of these settings, refer to step “9. Set
the Basic Fax Settings” of the Setup Guide.
Advanced Fax Setup
There are nine advanced fax settings to help you further customize
your HP OfficeJet fax to your particular situation.
Menu
then
press
6
1
Automatic Reports
The Automatic Reports setting lets you control automatic fax reports.
You have six options:
Every Error:
Send Error:
Receive Error:
Every Fax:
Send Only:
Off:
Reports every time there is any kind of fax error
Reports every time there is a fax transmission error
Reports every time there is an error receiving a fax
Reports every time a fax is sent or received
Reports every time a fax is sent
Does not send fax reports
.........................................................................................................................................
2-4
First then
press press
Menu
then
press
6
2
Busy Redial
The HP OfficeJet is factory set to automatically redial at intervals
after a busy signal. You can turn this setting off.
Note: To immediately redial the last fax number you entered on the
HP OfficeJet keypad, press the Redial/Pause button.
then
press
Menu
then
press
No Answer Redial
You can set the HP OfficeJet to automatically redial at intervals if a
fax call is not answered.
3
6
4
Answer Ring Pattern
The Answer Ring Pattern setting applies only if your phone line has
more than one number, each with its own distinctive ring pattern. This
is a service provided by your telephone company. If you do not have
this service, the Distinctive Ring feature on the HP OfficeJet will not
work and the Answer Ring Pattern should be set to All Rings.
If you do have Distinctive Ring service, have your telephone
company assign one ring pattern to voice calls and another to fax
calls. Then use the Answer Ring Pattern setting to set your HP
OfficeJet to automatically answer the fax call pattern.
Note: If you have an answering machine on this line for receiving
voice calls (using one of the other distinctive ring patterns), set it to
answer after 3 or more rings or your HP OfficeJet will not receive fax
calls.
Menu
then
press
6
5
Error Correction Mode
Error Correction Mode (ECM) reduces data lost due to poor phone
lines. In ECM, phone charges are unaffected, or may even be reduced,
on good phone lines. On poor phone lines, ECM increases sending
time and phone charges, but sends the data much more reliably.
.........................................................................................................................................
2-5
Two
Menu
6
First then
press press
Menu
then
press
Menu
then
press
6
6
6
7
Ring and Beep Volume
The HP OfficeJet provides four options for the volume of its rings and
beeps.
Automatic Reduction
The Automatic Reduction setting determines what the HP OfficeJet
does if it receives a fax too large for the paper size you set in Basic
Fax Setup:
On: Reduces the fax to fit the paper size setting in Basic Fax Setup
Off: Prints the fax at actual size on multiple sheets of paper
Menu
then
press
6
8
Silent Detect
The Silent Detect setting controls whether you can receive faxes from
older-model fax machines that don’t emit a fax signal. These silent
models represent less than 5% of fax machines in use. Leave Silent
Detect off unless all of the following are true:
l
l
l
Menu
then
press
6
9
You expect to receive a fax from an older-model machine.
Your telephone answering machine is connected directly to the
HP OfficeJet.
The HP OfficeJet is set to Auto Answer (green light on the
keypad is on).
Country and Language
This feature does not apply in certain countries.
Use this setting if you entered the wrong number when identifying
your country or language in the initial setup. When prompted, enter
the number corresponding to your country and/or language.
.........................................................................................................................................
2-6
Speed Dial Setup
First then
press press
Menu
then
press
7
1
Assign Speed Dial codes to frequently used fax numbers to quickly
dial those numbers using the Speed Dial button and a one- or twodigit code. See “Speed dialing” on page 2-1.
Individual Speed Dial
The first unassigned speed dial code appears on the display. Press
Start to select it (or press either arrow key to move to a different
unassigned code, and press Start to select it).
The display will ask if you want to enter another. If Yes, enter 1, and
repeat the process. If No, enter 2 to return to the time and date screen.
Menu
then
press
7
2
Group Speed Dial
To assign a new group speed dial code:
For your first speed dial group:
For all other speed dial groups:
The first unassigned speed dial
code appears.
At the 1=New 2=Edit prompt,
enter 1. The first unassigned
speed dial code appears.
Press Start to select it. Add 1 of 20 appears.
Below it will be your first speed dial code. If you want that number in
your group, press Start to include it. If you do not want that number
in your group, press the right arrow key multiple times to scroll to the
next number you want in your group, and press Start to include it.
The display will ask if you want to enter another. If Yes, press 1 and
repeat the process in the previous paragraph. If No, press 2, and enter
a name for the group. Press Start to save it.
The display then asks if you want to add another group. Enter 1 to
create another group, or 2 to return to the time and date screen.
Special Speed Dial Functions
To wait for a dial tone in a number: Press *(Symbols) 5 times (enters a W)
To enter a 3-second pause:
Press Redial/Pause
To simulate the Flash Key:
Press *(Symbols) 6 times (enters an R)
.........................................................................................................................................
2-7
Two
Enter the fax number you want to assign to that code, and press Start
to save it. Then enter the person’s (or company’s) name, and press
Start to save it.
To edit an existing group speed dial code:
At the 1=New 2=Edit prompt, press 2, and your first assigned group
speed dial code appears. If you want to edit it, press Start to select it
(or press either arrow key to scroll to the speed dial code you want to
edit and press Start to select it).
The first speed dial code in that group appears. For each number in
the group, press 1 to delete it, or 2 to keep it.
Then you’ll be asked if you want to add another. If No, press 2 to edit
the group name, or press Start to save it as is.
If Yes, press 1 and the first assigned speed dial code will appear. If
you want to add it to the group, press Start (or press either arrow key
to scroll to a number you’d like to add, and press Start.)
First then
press press
Menu
then
press
7
3
When done adding speed dial codes to the group, press 2, and you’ll
have the choice of editing the group name.
Delete Speed Dial
To delete an individual or group speed dial entry:
The first assigned speed dial code will appear on the display. Press
Start to delete it, or press either arrow key to scroll to an entry you
want to delete. With it displayed, press Start to delete it.
Maintenance
The Maintenance submenu has two options: Print Faxes in Memory
and Clean Print Cartridge.
Menu
then
press
Menu
then
press
8
1
8
Print Faxes in Memory
There may be times you need to print a fax stored in memory, for
example, if your print cartridge runs out of ink while printing a fax.
Since this option prints all faxes in memory, press Stop to stop
printing faxes you don’t need.
Clean Print Cartridge
Cleaning the print cartridges may solve some print problems but
should be done only when necessary.
2
.........................................................................................................................................
2-8
3
Maintenance and
Troubleshooting
..............................................................................................................
Maintenance
To keep your HP OfficeJet working at its best, regularly perform the
maintenance described below.
This section does not apply to stand-alone fax/copier users.
There are several maintenance tasks which help diagnose or solve
printing problems. To perform maintenance tasks:
1 Double-click HP OfficeJet Manager on your Windows desktop.
The HP OfficeJet Manager appears on your PC screen. If you
don’t see it, minimize open applications.
2 Click Settings on the HP OfficeJet Manager, then select Settings
and Maintenance.
Click the Maintenance tab.
Click the button of the
task you want to perform.
To see a description
of each task, click
Help and choose
from the list of tasks.
.........................................................................................................................................
Three
Maintenance tasks (PC-connected)
Cleaning the HP OfficeJet
Keep your HP OfficeJet clean to ensure that it delivers the best quality service.
l
l
Keep fluids away from the interior of the HP OfficeJet.
Do not use compressed air to clean the interior.
Cleaning the exterior
l
Use a soft cloth moistened with water to wipe dust, smudges, and
stains off of the exterior case.
Cleaning the scanner glass
If you notice vertical streaks or lines in your printing, the scanner
glass may need to be cleaned.
Caution:
l
l
Scanner
cover
Before you do this, unplug the HP OfficeJet.
The scanner glass is very delicate. Use extreme caution when
cleaning the glass to avoid scratches.
l
l
Scanner glass: Open the top cover and remove the
scanner cover. Look inside for a glass strip about
¾-inch (1.9 cm) wide and 9 inches (23 cm) long.
Apply mild glass cleaner to a soft, lint-free cloth,
squeeze out excess moisture, and gently wipe the
scanner glass clean.
Scanner cover: Look on the bottom of the scanner
cover that you removed to clean the scanner glass.
The white section also needs to be cleaned. Apply
mild glass cleaner to a soft, lint-free cloth and gently wipe this area clean.
Cleaning the print cartridges and surrounding areas
If your printing is smeared, it could be caused by a buildup of debris
on the print cartridge. To correct this problem, clean the print cartridges, cartridge holder, and the inside area of the HP OfficeJet.
Note: You’ll find this procedure with illustrations in the Help system.
Look in the Help index under “Maintenance, scheduled.” Click on
terms underlined with dashed lines to see photographs.
.........................................................................................................................................
3-2
1 Make sure you have the following materials at hand:
l
l
l
Cotton swabs or any soft material that will not come apart or
leave fibers.
Distilled, filtered, or bottled water.
Scrap paper to set the print cartridges on while you are working.
2 Remove the print cartridges:
l
l
l
Turn on the HP OfficeJet and lift the top cover. The print
cartridges move to the center.
With the print cartridges in the center, unplug the power cord.
Remove the print cartridges and place them on their sides on a
scrap piece of paper.
Caution:
l
l
3 Clean the black print cartridge:
l
l
l
l
Dip a clean cotton swab into distilled water and squeeze out any
excess water.
Hold the print cartridge by the colored cap.
Clean the face and edges of the print cartridge. DO NOT wipe the
nozzle plate.
Hold the print cartridge up to the light to inspect for fibers on the
face and edges. If fibers remain, clean the cartridge again.
4 Clean the color print cartridge (Repeat step 3.)
5 Clean the print cartridge holder:
l
l
Locate the print cartridge holder inside the HP OfficeJet in the
center.
Using clean, moistened swabs, wipe the flat surface of the
underside of the arms on the bottom of the holder. Clean from
back to front until thoroughly clean.
.........................................................................................................................................
3-3
Three
l
Don’t leave the print cartridges outside the printer more than 30
minutes.
Keep print cartridges out of reach of children.
Be careful not to get ink on your hands or clothing.
6 Clean the service station:
Locate the service station inside the HP OfficeJet to the far right.
l
Using a clean, moistened swab, clean the wipers and top surfaces
of the two caps. The caps are black squares with white dots; each
cap has a wiper on its left.
Caution: Use light force when cleaning the print cartridge caps to
avoid unseating them.
l
7 Clean the sponge holders:
l
l
Locate the sponge holders inside the HP OfficeJet to the far left
(there are two of them).
Clean the rim of each sponge holder with a clean, moistened swab.
8 Test the HP OfficeJet:
l
l
l
l
Reinstall the print cartridges, and close the top cover.
Reconnect the power cord.
Print a self test page. See “Maintenance tasks (PC-connected)” on
page 3-1 for details. Stand-alone fax/copier users refer to “Print
Report” on page 2-4.
Examine the printout for ink streaking. If necessary, repeat the
procedure until the self test page is clear and sharp.
Cleaning the paper rollers
If you see spots or stains on your printouts, clean the paper rollers:
1 Unplug your HP OfficeJet.
2 Open the top cover.
3 Remove the scanner cover (toward the back of the machine) to
expose the paper rollers.
4 Carefully inspect the paper rollers for ink or grease.
5 With a rag dipped lightly in isopropyl alcohol, clean the rollers.
.........................................................................................................................................
3-4
6 Let the rollers dry.
7 Replace the scanner cover, and close the top cover.
8 Plug in the HP OfficeJet.
Caution:
l
Do not pour isopropyl alcohol directly onto the rollers.
l
Do not use soap and water to clean the rollers.
Uninstalling the software
This process is required only if you are upgrading from an older HP
OfficeJet, updating the software, or if your installation failed.
1 Insert the HP OfficeJet Series 700 CD into your CD-ROM drive.
The Welcome Screen appears on your PC screen.
a:\setup.exe
where a: represents the letter of your floppy drive. Click OK.
2 At the HP OfficeJet Welcome screen, click Uninstall the HP
OfficeJet Series 700 software. You will be asked to confirm the
process, then the Uninstaller dialog box appears on your screen.
Clear the checkboxes for
all items you want to retain.
.........................................................................................................................................
3-5
Three
If you have floppy disks, insert Disk #1 into your floppy drive.
Choose Run from the Start menu in Windows, then type:
Troubleshooting
This section provides solutions to the most common problems you
might experience while using your HP OfficeJet. If your problem
isn’t listed, the Help system provides troubleshooting information on
every aspect of using your HP OfficeJet.
To view the Help system Table of Contents:
l
On the HP OfficeJet Manager, click Help. Select HP OfficeJet
Series 700 Help. The Help Table of Contents appears.
Click the button for the task
you’re having trouble with.
Then click Troubleshooting
for a list of potential problems
and their solutions.
To get help while working in a dialog box:
l
Most dialog boxes have a Help button. Click this button for Help
on that dialog box.
To find out what a particular setting does:
l
Most dialog boxes have a (?) icon in the upper right corner. Click
this icon, then click on any setting in the dialog box to see Help
for that setting.
.........................................................................................................................................
3-6
Common problems
The HP OfficeJet won’t pick up paper from the paper tray.
Use only paper that works with the HP OfficeJet. See “Paper
Types and Sizes” in the More Information guide.
l
Always load at least ten sheets of paper in the paper tray.
l
Use a stack of plain paper with specialty paper on top.
l
Reload the paper and push the document tray back into position.
l
Make sure the paper guides are not too tight against the paper.
Printouts have horizontal streaks.
l
Print a self test page to make sure your print cartridges are
working properly. They may be low on ink, have clogged nozzles,
or need cleaning.
l
Make sure you’ve selected the correct paper type. See “Changing
the Print Settings” on page 1-17 for details.
Scanned images have vertical lines in them.
l
Put the HP OfficeJet CD-ROM into the CD-ROM drive.
l
Uninstall the HP OfficeJet software.
l
Remove and reinsert the CD.
l
Reinstall the software. During the installation, install OmniPage.
See the Setup Guide for details on installing the HP OfficeJet
software.
Dialog boxes don’t fit on you screen or you can’t close the viewer.
l
l
Through Windows, change your screen resolution to 800 x 600 or
higher.
.........................................................................................................................................
3-7
Three
If you’re using a scan/copy sleeve, check to make sure it’s clean
and not scratched or worn.
l
Clean the scanner glass. See “Cleaning the scanner glass” on
page 3-2 for details.
OmniPage Limited Edition OCR software is not installed.
l
Error messages
You might see some of the following error messages on the front
panel display.
l
Clear document jam, then press START
Problem: Either your document jammed, or the HP OfficeJet loaded
more than one sheet at a time, or you loaded a document longer than
the 14-inch (35.6-cm) maximum.
Solution: Remove the document from the document tray, then reload
it and press Start to clear the message. Restart your job.
Note: If the document is jammed, lift the cover and clear the jam. To
display document jam-clearing instructions on your PC screen, from
the Help index, double-click “Jammed paper.”
l
Clear paper jam, then press START, or, Clear paper jam
Problem: Either the paper jammed, or the HP OfficeJet loaded more
than one sheet at a time, or you loaded paper longer than the 14-inch
(35.6-cm) maximum.
Solution: Remove the paper from the paper tray, open the cover, and
clear the paper path. (To display document jam-clearing instructions
on your PC screen, from the Help index, double-click “Jammed
paper.”) Then reload the paper, and press Start to clear the message
and reset the HP OfficeJet.
l
Replace scanner cover
Problem: Either you removed the scanner cover from inside the HP
OfficeJet and didn’t replace it, or you replaced the scanner cover
incorrectly.
Solution: Open the HP OfficeJet’s
top cover. Either replace the scanner
cover and close the cover, or remove
the scanner cover, replace it, then
close the cover.
Scanner
cover
.........................................................................................................................................
3-8