1
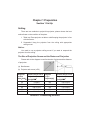
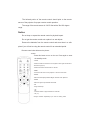
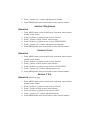
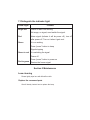
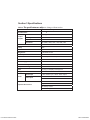
7KDQN\RXIRUEX\LQJRXUSURGXFW :DUQLQJV Please read this manual carefully so that you can understand and use the projector correctly. After reading, please save this manual for future reference. 1RWLFH The specifications are subject to change without notice. The manufacturer is not responsible for typographical errors, incorrect images, product descriptions and specifications. $ERXWWKHEUDQG VGA&XGA is the registered trademark of International Business Machines Corporation. VESA&SVGA is the registered trademark of Video Electronics Standard Association. Windows is the registered trademark of Microsoft Corporation. All other trademarks are the property of their respective owners. $FFHVVRULHV Remote Control Power Cord (2 m) Paired Composite, Analog Audio cable. (1.5 m) Owner’s Manual Warranty Card Batteries for Remote Control 1RWLFH To project a clear image it might be necessary to adjust the contrast ratio, brightness, focus and keystone. The image may look blurry or skewed without these adjustments. To lengthen the life of your projectors lamp the projector will lock out power commands during the first 3 minutes of use and for 5 minutes after the power off command. :DUQLQJ The projector lamp creates high temperatures; Avoid handling the projector lamp there is a risk of serious injury while hot. Do not touch the lens/exhaust fan/intake during projector use, to limit risk of bodily injury and damage to the projector. Do not obstruct the lens, exhaust fan and intake vents. The internal of projector contains high voltages; to reduce the risk of electrical shock, do not remove the cover. No user serviceable parts inside. Refer servicing to qualified service personnel. &KDSWHU3UHSDUDWLRQ 6HFWLRQ6HW8S 6HWWLQJ There are two methods to project this projector, please choose the best method base on the condition of the place. 1. Table top: Place projector on table or shelf keeping the projector in line with the screen. 2. Suspended: Hang the projector from the ceiling with appropriate ceiling mount. 1RWLFH You need to use a projector ceiling mount if you want to suspend the projector from the ceiling. 7KH6L]HRI3URMHFWLRQ6FUHHQDQGWKH'LVWDQFHRI3URMHFWLRQ Please refer to the diagram to confirm the size of picture and the distance of projection. (a) Size of screen (b) Projector and screen (±5%). 'LDJRQDO 6FUHHQUDWLR VFUHHQ 3URMHFWLRQ'LVWDQFH VL]H˄ ˄,QFK˅ >LQFK@ ˁ 'LDJRQDO VFUHHQ VL]H>,QFKP@ 6FUHHQUDWLR 3URMHFWLRQ'LVWDQFH >LQFK@ˁ 60 78.8/82.7 120 152.0/159.4 72 93.7/99.2 130 163.8/171.3 84 140 175.2/185.0 90 108.3/114.2 115.0/120.1 150 190.6/196.9 100 126.8/133.1 160 202.4/207.9 6HFWLRQ&RQQHFWLQJ'HYLFHV &RQQHFWLQJDFRPSXWHU Please turn off the power of the projector and signal before connecting a VGA source while the power is on may result in operational errors. Please confirm the type of connector fits the input on the projector, the projector can be damaged if the wrong connector is inserted. Set projector to the “VGA” by using the button “PC/ AV”. Refer to the VGA source manual to configure the source resolution and frequency. &RQQHFWLQJ$XGLR9LGHR6RXUFHV Connect audio and video output sources to the corresponding input connections located on the side of the projector. 1RWLFH To select the AV source use the mode button on supplied remote or press the PC/AV button located on the top of the projector until AV is select. Video output and left/right audio output of signal source should connect with corresponding input ports located on the side of the projector. 6HFWLRQ8VLQJWKHUHPRWHFRQWURO ,QVHUWLQJEDWWHULHV 1. Remove the rear cover 2. Load the batteries as indicated by the marks in the battery compartment . 3. Put the rear cover back on 1RWLFH The Infrared portion of the remote control should point to the remote sensor of the projector for proper remote control operation. The range of the remote sensor is 18'±5% feet with a 30±10% degree range. 1RWLFH Do not drop or expose the remote control to physical impact. Do not get the remote control wet or place it on wet objects. Remove the batteries from the remote control and store them in a safe place if you will not be using the remote control for an extended period. Remote control show below as the picture: -POWER: -Press this button to turn on the set. Press again to enter the standby mode. - MUTE: -Press this button to silence the sound system. Press again to activate it. -Numeric Keys (0~9): -Press these buttons to select the TV channel. -MENU: -Access the main menu of the projector or exit the current item. -IMAGE: -Select the best display between Bright / Normal / Soft / Optional. -MODE: -Select the signal input Video/S-video/VGA. -OK: -Image vertical flip. - : - Press this button to jump between two channels. - CH( +/-): Change channels sequentially up or down in viewing mode and move to the next higher or lower item in the menu. -Press these buttons to increase or decrease the sound volume level and directly choose the item in the menu. --/--˖ -Select the channel rapidly. -Call: -Press this button to view the current signal input and current channel number. &KDSWHU%DVLF2SHUDWLRQ 6HFWLRQ7XUQLQJRQWKH3URMHFWRU 1. Make sure that power of the projector and all equipment connecting with the projector is not on. 2. Connect a video source to the projector. 3. Remove the lens cover. 4. Connect the projector to an electrical outlet using the supplied power cable. 5. Turn on hard power switch located on the back of the projector. 6. When the projector is turned on, the indicator light rurns red to orange Press the POWER button on the projector of the STANDBY/ON button on the remote control, The indicator light will turn green indicating that the projector is working normally.(If no sources have been connected to the projector the indicator light will stay red.) 1RWLFH If there is no image displayed, check all connections and input setting. 6HFWLRQ7XUQLQJRIIWKH3URMHFWRU 1. Turn off the power of the video source equipment, which is connected to the projector. 2. Press the POWER button on the projector or STANDBY/ON button on the remote control. 3. The projector lamp will turn off ,the exhaust fan will continue to run for up to 3 minutes in order to cool the projector lamp and extend lamp life. when the exhaust fan turns off it is safe to remove the power cable. 4. Place lens cap over lens. 6HFWLRQ3LFWXUH$GMXVWPHQW $GMXVWLQJ3LFWXUHVL]H The picture size is a variable based on the distance between projector and screen. You can get the best image by adjusting the distance between projector and screen. Please refer to form (1) $GMXVWLQJWKH.H\VWRQH You can adjust the projector degree to proper degree by adjusting the keystone. To reduce distortion, align the projector to the center of the screen as close as you can. Degree offsets of 30 degrees off the center point of the screen can cause visual distortion. 6HFWLRQ$GMXVWLQJ3LFWXUH4XDOLW\ $GMXVWLQJWKHIRFXV Grasp the metal portion of the lens and rotate in either direction until the image is clear and sharp. 1RWLFH If the projector distance is out of range, the projector will be not able to focus. If it is hard to get correct focus, please confirm the distance of projector from the screen. &KDSWHU$GYDQFH2SHUDWLRQ 1RWLFH Under the situation of menu off, Press the “PC/AV” button of projector or remote control to choose the signal of one of the AV /S-VIDEO /YPbPr /VGA /HDMI . 6HFWLRQ,QSXW0HQX Signal: press “ PC/AV ” button to get “PROGRAM” menu. AV Video input S-VIDEO S-Video input YPbPr YPbPr input VGA Computer HDMI HDMI input Operation Press “PC/AV” button on the control board/remote control, you can choose what you need such as AV/S-VIDEO/YPbPr/VGA/HDMI. 6HFWLRQ&RQWUDVW5DWLR Operation 1. Press “MENU” button on the control board, it will show “menu function window” on the screen. 2. Press [Ĺ] button or [Ļ] button, move cursor to “Picture”. 3. Press [ĺ] button to enter “Picture” menu function. 4. Press [Ĺ] button or [Ļ] button, move cursor to “CONTRAST”. 5. Press [ĺ] button or [ĸ] button, adjust picture’s contrast. 6. Press [MENU] button twice to turn back to “menu function window” 6HFWLRQ%ULJKWQHVV Operation 1. Press “MENU” button on the control board, it will show “menu function window” on the screen. 2. Press [Ĺ] button or [Ļ] button, move cursor to “Picture”. 3. Press [ĺ] button to enter “Picture” menu function. 4. Press [Ĺ] button or [Ļ] button, move cursor to “BRIGHTNESS”. 5. Press [ĺ] button or [ĸ] button, adjust picture’s brightness. 6. Press [MENU] button twice to turn back to “menu function window” 6HFWLRQ&RORU Operation 1. Press “MENU” button on the control board, it will show “menu function window” on the screen. 2. Press [Ĺ] button or [Ļ] button, move cursor to “Picture”. 3. Press [ĺ] button to enter “picture” menu function. 4. Press [Ĺ] button or [Ļ] button, move cursor to “SATURATION”. 5. Press [ĺ] button or [ĸ] button, adjust picture’s color. 6. Press [MENU] button twice to turn back to “menu function window” 6HFWLRQ7LQW Operation (NTSC use only) 1. Press “MENU” button on the control board, it will show “menu function window” on the screen. 2. Press [Ĺ] button or [Ļ] button, move cursor to “Picture”. 3. Press [ĺ] button to enter “picture” menu function. 4. Press [Ĺ] button or [Ļ] button, move cursor to “HUE”. 5. Press [ĺ] button or [ĸ] button, adjust picture’s tint. 6. Press [MENU] button twice to turn back to “menu function window” 6HFWLRQ6KDUSQHVV Operation 1. Press “MENU” button on the control board, it will show “menu function window” on the screen. 2. Press [Ĺ] button or [Ļ] button, move cursor to “Picture”. 3. Press [ĺ] button to enter “picture” menu function. 4. Press [Ĺ] button or [Ļ] button, move cursor to “SHARPNESS”. 5. Press [ĺ] button or [ĸ] button, adjust picture’s sharpness. 6. Press [MENU] button twice to turn back to “menu function window” 6HFWLRQ/DQJXDJH Operation 1. Press “MENU” button on the control board, it will show “menu function window” on the screen. 2. Press [ĺ] button to enter “OSD” menu function. 3. Press [Ĺ] button or [Ļ] button, move cursor to “language”. 4. Press [ĺ] button or [ĸ] button, adjust picture’s language. 5. Press [MENU] button twice to turn back to “menu function window”. 6HFWLRQ7UDQVSDUHQFH Operation 1. Press “MENU” button on the control board, it will show “menu function window” on the screen. 2. Press [ĺ] button to enter “OSD” menu function. 3. Press [Ĺ] button or [Ļ] button, move cursor to “HALFTONE”. 4. Press [ĺ] button or [ĸ] button, adjust picture’s transparence. 5. Press [ MENU ] button twice to turn back to “menu function window” 6HFWLRQ9HUWLFDO+RUL]RQWDOIOLS Operation 1. Press “MENU” button on the control board, it will show “menu function window” on the screen. 2. Press [ĺ] button to enter “OSD” menu function. 3. Press [Ĺ] button or [Ļ] button, move cursor to “PICTURE SWAP” 4. Press [ĺ] button or [ĸ] button, choose appointed function. 5. Press [MENU] button twice to turn back to “menu function window”. 6HFWLRQ5HVHWWR'HIDXOW6HWWLQJV Operation 1. Press “MENU” button on the control board, it will show “menu function window” on the screen. 2. Press [ĺ] button to enter “FUNCTION” menu function. 3. Press [Ĺ] button or [Ļ] button, move cursor to “MEMORY RECALL” 4. Press [ĺ] button or [ĸ] button, choose appointed function. 5. Press [MENU] button twice to turn back to “menu function window”. 6HFWLRQ9*$,QSXW$GMXVWLQJ Make sure that VGA signal connection is ok, than follow “section 1 input menu” to enter VGA mode, you can operate as below. 1. Picture and setting option The adjusting method of Brightness, contrast, color, language and vision mode is the same as adjusting under VIDEO signal. Please refer to section 1 to section 10 of this chapter. 2. Picture’s location Operation 1. Press “MENU” button on the control board, it will show “menu function window” on the screen. 2. Press [Ĺ] button or [Ļ] button, move cursor to “PC”. 3. Press [ĺ] button to enter “PC” menu function. 4. Press [Ĺ] button or [Ļ] button, move cursor to “picture’s location”. 5. Press [ĺ] button, enter the adjusting of “picture’s location”. 6. Press [Ĺ] [Ļ] [ĸ] [ĺ] button to adjust picture’s position up/down/left/right. 7. Press [MENU] button twice to turn back to “menu function window”. 6HFWLRQ=RRP This function can adjust the size of the image “Zoom” menu is divided 9 grades, you can choose the right grade to gain the best size (The grade 9 is 16:9 screen). Operation 1. Press “MENU” button on the control board, it will show “menu function window” on the screen. 2. Press [ĺ] button to enter “FUNCTION” menu function. 3. Press [Ĺ] button or [Ļ] button, move cursor to “ZOOM”, 4. Press [ĺ] button or [ĸ] button, choose ZOOM ratio. 5. Press [MENU] button twice to turn back to “menu function window”. 1RWLFH This function can be only used in VIDEO, S-VIDEO mode. The operation in the VGA mode is not active. &KDSWHU$SSHQGL[ 6HFWLRQ7URXEOHVKRRWLQJ 1R,PDJHSRZHURII z Take off lens cap or not. z Projector is in bulb protect mode for 5 minutes after powering off. The projector will not turn back on until the blub is cool. z Brightness level too low. z The input picture is all black or not. Some times the input picture is all black because of screen protect. z Bulb not set properly in receptacle. Reset bulb 3URMHFWRUFDQQRWSURMHFWVKRZVLJQDO z Please verify that the image source is working. z Please check the cable between signal source and projector is connected or not. z Verify the Input settings match signal of the input port. %OXUU\ LPDJH z Adjust the focus if image is blurry. z The projection angle is too large or distance is too long. z Inspect lens for dust or debris. 4. 7KHLPDJHLVWRRELJRUWRRVPDOO. z Verify source resolution. Please keep setting of computer output signal and projector’s consistent. We suggest that you set resolution and frequency to 640×480 and 60HZ. 3LFWXUH FRORU z Verify the correct connection of the source connection. z Adjust the brightness and contrast ratio. z Time to change lamp? The image will become dark before you need to replace the blub. &DQQRWXVHUHPRWHFRQWUROIRURSHUDWLRQ z Does it have batteries? Is polarity correct or not. Is power weak? z Do operate the remote control by correct orientation? Range of operation degree: follow 30±10% degree of projector’s front. z Put the front of remote control to projector for operation? z Is the distance to projector too far? Operation distance is 5.5±5% meters. z Is remote sensor affected by strong light from sunshine or fluorescent lamp? Remote sensor can be disabled by strong light. 'LVWLQJXLVKWKHLQGLFDWRUOLJKW &RQWHQW 3RZHU/LJKW %ULJKWUHG Power on and is on working No image, no signal, need switch the signal. 5HG Alarm signal (indicate it will be power off), turn off after power off. Turn on it when it gets cool. *UHHQ It is on working Press “power” button to sleep Signal stopping *UHHQWRUHG It is switching the signal Power off Press “power” button to power on 5HGWRJUHHQ Restore the former signal 6HFWLRQ0DLQWHQDQFH /HQVFOHDQLQJ Please lightly wipe lens with Microfiber cloth. 5HSODFHWKHFRQVXPHGSDUWV We will hereby instruct how to replace the lamp. 7LPHRIUHSODFHPHQW This product is not designed for continuous use. In the case of continuous use, the lamp’s lifetime will shorten. Please replace the lamp when you meet these problems. z The lamp burn out, but other parts are normal. z The image becomes darker or unclear. 1RWH z If above phenomenon has occurred, we suggest you replace the old lamp as soon as possible. 5HSODFHPHQW Operation: 1. Before replacing the lamp, turn the projector off and unplug the power cord, and then wait at least 45 minutes for the lamp to cool sufficiently. 2. Turn it over, and put it on the projector, loose the 4 screws of the cover of lamp garage, then open it. 3. Loose the 3 screws fixed inside cover, then lift the cover forward and pick it up. 4. You can see the bulb is blocked in the white lamp stand, push one of bulb’s end lightly and take it out. (The protruding in the stand blocks the bulb). Do not loosen the fixed screws on the stand. Prevent the bulb deviating from the centre. 5. After picking the old lamp out, you can put the new one’s end into the white stand and push it lightly into the stand. 6. Back to the 3rd and 2nd step, and tweak the fixed screws. At last, put the projector over. 7. When you insert the lamp into the stand, please keep the vent of the lamp forward. 6HFWLRQ6SHFLILFDWLRQV subjec to change without notice. 1RWLFH The specifications are subject ,WHP 6SHFLILFDWLRQ 6 3URGXFW1DPH /LTXLG &U\VWDO 3DQHO6L]H 7” (Diag) 'ULYH6\VWHP TFT LCD $VSHFW 4 : 3 or 16 : 9 5HVROXWLRQ HD 1080P; 1080i; 720P; 720i; 480P; 480i /HQV Manual Focus Focus Adjustable /DPS LED &RQWUDVW 1,000:1 %ULJKWQHVV 1700 ANSI Lumens &RORU'HSWK TrueColor 16.7 Million colors 6SHDNHUV Power Amplified Stereo Speakers 1RLVH 25dB - 50dB 3RZHU6XSSO\ AC 90-120V 60HZ, 2A 3RZHU&RQVXPSWLRQ 225W±10% 7HPSHUDWXUH5DQJH 5ć-35ć 6L]H 13.19 (L) x 10.43(W) x 4.92 (H) inch :HLJKW 7.27 ± .44 Lbs $XGLR,QSXW 3RUWV 1 RCA Stereo input, 1 RCA Stereo output 9LGHR,QSXW 2SWLRQDO$FFHVVRULHV Projector Mount HD Ready Screen AV Connecting Cables PYLE MISCELLANEOUS PARTS MISC ACCESSORIES