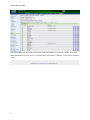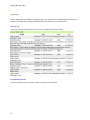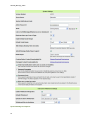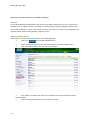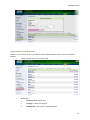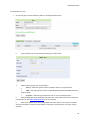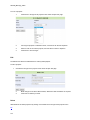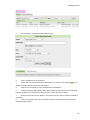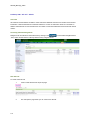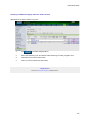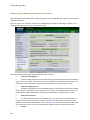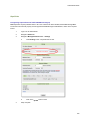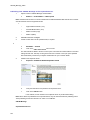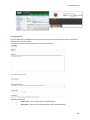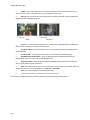
1
SAFARI Montage® Administrator Guide Administrator Guide Topics For quick access to the various topics covered in the Admin Guide, use the following links: First Time Install Content and Modules Backup and Data Recovery Reporting Settings System Tools Software Update APC UPS Monitor H24 Auto-Converter Admin SAFARI Montage CreationStation Admin Curriculum Developer - Digital Curriculum Presenter Admin EdCast Datacasting Pathways SM Admin SAFARI Montage Live Admin Selective Video Streaming Admin WAN Manager Admin SupeTube SNMP Accessing the Admin Area To access the Admin area, select in the Main Navigation Menu. A menu of administrative tools will display in the secondary navigation menu. 1 SAFARI_Montage_admin Note: Admin options may vary based on the licensed content and software of your school or district. If you are a limited administrative user type, such as a Curriculum Admin, School Admin or Principal, you may not see all areas of Admin. SAFARI Montage® © 2005-2013 Library Video Company. All Rights Reserved. 2 Administrator Guide First Time Install Accessing Your SAFARI Montage Server The instructions below describe how to access your SAFARI Montage server for the first time. These instructions assume that you have connected your SAFARI Montage server to your network and it is powered on. Finding SAFARI Montage on Your Network SAFARI Montage is factory-configured to use the Dynamic Host Configuration Protocol (DHCP). On power-up, SAFARI Montage will attempt to retrieve network configuration parameters from a DHCP host (if available) on your network. These configuration parameters include IP address, gateway address, subnet/netmask address, and DNS addresses. The instructions below assume that you have left SAFARI Montage in its default factory configuration and you have not modified any network settings or disabled DHCP. If your network is not configured to use DHCP, please see ‘Configuring SAFARI Montage to Use a Static IP’ in the ‘SAFARI Montage Console’ documentation. Any of three methods can be used to find and access SAFARI Montage on your network. 1. Default Hostname- Enter the SAFARI Montage default hostname into a web browser. SAFARI Montage is factory-configured to use a default hostname of: SVN<SerialNo>.local Replace <SerialNo> with the six-digit serial number of your SAFARI Montage server. Your serial number can be found on the back cover of your printed Setup Guide, on the back of the SAFARI Montage rack unit, or inside the case door of the SAFARI Montage tower. For example, if your serial number were 000123, you would enter the following address into your web browser: http://SVN000123.local 2. IP Address - Enter SAFARI Montage’s IP address into a web browser. To find out what IP address is assigned to SAFARI Montage, you may ping the default hostname. To ping the default hostname, enter the following command into a command prompt: ping svn000123.local Replace the six-digit serial number with the one from your SAFARI Montage unit. The ping command will display the IP address of SAFARI Montage. You may enter the IP directly into the address bar of your web browser, for example: http://192.168.1.78 If DHCP fails or a static IP has not been assigned, SAFARI Montage assigns itself an IP of 192.168.1.251. 3. Apple Bonjour - Apple Bonjour is a Zeroconf (Zero Configuration Networking) tool that allows you to easily discover other Bonjour-enabled devices on your network. SAFARI Montage is a Bonjour-enabled device. The Bonjour client is already built into the Safari browser on the Mac OS. For Windows operating 3 SAFARI_Montage_admin systems, there is a small add-in for Internet Explorer available via free download. Click the link above for more information. Changing the SAFARI Montage Hostname You may change the hostname to be anything you like. After you have successfully accessed SAFARI Montage in a browser, you may go to the “Admin > Setup > Hostname” section and enter a new one. From that point on, SAFARI Montage will be accessible by typing the new hostname into a browser. You may also choose to point a fully qualified domain name (FQDN) to SAFARI Montage. In this case, the SAFARI Montage hostname does not need to be changed to match the domain you point to the server. Hostname is merely the physical name of the SAFARI Montage box on your network. SAFARI Montage® © 2005-2013 Library Video Company. All Rights Reserved. 4 Administrator Guide Apple Bonjour If you are having trouble finding or “seeing” the SAFARI Montage server on your network, a technology called “Bonjour” from Apple can be used to easily discover the server. If you are a Mac OS X user, Bonjour is already built into the Safari browser. Simply select the Bonjour bookmark in Safari, then select the SAFARI Montage server that is listed. For Windows users, Bonjour is available as a free plug-in for Internet Explorer. You may download Bonjour here. Upon installation a Bonjour icon will appear in your browser toolbar. Click the Bonjour icon and double-click the SAFARI Montage server shown in the left-hand panel (see image below). SAFARI Montage® © 2005-2013 Library Video Company. All Rights Reserved. 5 SAFARI_Montage_admin SAFARI Montage Console SAFARI Montage is equipped with a text-based console application. The SAFARI Montage Console allows you to configure core server settings when SAFARI Montage is unavailable in a browser. The SAFARI Montage Console will appear when a keyboard and mouse are connected directly to the SAFARI Montage server. One particular use for the console is to configure SAFARI Montage to use a static IP. SAFARI Montage Console Configuring SAFARI Montage to Use a Static IP SAFARI Montage is factory-configured to acquire an IP address, and other network parameters, dynamically from your DHCP host. Some network administrators may not use DHCP, and may want to configure SAFARI Montage to use a static IP. The following instructions will demonstrate how to disable DHCP and configure SAFARI Montage to use a static IP using the SAFARI Montage Console. These functions may also be performed from the SAFARI Montage browser interface, under ‘Admin > Settings > Network.’ Make sure that the static IP you are about to assign to SAFARI Montage is available on your network. Configuring a duplicate IP address on a network can lead to problems. In most cases, the static IP that you assign must be different from any that SAFARI Montage acquired using DHCP. Network administrators will usually dedicate a particular IP address range for DHCP use and a different range for static addresses. Select menu item #1, ‘Network Settings...’, from the console’s main menu. The menu shown below will display. 6 Administrator Guide Select menu item #2, ‘IP Address (Static).’ The screen shown below will display. Enter each network configuration parameter that you are prompted for. After each parameter has been entered, SAFARI Montage will display a summary screen so you can confirm the changes. Press Enter to return to the Network Settings menu. Configuring SAFARI Montage to Use a Dynamic IP (DHCP) From the Network Configuration menu, choose menu item #3, ‘IP Address (DHCP).’ Press Enter to continue. SAFARI Montage will acquire the necessary network configuration parameters from the DHCP host on your network. 7 SAFARI_Montage_admin Other Console Settings The remainder of the console settings should be self-explanatory for a Systems Administrator. SAFARI Montage® © 2005-2013 Library Video Company. All Rights Reserved. 8 Administrator Guide Content and Modules Adding New Content and Add-On Modules (Quick Start) The ‘Activate Content & Modules’ function will attempt to automatically activate all inactive content packages that are on the hard drives on the server. The SAFARI Montage server needs to be connected to the Internet for this to take place. The server will transmit a few small pieces of data that identify your content packages and your server. An average-sized content package takes approximately 10 to 15 minutes to activate while the database is populated. This time may vary depending on your SAFARI Montage hardware and configuration. 1. Click ‘Admin’ on the SAFARI Montage header. 2. Click ‘Settings’ from the secondary navigation menu. 3. Click ‘Activate Content and Modules’ from the Settings submenu. 4. Read Digital Content License Agreement. 5. Type in site information and click ‘Next’ to the terms and conditions. If you experience any problem with this multi-package activation method, you may activate individual packages by browsing the ‘Content Packages’ section of ‘Admin’ area. If your SAFARI Montage server does not have Internet connectivity, there is also a manual activation method in the ‘Content Packages and Add-On Modules’ Help section. SAFARI Montage® © 2005-2013 Library Video Company. All Rights Reserved. 9 SAFARI_Montage_admin Content Packages and Add-On Modules This section lists all content packages and add-on modules, active and inactive, available on your SAFARI Montage server. If a content package or add-on module is not listed and you expect it to be listed, then click ‘Activate Content & Modules.’ This will detect and install any new content and modules found in the system. For more info, see the help page ‘Adding New Content and Add-On Modules (Quick Start).’ Fully-automatic activation is not available within this section. For information on fully-automatic activation, see the Help page ‘Activating Content or Add-On Modules.’ Auto-Activation To perform auto-activation on a particular content package or add-on module, follow the steps below. 1. Click ‘Admin’ on the SAFARI Montage header. 2. Click ‘Settings’ from the secondary navigation menu. 3. If you want to activate a content package, click ‘Content Packages’ from the Settings submenu. To activate an add-on module, click ‘Add-On Modules’ from the Settings submenu. 4. View currently installed Content Packages or Add-On Modules. Inactive packages or modules can be displayed by clicking the ‘Show Inactive Content Packages’ or ‘Show Inactive Modules’ on the respective screens. Active packages or modules will be indicated by a green checkmark ( (The image below displays the screen for content packages.) ) in the ‘Active’ column. 5. Click the ‘Activation’ link next to the item you wish to activate. 6. Click the ‘Activate’ button. Auto-activation requires that the SAFARI Montage server is able to access the Internet. SAFARI Montage will transmit several numbers that identify your SAFARI Montage server and the item you are activating. If your server is not able to access the Internet, follow the steps for manual activation below. The product will cycle through its activation process, showing progress in real time. If you are activating a content package, you will be returned to the Content Packages screen when it is finished. If you are activating an add-on module, you will be returned to the Add-On Modules screen when the activation is complete. Confirm that the content package or add-on module now has a green check mark in the Active column. 7. If you are logged into a WAN Manager Parent Server only: After the package or module is activated, you must assign the package/module to a school or schools. See the help page ‘WAN Manager Media and License Management’ in the WAN Manager Guide. Manual Activation Manual Activation can be used in the event that the SAFARI Montage server fails to connect to our activation servers or does not have access to the Internet. 10 Administrator Guide To perform manual activation on a particular content package or module, follow the steps below. 1. Click ‘Admin’ on the SAFARI Montage header. 2. Click ‘Settings’ from the secondary navigation menu. 3. If you want to activate a content package, click ‘Content Packages’ from the Settings submenu. To activate an add-on module, click ‘Add-On Modules’ from the Settings submenu. 4. Click the ‘Activation’ link next to the package/module you wish to activate. 5. Click the ‘Manual’ button. The manual activation screen will display. (The image below is an example of the manual activation screen for a content package.) 6. Enter your Activation ID and Password and hit ‘Activate.’ To acquire your Activation ID and Password, record the Unit ID from the screen shown, and have your Product ID from your package label handy. Browse to the Product Support and Activation website indicated: http://software.safarivideonetworks.com. You may want to launch a new browser window for this site and leave SAFARI Montage open in the previous one. You will need to return to SAFARI Montage to enter the activation ID and password. 7. Product Support and Activation Website - Once you have arrived at the Product Support and Activation website, select ‘SAFARI Montage’ from the ‘Activation’ menu. 8. Product ID - Enter your Product ID from your content package or module label and click ‘Next.’ 11 SAFARI_Montage_admin 9. Agreements - Read and agree to both license agreements by clicking the checkboxes underneath each license. You must also digitally ‘sign’ the license agreement by confirming your organization name and entering your name and title. Click ‘Next.’ 10. SAFARI Montage Customer Information - This screen gives you the opportunity to create a login and modify your personal profile. You will need the login for future visits to the support website to access the Knowledgebase, Downloads and Service Request sections. Please make a personal record of the password you choose. When you are finished entering all pertinent information, click ‘Save.’ 11. SAFARI Montage Activation - Enter the Unit ID that was displayed to you on the SAFARI Montage manual activation screen. Version Number and Serial Number should already be filled in, but you may correct them if necessary. Be sure to enter the numbers exactly as they appear on the SAFARI Montage manual activation screen. Click ‘Get Password.’ An activation ID and password will be generated and displayed. 12. SAFARI Montage Manual Activation - Return to the SAFARI Montage manual activation screen. Enter or copy and paste the activation ID and password that were provided from the support website into the appropriate fields. Click ‘Activate.’ The product will cycle through its activation process, showing progress in real time. If you are activating a content package, you will be returned to the Content Packages screen when it is finished. If you are activating an add-on module, you will be returned to the Add-On Modules screen when the activation is complete. Confirm that the content package/module is now labeled ‘true’ in the Active column. 13. If you are logged into a WAN Manager Parent Server only: After the package is activated, you must assign the package/module to a school or schools. See the help page ‘WAN Manager Media and License Management’ in the WAN Manager Guide. For further information and information about fully-automatic activation, see the Help page ‘Activating Content or AddOn Modules.’ For information about deactivating content or modules, see the Help page ‘Deactivating Content or Add-On Modules.’ SAFARI Montage® © 2005-2013 Library Video Company. All Rights Reserved. 12 Administrator Guide 13 SAFARI_Montage_admin Activating Content or Add-On Modules There are three different methods to activate a SAFARI Montage content package or add-on module. Fully Automated Activation This activation method requires that the SAFARI Montage server have Internet access. There is no user intervention required aside from agreement to the licenses. SAFARI Montage communicates with our remote activation servers automatically, transmitting the identifying data needed to activate your SAFARI Montage package/module(s). This method will attempt to activate all inactive content packages and modules detected within SAFARI Montage. SAFARI Montage attempts to use this method upon first-time install. If it fails, you will have the opportunity to use manual activation (see ‘Manual Activation’ below). This method may also be used to discover and activate add-on module content packages in the future by clicking the ‘Activate Content & Modules’ button in the secondary navigation menu. 1. Click ‘Admin’ on the SAFARI Montage header. 2. Click ‘Settings’ from the secondary navigation menu. 3. Click ‘Activate Content & Modules’ from the Settings submenu. 4. Read Digital Content License Agreement. 5. Type in site information and click ‘Next’ to the terms and conditions. Automatic Activation This activation method requires that the SAFARI Montage server have Internet access. You will be required to enter the Product ID from your content package/module label. SAFARI Montage transmits this data to our remote activation servers. This method is useful in that it allows a single content package or module to be activated if there are other packages/modules that you would like to leave inactive for whatever reason. Manual Activation Manual activation does not require that the SAFARI Montage server have Internet access. If the two methods above fail, you can use this method. You will be required to browse to our product activation website. The activation website will require that you enter your SAFARI Montage Product ID and Unit ID. Your Product ID is affixed to a label on your product packaging. Your Unit ID can be found in SAFARI Montage: 1. 14 Click ‘Admin’ on the SAFARI Montage header. Administrator Guide 2. Click ‘Settings’ from the secondary navigation menu. 3. If you want to activate a content package, click ‘Content Packages’ from the Settings submenu. To activate an add-on module, ‘Add-On Modules’ from the Settings submenu. 4. Click the ‘Activation’ link next to the item you wish to activate. 5. Click the ‘Manual’ button. 6. Write down the Unit ID shown or leave this browser window open in the background. You will need that Unit ID at the activation site. 7. From an Internet-connected PC, browse to our product activation website. Click the SAFARI Montage logo, or choose ‘SAFARI Montage’ from the ‘Activation’ menu. For full instructions, browse our manual activation support site. For more information, see the Help page ‘Content Packages and Add-On Modules.’ SAFARI Montage® © 2005-2013 Library Video Company. All Rights Reserved. 15 SAFARI_Montage_admin Deactivating Content or Add-On Modules 1. Click ‘Admin’ on the SAFARI Montage header. 2. Click ‘Settings’ from the secondary navigation menu. 3. If you want to deactivate a content package, click ‘Content Packages’ from the Settings submenu. If you’d like to deactivate a module, click ‘Add-On Modules’ from the Settings submenu. 4. Click the ‘Activation’ link next to the content package or module that you want to deactivate. 5. Click the ‘Deactivate’ button. 6. A message box will pop up asking you to verify that you want to deactivate this package. All media included in the package will be removed from your SAFARI Montage server. 16 Administrator Guide 7. When the deactivation is finished, there will no longer be a green check mark next to the package in the ‘Active’ column. SAFARI Montage® © 2005-2013 Library Video Company. All Rights Reserved. 17 SAFARI_Montage_admin Content Update Settings Your SAFARI Montage server will check nightly for any content updates that your server may require. If you are eligible to receive updates, they will be downloaded according to the download schedule created. To setup automatic content updates, perform the following: 1. Click on ‘Modules’ ( 2. Click on ‘Content Update Settings’ from the left-hand navigation, under Settings. 3. Enable ‘Allow Content Updates from SAFARI Montage’ by checking the checkbox. 4. Set the Content Download Schedule a. Select a ‘Transfer Speed’ from the dropdown list. This represents the bandwith to be used during the content download. 18 ) from the SAFARI Montage header. Administrator Guide b. Select a time frame for each day of the week. These time frame represents the times in which content updates will not be downloaded. c. Enable/Disable ‘Ignore Download Schedule.’ If enabled, this will instruct SAFARI Montage to ignore the above download schedule and to download content as it becomes available. 5. Click on the ‘Update’ button to set the download schedule. SAFARI Montage® © 2005-2013 Library Video Company. All Rights Reserved. 19 SAFARI_Montage_admin Restricting Access to Packaged Content Titles System Administrators can restrict access to a particular title included in distributed content packages by completing the following steps. 1. Click ‘Search’ on the SAFARI Montage header. 2. Locate the media that needs to be restricted by using the standard search feature. 3. Click the permissions icon on the title’s detail page. 4. From the ‘Grant Permissions To’ drop down box, select ‘All’ to grant permissions to all users or select ‘User Types’ to grant permission to specific users. 5. If you selected to grant permissions to user types, put a check mark in the boxes next to all of the user types you want to grant permissions to. By selecting only ‘Administrator,’ this title will only be viewable by logins within the Administrator group. If you choose ‘Teacher (w/Upload)’ and ‘Teacher,’ this title will be viewable by logins within the Teacher (w/Upload) group or the Teacher group. 6. Hit the ‘Save’ button. The media title will now only be viewable by logins belonging to the groups specified. NOTE: Administrators have full access by default. SAFARI Montage® © 2005-2013 Library Video Company. All Rights Reserved. 20 Administrator Guide 21 SAFARI_Montage_admin Backup and Data Recovery Add/Edit Destination Adding a Destination The first step in backing up your SAFARI Montage data is adding a backup destination. To add a destination, click the “Add Destination” button under the Data Recovery menu in the left navigation menu. The form shown below will display. Fill in the form fields to point to a SAMBA or Windows file share on your network. Click the “Add Destination” button to add the destination to your backup destinations list. As soon as you click “Add Destination”, the backup system will attempt to connect to the destination to verify its validity. 22 • Destination Name: Your personal name for this backup destination. Destination Name can be anything you • prefer. It does not affect the connection to the remote share. Remote Machine Name: The name of the destination machine on your network. This name should not be • prefixed with double backslashes (\\) or foreslashes (//). Remote IP or Hostname: The IP address on the destination machine. The IP is used if the name resolution • for Remote Machine Name fails. A fully qualified hostname can also be used here, for example, backup.yourschool.edu. Remote Share Name: The name of the share on the remote (destination) machine. Make sure the remote • share has granted read, write, and delete permissions to the specified user. Domain: If the permissions on the remote share use a domain user account, you must specify that domain • here. To use a local user account on the backup destination, you may leave this field blank. User Name: The user account used to connect to the remote share. Administrator Guide • Password: The password of the user account used to connect to the remote share. SAFARI Montage® © 2005-2013 Library Video Company. All Rights Reserved. 23 SAFARI_Montage_admin Backup Backing Up The Backup page allows you to manually back up your data or media files at any time. To begin a manual backup, choose one or more target destinations by clicking its checkbox in the left-hand column of the Backup Destinations table. Set the “Data Only” and “Keep Previous” drop-downs accordingly and click the “Back Up” button. What is Backed Up Data Uploaded Media Files (CreationStation™ module only) Playlists Audio Recent Searches User Accounts Images Video User Dashboards Flipcharts 24 Administrator Guide Data Only Customers who have CreationStation™ installed will also see a drop-down for “Data Only.” The Data Only drop-down lets you select between backing up only personal data or both personal data and uploaded media files. The personal data backed up is playlists, recent searches, user accounts, and user dashboards. If you have CreationStation installed, and you set the Data Only drop-down to “No,” all uploaded video, audio, and image files will also be backed up. Keep Previous The “Keep Previous” drop-down allows you to select whether to retain prior backups or overwrite the most recent backup. If Keep Previous is set to “Yes,” a new backup will be created on the selected destination. If Keep Previous is 25 SAFARI_Montage_admin set to “No,” the backup labeled, “Default backup,” will be overwritten. If your default backup is not on your target destination and you set Keep Previous to “No,” the system will still remove the default backup from the former destination. In other words, the system obeys the “Keep Previous” setting regardless of where the default backup is located. Spanning Destinations Activating more than a single destination checkbox allows you to span the backup across multiple destinations. During a multi-destination backup, when the first destination fills up, the backup will continue on the second destination, and so on, filling each destination up in sequence. Because a hard drive filled to 100% capacity can cause instability on the target system, the backup system does not fill the target drive(s) completely. The system will leave 2 GB of free space on each target destination. Editing Destinations To edit a destination, click the “edit” link at the right-hand side of its row. The Edit Destination page with appear allowing you to edit the title, server name, IP address, backup share name, and login credentials. Deleting Destinations To delete a destination, click the “delete” link at the right-hand side of its row. A dialog box will display to confirm deletion. Important: Deleting a destination does not delete the backup files that reside there. You may reassociate backups in the future by creating a destination and pointing it to that same location. Deleting Backups To delete a backup, click its “delete” link. A confirmation box will display. Deleting a backup will delete all files associated with that backup—data and media. Space Calculations The size calculations on the page indicate how much space remains on each destination, as well as estimated space required for your backup. The “Data Space” total is an estimate of how much space your personal data will consume. If the SAFARI Montage CreationStation module is installed, the “File Space” total indicates the total space needed to back up all of your uploaded video, audio, and image files. As you change the Data Only selection, the File Space estimation will appear or disappear and the “Space Needed” and “Will it Fit?” metrics will change accordingly. Please note that these space calculations are “safe estimates” with some overhead added. The physical space consumed on the destination drive will likely be less. SAFARI Montage® © 2005-2013 Library Video Company. All Rights Reserved. 26 Administrator Guide Backup Schedule The Backup Schedule area allows you to schedule backups to occur automatically on a weekly basis. You may set ® the backup to occur any day of the week, at any time. If you have the SAFARI Montage CreationStation module installed, you may also back up your uploaded media content in addition to your personal data. 1. Click ‘Admin’ on the SAFARI Montage header. 2. Click ‘Data Recovery’ from the secondary navigation menu. 3. Click ‘Backup Schedule.’ 4. Place a checkmark next to the destinations you wish to schedule. Set the ‘Active’ drop-down to ‘Yes.’ Set scheduling options as desired and click ‘Save.’ Scheduling an Auto-Backup To schedule an auto-backup, choose one or more target destinations by clicking its checkbox in the left-hand column of the Backup Destinations table. In the Backup Schedule table, set the “Week Day” and “Hour of Day” drop-down boxes to indicate when you would like the backup to occur. Customers who have CreationStation™ installed will also see a drop-down for “Data Only.” The Data Only drop-down lets you select between backing up only personal data or both personal data and uploaded media files. The personal data backed up is playlists, recent searches, user accounts, and user dashboards. If you have CreationStation installed, and you set the Data Only drop-down to “No,” all uploaded video, audio, and image files will also be backed up. To schedule the auto-backup, set the Active dropdown box to “Yes” and click the Save button. Please see the screenshot below for further information. 27 SAFARI_Montage_admin Spanning Destinations Activating more than a single destination checkbox allows you to span the auto-backup across multiple destinations. During a multi-destination backup, when the first destination fills up, the backup will continue on the second destination, and so on, filling each destination up in sequence. Because a hard drive filled to 100% capacity can cause instability on the target system, the backup system does not fill the target drive(s) completely. The system will leave 2 GB of free space on each target destination. SAFARI Montage® © 2005-2013 Library Video Company. All Rights Reserved. 28 Administrator Guide Restore Restoring Backups To restore a backup, select its radio button and click the “Restore” button. A dialog box will appear confirming your decision to restore that backup. Restoring a backup will overwrite all existing personal data and personal content in your SAFARI Montage system. Your existing licensed content packages will not be overwritten. You may also delete destinations and backups from this page. See the ‘Backup’ Help page for more information on deleting destinations and backups. What is Restored Backup restoration will overwrite all existing personal data in your SAFARI Montage system. This includes dashboards, playlists, recent searches, user accounts for CreationStation™ users that selected a full backup (rather than “Data Only”), all uploaded video, audio, and image files. For CreationStation users, if the backup being restored was “Data Only,” any media files that still exist since that backup took place will remain available in SAFARI Montage. Any media that was deleted since that backup will appear in search results but will not play. For these records, you must upload a media file again, or delete the entire item and add it again. Restoring to a New System Always follow this sequence to restore backups into a new system. 1. Install and activate all content packages. 2. Restore your backups. Do note restore your backups prior to reinstalling and activating content. Unpredictable results can occur. SAFARI Montage® © 2005-2013 Library Video Company. All Rights Reserved. 29 SAFARI_Montage_admin Reporting Various usage reports are available by clicking ‘Reporting’ from the Admin menu. Reports that have the word ‘live’ after them are reports that continually refresh themselves with live data as you are viewing them. Activity Log ‘Activity Log’ tracks all server activity. This tool can be very helpful when trouble shooting. Download Popularity ‘Download Popularity’ tracks the number of times a media title was downloaded. 30 Administrator Guide Download by User ‘Download by User’ tracks the number of times a media title was downloaded by a user. 31 SAFARI_Montage_admin Hard Drive Usage (live) The live report, ‘Hard Drive Usage,’ displays your servers hard drive usage by package. Logins by Failure The ‘Logins by Failure’ report displays a listing of failed login attempts to your server. Logins by IP ‘Logins by IP’ shows a listing of login attempts to your server by user IP address. 32 Administrator Guide Logins by School (live) The live report, ‘Logins by School,’ shows a listing of users currently logged on in each school. Logins by Time (live) This live report tracks the number of users logged on to your server by time. As a default, it displays the number of users logged in on an hourly basis for the last 24 hours. Playbacks by Media (live) The ‘Playbacks by Media’ live report breaks down the media playbacks by the type of media for a specified time period. As a default, the report displays playbacks by media for the last 24 hours. In the example below, the report is displaying the playbacks by media type for the last 7 days. 33 SAFARI_Montage_admin Playbacks by Package The ‘Playbacks by Package’ report lists media titles that have been played within each content package on SAFARI Montage. Playbacks by School The ‘Playbacks by School’ report lists media titles that have been played within each school on your SAFARI Montage server. Use the list of schools at the top to display the report for a different school. 34 Administrator Guide Playback by Time (live) The ‘Playback by Time’ live report lists the number of plays each hour. 35 SAFARI_Montage_admin Playback by User This report displays the number of plays for users in a school. Use the list of schools at the top to display the report for a different school. 36 Administrator Guide Playback Details ‘Playback Details’ allows administrators to search usage reports by a specific date range. Usage Data ‘Usage Data’ allows administrators to run several specific specialized DB extraction queries. The DB extraction queries include: • • • • • • • • • • • • • • • Total Plays (Month) Total Plays (Month, Content Package) Total Plays (Month, Content Package, School) Total Plays (Month, School) Total Plays (Month, School, User) Total Plays (Month, School, User, Title) Total Plays Last Month Total Plays Last Month (Content Package) Total Plays Last Month (Content Package, School) Total Plays Last Month (School) Total Plays Last Month (School, User) Total Plays Last Month (School, User, Title) Full Export (up to 5 years) Full Export Last Year Full Export Last Month If you have the SAFARI Montage Managed Home Access feature installed, then you will also see the following: 37 SAFARI_Montage_admin • • • • • • • • • • • • • Total Home Access Plays Total Home Access Plays (Month) Total Home Access Plays (Month, Content Package) Total Home Access Plays (Month, Content Package, School) Total Home Access Plays (Month, School) Total Home Access Plays (Month, School, User) Total Home Access Plays (Month, School, User, Title) Total Home Access Plays Last Month Total Home Access Plays Last Month (Content Package) Total Home Access Plays Last Month (Content Package, School) Total Home Access Plays Last Month (School) Total Home Access Plays Last Month (School, User) Total Home Access Plays Last Month (School, User, Title) Web Server Statistics ‘Web Server Statistics’ provides system administrators with a large number of basic reports. These reports can provide necessary daily, weekly, as well as quarterly usage reports. SAFARI Montage® 38 Administrator Guide © 2005-2013 Library Video Company. All Rights Reserved. 39 SAFARI_Montage_admin Settings LDAP Settings SAFARI Montage Users vs. LDAP Users SAFARI Montage may be configured to use either of two user-bases for login accounts—local SAFARI Montage users, or users from a directory server such as Microsoft Active Directory, Apple Open Directory, Novell eDirectory, or OpenLDAP. When configuring SAFARI Montage to use local users, each user must be created and managed manually in the SAFARI Montage system. This may become time-consuming if your organization is large. A better option is to connect SAFARI Montage to your organization’s directory server using LDAP (Lightweight Directory Access Protocol). Once SAFARI Montage is connected to an LDAP-compliant server, security groups from your organization’s directory server may be mapped directly to SAFARI Montage groups. This allows you to grant access to a large number of your network users in a single operation, and spares you the labor of having to manage two sets of user accounts: domain accounts and SAFARI Montage accounts. Enabling LDAP Under the ‘Settings’ sub-navigation item, click the ‘LDAP’ button. To enable LDAP on your SAFARI Montage system, click the ‘Enable LDAP’ link at the top of the page. Disabling LDAP When LDAP is active, the ‘Enable LDAP’ link will become ‘Disable LDAP.’ Click this link to disable the LDAP connection and return to using SAFARI Montage accounts. LDAP Settings Once LDAP is active, the form shown below will display. Enter the appropriate information for your directory server and click the ‘Save’ button. Beneath the example below, you will find more detailed information about each field on this form. 40 Administrator Guide Description Descriptive name for your LDAP server. Host The Host may be either the resolvable name of your LDAP server or its IP address. If you use the host name rather than IP, the SAFARI Montage system must be able to resolve the name. SAFARI Montage will look up the name in the DNS server(s) that you configured upon install. In most cases, you will need to fully qualify the hostname by appending its complete domain name, for example, ldap.myschool.edu rather than ldap. You may use SAFARI Montage’s ‘Ping’ feature, found under the ‘Tools’ sub-menu, to see if SAFARI Montage is able to resolve the hostname. SSL Activate the SSL checkbox if your LDAP server requires Secure Sockets Layer connections. Base DN Enter your LDAP server’s Base Distinguished Name (DN) in this field. Examples of valid Base DN’s are shown below. Note that most Novell eDirectory setups only require an organization (as shown). Base DN Examples • • • • Microsoft Active Directory - dc=domain, dc=com Apple Open Directory - dc=domain, dc=com Novell eDirectory - o=myorganization OpenLDAP - dc=domain, dc=com Fetch The Fetch button will attempt to retrieve the Base DN from your LDAP server. This method may not always retrieve the correct Base DN, depending upon your LDAP implementation. 41 SAFARI_Montage_admin LDAP Connection Style Choose the LDAP technology that exists on your network. Login Enter the username and password for the user that has read access to the LDAP tree specified. Clicking ‘Save’ will attempt to connect to your LDAP server and, if successful, will save your LDAP settings. After SAFARI Montage connects successfully to your LDAP server, click ‘LDAP Groups’ in the left navigation menu to map your LDAP groups to the SAFARI Montage user types. SAFARI Montage® © 2005-2013 Library Video Company. All Rights Reserved. 42 Administrator Guide Personalized Login Screen You can personalize your SAFARI Montage server by uploading a logo image that will display on your login screen. 1. Click ‘Admin’ on the SAFARI Montage header. 2. Click ‘Settings’ from the secondary navigation menu. 3. Click ‘Login Screen’ from the Settings submenu. 4. Click ‘Browse’ and navigate to an image file on your machine or network. 5. Click the ‘Upload’ button. SAFARI Montage® © 2005-2013 Library Video Company. All Rights Reserved. 43 SAFARI_Montage_admin Network Settings 1. Click ‘Admin’ on the SAFARI Montage header. 2. Click ‘Settings’ from the secondary navigation menu. 3. Click ‘Network’ from the Settings submenu. 4. Change or set various network settings. Changing the settings on this page will require a restart of SAFARI Montage. During the restart, SAFARI Montage will not be accessible for up to 10 minutes. 5. Click ‘Set.’ Hostname Help The Hostname is the unique name by which your SAFARI Montage server is known on your network. On most networks, hostname is usually a single word, for example, montage1. With certain other network configurations your hostname may need to be fully qualified using its entire domain name. For example, if the hostname of this server is montage1 and the domain on which it resides is called myschool.edu, the hostname above would be montage1.myschool.edu. SAFARI Montage® 44 Administrator Guide © 2005-2013 Library Video Company. All Rights Reserved. 45 SAFARI_Montage_admin Secure Sockets Layer (SSL) SSL is a technology that allows browser-based applications like SAFARI Montage to encrypt private data as it travels between the user’s web browser and the server. If data is not encrypted in this manner, then it is transmitted in “plain text,” which means there is a risk that it can be viewed by eavesdroppers using the right tools. This becomes a much greater concern with publicly exposed Internet or Extranet applications, as opposed to ones that reside behind your firewall on your LAN (Intranet). Even with Intranet applications, it is generally a wise practice to use SSL to secure certain pages where private data is entered by the user. In SAFARI Montage’s case, activating SSL will secure all pages where a password is entered for example, the Login and User-Management pages. (For complete list, see SSL-Secured Pages below.) Encryption Types in SAFARI Montage There are two methods of password-encryption in SAFARI Montage, a non-SSL encryption for older SAFARI Montage hardware, and true SSL encryption for new hardware. New Hardware SAFARI Montage Models: T-420, RM-640, WAN-1240 • • True SSL encryption SSL is managed from the Admin > Settings > SSL page. There are three SSL Types to choose from on • that page. See “SSL Types” below. SSL Type is a "server-wide" setting. It applies to all schools on that server. Old Hardware SAFARI Montage Models: T-400, RM-800, WAN-1000 • • • • • Only the non-SSL encryption is available, which can be activated or deactivated by the SAFARI Montage Admin. Non-SSL encryption is activated/deactivated on the Admin > Settings > System page. This is also a server-wide setting. It applies to all schools. When active, extra asterisks will suddenly appear in password boxes when “Submit” is clicked on secure pages. There is no Admin > Settings > SSL page. SSL Behavior When SSL is active on secure pages, several things will occur in the web browser: • The browser will display an SSL icon (usually a padlock or shield) either in the Address bar or the Status bar. • • 46 The SSL icon may be double clicked to see details about the SSL certificate, such as Certificate Authority, Encryption Level, etc. The browser’s URL will begin with https:// rather than http://. Administrator Guide • If the certificate in use is not signed by a trusted authority, the browser will display a warning about an untrusted certificate. SSL Types The three SSL Types on the Admin > Settings > SSL page are: None SSL is inactive. No SSL padlock icons will appear in the browser. Passwords are transmitted in plain text. Self-Signed Built-In self-signed SSL certificate signed by “SAFARI Montage.” Because this certificate is not signed by a trusted certificate authority (such as VeriSign, Thawte, or Comodo), it will cause browser warnings to appear. If the user does not trust this certificate permanently, the warnings will reappear the next time the user accesses SAFARI Montage. These warnings do not mean the pages are not secure. Regardless of whether the user trusts the certificate or not, an SSL icon will still display in the browser’s Address bar or Status bar indicating that these pages are still completely encrypted. Different browsers have different ways of letting the user trust a certificate. Refer to your browser’s documentation to find out more about trusting SSL certificates. With the Self-Signed certificate type, no certificate needs to be uploaded. This certificate type is available as a convenience to organizations that do not want to pay for a commercial certificate to use while they are waiting for their commercial certificate, or simply do not mind the one-time browser warnings. Prior to selecting this Self-Signed Certificate option, it is a good idea for the Systems Administrator to send out an email to all SAFARI Montage users asking them to permanently trust the certificate when prompted. They will encounter the warning first on the Login screen. Upload This option allows the SAFARI Montage Admin to upload a commercial SSL certificate from a commercial certificate vendor such as VeriSign, Thawte, or Commodo, or perhaps a certificate of your own. With commercial certificates from a trusted authority, there will be no browser security warnings for any users. Be aware that SSL vendors offer free SSL certificates that expire within 90 days, but these temporary certificates are not signed by the trusted authority. This means that temporary certificates from commercial SSL vendors will still cause the browser to display warnings. You must purchase a full, commercial SSL certificate if you want your users to never see any SSL warnings. Every SSL Certificate has a corresponding Private Key that is stored on the web server. Your Private Key is generated at the same time as your “Certificate Signing Request.” See “Certificate Signing Request” below. SAFARI 47 SAFARI_Montage_admin Montage provides you with two options with regard to the Private Key (1) uploading your own, and (2) generating one in SAFARI Montage when you create your CSR. The first method, uploading your own, would be used in cases where you have generated your CSR and Private Key outside of SAFARI Montage. The second method allows you to generate your Private Key and CSR directly in SAFARI Montage. Certificate Signing Request (CSR) When you purchase a commercial SSL certificate, the vendor will ask you for a “Certificate Signing Request” (simply some lines of encrypted text). Most certificate vendors will require that you to paste the CSR text directly into their online form during checkout. The Admin page, Admin > Settings > SSL, allows you to generate a CSR. On that page, when you fill in the required information and click “Generate CSR,” your CSR text will display and a temporary Private Key will be saved onto the SAFARI Montage hard drive. It will not overwrite any previously uploaded Private Keys (yet). Paste the CSR text into the appropriate box on the SSL vendor's checkout page, selecting “Apache mod_ssl” as the certificate type. When your certificate arrives, return to the Admin > Settings > SSL page and upload it. SAFARI Montage will verify that the temporary Private Key corresponds to the Certificate you are now uploading. At that point, provided the temporary Private Key and Certificate correspond, any previously uploaded Private Key will be overwritten with the temporary Private Key. In other words, your temporary Private Key is now your active Private Key. Back Up Your Private Key and SSL Certificate It is very important that you back up your Private Key and Certificate. To view your Certificate and Private Key, click the small icons next to the Upload boxes on the Admin > Settings > SSL page. A window will open with your encrypted Certificate or Private Key text in it. Copy and paste that text into text file and save them in a secure location on your computer or network. Certificates typically have a “CRT” file extension. Private Keys typically have a “KEY” or “PEM” extension. Certificate Trust in Various Browsers In each web browser brand, there are ways to trust self-signed certificates so that the security warnings no longer display. Internet Explorer 48 Administrator Guide To eliminate the warnings and the red Address Bar in Microsoft Internet Explorer when using a self-signed certificate, you must add the certificate to the Windows “Trusted Root Certification Authorities” store. To do this: 1. Click the following link to the self-signed SSL Certificate on this server. 2. When prompted, select “Open” button and agree to any warnings or prompts. 3. Click the “Install Certificate” button in the tabbed dialog box that appears. Internet Explorer will inform you that you are about to install the certificate. Click “Next.” 4. When it asks you to select a “Store” (a location), you must manually select “Place all certificates in the following store.” 5. Click “Browse...” and select “Trusted Root Certificate Authorities.” Again, accept any warnings that display. Internet Explorer’s warnings and red address bar when browsing SAFARI Montage should now be eliminated. Firefox Pre-3.0 versions of Firefox, when presented with an untrusted certificate, would display a dialog box with three choices: “Accept this certificate permanently”, “Accept this certificate temporarily for this session” and “Do not accept this certificate...” Clicking “Accept this certificate permanently” would cause no further warnings to display about that particular certificate. With the release of Firefox 3.0, the process has become more elaborate (for security purposes). When the warning dialog box appears, you must manually “Add a Security Exception” for that certificate. It takes several clicks. Follow the prompts. Safari Safari displays a dialog entitled, “Safari can't verify the identity of this website...” To trust the certificate, click “Show Certificate.” In the “Trust” section, set “When using this certificate” to “Always trust.” SSL-Secured Pages The following pages are secured when encryption (SSL or non-SLL) is active: • • • • • • • • • • Login Preferences > Change Password Admin > Settings > System Admin > Settings > Users > Add User Admin > Settings > Users > Add Multiple Admin > Settings > Users > [click a username] Admin > Settings > LDAP > Add Server Admin > Settings > LDAP > Edit Server Admin > Data Recovery > Add Destination Admin > Add-On Modules > DataCasting > Share SAFARI Montage® © 2005-2013 Library Video Company. All Rights Reserved. 49 SAFARI_Montage_admin 50 Administrator Guide System Settings System settings provide the system administrator with the ability to change settings globally. The system settings control which state standards are searched, grade limits, the preferred video player and whiteboard integration. 1. Click ‘Admin’ on the SAFARI Montage header. 2. Click ‘Settings’ from the secondary navigation menu. 3. Click ‘System’ from the Settings submenu. 4. Enter relevant information and save your changes by clicking ‘Update.’ Full descriptions of each setting are found below the screenshot. 51 SAFARI_Montage_admin System Setting Descriptions 52 Administrator Guide • • • • Version Number - The version number of your SAFARI Montage software. Server Name - The server name (hostname) of your SAFARI Montage system. System Notifications Email - The email address that will receive system-level email notifications from SAFARI Montage. For example, this email account is notified when a user changes their password or other user account data. Admin Password - The password of the master administrator. To log in as the master administrator, use a username of “admin” or “administrator” along with this password. This user has access the all SAFARI • Montage functions including all administrative functions. This user’s administrative privileges can never be revoked. Use descretion when distributing this password to anyone. State - Your home state. This causes the Curriculum Standards search to search within this state by default. Users may override this setting on the Standards search page or in their individual preferences. Also, any new users will initially have this state set on their personal preferences. After you select your default state, if you see the red X icon next to your state, then you will have to load the standards for that particular state. • To load the standards, click the ‘load’ link. Link to SAFARIMontageHDNetwork.com on Dashboard - when enabled, a link to • SAFARIMontageHDNetwork.com will display on the Dashboard. Maximum Items per Search Page - The default number of search results per page. Users may override • • this setting in their individual preferences. Enable Default Grade Range - Activate or deactivate the Default Grade Range feature. Default Grade Range - The default grade range that new users will see in searches. Users may override • this setting in their individual preferences. Stills Display Running Time (seconds) - The running time for stills and the default running time for stills in • playlists. SAFARI Montage Media Player Support - This box must be checked in order to allow users to use the • SAFARI Montage Media Player. Media Player - Select the specific player to be used by all users of the SAFARI Montage server or allow the • user to decide by selecting ‘User’s Choice.’ CreationStation Content Downloadable By - Determines which users can download and save • CreationStation content marked as downloadable to their local computer. Packaged Content Downloadable By - Determines which users can download and save downloadable • content to their local computer. Send emails when accounts are modified - With this feature active, users are notified of any changes to their account, including usernames and passwords. Disable this feature if you are sensitive to passwords • travelling via email or if you need to modify user accounts without the users being made aware. Permanent Links - Activate the Permanent Links feature on the playback page. This feature allows users to • generate and save permanent links to media Password Encryption - Activating this feature enables non-SSL-based encryption for passwords in transit • between browser and server. Allow user-created accounts - This feature allows anyone to create new user accounts. Activating this feature causes an “I am a new user” link to appear on the Login page. This feature allows the user to create accounts in the Student group only. If they desire a higher access level, they must contact their SAFARI Montage administrator. This feature is only available to standalone servers. Interactive Whiteboard Settings Descriptions • Enable Whiteboard Integration - Allows for the playback and uploading of Flipcharts and Notesbooks into CreationStation. 53 SAFARI_Montage_admin • Default Whiteboard - Select your default Whiteboard type. SMART allows for the uploading and playback • of Notebook files. Promethean allows for the uploading and playback of Flipchart files. Upload and Share Whiteboard - allows the administrator to extend uploading capabilities to teachers. By selecting ‘All teachers, including teachers (w/upload)’, the administrator can grant all users with the user type of teacher, to upload and share whiteboard files. As a default, only users with the user type of teacher • (w/upload) will be able to upload and share whiteboard files. This option will only be viewable if you have the CreationStation module installed. Whiteboard file size limitation - Set the maximum file size limit for uploaded whiteboard files. This option will only be viewable if you have the CreationStation module installed. Note: Administrators logged into a WAN parent server will see a system settings page containing fewer settings than outlined above. This is because many of the system settings are shifted to the schools page in a WAN environment. For info about schools and the management of schools, see the Help page, School Management in the WAN Manager Guide. SAFARI Montage® © 2005-2013 Library Video Company. All Rights Reserved. 54 Administrator Guide Setting System Time and Time Zone 1. Click ‘Admin’ on the SAFARI Montage header. 2. Click ‘Settings’ from the secondary navigation menu. 3. Click ‘Time’ from the Setup submenu. 4. Select the appropriate location from the drop down menu. Please note that changing only your system’s time zone will also change your system’s time settings. 5. There are two methods to set the system time for SAFARI Montage. If your SAFARI Montage server has access to the Internet, you can use an Internet time server to set your system's date and time. The second method on the System Time page allows you to manually enter system time by entering the year, month, day, hour and minutes in a continuous number series. 6. Click ‘Set.’ SAFARI Montage® © 2005-2013 Library Video Company. All Rights Reserved. 55 SAFARI_Montage_admin Creating and Managing SAFARI Montage® System Users Overview System Administrators can add and manage all user accounts. SAFARI Montage has nine user types with various rights and permissions for system use. Users can be added individually, in bulk using a comma-separated file or using LDAP. User accounts can be edited or removed from the system at any point. This topic covers the following, click a link to jump to that section: SAFARI Montage User Types Adding a Single New User Adding Multiple New Users LDAP Groups Editing User Accounts Deleting User Accounts SAFARI Montage User Types Detailed descriptions of each SAFARI Montage user type are below. The user types below are listed in order of most permissions (Administrator) to least (Parent). Click on a user type for more information. Administrator Principal Curriculum Administrator Teacher with Upload Student with Upload Student School Administrator Teacher Parent Administrator Users assigned the Administrator user type have full access to all areas of SAFARI Montage, including access to the private ‘Admin’ area, providing Administrators with access to the complete set of system configuration, status, reporting, and administration tools. Administrators are able to view and manage all aspects of all content in the system, including the ability to view all content, edit content metadata, and delete content uploaded by all system users, including content that has not been shared and content that has expired. Curriculum Administrator Users assigned the Curriculum Administrator user type have limited administrative rights that generally focus on system content and curriculum. Primarily, Curriculum Administrators have full privileges within Digital Curriculum Presenter and can create Departments, assign Developers and build digital curriculum. They also have the ability to share* their Playlists to the school or to the district, approve Playlists and content shared by other users for district distribution, edit CreationStation media metadata, manage district Playlist folders, add SVS streams and view reporting on a school or district level. 56 Administrator Guide Specific Capabilities of Note: o Search o Admin Areas o Access to the same Advanced Search filters as Administrators Reporting Curriculum Developer CreationStation EdCast - Transfer Queue only Managed Home Access Multi-Format Auto Converter Selective Video Streaming WAN Manager - approve content and Playlists and edit school CreationStation Automatically assigned as an Approver Can share their CreationStation uploaded items and items uploaded by other users to the school or to the district directly, bypassing an approval queue if configured. In addition to general CreationStation use, can edit and manage digital rights for CreationStation resources uploaded by all users from all schools. Bulk metadata download and upload ability to update existing Learning Object Repository items. o Digital Curriculum Presenter Automatically granted district-wide Departmental Developer rights Can create, edit and manage Courses, Lessons and Classes. 1. School Administrator Users assigned the School Administrator user type have limited administrative rights that generally focus on content and media for their School or School Group only. School Administrators have the capabilities to share* their Playlists to the school or to the district, approve Playlists and content added by other users, manage Playlist folders, add SVS streams, manage Pathways SM and view reporting on a School level. They are the only user type besides System Administrator who can add, edit and delete users (within their School). Specific Capabilities of Note: o o Search Access to the same Advanced Search filters as Administrators, excluding 'Location.' Admin Areas 57 SAFARI_Montage_admin • Content & Modules - Content Update Settings only • Reporting • Settings • Users – Can create, modify and delete school users. • Can assign LDAP groups to school but cannot add LDAP servers. o • Tools • Curriculum Developer • EdCast - Transfer Queue only • Managed Home Access • Pathways SM - School Call and Room Group Call only • Selective Video Streaming - can create streams for school only • WAN Manager - Approve content and Playlists and edit school CreationStation • Automatically assigned as an Approver • Can upload media files and create web links. • Can share* their CreationStation uploaded items to the school or to the district. • Cannot edit or manage digital rights for CreationStation titles uploaded by other users. Principal Users assigned the Principal user type have limited administrative rights that generally focus on system usage reports within the scope of school, school group or district. Principals can also share* their Playlists to the school or to the district, manage Playlists created by other users, add SVS streams and view all administrative reports. Specific Capabilities of Note: o Search o Admin o Access to the same Advanced Search filters as Administrators, excluding 'Location.' • Reporting • Curriculum Developer • Managed Home Access • Pathways SM – All-Call only CreationStation • Can upload media files and create web links. • Can share* their CreationStation uploaded items to the school or to the district. 58 Administrator Guide • Cannot edit or manage digital rights for CreationStation titles uploaded by other users. Teacher with Upload Users assigned the Teacher with Upload user type can conduct searches, create Playlists from any content on SAFARI Montage, view Playlists, and can upload new digital resources via CreationStation. Teachers with Upload can share* their CreationStation uploaded items to the school or publish to the district. Teacher Users assigned the Teacher user type generally have full instructional usage capabilities within the system, allowing them to conduct searches, view all available content, and create and share Playlists. Teachers can share* Playlists they create to the school or to the district. If the system is configured to allow Teachers to upload Interactive Whiteboard (IWB) files, a Teacher user type may do so via CreationStation. These uploaded IWB files will remain private to the Teacher and cannot be shared. When Digital Curriculum Presenter is licensed, Teacher capabilities extend to support Classes and delivery of Courses. Teachers can view and teach assigned Classes, including the ability to deliver lessons, conduct Get it? sessions and assign Concept Reviews and Assignments. Depending on system settings managed by Administrators, Teachers may be able to create personal My Lessons to complement Digital Curriculum Presenter Courses. If designated as a Course Developer for a Department, Teachers can also create and edit Department Course curriculum. Student with Upload Users assigned the Student (w/ Upload) user type have the same functionality as a Student but with the added ability to upload new media to the system. Uploads are automatically stored in an individual My Locker private to the student who uploaded them. My Locker items cannot be shared with the exception of submitting items in an Assignment response. Student Users assigned the Student user type have generally have full usage capabilities to interact with content and curriculum, allowing them to conduct searches, view all available content, and create and share Playlists. Students can share Playlists they create to their school. When Digital Curriculum Presenter is licensed, Students can view Classes, participate in Get it? and View & Chat sessions as well as complete Concept Reviews and Assignments. Student users have the ability to upload media to the system only in response to an Assignment. Parent Users assigned the Parent user type have the ability to conduct searches, view packaged content metadata, but not view packaged content, view CreationStation content on the system subject to content DRM settings, view shared Playlists, view Internet SVS streams, and join SAFARI Montage Live conferencing sessions as well as view recordings. *NOTE: SAFARI Montage may be configured to require approval of resources and Playlists shared to the district before making them available to general users. 59 SAFARI_Montage_admin top Adding a Single New User 1. Navigate to the system Users page and associated tools by clicking on the link in the Main Navigation Menu. 2. Select 'Users' from the 'Settings' secondary navigation menu. 3. Click the ‘Add User’ link at the top of the user summary page. If you are an administrator logged into a WAN parent server, select the school for which you want to create users before clicking the ‘Add User’ link. 4. 60 You will be navigated to the 'Add User' page. Complete the form: Administrator Guide Note: the editable fields may vary depending on your system configurations. • Username - must be between 3 and 30 letters and/or numbers. Spaces are not allowed. • E-mail Address - enter a valid e-mail address for the account. • First Name - enter the first name as it will appear when the user is logged into the system. • Last Name - enter the last name as it will appear when the user is logged into the system. • Password - must be between 5 and 10 letters and/or numbers. You may also leave the password field blank to generate a random password that will be e-mailed to the user. User Type - select from the menu of option. Refer to the user types overview for more information on the permissions of each. Note: If your system has MHA (Managed Home Access) installed, then you will • be able to assign users to the ‘Parent’ user type. • Approver - checking this box will grant the Approver role privileges to a user. Applicable to Teacher, Teacher with upload, Principal and School Administrator only. Note: Curriculum Administrator and Administrator have this role by default. • Recording Capability - checking this box will allow a user to record SVS titles using the Network- DVR. Applicable to user types of Teacher with Upload and above only. • VIEWPath Alerts - if applicable, grant the user VIEWPath Alert privileges by checking one or more of the corresponding boxes: • Administrator - allows the user to administer camera alerts. 61 SAFARI_Montage_admin 5. • View Alerts -allows the user to view camera alerts. • Control Camera - allows the user to control the camera during alerts. • Stop Recording - allows the user to stop the recording during alerts. Click ‘Add User.’ top Adding Multiple New Users Multiple new users can be added to a School at one time by manually entry or via a comma-separated list. 1. Navigate to the system Users page and associated tools by clicking on the link in the Main Navigation Menu. 2. Select 'Users' from the 'Settings' secondary navigation menu. 3. Click the ‘Add Multiple’ link at the top of the user summary page. If you are an administrator logged into a WAN parent server, select the school for which you want to create users before clicking the ‘Add Multiple’ link. 4. Choose from either the Manual Entry or Text File Upload options explained below to add multiple new users. Manual Entry 62 Administrator Guide 1. Select the user type to which you will be assigning the new users from the dropdown. 2. Should it apply, indicate if the users will be granted the Approver role by checking the box. 3. Enter a comma-separated list of e-mails to the 'Email Addresses' text entry field. ([email protected],[email protected],[email protected]) 4. Indicate if usernames will be created using the entire e-mail address ([email protected]) or just the e-mail address prefix (jsmith). 5. Click 'Add Users' at the bottom of the page. Text File Upload 1. Create a comma-separated file, either .TXT or .CSV. 2. Each line in the import file must be in the following format: username, firstname, lastname, password, emailaddress, title, user type Note: Leave a user's password blank to have it auto-generated. For example: ajones, Amy, Jones, , [email protected], Teacher (w/Upload) Valid user types are: Student, Student (w/Upload), Teacher, Teacher (w/Upload), Principal, School Administrator, Curriculum Administrator and Administrator. Note: If you have Managed Home Access on your SAFARI Montage server, you will have the ability to assign users to an additional user group called ‘Parent.’ 3. Click 'Browse' to locate the .TXT or .CSV file to be uploaded: 4. Click ‘Add Users’ at the bottom of the page. top LDAP Groups 63 SAFARI_Montage_admin The LDAP Groups page allows you to map groups from your LDAP server to the user types within SAFARI Montage. 1. Navigate to the system Users page and associated tools by clicking on the link in the Main Navigation Menu. 2. Select 'Users' from the 'Settings' secondary navigation menu: 3. Click the ‘LDAP Groups’ link at the top of the user summary page. If you are an administrator logged into a WAN parent server, select the school for which you want to create users before clicking the ‘LDAP Groups’ link. To Map an LDAP Group to a SAFARI Montage User Type 1. Select an LDAP Server from the ‘LDAP Server’ dropdown. 2. Select the SAFARI Montage user type from the ‘Show LDAP Assignments for the ... User Type’ selection box that you would like to map LDAP groups to. 3. Select an LDAP group, or groups, from the listbox and click ‘Add.’ to map the LDAP group to the SAFARI Montage user type. Your selections will display in the ‘Assigned LDAP Groups’ listbox. To Remove the Mapping of an LDAP Group to a SAFARI Montage User Type 1. Select an LDAP Server from the ‘LDAP Server’ dropdown. 2. Select the SAFARI Montage user type you want to modify from the ‘Show LDAP Assignments for the ... User Type’ selection box. 3. Select the LDAP group from the ‘Assigned LDAP Groups’ listbox that you want to un-map from the SAFARI Montage user type. 4. Click on the ‘Remove’ button. top Editing User Accounts An Administrator can edit a user account at any time. 64 Administrator Guide 1. Navigate to the system Users page and associated tools by clicking on the link in the Main Navigation Menu. 2. Select 'Users' from the 'Settings' secondary navigation menu: 3. Click the ‘edit’ link to the right of a user name: 4. This will open the 'Edit User' page allowing you to make any necessary changes to the account including username, e-mail address, name, password, user type and any additional options which may be available based on the user type and the system configurations. Note: You can transfer a user to another school from the 'Edit User' page by clicking the button. This can also be done from the user summary page by clicking the 'transfer' link. 5. page: You have the ability to add or edit a user's 'Profile Image' for a user account from the 'Edit User' 65 SAFARI_Montage_admin 6. After making changes, click 'Update' to save. top Deleting User Accounts An Administrator can delete a user account at any time. A user can be marked as inactive by un-checking the box in the 'Active' column of the user summary page. This will disable the user account without removing the account from the system. 1. Navigate to the system Users page and associated tools by clicking on the Main Navigation Menu. 66 2. Select 'Users' from the 'Settings' secondary navigation menu: 3. Click the ‘Delete’ link to the right of a user name: link in the Administrator Guide Note: Uncheck the 'Active' box to disable the account. 4. You will see the following message asking you to confirm the user account deletion: 5. Click 'Delete.' Note: The user account and all of their Playlists will be permanently deleted. top SAFARI Montage® © 2005-2013 Library Video Company. All Rights Reserved. 67 SAFARI_Montage_admin System Tools Your SAFARI Montage server has many system diagnostic tools. To locate these helpful tools, click ‘Admin’ on the SAFARI Montage header and then click ‘Tools’ from the secondary navigation menu. Tools with the text ‘live’ next to them are tools that are continually refreshed with new data as you are browsing the page. You can set the refresh rate of a ‘live’ tool by clicking on the refresh rate settings at the top of the tool’s page. Bandwidth (live) The Bandwidth tab on the Tools submenu allows system administrators to monitor the bandwidth usage of their SAFARI Montage server. Bandwidth Restrictor The Bandwidth Restrictor page allows you to specify the amount of bandwidth your server will use on the network. Connections SMB (live) The Connections SMB tab lists the active SMB connections per hard drive of your SAFARI Montage server. Connections TCP (live) The Connections TCP tab lists the remote address, connection type and number of ports for each TCP connection to your SAFARI Montage server. Content Packages Statistics This page lists all of the content packages available on your server. If a content package is activated, a breakdown of providers contained in the package, a total count of titles in the package, and amount of hard drive space consumed by the content package will be displayed. DB Cache 68 Administrator Guide Enabling database caching increases the performance of your SAFARI Montage server. The cache is updated every 20 minutes. Hard Drive Info OS The hard drive info tab on the Tools submenu provides information on hard drive utilization. Ping The Ping tab on the Tools submenu allows system administrators to ping other network devices from the SAFARI Montage server. Enter the relevant information and hit ‘Ping.’ Reboot and Shut Down The Reboot and Shut Down tab on the Tools submenu allows system administrators to reboot or shut down the SAFARI Montage server. SAFARI Montage can be connected to a keyboard, mouse and monitor, or it can be run as an independent appliance. If SAFARI Montage is being operated as an independent appliance, without a keyboard, mouse and monitor, use the reboot and shut down web page from within the ‘Admin’ section. DO NOT power your SAFARI Montage unit down by removing the power cord from the wall outlet, the rear of the appliance, or by holding in the power button. 69 SAFARI_Montage_admin Server Load (live) The Server Load page reports the CPU uptime and the processes currently running on your SAFARI Montage server. Server Load Averages (live) The Server Load Averages page lists the 5 minute load average per hour for a particular date. It averages the hourly values and displays an average for the day. You can view the data for this report for today or any day in the past. 70 Administrator Guide Software Update History This page displays what SAFARI Montage software version is installed on your server. It also displays a link the release notes and a history of installed software updates. Space Available The Space Available page displays the size and storage space available on your SAFARI Montage server. Sync Cache Status (live) This page lists the status of the WAN cache for syncing with remote servers and expansion servers. 71 SAFARI_Montage_admin System Volumes The System Volumes tab lists the volumes located on your SAFARI Montage server and the content packages contained on each volume. Traceroute The Traceroute tab on the Tools submenu allows system administrators to trace network paths from the SAFARI Montage server. Enter the relevant information and hit ‘Trace.’ SAFARI Montage® 72 Administrator Guide © 2005-2013 Library Video Company. All Rights Reserved. 73 SAFARI_Montage_admin Software Update To update the software or the content on your SAFARI Montage server, you must log on to the server's SAFARI Montage console. For more information about the SAFARI Montage console, see the Help page ‘SAFARI Montage Console.’ 1. Insert the SAFARI Montage update CD, DVD or USB thumb drive. 2. From the SAFARI Montage console, select menu item #5 ‘Update SAFARI Software...’ 3. Select #1 ‘Update SAFARI Software from CD or DVD’ if you inserted a CD or DVD. Select #2 ‘Update SAFARI Software from USB Drive’ if you inserted a USB thumb drive. 74 Administrator Guide The update will take several minutes to complete. If you are updating the software on your SAFARI Montage server, then your server will reboot once the update is finished. If you are only running a content update, the server will not reboot when the update is complete. Note: The software update will update all point releases as well as patch releases. If your server is in a WAN parent/child environment or you have expansion servers, it is suggested that you update your WAN parent or WAN controller server first. After updating the WAN controller server, the expansion servers will be automatically updated. If your WAN environment has child servers, you can opt to have your child servers automatically update once the WAN parent is updated - see Help page ‘Remote School Servers’ in the WAN Manager Guide. If you do not enable this feature, then you must manually update each child server once the update has been installed on the WAN parent. Release Notes Release notes for versions of SAFARI Montage can found here or by clicking the ‘Release Notes’ link on the ‘Software Update’ page. SAFARI Montage® © 2005-2013 Library Video Company. All Rights Reserved. 75 SAFARI_Montage_admin APC UPS Monitor Supported Models SAFARI Montage supports the following APC UPS USB Models: SmartUPS, SmartUPS VS (It has not been confirmed that the cable shipped with the VS is a 940-0095.), PowerStack 450, Matrix UPS, ShareUPS Advanced Port apcsmart smart (note: using Smart-Custom), 940-0024C Supported APC Model UPS Type UPS Cable BackUPS CS USB, Pro USB, ES USB, RS/XS 1000, RS/XS 1500, and probably other USB models usb usb (note: using APC cables Supported in 940-0127A/B/C) version >=3.9.8 Status Before you begin: • • Ensure that the Customer is running SAFARI Montage 2.3.10 or higher. Ensure that the Customer’s UPS is an APC UPS USB device and is listed in the ‘Supported Models’ table • above. Ensure that the Customer has properly connected the USB cable from the APC UPS to the SAFARI • Montage server. Determine whether or not the Customer’s server requires a rebuild of the kernel: • o Kernel Rebuild Required: If a customer has an older, 30GB OS partition hard drive, they will o Kernel Rebuild Not Required: If a customer has a newer, 80GB OS partition hard drive, they will receive this message when they click on Admin>Tools>APC UPS Monitor. Proceed to Step I: Rebuilding the Kernel. receive this message when they click on Admin>Tools>APC UPS Monitor. Proceed to Step II: Installing APC UPS Monitor. 76 Administrator Guide Step I: Rebuilding the Kernel If the Customer has one of the 2007 80GB OS partition drives, go to the next step, otherwise, you must rebuild the kernel. 1. cd /usr/src/sys/i386/conf 2. Perform a ls on the directory. 3. Edit or vi one of the following files: MONTAGE or MONTAGESMP. Under the ‘USB support’ section, search for the line that looks like this: deviceuhid#Human Interface Devices If there is a # in front of device, leave it alone. If there is not a # in front of device, place one there and save the file. 4. cd /usr/src 5. If you modified the MONTAGE file, enter: make buildkernel KERNCONF=MONTAGE If you modified the MONTAGESMP file, enter: make buildkernel KERNCONF=MONTAGESMP 6. If you modified the MONTAGE file, enter: make installkernel KERNCONF=MONTAGE If you modified the MONTAGESMP file, enter: make installkernel KERNCONF=MONTAGESMP 7. Reboot the server to initialize the new kernel. 8. After reboot, verify that the UPS is attached to ugen by entering: dmesg | grep –i ups If the result indicates the UPS is attached to both ugen0 and uhid0, shut the machine down and then power it on, and repeat this step. Step II: Installing APC UPS Monitor 77 SAFARI_Montage_admin Have the customer perform the following steps: 1. Choose Primary Monitor Configuration (the SAFARI Montage server must be directly connected to the APC UPS via USB). 2. Select the battery threshold at which the Monitor engages and powers down the server. 3. Click ‘Install APC UPS Monitor.’ The server is now configured to be the Primary Monitor, and will be powered down safely once the battery level of the APC UPS reaches the Battery Threshold level. SAFARI Montage® © 2005-2013 Library Video Company. All Rights Reserved. 78 Administrator Guide H264 Auto-Converter Admin Introduction Overview ® The Multi-Format Auto-Converter is a software module designed to convert SAFARI Montage CreationStation video formats to the SAFARI Montage standard. The following video formats are supported for conversion: ® ® • .wmv–Microsoft Windows Video • .mpg–MPEG-1 • .mp4–MPEG-4, Part 10 (H.264) • .flv–Video for Adobe® Flash (H.264) ® Multi-Format Auto-Converter Module Elements Choose one of the following Multi-Format Auto-Converter Module Elements to learn more: • Configuration • Adding Media • Convert Queue SAFARI Montage® © 2005-2013 Library Video Company. All Rights Reserved. 79 SAFARI_Montage_admin Adding Media Overview The following steps describe how to add media to the queue for conversion. There are two methods for adding media, and they are as follows: • Adding media to the convert queue with the Manually Add to Queue setting Disabled • Adding media to the convert queue with the Manually Add to Queue setting Enabled Adding Media - Manually Add to Queue Disabled 1. Upload an eligible video file format into SAFARI Montage Creation Station. File conversion will begin once the upload is complete. Use the Convert Queue to check the status of the file conversion. For more information about the Convert Queue, see the Convert Queue section of this help. Adding Media - Manually Add to Queue Enabled 80 1. Upload an eligible video file format into SAFARI Montage Creation Station. 2. Upon ‘Upload Successful,’ click on Formats from the left-hand navigation. 3. Click on the add to auto-convert link located under the Delete icon. Administrator Guide The video title is added to the Convert Queue for file conversion. Use the Convert Queue to check the status of the file conversion. For more information about the Convert Queue, see the Convert Queue section of this help. Configuration | Convert Queue SAFARI Montage® © 2005-2013 Library Video Company. All Rights Reserved. 81 SAFARI_Montage_admin Configuration Overview Using the following steps, administrators can easily configure the Multi-Format Auto-Converter Module for use. Configuration 82 1. Navigate to the Settings page of the module (Admin > Auto-Converter > Settings). 2. Configure the settings. Below is a list of configurable settings and a description of each setting. Setting Condition Description Enable Enabled (checked) Enables or disables the converter module. The default condition is set Disabled (unchecked) to enabled. Manually Enabled (checked) Enables or disables the manual queuing of uploaded video files for Add To Disabled conversion. The default condition is set to disabled, and video files will Administrator Guide Queue (unchecked) be automatically queued as they are uploaded into SAFARI Montage Creation Station. Threads No Limit Set the number of logical CPU cores to be used when converting a Number of CPUs available video file format. Note: The greater the number of CPUs used, the slower the server will Preset Normal Presets for video file encoding quality Encoding High Quality Quality Frame Size run during conversion. Original Set the frames size of the video files being converted. The default 320x240 (QVGA) setting is set to 320x240 (QVGA). Note: The Original setting will retain the resolution of the source video used for conversion. Bitrate 300 kb/s (Recommended) 800 kb/s (Better Quality) Set the bitrate (bandwidth) of the converted video file. Note: The higher the setting, the better the video quality; however, this will increase bandwidth requirements. 1.6 mb/s (High Quality) 3. 4. Click on the Update button to save the changes. Intro | Adding Media SAFARI Montage® © 2005-2013 Library Video Company. All Rights Reserved. 83 SAFARI_Montage_admin Convert Queue Overview The Convert Queue is a listing of all video files waiting to be converted. Administrators can use this view to check the status of the files being converted. In addition, files in the queue can be reordered or deleted. Convert Queue Administrators may check the status of a file conversion by navigating to Admin > Auto-Converter > Convert Queue. The Convert Queue will list all the video files waiting to be converted. The queue can be reordered by clicking on the Up /Down ( / ) arrows to the left of the video title. Individual video files can be removed from the queue by clicking on the Delete ( ) icon to the right of the video title beneath the Clear heading. In addition, the complete queue can be cleared by clicking on the Clear Queue link located at the top of the queue. Once conversion is complete, the queue entry will be removed, and a new MHA-ready video will be available for use. The new video format is listed on the file information page of the original video file. 84 Administrator Guide Add All Non-Converted The Add All Non-Converted function allows administrators to convert all the eligible videos already on the server. To perform this action, navigate to Admin > Auto-Converter > Convert Queue and click on the Add All NonConverted link, located at the top of the queue. Note: This operation will use server resources and take time to complete. It is recommended that this operation be performed during off hours so not to disrupt server performance. Adding Media | Intro SAFARI Montage® © 2005-2013 Library Video Company. All Rights Reserved. 85 SAFARI_Montage_admin SAFARI Montage CreationStation Admin CreationStation® Logo Upload This can only be performed by a user with administrator privileges. To upload a logo do the following: 1. Click ‘Admin’ in the SAFARI Montage header. 2. Click ‘CreationStation’ from the left-hand menu. 3. Click ‘Logo Upload’ from the CreationStation submenu. 4. If your SAFARI Montage server is part of a WAN environment, assign the logo to a school. 5. Click the ‘Browse...’ button 6. Browse and locate the file to be uploaded and click ‘Open.’ Note: Image files must be GIF or JPEG file and must be less than 80 x 80 pixels. 7. Hit the ‘Upload’ button to start the upload process. To select a new logo for CreationStation, click on the ‘Activate’ link next to the logo of your choice. To delete a logo, click on the ‘Delete’ ( ) icon. SAFARI Montage® © 2005-2013 Library Video Company. All Rights Reserved. 86 Administrator Guide Checking Available Space on CreationStation® You must be signed in as a user with administrator rights in order to check the available space on CreationStation. To view the size of your CreationStation drive and the amount of space available, follow the following steps: 1. Click ‘Admin’ on the SAFARI Montage header. 2. Click ‘Tools’ from the Secondary Navigation Menu. 3. Click ‘Space Available’ from the Tools submenu. A warning email will be sent to the system notifications email account (See ‘System Settings’ in the SAFARI Montage Administrator Guide.) when the total amount of storage space available is below 10 GB, and any further additions to the drives will be prevented when the space available is below 2 GB. SAFARI Montage® © 2005-2013 Library Video Company. All Rights Reserved. 87 SAFARI_Montage_admin Interactive Whiteboard Integration Overview The SAFARI Montage® Whiteboard Integration module allows you to upload whiteboard media into CreationStation®. Setup Please note, you must have Administrator privileges to change settings for Whiteboard Integration. If your SAFARI Montage server is part of a WAN environment: 1. Log into the WAN parent server as an administrator. 2. In the ‘Admin’ section of SAFARI Montage, click ‘WAN Manger’ from the Admin Tools left nav. 3. Select ‘Schools’ from the ‘WAN Manager’ submenu. 4. Click the name of the school that you want to modify interactive whiteboard settings for. 5. The ‘Interactive Whiteboard Settings’ portion of the school settings page allows you to alter the following settings for your school. o Whiteboard Integration - Allows upload of whiteboard files. o Upload and share Whiteboard Files - All teachers or only teachers w/upload can upload o Whiteboard file size limitation - Changes the maximum file size limit for uploaded and share whiteboard media. whiteboard files. 6. Click ‘Update.’ If your SAFARI Montage server is a standalone server: 1. Log into your server as an administrator. 2. In the ‘Admin’ section of SAFARI Montage, click ‘Settings’ from the Admin Tools left nav. 3. Select ‘System’ from the ‘Settings’ submenu. 4. The ‘Interactive Whiteboard Settings’ portion of the system settings page allows you to alter the following settings for your school. o 88 Whiteboard Integration - Allows upload of whiteboard files. Administrator Guide o Upload and share Whiteboard Files - All teachers or only teachers w/upload can upload o Whiteboard file size limitation - Changes the maximum file size limit for uploaded and share whiteboard media. whiteboard files. 5. Click ‘Update.’ SAFARI Montage® © 2005-2013 Library Video Company. All Rights Reserved. 89 SAFARI_Montage_admin School News with CreationStation® If your server has the CreationStation add-on module installed, users with administrator privileges can upload media into CreationStation and appropriate the uploaded media to ‘School News.’ Upon upload, items designated as ‘School News’ are automatically shared and scheduled to be distributed to all schools throughout the district. Each time a user logs in to SAFARI Montage, the most recent unviewed School News item will automatically play in the media player on the Dashboard. Media items tagged as School News are listed in the ‘School News’ panel on the Dashboard. For more information about uploading media into CreationStation see the ‘Uploading Media into CreationStation™’ Help page. 90 Administrator Guide SAFARI Montage® © 2005-2013 Library Video Company. All Rights Reserved. 91 SAFARI_Montage_admin Bulk Metadata Update for SAFARI Montage CreationStation® Bulk Metadata Changes Administrative users may update existing CreationStation metadata in bulk by exporting existing metadata, editing outside of SAFARI Montage and then re-uploading to effect bulk updates. Bulk Metadata Download Begin this process by downloading the existing metadata for CreationStation uploads: 1. Click on 2. Select 'Bulk Metadata Download' from the CreationStation secondary navigation menu. 3. Check the boxes: • in the Main Navigation Menu. Download with Extra Metadata - this will include any school specific metadata entered in the 'Additional Metadata' of the Information/Rights Management metadata entry process. • Download with Multi-Language Data - this will include an indication of whether a title is multilingual and if so, what supporting language(s) are included. 4. Click 'Download' to begin the download of the .csv file of all CreationStation metadata. Open this file to begin editing metadata outside of SAFARI Montage using a text editor. Note: It is recommended that you use a basic text editor to make changes to the .csv file as opposed to Excel or Numbers, which may automatically alter the format of the file. Make certain to retain all headings as these will be used by SAFARI Montage when the file is re-uploaded. Simply remove lines for CreationStation items for which you are not changing metadata through the Bulk Upload process. Bulk Metadata Upload After edits have been completed and the .csv file has been saved, upload the revised file to update CreationStation metadata using the Bulk Media Upload process: 1. 92 Click on in the Main Navigation Menu. Administrator Guide 2. Select 'Bulk Metadata Upload' from the CreationStation secondary navigation menu. 3. In the 'Upload File' box, browse to the file with metadata changes from the local computer. 4. Select 'Update CreationStation' from the Upload Type options. 5. The digital rights management settings will be applied to the CreationStation items being updating. Be sure to adjust these settings as is appropriate for the files you are updating. 6. Scroll to the bottom of the page and click 'Upload Bulk Media File.' Note: Review the tips on the 'Media File Location' and 'Text/CSV File Format.' The Bulk Media File Validator can also be used to troubleshoot unsuccessful upload attempts. SAFARI Montage® © 2005-2013 Library Video Company. All Rights Reserved. 93 SAFARI_Montage_admin Administrative Rights Management for Digital Resources Uploaded via SAFARI Montage CreationStation® Overview Users with administrative privileges are able to edit all CreationStation uploads and may have additional options to manage the rights associated with digital resources uploaded via CreationStation. Editing Media: Information & Rights Management In addition to the basic method of sharing digital resources uploaded via CreationStation as explained in the Information & Rights Management metadata process, administrative user types may have access to additional options in SAFARI Montage WAN Manager environments. 94 1. select To edit the Rights Management for an individual digital resource uploaded via CreationStation, from the title page of the resource. 2. Select 'Information/Rights' from the 'Edit Media' secondary navigation menu. 3. Select the Rights Management tab: Administrator Guide • In addition to 'Share' you will have the option to 'Share to District' which will allow all users to view the title, bypassing the creation of a separate copy of the media file and, if enabled, the approval queue. • Permissions can be adjusted for either option: • Permissions - manage item access rights by user type or users and groups. • Restrict Schools - when a CreationStation item is shared to the district, an administrator may Restrict Schools by individual schools or school groups. • You may also auto-distribute media to other SAFARI Montage servers in your district by clicking the ‘Auto-Distribute’ check box and selecting a priority level (Standard or High Priority) from the drop down menu. Note: If the CreationStation item is marked as 'School News' the auto-distribute option will automatically change to 'High Priority.' • If EdCast is licensed, media can be assigned to EdCast Groups. 4. After changes have been made, click 'Save and Continue.' 95 SAFARI_Montage_admin Rights Management with the Bulk Upload of Media and Web Links The administrative Rights Management options described above are also available to users with administrative privileges when using the Bulk Media Upload or Bulk Web Link Upload processes. SAFARI Montage® © 2005-2013 Library Video Company. All Rights Reserved. 96 Administrator Guide Curriculum Developer v5.8 Administrative Curriculum Developer Tools for Digital Curriculum Presenter™ Curriculum Developer Tools SAFARI Montage user types of Principal and higher can use the Curriculum Developer features to administer digital course curriculum for their school and/or district. To access the Curriculum Developer tools, select in the Main Navigation Menu. In the secondary navigation menu, select the 'Curriculum Developer' menu which will expand to reveal the following tools: Classes - this is the administrative location for creating Course Classes. Teachers can create their own Classes for Courses and My Lessons as explained in the Digital Curriculum Presenter User Guide. Course Authorization - access to courses can be restricted using this tool. Departments - this tools allows for the creation of Departments and the assignment of user types with Department Developer privileges who can create and edit Courses. The following user types need to be granted Developer privileges in order to add and edit Courses: Teacher, Teacher with Upload, Principal and School Admin. LMS Integrations* - this tool enables the importing of LMS courses. View & Chat Manager - records of all View & Chat sessions are kept here. Vocabulary Manager - this tool allows for the management of Course vocabulary. *Only System Administrators and Curriculum Administrators have access to this tool. SAFARI Montage® © 2005-2013 Library Video Company. All Rights Reserved. 97 SAFARI_Montage_admin Administrative Management of Digital Curriculum Presenter™ Classes Adding a Class Once a Course has been created, Classes can be added. The administrative creation and management of Classes allows specific teachers, aides/substitutes and students to be added to a Class based on the current school year. Teachers can also create Classes which administrators are able to manage. Note: A Course status must be set to ‘In Use’ in order to associate a Course with a Class. 1. Select on the Main Navigation Menu and ‘Classes’ from the 'Curriculum Developer' secondary navigation menu: 2. Select the ‘School’ the Class will be taught in from the drop-down menu. 3. Click ‘Add Class’ to create a new Class. Note: Several Classes can be added at a time by selecting the ‘Import Class(es)’ link and uploading a CSV file. Directions and an example CSV file are included on the Import Class(es) page on the system. Click the link to get started. 4. In the page that opens, enter a ‘Class Name’ based on the school/district Class naming protocols. 5. Select the ‘Course’ that is to be associated with the Class from the drop-down menu. 6. Set Class Status to ‘Active’ so that the Class will be available to the Teacher, Substitute/Aides, and Students. 7. Associate the Class ‘Teacher(s),’ ‘Substitute(s)/Aide(s)’ and ‘Students.’ 8. Click on ‘Add.’ The Class will now appear in the list of School Classes. The Class will also appear on the Dashboard DCP panel for associated Teachers and Students. Note: Classes are listed in alphabetical order on the DCP Dashboard panel. Only the first three classes will appear on this panel, click the '...MORE' link to view all Classes. 98 Administrator Guide Managing a Class Class information can be edited at any time by the Teacher or an administrator. Both have the ability to rename the Class, add or remove students, and update the Class Status. The following actions can only be complete by an administrative user in the 'Classes' tool of the 'Curriculum Developer' menu: • Adding or removing Teacher(s) • Adding or removing Substitute/Aide(s) For all other Class management topics, including reviewing Assignments and Get it? Results, see the Managing Classes page of the Digital Curriculum Presenter User Guide. Updating Class Status At the end of the school year, change the Class status from ‘Active’ to ‘Complete.’ This will remove Classes from Teacher and Student Dashboards but preserve Class data, such as Get it? results, on the system. Distinguishing My Lessons Classes from Course Classes The Class list will display all Classes that have been created on the SAFARI Montage system. Classes created by a Teacher for My Lessons will be indicated as such with a in the 'My Lessons' column and the name of the user who created the class will be distinguished : 99 SAFARI_Montage_admin Note: An administrative user can only create their own My Lessons Classes. However, My Lessons Classes created by other users can be managed by an administrative user. SAFARI Montage® © 2005-2013 Library Video Company. All Rights Reserved. 100 Administrator Guide Digital Curriculum Presenter™ Course Authorization Overview Course Authorization allows administrative user types to restrict Teacher access to a Course. A Course can be set to be ‘Available to all Teachers’ or it can be set to ‘Requires Authorization.’ If it is set to ‘Requires Authorization,’ the administrator then identifies which Teachers are authorized to teach the Course. When Classes are being created, only the Teachers authorized may be associated with a Class referencing the restricted Course. Restricting a Course 1. Select on the Main Navigation Menu and ‘Course Authorization’ from the 'Curriculum Developer' secondary navigation menu. Then click the 'edit' link in-line with a Course you wish to restrict access to: 2. To restrict access for the selected Course, choose 'Requires Authorization' from the 'Teacher Access' dropdown and click the 'Save' button. 3. Indicate which teachers will have access to the Course by click the 'Add Teachers' button. This will open a pop-up window where you can search for users and add teachers to the list of authorized users. 101 SAFARI_Montage_admin 4. When you are finished adding Teachers, click 'Close Window.' You will now see the list of users who are authorized. Click 'remove teacher' if you need to revoke a Teacher's access to the Course. SAFARI Montage® 102 Administrator Guide © 2005-2013 Library Video Company. All Rights Reserved. 103 SAFARI_Montage_admin Developing Digital Curriculum Presenter™ Course Curriculum Overview Before Courses can be created, a Department structure needs to be built and users need to be designated as Developers. As an unlimited number of Departments can be built, consider a logical organizational structure for your school or district. Creating Departments To build Departments: 1. Click on the link of the Main Navigation Menu. 2. Select 'Departments' from the 'Curriculum Developer' secondary navigation menu. 3. Click on the ‘Add Department’ link. 4. Enter a Department name and click ‘Add.’ Repeat this process to add more Departments. Assigning Developers Once Departments have been established, individual users can be designated with a Developer role that grants additional capabilities for creating and editing digital curriculum within Departments. As administrators, System and Curriculum Administrators are automatically granted the rights associated with the Developer role as a part of their user type. School Administrator, Principal, Teacher with Upload or Teacher user types must be designated as Developers in order to build digital Course curriculum as explained in this guide. Users who have not been designated as Developers will still be able to view and utilize a Course and its Lessons when they are assigned to be a Teacher of a Class associated with the Course. Note: As you designate Developers, please consider that all users designated as Developers for a Department are granted equal privilege to create and edit courses associated with that Department. Users are designated as Developers within the context of Departments. 104 Administrator Guide 1. Click on ‘Edit’ for a Department to add Developers. 2. Within the Department, click the ‘Add Developers’ button. 3. Search for a specific user by entering their name and clicking ‘Search.’ 4. Click the ‘add developer’ link for each desired user. This will designate them as a Developer for the specific Department. A designated Developer’s name will then disappear from the search results list. Multiple Developers can be added to one Department. Likewise, a single user can be added to multiple Departments. 5. When you have finished adding the desired users as Developers for the Department, click on ‘Close Window.’ 105 SAFARI_Montage_admin 6. Add or remove Developers at any time. Simply click ‘remove developer’ in line with the user you’d like to remove. Click on ‘Save’ to finalize your changes. Verifying Developer Privileges If a Teacher has been designated as a Developer their ability to create and edit Courses will now be active. Once a Teacher is a Developer he or she will have access to the ‘Courses’ link in the secondary navigation menu for Digital Curriculum Presenter under : 106 Administrator Guide SAFARI Montage® © 2005-2013 Library Video Company. All Rights Reserved. 107 SAFARI_Montage_admin Digital Curriculum Presenter™ View & Chat Manager Digital Curriculum Presenter™ View & Chat session transcripts are available to users with administrative privileges. To access View & Chat session transcripts, select on the Main Navigation Menu and ‘View & Chat Manager’ from the 'Curriculum Developer' secondary navigation menu: Advanced search filters are provided to locate records more quickly. Results are displayed with the following data: • • • • • User name - displays the name of the user who started the View & Chat session. Chat Date Created - displays the date and time the View & Chat session was started. Access Code - active chats will display the View & Chat Session ID # to join the open session. Others will indicate that they are 'Inactive.' View Chat link - this will open individual View & Chat session transcript records (see below) Advanced Search Filters Use the filters to quickly locate View & Chat records: • • • School - returns resulting records by School User - returns resulting records by User Date Added - returns resulting records by All Dates or Range o All Dates - will display all results chronologically with most recent appearing first o 108 Range - allows the System Administrator to narrow result by a particular date range Administrator Guide View & Chat Transcript View Clicking on the View Chat link will open the record from the View & Chat session selected with the following records: • • • • User - shows the user name for each message Chat Message - shows the text of each message Message Date - provides a date and time stamp for each message Deleted Date - if the teacher deleted a message from the View & Chat screen, the deleted user chat message will remain in the session record and a date and time stamp will appear for when the messages was deleted by the teacher Applies to: SAFARI Montage 5.8.xx with Digital Curriculum Presenter SAFARI Montage® © 2005-2013 Library Video Company. All Rights Reserved. 109 SAFARI_Montage_admin Digital Curriculum Presenter™ Vocabulary Manager Overview The Vocabulary Manager tool allows Admin users to add, edit or delete vocabulary terms for use in Courses. Each vocabulary term can support more than one definition. Vocabulary Manager supports multilingual vocabulary terms. Note: Vocabulary Manager is only for Course Lesson vocabulary. My Lessons vocabulary is only manageable by the individual Teacher within the Adding & Editing Vocabulary process. Adding Vocabulary Terms New vocabulary terms for Courses can be added in the Vocabulary Manager: 1. Click on the link of the Main Navigation Menu. 2. Select 'Vocabulary Manager' from the 'Curriculum Developer' secondary navigation menu. 3. Click on the ‘Add Vocabulary Term’ link at the top of the page. 4. In the 'Create a Vocabulary Term' area, enter a vocabulary term, set the language and enter a primary definition. 5. 110 Click the 'Create Vocabulary Term' button to save the new term: Administrator Guide Editing Existing Vocabulary Terms Existing Course vocabulary terms can be editing to include multiple definitions or deleted from the Vocabulary Manager: 1. Click the 'edit' link for the term you wish to edit: 2. Edit the term: • Vocabulary Term - edit the term. • Language - edit the term language. • Add Definition - click to enter an alternate definition. 111 SAFARI_Montage_admin • Delete Definition - removes an existing definition of the term without removing the term itself. 3. Drag and drop the desired definition to position ‘1 (Primary)’ using the 4. Click the 'Save Vocabulary Term' button to finalize your edits. tool. Deleting a Vocabulary Term To remove a vocabulary term from the system, click 'delete' in-line with the term you wish to remove. A pop-up window will appear reminding you that this will permanently delete the term. Click 'ok' to confirm. Confirming the deletion will remove the term from the Vocabulary Manager and any Lessons to which it was added: 112 Administrator Guide SAFARI Montage® © 2005-2013 Library Video Company. All Rights Reserved. 113 SAFARI_Montage_admin EdCast The SAFARI Montage EdCaster and EdCast Subscriber Add-ons allow you to share and distribute uploaded media to subscribers of EdCast groups. Set up an EdCaster Server Note: The user must have administrator privileges to set up the following. 1. Click ‘Admin’ from the SAFARI Montage header. 2. Click ‘EdCast’ from the left-hand menu. Create an EdCast group that EdCast subscribers can join. Select ‘EdCast Groups’ from the EdCast menu. Click the ‘Add EdCast Group’ link at the top of the EdCast Groups page. Enter a name and a description for your EdCast group, and assign an expiration date if applicable. Click ‘Add.’ 3. Click ‘EdCast Settings’ from the EdCast menu. To enable your EdCaster server to accept any SAFARI Montage unit that is attempting to subscribe, click ‘Auto accept EdCast subscribers.’ 4. Click ‘EdCast Groups’ from the EdCast menu. Click the ‘Group Members’ ( group to which you would like to assign subscribers. Click ( ( ) to cancel the subscriber. ) icon next to the ) to join a subscriber to your group or click 5. Share and distribute uploaded content or playlists to an EdCast group. On the Media Upload page or the Bulk Media Upload page, select which EdCast group or groups you would like to share your uploaded content with and click ‘Save.’ To share a playlist on the playlist edit or new playlist pages, click the group or groups you would like to share your playlist with and commit your changes. 114 Administrator Guide Set up an EdCaster Subscriber Note: The user must have administrator privileges to set up the following. 1. Click ‘Admin’ from the SAFARI Montage header. 2. Click ‘EdCast’ from the left-hand menu. 3. To subscribe your SAFARI Montage server to an Edcaster, click ‘EdCasters’ from the EdCast menu. Next click the ‘Add EdCaster’ link. Enter the IP address or the computer name of the Edcaster Server and click ‘Add.’ Note: As a default, the subscriber will be added to the ‘All EdCast group.’ A user with administrator privileges on the Edcaster can assign the subscriber to a specific group. SAFARI Montage® © 2005-2013 Library Video Company. All Rights Reserved. 115 SAFARI_Montage_admin Datacasting Datacasting automatically imports datacast videos and relevant metadata from a network share. Setup Note: The user must have administrator privileges to set up the following. 1. Click ‘Admin’ from the SAFARI Montage header. 2. Click ‘Datacasting’ from the left-hand menu. Datacasting requires a network share in which datacast files are stored. On a set schedule, the system will poll the share, looking for new files. If new files are found, it uploads them onto your CreationStation™ drive, interpreting any available metadata. The next step is to set up this datacasting share. Click ‘Datacasting Share’ from the Datacasting submenu. Enter the required information. The setup requires: o A remote machine name o A remote IP or hostname o A remote share on the machine where your datacasting files are stored o A domain name (if applicable) o o A username and password (if necessary) 3. Click the ‘Set up Share’ button. 4. Click ‘Upload Schedule’ from the Datacasting menu. Here, you can activate datacasting, as well as set the interval of how often your datacasting share is polled (anywhere from 1 to 24 hours). Once activated, the system will search the given share based on your schedule. 116 Administrator Guide 5. Click the ‘Save’ button. SAFARI Montage® © 2005-2013 Library Video Company. All Rights Reserved. 117 SAFARI_Montage_admin Pathways SM Admin Introduction to Pathways SM™ Administration Overview Pathways SM provides integrated control of classroom technology and district media resources, including the supporting tools required to effectively manage associated devices, rooms, and user rights from an administrative perspective. When Pathways SM is activated, it introduces several new features to your SAFARI Montage environment: Rooms, Device Control, Reservations and All-Calls. These appear in relevant areas throughout the system and will be visible on the Dashboard, in the Modules area and on the SAFARI Montage Media Player. Pathways SM Features Each of these features are created, managed and controlled by the System Administrator. The following sections address Pathways SM from an Administrator’s perspective. Click on any one of the following to learn more about the feature and its administrative tools: Rooms Button Set Management Controllable Devices Projector Management Classroom Media Controllers Reservations & Reservation Settings All-Call Scheduling Control SAFARI Montage® © 2005-2013 Library Video Company. All Rights Reserved. 118 Administrator Guide Pathways SM™ Rooms - Admin Overview Room configuration allows Administrators to create and manage rooms, room devices and users assigned to rooms. This topic covers the following, click a link to jump to that section: Accessing Room Admin New Room Edit a Room Delete a Room Room Groups Accessing Room Administration Navigate to the Rooms list and associated tools by clicking on the link in the Main Navigation Menu. Then, select 'Rooms' from the Pathways SM secondary navigation menu: top New Room To create a new room: 1. Click the 'New Room' link: 119 SAFARI_Montage_admin 2. This will open the New Room page: 3. Select a 'School' from the dropdown. 4. Type a Name for the new room in the 'Name' text entry field. 5. Enable or disable General Access: • Enabled (checked) – All users assigned to the school have access to the room and its assigned devices. Disabled (unchecked) – User access is specifically assigned via the 'Assigned Users' tab of the Rooms page. See Assign Users for more information. • 6. Click the 'Add' button to create the new room. You should see the messaging: 'Your room has been successfully saved' appear above the 'Save' button. At this point, a room has been created, and you can begin associating devices, editing All-Call scripts and assigning users as explained below. Add a Device 120 Administrator Guide To add devices to a room: 1. On the room page, click the 'Add Device' button on the 'Assigned Devices' tab: 2. A pop-up window for the room will open allowing you to add a device: 3. Select a device type from the 'Type' dropdown: • Device – Select this type if the device is neither a CMC nor a projector device. • CMC – Select this type if the device is a SAFARI Montage Classroom Media Controller or Kiosk Controller. • Projector – Select this type if the device an IP or non-IP controlled projector. 4. Select a button set from the 'Button Set' drop down menu. Note: Button sets must be created prior to adding devices. See Button Set Management for more information. 5. Enter the IP address for the device being added. Note: If the device is not a direct IP controlled device, the IP address used will be the IP address of a 3rd party controlling device, such as the Calypso Controller. 121 SAFARI_Montage_admin 6. If appropriate, enter the Selective Video Stream (SVS) URL in the space provided. The SVS URL is only needed for devices that stream video. Note: For devices requiring their output be encoded into a digital stream, such as a DVD player, the SVS URL associates the device to an SVS stream. 7. Select the SVS source type from the 'Source' dropdown: • DTV – Select this source if the media stream is from CATV or an over-the-air broadcast. • Internet – Select this source if the media stream is from the Internet. • Cameras – Select this source if the media stream is from a video or PTZ camera. • DVD – Select this source if the media stream is from a BLUE RAY, DVD or VCR player. 8. Should it be appropriate, enable 'Requires Reservation' to require users to reserve the device rather than having open access to control the device. To allow open access, leave this box un-checked. 9. Click 'Add' to add the device to the room. 10. The device will now display under the 'Assigned Devices' tab for the room: Edit a Device To edit a device: 1. From the 'Assigned Devices' tab, click on 'Edit' for the device you wish to make changes to: 2. In the pop-up window for the device, make changes to the device name, button set, IP address, SVS URL, SVS Source or Requires Reservation as required: 122 Administrator Guide Note: The editable fields will vary based on the device type. 3. Click 'Save' to finalize your edits to the device. Edit All-Call Start & Stop Scripts All-Call scripts are used to instruct the devices in a room to perform certain functions when an All-Call is received. There are two types of All-Call Scripts: Start and Stop. All-Call scripts can be edited from the 'All-Call' Scripts tab within a Room: All-Call Start Script 1. From the All-Call Scripts tab, click on the 'Edit All-Call Start Script' button (see image above). 2. Select an action or device from the 'Type' dropdown: 3. • Pause – Inserts a pause ranging from one second to one minute. • CMC – Pushes the All-Call signal to a Classroom Media Controller or Kiosk Controller. • Projector – Initiates a selected action of a Direct IP controlled projector. • Controllable Device – Initiates a selected action of a controllable device. Select an action or device from the corresponding dropdown based on the choice in Step 2: • Pause – Select a duration in seconds. • CMC – Select a CMC or Kiosk controller assigned to the room. • Projector – Select a direct IP controlled projector assigned to the room. • Controllable Device – Select a controllable device assigned to the room. 123 SAFARI_Montage_admin 4. Select an action from the device's button set to perform when the All-Call is received. Note: For Pause and CMC, once the action or device has been selected, these items will be added to the script. For Projector and Controllable Device, the button set for the device selected will appear. 5. Repeat the above steps for each new line of the script: 6. To reorder the All-Call script, click on the Up/Down arrows ( 7. To remove a function, click on the 'Remove' link. / ) to the right of the function. All-Call Stop Script All-Call Stop scripts are created in the same fashion as Start scripts. When creating these scripts, keep in mind that these will be the functions performed when an All-Call has stopped. Assign Users If General Access for a room has been disabled, users must be assigned to the room in order to access devices assigned to the room. Note: If General Access is enabled, it overrides the Assigned Users settings. To assign users to a room: 1. 124 Select the 'Assigned Users' tab of a Room and click 'Add Users:' Administrator Guide 2. In the 'Add Users' pop-up window, enter a user's full or partial name in the 'Search User' text entry field, and click the 'Search' button: Note: To reset the search input, click on the 'Reset Search' link. All users, including administrative user types, need to be added to a room in order to utilize Pathways SM features. 3. Click on the 'Add to Room' link next to the user's name to add the user to the room. 4. Continue the process to add all desired users to the room. 5. Click on the 'Close Window' link. 6. Selected users will now be listed under the 'Assigned Users' tab: 7. To remove a user, click on the 'Remove from Room' link. top Edit a Room To edit a room: 125 SAFARI_Montage_admin 1. Click on the 'Edit' link to the right of the room name in the Room List: 2. Make changes to the room as needed. Note: Functionality with regards to editing a room is the same as the procedure used to create a new room. 3. Click 'Save.' top Delete a Room To delete a room: 1. Click the 'Delete' link to the right of the room name in the Room List: 2. Confirm room deletion by clicking 'Remove' after reading the warning message: Note: All devices assigned to the room will be removed with the deletion of the room. 126 Administrator Guide top Room Groups Grouping like rooms together provides Administrators with an easy way to locate and manage rooms within a school. Rooms can be managed by group by selecting a group from the 'Group' drop down menu of the Rooms page: New Room Group To create a new Room Group: 1. Click on the 'New Group' link to the right of the 'Group' dropdown: 2. This will open the 'Room Group' creation page: 127 SAFARI_Montage_admin 3. Select a school association for the room group by choosing a school from the 'School' dropdown. 4. Enter a 'Description' for the group. 5. Click 'Add' to create the new group. Edit Room Group To edit an existing Room Group: 1. Click on the 'Edit Groups' link to the right of the Group dropdown: 2. Click on the' Edit' link to the right of the group you wish to edit: 3. 128 Make changes to the Group as needed: Administrator Guide • School - change the associated school using the dropdown. • Description - rename the group. • Assigned Rooms - if rooms are already assigned to the group, they can be removed by clicking on the 'Remove From Group' link to the right of the room name. 4. Click 'Save' to finalize your edits. 5. Use the 'View All Rooms' link to navigate back to the Rooms list page. Add to Room Group To add a room to a Room Group: 1. On the Room list page, click on the 'Add to Group' link to the right of the room name: 2. Select a group from the list of 'Available Groups' and click the 'Add' button: 129 SAFARI_Montage_admin 3. This will add the Room to the 'Assigned Groups' list: Note: To remove a group, select the group from the 'Assigned Groups' list, and click on the 'Remove' button; or use the 'Remove All' button. 4. top 130 Click 'Done' to save the changes. Administrator Guide SAFARI Montage® © 2005-2013 Library Video Company. All Rights Reserved. 131 SAFARI_Montage_admin Pathways SM™ Button Set Management - Admin Overview Selecting Button Set Management allows administrators to manage and define virtual remote controls for use within Pathways SM. Administrators will have the options to create new button sets, edit current button sets or import predefined button sets. When creating or editing button sets, it is recommended that administrators use a naming convention that best fits their current device infrastructure and allows devices to be easily identified, which is particularly important when multiple device models are in use. This topic covers the following, click a link to jump to that section: Accessing Button Set Management Import & Pre-Defined Button Sets Creating a New Button Set Export a Button Set Edit a Button Set Delete a Button Set Accessing Button Set Management Navigate to the Button Set Management list and associated tools by clicking on the link in the Main Navigation Menu. Then, select 'Button Set Management' from the Pathways SM secondary navigation menu: top 132 Administrator Guide Import & Pre-Defined Button Sets As an Administrator, you can choose to import previously exported button sets or choose a button set from a list of pre-defined devices. Get started from the Button Set Management page, by clicking on the 'Import/Pre-Defined Button Sets' link: Pre-Defined Button Sets Administrators can import pre-defined button sets for device control. 1. Click the 'Import/Pre-Defined Button Sets' link at the top of the Button Set Management page (see image above). This will open the 'Import/Pre-Defined Button Sets' page: 133 SAFARI_Montage_admin 2. Scroll through the list of 'Pre-Defined Button Sets,' and select a set that closely matches the buttons needed. You can sort the pre-defined button list by 'Device Type,' 'Source Controller Type' or both. Use the dropdowns for sorting. 3. Click on the 'Import' link. 4. The Button Set has been imported and appears in the Button Set List of the 'Button Set Management' page. Note: The name of the imported button set will be the same as the pre-defined name. Import a Button Set Export File File Upload is used to import previously exported button sets. See Export a Button Set for information regarding exporting. 1. Click the 'Import/Pre-Defined Button Sets' link at the top of the Button Set Management page (same as Step 1 for Pre-Defined Button Sets)). This will open the 'Import/Pre-Defined Button Sets' page: 134 Administrator Guide 2. Click the 'Choose File' button to locate the pre-made button file. 3. Click the 'Upload' button. 4. The Button Set that has been uploaded now appears in the Button Set List of the 'Button Set Management' page. Note: The name of the uploaded button set will be the same name as the button set from which it was exported. top Creating a New Button Set Administrators can create their own virtual remote controls used to control the devices within Pathways SM. Once a button set is defined, it may be associated with any number of controllable devices. Get started from the Button Set Management page, by clicking on the 'New Button Set' link: 135 SAFARI_Montage_admin Non IP Controlled Devices Pathways SM issues commands, defined via button sets, over the IP network to control devices. Non IP Controlled Devices are devices that cannot be controlled directly via a network connection and require a third-party, IP addressable IR or Serial device controller or URL strings to receive and relay commands from Pathways SM to the devices. These devices will be accessible via Controllable Devices. To create a button set for a Non IP Controlled Device: 1. Click the 'New Button Set' link at the top of the Button Set Management page (see image above). This will open the New Button Set page: 136 Administrator Guide 2. Select the device type to be controlled by using the button set from the 'Device Type' dropdown. Note: If Direct IP Controlled Projector is selected, see Direct IP Controlled Projector for information about creating button sets. 3. Select the type of device controller being used from the 'Source Controller Type' dropdown: • Calypso or Calypso 3000 – A third party network device that transmits device event commands via IR. Refer to the documentation from Calypso Systems for specific devices commands and how to configure Calypso units. • URL – Used to support devices that receive commands via coded URLs. Refer to documentation from the device manufacturer for commands available via URL. • ASC - an Addressable Source Controller which converts device commands to IR. Refer to the ASC documentation for specific information and how to configure ASC units. 4. Enter a 'Button Set Description.' 5. Select Custom or a previously made button set from the 'Button Set Definition' dropdown. 137 SAFARI_Montage_admin 6. Select an action/event button from the right-hand grid, and drag it to the desired position in the empty grid on the left. Note: Once a button is placed on the left-hand grid, it cannot be relocated. To change the location, the button must first be deleted and added again. 7. Set the 'Button Configuration' options for each button. Depending on the Source Controller Type selected, different configuration settings will be available. 'Button Configurations' will be saved automatically. The following details the button configuration options for a URL 'Source Controller Type:' • Button Name - enter a button name or use the default name provided. • Button Type - select the button action from the drop down menu: • Standard – Emulates a single press of a remote control button. • Repeat – Emulates pressing and holding a remote control button. The action on the virtual remote is a two-click process. The first click begins the action; the second click releases the action. Note: During this action, all other virtual remote buttons will be inactive. Data - Enter the corresponding data string (URL) used to control the device via its web interface. Note: When using the iTach Controller use the following syntax before entering the IR • data in the 'Data' field: GC:4998:<IR data string from iLearn> 8. When you are finished configuring the Button Set, click 'Set' at the bottom of the page to add the new Button Set. Direct IP Controlled Projector Direct IP Controlled Projectors are projectors that can be controlled directly via a network connection. IP Controlled Projectors and their available commands are pre-configured within SAFARI Montage. These projectors will be accessible via Projector Management. To create a button set for a Direct IP Controlled Projector: 1. Click the 'New Button Set' link at the top of the Button Set Management page (same as Step 1 for Non IP Controlled Devices). This will open the New Button Set page. 2. 138 Select Direct IP Controlled Projector from the Device Type dropdown: Administrator Guide Note: If a device other than Direct IP Controlled Projector is selected, see Non IP Controlled Device for information about creating button sets. 3. Select the type of projector from the 'Projector Type' dropdown. 4. Enter a 'Button Set Description.' 5. Select Custom or a previously made button set from the 'Button Set Definition' dropdown. 6. Select an action/event button from the right-hand grid, and drag it to the desired position in the empty grid on the left. Note: Once a button is placed on the left-hand grid, it cannot be relocated. To change the location, the button must first be deleted and added again. 7. Set the 'Button Configuration' options for each button: 139 SAFARI_Montage_admin • Button Name - enter a button name or use the default name provided. • Button Type - select the button action from the drop down menu: • Standard – Emulates a single press of a remote control button. • Repeat – Emulates pressing and holding a remote control button. The action on the virtual remote is a two-click process. The first click begins the action; the second click releases the action. Note: During this action, all other virtual remote buttons will be inactive. • Function - Select the button's function from the dropdown. 8. When you are finished configuring the Button Set, click 'Set' at the bottom of the page to add the new Button Set. top Export a Button Set The Administrator can export a button set by doing the following: 140 Administrator Guide 1. Click on the 'Export' link to the right of the button set to be exported. 2. Click on the 'Save' button in the File Download dialog. 3. Choose a location to save the file. 4. Click on the 'Save' button. top Edit a Button Set The Administrator can edit a button set by doing the following: 1. Click on the 'Edit' link to the right of the button set on the Button List View of the Button Set Management page: 2. Make changes to 'Device Type,' 'Source Controller Type' or 'Button Set Description' as needed. 141 SAFARI_Montage_admin 3. Make changes to the button configurations as needed: • Select a button from the left-hand grid. • Edit the 'Button Configuration' settings. • Click on the 'Delete' button to remove the button from the grid. • Click on the 'Set' button to save edits to the button set. top Delete a Button Set The Administrator can delete a button set by clicking on the 'Delete' link to the right of the button set: top SAFARI Montage® © 2005-2013 Library Video Company. All Rights Reserved. 142 Administrator Guide Pathways SM™ Controllable Devices - Admin Overview Controllable Devices gives an Administrator the ability to quickly view and manage the devices within a school. This topic covers the following, click a link to jump to that section: Accessing Controllable Devices Admin New Device Import Devices Export All Devices Export School Devices Additional Functions Accessing Controllable Devices Admin Navigate to the Controllable Devices list and associated tools by clicking on the link in the Main Navigation Menu. Then, select 'Controllable Devices' from the Pathways SM secondary navigation menu: top New Device The New Device screen allows an Administrator to add new devices and associate them to a school and room. To get started, click the 'New Device' link at the top of the Controllable Devices list page: 143 SAFARI_Montage_admin This functionality works the same as the 'Add Device' function under 'Room' administration. See the Add Device section of the Rooms Help topic for more information. Note: Because the device is being added directly, the device will need to be associated with a room. Select a room from the 'Room' drop down menu to make this association: top Import Device The Import Devices function gives Administrators the ability to bulk upload devices and button sets. School association, device name and IP address are also included in the device import. Administrators are able to edit these settings once the devices have been imported. To Import Devices: 1. 144 Click on the Import Devices link at the top of the Controllable Devices page: Administrator Guide 2. 3. This will open the 'Controllable Device File Upload:' Click 'Browse' and locate the import file to be used. 4. Click 'Upload' to begin the import. 5. Once the import is finished, you will be returned to the Controllable Devices list. Imported devices will have no assigned room in the device list and will instead display '----' to indicate that they require a room association. Administrators will need to edit each device to assign them to rooms and make them available to users. See Edit under Additional Functions for more information. top Export All Devices The 'Export All Devices' function gives Administrators the ability to export every device and button set at the district level. This function of installing the same or similar device types is ideal for new districts because it saves time by not having to repeatedly enter each device manually. To Export All Devices: 1. Click on the 'Export All Devices' link at the top of the Controllable Devices page. 2. Click 'Save' and choose a location to save the file. 3. Click 'Save' to begin the export. top 145 SAFARI_Montage_admin Export School Devices The Export School Devices function is the same as Export All Devices, except the export is at the school level and only the devices and button sets of the school (logged into) will be exported. To Export School Devices: 1. Click on the 'Export School Devices' link at the top of the Controllable Devices page. 2. Click 'Save' and choose a location to save the file. 3. Click 'Save' to begin the export. top Additional Functions In addition to importing and exporting devices, Administrators can test button sets, duplicate existing devices, export individual devices, move devices to other rooms, edit device configurations and delete devices. These additional features can be accessed by clicking the links to the right of the device from the Controllable Devices list: 146 Administrator Guide Test The Test function allows an Administrator to test the device's button set. Click 'Test' for a device to open the virtual remote control in a pop-up window and test button functionality: Duplicate The Duplicate function allows an Administrator to quickly copy existing devices and adjust as necessary. To duplicate an existing device, click 'Duplicate' and make the following changes: 1. Change the name of the device in the 'Room Device Name' text field. Note: The default duplicated device name will be 'Copy <Device Name>' and should be changed following and district naming protocols for Controllable Devices. This does not change the Room that the device is assigned to. Once you have duplicated the device and changed the required elements, use the Move function to assign the duplicated device to the appropriate room. 147 SAFARI_Montage_admin 2. Change the IP address, SVS URL, SVS Source and Requires Reservation settings as needed. 3. Click 'Save.' 4. From the Controllable Devices list, use the 'Move' function (see below) to change the room to which the duplicated device is assigned. 5. 'Edit' (see below) the device to make any additional changes as needed. Export The Export function, operates similarly to the Export All function, but allows Administrators to export a single device and button set. To export a device: 1. Click 'Export' to the right of the device name. 2. Click 'Save' and choose a location to save the file. 3. Click 'Save' to begin the export. Move The Move function allows the Administrator to move a device from one room to another without the need to delete and recreate the device. To move a device: 1. Click 'Move' to the right of the device name which will open this page for the device: 2. If moving the device to a new school and room, first choose from the 'School' dropdown. 3. Select a new room for the device from the 'Move To Room' dropdown . 4. Click 'Move' to finalize the change. 5. Once the device is moved, you will see the newly associated room for the device displayed in the Controllable Devices list. Edit The Edit function allows the Administrator to edit a device. Editing a device from this area has the same effect as editing a device under Rooms. 148 Administrator Guide 1. Click 'Edit' to the right of the device name which will open this page: 2. Make changes to the Room Device Name, Button Set, IP Address, SVS URL, SVS Source or Requires Reservation as needed. Note: these editable fields will vary based on the device type. 3. Click 'Save' to finalize edits. Delete Administrators can delete devices by clicking 'Delete' to the right of the device name. top SAFARI Montage® © 2005-2013 Library Video Company. All Rights Reserved. 149 SAFARI_Montage_admin Pathways SM™ Projector Management - Admin Overview Projector Management gives an Administrator the ability to quickly view and manage Direct IP Controlled projectors. This topic covers the following, click a link to jump to that section: Accessing Projector Management New Projector Check Projectors All On/Off Additional Functions Assessing Projector Management Navigate to the Projector Management list and associated tools by clicking on the link in the Main Navigation Menu. Then, select 'Projector Management' from the Pathways SM secondary navigation menu: When viewing projectors, use the projector as shown above. top New Projector 150 / icons by each projector name to expand or collapse details about a Administrator Guide The New Projector function allows an Administrator to add new projectors to a school and room. Note: Associated button sets and rooms must be created before adding a new projector. To add a New Projector: 1. Click 'New Projector' at the top of the Projector Management page: 2. This will open the 'Add Projector' page: 3. Select a school from the 'School dropdown. 4. Select a room from the 'Room' dropdown. 5. Select a button set from the 'Button Set' dropdown. 6. Enter the IP Address of the projector being added. 7. Click 'Add' to add the new projector. top Check Projectors The 'Check Projectors' link will refresh the Projector Management page. This will update the status and bulb life of all projectors. This link is located at the top of the Projector Management page: 151 SAFARI_Montage_admin top All On/Off The All On and All Off links provide the Administrator with an easy way to turn on or off projectors school-wide. This links are located at the top of the Projector Management page: • All On – This will send the command to turn on all Direct IP controlled projectors. • All Off – This will send the command to turn off all Direct IP controlled projectors. top Additional Functions Administrators can also test button sets, duplicate projectors, move projectors to other rooms, edit projector configurations and delete projectors. These additional functions are listed by projector: Test 152 Administrator Guide The 'Test' function allows an Administrator to test the projector's button set. By clicking the 'Test' link to the right of the projector name, the virtual remote control for the projector will open in a pop-up window and button functionality can then be tested: Duplicate The Duplicate function allows Administrators to easily copy existing projectors and adjust as necessary. To duplicate a projector: 1. Click 'Duplicate' to the right of the projector name to open the 'Projector' page with duplication information: 2. Make changes to the 'Room,' 'Projector Name,' 'IP Address,' 'Type' and 'Button Set' as required. Note - The default duplication name will be 'Copy <Projector Name>' which should be edited using district naming protocols. 3. Click 'Save' to create the new projector. Move The Move function allows the Administrator to move a projector from one room to another without the need to delete and recreate the projector. 153 SAFARI_Montage_admin To move a projector: 1. Click 'Move' to the right of the projector name which will open this page: 2. If moving the projector to a different school, choose from the 'School' dropdown. 3. Select a room for the chosen projector, from the 'Move To Room' dropdown. 4. Click 'Move' to save changes. Edit The Edit function allows the Administrator to edit any listed projector. To edit a projector: 1. Click 'Edit' to the right of the projector name which will open this page: 2. Make changes to the 'Room Device Name,' 'Button Set' and 'IP Address' as required. 3. Click 'Save' to finalize your edits. Delete Administrators can delete projectors by clicking on the Delete link to the right of the projector name. top 154 Administrator Guide SAFARI Montage® © 2005-2013 Library Video Company. All Rights Reserved. 155 SAFARI_Montage_admin Pathways SM™ Classroom Media Controllers - Admin Overview Classroom Media Controllers gives an Administrator the ability to quickly view and manage the Classroom Media Controllers (CMC) and Kisok Controllers used within a school. Assessing Classroom Media Controllers Management Navigate to the Classroom Media Controllers list and associated tools by clicking on the link in the Main Navigation Menu. Then, select 'Classroom Media Controllers' from the Pathways SM secondary navigation menu: Note - This page will list CMC groups. CMCs need to be assigned to schools before they can be added to Groups. Assigning CMCs to Schools and Rooms Before a CMC or Kiosk Controller can be assigned, the controller must first be associated with a SAFARI Montage server. After being assigned to a server, the CMC will need to be assigned to a school. To assign a CMC or Kiosk Controller to a School: 1. 156 Click 'View All CMCs:' Administrator Guide 2. In the 'School' dropdown, select 'Unknown' to find CMCs which have not been assigned: 3. Click 'Assign' for each CMC that is listed as 'Unknown:' Note: When viewing CMCs, use the / icons to expand or collapse details about a CMC or Kiosk Controller. 4. To assign an unknown CMC, select a 'School,' 'Room Group' if applicable, and 'Room' using the dropdowns. Note: The 'Room Groups' dropdown will appear only if they have been created. 5. Click 'Save.' Creating CMC Groups Once CMCs have been assigned to Schools, Groups can be created to assist in the management of CMCs. To create a CMC group: 1. Click 'New CMC Group:' 157 SAFARI_Montage_admin 2. Designate the 'School' using the dropdown and enter a name in the 'Group Name' text field: 3. Click 'Add' to create the CMC group. You will be navigated to the Group list page: 4. 5. 158 Click 'View All CMCs.' For each CMC you wish to add to a group click 'Add to CMCs Group:' Administrator Guide 5. Select a Group from the 'Available Groups' list and click 'Add:' 5. Groups the CMC has been assigned to will be listed in the 'Assigned Groups' box. 6. To remove a Group, select from the 'Assigned Group' list and click 'Remove.' 7. When finished, click 'Done.' Assigning a CMC Group Controller Once CMC Groups have been created and CMCs or Kiosk Controllers have been added, designate a CMC Group Controller: 1. Click 'Edit' for a CMC Group: 2. In the 'CMC Group Controller' drop down menu, select a CMC that has been assigned to the Group: 159 SAFARI_Montage_admin 3. Click 'Save.' All On/Off The All On and All Off links provide the Administrator with an easy way to turn on or off all Classroom Media Controllers and Kiosk Controllers school-wide. 1. From the Group list, click on any Group name: 2. 160 From the CMC Group, click 'All On' or 'All Off:' Administrator Guide • All On – This will send the command to turn on all Classroom Media Controllers and Kiosk Controllers. • All Off – This will send the command to turn off all Classroom Media Controllers and Kiosk Controllers. WOL Controller This feature allows Administrators to designate a specific CMC as the Wake On LAN Controller for the CMC Group in a LAN configuration. Click the check box next to 'WOL Controller' to enable this feature. When enabled, the CMC designated as the 'WOL Controller' will communicate All On/Off commands to other CMCs and Kiosk Controllers within the Group. Additional Functions In addition to the functions explained above, Administrators can update screen shots, check ID and delete. 161 SAFARI_Montage_admin Update Screen Shots Clicking on the 'Update Screen Shots' link at the top of the page will refresh the live screen shot for CMC or Kiosk Controllers that are listed. ID Clicking on the 'ID' link to the right of the controller's name will initiate a ticker on the controller and will scroll the unit's serial number. This function is helpful when configuring several controllers at once and the user needs to determine which controller is being configured. Delete Administrators can delete controllers by clicking on the Delete link to the right of the controller's name. SAFARI Montage® © 2005-2013 Library Video Company. All Rights Reserved. 162 Administrator Guide Pathways SM™ Reservations & Reservation Settings - Admin Overview Administrators can view and manage device reservations for devices that require users to reserve them in advance. As users reserve devices, reservations are added to the Reservation system. Administrators can review reservations made from a daily or monthly view. The Requires Reservation setting, located under Rooms: Add a Device, must be enabled in order for devices to appear in the Reservation system. Accessing Reservations Navigate to the Reservations list and associated tools by clicking on the link in the Main Navigation Menu. Then, select 'Reservations' from the Pathways SM secondary navigation menu: Reservation Settings Reservation Settings allow an Administrator to manage the default times during which reservations can be created and the default scheduling time interval. These are defaults and schedules can be created outside these settings. To adjust Reservation Settings: 1. Select 'Reservation Settings' from the Pathways SM secondary navigation menu: 163 SAFARI_Montage_admin 2. Adjust settings using the 'Scheduling Start Time,' 'Scheduling End Time,' and 'Scheduling Time Interval' dropdowns. 3. Click 'Save.' Note: If reservations already exists in the system and changes are made to the Reservation Settings that conflict with the new settings, the following warning will appear to alert the Administrator: Make a Reservation To make a reservation: 1. 164 Click the 'Make a Reservation' link at the top of the Reservation list: Administrator Guide 2. This will open the 'Create a Reservation Stream' page: 3. Enter a 'Title/Stream' for the reservation. 4. Enter a 'Date' for which the reservation will be made. You can click on the calendar ( ) icon to activate a clickable calendar to assist with date selection. 5. Select a 'Time' and 'Duration' for the reservation from the dropdowns. 6. Enable or disable the 'Repeat Daily' setting. When enabled by checking the box, this setting will make the reservation a recurring event based on the Time, Duration and Source settings. 7. Select a 'Source' type from the dropdown. This will be used in the search for devices available for reservation. 8. Click on the 'Search' button. The 'View Schedule' tab will populate with devices that match the entered reservation criteria: 165 SAFARI_Montage_admin 9. Click on a device that matches the reservation needed. The selected device will be highlighted in green: 10. Click on the Add button to use the device. Note: If a device is selected that is already reserved during this time, the Reservation system will let the administrator know that the device is unavailable. 166 Administrator Guide 11. Click on the 'Assigned Users' tab. Assign a user by clicking on the 'Add Users' button. In the pop- up window, search for users by name and add them to the reservation. Assigned users will be responsible for device control during the reserved time. This is usually the person who requested the reservation. Note: If the device selected has a reservation limit, the Reservation system will let the administrator know that the reservation exceeds the number of maximum users. 12. Click 'Save.' 13. The reservation will now appear in the Reservation list: Note: For more information on a user's ability to view their Reservations, view the Reservations page of the Pathways SM User Guide. 14. In addition, the assigned user will see the reservation on their Reservations Dashboard panel on the day of the reservation: Note: See the Reservations page of the Pathways SM User Guide for more information on a user accessing their reservations. Edit a Reservation To edit a reservation, click on the 'Edit' link to the right of the reservation and make changes as needed. Click on the 'Save' button when finished. 167 SAFARI_Montage_admin Delete a Reservation To delete a reservation, click on the 'Delete' link to the right of the reservation and confirm the deletion. Viewing Reservations The Reservation list provides two views for viewing reservations in the system: daily and monthly. Daily View This view provides a daily view of reservations. From this view, Administrators can view future daily reservations by changing the date. Click the calendar ( ) to easily select a date, or manually enter a date in the 'Date' entry field. Click 'View' to see the reservations for the day: Note: The date highlighted yellow is the current day. The date highlighted in green is the reservation view that has been selected currently. In addition, Administrators have the ability to filter reservations by Room using the 'Room' dropdown for a quick look at a room's daily reservations. Monthly View This view provides a monthly view of all reservations. The monthly view can be advanced by month in order to view future reservations. Each day of the month displays the number of reservations and their names for that day. By clicking on the number of reservations, the view will switch to the daily view of the day selected: 168 Administrator Guide SAFARI Montage® © 2005-2013 Library Video Company. All Rights Reserved. 169 SAFARI_Montage_admin Pathways SM™ All-Call - Admin Overview All-Call gives an Administrator the ability to easily and quickly distribute emergency and general announcement information or topical programming to individual classrooms, a group of classrooms, district or school-wide. In addition, administrators can view All-Call types, the number of rooms associated with an All-Call and the All-Call runtime. Accessing All-Call Management Navigate to the All-Call list and associated tools by clicking on the Then, select 'All-Call' from the Pathways SM secondary navigation menu: New All-Call To create a New All-Call: 170 1. Click on 'New All-Call' at the top of the page: 2. This will open the page where you can create a new All-Call: link in the Main Navigation Menu. Administrator Guide Note: The editable fields available when creating a new All-Call will vary based on the type of All-Call that is selected from the first dropdown. 3. Type - select a type of All-Call from the 'Type' dropdown: • ALL-CALL - distributes to all Classroom Media Controllers and Kiosk Controllers within the district. • School Group Call - distributes to all CMCs and Kiosk Controllers in a selected School Group. 4. • School Call - distributes to all CMCs and Kiosk Controllers in a selected School. • Room Group Call - distributes to all CMCs and Kiosk Controllers in a Room Group. School - for School Group Calls, School Calls and Room Group Calls, select a School from the corresponding dropdown. 5. Room Group - for Room Group Calls, select a Room Group from the corresponding dropdown. 6. Source - select a source for the All-Call to distribute from the 'Source Type' dropdown: • Selective Video Stream – This source type allows the selection of an SVS stream to be broadcast during the All-Call. • Digital Title - This source type allows a digital title from the Learning Object Repository (LOR) to be broadcast during the All-Call. Note: If using this source type, begin from a digital resource title page and click the action icon. You will be navigated to the All-Call setup. If you do not start from the digital resource title page and select 'Digital Title' from the ‘Source’ dropdown in this step you will see the following message: 171 SAFARI_Montage_admin Click the 'change' link to navigate to the LOR search page. Locate the desired digital resource for the All-Call and from its title page click on the icon. You will be returned to the ‘New All-Call’ page where you can set up the All-Call. The digital title will be listed under the ‘Source Type’ drop down. • CMC Ticker Text – This source type allows text to scroll across the bottom of the display attached to a CMC or Kiosk Controller. • CMC URL – This source type is a web page that will be pushed out to a CMC or Kiosk Controller. 7. Enter or select the corresponding medium based on the source type. 8. Click 'Start' to begin the All-Call immediately or click 'Save' to add the All-Call to the list for future use. Note: Clicking 'Start' will automatically save the All-Call to the All-Call list. Additional Functions In addition to the functions mentioned above, Administrators can Start or Stop, Edit or Delete All-Calls: Start/Stop Administrators can start or stop All-Calls by clicking on the 'Start' link (Stop if an All-Call is running). When an All-Call is started or stopped, the Administrator will be able to monitor its progress as the All-Call Start and / or Stop scripts (as explained in the Add a Device topic of the Rooms Help page) for each room are processed: 172 Administrator Guide Stop the All-Call by clicking the 'Stop Call' link on the All-Call status page (see above) or from the All-Call list: Edit Clicking on the' Edit' link to the right of the All-Call's name will allow an Administrator to edit the All-Call settings. These settings are the same as those used for creating a New All-Call explained above. Remove Administrators can delete an All-Call by clicking on the 'Remove' link to the right of the All-Call's name. SAFARI Montage® © 2005-2013 Library Video Company. All Rights Reserved. 173 SAFARI_Montage_admin Pathways SM™ Scheduling Control - Admin Overview Scheduling Control allows an Administrator to turn Controllable Devices, Projectors, and Classroom Media Controllers and Kiosks on and off within a district or school on a scheduled basis. Schedules can be configured to run once, daily or weekly. Accessing Scheduling Control Navigate to the Scheduling list and associated tools by clicking on the link in the Main Navigation Menu. Then, select 'Scheduling Control' from the Pathways SM secondary navigation menu: New Schedule To create a New Schedule: 1. 174 Click on the New Schedule at the top of the page. Administrator Guide 2. This will open the Schedule Device Action page. Use the drop down menus to customize the Schedule: Note: editable fields may vary based on the selected scope of the Schedule. • Device Class - select the type of controllable device from the 'Device Class' dropdown. • Scope - select a Scope of 'All,' 'School Group,' 'School,' 'Room Group,' or an individual 'Room' to define which devices will be controlled by the schedule. If selecting a scope other than 'All,' select the specific School Group, School, Room Group, or Room. • Action - select the Action to perform, either turning devices on or off. • # of Rooms - this will display the number of rooms that will be affected. • Repeat - select the frequency for the schedule from the 'Repeat' dropdown . • Time - use the dropdowns to select the time of day that the action will take place 3. Click 'Save' to add the Schedule. Edit Schedule Clicking on the 'Edit' link to the right of the schedule's entry will allow an administrator to edit the scheduled settings. These settings are the same as those used for creating a New Schedule (see above). 175 SAFARI_Montage_admin Remove Schedule Administrators can remove schedules by clicking on the 'Remove' link to the right of the schedule. SAFARI Montage® © 2005-2013 Library Video Company. All Rights Reserved. 176 Administrator Guide SAFARI Montage Live! (Administrator) Overview Administrators can: • Configure SAFARI Montage Live! (SML) integration • Add or remove archived sessions • Assign permissions Setting Up SML in SAFARI Montage Note: To configure SML integration, the user must have administrator rights. Adding a SML Server To add a SML server, do the following: 1. Log into SAFARI Montage as an Administrator. 2. Click the ‘Admin’ tab on the SAFARI Montage dashboard. 3. Click on ‘SAFARI Montage Live!’ on the left-hand navigation. 4. Click on ‘Servers’ in the submenu of the left-hand navigation. 5. Click on ‘Add Server,’ above the displayed server list to add a SML server. Note: The addition of multiple servers is supported; however, it is not typical. 6. Enter a description and hostname, then click the‘Save’ button. Note: If the SAFARI Montage Live! server's software does not meet the minimum version requirements, the user will see the warning below. 177 SAFARI_Montage_admin Enabling/Disabling a SML Server Note: Complete steps 1 - 4 from ‘Adding a SML Server’ to reach the list of SML servers. To enable or disable a server, check (enable) or uncheck (disable) the checkbox next to the server. Editing or Deleting a SML Server Note: Complete steps 1 - 4 from ‘Adding a SML Server’ to reach the list of SML servers. To delete a SML server, click the ‘delete’ link. To edit a SML server, click the ‘edit’ link. Edit the server details and click ‘Save.’ Adding a Recorded SML Session Automatically To add a recorded SML session automatically, do the following: 178 1. Log into SAFARI Montage as an Administrator. 2. Click the ‘Admin’ tab on the SAFARI Montage dashboard. 3. Click on ‘SAFARI Montage Live!’ on the left-hand navigation. 4. Click on ‘Archives’ in the sub-menu of the left-hand navigation. 5. Click on ‘New Recorded Session,’ located above the results list. Administrator Guide Note: If single sign-on fails for the enabled SML server, the user will be prompted to enter their SML credentials (ie.username and password) before continuing. Note: If multiple SML servers are enabled, the user will have to choose a server before continuing. 6. Select a SML Product from the ‘Product’ drop-down box. Note: A ‘Product’ is defined as the session type used when recording a SAFARI Montage Live! session. 7. Click the ‘Search’ button. 8. Click the checkbox next to the SML archived sessions to add. Note: Attendees associated with the SML archived session, SAFARI Montage will attempt to add authorized viewers automatically by matching the e-mail addresses of the sessions invitees stored in SML. To add or remove users, please see the ‘Setting Permissions’ section of this help page. 179 SAFARI_Montage_admin 9. Click the ‘Continue’ button to publish the session. Adding a Recorded SML Session Manually Manually adding archived sessions may be used to publish sessions organized by others. To add a recorded SML session manually, do the following: 1. Log into SAFARI Montage as an Administrator. 2. Click the ‘Admin’ tab on the SAFARI Montage dashboard. 3. Click on ‘SAFARI Montage Live!’ on the left-hand navigation. 4. Click on ‘Archives’ in the submenu of the left-hand navigation. 5. Click on ‘New Recorded Session’ located above the results list. 6. Click ‘Add manual recording.’ 7. Select a school, enter a description and paste the URL for the SML session. Click the ‘Save’ button to publish the session. 180 Administrator Guide The recorded SML session is now available to all users. To refine who can view the archived session, see the ‘Setting Permissions’ section of this help page. Editing or Deleting a Recorded SML Session Note: Complete steps 1 - 4 from ‘Add a Recorded SML Session’ to reach the list of SML sessions. To delete a session, click the ‘Del’ ( To edit a session, click the ‘Edit’ ( ) icon. ) icon. Edit the session details and click ‘Save.’ 181 SAFARI_Montage_admin Setting Permissions There are three ways to define permissions to allow users to view archived SML sessions. • All - Grants every user access to archived SML sessions. • User Type - Grants users access to archived SML sessions based on user types. • Users - Grants individual users accounts access to archived SML sessions. To set the permissions for an archived SML session, from the SAFARI Montage Live! Archives list do the following: 1. Click on the ‘Permissions’ ( ) icon next to the archived SML session. 2. Select how to grant permissions by choosing a method from the ‘Grant Permissions To’ drop-down box. Note: Changes the the ‘Grant Permissions To’ drop-down box become effective immediately. a. To Grant Permission to All Users – Choose ‘All’ from the ‘Grant Permissions To’ drop- down box. 182 Administrator Guide All user accounts now have permission to view the archived SML session. b. To Grant Permission to Specific User Types – Choose ‘User Types’ from the ‘Grant Permissions To’ drop-down box. i.Individually check (give permission) or uncheck (remove permission) for each User Type. ii.Click the ‘Save’ button. Selected User Types now have permission to view the archived SML session. c. To Grant Permission to Individual Users – Choose ‘Users’ from the ‘Grant Permissions To’ drop-down box. 183 SAFARI_Montage_admin Note: By default, all users are granted permission to view archived SML sessions. i.Enter a user's ‘Last Name.’ Note: To display a list of all users available on the SAFARI Montage server, leave ‘Last Name’ blank. ii.Choose a school from the ‘School’ drop-down box to filter by school. iii.Click the ‘Search’ button. iv.Click the name of the users from the ‘Available Choices’ list, and click the ‘>’ button to grant permission. The user's name is transferred to the ‘Granted to’ list and immediately has permission to view the archived SML session. Notes: To select multiple users, hold down ‘CTRL,’ on the keyboard, and click each desired user name. As soon as a user is transferred from the ‘Available Choices’ list to the ‘Granted to’ list, only the listed users are granted access. d. To Remove Permission from Individual User i.Highlight the user in the ‘Granted to’ list, and click the ‘<’ button. The user's name is transferred to the ‘Available Choices’ list and no longer has permission to view the archived SML session. Notes: 184 Administrator Guide To select multiple users, hold down ‘CTRL,’ on the keyboard, and click each desired user name. To remove all users, click the ‘<<’ button. All users are transferred to the ‘Available Choices’ box and the default condition of granting all users permission is now restored. SAFARI Montage® © 2005-2013 Library Video Company. All Rights Reserved. 185 SAFARI_Montage_admin SVS Admin SAFARI Montage® Selective Video Stream (SVS) Setup Overview SAFARI Montage Selective Video Streaming (SVS) provides administrative management and delivery of live video streaming sources. SVS provides management of dedicated, hardware-based video encoders serving digital video from components such as cable TV tuners, DVD players or school/district cameras, cameras with direct streaming capability or internet-based video streaming resources. SVS allows video stream access to be managed by source, by school, and for the designation of video streams as school news. Selective Video Streaming Settings 1. Click in the Main Navigation Menu. 2. Select ‘Settings’ from the ‘Selective Video Streaming’ secondary navigation menu. 3. Enable/Disable ‘Display School News Before Login.’ 4. Click the ‘Update’ button to save your changes Enabling ‘Display School News Before Login’ allows users to view school news streams without logging into the SAFARI Montage system. The screen below displays how the SAFARI Montage home page appears when this feature is enabled: 186 Administrator Guide SAFARI Montage® © 2005-2013 Library Video Company. All Rights Reserved. 187 SAFARI_Montage_admin Adding a SAFARI Montage® Selective Video Stream Administrators can add a new stream at any point. For the deployment of a large number of similar streams, an existing stream may be duplicated. Create a New Stream 188 1. Click in the Main Navigation Menu. 2. Select ‘Video Streaming’ from the ‘Selective Video Streaming’ secondary navigation menu. 3. Click ‘New Stream’ and enter the following information: Administrator Guide • Active Stream - Enable/Disable ‘Active Stream.’ • School - Select the school that the stream will be added to from the dropdown. • Video Stream Name - Enter a name for the video stream. • Description - Enter a description of the video stream. • URL - Enter a source URL for the video stream. This is the encoder, camera or Internet playback URL for the video stream. • Type - Select a type from the dropdown. This is primarily used to support SVS stream recording if the SAFARI Montage N-DVR module is licensed. • Bitrate - Enter the stream bitrate for informational purposes. • Source - Select a source from the dropdown. Streams can be quickly accessed from the ‘Internet Streams’ dashboard panel. By clicking ‘…More’ on this panel, all streams will be accessible. This step will determine the associated source tab for the stream as set in this step. • Dashboard - To display the SVS stream on the dashboard, check the box and select a position. • School News - Enable/Disable ‘School News.’ Enabling School News will add the ‘School News’ icon to the Quick Launch panel of the dashboard. 189 SAFARI_Montage_admin • Reservations - If Pathways SM is licensed, select whether the SVS stream requires reservation and enter the number of users allowed to reserve the stream at any one time. Dedicated device streams such as DVD players are typically set to 1 user while shared streams are set to a number of users that conforms to network bandwidth usage expectations. There is a limit of 99 reservations per stream. Note: Streams will not be available to remote schools when reservations are required. • Assign to - Select School Groups or Individual Schools from the dropdown and select which groups or schools will be able to view the video stream. 4. Click the ‘Add’ button. Note: Additional settings may be available based on licensed additional modules from SAFARI Montage. Duplicate an Existing Stream A duplicated stream will copy the information from an existing stream allowing administrators to replicate and adjust the information for similar streams. To duplicate an existing stream: 1. Click 'Duplicate' for an existing stream. 2. This will create a copy of the existing stream and open the 'Edit Video Stream' page for you to edit the copy. Notice that the title of the duplicated stream is "Copy <existing steam title>" and you can adjust the title, description, URL and other information to quickly create a new stream. 190 Administrator Guide 3. Click 'Save Changes.' SAFARI Montage® © 2005-2013 Library Video Company. All Rights Reserved. 191 SAFARI_Montage_admin Editing a SAFARI Montage® Selective Video Stream Administrators can edit a stream at any point: 1. Click in the Main Navigation Menu. 2. Select ‘Video Streaming’ from the ‘Selective Video Streaming’ secondary navigation menu. 3. Click 'Edit' in line with the video stream to be edited. 4. Make the required changes to the video stream information (see Adding a Video Stream for more information) . 5. Click the ‘Save Changes’ button. SAFARI Montage® © 2005-2013 Library Video Company. All Rights Reserved. 192 Administrator Guide Deleting a SAFARI Montage® Selective Video Stream Administrators can delete a stream at any point: 1. Click in the Main Navigation Menu. 2. Select ‘Video Streaming’ from the ‘Selective Video Streaming’ secondary navigation menu. 3. Click 'Delete' in line with the video stream. 4. Confirm your intent to delete the video stream. SAFARI Montage® © 2005-2013 Library Video Company. All Rights Reserved. 193 SAFARI_Montage_admin Setting Permissions for a SAFARI Montage® Selective Video Stream Administrators can manage permission for a stream at any point: 1. Click in the Main Navigation Menu. 2. Select ‘Video Streaming’ from the ‘Selective Video Streaming’ secondary navigation menu. 3. Click 'Permissions' in line with a video stream. 4. Grant permission to all users by selecting 'All' from the dropdown (this is the default). Or, select 'User Types' from the dropdown to limit user types that may view the stream: 194 Administrator Guide Note: Administrators have full access to streams by default. 5. Click the ‘Save’ button. SAFARI Montage® © 2005-2013 Library Video Company. All Rights Reserved. 195 SAFARI_Montage_admin WAN Manager Admin SAFARI Montage® WAN Manager Overview Overview WAN Manager is an enterprise network digital media management solution for distributing and managing media to classrooms. WAN Manager allows for the management of district-wide services to multiple schools, each of which may be configured as required to meet the needs of a specific school. The Central Server, or WAN Manager, can be used directly by clients (direct schools) and/or in a single tier Parent/Child architecture. WAN Manager services all of the needs in a Wide Area Network by serving and supporting the management of both direct schools and remote school servers. Server Types • WAN Manager/Parent Server • The parent server is the WAN Manager. The WAN Manager can have any number of connected child servers known as remote school servers. The parent server has control over certain functions on its child servers, such as specifying what things are sharable (see ‘Sharing in WAN Manager’), whether shared items are subject to approval and what times of day media may be transferred between servers. Parent servers may also assign content package licenses to schools on child school servers, thereby giving them access to that content (see WAN Manager Media and License Management). • Remote School Server/Child Server • A child server, or remote school server, can only have a single parent server. Child servers, in most cases, reside in a remote location to the parent server. They may have their own local content or may be granted content licenses from the parent server (see ‘WAN Manager Media and License Management’). School Types 196 Administrator Guide • Direct • A direct school can be thought of as a ‘virtual school.’ It is a private instance of SAFARI Montage on a particular server. A direct school has its own set of user accounts, content packages, Playlists and user preferences. Users associated with schools connect directly to the WAN Manager server over a highbandwidth connection by using a browser and do not require a SAFARI Montage server at their location. • Remote A remote school is one that is located on a connected server, separate from the local server to which a user is logged in. For example, in the case of a parent server, remote schools are those located on • remote school (child) servers. In the case of remote school server, remote schools are those that do not reside on the local remote school server, i.e., schools located on the parent server and/or other remote 197 SAFARI_Montage_admin school servers. Remote school server users usually do not connect directly to the parent server directly, because bandwidth between parent and remote school location is too low to support play back of SAFARI Montage’s high-quality video. Instead users of remote school servers connect to a local WAN Managerenabled SAFARI Montage server and WAN Manager transfers media as required between the WAN Manager parent and the remote server. Content packages may exist locally to their server or may be assigned to them from the parent server. When a content package exists locally, its media files also exist locally, so titles are readily available for instant playback to all schools on that server. When a content license has been assigned to a remote school from the parent server, the media files do not exist locally. Instead, the files must be transferred to the remote school server, upon user request, during times specified in the school’s transfer schedule. This ensures that SAFARI Montage’s large video files are only transferred during off-peak hours so they do not consume the school’s network bandwidth during the school day (peak hours). SAFARI Montage® © 2005-2013 Library Video Company. All Rights Reserved. 198 Administrator Guide Setup and Configuration Activating SAFARI Montage® WAN Manager Add-On Modules WAN Manager is a SAFARI Montage Module product. Like all modules, before it may be used, it must be activated. Modules cannot be activated without a valid license from SAFARI Montage. A valid license was created for your organization at the time you purchased WAN Manager. There are three types of activation available: Automatic, Semi-Automatic and Manual activation. Both automatic forms of activation require that your SAFARI Montage server has access to the Internet. When a module is activated, SAFARI Montage communicates with a remote licensing system via the HTTP protocol over the standard port 80. If a valid license exists, the product will activate. To perform any of these activation methods, you must be logged in to SAFARI Montage as an Administrator. Automatic Activation Automatic activation will attempt to detect and activate all inactive content packages and modules in the system. For the package to activate, a valid license must be found in the remote licensing system. 1. Click on in the Main Navigation Menu. 2. Select ‘Add-On Modules’ from the 'Content & Modules' secondary navigation menu. 3. Mark the ‘check box’ agreeing to the License Agreement. 4. Fill out the required information. 5. Click the ‘Next’ button. The system will activate each inactive package and add-on, verifying each activation with the remote licensing. Please be aware that this process can take some time (sometimes up to several hours), depending on the number of packages being activated. Semi-Automatic Activation During semi-automatic activation, you will be asked to enter the ‘Product ID‘ that was provided to you by Library Video Company when you ordered the product. Semi-auto activation requires that the SAFARI Montage server has access to the Internet. When a module is activated, SAFARI Montage communicates with our remote licensing system via the HTTP protocol over the standard port 80. If a valid license exists, the product will activate. 1. Click on in the Main Navigation Menu. 2. Select ‘Add-On Modules’ from the 'Content & Modules' secondary navigation menu. 3. Click the ‘Activation’ link to the right of the WAN Manager module. 4. Click the ‘Activate’ button. 5. Enter the ‘Product ID’ in the provided field. 6. Click the ‘Activate’ button. 199 SAFARI_Montage_admin Manual Activation Manual activation can be used if auto-activation fails for whatever reason. The most likely reason would be that Internet connectivity does not exist to the SAFARI Montage server. To manually activate the WAN Manager module, you must be logged in to SAFARI Montage as an administrator. First, you need to gather three pieces of information from the Manual Activation page in SAFARI Montage. These codes must be entered into our activation web site to retrieve your manual activation ID and password. 1. Click on in the Main Navigation Menu. 2. Select ‘Add-On Modules’ from the 'Content & Modules' secondary navigation menu. 3. Click the ‘Activation’ link to the right of the WAN Manager module. 4. Click the ‘Manual’ button. The Manual Activation page displays with three key pieces of information: Unit ID, Version Number and Serial Number. You will need this information to retrieve your Activation ID and Password from the web site. 5. Launch a new browser window, leaving the manual activation page open in the background. 1. Retrieve Activation Codes A web site has been set up to allow you to acquire your manual activation codes. 2. above. Navigate to http://software.safarivideonetworks.com/ in the browser window opened 3. Click the ‘Activate’ link next to the SAFARI Montage logo. 4. Enter the ‘Product ID.’ 5. Mark the ‘check box’ agreeing to the License Agreement. 6. Fill out the required information. 7. Click the ‘Next’ button. 8. Verify the contact information entered, and create a log in for the web site. 9. Click the ‘Save’ button. 10. Enter the ‘Unit ID,’ ‘Version Number‘ and ‘Serial Number’ into the provided fields. 11. Click the ‘Get Password’ button. An Activation ID and Password will displayed. 12. Switch to the browser window containing the Manual activation. 6. Enter the ‘Activation ID’ and ‘Password’ received during ‘Retrieve Activation Codes.’ 7. Click the ‘Activate’ button. If activation was successful, you will be returned to the Modules page and the Active checkmark ( next to WAN Manager module. Repeat the above process for any other parent or remote school servers. Activation Assistance 200 ) will be shown Administrator Guide If you need further assistance with the manual activation process, please contact our technical support department http://www.safarimontage.com/support/. SAFARI Montage® © 2005-2013 Library Video Company. All Rights Reserved. 201 SAFARI_Montage_admin SAFARI Montage® WAN Manager Administrative Functions All WAN Manager-specific administrative settings are grouped under the 'WAN Manager' submenu of the secondary navigation Admin area. Note: The options in the secondary navigation menu 'WAN Manager' are different, depending on whether you are using a WAN Manager parent server or remote school server. Descriptions of each WAN Manager administrative menu items are below. • Content Pending Approval • 'Content Pending Approval' houses all media waiting for approval before making them available to general users on the system. Users of the type Teacher or higher can be designated as an Approver by an administrator. System Administrators and Curriculum Administrators can always approve content. • Playlists Pending Approval 'Playlists Pending Approval' houses all Playlists waiting for approval before making them available to general users on the system. Users of the type Teacher or higher can be designated as an Approver by • an administrator. System Administrators and Curriculum Administrators can always approve content. • Remote School Servers The 'Remote School Servers' page is available only on the parent server. This page shows you a list of the remote school servers that are currently connected to this parent server as well as the current • database synchronization activity between servers. See Data Syncing for more information. Located under each remote school server is a list of content packages available locally on the remote school server. • 202 Schools Administrator Guide • The 'Schools' section is where all school management functions take place. These functions include the creation and removal of schools on this server, assignment of content package to schools (both local and remote), and management of school-specific settings such as WAN settings, user accounts and LDAP mappings. See School Management for complete information. • Transfer Queue • The 'Transfer Queue' lists all pending media file transfers. When a remote media file is requested by a user, the media file is queued and transferred according to the transfer schedule. • WAN Settings The 'WAN Settings' page allows you to configure WAN Manager-specific settings, such as disk space limits, media transfer schedule and, in the case of the parent server, upload and content approval • constraints. See ‘WAN Settings‘ for more information. On the remote school server, the WAN Settings page allows you to specify the parent server to which the remote school server is attached. For more information, please see ‘Connecting Child Servers to Parent Server.’ SAFARI Montage® © 2005-2013 Library Video Company. All Rights Reserved. 203 SAFARI_Montage_admin SAFARI Montage® WAN Manager Settings All WAN Manager-specific administrative settings are grouped under the 'WAN Manager' submenu of the secondary navigation Admin area. Note: The options in the secondary navigation menu 'WAN Manager' are different, depending on whether you are using a WAN Manager parent server or remote school server. Settings Common to WAN Manager and Remote School Servers • Drive Space Disk Space Warning The drive space warning is labeled ‘CreationStation and WAN Manager space available warning at this threshold.’ When free drive space falls below this level, SAFARI Montage will display warning messages to Administrators. • Disk Drive Space Limit • The drive space limit is labeled ‘Prevent CreationStation uploads and WAN Manager transfers when at this threshold.’ When free drive space falls below this limit, uploads and WAN Manager media file transfers will cease until drive space becomes available. Transfer Schedule The transfer schedule allows you to specify peak times of day during which media file transfers should not occur between your connected SAFARI Montage servers, e.g., during peak school hours when WAN bandwidth is needed for other purposes. It also allows you to throttle bandwidth usage to specific levels. • Limit Transfer Speed • This setting will throttle bandwidth used for media file transfers between SAFARI Montage servers. • Ignore Transfer Schedule Activating this checkbox disables the transfer schedule to allow media files to transfer between SAFARI Montage servers at all times of day. • WAN Manager (Parent) Server Settings The following settings are found on WAN Manager parent servers only. 204 • Allow Users to Publish Uploaded Media to District • Activating this setting gives users the ability to share user-uploaded media with the parent server. • Allow Users to Publish Uploaded Media to District Requires Approval Administrator Guide • Activating this setting causes all published media to be subject to approval first before they are made available for general use on the system. Published media that is awaiting approval appears on the ‘Content Pending Approval’ list until approved. • Allow Users to Share Playlists with the District • Activating this setting gives users the ability to share Playlists with the parent server. • Allow Users to Share Playlists with the District Requires Approval Activating this setting causes all shared Playlists to be subject to approval first before it is made available for general use on the system. Playlists that is awaiting approval appears on the ‘Playlists Pending • Approval’ list until approved. • Apply All Settings Below to Remote School Servers This checkbox, when active, causes all settings below that point, including the transfer schedule, to migrate to remote school servers, removing control of the settings on the Remote School Server. Changes • in settings will not be propagated to the Remote School Server until the next sync process runs. Please allow up to 30 minutes for settings to propagate to Remote School Servers. Remote School (Child) Servers Settings The following settings are found on WAN Manager remote school servers only. • Parent Server (IP or Hostname) This textbox contains the hostname, or IP address, of the parent server. After entering a valid hostname or IP address of the parent server, the Remote School Server will perform an initialization and • syncing process with the parent server. SAFARI Montage® © 2005-2013 Library Video Company. All Rights Reserved. 205 SAFARI_Montage_admin Connecting a Child Server to a Parent Server with SAFARI Montage® WAN Manager To connect a remote school (child) server to a WAN Manager (parent) server, you must be logged into the remote school server as an administrator. 1. Click on the SAFARI Montage Main Navigation Menu. 2. Select ‘WAN Settings’ from the ‘WAN Manager’ secondary navigation menu. 3. Enter the ‘Hostname’ or ‘IP address’ of the parent server into the field labeled ‘Parent Server.’ 4. Click the ‘Update’ button. SAFARI Montage® © 2005-2013 Library Video Company. All Rights Reserved. 206 Administrator Guide SAFARI Montage® WAN Manager Data Syncing SAFARI Montage WAN Manager maintains data concurrency between servers through a background synchronization process, which runs every 15 to 30 minutes. This process transfers information such as media metadata, Playlists, personal user data and various WAN settings that must be exchanged. The user may monitor synchronization progress via the ‘Remote School Servers’ page on the parent server or via the ‘WAN Settings’ page on the remote school server. Both of these areas show the date and time of the last communication, and a progress indicator shows how much of the database is synced. SAFARI Montage® © 2005-2013 Library Video Company. All Rights Reserved. 207 SAFARI_Montage_admin SAFARI Montage® WAN Manager Remote School Servers The 'Remote School Servers' page lists all of the child servers attached to the WAN Parent server. Listing of Remote School (Child) Servers 1. Log into the WAN Manager Parent Server. 2. Click 3. Select ‘Remote School Servers’ from the ‘WAN Manager’ secondary navigation menu. 4. This displays a listing of all of the child servers attached to the WAN Parent that you are logged on the SAFARI Montage Main Navigation Menu. into. The percent synchronized, the time of the last communication with each child and the content packages installed on each child server is listed for quick viewing. Remotely Update All Child Servers On the 'Remote School Servers' page, you have the option to remotely push out the update to all child servers whenever a software or content update is run on the WAN parent server. By enabling this feature, it will save the administrator the time of manually updating each child server individually. To enable this feature, check the box at the top of the screen: . SAFARI Montage® © 2005-2013 Library Video Company. All Rights Reserved. 208 Administrator Guide Assigning Networks to a Remote School (Child) Server with SAFARI Montage® WAN Manager Multiple ranges of IP addresses can be associated with a specific remote school server for the purposes of forwarding permanent links created on the WAN Manager server. If a user’s IP address falls within the range, it is forwarded to the associated remote school, where the media will play it if it is available. These networks are defined by IP/Netmask pairs. Any number of networks may be associated with a single remote school server. Assign a network to a remote school server 1. Log into the WAN Manager Parent Server. 2. Click 3. Select ‘Remote School Servers’ from the ‘WAN Manager’ secondary navigation menu. on the SAFARI Montage Main Navigation Menu. 4. Locate the remote school server that you want to modify network assignments for and click the ‘add/remove’ link under the ‘Networks’ column for that server. 5. Enter the ‘IP address’ and its corresponding ‘Netmask’ to assign additional networks to this remote school server. 6. Click the Add button. Remove an assigned network from a remote school server 1. Log into the WAN Manager (Parent) Server. 209 SAFARI_Montage_admin 2. Click on the SAFARI Montage Main Navigation Menu. 3. Select ‘Remote School Servers’ from the ‘WAN Manager’ secondary navigation menu. 4. Locate the remote school server that you want to modify network assignments for, and click the ‘add/remove’ link under the ‘Networks’ column for that server. 5. Select the assigned network you want to remove and click the ‘Remove’ button. SAFARI Montage® © 2005-2013 Library Video Company. All Rights Reserved. 210 Administrator Guide SAFARI Montage® WAN Manager School Management The Schools section of the WAN Manager administrative area is where all school management functions take place, such as creation of schools, LDAP mappings, user accounts and assignment of content package licenses. A school in SAFARI Montage can be thought of as an individual instance of the SAFARI Montage system which is manageable through appropriate administrative controls. A school has its own set of licensed content, user-uploaded content, Playlists, user accounts, configuration settings, school logo and preferences. Schools may be local or remote to the SAFARI Montage server. On a parent server, remote schools are those that exist on connected remote school servers. On the remote school servers, remote schools are those that exist on the parent server. Local schools on the WAN Manager Parent Sever are also referred to as direct schools or direct play schools. Users in these schools must connect directly to the SAFARI Montage server by using a web browser. Adding and Editing School Settings To add a school, click the ‘Add School’ link on the Schools page. Enter a school name, configure the school settings and click 'Add.' To modify a school’s specific preferences and settings, click 'Edit' for the school from the Schools page. Adjust the settings and click 'Update' to save changes: 211 SAFARI_Montage_admin 212 Administrator Guide Note: School settings may vary based on the configuration and activated add-on modules for your SAFARI Montage server. School Management Options Additional management options are available by school from the 'School' list page: • Log In - click to log out of the school you are in and log in to another school. • Content Packages - click to view and/or make changes to content packages licensed for the school. • Users - click to add, edit or manage users for the school. LDAP can be utilized (see below). • Edit - click to edit a school's settings (see above). • Delete - click to remove a school and its data from the system. Note: Content packages must be unassigned before a school can be deleted. Deleting a school will permanently remove the school and its data (users and Playlists) from the system. User-uploaded CreationStation media will remain visible to Administrators. LDAP Groups Each school may have its own set of associated user accounts from the LDAP server(s) to which SAFARI Montage is connected. Any number of user account groups from your LDAP directory server may be mapped to each SAFARI Montage user types. For more information on connecting SAFARI Montage to an LDAP directory server, please see the LDAP Settings section of the SAFARI Montage Administrator Guide. • Mapping LDAP Groups To map SAFARI Montage user types to LDAP groups for a school, click the ‘LDAP’ link on Schools page. Note: You must have LDAP enabled in order to have this link visible. The ‘Edit LDAP Groups’ page • will be displayed. Each of the SAFARI Montage groups are listed in the “User Type” dropdown: Administrator, Curriculum Administrator, School Administrator, Principal, Teacher w/Upload, Teacher, Student w/ Upload, Student, and Parent. Follow the instructions on the ‘LDAP Groups’ page of the SAFARI Montage Administrator Guide. 213 SAFARI_Montage_admin SAFARI Montage® © 2005-2013 Library Video Company. All Rights Reserved. 214 Administrator Guide SAFARI Montage® WAN Manager Media and License Management Content Types There are two types of content within SAFARI Montage: licensed content and user-uploaded content. • Licensed • Licensed content is pre-packaged content purchased from SAFARI Montage. • User-Uploaded (CreationStation™) User-uploaded content is content uploaded by a user using the SAFARI Montage CreationStation® module. This document uses the phrases user-uploaded content and CreationStation content • interchangeably. License Management - Assigning Licensed Content to Schools Once activated, licensed content packages may be assigned to any school, direct or remote, subject to the number of schools for which the package is licensed. CreationStation licenses may only be assigned to schools on the local server to which you are logged in. Assigning a CreationStation license to a school allows users associated with the school to upload media via CreationStation. Users of schools without a CreationStation license will not be able to upload media, will not see ‘Upload’ functions or ‘Edit’ buttons next to uploaded media, but may still view uploaded CreationStation media, which does not require a CreationStation license. In order to assign a content package to a school, the parent server must own a license to that package and the content package must be activated. When a content package is activated, one or more licenses for that package are granted to that SAFARI Montage system. The license count is indicated in the ‘Available’ column on the Content Packages page in the Admin area. When a package is assigned to a school, the ‘Used’ column will increment by one. When all available licenses are assigned to schools, the content package may not be assigned to additional schools. Due to licensing policies, package assignments cannot be deleted (unassigned) or reassigned to other schools without the approval of SAFARI Montage, so please take care to assign content package licenses accurately. • Assignment to Direct Play Schools • Assigning a content package license to a direct school makes the content immediately available to that school. They may play back content immediately, because the school resides on the same server as the content. The content does not need to be transferred from a remote SAFARI Montage server. To assign a licensed package that has been activated to a direct school, follow these steps: 1. Log into the WAN Manager Parent Server. 2. Click 3. Select 'School's from the ‘WAN Manager’ secondary navigation menu. on the SAFARI Montage Main Navigation Menu. 4. Locate the direct school that you want to assign an activated package to. Expand the content package assignment list for the school by clicking on the icon. 215 SAFARI_Montage_admin 5. Select the activated package you want to assign to this school, and click the ‘Add’ button. The package will show up in the assigned list below. To unassign a package from a school, click the icon next to the package. • Assignment to Remote Schools Content package licenses may also be assigned to schools on remote school, child, servers by • using the ‘Schools’ admin page on a WAN Manager, parent, server. In this case, the remote school does not need to have a local content package hard drive for that package. The media files remain on the parent server, and they are delivered to the child server upon request, during the times of day specified in their transfer schedule. Assigning a content package license to a remote school causes several events: • o The data for that package becomes available in the remote school’s search results after the next sync process runs in 15 to 30 minutes. o ‘Transfer’ buttons appear next to each title not available on a local content hard drive in o Media files not available locally on a content hard dive are not transferred to the remote the remote school’s search results for that package. school until a user in that school requests to transfer a title. 216 Administrator Guide o To assign a licensed package that has been activated to a remote school, follow these steps: 1. Log into the WAN Manager Parent Server. 2. Click 3. Select ‘Schools’ from the ‘WAN Manager’ secondary navigation menu. on the SAFARI Montage Main Navigation Menu. 4. Locate the remote school to which you want to assign an activated package to. Remote schools have next to the school name. Expand the content package assignment list for the remote school by clicking on the icon. Packages listed under ‘Remote content package assignments’ are active, assigned packages that reside on the remote school server. 5. Select the activated package you want to assign to this school and click the ‘Add’ button. The package will show up in the assigned list below. To unassign a package from a school, click the icon next to the package. Requesting a Media File Transfer Once the content package is assigned to a remote school, all titles within the package will display in the school’s search results. Titles not present on the remote school server display the following icon: . By clicking the 'Transfer' icon, the user is requesting to have the media file for that title transferred to their local SAFARI Montage server. When that request is made, the media file is queued in the Transfer Queue and is downloaded during the times of day permitted by the Transfer Schedule. Cancelling Queued Items 217 SAFARI_Montage_admin When the Transfer icon is clicked, it will change to a icon. Clicking the 'Cancel' icon will remove the item from the transfer queue, and the 'Transfer' icon will reappear. Delete Transferred Items When the transfer is complete, the 'Cancel' icon will change to a icon. Clicking 'Delete' will remove the file from your local server. SAFARI Montage® © 2005-2013 Library Video Company. All Rights Reserved. 218 Administrator Guide User Management with SAFARI Montage® WAN Manager Accessing User Management When WAN Manager is enabled on a SAFARI Montage server, each school has its own set of user accounts. User accounts are managed in the same way that they are on a SAFARI Montage standalone system. From the WAN Manager Menu To access user management from the WAN Manager secondary navigation menu, select the 'Schools' page and click the 'users' link for a particular school: This will navigate you to the Settings menu and display users for the selected school. You can also access user management directly from the Settings secondary navigation menu. From the Settings Menu To manage the user accounts for a particular school, select 'Users' from the 'Settings' secondary navigation menu. Select a school from the Schools dropdown to display users for the selected school. 219 SAFARI_Montage_admin Once a school is selected, user management is exactly the same as on a SAFARI Montage standalone server. Transferring a User to Another School On a WAN Manger parent server with multiple direct play schools, the administrator has the ability to transfer users from one school to another. To transfer a user to another school, either: 220 • Click the 'transfer link' from the Users list: • Or, click on the icon from the edit user page: Administrator Guide Then, select the school to which you wish to transfer the user from the dropdown and click 'Transfer:' SAFARI Montage® © 2005-2013 Library Video Company. All Rights Reserved. 221 SAFARI_Montage_admin Sharing with SAFARI Montage® WAN Manager Uploaded media and Playlists may be shared to other schools across your district’s Wide-Area Network. Sharing Uploaded Media To share uploaded media with other users within your school on either a parent or child server, check the ‘Share’ checkbox on the SAFARI Montage CreationStation® media upload page or the edit media page. When checked, the Permissions link becomes active and allows the selection of user types to whom you would like to grant access within your school. • On a Parent Server • Marking an item as ‘Share to District’ on a parent server makes the item available to all schools on the local parent server and distributes the title metadata to all schools on the remote school servers. The item will be immediately playable for schools on the parent server. Schools on the remote school server will see the metadata immediately and may transfer the media file upon request. Media marked as Share to District will bypass the approval queue. • On a Remote School Server Marking an item as ‘shared’ on a child server makes the item available to other users within your school on that local server. It does not share the item with the parent server. To share an item to the parent • server and the sibling Remote School Servers – if the parent permits – you must publish it (see Publishing with WAN Manager). Auto-Distribution Auto-Distribution differs from ‘Share to District’ in that ‘Share to District’ merely transfers the metadata (a media title’s title, description, chapters, etc.) while the media file remains on the parent server until requested by a user on the remote child server. ‘Auto-Distribute’ extends this to transfer the media file along with its metadata. Two priority choices are available when auto-distributing content: standard and high. Standard priority items are placed at the bottom of the transfer queue. High priority items are transferred immediately or as the transfer schedule permits. Note: The ‘Share to District’ and ‘Auto-Distribute’ features are only available to users with administrator access. Sharing Playlists Playlists may be shared to the School or District by clicking the Edit icon and selecting School or District from the “Share this Playlist?” dropdown. The District option is available only if you have at least one item on your Playlist and the ‘share Playlists with the district’ option is active on the parent server. • School Selecting the ‘School’ sharing option on a Playlist makes that Playlist available to other users in your school only. Note that clicking the “Share” icon provides a shortcut to share the Playlist to the • School. 222 Administrator Guide • District Selecting the ‘District’ sharing option on a Playlist makes that Playlist available to all schools outside of yours. A district-shared Playlist created on a remote school will travel to the parent server. The • parent server has the option to allow that Playlist to travel to other remote school servers. If the ‘share Playlists with the district’ and ‘Approval required’ options are active in the WAN Settings page of the parent server, all Playlists shared from remote school servers will be sent to the ‘Playlists Pending Approval’ area until it is approved by the administrator or a user designated as an ‘Approver.’ Playlists Pending Approval If the District Sharing WAN Setting of 'Share Playlist with the District, Approval Required' has been set, Playlist that are shared to the district will be added to the approval queue. Users who have the role of an Approver (as set up in User Management) will be able to access the approval queue in the section of the SAFARI Montage system. Note: System and Curriculum Administrators have universal Approver roles. To approve or disapprove the Playlists that is in the queue: 1. Select 'Playlists Pending Approval' from the 'WAN Manager' secondary navigation menu. 2. Review the Playlist by clicking 3. Approve the Playlist by clicking 4. Or, disapprove sharing of the Playlist by clicking 5. As each Playlist is approved or disapproved, it will be cleared from the queue. or clicking the Playlist title link. SAFARI Montage® © 2005-2013 Library Video Company. All Rights Reserved. 223 SAFARI_Montage_admin 224 Administrator Guide Publishing with SAFARI Montage® WAN Manager Overview In SAFARI Montage, ‘publishing,‘ is the act of sharing uploaded SAFARI Montage CreationStation® media to the district. The item’s distribution to child servers is dependent upon two settings on the parent server called ‘publish uploaded media to district’ and ‘approval required.’ If the ‘approval required’ checkbox is active, the item to be published is placed in a an approval queue on the local server until it is approved by the administrator or any user designated as an ‘Approver.’ Once approved, the content is distributed to the parent server and all child servers. If the ‘approval required’ checkbox is inactive, the content is automatically passed through to the child servers as the transfer schedule allows. Note: Sharing an item on a remote school server only shares the item with other users within your school and does not cause content to travel to the parent and sibling Remote School servers. Content must be published in order for the parent and sibling Remote School servers to receive the item. Content Pending Approval If the District Sharing WAN Setting of 'Publish Uploaded Media to District, Approval Required' has been set, CreationStation media that are published to the district will be added to the approval queue. Users who have the role of an Approver (as set up in User Management) will be able to access the approval queue in the section of the SAFARI Montage system. Note: System and Curriculum Administrators have universal Approver roles. To approve or disapprove the Playlists that is in the queue: 225 SAFARI_Montage_admin 1. Select 'Content Pending Approval' from the 'WAN Manager' secondary navigation menu. 2. Review the CreationStation media by clicking 3. Approve the publishing of the media by clicking 4. Or, disapprove publishing of the media by clicking 5. As each item is approved or disapproved, it will be cleared from the queue. or the media title link. SAFARI Montage® © 2005-2013 Library Video Company. All Rights Reserved. 226 Administrator Guide Dashboard with SAFARI Montage® WAN Manager Dashboard panels relating specifically to WAN Manager are described below. Panels that are common to all SAFARI Montage configurations, such as My Playlists and My Media, are described on the Dashboard page of the SAFARI Montage Users Guide. School Playlists Tab The School Playlists tab of the Playlists panel contains Playlists that have been recently shared locally with your school on your SAFARI Montage server. Click '...More' to view all school shared Playlists. District Playlists Tab The District Playlists tab of the Playlists panel shows Playlists that have been recently shared with the district; in other words, they have been shared remotely with your SAFARI Montage server. Click '...More' to view all district shared Playlists. SAFARI Montage® © 2005-2013 Library Video Company. All Rights Reserved. 227 SAFARI_Montage_admin Search with SAFARI Montage® WAN Manager Outlined below are descriptions of the search options that are relevant to the WAN Manager module. Search options that are common to all SAFARI Montage configurations are described in the SAFARI Montage User Guide. For convenience, search criteria remains set to your last selections. To reset the search back to the default criteria, click the ‘Reset Search’ link at the bottom of the page near the Search button. 228 Administrator Guide CreationStation Advanced Search Options Shared This dropdown, located in the CreationStation advanced search criteria section, is extended to display a 'District' option to filter results to only those titles shared to the entire district. Uploaded By This filter allows you to show only media uploaded by a particular user. School News Checking this box will show only upload titles marked as school news in search results. Location Advanced Search Options Note: The 'Location' advances search filters are available to administrators only. School To view only media uploaded by a particular school, select a school from this drop-down list. Location This drop-down list has three options: ‘All,’ ‘Local’ and ‘Remote.’ Local shows you only media titles (including those from direct schools) that were uploaded to your local SAFARI Montage server. Remote shows you only titles that were shared to your server from external servers. Newly Received Activating this checkbox will show you titles that have recently finished transferring from remote SAFARI Montage servers. SAFARI Montage® © 2005-2013 Library Video Company. All Rights Reserved. 229 SAFARI_Montage_admin SAFARI Montage® WAN Expansion Clusters Overview WAN Expansion Clusters provide load-balancing and fault tolerance for SAFARI Montage, enabling a WAN Manager parent server to be clustered with one or more WAN Expansion servers to increase the concurrent user capacity of the SAFARI Montage installation and provide fault tolerance should a single server fail. Server Types • Expansion Controller • The Expansion Controller facilitates user logins and distributes users evenly across servers in the cluster, including the controller itself. A WAN Manager parent server is designated as an Expansion Controller by activating the software license for the Expansion Controller module. • Expansion Servers • Expansion Servers are members of the cluster managed by the Expansion Controller. Expansion Servers are not typically logged into directly by users; users log in to the Expansion Controller, which then refers the user to a cluster member server. The referral is performed ‘behind the scenes’ and is not apparent to the end user. A SAFARI Montage server is designated as an Expansion Server by activating the software license for the Expansion Server feature. • Activating WAN Expansion Module The WAN Expansion Server and Expansion Controller modules are activated in the same manner as WAN Manager modules. See ‘Activating WAN Manager Add-On Modules,‘ for complete instructions on the activation process. Expansion Controller Settings Once the Expansion Controller module is active on the controller, an ‘Expansion’ submenu will appear under the WAN Manager menu in the Admin area of SAFARI Montage. Clicking this submenu reveals the two sections that are specific to Expansion Controller management: Controller Settings and Expansion Servers. Controller Settings contains a single checkbox called ‘Load balance usage across expansion servers.’ This checkbox activates and deactivates WAN Expansion load-balancing functions. Expansion Controller Settings Clicking the ‘Expansion Servers’ submenu button displays a page listing all Expansion Servers that are currently connected to the controller. To log in to an Expansion Server to manage its settings, click the ‘Expansion Server 230 Administrator Guide (000000)’ link. The six digits displayed represent the serial number for each Expansion Server. You must use this link to log in to the Expansion Servers. If you attempt to log into the Expansion Server’s direct IP or hostname, you will be redirected back to the controller. Also listed is each Expansion Server's version, serial number, IP address, last synchronization time, percent synchronized, usage rate and a remove function. Serial Number and IP Address are self-explanatory and descriptions of other columns are listed below. • Version • Versions of the SAFARI Montage software must match between servers in the expansion cluster. The ‘Software Update’ submenu item is available on controllers and Expansion Servers. The software update is performed in the same manner as on SAFARI Montage standalone servers. • Database Synchronized • The databases between servers in the cluster are synced every four minutes. The ‘Database Synchronized’ column lists how long ago the database for that expansion server was synced. When a user makes any changes to data, changes propagate to other servers in the cluster when the sync process occurs. • % Synchronized • The ‘% Synchronized’ column indicates the current level of synchronization between servers in the cluster. A sync level of 100% means that the Expansion Server's database is completely synchronized with the other servers in the cluster. If the sync level is below 100%, this indicates there is a temporary data disparity between servers. During this two- to four-minute period, users may see differences in data between servers. For example, if a user makes a change to the title of their uploaded media, then immediately asks another user to look for those changes and the other user is connected to a different server in the cluster, that user will not see the changes until the next sync occurs. • Usage • The ‘Usage’ column indicates how utilized that Expansion Server has been in relation to the other servers. For example, if you have a two-server cluster (one controller and one Expansion Server), you should see usage at approximately 50%, because load is distributed evenly between two servers. • Disconnecting Expansion Servers • The ‘Clear’ link is used to remove an Expansion Server from the list after the Expansion Server is disconnected from the controller. The ‘Clear All’ link removes all Expansion Servers from the list. It is important to understand that disconnecting an Expansion Server from the cluster is a two-step process. First, the Expansion Server must be disconnected from the controller by removing the controller’s hostname or IP from the Expansion Server Settings page. Once that is complete, the ‘Clear’ link is used on the controller to remove the Expansion Server from the list. If the ‘Clear’ link is used without first disconnecting the Expansion Server, the Expansion Server will reappear in the list when the sync process executes again. Expansion Server Settings Once the Expansion Server module is active, an ‘Expansion Server’ submenu will appear under the WAN Manager menu in the Admin area of SAFARI Montage. Since an Expansion Server is essentially a mirror image of the controller, many of the usual SAFARI Montage Admin functions are unavailable. 231 SAFARI_Montage_admin • Back to Controller • The ‘Back to Controller’ button will return you to the Settings area of the controller. • Server Settings The ‘Server Settings’ submenu button displays a page with data similar to what was shown on the • controller: version number, last synchronization date/time, synchronization progress and a text box for the hostname or IP of the Expansion Controller. o Status o o The Status link displays a real-time progress bar of the active sync. Login o Once a controller has been successfully connected, the Login link will take you to the Login page of the controller. Connecting Expansion Server to Controller To connect an Expansion Server to a controller, click ‘Server Settings.’ Enter the IP address or hostname of the controller into the text box labeled ‘Expansion Controller (IP or Computer Name),’ and click the ‘Update’ button. A confirmation page will appear to verify that you wish to perform this action. If you confirm, the servers will connect and begin the synchronization process. Important: The sync process can take up to several hours (or a day), depending upon speed of hardware and the amount of data that needs to sync. SAFARI Montage® © 2005-2013 Library Video Company. All Rights Reserved. 232 Administrator Guide SupeTube Integrating SupeTube Portal With SAFARI Montage® Note: SupeTube requires published video to be in the H.264 format. When installed, the SAFARI Montage MultiFormat Auto Converter will properly convert supported SAFARI Montage CreationStation® videos to the required format. 1. Login in as an Administrator. 2. Navigate to Admin tab. 3. Navigate to Managed Home Access -> Settings 4. a. Under Settings, enter a SupeTube Server URL. b. Click on the Update button to save. Setup complete. 233 SAFARI_Montage_admin Publishing from SAFARI Montage to the SupeTube Server 1. Upload a video to SAFARI Montage CreationStation. a. Modules -> CreationStation -> Media Upload Note: Uploaded video must be in a format supported by the SAFARI Montage Multi-Format Auto Converter. See the below list for these supported formats. 1. o Apple QuickTime Movie (.mov) o Windows Media Video (.wmv) o MPEG-4 /H.264 (.mp4) o MPEG-1 (MPG) 2. Edit/Add Information and Rights. 3. Create a H.264 version of the uploaded video, if required. 2. a. Edit Media -> Formats b. Click on the add to auto-convert link to convert. The video file will be added to the auto convert queue. Conversion time will be based on converter settings and file size. This step can be ignored if the auto converter is set up to queue uploaded files automatically. Check with your System Administrator for your converter details. 3. Publish to the SupeTube server. a. SupeTube-> Publish to District SupeTube Portal b. Verify the information to be passed to the SupeTube server. c. Click on the Publish button. i.Once clicked, the user is taken to the SupeTube server to provide further editing. Note: When videos are published to the SupeTube Server, they are associated with the publishing school. These publishing schools are referred to as ’Tubes‘ in Local Motion. SAFARI Montage SupeTubePortal Server 234 Administrator Guide Using SupeTube Once the Publish button in SAFARI Montage is clicked, the user and the video file information will be passed to the SupeTube server for further editing. The following is a list of what can be edited once at the SupeTube Server: • Feature Title* – This is the title given in SAFARI Montage. • Description* – This is the descriptive information given in SAFARI Montage. 235 SAFARI_Montage_admin • Private – This function allows the user to mark the video as private and it will be hidden from all other user’s view. Users must receive a link from the publisher in order to view. • Starred – This function allows users to flag videos as featured or important. Video thumbnails will appear with a star to highlight importance. • Tag List* – This is initially populated based on metadata from SAFARI Montage. This data will be used as Topics in SupeTube and will be searchable data. • Thumbnail Upload – This function allows the user to change the preview thumbnail passed from SAFARI Montage. • Thumbnail URL – This displays the path to the current thumbnail for SAFARI Montage. • SAFARI Montage Hosted Video – When enabled provides the SAFARI Montage URL and identifier which points back to the host SAFARI Montage server. • Progressive Video – When enabled, it disables SAFARI Montage Hosted Video and allows the user to specify a different video host location. Note: The SupeTube server does not store video files. It references back to a specified host server and delivers them from the location specified in the API URL or Video URL • • Save – Click the Save Button when finished with editing. • *Denotes data that is passed from SAFARI Montage to the SupeTube Server. Once saved, the publisher can review the video published, edit the video details or delete the video. 236 Administrator Guide End User Viewing of SupeTube Server Published Videos: Once videos have been published, end users can access the SupeTube Sever to view the published content. Access to the SupeTube Server is setup by the school’s System Administrator. ® In order to play published videos, the end user must have a web browser that supports HTML 5 video tags or Adobe ® Flash Player installed on their system. To view a video, perform the following: 1. Open a web browser and navigate to the SupeTube Server. Contact the school’s System Administrator for the server’s address. 2. Click on the ‘TUBES’ link and then click on the school associated with the video. 3. From the available videos, click on the video to be viewed. The user is taken to the video details page. 4. Mouse–over the video thumbnail and click on the play arrow. Video begins playback. 237 SAFARI_Montage_admin From the video details page, viewers can see a description of the video, associated topics, related videos and have the ability to share the video across various social media networks. Administrative Functions of the SupeTube Server: When logged in to the SupeTube Server as an Administrator, the following can be done. • Topic Group – Allows administrators to create Topic Groups. • Features – Administrators can create Features (videos) or edit existing ones • Tags – Provides Administrators with a quick reference of the videos in Local Motions, sorted by the metadata. • Settings and Tubes – This function gives Administrators the ability to edit or delete Tubes from the SupeTube Server. Tubes are created automatically based on the schools associated with the attached SAFARI Montage server. • 238 To edit a Tube on the SupeTube Server, perform the following: 1. Log into the server as an Administrator. 2. Click on the ‘Settings & Tubes’ link from the top navigation. 3. Locate the Tube to be edited and click on the Edit ( ) icon. 4. Make edits to the Tube and click on the Save button. Administrator Guide The following are a description of the settings available when editing a Tube: • • o Title – Name of the TUBE as displayed under ‘TUBES’ selection. o Organization – Sub-title of the TUBE. This is only displayed in the title of the web browser. If the web browser used does not support <title> tags, this sub–title will not be seen. o Site path – Title of a TUBE landing page. Also, affects the URL address of the TUBE. o Theme Foreground Color – Customizes the color of a TUBE landing page title and the o Theme Background Color – Changes the background color of the listed videos on the o Default site – When checked, assigns the TUBE’s page as the default landing page when highlighting of a video on mouse-over. TUBE’ landing page. the SupeTube Server is accessed. o Unlist this site from Tubes – When checked, removes the TUBE from the TUBEs list. Note: This function does not delete the TUBE. It only renders it as unseen in the list of TUBEs. o Remove tubes navigation – When checked, removes the TUBES link from the TUBE’s landing page, preventing the navigation to other TUBEs on the server. 239 SAFARI_Montage_admin o Disable the “Get Embed Code” feature – When checked, disables the ability to copy the embedded code that is used for linking back to the server. The embedded code could be used on social media sites, personal websites or in other web based applications. The “Get Embed Code” feature is located on the video details page. o Default topic – Assigns the TUBE to a related topic. Topics are the same as Tags under o Logo – Allows for the uploading of a logo to be displayed on the TUBE’s page. the Features page of a video. To delete a Tube for the SupeTube Server, perform the following: • 1. Log into the server as an Administrator. 2. Click on the ‘Settings & Tubes’ link from the top navigation. 3. Locate the Tube to be deleted and click on the Delete ( ) icon. 4. Make edits to the Tube and click on the Save button. Note: All Features associated with the TUBE being deleted with be deleted too. To maintain a Feature on the server, edit the Feature and reassign the Owner. • Users – Administrators can create, edit or delete users from the SupeTube Server. Note: The default role of Administrator cannot be deleted. • 240 To create a user, perform the following: 1. Click on the Plus ( + ) icon. 2. Fill in the appropriate information need to create a user. Administrator Guide 3. Click on the Save button. SAFARI Montage® © 2005-2013 Library Video Company. All Rights Reserved. 241 SAFARI_Montage_admin SNMP Montage is an SNMP-enabled device. An SNMP agent is running on Montage that provides some standard SNMP system monitoring data to an SNMP management application. There are thousands of SNMP management applications, each having very different ways of aggregating and displaying SNMP data, and many are very elaborate. Outlining the specific configuration processes of individual SNMP applications is beyond the scope of this article. The intent of this article is to provide some of the system monitoring information that can be gathered from Montage by an SNMP application. This article assumes you are familiar with network monitoring via SNMP and familiar with terms such as ‘Community String,’ ‘Management Information Base’ (MIB), and ‘Object Identifier’ (OID). SAFARI Montage provides read-only access via the SNMP V1 and V2c protocols. The Community String you will enter into your SNMP management application is ‘public.’ We do not publish or maintain a MIB specific to SAFARI Montage. It is left as an exercise for the Systems Administrator to choose which data they are interested in. The four general MIBs that encompass the OIDs accessible on a SAFARI Montage server: • • • • HOST-RESOURCES-MIB RFC1213-MIB SNMPv2-MIB SNMPv2-SMI Open each of these MIBs and you will see over 1,300 OIDs available. Some examples of monitoring data provided: • • • • • • • • System Information (Contact, Location, Name, etc.) Uptime Network Interfaces Partitions (Drive Capacities and Usage) Memory Processes Sockets Network Connections There are two objects specific to the SAFARI Montage software (rather than the hardware or OS): • • syscontact - Email address if the Montage Admin user syslocation - The ‘Server Name’ field on the ‘System Settings’ page in the Montage Admin. This is simply a short name that the Admin can give to the server. Most SNMP applications will have a search feature if you need to find the above OIDs. 242 Administrator Guide SAFARI Montage® © 2005-2013 Library Video Company. All Rights Reserved. 243