Transcript
6-2
7
1
6
OSD Operation
8
1. To invoke the OSD Main Menu, tap the OSD key, or tap the [Scroll Lock] key twice.
2. The OSD incorporates a two level (Administrator / User) password system. If this is the first time that the
OSD is being run, or if the password function has not been set, simply press Enter.
3. The OSD Main Screen comes up in Administrator Mode. In this mode, you have administrator privileges,
with access to all Administrator and User functions, and can set up operations, as you would like.
4. OSD Port Selection
11
Online Registration
International:
• http://support.aten.com
North America:
• http://www.aten-usa.com/product_registration
KL1508/KL1516 Cat 5 High-Density Dual Rail LCD KVM Switch
Quick Start Guide
®
© Copyright 2010 ATEN International Co., Ltd. www.aten.com
Altusen and the Altusen logo are trademarks of ATEN International Co., Ltd.
All rights reserved. All other trademarks are the property of their respective owners.
This product is RoHS compliant
1
PAPE-1214-U00G Printing Data: 05/2010
Technical Phone Support
International:
• 886-2-8692-6959
China:
• 86-10-5255-0110
Japan:
• 81-3-5323-7178
Korea:
• 82-2-467-6789
North America:
• 1-888-999-ATEN Ext: 4988
United Kingdom:
• 44-8-4481-58923
2
• The OSD uses a tree view. To see the ports for a particular station, click the plus sign [ + ] in front of the Station
Number. The Port Number list drops down. To dismiss the list, click the circle symbol [ o ] in front of the
Station Number.
9
5
4
3
10
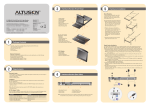
1. Keyboard
2. Touchpad
3. Port Selection Area
4. Station Selection Area
5. Lock LEDs & Reset Switch
6. Extra PS/2 Mouse Port
7. Port LEDs
• To bring the KVM focus to a port, Double Click it, or move the Highlight Bar to it then press [Enter].
8. LCD Display
9. LCD Controls
10. LCD On/Off Button
11. Firmware Upgrade Section
3. After the L brackets have been secured, tighten the front bracket screws.
5-2
Package Contents
4
The KL1508 / KL1516 package consists of:
1 KL1508 or KL1516 Cat 5 High-Dual Rail LCD KVM Switch With Standard Rack Mount Kit
1 Firmware Upgrade Cable
1 Power Cord
1 User Manuals
1 Quick Start Guide
2
Hardware Installation 2
Single Stage Installation
KL1508 / KL1516 Rear View
1
1. If you choose to install an external console, plug your keyboard, monitor, and mouse into the Console Ports
located on the switch’s rear panel. The ports are color coded and marked with an icon to identify themselves.
(This Step is Optional)
2. For each of the computers you are installing, use Cat 5e cable to connect any available KVM port to a KVM
adapter cable that is appropriate for the computer you are installing.
3
Note: The maximum supported distance to the adapter cable is 40 m.
Optional Equipment
Depending on any optional equipment that you may have purchased, one of the following may be included in your
package:
• Standard Rack Mount Kit - Long
• Easy Installation Rack Mount Kit - Short
• Easy Installation Rack Mount Kit - Long
KL1508
4
1
2
3. Connect the KVM Adapter cable to the computer.
4. Connect the power cord to the switch and to an AC power source.
After you are all cabled up, you can power on the switch. After the switch is powered on, power on the computers.
2
Hotkey Operation
To invoke Hotkey Setting Mode (HSM), do the following:
1. Press and hold down the Num Lock key
2. Press and release the Minus [-] key
3. Release the Num Lock key
[Num Lock] + [-]
or
[Ctrl] + [F12]
2
5
[Port ID] [Enter]
[A]
[P]
[Esc]
[Spacebar]
Right-click
[H]
[T]
[F1]
4
1
1. Power Socket
2. Power Switch
3. Daisy Chain Port
4. Console Port Section
5. KVM Port Section
Computers
Operation 3
After invoking Hotkey Setting Mode, key in one of the following keys to perform the corresponding function:
3
4
6-3
Hotkey summary table:
5
KL1516
Requirements
Operation 2
[F2]
[F3]
3
[R] [Enter]
[B]
The following equipment must be installed on each computer:
• A VGA, SVGA or Multisync card.
Switches access to the computer that corresponds to that Port ID.
Invokes Auto Scan Mode.
When in Auto Scan Mode, it pauses Auto Scanning.
Exits Auto Scan Mode.
Changes the Hotkey Invocation keys from [Num Lock] + [-] to [Ctrl] +
[F12] and vice versa.
Changes the OSD Hotkey from [Scroll Lock] [Scroll Lock] to [Ctrl]
[Ctrl] and vice versa.
Sets the keyboard language layout of the port that has the KVM focus to
Windows.
Sets the keyboard language layout of the port that has the KVM focus to
Mac.
Sets the keyboard language layout of the port that has the KVM focus to
Sun.
Resets the switch to the default settings.
Toggles the Beeper On or Off.
Note: The integrated LCD monitor's maximum resolution is 1280 x 1024 @ 75Hz. Make sure that none of the
computer's resolution settings exceed the LCD monitor's maximum resolution.
• Either a Type A USB port and USB host controller (for USB KVM Adapter Cable Connection), or 6-pin mini-DIN
keyboard and mouse ports (for PS/2 KVM Adapter Cable Connection).
Cables
• Cat 5 (or higher) cable is required to connect the KL1508 / KL1516 to one of the KVM Adapter Cables.
• The following KVM Adapter Cables are required for use with the KL1508 / KL1516:
5-1
7
Hardware Installation 1
2
Function
Connect to devices with PS/2 ports
Connect to devices with USB ports
Connect to Sun Legacy systems (with 13W3 port)
Connect to Sun USB systems
Connect to serial based devices
Module
KA9520
KA9570
KA9130
KA9170
KA9140
Standard Rack Mounting
A standard rack mounting kit is provided with your KL1508 / KL1516. The kit enables the switch to be mounted in
rack with a depth of 42–77 cm.
The standard rack mounting kit does not include screws or cage nuts. If you need additional screws or cage nuts,
contact your rack dealer.
Note:
1. It takes two people to mount the switch: one to hold it in place; the other to screw it in.
2. Optional mounting kits - including single person Easy Installation kits – are available with a separate purchase.
3. The standard rack mounting kit does not include screws or cage nuts. If you need additional screws or cage nuts,
contact your rack dealer.
3
1. While one person positions the switch in the rack and holds it in place, the second person loosely screws the front
brackets to the rack.
KL1508 / KL1516 Front View
6-1
Operation 1
LCD OSD Configuration - The LCD OSD allows you to set up and configure the LCD display.
Four LCD buttons are used to perform the configuration.
1
Hot Plugging - The KL1508 / KL1516 supports hot plugging - components can be removed and added back into
the installation by unplugging their cables from the ports without the need to shut the unit down.
2
Powering Off and Restarting - If it becomes necessary to Power Off one of the units, please shut down all the
computers that are attached to it. And Wait 10 seconds, then plug the switch back in. After the Station is up, Power
On the computers.
Port ID Numbering - Each computer port on a KL1508 / KL1516 installation is assigned a unique Port ID. The
Port ID is made up of two parts: a Station Number, and a Port Number.
3
1. Upper Handle
2. LCD Module
3. Keyboard Module
4. Lower Handle
5. Power LED
6. Keyboard Release Catch
7. LCD Release Catch
8. Rack Mounting Tabs
Port Selection - The KL1508 / KL1516 provides three port selection methods to access the computers on the
installation: Manual, an OSD (On Screen Display) menu system, and Hotkeys.
8
4
7
5
6
2. While the first person still holds the switch in place, the second person slides the L brackets into the switch's side
mounting brackets, from the rear until the bracket flanges contact the rack, then screws the L brackets to the rack.
Manual Port Switching
Use the Station and Port selection switches on the keyboard module, to manually switch to a port.
Specifications
Function
Computer Direct
Connections Max.
Port Selection
External
Keyboard
Console
Video
Ports
Mouse
Connectors KVM Ports
Daisy Chain Ports
F/W Upgrade
Power
External Mouse
Reset
Port Selection
Switches
LEDs
Power
F/W Upgrade
LCD Power
LCD Adjustment
On Line
Station ID
Selected
Port ID
Power
Lock
LCD Power
Emulation Keyboard/Mouse
17” LCD
Video
19” LCD
Scan Interval
I/P Rating
17” LCD
Power Consumption
19” LCD
Operating Temp.
Environment
Storage Temp.
Humidity
Housing
17” LCD
Physical Properties
Weight
19” LCD
Dimensions 17” LCD
(L x W x H) 19” LCD
KL1508
KL1516
8
16
256 (via Daisy Chain)
512 (via Daisy Chain)
OSD, Hotkey, Pushbutton
1 x 6-pin Mini-DIN Female (Purple)
1 x HDB-15 Female (Blue)
1 x 6-pin Mini-DIN Female (Green)
8 x RJ-45 Female (Black) 16 x RJ-45 Female (Black)
1 x DB-25 Male (Black)
1 x RJ-11 Female (Black)
1 x 3-prong AC Socket
1 x 6-pin Mini-DIN Female (Green)
1 x Semi-recessed Pushbutton
2 x Pushbutton (Station)
2 x Pushbutton (Port)
1 x Rocker
1 x Slide
1 x Pushbutton
4 x Pushbutton
8 (Green)
16 (Green)
2 x 7-segment (Orange)
2 x 7-segment (Orange)
1 (Blue)
1 x Num Lock (Green)
1 x Caps Lock (Green)
1 x Scroll Lock (Green)
1 (Orange)
PS/2; USB(PC, Mac, Sun); Serial
1280 x 1024@75Hz
1280 x 1024@75Hz
1-255 Seconds
100-240V AC; 50/60 Hz; 1A
120V/ 28W; 230V/ 28W
120V/ 30W; 230V/ 30W
0-40°C
-20-60°C
0-80% RH, Non-condensing
Metal
17.30 kg
18.50 kg
70.90 x 48.20 x 4.40 cm (19”/1U)
76.00 x 48.20 x 4.40 cm (19”/1U)


