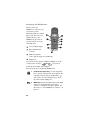
1
VARIABLE TRIM FIXEDTRIM ADD OR SUBTRACT SPINE WIDTH FROM LEFT EDGE ADJUST WIDTH OF SPINE IF NEEDED TO ACCOMMODATE ACTUAL NUMBER OF PAGES 4.50" + OR – 4.50" LIT1788 GH68-00570A ® Sprint PCS Personal Communication Services 7.50" User Guide Model SCH-3500 CB2 CLIENT: FOLDER: ITEM: FILE: THIS PROOF PRINTED AT 100% ACTUAL SIZE SPRINT Sprint PCS>SAMSUNG 3500 - user guide Samsung 3500 Phone User Guide CB2-Samsung 3500.UserGuide DATE: BY/ON: DIE: FIERY PD: 07.23.99 ms/dakota Drawn by DDW* 100%SWOP GP DESIGN: PRODUCTION: MS ACCOUNT MNGR: TS PROOFREADER: FINAL ART APPROVAL REQUIRED: Please review carefully. All copy should be proofread by Client & legal requirements checked by Client’s legal department. Printer is responsible for confirmation of specifications before making plates for accuracy in measurements, plate tolerance requirements, & registration. Any changes made by Printer to accommodate production requirements should be approved by both the Client and Designer. Deutsch Design Works is not responsible for any corrections not specified on This Approval. WE REQUIRE YOUR WRITTEN AUTHORIZATION VIA YOUR SIGNATURE BELOW PRIOR TO RELEASING THIS ART. PLEASE RETURN ONE SIGNED COPY TO DEUTSCH DESIGN WORKS CLIENT: ® D E U T S C H DATE: D E S I G N W O R K S , S A N F R A N C I S C O Sprint PCS. The clear alternative to cellular.5/ This phone will work only with service from Sprint PCS, which must be purchased separately. See Terms and Conditions of Service. 1999 Sprint Spectrum L.P. All rights reserved. No reproduction in whole or in part without prior written approval. Sprint, Sprint PCS, Sprint PCS Phone, Print Personal Communications Services, and the diamond logo are trademarks of Sprint Communications Company L.P. Samsung and SCH-3500 are registered trademarks of Samsung Electronics Co., Ltd. All other trademarks are the property of their respective owners. Licensed by Qualcomm Incorporated under one or more of the following patents: U.S. Patent No. 4,901,307; 5,056,109; 5,099,204; 5,101,501; 5,103,459; 5,107,225; 5,109,390. Printed in South Korea GH68-00570A V 1.0 (KTUVVJKPIUHKTUV 4GCFVJKUDGHQTG[QWFQ CP[VJKPIGNUG &GVGTOKPGKH[QWTRJQPGKURTGCEVKXCVGF If you received your Sprint PCS PhoneTM in the mail or purchased it at a Sprint PCS Center, your phone may already be activated. If so, it simply needs to be unlocked before you begin using it (see “How to unlock your phone.” on page 3). This guide will introduce you to our technology and your new Sprint PCS Phone through easy-to-follow instructions. *QYVQCEVKXCVG[QWTRJQPG 6JGTGCTGVYQYC[UVQCEVKXCVG[QWTRJQPG 1. The fastest way is to call from your new Sprint PCS Phone. First, fully charge your battery. Turn on your Sprint PCS Phone. Make sure you are in a Sprint PCS Service Area (no “ ” is displayed in the icon line of your screen). while in a Sprint PCS Service Press Area. You will be connected to a Sprint PCS Customer Advocate who will guide you through the activation process. 2. Another option is to call Sprint PCS Customer Care from any phone other than your new Sprint PCS Phone. Call us toll free at 1-888-715-4588. 9JCV[QWUJQWNFMPQYDGHQTG[QWECNN The call may take up to 30 minutes. A credit check will be run. Your Sprint PCS Phone will be ready for use about an hour after this call is finished. 9JCV[QWUJQWNFJCXGJCPF[ Your new Sprint PCS Phone. The original packaging for your new phone. Your billing address. Your Social Security number or tax ID number. Your driver’s license number. Pen and paper to write down your new Sprint PCS Phone Number. During this call, a Sprint PCS Customer Advocate will collect your information, as well as help you select your Sprint PCS Service Plan. Once you’ve made all your selections, the advocate will guide you through the activation process. *QYVQWPNQEM[QWTRJQPG If you received your phone in the mail, you need to unlock it before you begin making calls. Just enter your four-digit lock code, and you’ll be ready to begin making calls. This code typically is the last four digits of your Sprint PCS Phone Number, Social Security number, or tax ID number. *QYVQIGVJGNR If you need help with this or anything else, please call Sprint PCS Customer Care at 1-888-211-4PCS (4727). You from your activated can also press Sprint PCS Phone. A Sprint PCS Customer Advocate will answer (24 hours a day, seven days a week) and be happy to assist you. Our services are provided to you under certain terms and conditions — all of which are listed in the brochure included in your Sprint PCS Phone Box. 6CDNGQH%QPVGPVU (KTUVVJKPIUHKTUV 4GCFVJKUDGHQTG[QWFQCP[VJKPIGNUG Determine if your phone is pre-activated. How to activate your phone. What you should know before you call. What you should have handy. How to unlock your phone. How to get help. 1 1 2 2 3 3 9GNEQOGVQ5RTKPV2%5 )GVVKPIVQMPQY[QWTRJQPG &KURNC[KPFKECVQTU 7UKPIVJGDCVVGT[ Installing the battery. Charging the battery. Charging with the Dual-Slot Desktop Charger. Turning your Sprint PCS Phone on and off. Standby mode. Power Save mode. Conversation mode. $CUKEHWPEVKQPU Making a call. Ending a call. Answering a call. Correcting dialing mistakes. Prepend dialing. Automatic hyphenation. Where you can use your phone. Setting your phone’s roaming ability. Roaming call guard. What you’ll see. Voice calling experience. Using Caller ID. 19 19 20 21 21 22 22 23 23 24 24 24 25 25 25 26 27 27 28 $CUKEHWPEVKQPU EQPVKPWGF Call Waiting. Answering a Call Waiting call. Deactivating Call Waiting. Using Three-Way Calling. Using Call Forwarding. Redialing calls. Displaying your own phone number. Adjusting voice volume. Adjusting ring volume. To silence the ringer. Missed call alert. Dropped call alert. Failed call alert. Minute Beep. To mute a call. Incoming call notification. Key beep volume setting. Tone length setting. Alerts settings. Any Key Answer. &KURNC[QRVKQPU Backlight control. Personal greeting. #NCTO Setting the alarm. Setting the alarm ring type (or sound). Setting the alarm ring volume. 4KPIGTQRVKQPU Ring type setting for voice calls. Ring volume setting for voice calls. Ring tone mute. Ring type setting for message calls. Ring volume setting for message calls. Ring type setting for roaming calls. 29 29 30 30 31 31 32 32 32 33 33 33 34 34 35 35 36 37 37 38 39 39 40 41 42 43 44 44 44 45 46 8QKEG/GOQ Reviewing a Voice Memo. 48 8QKEG#EVKXCVGF&KCNKPI Tips on recording names. Program the phone for Voice-Activated Dialing. Voice dialing activation. Placing a call using voice dialing. Reviewing voice dialing entries. Erasing voice dialing entries. 49 50 51 52 52 53 -G[IWCTF 'OGTIGPE[FKCNKPI Calling 911. Dialing Sprint PCS Directory Assistance. Dialing Sprint PCS Operator Services. /GUUCIG5GTXKEGUCPF8QKEGOCKN Message memory capacity. Message ringing. Setting up your Sprint PCS Voicemail box. Reviewing Sprint PCS Voicemail messages. One-Touch Access to your Sprint PCS Voicemail box. Reviewing messages. Messages and Lock mode. Reviewing Numeric Pages, Text Messages, and MiniBrowser Messages. Message options. Erasing messages. 6JG+PVGTPCN2JQPG$QQM Viewing your Internal Phone Book. Storing phone numbers and names. Storing numbers shortcut. Storing phone numbers at the end of a call. Finding entries by location. Finding entries by name. Internal Phone Book services. 55 55 55 56 56 57 57 57 58 58 58 59 60 61 61 62 62 63 64 65 %JCPIKPI[QWT+PVGTPCN2JQPG$QQM Editing Internal Phone Book numbers. Secret Phone Book numbers. Erasing the Internal Phone Book. 66 66 67 &KCNKPIPWODGTUHTQO[QWT+PVGTPCN2JQPG$QQM Dialing by memory location. Memory Dialing Shortcuts. #FXCPEGF+PVGTPCN2JQPG$QQMHGCVWTGU Pause Dialing. Storing pauses in an Internal Phone Book entry. Pause dialing from a stored Internal Phone Book entry. Manual pause dialing. Four-digit dialing. Setting the TALK key. ;QWTRJQPG UUGEWTKV[HGCVWTGU Lock mode. Lock code setting. Locking the phone. Dialing in Lock mode. Call limiting options. Special numbers. Storing special numbers. Dialing special numbers in Lock mode. Resetting your phone. -GGRKPIVTCEMQH[QWTECNNUWUKPI%CNN.QIU 68 68 69 70 70 71 72 73 74 75 75 76 76 79 79 79 80 Reviewing Call Logs. Reviewing airtime. 81 82 (CZCPF&CVCECNNU Receiving a fax. Receiving a data file. 83 84 6JG5RTKPV2%5/KPK$TQYUGT Launching the MiniBrowser. To exit the MiniBrowser. The MiniBrowser soft keys. Navigating the MiniBrowser. Entering text, numbers, or symbols. Using Links. Initiating a phone call from the MiniBrowser. Using bookmarks. To create a bookmark. Finding a bookmark. /GPWU Main Menu. In Use Menu. Menu navigation. 86 87 87 88 90 90 90 90 91 91 92 92 92 ;QWT2JQPG U/CKP/GPW 7UCIGIWKFGNKPGU #NNCDQWVRGTHQTOCPEGCPFUCHGV[ Keeping tabs on signal strength. Understanding Power Save mode. Understanding how your phone operates. Radio frequency safety. Maintaining your phone’s peak performance. Protecting your battery. Battery disposal and recycling. Sprint PCS Phone and battery specifications. Using your phone while driving. Following safety guidelines. Using your phone near other electronic devices. Turn off your phone before flying. Restricting children’s access to your phone. Turn off your phone in dangerous areas. Cautions. FCC notice. +PFGZ 94 94 95 95 96 97 98 98 99 99 99 100 100 100 101 101 9GNEQOGVQ5RTKPV2%5 Sprint PCS built the only all-digital, all-PCS nationwide network from the ground up for clearer calls, serving more than 280 major metropolitan areas. We’ve built our network to give you what we believe you really want from a wireless phone: clear sound, private conversations, and time-saving features. But Sprint Personal Communications Services also has the potential to do something even more far-reaching – simplify your life. Our advanced technology is designed to grow with your communications needs so you will be able to rely on your phone to stay connected. This user guide will introduce you to our technology and your new Sprint PCS Phone through easy-to-follow instructions. For additional help, just stop by any Sprint PCS Center, call Sprint PCS Customer Care by pressing , or call 1-888-211-4PCS (4727). Thank you for choosing Sprint PCS. )GVVKPIVQMPQY [QWTRJQPG 1. Active Flip: Just open the flip to answer an incoming call, and close the flip to end the call. The flip also contains the speaker. You can also: Initiate a Voice-Activated Dialing call by opening the flip when you set this option in the Main Menu. Set the flip to turn the backlight on and off. 2. LED Indicator: Flashes to indicate an incoming call or message. Also lights up (flashes) for a few seconds when you turn on the phone. 3. Volume/Scroll Key: This key is actually two keys (one up and one down) that are used to set volume levels and help you navigate through menus and the Internal Phone Book. Press the volume/scroll key to: Adjust voice volume during conversation. Adjust ringer volume in Standby mode. Mute the ringer during an incoming call. Scroll through menu options. Scroll through your Internal Phone Book. 4. Backlit Display Screen: The Display screen contains two areas: The top line displays indications about your phone’s operating mode (see “Display indicators.” on page 18). The lower area displays in-use information such as the other party’s number, the call timer, the name and number of the other party (if available), Mute, Call Waiting, etc. Your menus also display in the lower area. 5. OK / Messages Key: This key performs several useful functions: During incoming calls, press it to mute the ringer. When the alarm goes off, press it to silence the alarm. From Standby mode, press it briefly to access the Messages Menu. From Standby mode, press and hold it to access voicemail. When entering a phone number, press it once to save the number to the Internal Phone Book. When navigating a menu, press it to select the highlighted item. 6. Voice Memo Key: Press and hold it to record up to 60 seconds of audio. A total of 10 minutes of audio can be recorded in 10 separate Voice Memos. Each Voice Memo can be stored indefinitely or erased. From Standby mode, press briefly to view the Voice Memo menu. 7. TALK Key: This key performs several useful functions. Press it to answer calls. Dial a number and press it to connect. During a conversation, press it to initiate Three-Way calling. During a conversation, press it to answer a Call Waiting call. Press it once in Standby mode to quickly access your Call Logs. Quickly press it twice to redial the last outgoing number. Press and hold to use Voice-Activated Dialing (depending on your Main Menu setting). 8. Scroll Keys: Use the scroll keys to scan menu options, Internal Phone Book entries, Call Logs or to move the cursor when editing. As shown in the illustration, there are several keys that can be used to scroll. 9. Microphone: Your typical voice microphone for conversation, but also accepts your voice commands for Voice-Activating Dialing. You can also mute the microphone during conver. sation by pressing 10. Accessories Connector: The location where you connect your charging device. It can also be used to connect a wireless data device or hands-free car kit (sold separately). 11. CLR Key: This key is used to erase numbers or characters you may have entered incorrectly, or to return to a previous screen. To erase one character from the display screen, briefly press it once. To erase all of them, hold it down for one second. To back up one menu level, press it once. To return to Standby mode, hold it down for one second. 12. END/ Power Key: Press this key to disconnect a call or to return to Standby mode from any menu. Press and hold this key to turn the phone on or off. If the flip is already open, and you receive an incoming call, you can . mute the ringer by pressing 13. MENU Key: When in Standby mode, press this key to access Main Menu items, and continue pressing it to scan Main Menu items. When you reach the Main Menu item you want, press . 14. Navigation Key: This key is similar to the volume key in that it functions as two keys (one up and one down). Press the upper portion to scroll “up”, and press the lower portion to scroll “down”. When in Standby or Conversation mode: Press the upper portion to see the memory locations in your Internal Phone Book (in numerical order). Press the lower portion to see the names in your Internal Phone Book (in alphabetical order). 15. Headset connector: This is where you connect an optional headset. The headset includes an earpiece and microphone in a convenient, lightweight unit so you can converse without using your hands. 16. Antenna: Makes the call sound clearest when it’s fully extended. &KURNC[KPFKECVQTU Display indicators appear across the top of your phone’s display screen. These display indicators (or icons) will vary based your phone’s operating mode. Signal strength: This icon shows your current signal strength. More lines indicate more signal strength. Four lines indicate maximum strength, and one line indicates least strength. Service indicator: This icon indicates a call is in progress. No service indicator: This icon indicates your phone cannot find a signal because you’re outside a service area. When this is displayed, you cannot make or receive calls. Wait a little while for a signal or move into an open area. Roaming: This icon indicates you are “roaming” off the Sprint PCS Nationwide Network. Message indicator: This icon indicates you have message(s) waiting. Press to see the message menu, or press and hold to be connected to Sprint PCS Voicemail. Analog mode: This icon indicates your phone is operating in analog mode. Your phone will be able to place and receive calls where Sprint PCS roaming agreements exist, but quality will be similar to calls on other analog cellular networks. Also, some features of your phone may not be available in Analog mode. Vibrator on: This icon means that an incoming call will vibrate the phone rather than ring it. This feature is good for quiet situations where you don’t want your ringer to disturb others. Battery strength: This icon shows the level of your battery charge. The more black bars you see, the greater the charge. When the battery becomes very low, an empty box appears and the phone flashes an alert. 7UKPIVJGDCVVGT[ Your Sprint PCS Phone comes with a partially charged, rechargeable Lithium Ion (LiIon) Battery so that you can use your the phone immediately after it is activated. +PUVCNNKPIVJGDCVVGT[ To attach the battery to your Sprint PCS Phone: 1. Hold the battery so that the metal contacts on the base of the battery line up with the metal contacts on the base of the phone. 2. Place the battery on the back of the phone with the top of the battery about a quarter of an inch from the latch. 3. Gently slide the battery toward the top of the phone until it snaps into place. %JCTIKPIVJGDCVVGT[ You can tell whether or not your battery needs to be recharged by checking the upper-right corner of your phone’s display. When the battery charge level gets low, the battery sensor will let you know by blinking the battery icon, sounding a tone and displaying a message. If the battery level gets too low, the phone will turn off automatically. Unfortunately, if this happens you’ll lose whatever you were just doing, including dropping your call. Watch the battery strength icon and make sure your battery is adequately charged. %JCTIKPIYKVJVJG&WCN5NQV&GUMVQR%JCTIGT Use only Samsung-approved chargers and adapters with your Sprint PCS Phone. Use of any unauthorized accessories may be dangerous and will invalidate the phone warranty if the accessories cause damage or a defect to the phone. To charge the battery using the Dual-Slot Desktop Charger: 1. Plug the power cord of the charger into a wall outlet. 2. Select one of the following options: Insert the entire phone with battery attached into the front compartment of the charger. Insert a single battery (alone, not attached to the phone) into the rear compartment of the charger. When two batteries are in the charger, the batteries charge simultaneously. A green light on the charger denotes that the battery has completed its charge cycle. A completely discharged standard battery recharges fully in approximately 2 hours. The extended battery recharges in approximately 3 hours. Leaving your Sprint PCS Phone powered on during charging, or charging batteries simultaneously, increases charging time. Leaving the battery in the charger once it is fully charged does not harm the battery. 6WTPKPI[QWT5RTKPV2%52JQPGQPCPFQHH When you’re ready to turn your phone on, fully extend the antenna for best reception. Press and hold until the LED comes on and the phone beeps. When the phone has found a signal, the icon appears. Once the phone is on, it enters Standby mode, which is the phone’s idle state. You can make and receive calls now. To turn your phone off, press and hold until the display goes blank. When the phone is turned off, nothing is displayed on the screen. is pressed for less than one second, the Note: If phone will not turn off. This helps keep your phone from being turned off accidentally. 5VCPFD[OQFG Standby is the most basic state of your Sprint PCS Phone. The phone goes into Standby mode soon after you turn it on, or whenever you briefly press . When your phone is in Standby mode, you will typically see the banner (that’s the message displayed when you turn on your phone). If you enter a phone number, you can press to dial it, or press to save it in the Internal Phone Book. Press at any time to return to Standby mode. Be careful; if you’re on a call when you press , you’ll return to Standby mode, but it also disconnects the call. Press several times or hold it down to return to Standby mode without ending the call. 2QYGT5CXGOQFG Your Sprint PCS Phone comes with a Power Save feature that will automatically be activated if your phone is unable to find a signal after 15 minutes of searching. While this feature is active, the phone’s battery charge is conserved. The phone will automatically recheck for a signal periodically. To manually force the phone to recheck for a signal, press any key. A message on the display will let you know when your phone is operating in Power Save mode. %QPXGTUCVKQPOQFG You can place and answer calls only when your Sprint PCS Phone is powered on. During a call, the phone is in Conversation mode. $CUKEHWPEVKQPU /CMKPICECNN To place a call: 1. Press and hold to power on your Sprint PCS Phone. If you see indicators on the display, this indicates your phone is on. Note that you will not hear a dial tone. 2. Enter the phone number (up to 32 digits) by pressing the digit keys. The phone number displays from left to right. 3. . The phone places the call to the entered Press phone number (if service is available). You can also make calls; from your Internal Phone Book (see “The Internal Phone Book.” on page 61). from your Call Logs list (see “Keeping track of your calls using Call Logs.” on page 81). by using One-, Two-, or Three-Touch Dialing (see “Memory Dialing Shortcuts.” on page 68). 'PFKPICECNN To end a call, close the flip or press . The call time (length of the call) displays, along with the name and number of the called party (if available). The phone returns to Standby mode automatically. #PUYGTKPICECNN To answer an incoming call, open the flip or press if the flip is already open. You can also press any key except , when the Any Key Answer option is selected in the Main Menu (see “Any Key Answer.” on page 38). %QTTGEVKPIFKCNKPIOKUVCMGU To correct a misdialed digit: Press to erase one digit at a time. You can erase all the digits at once by pressing and holding it down for at least one second. 2TGRGPFFKCNKPI The Prepend option lets you add digits such as area codes and network feature activation codes to a phone number that is in your Internal Phone Book or Call Logs. (The prepended phone number cannot be more than 10 digits.) To prepend existing phone numbers in the Internal Phone Book or Call Logs: 1. Access the phone number entry. 2. Press for more options. 3. Press for Prepend. 4. Enter the area code or feature activation code by pressing the digit keys. For feature calls, press before dialing the feature code. 5. Press to call the prepended number. #WVQOCVKEJ[RJGPCVKQP Automatic hyphenation follows the North American Numbering Plan, which hyphenates numbers as follows: 800-555-1234 Digits following a pause are not hyphenated (see “Pause Dialing.” on page 69). 9JGTG[QWECPWUG[QWTRJQPG Your Sprint PCS Phone is dual-band, which means you can use it to make and receive calls in many places. In any city where Sprint PCS provides service. On other CDMA networks and conventional analog cellular networks where Sprint PCS has implemented roaming agreements. When you use your phone outside the Sprint PCS Network, it’s called roaming. If you’re roaming in areas where Sprint PCS has agreements in place with CDMA or conventional analog cellular providers, you will pay the roaming rate plus long-distance charges, where they apply. Note: In areas where Sprint PCS does not have roaming agreements in place, you will still be able to make (but not receive) calls using a credit card. This is called manual roaming. 5GVVKPI[QWTRJQPG UTQCOKPICDKNKV[ Your Sprint PCS Phone allows you to control your ability to roam. The roaming ability is determined by the “mode” that you select in the Main Menu. The three service modes are: Automatic: The phone will search for digital service first. If digital service is not available, it will search for analog service automatically. Sprint PCS: Service is limited to Sprint PCS Service, and digital and analog roaming are not allowed. Analog: The phone will acquire analog service, but will revert to Sprint PCS or Automatic (depending on your setting) at the next power-up. To select the service mode: 1. Press to display the Main Menu. 2. Press for Roaming. 3. Press for Set Mode. 4. Press the scroll keys to scan options. 5. When the desired service mode displays, press to save the setting or to exit without saving. 4QCOKPIECNNIWCTF Your phone can be set to display a message when a roaming call is about to be placed or received. To change your call guard setting: 1. Press to display the Main Menu. 2. Press for Roaming. 3. Press for Call Guard. 4. Select yes or no using the scroll keys. 5. When the desired setting displays, press the setting or to exit without saving. to save 9JCV[QW NNUGG You should always check your phone’s display because it will let you know when you’re outside the Sprint PCS Network and whether your phone is operating in analog cellular or digital mode. Sprint PCS Network - no icons display Other CDMA Networks - displays Analog Cellular Networks - both and display Note: Always dial using 11 digits (area code + number) when calling from outside your Sprint PCS Home Service Area. 8QKEGECNNKPIGZRGTKGPEG When you use your phone on other CDMA networks, your calling experience and call quality will be quite similar to what you experience when making calls from within the Sprint PCS Network. Although certain voice-calling features may not be available, your phone calls are still private and secure. When you use your phone on analog cellular networks, your experience will be different. Cellular roaming will be similar to the quality provided by conventional analog cellular carriers today. Although you will still have the convenience of being able to make and receive calls, here are some differences you can expect: You are more likely to experience static, cross-talk, fade-out and dropped calls. Some voice-calling features (such as Caller ID) that are standard within the Sprint PCS Network may not be available. You will experience the same security and privacy risks (eavesdropping and cloning) that exist with conventional analog cellular services today. Battery life will be shorter when you use your phone for cellular roaming than when you use it on a CDMA network. If you’re on your phone and leave a Sprint PCS Service Area, your call will be dropped. When reentering a Sprint PCS Service Area while on a roaming call, turn your phone off and on again to acquire Sprint PCS Service. If you need customer service while using your phone outside the Sprint PCS Network, dial 1-888-211-4PCS for Sprint PCS Customer Care. 7UKPI%CNNGT+& This feature tells you who is calling you by displaying the caller’s number when the phone rings. If a caller’s name and number are stored in your Internal Phone Book, the corresponding name is also displayed. If you call someone who has this feature, your phone number will be displayed on their phone. To block your phone number from being displayed for a particular outgoing call, just follow these steps: 1. Press 2. Enter the phone number, and then press . . To activate Block Own Number permanently: Call customer care by pressing , , . To temporarily unblock the number: 1. Press , , . 2. Enter the phone number, and then press . %CNN9CKVKPI Call Waiting lets you receive a second call during conversation. When a Call Waiting call comes in, the incoming call alert sounds, when set, and a text notification displays. Your Sprint PCS Phone provides the option of turning the Call Waiting feature on and off. Call Waiting is on by default. If you choose to have an undisturbed conversation, simply turn off the feature for the current call. #PUYGTKPIC%CNN9CKVKPIECNN To answer a Call Waiting call: 1. Press . The phone connects the calling party and places the current party on hold. 2. Press again to switch between the two parties. Note: If you do not respond to a Call Waiting notification, the phone logs the call in the Missed Calls Log and then sends the call to Sprint PCS Voicemail. &GCEVKXCVKPI%CNN9CKVKPI To turn off Call Waiting on your next call: Press , , before dialing the number. When you complete your call and hang up, the Call Waiting feature is automatically turned back on. To turn off Call Waiting permanently: Call customer care by pressing , , . 7UKPI6JTGG9C[%CNNKPI Three-Way Calling lets you conduct conference calls with two different parties at the same time. When you use this feature, you will be charged normal airtime rates for each of the two calls you make. The phone records each party into the Outgoing Calls Log. To place a three-way call: 1. During a conversation, simply press . 2. Next, enter the number for the third party, and press . The phone places the other party on hold. 3. When you’re connected to the third party, press again to begin your three-way call. If one of the callers (not you) hangs up, you and the remaining caller stay connected. If you initiated the call and you hang up first, all three parties are disconnected. 7UKPI%CNN(QTYCTFKPI With Call Forwarding, you can have all of your incoming calls forwarded to another phone number — even if your phone is turned off. When Call Forwarding is activated, you can still make calls from your phone. To activate Call Forwarding: 1. Press . 2. Enter the 10-digit phone number (area code and phone number) to which your calls should be forwarded. 3. Press . You will hear a tone that confirms you’ve activated Call Forwarding. To deactivate Call Forwarding, press . Once again, you’ll hear a tone confirming the deactivation. 4GFKCNKPIECNNU To redial the last call you made, press twice quickly. Note: This is the default setting for the TALK key. If you change this setting, then pressing twice won’t call your last outgoing call (see “Setting the TALK key.” on page 73”). You can also redial any of your last incoming, outgoing, or missed calls by accessing the Call Logs listings (see “Keeping track of your calls using Call Logs.” on page 81). &KURNC[KPI[QWTQYPRJQPGPWODGT The phone number of your Sprint PCS Phone displays every time you turn on your phone. At other times, you can display your phone number from the Main Menu. To view your phone number from Standby mode: 1. Press to display the Main Menu. 2. Press for Phone Book. 3. Press for My Phone #. 4. Press to return to the previous screen. To view your phone number while using the phone: 1. Press to display the Main Menu. 2. Press for Phone Book menu. 3. Press for My Phone #. #FLWUVKPIXQKEGXQNWOG You can adjust the earpiece volume during a call using the volume keys on the side of your phone. Briefly pressing the volume key once displays your earpiece volume. Repeatedly press the volume key to adjust to HIGH, MED, or LOW. #FLWUVKPITKPIXQNWOG During an incoming call you can quickly adjust the volume of the ringer by pressing the volume key on the side of the phone. To mute the ringer press . You can also store the settings for your phone’s ring volume from the Main Menu (see “Ringer options.” on page 43). 6QUKNGPEGVJGTKPIGT When your Sprint PCS Phone rings, press to silence the ringer. You can also set the ringer to always be off by using the Main Menu (see “Ring volume setting for voice calls.” on page 44). /KUUGFECNNCNGTV Your phone keeps a list of calls that you do not answer when the phone is on and service is available. The phone indicates a missed call by displaying a text notification on the screen. Additionally, if caller information is available, an Incoming Call Log entry marked “Missed” is created, and the screen displays the phone number of the most recent missed call. To acknowledge a missed call notification, select one of the following options: Press to call the displayed number. Press to save the number in the Internal Phone Book. &TQRRGFECNNCNGTV A dropped call can occur during conversation in response to a signal fade. In this case, the call ends and “Call Dropped” displays. Press mode. to clear the message and return to Standby If the dropped call was an outgoing call from your phone, you can redial the number automatically by pressing twice. (CKNGFECNNCNGTV A failed call can occur if your Sprint PCS Phone is out of calling range or the network is temporarily busy. Your phone responds to a failed call by displaying an appropriate text message: “Call Failed. Out of Range.” or “Call Failed. Network Busy.”. To acknowledge a failed call alert, cancel the call attempt and return to Standby mode by pressing or , and then try the call again later. /KPWVG$GGR You can set the Minute Beep option to sound an alert 10 seconds before each elapsed minute to remind you of the length of the current call. To turn Minute Beep on and off: 1. Press to display the Main Menu in Standby mode before placing the call. 2. Press for Sounds. 3. Press for Alerts. 4. Press for Minute Beep. 5. Press the scroll keys to toggle between On / Off. 6. When the desired option displays, press the setting. to save 6QOWVGCECNN You can mute the microphone during conversation by selecting the Mute option from the In Use Menu. When Mute is active, “MUTE” displays. The phone resets this condition to the default Unmute setting at the end of your call. To mute the microphone during a call: 1. During conversation, press Menu. to display the In Use 2. Press to mute the microphone. You will hear the other party’s conversation, but they will not hear your conversation. “MUTE” displays on the screen. 3. To “unmute” the microphone during the same conversation, repeat steps 1 and 2. Selecting the (Un)Mute option toggles Mute on and off. +PEQOKPIECNNPQVKHKECVKQP Your Sprint PCS Phone signals an incoming call or message in the following ways: The backlight illuminates. The red LED on the top of the handset flashes. The ringer sounds (unless set to Vibrate or Off). Incoming call notification continues until one of the following events occurs: You answer the call. You press , or you press to silence the ringer before answering the call. The calling party ends the call. The call is sent to Sprint PCS Voicemail. Your Sprint PCS Phone provides the following call notification features: Nine unique ring types and four melody tones. Six ring volume settings including Vibrate, Off, and 1-Beep. Name display with Caller ID (if the name is programmed into your Internal Phone Book. Automatic storage of call information in the Call Logs (up to nine phone numbers each for outgoing, incoming, and missed calls). Three answer options: press Answer, or open the flip. , use Any Key For information on these options, see the related section in this user guide. -G[DGGRXQNWOGUGVVKPI The keys on your phone beep when they are pressed. The volume of the beeps can be easily set to one of three levels. If you don’t want the keys to beep at all, you can turn them off. To set the key beep volume: 1. Press to display the Main Menu. 2. Press for Sounds. 3. Press for Key Beep. 4. Press the scroll keys to scan volume options: HIGH, MED, LOW, or Off. 5. When the desired option displays, press the setting. to save 6QPGNGPIVJUGVVKPI The tone length setting enables you to select short or long DTMF (dual-tone multi-frequency) tones. DTMF tones are what is sent by your phone to access tele-services (such as a bank account). The system used by the bank or other service determines if you need short or long DTMF. If the service is digital (which most are these days) short DTMF will almost always work. However, some new systems and almost all older (analog) systems require you to use long DTMF tones. To set tone length: 1. Press to display the Main Menu. 2. Press for Sounds. 3. Press for Tone Length. 4. Press the scroll keys to toggle between Short and Long. 5. When the desired option displays, press the setting. to save #NGTVUUGVVKPIU The alerts settings allow you to turn the Minute Beep and Service Alert Tones on and off. The Minute Beep sounds an alert 10 seconds before every elapsed minute during an incoming or outgoing call, when set. Service alerts include audible alert tones that sound when: The phone experiences a dropped call or a failed call. The phone enters a new service area. To select alert options: 1. Press to display the Main Menu. 2. Press for Sounds. 3. Press for Alerts. 4. Press the associated digit key to select an option: Press for Minute Beep. Press for Service. 5. Press the scroll keys to toggle between On / Off. 6. When the desired option displays, press the setting. to save #P[-G[#PUYGT When the Any Key Answer feature is turned on, you can answer incoming calls by pressing any key on the keypad, except . To activate Any Key Answer: 1. Press to display the Main Menu. 2. Press for Setup. 3. Press for AnyKey Ans. 4. Use the scroll keys to toggle between On and Off. 5. Press to save the setting. &KURNC[QRVKQPU Your Sprint PCS Phone provides the following display options: $CEMNKIJVEQPVTQN When the phone is attached to the optional Hands-Free Car Kit, the backlight remains on (when the phone is on). When KeyGuard is active, the backlight remains off. At other times, you can select backlight options, but remember that backlight use drains your battery faster. To select backlight options: 1. Press to display the Main Menu. 2. Press for Display. 3. Press for BackLight. 4. Press the scroll keys to scan menu options: Flip Open, 10 or 30 Seconds (after last keypress), or Off. 5. When the desired option displays, press the setting. to save 2GTUQPCNITGGVKPI You can create and display a 12-character personal greeting that displays in Standby mode. To create a personal greeting: 1. Press to display the Main Menu. 2. Press for Display. 3. Press for Greeting. 4. Enter your personal greeting by pressing the alphanumeric keys on the keypad. 5. Press to save the setting. #NCTO When your Sprint PCS Phone is turned on, you can set the 24-hour alarm to sound an alert at a set time. In addition to functioning as a normal alarm clock, the alarm can also be used to remind you to call a certain person or phone number. Keep in mind that if your phone is off at the alarm set time, the alarm will not sound. Note: In order for the alarm to work, the phone must be on, and you must be in a Sprint PCS service area or another CDMA provider’s service area. 5GVVKPIVJGCNCTO 1. Press to display the Main Menu. 2. Press for Sounds. 3. Press for Alarm. 4. Press for Set. If the alarm is already set, the screen displays the set time and provides the option of overwriting the current setting. Press to overwrite the current setting. If the alarm is not set or if you are overwriting the current setting, the screen prompts for AM / PM. Press the scroll keys to select AM / PM, and then press to save the setting. 5. Enter the time (HH / MM) by pressing the digit keys. To correct a digit entered incorrectly, press to go back, and then enter the correct digit. 6. Press 7. Respond to the screen prompt by entering the phone number. (You can also set the alarm without entering a to save the setting. phone number.) If the entered number matches an Internal Phone Book entry, the party’s name displays. When there is no Internal Phone Book match, the entered phone number displays. 8. Press to save the setting. The entered phone number, alarm set time, and a confirmation message display. 9. At the set time, the alert sounds, and the party’s name / number displays, if available. Respond to the alarm in one of the following ways: To call the displayed phone number, press . To silence the alarm and return to Standby mode, press . 10. To cancel the alarm at any time, access the Alarm option (Steps 1 and 2), press to cancel the setting, and then press to confirm the action. 5GVVKPIVJGCNCTOTKPIV[RG QTUQWPF This option enables you to set a unique ring type for the alarm. To set the alarm ring type: 1. Press to display the Main Menu. 2. Press for Sounds. 3. Press for Ring Type. 4. Press for Alarm. 5. Press the scroll keys to scan nine ring types and four melody tones. Each tone sounds as you scan the options. 6. When the desired ring type sounds, press the setting. to save 5GVVKPIVJGCNCTOTKPIXQNWOG This feature enables you to select a unique ring volume for the alarm. To set the ring volume for the alarm: 1. Press to display the Main Menu. 2. Press for Sounds. 3. Press for Ring Volume. 4. Press for Alarm. 5. Press the scroll keys to choose: HIGH, MED, LOW, or OFF. 6. When the desired volume setting displays, press to save the setting. 4KPIGT QRVKQPU Your Sprint PCS Phone provides a variety of ringer options in the Sounds menu. These ringer options allow you to customize your ring and volume settings so that you can easily recognize when a certain type of call is coming in. 4KPIV[RGUGVVKPIHQTXQKEGECNNU This option enables you to set a unique ring type for incoming voice calls. Also, by selecting different tones, incoming voice calls which have caller identification can be distinguished from those that do not. To set the ring type for voice calls: 1. Press to display the Main Menu. 2. Press for Sounds. 3. Press for Ring Type. 4. Press for Calls. 5. Press info or to set the ring for calls that have Caller ID for calls without Caller ID info. 6. Press the scroll keys to scan nine ring types and four melody tones. Each tone sounds as you scroll the options. 7. When the desired ring type sounds, press the setting. to save 4KPIXQNWOGUGVVKPIHQTXQKEGECNNU There are two ways to set the ring volume for voice calls: From the Standby mode, press the volume keys until the desired volume is reached. In the Main Menu: 1. Press to display the Main Menu. 2. Press for Sounds. 3. Press for Ring Volume. 4. Press for Calls. 5. Press the scroll keys to HIGH, MED, LOW, OFF, VIBRATE, or 1-BEEP. 6. When the desired ring volume setting displays, press to save the setting. 4KPIVQPGOWVG Mute the ringer during an incoming call by pressing . At the end of your call, the saved ring volume setting resets automatically. 4KPIV[RGUGVVKPIHQTOGUUCIGECNNU This option enables you to set a unique ring type for incoming message calls. This means you can have distinct ring types for Sprint PCS Voicemail notifications, text messages and numeric pages. To set the ring type for voice calls: 1. Press to display the Main Menu. 2. Press for Sounds. 3. Press for Ring Type. 4. Press for Messages. 5. Press or for Voice, for MiniBrowser. 6. Press the scroll keys to scan nine ring types and four melody tones. Each tone sounds as you scan the options. 7. When the desired ring type sounds, press the setting. for Page, for Text, to save 4KPIXQNWOGUGVVKPIHQTOGUUCIGECNNU This feature enables you to select a unique ring volume for incoming message calls. This volume setting applies to incoming Sprint PCS Voicemail notifications, text messages and numeric pages. To set the ring volume for message calls: 1. Press to display the Main Menu. 2. Press for Sounds. 3. Press for Ring Volume. 4. Press for Messages. 5. Press the scroll keys to choose: HIGH, MED, LOW, OFF, VIBRATE, or 1-BEEP. 6. When the desired volume setting displays, press to save the setting. 4KPIV[RGUGVVKPIHQTTQCOKPIECNNU This option enables you to select a unique ring type for incoming roaming calls. To set ring type for incoming roaming calls: 1. Press to display the Main Menu. 2. Press for Sounds. 3. Press for Roam Ringer. 4. Press the scroll keys to choose Distinctive or Normal. Each tone sounds as you scan the options. 5. When the desired ring type sounds, press the setting. to save 8QKEG/GOQ Your Sprint PCS Phone can record 10 Voice Memos. Each Voice Memo can be up to one minute in length. When recording, a 60-second timer displays and an alert sounds to indicate when recording time expires. To record a Voice Memo in Standby mode: 1. Press and hold . The message “Recording” displays, along with the timer. 2. Record the Voice Memo by speaking into the microphone. 3. To stop recording, release the button. A menu for the current Voice Memo becomes available. 4. To save the Voice Memo with the default date / time stamp, press or do nothing. Your phone will automatically save the voice memo stamped with the date and time after about one minute. For other options on the Voice Memo press: for Add Label. The screen labels the Voice Memo with the date / time stamp. You can now create your own label using the alphanumeric keys. Just start entering the label and press when you are ready to save it. for Continue. Press and hold to continue recording. for Erase. Press and hold to erase the Voice Memo. 4GXKGYKPIC8QKEG/GOQ To review a Voice Memo: 1. Press 2. Press for Review. The phone displays the label for Voice Memo 1, begins to play Voice Memo 1, and displays a list of reviewing options. All Voice Memos will play in order until you press , , or select one of the following options: 3. to display the Voice Memo menu. Press to Replay the Voice Memo. Press to Erase the Voice Memo. Press to listen to the Next Voice Memo. Press to listen to the Previous Voice Memo. After reviewing the Voice Memos, press to Standby mode. to return 8QKEG#EVKXCVGF&KCNKPI Your Sprint PCS Phone features Voice-Activated Dialing. When on the Sprint PCS Network, you can call up to 20 stored entries by speaking the name into the microphone. Using the Voice-Activated Dialing option requires that you first train the phone to recognize the name of the person you are calling. Note: Voice-Activated Dialing does not work when your phone is in analog mode. 6KRUQPTGEQTFKPIPCOGU Avoid recording similar names phonetically. If you record a similar name to one that is already in memory, the phone requests another name. Avoid recording in a noisy place. Speak clearly and naturally. The person who will use the phone should record the name. The phone does not recognize anyone else’s voice. Avoid very long or very short names. Names with two to five syllables are recommended. If a voice dial entry does not properly connect, you may need to record the name and number again. 2TQITCOVJGRJQPGHQT8QKEG#EVKXCVGF&KCNKPI Programming your Sprint PCS phone for Voice-Activated Dialing is easy. The phone provides voice prompts and screen displays to guide you through the recording process. To program the phone for Voice-Activated Dialing: 1. Press to display the Main Menu. 2. Press for Voice Dial. 3. Press for Record. The phone will prompt you to say the name you want to program. 4. Wait for the beep and then say the name. For best results, use names with at least two syllables, or use both a first and last name. The phone stores the name as a sample first, and then prompts for the name again. 5. Respond to the prompt by repeating the name after the beep. The phone stores the name as a second sample and then requests the phone number. 6. Enter the phone number by pressing the digit keys. 7. To store the phone number, press . The name (if it is already in the Internal Phone Book) and number display, along with the notification “Recorded”. The screen then returns to the Voice Dialing menu. Note: For Voice-Activated Dialing in Hands-Free mode, refer to the HFK350 Hands-Free Car Kit Manual. 8QKEGFKCNKPICEVKXCVKQP Voice dialing is always active once you have programmed the phone to accept voice dialing entries. To place voice dialing calls, press and hold . Then say the name into the phone after you hear the voice prompt and the beep. You can also initiate a voice dialing call by opening the flip, when you select this option through the Main Menu. To change voice dialing setup options: 1. Press to display the Main Menu. 2. Press for Voice Dial. 3. Press for Set Active. 4. Press the scroll keys to toggle between options: Talk Only: Enables voice dialing by pressing and holding . Talk or Flip: Enables voice dialing by pressing and holding 5. , or by opening the flip. When the desired option displays, press the setting. to save 2NCEKPICECNNWUKPIXQKEGFKCNKPI To place a call using voice dialing: , or open the flip, depending on 1. Press and hold the setting. 2. At the voice prompt, say the name into the phone. The phone places the call if it recognizes the name. If the phone does not recognize the name, it prompts for the name again. If the phone is unable to recognize the name after two attempts, the following message displays: “Cannot recognize name. Please check name.” The phone returns to Standby mode automatically, and you can try the call again later. 4GXKGYKPIXQKEGFKCNKPIGPVTKGU To review voice dialing entries: 1. Press to display the Main Menu. 2. Press for Voice Dial. 3. Press for Review. A list of entries displays. 4. Press the digit key to select the desired entry, or press the scroll keys to scan entries. The recorded names play audibly as you scroll through the list. 5. Press to return to the previous screen. 'TCUKPIXQKEGFKCNKPIGPVTKGU To erase an individual voice dialing entry: 1. Press to display the Main Menu. 2. Press for Voice Dial. 3. Press for Review. A list of entries displays. 4. Press the digit key to select the desired entry, or press the scroll keys to scan entries. The recorded names play audibly as you scroll through the list. 5. When the desired entry displays, press that entry. to erase To erase all Voice Dialing entries: 1. Press to display the Main Menu. 2. Press for Voice Dial. 3. Press for Erase All. 4. Press to erase all Voice Dialing entries. -G[IWCTF To avoid accidental key presses, you can enable the KeyGuard feature. However, you’ll still be able to receive incoming calls and messages. This feature also prevents needless battery usage because the phone does not respond to any keypresses and turns off the backlight. Note: If you have an incoming call, open the flip to answer it. When you are done with the call, close the flip and KeyGuard is automatically turned on. To activate KeyGuard: 1. Press to display the Main Menu. 2. Press for KeyGuard. The keypad locks and “KeyGuard” displays. 3. Press and hold to deactivate KeyGuard, or simply open the flip to turn on the backlight and temporarily disable KeyGuard. Note: KeyGuard works only when the flip is closed. 'OGTIGPE[FKCNKPI You can place calls to 911 even if your phone is locked or outgoing calls are restricted (see “Lock mode.” on page 74). As long as you’re within a Sprint PCS Service Area (check your signal strength indicator), 911 can be dialed. %CNNKPI 1. Dial 2. Press . . Note: Even if your account is restricted, you can still dial 911 (as long as you’re within your home service area), but no other emergency numbers. Also, your phone allows you to call 911 even if it is set to limit all outgoing calls. &KCNKPI5RTKPV2%5&KTGEVQT[#UUKUVCPEG Dial to obtain residential, business and government listings; to get help completing local or long-distance calls; or to obtain movie listings, hotel, restaurant and shopping information, and major local event information. &KCNKPI5RTKPV2%51RGTCVQT5GTXKEGU Dial to obtain assistance in placing collect calls or calls billed to a local telephone calling card or a third party. /GUUCIG5GTXKEGUCPF 8QKEGOCKN Your Sprint PCS Phone receives three kinds of messages: voicemail notification (VMN) messages, text messages and numeric pages. When your phone receives a message, an alert sounds, and the screen displays (“New Voice”, “New Text”, “New Page” or “BrowserMsg”). The message indicator ( ) remains on the screen until you listen to the new voicemail message, or read the new text, numeric page, or MiniBrowser message. /GUUCIGOGOQT[ECRCEKV[ Your Sprint PCS Phone can store up to 50 messages, depending on the length of the messages. When message memory reaches 75% capacity, the screen displays “Memory is 75% full. Erase old messages.” At 100% capacity, the screen displays a text notification and rejects additional incoming messages until you erase the stored messages. /GUUCIGTKPIKPI In Standby mode, an audible alert sounds in addition to the message header. The phone automatically mutes the incoming message when the phone is in Conversation mode (this is to avoid ringing in your ear while you are trying to converse). Your Sprint PCS Phone allows you to set a unique ring type for each type of incoming message; voicemail, text, numeric page, or MiniBrowser (see “Ring type setting for message calls.” on page 44). 5GVVKPIWR[QWT5RTKPV2%58QKEGOCKNDQZ Setting up your Sprint PCS Voicemail box provides access to voicemail messages for review. To set up your voicemail box: 1. Press and hold for at least two seconds. 2. Create your own pass code. Make sure you pick a number that you will remember. 3. Create a greeting that people will hear when they call you. 4. Record your name announcement. 5. Choose whether to activate One-Touch Access. 4GXKGYKPI5RTKPV2%58QKEGOCKNOGUUCIGU To review voicemail messages: 1. Press to display the Messages Menu. 2. Press for Voice. The screen displays “Voicemail”, the time, date and the number of new messages. 3. Press for more options: Press to Listen to voicemail messages. Press to reset the counter for voicemail messages, if desired. (The system resets the counter automatically after you listen to all new messages.) 1PG6QWEJ#EEGUUVQ[QWT5RTKPV2%58QKEGOCKN DQZ One-Touch Access to your voicemail box is done by pressing and holding . 4GXKGYKPIOGUUCIGU Your phone receives incoming messages in both Standby and Conversation modes. When a new message arrives, the message header includes the type of message (Voice, Numeric Page, Text, or MiniBrowser) and the name / phone number of the caller, if available. You can review the message upon notification, or store the message for later review. The Messages Menu provides options for reviewing the sender’s name / phone number, time / date stamp and the message. /GUUCIGUCPF.QEMOQFG Incoming messages are received even when your phone is in Lock mode. However, the screen will not display information about the message. To access a message, or to return a call other than an emergency or special number, unlock the phone to proceed. 4GXKGYKPI0WOGTKE2CIGU6GZV/GUUCIGUCPF /KPK$TQYUGT/GUUCIGU To review a numeric page, text message, or MiniBrowser message: 1. Press to display the Messages Menu. The number of new messages displays next to the associated message type in the menu. 2. Press for Page, for Text, or for MiniBrowser. An indexed list of messages displays. An exclamation point next to an entry indicates an urgent message. A check mark next to an entry indicates that you have read and stored the message. 3. Use the scroll keys to scan messages, or press the associated digit key to select a message by its entry number. 4. When the message displays, use the scroll keys to review and re-review the message(s). 5. Press to return to the previous screen. /GUUCIGQRVKQPU The Messages menu provides a number of options while you are reviewing text messages. You can return a call to the phone number in the message, save or erase the message, and scroll to the next or previous message. 1. While reviewing a message, press for options: Press for Talk (to call the phone number). Press to Save the number (if there is no Internal Phone Book match). 2. Press to Erase the message. Press to review the Next message. Press to review the Previous message. Press to return to the previous screen. Note: If the message you are reviewing contains a phone number that is already stored in the Internal Phone Book, the Save option does not display, and the available menu options will be: (1) Talk, (2) Erase, (3) Next Msg, (4) Previous Msg. 'TCUKPIOGUUCIGU You can erase an individual text message or numeric page after reviewing it, or erase all stored text messages and numeric pages at one time. To erase all text messages and numeric pages: 1. Press to display the Messages Menu. 2. Press for Security and enter the lock code. 3. Press for Erase. 4. Press for Messages. 5. Press pages, or to erase all text messages and numeric to return to the previous screen. To erase a message after reviewing it, refer to the previous section. 6JG+PVGTPCN2JQPG$QQM Your Sprint PCS Phone lets you store up to 179 names and phone numbers in the Internal Phone Book. Each entry can contain up to 32 digits, with an associated name of up to 12 characters. 8KGYKPI[QWT+PVGTPCN2JQPG$QQM The key allows you to view your entire Internal Phone Book in two different ways; by alphabetical order of the names (a-z), or by numerical order (1-179). To view alphabetically: Press the lower portion of the key. To view numerically: Press the upper portion of the key. 5VQTKPIRJQPGPWODGTUCPFPCOGU To store phone numbers and names: 1. Press to display the Main Menu. 2. Press for Phone Book. 3. Press for Add Entry. The screen prompts for the phone number. (You can enter up to 32 digits.) 4. Enter the phone number by pressing the digit keys. The number displays from left to right. 5. To store the phone number, press available location displays. 6. To accept the displayed location, press . To select another location, press the scroll keys to scroll . The first to the desired location, or enter the location number by pressing the digit keys, and then press . 7. To include a name with the phone number entry, enter the name at the screen prompt. 8. Press to save the entry. Note: If the desired memory location already contains an entry, the phone displays a message asking if you want to replace the current entry. To replace the entry, press . To return to the previous screen and select another location, press . 5VQTKPIRJQPGPWODGTUUJQTVEWV You can store a phone number quickly by entering the number, and then pressing . Then follow the prompts to designate the memory location and to enter the associated name. 5VQTKPIRJQPGPWODGTUCVVJGGPFQHCECNN To store a phone number after ending a call: Note: If the call was incoming, and Caller ID information was not available, then the store option will not be available. 1. Press to end the call. The screen displays the call time (length of call), phone number of the party (if available), and the “OK: Save” option. 2. To store the phone number, press available location displays. 3. To accept the location, press . To select another location, press the scroll keys to scroll to the desired . The first location, or enter the location number by pressing the digit keys, and then press . 4. To include a name with the phone number entry, enter the name at the screen prompt. 5. Press to save the entry. (KPFKPIGPVTKGUD[NQECVKQP To find an entry by location: 1. Press to display the Main Menu. 2. Press for Phone Book. 3. Press location. for Find Entry. The screen prompts for a 4. Enter the location by pressing the associated digit key, or press the scroll keys to scroll to the desired location. 5. When the desired entry displays, press call. to place a (KPFKPIGPVTKGUD[PCOG You can locate Internal Phone Book entries quickly when your phone is in Standby mode: Press to access the Internal Phone Book in one step, and then press the scroll keys to scan entries. To find Internal Phone Book entries from the Main Menu: 1. Press to display the Main Menu. 2. Press for Phone Book. 3. Press name. for Find Name. The screen prompts for the 4. Begin entering the letters of the name you are searching by pressing the alphanumeric keys. (You can also press the scroll keys to scroll to the desired name.) Then press . 5. When the desired entry displays, press call. to place a +PVGTPCN2JQPG$QQMUGTXKEGU Phone numbers for frequently used services are preprogrammed into your phone. The pre-programmed numbers are: for Directory Assistance for Sprint PCS Customer Care for Prepaid Calling Service for Roadside Assistance To access these services: 1. Press to display the Main Menu. 2. Press for Phone Book. 3. Press for Services. 4. Press the associated digit key to select an option: For Directory Assistance, press connect. For Customer Care, press connect. and then and then For Prepaid Calling Services, press to connect. For Roadside Assistance, press connect. to to and then and then to %JCPIKPI[QWT +PVGTPCN2JQPG$QQM 'FKVKPI+PVGTPCN2JQPG$QQMPWODGTU Once you have stored a number in the Internal Phone Book you can easily change it. To change an Internal Phone Book entry: 1. From Standby mode, find the number that you want to change by pressing the key and then scrolling to the number. 2. Press the key to display the name and number. 3. Press the key for options. 4. Press for Edit. Your edit options display. Press to change the number Press to change the name. Press to move the number to a different location. Press to make the number secret. 5GETGV2JQPG$QQMPWODGTU Your Sprint PCS Phone allows you to hide a confidential number so that only a person with your phone’s lock code can view the number and name. To make a number secret, see the previous paragraph. When you have made the number secret, the phone will not allow anyone to view information on the number unless they enter your 4--digit lock code. 'TCUKPIVJG+PVGTPCN2JQPG$QQM To erase the Internal Phone Book: 1. Press to display the Main Menu. 2. Press for Security and enter the lock code. 3. Press for Erase. Additional options display. 4. Press for Phone Book. 5. Press to erase the entire Internal Phone Book or to return to the previous screen. &KCNKPIPWODGTUHTQO [QWT+PVGTPCN2JQPG$QQM &KCNKPID[OGOQT[NQECVKQP Dialing numbers from your Internal Phone Book is quick and easy. There are five methods explained below. /GOQT[&KCNKPI5JQTVEWVU Scroll to the number: From Standby mode, press the key to enter your Internal Phone Book list. Scroll until you find the desired person or number, and then press the key. One-Touch Dialing: Press and hold the associated digit key for the location (applies to memory locations 1 through 9). Two-Touch Dialing: Press and release the first associated digit key, and then press and hold the second digit key (applies to memory locations 10 through 99). Three-Touch Dialing: Press and release the first associated digit key, then press and release the second digit key, then press and hold the third digit key (applies to memory locations 100 through 179). Speed Dialing: From Standby mode, enter the number of the memory location, and press . #FXCPEGF+PVGTPCN2JQPG $QQMHGCVWTGU 2CWUG&KCNKPI When you call automated systems (like banking services), you are often required to enter a password or account number. Instead of entering the numbers manually each time, you can store the numbers in your Internal Phone Book, separated by special characters called pauses. There are two kinds of pauses that can be entered on your phone: Hard pause - A hard pause stops the dialing sequence until you press the button. 2sec pause - A 2sec pause stops the dialing sequence for 2 seconds and then automatically sends the remaining digits. Your phone has two pause dialing methods: pause dialing from the Internal Phone Book (see “Pause dialing from a stored Internal Phone Book entry.” on page 70), and manual pause dialing (see “Manual pause dialing.” on page 71). Note: Multiple 2 second pauses can be entered to extend the length of a pause. For example, two consecutive 2 second pauses cause a total pause time of four seconds. However, keep in mind that pauses count as digits towards the 32 digit dialing maximum. 5VQTKPIRCWUGUKPCP+PVGTPCN2JQPG$QQMGPVT[ To store a number in your Internal Phone Book that contains pauses: 1. Enter the phone number you want to connect to (such as the bank’s teleservice phone number). 2. Press . More options display. Press to enter the desired pause: or Press to enter a Hard Pause. The letter “p” displays in the number, meaning that a hard pause will occur at that point in the dialing sequence. Enter the digits that need to follow the pause (such as your account number). Press to enter a 2 second pause. The letter “T” displays in the number, meaning that a “Timed” pause will occur at that point in the dialing sequence. Enter the digits that need to follow the pause (such as your account number). 3. Store the number as you normally would by pressing the key and entering a name. 2CWUGFKCNKPIHTQOCUVQTGF+PVGTPCN2JQPG$QQM GPVT[ Dialing from the Internal Phone Book is easy: 1. If you stored the number using a 2 second pause(s), simply dial the number as you normally would, and you are finished. The phone transmits the number that follows the “T” pause two seconds after connection. “Tpause” displays when you dial the number. 2. If you stored the number using a hard pause(s), then dial the teleservice number and wait to be prompted by the service for the number (credit card number, bank account number, etc). When prompted, press to send the DTMF number that follows your pause. “SENDING DTMF” flashes on the screen, and the transmitted tones are audible. /CPWCNRCWUGFKCNKPI Pauses are entered manually using the Digit Entry Menu during the dialing process. To manually dial a number using a pause(s): 1. Enter the phone number of the service you want to connect to (such as the bank’s teleservice phone number). For example, your bank’s teleservice phone number might be a 1.800 number. 2. Press 3. Press the associated digit key to select an option: to display digit dialing options. Press for a Hard Pause. The screen displays a “p” indicating a hard pause. Enter the number to be sent after the pause by pressing the digit keys, and then press . After connecting, press again to transmit the additional number. Press for a 2 Second Pause. The screen displays a “T” indicating a timed pause. The screen prompts for the number to be sent after the pause. Enter the number to be sent after the pause by pressing the digit keys, and then press . The phone transmits the number that follows the pause two seconds after connection. (QWTFKIKVFKCNKPI Your phone provides the option of four-digit dialing of numbers stored in the Internal Phone Book. This allows you to enter any four consecutive digits of someone’s phone number, have your phone remember the rest, and then dial it for you. To place a call using four-digit dialing: 1. Dial any four consecutive digits of a phone number that you have stored in your Internal Phone Book. The phone number can be any length up to 32 digits. 2. Press 3. Press for 4-DigiDial. The phone dials the phone number automatically. to display the Digit Dial menu. Note: If more than one phone number saved in the Internal Phone Book contains the same four consecutive digits, “Wait” displays. Press the scroll keys to scan the phone numbers and to highlight the selected number, and then press . 5GVVKPIVJG6#.-MG[ Your key is factory set to provide one-touch access to your Call Logs lists. You can change the function of the key so that it will give you one-touch access to your Internal Phone Book. Note: The key also allows you to easily redial your last call (by pressing it twice). If you change the key to one-touch Phone Book access, you will no longer have this redial function. To change the function of the key: 1. Press to display the Main Menu. 2. Press for Setup. 3. Press for TALK key. 4. Use the scroll keys to make your selection. The selections are “Calls” and “PhoneBook”. 5. Press saving. to save the setting or to exit without ;QWTRJQPG U UGEWTKV[HGCVWTGU Your Sprint PCS Phone provides many security options, including a user-programmable lock code and call restriction features. To access the Security menu in Standby mode, press , , and then enter the four-digit lock code (normally the lock code is the last four digits of your Sprint PCS Phone number). Press the associated digit key to access one of the following Security options: 1. Lock Phone 2. Limit Use (Phone Book, Incoming / Outgoing, Roaming calls) 3. Lock Code 4. Special # 5. Erase 6. Reset Phone .QEMOQFG Locking the phone limits all outgoing calls except calls to the three hard-coded emergency numbers (911, *911, and #911), the three user-programmable special numbers, and the Sprint PCS Customer Care number which is: , , You can lock the phone manually during use, or set the phone to lock automatically when it is turned on. When the phone is in Lock mode, you can answer incoming calls, but you must unlock the phone to place outgoing calls (except to emergency and special numbers). .QEMEQFGUGVVKPI The default lock code for your Sprint PCS Phone is generally 0000 or the last four digits of your phone number, depending on activation. You can enter a personal lock code, and then change the lock code as often as you like. To enter a new lock code: 1. Press to display the Main Menu. 2. Press code. for Security and enter your current lock 3. Press displays. for Lock Code. The current lock code 4. Enter a new, four-digit lock code by pressing the digit keys. 5. Press to save the new lock code or to exit. Note: Your phone does not allow viewing of the lock code unless you know the lock code (this is for obvious security reasons). So, if you change the lock code, be sure to write down the new code and keep it for your reference. .QEMKPIVJGRJQPG The Security menu allows you to lock the phone manually, automatically when powering on your phone, or to leave the phone unlocked. To lock the phone: 1. Press to display the Main Menu. 2. Press for Security and enter the lock code. 3. Press for Lock Phone. 4. Press the scroll keys to select an option: Off: The phone remains unlocked. Now: The phone locks immediately and stays locked until the lock code is entered. On Power-Up: The phone locks automatically the next time your phone is powered on and stays locked until the lock code is entered. 5. Press to save the setting. &KCNKPIKP.QEMOQFG You can place calls to emergency and special numbers in Lock mode. To place normal outgoing calls in Lock mode, enter the lock code to unlock the phone, and then dial the phone number. To place an outgoing call in Lock mode: To call an emergency or special number, enter the number and then press . To place normal outgoing calls, press to display the Lock Code screen, and then enter the lock code. When the Standby screen displays, enter the phone number, and then press . %CNNNKOKVKPIQRVKQPU Your Sprint PCS Phone provides a wide variety of call limiting options in the Security menu. These options give you powerful tools to manage your phone. Descriptions of the call limiting options are given on page 77. Outgoing Calls - You can set outgoing calls to: Phone Book - only Phone Book, Special, and Emergency numbers can be dialed. Manual dialing from the keypad is not allowed. Special and emergency numbers - outgoing calls are limited to the three special and three emergency numbers only (see“Special numbers.” on page 79 for a description of these numbers). Unlimited - any outgoing call can be dialed. Incoming Calls - You can set your phone to receive all incoming calls or to not receive incoming calls. Internal Phone Book - Internal Phone Book access can be limited: Full Access - User can place calls to any Internal Phone Book number, and can view, add, or erase Internal Phone Book entries. No Access - User cannot view the Internal Phone Book entries. However, note that manual keypad dialing is unlimited (even to numbers stored in the Internal Phone Book). Read-Only - User can view the entire Internal Phone Book but cannot add or erase entries. Roaming - You have several options for your phone’s roaming abilities: No limit - All roaming calls are allowed. Incoming - Roaming calls are limited to those placed to your phone. Outgoing roaming calls from your phone are not allowed. Outgoing - Roaming calls are limited to those placed from your phone. Incoming roaming calls to your phone are not allowed. No Call - Roaming calls are not allowed to or from your phone. To set call limiting options: 1. Press to display the Main Menu. 2. Press for Security and enter the Lock Code. 3. Press for Limit Use. 4. Press the associated digit key to select an option: Press for Outgoing calls. Scroll to choose Phone Book, Special#, or No Limit. Press for Incoming calls. Scroll to choose No Call or No Limit. Press for Phone Book. Scroll to choose Full Access, No Access, or ReadOnly. Press for Roaming. Scroll to choose No Limit, Incoming, Outgoing, or No Call. 5. Press saving. to save the setting or to exit without 5RGEKCNPWODGTU Your Sprint PCS Phone provides the option of storing three special numbers. Each special number can be up to ten digits long. All three special numbers can be manually dialed at any time even when your phone is locked or all outgoing calls are limited. This can be a useful feature for controlling what numbers can be dialed from your phone. 5VQTKPIURGEKCNPWODGTU To store special numbers: 1. Press to display the Main menu. 2. Press code. for Security and enter the four-digit lock 3. Press for Special #. 4. Press , , or the special number. 5. Enter the special number by pressing the digit keys. Special numbers can be up to ten digits long. 6. Press location. to select a location for to save the number in the selected &KCNKPIURGEKCNPWODGTUKP.QEMOQFG To dial special numbers in Lock mode: 1. Enter the special number by dialing it as you normally would using the digit keys. 2. Press to place the call. 4GUGVVKPI[QWTRJQPG Resetting the phone erases all Internal Phone Book entries, Sprint PCS Voicemail, numeric pages, text messages, call logs, special numbers, and returns all saved options to the default settings. To reset the phone: 1. Press to display the Main Menu. 2. Press for Security and enter the Lock Code. 3. Press for Reset Phone. A confirmation displays explaining that you will erase your phonebook. 4. Press to reset the phone, or press the operation. 5. To confirm resetting the phone, press again. The phone reboots (turns itself off then on), restores the default settings, erases your messages, and then returns to Standby mode. To cancel the operation before resetting the phone, press . to cancel -GGRKPIVTCEMQH[QWTECNNU WUKPI%CNN.QIU When displaying a Call Log, press connected. to be immediately Your phone maintains a list of the last calls made to or placed from your phone. Each entry on the list is referred to as a Call Log. This list of Call Logs contains: The last 9 calls placed to your phone The last 9 calls placed from your phone The last 9 calls placed to your phone that you did not answer (missed calls) Each log contains the name and phone number (if available), and a time/date stamp. In case of duplicate entries back-to-back, the phone consolidates those logs and stores only the most recent call from or to the same number. 4GXKGYKPI%CNN.QIU 1. Press to display the Main Menu. 2. Press for Call Logs. Press the associated digit key to select an option: 3. Press for Outgoing calls. Press for Incoming calls. Press for Missed calls. Press for Airtime. When the list of calls displays (Options 1, 2, or 3), press the scroll keys to scan the logs. The time / date stamp displays for each log. If there is an Internal Phone Book match, the name displays. If there is not an Internal Phone Book match, only the phone number displays. For option 4 (Airtime) see the next paragraph. 4. Press to exit Call Logs and return to the previous screen or to talk to the other party, just highlight the log, and press the key. 4GXKGYKPICKTVKOG You can review the airtime of the most recent call, as well as total airtime for all calls since the last reset action. A feature is provided to erase the total airtime so that you can begin a new total airtime measurement. To review airtime: 1. Press to display the Main Menu. 2. Press for Call Logs. 3. Press for Airtime. 4. Press the associated digit key to display airtime for the selected calls: Press for Last Call. The screen displays the phone number of the last call, along with the airtime and the time / date stamp. Press to return to the previous screen. Press for Total. The screen displays the total number of calls and the airtime for all calls since the last reset action. Press to return to the previous screen. Press for Erase Total. Press to erase total airtime, or press to cancel the operation and return to the previous screen. (CZCPF&CVCECNNU Your Sprint PCS Phone can receive and send a fax or data file. Note: The phone must be on a digital network to receive or send faxes and data. 4GEGKXKPICHCZ 1. Ensure that your Sprint PCS Phone is connected to your PC and is powered on. 2. Press to display the Main Menu. 3. Press for Setup. 4. Press for Data/Fax In. 5. Use the scroll keys to select “Incoming Fax Only”. 6. Press to save the setting. The screen displays “No incoming voice calls can be received”. Your phone then returns to Standby mode and displays “Fax Only” above the greeting. Note: Once you have set your phone’s mode to “Incoming Fax Only”, you cannot receive regular voice calls until you change back to “Voice”. 7. In the Fax program on your PC, setup the Answer mode. Click on “Receive” and select one of the following: Automatic Receive (recommended) Manual Receive Your Sprint PCS Phone is now ready to receive an incoming fax. 4GEGKXKPICFCVCHKNG 1. Ensure that your Sprint PCS Phone is connected to your PC and is powered on. 1. Press to display the Main Menu. 2. Press for Setup. 3. Press for Data/Fax In. 4. Use the scroll keys to select “Incoming Data Only”. 5. Press to save the setting. The screen displays “No incoming voice calls can be received”. Your phone then returns to Standby mode and displays “Data Only” above the greeting. Note: Once you have set your phone’s mode to “Incoming Data Only”, you cannot receive regular voice calls until you change back to “Voice”. Your Sprint PCS Phone is now ready to receive an incoming data call. 6JG5RTKPV2%5 /KPK$TQYUGT The Sprint PCS MiniBrowser allows you to access certain information such as stock quotes and weather via the Internet. Browsing the web via the phone is not like using your home computer. Site providers have selected only the critical aspects of their site to present to wireless phone users, and have removed most graphics. Each time you start MiniBrowser, the phone will connect to the Sprint PCS Nationwide Network as necessary, and the service indicator icon ( ) will appear on the display. Any time the service indicator icon is visible on the display, your phone is connected to the Sprint PCS Nationwide Network and you will be billed accordingly. Rates will vary according to your billing plan. The Sprint PCS MiniBrowser will end the connection after a certain period of network inactivity and will automatically re-connect as necessary. For this reason, you may find that you are billed for several network connections within a single MiniBrowser session. This is normal and is designed to minimize your bill. Each time you start the Sprint PCS MiniBrowser, you will view a reminder that you will be billed for the connection time. You have the option to change if and when this message appears. 1. Press to display the Main Menu. 2. Press for Setup. 3. Press for MiniBrowser. 4. Use the scroll keys to select one of the four options: Prompt to start (The default setting. You will see the prompt when you enter the browser, but not when you exit it.) Prompt to end (You will see the prompt only when you exit the browser.) Prompt both (You will be prompted when you enter or exit the browser.) Prompt none (You will never see the prompt.) 5. Press to save your setting or to cancel. .CWPEJKPIVJG/KPK$TQYUGT Note: The first time you use the Sprint PCS MiniBrowser, you will go through a security setup process that takes 3 to 5 minutes. Please follow the on-screen prompts to complete the security setup process. This initial setup process occurs only the first time you access the service. 1. Press 2. Press for MiniBrowser. Your Sprint PCS Phone will access the MiniBrowser network. 3. A reminder of the charge will appear. Using the soft keys, simply answer yes ( ) or no ( ). to display the Main Menu. 4. Once connected, the Home page (or the last page visited) will be displayed. To access the Home menu page from any other menu in the MiniBrowser, press and hold . An example of a Home Page is shown below: Home Page 1 Sprint PCS 2 Yahoo ! 3 Weather 4 Portfolio 5 More Internet 5. What appears on the display when accessing the MiniBrowser is dependent on the service provider content. To view additional text, use the scroll keys. 6QGZKVVJG/KPK$TQYUGT Simply press to exit the MiniBrowser. If the "Prompt to end" or "Prompt both" option is set in the MiniBrowser Setup ( ) , you will be prompted whether you want to end the browser call. 6JG/KPK$TQYUGTUQHVMG[U At the bottom of the MiniBrowser display is a solid bar and which contains browser commands. “Soft” keys ( ) below the solid bar are used to execute the commands. These two keys are called soft keys because their function changes depending on where you are in the MiniBrowser software. 0CXKICVKPIVJG/KPK$TQYUGT When you use the MiniBrowser, some keys on your phone operate differently than on a normal phone call. These keys are explained below. The MiniBrowser presents onscreen items in one of the following ways: text or numeric input links (embedded in content) numbered options (some options may not be numbered) simple text You can act on the options or links by making use of the and ) are located soft keys. The soft keys ( below the bottom line of the display. Here’s how the keys work in the MiniBrowser: 1. Up/Down Navigation Key: Use the navigation key to scroll to and select browser options. The currently selected option is indicated by “ ” . You can also use the navigation key to move the cursor when editing text. 2. MENU Key: This is the right soft key. The right soft key is used primarily for secondary options, or a menu of secondary options. For more info, see “The MiniBrowser soft keys.” on page 87. 3. END Key: Exits the MiniBrowser and returns the phone to Standby mode. 4. Numbered Keys 0 - 9: If the items on a page are numbered, you can use these keys to select them. 5. Right Cursor Key: Moves the cursor right in a text entry. 6. 0 Key: enters a space in a text entry. 7. Left Cursor Key: Moves the cursor left in a text entry. 8. CLR Key: This key performs two important functions: Backs you up in the browser. Pressing it once backs you up one page. Pressing and holding it backs you up to the Home page. Clears out entered text or numbers. When entering numbers or text, press to clear the last number, letter, or symbol. Press and hold to completely clear the input field. 9. OK / Messages Key: This is the left soft key. The left soft key is used primarily for selecting the highlighted item, but its function may change depending on what you are doing (see “The MiniBrowser soft keys.” on page 87). 10. Volume Key: This key performs several useful functions: Allows you to scroll up or down by a page. Press and hold the up portion for one second to back up one level in the browser. Press and hold the down portion for one second to go to your home page. 'PVGTKPIVGZVPWODGTUQTU[ODQNU When you are prompted to enter text, the current text entry method will appear on the right soft key as ALPHA, NUM or SYM. To change the input mode, use the right soft key. 7UKPI.KPMU Links have several purposes, including jumping to a different page, jumping to a different site, or even initiating a phone call from some sites. Links are shown inside of brackets ( [ ] ) , and you can normally use the left soft key to select a link when it is highlighted. +PKVKCVKPICRJQPGECNNHTQOVJG/KPK$TQYUGT You may initiate a phone call from the MiniBrowser if the site you are using supports this feature (the phone number may be highlighted and the left soft key will appear as "Call."). In most cases, you can also use the key to call the number. The browser connection will be terminated when you initiate the call. After you end the call, your phone will return to Standby mode. 7UKPIDQQMOCTMU You can bookmark many individual pages for easy access at a later time. Bookmarks save you time by reducing the number of steps it takes to access a desired page. 6QETGCVGCDQQMOCTM 1. Go to the page that you want to mark. 2. Press and hold 3. Select Mark Site. 4. If the page has a title, it will be automatically used for the name of the bookmark. You can also change the bookmark name. Selecting Save will save the name and add the page to your list of bookmarks. 5. A message will appear confirming that the bookmark was added to the list. Select OK to return to the screen that you marked to resume navigation within the MiniBrowser. 6. The new bookmark is added to the bottom of your bookmark list. . A list of options appears. (KPFKPICDQQMOCTM 1. From the Home Page, select Bookmarks. 2. Select the bookmark you want and press . Or 1. From the Home Page, press and hold the number associated with the bookmark in the bookmark list. /GPWU Your Sprint PCS Phone includes both a Main Menu and an In Use Menu. /CKP/GPW The Main Menu in Standby mode contains 10 primary options, most of which contain sub-menus with contextspecific options (see “Your Phone’s Main Menu.” on page 93). +P7UG/GPW The In Use Menu options are available in Conversation mode: 1. Mute / (Un)mute 2. Silent Key 3. Phone Book 4. Version 5. Send Tel # /GPWPCXKICVKQP To access a menu option, press , and then press the scroll keys to scan menu options. Press the associated digit key to select the desired option. If you know the number of the option you want to select, simply press , and then press the associated digit key to select the desired option. (You do not have to scroll through the list or display an option in order to select it.) Note: Closing the flip will return the phone to Standby mode from any menu. Also, the phone will automatically return to Standby mode from any menu if you don’t touch a key for 60 seconds. ;QWT2JQPG U/CKP/GPW Main Menu ➪ Menu Level 1 Menu Level 2 Menu Level 3 ➪ ➪ ➪ ➪ ➪ ➪ ➪ ➪ ➪ ➪ ➪ ➪ ➪ ➪ ➪ ➪ ➪ ➪ ➪ ➪ ➪ 7UCIGIWKFGNKPGU #NNCDQWVRGTHQTOCPEG CPFUCHGV[ -GGRKPIVCDUQPUKIPCNUVTGPIVJ The voice quality of your phone will always be at its best when the antenna is fully raised. If you’re inside a building, reception may be better near a window. The quality of each call you make or receive depends on the signal strength in your area. Your phone will inform you of the current strength by displaying a number of bars next to the signal strength icon. The more bars displayed, ) the stronger the signal. The signal strength indicator ( displays in the upper left corner of your display. 7PFGTUVCPFKPI2QYGT5CXGOQFG If you’re trying to use your Sprint PCS Phone in an area where the signal is too weak, the Power Save feature will automatically activate to conserve battery power when you’ve been unable to pick up a signal for 15 minutes. If your phone is on, it will periodically recheck service availability, or you can do so yourself manually by pressing any key. A message will be displayed on the screen any time Power Save has been activated. 7PFGTUVCPFKPIJQY[QWTRJQPGQRGTCVGU Your phone is basically a radio transmitter and receiver. When it’s turned on, it receives and transmits radio frequency (RF) signals. When your phone is in use, the system handling your call controls the power level. This power level can range from 0.006 watts to 0.2 watts. 4CFKQHTGSWGPE[UCHGV[ In 1991—1992, the Institute of Electrical and Electronics Engineers (IEEE) and the American National Standards Institute (ANSI) joined in updating ANSI’s 1982 standard for safety levels with respect to human exposure to RF signals. More than 120 scientists, engineers, and physicians from universities, government health agencies, and industry developed this updated standard after reviewing the available body of research. In 1993, the Federal Communications (FCC) adopted this updated standard in a regulation. In August 1996, the FCC adopted a hybrid standard consisting of the existing ANSI/IEEE standard and the guidelines published by the National Council of Radiation Protection and Measurements (NCRP). The design of the phone complies with these updated standards. Of course, if you want to limit RF exposure even further than the updated standard, you can choose to control the duration of your calls and operate your phone in the most power-efficient manner. /CKPVCKPKPI[QWTRJQPG URGCMRGTHQTOCPEG To operate your phone properly — that is, to maintain safe and satisfactory service — you should follow these rules: For best reception, extend the antenna fully. Hold the phone with the antenna up and over your shoulder. Do not hold, bend, or twist the phone antenna at any time. Close the phone antenna when not on a call. Do not use the phone with a damaged antenna. Speak directly into the microphone. Avoid exposing your phone and accessories to rain or liquid spills. If your phone gets wet, turn the power off immediately, remove the battery, and allow the phone an battery to air dry for 10 hours (in normal room temperature and humidity). If after the 10 hour drying time, the phone is inoperable, you should return it to the store where you purchased it, or a Sprint PCS authorized service center. Only Sprint PCS authorized personnel should service your phone and its accessories. Faulty service may invalidate the warranty. 2TQVGEVKPI[QWTDCVVGT[ For best battery performance, you should follow these guidelines: Only use Samsung-approved batteries and desktop chargers. These chargers are designed to maximize battery life. Using other batteries or chargers will invalidate your warranty and may cause damage as well. To avoid damage, only charge the battery in temperatures that range from 32° F to 104° F. Do not use the battery charger in direct sunlight or in high humidity areas (such as a bathroom). Never dispose of the battery by incineration (fire). Keep the metal contacts at the battery base clean. Do not attempt to disassemble or short-circuit the battery, as injuries or burns may result. You may need to recharge the battery if it has not been used for a long period of time. Replace the battery when it no longer provides acceptable performance. It can be charged hundreds of times before it will need to be replaced. Do not allow metal objects or liquids to contact or short-circuit the battery terminals, as injuries or burns may result. To avoid damage, store the battery in temperatures ranging from -4° F to 185° F, and avoid leaving the battery unused for very long periods. Follow these storage rules: Less than one month: -4° F to 140° F (-20° C to 50° C) More than one month: -4° F to 113° F (-20° C to 35° C) $CVVGT[FKURQUCNCPFTGE[ENKPI Please follow these guidelines when disposing of or recycling the battery: Do not dispose of the battery in a fire; the cell may explode. Check the regulations in your area for special disposal instructions. Do not open or puncture the battery; the released electrolyte is corrosive and may cause damage to the eyes and skin, and can be toxic if swallowed. Charge the battery in accordance with the instructions specified in this user guide. Return unwanted Samsung Lithium Ion batteries to your nearest Samsung Service Center. (Call toll free 1-888-987-HELP (4357) in the U.S.) 5RTKPV2%52JQPGCPFDCVVGT[URGEKHKECVKQPU Dual Band: Display Screen: CDMA 1.9 GHz / AMPS 800 MHz 5 Lines (4 Text Lines, 1 Icon Line) Battery Type: Standard: 1000 mAh Lithium-Ion PCS Antenna: 1/4 Wave (down), 5/8 Wave (up) Extended: 1600 mAh Lithium-Ion 5RTKPV2%52JQPGYKVJ Dimensions (H x W x D): Weight: Volume: Talk Time Digital: Talk Time Analog: Standby Time Digital: Standby Time Analog: 5VCPFCTF$CVVGT[ 'ZVGPFGF$CVVGT[ 4.4 x 2.0 x 1 inches 4.4 x 2.0 x 1.2 inches 112 x 52 x 25 mm 112 x 52 x 30 mm 5.5 oz. (156 g) 145 cc 6.1 oz. (172 g) 174 cc up to 2.5 hours up to 45 mins or up to 130 hours up to 15 hours up to 5 hours up to 1.5 hours or up to 230 hours up to 25 hours 7UKPI[QWTRJQPGYJKNGFTKXKPI Talking on the phone while you’re driving may divert your attention away from the road. Besides that, it is illegal in some states. Remember, safety comes first. When using your phone in the car: Focus on driving, not talking. Use your optional Hands-Free Car Kit. If you must use the phone while driving, please use One-Touch Dialing and Speed Dialing. FAILURE TO FOLLOW THESE INSTRUCTIONS MAY LEAD TO SERIOUS PERSONAL INJURY AND POSSIBLE PROPERTY DAMAGE. (QNNQYKPIUCHGV[IWKFGNKPGU To operate your phone safely and efficiently, you should always follow any special guidelines in a given area, and turn your phone off in areas where use is forbidden or when it may cause interference or danger. 7UKPI[QWTRJQPGPGCTQVJGTGNGEVTQPKEFGXKEGU Most modern electronic equipment is shielded from radio frequency (RF) signals. However, RF signals from PCS telephones may affect inadequately shielded electronic equipment. RF signals may affect improperly installed or inadequately shielded electronic operating and entertainment systems in motor vehicles. Check with the manufacturer or its representative to determine if these systems are adequately shielded from external RF signals. You should also check with the manufacturer regarding any equipment that has been added to your vehicle. Consult the manufacturer of any personal medical devices (such as pacemakers and hearing aids) to determine if they are adequately shielded from external RF signals. Turn off the phone in healthcare facilities and request permission before using the phone near medical equipment. 6WTPQHH[QWTRJQPGDGHQTGHN[KPI You should turn off your phone before boarding any aircraft. To prevent possible interference with aircraft systems, U.S. Federal Aviation Administration (FAA) regulations require you to have permission from a crew member to use your phone while the plane is on the ground. To prevent any risk of interference, FCC regulations prohibit using your phone while the plane is in the air. 4GUVTKEVKPIEJKNFTGP UCEEGUUVQ[QWTRJQPG Your phone should not be played with by children. They could hurt themselves and others, damage the phone, or make calls that increase your Sprint PCS bill. 6WTPQHH[QWTRJQPGKPFCPIGTQWUCTGCU To avoid interfering with blasting operations, you should turn off your phone when in a blasting area or in other areas with signs indicating that two-way radios should be turned off. Construction crews use remote-controlled RF devices to set off explosives. Turn off your phone when you are in any area with a potentially explosive atmosphere. It is rare, but your phone or its accessories could generate sparks. Sparks could cause an explosion or a fire resulting in bodily injury or even death. Areas with a potentially explosive atmosphere are often, but not always clearly marked. They include fueling areas such as gas stations; below deck on boats; fuel or chemical transfer or storage facilities; areas where the air contains chemical or particles such as grain, dust, or metal powders; and any other area where you would normally be advised to turn off your vehicle engine. Do not transport or store flammable gas, liquid, or explosives in the compartment of any vehicle that contains your phone or accessories. %CWVKQPU Any changes or modifications to your phone not expressly approved in this document could void your warranty for this equipment and void your authority to operate this equipment. Only use approved batteries, antennas, and chargers. The use of any unauthorized accessories may be dangerous and will invalidate the phone warranty if said accessories cause damage or a defect to the phone. Although your phone is quite sturdy, it is a complex piece of hardware and can be broken. Use common-sense guidelines to avoid dropping, hitting, bending, or sitting on it. (%%PQVKEG The phone may cause TV or radio interference if used in close proximity to receiving equipment. The FCC can require you to stop using the telephone if such interference cannot be eliminated. Lastly, vehicles using liquefied petroleum gas (such as propane or butane) must comply with the National Fire Protection Standard (NFPA-58). For a copy of this standard, contact the National Fire Protection Association, One Batterymarch Park, Quincy, MA 02269, Attn.: Publication Sales Division. +PFGZ # access a menu option, 92 accessories, 20, 96, 100, 101 Accessories, 15 Accessories Connector, 15 desktop charger, 97 Dual-Slot Desktop Charger, 20 Extended Battery, 98 Hands-Free Car Kit, 39, 50, 99 Headset, 17 Standard Battery, 98 accidental key presses, 54 Activating Service activate your phone, 1, 5 active flip, 12, 23, 24, 39, 51, 52, 54, 92 add digits, 24 Adjusting voice volume, 32 Airtime, 81, 82 review airtime, 82 Alarm, 40, 41, 42 alarm ring type, 41 alarm ring volume, 42 cancel the alarm, 41 Setting the alarm, 40, 41, 42 silence the alarm, 13, 41 Alerts, 34, 37, 38 Alerts settings, 37 select alert options, 38 Analog, 18, 26, 27, 98 analog cellular networks, 27 Analog mode, 18 conventional analog cellular networks, 25 answer, 3, 12, 14, 22, 33, 35, 54, 74, 81, 86 answer options, 36 Answering a call, 24, 29 Any Key Answer, 24, 36, 38 Antenna, 17, 98 reception, 21, 94, 96 Any Key Answer, 24, 36, 38 area codes, 24 Automatic hyphenation, 25 Automatic storage, 36 $ back up one menu level, 15 Backlight, 39 Battery, 18, 20, 28, 97, 98, 101 Battery charge indicator, 20 Battery life, 28 battery performance, 97 Battery strength, 18 Charging with the Dual-Slot Desktop Charger, 20 fully charged battery, 20 Protecting your battery, 97 recharge the battery, 97 Replace the battery, 97 Standard Battery, 98 store the battery, 97 using the battery, 19 Block Own Number, 29 browser commands, 87 % call an emergency or special number, 76 call automated systems, 69 Call Dropped, 33 Call Failed, 34 call forwarding, 31 activate Call Forwarding, 31 deactivate Call Forwarding, 31 Using Call Forwarding, 31 Call limiting options, 76 Call Logs, 14, 23, 24, 31, 36, 73, 80, 81, 82 incoming call, 12, 13, 18, 24, 29, 31, 32, 35, 36, 38, 44, 54, 74, 77 Keeping track of your calls, 23, 31, 81 Outgoing Calls Log, 30 call quality, 27 call time, 13, 23, 62 Call Waiting, 13, 14, 29, 30 Deactivating, 30 turn off permanently, 30 turn off temporarily, 30 Caller ID, 28, 43, 62 Name display with, 36 Using Caller ID, 28 Cautions, 101 Cellular roaming, 27 Charging with the Dual-Slot Desktop Charger, 20 Clear (CLR) Key, 15, 89 back up one menu level, 15 correct a misdialed digit, 24 Correcting dialing mistakes, 24 erase one character, 15 erase one digit at a time, 24 return to Standby mode, 15, 16, 21, 33, 34, 41, 48, 92 conference calls, 30 confidential number, 66 Conversation Mode In Use Menu, 35, 92 correct a misdialed digit, 24 cross-talk, 27 customer service Samsung Service Center, 98 Sprint PCS Customer Care, 2, 3, 10, 28, 74 & data, 15, 83, 84 Receiving a data file, 84 default, 29, 31, 35, 47, 75, 80, 86 desktop charger, 97 Dialing, 15, 49, 51, 55, 68, 70, 76, 79 Correcting dialing mistakes, 24 Dialing by memory location, 68 Dialing from the Internal Phone Book, 70 Dialing in Lock mode, 76 Dialing numbers from your Internal Phone Book, 68 Dialing special numbers in Lock mode, 79 One-Touch Dialing, 68, 99 Three-Touch Dialing, 23, 68 Two-Touch Dialing, 68 Digit Entry, 71 Dimensions, 98 direct sunlight, 97 Directory Assistance, 55, 65 Display, Display indicators, 13, 18 Display options, 39 dropped calls, 27 DTMF, 37, 71 Dual-Slot Desktop Charger, 20 ' earpiece volume, 32 eavesdropping and cloning, 28 Editing Internal Phone Book numbers, 66 electronic devices, 99 emergency, 55, 58, 74, 76, 77 Emergency and Special Numbers call an emergency or special number, 76 Emergency dialing, 55 END/ Power Key, 16 entering a phone number, 13, 40 erase, 15, 24, 47, 53, 56, 59, 60, 67, 77, 80, 82 erase all, 15, 24, 53, 60 erase all the digits at once, 24 erase an individual text message, 60 erase one character, 15 erase one digit at a time, 24 explosive atmosphere, 100, 101 Extended Battery, 98 ( fade-out, 27 failed call, 34, 37 Fax, 83, 84 Receiving a fax, 83 Federal Communications (FCC), 95 find an entry by location, 63 Find Entry, 63 find Internal Phone Book entries from the Main Menu, 64 flip (see active flip) flying, 100 incoming voice calls, 43, 83, 84 interference, 99, 100, 101 Internal Phone Book, 12, 13, 14, 16, 21, 23, 24, 28, 33, 40, 41, 50, 59, 61, 64, 65, 66, 67, 68, 69, 70, 72, 73, 77, 80, 82 changing your Internal Phone Book, 66 erase the Internal Phone Book, 67 find an entry by location, 63 find entry, 63 find Internal Phone Book entries from the Main Menu, 64 make a number secret, 66 Internal Phone Book services, 65 Secret phone book numbers, 66 view alphabetically, 61 view numerically, 61 Internet, 85, 87 Key beep volume setting, 36 KeyGuard, 39, 54 activate KeyGuard, 54 ) . Getting to know your phone, 11 Greeting, 39 LCD Screen, 13, 98 leave a Sprint PCS Service Area, 28 LED Indicator, 12 liquid spills, 96 Lithium Ion (LiIon) Battery, 19 Lithium Ion batteries, 98 lock code, 3, 60, 66, 67, 74, 75, 76, 79 default lock code, 75 lock the phone, 74, 75 new lock code, 75 Lock Mode, 55, 74 place an outgoing call in Lock mode, 76 long-distance charges, 25 * Hands-Free Car Kit, 39, 50, 99 Headset, 17 Headset connector, 17 help, 2, 3, 10, 12, 55 high humidity areas, 97 + In Use Menu, 35, 92 incoming call, 12, 13, 18, 24, 29, 31, 32, 35, 36, 38, 44, 54, 74, 77 incoming message calls, 44, 45 / Main Menu, 92, 93 make calls, 23, 31, 100 Making a call, 23 Manual pause dialing, 69, 71 manually dial a number using a pause(s), 71 melody tones, 36, 41, 43, 45 Memory, 23, 56, 68 Memory Dialing Shortcuts, 23, 68 Menu, 16, 71, 92 access a menu option, 92 back up one menu level, 15 In Use Menu, 35, 92 Main Menu, 92, 93 navigating a menu, 13 MENU Key, 16, 88 Messages, 13, 45, 57, 58, 59, 60, 89 erase a message after reviewing, 60 erase all stored text messages, 60 erase all text messages and numeric pages, 60 incoming message calls, 44, 45 kinds of messages, 56 Message indicator, 18 Message Services, 56 Messages and Lock mode, 58 Messages Key, 13, 89 Messages Menu, 13, 57, 58, 60 Microphone, 15 Mute / (Un)mute, 92 mute the microphone during a call, 15, 35 MiniBrowser, 45, 85, 86, 87, 88, 89, 90, 91 browser commands, 87 exit the MiniBrowser, 87 Minute Beep, 34, 37, 38 Missed call alert, 33 Mode, 26 Mute the ringer, 12, 44 0 Name display with Caller ID, 36 navigating a menu, 13 Navigation Key, 16, 88 Network Busy, 34 network feature activation codes, 24 North American Numbering Plan, 25 numeric pages, 44, 45, 56, 58, 60, 80 Reviewing Numeric Pages and Text Messages, 58 1 One-Touch Access to your Voicemail box, 57 One-Touch Dialing, 68, 99 Operator Services, 55 other CDMA networks, 25, 27 out of calling range, 34 Out of Range, 34 Outgoing Calls Log, 30 outside the Sprint PCS Network, 25, 27, 28 2 Pages numeric pages, 44, 45, 56, 58, 60, 80 Pause Dialing, 25, 69 Manual pause dialing, 69, 71 pause dialing methods, 69 peak performance, 96 performance and safety, 94 Personal Greeting, 39 Phone Book, see Internal Phone Book phone number displays, 23, 41, 82 Placing a call, 52 place a three-way call, 30 place an outgoing call in Lock mode, 76 using Voice Dialing, 52 Prepend dialing, 24 prepend existing phone numbers, 24 Prepend option, 24 Protecting your battery, 97 4 radio frequency, see RF rain, 96 Receiving a data file, 84 Receiving a fax, 83 reception, 21, 94, 96 recharge the battery, 97 record a Voice Memo in Standby mode, 47 Redialing calls, 31 redial the last call, 31 Resetting your phone, 80 return to Standby mode, 15, 16, 21, 33, 34, 41, 48, 92 review, 48, 52, 57, 58, 59, 82 review a Voice Memo, 48 review airtime, 82 review Voice Dialing entries, 52 Reviewing a Voice Memo, 48 Reviewing Numeric Pages and Text Messages, 58 reviewing text messages, 59 RF, 95, 99, 100 RF exposure, 95 RF signals from PCS, 99 Radio frequency safety, 95 Ring Type setting for message calls, 44, 56 for roaming calls, 46 for voice calls, 43 Ring volume, 33, 44, 45 for message calls, 45 for voice calls, 33, 44 Adjusting ring volume, 32 Ringer, 32, 43, 46 Mute the ringer, 12, 44 Ring tone mute, 44 silence the ringer, 33, 35 Roaming, 18, 26, 46, 74, 77, 78 Cellular roaming, 27 leave a Sprint PCS Service Area, 28 manual roaming, 25 roaming agreements, 18, 25 5 Safety Considerations Cautions, 101 explosive atmosphere, 100, 101 flying, 100 Following safety guidelines, 99 performance and safety, 94 Radio frequency safety, 95 Using your phone while driving, 99 Samsung Service Center, 98 Scroll Keys, 14 Secret phone book numbers, 66 Security, 2, 3, 60, 67, 74, 75, 76, 78, 79, 80 security and privacy risks, 28 security features, 74 Security menu, 74, 75, 76 Send Tel #, 92 Service, 1, 2, 18, 26, 27, 28, 37, 38, 55, 65 Service alerts, 37 Service indicator, 18 service modes, 26 Signal strength, 18 Silent Key, 92 Special numbers, 77, 79 calling, 76 Dialing in Lock mode, 79 Storing, 79 Speed Dialing, 68, 99 Sprint PCS Customer Care, 2, 3, 10, 28, 74 Standard Battery, 98 Standby or Conversation, 16 Standby Time, 98 static, 27 store, a phone number after ending a call, 62 phone numbers and names, 61 special numbers, 79 phone numbers (shortcut) at the end of a call, 62 6 TALK Key, 14 Setting the TALK key, 31, 73 Talk Time, 98 temperatures, 97 temporarily unblock, 29 text messages, 44, 45, 56, 58, 80 Reviewing, 58, 59 Three-Touch Dialing, 23, 68 Three-Way Calling, 30 Tone length setting, 37 Turning your Sprint PCS Phone on and off, 21 Two-Touch Dialing, 68 7 unlock your phone, 1, 3, 5 8 Version, 92 vibrate, 18 Vibrator on, 18 Vibrate, 35, 36 vi ew your pho ne nu mber from Standby mode, 32 Viewing your Internal Phone Book, view alphabetically, 61 view numerically, 61 Voice calling experience, 27 VoiceMail One-Touch Access to your Voicemail box, 57 Voice Memo, 14, 47, 48 recording in Standby mode, 47 review a Voice Memo, 48 Reviewing a Voice Memo, 48 Voice Memo Key, 14 Voice volume Adjusting voice volume, 32 Voice-Activated Dialing, 12, 14, 49, 50 change setup options, 51 erase all Voice Dialing entries, 53 place a call using Voice Dialing, 52 review Voice Dialing entries, 52 Tips on recording names, 49 Training the phone for Voice-Activated Dialing, 50 Voice Dialing Activation, 51 voicemail box set up your voicemail box, 57 Voicemail notifications, 44, 45 volume key, 12, 16, 32, 44 Adjusting voice volume, 32 earpiece volume, 32 Key beep volume setting, 36 9 warranty, 20, 96, 97, 101 Weight, 98 Where you can use your phone, 25