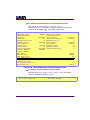
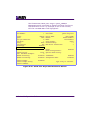
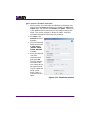
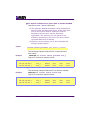
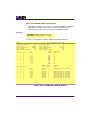
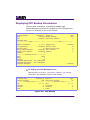
1
LX Series Configuration Guide Version 5.1.0 LX Series Configuration Guide April 2007 All rights reserved. No part of this publication may be reproduced without the prior written consent of MRV Communications, Inc. The information in this document is subject to change without notice and should not be construed as a commitment by MRV Communications, Inc. MRV Communications, Inc. reserves the right to revise this publication, and to make changes in content from time to time, without obligation to provide notification of such revision or changes. MRV Communications, Inc. assumes no responsibility for errors that may appear in this document. Copyright © 2007 MRV Communications, Inc. Corporate Headquarters MRV Communications, Inc. Corporate Center 20415 Nordhoff Street Chatsworth, CA 91311 Tel: 818-773-0900 Fax: 818-773-0906 www.mrv.com MRV Americas Service and Support 295 Foster Street Littleton, MA 01460 Tel: 800-435-7997 Tel: +001 978-952-4888 (Outside U.S.) Email: [email protected] MRV America Sales 295 Foster Street Littleton, MA 01460 Tel: 800-338-5316 (U.S.) Email: [email protected] 451-0311W MRV International Sales Business Park Moerfelden Waldeckerstrasse 13 64546 Moerfelden-Walldorf Germany Tel: (49) 6105/2070 Fax: (49) 6105/207-100 Email: [email protected] iii FCC Notice CAUTION This equipment has been tested and found to comply with the limits for a Class A digital device, pursuant to Part 15 of the FCC Rules. These limits are designed to provide reasonable protection against harmful interference when the equipment is operated in a residential installation. This equipment generates, uses, and can radiate radio frequency energy and, if not installed and used in accordance with the instructions, can cause harmful interference to radio communications. However, there is no guarantee that interference will not occur in a particular installation. If this equipment does cause harmful interference to radio or television reception, which can be determined by turning the equipment off and on, the user is encouraged to try to correct the interference by one or more of the following measures: BSMI Notice Reorient or relocate the receiving antenna. Increase the separation between the equipment and receiver. Connect the power cord of the equipment into an outlet on a circuit that is different from that to which the receiver is connected. Consult the dealer or experienced radio/TV technician for help. Changes or modifications not expressly approved by MRV Communications, Inc. could void the user's authority to operate the equipment. iv This is a Class A product based on the standard of the Voluntary Control Council for Interference by Information Technology Equipment (VCCI). If this equipment is used in a domestic environment, radio disturbance may arise. When such trouble occurs, the user may be required to take corrective action. VCCI Notice ! WARNING You must disconnect both power sources before you service the unit. Export Notice MRV models contain 128-bit encryption software. Export of this product is restricted under U.S. law. Information is available from the U.S. Department of Commerce, Bureau of Export Administration at www.bis.doc.gov. Licensing Notice This software is licensed as described in the "License" file on the LX-Series CD Kit and at the MRV website when downloading software. LX Series Configuration Guide Table of Contents v LX Series Configuration Guide About This Book xix How This Book is Organized ............................................. xix Conventions..................................................................... xxi Online Help ...................................................................... xxi PART 1 Before You Configure the LX Series Unit CHAPTER 1 Using the Command-Line Interface About Command Modes 1-3 Command Mode Descriptions 1-5 Using the Function Keys ............................................... 1-16 CHAPTER 2 Performing the Initial Setup Configuring TCP/IP 2-2 Obtaining TCP/IP Parameters from the Network ............. 2-2 Setting the TCP/IP Parameters in the IP Configuration Menu ............................................................................. 2-8 Setting Up Local (Onboard) Security ............................. 2-10 Setting Up TACACS+ .................................................... 2-25 Specifying the TACACS+ Period .................................... 2-33 Setting Up RSA SecurID ............................................... 2-33 Setting Up KerberosV5 ................................................. 2-40 Resetting the Unit to Factory Defaults CHAPTER 3 2-47 Syslog Overview 2-48 Assigning an Asset Tag 2-49 Assigning a Contact 2-50 Setting Up Remote Console Management Connecting the Console Port to the Network Element 3-2 Recommendations for Making Cables .............................. 3-2 Making Straight-through Cables ..................................... 3-3 LX-Series Configuration Guide vi Table of Contents Modular Adapters (RJ-45 to DB-25 and RJ-45 to DB-9)......................................................... 3-3 Configuring Ports for Remote Console Management 3-4 Configuring Asynchronous Ports for Direct Serial Connections .......................................................... 3-4 Setting Up Security for a Console Port .......................... 3-10 Verifying Serial Port Connections .................................. 3-13 Creating Subscribers for Remote Console Management ......................................................................................... 3-17 Specifying Access Methods ........................................... 3-18 Connect Port Escape Character ..................................... 3-19 CHAPTER 4 System Administration Backup and Recovery 4-2 Saving the Configuration File .......................................... 4-2 Saving the Configuration to the Network ........................ 4-3 Editing the Files on a Unix Host ...................................... 4-3 Editing the Files in Windows ........................................... 4-4 Loading the Configuration from Network......................... 4-7 Applying Default Configurations to Other Units 4-8 Creating a Default Configuration File .............................. 4-8 Restoring the Default Configuration File to a New Unit .... 4-8 Configuring SFTP 4-9 Configuring Telnet Server 4-12 Scripting On External Units 4-13 Upgrading the Software 4-13 Upgrading Software and ppciboot using the CommandLine Interface 4-14 ppciboot Factory Default Settings 4-16 Upgrading Software with the ppciboot Main Menu 4-17 Booting from the Network............................................. 4-18 LX-Series Configuration Guide Table of Contents vii Saving the Image to Flash When Booting from the Network ......................................................... 4-19 Setting the Timeout in Seconds .................................... 4-20 Setting the Speed and Duplex Mode of the Ethernet Network Link .............................................................................. 4-21 Changing the ppciboot Password .................................. 4-22 Enabling/Disabling FIPS Security .................................. 4-22 EM316LX Configuration Menu ....................................... 4-23 Entering a ppciboot Image Name .................................. 4-23 Entering a Software Image Name ................................. 4-24 Resetting System Defaults ............................................ 4-25 Saving the Configuration .............................................. 4-25 Booting the System ...................................................... 4-26 Using the IP Configuration Menu 4-26 Choosing an IP Assignment Method .............................. 4-28 Changing the Unit IP Address ....................................... 4-28 Changing the Network Mask ......................................... 4-29 Changing the Gateway Address .................................... 4-29 Changing the TFTP Server IP Address ........................... 4-30 Saving the Configuration .............................................. 4-30 Using EM316LX Configuration Menu 4-31 Restarting the Module ................................................... 4-31 Enabling the Management Port ..................................... 4-31 Disabling the External I2C Bus ..................................... 4-32 Saving the Configuration .............................................. 4-32 Configuring Image Names 4-33 Defaulting Image Names 4-33 Updating the Software Image Name 4-34 Updating the ppciboot via a specific image name 4-35 Booting from Defaults 4-38 Defaulting from the Main Menu ..................................... 4-38 LX-Series Configuration Guide viii Table of Contents Defaulting from CLI ...................................................... 4-39 Acquiring the IP Configuration 4-39 ppciboot/linuxito Downgrade 4-40 Downgrading ppciboot/linuxito ..................................... 4-40 System and Status Screens 4-43 PART 2 Configuring the LX Series Unit CHAPTER 5 Setting Up the Notification Feature Overview of the Notification Feature 5-2 Configuring the Notification Feature 5-3 Creating Service Profiles ................................................. 5-3 Overview of User Profiles .............................................. 5-14 User Profile Name Restrictions ...................................... 5-16 Configuration Examples 5-17 syslogd Message Configuration Example ....................... 5-18 Outbound Asynchronous Port Example ......................... 5-18 Localsyslog Example ..................................................... 5-19 Remotesyslog Example ................................................. 5-19 SNPP Example .............................................................. 5-20 Email Example .............................................................. 5-21 TAP Example ................................................................ 5-22 SNMP Example ............................................................. 5-23 SSHD and DNS CHAPTER 6 5-24 Configuring IP Interfaces Setting Up IP Interfaces 6-4 Re-Using IP Addresses .................................................... 6-5 Specifying SSH Keepalive Parameters............................. 6-5 Specifying Socket Numbers ............................................ 6-6 Specifying Maximum Transmission Units (MTU) .............. 6-7 Configuring Local Authentication on an IP Interface ........ 6-8 LX-Series Configuration Guide Table of Contents ix Configuring Server-Based Authentication on an IP Interface ............................................................................. 6-8 Configuring a Rotary 6-11 Removing Ports from a Rotary ...................................... 6-14 Disabling a Rotary ........................................................ 6-14 Setting Maximum Telnet Connections 6-15 Displaying Interface Information .................................. 6-15 CHAPTER 7 Telnet Client 6-19 Setting the Banner 6-20 Message of the Day Commands 6-21 Configuring the Data Broadcast Feature Setting Up Broadcast Groups 7-2 Guidelines for Adding Ports ............................................. 7-3 Specifying Port Options................................................... 7-4 CHAPTER 8 Configuring Subscriber Accounts Creating Subscriber Accounts and Entering Subscriber Command Mode 8-5 Subscriber Account Settings 8-6 Specifying the Subscriber Access Methods ...................... 8-7 Setting Up Session and Terminal Parameters................ 8-12 Configuring the Subscriber Password ............................ 8-16 Specifying Escape Characters ....................................... 8-18 Specifying a Dedicated Service ..................................... 8-19 Specifying a Security Level ........................................... 8-20 Enabling Audit Logging ................................................. 8-20 Enabling the Menu Feature ........................................... 8-21 Enabling Command Logging.......................................... 8-21 Displaying Subscriber Information 8-22 Displaying the Audit Log for a Subscriber ..................... 8-26 Assigning a Public Key to a Subscriber 8-27 Generating the Key and Assigning it to a Subscriber 8-29 LX-Series Configuration Guide x Table of Contents Generating the SSH Key ............................................... 8-29 Changing the SSH Key Passphrase ............................... 8-29 CHAPTER 9 Configuring Async Port Features Configuring Sensor Access for LX Ports 9-2 Displaying the Temperature and Humidity ...................... 9-2 Displaying Sensor Summaries ........................................ 9-3 Configuring the IdleBuffer 9-4 Customizing Asynchronous Port Settings 9-6 Configuring Asynchronous Ports for Data Buffering 9-8 RS-485 CLI Support 9-11 Telnet Serial-Over-IP (RFC2217) Support 9-13 Default TCP Transmit Mode........................................... 9-14 Displaying Port Async Summaries 9-19 Port Async Connect 9-20 Enabling/Disabling Display of the Command Prompt ..... 9-20 CHAPTER 10 Setting the Banner 9-21 Inbound and Outbound Authentication 9-25 Message of the Day Commands 9-26 DSR Wait 9-29 Configuring Power Control Units Default Name for an Outlet 10-3 Configuring 5250, 5150 and 4800 Units 10-3 Specifying the Off Time ................................................ 10-4 Naming an Outlet ......................................................... 10-5 Naming an Outlet Group ............................................... 10-5 Rebooting or Turning Outlets On or Off ......................... 10-6 Disabling the Off Option for Power Outlets .................... 10-7 Accessing the 5250/5150/4800 CLI 10-8 Configuring Unique 5250, 5150 and4800 Features 10-9 Configuring a Port for 5250, 5150 and 4800 CLI Access .................................................................... 10-9 LX-Series Configuration Guide Table of Contents xi Enabling the Factory Reset Button .............................. 10-10 Configuring the Authentication Feature for the 5250/5150/4800 ........................................................ 10-10 Specifying the Password for the 5250/5150/4800 Unit 10-12 Enabling 5250/5150/4800 Authentication ................... 10-13 Configuring Power Boot Sequencing ........................... 10-13 CHAPTER 11 Enabling SCP 10-14 Displaying Information on Power Control Units 10-15 Configuring the Trigger-Action Feature Disabling Rules ........................................................... 11-18 CHAPTER 12 Configuring iptables and ip6tables IP Firewall 12-2 Updating the Firewall .................................................... 12-9 Configuring Packet Filters Using the iptables and ip6tables Commands 12-9 Using iptables and ip6tables Command Options .......... 12-13 CHAPTER 13 Configuring the Cluster Configuration and Control Feature What is a Cluster? ........................................................ 13-2 How the Protocol Works ................................................ 13-3 Cluster Configuration and Control Rules........................ 13-4 Creating a Cluster Secret 13-5 Sharing Attributes with Other Nodes Within the Cluster ......................................................................................... 13-9 Updating the Software 13-13 Updating the ppciboot 13-14 User Graphical User Interface (GUI) 13-15 Sharing and Unsharing Interfaces 13-21 Sharing and Unsharing Subscribers 13-22 Sharing and Unsharing the Authenticate Image 13-23 Sharing and Unsharing the Message 13-24 LX-Series Configuration Guide xii Table of Contents Sharing and Unsharing the Telnet Client 13-25 Configuring a Remote Cluster Member 13-26 GUI Cluster 13-27 Launching the GUI Cluster Explorer ............................ 13-27 Cluster Automatic Discovery and Setup 13-29 Cluster Automatic Discovery ....................................... 13-29 Cluster Automatic Setup ............................................. 13-33 CHAPTER 14 SNMP Configuration Network Management System 14-2 Management Information ............................................. 14-3 LX Fault/Cleared Alarm SNMP Trap Pairings .................. 14-7 Security 14-8 SNMP Management 14-8 Configuring an SNMP Agent .......................................... 14-8 Adding or Removing an SNMP GET Client ..................... 14-9 Adding or Removing an SNMP SET Client .................... 14-10 Adding and Removing SNMP Trap Clients ................... 14-11 Adding and Removing SNMP V3 User Entries .............. 14-11 Adding and Removing SNMP V3 Group Entries ............ 14-12 Adding and Removing SNMP V3 Access Entries ........... 14-13 Adding and Removing SNMP V3 View Entries .............. 14-14 MIB-II System Group Configuration 14-15 SNMP V3 Overview ..................................................... 14-15 Configuration 14-16 SNMP V3 Commands 14-17 Configuring a Trap Client User Index 14-21 Configuring a V3 User Passw/Priv Key 14-21 Displaying SNMP Information 14-22 Show the SNMP V3 Settings 14-24 Dual Power Supply SNMP Traps 14-28 LX-Series Configuration Guide Table of Contents xiii CHAPTER 15 SNMP MIB Support 14-28 References 14-28 Configuring Alarming with LX-7204T/7304T Sensor Manager and LDAM Configuring the HDAM Port 15-2 Updating the LX-7204T/7304T Firmware 15-2 Using the Alarm Input Commands 15-4 Naming Alarm Inputs .................................................... 15-4 Enabling and Disabling Audible Alarms ......................... 15-5 Configuring an Alarm Input Description String .............. 15-7 Defaulting the Description for an Alarm Input ............... 15-8 Enabling and Disabling SNMP Traps for Alarm State Changes .................................................................................... 15-9 Configuring the Debounce Interval for an Alarm ......... 15-10 Configuring the Fault State for Alarm Inputs............... 15-11 Configuring a Severity Level for Alarm Inputs ............. 15-13 Resetting the Alarm Input Name to Its Default ........... 15-14 Resetting Alarm Inputs to the Defaults ....................... 15-15 Using the Control Output Commands 15-16 Naming Control Outputs ............................................. 15-16 Setting Control Output as Open or Closed .................. 15-18 Configuring a Control Output Description String ......... 15-19 Defaulting the Description for a Control Output .......... 15-20 Setting the Active State of a Named Control ............... 15-21 Resetting Control Outputs to the Defaults ................... 15-22 Resetting the Control Output Name to its Default ....... 15-23 Using the Analog Input Commands 15-24 Naming Analog Inputs ................................................ 15-24 Configuring an Analog Input Description String .......... 15-25 Defaulting the Description for an Analog Input ........... 15-26 Resetting Analog Inputs to the Defaults ...................... 15-27 LX-Series Configuration Guide xiv Table of Contents Resetting the Analog Name to its Default ................... 15-28 Enabling and Disabling the Analog State ..................... 15-29 Displaying HDAM Information 15-32 Configuring the LDAM Port 15-41 Using the Alarm Input Commands 15-41 Naming Alarm Inputs .................................................. 15-42 Using the Control Output Commands 15-47 Naming Control Outputs ............................................. 15-47 Displaying LDAM Information CHAPTER 16 15-53 Configuring PPP Configuring an IP Interface for PPP 16-2 Re-binding an IP Interface to Eth0 ................................ 16-3 Setting Optional PPP Parameters .................................. 16-4 PPP Routing on the LX .................................................. 16-9 Configuring PPP Dial-On-Demand 16-12 PPP Backup 16-15 Displaying PPP Backup Information............................. 16-18 PPP Dialback 16-19 RSA SecurID PPP Fallback 16-21 Sample Configuration ................................................. 16-22 CHAPTER 17 Configuring Redundant Ethernet Redundant Ethernet 17-2 Configuring Ethernet 2 as a Second Network Interface . 17-2 Configuring Ethernet 2 as a Redundant Ethernet Link for Ethernet 1 .................................................................... 17-3 Bonding Link ................................................................. 17-5 Bonding Link ARP Address ............................................ 17-5 Bonding Link ARP Interval ............................................ 17-6 CHAPTER 18 Internal Modem Configuring the Internal Modem for Dial-Out 18-2 Viewing Internal Modem Characteristics 18-4 LX-Series Configuration Guide Table of Contents xv CHAPTER 19 Alarm Input/Control Output Points Configuring Control Output 19-2 Configuring Alarm Inputs via Trigger Action Rules 19-5 Using Signal Notice to Set Up a Trigger-Action-Rule ..... 19-8 LX Signal Notice Ease-of-Use ........................................ 19-8 Port Async Signal Notice GUI Configuration CHAPTER 20 19-10 Configuring IPv6 Configuring IPv6 Internet Protocol 20-2 Viewing IPv6 Status .................................................... 20-12 Viewing the IPv6 NTP Address .................................... 20-13 Viewing IPv6 Routes ................................................... 20-14 IPv6 Additions to Ping, SSH, and Telnet 20-17 Web Browser Support for IPv6 20-18 PART 3 Additional Information RADIUS Authentication Process A-2 RADIUS Authentication Attributes ................................... A-4 RADIUS Access Request Packet Service Type A-7 RADIUS Accounting Client Operation B-2 RADIUS Accounting Attributes ........................................ B-3 TACACS+ Accounting Client Operation B-4 TACACS+ Accounting Attributes ..................................... B-5 TACACS+ Authentication Example C-2 TACACS+ Authentication Attributes ................................ C-3 TACACS+ Authorization Attributes .................................. C-4 iptables man Pages D-2 ip6tables man Pages D-23 Multi-Level Command Execution E-2 Executing Multi-Level Commands from the User Command Mode E-3 LX-Series Configuration Guide xvi Table of Contents Configuring the Notification Feature with Multi-Level Commands ................................................... E-3 Multi-Level Commands Examples.................................... E-5 Open Ports on the LX F-2 Changing the Default TCP Listener Ports ......................... F-3 Considerations H-3 Associated Commands .................................................... H-3 Defining rlogin Dedicated Services H-4 rlogin with Preferred Services ......................................... H-4 rlogin Transparent Mode H-5 References I-1 FIPS 140-2 Standard I-2 Required FIPS 140-2 Validation ...................................... I-2 Applying Tamper Evident Labels ..................................... I-4 Enabling FIPS 140-2 Mode of Operation I-6 Changing the Default ppciboot Password ........................ I-8 Changing the Default Subscriber Password ..................... I-9 Changing the Default Configuration Password ................. I-9 FIPS 140-2 Mode Console Access I-10 Applications Unsupported in FIPS 140-2 Mode of Operation .................................................................. I-10 Upgrading Software I-12 FIPS 140-2 JCE Module Commands I-12 Configuring a Web Server FIPS 140-2 JCE Module Name................................................................. I-13 Viewing the Web Server FIPS 140-2 JCE Module Name................................................................. I-13 How NTP Works J-2 About the Nested Menu Feature K-2 How a Subscriber Obtains the Menus K-4 Creating the Menu File K-5 LX-Series Configuration Guide Table of Contents xvii Using Comment Lines in the Menu File K-11 General Guidelines........................................................ K-11 Debugging the Menu File .............................................. K-11 Enabling the Menu Feature K-12 Sample File 2 ................................................................ K-15 About LXPORTD L-2 LXPORTD man Pages L-2 Applications Examples L-6 Basic LXPORTD Application ............................................. L-6 Advanced LXPORTD Application ...................................... L-8 Line Printer Daemon (LPD) Protocol Support ............. M-2 Setting Up Your Environment to Work with LDAP Version 3 O-1 Sample Slapd.conf File .................................................. O-3 Troubleshooting LDAP Connections O-5 LX-Series Configuration Guide xviii Table of Contents LX-Series Configuration Guide About This Book xix About This Book This guide describes how to manage and configure the LX unit and provides support information for each configurable feature. How This Book is Organized This book is organized in three parts. Part 2 Part 1 Part 1 contains setup information Part 2 contains configuration information Part 3 contains appendixes with additional information Chapter Describes how to... Chapter 1 Use the Command-Line Interface (CLI) Chapter 2 Set up the LX unit initially Chapter 3 Set up remote console management on the LX unit Chapter 4 Perform system administration on the LX unit Chapter Describes how to... Chapter 5 Set up the Notification Feature Chapter 6 Configure IP interfaces Chapter 7 Set up the Data Broadcast Feature Chapter 8 Configure subscriber accounts Chapter 9 Configure ports for Temperature/Humidity sensors Chapter 10 Configure ports for power management Chapter 11 Use the iptables command to configure packet filters Chapter 12 Configure the Trigger-Action feature Chapter 13 Configure the Cluster Configuration and Control feature Chapter 14 Configure SNMP and describes the MIB structure About This Book xx How This Book is Organized Chapter Describes how to... Part 2 (Cont.) Chapter 15 Configure the LX-7204T/7304T Sensor Manager Chapter 16 Configure PPP Dial-On-Demand Chapter 17 Configure Redundant Ethernet Chapter 18 Configure the Internal Modem Chapter 19 Configure Alarm Input/Control Output Points Chapter 20 Configure the IPv6 Internet Protocol Part 3 This book also contains 12 appendixes: Appendix Provides information about... Appendix A RADIUS authentication feature and attributes Appendix B RADIUS and TACACS+ accounting feature and attributes Appendix C TACACS+ authentication feature and attributes Appendix D Linux man pages for the iptables command Appendix E Executing commands at multiple levels Appendix F Enabling/disabling TCP ports/IR Listener ports Appendix G RADIUS vendor-specific dictionary files Appendix H Configuring rlogin support Appendix I FIPS support Appendix J NTP Client overview Appendix K Using nested menus Appendix L Using LXPORTD Appendix M Using LPD Appendix N Semicolons Embedded in Data Strings Appendix O LDAP Version 3 Environment Setup and Troubleshooting LX Series Configuration Guide Conventions xxi Conventions The following conventions are used throughout this guide: Convention Description Command execution Unless otherwise specified, commands are executed when you press <RETURN>. Command syntax where command options or command syntax are shown, keywords and commands are shown in lowercase letters. Keyboard characters (keys) Keyboard characters are represented using left and right angle brackets (< and >). For example, the notation <CTRL> refers to the CTRL key; <A> refers to the letter A; and <RETURN> refers to the RETURN key. Typographical conventions The following typographical conventions are used: Monospace Typeface indicates text that can be displayed or typed at a terminal (for example, displays, user input, messages, and prompts). italics indicate a variable in command syntax descriptions. Online Help The question mark character (?), and the Tab key, are used to display online help in the LX Command Line Interface (CLI). See Chapter 1, “Using the Command-Line Interface” for a complete description of the command modes and corresponding commands. The following guidelines will help you to navigate the online help: Type the ? character (or press the Tab key) at the command prompt in any command mode to display the first keyword of each command that can be executed in that command mode. About This Book xxii Online Help For example, the following is displayed when you type the ? character at the User mode command prompt: clear Clear screen and reset terminal line cluster Superuser cluster commands connect Connect to a remote access port async on this LX unit dial Dial a dialout modem enable Turn on privileged commands exit Exit up one level menu Menu utility message Send a message to a logged on user monitor Monitor running system information no Negate a command outlet Manipulate outlets password Change the user password pause Set the page mode ping Send echo messages ppp Start outbound PPP rlogin Open a rlogin connection shell Run a shell as Superuser show Show running system information ssh Secure Shell (3DES/Blowfish) telnet Open a telnet connection terminal Set the terminal type zero Clear information LX Series Configuration Guide Additional Help xxiii Type the ? character (or press the Tab key) after the displayed keyword to list the options for that keyword. For example, type show ? to list the options of the show keyword. You could then type show port ? to list the next item in the syntax of the show port command. Additional Help The CLI help feature now displays more information dynamically when you request help for certain commands. When you request help while entering a CLI command by typing “?” or pressing the <tab> key, all valid choices related to your command type are displayed. The choice categories are: Menu names Subscriber names Trigger names Action names Rule names Outlet Group names Outlet names KerberosV5 Realm names Service names Notification Profile names This now displays known valid choices available to you. For example, if you entered: Example Config:0 >>subscriber ? all subscribers on the LX are alphabetically listed. Similarly, if you type: Example InReach:0 >>menu <tab> the LX alphabetically lists all configured menu names on the unit. L Typing the ? key prints the help for the current level you are on. Typing a space after the keyword displays the help for the next level. About This Book xxiv Additional Help If you have used help to list all the configured menu names, you can complete the menu names by typing the first letter of the name, then pressing the Tab key; for example: Example Config:0 >> menu open d<tab> which fills in the remainder of an existing menu's name as follows: Example Config:0 >> menu open demo_menu LX Series Configuration Guide Part 1 PART 1 Before You Configure the LX Series Unit Using the Command-Line Interface 1-1 CHAPTER 1 Using the Command-Line Interface The LX Series Command-Line Interface (CLI) is structured as a set of nested command modes. Each command mode is used to implement a group of related features or functions. Figure 1.1 lists the command modes available in the LX CLI. Using the Command-Line Interface 1-2 Using the Command-Line Interface User Enter “enable” command and login to Superuser command mode Service Profile Superuser Protocol Command Modes -See Note (below) Cconfiguration Configuration Nnotification Ssnmp Pport ethernet Pport async Notification SNMP Ethernet Async Mmodem Ssubscriber Mmenu User Service Modem User Information Subscriber MenuOopen Menu Editing Iinterface Interface Ibroadcast group Broadcast Group Pppp Aauthentication cluster hdam trigger-action AAA PPP Cluster Config HDAM Trigger-Action Maction name Trule name Mtrigger name Action Rule Trigger Note: The Protocol Command Modes include Async, Localsyslog, Remotesyslog, SMTP, SNPP, TAP, and WEB. Figure 1.1 LX Command Modes LX Series Configuration Guide About Command Modes 1-3 About Command Modes Each command mode uses a unique command prompt (for example, Config:0 >>) and its own set of commands. Each command mode (except the top-level User command mode) is nested within the previous level command mode. L The User command mode is the basic command mode of the LX CLI. When you log in to the LX unit, you are in User command mode . For example, the Superuser command mode is nested in User command mode; the Configuration command mode is nested in the Superuser command mode, and so on. See Figure 2.1.1, “LX Command Modes” to see the order of these nested modes. X To display a list of available commands Type a question mark (?) (or press the Tab key) at any of the LX CLI command prompts to display a list of commands that can be executed in the current command mode. For example, type a question mark at the Menu :0 >> ? prompt to display the commands that can be executed in Menu command mode. X To clear the current command line Type ^K. Using the Command-Line Interface 1-4 About Command Modes X To enter a nested command mode Enter the appropriate command from the previous command mode. For example, to enter the Configuration command mode you must enter the configuration command from the Superuser command mode. X To return to the previous command mode Type exit. For example, type the exit command in Configuration Command Mode to return to the Superuser command mode. X To display global information Execute the monitor/show commands in each of the LX command modes. The monitor/show commands are used to display global information for the LX unit. The CLI supports execution of multiple level commands on the same line. You can execute a command from any level, if you know the complete path. For example: InReach>> config port async 1 prompt tim The following sections describes each command mode. LX Series Configuration Guide Command Mode Descriptions 1-5 Command Mode Descriptions The following sections describe the LX command modes and the commands used to access them. User Command Mode Contains commands for performing user functions on the LX unit. Accessed by Logging on to the LX unit Command prompt InReach:0 > For more information, see “User Commands” in the LX-Series Commands Reference Guide. Superuser Command Mode Contains commands for performing Superuser functions on the LX unit. Accessed by Executing the enable command in User Command Mode, and then entering the Superuser password when prompted. (The default Superuser password is system.) Command prompt InReach:0 >> For more information, see “Superuser Commands” in the LX-Series Commands Reference Guide. Using the Command-Line Interface 1-6 Command Mode Descriptions Configuration Command Mode L If you change a parameter in the Configuration Mode, and then exit this mode, the following message appears: You have unsaved changes in your configuration. You need to save these if you want them to be permanent through a reboot. Contains commands for configuring the LX unit at the server level and accessing nested command modes. Accessed by Command prompt Executing the configuration command in Superuser Command Mode. Config:0 >> For more information, see “Configuration Commands” in the LX-Series Commands Reference Guide. Authentication, Accounting, and Authorization (AAA) Command Mode Contains commands for configuring local and server-based authentication and authorization, and RADIUS and TACACS+ accounting, on the LX unit. Accessed by Executing the aaa command in Configuration Command Mode. Command prompt AAA:0 >> For more information, see “Authentication, Accounting, and Authorization Commands” in the LX-Series Commands Reference Guide. LX Series Configuration Guide Command Mode Descriptions 1-7 Asynchronous Command Mode Contains commands for configuring asynchronous ports on the LX unit. Accessed by Executing the port async <port_number> command in Configuration Command Mode. Command prompt Async 4-4:0 >> For more information, see “Asynchronous Commands” in the LX-Series Commands Reference Guide. Ethernet Command Mode Contains commands for configuring the Ethernet port on the LX unit. Accessed by Executing the port ethernet <port_number> command in Configuration Command Mode. Command prompt Ether 1-1:0 >> For more information, see “Ethernet Commands” in the LX-Series Commands Reference Guide. PPP Command Mode Contains commands for configuring PPP sessions on the LX unit. Accessed by Executing the ppp command in Interface Command Mode. Command prompt PPP 4-4:0 >> For more information, see “PPP Commands” in the LX-Series Commands Reference Guide. Using the Command-Line Interface 1-8 Command Mode Descriptions Modem Command Mode Contains commands for configuring modems on LX asynchronous ports. Accessed by Executing the modem command in Asynchronous Command Mode. Command prompt Modem 4-4:0 >> For more information, see “Modem Commands” in the LX-Series Commands Reference Guide. Subscriber Command Mode Contains commands for configuring LX subscriber accounts. Accessed by Executing the subscriber <subscriber_name> command in Configuration Command Mode. Command prompt Subs_mark >> For more information, see “Subscriber Commands” in the LX-Series Commands Reference Guide. SNMP Command Mode Contains commands for configuring SNMP on the LX unit. Accessed by Executing the snmp command in Configuration Command Mode. Command prompt Snmp:0 >> For more information, see “SNMP Commands” in the LX-Series Commands Reference Guide. LX Series Configuration Guide Command Mode Descriptions 1-9 Interface Command Mode Contains commands for configuring IP interfaces on the LX unit. Accessed by Executing the interface <interface_number> command in Configuration Command Mode. Command prompt Intf 1-1:0 >> For more information, see “Interface Commands” in the LX-Series Commands Reference Guide. Menu Command Mode Contains commands for creating, displaying, and accessing subscriber menus. Accessed by Executing the menu command in Configuration Command Mode. Command prompt Menu :0 >> For more information, see “Menu Commands” in the LX-Series Commands Reference Guide. Menu Editing Command Mode Contains commands for creating and modifying entries in subscriber menus. Accessed by Command prompt Executing the open <menu_name> command in Menu Command Mode. menu_name-1:0 >> For more information, see “Menu Editing Commands” in the LXSeries Commands Reference Guide. Using the Command-Line Interface 1-10 Command Mode Descriptions Notification Command Mode Contains commands for configuring the LX Notification Feature. Accessed by Command prompt Executing the notification command in Configuration Command Mode. Notification:0 >> For more information, see “Notification Commands” in the LX-Series Commands Reference Guide. Broadcast Group Command Mode Contains commands for configuring Broadcast Groups on the LX unit. Accessed by Executing the broadcast group <group_number> command in Interface Command Mode. Command prompt BrGroups 6:0 >> For more information, see “Broadcast Group Commands” in the LX-Series Commands Reference Guide. Service Profile Command Mode Contains commands for specifying the protocol for a Service Profile. Accessed by Executing the profile service <profile_name> command in Notification Command Mode. Command prompt Noti_Serv_Protocol:0 >> For more information, see “Service Profile Commands” in the LX-Series Commands Reference Guide. LX Series Configuration Guide Command Mode Descriptions 1-11 Async Protocol Command Mode – Contains the port command for specifying the asynchronous port parameter for a Service Profile of the Async type. Accessed by Command prompt Executing the async command in Service Profile Command Mode. Noti_Serv_Async:0 >> For more information, see “Async Protocol Commands” in the LX-Series Commands Reference Guide. Localsyslog Protocol Command Mode Contains the file command for specifying the local file to which syslog messages will be sent under a Service Profile of the Localsyslog type. Accessed by Command prompt Executing the localsyslog command in Service Profile Command Mode. Noti_Serv_LSyslog:0 >> For more information, see “Localsyslog Protocol Commands” in the LX-Series Commands Reference Guide. Remotesyslog Protocol Command Mode Contains the host command for configuring the remote host IP address for a Service Profile of the Remotesyslog type. Accessed by Command prompt Executing the remotesyslog command in Service Profile Command Mode. Noti_Serv_RSyslog:0 >> For more information, see “Remotesyslog Protocol Commands” in the LX-Series Commands Reference Guide. Using the Command-Line Interface 1-12 Command Mode Descriptions SMTP Protocol Command Mode Contains the server command for configuring the server for a Service Profile of the SMTP type. Accessed by Executing the smtp command in Service Profile Command Mode. Command prompt Noti_Serv_SMTP:0 >> For more information, see “SMTP Protocol Commands” in the LX-Series Commands Reference Guide. SNPP Protocol Command Mode Contains commands for configuring a Service Profile of the SNPP type. Accessed by Executing the snpp command in Service Profile Command Mode. Command prompt Noti_Serv_SNPP:0 >> For more information, see “SNPP Protocol Commands” in the LX-Series Commands Reference Guide. TAP Protocol Command Mode Contains commands for configuring a Service Profile of the TAP type. Accessed by Executing the tap command in Service Profile Command Mode. Command prompt Noti_Serv_TAP:0 >> For more information, see “TAP Protocol Commands” in the LXSeries Commands Reference Guide. LX Series Configuration Guide Command Mode Descriptions 1-13 User Service Command Mode Contains the service command for specifying a Service Profile for a User Profile. Accessed by Executing the profile user <username> command in Notification Command Mode. Command prompt Noti_User_Service:0 >> For more information, see “User Service Commands” in the LX-Series Commands Reference Guide. User Information Command Mode Contains commands for specifying the contact, facility, and priority parameters of a User Profile. Accessed by Command prompt Executing the service command in User Service Command Mode. Noti_User_Info:0 >> For more information, see “User Information Commands” in the LX-Series Commands Reference Guide. Trigger-Action Command Mode Contains commands for creating, or accessing, Actions, Rules, and Triggers for the Trigger-Action Feature. Accessed by Command prompt Executing the trigger-action command in Notification Command Mode. Trigger-Action:0 >> For more information, see “Trigger-Action Commands” in the LX-Series Commands Reference Guide. Using the Command-Line Interface 1-14 Command Mode Descriptions Rule Command Mode Contains commands for enabling, disabling, and specifying Actions and Triggers for Rules. Accessed by Command prompt Executing the rule name <rule_name> command in Trigger- Action Command Mode. Rule_AC7TurnOnRule:0 >> For more information, see “Rule Commands” in the LX-Series Commands Reference Guide. Action Command Mode Contains the command command for specifying an LCX CLI command for an Action. Accessed by Command prompt Executing the action name command in Trigger-Action Command Mode. Action_TurnOnAC7:0 >> For more information, see “Action Commands” in the LX-Series Commands Reference Guide. LX Series Configuration Guide Command Mode Descriptions 1-15 Trigger Command Mode Contains commands for specifying the conditions for triggers. Accessed by Executing the trigger name command in Command prompt Trigger_TempPortCT30:0 >> Trigger-Action Command Mode For more information, see “Trigger Commands” in the LX-Series Commands Reference Guide. Cluster Command Mode Contains commands for creating and monitoring clusters. Accessed by Command prompt Executing the cluster command in Configuration Command Mode. Cluster:0 >> For more information, see “Cluster Configuration and Control Commands” in the LX-Series Commands Reference Guide. Using the Command-Line Interface 1-16 Using the Function Keys Using the Function Keys The LX Command Line Interface (CLI) supports the following function keys: Key Description Tab key Completes a partially typed command. For example, if you type the tab key after you type show ve at the Superuser command prompt, the show version command will be executed. Up arrow Recalls the last command. Ctrl-F Moves forward to the next session. Ctrl-B Moves back to the previous session. Ctrl-L Returns you to the Local Command Mode. Related Documents For more information about the LX Series units, see the referenced documents in the following table: See this document P/N For information about LX-Series Commands Reference Guide 451-0310 LX commands Getting Started with the 451-0308 LX-4000 Series LX-4000 hardware LX-4000 Quick Start Instructions Getting the LX-4000 unit up and running 451-0312 Getting Started with the 451-0331 LX-8000 Series LX-8000 hardware LX-8000 Quick Start Instructions Getting the LX-8000 unit up and running 451-0332 Getting Started with the 451-0320 LX-1000 Series LX-1000 hardware LX-4000 Quick Start Instructions Getting the LX-1000 unit up and running LX Series Configuration Guide 451-0321 Performing the Initial Setup 2-1 CHAPTER 2 Performing the Initial Setup This chapter describes the initial setup of the LX unit. You can perform the tasks described in this chapter after you install and power on the LX unit as described in Chapter 1 of Getting Started with the LX Series. Then you can use the LX unit for network management. Performing the Initial Setup 2-2 Configuring TCP/IP Configuring TCP/IP You can let the LX unit obtain its TCP/IP parameters from the network, or you can explicitly configure TCP/IP parameters for the LX unit with the Quick Start Configurator or the IP Configuration Menu. (You can access the IP Configuration Menu from the ppciboot Main Menu.) Obtaining TCP/IP Parameters from the Network If the TCP/IP parameters for the LX unit have not been explicitly configured, the LX unit will attempt to load its TCP/IP parameters from the network when the LX unit boots. The LX unit can load its TCP/IP parameters from any LAN that runs DHCP, BOOTP, or RARP. X To configure TCP/IP parameters with the Quick Start Configurator 1. Plug in the terminal at the DIAG port (port 0) on the LX unit. (The port values are 9600 bps, 8 bits, 1 stop bit, No parity, and Xon/Xoff flow control.) When the LX unit first boots up on default parameters, the following message displays: Run Initial Connectivity Setup? y/n 2. Press y (yes) and press Enter. The Enter your superuser password message appears, followed by the Superuser Password prompt. LX Series Configuration Guide Obtaining TCP/IP Parameters from the Network 2-3 3. Enter the superuser password system. The Quick Configuration menu displays: Quick 1 2 3 4 5 6 7 8 Enter 4. 5. 6. Configuration menu Unit IP address Subnet mask Default Gateway Domain Name Server Domain Name Suffix Cluster Secret Superuser Password Exit and Save your choice: Press the number corresponding to the parameter to set. Enter the appropriate information and press <Enter> to return to the Quick Configuration menu. After you enter a parameter value, a data entry line specific to that parameter displays on the Quick Configuration menu. Continue to configure parameters using this procedure. You aren’t required to configure all parameters. L You should change the Superuser Password, since this is the first time you are configuring the LX unit (the default password is system). 7. Press 8 (Exit and Save) to save your changes. The following message displays: Is this information correct? CONFIGURATION SUMMARY 1 Unit IP address 2 Subnet mask 3 Default Gateway 4 Domain Name Server 5 Domain Name Suffix 6 Cluster Secret 7 Superuser Password 8 Exit and Save Is this information correct? (y/n) : 10.80.1.5 255.0.0.0 Configured Changed Performing the Initial Setup 2-4 DHCP Client 8. 9. 10. 11. 12. Press y (yes) and press <Enter>. The following message displays: Save this information to flash? Press y (yes) and press <Enter>. The information is saved to flash. Press <Enter> several times to display the Login: prompt. Enter your login name (default is InReach). Enter your password (default is access). You can now use the LX unit. L The login username and password are case-sensitive. DHCP Client Previously, the LX only supported DHCP during the boot process in ppciboot. The learned ppciboot DHCP address was passed on to the LX OS after the LX was loaded. However, the LX would no longer participate in DHCP communications. This led to potential problems when the DHCP server lease expired, but the LX continued to use the address. As of version 3.7.0 the LX supports DHCP during normal operation as well as the boot process. To maintain the same functionality as before, but to comply with DHCP rules, the LX has implemented DHCP. In version 3.7.0, the only way to enable DHCP in the LX OS is if ppciboot uses DHCP to obtain an address during the loading of the linuxito.img. After the LX software is loaded, the ppciboot DHCP client releases its IP address information and the LX DHCP client then requests DHCP. This IP is then assigned to interface 1, and actively takes part in DHCP communications, partaking in release/renewal notices. LX Series Configuration Guide DHCP Client 2-5 There is no DHCP enable/disable flag in Config mode. DHCP is sensed on or off based on whether ppciboot learns its IP via DHCP. If DHCP is enabled in ppciboot, but fails to get its IP via DHCP, and instead gets an IP via RARP, then after the LX loads, DHCP will not be enabled. The DHCP Client feature allows an Ethernet interface to query the DHCP server for configuration options. This was done primarily to support DHCP leasing. The following configuration options are supported: DNS servers default route DHCP lease IP address IP address mask IP broadcast address The DNS servers, default route, and DHCP lease time configuration settings are optional and can’t be specified by the DHCP client. If the configuration sent by the DHCP server conflicts with the configuration specified in the shared memory, the settings sent by the server take precedence. The LX and ppciboot software has been enhanced to include a “boot_release” application which releases the DHCP lease obtained during boot time, if necessary. The “boot_release” application uses the udhcpc client to handle the actual DHCP requests. L DHCP is enabled on the LX only at runtime, if the LX used DHCP to get its address during ppciboot. The following information is returned from a DHCP ACK message (these are not "options", but the information is useful): Our own IP address TFTP server IP address Server (last protocol used) Ethernet address (saves future ARPs) Performing the Initial Setup 2-6 DHCP Client The following information is returned from Vendor Options: 1 - Subnet Mask 3 - Gateway IP address 6 - DNS server IP addresses 12 - Our host name 17 - Root path 51 - DHCP leasetime 28 - Broadcast address The following options are recognized by DHCP, so they do not generate the unhandled option error message, although no information is saved: 2 - Time offset 4 - Time server (RFC 868, not NTP) 15 - Domain name 31 - Perform router discovery 53 - DHCP message type 54 - DHCP server Identifier 58 - Renewal time 59 - Rebinding time All other option values produce the unhandled option error message. X To release the current lease Use the following syntax to release the current lease: Intf 1-1:0>>dhcp release where release requests that the DHCP client release the current lease. L You can use this command only on DHCP-enabled interfaces. Example Intf 1-1:0>>dhcp release X To renew the current lease Use the following command syntax: Intf 1-1:0>>dhcp renew LX Series Configuration Guide DHCP Client 2-7 where renew requests that the DHCP client renew the current lease. L You can use this command only on DHCP-enabled interfaces. Example Intf 1-1:0>>dhcp renew X To display the Interface Status Screen Use the show interface <interface_number> status command. Figure 2.1 shows a sample screen with the DHCP fields highlighted: Time: Interface Name: Interface_1 IP Address: 112.19.161.191 IP Broadcast Addr: 112.19.161.255 DHCP Status: Active DCHP Lease Expiration: Mon 12 Dec 2005 16:19:34 Bound to : eth0 IP Mask: 255.255.255.0 Learned from: DHCP DHCP Lease Server: 112.19.163.21 Tue, 11 Jan 2005 05:32:07 UTC Figure 2.1 Show Interface Status Screen Performing the Initial Setup 2-8 Setting the TCP/IP Parameters in the IP Configuration Menu Setting the TCP/IP Parameters in the IP Configuration Menu You can use the IP Configuration Menu to set the TCP/IP parameters for the LX unit. For more information, see “Using the IP Configuration Menu” in Getting Started with the LX Series. Creating and Loading a Default Configuration File This section explains how to create a default configuration file with which you can load multiple units. After your first LX unit is up and running, you can save the unit configuration to the network. For more information, see “Saving the Configuration to the Network” on page 2-9. You must rename this .zip file to lx last six digits of the mac address.prm (such as lx12ab9f.prm). After this is complete, you can use this .prm file as a template to configure multiple units at one time by changing the last six digits of the mac address to reflect that of the specific unit. If loading via BOOTP and DHCP, you can load a default configuration file from a TFTP server that is located on the same server from which you obtained your IP address. If you are not loading via one of these, the unit looks on the TFTP server specified in ppciboot. If the configuration is defaulted, it is detected at startup and the unit checks that a TFTP server was passed by ppciboot. If a TFTP server is accessible, the LX unit connects to it and tries to download a default file named lx last six digits of the mac address.prm (such as lx12ab9f.prm). If this file exists, the LX unit loads it into its configuration table. If the default file does not exist, the Quick Start menu is displayed. You can use the .prm file as a template to configure multiple units at one time. After copying the .prm file, you would rename it to lx last six digits of the mac address.prm (such as lx12ab9f.prm). For more information, see “To save the configuration to the network” on page 4-3. LX Series Configuration Guide Saving the Configuration to the Network 2-9 Saving the Configuration to the Network The .zip file format can be accessed by either WinZip o UNIX Unzip. The TFTP/SFTP protocol is used to perform the operation of saving the LX configuration to a network host. If the network host is a UNIX host, a configuration file must already exist on the TFTP/SFTP server. The configuration file is a .zip file that contains everything previously described except for the SSH keys, because they belong to the unit itself and can’t be used on a different unit. X To save the configuration to the network Execute the save configuration network command in Superuser Command Mode: Syntax save configuration [network <path/filename>] [ipv6 <ipv6_address>][<domain_name>|<ip_address>] L The filename that you specify in the save configuration network command must not include the .zip extension. Performing the Initial Setup 2-10 Setting Up Local (Onboard) Security Setting Up Local (Onboard) Security Local security is the default security method for the LX unit. Under Local security, the user is authenticated against a username/password file that resides on the LX unit. L The LX unit also supports LDAP, RADIUS, TACACS+, and RSA SecurID security. Under LDAP, RADIUS, TACACS+, and RSA SecurID, the user is authenticated against a username/password file that resides on the authentication server. For more information, see “Setting Up Server-Based Authentication and Accounting” on page 2-12. IMPORTANT! MRV Communications recommends that you change the default password for the user InReach before you put the LX unit on a network. For more information, see “Changing the Password Defaults” (below). Changing the Password Defaults It is widely known that the default password for the InReach user is access. If an unauthorized user knew this username/ password combination, he/she could log on to your LX unit. For this reason, you should change the InReach user’s password to something other than access. It is also widely known that the default Superuser password is system. L To reduce the risk of an unauthorized user gaining access to the Superuser Command Mode, MRV recommends that you change this password to something other than system. LX Series Configuration Guide Changing the Password Defaults 2-11 See “Command MoX To change the User-level password of the InReach User Descriptions” on 1. Access the Configuration Command Mode. page 1-5 for 2. Access the Subscriber Command Mode for the InReach information about subscriber. You do this by entering the subscriber accessing Asynchronous command with InReach as the command argument: Command Mode. Config:0 >>subscriber InReach 3. 4. 5. Enter the password command at the Subs_InReach >> prompt: Subs_InReach >>password Enter a new User password at the Enter your NEW password: prompt. The password will be displayed as asterisks, as in the following example: Enter your NEW password:*************** Re-enter the new User password at the Re-Enter your NEW password: prompt. The password will be displayed as asterisks, as in the following example: Re-Enter your NEW password:*************** X To change the Superuser password 1. Access the Configuration Command Mode. (see “Command Mode Descriptions” on page 1-5 for information about accessing the Configuration Command Mode.) 2. 3. 4. Enter the password command at the Config:0 >> prompt: Config:0 >>password Enter a new Superuser password at the Enter your NEW password: prompt. The password will be displayed as asterisks, as in the following example: Enter your NEW password:*************** Re-enter the new Superuser password at the Re-Enter your NEW password: prompt. The password will be displayed as asterisks, as in the following example: Re-Enter your NEW password: *************** Performing the Initial Setup 2-12 Setting Up Server-Based Authentication and Accounting Setting Up Server-Based Authentication and Accounting You can implement four methods of server-based authentication, and two methods of server-based accounting, for the LX unit: Server-based Server-based authentication methods accounting methods RSA SecurID RADIUS RADIUS TACACS+ TACACS+ LDAP Kerberos For more information, see the following sections: “Setting Up LDAP” (below) “Setting Up RADIUS” on page 2-19 “Setting Up TACACS+” on page 2-25 “Setting Up RSA SecurID” on page 2-33 “Setting Up KerberosV5” on page 2-40 Setting Up LDAP The LX can implement LDAP authentication for specific interfaces and asynchronous ports. However, you must configure LDAP authentication at the server level before you can implement it on specific interfaces and asynchronous ports on the LX unit. L LDAP version 3 supports encryption via Transport Layer Security (TLS). Example X To configure the LDAP version to pass to the authentication server Execute the ldap version <version_number> command in the AAA Command Mode to configure which version of LDAP (2 (the default) or 3) to use when communicating with the LDAP primary and secondary authentication server: AAA:0 >>ldap version 3 LX Series Configuration Guide Setting Up LDAP 2-13 L The LDAP Version 3 clock must keep in sync with the LDAP server. X To download the valid client certificate for the primary authentication server to the LX L A valid certificate must reside on both the host and the LX. The certificates are parsed during authentication. Execute the ldap update primary certificate [file <filename>]|[<hostname_or_ip_address> file <filename>] command in the Superuser Command Mode to download the valid client certificate for the primary authentication server to the LX. When you execute this command, the primary client certificate is downloaded to the "/config" directory on the LX, where it is renamed "ldapcacert1.pem". A message is displayed, alerting you to issue the save configuration command to save the file permanently on the LX. The configurable Hostname or IP Address is used to override the Host Name or IP Address that is stored in the ppciboot menu for TFTP. If SFTP is the configured file transfer protocol, the IP address overrides the configured SFTP server address. Example InReach:0 >>ldap update primary certificate 125.111.83.21 file clientcert.pem X To download the valid client certificate for the secondary authentication server to the LX L A valid certificate must reside on both the host and the LX. The certificates are parsed during authentication. Execute the ldap update secondary certificate [file <filename>]|[<hostname_or_ip_address> file <filename>] command in the Superuser Command Mode to download the valid client certificate for the secondary authentication server to the LX. When you execute this command, the secondary client certificate is downloaded to the "/config" directory on the LX, where it is renamed "ldapcacert2.pem". Performing the Initial Setup 2-14 Installing and Configuring the LDAP Server on a Network-based Host A message is displayed, alerting you to issue the save configuration command to save the file permanently on the LX. The configurable Hostname or IP Address is used to override the Host Name or IP Address that is stored in the ppciboot menu for TFTP. If SFTP is the configured file transfer protocol, the IP address overrides the configured SFTP server address. Example InReach:0 >>ldap update secondary certificate 125.111.83.21 file clientcert.pem L You can save the configuration and store the files permanently by rebooting. L To configure the LDAP server, see your LDAP server documentation. For more information about LDAP authentication, see http://www.directory-applications.com/ldap3_files/frame.htm. Installing and Configuring the LDAP Server on a Network-based Host Before you can authenticate with LDAP on your LX unit, you must configure an LDAP server on your network. In general, LDAP server implementations are available on the Internet. Under LDAP, each attempted login is treated as a request for directory services. When a user attempts to log in via LDAP, he must enter a username/password combination. The username must match the uid component of the user’s Distinguished Name (DN). The password must match the userPassword attribute for the user’s uid. In order to authenticate the user, the LX binds anonymously to the LDAP server and searches for the user’s uid. After the uid entry is found, a subsequent bind is used to authenticate with the LDAP server using the DN and the password supplied. LX Series Configuration Guide Installing and Configuring the LDAP Server on a Network-based Host 2-15 X To specify the LDAP server settings on the LX unit 1. Choose the desired LDAP version (2 or 3). The default is 2. Example AAA:0 >>ldap version 3 2. 3. Example Verify that the primary LDAP Server has been installed on the primary LDAP Server host. Use the ldap primary authentication server address <hostname_or_ip_address> command to specify the IP address of the LDAP primary authentication server: AAA:0 >>ldap primary authentication server address 143.34.87.93 L When you use Version 3, the authentication server address must match the address used when creating the certification file on the LDAP server. If you use a hostname while creating a certification file on the LDAP server, you must use that same name when configuring the LX. L You can specify a fully qualified domain name or an IP Address. Use an IP Address if you are creating the Certification via the IP. Use a Host Name if you are creating the Certification via the Host Name. 4. Example Use the ldap primary authentication server port command to specify the TCP socket your LDAP server is listening to: AAA:0 >>ldap primary authentication server port 1823 L If you are running LDAP version 3, the only TCP ports allowed are 389 and 636. The LX listens to port 389 by default. Example 5. Use the ldap primary authentication server base dn command to specify the search path that will be used to find a match for the uid (User ID) component of the Distinguished Name on the LDAP primary authentication server: AAA:0 >>ldap primary authentication server base dn dc=box7,dc=acme,dc=boston,dc=sqa,dc=com Performing the Initial Setup 2-16 Installing and Configuring the LDAP Server on a Network-based Host 6. Example Specify the maximum number of retries that the LX unit will have for transmitting an Access Request to the LDAP primary authentication server: AAA:0 >>ldap primary authentication server retransmit 7 7. Example Specify the length of time that the LX unit will wait for the LX unit to respond before retransmitting packets to the LDAP primary authentication server: AAA:0 >>ldap primary authentication server timeout 4 8. Example To verify the LX LDAP configuration, execute the show ldap characteristics command: AAA:0 >>show ldap characteristics Before you use an LDAP secondary authentication server, you must first specify the following values for it: Using an LDAP secondary authentication server is optional. IP address Search path TCP socket Retransmit value Timeout value See “LDAP Command Examples” on page 2-17 for command examples for setting these values. LX Series Configuration Guide LDAP Command Examples 2-17 LDAP Command Examples This section provides examples of all of the commands that are used to specify settings for the LDAP servers. See the “Authentication, Accounting, and Authorization Commands” chapter of the LX Series Command Reference for detailed descriptions of the commands in this chapter. LDAP Primary Authentication Server Commands AAA:0 >>ldap primary authentication server address 143.34.87.93 AAA:0 >>ldap primary authentication server base dnO=box7.acme.boston.sqa.com AAA:0 >>ldap primary authentication server port 1823 AAA:0 >>ldap primary authentication server retransmit 7 AAA:0 >>ldap primary authentication server timeout 4 LDAP Secondary Authentication Server Commands AAA:0 >>ldap secondary authentication server address 143.35.86.122 AAA:0 >>ldap secondary authentication server base dn O=box7.acme.boston.sqa.com AAA:0 >>ldap secondary authentication server port 1948 AAA:0 >>ldap secondary authentication server retransmit 7 AAA:0 >>ldap secondary authentication server timeout 4 LDAP Authentication Server Commands AAA:0 >>ldap version 3 AAA:0 >>ldap local subscriber Performing the Initial Setup 2-18 LDAP Local Subscriber Feature LDAP Local Subscriber Feature Under the LDAP Local Subscriber Feature, a subscriber can be logged on as either: An LX subscriber with the attributes of that subscriber (if the LX subscriber account exists), or The default (InReach) subscriber (if the LX subscriber account does not exist). Under either scenario, the subscriber must have an LDAP account on the LDAP authentication server. If the subscriber account also exists on the LX unit, the subscriber is logged on under that account and with the attributes of that account. If the subscriber account does not exist on the LX unit, the subscriber is logged on under his LDAP account with the attributes of the default (InReach) account. X To configure the LDAP Local Subscriber Feature Use the ldap local subscriber enable command: Example AAA:0 >>ldap local subscriber enable When the LDAP Local Subscriber Feature is set to only, the subscriber can only be logged in if the subscriber account is configured on both the LX unit and the LDAP authentication server and the subscriber account on the LX server has the same name as the subscriber account on the LDAP authentication server. X To set the LDAP Local Subscriber Feature to only Use the ldap local subscriber only command: Example AAA:0 >>ldap local subscriber only LX Series Configuration Guide Setting Up RADIUS 2-19 Setting Up RADIUS The LX can implement RADIUS authentication and RADIUS accounting at the server level and for specific interfaces and asynchronous ports. You must configure RADIUS accounting and/or authentication at the server level before you can implement it on specific interfaces and asynchronous ports on the LX unit. X To configure RADIUS authentication on the LX unit 1. Install and configure the RADIUS server on a Network-based Host (see page 2-19). 2. 3. Specify the RADIUS server settings on the LX (see page 2-20). Specify the RADIUS period on the LX (see page 2-24). See Appendix A ,“RADIUS Authentication” for more information about RADIUS authentication. See Appendix B ,“About RADIUS and TACACS+ Accounting” for more information about RADIUS and TACACS+ Accounting. You can also configure a RADIUS Local Subscriber. For more information, see “RADIUS Local Subscriber Feature” on page 2-24. Installing and Configuring the RADIUS Server on a Network-Based Host Before you can authenticate with RADIUS on your LX unit, you must configure a RADIUS server on your network. In general, RADIUS server implementations are available on the Internet. These implementations generally use a daemon process that interacts with RADIUS clients (located on LX units and on other remote access devices). Performing the Initial Setup 2-20 Installing and Configuring the RADIUS Server on a Network-Based The daemon uses a list of clients and associated secrets that it shares with these clients. The per-client secret is used to encrypt and validate communications between the RADIUS server and the client. The file used to keep the client list and secrets is the “clients” file. Another file used by the daemon to store the users that are authenticated is the “users” file. The “users” file contains the RADIUS attributes associated with a specific user. As a minimum, this file must contain the user’s username, password (depending on the RADIUS server used), and Service-type. To configure the RADIUS server, see your RADIUS host documentation. MRV recommends that you use the Merit RADIUS server implementation. Information for the Merit RADIUS server can be found at http://www.merit.edu. See the GOPHER SERVER and the MERIT Network Information Center for new releases. See “Command X To specify the RADIUS server settings Mode Descriptions” 1. Check the primary RADIUS Server host to ensure that on page 1-5 for RADIUS server client database has been configured. information about accessing 2. Access the AAA Command Mode. Asynchronous 3. Use the radius primary authentication server Command Mode. the address command to specify the IP address of the RADIUS primary authentication server. Example AAA:0 >>radius primary authentication server address 146.32.87.93 4. Example Use the radius primary authentication server secret command to specify the secret that will be shared between LX unit and the RADIUS primary authentication server. You can use uppercase and lowercase in combination, as long as the case matches that of the secret on the other side. AAA:0 >>radius primary authentication server secret BfrureG LX Series Configuration Guide Installing and Configuring the RADIUS Server on a Network-Based Host 2-21 The LX listens to port 1812 by default. 5. Example Use the radius primary authentication server port command to specify the socket your RADIUS server is listening to. AAA:0 >>radius primary authentication server port 1645 6. Example AAA:0 >>radius source interface 3 7. Example Use the radius source interface command to specify the source address the LX sends when contacting the RADIUS server. To verify the LX RADIUS configuration, execute the show radius characteristics command. AAA:0 >>show radius characteristics See Table 2.1, “RADIUS Settings,” on page 2-22 for descriptions of all of the settings that you can specify for a RADIUS server. In order to use a RADIUS primary accounting server, or a RADIUS secondary server, you must specify an IP address and a secret for the respective RADIUS server. For examples of the commands that you would use, see the following sections: • “RADIUS Primary Accounting Server Commands” on page 2-23 • “RADIUS Secondary Accounting Server Commands” on page 2-23 L The use of a RADIUS primary accounting server, and the use of RADIUS secondary servers, is optional. After you specify the RADIUS settings for the RADIUS primary authentication server, you can configure the RADIUS primary accounting server and the RADIUS secondary authentication and accounting servers. Performing the Initial Setup 2-22 RADIUS Command Examples Table 2.1 RADIUS Settings RADIUS Settings Description address port IP address of the RADIUS server * retransmit UDP port of the RADIUS server * Maximum number of times that the LX unit attempts to retransmit a message to the RADIUS server secret The RADIUS secret shared between the LX unit and the RADIUS server timeout* Length of time that the LX unit waits for the RADIUS server to respond before retransmitting packets to it *. If you do not specify a UDP port, retransmit value, or timeout value for the RADIUS server, the LX unit will use the default values for these settings. For more information, see the applicable commands in the “Configuration Commands” chapter of the LX-Series Commands Reference Guide. RADIUS Command Examples This section provides examples of all of the commands that are used to specify settings for the RADIUS servers. See the “Configuration Commands” chapter of the LX-Series Commands Reference Guide for detailed descriptions of the commands in this chapter. RADIUS Primary Authentication Server Commands AAA:0 >>radius primary accounting server address 181.28.68.56 AAA:0 >>radius primary accounting server port 1646 AAA:0 >>radius primary accounting server retransmit 3 AAA:0 >>radius primary accounting server secret reuyyurew AAA:0 >>radius primary accounting server timeout 7 LX Series Configuration Guide RADIUS Command Examples 2-23 RADIUS Secondary Authentication Server Commands AAA:0 >>radius secondary authentication server address 178.67.82.78 AAA:0 >>radius secondary authentication server port 1812 AAA:0 >>radius secondary authentication server retransmit 3 AAA:0 >>radius secondary authentication server secret AsJkirbg AAA:0 >>radius secondary authentication server timeout 7 RADIUS Primary Accounting Server Commands AAA:0 >>radius primary accounting server address 181.28.68.56 AAA:0 >>radius primary accounting server port 1646 AAA:0 >>radius primary accounting server retransmit 3 AAA:0 >>radius primary accounting server secret reuyyurew AAA:0 >>radius primary accounting server timeout 7 RADIUS Secondary Accounting Server Commands AAA:0 >>radius secondary accounting server address 198.20.84.77 AAA:0 >>radius secondary accounting server port 1813 AAA:0 >>radius secondary accounting server retransmit 3 AAA:0 >>radius secondary accounting server secret GgJjoreou AAA:0 >>radius secondary accounting server timeout 7 Performing the Initial Setup 2-24 Specifying the RADIUS Period Specifying the RADIUS Period The RADIUS period is the interval at which the LX unit will update the RADIUS accounting server with the status of each RADIUS user. The RADIUS period is specified in minutes. X To specify the RADIUS period 1. Access the AAA Command Mode on the LX. (See “Command Mode Descriptions” on page 1-5 for information about accessing the AAA Command Mode.) 2. Example Use the radius period command to specify the RADIUS period: AAA:0 >>radius period 10 RADIUS Local Subscriber Feature Under the RADIUS Local Subscriber Feature, a subscriber can be logged on as either: An LX subscriber with the attributes of that subscriber (if the LX subscriber account exists), or The default (InReach) subscriber (if the LX subscriber account does not exist). Under either scenario, the subscriber must have a RADIUS account on the RADIUS server. If the subscriber account also exists on the LX unit, the subscriber is logged on under that account and with the attributes of that account. If the subscriber account does not exist on the LX unit, the subscriber is logged on under his RADIUS account with the attributes of the default (InReach) account. Use the radius local subscriber enable command to configure the RADIUS Local Subscriber Feature for the LX unit. Example AAA:0 >>radius local subscriber enable When the RADIUS Local Subscriber Feature is set to only, the subscriber can only be logged in if the subscriber account is configured on both the LX unit and the RADIUS server and the subscriber account on the LX server has the same name as the subscriber account on the RADIUS server. LX Series Configuration Guide Setting Up TACACS+ 2-25 X To set the RADIUS Local Subscriber Feature to only Use the radius local subscriber only command: Example AAA:0 >>radius local subscriber only Setting Up TACACS+ You can implement TACACS+ authentication and TACACS+ accounting at the server level and for specific interfaces and asynchronous ports on the LX unit. You must implement TACACS+ accounting and/or authentication at the server level before you can implement it on specific interfaces and asynchronous ports on the LX unit. X To configure TACACS+ authentication on the LX unit 1. Install and configure the TACACS+ server on a Network-based Host (see page 2-26). 2. 3. Specify the TACACS+ server settings on the LX (see page 2-26). Specify the TACACS+ period on the LX (see page 2-33). See Appendix C ,“TACACS+ Authentication and Authorization” for more information about TACACS+ authentication. See Appendix B ,“About RADIUS and TACACS+ Accounting” for more information about TACACS+ accounting. You can also configure a TACACS+ Local Subscriber. For more information, see “TACACS+ Local Subscriber Feature” on page 2-29. Performing the Initial Setup 2-26 Installing and Configuring a TACACS+ Server on a Network-Based Host Installing and Configuring a TACACS+ Server on a Network-Based Host Before you can configure TACACS+ on your LX unit, you must configure a TACACS+ server on your network. In general, TACACS+ server implementations are available on the Internet. These implementations generally use a daemon process that interacts with TACACS+ clients (located on LX units and on other remote access devices). The daemon uses a list of clients and associated secrets that it shares with these clients. The per-client secret is used to encrypt and validate communications between the TACACS+ server and the client. The file used to keep the client list and secrets is the “clients” file. Another file used by the daemon to store the users that are authenticated is the “users” file. The “users” file contains the TACACS+ attributes associated with a specific user. As a minimum, this file must contain the user’s username, password (depending on the TACACS+ server used), and Service-type. To configure the TACACS+ server, see your TACACS+ host documentation. X To specify the TACACS+ server authentication settings on the LX unit 1. Check the primary TACACS+ Server host to ensure that the TACACS+ server client database has been configured. 2. 3. Example Access the AAA Command Mode on the LX. (See “Command Mode Descriptions” on page 1-5 for information about accessing the AAA Command Mode.) Use the tacacs+ primary authentication server address command to specify the IP address of the TACACS+ primary authentication server. AAA:0 >> tacacs+ primary authentication server address 149.19.87.89 LX Series Configuration Guide Installing and Configuring a TACACS+ Server on a Network-Based Host 2-27 4. Example The LX listens to port 49 by default. Use the tacacs+ primary authentication server secret command to specify the secret that will be shared between LX unit and the TACACS+ primary authentication server: AAA:0 >>tacacs+ primary authentication server secret Goitji 5. Example Use the tacacs+ primary authentication server port command to specify the socket your TACACS+ server is listening to. AAA:0 >>tacacs+ primary authentication server port 1687 6. Example Use the tacacs+ source interface command to specify the source address the LX sends when contacting the TACACS+ server. AAA:0 >>tacacs+ source interface 3 7. Example To verify the LX TACACS+ configuration, execute the show tacacs+ characteristics command at the Superuser command prompt: AAA:0 >>show tacacs+ characteristics See Table 2.2 on page 2-29 for descriptions of all of the settings that you can specify for a TACACS+ server. X To specify the TACACS+ server authorization settings on the LX unit L Command authorization occurs for every command entered, regardless of the authentication method used. 1. 2. Check the primary TACACS+ Server host to ensure that the TACACS+ server client database has been configured. Access the AAA Command Mode on the LX. (See “Command Mode Descriptions” on page 1-5 for information about accessing the AAA Command Mode.) Performing the Initial Setup 2-28 Installing and Configuring a TACACS+ Server on a Network-Based Host 3. Example Use the tacacs+ primary authorization server address command to specify the IP address of the TACACS+ primary authorization server. AAA:0 >> tacacs+ primary authorization server address 149.19.87.89 4. Example Use the tacacs+ primary authorization server secret command to specify the secret that will be shared between LX unit and the TACACS+ primary authorization server: AAA:0 >>tacacs+ primary authorization server secret Goitji The LX listens to port 49 by default. 5. Example Use the tacacs+ primary authorization server port command to specify the socket your TACACS+ server is listening to. AAA:0 >>tacacs+ primary authorization server port 1687 6. To enable authorization globally on the LX, return to the Configuration Mode and make sure the Authorization is online and configured for the user before you enable this on the LX. Config:0 >>tacacs+ command authorization enable 7. Example To verify the LX TACACS+ configuration, execute the show tacacs+ characteristics command at the Superuser command prompt: AAA:0 >>show tacacs+ characteristics See Table 2.2 on page 2-29 for descriptions of all of the settings that you can specify for a TACACS+ server. Using a TACACS+ primary accounting server or using a TACACS+ secondary server is optional. In order to use a TACACS+ primary accounting server, or a TACACS+ secondary server, you must specify an IP address and a secret for the respective TACACS+ server. For examples of the commands that you would use, see the following sections: “TACACS+ Primary Authentication Server Commands” on page 2-31 LX Series Configuration Guide TACACS+ Local Subscriber Feature 2-29 “TACACS+ Secondary Authentication Server Commands” on page 2-32 “Specifying the TACACS+ Period” on page 2-33 After you have specified the TACACS+ settings for the TACACS+ primary authentication server, you can configure the TACACS+ primary accounting server and the TACACS+ secondary authentication and accounting servers. Table 2.2 TACACS+ Settings TACACS+ Settings Description address IP address of the TACACS+ server * port UDP port of the TACACS+ server 1 retransmit Maximum number of times that the LX unit will attempt to retransmit a message to the TACACS+ server secret The TACACS+ secret shared between the LX unit and the TACACS+ server 1 Length of time that the LX unit will wait for the TACACS+ server to respond before retransmitting packets to it timeout *. If you do not specify a UDP port, retransmit value, or timeout value for the TACACS+ server, the LX unit will use the default values for these settings. For more information, see the applicable commands in the “Configuration Commands” chapter of the LX-Series Commands Reference Guide. TACACS+ Local Subscriber Feature Under the TACACS+ Local Subscriber Feature, a subscriber can be logged on in one of two ways: As an LX subscriber with the attributes of that subscriber (if the LX subscriber account exists) Or, if the LX subscriber account does not exist, as the default (InReach) subscriber. Performing the Initial Setup 2-30 TACACS+ Local Subscriber Feature Under either scenario, the subscriber must have a TACACS+ account on the TACACS+ server. If the subscriber account also exists on the LX unit, the subscriber is logged on under that account and with the attributes of that account. If the subscriber account does not exist on the LX unit, the subscriber is logged on under his TACACS+ account with the attributes of the default (InReach) account. X To configure the TACACS+ Local Subscriber Feature Use the tacacs+ local subscriber enable command: Example AAA:0 >>tacacs+ local subscriber enable When the TACACS+ Local Subscriber Feature is set to only, the subscriber can only be logged in if the subscriber account is configured on both the LX unit and the TACACS+ server and the subscriber account on the LX server has the same name as the subscriber account on the TACACS+ server. X To set the TACACS+ Local Subscriber Feature to only Use the tacacs+ local subscriber only command: Example AAA:0 >>tacacs+ local subscriber only LX Series Configuration Guide TACACS+ Command Examples 2-31 TACACS+ Command Examples This section provides examples of all of the commands that are used to specify settings for the TACACS+ servers. See the “Configuration Commands” chapter of the LX Series Command Reference for detailed descriptions of the commands in this chapter. TACACS+ Primary Authentication Server Commands AAA:0 >>tacacs+ primary authentication server address 182.36.98.33 AAA:0 >>tacacs+ primary authentication server port 1687 AAA:0 >>tacacs+ primary authentication server retransmit 3 AAA:0 >>tacacs+ primary authentication server secret Gfsufsa AAA:0 >>tacacs+ primary authentication server timeout 7 TACACS+ Primary Authorization Server Commands AAA:0 >>tacacs+ primary authorization server address 182.36.98.33 AAA:0 >>tacacs+ primary authorization server port 1687 AAA:0 >>tacacs+ primary authorization server retransmit 3 AAA:0 >>tacacs+ primary authorization server secret Gfsufsa AAA:0 >>tacacs+ primary authorization server timeout 7 TACACS+ Primary Accounting Server Commands AAA:0 >>tacacs+ primary accounting server address 182.28.86.56 AAA:0 >>tacacs+ primary accounting server port 1664 AAA:0 >>tacacs+ primary accounting server retransmit 3 AAA:0 >>tacacs+ primary accounting server secret iuhgeuer AAA:0 >>tacacs+ primary accounting server timeout 7 Performing the Initial Setup 2-32 TACACS+ Command Examples TACACS+ Secondary Authentication Server Commands AAA:0 >>tacacs+ secondary authentication server address 182.57.32.58 AAA:0 >>tacacs+ secondary authentication server port 1842 AAA:0 >>tacacs+ secondary authentication server retransmit 3 AAA:0 >>tacacs+ secondary authentication server secret L3498reiu AAA:0 >>tacacs+ secondary authentication server timeout 7 TACACS+ Secondary Authorization Server Commands AAA:0 >>tacacs+ secondary authorization server address 182.57.32.58 AAA:0 >>tacacs+ secondary authorization server port 1842 AAA:0 >>tacacs+ secondary authorization server retransmit 3 AAA:0 >>tacacs+ secondary authorization server secret L3498reiu AAA:0 >>tacacs+ secondary authorization server timeout 7 Config:0 >>tacacs+ command authorization enable Config:0 >>tacacs+ command logging enable TACACS+ Secondary Accounting Server Commands AAA:0 >>tacacs+ secondary accounting server address 182.20.56.18 AAA:0 >>tacacs+ secondary accounting server port 1819 AAA:0 >>tacacs+ secondary accounting server retransmit 3 AAA:0 >>tacacs+ secondary accounting server secret Geihuige2 AAA:0 >>tacacs+ secondary accounting server timeout 7 LX Series Configuration Guide Specifying the TACACS+ Period 2-33 Specifying the TACACS+ Period The TACACS+ period is the interval at which the LX unit will update the TACACS+ accounting server with the status of each TACACS+ user. This value is specified in minutes. X To specify the TACACS+ period 1. Access the AAA Command Mode on the LX. (See “Command Mode Descriptions” on page 1-5 for information about accessing the AAA Command Mode.) 2. Example Use the tacacs+ period command to specify the TACACS+ period: AAA:0 >>tacacs+ period 10 Setting Up RSA SecurID PPP CHAP is not supported with authentication SecurID. RSA SecurID operation requires the use of a node secret. The secret is only transferred after the first successful authentication between the LX and the RSA ACE/Server. Subsequent communication between the LX and the RSA ACE/Server relies on an exchange of the node secret to verify one another's authenticity. The secret is now saved when the secret is first sent. It is now saved permanently through reboot. At the first successful authentication attempt with the RSA server, the file is created and written to the /config/securid_v5 file in flash. You can implement RSA SecurID authentication at the server level and for specific interfaces and asynchronous ports on the LX unit. You must implement RSA SecurID authentication at the server level before you can implement it on specific interfaces and asynchronous ports on the LX unit. Under RSA SecurID authentication, the user is required to enter a user name and a PIN number plus the current token code from his or her RSA SecurID server. The LX unit transmits the information to the RSA ACE/Server, which approves access when the information is validated. RSA SecurID supports both DES and SDI encryption. Performing the Initial Setup 2-34 Installing and Configuring the RSA SecurID Server on a Network-based X To configure RSA SecurID authentication 1. Install and configure the RSA SecurID server on a Network-based Host (see page 2-26). 2. Specify the RSA SecurID server settings on the LX (see page 2-26). For more information about RSA SecurID authentication, go to the RSA SecurID website at http://www.rsasecurity.com/products/ securid/index.html. You can also configure a SecurID Local Subscriber. For more information, see “RSA SecurID Local Subscriber Feature” on page 2-38. Installing and Configuring the RSA SecurID Server on a Network-based Host Before you can configure RSA SecurID on your LX unit, you must configure a RSA SecurID server on your network. To configure the RSA SecurID server, see your RSA SecurID host documentation. X To specify the RSA SecurID server settings 1. Check the primary RSA SecurID Server host to ensure that the RSA SecurID application is running. 2. 3. Example Access the AAA Command Mode on the LX. Use the rsa securid authentication version command to specify the RSA SecurID authentication version for the LX unit. You can specify the authentication version as Version 5, or pre-Version 5 (legacy): See “Command Mode Descriptions” on page 1-5 for information about accessing Asynchronous Command Mode. AAA:0 >>rsa securid authentication version version_5 AAA:0 >>rsa securid authentication version legacy LX Series Configuration Guide Installing and Configuring the RSA SecurID Server on a Network-based Host 4. Example If the RSA SecurID authentication version is “legacy”, you must specify a Example Master authentication server instead of a Primary authentication server. Use the rsa securid authentication port command to specify the socket your RSA SecurID server is listening to: The LX listens to port 1812 default. AAA:0 >>rsa securid authentication port 1687 5. Use the rsa securid primary authentication server address command to specify the IP address of the RSA SecurID primary authentication server: AAA:0 >>rsa securid primary authentication server address 149.19.87.89 6. Example Use the rsa securid authentication encryption command to specify the RSA SecurID encryption method for the LX unit. You can specify DES or SDI as the encryption method: AAA:0 >>rsa securid authentication encryption des AAA:0 >>rsa securid authentication encryption sdi 7. Example Use the rsa securid source interface command to specify the source address the LX sends when contacting the RSA SecurID server. AAA:0 >>rsa securid source interface 3 8. To verify the LX RSA SecurID configuration, execute the show rsa securid characteristics command at the Superuser command prompt: AAA:0 >>show rsa securid characteristics Performing the Initial Setup 2-36 RSA SecurID Command Examples RSA SecurID Command Examples This section provides examples of all of the commands that are used to specify settings for the RSA SecurID servers. See the “Configuration Commands” chapter of the LX-Series Commands Reference Guide for detailed descriptions of the commands in this chapter. RSA SecurID Commands AAA:0 >>rsa securid primary authentication server address 138.30.65.34 AAA:0 >>rsa securid authentication port 4500 AAA:0 >>rsa securid primary authentication server name bigsky1.com AAA:0 >>rsa securid authentication encryption des AAA:0 >>rsa securid authentication retransmit 7 AAA:0 >>rsa securid authentication timeout 3 LX Series Configuration Guide RSA SecurID Command Examples 2-37 Table 2.3 describes each setting that you can specify for a RSA SecurID server. Table 2.3 RSA SecurID Settings Setting Specifies the address IP address of the RSA SecurID server port* UDP port of the RSA SecurID server retransmit* Maximum number of times that the LX unit will attempt to retransmit a message to the RSA SecurID server encryption* Encryption method for RSA SecurID authentication on the LX unit version* RSA SecurID authentication version that will be used on the LX unit name* Host name of the RSA SecurID authentication server for the LX unit timeout* Length of time that the LX unit will wait for the RSA SecurID server to respond before retransmitting packets * If you do not specify a UDP port, retransmit value, timeout, version, encryption, or name for the RSA SecurID server, the LX unit will use the default values for these settings. For more information, see the applicable commands in the “Configuration Commands” chapter of the LX Series Command Reference. L If the RSA SecurID secret on the LX unit does not match the RSA SecurID secret on the RSA SecurID server, you will need to clear the secret from the LX unit. To clear the RSA SecurID secret from the LX unit, see the zero rsa securid secret command in the LX-Series Commands Reference Guide. Performing the Initial Setup 2-38 RSA SecurID Local Subscriber Feature RSA SecurID Local Subscriber Feature Under the RSA SecurID Local Subscriber Feature, a subscriber can be logged on in one of two ways: As an LX subscriber with the attributes of that subscriber (if the LX subscriber account exists) Or, if the LX subscriber account does not exist, as the default (InReach) subscriber. Under either scenario, the subscriber must have a RSA SecurID account on the RSA SecurID server. If the subscriber account also exists on the LX unit, the subscriber is logged on under that account and with the attributes of that account. If the subscriber account does not exist on the LX unit, the subscriber is logged on under his RSA SecurID account with the attributes of the default (InReach) account. X To configure the RSA SecurID Local Subscriber Feature for the LX unit Use the rsa securid local subscriber enable command: Example AAA:0 >>rsa securid local subscriber enable When the RSA SecurID Local Subscriber Feature is set to only, the subscriber can only be logged in if the subscriber account is configured on both the LX unit and the RSA SecurID server and the subscriber account on the LX server has the same name as the subscriber account on the RSA SecurID server. X To set the RSA SecurID Local Subscriber Feature to only Use the rsa securid local subscriber only command: Example AAA:0 >>rsa securid local subscriber only LX Series Configuration Guide RSA SecurID sdconf.rec File 2-39 RSA SecurID sdconf.rec File The RSA SecurID known replica information displayed on the show rsa securid status screen is now saved through a reboot. After the initial contact, the replica information is saved automatically to flash. If power is lost or a reboot occurs and the primary is down, the replica is contacted instead. The LX software supports the sdconf.rec file (the configuration file created by the RSA SecurID Host installation program, which holds the Primary and Replica host addresses). The sdconf.rec file is read the first time RSA SecurID is attempted. If the Primary host address is unreachable, the Replica address is tried. To use the sdconf.rec file, download it into the LX /config directory. If this file is present on the LX, the RSA SecurID system characteristics from the sdconf.rec file will be used, and configuration of the RSA SecurID attributes will be blocked at the CLI command level. X To download the sdconf.rec file 1. Go to the shell. 2. 3. Change to the directory cd / config directory. From /config, perform an FTP and retrieve the sdconf.rec file. Performing the Initial Setup 2-40 Setting Up KerberosV5 Setting Up KerberosV5 KerberosV5 is a computer network authentication protocol that allows users communicating between machines to securely prove their identity to one another and ensure data integrity. It is aimed at a client-server model in which both the user and the server verify each other's identity. For a detailed explanation of Kerberos, go to http://web.mit.edu/kerberos. KerberosV5 maintains a database of secret keys - each network entity (client or server) shares a secret key known only to itself and to KerberosV5. Knowledge of this key proves an entity's identity. When two network entities are communicating with one another, KerberosV5 generates a session key these entities use to secure their interactions. Some issues to be aware of when configuring Kerberos V5: The clock on the LX must be set to the same time as the host that runs the KDC server. Kerberos V5 will reject requests from any host whose clock is not within the specified maximum clock skew of the Key Distribution Center (KDC). You can enable the Network Time Protocol (NTP) to keep your clocks in sync. The Domain Name System (DNS) must be set up and working properly. For Kerberos V5 to function correctly, your DNS entries and your hosts must have the correct information. Each host name must be in the fully-qualified format, and each host IP address must reverse-resolve to match the name. The krb5.keytab must be the same on all LX units, as well as the KDC servers. You must copy the /etc/krb5.keytab from the KDC onto all the LX units (/config/krb5.keytab). Follow the instructions supplied with the KerberosV5 software to install and set up the KerberosV5 Master and Slave hosts. LX Series Configuration Guide Setting Up KerberosV5 2-41 X To add or remove a KerberosV5 Realm Name Use the kerberosv5 realm name <realm_name> command to create a KerberosV5 realm. The name can be up to 31 characters long, and should be in uppercase letters. Removing the realm name deletes all servers in that realm. Example AAA:0 >>kerberosv5 realm name KrbV5Realm_REALM Use the no kerberosv5 realm name command to delete a KerberosV5 realm. Removing the realm name deletes all servers in that realm. Example AAA:0 >>no kerberosv5 realm name KrbV5Realm_REALM Once you have created a realm name, the prompt changes to that realm name (e.g., KrbV5Realm_REALM:0 >>) and you configure the KerberosV5 Master and Slave servers from that level. X To add or remove a Master Key Distribution Center (KDC) Server Use the kdc master ipv4 <hostname_or_ip> [port <port_ number>] command to specify the master KDC server (specify an address OR a hostname): Example KrbV5Realm_REALM:0 >> kdc master ipv4 112.234.255.20 port 33 Use the no kdc master command to delete the master KDC server: Example KrbV5Realm_REALM:0 >> no kdc master X To add or remove a Slave KDC Server Use the kdc slave 1|2 ipv4 <hostname_or_ip> [port <port_number>] command to specify up to two KDC servers (specify an address OR a hostname): Example KrbV5Realm_REALM:0 >> kdc slave 1 ipv4 112.234.255.10 port 88 Performing the Initial Setup 2-42 Setting Up KerberosV5 Use the no kdc slave command to delete up to two KDC servers (specify an address OR a hostname): Example KrbV5Realm_REALM:0 >> no kdc slave 1 X To retrieve the KerberosV5 Keytab L Before configuring the KerberosV5 keytab, configure a username, password, and server as explained in “Configuring TCP/IP” on page 2-2. Use the load kerberosv5 keytab remotefile <remote_ filename> command (from the Configuration Command Mode) to retrieve the kerberos keytab (the local file is / config/krb5.keytab) from the configured SFTP server. Refer to “Configuring SFTP” on page 4-9 for more information. Example Config:0 >> load kerberosv5 keytab remotefile krbs.keytab X To configure or remove Instance Mapping Use the kerberosv5 superuser instance name <instance_ name> command to configure instance mapping. This is used to determine privilege levels on the LX. Example AAA:0 >>kerberosv5 superuser instance name admin where <instance_name> is the suffix of the username (userconfigured in the KerberosV5 database) that follows the “/”, and must match the LX setting for the user to become a superuser. For example, in login: fred/admin, admin is the instance mapping. Use the no kerberosv5 superuser instance name command to remove instance mapping: Example AAA:0 >>no kerberosv5 superuser instance name LX Series Configuration Guide Setting Up KerberosV5 2-43 X To enable or disable accepting and sending of Forwardable Tickets Use the kerberosv5 forward credentials enable command to enable the accepting and sending of forwardable tickets. This is so you do not have to enter your password multiple times when SSHing from the LX. This applies only to ssh/sshd/sftp session established from the LX outbound to another host with KerberosV5 enabled. The default is disabled. The authentication type on the LX interface has to be KerberosV5 to establish an SSH KerberosV5 session to the LX’s IP address. You can check the authentication type by looking at the show screens for the show interface <interface_number> characteristics and show port <port_number> characteristics commands. Example AAA:0 >> kerberosv5 forward credentials enable Use the no kerberosv5 forward credentials command to disable the accepting and sending of forwardable tickets. Example AAA:0 >> no kerberosv5 forward credentials X To remove KerberosV5 Credentials Use the zero kerberosv5 credentials command to remove your KerberosV5 credentials: Example InReach:0 > zero kerberosv5 credentials X To set KerberosV5 Authentication on Port Async Use the authentication kerberosv5 enable command to set KerberosV5 authentication: Example Async 1-1:>> authentication kerberosv5 enable X To enable KerberosV5 Authentication on the interface To enable server-based authentication for an IP interface, the authentication method must be configured for the LX unit. To enable KerberosV5 authentication on the IP interface: Example Intf 1-1:>> authentication kerberosv5 enable Intf 1-1:>> authentication kerberosv5 enable Performing the Initial Setup 2-44 KerberosV5 Local Subscriber Feature To disable this command, enter authentication local enable. KerberosV5 Local Subscriber Feature Under the KerberosV5 Local Subscriber Feature, a subscriber can be logged on as either: An LX subscriber with the attributes of that subscriber (if the LX subscriber account exists), or The Default subscriber (if the LX subscriber account does not exist). Under either scenario, the subscriber must have a KerberosV5 account on the KerberosV5 server. If the subscriber account also exists on the LX unit, the subscriber is logged on under that account and with the attributes of that account. If the subscriber account does not exist on the LX unit, the subscriber is logged on under his KerberosV5 account with the attributes of the Default account. A login username with the instance mapping suffix of “/” will be matched to a local subscriber of the username minus the instance mapping suffix. For example, fred/admin matches an LX local subscriber named fred. Use the kerberosv5 local subscriber enable command to configure the KerberosV5 Local Subscriber Feature for the LX unit. Example AAA:0 >>kerberosv5 local subscriber enable If you disable this command, KerberosV5 uses the Default template. X To set the KerberosV5 Local Subscriber Feature to only When the KerberosV5 Local Subscriber Feature is set to only, the subscriber can only be logged in if the subscriber account is configured on both the LX unit and the KerberosV5 server and the subscriber account on the LX server has the same name as the subscriber account on the KerberosV5 server. LX Series Configuration Guide KerberosV5 Local Subscriber Feature 2-45 Use the kerberosv5 local subscriber only command to enable KerberosV5 only on the local subscriber: Example AAA:0 >>kerberosv5 local subscriber only If the KerberosV5 subscriber does not exist on the LX, the LX terminates the session. X To display KerberosV5 Credentials Use the show kerberosv5 credentials command to display the KerberosV5 credentials: Example InReach:0 > show kerberosv5 credentials The KerberosV5 Credentials screen appears: Ticket cache: FILE:/var/tmp/krb5cc_krbuser_XXXXEZKd3Y Default principal: [email protected] Valid starting Expires Service principal 11/27/06 17:34:19 11/28/06 03:34:19 krbtgt/[email protected] renew until 11/28/06 17:33:39, Flags: RI Figure 2.2 KerberosV5 Credentials Screen X To display KerberosV5 Characteristics Use the show kerberosv5 characteristics command to display the KerberosV5 characteristics: Example InReach:0 > show kerberosv5 characteristics The KerberosV5 Characteristics screen appears. Time: Kerberos V5 Configuration Settings Keytab: Configured Forward Credentials: Disabled Superuser Instance: Realm: Master KDC: Slave KDC 1: Slave KDC 2: Tue, 28 Nov 2006 08:51:36 US/EASTERN Local Subscriber: 120.119.129.203 Disabled admin Port: Port: Port: IS.MLC.COM 88 Kerberos V5 Authentication Serial Ports: Kerberos V5 Authentication Interfaces: Figure 2.3 KerberosV5 Characteristics Screen Performing the Initial Setup 2-46 KerberosV5 Local Subscriber Feature X To display KerberosV5 Status Use the show kerberosv5 status command to display the KerberosV5 status: Example InReach:0 > show kerberosv5 status The KerberosV5 Status screen appears. Time: Kerberos V5 Status & Counters Successful Logins: Failed Logins: Fallback Logins: Mon, 09 Oct 2006 13:36:19 UTC 0 0 0 Figure 2.4 KerberosV5 Status Screen X To display KerberosV5 Summary Use the show kerberosv5 summary command to display the KerberosV5 summary: Example InReach:0 > show kerberosv5 summary The KerberosV5 Summary screen appears. Time: Realm: Master KDC: Slave KDC 1: Slave KDC 2: 120.119.129.203 120.119.129.204 120.119.129.205 Port: Port: Port: Mon, 09 Oct 2006 13:36:19 UTC EXAMPLE.COM 88 88 88 Figure 2.5 KerberosV5 Summary Screen LX Series Configuration Guide Resetting the Unit to Factory Defaults 2-47 Resetting the Unit to Factory Defaults If you misconfigure the unit or believe that the configuration might have been corrupted, you can reset the unit to its factory defaults from either an LX asynchronous port, from the LX DIAG port, or from a Web browser. See “Command Mode Descriptions” on page 1-5 for information about accessing Asynchronous Command Mode. This method is recommended if you no longer have network access, or if you are unable to make a serial connection to an LX asynchronous port. X To reset the unit to factory defaults from an LX asynchronous port 1. Access the Configuration Command Mode. 2. Enter the default Configuration command to reset the LX unit to the factory defaults: Config:0 >>default configuration L After you enter the default configuration command, the LX displays a confirmation prompt to warn you that the unit will be rebooted. If you answer yes at the confirmation prompt, the LX unit is defaulted and rebooted. X To reset the unit to factory defaults from the LX DIAG port 1. Connect a terminal to the DIAG port of the LX unit. 2. 3. 4. 5. 6. Power-cycle the LX unit. When the unit is powered on, the ppciboot Main Menu is displayed. Select the asterisk (*) from the menu to display the following options: [1] Reset ppciboot Configuration [2] Reset Linux System Configuration Select [1] to reset the ppciboot configuration to system defaults. After you select Option [1] and the reset is complete, the changes are saved to Flash. Select [2] to reset the Linux system configuration. This command erases all of the configurations you have saved, except for the ppciboot configuration. After you finish configuring the ppciboot options and save the configuration, press B to boot the system. Performing the Initial Setup 2-48 Syslog Overview X To reset the unit to factory defaults from a Web browser 1. Browse to the LX unit’s IP address. 2. Log in to the LX unit and bring up the console. L After you select a default option, the LX displays a confirmation prompt to warn you that the unit will be rebooted. If you answer “yes” at the confirmation prompt, the LX unit will be defaulted and rebooted. See “Booting from Defaults” on page 4-38 for more information about defaulting from ppciboot and defaulting from the CLI. Syslog Overview The local Syslog size is set to 64K by default and can be increased to a maximum size of 128K. When a remote Syslog is configured it receives the same information as the local syslog. The local syslog wraps when it reaches its maximum size. When the syslog reaches its maximum size, it is automatically saved as a gzip file to compress the syslog file and save space. For example, a syslog file named /var/log/syslog of 64K would be saved as var/log/syslog.gz of perhaps 10K. After the latter file reaches 64K, it too is saved, as, for example, var/log/ syslog.old.gz of perhaps 20K. After the compressed file totals 64K in size and can be compressed no more, the oldest data in the file will be dropped to provide space. Command logging is another useful tool. It is an attribute of the subscriber and is disabled by default. When enabled, all commands entered by the user are also written to syslog. The command log CLI commands act like a filter to screen the specific users commands from the syslog. For more information about the Command Logging Feature, see the command log enable command and the monitor/show command log command in the LX Series Command Reference. LX Series Configuration Guide Assigning an Asset Tag 2-49 Assigning an Asset Tag The assettag and no assettag commands allows you to assign a label (up to 32 characters, all printable characters are valid except spaces) to the unit, or to delete the label. This tag is typically used for system inventory purposes, to identify each LX on the network. Syntax Config:0 > assettag <asset_tag> Config:0 > no assettag Example Config:0 > assettag AST-001-001 The Asset Tag is displayed on the System Characteristics screen. Use the show system characteristics command to display the System Characteristics screen. An example of this screen is shown in Figure 2.6. Time: Asset Tag: Contact: Location: LX Model Type: LX-4008T-102AC Flash Size: 16 MB Maximum Number of Async Ports: 10 Maximum Number of Interfaces: 22 Internal Module on Port: 9 Modem Pool Enabled Serial Ports: -------ONBOARD TEMP THRESHOLDS------Low: -10 C High: 64 C Hysteresis: 2 C Tue, 13 Feb 2007 09:14:59 US/EASTERN BostonMarketingLevel4 Serial Number: 00:a0:9c:00:49:b6 Memory Size: 128 MB Maximum Number of Ethernet Ports: 2 Maximum Number of Subscribers: 100 Internal Module Type: V.90 Figure 2.6 System Characteristics Screen Performing the Initial Setup 2-50 Assigning a Contact Assigning a Contact The contact and no contact commands allows you to add a contact name string (e.g., a person or place) up to 32 characters long (all printable characters are valid), or to delete the contact. Syntax Config:0 > contact <contact> Config:0 > no contact Example Config:0 > contact bill smith The Contact is displayed on the System Characteristics screen. Use the show system characteristics command to display the System Characteristics screen. An example of this screen is shown in Figure 2.6. LX Series Configuration Guide Setting Up Remote Console Management 3-1 CHAPTER 3 Setting Up Remote Console Management Network Elements can be managed by using Telnet connections, or by using SSH connections, to the LX asynchronous ports on which the network elements are attached. This method of managing network elements is known as remote console management. This chapter describes how to set up remote console management on an LX unit. See the following sections for how to set up remote console management: “Connecting the Console Port to the Network Element” on page 3-2. “Configuring Ports for Remote Console Management” on page 3-4. “Creating Subscribers for Remote Console Management” on page 3-17. Setting Up Remote Console Management 3-2 Connecting the Console Port to the Network Element Connecting the Console Port to the Network Element Network elements can be connected to LX asynchronous ports by a modem or by a direct serial line. The LX asynchronousport connectors are female RJ-45 connectors. Use a crossover cable to connect a direct serial line from an LX console port to the serial management port on a network element. Use a straight-through cable to connect a console port to a modem. MRV Communications provides RJ-45 crossover cables. You can make the MRV-supplied RJ-45 crossover cables into straightthrough cables. For more information, see “Recommendations for Making Cables” on page 3-2. Recommendations for Making Cables Keep the following in mind when you make your own cables: Before crimping the cables, make sure that the RJ-45 connector is fully inserted into the die-set cavity and that the wire is fully inserted into the RJ-45 connector. L The die set might be fragile, and it could break if the RJ-45 connector is not properly seated before you squeeze the handle. In order to keep track of the cable type, you should use different colored wires for straight-through and crossover cable. For example, MRV Communications recommends silver wire for making crossover cables and black wire for making straight-through cables. L MRV Communications recommends that you not use Ethernet Xbase-T crossover or straight-through cable for serial communications. L The RJ-45 plugs for solid wire are different than those used for standard wire. Make sure to use the proper RJ-45 plug for the wire type and gauge type used. LX Series Configuration Guide Making Straight-through Cables 3-3 Making Straight-through Cables To make an MRV-supplied crossover cable into a straightthrough cable Lay the modular cable on a table or on some other flat surface. L The modular cable should lie flat (no rolls or twists). RJ-4 Connectors Crimp the RJ-45 connector in opposite directions at both ends as shown in Figure 3.1. Straight Through Cable RJ-45 Connectors Figure 3.1 Straight-through Wiring Scheme Modular Adapters (RJ-45 to DB-25 and RJ-45 to DB-9) You can obtain adapters with male and female DB-25 and female connectors from MRV Communications. These adapters direct signals from the RJ-45 connectors on the cable to the correct pin on the DB-25, or DB-9, connector. For more information, see Getting Started with the LX Series. Setting Up Remote Console Management 3-4 Configuring Ports for Remote Console Management Configuring Ports for Remote Console Management This section describes how to configure LX asynchronous ports for remote console management. Configuring Asynchronous Ports for Direct Serial Connections The default settings for LX asynchronous ports will support direct serial connections to most Network Elements. However, when conditions warrant, you can explicitly set an asynchronous port to non-default values. L Autobaud must be disabled on ports that are used for remote console management. To disable autobaud on a port, execute the no autobaud command in the Asynchronous command mode. See “Command Mode Descriptions” on page 1-5 for information abou accessing Asynchronous Command Mode. Explicitly Setting LX Asynchronous Port Characteristics You should explicitly set the characteristics of an LX asynchronous port to match those of a directly connected Network Element. X To explicitly set the characteristics of an LX asynchronous port 1. 2. Example Access the Asynchronous Command Mode for the asynchronous port to configure. Use the access remote command in to set the access for the asynchronous port to remote: Async 6-6:0 >>access remote LX Series Configuration Guide Explicitly Setting LX Asynchronous Port Characteristics 3-5 3. In Asynchronous Command Mode, enter the appropriate command to set the speed, parity, data bits, stop bits, flow control, or autohangup setting for the asynchronous port. Table 3.1 lists the commands that you can use to set the port characteristics that pertain to remote console management of directly connected Network Elements. For the full syntax of each command listed in Table 3.1, see the LX Series Command Reference. Table 3.1 Commands for Setting Asynchronous Port Characteristics See “Command Mode Descriptions” on page 1-5 for information about accessing Asynchronous Command Mode. Port Characteristics Allowable Values Command Examples autohangup enabled or disabled autohangup enable no autohangup data bits 5, 6, 7, or 8 bits 6 flow control xon or cts flowcontrol cts flowcontrol xon parity even, odd, none, mark, or space parity parity parity parity parity speed auto, 134, 200, 300, 600, 1200, 2400, 4800, 9600, 19200, 38400, 57600, 115200, or 230400 speed 115200 stop bits 1 or 2 stopbits 1 stopbits 2 even odd none mark space L MRV Communications recommends that you enable Autohangup on an LX asynchronous port that will be used to do remote console management. This ensures that the port will drop the connection, when the network element resets DTR at subscriber logout. Setting Up Remote Console Management 3-6 Explicitly Setting LX Asynchronous Port Characteristics X To set up a modem port for remote console management 1. 2. Example Execute the access remote command to set the port access to remote. Async5:0 >>access remote 3. Example Execute the modem enable command to enable modem control on the port. Async5:0 >>modem enable 4. Example Execute the flow control command to set the port flow control to CTS. Async5:0 >>flowcontrol cts 5. 6. Example Ensure that the port is set to the same speed as the modem to which the port is attached. To set the port speed, use the speed command. Async5:0 >>speed 57600 Execute the modem command to access the Modem Command Mode for the port under configuration. Async5:0 >>modem 7. Example Access the Asynchronous Command Mode for the asynchronous port to set up for remote console management. For both dial-in and dial-out configurations, you should enable autohangup and modem control enabled when you configure ports for modems. In Modem Command Mode, execute the dialout number command to specify the number (up to 32 characters) that the modem will dial to connect with the Network Element on the Public Network. Modem 5-5:0 >>dialout number 19785558371 LX Series Configuration Guide Configuring Modem Caller ID 3-7 8. Example In Modem Command Mode, execute the initstring command to specify the initialization string for the modem. Modem 5-5:0 >>initstring S0=1 V1 X4 E1 Q0=1 \J0 &K3 L The initialization string may vary between modem types. 9. Example Modem 5-5:0 >> retry 6 10. Example In Modem Command Mode, execute the retry command to specify the Retry value for the modem. In Modem Command Mode, execute the timeout command to specify the Timeout value for the modem. Modem 5-5:0 >>timeout 30 Configuring Modem Caller ID This feature allows you to add an additional layer of security on top of a local access port. You can define a list of allowed names, numbers, or both (up to four). An exact match of the name or number is required to login. For external modems, you must configure the modem initialization string to enable Modem Caller ID. For internal modems, the modem initialization string is automatically added when you enable Caller ID security. This feature configures a name or number with which to verify the user's identity when connecting to an async port. The feature functions on internal modems and any external modems that support caller ID. L If you are using an internal GPRS modem, you can only enter a caller ID security number, not a name. X To specify a caller id security name Execute the caller id security name <string> command: Example Modem41:0 >> caller id security name John Smith Enter no caller id security name to remove the security name. Setting Up Remote Console Management 3-8 Configuring Modem Caller ID X To specify a caller id security number Execute the caller id security number <number> command: Example Modem41:0 >> caller id security number 1-508-555- 1212 Enter no caller id security number to remove the security number. X To specify a caller id security number and name Execute the caller id security number <number> name <string> command: Example Modem41:0 >> caller id security number 1-508-5551212 name Joe Smith Enter no caller id security number 1-508-555-1212 name Joe Smith to remove the security number and name. Use the monitor/show port async <port_number> modem command to display the Show Port Modem Settings screen. An example of this screen follows, with the Caller ID Security Name and Number fields highlighted: Time: Port Number: Modem: Retry: Dialout Number: Init String: ATS0=1V1X4&K3^M 5 Enabled 5 Mon, 02 Apr 2007 15:20:51 UTC Port Name: Port_5 Timeout: Pool: 45 Disabled ----------------------------------Caller ID--------------------------------Security: Disabled Number: Name: Number: Name: Number: Name: Number: Name: Internal Modem Type: V.90 Figure 3.2 Show Port Modem Settings Screen LX Series Configuration Guide Configuring Modems for the RAS Dial Feature 3-9 Modem Caller ID Troubleshooting Tips If you are having trouble connecting, make sure that Caller ID is enabled on the line (contact your phone company). Connect to a remote port and then dial in from another location. The following information should appear for normal modems: RING DATE = 0331 TIME = 1245 NMBR = 12345678 NAME = example The following information should appear for GPRS modems: RING +CLIP: "12345678"' 161 Configuring Modems for the RAS Dial Feature A subscriber can use the RAS Dial Feature to make a console connection to an LX unit. For more information about the RAS Dial Feature, see the dial direct command in the LX Series Command Reference. The RAS Dial Feature uses a Modem Pool to make direct dial connections. For more information about modem pools, see the pool enable command in the LX Series Command Reference. To support the RAS Dial Feature, each modem in the Modem Pool must have an initialization string that is equivalent to: Answer mode Result word Extended Results Echo ON Result code ON Mode Buffer RTS Flow control S0=1 V1 X4 E1 Q0=1 \J0 &K3 Setting Up Remote Console Management 3-10 Setting Up Security for a Console Port L The symbols in the initialization string may be different for your type of modem. See your modem manual for the correct symbols for your modem. step 8 (above) provides an example of an initstring command that configures a modem string to support the RAS Dial Feature. Setting Up Security for a Console Port See “Command Mode Descriptions” on page 1-5 for more information about accessing Asynchronous Command Mode. You can use LOCAL authentication, LDAP authentication, RADIUS authentication, RSA SecurID authentication, or TACACS+ authentication to protect a console port from unauthorized access. These methods of authentication require a user to enter a valid username/password combination to access the console port. Setting Up Local Authentication Under LOCAL authentication, a username/password combination is validated against the local security database. LOCAL authentication is enabled by default on console ports. Other authentication options on console ports are NONE, LDAP, RADIUS, TACACS+, and RSA SecurID. X To enable LOCAL authentication on a console port 1. 2. Example Access the Asynchronous Command Mode for the asynchronous port to configure. Execute the following command to enable LOCAL authentication on the port: Async5:0 >>authentication outbound local enable Setting Up RADIUS Authentication RADIUS authentication is disabled by default on console ports. Under RADIUS authentication, a username/password combination is validated against the RADIUS user and client database. The RADIUS security database is stored on the RADIUS server for the LX unit. In order to use RADIUS authentication on a port, you must have RADIUS set up for the LX unit. See “Setting Up RADIUS” on page 2-19 for information about setting up RADIUS for the LX unit. LX Series Configuration Guide Setting Up TACACS+ Authentication 3-11 X To enable RADIUS authentication on a console port 1. 2. Example Access the Asynchronous Command Mode for the asynchronous port to configure. RADIUS authentication is disabled by default on console ports. Execute the following command: Async5:0 >>authentication outbound radius enable L If RADIUS authentication is enabled, you may want See “Command Mode Descriptions” on page 1-5 for more information about accessing Asynchronous Command Mode. to implement a backup method (Fallback), which will be used if the RADIUS server is unreachable. Fallback switches to Local Authentication when there is no reply from the RADIUS server(s) after three attempts. For more information, see “Setting Up Fallback” on page 3-12. Setting Up TACACS+ Authentication Under TACACS+ authentication, a username/password combination is validated against the TACACS+ user and client database. The TACACS+ security database is stored on the TACACS+ server for the LX unit. In order to use TACACS+ authentication on a port, you must have TACACS+ set up for the LX unit. See “Setting Up TACACS+” on page 2-25 for information about setting up TACACS+ on the LX unit. X To enable TACACS+ authentication on a console port 1. 2. Example Access the Asynchronous Command Mode for the asynchronous port to configure. Execute the following command to enable TACACS+ authentication on the port: Async5:0 >>authentication outbound tacacs+ enable L If TACACS+ authentication is enabled, you may want to implement a backup method (Fallback), which will be used if the TACACS+ server is unreachable. Fallback switches to Local Authentication when there is no reply from the TACACS+ server(s) after three attempts. Setting Up Remote Console Management 3-12 Setting Up RSA SecurID Authentication Setting Up RSA SecurID Authentication See “Command Mode Descriptions” on page 1-5 for more information about accessing Asynchronous Command Mode. Under RSA SecurID authentication, a username/ PPP CHAP is not supported with password combination is validated against the authentication RSA SecurID user and client database. The RSA SecurID. SecurID security database is stored on the RSA SecurID server for the LX unit. In order to use RSA SecurID authentication on a port, you must have RSA SecurID set up for the LX unit. See “Setting Up RSA SecurID” on page 2-33 for information about setting up RSA SecurID on the LX unit. RSA SecurID authentication is disabled by default on console ports. X To enable RSA SecurID authentication on a console port 1. 2. Example Access the Asynchronous Command Mode for the asynchronous port to configure. Execute the following command to enable RSA SecurID authentication on the port: Async5:0 >>authentication outbound rsa securid enable L If RSA SecurID authentication is enabled, you may want to implement a backup method (Fallback), which will be used if the RSA SecurID server is unreachable. Fallback switches to Local Authentication when there is no reply from the RSA SecurID server(s) after three attempts. For more information, see “Setting Up Fallback”. Setting Up Fallback Fallback Authentication can be used as a mechanism for authenticating users when the configured authentication method (such as LDAP, RADIUS, TACACS+, or RSA SecurID) fails because the authentication server is unreachable. When a user logs in by using Fallback, his or her username/password combination is validated against the LOCAL security database for the LX unit. LX Series Configuration Guide Verifying Serial Port Connections 3-13 The LX unit will make three attempts to log in the user by using LDAP, RADIUS, TACACS+, or RSA SecurID before it implements Fallback. After the third attempt at logging in by using the configured authentication method (RADIUS, TACACS+, or RSA SecurID), the username/password combination will be validated against the LOCAL security database for the LX unit. LDAP, RADIUS, TACACS+, or RSA SecurID must be enabled on a port in order for Fallback to function on the port. When all four methods (such as LDAP, RADIUS, TACACS+, or RSA SecurID) are disabled on the port, Fallback is ignored by the port. See L When using SSH and Fallback, make sure your SSH “Command client is configured to send a minimum of four Mode Password prompts (see your SSH client Descriptions” on page 1-5 documentation). You may also need to increase the for information LoginGraceTime on the LX. To increase the about LoginGraceTime, go to the shell, change the accessing directory to /config, and edit the sshd_config file. Asynchronous Command X To enable fallback on a port Mode. 1. 2. Example Access the Asynchronous Command Mode for the asynchronous port on which to enable Fallback. Execute the following command to enable Fallback authentication on the port: Async5:0 >>authentication fallback enable Verifying Serial Port Connections When you use the Test Port command, the server tests the physical connection between itself and a device attached to the port. To end the test at any time, enter CTRL-C. The Test Port feature allows you to validate cable configuration and port settings, such as baud rate and bit parity. Setting Up Remote Console Management 3-14 Verifying Serial Port Connections X To validate cable configurations: Execute the following command to test the connection: Example InReach:0 >>test port async <port_number> [width <number>] [lines <number>] [loopback] There are several ways to execute the command 1. Example Test the port async port: InReach:0 >>test port async 4 This option generates 23 lines of 80 characters each of a printable sequence of ASCII characters to be sent to the destination port. The general rules are: 2. Example • The access of the destination port must be Local, Remote, or Dynamic. • The destination port must be in an idle state with no subscriber active (an exception to this rule is when the source and the destination ports are the same). • Only one port can be specified. • If a CTRL-C is issued during the test, the test is stopped after a delay period and the bytes generated up to that point are counted. • An end of test message is displayed in all cases. Test the port async port, but limit the width of characters returned: InReach:0 >>test port async 4 width 50 This option generates 23 lines of 50 characters each of a printable sequence of ASCII characters to be sent to the destination port. You can enter values from 1-132. The default is 80. An end of test message is displayed. 3. Example Test the port async port and limit the width of characters and lines returned: InReach:0 >>test port async 4 width 50 lines 15 LX Series Configuration Guide Verifying Serial Port Connections 3-15 This option generates 15 lines of 50 characters each of a printable sequence of ASCII characters to be sent to the destination port. You can enter values from 0-65535. The default is 23. If you enter 0, the test port runs continuously until you enter CTRL-C. An end of test message is displayed. L You must use the “width” parameter in the same command if you want to use the “lines” parameter. 4. Example Test the port async port with loopback: InReach:0 >>test port async loopback This option generates 23 lines of 80 characters each of a printable sequence of ASCII characters to be sent to the destination port. The rules of this option are as follows: • A "loopback" connector requires that the "transmit" wire be tied to the "receive" wire. • If a parity, framing, or overrun error occurs, it is recorded as an error as part of the end of the test message. • If the "loopback" connector is not being used or it is wired incorrectly, the command fails because there is no data to read in from the destination port. • The "loopback" option is not valid if the source and destination port are the same. • The appropriate messages will be displayed in the above cases. • If a "loopback" connector is connected, but you do not specify the "loopback" keyword, the port records the characters transmitted out and received in, but no character received is checked for integrity. • The "loopback" option is also valid with the "width" parameter and the "width and lines" parameters. Setting Up Remote Console Management 3-16 Verifying Serial Port Connections When you enter any of these commands, the test port output is displayed automatically. A sample screen follows: !"#$%&'()*+,-./0123456789:;<=>?@ABCDEFGHIJKLMNOPQRSTUVWXYZ[\]^_`abcdefghijklmno !"#$%&'()*+,-./0123456789:;<=>?@ABCDEFGHIJKLMNOPQRSTUVWXYZ[\]^_`abcdefghijklmnop "#$%&'()*+,-./0123456789:;<=>?@ABCDEFGHIJKLMNOPQRSTUVWXYZ[\]^_`abcdefghijklmnopq #$%&'()*+,-./0123456789:;<=>?@ABCDEFGHIJKLMNOPQRSTUVWXYZ[\]^_`abcdefghijklmnopqr $%&'()*+,-./0123456789:;<=>?@ABCDEFGHIJKLMNOPQRSTUVWXYZ[\]^_`abcdefghijklmnopqrs %&'()*+,-./0123456789:;<=>?@ABCDEFGHIJKLMNOPQRSTUVWXYZ[\]^_`abcdefghijklmnopqrst &'()*+,-./0123456789:;<=>?@ABCDEFGHIJKLMNOPQRSTUVWXYZ[\]^_`abcdefghijklmnopqrstu '()*+,-./0123456789:;<=>?@ABCDEFGHIJKLMNOPQRSTUVWXYZ[\]^_`abcdefghijklmnopqrstuv ()*+,-./0123456789:;<=>?@ABCDEFGHIJKLMNOPQRSTUVWXYZ[\]^_`abcdefghijklmnopqrstuvw )*+,-./0123456789:;<=>?@ABCDEFGHIJKLMNOPQRSTUVWXYZ[\]^_`abcdefghijklmnopqrstuvwx *+,-./0123456789:;<=>?@ABCDEFGHIJKLMNOPQRSTUVWXYZ[\]^_`abcdefghijklmnopqrstuvwxy +,-./0123456789:;<=>?@ABCDEFGHIJKLMNOPQRSTUVWXYZ[\]^_`abcdefghijklmnopqrstuvwxyz ,-./0123456789:;<=>?@ABCDEFGHIJKLMNOPQRSTUVWXYZ[\]^_`abcdefghijklmnopqrstuvwxyz{ -./0123456789:;<=>?@ABCDEFGHIJKLMNOPQRSTUVWXYZ[\]^_`abcdefghijklmnopqrstuvwxyz{| ./0123456789:;<=>?@ABCDEFGHIJKLMNOPQRSTUVWXYZ[\]^_`abcdefghijklmnopqrstuvwxyz{|} /0123456789:;<=>?@ABCDEFGHIJKLMNOPQRSTUVWXYZ[\]^_`abcdefghijklmnopqrstuvwxyz{|}~ 0123456789:;<=>?@ABCDEFGHIJKLMNOPQRSTUVWXYZ[\]^_`abcdefghijklmnopqrstuvwxyz{|}~* 123456789:;<=>?@ABCDEFGHIJKLMNOPQRSTUVWXYZ[\]^_`abcdefghijklmnopqrstuvwxyz{|}~** 23456789:;<=>?@ABCDEFGHIJKLMNOPQRSTUVWXYZ[\]^_`abcdefghijklmnopqrstuvwxyz{|}~*** 3456789:;<=>?@ABCDEFGHIJKLMNOPQRSTUVWXYZ[\]^_`abcdefghijklmnopqrstuvwxyz{|}~**** 456789:;<=>?@ABCDEFGHIJKLMNOPQRSTUVWXYZ[\]^_`abcdefghijklmnopqrstuvwxyz{|}~***** 56789:;<=>?@ABCDEFGHIJKLMNOPQRSTUVWXYZ[\]^_`abcdefghijklmnopqrstuvwxyz{|}~***** 6789:;<=>?@ABCDEFGHIJKLMNOPQRSTUVWXYZ[\]^_`abcdefghijklmnopqrstuvwxyz{|}~***** P In-Reach -511- Test complete 1840 bytes written, 0 error(s) detected Figure 3.3 Sample Test Port Command Output LX Series Configuration Guide Creating Subscribers for Remote Console Management 3-17 Creating Subscribers for Remote Console Management L The administrator must configure the first password for a new subscriber in order for that subscriber account to be active. In order for a subscriber to do remote console management, he/ she must have specific access rights. If RADIUS is the outbound authentication method, configure a Service-type of OutboundUser for the subscriber on the RADIUS server. See “Subscriber Command Mode” on page 1-8 for information about creating or accessing a subscriber record. X To set up the access rights for the subscriber if local authentication is used 1. 2. 3. Example In the Subscriber Command Mode, specify one or more access methods for the subscriber to use in connecting to the LX unit. For more information, see “Specifying Access Methods” on page 3-18. Execute the access console enable command to specify that the subscriber will have console access to the LX unit: Subs_mark:0 >>access console enable 4. Example Execute the access port command to specify the console ports that the subscriber can access. In the following example, the access port command specifies that the subscriber mark can log on to ports 2, 3, 5, and 6: Subs_mark:0 >>access port 2 3 5 6 5. Example Create or access the subscriber record of the subscriber to configure for console-port access. If the subscriber to create his or her own login password, execute the password enable command: Subs_mark:0 >>password enable When the subscriber logs in to the LX unit for the first time, the user is asked to enter and confirm the new password. Setting Up Remote Console Management 3-18 Specifying Access Methods 6. Example To create a login password for the subscriber, execute the password command: Subs_mark:0 >>password The following prompts are displayed: Enter your NEW password : Re-enter your NEW password : 7. Enter the new password at the Enter prompt, and re-enter it at the Re-enter prompt. L This is the password that the subscriber is required to enter when the user logs on to a console port. Specifying Access Methods You can specify SSH, Telnet, or the Web (or any combination of SSH, Telnet, and the Web) as the method(s) that the subscriber can use to access LX asynchronous ports for remote console management. L Because SSH includes data encryption capabilities, it is recommended as the access method for subscribers who will be sending sensitive data to the LX asynchronous ports. X To specify Telnet as an access method 1. Example Execute the access telnet enable command: Subs_mark:0 >>access telnet enable X To specify SSH as an access method Execute the access ssh enable command: Example Subs_mark:0 >>access ssh enable X To specify the Web as an access method Execute the access web enable command: Example Subs_mark:0 >>access web enable LX Series Configuration Guide Connect Port Escape Character 3-19 Connect Port Escape Character You can configure an escape character in the local subscriber database. The default value is ^Z. X To configure an escape character Change the escape sequence: Example Subs_Tom:0 >>connect escape ^<character> where <character> is a character from A-Z. X To set the escape character back to the default value Execute the following command: Example Subs_Tom:0 >>default connect escape The connect command establishes a connection to the specified remote port. X To break the connection Execute the connect escape character: Example InReach:0 >>connect port async 1 Remote_device: ^Z InReach>> Setting Up Remote Console Management 3-20 Connect Port Escape Character X To display the Subscriber Characteristics Screen Use the following command syntax: show subscriber <subscriber_name> characteristic The Connect Escape Char field displays the escape character. Figure 3.4, “Subscriber Characteristics Screen" shows a sample of this screen: Time: Wed, 18 Oct 2006 09:08:19 US/EASTERN Subscriber Name: Preferred Service: Security: Login Mode : Maximum Connections: Command Logging: Idle Timeout: Screen Pause: Local Switch: Rlogin Transparent: Dialback Feature: Dialback Number: Menu Name: Web Menu Name: Port Access list: Port Read Only list: Remote Access list: Outlet Access list: Outlet Group Access list: Web Access List: InReach SuperUser Cli 50 Disabled 0 Enabled ^L Disabled Disabled Rlogin Ded. Service: Dedicated Service: User Password: Change User Password: Maximum Sessions: Audit Logging : User Prompt: Forward Switch: Backward Switch: Connect Escape Char: /config/M_InReach /config/M_InReach 0-9 Telnet Ssh Web_Server Console Figure 3.4 Subscriber Characteristics Screen LX Series Configuration Guide Configured Disabled 4 Disabled InReach ^F ^B ^Z Config System Administration 4-1 CHAPTER 4 System Administration This chapter describes backup and recovery, applying default configurations to other units, how to use the Main menu and Configuration menu, booting from defaults, and how to upgrade the software and also describes some basic maintenance functions. System Administration 4-2 Backup and Recovery Backup and Recovery This section explains how to save, edit, and load the configuration file. Saving the Configuration File The configuration file (Config.prm) is saved in a format that is readable in WordPad and the vi editor in UNIX. Because anyone can easily modify it, the file is signed with a digest using the SHA-1 hashing algorithm. The SHA-1 hashing algorithm lets the administrator know if a modified file is being loaded by issuing an alert message when a file not matching the original algorithm is being loaded. This way the administrator knows the file was modified and can take the appropriate action. The Config.prm file is created when you configure the LX unit. After the Config.prm file has been created on one unit, it can be copied to other units. When the Config.prm file resides on a new unit, you can copy its contents as appropriate for the new unit. For example, you can change the IP settings (such as IP Address and Subnet Mask) to the IP settings of the new unit. All other settings will be imported when the LX unit is rebooted. Where the Configuration is Stored All files related to the unit configuration are located in the /config directory. This directory contains the SSH keys, Menus, Configuration, a file to tell from where the configuration is to be taken (the ConfToBootFrom file), and the zone information directory (time and date). X To save the configuration to flash Execute the save configuration flash command in Superuser command mode: Syntax InReach:0 >>save configuration flash Example InReach:0 >>save configuration flash LX Series Configuration Guide Saving the Configuration to the Network 4-3 Saving the Configuration to the Network The .zip file can be accessed by either WinZip or UNIX Unzip. The TFTP/SFTP protocol is used to save the LX configuration to a network host. Consequently, if you are saving to a UNIX host, a configuration file must already exist on the TFTP/SFTP server. Use the touch command to create the configuration file as a .zip file. Windows-based workstations will automatically create the .zip file after the LX unit attempts the TFTP/SFTP put process. The configuration format differs slightly from that described in “Saving the Configuration File” on page 4-2. The .zip file contains everything previously described except for the SSH keys, since they belong to the unit itself and can’t be used on a different unit. X To save the configuration to the network Use the following command syntax: Syntax InReach:0 >>save configuration network <path/ filename> ipv6 <ipv6_address>|<host_name_or_ip> Example InReach:0 >>save configuration network filename server_address L The file name that you specify in the save configuration network command must not include a .zip extension, as the .zip extension is appended automatically. Editing the Files on a Unix Host L Move your Config.prm file to a directory of your choosing. The /TFTP Boot directory is the default. You can edit the Config.prm file so that you can bring multiple units online at one time. X To edit the files 1. Syntax Open the .zip file into the directory using the following command syntax: unzip filename.zip System Administration 4-4 Editing the Files in Windows 2. 3. 4. 5. 6. The filenames within the .zip file are displayed as they are extracted, including the Config.prm file. If you have configured menus, the Menu file also appears. Open the Config.prm file with any text editor (such as vi or emacs). Select and copy the section of the Config.prm file to modify: • Users that have access to all new LX units • PPP configurations • Broadcast Groups • Interface configurations • LDAP, RADIUS, RSA SecurID, or TACACS+ configurations • Specific Async Port configurations If you are adding a new user to the Config.prm file, copy an existing user, paste it into the section directly below the last user, and make the necessary modifications to the copy. Follow the same steps for any other changes you make to the Config.prm file. Editing the Files in Windows You can edit the Config.prm file so that you can bring multiple units online at one time. X To edit the files 1. 2. 3. Open the .zip file into the directory using WinZip.The Config.prm file displays. If you have configured menus, the Menu file also displays. Open the Config.prm file with the WordPad editor. Select and copy the section of the Config.prm file to modify: • Users that have access to all new LX units LX Series Configuration Guide Editing the Files in Windows 4-5 4. 5. • PPP configurations • Broadcast Groups • Interface configurations • LDAP, RADIUS, RSA SecurID, or TACACS+ configurations • Specific Async Port configurations If you are adding a new user to the Config.prm file, copy an existing user, paste it into the section directly below the last user, and make the necessary modifications to the copy. Follow the same steps for any other changes you make to the Config.prm file. X To recreate the .Zip file for uploading L Be sure to include all files previously extracted from the .zip file when you rebuild the .zip file. The .zip file cannot contain any path information. 1. Use the following command syntax in UNIX: zip -o filename.zip file1 file2 file3 Syntax where filename.zip (you can name this whatever ) is the To perform this procedure, you must be in the directory in which the files to be zipped reside. archive to write the files to, and file1, file2, and file3 are the files to add to the archive. 2. 3. In Windows, select the files to add to the zip file by clicking on them while holding down the Ctrl key. Right click the selected files and select Add to Zip. X To load the configuration 1. At the Config prompt, load the configuration as follows: Config:0:>>boot configuration from network <server_address> <path/filename> Config:0:>>end InReach:0 >>save configuration flash InReach:0 >>reload System Administration 4-6 Editing the Files in Windows L You must define an LX address in the ppciboot menu before loading a saved configuration from a TFTP/ SFTP server. See “Changing the Unit IP Address” on page 4-28. 2. 3. Example After the LX has reloaded, check the System Load Status screen to make sure that the LX loaded from the proper place. Enter the following command: InReach:0>>show system load status The System Load Status screen shows from where the LX loads its parameter file when the unit configuration is defaulted. The Configuration Loaded From: field displays the TFTP/SFTP server source of the .prm file. The Network Configuration File Name: field displays the name of the .prm file. Figure 4.1 shows a sample System Load Status Screen. 4. Time: Software Loaded From: Configuration Loaded From: Network Configuration File Name: Configuration Status: Configuration Version: Configuration Conversion Status: Tue, 13 Feb 2007 09:59:10 US/EASTERN 140.179.169.181 Flash Configuration Not Saved 47 N/A Figure 4.1 System Load Status Screen LX Series Configuration Guide Loading the Configuration from Network 4-7 Loading the Configuration from Network You can load a configuration .zip file that was previously saved to network into flash on the LX. This enables the LX to boot from the saved configuration from flash from this point forward. X To load the configuration from network 1. Syntax Use the following command syntax: Config:0 >>load configuration from network ipv6 <ipv6_address>|<ip_address> <path/filename> where <ipv6_ address> specifies the IPv6 address of the TFTP/SFTP server where the configuration zip file resides <ip_address> specifies the IPv4 address of the TFTP/SFTP server where the configuration zip file resides filename is the name of the configuration zip file without the .zip extension The filename will be appended with a .zip suffix on the TFTP/SFTP server when it is saved. For example, filename local becomes local.zip on the TFTP/SFTP server. 2. After you enter the command, the following warning messages are displayed: This will overwrite your current configuration. Are you sure? y/n 3. If you enter y, the LX will TFTP/SFTP get the configuration file and write it into memory, and the following message displays: You must reboot for the new configuration to take effect. Reboot now? y/n If you enter n, the command aborts without changing the configuration in flash, and displays the following message: Operation aborted. System Administration 4-8 Applying Default Configurations to Other Units 4. If you enter y, the LX reboots, loading the new configuration from flash upon reboot. If you enter n, the command ends and returns to the prompt. The new configuration is now written in flash, and upon the next reboot loads the new configuration. Applying Default Configurations to Other Units This section explains how to create a default configuration file with which you can load multiple units. Creating a Default Configuration File After your first LX unit is up and running, you can save the unit configuration to the network. See “Saving the Configuration to the Network” on page 2-9 for more information. You must rename this .zip file to lxlast six digits of the mac address.prm (for example, lx12ab9f.prm). After this is complete, you can use this .prm file as a template to configure multiple units at one time by changing the last six digits of the mac address within the filename to reflect that of the specific unit. Restoring the Default Configuration File to a New Unit The unit looks on the TFTP/SFTP server specified in ppciboot. If the configuration is defaulted, it is detected at startup and the unit checks that a TFTP/SFTP server was passed by ppciboot. If a TFTP/SFTP server is accessible, the LX unit connects to it and tries to download a default file named lx plus the last six digits of the mac address and the .prm extension (for example, lx12ab9f.prm). If this file exists, the LX unit loads it into its configuration table. If the default file does not exist, the Quick Start menu is displayed. LX Series Configuration Guide Configuring SFTP 4-9 Configuring SFTP Secure File Transfer Protocol (SFTP) allows you to securely update images and load/save configuration files. X To configure the File Transfer Protocol Use this command to configure the file transfer protocol to either TFTP or SFTP. Syntax Config:0 >>file transfer protocol <sftp|tftp> Example Config:0 >>file transfer protocol sftp X To configure an SFTP Server IPv4 Address Use this command to configure the SFTP server IPv4 address. Syntax Config:0 >>sftp server ipv4 <ipv4_address> Config:0 >>no sftp server ipv4 where <ipv4_address> is the IP Address of the SFTP server to which the connection is being made. Example Config:0 >>sftp server ipv4 1.2.3.4 X To configure an SFTP Username Use this command to configure the SFTP username. Syntax Config:0 >>sftp username <username> Config:0 >>no sftp username where <username> can be a maximum of 31 characters long. Example Config:0 >>sftp username otto X To configure an SFTP Password L If you configure a password, you can generate an SFTP Public/Private key and create a passphrase if you want, but it is not required. Use this command to configure the SFTP password. Syntax Config:0 >>sftp password <password> Config:0 >>no sftp password where <password> can be a maximum of 32 characters long. System Administration 4-10 Configuring SFTP Example Config:0 >>sftp password ottos_secret X To generate an SFTP Public/Private Key This command lets you avoid entering a password every time you log in. You can use one password for all the units in your network, but you can use that password only from the station where you configured the key. The key identifies a unit on the network to all its available clients. L If you generate an SFTP Public/Private key and create a passphrase, you can configure a password if you want, but it is not required. Use this command to generate a SFTP Public/Private Key pair. Syntax Config:0 >>sftp keygen [rsa|dsa|rsa1] bits [1024|2048] Examples Config:0 >>sftp keygen rsa bits 1024 Config:0 >>sftp keygen rsa1 bits 2048 X To change the SFTP Key Passphrase L If you use an SFTP key to boot the configuration from the network, the administrator must not set a passphrase on this key. If the administrator does so, the LX will prompt you for the passphrase during bootup on the DIAG port, blocking the boot cycle. L You must generate the SFTP Key before using this command. Use this command to change the SFTP private key using a Passphrase. Syntax Config:0 >>sftp keygen passphrase To create a new SFTP passphrase, do the following: 1. Enter sftp keygen passphrase and press <Enter>. The following messages appear: Generating public/private rsa key pair Enter new passphrase (empty for no passphrase): LX Series Configuration Guide Configuring SFTP 4-11 2. 3. Enter a new passphrase (this will not appear on the screen). The following message appears: Enter the same passphrase again: Enter your passphrase again. The following message appears: Your identification has been saved in config/ sftp_identity. The File Transfer Protocol Type is displayed on the System Load Characteristics screen. Use the show system load characteristics command to display the System Load Characteristics screen. An example of this screen follows, with the new File Transfer Protocol field on the top of the left column: Time: File Transfer Protocol: Tftp TFTP Retries: 3 TFTP Timeout: 3 Authenticate Image: Disabled Configuration File to Boot From: Configuration Settings to Boot From: Wed, 18 Oct 2006 09:08:19 US/EASTERN /config/Config.prm Flash Figure 4.2 System Load Characteristics Screen Use the show sftp characteristics command to display the SFTP Characteristics screen. An example of this screen follows: Time: Default SFTP Server: SFTP Username: SFTP Password: SFTP Client Key Passphrase: SFTP Client Key Type: SFTP Client Key Bits: SFTP Client Private Key: SFTP Client Public Key: Wed, 18 Oct 2006 09:08:19 US/EASTERN Not Configured N/A N/A N/A Not Configured Figure 4.3 SFTP Characteristics Screen System Administration 4-12 Configuring Telnet Server Configuring Telnet Server You can enable telnet server and configure telnet server to send urgent data. X To enable telnet server Use the telnet server enable command in the Configuration Command Mode to configure the LX unit to accept inbound Telnet connections. The default is enable. For example: Example Config:0 >> telnet server enable Enter no telnet server to disable telnet server. The status of the Telnet Server is displayed in Figure 4.6, “System Summary Screen". X To enable telnet server urgent data Use the telnet server urgent data enable command in the Configuration Command Mode to configure the LX unit to send urgent Telnet data. The default is enable. For example: Example Config:0 >> telnet server urgent data enable Enter no telnet server urgent data to disable telnet server urgent data. The status of the Telnet Server Urgent Data is displayed in Figure 4.7, “System Advanced Characteristics Screen". LX Series Configuration Guide Scripting On External Units 4-13 Scripting On External Units The LX unit supports Expect scripting. Expect is a common, simple, command-line scripting language. You can use it to write simple scripts to automate interactive applications. For example, you can write an Expect script that can automatically log you in, modify the IP configuration, set up the configuration for any port, make the LX unit dial out, and establish a PPP configuration to a remote site. For more information about LX commands, see the LX Series Command Reference. Upgrading the Software You can upgrade the software and enter the IP information on your LX unit using one of two methods: Command Line Interface (See “Upgrading Software and ppciboot using the Command-Line Interface” on page 4-14.) ppciboot Menu (See “Upgrading Software with the ppciboot Main Menu” on page 4-17.) System Administration 4-14 Upgrading Software and ppciboot using the Command-Line Interface Upgrading Software and ppciboot using the Command-Line Interface Before you upgrade the software or ppciboot, a check is performed in Superuser mode to ensure that there is adequate space is available to update the software (8 MB) or ppciboot (1 MB). L The default filename for the software is linuxito.img. The ppciboot filename is ppciboot.img. L The ppciboot.img.sign and linuxito.img.sign digital signature files are used to authenticate load images. The sign files must be in the same directory as the img files. Place these files on the TFTP/SFTP server if Authenticate Image is enabled (on the Show System Load Characteristics screen) or if you are running in the FIPS mode of operation so the LX unit can download them. This download occurs automatically. See “Enabling/Disabling FIPS Security” on page 4-22 for further information on FIPS. Make sure you have a TFTP/SFTP server containing the software image and the ppciboot image up and running. L You must be in Superuser mode to download the ppciboot from the command-line interface. X To download ppciboot from the command-line interface 1. Syntax Type the following command and then press <Enter>: InReach:0 >>update ppciboot[ipv6 <ipv6_address>]| [<hostname_or_ip>] [image name <image_name>] Example InReach:0 >>update ppciboot 1.2.3.4 L If the LX unit has a TFTP/SFTP server address configured, you do not need to include the TFTP/SFTP server IP Address or the TFTP/SFTP server name in the update ppciboot command. LX Series Configuration Guide Upgrading Software and ppciboot using the Command-Line Interface 4-15 By default, the software stores in memory the IP address of the TFTP/SFTP server from which it has booted. If your file transfer protocol is TFTP, the “TFTP Download complete, verifying file integrity” message appears. If your file transfer protocol is SFTP, the “SFTP Download complete, verifying file integrity” message appears. 2. The loaded file is checked for integrity. If the check is successful, following message displays: File ok, copying image to flash If the check finds a problem, the following message displays: Verify failed, Bad ppciboot file 3. You have upgraded ppciboot. You must reboot the unit for the new ppciboot to take effect. Now you can upgrade the software. X To upgrade the software from the CLI 1. Type the following command and then press <Enter>: Syntax InReach:0 >>update software [ipv6 <ipv6_address>]| [<hostname_or_ip>] [image name <path/image_name>] Example InReach:0 >>update software 1.2.3.4 2. Example Type the following command and then press <Enter> to save your configuration locally, if desired: InReach:0 >>save config flash This stores the parameters. 3. Example Type the following command and then press <Enter> to reboot the unit: InReach:0 >>reload When the reload is complete, log in again. The new software is activated. System Administration 4-16 ppciboot Factory Default Settings L You can load a default configuration file from a TFTP/ SFTP server while the unit is at its default setting. ppciboot Factory Default Settings The following table lists the factory default settings. Table 4.1 ppciboot Factory Default Settings Main Menu Configuration Factory Default Setting Boot from Network yes Save boot image to flash no Boot from flash yes Time Out, in seconds 8 IP Configuration Menu Configuration Factory Default Setting IP Assignment method #1 DHCP IP Assignment method #2 BOOTP IP Assignment method #3 RARP IP Assignment method #4 User Defined L For defaults on specific commands, see the LX Series Command Reference. L Each LX Series unit is configured at the factory to use a default set of initialization parameters that sets all ports to operate with asynchronous ASCII terminal devices. LX Series Configuration Guide Upgrading Software with the ppciboot Main Menu 4-17 Upgrading Software with the ppciboot Main Menu This section explains how to use the ppciboot Main menu to set up the boot configuration. Use it as a reference for how to use specific menu entries. You can access the ppciboot commands through the DIAG port (port 0), the graphic user interface (GUI), or in the Configuration Command Mode of the CLI. When you set ppciboot parameters, the software is not loaded on the unit yet. Use the ppciboot menu to set load parameters that allow you to get up and running. L At boot, the DIAG port (port 0) is used to configure the loading method (network or flash) of the Software image, ppciboot image, and the IP address assignment preferences. L Main Menu entry [8] EM316LX Configuration appears on the Main Menu only when you are managing an EM316LX. X To access the menu 1. Connect a terminal using a console port cable to the DIAG port (port 0) and then press <Enter> one or two times. 2. Enter L and then the password. The Main Menu appears: 3. To accept the defaults, press B or wait eight seconds. 4. At the "Make a choice" prompt of the Main Menu, type the number that corresponds to the configuration action to perform. The sections that follow describe each option in detail. System Administration 4-18 Booting from the Network Main Menu [1] Boot from network: Network, Flash Image currently in flash: [f] Save software image to flash when boot from network:no [2] Time Out, in seconds (0=disabled): 8 [3] IP Configuration Menu [4] Update ppciboot Firmware [5] Ethernet Network Link Auto [6] Change ppciboot Password [7] FIPS 140-2 Security: no [8] EM316LX Configuration [9] ppciboot image name: ppciboot.img [0] software image name: linuxito.img [*] Reset to System Defaults [S] Save Configuration [B] Boot System Make a choice: __ Booting from the Network The Boot from network option lets you boot your software image file from the network. X To boot from the network 1. Press 1 repeatedly to toggle between Network only, Flash only, Network, Flash, or Flash, Network (FIPS mode only allows Flash only). Choose this option to load from... If unsuccessful... Network only Choose another load method Flash only Choose another load method LX Series Configuration Guide Saving the Image to Flash When Booting from the Network 4-19 2. Choose this option to load from... If unsuccessful... Network, Flash Automatically attempts to load from Flash Flash, Network Automatically attempts to load from the Network Press B to boot the system. Do this only after you have made all configuration changes to the LX and saved the configuration. L MRV recommends that you leave Boot from network flash on if you are booting from the network. By doing so, you provide a fallback method of booting in the event the network becomes unreachable. Saving the Image to Flash When Booting from the Network The Save image to flash when boot from network option lets you save the software image from the network to flash when booting from the network. X To save the software image to flash 1. 2. Press f to toggle between yes and no. To save the software image to flash when booting from the network, choose yes. After you finish configuring the ppciboot options and save the configuration, press B to boot the system. L Booting the system can take 5 or more minutes. System Administration 4-20 Setting the Timeout in Seconds Setting the Timeout in Seconds The Time Out, in seconds option lets you set the amount of time the system waits for you to press Boot before booting automatically. L The default timeout is 8 seconds. X To set the timeout 1. Press the number 2 (Time Out, in seconds). 2. An Enter Time Out prompt appears. 3. Add a time, in seconds, and then press <Enter>. L If you enter 0 you will disable the timeout. Make sure that you don’t enter 0 and disable the timeout for remotely located units. 4. Press S to save the configuration. IP Configuration Menu The IP Configuration Menu option lets you change addresses and settings if you do not want to accept the defaults. See “Using the IP Configuration Menu” on page 4-26 for details. L Updating ppciboot firmware from the Main menu works only if you have already set up an IP address, IP mask, and TFTP/SFTP server. The Update ppciboot Firmware option lets you update the firmware via the Main Menu. X To update ppciboot firmware: 1. 2. Press the number 4 (Update ppciboot Firmware). The ppciboot firmware begins loading from the TFTP/SFTP server. If the firmware loads successfully (taking only a few seconds) the firmware is saved and the unit is reset. Enter L and then the password, and the Main menu reappears. A verification check of the firmware is performed. If an error message appears, the ppciboot image may be corrupted. LX Series Configuration Guide Setting the Speed and Duplex Mode of the Ethernet Network Link 4-21 3. Press B to boot the system. Setting the Speed and Duplex Mode of the Ethernet Network Link The Ethernet Network Link option lets you set the speed and duplex mode of the Ethernet Network Link. X To set the speed or duplex mode of your Ethernet Network Link 1. 2. Press number 5 (Ethernet Network Link) repeatedly to toggle between the following speed/duplex options (the default is Auto): Set to... for... Auto default 100 half 100TX half duplex 100 full 100TX full duplex 10 half 100TX half duplex 10 full 100TX full duplex Toggle to the option and press S to save the configuration. System Administration 4-22 Changing the ppciboot Password Changing the ppciboot Password IMPORTANT! If you change the ppciboot password, be sure to write it down. If you do not remember your password, or the password is lost, you must return the unit to MRV to be defaulted. Defaulting the unit yourself will not clear the ppciboot password - you must return the unit to MRV. In FIPS Mode the password must be at least six characters long. The Change ppciboot Password option lets you change the ppciboot password for the unit. X To change the ppciboot password 1. 2. 3. 4. Press the number 6 (Change ppciboot Password). The following prompt is displayed: Enter your current ppciboot password: Enter the current ppciboot password at the prompt. After you have entered the current ppciboot password, the following prompt is displayed: Enter your NEW password: : Enter the new ppciboot password at the prompt. After you enter the new ppciboot password, the following prompt displays: Re-enter your NEW password: Re-enter the new ppciboot password at the prompt. A confirmation message is displayed. Enabling/Disabling FIPS Security L If you enable FIPS Security, option [1] Boot from Network is set to Flash Only automatically. You can only update from the CLI while FIPS is enabled. Option [4] Update ppciboot Firmware also does not work while FIPS is enabled. The FIPS 140-2 Security option lets you enable or disable FIPS security. LX Series Configuration Guide EM316LX Configuration Menu 4-23 X To enable or disable FIPS security 1. Press the number 7 (FIPS 140-2 Security). The following prompt appears: Enabling FIPS security will reset run-time configuration to defaults. Are you sure? (y/n): 2. 3. If you select y (this defaults the flash immediately), a Resetting Linux Configuration message appears, and the Main Menu reappears after a few seconds. If you select n, the Main Menu reappears immediately. If FIPS is already enabled and to disable it, press 7 (FIPS 140-2 Security) from the Main Menu. EM316LX Configuration Menu IMPORTANT! The EM316LX is not supported in V5.0.0 or later. The EM316LX Configuration Menu option lets you control and configure module settings. See “Using EM316LX Configuration Menu” on page 4-31 for more information. L The Main Menu entry [8] EM316LX Configuration appears on the Main Menu only when you are managing an EM316LX. Entering a ppciboot Image Name The ppciboot image name: option lets you assign different ppciboot image names to different LX units via the Main Menu. L Entering a ppciboot image name from the Main menu allows you to load a unique ppciboot image when the unit loads from the network TFTP/SFTP server. The file must exist on your TFTP/SFTP server. The name can be up to 32 characters long. System Administration 4-24 Entering a Software Image Name X To enter a ppciboot image name 1. 2. Press the number 9 (ppciboot image name). The Enter ppciboot image name prompt appears. Enter the ppciboot image name (the file must exist on your TFTP/SFTP server): ppciboot.370 3. The image name can contain a path as well as a file name: /tmp/ppciboot.370). 4. Press S to save your configuration. The next time a ppciboot image is loaded over the network, the LX requests the assigned filename from the TFTP/SFTP server. Entering a Software Image Name The software image name: option lets you assign different software image names to different LX units via the Main Menu. L Entering a software image name from the Main menu allows you to load a unique linuxito image when the unit loads from the network TFTP/SFTP server. The file must exist on your TFTP/SFTP server. The name can be up to 32 characters long. X To enter a software image name 1. 2. Press the number 0 (software image name). The Enter software image name prompt appears. Enter the software image name (the file must exist on your TFTP/SFTP server): linux370.img The image name can contain a path as well as a file name: /tmp/linux370.img). 3. 4. Press S to save your configuration. The next time a software image is loaded over the network, the LX requests the assigned filename from the TFTP/SFTP server. LX Series Configuration Guide Resetting System Defaults 4-25 Resetting System Defaults The Reset to System Defaults option lets you reset the unit to system defaults. X To reset to the system defaults 1. Press the asterisk (*) (Reset to System Defaults). You are prompted for the password, which is access. The following options appear: [1] Reset ppciboot Configuration [2] Reset Linux System Configuration [3] Reset PPCiBoot and Linux configurations Warning: Options 1 and 3 will cause system reset in the end!! 2. 3. Select 1, 2, or 3. If you select [1] Reset ppciboot Configuration, the command sets the ppciboot configuration to system defaults and saves the configuration to flash. If you select [2] Reset Linux System Configuration, the command erases all of the configurations you have saved, except for the ppciboot configuration. If you select [3] Reset PPCiBoot and Linux configurations, options [1] and [2] are performed. Press B to Boot the system. Do this only after you have configured the ppciboot options and saved the configuration. See “Booting from Defaults” on page 4-38 for more information on defaulting from ppciboot and defaulting from the CLI. Saving the Configuration The Saving Configuration option lets you save the ppciboot configuration. When you are finished configuring the Main menu, press S to save the configuration. System Administration 4-26 Booting the System Booting the System The Boot System option lets you boot the system. Be sure to save the configuration and choose a boot method before you boot the system. Press B to boot the system. L Do this only after you finish configuring all necessary ppciboot options and save the configuration. Using the IP Configuration Menu The IP Configuration Menu option lets you change addresses and settings if you do not want to accept the defaults. X To configure the IP settings 1. 2. At the Main menu, enter 3 to open the IP Configuration menu. Choose the number of the field to change. See the following sections for specific details. LX Series Configuration Guide Using the IP Configuration Menu 4-27 Welcome to LX ppciboot Version x.x IP Configuration Menu [1] IP Assignment method #1: DHCP [2] IP Assignment method #2: BOOTP [3] IP Assignment method #3: RARP [4] IP Assignment method #4: User Defined [5] Unit IP Address: [6] Network mask: [7] Gateway: [8] TFTP Server IP Address: [S] Save Configuration [R] Return to Main menu Make a choice: Figure 4.4 IP Configuration Menu System Administration 4-28 Choosing an IP Assignment Method Choosing an IP Assignment Method The IP Assignment Method option lets you set the method by which to assign IPs. X To configure an IP Assignment method 1. 2. 3. Press 1, 2, 3, or 4 to see the options for IP Assignment method #1-4:. Select the IP Assignment method to change, and toggle the options (DHCP, BOOTP, RARP, User Defined, and None) by repeatedly pressing the option number. When you reach the option , stop toggling the options for that IP Assignment method and go on to press the numbers corresponding (2 for IP Assignment method #2:) to the other IP Assignment methods and make the changes in the same way. If you are finished configuring the IP settings, press S to save the configuration. The IP Configuration menu reappears. Press R to return to the Main Menu. L If any of the four IP Assignment methods are set to User Defined you will need to complete an additional configuration. Changing the Unit IP Address The Unit IP Address option lets you change the unit IP address L This applies only to the user-defined IP method. X To change an IP Address 1. 2. 3. 4. Press the number 5 (Unit IP Address). A Unit IP Address prompt appears. Type the new address and press <Enter>. If you are finished configuring the IP settings, press S to save the configuration. The IP Configuration menu redisplays. Press R to return to the Main Menu. LX Series Configuration Guide Changing the Network Mask 4-29 Changing the Network Mask The Network Mask option lets you change the Network Mask (this applies only to the user-defined IP method). X To change a Network Mask 1. 2. 3. 4. Press the number 6 (Network Mask). A Network Mask prompt displays. Type the new network mask and press <Enter>. If you are finished configuring the IP settings, press S to save the configuration. The IP Configuration menu redisplays. Press R to return to the Main Menu. Changing the Gateway Address The Gateway option lets you change the Gateway address (this applies only to the user-defined IP method). X To change a Gateway address 1. 2. 3. Press the number 7 (Gateway). A Gateway prompt appears. Type the new Gateway address and press <Enter>. If you are finished configuring the IP settings, press S to save the configuration. The IP Configuration menu reappears. Press R to return to the Main Menu. System Administration 4-30 Changing the TFTP Server IP Address Changing the TFTP Server IP Address The TFTP Server IP Address option lets you change the TFTP Server IP address (the address from where you load the boot image). This applies only to the user-defined IP method. X To change the TFTP Server IP address 1. 2. 3. 4. Press the number 8 (TFTP Server IP address). A TFTP Server IP address prompt appears. Type the new TFTP Server IP address and press <Enter>. If you are finished configuring the IP settings, press S to save the configuration. The IP Configuration menu reappears. Press R to return to the Main Menu. Saving the Configuration The Saving Configuration option lets you save the ppciboot configuration. X To save the configuration 1. 2. When you are finished configuring using the IP Configuration menu, press S to save the configuration. Press R to return to the Main Menu. L The IP Assignment method #1-4 has precedence over user defined assignment, but the user defined settings are used as soon as the User Defined method comes up. LX Series Configuration Guide Using EM316LX Configuration Menu 4-31 Using EM316LX Configuration Menu The EM316LX Configuration Menu option lets you control and configure module settings. X To configure the EM316LX settings 1. At the Main Menu, enter 9 to open the EM316LX Configuration Setup menu.: [0] Module Restart: [1] Management Enable: [2] External I2C Bus Enable yes yes yes [S] Save New Configuration [R] Return to Main menu Make a choice: 2. Choose the number of the field to change. See the following sections for specific details. Restarting the Module The Module Restart option lets you reset the EM316LX module. X To reset the EM316LX module Press 0(Module Restart) to toggle between restart on and restart off, shown on the EM316LX Configuration Menu as yes or no. Enabling the Management Port The Management Enable option lets you enable Management from the EM316NM management module. If this is disabled, the EM316NM management module can still monitor the status of the EM316LX, but not make changes. System Administration 4-32 Disabling the External I2C Bus X To enable the management port 1. 2. 3. Press the number 1 (Management Enable) to enable management. Pressing 1 toggles between Management enabled and Management disabled, shown on the EM316LX Configuration Menu as yes or no. Press S to save the configuration. The EM316LX Configuration menu reappears. Press R to return to the Main Menu. Disabling the External I2C Bus The External I2C Bus Enable option lets you disconnect the EM316LX module from the External I2C management bus. In this case, the module will be invisible to the Management unit. X To disable the External I2C Bus Press 2 (External I2C Bus Enable) to toggle between enabling and disabling the I2C Bus, shown on the EM316LX Configuration Menu as yes or no.The system automatically saves your new setting. Saving the Configuration The Saving New Configuration option lets you save the new EM316LX configuration. X To save the configuration 1. 2. When you are finished configuring using the EM316LX Configuration menu, press S to save the configuration. Press R to return to the Main Menu. LX Series Configuration Guide Configuring Image Names 4-33 Configuring Image Names These commands allow you to configure and default ppciboot and software image names, or update software and ppciboot using the configured image names. If you have several LX units and want to load different images on different units, you can rename image names so the same image is not loaded on all units by default. Therefore, you must configure ppciboot image names and software image names before you can use them to update an LX unit. Software and ppciboot names can consist of any printable character (other than a space). The name can be 1 to 32 characters long. If this name is not specified, the default image name is used (ppciboot.img or linuxito.img). X To configure the ppciboot image name Use the following command syntax to create a configurable ppciboot image name: Syntax Config:0>>image ppciboot name <ppciboot_name> X To configure the software image name Use the following command syntax to create a configurable software image name: Syntax Config:0>>image software name <software_name> Defaulting Image Names You can return the image name back to the default. X To default the ppciboot image name Use the following command syntax to default the configurable ppciboot image name to ppciboot.img: Syntax Config:0>>default image ppciboot name System Administration 4-34 Updating the Software Image Name X To default the software image name Use the following command to default the configurable software image name to linuxito.img. Syntax Config:0>>default image software name Updating the Software Image Name There are several paths by which you can update the software image name. The name can consist of any printable character (other than a space). The name can be 1 to 32 characters long. IMPORTANT For the update to work, you must enter the file name of an existing software image file on the TFTP server. X To update the software using the software image name Use the following command syntax to update the software using an explicit software image name: Syntax InReach:0>>update software image name <software_name> L A Host TFTP server must be configured for this update to work. Example InReach:0>>update software image name linux370.img X To update the software using the software image name and host name Use the following command syntax to update the software using an explicit software image name and by specifying the host: Syntax InReach:0>>update software <host_name> image name <image_name> Example InReach:0>>update software timshost image name linux370.img LX Series Configuration Guide Updating the ppciboot via a specific image name 4-35 X To update the software using the software image name and host IP address Use the following command syntax to update the software by using an explicit software image name and host IP address: Syntax InReach:0>>update software <ip_address> image name <path/image_name> Example InReach:0>>update software 111.222.33.44 image name linux370.img X To update the software using the software image name and host IPv6 address Use the following command syntax to update the software by using an explicit software image name and host IPv6 address: Syntax InReach:0>>update software ipv6 <ipv6_address> image name <path/image_name> Example InReach:0>>update software ipv6 2001:123:lf00:1266 :220:ebff:feba:3cbd image name linux50.img Updating the ppciboot via a specific image name There are several paths by which you can update the ppciboot image name. The name can consist of any printable character (other than a space). The name can be 1 to 32 characters long. IMPORTANT For the update to work, you must enter the file name of an existing ppciboot image file. X To update ppciboot using the ppciboot image name Use the following command syntax to update the ppciboot by using the ppciboot image name. Syntax InReach:0>>update ppciboot image name <path/image_ name> System Administration 4-36 Updating the ppciboot via a specific image name L A Host TFTP/SFTP server must be configured for this update to work. Example InReach:0>>update ppciboot image name ppciboot.370 X To update ppciboot via the ppciboot image name and host name Use the following command syntax to update the ppciboot using the ppciboot image name and by supplying a host name. Syntax InReach:0>>update ppciboot <host_name> image name <path/image_name> Example InReach:0>>update ppciboot timshost image name ppciboot.370 X To update the ppciboot via the ppciboot image name and host IP address Use the following command syntax to update the ppciboot via the ppciboot image name and supplying the Host IP Address. Syntax InReach:0>>update ppciboot <ip_address> image name <path/image_name> Example InReach:0>>update ppciboot 111.222.33.44 image name ppciboot.370 X To update the ppciboot via the ppciboot image name and host IPv6 address Use the following command syntax to update the ppciboot via the ppciboot image name and supplying the Host IPv6 Address. Syntax InReach:0>>update ppciboot [ipv6 <ipv6_address>] image name <path/image_name> LX Series Configuration Guide Updating the ppciboot via a specific image name 4-37 Example InReach:0>>update ppciboot ipv6 2001:123:lf00:1266:220: ebff:feba:3cbd image name ppciboot.50 The software image name and the ppciboot image name are displayed in the System Ppciboot screen. Use the show system ppciboot command to display the System Ppciboot Screen. Figure 4.5, “Show System Ppciboot Screen" shows an example of this screen with the Image name fields set to their default values: Ppciboot Configured Load Settings Ppciboot Ethernet Network Link: IP Address: Network Mask: Gateway Address: IP Assignment Method #1: IP Assignment Method #2: IP Assignment Method #3: IP Assignment Method #4: auto 120.159.169.191 255.255.255.0 120.159.169.1 User Defined None None None Software Load From: Save Image to Flash: SoftwareImg: PpcibootImg: TFTP Server Address: Network, Flash no linuxito.img ppciboot.img 120.159.169.181 FIPS 140-2 Mode: no Figure 4.5 Show System Ppciboot Screen System Administration 4-38 Booting from Defaults Booting from Defaults When you boot a unit from defaults, it can take up to four minutes because the system must regenerate the SSH keys. The SSH keys are saved into the flash. You can default the configuration from either the: Main Menu Command-Line Interface (CLI) Depending on where you default the configuration from, the effect is not the same. Defaulting from the Main Menu When you default from the Main Menu the entire configuration, including the SSH keys, is erased. The next reboot may take up to four minutes to recompute the SSH keys. X To default from the Main Menu 1. 2. Choose the (*) Reset to System Defaults option from the ppciboot menu. Choose [2] Reset Linux System Configuration. The following message displays: [2] Reset Linux system configuration WARNING: This will erase all configuration data in the system. Do not use unless the configuration is unusable. 3. 4. Enter the password access to display the Main Menu. Press B to boot the unit. Various lines of data are displayed on the screen while the default ppciboot loads. This may take a few minutes. L This display is generated by the operational software. The system must be booted before this occurs. 5. The default from ppciboot completes. LX Series Configuration Guide Defaulting from CLI 4-39 Defaulting from CLI When you default from the CLI, only the configuration (Config.prm) is erased. The SSH keys are preserved. X To default from the CLI Enter the default configuration command in Configuration command mode. Acquiring the IP Configuration The LX software gets its IP configuration from ppciboot or from the configuration. If the configuration is not loaded yet, the LX unit uses the IP configuration from ppciboot. After the configuration file is found and loaded, the IP is modified according to the configuration. Therefore, if the configuration is already set, it always overrules the ppciboot configuration. You can use two commands to display interface information: The monitor/show interface 1 status command displays the actual setting of the interface. The monitor/show interface 1 characteristics command displays the configuration for the interface. See the LX-Series Commands Reference Guide for more information about using these commands. X To change the password from the CLI 1. Example Type the following command: Config:0 >>default ppciboot password The the following message displays: Enter your CURRENT password: 2. Enter your current password. The the following message displays: The ppciboot password has been defaulted The Config:0 >> prompt displays. System Administration 4-40 ppciboot/linuxito Downgrade ppciboot/linuxito Downgrade This feature allows you to downgrade to previous versions of ppciboot/linuxito. This feature makes downgrading easier for sites that need to run a particular version. Downgrading to versions earlier than 3.6.0 is not supported. IMPORTANT Please read the following bulleted list before moving on to the Downgrading ppciboot/linuxito procedure. There are several issues to keep in mind while downgrading ppciboot/linuxito. You must default the configurations of units downgraded from V4.0.0, as their configurations will not be maintained. You must follow the specific procedure for downgrading ppciboot (see "Downgrading ppciboot/linuxito"). Downgrading to pre-V3.6.0 versions is not supported due to changes in the encryption of the ppciboot password prior to this version. Downgrading to a version prior to V3.6.0 will result in an RMA factory repair. Mismatches between ppciboot and linuxito versions leads to unpredictable behavior and is not supported. The ppciboot and linuxito versions must be synchronized. There is no mechanism to prevent you from downgrading to a ppciboot or linuxito version that does not support the hardware platform you are running. Downgrading to a version of ppciboot or linuxito that does not support the hardware platform will result in an RMA factory repair. Downgrading ppciboot/linuxito L Steps 1 and 14 are optional. If you skip them, the LX comes up at the defaults and must be manually reconfigured. You will need access to the DIAG port on the LX to perform this procedure. LX Series Configuration Guide Downgrading ppciboot/linuxito 4-41 1. 2. 3. Save your configuration to a network tftp server (see "Saving the Configuration to the Network" earlier in this chapter. Put the appropriate matching ppciboot/linuxito on your tftp server as filenames ppciboot.img and linuxito.img. To default the configuration, enter: InReach:0>>config default config This reboots the LX. 4. 5. 6. 7. 8. 9. Connect a terminal using a console port cable to the DIAG port (port 0) and press <Enter> one or two times. Power cycle to get to the ppciboot login. Enter "L" and the password. The ppciboot Main Menu appears. Type "3" to open the IP Configuration Menu. Once there, configure ppciboot to load from your tftp server (via dhcp, bootp, rarp, or user config) by entering the necessary information. Type "s" to save the configuration. Type "r" to return to the main menu screen and make sure the Boot from network field (1) is set to "Network, Flash". Type "d" to downgrade ppciboot and erase all flash. This resets ppciboot and brings up the downgrade version at the default settings. At the DIAG port, Re-enter the ppciboot menu and enter "L" and the password. Now you must reconfigure ppciboot to load the downgrade version of linuxito.img from your tftp server. 10. Type "3" to open the IP Configuration Menu. Once there, configure ppciboot to load linuxito.img from your tftp server (via dhcp, bootp, rarp, or user config) by entering the necessary information. 11. Type "s" to save the configuration. System Administration 4-42 Downgrading ppciboot/linuxito 12. Type "r" to return to the main menu screen and make sure the Boot from network field (1) is set to "Network, Flash". 13. Type "f" to save the software image to flash, then "b" to boot the LX. This causes the LX to load the image from the tftp server and (this time only) write it into flash in the proper location for this version. 14. Once your LX is up and running on the older software, you may restore your ppciboot and linux configuration as you wish from the CLI, GUI, or network (see "Loading the Configuration from Network" earlier in this chapter). LX Series Configuration Guide System and Status Screens 4-43 System and Status Screens Other system characteristics screens and system status screens display important system information. Use the show system summary command to display the System Summary screen. An example of this screen follows: Time: Fingerd: NTP: SSH: Web Server: Disabled Enabled Enabled Enabled Rlogin Client: Telnet Client: Disabled Enabled LPD: SNMP: Timed: Thu, 01 Mar 2007 10:32:13 UTC Enabled Disabled Disabled Telnet Server: Enabled Figure 4.6 System Summary Screen Use the show system advanced characteristics command to display the System Advanced Characteristics screen. An example of this screen follows: Time: Outlet Access: Logging Size: Message: Disabled 64000 bytes Disabled Thu, 01 Mar 2007 10:32:13 UTC Minimum Password Length: 0 Logging Source Interface: 1 Telnet Server Urgent Data: Disabled Figure 4.7 System Advanced Characteristics Screen Use the show system status command to display the System Status screen. An example of this screen follows: Time: System Uptime: 5 1:31:18 ----------CPU LOAD AVERAGE----------1 min: 0.00 5 min: 0.00 15 min: 0.00 -----------CPU UTILIZATION----------User Time: 0.000000 System Time: 0.000000 Idle Time: 100.000000 Tue, 13 Feb 2007 10:24:05 US/EASTERN Current OnBoard Temp: 37 C ---------------MEMORY---------------Cached Memory: 20624 KB Free Memory: 91780 KB Figure 4.8 System Status Screen System Administration 4-44 System and Status Screens Use the show system ip status command to display the System IP Status screen. An example of this screen follows: Time: Active System Gateway: Primary DNS: Secondary DNS: Tue, 13 Feb 2007 10:25:58 US/EASTERN 120.159.169.1 120.159.128.17 120.159.176.254 Figure 4.9 System IP Status Screen LX Series Configuration Guide Configuring the LX Series Unit Part 2 PART 2 Setting Up the Notification Feature 5-1 CHAPTER 5 Setting Up the Notification Feature The Notification Feature is used to send syslog messages of LX system events to pagers, email addresses, cell phones, SNMP trap clients, outbound asynchronous ports, and local or remote syslogd files. Setting Up the Notification Feature 5-2 Overview of the Notification Feature Overview of the Notification Feature The Notification Feature uses the syslog daemon (syslogd) to generate event messages. Event Messages can be generated for events that occur in any of the Linux facilities listed in Table 5.1. Table 5.1 Sources of Event Messages Facility all authpriv daemon kern local0—local7 syslog user Description All system syslog messages Superuser authentication process A system daemon, such as in.ftpd The Linux kernel Remote syslog levels 0 through 7 The syslog daemon (syslogd) User processes (default) The event messages that are sent to any given destination can be filtered according to the facility and priority (severity level) of the message. For example, a destination could be configured to receive only those messages that originate in a daemon and have a priority of crit. Table 5.2 lists the priorities that can be specified as filters for the Notification Feature. Table 5.2 Supported Priorities Priority Description info Normal, informational messages L notice warning err crit alert emerg You can’t specify a facility characteristic of all with a priority characteristic of info for User Profiles that are based on a Service Profile of the TAP type. Conditions that are not errors, but which might require specific procedures to adjust them A warning message A software error condition (default) A critical condition, such as a hard device error A condition that the system administrator needs to correct immediately, such as a corrupted system database A severe condition that can immediately affect the users’ ability to work on the LX LX Series Configuration Guide Configuring the Notification Feature 5-3 Configuring the Notification Feature In order to use the Notification Feature, you must create a Service Profile and a User Profile. Create a Service Profile—A Service Profile defines a method for sending event messages to a destination. This method is a protocol (such as SMTP) or an on-board feature (such as outbound asynchronous ports). For most event notification processes, the Service Profile also defines the destination to which event messages will be sent. For more information, see “To create a Service Profile” on page 5-5. Create a User Profile—A User Profile specifies a facility/ priority filter for a destination. A User Profile also specifies the destinations (such as addresses and telephone numbers) for event notification processes that send event messages by email, cell phones, and pagers. For more information on User Profiles, see “Overview of User Profiles” on page 5-14. Create a SYSLOG Notification Source Interface—A SYSLOG Notification Source Interface allows you to indicate the IPv4 source address to use when contacting the server. In each case, this value defaults to interface 1. For more information on SYSLOG Notification Source Interface, see “To configure a REMOTESYSLOG service profile” on page 5-11. Creating Service Profiles You need to create a Service Profile for each desired method of sending event messages to a destination. For example, to send event messages to pagers via the Telocator Alphanumeric Protocol (TAP), a Service Profile of the TAP type must first be created. A Service Profile must be fully configured, as described in “To create a Service Profile” on page 5-5, before a User Profile can be associated with it. Setting Up the Notification Feature 5-4 Creating Service Profiles You can create more than one Service Profile for each method of sending event messages. For example, you can create several Service Profiles of the TAP type, each specifying a different Short Message Service Center (SMSC). The LX unit supports a maximum of 20 Service Profiles. In Notification command mode, you can create Service Profiles of the following types: Profile type TAP Sends event messages to Pagers with the Simple Network Pager Protocol (SNPP) Pagers via TAP SNMP SNMP trap clients LOCALSYSLOG A local file on the LX unit REMOTESYSLOG Syslogd on a remote host ASYNC Outbound asynchronous ports on the LX unit.1 Email addresses SNPP SMTP 1 For more information See “To configure an SNPP service profile” on page 5-6. See “To configure a TAP service profile” on page 5-7). See “To create a Service Profile” on page 5-5. See “To configure a LOCALSYSLOG service profile” on page 5-6. See “To configure a REMOTESYSLOG service profile” on page 5-11. See “To configure an ASYNC service profile” on page 5-10. See “To configure an SMTP service profile” on page 5-12. Users can receive the event messages by connecting a terminal or a printer to the configured asynchronous port(s). Under this method, syslog messages will be sent out the specified asynchronous port(s) as they occur. LX Series Configuration Guide Creating Service Profiles 5-5 X To create a Service Profile See “Command Mode Descriptions” on page 1-5 for information about accessing Notification Command Mode. Access the Notification Command Mode. 2. Use the profile service command to create a Service Profile. For example, the following command creates a Service Profile called Messagedirect: Notification:0 >>profile service messagedirect 1. When you execute the profile service command, the CLI enters the Service Profile command mode. In the Service Profile command mode, you can begin configuring the Service Profile. See the following sections for more information. 3. Configure the Service Profile. This step varies, depending on the type of the Service Profile. For more information, see the following sections: • “To configure a LOCALSYSLOG service profile” on page 5-6 • “To configure an SNPP service profile” on page 5-6 • “To configure a TAP service profile” on page 5-7 • “To configure an ASYNC service profile” on page 5-10 • “To configure a REMOTESYSLOG service profile” on page 5-11 • “To configure an SMTP service profile” on page 5-12 L SNMP Service Profiles do not require any configuration after they are created with the serviceprofile protocol command. For more information, see the trap client version command, and the trap client community command, in the LX-Series Commands Reference Guide. Setting Up the Notification Feature 5-6 Creating Service Profiles X To configure a LOCALSYSLOG service profile Execute the profile service command. The CLI enters the Service Profile command mode. 2. Then execute the following command in Service Profile command mode to configure a Service Profile as LOCALSYSLOG: 1. Example Noti_Serv_Protocol:0 >>localsyslog 3. Example The CLI enters the LOCALSYSLOG Protocol command mode. Execute the file command in LOCALSYSLOG Protocol command mode to specify the local file to send event messages to: Noti_Serv_LSyslog:0 >>file ricklog 4. The local syslog writes event messages to the default directory /var/log. X To read the contents of the syslog file Look in the /var/log<filename> directory in the shell. For example, see /var/log/ricklog to read the contents of the local file specified in the preceding service profile file command. You can create User Profiles to filter, by facility and priority, the event messages that will be sent to the local file. For more information, see “To create a user profile” on page 5-14. X To configure an SNPP service profile Execute the profile service command to enter Service Profile command mode. 2. In Service Profile command mode, execute the following command to configure a Service Profile as SNPP: 1. Example Noti_Serv_Protocol:0 >>snpp When you execute the snpp command, the CLI goes into the SNPP Protocol command mode. LX Series Configuration Guide Creating Service Profiles 5-7 3. Example Execute the server command to specify the SNPP server to which notifyd will send the log messages. (The pager messages will be forwarded to the user by the service provider’s server.) The service provider’s server can be specified as an IP Address or as any symbolic name that can be resolved by DNS. Noti_Serv_SNPP:0 >>server 118.28.118.34 L If you specify a symbolic name (for example, snpp.Skytel.com) as the SNPP server, the LX first tries to resolve the name in its local service table. If there is no matching name, then the LX must have a primary DNS server and a domain name suffix configured for the LX unit. For more information, see the dns primary command, and the domain name command, in the LX-Series Commands Reference Guide. L The size limit of the Service Table has been increased from 16 to 200. The LX Service Table is used to map a logical name to an IP address. 4. Example Use the port command to specify the LX TCP port that will be used to send messages to the SNPP server. Noti_Serv_SNPP:0 >>port 7777 In order to send messages to a pager, you must create a User Profile that specifies the pager pin number as its contact field. For more information, see “To create a user profile” on page 5-14. X To configure a TAP service profile Execute the profile service command to enter Service Profile command mode. 2. In Service Profile command mode, execute the following command to configure a Service Profile as TAP: 1. Example Noti_Serv_Protocol:0 >>tap When you execute the tap command, the CLI goes into the TAP Protocol Command mode. Setting Up the Notification Feature 5-8 Creating Service Profiles 3. Example Use the smsc command to specify the provider SMSC that will be used to send the event messages to the pager. Noti_Serv_TAP:0 >>smsc 18668230501 4. Example Use the parity command to specify the bit parity setting for the Service Profile. Noti_Serv_TAP:0 >>parity even 5. Example Use the bits command to specify the bits-per-byte setting for the Service Profile. Noti_Serv_TAP:0 >>bits 7 6. Example Use the stopbits command to specify the stop bits setting for the Service Profile: Noti_Serv_TAP:0 >>stopbits 2 L The bits-per-byte setting, and the stop bits setting, that you specify for a Service Profile, must match the corresponding settings of the modem port(s) that you specify in the next command. 7. Example Use the modem port command to specify the modem port(s) that the LX can dial out to send a message with this Service Profile: Noti_Serv_TAP:0 >>modem port 2 3 5 6 LX Series Configuration Guide Creating Service Profiles 5-9 External Modem Settings For an internal modem, the default configuration is usually sufficient to support a TAP Service Profile. However, the following guidelines are recommended for external modems: All External Modems: S0=1 Autoanswer on one ring. V1 Displays result codes as words. The modem code looks for word responses, not numbered responses. X4 Extended result codes. The modem code looks for word responses that the extended result codes provide. &B1 Makes the modem use the speed of the LX port. The TAP sites can have all different speed modems. This setting ensures that at least your port and the attached modem are always in sync. US Robotics Sportster and Faxmodem modems: • The port needs CTS flow control. • The port speed should be set to a speed that the modem supports. • The initstring should be ^MAT S0=1 V1 X4 &H1 &B1^M where: S0=1 Autoanswer on one ring. V1 Displays result codes as words. X4 Extended result codes. &H1 Hardware Flow Control &B1 Makes the modem use the speed of the LX port. Dipswitches 3,7, and 8 need to be in the “down” position per the US Robotics website: http://www.usr.com/support/docstemplate.asp?prod=s-modem Setting Up the Notification Feature 5-10 Creating Service Profiles US Robotics Courier V. Everything modem: • The port needs CTS flow control. • The port speed should be set to a speed that the modem supports. • The initstring should be ^MAT S0=1 V1 X4 &K0 &B1^M where: S0=1 Autoanswer on one ring. V1 Displays result codes as words. X4 Extended result codes. &K0 No data compression. &B1 Makes the modem use the speed of the LX port. Dipswitches 3, 8, and 10 need to be in the “down” position per the US Robotics website: http://www.usr.com/support/docstemplate.asp?prod=s-modem In order to send event messages to a pager or cell phone via TAP, you must create a User Profile that specifies the cell phone number to which event messages will be sent, as well as the LX modem port that will be used to send the event messages to the SMSC. For more information, see “To create a user profile” on page 5-14. X To configure an ASYNC service profile Execute the profile service command to enter Service Profile command mode. 2. In Service Profile command mode, execute the async command to enter ASYNC Protocol command mode: 1. Example Noti_Serv_Protocol:0 >>async LX Series Configuration Guide Creating Service Profiles 5-11 3. Example In ASYNC Protocol command mode, execute the port command to specify the asynchronous port(s) to which event messages will be sent: Noti_Serv_Async:0 >>port 2 3 4 5 You can create User Profiles to filter, by facility and priority, the event messages that will be sent to the asynchronous ports. For more information, see “To create a user profile” on page 5-14. X To configure a REMOTESYSLOG service profile Execute the profile service command to enter Service Profile command mode. 2. In Service Profile command mode, execute the remotesyslog command to enter REMOTESYSLOG Protocol command mode: 1. Example Noti_Serv_Protocol:0 >>remotesyslog 3. Example Noti_Serv_RSyslog:0 >>host 10.179.170.253 4. Example On the UNIX host that you specify in the host command, edit the /etc/syslog.conf file and add the following entry for user.warning: user.warning /tftpboot/test/user.warning.log 5. Example Create an empty log file as follows: #touch /tftpboot/test/user.warning.log #chmod 777 /tftpboot/test/user.warning.log 6. Example In REMOTESYSLOG Protocol command mode, execute the host command to specify the remote UNIX host to which event messages will be sent: Restart the syslog daemon to make changes to the syslog.conf file take effect: # ps –ef|grep syslog # kill –HUP pid# Setting Up the Notification Feature 5-12 Creating Service Profiles 7. Example Optionally, the SYSLOG Notification Source Interface allows you to configure which configured interface’s IPv4 source address to report when contacting the target server. In each case, this value defaults to interface 1. To use this feature, return to the Configuration Mode and use the log source interface command to specify the source address the LX sends when contacting the SYSLOG Notification server. Config:0 >>log source interface 3 You can create User Profiles to filter, by facility and priority, the event messages that will be sent to the remote host. For more information, see “To create a user profile” on page 5-14. X To configure an SMTP service profile Execute the profile service command to enter Service Profile command mode. 2. In Service Profile command mode, execute the smtp command to enter SMTP Protocol command mode: 1. Example Noti_Serv_Protocol:0 >>smtp 3. Example In SMTP Protocol command mode, execute the server command to specify the SMTP server to which notifyd will send the log messages. (The messages will be forwarded by the server to a user profile specific email address.) The service provider’s server can be specified as an IP Address or as any symbolic name that can be resolved by DNS: Noti_Serv_SMTP:0 >>server 10.179.176.21 In order to send messages to an email address, you must create a User Profile that specifies the email address as its contact field. For more information, see “To create a user profile” on page 5-14. LX Series Configuration Guide Creating Service Profiles 5-13 L If you specify a symbolic name (such as mrv.com) as the SMTP server, the LX first tries to resolve the name in its local service table. If there is no matching name, then the LX must have a primary DNS server and a domain name suffix configured for the LX unit. See the dns primary command in the LX-Series Commands Reference Guide for more information on configuring a DNS server for the LX unit. (In addition, the LX unit will need to have a fully qualified domain name suffix.) X To display service profile characteristics for a single service profile Use the monitor/show notification profile service command. In the following example, the characteristics are displayed for the service profile jacklocal: Example Notification:0 >>show notification profile service messagedirect X To display the characteristics of all service profiles Use the following command: Example Notification:0 >>show notification profile service all Figure 5.1 shows an example of the Service Profile Screen. Time: Wed, 18 Oct 2006 09:08:19 US/EASTERN ServiceProfile: syslog Protocol: localsyslog File: syslog ServiceProfile: messages Protocol: localsyslog File: messages ServiceProfile: messagedirect Protocol: remotesyslog Remote Host: Figure 5.1 Service Profile Screen Setting Up the Notification Feature 5-14 Overview of User Profiles Overview of User Profiles A User Profile filters event messages by the type (facility) and severity level (priority) of the event message. A User Profile also specifies the destinations (for example, addresses and telephone numbers) for event notification processes that send event messages by email, cell phones, and pagers. The LX unit supports a maximum of 20 User Profiles. X To create a user profile 1. 2. Example See “Command Mode Descriptions” on page 1-5 for information about accessing Notification Command Mode. Access the Notification Command Mode. Use the profile user command to create a User Profile: Notification:0 >>profile user adminscell L See “User Profile Name Restrictions” on page 5-16 for restrictions on the use of Special Characters and Reserved Words in User Profile names. 3. Example When you execute the profile user command, the CLI enters the User Service command mode. In the User Service command mode, execute the service command to specify an existing Service Profile for the current User Profile: Noti_User_Service:0 >>service Center10 When you execute the service command, the CLI enters the User Information command mode. 4. Example If the User Profile is for a Service Profile of the SNPP, SMTP, or TAP type, you must use the contact command to specify the contact field for the User Profile: Noti_User_Info:0 >>contact 9785552222 LX Series Configuration Guide Overview of User Profiles 5-15 The contact field specifies the destination (such as pager or cell phone) for User Profiles that are created for Service Profiles of the SNPP, SMTP, or TAP type. The allowable values for this field are the following: Value Pager Pin Number For user profiles based on Service Profiles of the SNPP type Email Address Service Profiles of the SMTP type Pager Number or Service Profiles of the TAP Telephone Number type 5. Example Example 8875551212 [email protected] 9785552222 Use the priority command to specify a priority characteristic for the User Profile: Noti_User_Info:0 >>priority warning The allowable values for the priority characteristic are info, notice, warning, err, crit, alert, emerg, and none. 6. Example Use the facility command to specify a facility characteristic for the User Profile: Noti_User_Info:0 >>facility user 7. Event messages that originate from the specified facility, and have the specified priority (see step 5), will be sent to the destination. The allowable values for the facility characteristic are: authpriv, daemon, kern, syslog, user, local0, local1, local2, local3, local4, local5, local6, and local7. Setting Up the Notification Feature 5-16 User Profile Name Restrictions User Profile Name Restrictions The following characters can not be included in a User Profile name that will be associated with a Service Profile of the SMTP, TAP, or SNPP type: ( ) { } , . ; : @ All text strings are caseinsensitive. open parentheses close parentheses open bracket close bracket comma period semicolon colon at sign The following text strings can be included in a User Profile name that will be associated with a Service Profile of the SMTP, TAP, or SNPP type. However, such a User profile can not begin with the following text strings: true false no yes Acceptable name Unacceptable name BillJonesTrue BillJonesfalse BillJonesNo BilljonesYES TrueBillJones falseBillJones NObillJones YesBillJones X To display User Profile characteristics for a specific user Use the monitor/show notification profile user command, in Superuser Command Mode. In the following example, the characteristics are displayed for the User Profile grogers: Example Notification:0 >>show notification profile user grogers X To display User Profile characteristics for all users Use the monitor/show notification profile user command, in Superuser Command Mode: Example Notification:0 >>show notification profile user all LX Series Configuration Guide Configuration Examples 5-17 Figure 5.2 shows an example of the User Profile Screen. UserProfile: messages ServiceProfile: messages Contact: Facility: all Priority: notice UserProfile: debug ServiceProfile: debug Contact: Facility: all Priority: debug UserProfile: grogers ServiceProfile: N/A Contact: Facility: kern Priority: emerg UserProfile: jacklocal ServiceProfile: jacklocal Contact: Facility: user Priority: warning Figure 5.2 User Profile Screen Configuration Examples This section contains examples of each type of Service Profile. Each example includes the commands for creating the Service Profile, along with the commands for creating a User Profile based on the Service Profile. Setting Up the Notification Feature 5-18 syslogd Message Configuration Example syslogd Message Configuration Example There are no prerequisites for this task. This example shows how to change the text field, facility, and priority of a configurable syslogd message. X To access the Notification command mode 1. Execute the following commands: Example Login: InReach Password: access InReach:0>enable Password>> system InReach:0 >>config Config:0 >>notification Notification:0 >> 2. Example Notification:0 >>message 1 string New CLI mode entered by 3. Example Change the priority setting of the message: Notification:0 >>message 1 priority notice 4. Example Change the text field of the message: Change the facility setting of the message: Notification:0 >>message 1 facility daemon Outbound Asynchronous Port Example The following commands forwards the logging of events to ports 5, 6, and 7: Example Notification:0 >>profile service 3serialport Noti_Serv_Protocol:0 >>async Noti_Serv_Async:0 >>port 5 6 7 Noti_Serv_Async:0 >>exit Notification:0 >>profile user serialport Noti_User_Service:0 >>service 3serialport Noti_User_Info:0 >>facility user Noti_User_Info:0 >>priority warning LX Series Configuration Guide Localsyslog Example 5-19 Localsyslog Example The following commands are used to configure the logging of events to the local syslog. In the following example, the locallog home directory is /var/log/Build5. Example Notification:0 >>profile service local Noti_Serv_Protocol:0 >>localsyslog Noti_Serv_Async:0 >>file Build5 Noti_Serv_Async:0 >>exit Notification:0 >>profile user locallog Noti_User_Service:0 >>service local Noti_User_Info:0 >>facility user Noti_User_Info:0 >>priority warning Remotesyslog Example Use the following commands to configure the logging of events to syslogd on a remote host: Example Notification:0 >>profile service Rlogvenus Noti_Serv_Protocol:0 >>remotesyslog Noti_Serv_RSyslog:0 >>host 10.179.170.253 Noti_Serv_RSyslog:0 >>exit Notification:0 >>profile user venus Noti_User_Service:0 >>service Rlogvenus Noti_User_Info:0 >>facility user Noti_User_Info:0 >>priority warning At the remote host, add the following entry to the /etc/syslog.conf file: user.warning /tftpboot/log/user.warning.log Setting Up the Notification Feature 5-20 SNPP Example In order to resolve the provider’s address, DNS must be configured on the LX unit. Create an empty log file as follows: #touch /tftpboot/log/user.warning.log #chmod 777 /tftpboot/log/user.warning.log Restart the syslog daemon, using the following commands, to make changes to the syslog.conf take effect. # ps –ef|grep syslog # kill –HUP pid# SNPP Example The following commands configure the logging of events to a text pager: Example Notification:0 >>profile service Skytel Noti_Serv_Protocol:0 >>snpp Noti_Serv_SNPP:0 >>server snpp.Skytel.com Noti_Serv_SNPP:0 >>port 7777 Noti_Serv_SNPP:0 >>exit Notification:0 >>profile user johnpager Noti_User_Service:0 >>service Skytel Noti_User_Info:0 >>contact 8875551212 Noti_User_Info:0 >>facility user Noti_User_Info:0 >>priority warning LX Series Configuration Guide Email Example 5-21 Email Example The following commands configure the logging of events to an email address: Example You may need to configure the LX with a Domain suffix, a DNS server address, and a primary gateway address. Notification:0 >>profile service youremail Noti_Serv_Protocol:0 >>smtp Noti_Serv_SMTP:0 >>server 10.10.10.21 Noti_Serv_SMTP:0 >>name john Noti_Serv_SMTP:0 >>subject Lab2 Floor5 lx11 Noti_Serv_SMTP:0 >>exit Notification:0 >>profile user jsmith Noti_User_Service:0 >>service youremail Noti_User_Info:0 >>contact [email protected] (verizon text phone) Noti_User_Info:0 >>facility user Setting Up the Notification Feature 5-22 TAP Example TAP Example The following sequence of commands could be used to configure the logging of events via a wireless provider such as Verizon, Sprint, or AT&T: Example Notification:0 >>profile service verizon Noti_Serv_Protocol:0 >>tap Noti_Serv_TAP:0 >>smsc 18668230501(provider’s service phone #) Noti_Serv_TAP:0 >>bits 7 Noti_Serv_TAP:0 >>stopbit 1 Noti_Serv_TAP:0 >>parity even Noti_Serv_TAP:0 >>modem port 6 Noti_Serv_TAP:0 >>exit Notification:0 >>profile user jmscell Noti_User_Service:0 >>uservice verizon Noti_User_Info:0 >>contact 785551212 Noti_User_Info:0 >>facility user Noti_User_Info:0 >>priority warning Noti_User_Info:0 >>exit Notification:0 >>exit Configure the modem port that will be used for sending messages: Example Config>>port async 17 Async 17-17:0 >>no apd Async 17-17:0 >>access remote Async 17-17:0 >>modem Modem>>modem enable LX Series Configuration Guide SNMP Example 5-23 MRV Communications is not responsible for these SMSC phone numbers and can’t guarantee their service. Contact your provider for a local number. Table 5.3, “Wireless SMSC Phone Numbers” is provided for your convenience. Table 5.3 Wireless SMSC Phone Numbers Carrier SMSC Number AT&T 7, 1, e Not Available Email Address SMSC Phone#@ @mobile.att.net Cingular 7, 1, e 800-909-4602 @Cingular.com Nextel 7, 1, e 801-301-6683 @messaging.nextel.com Sprint 7, 1, e 888-656-1727 @sprintpcs.com Verizon 7, 1, e, 8, 1, n 866-823-0501 @vtext.com Skytel 8, 1, n 800-679-2778 [email protected] SNMP Example The following commands configure the logging of events to an SNMP trap client (the LX unit must first have a trap client configured): Example Snmp:0 >>trap client 0 10.179.170.57 Snmp:0 >>trap client 0 community public Snmp:0 >>trap client 0 version 1 You can create the Service Profile and the User Profile in Notification Command Mode: Example Notification:0 >>profile service ricksnmp Noti_Serv_Protocol:0 >>snmp Noti_Serv_Protocol:0 >>exit Notification:0 >>profile user ricksnmp Noti_User_Service:0 >>service ricksnmp Noti_User_Info:0 >>facility user Noti_User_Info:0 >>priority warning Setting Up the Notification Feature 5-24 SSHD and DNS SSHD and DNS SSHD uses DNS to resolve the IP address of an incoming connection. In the previous release this feature was enabled by default. It is now disabled by default in the 4.0 release. If you have already saved your LX configuration, the new defaults will not be used, and must be set up manually. To configure SSHD to just use the IP address, rather than the resolved DNS name, enter the shell and edit the /config/ sshd_config file using "vi". Modify the line #UseDNS yes, to be UseDNS no. Then exit the shell, enter the save config flash command to save the change, then reboot the LX. Another way to do this is to default the LX configuration using the config default config command, and then reboot the LX. LX Series Configuration Guide Configuring IP Interfaces 6-1 CHAPTER 6 Configuring IP Interfaces An IP interface is a logical interface for accessing the LX unit from a network. The maximum number of IP interfaces on an LX unit is the number of serial ports on the LX unit, plus 2. For example, the maximum number of IP interfaces on an 8-port unit is 11 or 12 (if the unit has a modem port); the maximum number of IP interfaces on a 16-port unit is 20, and so on. See Chapter 16, “Configuring PPP” for information about configuring IP interfaces for PPP. On LX-8000 units, the maximum number of IP interfaces is the number of serial ports on the LX unit, multiplied by the number of Ethernet ports (2), plus 2. For example, the maximum number of IP interfaces on a 40-port unit is 82 ((40 x 2) + 2 = 82). Each IP interface can have its own IP characteristics. You can access an LX unit via the Address of the IP interface as an alternative to the ppciboot (server) Address of the LX unit. The network treats an IP interface as a network element that is no different from an actual server. Configuring IP Interfaces 6-2 Configuring IP Interfaces For example, you could have an LX unit with an IP address of 117.19.23.5, a Broadcast address of 117.255.255.255, and the subnet mask of 255.0.0.0 in ppciboot. You could then create the IP interfaces shown in Table for the LX unit. Table 6.1 IP Interface Examples Interface Number IP Address Broadcast Address Subnet Mask 1 119.20.112.3 119.255.255.255 255.0.0.0 2 124.45.65.23 119.255.255.255 255.0.0.0 3 178.123.87.123 119.255.255.255 255.0.0.0 This enables you to include the LX unit in three different networks (for example, 119.20.112.0, 124.45.65.0, and 178.123.87.0). IP interfaces can be configured as rotaries. For more information, see “Configuring a Rotary” on page 6-11. An IP interface has the same subscriber database as the LX unit on which it was created. A subscriber can connect to asynchronous ports, or virtual ports, on the LX unit via an IP interface. IP interfaces support SSH and Telnet as methods for connecting subscribers to the LX unit. See “Specifying the Subscriber Access Methods” on page 8-7 for more information. LX Series Configuration Guide Configuring IP Interfaces 6-3 It is possible for a subscriber with superuser privileges to log into the interface using SSH. The client SSH command line can include an LX CLI command. Once the SSH session is established, the CLI command is performed. The return from that screen is sent to the user and the session is then terminated. This capability is not supported by all SSH applications. The syntax follows: Syntax ssh -l <username> <lx_ip_address> -p 22 <cli_command> Example ssh -l InReach 1.2.3.4 -p 22 show users You can authenticate connections via IP interfaces with the same authentication methods that are configured for the LX unit (LOCAL, LDAP, RADIUS, TACACS+, or RSA SecurID). However, you must enable the authentication method on the IP interface before you can use it on the IP interface. (For more information, see “Configuring Local Authentication on an IP Interface” on page 6-8 and “Configuring Server-Based Authentication on an IP Interface” on page 6-8.) Ports can be configured as Master Ports, or Slave Ports, in a Broadcast Group associated with an IP interface. The Slave Ports can receive data from, and send data broadcasts to, the Master Ports in the Broadcast Group. See Chapter 7, “Configuring the Data Broadcast Feature” for more information. By default, an IP interface is bound to the physical Ethernet interface (Eth0) on the LX unit. For more information, see the Interface Commands in the LX Series Command Reference. Configuring IP Interfaces 6-4 Setting Up IP Interfaces Setting Up IP Interfaces IP interfaces are created and configured in the Interface Command Mode. You can enter the Interface Command Mode by executing the interface command in the Configuration Command Mode. When you are in the Interface Command Mode, the Interface Command prompt (such as Intf 1-1:0 >>) is displayed. X To configure an IP interface 1. Example Execute the interface command in the Configuration Command Mode: Config:0 >>interface 1 This enters the Interface command mode for the specified IP interface (IP interface 1 in the preceding example). 2. Example Use the address command to specify an IP Address, and Subnet Mask, for the interface: Intf 1-1:0 >>address 119.20.112.3 maskx 255.0.0.0 If you do not specify an explicit IP address, you can configure the IP address to re-use the IP address of another interface. Otherwise, the interface will default to using the First Available IP address. See “Re-Using IP Addresses” on page 6-5 for more information. 3. Example 4. Use the broadcast command to specify the Broadcast Address for the IP interface: Intf 1-1:0 >>broadcast 119.255.255.255 Configure an authentication method (LOCAL, LDAP, RADIUS, TACACS+, or RSA SecurID) for the IP interface. For more information, see the following sections: • “Configuring Local Authentication on an IP Interface” on page 6-8 • “Configuring Server-Based Authentication on an IP Interface” on page 6-8 LX Series Configuration Guide Re-Using IP Addresses 6-5 See the following sections to configure optional parameters for an IP interface: “Specifying SSH Keepalive Parameters” on page 6-5 “Specifying Socket Numbers” on page 6-6 “Specifying Maximum Transmission Units (MTU)” on page 6-7 Re-Using IP Addresses Unless you configure an IP address, with the address command, the IP interface will obtain its IP address from the First Available interface or from the interface that you specify in the unnumbered interface command. In the following example, the unnumbered interface command specifies that Interface 4 will use the IP address of Interface 3: Example Intf 4-4:0 >>unnumbered interface 3 If you do not execute the unnumbered interface command, or the address command, the interface re-uses the First Available IP address. Specifying SSH Keepalive Parameters The SSH Keepalive Count is the number of times that an SSH client will attempt to make an SSH connection to an IP interface. The SSH Keepalive Interval is the length of time, in seconds, between attempts at making an SSH connection to the IP interface. X To specify the SSH Keepalive Count Example Execute the ssh keepalive count command: Intf 1-1:0 >>ssh keepalive count 8 X To specify the SSH Keepalive Interval Execute the ssh keepalive interval command: Example Intf 1-1:0 >>ssh keepalive interval 30 Configuring IP Interfaces 6-6 Specifying Socket Numbers Specifying Socket Numbers IP interfaces have a default SSH Socket Number of 22 and a default Telnet Socket Number of 23. Table 6.2 lists the default SSH and Telnet Socket Numbers for LX serial ports. Table 6.2 Default Socket Numbers for Serial Ports LX Serial Port Default Telnet Port Default SSH Port 0 0 0 1 2100 2122 2 2200 2222 3 2300 2322 4 2400 2422 5 2500 2522 6 2600 2622 7 2700 2722 8 2800 2822 This section describes how to specify SSH Socket Numbers and Telnet socket Numbers for IP interfaces and LX (asynchronous) ports. This is typically done to prevent hackers from accessing LX ports via default SSH Socket Numbers or default Telnet Socket Numbers. X To specify a Telnet socket number for a serial port Example Execute the serial command with the telnet modifier. In the following example, the Telnet Socket Number for serial port 6 is set to 1297: Intf 1-1:0 >>serial 6 telnet 1297 LX Series Configuration Guide Specifying Maximum Transmission Units (MTU) 6-7 X To specify an SSH socket number for a serial port Example Execute the serial command with the ssh modifier. In the following example, the SSH Socket Number for serial port 4 is set to 983: Intf 1-1:0 >>serial 4 ssh 983 X To specify a Virtual Port Socket Number for SSH Example Execute the ssh port command. In the following example, the Virtual Port Socket Number for making an SSH connection to the IP interface is set to 988: Intf 1-1:0 >>ssh port 988 X To specify a Virtual Port Socket Number for Telnet Example Execute the telnet port command. In the following example, the Virtual Port Socket Number for making a Telnet connection to the IP interface is set to 1743: Intf 1-1:0 >>telnet port 1743 Specifying Maximum Transmission Units (MTU) The Maximum Transmission Units (MTU) is the maximum size (in bytes) of frames that can be transmitted on the IP interface. Frames that are larger than the designated MTU size are fragmented before transmission. L The software fragments frames on the transmit side only. X To specify the MTU for an IP interface Use the mtu command: Example Intf 1-1:0 >>mtu 1200 You can specify any number from 1000 through 1500 as the MTU size. The default MTU size is 1500. Configuring IP Interfaces 6-8 Configuring Local Authentication on an IP Interface Configuring Local Authentication on an IP Interface Local authentication can be used when a subscriber logs in to a specific asynchronous port via an IP interface. In order to use local authentication, it must be enabled as the method of inbound authentication for the asynchronous port. Then it must be enabled for the IP interface. X To enable local authentication for inbound asynchronous ports Example Execute the authentication enable command, in Asynchronous Command Mode, with the inbound and local modifiers. In the following example, local authentication is enabled as the method of inbound authentication for asynchronous port 4: Async 4-4:0 >>authentication inbound local enable X To enable local authentication on the IP interface Example Execute the authentication local enable command, in Interface Command Mode: Intf 1-1:0 >>authentication local enable Configuring Server-Based Authentication on an IP Interface Server-based authentication methods (for example, LDAP, RADIUS, TACACS+, or RSA SecurID) can be used when a subscriber logs in to an asynchronous port via an IP interface. In order to enable server-based authentication for an IP interface, the authentication method must be configured for the LX unit and enabled as the method of inbound authentication for the asynchronous port. For more information, see “Setting Up Server-Based Authentication and Accounting” on page 2-12 and the authentication enable commands in the LX-Series Commands Reference Guide. LX Series Configuration Guide Configuring RADIUS Accounting on an Interface 6-9 X To enable LDAP authentication on the IP interface Example Execute the authentication ldap enable command in Interface Command Mode: Intf 1-1:0 >>authentication ldap enable X To enable RADIUS authentication on the IP interface Example Execute the authentication radius enable command in Interface Command Mode: Intf 1-1:0 >>authentication radius enable X To enable RSA SecurID authentication on the IP interface Example Execute the authentication rsa securid enable command in Interface Command Mode: Intf 1-1:0 >>authentication rsa securid enable X To enable TACACS+ authentication on the IP interface Example Execute the authentication tacacs+ enable command, in the Interface Command Mode: Intf 1-1:0 >>authentication tacacs+ enable X To enable Kerberos authentication on the IP interface Example Execute the authentication kerberosv5 enable command, in the Interface Command Mode: Intf 1-1:0 >>authentication kerberosv5 enable Configuring RADIUS Accounting on an Interface RADIUS Accounting allows you to log user account information to a remote server in a per-client file. The file or record can contain information such as the user who logged in, the duration of the session, port number, Client IP address, and the number of bytes/packets that were processed by the LX unit. See Appendix B, “About RADIUS and TACACS+ Accounting” for more information about RADIUS accounting. Configuring IP Interfaces 6-10 Configuring TACACS+ Accounting on an Interface RADIUS accounting can be used when a subscriber logs in to an asynchronous port via an IP interface. In order to enable RADIUS accounting for an IP interface, RADIUS accounting must be configured for the LX unit. For more information, see “Setting Up RADIUS” on page 2-19. X To enable RADIUS accounting on the IP interface Example Execute the radius accounting enable command in Interface Command Mode: Intf 1-1:0 >>radius accounting enable Configuring TACACS+ Accounting on an Interface TACACS+ Accounting allows you to log user account information to a remote server in a per-client file. For more information about TACACS+ accounting, see See Appendix B, “About RADIUS and TACACS+ Accounting”on page page B-1. X To enable TACACS+ accounting on the IP interface Execute the tacacs+ accounting enable command in Interface Command Mode: Example Intf 1-1:0 >>tacacs+ accounting enable Configuring Fallback on an IP Interface Fallback Authentication can be used as a mechanism for authenticating users when the configured authentication method (for example, LDAP, RADIUS, TACACS+, or RSA SecurID) fails because the authentication server is unreachable. When a user logs in via Fallback, his or her username/password combination is validated against the LOCAL security database for the LX unit. The LX unit will make three attempts to log in the user via LDAP, RADIUS, TACACS+, or RSA SecurID before it implements Fallback. After the third login attempt, the username/password combination will be validated against the LOCAL security database for the LX unit. LX Series Configuration Guide Configuring a Rotary 6-11 LDAP, RADIUS, TACACS+, or RSA SecurID must be enabled on an IP interface in order for Fallback to function on the interface. See “Configuring Server-Based Authentication on an IP Interface” on page 6-8 for information on enabling LDAP, RADIUS, TACACS+, or RSA SecurID. When all four methods (for example, LDAP, RADIUS, TACACS+, or RSA SecurID) are disabled on the interface, Fallback is ignored by the interface. L Enable Fallback is not supported when used in conjunction with inbound PPP CHAP. X To enable Fallback on the IP interface Example Execute the authentication fallback enable command in Interface Command Mode: Intf 1-1:0 >>authentication fallback enable Configuring a Rotary The term “rotary” refers to the assignment of an IP address to multiple destinations that offer the same type of service. A rotary can be configured on an IP interface, with LX ports as the multiple destinations of the rotary. A user can attempt to connect to an IP interface that has a rotary configured on it. When a user attempts such a connection, he/she is connected to an available port that has been configured as one of the destinations of the rotary. Configuring IP Interfaces 6-12 Configuring a Rotary Figure 6.1 illustrates a rotary on an LX unit. The user initiates a Telnet connection, or an SSH connection, to the IP address of an IP interface that has been configured as a rotary. The user is connected to an available port in the rotary port list. LX Unit Figure 6.1 Rotary Connections on an IP Interface The rotary is transparent to users. A user simply requests a connection to an IP address, and the LX unit sets up the connection with one of the available ports in the rotary group. X To configure a rotary on an IP interface 1. Example Create a new IP interface, or access an existing one, by executing the interface command in the Configuration Command Mode: Config:0 >>interface 1 This enters the Interface Command Mode for the specified interface (for example, Interface 1). The Interface Command prompt (such as Intf 1-1:0 >>) is displayed. 2. Example 3. Example Use the address command to configure a server IP address for the IP interface: Intf 1-1:0 >>address 10.240.10.100 Use the rotary port command to create a rotary, and to assign LX asynchronous ports to the rotary: Intf 1-1:0 >>rotary 1 port 1 2 3 LX Series Configuration Guide Configuring a Rotary 6-13 In the preceding example, Rotary 1 is created and the LX asynchronous ports 1, 2, and 3 are assigned to it. (You can execute the rotary port command on an existing rotary to add asynchronous ports to it.) 4. Example 5. 6. Example 7. Example 8. Use the rotary type command to specify the rotary type (round robin or first available). For example: Intf 1-1:0 >>rotary 1 type round robin The rotary type is identifies the port search method for the rotary. The supported values are: first available An incoming call is connected to the First Available (non-busy) port in the rotary. round robin The LX unit will search the rotary for an available port, starting with the lowestnumbered port in the rotary. Use the rotary enable command to enable the rotary: Intf 1-1:0 >>rotary 1 enable Use the rotary tcp port command to assign a TCP socket number to the rotary. For example: Intf 1-1:0 >>rotary 1 tcp port 3000 In the preceding example, the TCP socket number for the rotary is specified as 3000. This identifies the socket that will be used to make Telnet connections to the rotary. L The default TCP socket is 1500. 9. Example Use the rotary ssh port command to assign an SSH socket number to the rotary: Intf 1-1:0 >>rotary 1 ssh port 3022 In the preceding example, the SSH socket number for the rotary is specified as 3022. This identifies the socket that will be used to make SSH connections to the rotary. L The default SSH socket is 1522. Configuring IP Interfaces 6-14 Removing Ports from a Rotary Removing Ports from a Rotary X To remove ports from a rotary 1. Example Execute the rotary port command in Interface command mode. In the following example, ports 2 and 3 are removed from rotary 1: Intf 1-1:0 >>rotary 1 port 1 In the next example, port 3 is removed from rotary 1: Example Intf 1-1:0 >>rotary 1 port 1 2 You can verify that asynchronous ports have been removed from a rotary by executing the monitor/show interface rotary command. If the asynchronous ports have in fact been removed, they will not appear in the “Serial Ports” column of the screen. For more information on the monitor/show interface rotary command, see “To display rotary information for an IP interface” on page 6-19. Disabling a Rotary X To disable a rotary Example Execute the no rotary command in Interface command mode. In the following example, the command disables Rotary 1: Intf 1-1:0 >>no rotary 1 When a rotary is disabled, it no longer functions as a rotary. L Disabling a rotary does not delete the rotary; the configuration of the rotary still exists, and you can reenable it by executing the rotary enable command in the Interface Command Mode. LX Series Configuration Guide Setting Maximum Telnet Connections 6-15 X To verify that a rotary has been disabled Execute the monitor/show interface rotary command. If the rotary is actually disabled, it will say in the Rotary State column of the screen will show as Disabled. For more information about the monitor/show interface rotary command, see “To display rotary information for an IP interface” on page 6-19. Setting Maximum Telnet Connections Use this command to limit the number of open connections on the telnet port per interface. When the maximum count is reached, the LX stops listening on the socket. When one of the connections is closed, the LX starts listening again. The range is from 0 - 32. The default is 0 (unlimited connections). X To configure telnet max connections Example Execute the telnet max connections command in Interface command mode. In the following example, the command sets the maximum connections to its highest number: Intf 1-1:0 >>telnet max connections 32 Displaying Interface Information This section describes how to display information about IP interfaces and rotaries. The IP interface information includes characteristics, port mapping, statuses, and summaries. The rotary information includes the Rotary IP Address, the Rotary ports, the Rotary type, and the Rotary State. X To display the characteristics of an IP interface Example Use the monitor/show interface characteristics command. In the following example, the interface characteristics are displayed for IP interface 1: Intf 1-1:0 >>show interface 1 characteristics Configuring IP Interfaces 6-16 Displaying Interface Information X To display the interface characteristics of all IP interfaces Example Use the following command: Intf 1-1:0 >>show interface all characteristics Figure 6.2 shows an example of the Interface Characteristics screen. Time: Interface Name: Interface_1 Configured IP Address: Configured IP Mask: Configured IP Broadcast: Configured System Gateway: IP MTU Size: 1500 Interface Status: In Use Banner: banner.default Authentication: Local Auth. FallBack Attempts: 0 Telnet port: 23 Thu, 16 Nov 2006 16:00:20 US/EASTERN Bound to: eth0 0.0.0.0 0.0.0.0 0.0.0.0 0.0.0.0 Unnumbered Interface: First Available MOTD: RADIUS Accounting: Disabled TACACS+ Accounting: Disabled SSH port: 22 Telnet Max Connections: 0 Figure 6.2 Interface Characteristics Screen LX Series Configuration Guide Displaying Interface Information 6-17 X To display interface port mapping Example Use the monitor/show interface port mapping command to display the Telnet Socket Number, and the SSH Socket Number, associated with each serial port on the LX unit. In the following example, the port mapping for IP interface 1 is displayed: Intf 1-1:0 >>show interface 1 port mapping X To display the port mapping for all IP interfaces Use the show interface all port mapping command: Example Intf 1-1:0 >>show interface all port mapping Figure 6.3 shows an example of the Interface Port Mapping screen for a 20-port unit. Serial Port 0 1 2 3 4 5 6 7 8 9 10 11 12 13 14 15 16 17 18 19 20 Telnet Port 0 2100 2200 2300 2400 2500 2600 2700 2800 2900 3000 3100 3200 3300 3400 3500 3600 3700 3800 3900 4000 SSH Port 0 2122 2222 2322 2422 2522 2622 2722 2822 2922 3022 3122 3222 3322 3422 3522 3622 3722 3822 3922 4022 Figure 6.3 Interface Port Mapping Screen Configuring IP Interfaces 6-18 Displaying Interface Information X To display interface status for an IP interface Example Use the monitor/show interface status command. In the following example, the status information for IP interface 1 is displayed: Intf 1-1:0 >>show interface 1 status X To display the status information for all IP interfaces Use the show interface all status command: Example Intf 1-1:0 >>show interface all status Figure 6.4 shows an example of the Interface Status screen. Time: Mon 24 Apr 2003 16:19:34 Interface Name: Interface_1 Bound to : eth0 IP Address: 112.19.161.191 IP Mask: 255.255.255.0 IP Broadcast Addr: 112.19.161.255 Learned from: DHCP DHCP Status: Active DHCP Lease Server: 112.19.163.21 DCHP Lease Expiration: Tue, 11 Jan 2005 05:32:07 UTC Figure 6.4 Interface Status Screen X To display IP interface summary information for all IP interfaces Example Use the monitor/show interface summary command: Intf 1-1:0 >>show interface summary Figure 6.5 shows a sample Interface Summary Screen. Name Address Broadcast Addr. Mask to Interface_1 *157.145.162.155 157.145.162.255 *255.255.255.0 eth0 Interface_2 0.0.0.0 0.0.0.0 0.0.0.0 Interface_3 0.0.0.0 0.0.0.0 0.0.0.0 Interface_4 0.0.0.0 0.0.0.0 0.0.0.0 '*' before the value denote it was learned from ppciboot Figure 6.5 Sample Interface Summary Screen LX Series Configuration Guide Bound eth0:1 eth0:2 eth0:3 Telnet Client 6-19 X To display rotary information for an IP interface Use the monitor/show interface rotary command. In the following example, the rotary information for IP interface 1 is displayed: Intf 1-1:0 >>show interface 1 rotary L An interface can contain up to four rotaries. X To display the rotary information for all IP interfaces Use the following command: Intf 1-1:0 >>show interface all rotary Figure 6.6 shows a sample Rotary Characteristics screen. Rotary IP Address 147.132.145.16 TCP 1500 SSH 1522 Rotary Type First Available Rotary State Disabled Serial Ports Figure 6.6 Rotary Characteristics Screen Telnet Client The Telnet Client supports telnet negotiation options binary mode (RFC 856) and send location (RFC 779) when requested via the peer. The send location option can be up to 31 characters in length and is only supported from the shell level. LX:/#telnet -s <location> <host> <port> Example LX:/#telnet -s bostonLab 120.119.129.13 Configuring IP Interfaces 6-20 Setting the Banner Setting the Banner This feature allows the administrator to configure a warning banner upon login. X To specify the Login Banner File Name Example Use the banner file <file_name> [contents] command to specify the inbound or outbound banner file name and message. Intf 1-1:0 >>banner file new_banner.txt contents <cr> If you entered the word “contents”, the following message appears: Please enter your banner: (CTRL-K to save) Here you can enter the banner text directly and press CTRL-K to save it. If the file exists in the /config directory on the LX, a warning message is displayed to alert the user that the current contents of the file will be overwritten. X To default the Login Banner File Name Examples Use the default banner file command to default the banner file name and contents. The default filename is banner.default. Intf 1-1:0 >>default banner file X To delete the Login Banner File Name Example Use the no banner file command to delete the banner file name. Intf 1-1:0 >>no banner file LX Series Configuration Guide Message of the Day Commands 6-21 Message of the Day Commands The Message of the Day allows you to display a message to the user upon login. This message could be, for example, You are on a proprietary system, or We are shutting down at 4PM today. The message you specify appears on the screen just after the user logs in. X To specify the Message of the Day File Name Examples Use the motd file <file_name> [contents] command to specify the message of the day file name and use the no motd file to delete the message of the day file on an interface basis. Intf 1-1:0>>motd file message12 contents <cr> Intf 1-1:0>>no motd file If you use the word “contents“, the following message appears: Please enter your message of the day: save) (CTRL-K to Here you can enter the MOTD text directly and press CTRL-K to save it. If the file already exists in the /config directory on the LX, a warning message is displayed to alert the user that the current contents of the file will be overwritten. Use the show interface <interface_number> characteristics command to display the Interface Characteristics screen (see Figure 6.2, “Interface Characteristics Screen"). X To default the Message of the Day File Examples Use the default motd file command to default the message of the day file name and contents. The default filename is motd.default. Intf 1-1:0 >>default motd file Configuring IP Interfaces 6-22 Message of the Day Commands LX Series Configuration Guide Configuring the Data Broadcast Feature 7-1 CHAPTER 7 Configuring the Data Broadcast Feature All Slave Ports and Master Ports belong to a Broadcast Group. The Slave Ports in a Broadcast Group can only receive data broadcasts from a Master Port in the same Broadcast Group. When a port is configured as a Slave Port, it can still receive data from sources other than the Master Ports in its Broadcast Group. By default, any data that a Slave Port receives is forwarded to the Master Ports in the Broadcast Group. The Master Ports then broadcast the data to the Slave Ports in the Broadcast Group. Configuring the Data Broadcast Feature 7-2 Setting Up Broadcast Groups Setting Up Broadcast Groups X To set up a Broadcast Group See “Command Mode Descriptions” on page 1-5 for more information. 1. 2. Access the Configuration Command Mode in the LX CLI. Execute the interface command to enter the Interface command mode for an IP interface: Config:0 >>interface 1 3. Use the broadcast group command to create a Broadcast Group. In the following example, the Broadcast Group Command prompt (BrGroups 4:0 >>) indicates that you are in the Broadcast Group Command Mode for Broadcast Group 4.: Intf 1-1:0 >>broadcast group 4 This enters the Broadcast Group Command Mode. 4. 5. Use the master port command to specify the Master Ports for the Broadcast Group. In the following example, asynchronous port 5, and TCP port 1500, are specified as Master Ports for Broadcast Group 4: BrGroups 4:0 >>master port async 5 BrGroups 4:0 >>master port tcp 1500 BrGroups 4:0 >>master port telnet 2500 BrGroups 4:0 >>master port ssh 2500 Use the slave port command to specify the Slave Ports for the Broadcast Group. In the following example, asynchronous port 4, 6, and 7, and TCP port 2500, are specified as Slave Ports for Broadcast Group 4: BrGroups BrGroups BrGroups BrGroups 6. 4:0 4:0 4:0 4:0 >>slave port async 4,6,7 >>>slave port tcp 2500 >>slave port telnet 2500 >>>slave port ssh 2500 Use the mode command to specify the Telnet mode for the Broadcast Group. In the following example, the Telnet mode is specified as line; the Telnet mode can also be specified as character: LX Series Configuration Guide Guidelines for Adding Ports 7-3 BrGroups 4:0 >>mode line 7. Use the exit command to return to the Interface Command Mode: BrGroups 4:0 >>exit 8. Use the broadcast group enable command to enable the Broadcast Group that you just created: Intf 1-1:0 >>broadcast group 4 enable L In order to enable a Broadcast Group, the Broadcast Group must contain at least one Master Port and one Slave Port. Guidelines for Adding Ports Keep the following in mind as you add Slave Ports and Master Ports to a Broadcast Group: You can’t specify a the DIAG port (port 0) as a Slave Port or a Master Port. A maximum of 20 ports, including Masters and Slaves, can be configured for a Broadcast Group. You can’t add a port to a Broadcast Group if it is already a member of another Broadcast Group. A TCP port that is already in use can’t be added to a Broadcast Group. No more than one TCP socket may be open on a single TCP port. A maximum of 16 TCP ports can be configured for a Broadcast Group. To prevent data overruns, it is recommended that the Master Port(s) and Slave Port(s) in a Broadcast Group be set to the same port speed. A maximum of five Broadcast Groups per interface is allowed. If more than five broadcast groups are required, you must create additional interfaces. Configuring the Data Broadcast Feature 7-4 Specifying Port Options Specifying Port Options You can specify that a timestamp will be appended to each line of data that is broadcast from a Master Port. You can also specify that non-broadcast data will be discarded by Slave Ports and that Slave Ports will echo any data that comes into them. This section describes how to configure these features. X To append a timestamp Use the timestamp option of the master port command to specify that a timestamp will be appended to each line of data that is broadcast from a Master Port: Example BrGroups 4:0 >>master port async 4 6 7 timestamp BrGroups 4:0 >>master port telnet 2500 timestamp BrGroups 4:0 >>master port ssh 2500 timestamp By default, any data that a Slave Port receives is forwarded to the Master Port(s) in the Broadcast Group. This data is then broadcast to all of the Slave Ports in the Broadcast Group. However, you can configure Slave Port(s) to discard data without forwarding it to the Master Port(s). X To discard non-broadcast data Specify the discard option in the slave port command. In the following example, the discard option is specified for the asynchronous ports 5 and 7 and the TCP port 2500, in the Broadcast Group 4: Example BrGroups BrGroups BrGroups BrGroups 4:0 4:0 4:0 4:0 LX Series Configuration Guide >>slave >>slave >>slave >>slave port port port port async 5,7 discard tcp 2500 discard telnet 2500 discard ssh 2500 discard Specifying Port Options 7-5 X To echo incoming data at slave ports Use the localecho option in the slave port command to specify that Slave Ports will echo any data that comes into them: Example BrGroups BrGroups BrGroups BrGroups 4:0 4:0 4:0 4:0 >>slave >>slave >>slave >>slave port port port port async 5,7 localecho tcp 2500 localecho telnet 2500 localecho ssh 2500 localecho X To remove Master Ports from a Broadcast Group Execute the no master port command in Broadcast Group Command Mode. In the following examples, asynchronous port 5 and TCP port 1500 are removed from Broadcast Group 4: Example BrGroups BrGroups BrGroups BrGroups 4:0 4:0 4:0 4:0 >>no >>no >>no >>no master master master master port port port port async 5 tcp 1500 telnet 1500 ssh 1500 X To remove Slave Ports from a Broadcast Group Execute the no slave port command in the Broadcast Group Command Mode. In the following examples, asynchronous port 7 and TCP port 2500 are removed from Broadcast Group 4: Example BrGroups BrGroups BrGroups BrGroups 4:0 4:0 4:0 4:0 >>no >>no >>no >>no slave slave slave slave port port port port async 7 tcp 2500 telnet 2500 ssh 2500 X To enable an authentication type for a Broadcast Group Execute the virtual authentication enable command in the Broadcast Group Command Mode. In the following examples, various authentication types are enabled: Example BrGroups BrGroups BrGroups BrGroups 4:0 4:0 4:0 4:0 >>virtual >>virtual >>virtual >>virtual authentication authentication authentication authentication fallback enable ldap enable local enable none enable Configuring the Data Broadcast Feature 7-6 Specifying Port Options BrGroups 4:0 >>virtual authentication radius enable BrGroups 4:0 >>virtual authentication rsa securid enable BrGroups 4:0 >>virtual authentication tacacs+ enable X To set the maximum number of virtual connections for a Broadcast Group Execute the virtual max connections <number> command in the Broadcast Group Command Mode. In the following example, max connections is set to 5: Example BrGroups 4:0 >>virtual max connections 5 X To verify that Master Ports or Slave Ports have been deleted from a Broadcast Group Execute the monitor/show interface broadcast group characteristics command. L The deleted ports will not be listed in the Broadcast Group Characteristics Screen.) For more information on the monitor/show interface broadcast group characteristics command, see “To display Broadcast Group characteristics for a single Broadcast Group” on page 7-7. L You can’t delete a Broadcast Group. In lieu of deleting a Broadcast Group, you can remove all of the ports from the Broadcast Group and then disable the Broadcast Group. X To disable a Broadcast Group Execute the no broadcast group command in Interface Command Mode. In the following example, Broadcast Group 4 is disabled: Example Intf 1-1:0 >>no broadcast group 4 LX Series Configuration Guide Specifying Port Options 7-7 X To display Broadcast Group characteristics for a single Broadcast Group Use the monitor/show interface broadcast group characteristics command. In the following example, the Broadcast Group characteristics are displayed for Broadcast Group 4: Example BrGroups 4:0 >>show interface 1 broadcast group 4 characteristics X To display Broadcast Group characteristics for all Broadcast Groups Use the following command to display the Broadcast Group characteristics of all Broadcast Groups on the LX unit: Example BrGroups 4:0 >>show interface 1 broadcast group all characteristics Figure 7.1 shows an example of the Broadcast Group Characteristics screen. Time: Thu, 29 Jun 2006 10:31:42 UTC Broadcast Group Number: 1 Mode: State: Disabled Max Virtual Connections: Auth. Fallback Attempts: 0 Virtual Authentication: Local Port Number: 1 Type: Value: Master TimeStamp: Port Number: 1025 Type: Value: Master TimeStamp: Port Number: 2 Type: Value: Slave Discard: LocalEcho: Disabled Line Mode 1 Async Disabled Tcp Disabled Async Disabled Figure 7.1 Broadcast Group Characteristics Screen Configuring the Data Broadcast Feature 7-8 Specifying Port Options X To display a Broadcast Group summary for all Broadcast Groups Use the monitor/show interface broadcast group summary command in Superuser Command Mode: Example BrGroups 4:0 >>show interface 1 broadcast group summary Figure 7.2 shows an example of the Broadcast Group Summary screen. Interface number 1 Broadcast group number: 1 2 3 4 5 State: Enabled Disabled Disabled Disabled Disabled Figure 7.2 Broadcast Group Summary Screen LX Series Configuration Guide Configuring Subscriber Accounts 8-1 CHAPTER 8 Configuring Subscriber Accounts In order for a user (subscriber) to use the LX unit, he/she must log in to the unit under a subscriber account. The subscriber account defines a User Profile that includes the subscriber’s username and password. The User Profile also defines the subscriber’s Security Level (User or Superuser) and contains all of the settings that affect the subscriber’s use of the LX unit. This chapter describes how to create and delete subscriber accounts, how to modify subscriber accounts, and how to display information on subscriber accounts. The LX Series Command Reference provides a detailed syntax, and description, for each command listed in this chapter. Configuring Subscriber Accounts 8-2 Configuring Subscriber Accounts Configuring Subscribers with the Default Template Users who connect to the LX and are authenticated with a remote authentication mechanism can have some modifiable, inherited rights as defined by the new subscriber Default template. Default is a new subscriber that comes with the software. You cannot create or login as this subscriber, but you can modify the template characteristics. The template is then applied or inherited when using external authentication methods such as RADIUS and TACACS+. In external authentication, the circumstances under which the Default Template is used are: If the Local Subscriber is set to disabled, the LX uses the "Default" subscriber as a template. If the Local Subscriber is set to enabled, the LX uses the subscriber with the same name. If no such subscriber exists, the LX uses the "Default" subscriber as a template. If the Local Subscriber is set to only, the LX uses the subscriber with the same name. If no such subscriber exists, you are not allowed to log in. In cases with no authentication, the circumstances under which the Default Template is used are: When connecting to an async port, if a subscriber has the same name as that of the port, that subscriber is used. Otherwise, the non-modifiable "Default" template is used. If the "Default" template is used the prompt and user name is changed to: 1. PPP_PORTNUM for ppp access ports 2. Slave_PORTNUM for broadcast slaves access ports 3. Local_PORTNUM for local access ports 4. Remote_PORTNUM for remote access ports 5. Remote for interfaces LX Series Configuration Guide Configuring Subscriber Accounts 8-3 When using a connect port async NUMBER from the CLI, if the Outbound authentication is set to none, the default template name is used, instead of the connect port authentication. L If the "Default" template is used and you authenticate via RSA SecurID, LDAP, or AUTH_NONE, you are made a superuser when you log in. L Authentications using the "Default" template increment the same "Max Connections" counter. This is a counter only, and cannot be configured. Once the Maximum Connections is reached, it will not prevent you from logging in. X To modify a Default account Example Use the subscriber command in Configuration Command Mode to change attributes in the Default Template: Config:0 >> subscriber Default where Default is a subscriber name (user name). This name is case sensitive. X To default the Default subscriber account Example Use the subscriber Default default command in Configuration Command Mode to change all attributes to the defaults listed in the screen in Figure 8.1, “Subscriber Default Characteristics Screen". In the following example, the subscriber account Default is defaulted: Config:0 >>subscriber Default default X To display subscriber Default characteristics Use the monitor/show subscriber Default characteristics command. In the following example, the show subscriber Default characteristics command is used to display the characteristics for the subscriber Default: InReach:0 >>show subscriber Default characteristics Configuring Subscriber Accounts 8-4 Configuring Subscriber Accounts Subscriber Name: Preferred Service: Security: Login Mode : Command Logging: Idle Timeout: Rlogin Transparent: Forward Switch: Backward Switch: Dialback Feature: Menu Name: Web Menu Name: Port Access list: Port Read Only list: Remote Access list: Outlet Access list: Outlet Group Access list: Web Access List: Default User Cli Disabled 0 Disabled ^F ^B Disabled Rlogin Ded. Service: Dedicated Service: Maximum Sessions: Audit Logging : User Prompt: Screen Pause: Local Switch: Connect Escape Char: Dialback Number: 4 Disabled InReach Enabled ^L ^Z /config/M_Default /config/M_Default 0-8 Telnet Ssh Web_Server Console Config Figure 8.1 Subscriber Default Characteristics Screen You can modify most of the default values that appear on this screen. The few default values you cannot modify are: Change password Max Connections Password enable SSH Key Password Subscriber Name (displayed but cannot be changed) LX Series Configuration Guide Creating Subscriber Accounts and Entering Subscriber Command Mode 8-5 Creating Subscriber Accounts and Entering Subscriber Command Mode The administrator must configure the first password for a new subscriber in order for that subscriber account to be active. The subscriber name must contain at least two characters, and no more than 15 characters. The reserved words super and subscriber, and any variation of super and subscriber, can’t be used as subscriber names. L Variations of super and subscriber include su, sup, sub, and subs.) The maximum number of subscribers on an LX unit is equal to double the number of ports on the unit. For example, the maximum number of subscribers is 16 on an 8-port unit, 32 on a 16-port unit, 64 on a 32-port unit, and 96 on a 48-port unit. Executing the subscriber command puts you into the Subscriber Command Mode for the subscriber. The Subscriber Command prompt (such as Subs_jack:0 >>) is displayed. X To create or modify a subscriber account Example Use the subscriber command in Configuration Command Mode: Config:0 >>subscriber jack where jack is a subscriber name (user name). X To create a subscriber account by copying Example Execute the copy subscriber command in Configuration Command Mode. The copy subscriber command creates new subscriber accounts by copying the configuration of an existing subscriber account. In the following example, the subscriber account configuration of benw is copied to jimk, billj, and edw: Config:0 >>copy subscriber benw to jimk billj edw Configuring Subscriber Accounts 8-6 Subscriber Account Settings L When you create a new subscriber with the copy subscriber command, all subscriber characteristics are copied over except the user password, user prompt, menu name, and web menu name. X To delete a subscriber account Use the no subscriber command in Configuration Command Mode. In the following example, the subscriber account jack is deleted: Config:0 >>no subscriber jack Example L You can’t delete the subscriber InReach unless you create another superuser account. Subscriber Account Settings When you create a new subscriber account with the subscriber command, its account settings are based on the default User Profile of the InReach subscriber. L The InReach subscriber is the default subscriber for the LX unit. See the following sections to specify new settings in a subscriber account: “Specifying the Subscriber Access Methods” on page 8-7 “Setting Up Session and Terminal Parameters” on page 8-12 “Specifying a Dedicated Service” on page 8-19 “Enabling the Menu Feature” on page 8-21 “To add Superuser privileges to a subscriber account” on page 8-17 “Enabling Audit Logging” on page 8-20 “Enabling Command Logging” on page 8-21 LX Series Configuration Guide Specifying the Subscriber Access Methods 8-7 Specifying the Subscriber Access Methods You can specify up to four methods for the subscriber to access the LX unit. The methods include Telnet, SSH, Web Browser, and Console. For procedural information about specifying each method, see the following: “To specify Telnet access for a subscriber” on page 8-7 “To specify SSH access for a subscriber” on page 8-7 “To enable Web browser access for a subscriber” on page 8-9 “To configure a subscriber account for access to asynchronous ports” on page 8-9 “To configure a subscriber account for outlet access” on page 8-10 “To configure a subscriber account for outlet group access” on page 8-10 You can also provide subscribers with access via Dialback. For more information, see “Dialback Access” on page 8-11. X To specify Telnet access for a subscriber 1. Example Set the telnet access parameter to enabled: Subs_jack:0 >>access telnet enable After you execute the preceding command, the subscriber will have Telnet access to virtual ports on the LX unit. See “Configuring Asynchronous Ports for Direct Serial Connections” on page 3-4 for information about giving users access to asynchronous ports on the LX unit. X To specify SSH access for a subscriber 1. Example Subs_jack:0 >>access ssh enable 2. Example Set the ssh access parameter to enabled: Set the ssh log level parameter to the class of SSH messages that will be logged to syslogd: Subs_jack:0 >>ssh log level debug Configuring Subscriber Accounts 8-8 Specifying the Subscriber Access Methods The preceding example of the ssh log level command specifies that SSH messages of the debug class will be logged to syslogd for the subscriber. You can also specify SSH log levels of error, fatal, info, quiet, verbose. After you have executed the preceding commands, the subscriber will have SSH access to virtual ports on the LX unit. See “Configuring Asynchronous Ports for Direct Serial Connections” on page 3-4 to give the subscriber access to asynchronous ports on the LX unit. You can specify a unique SSH key for the subscriber. See “To specify a unique SSH key for a subscriber” on page 8-8 for more information. X To specify a unique SSH key for a subscriber 1. Execute the ssh key command: Subs_jack:0 >>ssh key Then the following prompt displays: Please enter your key: 2. At the prompt, type an SSH key or cutand-paste a generated SSH key from the preceding prompt. L The SSH key must be generated on the The SSH key can be any random string of characters. The minimum length of an SSH key is 96 characters (768 bits). The maximum length of an SSH key is 1200 characters (9600 bits). host from which the subscriber will make SSH connections to the LX unit. See your Linux documentation for more information about generating SSH keys. LX Series Configuration Guide Specifying the Subscriber Access Methods 8-9 When a subscriber has a unique SSH key, he/she can log on to the LX unit, via SSH, without entering a password. L The only requirement is that the user must log on from the host on which his or her SSH key was generated. X To enable Web browser access for a subscriber Set the access web parameter to enabled: Example Subs_jack:0 >>access web enable In order for the subscriber to have access to virtual ports on the LX, you must configure Telnet or SSH for the subscriber. For more information, see “To specify Telnet access for a subscriber” on page 8-7 and “To specify SSH access for a subscriber” on page 8-7. See “To configure a subscriber account for access to asynchronous ports” on page 8-9 to give the user access to asynchronous ports on the LX. By default, a user can only access virtual ports on the LX when his or her subscriber account has been configured for Telnet, SSH, or Web Browser access. In order for a subscriber to access asynchronous ports, the access to those ports must be configured in the subscriber account. X To configure a subscriber account for access to asynchronous ports 1. Example Execute the access console enable command to enable asynchronous port access for the subscriber: Subs_jack:0 >>access console enable 2. Execute the access port command to specify the asynchronous ports that the subscriber can access. In the following example, the subscriber is given access to asynchronous ports 2, 4, and 6: Subs_jack:0 >>access port 2 4 6 Configuring Subscriber Accounts 8-10 Specifying the Subscriber Access Methods A subscriber X To configure a subscriber account for outlet access must have 1. Execute the security level outlet command to specify access to outlet management privileges for the subscriber: specific outlets in Subs_jack:0 >>security level outlet order to 2. Execute the outlet access command to specify the manage those outlets outlets that the subscriber can manage. In the following from the LX example, the subscriber is given outlet management unit. privileges to outlet 3:4, outlet 5:1, and outlets 6:7, 6:8, 6:9, and 6:10. Example Subs_jack:0 >>access outlet 3:4 5:1 6:7-10 X To configure a subscriber account for outlet group access 1. Example Subs_jack:0 >>security level outlet 2. Example Execute the outlet access group command to specify the outlet groups that the subscriber can manage. In the following example, the subscriber is given outlet group management privileges to outlet group 2, outlet group 6, and outlet groups 12 through 14: Subs_jack:0 >>access outlet group 2 6 12-14 3. Example Execute the security level outlet command to specify outlet management privileges for the subscriber: You can also specify outlet group access for a named outlet group. In the following example, the subscriber is given outlet group management privileges to the outlet group Testoutlets: Subs_jack:0 >>access outlet group name Testoutlets LX Series Configuration Guide Dialback Access 8-11 Dialback Access The LX unit supports Dialback as an access method for LX subscribers. Under Dialback, the subscriber dials in to the LX unit and logs in as he/she would if he/she were a dialin subscriber. The LX unit then validates the login and terminates the call. If the subscriber login is valid, the LX unit calls the subscriber back. The subscriber is then logged in to the LX unit. Dialback is used for: Security—the destination is recorded by the Telco for billing, and calls can be restricted to specific destinations. Managing connection costs—central site billing. X To specify Dialback access for a subscriber 1. Example Specify a dialback number for the subscriber: Subs_jack:0 >>dialback number 19785551978 2. Set the dialback access parameter to enabled: Subs_jack:0 >>dialback enable The dialback number is the telephone number that the LX modem will dial to call back the subscriber. When a subscriber is configured for Dialback, and the LX has a Modem Pool, the subscriber can establish a reverse dial connection from the LX CLI. (Under reverse dialing, the subscriber is logged in with his username and password to a Modem Pool so that the next available modem makes the call back to the subscriber.) The dial reverse command is used to establish reverse dial connections from the LX CLI. The dial reverse command exists in the User Command Mode and in the Superuser Command Mode. For more information, see the dial reverse command in the LX-Series Commands Reference Guide. Configuring Subscriber Accounts 8-12 Setting Up Session and Terminal Parameters See “Command Mode Descriptions” on page 1-5 for information about accessing Example Modem Command Mode. X To create a Modem Pool 1. 2. Access the Modem Command Mode for the modem ports to add to the Modem Pool. Execute the pool enable command to enabled for the modem ports to add to the Modem Pool. In the following example, Modem Ports 3 through 7 are added to the Modem Pool: Modem 3-7:0 >>pool enable Setting Up Session and Terminal Parameters The session and terminal parameters include all settings that affect the subscriber session and the operation of the subscriber terminal during a subscriber session. These settings include the session timeouts and limits, screen pause, user prompts, terminal type, Subscriber session mode, and function keys for switching between sessions. L When you log out of any one of your CLI sessions, all sessions are now terminated and reset. X To specify a custom user prompt Example You can specify a custom user prompt of up to 8 ASCII characters to replace the username field of the default login prompt for a subscriber. Execute the prompt command. In the following example, the subscriber’s default login prompt (such as jack:0 >) is changed to mxxxx9:0 >: Subs_jack:0 >>prompt mxxxx9 X To set the terminal type for a subscriber Example Use the terminal command. In the following examples, you can set the terminal type to ANSI or VT100: Subs_jack:0 >>terminal ansi Subs_jack:0 >>terminal vt100 LX Series Configuration Guide Setting Up Session and Terminal Parameters 8-13 X To enable the screen pause feature for a subscriber Example Use the pause enable command. When this feature is enabled, the screen will pause after displaying the number of lines specified in the “lines/screen” value for the terminal: Subs_jack:0 >>pause enable X To change the subscriber session mode Example Use the login mode command: Subs_jack:0 >>login mode cli Subs_jack:0 >>login mode shell Subs_jack:0 >>login mode menu Subs_jack:0 >>login mode raw menu The default Subscriber session mode is CLI. When the Subscriber session mode is... The subscriber is logged into the... CLI CLI Shell Linux shell Menu User’s menu raw menu Menu* *This menu doesn’t contain formatting characters. L When subscriber login mode is set to menu, you can use session-switching keys to move between sessions, up to the maximum number of sessions you configured. Each session displays the same menu configured via the menu name command. See the “Subscriber Commands” chapter in the LX-Series Commands Reference Guide for details on the menu name command. Configuring Subscriber Accounts 8-14 Setting Up the Session Switch Characters X To set the Inactivity Timeout Example Use the idletime command to set the Inactivity Timeout to any value from 0 through 65535. The Inactivity Timeout is the length of time (in seconds) that the subscriber has to enter keyboard data. If the subscriber does not enter keyboard data before the expiration of the Inactivity Timeout, the subscriber is logged out. Subs_jack:0 >>idletime 1200 L A value of 0 means that the Inactivity Timer is effectively disabled. X To set the maximum simultaneous connections for a subscriber Example Use the maxsubscriber command to configure 1 through 255 simultaneous connections for a subscriber: Subs_jack:0 >>maxsubscriber 10 X To set the maximum sessions for a subscriber Example Use the maxsessions command to configure 1 through 10 sessions for a subscriber: Subs_jack:0 >>maxsessions 10 Function Keys for Switching Between Sessions – Used to switch between subscriber sessions, including the Local Command Mode (see “Setting Up the Session Switch Characters” on page 8-14). Setting Up the Session Switch Characters The LX unit supports up to 10 sessions per subscriber. (See “Setting Up Session and Terminal Parameters” on page 8-12 to configure the number of sessions for a subscriber.) You can configure Control characters as function keys for switching to the previous, or next, session. You can also configure a Control character as a function key for switching to the Local Command Mode.) LX Series Configuration Guide Setting Up the Session Switch Characters 8-15 X To configure session switch characters for a subscriber Use the following commands: Command To switch to the... backward_switch Previous session Example forward_switch Next session local_switch Local Command Mode Subs_jack:0 >>backward_switch ^I Subs_jack:0 >>forward_switch ^J Subs_jack:0 >>local_switch ^K The Session Switch character can be specified as an uppercase alphabetical character with, or without, a caret (^) before it. When the Session Switch character is preceded by a caret, the LX command parser interprets it as a Control-character sequence. For example, ^I is interpreted as CTRL/I; ^J as CTRL/J; and ^M as CTRL/M. Be sure that there are no conflicting uses for the character you select (particularly with control characters that are used by applications programs, or with the character you set for the FORWARD SWITCH, the LOCAL SWITCH, or any Telnet command characters). If you specify a CTRL character, when the user types the character, it will be displayed as ^<Key> (such as if the user types CTRL/I, the terminal will echo the characters: ^I). Configuring Subscriber Accounts 8-16 Configuring the Subscriber Password Configuring the Subscriber Password The administrator must configure the first password for a new subscriber. New subscribers can no longer assign their own first password. The new subscriber Example may subsequently change the password created by the administrator. The default password for the LX InReach subscriber account is access. It is recommended that you, or the subscriber, change the password from this default before the subscriber uses it to log in to the LX unit. This prevents unauthorized users (who might know the default password) from logging on to the LX unit. X To change the subscriber password 1. Execute the password command: Subs_jack:0 >>password After the password command is executed, the following prompts are displayed: Enter your NEW password : Re-enter your NEW password: 2. Enter the new password at the first prompt, and then reenter it at the second prompt. L The password string can be up to 32 characters in length, and it will be masked when you enter it at the preceding prompts. X To enable a subscriber to change the password 1. Example 2. Execute the password enable command: Subs_jack:0 >>password enable The subscriber will be prompted to enter and verify the new password the next time he/she logs in to the LX unit. By default, a subscriber password has user privileges on the LX unit. A subscriber with user privileges can only access the User Command Mode, or his or her assigned menu, when he/she logs in to the LX unit. You can add Superuser privileges to a subscriber account. With Superuser privileges, the subscriber can use the enable command in the User Command Mode to enter the Superuser Command Mode. LX Series Configuration Guide Warning Banner 8-17 X To add Superuser privileges to a subscriber account Example Use the security level superuser command: Subs_jack:0 >>security level superuser Warning Banner This feature allows the administrator to configure a warning banner that appears when a subscriber enters superuser mode. A warning file is in the LX /config directory named banner.su_ warning. This file is initially empty, but you can enter the shell and edit the file by adding whatever message to appear. The text you add is displayed subsequently whenever you enter Superuser mode. X To configure a new warning banner 1. 2. 3. 4. 5. 6. Enter the shell. To add text to the warning file, enter: In-Reach:/# cd config InReach/config# vi banner.su_warning This opens the file. Add the text to appear in the Superuser entry message, save, and exit “vi”. Exit the shell. Perform the save configuration flash command to save the contents of the banner.su_warning file between reloads of the LX unit. The file contents are displayed on the screen whenever you enter Superuser mode: InReach:0 > enable <password> You are entering Superuser privileged mode. InReach:0 >> L The file contents are not displayed when CLI commands are entered as actions for trigger-action or as menu entries, nor are they displayed during CLI commands entered from the shell or from a script. Configuring Subscriber Accounts 8-18 Specifying Escape Characters Specifying Escape Characters You can configure an SSH or Telnet escape character in the local subscriber database. When this character is typed by the subscriber in a remote SSH or Telnet session, will cause the SSH or Telnet host to return to the operating system command prompt. X To specify an SSH escape character Execute the ssh escape CHARACTER command: Example Subs_jack:0 >>ssh escape ^R A capital letter (A - Z) that the subscriber can type to cause the SSH host to return to the operating system command prompt. This must be an unused CTRL character. To specify that the SSH Escape character is a CTRL character, the character must be preceded by the caret symbol (^) in the ssh escape command. X To specify a Telnet escape character Execute the telnet escape CHARACTER command: Example Subs_jack:0 >>telnet escape ^I A capital letter (A - Z) that the subscriber can type to cause the SSH host to return to the operating system command prompt. This must be an unused CTRL character. To specify that the Telnet Escape character is a CTRL character, the character must be preceded by the caret symbol (^) in the telnet escape command. LX Series Configuration Guide Specifying a Dedicated Service 8-19 Specifying a Dedicated Service You can use a domain name when configuring a subscriber’s Dedicated Service. There is also no longer a restriction on the server name being in the local service table. MRV recommends that the LX be configured with a DNS and a domain name, and that the service name(s) be in the local service table. You can permanently assign the subscriber to a dedicated service. Whenever the subscriber logs into the LX unit, a dedicated telnet session to the configured service/host name is initiated. Telnet must be enabled for the subscriber in order for him to run a dedicated service. See “Specifying the Subscriber Access Methods” on page 8-7 to enable Telnet for a subscriber. X To specify a dedicated service name for the subscriber Use the dedicated service command: Subs_jack:0 >>dedicated service foo You can now use a domain name when configuring a subscriber’s Preferred Service. There is also no longer a restriction on the server name being in the local service table. MRV recommends that the LX be configured with a DNS and a domain name, and that the service name(s) be in the local service table. X To specify a Preferred Service Use the preferred service command to assign a service name to which the subscriber will be connected whenever he/she makes a connect request (telnet, rlogin, SSH, or sftp) without specifying a service name: Subs_jack:0 >>preferred service foo L Telnet must be enabled for the subscriber in order for him to run a preferred service. See “Specifying the Subscriber Access Methods” on page 8-7 to enable Telnet for a subscriber. Configuring Subscriber Accounts 8-20 Specifying a Security Level Specifying a Security Level The Security Level specifies the privileges that the subscriber has on the LX unit. The highest security level is “superuser”. A subscriber with superuser privileges can execute all of the commands in the LX CLI. By default, subscribers without superuser privileges can execute all of the commands in the User command mode, except for the monitor/show commands. When the “read” privilege level is specified for a subscriber account, the subscriber can use the monitor/show commands. Privilege levels of “outlet” and “shell” can also be configured for non-superuser subscriber accounts. A subscriber with the outlet privilege level can manage outlets, or outlet groups, from the LX unit. A subscriber with the shell privilege level can access the Linux shell from the LX CLI. X To specify the security level for a subscriber account Use the security level command: Subs_jack:0 Subs_jack:0 Subs_jack:0 Subs_jack:0 >>security >>security >>security >>security level level level level outlet read shell superuser Enabling Audit Logging An audit log records all of the port activity for a subscriber. This includes the commands that the subscriber enters as well as the data that is output on the port for the subscriber. X To enable audit logging for a subscriber Execute the audit log enable command: Subs_jack:0 >>audit log enable LX Series Configuration Guide Enabling the Menu Feature 8-21 X To display the contents of the audit log Execute the show audit log command in Superuser Command Mode. For more information, see “Displaying the Audit Log for a Subscriber” on page 8-26. Enabling the Menu Feature A Subscriber Menu is a preconfigured menu that displays for a subscriber when he/she logs in to the LX unit. A menu is displayed when the subscriber logs into a physical port. In order for a menu to display for a subscriber, you must enable the Menu Feature and specify a menu for the subscriber. X To specify a menu for the subscriber Use the menu name command. The following command specifies that the menu financegroup will be displayed for the subscriber jack when he logs into the LX unit: Subs_jack:0 >>menu name financegroup Enabling Command Logging Command logging creates an audit trail of subscriber input in a subscriber session. The audit trail is sent to the accounting log and to syslogd. X To enable command logging for a subscriber Execute the command log enable command: Subs_jack:0 >>command log enable X To display the contents of the command log Execute the show command log command in Superuser Command Mode. For more information, see “To display the command log for a subscriber” on page 8-27. Configuring Subscriber Accounts 8-22 Displaying Subscriber Information Displaying Subscriber Information This section describes how to display subscriber characteristics, subscriber status and TCP information, subscriber summaries, and the audit log and command log for a subscriber. X To display subscriber characteristics Use the monitor/show subscriber characteristics command. In the following example, the show subscriber characteristics command is used to display the characteristics for the subscriber tim: Subs_frank:0 >>show subscriber tim characteristics X To display the characteristics for all subscribers Use the following command: Subs_frank:0 >>show subscriber all characteristics Figure 8.2 shows an example of the Subscriber Characteristics Screen. LX Series Configuration Guide Displaying Subscriber Information 8-23 Time: Wed, 18 Oct 2006 09:08:19 US/EASTERN Subscriber Name: Preferred Service: Security: Login Mode: Maximum Connections: Command Logging: Idle Timeout: Screen Pause: Local Switch: Rlogin Transparent: Dialback Feature: Dialback Number: Menu Name: Web Menu Name: Port Access list: Port Read Only list: Remote Access list: Outlet Access list: Outlet Group Access list: Web Access List: InReach SuperUser Cli 50 Disabled 0 Enabled ^L Disabled Disabled Rlogin Ded. Service: Dedicated Service: User Password: Change User Password: Maximum Sessions: Audit Logging: User Prompt: Forward Switch: Backward Switch: Connect Escape Char: Configured Disabled 4 Disabled InReach ^F ^B ^Z InReach InReach 0-9 Telnet Ssh Web_Server Console Config Figure 8.2 Subscriber Characteristics Screen See the monitor/show subscriber command in the LX Series Command Reference for detailed descriptions of the fields in the Subscriber Characteristics Screen. Configuring Subscriber Accounts 8-24 Displaying Subscriber Information X To display the subscriber status Use the monitor/show subscriber status command. In the following example, the show subscriber status command is used to display the status information for the subscriber tim: Subs_jack:0 >>show subscriber tim status X To display the subscriber status for all subscribers Use the following command: Subs_jack:0 >>show subscriber all status Figure 8.3 shows an example of the Subscriber Status Screen. Time: Subs. Name: InReach Configured TermType: Ansi Name: InReach Key: /dev/pts/0 Local IPV4 Address: 130.169.159.181 Idle Time (mins): 0 Session 0 User Session 1 User Session 2 User Session 3 User Wed, 22 Mar 2006 09:16:33 US/EASTERN Number of Connections: 1 Protocol: Local Port: Remote IPV4 Address: Telnet 23 130.169.158.162 Figure 8.3 Subscriber Status Screen See the monitor/show subscriber command in the LX Series Command Reference for detailed descriptions of the fields in the Subscriber Status Screen. X To display the subscriber TCP information Use the monitor/show subscriber tcp command. In the following example, the show subscriber tcp command is used to display the TCP information for the subscriber tim: Subs_jack:0 >>show subscriber tim tcp LX Series Configuration Guide Displaying Subscriber Information 8-25 X To display subscriber TCP information for all subscribers Use the following command: Subs_jack:0 >>show subscriber all tcp Figure 8.4 shows an example of the Subscriber TCP Screen. Time: Subscriber Name: Telnet Escape: Mon, 26 Mar 2007 08:43:37 US/EASTERN Default ^] Time: Subscriber Name: InReach Telnet Escape: ^] SSH Server Authorized Key: SSH Client Private Key: SSH Client Private Key Passphrase: SSH Client Key Type: SSH Client Key Bits: SSH Client Public Key: SSH Escape: ~ Mon, 26 Mar 2007 08:43:37 US/EASTERN SSH Escape: ~ Not Configured N/A N/A N/A Figure 8.4 Subscriber TCP Screen See the monitor/show subscriber command in the LX Series Command Reference for detailed descriptions of the fields in the Subscriber TCP Screen. X To display the subscriber summary information Use the monitor/show subscriber summary command: Subs_jack:0 >>show subscriber summary Figure 8.5 shows an example of the Subscriber Summary Screen. Time: Wed, 18 Oct 2006 09:08:19 US/EASTERN Name Default InReach bmiller Connections 0 1 0 Terminal Type Ansi Ansi Ansi Figure 8.5 Subscriber Summary Screen Configuring Subscriber Accounts 8-26 Displaying the Audit Log for a Subscriber See the monitor/show subscriber summary command in the LX Series Command Reference for detailed descriptions of the fields in the Subscriber Summary Screen. Displaying the Audit Log for a Subscriber An audit log records all of the port activity for a subscriber. This includes the commands that the subscriber enters as well as the data that is output on the port for the subscriber. X To display the audit log for a subscriber Use the monitor/show audit log command in Superuser Command Mode. In the following example, the show audit log command is used to display the audit log for the subscriber tim: Subs_jack:0 >>show audit log tim Figure 8.6 shows an example of the Audit Log. Nov 18 Nov 18 Nov 18 Nov 18 Nov 18 Nov 18 Status Nov 18 Nov 18 Nov 18 Nov 18 * 16:08:32 tim ttyGN0 0 Subs_tim >>end 16:08:50 tim ttyGN0 1 tim:0 >> 16:08:50 tim ttyGN0 2 tim:1 > 16:08:50 tim ttyGN0 3 tim:2 > 16:08:55 tim ttyGN0 3 tim:3 >sho session 16:08:55 tim ttyGN0 3 Number Device Program 16:08:55 tim ttyGN0 3 0 /dev/pts/0 16:08:55 tim ttyGN0 3 1 /dev/pts/3 16:08:55 tim ttyGN0 3 2 16:08:55 tim ttyGN0 3 3 Superuser Time 477 98 User 481 5 /dev/pts/4 User 482 5 /dev/pts/5 User 483 5 Figure 8.6 Audit Log Screen LX Series Configuration Guide Pid Assigning a Public Key to a Subscriber 8-27 X To display the command log for a subscriber Use the monitor/show command log command in Superuser Command Mode to display an audit trail of subscriber input in a subscriber session. In the following example, the show command log command is used to display the command log for the subscriber tim: Subs_jack:0 >>show command log tim Figure 8.7 shows an example of the Command Log. Nov Nov Nov Nov Nov 11 11 11 11 11 12:47:30 12:47:33 12:49:21 12:49:29 12:49:39 tim tim tim tim tim 0 end 0 sho command log 23 modem 23 end 23 show command log tim Figure 8.7 Command Log Screen Assigning a Public Key to a Subscriber With a Public Key, the subscriber can automate SSH connections between machines without interaction between users. The subscriber only needs to enter his username and password the first time he logs in, after which the LX stores them. On subsequent sessions, the subscriber can log in without specifying a name and password. The following example shows how to create and assign a Public Key to a Subscriber. There are no prerequisites for this configuration example. X To create and assign a Public Key to a Subscriber 1. Connect to an SSH client that will be connecting to the LX via SSH. L In this example, the SSH client is a Linux host. 2. 3. Log in to the Linux host with the user name and password with root privileges: Generate the SSH public key without a passphrase: gina# ssh-keygen -f sshgina -t dsa Configuring Subscriber Accounts 8-28 Assigning a Public Key to a Subscriber L In the preceding example, the attribute -f is for filename and the attribute -t is for type of encryption. The dsa encryption type is for SSH Version2. The ssh-keygen command creates the files sshgina and sshgina.pub. The file sshgina is the identity file and sshgina.pub is the public key. 4. 5. 6. 7. 8. 9. When you are prompted for a passcode, press <Enter>. Open the file that contains the Public Key (sshgina.pub in the preceding example): Select and copy the Public Key from the file. Log out of the Linux client that will be used to initiate the SSH connections to the LX unit: Connect to the LX unit on which the subscriber (gina in this example) has an account. Log in to the LX unit: Login: InReach Password: ****** Access the Configuration Command Mode of the LX CLI. InReach:0>enable Password:>> system InReach:0 >>config Config:0 >> 10. Access the subscriber account for which you are creating the Public Key: Config:0 >>subscriber gina 11. Execute the ssh key command: Subs_gina:0 >>ssh key The following prompt is displayed: Please enter your key: 12. Paste the Public Key for the subscriber at the preceding prompt. (The Public Key should be in the Paste Buffer from when it was copied in step 6.) 13. From the Linux host, connect via SSH to the LX port 1: gina$ ssh - i sshgina 10.242.131.48 -p 2122 LX Series Configuration Guide Generating the Key and Assigning it to a Subscriber 8-29 This should allow the subscriber gina to connect straight into their user prompt, without being prompted for a password. Generating the Key and Assigning it to a Subscriber The LX may function as the client for SSH public key authentication. The LX can generate its own SSH key pair. One use for this is so you do not have to enter a password when you log in. You can use the public portion for all the units in your network, but you can only use the public key from the station where you configured the key. This feature can be configured from User, Superuser, or Subscriber modes. At the User or Superuser mode, this will generate an SSH key pair for the current subscriber. At the Subscriber mode, this will generate an SSH key for that subscriber. Generating the SSH Key Use this command to specify the SSH Public key. Select an appropriate type and size. Syntax InReach:0>ssh keygen [dsa|rsa|rsa1] bits [1024|2048] Example where [dsa|rsa|rsa1]are different bit types, and [1024|2048] indicate key lengths. InReach:0>ssh keygen dsa bits 1024 Changing the SSH Key Passphrase L You must generate the SSH Key before using this command. Use this command to change the SSH key passphrase. Syntax InReach:0>ssh keygen passphrase Configuring Subscriber Accounts 8-30 Changing the SSH Key Passphrase To create a new passphrase, do the following: 1. Enter ssh keygen passphrase and press <Enter>. The following messages appear: Key has comment (config/identify/In-Reach) Enter new passphrase (empty for no passphrase): 2. Enter a new passphrase, or press <Enter> for no passphrase (this will not appear on the screen). The following message appears: Enter the same passphrase again: 3. Enter your passphrase again, or press <Enter> for no passphrase. The following message appears: Your identification has been saved with the new passphrase. Use the show subscriber <subscriber_name> tcp command or the show subscriber tcp command to display the Subscriber TCP screen. An example of this screen follows: Time: Sat, 06 Jan 2007 14:00:28 UTC Subscriber Name: InReach Telnet Escape: ^] SSH Escape: ~ SSH Authorized Key: SSH Client Private Key: Configured SSH Client Private Key Passphrase: Configured SSH Client Key Type: DSA SSH Client Key Size: 1024 SSH Client Public Key: ssh-dss AAAAB3NzaC1kc3MAAACBAOYMxpxnWIU5tsVrPLzc1yGKeMq+dCOlb6CzSyU2W7VFHqUd/9 0ssr+M/Iuf+AT7yfS17FQiAwgeAvd8uzgxBs+n/v2X7OPctIFNnNQ+Vc8akxTclHlebGr5Bqf+Dq+X +2qg0TAPZzGDxHbVn0xlGRjeTc5r5MRdTNF1YRAAAAFQCYjgU/0LP+3xTYd8tCU24rYDlAtwAAAIBN vuqofb6EgxQFQt6s7cDBQQuKrv4wK1Wz/kh2k8NKe47iCag4L11ee3M3EIp7JWIVb+XmLucdnRAx6J Vyf/Eu75kUPelEupAG+ZSfitHk2lkJnyH6eqqifZvboydKEwkA7jkqlCYljZjwWxIpNWfQYhR56zbK L6OkAqw8I6Ic0gAAAIEAov7UAvxIBX5FpgjCON/BnfbO2ht5fPrSFAtwSkYq3gSAfyHsEFxvfwD/CJ vP4GpGYyJ8e0JHnjxbLHNlzZ/HjAgxiNKYFQL/tgP5kp6FpFIkOolcsW7xeB4oWcfXQYqflnEL6jvD 5IfZDRWYHXKYEvn6kNrVIZOPObBDoOhXASM= root@Nick Figure 8.8 Subscriber TCP Screen LX Series Configuration Guide Configuring Async Port Features 9-1 CHAPTER 9 Configuring Async Port Features You can configure ports to act as temperature and humidity monitors when connected to an In-Reach Temperature/Humidity Sensor. The Temperature/ Humidity Sensor provides an accurate measurement of the temperature and humidity in the area in which your LX Series unit is placed. See Getting Started with the LX Series to connect a Temperature/Humidity Sensor to an LX port. Configuring Async Port Features 9-2 Configuring Sensor Access for LX Ports Configuring Sensor Access for LX Ports You need to configure an LX port’s access as sensor before you can perform any temperature/humidity monitoring on the port. X To configure sensor access for an LX port Execute the access command in Asynchronous Command Mode: Example Async 4-4:0 >>access sensor L The DIAG port (port 0) can’t be configured as a Sensor port. Displaying the Temperature and Humidity Use the monitor/show device status command to display the current temperature and humidity readings on a Sensor port. X To display the current temperature and humidity readings for a specific Sensor Execute the show device status command in Asynchronous Command mode. In the following example, the temperature and humidity readings of the Sensor attached to port 4 are displayed: Example Async 4-4:0 >>show device 4 status X To display the current temperature and humidity readings for all Sensors Execute the show device all status command in Asynchronous Command mode: Example Async 4-4:0 >>show device all status LX Series Configuration Guide Displaying Sensor Summaries 9-3 Figure 9.1 shows an example of the Device Status Screen for a Sensor port. Time: Mon, 12 Dec 2005 21:14:29 UTC Port Name: Port_25 Device Type: Humidity Level(%): Temperature (Celsius): Temperature (Fahrenheit): Device Number: 5 Sensor 65.00 25.00 77.00 Figure 9.1 Device Status Screen for a Sensor Port Displaying Sensor Summaries Use the monitor/show device summary command to display summary information for all of the Temperature/Humidity Sensors that are currently connected to the LX unit. X To display summary information for all Temperature/Humidity Sensors Execute the show device summary command in Asynchronous Command mode: Example Async 4-4:0 >>show device summary Figure 9.2 shows an example of the Device Summary Screen. Device Number 1 Device Type Model Name Sensor N/A Figure 9.2 Device Summary Screen for Sensors L If any of the ports on the LX unit are configured as POWER ports, the Device Summary Screen will display information for the attached Power Management Device (5100 or 5150). Configuring Async Port Features 9-4 Configuring the IdleBuffer Configuring the IdleBuffer The IdleBuffer is enabled by default. Therefore, the async port will buffer data before a TCP connection arrives when autohangup is disabled. To flush (discard) all data upon a TCP connection's arrival, disable the IdleBuffer feature. If IdleBuffer is disabled, the port will not buffer erroneous data that enters the port prior to a telnet session. X To enable the IdleBuffer Execute the following command: Example Async1:0 >>idlebuffer enable X To disable the IdleBuffer Execute the following command: Example Async1:0 >>no idlebuffer X To display the IdleBuffer field in the Port Async Characteristics screen Use the show port async <port_number> characteristics command to display the IdleBuffer field in the Port Async Characteristics screen. LX Series Configuration Guide Configuring the IdleBuffer 9-5 Figure 9.3, “Port Characteristics Screen for IdleBuffer” shows this screen with the IdleBuffer field highlighted: Time: Port Number: 1 Access: Speed: Bits per Character: Stop Bits: Parity: Flow Control: Autohangup: DSR Wait: DTR Drop Time: Remote 9600 8 1 None Xon Disabled Enabled 2 Authentication: Auth. FallBack Attempts: RADIUS Accounting: TACACS+ Accounting: Local 0 Disabled Disabled Connect Prompt: Connect Prompt String: Connect Command: Disabled Wed, 21 Feb 2007 14:02:29 US/EASTERN Port Name: genlx Diag Port Device Name: /dev/ttyGN0 Banner: banner.default MOTD: motd.default Local Prompt: Login Autobaud Retry: 5 Max Mirror Connections: 1 Break: Break String/Control: Special Break String: IdleBuffer: Transparent Mode: Enabled Enabled Disabled Type a key to continue. Figure 9.3 Port Characteristics Screen for IdleBuffer Configuring Async Port Features 9-6 Customizing Asynchronous Port Settings Customizing Asynchronous Port Settings The default settings for an LX asynchronous port meet the defacto standard for Console Access ports. The default settings for an LX asynchronous port are as follows: The default port settings are sufficient to support most remote console applications. However, for some applications you may need to specify a customized (non-default) value for one or more asynchronous port settings. Telnet Negotiations: Enabled Telnet Cr filter: Disabled Transparent Mode: Disabled Flow Control: Xon Stop Bits: 1 Parity: None Bits per Character: 8 Autobaud: Disabled Auto Dial: Disabled Autohangup: Enabled This section provides examples of Baud Rate: all of the commands that would be used to specify non-default values for asynchronous port settings. 9600 L There are no prerequisites for this configuration example. X To access the Configuration Command Mode 1. Execute the following commands: Example Login: InReach Password: access InReach:0>enable Password>> system InReach:0 >>config Config:0 >> LX Series Configuration Guide Customizing Asynchronous Port Settings 9-7 2. Example Access the Asynchronous Command Mode for the asynchronous ports for which to specify non-default settings: Config:0 >>port asynchronous 4 3. Execute any of the following commands to specify nondefault values for port settings: To... Use the following command Disable Telnet negotiations Async 4-4:0 >>no telnet negotiation Enable Telnet Carriage Return (CR) filtering Async 4-4:0 >>cr filtering enable Enable the Transparent Mode for the port Async 4-4:0 >>transparency enable Set the port Flow Control to CTS Async 4-4:0 >>flowcontrol cts Specify that the port will transmit and receive 5 data bits per character Async 4-4:0 >>bits 5 Specify that the port will use the Autobaud Feature Async 4-4:0 >>autobaud enable Specify that the port will be automatically dialed Async 4-4:0 >>autodial enable Set the number of stop bits to be used to maintain synchronization of data to 2 Async 4-4:0 >>stopbits 2 Specify that each byte that is transmitted or received by the port will contain an odd number of 1’s, including the parity bit Async 4-4:0 >>parity odd Specify that the port will automatically log out when the attached device drops its signal to the DSR pin of the LX port Async 4-4:0 >>autohangup enable Configuring Async Port Features 9-8 Configuring Asynchronous Ports for Data Buffering Configuring Asynchronous Ports for Data Buffering This example shows how to configure an asynchronous port on the LX unit for data buffering. For more information about this task, see the following commands in the LX Series Command Reference. access databuffer databuffer databuffer databuffer display size syslog enable timestamp enable The prerequisite for this task is to set up a connection between a network device’s serial console port and a port on the LX unit. L The LX port that receives the data will be the port that you configure for data buffering in step 2 of the following procedure. X To set up a connection between a serial console port and a port on the LX unit 1. Access the Configuration Command Mode of the LX CLI. Example Login: InReach Password: ****** InReach:0>enable Password: >> ****** InReach:0 >>config Config:0 >> 2. Example Config:0 >>port asynchronous 3 3. Example Access the Asynchronous Command Mode for the port to configure for data buffering: Specify databuffer as the port access method: Async 3-3:0 >>access databuffer LX Series Configuration Guide Configuring Asynchronous Ports for Data Buffering 9-9 4. Example Specify that a timestamp will be added to every line of data that is printed from the port to the connected client: Async 3-3:0 >>databuffer timestamp enable 5. Example Specify the size, in bytes, for the data buffer on the port: Async 3-3:0 >>databuffer size 1024 6. Example Specify that the data received on the port will be logged to the local syslogd: Async 3-3:0 >>databuffer syslog enable L syslogd sends the data buffer messages to the databuffer file in /var/log directory. 7. Example Specify the data buffer display option: Async 3-3:0 >>databuffer display enable L In the preceding example, the data buffer display option enable specifies that the contents of the data buffer will be displayed as soon as the user logs into the port. Set to prompt if the option of seeing the databuffer contents. 8. Example Config:0 >>end 9. Example Go to the Superuser Command Mode: Verify that the port has been configured for data buffer access: InReach:0 >>show port asynchronous 3 databuffer Configuring Async Port Features 9-10 Configuring Asynchronous Ports for Data Buffering Figure 9.4, “Port Databuffer Characteristics Screen” shows the highlighted fields on the following Port Characteristics screen indicate that databuffer access has been configured on port 3: Time: Port Number: 3 Size: Syslog: 1024 Disabled Tue, 01 Aug 2006 16:00:17 US/EASTERN Port Name: Port_1 Display: Timestamp: Prompt Disabled Figure 9.4 Port Databuffer Characteristics Screen 10. Example Type the following command at the InReach:0 >> prompt: InReach:0 >show databuffer log <port> L The databuffer contents are lost during a reboot of the LX and when the databuffer size is changed. LX Series Configuration Guide RS-485 CLI Support 9-11 RS-485 CLI Support The LX-1004 Series supports an RS-485 option. Commands and show screens have been added to support this feature. These Asynchronous Mode commands allow you to configure the RS-485 for Duplex Mode (half or full duplex), Transmitter Mode, or Echo Mode. X To configure RS-485 duplex mode Use the following duplex mode commands to set the RS-485 port to a duplex mode of either half or full (default). Examples Async1:0 >> rs485 duplex mode half Async1:0 >> rs485 duplex mode full X To configure RS-485 echo mode Use the enable or disable (default) commands in RS-485 echo mode when the port is in half-duplex mode. L The echo mode is valid only if duplex mode is set to half. Examples Async1:0 >>rs485 echo mode enable Async1:0 >>rs485 no echo mode X To set the RS-485 transmitter to always/RTS enable Use the rs485 transmitter always enable command to use full-duplex applications such as RS-422 or RS-485 4-wire Master modes in which tri-state control of the transmitter is not required. L This parameter is valid only if duplex mode is set to full. Set this command to rs485 transmitter rts enable to use the RTS modem control signal to enable the RS-485 interface, and provide backward compatibility with existing software. Syntax rs485 transmitter [always|rts] enable Examples Async1:0 >>rs485 transmitter always enable Configuring Async Port Features 9-12 RS-485 CLI Support Async1:0 >>rs485 transmitter rts enable X To view RS-485 information Use the show port async <port_number> rs485 command to display the RS-485 Characteristics Screen. Figure 9.5 shows a sample screen. Time: Device Name: Port Type: Duplex Mode: Transmitter: /dev/ttyCPM2 Physical Full Always Enabled Sun, 02 Jan 2005 01:34:16 UTC Port Number: 49 Port Name: Port_49 Echo Mode: Disabled Module Status: Operational Figure 9.5 Show RS-485 Characteristics Screen LX Series Configuration Guide Telnet Serial-Over-IP (RFC2217) Support 9-13 Telnet Serial-Over-IP (RFC2217) Support Telnet Serial-Over-IP (RFC2217) allows numerous network entities (clients) to connect via telnet to an LX serial port and use the connected device (e.g., Cisco console port) in many different ways. RFC2217 eliminates the need to statically define the Serial port information (i.e., Speed, databits…etc.). With this feature enabled, an RFC2217 client can telnet to the LX port, and through telnet negotiations dynamically request changes to the serial port. This feature is especially useful in applications where the communications parameters change several times during a single connection. The remote access server in turn can send telnet negotiations of its own to report various port error conditions, changes in modem control signals, flow control, and also request the client's signature. X To configure the RFC2217 server Use the following telnet negotiation rfc2217 server commands to enable or disable RFC2217 on a server. Examples Async1:0 >>telnet negotiation rfc2217 server enable Async1:0 >>no telnet negotiation rfc2217 server X To configure RFC2217 server signature Use the following telnet negotiation rfc2217 server signature commands to enable or disable RFC2217 signature support on a server. Examples Async1:0 >>telnet negotiation rfc2217 server signature enable Async1:0 >>no telnet negotiation rfc2217 server signature Configuring Async Port Features 9-14 Default TCP Transmit Mode X To view RFC2217 information Use the show port async <port_number> rfc2217 command to display the RFC2217 Characteristics Screen. Figure 9.6 shows a sample screen. Time: Port Number: 8 Telnet RFC2217 Server: Client Modemstate Mask: Flow Control State: Client Signature: Mon, 17 Jul 2006 09:58:47 US/EASTERN Port Name: Port_8 Enabled Telnet RFC2217 Signature: 0x0 Client Linestate Mask: Normal Disabled 0x0 Figure 9.6 Show RFC2217 Characteristics Screen Default TCP Transmit Mode The default TCP transmit mode has been changed from "Buffered 80" to "Immediate" on the Async ports. As of this release, all ports will come up in "Immediate" mode regardless of your previous configuration. If you were relying on functionality of the "Buffered 80" mode, you must reconfigure the appropriate port(s) to put them back into buffered mode. LX Series Configuration Guide Port Mirroring 9-15 Port Mirroring The Port Mirroring feature allows multiple subscribers to connect to the same port to view the same data and interact with a common device. A maximum of 10 connections is allowed (default is 1). After the maximum number of connections has been reached, any additional users are refused. To use this feature, the port access must be set to either remote or databuffer, and the serial device must echo all user-typed characters. For example, this feature is useful for training purposes, where a number of trainees would all be able to see what the instructor is doing from their own screens. The session begins when the first user connects to the port. When the second user connects, his session starts where the first session is currently, rather than where the first session began. All users currently logged into the port are disconnected when the administrator changes the value of the number of simultaneous connections, or any other port attribute that logs out the port. The system administrator can limit subscribers’ port mirror capabilities. Subscribers are allowed full interactivity with the attached device (default access), or limited port mirror access based on a port access list and read-only access. Configuring Async Port Features 9-16 Port Mirroring X To enable mirroring on async ports Use the max mirror connections command to determine the maximum number of simultaneous connections to the target remote access or databuffer port. The number of connections allowed is 1 to 10 (default is 1). Syntax max mirror connections <number> <connections_number> Examples Async5:0 >>max mirror connections Async5:0 >>max mirror connections 5 1 X To default mirroring on async ports Example Use this command to default port mirroring connections on a specific async port or ports to a value of 1. The default value allows only one user to connect to the remote access or databuffer port. The max mirror connections command determines the maximum number of simultaneous connections to the target remote access port. Async5:0 >>default max mirror connections X To enable read-only access for a subscriber Use this command to enable read-only access for a subscriber. Read only access means subscribers can only see what activities are transpiring, but are restricted from participating. The default is write. Syntax Example access port <port_list> readonly Subs_Bill >>access port 1-5 readonly LX Series Configuration Guide Port Mirroring 9-17 X To display the Port Async Characteristics screen Use the show port async <port_number> characteristics command. Figure 9.7, “Show Port Async Characteristics Screen” shows this screen with the Max Mirror Connections field highlighted: Time: Port Number: 1 Access: Speed: Bits per Character: Stop Bits: Parity: Flow Control: Autohangup: DSR Wait: DTR Drop Time: Remote 9600 8 1 None Xon Disabled Enabled 2 Authentication: Auth. FallBack Attempts: RADIUS Accounting: TACACS+ Accounting: Local 0 Disabled Disabled Connect Prompt: Connect Prompt String: Connect Command: Disabled Wed, 21 Feb 2007 14:02:29 US/EASTERN Port Name: genlx Diag Port Device Name: /dev/ttyGN0 Banner: banner.default MOTD: motd Local Prompt: Login Autobaud Retry: 5 Max Mirror Connections: 1 Break: Break String/Control: Special Break String: IdleBuffer: Transparent Mode: Enabled Enabled Disabled Type a key to continue. Figure 9.7 Show Port Async Characteristics Screen Configuring Async Port Features 9-18 Port Mirroring X To display the Subscriber Characteristics screen Use the show subscriber <subscriber_name> characteristics command. Figure 9.8 shows this screen with the Port Read Only List field highlighted: Time: Wed, 18 Oct 2006 09:08:19 US/EASTERN Subscriber Name: Preferred Service: Security: Login Mode: Maximum Connections: Command Logging: Idle Timeout: Screen Pause: Local Switch: Rlogin Transparent: Dialback Feature: Dialback Number: Menu Name: Web Menu Name: Port Access list: Port Read Only list: Remote Access list: Outlet Access list: Outlet Group Access list: Web Access List: InReach SuperUser Cli 50 Disabled 0 Enabled ^L Disabled Disabled Rlogin Ded. Service: Dedicated Service: User Password: Change User Password: Maximum Sessions: Audit Logging: User Prompt: Forward Switch: Backward Switch: Connect Escape Char: Configured Disabled 4 Disabled InReach ^F ^B ^Z InReach InReach 0-9 Telnet Ssh Web_Server Console Config Figure 9.8 Show Subscriber Characteristics Screen X To display the Port Async Users screen Use the show port async <port_number> user command. Figure 9.9 shows a sample screen: Time: Wed, 18 Oct 2006 09:08:19 US/EASTERN Total users logged in: 0 Max Users Allowed: Figure 9.9 Show Port Async Users Screen LX Series Configuration Guide 1 Displaying Port Async Summaries 9-19 Displaying Port Async Summaries Use the show port async summary command to display the Port Async Summary Screen. An example of this screen follows: Time: Wed, 18 Oct 2006 09:08:19 US/EASTERN Port 1 2 3 4 5 6 7 8 Port Name Access Port_1 Control Port_2 Remote Port_3 Local Port_4 Dynamic Port_5 Sensor Port_6 Databuffer Port_7 IR4800 Port_8 IR5150 Speed 9600 9600 9600 9600 9600 9600 9600 9600 TCP Port 2100 2200 2300 2400 2500 2600 2700 2800 SSH port 2122 2222 2322 2422 2522 2622 2722 2822 Device /dev/ttyGN0 /dev/ttyGN1 /dev/ttyGN2 /dev/ttyGN3 /dev/ttyGN4 /dev/ttyGN5 /dev/ttyGN6 /dev/ttyGN7 Figure 9.10 Show Port Async Summary Screen Additional summary information is shown in the Port Async Alternate Summary screen. Use the show port async alternate summary command to display the Port Async Alternate Summary Screen. An example of this screen follows Time: Port 1 2 3 4 5 6 7 8 Wed, 18 Oct 2006 09:08:19 US/EASTERN Port Name Port_1 Port_2 Port_3 Port_4 Port_5 Port_6 Port_7 Port_8 Access Status Remote Remote Remote Notify Remote Remote Remote Remote Avail Avail Avail N/A Avail Avail Avail Avail Local Accesses N/A N/A N/A N/A N/A N/A N/A N/A Remote Accesses 0 0 0 N/A 0 0 0 0 Figure 9.11 Show Port Async Alternate Summary Screen Configuring Async Port Features 9-20 Port Async Connect Port Async Connect Previously, the Port Async connect command would connect automatically when it was configured. Since you might want to initiate the command only upon user request, this could cause issues. The Port Async connect command now has an additional feature to prompt the user for a character before it initiates the command. This displayed prompt is configurable. Enabling/Disabling Display of the Command Prompt X To enable or disable display of the Command Prompt on an async port during a connect Enable this command to wait for a character. The default is disabled. Syntax connect command prompt enable Examples Async1:0 >>connect command prompt enable Async1:0 >>no connect command prompt X To configure the Display String Use this command to display the Command Prompt string on an async port during a connect. The default string is Type a key to continue. Syntax connect command prompt string <string> Examples Async1:0 >>connect command prompt string Press return to connect Async1:0 >>no connect command prompt string Use the connect command prompt string <string> command to change the message that is displayed. Use the no connect command prompt string command to display no message, but still wait for input (if the command prompt is enabled). LX Series Configuration Guide Setting the Banner 9-21 Setting the Banner This feature allows the administrator to configure a warning banner that appears when a subscriber logs in. Commands that make the banner feature more robust have replaced the old banner commands. The only time you must use inbound and outbound is when the port access is dynamic. X To specify the Inbound/Outbound Login Banner File Name Example Use the banner [inbound|outbound] file <file_name> [contents] command to specify the port async inbound or outbound banner file name and message. Async1:0 >>banner inbound file new_banner.txt contents <cr> If you entered the word “contents”, the following message appears: Please enter your banner: (CTRL-K to save) Here you can enter the banner text directly and press CTRL-K to save it. If the file exists in the /config directory on the LX, a warning message is displayed to alert the user that the current contents of the file will be overwritten. X To default the Login Banner File Name Examples Use the default banner [inbound|outbound] file command or the default banner file command to default the banner file name and contents. The default filename is banner.default. Async1:0 >>default banner inbound file Async1:0 >>default banner outbound file X To delete the Login Banner File Name Examples Use the no banner [inbound|outbound] file command to delete the banner file name. Async1:0 >>no banner inbound file Async1:0 >>no banner outbound file Configuring Async Port Features 9-22 Setting the Banner Use the show port async <port_number> characteristics command to display the Show Port Async Characteristics screen. The Banner field appears in the upper right side of the screen if the async port is remote or local. An example of this screen follows: Time: Port Number: 2 Access: Speed: Bits per Character: Stop Bits: Parity: Flow Control: Autohangup: DSR Wait: Dtr Drop Time: Local 9600 8 1 None Xon Disabled Enabled 2 Authentication: Auth. FallBack Attempts: RADIUS Accounting: TACACS+ Accounting: Local 0 Disabled Disabled Connect Prompt: Connect Prompt String: Connect Command: Disabled Thu, 16 Nov 2006 11:00:14 US/EASTERN Port Name: Rack Temp Device Name: /dev/ttyGN1 Banner: banner.default MOTD: Local Prompt: Login Autobaud Retry: 5 Max Mirror Connections: N/A Break: Break String/Control: Special Break String: IdleBuffer: Transparent Mode: Enabled Enabled Disabled Figure 9.12 Show Port Async Characteristics Screen for a Local Port LX Series Configuration Guide Setting the Banner 9-23 The Inbound and Outbound Banner Display fields appear in the lower left side of the screen if the async port is dynamic. An example of this screen follows: Time: Port Number: Access: Speed: Bits per Character: Stop Bits: Parity: Flow Control: Autohangup: DSR Wait: Dtr Drop Time: Inbound Authentication: Outbound Authentication: Auth. FallBack Attempts: Radius Accounting: Tacacs+ Accounting: Inbound Banner: Outbound Banner: Inbound MOTD: Outbound MOTD: Connect Prompt: Connect Prompt String: Connect Command: 1 Dynamic 9600 8 1 None Xon Enabled Enabled 2 Local Local 0 Disabled Disabled Thu, 30 Nov 2006 20:27:31 UTC Port Name: Port_4 Device Name: Local Prompt: Autobaud Retry: Break: Break String/Control: Special Break String: IdleBuffer: Transparent Mode: /dev/ttyGN0 Login 5 Enabled Enabled Disabled banner.default banner.default Disabled Type a key to continue. Figure 9.13 Show Port Async Characteristics Screen for a Dynamic Port Configuring Async Port Features 9-24 Setting the Banner Use the show port async <port_number> login command to display the Port Async Login screen for a port that is anything other than a Dynamic Access port: Time: Port Number: 1 Wed, 07 Feb 2007 10:47:36 UTC Port Name: Port_1 Banner: Contents: Welcome to MRV Communications, LX-Series Console Server MOTD: Contents: Connected to console: banner.default motd.default Figure 9.14 Show Port Async Login Screen for a Non-Dynamic Port Use the same command to display the Port Async Login screen for a Dynamic Access port: Time: Port Number: 1 Wed, 07 Feb 2007 10:47:36 UTC Port Name: Port_1 Inbound Banner: Contents: Welcome to MRV Communications, LX-Series Console Server banner.default Outbound Banner: Contents: Welcome to MRV Communications, LX-Series Console Server banner.default Inbound MOTD: Contents: motd.default Outbound MOTD: Contents: motd.default Figure 9.15 Show Port Async Login Screen for a Dynamic Port LX Series Configuration Guide Inbound and Outbound Authentication 9-25 Inbound and Outbound Authentication A command has been added to simplify setting port async authentication to inbound and outbound. With these commands, setting authentication to inbound or outbound is no longer necessary. The appropriate authentication field is now set based on the port access type. Inbound applies to port access Dynamic, Local, Broadcast Master, and APD. Outbound applies to port access Dynamic, Remote, Databuffer, and Edap. L You can enable inbound and outbound authentication manually or automatically. MRV recommends that you enable inbound and outbound automatically. X To manually configure inbound and outbound authentication Example Use the authentication inbound|outbound kerberosv5|ldap|local|radius|rsa securid|tacacs+ enable command to configure inbound and outbound authentication. Async1:0 >>authentication inbound|outbound radius enable where you selected inbound for local access and outbound for remote access. Now you no longer need to choose inbound or outbound, as this is done automatically, based on your port access. The new syntax follows: X To automatically configure inbound and outbound authentication Examples Use the authentication kerberosv5|ldap|local|radius |rsa securid|tacacs+ enable command to configure inbound and outbound authentication. Async1:0 >>authentication ldap enable Async1:0 >>no authentication Configuring Async Port Features 9-26 Message of the Day Commands Message of the Day Commands The Message of the Day allows you to display a message to the user upon login. This message could be, for example, You are on a proprietary system, or We are shutting down at 4PM today. The message you specify appears on the screen just after the user logs in. X To specify the Message of the Day File Name Examples Use the motd [inbound|outbound] file <file_name> [contents] command to specify or delete the message of the day file name and message on a port async basis. The only time to use inbound and outbound is when the port access is dynamic. If port access is not dynamic, inbound and outbound do not apply. Async1:0>>motd inbound file message12 contents <cr> Async1:0>>no motd outbound file If you use the word “contents“, the following message appears: Please enter your message of the day: save) (CTRL-K to Here you can enter the MOTD text directly and press CTRL-K to save it. If the file already exists in the /config directory on the LX, a warning message is displayed to alert the user that the current contents of the file will be overwritten. X To default the Message of the Day File Examples Use the default motd [inbound|outbound] file command or the default motd file command to default the message of the day file name and contents. The default filename is motd.default. Async1:0 >>default motd inbound file Async1:0 >>default motd outbound file LX Series Configuration Guide Message of the Day Commands 9-27 Use the show port async <port_number> characteristics command to display the Port Async Characteristics screen. Time: Port Number: Access: Speed: Bits per Character: Stop Bits: Parity: Flow Control: Autohangup: DSR Wait: Dtr Drop Time: Authentication: Auth. FallBack Attempts: RADIUS Accounting: TACACS+ Accounting: Connect Prompt: Connect Prompt String: Connect Command: 1 Remote 9600 8 1 None Xon Enabled Enabled 2 Thu, 16 Nov 2006 13:04:34 US/EASTERN Port Name: genlx Diag Port Device Name: /dev/ttyGN0 Banner: banner.default MOTD: Local Prompt: Login Autobaud Retry: 5 Max Mirror Connections: 1 Break: Break String/Control: Local Special Break String: 0 Disabled IdleBuffer: Disabled Transparent Mode: Enabled Enabled Disabled Disabled Type a key to continue. Figure 9.16 Port Async Characteristics Screen for a Non-Dynamic Port Configuring Async Port Features 9-28 Message of the Day Commands The Inbound and Outbound MOTD Display fields appear in the lower left side of the screen if the async port is dynamic. An example of this screen follows, with the Inbound MOTD and Outbound MOTD fields highlighted: Time: Port Number: 1 Access: Speed: Bits per Character: Stop Bits: Parity: Flow Control: Autohangup: DSR Wait: Dtr Drop Time: Inbound Authentication: Outbound Authentication: Auth. FallBack Attempts: Radius Accounting: Tacacs+ Accounting: Dynamic 9600 8 1 None Xon Enabled Enabled 2 Local Local 0 Disabled Disabled Inbound Banner: Outbound Banner: Inbound MOTD: Outbound MOTD: Connect Prompt: Connect Command: Connect Prompt String: Thu, 30 Nov 2006 20:27:31 UTC Port Name: Port_4 Device Name: Local Prompt: Autobaud Retry: Max Mirror Connections: Break: Break String/Control: Special Break String: IdleBuffer: Transparent Mode: /dev/ttyGN0 Login 5 N/A Enabled Enabled Disabled banner.default banner.default Figure 9.17 Show Port Async Characteristics Screen for a Dynamic Port LX Series Configuration Guide DSR Wait 9-29 DSR Wait This feature allows you to proceed with port connection without waiting until DSR is up. There are several issues of which you should be aware: Autohangup must be enabled for this feature to work. If Autohangup is disabled, the port will not wait for DSR to come up, regardless of how you set this feature. If modem is enabled, this feature is not applicable. An error message is sent if this feature is disabled. X To set the async port to wait for DSR before proceeding: Examples Use the dsr wait enable command. Async1:0 >>dsr wait enable The default is enabled. X To set the async port to not wait for DSR before proceeding: Examples Use the no dsr wait command. Async1:0 >>no dsr wait Configuring Async Port Features 9-30 DSR Wait Use the monitor/show port async <port_number> characteristics command to display the Show Port Async Characteristics screen. An example of this screen follows, with the new DSR Wait field highlighted: Time: Port Number: Access: Speed: Bits per Character: Stop Bits: Parity: Flow Control: Autohangup: DSR Wait: DTR Drop Time: 1 Remote 9600 8 1 None Xon Enabled Enabled 2 Authentication: Auth. FallBack Attempts: RADIUS Accounting: TACACS+ Accounting: Local 0 Disabled Disabled Connect Prompt: Connect Prompt String: Connect Command: Disabled Wed, 21 Feb 2007 14:02:29 US/EASTERN Port Name: genlx Diag Port Device Name: /dev/ttyGN0 Banner: banner.default MOTD: motd.default Local Prompt: Login Autobaud Retry: 5 Max Mirror Connections: 1 Break: Break String/Control: Special Break String: IdleBuffer: Transparent Mode: Enabled Disabled Type a key to continue. Figure 9.18 Show Port Async Characteristics Screen LX Series Configuration Guide Enabled Configuring Power Control Units 10-1 CHAPTER 10 Configuring Power Control Units The Power Control Units (5250, 5150, and 4800) can be managed remotely from asynchronous ports on an LX unit. The management tasks that can be performed remotely include rebooting outlets and turning outlets on and off. (For information on performing these tasks, see the outlet command, and the outlet group command in the “Superuser Commands” chapter of the LX-Series Commands Reference Guide.) For 5250 units, the LX CLI also supports power boot sequencing, control of the Factory Reset button, the ability to change the 5250 username and password, and the ability to access the 5250 CLI. Power Control units are remotely managed from LX asynchronous ports that are configured as POWER ports. This chapter describes how to configure ports as POWER ports, how to configure Power Control units via POWER ports, and how to display information on Power Control units. The Outlet Management Feature is disabled by default. When the Outlet Management Feature is disabled, only Superusers can manage outlets. Configuring Power Control Units 10-2 Configuring Power Control Units X To configure an LX asynchronous port as a POWER port Use the access power command in Port Async Command Mode. When the target port is set to power, it will auto-detect which power device (4800, 5150, or 5250) is connected to that port Example Async5:0 >>access power When you enter this command, the LX autodetects which power device you are connecting to and sets the access to the appropriate type. You no longer need to know beforehand what type of power device is connected to the port. This command replaces the access power model ir4800, access power model ir5150, and access power model ir5250 commands. When a port has been configured as a POWER port, you can connect a Power Control unit to it. The connection to the POWER port is made using the RJ-45 crossover cable that is supplied with the Power Control unit. You must power on the Power Control unit before you can configure it from the LX unit. For more information, see the Getting Started guide for the Power Control unit. When a Power port's access is changed to something other than “power”, the outlets that exist for the port will be removed from any existing Outlet group and the port setting will be defaulted. If the port is changed back into a Power port, the previous outlets groups will have to be reconfigured. LX Series Configuration Guide Default Name for an Outlet 10-3 Default Name for an Outlet The default name for an outlet is derived from its POWER port and the number of the outlet on the Power Control unit. For example, 5:7 is the default name of the 7th outlet on the Power Control Unit that is managed from POWER port 5. You can specify a descriptive name for an outlet or an outlet group. A descriptive name is a unique text name of up to 15 alphanumeric characters. For more information, see “Naming an Outlet” on page 10-5 and “Naming an Outlet Group” on page 10-5. You must specify the default name, or the descriptive name, of an outlet, in the outlet group command in the Configuration Command Mode. However, you only need to specify the number, or descriptive name, of the outlet in the outlet name command in the Asynchronous Command Mode. This is because the LX software “knows” that the POWER port is the current asynchronous port. See the LX Series Command Reference for more information about the outlet group and outlet name commands. Configuring 5250, 5150 and 4800 Units Outlets can be assigned to a group and managed and configured as a group. The Off Time for outlets can be specified using the LX CLI. This section describes how to assign outlets to a group and how to specify the Off Time for outlets. When outlets are assigned to a group, they can be configured and managed as a group. This can be more efficient than configuring and managing outlets individually. X To assign outlets to a group Use the outlet group command. In the following example, the outlets 2:5 3:7 4:2 4:3 4:5 are assigned to Group 2: Example Config:0 >>outlet group 2 2:5 3:7 4:2 4:3 4:5 Configuring Power Control Units 10-4 Specifying the Off Time The Power Control unit must be serially attached to the LX asynchronous port when you create outlet groups. This allows for the LX to poll the Power Control unit to determine the maximum number of outlets available. Checks have been put in place to prevent a user from configuring outlet groups with outlet numbers that do not exist. Specifying the Off Time The Off Time is the length of time, in seconds, that outlets must remain off before they can be turned back on. This section describes how to specify the Off Time for a Power Control unit or for an outlet group. Valid values are 0 to 255 seconds. X To specify the off time for an outlet group Use the outlet group off time command in the Configuration Command Mode. In the following example, the Off Time for outlets in Outlet Group 14 is set to 20 seconds: Example Config:0 >>outlet group 14 off time 20 X To specify the default off time for an outlet group Use the default outlet group name <group_ number>|<group_name> off time command in the Configuration Command Mode. In the following example, the Off Time for outlets in Outlet Group Name Router 1 is set to the default of 15 seconds: Example Config:0 >>default outlet group name router1 off time X To specify the off time for a Power control unit Use the power off time command in Asynchronous Command Mode. In the following example, an Off Time of 15 seconds is specified for all of the outlets that are managed from asynchronous port 5: Example Async5:0 >>power off time 15 L The power off time command should be executed on a port that is configured as a POWER port and has a Power Control unit attached to it. LX Series Configuration Guide Naming an Outlet 10-5 Naming an Outlet You can assign a descriptive name of up to 15 alphanumeric characters to an outlet. X To specify a descriptive name for an outlet Use the outlet name command in Asynchronous Command Mode. In the following example, the descriptive name Build5NTserver is assigned to Outlet 2 on the Power Control unit that is managed from POWER port 5: Example Async5:0 >>outlet 2 name Build5NTserver L The POWER port number is not specified in the outlet name command (such as 5:2) because the POWER port is implied to be the current port in the Asynchronous Command Mode. In the preceding example, the implied POWER port is port 5. The CLI is in the Asynchronous Command Mode for port 5. Naming an Outlet Group You can assign a descriptive name of up to 15 alphanumeric characters to an outlet group. X To specify a descriptive name for an outlet group Use the outlet group name command in Configuration Command Mode. In the following example, the descriptive name TestEquipment is assigned to outlet group 14: Example Config:0 >>outlet group 14 name TestEquipment Configuring Power Control Units 10-6 Rebooting or Turning Outlets On or Off Rebooting or Turning Outlets On or Off This section describes how to reboot a single outlet or outlets within a group, or turn them on or off. X To turn on or off or reboot an outlet by number Use the outlet <power_master>:<outlet_number> on|off|reboot command in the Superuser Command Mode. In the following example, Outlet 2 of Power Master 5 is turned off: Example InReach:0 >>outlet 5:2 off X To turn on or off or reboot an outlet by name Use the outlet name <outlet_name> on|off|reboot command in the Superuser Command Mode to manage an outlet via name. L If you have Outlet Access rights, you can manage outlets via the User (>) prompt. In the following example, the Outlet named router1 is turned on: Example InReach:0 >>outlet name router1 on X To turn on or off or reboot an outlet group by name or number Use the outlet group <group_number|name <group_name> on|off|reboot command in the Superuser Command Mode. L If you have Outlet Access rights, you can manage outlets via the User (>) prompt. In the following example, Outlet Group 14 is rebooted, first by number, then by name: Examples InReach:0 >>outlet group 14 reboot InReach:0 >>outlet group name router2 reboot LX Series Configuration Guide Disabling the Off Option for Power Outlets 10-7 Disabling the Off Option for Power Outlets Mission-critical outlets are those outlets that must remain on at all times. You can ensure that mission-critical outlets remain on by disabling the Off option for them. Outlets that have their Off option disabled can’t be turned off with the outlet command or the outlet group command. X To disable the Off option for outlets Example Use the no outlet off command in Asynchronous Command Mode. In the following example, the Off option is disabled for outlet 5:3 and outlets 5:7 through 5:11: Async5:0 >>no outlet off 3,7-11 X To re-enable the Off option for outlets Example Use the outlet off enable command in Asynchronous Command Mode. In the following example, the Off option is re-enabled for outlet 5:3 and outlets 5:7 through 5:11: Async5:0 >>outlet off 3,7-11 enable L The no outlet off command and the outlet off enable command can only be executed on a port that is configured as a POWER port and has a Power Control unit attached to it. Configuring Power Control Units 10-8 Accessing the 5250/5150/4800 CLI Accessing the 5250/5150/4800 CLI In order to access the 5250/5150/4800 CLI from an LX unit, the port to which the 5250/5150/4800 unit is attached must be configured for remote access. See “Configuring a Port for 5250, 5150 and 4800 CLI Access” on page 10-9 to configure a port for 5250/5150/4800 CLI access. X To access the 5250/5150/4800 CLI from an LX unit 1. Configure async port 5 as the default port: InReach:0 >>config port async 5 default port 2. Example 3. Execute the connect port async command to make a connection to the 5250/5150/4800 unit, going through the access remote LX port. In this example, assume the LX port involved is port 5: InReach:0 >>connect port async 5 When you are connected to the 5250/5150/4800 unit, you will be prompted to log in to the unit. L The default login username is admn and the password is admn. 4. 5. The 5250/5150/4800 CLI is displayed after you finish logging in. To logout, enter: InReach:0 >>logout See your 5250/5150/4800 documentation for information on using the 5250/5150/4800 CLI. LX Series Configuration Guide Configuring Unique 5250, 5150 and 4800 Features 10-9 Configuring Unique 5250, 5150 and 4800 Features This section describes how to configure the unique 5250/5150/ 4800 Features from the LX CLI. The unique 5250/5150/4800 Features include power boot sequencing, control of the Factory Reset button, the ability to change the 5250/5150/4800 username and password, and the ability to access the 5250/ 5150/4800 CLI. Configuring a Port for 5250, 5150 and 4800 CLI Access See “Command Mode Descriptions” on page 1-5 for information about accessing Asynchronous Command Mode. You can configure the POWER port of a 5250/5150/4800 to support access to the CLI of the 5250/5150/4800 unit. The CLI of the 5250/5150/4800 can then be accessed, via connect port or Telnet, from the CLI of the LX unit. See “Accessing the 5250/ 5150/4800 CLI” on page 10-8 for more information on using the connect port async command to connect to a 5250/5150/ 4800 unit. X To configure a port for access to the CLI of the 5250/ 5150/4800 unit 1. Example 2. Example Access the Configuration Command Mode for an asynchronous port that is configured as a POWER port for a 5250/5150/4800 unit. Async7:0 >>access power Use the power cli enable command to enable CLI access for the 5250/5150/4800 that is managed from the port: Async7:0 >>power cli enable L The port settings on the POWER port must match the port settings on the 5250/5150/4800 unit. If both settings don’t match, the LX unit and the 5250/5150/ 4800 unit won’t be able to communicate. Configuring Power Control Units 10-10 Enabling the Factory Reset Button Enabling the Factory Reset Button See “Command Mode Descriptions” on page 1-5 for information about accessing Asynchronous Command Mode. The 5250/5150/4800 unit includes a Factory Reset Button, which is used to reset the 5250/5150/4800 unit to factorydefault values. However, you must enable the Factory Reset Button in order to use it for this purpose. X To enable the Factory Reset Button 1. 2. Example Access the Configuration Command Mode for an asynchronous port that is configured as a POWER port for a 5250/5150/4800 unit. Use the power factory reset button enable command: Async7:0 >>power factory reset button enable The following confirmation prompt is displayed: Do you really want to perform this operation? y/n 3. Enter y to enable the factory reset button on the 5250/ 5150/4800 unit, or enter n to abort the command. Configuring the Authentication Feature for the 5250/5150/4800 The LX supports an Authentication Feature for the 5250/5150/ 4800. Under this Authentication Feature, the 5250/5150/4800 Admin Name and Password are passed transparently to the 5250/5150/4800. If the Admin Name/Password combination from the LX unit matches the one that is configured for the LX unit, the LX can manage and modify the power unit’s configuration. If the username does not match, you must default the power unit to clear the stored username and password. Specifying the 5250/5150/4800 Admin Name The 5250/5150/4800 Admin Name and Password are passed automatically from the LX POWER port to the 5250/5150/4800 unit; the user does not enter these values. LX Series Configuration Guide Specifying the 5250/5150/4800 Admin Name 10-11 X To specify the 5250/5150/4800 Admin Name 1. Example 2. Example See “Command Mode Descriptions” on page 1-5 for information about accessing Asynchronous Command Mode. Access the Asynchronous Command Mode for an asynchronous port that is configured as a POWER port for a 5250/5150/4800 unit; for example: Async7:0 >>access power Use the power scp admin name command to specify the Admin Name: Async7:0 >>power scp admin name HenryK In order to communicate to the 5250/5150/4800 unit, with scp enable there must be an admin name and Password for the 5250/5150/4800 unit and 5250/5150/4800 authentication must be enabled. For more information, see “Specifying the Password for the 5250/5150/4800 Unit” on page 10-12. This command can only be executed on a port that is configured for 5250/5150/4800 power access and currently has a 5250/ 5150/4800 unit connected to it. See “To configure an LX asynchronous port as a POWER port” on page 10-2 to configure an asynchronous port for 5250/5150/4800 power access. This command configures the 5250/5150/4800 Admin Name for both the port and the 5250/5150/4800 unit that is connected to the port. If you connect the 5250/5150/4800 unit to another port, you will need to re-specify the 5250/5150/4800 Admin Name, and Password, for that port. After the Admin Name and Login Password are configured, you can enable authentication. For more information, see “Enabling 5250/5150/4800 Authentication” on page 10-13. Configuring Power Control Units 10-12 Specifying the Password for the 5250/5150/4800 Unit Specifying the Password for the 5250/5150/4800 Unit The Password for the 5250/5150/4800 is passed transparently, with the 5250/5150/4800 Admin Name, to the 5250/5150/4800 unit when the LX attempts to communicate to the Power unit. X To specify the administrator login password 1. Example Create a Power port: Async7:0 >>access power 2. Example Execute the power scp admin password command: Async7:0 >>power scp admin password 3. At the following prompts, enter the password: Enter your NEW password: Re-Enter your NEW password: This command can only be executed on a port that is configured for 5250/5150/4800 power access and currently has a 5250/ 5150/4800 unit connected to it. See “To configure an LX asynchronous port as a POWER port” on page 10-2 to configure an asynchronous port for 5250/5150/4800 power access. This command configures the 5250/5150/4800 Login Password for both the port and the 5250/5150/4800 unit that is connected to the port. If you connect the 5250/5150/4800 unit to another port, you will need to re-specify the 5250/5150/4800 Login Password, and Admin Name, for that port. After the Admin Name and Login Password are configured, you can enable authentication. For more information, see “Enabling 5250/5150/4800 Authentication” on page 10-13. LX Series Configuration Guide Enabling 5250/5150/4800 Authentication 10-13 Enabling 5250/5150/4800 Authentication After you have specified the 5250/5150/4800 Admin Name and the 5250/5150/4800 Login Password for a POWER port, you can enable 5250/5150/4800 authentication on the port. X To enable 5250/5150/4800 authentication 1. 2. Example Access the Asynchronous Command Mode for an asynchronous port that is configured as a POWER port for a 5250/5150/4800 unit. Execute the power scp authentication enable command: Async7:0 >>power scp authentication enable Configuring Power Boot Sequencing See “Command Mode Descriptions” on page 1-5 for information about accessing Asynchronous Command Mode. A Power Boot Sequence is a break that is sent from the 5250/ 5150/4800 to indicate that an outlet has been cold-booted. The Power Boot Sequence Feature also causes the LX, rather than the 5250/5150/4800, to turn on the 5250/5150/4800 outlets from a cold boot. The Power Boot Sequence Feature can only be enabled on a port that is configured as a POWER port for a 5250/5150/4800 unit. When the Power Boot Sequence Feature is enabled on such a port, it applies to all of the outlets that are managed from that port. X To enable the Power Boot Sequence Feature on a port 1. 2. Example Access the Asynchronous Command Mode for an asynchronous port that is configured as a POWER port for a 5250/5150/4800 unit. Use the power boot sequence enable command to enable the Power Boot Sequence Feature on the port: Async7:0 >>power boot sequence enable Configuring Power Control Units 10-14 Enabling SCP Enabling SCP If you are unable to communicate to the Power unit, SCP may be disabled on the unit. X To enable SCP 1. Examples Default the LX async port to default parameters: LX:0 >>config port async 3 default port LX:0 >>logout port 3 2. Example Connect and log into the (remote access) port to talk directly to the 5250/5150/4800 CLI: LX:0 >>connect port async 3 Then press <Enter> at least three times. 3. 4. 5. After you have logged into port async 3 you must log in to the 5250/5150/4800: LX Version 5.3a Username: admn Password: admn At the LX prompt, enter the following command to enable SCP and then log out: LX: set port scp console enabled command successful LX: logout The remote session to port async 3 closes. At the LX prompt, reconfigure the port for Power Management 5250/5150/4800 and then save your configuration: LX:0 >>config port async 3 access power LX:0 >>save config flash LX Series Configuration Guide Displaying Information on Power Control Units 10-15 Displaying Information on Power Control Units This section describes how to display information on Power Control units and outlets. The information that can be displayed includes statuses and summaries for Power Control units, and statuses for groups of outlets. X To display status information for a specific power control unit Example Use the show device status command in the Superuser Command Mode: LX:0 >>show device 3 status X To display the status for all Power Control units Example Use the show device status command in the Superuser Command Mode: LX:0 >>show device all status L The show device status command displays the status of all Power Control units and Temperature/ Humidity sensors that are connected to the LX unit. See “Displaying the Temperature and Humidity” on page 9-2 for the status display for a Temperature/ Humidity Sensor port. Configuring Power Control Units 10-16 Displaying Information on Power Control Units Figure 10.2 shows an example of the Device Status Screen for a 5250 POWER port. Time: Thu, 25 May 2006 13:14:14 UTC Device Type: Firmware: Outlet Minimum Off Time: 1 Power Cli: Enabled SCP Admin name: Not configured Power Factory Reset Button: Enabled Total Load: 1.50 11 IR5250 MRV LX Series LX-5250 Version 5.3d Power Boot Sequence: Disabled Power SCP Authentication: Disabled SCP Admin password: Not configured Enclosure: Status: Input: Total Current Load: Outlet Name 1 Groups: 2 Groups: 3 Groups: 4 Groups: 5 Groups: 6 Groups: 7 Groups: 8 Groups: 1 Device Number: Normal A Control Status: 0.00 Total Current Utilization(%): State Boot Wakeup Off On 0 On Enabled On 1 On Enabled On 2 On Enabled On 3 On Enabled On 4 On Enabled On 5 On Enabled On 6 On Enabled On 7 On Enabled On 0.00% Figure 10.1 Device Status Screen for a 5250 POWER Port LX Series Configuration Guide Displaying Information on Power Control Units 10-17 Figure 10.2 shows an example of the Device Status Screen for a 5150 POWER port. Time: Tue, 08 Jul 2006 21:12:06 UTC Device Number: 9 Device Type: IR5150 Firmware: MRV Comm In-Reach IR-5150 Version 1.0k Total Outlet Strip Load: 0.25A Total Outlet % Current Utilization (%): 21.67 Outlet Minimum Off Time: 10 Power Boot Sequence: Disabled Power Cli: Enabled Power SCP Authentication: Enabled SCP Admin name: Configured SCP Admin password: Configured Power Factory Reset Button: Enabled Total Outlet Strip Current Load: 2.50A Total Outlet Strip % Current Utilization (%): 8.33% Outlet 1 2 3 4 5 6 7 8 9 10 11 12 13 14 15 16 Name State On On On On On On On On On On On On On On On On Boot 0 1 2 3 4 5 6 7 8 9 10 11 12 13 14 15 Status Normal Normal Normal Normal Normal Normal Normal Normal Normal Normal Normal Normal Normal Normal Normal Normal Wakeup On On On On On On On On On On On On On On On On Off Groups Enabled Enabled Enabled Enabled Enabled Enabled Enabled Enabled Enabled Enabled Enabled Enabled Enabled Enabled Enabled Enabled Figure 10.2 Device Status Screen for a 5150 POWER Port Configuring Power Control Units 10-18 Displaying Information on Power Control Units Figure 10.3 shows an example of the Device Status Screen for a 4800 POWER port. Time: Fri, 04 Aug 2006 01:57:09 UTC Device Type: Firmware: Outlet Minimum Off Time: 5 Power Cli: Disabled SCP Admin name: Not configured Power Factory Reset Button: Enabled Total Load: 7.50 Device Number: Enclosure: Status: 1 12 IR4800 MRV LX Series LX-4800 Version 5.3d Power Boot Sequence: Disabled Power SCP Authentication: Disabled SCP Admin password: Not configured Normal Input: A Control Status: On Load: 3.50 Outlet Name State Boot Wakeup Load Off 1 out1DC On 0 On 3.5 Amps Enabled Groups: 1,4,7,9,11,13,15,17,19,21,23,25,27,29,31,33,35,37,39,41,43,45,47,49 ,51,53,55,57,59,61,63,65,67,69,71,73,75,77,79,81,83,85,87,89,91,93,95 2 IR8040OutletAB2 On 1 On 0.0 Amps Enabled Groups: 2-4,6,8,10,12,14,16,18,20,22,24,26,28,30,32,34,36,38,40,42,44,46,48 ,50,52,54,56,58,60,62,64,66,68,70,72,74,76,78,80,82,84,86,88,90,92,94 Input: B Control Status: On Load: 4.00 Outlet Name State Boot Wakeup Load Off 3 IR7104OutletAB1 On 2 On 0.0 Amps Enabled Groups: 4 4 RaptorOutletAB4 On 3 On 4.0 Amps Enabled Groups: 3-4 Figure 10.3 Device Status Screen for a 4800 Port LX Series Configuration Guide Displaying Information on Power Control Units 10-19 X To display status information for outlet groups Example Use the monitor/show outlet group <group_number>|name <group_name> status command to display status information for outlet groups. In the following example, the status for the group TestEquipment is displayed: LX:0 >>show outlet group name TestEquipment status X To display the status for all outlet groups that are managed from the LX unit Example Use the show outlet group all status command to display status information for all outlet groups: LX:0 >>show outlet group all status Figure 10.4 shows an example of the Device Status Screen for an outlet group. Time: Mon, 16 Sep 2002 17:55:19 Group Name: TestEquipment Port Outlet State 2 1 ON 2 2 ON Group Number: Group Off Time: 2 4 Figure 10.4 Device Status Screen for an Outlet Group X To display summary information for all power control units Example Use the monitor/show device summary command to display summary information for all of the Power Control units that are currently connected to the LX unit: LX:0 >>show device summary Figure 10.5 shows an example of the Device Summary Screen. Device Number 4 5 6 7 Device Type LX5250 LX5250 Sensor IR4800 Model Name LX-5250-1108H LX-5252-3116VL IR-4800-4870 Figure 10.5 Device Summary Screen Configuring Power Control Units 10-20 Displaying Information on Power Control Units L The monitor/show device summary command displays summary information for all Power Control units and Temperature/Humidity sensors that are connected to the LX unit. See “Displaying the Temperature and Humidity” on page 9-2 for the Summary Screen for a Temperature/Humidity Sensor port. LX Series Configuration Guide Configuring the Trigger-Action Feature 11-1 CHAPTER 11 Configuring the Trigger-Action Feature The Trigger-Action Feature is an LX feature that executes LX commands in response to triggering events. The LX command execution is an automated process, in the background, in response to a triggered event. A triggering event is associated with an Action in a Rule. When the triggering event occurs, the LX unit executes the action command that is associated with it by an enabled rule. Configuring the Trigger-Action Feature 11-2 Configuring the Trigger-Action Feature The following events can be configured as triggering events (for example, triggers) for a Rule: A humidity reading that is equal to, greater than, or less than a specified threshold. A temperature reading that is equal to, greater than, or less than a specified threshold. The system clock of the LX unit reaches a certain instant of time. The system calendar of the LX unit reaches a specified date or day of the week. The CTS signal on a specified asynchronous port changing to high or low. The DSR/DCD signal on a specified asynchronous port changing to high to low. A specified ping host returning a status of Up or Down. A pattern-match string is received at a specified LX asynchronous port. When an LX unit reboots. The input status on both Power Input A and Power Input B on both AC and DC versions of the LX-8000 Series. The combined result of the “AND” and “OR” of multiple triggers. In order to use the Trigger-Action Feature, you must first create actions and triggers. After you have created actions and triggers, you can associate actions with triggers in rules. For more information about creating actions, triggers, and rules: To create a(n)... See action “To create or modify an action” on page 11-4 trigger “To create or modify a trigger” on page 11-5 rule “To create or modify a rule” on page 11-17 LX Series Configuration Guide Greenwich Time Display 11-3 Greenwich Time Display MRV uses POSIX-style signs in the Zone names and the output abbreviations, although this is the opposite of what many users may expect. POSIX uses a positive (+) sign for times west of Greenwich, but many users expect a positive sign for times east of Greenwich. For example, TZ='Etc/GMT+4' uses the abbreviation "GMT+4" and corresponds to four hours behind UTC (i.e. west of Greenwich) even though many users expect it to mean four hours ahead of UTC (i.e. east of Greenwich). InReach:0 >>conf timezone gmt +0 Timezone set to GMT+0 InReach:0 >>show clock Wed, 22 Mar 2006 03:10:47 GMT+0 InReach:0 >>conf timezone gmt -5 Timezone set to GMT-5 InReach:0 >>show clock Wed, 22 Mar 2006 08:10:55 GMT-5 Previously, configuring the timezone to GMT -5 would have changed the clock to five hours earlier, (e.g., to Wed, 22 Mar 2006 10:10:47 GMT-5, from Wed, 22 Mar 2006 03:10:47 GMT5). Now the time is set five hours ahead, as shown in the final line of the above example. Configuring the Trigger-Action Feature 11-4 Guidelines for Creating or Modifying Actions Guidelines for Creating or Modifying Actions Keep the following in mind when you create or modify an Action: Example If an Action is associated with an enabled Rule, you must disable the Rule before you can modify the Action. For more information, see “Disabling Rules” on page 11-18. If you specify the send trap message command in an Action, you must have SNMP enabled and trap client(s) configured. The LX command that you specify for an Action must be a Superuser command or a Multi-Level command that begins with the configuration command: Action_TurnOnAC7:0 >>command outlet 5:2 on Action_TurnOnAC7:0 >>command configuration port async 4 access none Example To specify more than one LX command for an Action, use the script command: Action_TurnOnAC7:0 >>command script TurnOffAndDenyAccess.txt See the script command in the LX Series Command Reference for more information about LX command scripts. X To create or modify an action 1. 2. Example Access the Trigger-Action Command Mode. See “Command Mode Descriptions” on page 1-5 for information about accessing the Trigger-Action Command Mode. Use the action name command to create an Action, or to access an existing Action: Trigger-Action:0 >>action name TurnOnAC7 When you execute the Action name command, you enter the Action Configuration Mode for the specified Action. For example, the Action Configuration prompt for the Action TurnOnAC7 is Action_TurnOnAC7:0 >>. 3. Example Use the command command to specify an LX command for an Action: Action_TurnOnAC7:0 >>command outlet 5:2 on LX Series Configuration Guide Guidelines for Creating or Modifying Actions 11-5 After you have specified an LX command for the Action, you can bind a Trigger with the Action by a Rule. For more information, see “To create or modify a rule” on page 11-17. X To display information about actions Example Use the show trigger-action action command: Action_TurnOnAC7:0 >>show trigger-action action name TurnonAC7 Figure 11.1 shows an example of the Action Information Screen. See “Command Mode Descriptions” on page 1-5 for information about accessing the TriggerAction Command Mode. Time: Action Name: TurnOnAC7 Command: outlet 3:7 on Figure 11.1 Action Information Screen X To create or modify a trigger 1. Example Wed, 18 Oct 2006 09:08:19 US/EASTERN Use the trigger name command in Trigger-Action Command Mode to create or modify a Trigger: Trigger-Action:0 >>trigger name TempPort4GT34 When you execute the trigger name command, you enter the Trigger Command Mode for the specified Trigger. For example, the Trigger Command prompt for the Trigger TempPort4GT34 is Trigger_TempPort4GT34:0 >>. You can configure a Trigger in Trigger Command Mode. See the appropriate procedure for configuring each type of Trigger: To configure a trigger for... See alarm “To configure an alarm trigger” on page 11-6 analog “To configure an analog trigger” on page 11-7 bootup “To configure a bootup trigger” on page 11-7 compound “To configure a compound trigger” on page 11-7 Configuring the Trigger-Action Feature 11-6 Guidelines for Creating or Modifying Actions To configure a trigger for... See duration “To configure a clock-based duration” on page 11-8 “To configure a clock-based duration outside of the set time” on page 11-8 “To configure a day-based duration” on page 11-8 humidity “To configure a humidity trigger” on page 11-9 instant “To configure a clock-based timer” on page 11-9, “To configure a date-based trigger” on page 11-9, “To configure a day-based trigger” on page 11-10 pattern “To configure a Pattern Trigger” on page 11-10 ping “To configure a ping trigger” on page 11-11 power “To configure a trigger to track a power failure” on page 11-11 “To configure a power port async lost contact trigger” on page 11-12 “To monitor the power threshold based on total power per input” on page 11-12 “To monitor the power threshold based on the sum of the load on multiple power units attached to an LX” on page 11-13 “To configure a power trigger” on page 11-13 “To configure a power input voltage threshold trigger” on page 11-14 signal “To configure a CTS signal trigger” on page 11-15 temperature “To configure a temperature port trigger” on page 1115 “To configure a temperature onboard trigger” on page 11-16 X To configure an alarm trigger 1. Example Execute the alarm type command to specify the alarm for the alarm condition: Trigger_CapeIsReachable:0 >>alarm L Each LDAM port supports two alarm points. LX Series Configuration Guide Guidelines for Creating or Modifying Actions 11-7 The Alarm Condition is true if the state of the faulted state is equal to the signal state of CTS or DSR on the configured LDAM async port alarm point. X To configure an analog trigger Example An Analog Trigger is used to initiate an Action in response to an HDAM analog sensor reading. Execute the analog command in the Trigger Command Mode. In the following example, the Trigger condition is true when the sensor reading on the point with the given name is greater than 34: Trigger_AnalogPoint:0 >>analog 10_1_5 > 34 [hysteresis 4] This example also includes an optional hysteresis value of 4. The hysteresis is a range that exists preceding and below the actual threshold setting. After a threshold is crossed, any readings within the hysteresis range are not considered a crossing of the threshold until a measurement outside the hysteresis has been taken. You should only configure the hysteresis to prevent “sporadic” or “spike” sensor levels from producing inappropriate firings of the Rule associated with this Trigger. X To configure a bootup trigger Example Execute the bootup Trigger type command to specify a Trigger type to be executed when the unit reboots: Trigger_bootstrap:0 >>bootup X To configure a compound trigger Example Execute the compound type Trigger command to specify a Trigger type based on an AND/OR condition between two existing triggers: Trigger_bothtests:0 >>compound TempPort4GT30 and/or HumPort4GT80 Configuring the Trigger-Action Feature 11-8 Guidelines for Creating or Modifying Actions X To configure a clock-based duration Example Execute the duration time command to specify a Duration Trigger that is based on a range of hours and minutes in the LX system clock. In the following example, the Duration Condition is true when the LX system clock falls within the range of 8:00AM to 5:00PM: Trigger_EightFive:0 >>duration time 08-17:00 X To configure a clock-based duration outside of the set time Example Execute the duration time not command to specify a Duration Trigger that is based on being outside a range of hours and minutes in the LX system calendar. In the following example, the Duration Condition is true when the LX system calendar falls outside the following range (12:00:01 to 8:00AM): Trigger_Notfirsteight:0 >>duration time not 00-08:00 X To configure a day-based duration Example Execute the duration day command to specify a Duration Trigger that is based on a day or range of days in the LX system calendar. In the following example, the Duration Condition is true from 00:00:01 midnight until 23:59 PM Tuesday: Trigger_Tuesday:0 >>duration day tuesday LX Series Configuration Guide Guidelines for Creating or Modifying Actions 11-9 X To configure a humidity trigger Execute the humidity command in the Trigger Command Mode. The following example also includes an optional hysteresis value of 7: Example A Humidity Trigger is used to initiate an Action in response to a humidity reading. Trigger_HumPort4GT60:0>>humidity port 3 > 60 hysteresis 7 The hysteresis is a range that exists preceding and below the actual threshold setting. After a threshold is crossed, any readings within the hysteresis range are not considered a crossing of the threshold until a measurement outside the hysteresis has been taken. You should only configure the hysteresis to prevent “sporadic” or “spike” humidity levels from producing inappropriate firings of the Rule associated with this Trigger. X To configure a clock-based timer An Instant Trigger is used to initiate an Action in response to timer- or calendar-related events. A time-related event occurs when the system clock of the LX unit reaches a specified time. A calendar-related event occurs when the system calendar of the LX unit reaching a specified date or day of the week. Example Execute the instant time command to specify a Time Trigger that is based on the LX system clock reaching a specified time of day. In the following example, the Instant Condition is true when the LX system clock reaches 6:12 AM each morning: Trigger_SixTwelve_AM:0 >>instant time 06:12 X To configure a date-based trigger Example Execute the instant date command to specify a Trigger that is based on the LX system calendar reaching a specified date. In the following example, the Instant Condition is true when the LX system calendar reaches midnight (12:00 AM 00:00:01) on May 11th: Trigger_MayEleventh:0 >>instant date 05/11 Configuring the Trigger-Action Feature 11-10 Guidelines for Creating or Modifying Actions X To configure a day-based trigger Example Execute the instant day command to specify a Trigger that is based on the LX system calendar reaching a specified day of the week. In the following example, the Instant Condition is true when the LX system calendar reaches midnight (12:00 AM) on Tuesday: Trigger_Tuesday:0 >>instant day tue X To configure a Pattern Trigger 1. Example A Pattern Trigger is used to initiate an Action in response to a Pattern data received at an LX Databuffer or remote access ports only. Execute the pattern port string command to specify the match pattern for the port: Trigger_Port5Match:0 >>pattern port 5 string EdwardW In the preceding example, the pattern condition is true when a data string matching the pattern EdwardW is received on DATABUFFER or Remote Access port 5. 2. Execute the pattern case command to specify whether or not the match pattern is case-sensitive or case-insensitive: Trigger_Port5Match:0 >>pattern case sensitive L Pattern trigger is limited to the port async access types of databuffer or remote only. LX Series Configuration Guide Guidelines for Creating or Modifying Actions 11-11 A Ping Trigger is used to initiate an Action in response to a network Example device being available (up) or not (down). X To configure a ping trigger 1. 2. Example 3. Example A Power Trigger is used to initiate an Action in response to a power failure (no power) or Example power restore (powered) on Power Input A or Power Input B of an LX8000 Series unit. Execute the ping status command to specify the state of the ping host to make the Ping Condition true: Trigger_HostIsReachable:0 >>ping status up Execute the ping interval command to specify the interval (in seconds) at which ping messages will be sent to the specified ping host: Trigger_HostIsReachable:0 >>ping interval 30 The Ping Condition is true if host specified in this command is up or down as specified in the ping status command. 4. Execute the ping count command to specify the total number of unanswered ping requests before the target device is considered to be true: Trigger_HostIsReachable:0 >>ping count 5 In this example, a ping message will be sent to the host at IP Address 119.20.110.87 at 30-second intervals. The Trigger Condition is true as long as the ping status is up. X To configure a trigger to track a power failure 1. Example 2. Example Execute the ping address command to specify the Trigger type ping and include the address of the target device: Trigger_HostIsReachable:0 >>ping address 119.20.110.87 Execute the Trigger name command in the Trigger Command Mode. The following example configures a Trigger to track a power failure on Power A Input of an LX8000 Series unit: Trigger_Action:0 >>trigger name track_powerA Then configure the power status of Power Input A: Trigger_track_powerA:0 >>power input A status no power L This is supported only on dual input power LX units. Configuring the Trigger-Action Feature 11-12 Guidelines for Creating or Modifying Actions A Power Port Async lost contact Trigger is used to detect a timeout on a specific port. Example X To configure a power port async lost contact trigger L This command applies to all power units. Execute the power port async <port_number> lost contact command from the Trigger-Action Command Mode to poll the power device with status commands (every 10 seconds). If the device does not respond within a certain time period, the LX is considered to have "lost contact" with the device and the action is performed. The trigger does not perform the action again until a successful response is received, and then followed by another timeout: Trigger_TestA:0 >>power port async 2 lost contact where the port number is the port on which you want to detect loss of contact with the attached device. A Power Port Async Load Input Trigger is used to monitor the power threshold based on total power per input. X To monitor the power threshold based on total power per input L Certain 5250 Power Control models are three-phase. 5250 models supporting three phase power input can set trigger-actions on each phase individually. Using a 5250 three phase unit is similar to having three power strips in one unit, the new features apply to each phase individually. On 4800 DC models, you can set thresholds on individual ports as well as on the device as a whole. Execute the power port async <port_number> load <|> <threshold_number> input A|B|C [hysteresis <hysteresis_number>] command to perform monitoring on a specific input (for Power Control 4800 and 5250 series only): Trigger_TestA:0 >>power port async 12 load < 8 input A hysteresis 1 If the defined threshold is exceeded, the appropriate action is executed when the rule is enabled. Valid threshold values are in the range from 0.0 to 65534.9. Valid hysteresis values are in the range is 0.0 to 9.9 (note that you can use decimals). LX Series Configuration Guide Guidelines for Creating or Modifying Actions 11-13 A Power Port Async Total Load Trigger is used to perform monitoring on the total load against a given threshold. Example X To monitor the power threshold based on the sum of the load on multiple power units attached to an LX L This command applies to all power units. Execute the power port async total <port-list> load <|> <threshold_number> [hysteresis <hysteresis_ number>] command to define a threshold (for Power Control 4800, 5150, and 5250 series) to compare the current total load against: Trigger_TestA:0 >>power port async total 8-12 load < 8 hysteresis 1 If the defined threshold is exceeded, the appropriate action is executed when the rule is enabled. Valid threshold values are in the range from 0.0 to 65534.9. Valid hysteresis values are in the range is 0.0 to 9.9 (note that you can use decimals). A Power Trigger is used to initiate an Action in response to Example a power reading or condition. X To configure a power trigger Execute the power regulator command to specify the status of the internal power supply’s functionality when connected to the LX internals: Trigger_PowerSupplyA:0 >>power regulator A status restored L You cannot use the trigger-action trigger types "power" and "power regulator" on the LX-7304T. Configuring the Trigger-Action Feature 11-14 Guidelines for Creating or Modifying Actions A Power Input Threshold Trigger is used to initiate an action when power input falls outside a threshold. Example X To configure a power input voltage threshold trigger Execute the power input A|B voltage <|> <threshold_ number> [hysteresis <hysteresis_number>] command from the Trigger-Action Command Mode to define a threshold based off of the current voltage reading. It polls the Digital Volt Meter (DVM) every second: Trigger_TestA:0 >>power input A voltage < 48 hysteresis 1 where the input (A or B) is the input on which you want to detect voltage with the attached device. If the defined threshold is exceeded, the appropriate action is executed when the rule is enabled. The action is executed again when the voltage falls back below the threshold (plus or minus the hysteresis) and then crosses it again. Valid threshold values are in the range from 0.0 to 80. Valid hysteresis values are in the range is -10.0 to 10 (note that you can use decimals). A Power Input Status Trigger is used to initiate an action when power status falls outside a threshold. Example X To configure a power input status threshold trigger Execute the power input A|B powered|no power command from the Trigger-Action Command Mode to define a threshold based off of the powered or no powered state. Trigger_TestA:0 >>power input A status powered where the input (A or B) is the input on which you want to detect power status with the attached device. If the defined power status changes, the appropriate action is executed when the rule is enabled. The action is executed again when the power status changes again. LX Series Configuration Guide Guidelines for Creating or Modifying Actions 11-15 A Signal Trigger is used to initiate an Action in response to a signal transition on the CTS pin, or the DSR/DCD pin, of an LX Example asynchronous port. X To configure a CTS signal trigger Execute the signal port cts command in Trigger Command Mode to specify a signal transition on the CTS pin of a specified port as the condition for a signal Trigger. The following command specifies that the Trigger condition is true when the CTS signal on port 5 transitions to high: Trigger_Port5CTSHigh:0 >>signal port 5 cts high X To configure a DSR/DCD signal trigger Use the signal port dsr-dcd command to specify a signal transition on the DSR/DCD pin of a specified port as the condition for a signal Trigger. The following command specifies that the Trigger condition is true when the DSR/DCD signal on port 6 transitions to high: Example Trigger_Port6DSR-DCDHigh:0 >>signal port 6 dsr-dcd high X To configure a temperature port trigger Example A Temperature Port Trigger is used to initiate an Action in response to an external temperature reading. Execute the temperature port command in the Trigger Command Mode. In the following example, the temperature condition is true when the temperature reading on SENSOR port 3 is greater than 34 degrees Celsius. This example also includes an optional hysteresis value of 4: Trigger_TempPort3GT34:0 >>temperature port 3 > 34 celsius hysteresis 4 The hysteresis is a range that exists preceding and below the actual threshold setting. After a threshold is crossed, any readings within the hysteresis range are not considered a crossing of the threshold until a measurement outside the hysteresis has been taken. You should only configure the hysteresis to prevent “sporadic” or “spike” temperature levels from producing inappropriate firings of the Rule associated with this Trigger. Configuring the Trigger-Action Feature 11-16 Guidelines for Creating or Modifying Actions A Temperature OnBoard Trigger is used to initiate an Action in response to an LX internal temperature threshold. ELXLX X To configure a temperature onboard trigger Execute the onboard temperature command in the Configuration Command Mode. Use this command to change the LX onboard temperature low and high thresholds and, optionally, the hysteresis: 1. Execute the onboard temperature command to specify the high and low temperature thresholds: Config:0 >>onboard temperature low threshold 34 high threshold 40 hysteresis 4 The temperature thresholds are in Degrees Celsius. The low threshold limit is -10° Celsius. The high threshold limit is 75° Celsius. The hysteresis range is from 0 to 5° Celsius. 2. Example Execute the temperature onboard command in the Trigger-Name Mode to configure a Trigger-Action trigger based on the temperature exceeding (for example) the onboard temperature threshold: Trigger_Onboard_high:0 >>temperature onboard > high threshold In this example, the temperature condition is true when the internal temperature reading is greater than 40 degrees Celsius. The hysteresis is a range that exists preceding and below the actual threshold setting. After a threshold is crossed, any readings within the hysteresis range are not considered a crossing of the threshold until a measurement outside the hysteresis has been taken. You should only configure the hysteresis to prevent “sporadic” or “spike” temperature levels from producing inappropriate firings of the Rule associated with this Trigger. LX Series Configuration Guide Guidelines for Creating or Modifying Actions 11-17 X To display information about triggers Example See “Command Mode Descriptions” on page 1-5 for information about accessing the Trigger-Action Command Mode. Use the show trigger-action trigger command: Trigger_TempPort3GT34:0 >>show trigger-action trigger name TempPort3GT34 Figure 11.2 shows an example of the Trigger Information Screen. Time: Wed, 18 Oct 2006 09:08:19 US/EASTERN Trigger Name: TempPort3GT34 Type: Temperature(C) Port: 3 HysteresisThreshold: +/- 4 degrees celsius Temperature > 34 celsius Errors: 0 Figure 11.2 Trigger Information Screen L Figure 11.2 shows an example of the Trigger Information Screen for a Temperature Trigger. The content of the Trigger Information Screen varies according to the Trigger type. X To create or modify a rule 1. 2. Example Access the Trigger-Action Command Mode. Execute the rule name command to create a Rule, or to modify an existing Rule: Trigger-Action:0 >>rule name ACTurnOnRule7 When you execute the Rule name command, you enter the Rule Command Mode for the specified Rule. For example, the Rule Command prompt for the Action ACTurnOnRule7 is Rule_ACTurnOnRule7:0 >>. 3. Example Execute the trigger command to specify a Trigger for the Rule: Rule_ACTurnOnRule7:0 >>trigger TempPort3GT34 Configuring the Trigger-Action Feature 11-18 Disabling Rules 4. Example 5. Example Execute the action command to specify an Action for the Rule: Rule_ACTurnOnRule7:0 >>action TurnonAC7 Execute the enable command to enable the Rule: Rule_ACTurnOnRule7:0 >>enable When the Rule is enabled, it is put into use by the Trigger-Action Feature; the Trigger-Action Feature executes the Action associated with the Rule when the condition specified for the Rule Trigger is true. In the preceding example, the Trigger associated with the Rule ACTurnOnRule7 is TempPort3GT34; the Action associated with ACTurnOnRule7 is TurnonAC7. If the Trigger condition is temperature port 3 > 34 celsius and the Action is outlet 5:7 on, this Rule will cause outlet 5:7 to be turned on when the temperature on SENSOR port 3 is greater than 34 degrees Celsius. Disabling Rules When a Rule is disabled, it is taken out of use by the TriggerAction Feature; the Trigger-Action Feature does not execute the Action associated with the Rule when the condition specified for the Rule Trigger is true. There are two ways to disable a Rule. X To disable a rule in Rule command mode Example Execute the disable command (at the Trigger-Action Rule level): Rule_ACTurnOnRule7:0 >>disable X To disable a rule in Trigger-Action command mode Example Execute the rule command with the disable command (at the Trigger-Action level): Trigger-Action:0 >>rule name ACTurnOnRule7 disable LX Series Configuration Guide Disabling Rules 11-19 X To display information about rules Example Use the show trigger-action rule characteristics command: Rule_ACTurnOnRule7:0 >>show trigger-action rule name ACTurnOnRule7 characteristics Figure 11.3 shows a sample Trigger Information Screen. Rule Name: ACTurnOnRule7 State: enabled Trigger Name: TempPort3GT34 Type: Temperature (F) Action Name: TurnOnAC7 Command: outlet 5:7 on You must have port 5 configured for sensor. Figure 11.3 Rule Information Screen X To turn off an outlet based on a temperature sensor reading 1. Example 2. Example 3. Execute the config trigger command at the InReach:0 >> prompt: InReach:0 >>config trigger Execute the following command at the Trigger Action:0 >> prompt: Trigger Action:0 >> trigger name check4-temp Execute the following command at the Trigger_check4- temp:0 >> prompt: Example Trigger_check4-temp:0 >>temperature port 5 > 25 cel hysteresis 3 where 3 is the tolerance level in degrees. Then enter: Example Trigger_check4-temp:0 >>exit 4. Example 5. Execute the following command at the Trigger-action:0 >> prompt: Trigger Action:0 >>action name temp-ac-power-off Execute the following commands at the Action_temp-ac- power-off:0 >> prompt: Examples Action_temp-ac-power-off:0 >>command outlet 11:5 off Action_temp-ac-power-off:0 >>exit Configuring the Trigger-Action Feature 11-20 Disabling Rules 6. Example 7. Execute the following command at the Trigger-action:0 >> prompt: Trigger-action:0 >>rule name high-temp-off Execute the following command at the Rule_high-temp- off:0 >> prompt: Examples Rule_high-temp-off:0 >>trigger check4-temp Rule_high-temp-off:0 >>action temp-ac-power-off Rule_high-temp-off:0 >>enable 8. 9. Example At the Rule_high-temp-off:0 >>prompt, type exit three times. Execute the following command at the InReach:0 >> prompt to save your configuration: InReach:0 >>save config flash Then type: Example InReach:0 >>show trigger-action trigger name check4-temp The following screen displays: Time: Wed, 14 Mar 2007 09:08:19 US/EASTERN Trigger Name: check4-temp Type: Temperature (C) Errors: 0 Port: 5 Hysteresis: - 2 Celsius Temperature: > 25 Celsius Figure 11.4 Show Trigger Action Trigger Screen 10. Type Example the following command at the InReach:0 >> prompt: InReach:0 >>show trigger-action action name temp-ac-power-off The following lines are displayed: Time: Tue, 27 Mar 2007 09:08:19 US/EASTERN Action Name: temp-ac-power-off Command: outlet 11:5 off LX Series Configuration Guide Disabling Rules 11-21 X To display information about power input: Example Use the show system power command: InReach:0 >show system power Figure 11.5 shows a sample System Power Screen. Time: LX Power Supply Status Power Supply Type: Power Supply A: Power A Input Status: Power A Output: Power A Input Voltage: PowerFail Log: 01: No entry 02: No entry 03: No entry 04: No entry 05: No entry 06: No entry 07: No entry 08: No entry 09: No entry 10: No entry 11: No entry 12: No entry 13: No entry 14: No entry 15: No entry 16: No entry Wed, 21 Feb 2007 11:01:01 US/EASTERN DC Present Powered 5V 48 Power Power Power Power Supply B: B Input Status: B Output: B Input Voltage: Present Powered 5V 48 Figure 11.5 System Power Screen L Power Fail Log is not supported on the LX-7304T. Configuring the Trigger-Action Feature 11-22 Disabling Rules LX Series Configuration Guide Configuring iptables and ip6tables 12-1 CHAPTER 12 Configuring iptables and ip6tables This chapter describes how to configure iptables and ip6tables using the MRV Graphical User Interface (GUI). L ip6tables commands are for use with IPv6 support on the LX-Series. Configuring iptables and ip6tables 12-2 IP Firewall IP Firewall The MRV Graphical User Interface (GUI) provides a simple, limited method for configuring iptables. The following IP Firewall GUI feature procedure uses terms which may not be familiar. These terms are defined as follows: Term Definition Example Chain A grouping of rules that specifies when the rules should be applied to traffic (INPUT, OUTPUT) source ip address x.x.x.x destination port 23 Rule The actual filter definition source ip address x.x.x.x destination port 23 Policy The action to the rule (Accept or Drop) source ip address x.x.x.x destination port 23 drop source ip address x.x.x.x destination port 23 accept Default Policy The default action of the entire chain. If a packet makes it through all the rules in a chain, the default policy decides which final action to take (Accept or Drop) A firewall consists of several rules for establishing (or setting) the input and output firewall policies. There is now a new Firewall menu item in the GUI Configuration Console. When you click on Firewall, the GUI gathers the firewall information from the LX unit. If the GUI detects an advanced firewall configuration in system iptables (advance firewall configurations are created through the shell level only, and the GUI can’t recognize these rules) a confirmation window appears: If you click Yes, the GUI loads the previous firewall configuration, saves a copy of iptables, overwrites iptables, and automatically displays a filled-in input table. If no previous firewall is detected, a blank input table appears. LX Series Configuration Guide IP Firewall 12-3 Figure 12.1 shows the confirmation window that appears in a blank input table. Figure 12.1 Blank input table confirmation window Configuring iptables and ip6tables 12-4 IP Firewall Figure 12.2 shows a “loaded” input table. Figure 12.2 Loaded input table LX Series Configuration Guide IP Firewall 12-5 Figure 12.3 shows a “loaded” output table. Figure 12.3 Loaded output table After you are in the Firewall window (whether it contains input/ output or is blank), use the New, Delete, and Modify buttons to make changes, and use the up and down (KandL) arrows on the right side of the window to change the order of the entries within the list. When you finish configuring, press Commit to update the configuration to the LX unit. Configuring iptables and ip6tables 12-6 IP Firewall X To create a firewall and rules 1. Set the policy for both Input and Output by selecting one option from the Policy dropdown box under the Input and Output tabs. The options are ACCEPT and DROP. The policy is the default action that occurs to all traffic entering the chain. This action accepts or drops all traffic, and then executes the specific rules that you created. 2. 3. Click New. The NewRule window displays. Fill in all required fields and choose a Filter Action (ACCEPT, DROP, QUEUE, RETURN, or LOG). 4. Enter the desired rule filter characteristics and press OK. The GUI checks to ensure that your inputs are in the right format. If your inputs are valid, a new entry (rule) is inserted into the table. Figure 12.4 New Rule window LX Series Configuration Guide IP Firewall 12-7 5. Optionally, click the question mark button in the upperright corner of the screen to display some information about the format of specific fields in the window. A sample informational message window displays: Figure 12.5 Message Window X To delete a rule 1. Select one or more entries in the table. 2. Click Delete. The entries are removed from the table. Configuring iptables and ip6tables 12-8 IP Firewall X To modify a rule 1. Select one entry (rule) from the Firewall table and press the Modify button. The Modify Rule window (with pre-filled values) appears. 2. 3. Modify the values and click OK. The Firewall window reappears, with the changes reflected in the table. Click on Commit to save the changes to this rule. Figure 12.6 Modify Rule window X To change the rule order 1. Select an entry in the table. 2. Click the up or down (KorL) arrows on the right side of the window to shift the order of the entry (rule). LX Series Configuration Guide Updating the Firewall 12-9 Updating the Firewall All the preceding operations are first changed locally; nothing has yet been changed on the LX unit. When you click Commit, the GUI updates the local firewall configuration to the LX unit iptables, and also creates a firewall configuration copy in the LX unit. Click... To... Commit propagate your changes and close the firewall window Reload also propagate your changes, but leave the firewall window open Close cancel all operations after the last update to the LX unit L You must save the configuration for the changes to take effect after a reboot (enter save config flash). Configuring Packet Filters Using the iptables and ip6tables Commands Packet Filters are used to allow certain IP packets to pass, or not pass, through an LX unit. Packet Filters can be applied to IP packets that originate from the LAN side of the LX, or from the LX unit itself. On the LX unit (as on all Linux-based systems), Packet Filters are known as chains. The INPUT chain filters packets coming from the LAN to the LX; the OUTPUT chain filters packets from the LX destined for the LAN. L The LX unit also supports the FORWARD chain, which filters packets that are to be forwarded to another network. The FORWARD chain is used primarily in routing environments rather than in console management environments. For this reason, the FORWARD chain is not covered in this chapter. Configuring iptables and ip6tables 12-10 Configuring Packet Filters Using the iptables and ip6tables Commands A chain consists of a series of rules that specify the criteria for accepting, denying, or dropping a packet. The criteria for accepting, denying, or dropping a packet can include the source IP Address, the destination IP Address, and other characteristics. X To add a rule to a chain Syntax Use the following iptables or ip6tables command syntax from the CLI: iptables <string> ip6tables <string> The following sections provide examples of how to create rules using various options of the iptables and ip6tables commands. For detailed information on the iptables and ip6tables commands, see Appendix D “Linux Man Pages for iptables and ip6tables Commands” on page D-1. X To create a rule to drop packets based on the source IP address Example Example Use the iptables command. The following example creates a rule that will drop any packets coming to the LX from source address 10.240.10.240: Config:0 >> iptables -A INPUT -s 10.240.10.240 -j DROP Use the ip6tables command. The following example creates a rule that will drop any packets coming to the LX from source address fe80::220:edff:febe:3cae: Config:0 >>ip6tables -A INPUT -s fe80::220:edff:febe:3cae -j DROP LX Series Configuration Guide Configuring Packet Filters Using the iptables and ip6tables Commands 12-11 where -A Specifies that the rule is to be appended to the specified chain (in this case, the INPUT chain). See “Using iptables and ip6tables Command Options” on page 12-13 for alternatives to the -A option. -s Specifies that the rule applies to the specified source IP Address (in this case, 10.240.10.240). -j Specifies the action that is to be taken when a packet matching this criteria is received. In this case, the packet is to be dropped. See “Using iptables and ip6tables Command Options” on page 12-13 for a description of all of the allowable values (for example, ACCEPT, DENY, or DROP) of the -j option. X To create a rule allow outbound connections to a specific destination IP address Example Example Use the iptables command. The following example creates a rule that allows the LX unit to output packets to the destination IP address 123.146.17.129: Config:0 >> iptables -A OUTPUT -d 123.146.17.129 -j ACCEPT Use the ip6tables command. The following example creates a rule that allows the LX unit to output packets to the destination IP address 123.146.17.129: Config:0 >>ip6tables -A OUTPUT -d fe80::220:edff:febe:3cae -j ACCEPT where -A Specifies that the rule is to be appended to the specified chain (in this case, the OUTPUT chain). See “Using iptables and ip6tables Command Options” on page 12-13 for alternatives to the -A option. -d Specifies that the rule applies to the specified destination IP Address (in this case, 123.146.17.129). -j Specifies the action that is to be taken when a packet matching this criteria is received. In this case, the packet is to be accepted. See “Using iptables and ip6tables Command Options” on page 12-13 for a description of all of the allowable values (for example, ACCEPT, DENY, or DROP) of the -j option. Configuring iptables and ip6tables 12-12 Configuring Packet Filters Using the iptables and ip6tables Commands X To create a rule that prevents Telnet requests from a specific IP address Example Example Use the iptables command. The following example creates a rule that ignores Telnet requests from the IP address 143.114.56.104: Config:0 >> iptables -A INPUT -s 143.114.56.104 -p tcp --destination-port telnet -j DROP Use the ip6tables command. The following example creates a rule that ignores Telnet requests from the IP address fe80::220:edff:febe:3cae: Config:0 >>ip6tables -A INPUT -s fe80::220:edff:febe:3cae -p tcp --destination-port telnet -j DROP where -A Appends the rule to the specified chain (in this case, the INPUT chain). See “Using iptables and ip6tables Command Options” on page 12-13 for alternatives to the -A option. -s Applies the rule to the specified destination IP Address (in this case, 143.114.56.104). -p Applies the rule applies to a specific protocol (in this case, TCP). See “Using iptables and ip6tables Command Options” on page 12-13 for a description of the allowable values of the -p option. --destination-port Indicates the TCP destination port to which the rule applies. (In this case, the destination port is the Telnet port.) -j Specifies the action that is to be taken when a packet matching this criteria is received. In this case, the packet is to be dropped. See “Using iptables and ip6tables Command Options” on page 12-13 for a description of all of the allowable values (for example, ACCEPT, DENY, or DROP) of the -j option. LX Series Configuration Guide Using iptables and ip6tables Command Options 12-13 Using iptables and ip6tables Command Options You can use the -I option or the -R option, instead of the -A option, to specify how a rule is added to the chain. -I Inserts the rule at a specified location before the end of the chain. -R Replaces a specific rule in the chain with the new rule. In the following example, the -I option specifies that to insert the rule as the 11th rule in the INPUT chain: Examples iptables -I INPUT 11 -s 10.240.10.240 -j DROP iptables -I INPUT 11 -s fe80::220:edff:febe:3cae -j DROP The rules that follow the new rule will be bumped up by 1. In the following example, the -R option specifies that the rule is to replace the 8th rule in the OUTPUT chain: Example iptables -R OUTPUT 8 -s 89.247.112.93 -j DROP iptables -R OUTPUT 8 -s fe80::220:edff:febe:3cae -j DROP You can specify the following values for the -j option: ACCEPT The packet is allowed to pass through the specified chain (for example, INPUT or OUTPUT). DENY The packet is not allowed to pass through the specified chain (for example, INPUT or OUTPUT). A message indicating that the LX is not accepting connections is sent back to the source IP Address. DROP The packet is not allowed to pass through the specified chain (for example, INPUT or OUTPUT). A message is not sent back to the source IP Address. You can specify TCP, UDP, or ICMP as the value of the -p option. Configuring iptables and ip6tables 12-14 Using iptables and ip6tables Command Options X To save changes to a rule Example Execute the save configuration command in Superuser Command Mode to save the iptables file either to flash or to the network: InReach:0 >>save configuration flash L You can use the network option of the save configuration command to save the configuration to a network server. For more information, see the save configuration command in the LX Series Command Reference. LX Series Configuration Guide Configuring the Cluster Configuration and Control Feature 13-1 CHAPTER 13 Configuring the Cluster Configuration and Control Feature The Cluster Configuration and Control (C3) feature saves time and effort by allowing you to propagate changes to any or all units in a cluster, without having to script or manually configure each unit individually. This also allows rapid recovery and replacement if there should be a problem anywhere within the cluster. The editor or interface for this feature is either the LX CLI or the Configuration GUI (Graphic User Interface). Both are easy to use, and both interfaces allow you to perform changes and propagate them to all units that are cluster members. Cluster Configuration and Control also provides a mechanism for updating software (both linuxito and ppciboot) to all units within a cluster. You can schedule updates using the time-of-day rules feature to set when the updates done. This allows you to preschedule when updates will run - you don’t even have to be there. You can share any or all configuration attributes to all units in a cluster. You can also unshare any or all of the same administrator configurable attributes from the cluster, and keep those attributes local. At any time you can view cluster status, including which units are in the cluster, the health of individual units, and lists of all the shared attributes and settings. You can also view the synchronization status. If attributes are not synchronized, the reason is displayed. Configuring the Cluster Configuration and Control Feature 13-2 What is a Cluster? Each LX unit can get a software update from the TFTP server and write it to flash. The reboot image is downloaded to all cluster members. Again, Cluster Configuration and Control provides update status. What is a Cluster? L Up to 1000 nodes are allowed in a single LX cluster. Some performance degradation will occur for large clusters, depending on specific network characteristics. A cluster is an independent group of LX Console Servers that share some number of common configuration attributes. The cluster has a defined secret: all the units associated with that cluster are configured with that same secret. A cluster member’s IP address table (configured on any one of the LX units) initially associates each individual LX with the cluster. Cluster members can traverse switches and routers, so they do not need to be on the same network. Each LX unit in a cluster is a peer, and each unit can act as a virtual master, thus eliminating a single point of failure if something should be amiss at any one of the nodes. For security reasons, LX units can be members of only one cluster. You can create multiple independent clusters when your situation demands departmental security or unit/units isolation. L The Cluster feature has also been enhanced to improve the performance of Cluster operations. The user/administrator need not take any action to enable/use this feature. LX Series Configuration Guide How the Protocol Works 13-3 How the Protocol Works Cluster Configuration and Control uses Distributed Shared Memory. The memory exchange is done via TCP/IP protocol (fully routable via LAN/WAN routers and switches). The data exchange is encrypted via the TLS protocol using 128-bit AES encryption and SHA hashing. Because all cluster shared memory exchange is administrator driven, and the protocol does not perform background exchange unless prompted by the administrator, the protocol works efficiently with low network overhead. The protocol uses TCP port 8100. Table 13.1 describes some of the common cluster operation terms. Table 13.1 Cluster Configuration and Control Terms Term Definition Master Any unit in the cluster from which changes are being made. Any unit in the cluster can be the master, but it is a good practice to always use the same unit as the master to avoid confusion. Any configuration changes are always pushed to the cluster from the master. Slave Any and all units in the cluster that are not the master. This means that once you have chosen your master unit, all other units in the cluster should be considered slaves. All configuration changes to the slaves will be pushed to them via the master unit. Cluster Save Config The command issued to the master unit to push the configuration to the cluster. Save Config Flash The command issued to any unit to save its own configuration locally. Configuring the Cluster Configuration and Control Feature 13-4 Cluster Configuration and Control Rules Table 13.1 Cluster Configuration and Control Terms Term Definition Show Cluster Status This displays the attributes that are currently being shared with the cluster, and the status of each node in the cluster. In Sync is normal status for the nodes, which means they agree with the master’s configuration. If there is a node out of sync, there is a brief description of why it does not agree with the master. Cluster Configuration and Control Rules Your cluster can have only one master unit at any one time. If you have more than one master at a time, the configuration will be out of sync, and will only reflect the changes that were made by the last execution of the cluster save configuration command. After making any cluster changes to a master, your final step should always be to save the configuration to the cluster. This is only necessary if you changed one of the shared cluster attributes. Otherwise, you need only save to local flash. Do not put an individual LX into more than one cluster. Cross Clustering is not allowed, and will create some issues while saving and communicating with the cluster. The cluster LX nodes must be running the same version of software in order to be in-sync with each other. New features are being added all the time to the software, and the other LX nodes must also be aware of the new features, so they can be in sync with each other. RULE OF THUMB: When updating software on a LX in a cluster, use the cluster update software command, so that the entire cluster is updated at the same time. LX Series Configuration Guide Creating a Cluster Secret 13-5 Select a unit with the highest density port count in the cluster to be your master, because if you have varying port density units in your cluster, the number of ports information to be shared will be the lowest common denominator. For example, if you have a 2-port unit, and you share ALL ports configurations and send it to the cluster containing 48 port units, only ports 1 and 2 will be shared to the cluster. If to make sure all the ports are shared, make a 48 port unit the master, then make the changes, and then share them to the cluster. All 48 ports will be sent, but ports 1 and 2 will be the only ones looked at by a 2-port unit. X To access Cluster Configuration and Control Example Type the following command in Configuration Command Mode: Config:0 >>cluster Creating a Cluster Secret The secret allows authorized LX units access to other LX units with the same secret. The secret should be at least 16 characters long. The maximum is 32 characters. All nodes in the cluster must be configured with the same secret if they are to communicate. You must set up the secret individually on each LX unit. L Your cluster secret must be kept secret if future cluster operations are to be performed securely. This implies that you should configure your cluster secret locally, or via a secure protocol such as SSH. X To set up the secret at the Quick Configuration Menu 1. Plug in the terminal at the DIAG port (port 0 - port values are 9600 bps, eight data bits, one stop bit, no parity, and Xon/Xoff flow control). Configuring the Cluster Configuration and Control Feature 13-6 Creating a Cluster Secret 2. If the unit has loaded from defaults, the following message displays: The unit has loaded to factory defaults, would you like to run Initial Connectivity Setup? y/n 3. 4. Press y (yes) and press <Enter>. The Superuser Password prompt appears. Enter password system. The Quick Configuration menu displays: Quick Configuration menu 1 Unit IP address 2 Subnet mask 3 Default Gateway 4 Domain Name Server 5 Domain Name Suffix 6 Cluster Secret 7 Superuser Password 8 Exit and Save Enter your choice: 5. 6. 7. 8. Press the number 6 Cluster Secret. A Cluster Secret: prompt displays. Enter a Cluster Secret 16 to 32 characters in length and press <Enter>. You are prompted to verify the new cluster secret. Re-enter the new cluster secret and press <Enter>. The Quick Configuration menu reappears. The Cluster Secret field appears as Changed. Press 8 (Exit and Save) to save your secret. The The following message displays: Is this information correct? LX Series Configuration Guide Creating a Cluster Secret 13-7 9. Press y (yes) and press <Enter>. The word Configured appears on the Quick Configuration menu to the right of Cluster Secret. The following message displays: Save this information to flash? 10. Press y (yes) and press <Enter>. The information is saved to flash. CONFIGURATION SUMMARY 1 Unit IP address 2 Subnet mask 3 Default Gateway 4 Domain Name Server 5 Domain Name Suffix 6 Cluster Secret 7 Superuser Password 8 Exit and Save Is this information correct? 10.80.1.5 255.0.0.0 Configured Not Changed (y/n) : 11. Press <Enter> several times to display the Login: prompt. 12. Enter your login name (default is InReach). 13. Enter your password (default is access). You can now use the LX unit. Now that the secrets are configured, you can create a cluster. Example X To create or modify a secret on a cluster node 1. Access the Cluster Command Mode and enter a secret for your master node: Cluster:0 >>secret abcde678ijklmno6 2. Exit to the Priv level InReach:0 >>. 3. Type save config to flash. 4. Configure a secret for the other nodes in the cluster. SSH to each node to include in the cluster and perform the same steps. Configuring the Cluster Configuration and Control Feature 13-8 Creating a Cluster Secret Example X To create a cluster 1. In Cluster Command Mode, enter the address of all LX units (including your local address) in which you created a secret: Cluster:0 >> address A.B.C.D 2. Share attributes to propagate to the other members of the cluster, then type cluster save config to send the attributes to the other members. See “Sharing Attributes with Other Nodes Within the Cluster” on page 13-9 for more information about sharing attributes. X To display the members of the cluster Example Use the show cluster characteristics command: InReach:0>show cluster characteristics Figure 13.1 shows a sample screen. Time: Mon, 12 Dec 2005 22:22:47 UTC Cluster Name: Cluster Secret: Configured Cluster Member Addresses: 111.222.33.44 111.222.33.55 111.222.33.66 112.223.33.77 TimeZone is being shared Snmp is being shared Ntp is being shared SSH is being shared Telnet is being shared Gui is being shared System Name: Cluster Debug: Figure 13.1 Show cluster characteristics LX Series Configuration Guide In-Reach ClusterDAone Disabled Sharing Attributes with Other Nodes Within the Cluster 13-9 Sharing Attributes with Other Nodes Within the Cluster Whichever node you make changes from becomes the master node. Valid attributes are listed in Figure 13.2. The following sections describe how to: Example Share an attribute Unshare an attribute locally or globally Display cluster information X To share an attribute 1. Type the following command in Cluster Command Mode: Cluster:0 >> share telnet daemon This shares the telnet daemon state as on the master machine. 2. 3. Type cluster save config to share the attribute across all nodes in the cluster. Type show cluster characteristics to see which attributes are being shared. L This feature is not shared until a cluster save config is performed. When you share interfaces within a cluster, the banner is not shared. When you unshare an attribute, it keeps its current value. It is only unshared. You can also unshare attributes from an individual node, or across the cluster. Configuring the Cluster Configuration and Control Feature 13-10 Sharing Attributes with Other Nodes Within the Cluster System Attributes Port Async Attributes All, Number Access Banner Transparent Mode Flow Control Stop Bits, Parity, Bits per Character Port Prompt String Autobaud Break Autobaud Retry Special Break String Auto Dial Inbound Authentication, Outbound Authentication Autohangup Radius Accounting, Tacacs+ Accounting Authentication FallBack Break String, Telnet Negotiations, Cr filter Data Buffer Size, Data Buffer Display, Data Buffer Syslog, Data Buffer Time Stamp Connect Command TCP (Transmission Control Protocol) Window Size, TCP Transmit Mode, TCP Pipe Destination Host, TCP Pipe Destination Port Modem Control, Modem Timeout, Modem Retry, Modem Pool, Modem Dialout Num., Modem Init String APD (Auto Protocol Detect) Signature, APD Retry, APD Timeout Control Dtr, Control Rts SCP Username/Password, Off timers/enable TCP Pipe Retries Primary Domain Secondary Domain Gateway TFTP Timeout TFTP Retries NTP Server Alternate NTP Server SNMP Daemon Finger Daemon Timed Daemon NTP Daemon Telnet Daemon SSH Daemon Logging Size Web_Server Outlet Access Timezone Service: Name All LDAP Radius RSA SecurID TACACS+ Snmp Web_Server (Server and Port) Subscriber Attributes Character Name /All Port Access List Outlet Access List Outlet Group Access List Change Password Connect Escape Attributes not shared on port Port Name, Outlet Names Signal Notification Snmp sensor units/ alarm severity Figure 13.2 Attributes tables LX Series Configuration Guide Sharing Attributes with Other Nodes Within the Cluster 13-11 X To unshare an attribute locally Example Type the following command in Cluster Command Mode: Cluster:0 >> locally unshare telnet daemon This unshares the telnet daemon state on the local machine and all other cluster nodes remain shared. You do not need to save the configuration to the cluster, because you are only unsharing the attribute on a local node. Example X To unshare an attribute globally (across the entire cluster) 1. Type the following command in Cluster Command Mode: Cluster:0 >> globally unshare telnet daemon 2. Examples Type cluster save config to unshare the attribute across all nodes in the cluster. X To display cluster information 1. Type the show cluster characteristics command in Cluster Command Mode to display information about characteristics at either of the following command modes: Cluster:0 >>show cluster characteristics InReach:0 >>show cluster characteristics Configuring the Cluster Configuration and Control Feature 13-12 Sharing Attributes with Other Nodes Within the Cluster Figure 13.3 shows a Cluster Characteristics Screen. System Name: In-Reach Time: Mon, 12 Dec 2005 22:22:47 UTC Cluster Name: ClusterDAone Cluster Secret: Configured Cluster Debug: Disabled Cluster Member Addresses: 111.222.33.44 111.222.33.55 111.222.33.66 112.223.33.77 Interface 1 is being shared Interface 2 is being shared Ntp is being shared SSH is being shared Telnet is being shared Gui is being shared Timed is being shared Fingerd is being shared Gateway1 is being shared Dns1 is being shared Dns2 is being shared TftpTimeout is being shared TftpRetries is being shared OutletAccess is being shared Subscriber ab is being shared Subscriber billm is being shared Subscriber timb is being shared Figure 13.3 Cluster Characteristics Screen 2. Examples Use the show cluster status command to display information on status at either of the following command modes: Cluster:0 >>show cluster status InReach:0 >>show cluster status Cluster Node IP Software Version PpciBoot Version Synchronized 140.111.222.333 140.111.222.334 3.3.0 3.3.0 3.2.0 3.2.0 yes yes Figure 13.4 Cluster Status Screen LX Series Configuration Guide Updating the Software 13-13 Updating the Software You can update the software on an individual node, or on all members across an entire cluster. The cluster update commands allow you choose between loading the image from an SFTP server or a TFTP server. The choice is made automatically, based on the File Transfer Protocol displayed on the System Load Characteristics screen. Syntax X To update the software 1. In Superuser Command Mode, enter the following: InReach:0 >> cluster update software [server <ip_ address>] [address <ip_address>] [image name <name>] where server <ip_address> is the IP address of the TFTP/SFTP server from which to download the image, [address <ip_address>] is the IPv4 address of any individual node in your cluster you want to update and [image name <name>] is the image name of the software you want to update. Example X To update the software on an individual node 1. In Superuser Command Mode, enter the address of the node on which to update the software: InReach:0 >> cluster update software server A.B.C.D This updates the software on that node. You do not need to save the configuration, because you are only updating software, not rebooting it. 2. Example Example To run the new image, you must perform a reboot. Enter the following command: InReach:0 >> cluster reload A.B.C.D X To update the software across all cluster members 1. In Superuser Command Mode, enter the following command: InReach:0 >> cluster update software Configuring the Cluster Configuration and Control Feature 13-14 Updating the ppciboot 2. Example 3. To run the new image, you must perform a reboot. Enter the following command: InReach:0 >> cluster reload The message Are you sure you want to reload the cluster? y/n displays. Enter y to reload the cluster. Updating the ppciboot You can update the ppciboot on an individual node, or on all members across an entire cluster. Syntax X To update the software 1. In Superuser Command Mode, enter the following: InReach:0 >> cluster update ppciboot [server <ip_ address>] [address <ip_address>] [image name <name>] where server <ip_address> is the IP address of the TFTP/SFTP server from which to download the image, [address <ip_address>] is the IPv4 address of any individual node in your cluster you want to update and [image name <name>] is the image name of the ppciboot you want to update. Example X To update the ppciboot on an individual node 1. In Superuser Command Mode, enter the address of the node on which to update the ppciboot: InReach:0 >> cluster update ppciboot server A.B.C.D This updates the ppciboot on that node. You do not need to save the configuration, because you are only updating ppciboot, not rebooting it. 2. Example Example To run the new image, you must perform a reboot. Enter the following command: InReach:0 >> cluster reload A.B.C.D X To update the ppciboot across all cluster members 1. In Superuser Command Mode, enter the following command: InReach:0 >> cluster update ppciboot LX Series Configuration Guide User Graphical User Interface (GUI) 13-15 2. Example 3. To run the new image, you must perform a reboot. Enter the following command: InReach:0 >> cluster reload The message Are you sure you want to reload the cluster? y/n displays. Enter y to reload the cluster. User Graphical User Interface (GUI) The User GUI simplifies the sometimes complex process of providing menu-defined access and connectivity. You can browse to the IP address of any console server in the cluster, and use the Cluster Explorer search capability across multiple LX units. The GUI has two modes: Configuration and Menu. The one you can access depends on what privileges the administrator has given you. A Web/GUI menu displays the structure of menu labels for the commands available to a specific user. To access the menu via the GUI, you must first modify the subscriber profile. The LX has a default web menu name called demo_menu. The demo_menu is a template that you can modify to fit your specific location. See “Enabling the Menu Feature” on page 8-21 for more information on modifying menus. Example X To modify the subscriber profile 1. In Subscriber Mode type the following command: Subs_frank:0 >> web menu name M_demo_menu This is the menu the subscriber will access when they log into the GUI. 2. Example Set the Web Access Mode for the GUI to Menu. The options are Config, Menu, or Cluster; for example. Subs_frank:0 >> web access menu enable Configuring the Cluster Configuration and Control Feature 13-16 User Graphical User Interface (GUI) L Set the Web Access Mode to “Menu” if the subscriber wants to access the defined menu. Set the Web Access Mode to “Config” if the subscriber wants to access the standard configuration GUI. 3. Example To verify that you have configured the subscriber correctly, enter the following: InReach:0 >> show subscriber frank characteristics Subscriber Name: Preferred Service: Security: Login Mode : Maximum Connections: Command Logging: Idle Timeout: Screen Pause: Local Switch: Rlogin Transparent: Dialback Feature: Menu Name: Web Menu Name: Port Access list: Port Read Only list: Remote Access list: Outlet Access list: Outlet Group Access list: Web Access List: Frank SuperUser Cli 50 Disabled 0 Enabled ^L Disabled Disabled Rlogin Ded. Service: Dedicated Service: User Password: Change User Password: Maximum Sessions: Audit Logging : User Prompt: Forward Switch: Backward Switch: Connect Escape Char: Dialback Number: Configured Disabled 4 Disabled InReach ^F ^B ^Z InReach InReach 0-8 Telnet Ssh Web_Server Console Config L If you are using a Web Menu Name, configure the name as M_demo_menu if to use the default menu template. 4. Check the Web Menu Name, highlighted preceding. At this stage, the subscriber can login via the GUI and access the web/GUI menu. LX Series Configuration Guide User Graphical User Interface (GUI) 13-17 5. Access the LX GUI via the web and login with the username and password. The User Console window displays. When the Subscriber Login Mode is set to Menu, the subscriber is presented with the first menu level of the named Menu Name. This user level offers the subscriber access to up to ten user menu sessions. To open a new menu session, click on the New User Menu button to open the LX GUI User Menu Template: Figure 13.5 User Console window Configuring the Cluster Configuration and Control Feature 13-18 User Graphical User Interface (GUI) Select Cluster from the View menu at the top right side of the window to view a menu tree of the cluster. Based on permissions, you can also look at sensor values, power module outlet status, and have Telnet and SSH access to Remote Access Ports. 123.456.789.40 123.456.789.48 123.456.789.49 Figure 13.6 User Console window LX Series Configuration Guide User Graphical User Interface (GUI) 13-19 X To enable or disable generating debug information Use the debug cluster enable command in Superuser Command Mode to generate debug messages for troubleshooting. Use the no debug cluster command to disable this feature (default). L When debug cluster is enabled and the LX is rebooted, the debug cluster reverts to the default state of off. X To display debug information Examples Use the show debug cluster command at any of the following command modes: Cluster:0 >>show debug cluster InReach:0 >>show debug cluster Config:0 >>show debug cluster Mar Mar Mar Mar Mar Mar Mar Mar Mar Mar Mar Mar Mar 24 24 24 24 24 24 24 24 24 24 24 24 24 14:40:19 14:40:19 14:49:59 14:49:59 14:49:59 14:49:59 14:49:59 14:49:59 14:49:59 14:49:59 14:50:00 14:50:00 14:50:00 ConfCall: registered port 8101 ConfCall: unregistered port 8101 looking for ssh key /config/ssh_authorized_InReach.pub adding file /config/ssh_authorized_InReach.pub looking for menu /config/Menu2 looking for gui menu /config/Menu2 looking for ssh key /config/ssh_authorized_cmurch.pub looking for menu /config/M_cmurch looking for gui menu /config/M_cmurch external ref = /config/ssh_authorized_InReach.pub calling Agent_Main calling Tcl_CreateInterp calling initialize Figure 13.7 Debug Cluster screen Configuring the Cluster Configuration and Control Feature 13-20 User Graphical User Interface (GUI) X To search a cluster for a port name or access method Use the cluster search command. L The cluster search command is now accessible at both the user and superuser levels. At the User level, you do not need to enter a superuser name or password, but you can’t execute Superuser commands. The searches you can perform are different, depending on the level. See the LX Series Command Reference for details. L Entering ^C now returns you to the command line during a cluster search. Syntax Example cluster search portname <port_name> | <access> The following example searches for a case-sensitive port name: InReach:0 >> cluster search portname Port_1 Figure 13.8 shows a sample screen: Cluster Node IP Port # Port Name Access 142.122.166.206 1 142.122.166.221 1 Remote Remote Port_1 Port_1 Telnet Port SSH Port Auth 2100 2100 2122 2122 Local Local Figure 13.8 Cluster Search Port Name Screen Example The following example searches for an access method: InReach:0 >> cluster search access apd Figure 13.9 shows a sample screen: Cluster Node IP Port # Port Name Access 142.122.166.206 1 142.122.166.221 1 Remote Remote Port_1 Port_1 Telnet Port SSH Port Auth 2100 2100 2122 2122 Figure 13.9 Cluster Search Access Screen LX Series Configuration Guide Local Local Sharing and Unsharing Interfaces 13-21 X To name a cluster Example In Superuser Command Mode, use the config cluster name command to share an attribute: Config:0 >>config cluster name cluster_name where cluster_name is a name from 1 to 31 characters long. This name is shared after you execute cluster save config. Sharing and Unsharing Interfaces You can share the characteristics of one interface with any or all other interfaces in the cluster. X To share an interface Example In Cluster Mode, share an interface by using the following command syntax: Cluster:0 >>share interface all | interface_number where all shares all interfaces interface_number shares a specific interface This interface is shared after you execute the cluster save config command. X To unshare an interface Example In Cluster Mode, unshare an interface by using the following command syntax: Cluster:0 >>[globally|locally] unshare interface all | interface_number where globally locally all unshares interfaces across the cluster interface_number unshares a specific interface unshares the interface on the local unit unshares all interfaces Configuring the Cluster Configuration and Control Feature 13-22 Sharing and Unsharing Subscribers X To view which interfaces are shared or unshared Type show cluster characteristics to display the Cluster Characteristics screen. See Figure 13.3 on page 13-12 for an example of this screen. Sharing and Unsharing Subscribers You can share the characteristics of one subscriber with any or all other subscribers in the cluster. X To share a subscriber Example In Cluster Mode, share a subscriber by using the following command syntax: Cluster:0 >>share subscriber all | subscriber_name where all shares all subscribers interface_number shares a specific subscriber This subscriber is shared after you execute the cluster save config command. X To unshare a subscriber: Example In Cluster Mode, share a subscriber by using the following command syntax: Cluster:0 >>[globally|locally] unshare subscriber all | subscriber_name where globally locally all unshares subscribers across the cluster interface_number unshares a specific subscriber unshares the subscriber on the local unit unshares all subscribers X To view which subscribers are shared or unshared Type show cluster characteristics to display the Cluster Characteristics screen. See Figure 13.3 on page 13-12 for an example of this screen. LX Series Configuration Guide Sharing and Unsharing the Authenticate Image 13-23 Sharing and Unsharing the Authenticate Image You can share the authenticate image with any or all other members in the cluster. X To share the authenticate image Example In Cluster Mode, share the authenticate image: Cluster:0 >>share authenticate image The image is shared after you execute cluster save config. X To unshare the authenticate image Example In Cluster Mode, unshare the authenticate image: Cluster:0 >>[globally|locally] unshare authenticate image X To view whether the authenticate image is shared or unshared Type show cluster characteristics to display the Cluster Characteristics screen. See Figure 13.3 on page 13-12 for an example of this screen. Configuring the Cluster Configuration and Control Feature 13-24 Sharing and Unsharing the Message Sharing and Unsharing the Message You can share the message with any or all other members in the cluster. X To share the message In Cluster Mode, share the message: Cluster:0 >>share message The message is shared after you execute the cluster save config command. X To unshare the message In Cluster Mode, unshare the message: Cluster:0 >>[globally|locally] unshare message The message is unshared after you execute the cluster save config command. X To view whether the message is shared or unshared Type show cluster characteristics to display the Cluster Characteristics screen. See Figure 13.3 on page 13-12 for an example of this screen. LX Series Configuration Guide Sharing and Unsharing the Telnet Client 13-25 Sharing and Unsharing the Telnet Client You can share the Telnet client with any or all other members in the cluster. X To share the Telnet client In Cluster Mode, share the Telnet client: Example Cluster:0 >>share telnet client The Telnet client is shared after you execute the cluster save config command. X To unshare the Telnet client In Cluster Mode, unshare the Telnet client: Example Cluster:0 >>[globally|locally] unshare telnet client X To view whether the Telnet client is shared or unshared Type show cluster characteristics to display the Cluster Characteristics screen. See Figure 13.3 on page 13-12 for an example of this screen. Configuring the Cluster Configuration and Control Feature 13-26 Configuring a Remote Cluster Member Configuring a Remote Cluster Member You can issue a CLI command to any remote cluster member without having to log in to that cluster member. This command is available only at the Superuser level. L The cluster command command is now accessible at both the user and superuser levels. At the User level, you don’t need to enter a superuser name or password, but you can’t execute Superuser commands. See theLX Series Command Reference for more information. Syntax InReach:0 >>cluster command all | <ip_address> <superuser_ name> <superuser_password> <cluster_command> where: ip_address superuser_name superuser_password cluster_command is the IP address of the cluster member to which to send a command. is the superuser name of the cluster member to which to send a command. is the superuser password of the cluster member to which to send a command. is the cluster command to send to the cluster member. At the Superuser level, you must enter the superuser name and password, and then enter the command. Examples InReach:0 >>cluster command all enable system conf port async 1 InReach:0 >>cluster command 120.130.222.33 enable system conf port 1 LX Series Configuration Guide GUI Cluster 13-27 GUI Cluster The LX GUI displays information on nodes, port types, and ports in an explorer menu tree on the left of the window. This feature is available only if you have cluster permissions. Launching the GUI Cluster Explorer X To access the GUI Cluster Explorer windows: 1. Open your browser and login. The LX Console window appears. 2. Select Cluster from the View pulldown menu on the top right side of the window. The Cluster Explore window appears, with a list of all nodes displayed on the left side of the window. You can expand each node in the list to view the port types and ports. The options you can see depend on how the ports are set up on the LX. Configuring the Cluster Configuration and Control Feature 13-28 Launching the GUI Cluster Explorer 123.456.789.40 123.456.789.48 123.456.789.49 3. You can right-click on any host, port, or group of ports in the list and select from a pull-down menu to manage or monitor that selected item. LX Series Configuration Guide Cluster Automatic Discovery and Setup 13-29 Cluster Automatic Discovery and Setup This ease of use feature helps you to set up a cluster or to add nodes to an existing cluster. There are two sections to this feature: Cluster Automatic Discovery and Cluster Automatic Setup. Cluster Automatic Discovery Cluster Automatic Discovery allows you to gather a list of IP addresses belonging to LX units within a range of IP addresses. You can use this list of IP addresses to build a cluster via the Cluster Automatic Setup feature. X To use Cluster Automatic Discovery via the CLI Use this command to generate the IP address list: Example InReach:0 >>cluster autodiscover address list <ipv4_ address_list> where <ipv4_address_list> is an IP address, or list of IP addresses separated by commas, or a range of IP addresses, or a combination thereof (this works on IPv4 only at this time). When a listed IP address has been reached, you are prompted to confirm the addition of this IP address with the following message: Would you like to add <ip_address> to the cluster? y/n? Choose y to add the given IP address to the cluster. Choose n to ignore/skip this IP address and go on to the next (if any) in the given list. If the address is added to the cluster successfully, the following confirmation message appears: <ip_address> successfully added as cluster member Configuring the Cluster Configuration and Control Feature 13-30 Cluster Automatic Discovery If you attempt to add an address to the cluster, but it was already a cluster member, the following error message appears: This address has already been defined in the cluster If none of the IP addresses are reachable, the following error message appears: Unit(s) with given address(es) not available X To use Cluster Automatic Discovery via the GUI To use the Cluster Automatic Discovery feature via the GUI, do the following: 1. Open your browser and login. The LX Console window appears. 2. 3. 4. Select Cluster: Cluster Setup from the menu on the upper left side of the window. The Cluster Setup window appears, but with the buttons grayed out. Click on the Admin button at the top of the window. A Superuser Login confirmation window appears. Enter your administration password and click OK. The buttons on the Cluster Setup window are now usable. LX Series Configuration Guide Cluster Automatic Discovery 13-31 5. 6. Click the Add Known Unit button (to open the Add Single Unit window and add an address you know exists) or click on the Discover Available Units button to open the Auto-Discover IP Address Range window. Add a Starting IP Address and an Ending IP Address and click OK. Configuring the Cluster Configuration and Control Feature 13-32 Cluster Automatic Discovery 7. 8. 9. All LX units that Cluster Automatic Discovery finds within the range you specified are displayed in the listbox labeled Units Not in Cluster on the Cluster Setup screen. Select newly found units you want to add to the cluster, and click the [>>] button to move them to the Units in Cluster listbox. Note that, unlike when you run the Cluster Automatic Discovery via the CLI, no newly found units are part of the cluster at this stage. If your Cluster Secret is not yet configured, you should add one now. 10. Click Apply to add the units to the cluster. LX Series Configuration Guide Cluster Automatic Setup 13-33 Cluster Automatic Setup The Cluster Automatic Setup feature automatically configures and sets up a cluster based on a list of IP addresses known to belong to LX units. The Cluster Automatic Discovery steps should be performed first. X To use Cluster Automatic Setup via the CLI Setting up a set of LXs into a cluster grouping requires the following steps: 1. Configure all LX members with the same cluster secret <string>. 2. 3. 4. At the same time, cluster members must be configured with the same cluster name (if a cluster name is defined). Configure one LX to contain the list of all members in the cluster. Issue the cluster save configuration command to synchronize the current master node configuration with all members in the cluster. Cluster Automatic Setup performs the first three of these configuration steps. Enter the cluster save configuration command at a later time. This allows you to complete the shared attribute configuration setting of a cluster before saving the changes. L MRV recommends that you run the show cluster health command at the end of the Cluster Automatic Setup operation, to provide you with visual feedback. Example Use the following command to create a cluster of LX devices. The set of commands required is run automatically on each individual LX, providing a fast and simple means for you to start clustering effectively and rapidly. InReach:0 >>cluster autosetup username <username> password <password> epassword <epassword> secret <secret> Configuring the Cluster Configuration and Control Feature 13-34 Cluster Automatic Setup where <username> is the username used to log into the remote systems, <password> is the password used to log into the remote systems, <epassword> is the superuser password used on the remote systems, and <secret> is the new cluster secret (restricted to 16 to 32 characters). As the setup executes, the following messages appear for each IP address configured in the cluster: Connecting to <ipaddress> from <initiating_ ipaddress> Configuration of <ipaddress> by <initiating_ ipaddress> completed If any connection fails, the following message appears: Configuration of <ipaddress> by <initiating_ ipaddress> failed After the setup executes successfully, you are reminded to perform a cluster save: You must perform the 'cluster save configuration' command in order to finalize the cluster setup If there is an error in the setup execution, the following message appears: Autosetup failed. Correct failing nodes and rerun command X To use Cluster Automatic Setup via the GUI When you click the Cluster Setup screen Apply button, any changes made to the cluster configuration through the GUI (number or address of members, cluster secret, etc.) are recorded and passed to the Cluster Automatic Setup. Then click on the Save button on the top of the screen to save your changes. LX Series Configuration Guide SNMP Configuration 14-1 CHAPTER 14 SNMP Configuration This chapter provides information about SNMP and MIBs, and includes procedures for configuring the LX unit to provide SNMP management. SNMP Configuration 14-2 Network Management System Network Management System Network Management Systems monitor and control network elements. Network Elements (NE) are devices, such as hosts, routers, and terminal servers, that are monitored and controlled through access to their management information. The NMS can potentially monitor several nodes, each with a processing entity termed an agent. An agent is a network management software module that resides in a managed device. It has local knowledge of management information and can translate that information into a form compatible with SNMP. The managed objects might be configuration parameters or performance statistics relating to the device being managed. Operations of the protocol are carried out under an administrative framework that defines both authentication and authorization policies in SNMPv1, SNMPv2C, and SNMPv3. MANAGEMENT SYSTEM Human Network Manager MANAGED ELEMENT MANAGER Management Database AGENT SNMP Management Database Figure 14.1 Typical Network Management System All SNMP-managed devices contain a Management Information Base (MIB) database that stores management information for that device. The database is organized as a tree; branches of the tree name objects and the leaves of the tree contain the values manipulated to effect management. The values are comprised of managed objects and are identified by object identifiers. Objects in the MIB are defined using Abstract Syntax Notation One (ASN.1). The MIB structure is depicted in RFC 1155, “The Structure of Management Information” or SMI. LX Series Configuration Guide Management Information 14-3 A managed object is one of any number of characteristics of a managed device. Managed objects are comprised of one or more object instances. A managed object is identified by an object identifier (OID). The tree consists of a root connected to a number of labeled nodes via edges. Each node may, in turn, have children of its own which are labeled. In this case, we may term the node a subtree. The Simple Network Management Protocol (SNMP) is an Internet standard defined by the Internet Engineering Task Force (IETF) Request for Comment (RFC) 1157, which specifies how network management information is carried through a network. MRV Communications devices support SNMP by implementing an SNMP Agent. The agent supports SNMP MIB data and makes it available when requested via SNMP Get/Set requests. In addition, the LX device generates SNMP Traps, which are asynchronous messages used to indicate specific events on the device. Management Information Management information is a collection of managed objects, residing in a virtual information store called the Management Information Base (MIB). Collections of related objects are defined in MIB modules and are written using a subset of ASN.1.The subset is defined by the SMI and is divided into three parts: 1. 2. 3. Module definitions are used when describing information modules. An ASN.1 macro MODULE-IDENTITY is used to convey the semantics of an information module. Object definitions are used when describing managed objects. An ASN.1 macro OBJECT-TYPE is used to convey the syntax and semantics of a managed object. Notification definitions are used when describing unsolicited transmissions of management information. An ASN.1 macro TRAP-TYPE is used to convey the syntax and semantics of a trap. SNMP Configuration 14-4 OID Structure Example MIBs are organized into MIB modules. A MIB module is a file defining managed MIB objects. In addition to the standard MIBs, companies usually provide vendor specific enterprise MIBs which define additional MIB objects used to manage the network devices. OID Structure Example A sample Object identifier follows: Example Internet OBJECT IDENTIFIER ::= (6) internet (1) 1} (iso (1) org (3) dod In tree format, the same object appears as follows: Figure 14.2 Hierarchical Tree Structure LX Series Configuration Guide OID Structure Example 14-5 Table 14.1 Standard MIBs RFC Number Description RFC 1213 MIB-2 RFC 1658 Character MIB RFC 2465 IPv6 MIB RFC 3411 SNMP V3 Framework MIB RFC 3414 SNMP V3 User-based Security Model (USM) MIB RFC 3415 SNMP V3 View-based Access Control Model (VACM) MIB Table 14.2 MRV InReach Enterprise MIBs MRV InReach MIB Description MRV-IR-SYSTEM-MIB InReach System MIB MRV-IR-CHAR-MIB InReach Character MIB MRV-IR-HDAM-MIB In-Reach High Density Alarm (HDAM) MIB MRV-IR-TRAP-MIB InReach Trap MIB Table 14.3 LX Standard SNMP Traps Trap ID Trap Name Trap Description 0 coldStart Trap generated when the system powers on. 2 linkDown Trap generated when an interface link status changes to down. 3 linkUp Trap generated when an interface link status changes to up. 4 authenticationFailure Trap generated by SNMP agent when an incoming SNMP request fails authentication. SNMP Configuration 14-6 OID Structure Example Table 14.4 LX Enterprise-Specific SNMP Traps ID Name Indicates that 1 irNotifyEvent A text message is being sent to an SNMP client. 2 irTempHighTholdAlarmRaised A configured high threshold has been raised. 3 irTempHighTholdAlarmCleared A configured high threshold has been cleared. 4 irTempLowTholdAlarmRaised A configured low threshold has been raised. 5 irTempLowTholdAlarmCleared A configured low threshold has been cleared. 6 irHumidityHighTholdAlarmRaised A configured high threshold was raised. 7 irHumidityHighTholdAlarmCleared A configured high threshold was cleared. 8 irHumidityLowTholdAlarmRaised A configured low threshold was raised. 9 irHumidityLowTholdAlarmCleared A configured low threshold was cleared. 10 irClusterSyncStarted A Cluster Synchronization started. 11 irClusterSyncCompleted A Cluster Synchronization completed. 12 irClusterSoftwareUpdateStarted A Cluster system software update started. 13 irClusterSoftwareUpdateCompleted A Cluster system software update completed. 14 irClusterBootloaderUpdateStarted A Cluster boot loader software update started. 15 irClusterBootloaderUpdateCompleted A Cluster boot loader software update completed. 16 irPowerSupplyStatusChanged A power supply status changed. 17 irLoginFailed A user tried to log in and failed. 18 irHdamAlarmRaised HDAM unit generated an alarm. 19 irHdamAlarmCleared HDAM unit cleared an alarm. 20 irHdamContactLost LX lost contact with the HDAM unit. 21 irHdamContactRegained LX regained contact with the HDAM unit. 22 irHdamPowerStatusChanged The HDAM power status has changed. 24 irOnBoardLowTempExceeded Onboard low temperature exceeded the threshold value. 25 irOnBoardLowTempCleared Onboard low temperature has fallen below the threshold value. 26 irOnboardLowHighExceeded Onboard high temperature exceeds the threshold value. 27 irOnboardLowHighCleared Onboard high temperature has fallen below the threshold value. LX Series Configuration Guide LX Fault/Cleared Alarm SNMP Trap Pairings 14-7 Table 14.4 LX Enterprise-Specific SNMP Traps (Continued) ID Name Indicates that 28 irAdminLoginFailed Administrator login failed. 29 irEnetPortBondLinkStatusChanged Enet port bonding link status changed. 30 irHdamAnalogHighAlarmRaised Analog high threshold alarm was raised. 31 irHdamAnalogHighAlarmCleared Analog high threshold alarm was cleared. 32 irHdamAnalogLowAlarmRaised Analog low threshold alarm was raised. 33 irHdamAnalogLowAlarmCleared Analog low threshold alarm cleared. 34 irLdamAlarmRaised LDAM alarm raised. 35 irLdamAlarmCleared LDAM alarm cleared. LX Fault/Cleared Alarm SNMP Trap Pairings Table 14.5 shows the pairings of a fault alarm and the corresponding cleared alarm trap IDs: Table 14.5 Fault Alarm and Cleared Alarm Trap IDs Fault Trap ID Fault Alarm Trap Cleared Trap ID Cleared Alarm Trap 2 irTempHighTholdAlarmRaised 3 irTempHighTholdAlarmCleared 4 irTempLowTholdAlarmRaised 5 irTempLowTholdAlarmCleared 6 irHumidityHighTholdAlarmRaised 7 irHumidityHighTholdAlarmCleared 8 irHumidityLowTholdAlarmRaised 9 irHumidityLowTholdAlarmCleared 18 irHdamAlarmRaised 19 irHdamAlarmCleared 20 irHdamContactLost 21 irHdamContactRegained 24 irOnBoardLowTempExceeded 25 irOnBoardLowTempCleared 26 irOnboardLowHighExceeded 27 irOnboardLowHighCleared 30 irHdamAnalogHighAlarmRaised 31 irHdamAnalogHighAlarmCleared 32 irHdamAnalogLowAlarmRaised 33 irHdamAnalogLowAlarmCleared 34 irLdamAlarmRaised 35 irLdamAlarmCleared SNMP Configuration 14-8 Security Security Additional security is provided by only allowing SNMP requests from hosts that are configured in the GET/SET client table. The SNMP agent is disabled by default. An SNMP Client must be configured on the device before it can communicate with the SNMP agent. An SNMP Client is configured via the Command Line Interface (CLI). The SNMP agent must be enabled via the CLI to accept SNMP requests. SNMP Management To allow a device to be managed by SNMP, the SNMP agent must be enabled and GET/SET clients configured (see the following section). Configuring an SNMP Agent This section describes how to configure SNMP Clients, enable SNMP, and display SNMP-related information. The tasks in this section are performed in the LX Command Line Interface (CLI). See the LX-Series Commands Reference Guide (451-0310) for more information on the commands that are used in this section. X To enable an SNMP agent Use the following command: Example Config:1>>snmp enable X To disable an SNMP agent Use the following command: Example Config:1>>no snmp enable LX Series Configuration Guide Adding or Removing an SNMP GET Client 14-9 X To configure a source interface on SNMP Optionally, the SNMP Interface allows you to indicate the IPv4 source address to use when contacting the server. In each case, this value defaults to interface 1. Use the following command syntax to specify the source address the LX sends when contacting the SNMP server. Syntax Config:0 >>snmp source interface <interface_number> Example Config:0 >>snmp source interface 1 Adding or Removing an SNMP GET Client Before an SNMP client can send SNMP GET requests to the agent, it must be configured in the SNMP Get client table. A GET Client is a specific NOC that is allowed to manage the InReach device via GET and GET NEXT requests. You can configure up to 16 of these SNMP clients. X To add an SNMP GET client Use the following command syntax: Syntax Snmp:0 >>get client <number> ip_address where number is a value from 0 to 15. X To remove an SNMP GET client Use the following command syntax: Syntax Snmp:0 >>no get client <number> SNMP Configuration 14-10 Adding or Removing an SNMP SET Client Examples Snmp:1 >>get client 0 <a.b.c.d> Snmp:1 >>get client 0 community <string> Snmp:1 >>get client 0 version <v1 | v2c> Snmp:1 >>get client 0 mask 255.255.255.0 Snmp:1 >>no get client 0 L A community string can be up to 32 characters long. Adding or Removing an SNMP SET Client Before an SNMP client can send SNMP SET requests to the agent, it must be configured in the SNMP SET client table. Execute this command at the SNMP command mode. A SET Client is a NOC that may issue SET Requests to the device. You can configure up to 16 of these clients. X To add an SNMP SET client Use the following command syntax: Syntax Snmp:0 >>set client <number> ip_address where number is a value from 0 to 15. X To remove an entry Use the following command syntax: Syntax Config0:>>no set client <number> Examples Snmp:1 >>set client 0 <a.b.c.d> Snmp:1 >>set client 0 community <string> Snmp:1 >>set client 0 version <v1 | v2c> Snmp:1 >>set client 0 mask 255.255.255.0 Snmp:1 >>no set client 0 LX Series Configuration Guide Adding and Removing SNMP Trap Clients 14-11 Adding and Removing SNMP Trap Clients A Trap Client is a specific NOC to which the device sends Trap messages. Execute this command at the SNMP command mode. An LX will not generate an SNMP Trap message until a Trap Client is defined. You can configure up to 16 Trap Clients. X To add an SNMP Trap client Use the following command syntax: Syntax Snmp:0 >>trap client <number> ip_address where number ip_address is a value from 0 to 15. identifies the NOC that should receive the Trap messages. X To remove an SNMP Trap client Use the following command syntax: Syntax Snmp:0 >>no trap client <number> Examples Snmp:1 >>trap client 0 <a.b.c.d> Snmp:1 >>trap client 0 community <string> Snmp:1 >>trap client 0 version <v1 | v2c-inform | v3> Snmp:1 >>trap client 0 retransmit count 0 Snmp:1 >>trap client 0 retransmit interval 0 Snmp:1 >>no trap client 0 Adding and Removing SNMP V3 User Entries Use this command to configure an SNMP V3 user entry. Up to 10 V3 Users can be configured. X To add an SNMP V3 user entry Use the following command syntax: Syntax Snmp:0 >>v3 user <number> user user_name SNMP Configuration 14-12 Adding and Removing SNMP V3 Group Entries where number user_name is a value from 0 to 9. identifies the name of the user. X To remove an SNMP V3 user entry Use the following command: Examples Snmp:0 >>no v3 user 3 SNMP V3 User Configuration Examples Snmp:1 >>v3 user 3 name bob Snmp:1 >>v3 user 3 authpass <password> Snmp:1 >>v3 user 3 authproto <protocol> Snmp:1 >>v3 user 3 privpass <password> Snmp:1 >>v3 user 3 privproto <protocol> Adding and Removing SNMP V3 Group Entries You can configure up to 10 V3 Groups using the v3 group command. X To add an SNMP V3 group entry Use the following command syntax: Syntax Snmp:0 >>v3 group <number> group group_name where number group_name is a value from 0 to 9. identifies the name of the group. X To remove an SNMP V3 user entry Use the following command syntax: Snmp:0 >>no v3 group 3 LX Series Configuration Guide Adding and Removing SNMP V3 Access Entries 14-13 Examples SNMP V3 Group Configuration Examples Snmp:1 >>v3 group 3 group grpAll Snmp:1 >>v3 group 3 user 3 <name> Adding and Removing SNMP V3 Access Entries You can configure up to 10 V3 Access Entries using the v3 access command. X To add an SNMP V3 access entry Use the following command syntax: Syntax Snmp:0 >>v3 access <number> name <string> where number group_name is the entry in the access table being configured. identifies the name assigned to the entry. X To remove an SNMP V3 access entry Use the following command: Snmp:0 >>no v3 access 3 Examples SNMP V3 Access Configuration Examples Snmp:1 >>v3 access 3 name grpAll Snmp:1 >>v3 access 3 readview <word> Snmp:1 >>v3 access seclevel <security_level> Snmp:1 >>v3 access 3 writeview <word> SNMP Configuration 14-14 Adding and Removing SNMP V3 View Entries Adding and Removing SNMP V3 View Entries Use this command to configure an SNMP V3 view entry. Up to 10 V3 View Entries can be configured. X To add an SNMP V3 View Entry Use the following command syntax: Syntax Snmp:1 >>v3 view <number> name <string> where number string is the entry in the view table being configured. identifies the name assigned to the entry. X To remove an SNMP V3 View Entry Use the following command: Example Snmp:0 >>no v3 view 3 Examples SNMP V3 View Configuration Examples Snmp:1 >>v3 view 3 name all Snmp:1 >>v3 view 3 mask FF Snmp:1 >>v3 view 3 subtree 1.3.6.1 Snmp:1 >>v3 view 3 type included LX Series Configuration Guide MIB-II System Group Configuration 14-15 MIB-II System Group Configuration This section describes how to configure the MIB-II sysContact and sysLocation object values. Type the following commands at the CLI Config prompt. Config:0 >>contact <string> Config:0 >>location <string> SNMP V3 Overview The LX Series supports SNMP V3. The following structures are used to set up an SNMP V3 entity. User This is where the user is defined, as well as the security levels to be applied to this user. A two-tier security level is provided for the user: Authentication and Privacy. Authentication security defines which secure methods used to encrypt the user/password being sent. The options are MD5, SHA-1, or NONE. Privacy security defines the secure methods used to encrypt the user datagrams being exchanged between the two devices. The options are NONE, DES, or AES128. You can define a user with any combination of the preceding. For example, NoAuth/NoPriv defines a user with both encryptions set to none. Auth/noPriv defines a user who can use authentication encryption, but no datagram encryption. Group This is an organization of users, and points to various ACCESS entries. SNMP Configuration 14-16 Access Access This defines the abilities available to a GROUP that is bound to a specific access entry. Access defines which VIEW from the VIEW table is used to determine READ/WRITE capabilities. View This is where you limit what a user can view. You can specify a certain OID; for example, 1.3.6.1. This means as long as the user request attempts to read or write to a value that has 1.3.6.1 beginning the string, they will be able to do so. Configuration For SNMP V3 to function properly, an entry must exist in each of the four tables. Your configuration is a logical linking of table entries in the four different tables: USER ---> GROUP---> ACCESS --->VIEW The following sections consist of examples of how to configure the SNMP V3 feature on the LX. X To access SNMP commands Execute the following commands in Configuration Command Mode: Config:0 >>snmp enable Config:0 >>snmp SNMP:0 >> LX Series Configuration Guide SNMP V3 Commands 14-17 SNMP V3 Commands The LX supports SNMP V3. The SNMP V3 commands are: monitor/show snmp v3 access monitor/show snmp v3 group monitor/show snmp v3 misc monitor/show snmp v3 user monitor/show snmp v3 view v3 access <number> name v3 access <number> readview v3 access <number> seclevel v3 access <number> writeview v3 group <number> user authpass v3 group <number> user authproto v3 group <number> user name v3 group <number> user privpass v3 group <number> user privproto v3 view <number> mask v3 view <number> name v3 view <number> subtree v3 view <number> type v3 user <number> privpass <0xkey> trap client <number> v3 user index <index> SNMP Configuration 14-18 SNMP V3 Commands X To configure SNMP V3 for No Authentication and No Privacy 1. Example Configure the user: Snmp:0 >>v3 user 0 name tim 2. Example Configure group: Snmp:0 >>v3 group 0 user tim Snmp:0 >>v3 group 0 group groupall 3. Example Configure access: Snmp:0 >>v3 access 0 name groupall Snmp:0 >>v3 access 0 readview viewall Snmp:0 >>v3 access 0 writeview viewall 4. Example Configure view: Snmp:0 >>v3 view 0 name viewall Snmp:0 >>v3 view 0 subtree 1.3.6.1 X To configure SNMP V3 for Authentication and No Privacy 1. Example Snmp:0 >>v3 access 1 seclevel authAndPriv 2. Example Configure user: Snmp:0 >>v3 user 2 name tim 3. Example Configure group: Snmp:0 >>v3 group 2 user tim 4. Example Configure access: Snmp:0 >>v3 access 2 seclevel authNoPriv 5. Example Access Security Level 1: Configure group: Snmp:0 >>v3 group 2 group groupall LX Series Configuration Guide SNMP V3 Commands 14-19 6. Example Configure access: Snmp:0 >>v3 access 2 name groupall Snmp:0 >>v3 access 2 readview viewall Snmp:0 >>v3 access 2 writeview viewall 7. Example Configure view: Snmp:0 >>v3 view 2 name viewauthnopriv Snmp:0 >>v3 view 2 subtree 1.3.6.1 8. Example Configure protocols and password: Snmp:0 >>v3 user 2 authproto md5 Snmp:0 >>v3 user 2 authpass authpass Snmp:0 >>v3 access 2 seclevel authNoPriv X To configure SNMP V3 for Authentication and Privacy L This is the most secure configuration. 1. Example Configure user: Snmp:0 >>v3 user 1 name tim 2. Example Configure group: Snmp:0 >>v3 group 1 user tim Snmp:0 >>v3 group 1 group groupall 3. Example Configure access: Snmp:0 >>v3 access 1 name groupall Snmp:0 >>v3 access 1 readview viewall Snmp:0 >>v3 access 1 writeview viewall 4. Example Configure view: Snmp:0 >>v3 view 1 name viewall Snmp:0 >>v3 view 1 subtree 1.3.6.1 SNMP Configuration 14-20 SNMP V3 Commands 5. Example Configure protocols and passwords: Snmp:0 >>v3 user 1 privproto des Snmp:0 >>v3 user 1 privpass privpass Snmp:0 >>v3 user 1 authproto md5 Snmp:0 >>v3 user 1 authpass authpass X To configure SNMP V3 for Authentication and Privacy with Read-Only Access 1. Example Configure user: Snmp:0 >>v3 user 3 name tim 2. Example Configure group: Snmp:0 >>v3 group 3 user tim Snmp:0 >>v3 group 3 group groupall 3. Example Configure access: Snmp:0 >>v3 access 3 name groupall Snmp:0 >>v3 access 3 readview viewall 4. Example Configure view: Snmp:0 >>v3 view 3 name viewall Snmp:0 >>v3 view 3 subtree 1.3.6.1 5. Example Configure protocols and passwords: Snmp:0 >>v3 user 3 privproto des Snmp:0 >>v3 user 3 privpass abcd Snmp:0 >>v3 user 3 authproto md5 Snmp:0 >>v3 user 3 authpass authpass Snmp:0 >>v3 access 3 seclevel authAndPriv LX Series Configuration Guide Configuring a Trap Client User Index 14-21 Configuring a Trap Client User Index The trap client user index command has been added. L You only need to set this field if this entry is for a V3 trap client. Syntax Snmp:0 >>trap client <number> v3userindex <number> where <number> Example points to the entry in the v3 user table on whose behalf this trap client is configured. The range is from 0 to 9. Snmp:0 >>trap client 4 v3userindex 8 Configuring a V3 User Passw/Priv Key The V3 UserPassw/Priv Key command has been added. Syntax Snmp:0 >>v3 user <number> privpass <password> Snmp:0 >>v3 user <number> privpass <0xkey> where: <number> is the index for the user entry being configured. <password> is the alphanumeric privacy password. <0xkey> is the privacy key, in hex format. To indicate that a key value is being entered, the value must begin with “0x.”The key must be 32 characters or less. Examples Snmp:0 >> v3 user 0 privpass mypassword Snmp:0 >> v3 user 0 privpass 0x01020304 SNMP Configuration 14-22 Displaying SNMP Information Displaying SNMP Information The following sections explain how to access the SNMP Show screens. X To show whether SNMP is enabled or disabled Use the show snmp characteristics command: Example In-Reach:0 >>show snmp characteristics Figure 14.3, “Show SNMP Characteristics Display” shows the “SNMP Daemon” field which indicates whether SNMP is enabled or disabled. Time: SNMP Daemon: Source Interface: Disabled 1 Tue, 13 Feb 2007 09:45:25 US/EASTERN Port: 16 Figure 14.3 Show SNMP Characteristics Display LX Series Configuration Guide Displaying SNMP Information 14-23 X To show SNMP clients Use the show snmp client command syntax to display the SNMP client information: Syntax In-Reach:0 >>show snmp client [number | all] where: <number> Example is any valid client number from 0 to 15 In-Reach:0 >>show snmp client all Time: Wed, 18 Oct 2006 09:08:19 US/EASTERN Get Client: Version: Community: 1 v1 Address: NetMask: 140.111.222.111 255.255.255.255 public Set Client: Version: Community: 1 v1 Address: NetMask: 140.111.222.111 255.255.255.255 private Trap Client: Version: Community: Retransmit Count: V3 User Index: 1 Address: v1 UDP Port: 0 0 140.111.222.111 162 public Retransmit Interval: 0 Figure 14.4 Show SNMP Client Display SNMP Configuration 14-24 Show the SNMP V3 Settings Show the SNMP V3 Settings The following sections explain how to access the SNMP V3 Show screens. X To show all SNMP V3 users Use the show snmp v3 user all command in either of the following command modes: Example InReach:0 >>show snmp v3 user [number|all] Figure 14.5 shows an example of the SNMP V3 User All Screen. Time: userEntry: userName: authProtocol: authPassword: privPassword (Key): 0 none Wed, 28 Mar 2007 10:21:20 US/EASTERN status: notReady ddd privProtocol: none Figure 14.5 SNMP V3 User All Screen X To show all SNMP V3 access Use the snmp v3 access all command: Example InReach:0 >>show snmp v3 access all Time: accessEntry: groupName: readView: writeView: secModel: ctxPrefix: 0 usm Wed, 28 Mar 2007 10:22:30 US/EASTERN status: notReady ddd secLevel: ctxMatch: Figure 14.6 SNMP V3 Access All Screen LX Series Configuration Guide noAuthNoPriv exact Show the SNMP V3 Settings 14-25 X To show all SNMP V3 view Use the snmp v3 view all command: Example InReach:0 >>show snmp v3 view all Time: viewEntry: viewName: subTree: mask: type: 0 Wed, 28 Mar 2007 10:23:30 US/EASTERN status: notReady ddd .1.3.6.1 included Figure 14.7 SNMP V3 View All Screen X To show the SNMP V3 access settings Use the following command syntax: Syntax In-Reach:0 >>show snmp v3 access entry_number where entry_ number Example Time: accessEntry: groupName: readView: writeView: secModel: ctxPrefix: is any valid SNMP V3 entry number from 0 to 9. In-Reach:0 >>show snmp v3 access 0 0 usm Wed, 28 Mar 2007 10:26:34 US/EASTERN status: notReady ddd secLevel: ctxMatch: noAuthNoPriv exact Figure 14.8 V3 Access Screen SNMP Configuration 14-26 Show the SNMP V3 Settings X To show the SNMP V3 group settings Use the following command syntax: Syntax In-Reach:0 >>show snmp v3 group entry_number where entry_ number Example is any valid SNMP V3 entry number from 0 to 9. In-Reach:0 >>show snmp v3 group 0 Time: Entry: userName: groupName: secModel: 0 Wed, 28 Mar 2007 10:29:44 US/EASTERN status: notReady ddd ddd usm Figure 14.9 SNMP V3 Group Screen X To show the SNMP V3 miscellaneous settings Use the following command: Example In-Reach:0 >>show snmp v3 misc Time: Wed, 18 Oct 2006 09:08:19 US/EASTERN EngineId: EngineBoots: 800000210100000000 1 Figure 14.10 SNMP V3 Miscellaneous Screen LX Series Configuration Guide Show the SNMP V3 Settings 14-27 X To show the SNMP V3 user settings Use the following command: Syntax In-Reach:0 >>show snmp v3 user entry_ number where entry_ number Example is any valid SNMP V3 entry number from 0 to 9. In-Reach:0 >>show snmp v3 user 0 Time: Wed, 18 Oct 2006 09:08:19 US/EASTERN userEntry: userName: authProtocol: authPassword: privPassword (Key): 0 md5 status: active bob des Configured Configured privProtocol: Figure 14.11 SNMP V3 User Screen X To show the SNMP V3 view settings Use the following command syntax: Syntax In-Reach:0 >>show snmp v3 view entry_number where entry_ number Example Time: viewEntry: viewName: subTree: mask: type: is any valid SNMP V3 entry number from 0 to 9. In-Reach:0 >>show snmp v3 view 0 0 Wed, 28 Mar 2007 10:34:11 US/EASTERN status: notReady ddd .1.3.6.1 included Figure 14.12 SNMP V3 View Screen SNMP Configuration 14-28 Dual Power Supply SNMP Traps Dual Power Supply SNMP Traps SNMP traps notify you of a Power Supply state change (on/off). SNMP MIB Support LX SNMP software supported the ability to read the total current load per power device. Additional SNMP support has been added to read current loads for 5250 devices with 3-phase (A, B and C) power support. References Understanding SNMP MIBs by Dave Perkins, Prentice Hall. The Simple Book, by Marshall Rose, Prentice Hall. RFC 1213, "MIB-II", IETF RFC 1902, "Structure of Management Information for Version 2 of SNMP", IETF RFC 1903, "Textual Conventions for Version 2 of SNMP", IETF RFC 1905, "Protocol Operations for Version 2 of SNMP", IETF RFC 1907, "Management Information Base for Version 2 of SNMP", IETF LX Series Configuration Guide Configuring Alarming with LX-7204T/7304T Sensor Manager and LDAM 15-1 CHAPTER 15 Configuring Alarming with LX-7204T/7304T Sensor Manager and LDAM This chapter describes how to configure the LX-7204T/7304T Sensor Manager and Option Modules, as well as Low-Density Alarm Management (LDAM). IMPORTANT The LX-7204T sensor Manager High-Density Alarm Management (HDAM) is compatible only with the LX-Series. It is no longer compatible with In-Reach legacy products. Configuring Alarming with LX-7204T/7304T Sensor Manager and LDAM 15-2 Configuring the HDAM Port Configuring the HDAM Port The LX-7204T and Option Modules are managed from a port on the LX Master Unit that is configured as an HDAM port. All ports on an LX-Series unit other than port 0 (diagnostic/management port) can be configured as HDAM ports. Only four total ports can be HDAM ports at one time. X To configure ports as HDAM ports Use the following command syntax: Syntax Config:0 >>port async <port_list> access hdam where port_list Specifies the ports to use to control the HDAM. You can use any LX-Series port other than port 0 (diagnostic/ management port or an internal modem, or an RS-485 port). The list can contain single items (such as 1,3,4) or ranges (such as 1-8), or a combination. Press <RETURN> to configure the port as an HDAM port. Example Config:0 >>port async 6 access hdam Updating the LX-7204T/7304T Firmware Use this command to launch an attempt to update the firmware on the 7204T/7304T connected to a specific HDAM port. The LX attempts to download the hdam2.img file and copy it into 7204T/ 7304T flash memory. X To update the LX-7204T/7304T firmware Syntax Use the following command syntax: hdam <port_number> update [<hostname_or_ip_address>]|[ipv6 <ipv6_address>] [image name <path/filename>] where ipv6_address LX Series Configuration Guide The IPv6 address of the TFTP server from which the firmware update will be obtained. Updating the LX-7204T/7304T Firmware 15-3 port_number The number of the LX port connected to the HDAM on which to update firmware. For example, a value of 1 means that the LX-7204T/7304T connected to port 1 of the Master LX Unit will have its firmware updated. ip_address Specifies the IP address of the TFTP server from which the firmware update will be obtained. If no IP address is given, the LX unit’s default TFTP server address is used. domain_name Specifies the domain name of the TFTP server from which the firmware file will be obtained. If no domain name is given, the LX unit’s default TFTP server address is used. path/filename The name of the existing HDAM file to be copied. If this name is not specified, the default image name is used (hdam2.img). The name can consist of any printable character (other than a space). The name can be 1 to 32 characters long. You can add an optional directory path prior to the filename. The LX-7204T/7304T reboots automatically after the firmware is successfully updated. This ensures that the updated firmware will take effect immediately. Examples InReach:0 >> hdam 5 update 130.155.110.55 InReach:0 >> hdam 28 update local_host_foo InReach:0 >> hdam 28 update ipv6 3ffe:303:14:42a0:9cff:fe00:8ad X To reboot the LX-7204T/7304T Use the following command to reboot the LX-7204T/7304T: hdam <port_number> reset Syntax where port_number The number of the LX port that is connected to the LX7204T/7304T you want to reboot. For example, a value of 1 means that the LX-7204T/7304T connected to port 1 of the Master LX Unit will be rebooted. Example InReach:0 >>hdam 1 reset Configuring Alarming with LX-7204T/7304T Sensor Manager and LDAM 15-4 Using the Alarm Input Commands Using the Alarm Input Commands This section explains how to configure the alarm input commands, including the following: Naming Alarm Inputs Enabling and Disabling Audible Alarms Configuring an Alarm Input Description String Defaulting the Description for an Alarm Input Enabling and Disabling SNMP Traps for Alarm State Changes Configuring the Debounce Interval for an Alarm Configuring the Fault State for Alarm Inputs Configuring a Severity Level for Alarm Inputs Resetting the Alarm Input Name to its Default Resetting Alarm Inputs to the Defaults Naming Alarm Inputs The default name for an alarm input is canonically derived from the port number, slot number and point number. For example, the default name for the 8th alarm input on the 2nd slot of the HDAM being managed by port 5 is 5_2_8. L You can use each point name once on the LX. You can’t use the same name on multiple ports, slots, or points. You can configure by the default name (if known), or by the physical location on the HDAM (see examples below). L All names across the Master LX Unit must be unique. LX Series Configuration Guide Enabling and Disabling Audible Alarms 15-5 X To configure a descriptive name for any Alarm Input in the LX-7204T/7304T Use the following Privileged command syntax: hdam alarm <alarm_name_1> name <alarm_name_2> hdam alarm port <port_number> slot <slot_number> point <point_number> name <new_name> Syntax where alarm_name_1 Name of the alarm input to rename alarm_name_2 New alarm name to assign to the alarm input L The name must start with a letter, and the remainder of the name can contain only letters and/or numbers and/or underscores. port_number Specifies the individual LX port to which the LX-7204T/7304T is attached slot_number Number of the slot for which to configure a name point_number Specifies a specific point for which to configure a name new_name New name for the point Examples Config:0 >>hdam alarm 5_4_20 name BankVaultDoor Config:0 >>hdam alarm port 5 slot 4 point 20 name BankVaultDoor InReach:0 >>hdam alarm port 5 slot 4 point 20 name BankVaultDoor Enabling and Disabling Audible Alarms Use the following commands to enable and disable the audible alarm for a specific alarm or for multiple alarms. X To enable and disable audible alarms 1. Syntax Use the following command syntax to enable and disable the audible alarm for either a specific alarm: hdam alarm port <port_number> slot [<slot_list>|all] point [<point_list>|all] audible enable hdam alarm port <port_number> slot [<slot_list>|all] point [<point_list>|all] no audible Configuring Alarming with LX-7204T/7304T Sensor Manager and LDAM 15-6 Enabling and Disabling Audible Alarms 2. Syntax Use the following command syntax to enable and disable the audible alarm for multiple alarms: hdam alarm <alarm_name> audible enable hdam alarm <alarm_name> no audible where alarm_name Name of the alarm on which to enable/disable the audible alarm. This entry is in the order port_slot_alarm (such as 5_2_31, or BankVaultDoor). enable Enables the audible alarm to sound when a fault condition is detected on an Alarm Input of an LX-7204T/ 7304T unit specified in alarm_name. no audible Disables the audible alarm when a fault condition is detected on an Alarm Input of an LX-7204T/7304T unit specified in alarm_name (default). port_number Specifies the HDAM port managing the LX-7204T/ 7304T. slot_list List of slots on which to enable the audible alarm. This list can contain single items, lists (such as 1,3,4) or ranges (such as 1-4). point_list List of points on which to enable the audible alarm. This list can contain single items, lists (such as 1,3,4) or ranges (such as 1-32). all Specifies that all Alarm Inputs managed by the LX Master Unit will be as specified in this command. Example Config:0 Config:0 Config:0 Config:0 Config:0 Config:0 >>hdam >>hdam >>hdam >>hdam >>hdam >>hdam alarm alarm alarm alarm alarm alarm LX Series Configuration Guide BankVaultDoor audible 5_2_31 no audible port 2 slot 1,2 point port 2 slot 1-4 point port 2 slot all point port 2 slot 1-4 point enable 1,2,3,4 no audible 6-18 no audible all audible enable 6-18 audible enable Configuring an Alarm Input Description String 15-7 Configuring an Alarm Input Description String Use the following commands configure an Alarm Description String for a specific alarm or for multiple alarms. X To configure an alarm input description string Use the following command syntax to configure an alarm input description string for a specific alarm: hdam alarm <alarm_name> description <string> 2. Use the following command syntax to configure an alarm input description string for multiple alarms: hdam alarm port <port_number> slot [<slot_list>|all] point [<point_list>|all] description <string> 1. Syntax Syntax where alarm_name The name of the alarm on which you want to configure a description string. This entry is in the order port_slot_ alarm (e.g., 5_2_31, or BankVaultDoor). port_number Specifies the HDAM port managing the LX-7204T/ 7204T. slot_list Specifies a list of Slots on which you want to configure a description string. The list can contain single items, lists (such as 1,3,4) or ranges (such as 1-4), or a combination. point_list Specifies a list of Points on which to configure a description string. The list can contain single items, lists (such as 1,3,4) or ranges (such as 1-32), or a combination. all Specifies that all Slots or Points managed by the LX Master Unit will be as specified in this command. string The description of the alarm input (a maximum of 63 characters long). Example Config:0 >>hdam alarm Config:0 >>hdam alarm Config:0 >>hdam alarm Config:0 >>hdam alarm library second floor 5_4_8 description lab 3_1_8 description lab port 2 slot 1,2 point port 2 slot all point door 1 door 2 1-4 description lab1 all description Configuring Alarming with LX-7204T/7304T Sensor Manager and LDAM 15-8 Defaulting the Description for an Alarm Input Defaulting the Description for an Alarm Input Use the following commands default an Alarm Input Description for a specific alarm or for multiple alarms. X To default the description for an alarm input Use the following command syntax to default the description for an alarm input for a specific alarm: hdam alarm <alarm_name> description <string> 2. Use the following command syntax to default the description for an alarm input for multiple alarms: hdam alarm port <port_number> slot [<slot_list>|all] point [<point_list>|all] default description <string> 1. Syntax Syntax where alarm_name The name of the alarm on which you want to default the alarm input description. This entry is in the order port_ slot_alarm (e.g., 5_2_31, or BankVaultDoor). port_number Specifies the HDAM port managing the LX-7204T/ 7304T. slot_list Specifies a list of Slots whose points you want to configure a description for. The list can contain single items, lists (such as 1,3,4) or ranges (such as 1-4), or a combination. point_list Specifies a list of Points for which you want to configure a description. The list can contain single items, lists (such as 1,3,4) or ranges (such as 1-32), or a combination. all Specifies that all Slots or Points managed by the LX Master Unit will be as specified in this command. Example Config:0 Config:0 Config:0 Config:0 >>hdam >>hdam >>hdam >>hdam alarm alarm alarm alarm LX Series Configuration Guide 5_4_8 default description 3_1_8 default description port 2 slot 1,2 point 1-4 default description port 2 slot all point all default description Enabling and Disabling SNMP Traps for Alarm State Changes 15-9 Enabling and Disabling SNMP Traps for Alarm State Changes Use the following commands to enable or disable the sending of an SNMP trap for a change in Alarm state for a specific alarm or for multiple alarms. X To enable SNMP traps for alarm state changes for a specific alarm Use the following command syntax: Syntax hdam alarm <alarm_name> trap enable X To enable SNMP traps for alarm state changes for multiple alarms Use the following command syntax: Syntax hdam alarm port <port_number> slot [<slot_list>|all] point [<point_list>|all] trap enable X To disable SNMP traps for alarm state changes for a specific alarm Use the following command syntax: Syntax hdam alarm <alarm_name> no trap X To disable SNMP traps for alarm state changes for multiple alarms Use the following command syntax: Syntax hdam alarm port <port_number> slot [<slot_list>|all] point [<point_list>|all] no trap where alarm_name Specifies an Alarm Input Name. The value of name can be a descriptive name or a default name. port_number Specifies the LX HDAM port managing the 7204T. slot_list Specifies a list of Slots whose points about which you want to send SNMP traps. The list can contain single items, lists (such as 1,3,4) or ranges (such as 1-4), or a combination. Configuring Alarming with LX-7204T/7304T Sensor Manager and LDAM 15-10 Configuring the Debounce Interval for an Alarm point_list Specifies a list of Points about which you want to send SNMP traps. The list can contain single items, lists (such as 1,3,4) or ranges (such as 1-32), or a combination. all Specifies that Slots or Points managed by the LX Master Unit will be as specified in this command. enable This is the default setting. An SNMP trap will be sent when the Alarm Input specified changes state. Example Config:0 Config:0 Config:0 Config:0 >>hdam >>hdam >>hdam >>hdam alarm alarm alarm alarm SafedepositDoor trap enable 5_2_31 no trap port 2 slot all point all trap enable port 2 slot all point 6-18 no trap Configuring the Debounce Interval for an Alarm An Alarm Input can be configured to stop receiving alarms for up to 1,800,000 milliseconds (1800 seconds or 30 minutes) after an alarm comes in. The period during which the Alarm Input does not receive alarms is called the debounce interval. For example, if you have a door with a timer attached with a debounce setting of 500 milliseconds, and the door stays open more than 500 milliseconds after opening, an alarm message is sent. If the door closes within 500 milliseconds, no alarm message is sent and everything displays normal. L The debounce interval must be in multiples of 100 if it is under 1000, and in multiples of 1000 if it is greater than 1000. Use the following commands to configure the Interval for a specific alarm or for multiple alarms. X To configure the debounce interval for a specific alarm or multiple alarms Use the following command syntax: Syntax hdam alarm <alarm_name> debounce <time> hdam alarm port <port_number> slot [<slot_list>|all] point [<point_list>|all] debounce <time> LX Series Configuration Guide Configuring the Fault State for Alarm Inputs 15-11 where alarm_name Specifies an Alarm Input Name. The value of name can be a descriptive name or a default name. port_number Specifies the LX HDAM port managing the LX-7204T/ 7304T. slot_list Specifies a list of Slots on which you want to set the debounce interval. The list can contain single items, lists (such as 1,3,4) or ranges (such as 1-4), or a combination. point_list Specifies a list of Points on which you want to set the debounce interval. The list can contain single items, lists (such as 1,3,4) or ranges (such as 1-32), or a combination. all The debounce interval specified in this command will apply to all Slots or Points (or both) managed by this LX Master Unit. time Specifies the debounce interval, in milliseconds. The allowable values are 0—1,800,000 milliseconds (1800 seconds or 30 minutes). The default is 0. Example Config:0 >>hdam alarm 5_2_31 debounce 300 Config:0 >>hdam alarm port 2 slot 1-4 point 1,2,6-18 debounce 400 Configuring the Fault State for Alarm Inputs Use the following commands to configure the fault state for Alarm Inputs for a specific alarm or for multiple alarms. X To configure the fault state for alarm inputs for a specific alarm Use the following command syntax: Syntax hdam alarm <alarm_name> fault state [open|closed] Configuring Alarming with LX-7204T/7304T Sensor Manager and LDAM 15-12 Configuring the Fault State for Alarm Inputs X To configure the fault state for alarm inputs for multiple alarms Use the following command syntax: Syntax hdam alarm <alarm_name> hdam alarm port <port_number> slot [<slot_list>|all] point [<point_list>|all]fault state [open|closed] where alarm_name The name of the alarm on which you want to open or close the fault state. This entry is in the order port_slot_ alarm (e.g., 5_2_31, or BankVaultDoor). The value of alarm_name can be a descriptive name or a default name. port_number Specifies the LX HDAM port managing the 7204T. slot_list Specifies a list of Slots on whose points you want to change the fault state. The list can contain single items, lists (such as 1,3,4) or ranges (such as 1-4), or combination. point_list Specifies a list of Points on which you want to change the fault state. The list can contain single items, lists (such as 1,3,4) or ranges (such as 1-32), or a combination. all The fault state specified in this command applies to all Slots or Points (or both) managed by this LX Master Unit. open The point will be in Alarm when it is open. closed The point will be in Alarm when it is closed. This is the default setting. Example Config:0 Config:0 Config:0 Config:0 >>hdam >>hdam >>hdam >>hdam alarm alarm alarm alarm LX Series Configuration Guide SafedepositDoor fault state open 5_2_31 fault state closed port 2 slot 1,2 point 1,2,3,4 fault state open port 2 slot 1-4 point 6-18 fault state closed Configuring a Severity Level for Alarm Inputs 15-13 Configuring a Severity Level for Alarm Inputs Use the following commands to configure a severity level for Alarm Inputs for a specific alarm or for multiple alarms. X To configure a severity level for alarm inputs for a specific alarm Use the following command syntax: Syntax hdam alarm <alarm_name> trap severity <severity_level> X To configure a severity level for alarm inputs for multiple alarms Use the following command syntax: Syntax hdam alarm port <port_number> slot [<slot_list>|all] point [<point_list>|all] point [<point_list>|all] trap severity <severity_level> where name Specifies an Alarm Input Name. The value of name can be a descriptive name or a default name. port_number Specifies the LX HDAM port managing the 7204T. slot_list Specifies a list of Slots whose points you want to set trap severity on. The list can contain single items, lists (such as 1,3,4) or ranges (such as 1-4), or a combination. point_list Specifies a list of Points on which you want to set trap severity. The list can contain single items, lists (such as 1,3,4) or ranges (such as 1-32), or a combination. all The fault severity specified in this command will apply to all Slots or Points (or both) managed by this LX Master Unit. severity_level The SNMP Trap Severity Level used when SNMP Traps are sent for faults detected by the specified Alarm Inputs. The allowable values are Informational, Warning, Minor, Major, and Critical. The default is Minor. Configuring Alarming with LX-7204T/7304T Sensor Manager and LDAM 15-14 Resetting the Alarm Input Name to Its Default Example Config:0 Config:0 Config:0 Config:0 >>hdam >>hdam >>hdam >>hdam alarm alarm alarm alarm SafedepositDoor trap severity critical 5_2_31 trap severity informational port 2 slot 1,2 point 1,2,3,4 trap severity minor port 2 slot 1-4 point 6-18 trap severity major Resetting the Alarm Input Name to Its Default Use the following commands to reset the Alarm Inputs to their default names for a specific alarm or for multiple alarms. X To reset the alarm input name to default for a specific alarm Use the following command syntax Syntax hdam alarm <alarm_name> default name X To reset the alarm input name to default for multiple alarms Use the following command syntax: Syntax hdam alarm port <port_number> slot [<slot_list>|all] point [<point_list>|all]default name where alarm_name The name of the alarm which you want to set to its default name. This entry is in the order port_slot_alarm (e.g., 5_2_31, or BankVaultDoor). The value of alarm_ name can be a descriptive name or a default name. port_number Specifies the LX HDAM port managing the 7204T. slot_list Specifies a list of Slots whose points to reset to the default name. The list can contain single items, lists (such as 1,3,4) or ranges (such as 1-4), or a combination. point_list Specifies a list of Points to reset to the default name. The list can contain single items, lists (such as 1,3,4) or ranges (such as 1-32), or a combination. all The default command will apply to all Slots or Points (or both) managed by this LX Master Unit. LX Series Configuration Guide Resetting Alarm Inputs to the Defaults 15-15 Example Config:0 Config:0 Config:0 Config:0 Config:0 >>hdam >>hdam >>hdam >>hdam >>hdam alarm alarm alarm alarm alarm port 2 slot 1,2 point 1,2,3,4 default name port 2 slot 1-4 point 6-18 default name port 2 slot all point all default name port 2 slot 1-4 point 6-18 default name fan_window default name Resetting Alarm Inputs to the Defaults Use the following commands to reset Alarm Inputs to the default settings for a specific alarm or for multiple alarms. X To reset the alarm input to default for a specific point Use the following command syntax Syntax hdam alarm <alarm_name> default point X To reset alarm inputs to defaults for multiple points Use the following command syntax: Syntax hdam alarm port <port_number> slot [<slot_list>|all] point [<point_list>|all] default point where alarm_name The name of the alarm which you want to default. This entry is in the order port_slot_alarm (e.g., 5_2_31, or BankVaultDoor). port_number Specifies the HDAM port managing the 7204T. slot_list Specifies a list of Slots whose points you want to default. The list can contain single items, lists (such as 1,3,4) or ranges (such as 1-4), or a combination. point_list Specifies a list of Points to default. The list can contain single items, lists (such as 1,3,4) or ranges (such as 132), or a combination. all The default command will apply to all Slots or Points (or both) managed by this LX Master Unit. Configuring Alarming with LX-7204T/7304T Sensor Manager and LDAM 15-16 Using the Control Output Commands Example Config:0 Config:0 Config:0 Config:0 Config:0 Config:0 >>hdam >>hdam >>hdam >>hdam >>hdam >>hdam alarm alarm alarm alarm alarm alarm BankVaultDoor default 3_1_22 default point port 2 slot 1,2 point port 2 slot 1-4 point port 2 slot all point port 2 slot 1-4 point point 1,2,3,4 default point 6-18 default point all default point 6-18 default point Using the Control Output Commands This section explains how to configure the control output commands, including the following: Naming Control Outputs Setting a Control Output Name as Opened or Closed Configuring a Control Output Description String Defaulting the Description for a Control Output Configuring a Name for a Control Output Setting the Active State of a Named Control Resetting Control Output Name to its Default Naming Control Outputs The default name for a control output is canonically derived from the port number, slot number and point number. For example, the default name for the 8th control output on the 2nd slot of the LX-7204T/7304T Sensor Manager being managed by port 1 is 1_2_8. You can configure by the default name (if known), or by the physical location on the LX-7204T/7304T Sensor Manager. X To configure a descriptive name for a specific control output Execute the following Privileged command: Syntax hdam control <control_name_1> name <control_name_2> LX Series Configuration Guide Naming Control Outputs 15-17 Example X To configure a name for a control output for multiple controls Use the following command syntax: hdam control port <port_number> slot <slot_number> point <point_number> name <new_name> Syntax where control_name_1 Specifies that the point being named is a control output. control_name_2 The new control name to assign to the control output. The names must be unique across the Master LX Unit. The name must start with a letter, and the remainder of the name can contain only letters and/ or numbers and/or underscores. port_number Specifies the HDAM port managing the 7204T. slot_number Specifies a specific Slot whose point to give a new name. point_number Specifies a specific Point to which to give a new name. new_name The unique name of the control output. L You cannot list multiple slots or points, because point names must be unique across the Master LX Unit. Examples Config:0 Config:0 Config:0 Config:0 Config:0 >>hdam >>hdam >>hdam >>hdam >>hdam control control control control control 3_1_8 name AuxACUnitON 5_2_31 name DoorAlarm DoorAlarm name AuxACDown port 2 slot 1 point 1 name lab1 port 2 slot 4 point 8 name library Configuring Alarming with LX-7204T/7304T Sensor Manager and LDAM 15-18 Setting Control Output as Open or Closed Setting Control Output as Open or Closed Use the following commands to set LX-7204T/7304T Control Output signals as Open or Closed for a specific control or for multiple controls. X To configure control output name as open or closed for a specific control Use the following command syntax: Syntax hdam control <control_name> set [open|closed] X To configure control output name as open or closed for multiple controls Use the following command syntax: Syntax hdam control port <port_number> slot [<slot_list>|all] point [<point_list>|all] set [open|closed] where port_number The number of the port to which the HDAM is connected. control_name Specifies a Control Output Name. The default name for an alarm input or control output is canonically derived from the port number, slot number and point number. For example, the default name for the 8th control output on the 2nd slot of the HDAM being managed by port 1 is 1_ 2_8. slot_list The list of the slots whose points to configure as open or closed. The list can contain single items (such as 1,3,4) or ranges (such as 1-4), or a combination. point_list The list of the points whose state to set open or closed. The list can contain single items (such as 1,3,4) or ranges (such as 1-8), or a combination. open|closed Set the specified Control Output signals to Open|Closed. Closed is the default setting. Example Config:0 >>hdam control 5_4_8 set open Config:0 >>hdam control 3_1_8 set closed Config:0 >>hdam control port 2 slot all point 1-4 set open LX Series Configuration Guide Configuring a Control Output Description String 15-19 Configuring a Control Output Description String Use the following commands to configure a Control Output Description String for a specific control or for multiple controls. X To configure a control output description string for a specific control Use the following command syntax: Syntax hdam control <control_name> description <string> X To configure a control output description string for multiple controls Use the following command syntax: Syntax hdam control port <port_number> slot [<slot_list>|all] point [<point_list>|all] description <string> where control_name Specifies a Control Output Name. The default name for an alarm input or control output is canonically derived from the port number, slot number and point number. For example, the default name for the 8th control output on the 2nd slot of the HDAM being managed by port 5 is 5_2_8. port_number Specifies the LX HDAM port managing the 7204T. slot_list Specifies a list of Slots whose points to configure a description for. The list can contain single items (such as 1,3,4) or ranges (such as 1-4), or a combination. point_list Specifies a list of Points to configure a description for. The list can contain single items (such as 1,3,4) or ranges (such as 1-8), or a combination. all Specifies that all Slot or control outputs managed by the LX Master Unit will be as specified in this command. string The description of the control output (a maximum of 63 characters long). Configuring Alarming with LX-7204T/7304T Sensor Manager and LDAM 15-20 Defaulting the Description for a Control Output Example Config:0 >>hdam control Floor2Lab description lab door 1 Config:0 >>hdam control 3_1_8 description lab door 2 Config:0 >>hdam control port 2 slot 1,2 point 1-4 description lab1 Config:0 >>hdam control port 2 slot all point all description library second floor Defaulting the Description for a Control Output Use the following commands to default a Control Output Description for a specific control or for multiple controls. X To configure a control output default description for a specific control Use the following command syntax: Syntax hdam control <control_name> description X To configure a control output default description for multiple controls Use the following command syntax: Syntax hdam control port <port_number> slot [<slot_list>|all] point [<point_list>|all] description where control_name Specifies a Control Output Name. The default name for an alarm input or control output is canonically derived from the port number, slot number and point number. For example, the default name for the 8th control output on the 2nd slot of the HDAM being managed by port 5 is 5_2_8. port_number Specifies the HDAM port managing the 7204T. slot_list Specifies a list of Slots whose points to configure a description for. The list can contain single items (such as 1,3,4) or ranges (such as 1-4), or a combination. LX Series Configuration Guide Setting the Active State of a Named Control 15-21 point_list Specifies a list of Points for which to configure a description. The list can contain single items (such as 1,3,4) or ranges (such as 1-8), or a combination. all Specifies that all Slot or control outputs managed by the LX Master Unit will be as specified in this command. Example Config:0 Config:0 Config:0 Config:0 >>hdam >>hdam >>hdam >>hdam control control control control Temp_AC default description 3_1_8 default description port 2 slot 1,2 point 1-4 default description port 2 slot all point all default description Setting the Active State of a Named Control Use the following commands to set the active state of a named control to open or closed, or to set the active state for a specific control or for multiple controls to open or closed. X To set the active state of a specific control to open or closed Use the following command syntax: Syntax hdam control <control_name> active state [open|closed] X To set the active state of multiple control outputs to open or closed Use the following command syntax: Syntax hdam control port <port_number> slot [<slot_list>|all] point [<point_list>|all] active state [open|closed] where control_name The name of the control output whose active state to set open or closed. port_number Specifies the HDAM port managing the 7204T. slot_list Specifies a list of Slots whose points to configure as open or closed. The list can contain single items, lists (such as 1,3,4) or ranges (such as 1-4), or a combination. Configuring Alarming with LX-7204T/7304T Sensor Manager and LDAM 15-22 Resetting Control Outputs to the Defaults point_list Specifies a list of Points whose active state to set open or closed. The list can contain single items, lists (such as 1,3,4) or ranges (such as 1-8), or a combination. all The Active State specified in this command will apply to all Slots or Points (or both) managed by this LX Master Unit. Examples Config:0 Config:0 Config:0 Config:0 >>hdam >>hdam >>hdam >>hdam control control control control AuxAcDown active state open 5_2_8 active state closed port 2 slot 4 point all active state open port 2 slot 5 point 5-8 active state closed Resetting Control Outputs to the Defaults Use the following command to default a named control output, or to reset a range of control outputs to their defaults. X To default a named control output Syntax hdam control <control_name> default point X To default a named control output Syntax hdam control port <port_number> slot <slot_list>|all point <point_list>|all default point where control_name The name of the control output you want to default. port_number Specifies the HDAM port managing the 7204T. slot_list Specifies a list of Slots whose points to reset to defaults. The list can contain single items, lists (such as 1,3,4) or ranges (such as 1-4), or a combination. point_list Specifies a list of Points to reset to defaults. The list can contain single items, lists (such as 1,3,4) or ranges (such as 1-8), or a combination. all The defaults specified in this command will apply to all Slots or Points (or both) managed by this LX Master Unit. LX Series Configuration Guide Resetting the Control Output Name to its Default 15-23 Examples Config:0 Config:0 Config:0 Config:0 Config:0 Config:0 >>hdam >>hdam >>hdam >>hdam >>hdam >>hdam control control control control control control AuxAcDown default point 6_1_8 default point port 2 slot 1,2 point 1,2,3,4 default poin port 2 slot 1-4 point 6-8 default point port 2 slot all point all default point port 2 slot 1-4 point 6-8 default point Resetting the Control Output Name to its Default Use the following commands to reset control outputs to their defaults for a specific control or for multiple controls: X To reset control outputs to default settings for a specific control hdam control <control_name> default name Syntax X To reset control outputs to default settings for multiple controls hdam control port <port_number> slot [<slot_list>|all] point [<point_list>|all] default name Syntax where port_number Specifies the LX HDAM port managing the 7204T. slot_list Specifies a list of Slots whose points to reset to the default name. The list can contain single items, lists (such as 1,3,4) or ranges (such as 1-4), or a combination. point_list Specifies a list of Points to reset to the default name. The list can contain single items, lists (such as 1,3,4) or ranges (such as 1-8), or a combination. all The default command will apply to all Slots or Points (or both) managed by this LX Master Unit. Examples Config:0 Config:0 Config:0 Config:0 >>hdam >>hdam >>hdam >>hdam control control control control port 2 slot 1,2 point 1,2,3,4 default name port 2 slot 1-4 point 6-8 default name port 2 slot all point all default name Door_Sign default name Configuring Alarming with LX-7204T/7304T Sensor Manager and LDAM 15-24 Using the Analog Input Commands Using the Analog Input Commands This section explains how to configure the analog input commands, including the following: Naming Analog Inputs Configuring an Analog Input Description String Defaulting the Description for an Analog Input Resetting Analog Inputs to the Defaults Resetting the Analog Input Name to Its Default Enabling and Disabling the Analog State Configuring Analog Calibration Naming Analog Inputs You can use each point name after on the LX. You can’t use the same name on multiple ports, slots, or points. The default name for an analog input is canonically derived from the port number, slot number and point number. For example, the default name for the 8th analog input on the 2nd slot of the HDAM being managed by port 5 is 5_2_8. X To configure by default name or by physical location on the HDAM Use the following command syntax: Syntax hdam analog <analog_name> name <new_name> X To configure a descriptive name for any analog input in the LX-7204T/7304T Use the following Privileged command syntax: Syntax hdam analog port <port_number> slot <slot_number> point <point_number> name <new_name> where analog_name Name of the analog input to rename. new_name LX Series Configuration Guide New analog name to assign to the analog input. The name must start with a letter, and the remainder of the name can contain only letters and/or numbers and/or underscores. Configuring an Analog Input Description String 15-25 port_number Specifies the individual LX port number to which the LX-7204T/7304T is attached. slot_number Specifies a Slot for which to configure a name. point_number Specifies a Point for which to configure a name. L All names across the Master LX Unit must be unique. Example Config:0 >>hdam analog 5_4_8 name BankVaultDoor Config:0 >>hdam analog port 5 slot 4 point 8 name BankVaultDoor InReach:0 >>config hdam analog port 5 slot 4 point 8 name BankVaultDoor Configuring an Analog Input Description String Use the following commands to configure an Analog Input Description String for a specific analog or for multiple analogs. X To configure an analog input description string Use the following command syntax: Syntax hdam analog <analog_name> description <string> hdam analog port <port_number> slot [<slot_list>|all] point [<point_list>|all] description <string> where analog_name Specifies an Analog Input Name. The name of the analog for which you want to configure a Description String. port_number Specifies the HDAM port managing the 7204T. slot_list Specifies a list of Slots on which to configure a description string. The list can contain single items, lists (such as 1,3,4) or ranges (such as 1-4), or a combination. point_list Specifies a list of Points on which to configure a description string. The list can contain single items (such as 1,3,4) or ranges (such as 1-8), or a combination. Configuring Alarming with LX-7204T/7304T Sensor Manager and LDAM 15-26 Defaulting the Description for an Analog Input all Specifies that all Slots or Points managed by the LX Master Unit will be as specified in this command. string The description of the analog input (a maximum of 63 characters long). Examples Config:0 Config:0 Config:0 Config:0 >>hdam analog 5_4_8 description lab >>hdam analog 3_1_8 description lab >>hdam analog port 2 slot 1,2 point >>hdam analog port 2 slot all point library second floor door 1 door 2 1-4 description lab1 all description Defaulting the Description for an Analog Input Use the following commands to default an Analog Input Description for a specific analog or for multiple analogs. X To configure an analog input description string Use the following command syntax: Syntax hdam analog <analog_name> description hdam analog port <port_number> slot [<slot_list>|all] point [<point_list>|all] description where analog_name Specifies an Analog Input Name. The default name for an analog input is canonically derived from the port number, slot number and point number. For example, the default name for the 8th analog input on the 2nd slot of the HDAM being managed by port 5 is 5_2_8. port_number Specifies the HDAM port managing the 7204T. slot_list Specifies a list of Slots on which to configure a description string. The list can contain single items, lists (such as 1,3,4) or ranges (such as 1-4), or a combination. point_list Specifies a list of Points on which to configure a description string. The list can contain single items, lists (such as 1,3,4) or ranges (such as 1-8), or a combination. LX Series Configuration Guide Resetting Analog Inputs to the Defaults 15-27 all Specifies that all Slots or Points managed by the LX Master Unit will be as specified in this command. Examples Config:0 >>hdam analog Temp_AC default description Config:0 >>hdam analog 3_1_8 default description Config:0 >>hdam analog port 2 slot 1,2 point 1-4 default description Config:0 >>hdam analog port 2 slot all point all default description Resetting Analog Inputs to the Defaults Use the following commands to reset a specified analog input or multiple analog inputs to the default settings. X To reset analog inputs to default settings Use the following command syntax: hdam analog <analog_name> default point hdam analog port <port_number> slot [<slot_ list>|all] point [<point_list>|all] default point where analog_name Specifies the Analog Input you want to default by name. port_number Specifies the HDAM port managing the 7204T. slot_list Specifies a list of Slots whose points you want to default. The list can contain single items, lists (such as 1,3,4) or ranges (such as 1-4), or a combination. point_list Specifies a list of Points you want to default. The list can contain single items, lists (such as 1,3,4) or ranges (such as 1-8), or a combination. all The default command will apply to all Slots or Points (or both) managed by this LX Master Unit. Configuring Alarming with LX-7204T/7304T Sensor Manager and LDAM 15-28 Resetting the Analog Name to its Default Examples Config:0 Config:0 Config:0 Config:0 Config:0 >>hdam >>hdam >>hdam >>hdam >>hdam analog analog analog analog analog BankVaultDoor default 3_1_8 default point port 2 slot 1,2 point port 2 slot 1-4 point port 2 slot all point point 1,2,3,4 default point 6-8 default point all default point Resetting the Analog Name to its Default Use the following commands to reset a specified analog input or multiple analog inputs to its default name. X To reset a specific analog input name to the default setting Use the following command syntax: Syntax hdam analog <analog_name> default name X To reset multiple analog input names to the default setting Use the following command syntax: hdam analog port <port_number> slot [<slot_list>|all] point [<point_list>|all] default name where analog_name Specifies an Analog Input name. The value of analog_ name can be a descriptive name or a default name. port_number Specifies the LX HDAM port managing the 7204T slot_list Specifies a list of Slots whose points to reset to the default name. The list can contain single items, lists (such as 1,3,4) or ranges (such as 1-4), or a combination. point_list Specifies a list of Points to reset to the default name. The list can contain single items, lists (such as 1,3,4) or ranges (such as 1-8), or a combination. LX Series Configuration Guide Enabling and Disabling the Analog State 15-29 The default command will apply to all Slots or Points (or both) managed by this LX Master Unit. all Examples Config:0 Config:0 Config:0 Config:0 >>hdam >>hdam >>hdam >>hdam analog analog analog analog port 2 slot 1,2 point 1,2,3,4 default name port 2 slot 1-4 point 6-8 default name port 2 slot all point all default name fan_window default name Enabling and Disabling the Analog State Use the following commands to configure the state for a specific analog input or multiple analog inputs. X To enable and disable the analog state Use the following command syntax: hdam analog <analog_name> state [enable|disable] Syntax hdam analog port <port_number> slot [<slot_list>|all] point [<point_list>|all] state [enable|disable] where analog_name Specifies an Analog Input name. The value of analog_ name can be a descriptive name or a default name. port_number Specifies the LX HDAM port managing the 7204T slot_list Specifies a list of Slots on which you want to enable the state. The list can contain single items, lists (such as 1,3,4) or ranges (such as 1-4), or a combination. point_list Specifies a list of Points on which you want to enable the state. The list can contain single items, lists (such as 1,3,4) or ranges (such as 1-8), or a combination all The default command will apply to all Slots or Points (or both) managed by this LX Master Unit Examples Config:0 Config:0 Config:0 Config:0 >>hdam >>hdam >>hdam >>hdam analog analog analog analog port 2 slot 1,2 point 1,2,3,4 state enable port 2 slot 1-4 point 6-8 state enable port 2 slot all point all state disable fan_window state enable Configuring Alarming with LX-7204T/7304T Sensor Manager and LDAM 15-30 Enabling and Disabling the Analog State X To calibrate analog inputs Use the following command syntax: Syntax hdam analog <analog_name> calibrate minimum <minimum_ value> maximum <maximum_value> units <unit_name_string> [margin <margin_value>] hdam analog port <port_number> slot [<slot_list>|all] point [<point_list>|all] calibrate minimum <minimum_ value> maximum <maximum_value> units <unit_name_string> [margin <margin_value>] where analog_name Specifies an Analog Input name. The value of analog_ name can be a descriptive name or a default name. port_number Specifies the LX HDAM port managing the 7204T. slot_list Specifies a list of Slots on whose points you want to calibrate values. The list can contain single items, lists (such as 1,3,4) or ranges (such as 1-4), or a combination. point_list Specifies a list of Points on which you want to calibrate values. The list can contain single items, lists (such as 1,3,4) or ranges (such as 1-8), or a combination. all The default command will apply to all Slots or Points (or both) managed by this LX Master Unit. minimum_value The minimum calibration setting. The range is -9999.9999 to 9999.9999. See your Sensor documentation for this information. maximum_value The maximum calibration setting. The range is -9999.9999 to 9999.9999. See your Sensor documentation for this information. unit_name_string String that represents the attached sensor’s native units. For example, DegF or DegC for a temperature sensor. This can be up to 7 characters long. margin_value Indicates the optional margin value. The range is -9999.9999 to 9999.9999. LX Series Configuration Guide Enabling and Disabling the Analog State 15-31 Examples Config:0 >>hdam analog 5_2_8 calibrate minimum 5 maximum 140 units DegF Config:0 >>hdam analog 5_2_7 calibrate minimum 5 maximum 95 units %RH Config:0 >>hdam analog port 2 slot 1,2 point 1,2,3,4 calibrate minimum 20.8 maximum 32.0 units Hg Config:0 >>hdam analog port 2 slot 3-4 point 6-8 calibrate minimum 5 maximum 140 units TempF margin 1.2 X To send a user-generated message to the LX-7204T/ 7304T LCD panel Use the following command syntax: hdam <port_number> banner <string> Syntax where port_number Specifies one HDAM port. The LX-7204T/7304T unit that is managed from this port will display the given string. string Specifies the message text that is to be displayed on the LCD Panel of the LX-7204T/7304T. The maximum size of the message is 32 characters. The contents of string will be displayed on the LCD Panel of the LX-7204T/7304T when all alarms have been cleared. Example In the following example, the message PUSH MASTER ALARM CLEAR SWITCH is displayed on the LCD Panel of the LX7204T/7304T that is attached to port 6. Use this to set your own banner, if necessary. Config:0 >>hdam 6 banner PUSH MASTER ALARM CLEAR SWITCH X To set the banner on the LCD panel to defaults Use the following command syntax: hdam <port_number> default banner where port_number Example Specifies the HDAM port. The LX-7204T/7304T unit that is managed from this port will display the default banner. Config:0 >>hdam 5 default banner Configuring Alarming with LX-7204T/7304T Sensor Manager and LDAM 15-32 Displaying HDAM Information Displaying HDAM Information This section explains how to display HDAM show screens. X To view HDAM alarm input characteristics using the alarm name Use the following command syntax: Syntax show hdam alarm <alarm_name> characteristics Example Config:0 >>show hdam alarm 5_4_20 characteristics InReach:0 >>show hdam alarm 5_2_31 characteristics Figure 15.1 shows an example of the HDAM Alarm Name Characteristics Screen. Port Slot Point Name Audible Fault State 8 2 5 Description: 8_2_5 Disabled Open Debounce Interval 300 Trap Trap Setting Severity Enabled Minor Figure 15.1 HDAM Alarm Name Characteristics Screen X To display alarm status information using a specific alarm name Use the show hdam alarm <alarm_name> status command at either of the following command modes. Examples Config:0 >>show hdam alarm 5_4_20 status InReach:0 >>show hdam alarm 5_2_31 status Figure 15.2 shows an example of the HDAM Alarm Name Status Screen Port Slot Point 8 2 5 Name Current Fired State Count Last Time Fired 8_2_5 Faulted Wed,20 Oct 2004 11:47:24 UTC Figure 15.2 LX Series Configuration Guide 5 HDAM Alarm Name Status Screen Displaying HDAM Information 15-33 X To view HDAM port characteristics information Use the show hdam <port_number> characteristics command to display alarm and analog input, and control output characteristics at either of the following command modes: Examples Config:0 >>show hdam 4 characteristics InReach:0 >>show hdam 1 characteristics Figure 15.3 shows an example of the HDAM Port Characteristics Screen. Time: Port Name: Device Type: Number of Resets: Banner: Slot 1 2 3 4 Type Control Alarm Alarm None Port_1 LX-7204 1 Mon, 5 Mar 2007 09:10:18 UTC Device Number: 1 Firmware: 3.1 Points 8 32 32 0 Port Slot Point Name Active State 1 1 1 Description: 1_1_1 Open 1 1 2 Description: 1_1_2 Open 1 1 3 Description: 1_1_3 Open 1 1 4 Description: . . . . 1_1_4 Open Port Slot Point Audible Fault State Debounce Interval Trap Setting Trap Severity Open 300 Enabled Informational 300 Enabled Informational 1 2 1 Description: labdoor Disabled 1 2 2 Description: 1_2_2 Disabled 1 2 3 Description: 1_2_3 Disabled Open 1800000 Enabled Minor this point is on port 1 slot 2 point 3 for my cellar door Closed Figure 15.3 HDAM Port Characteristics Screen Configuring Alarming with LX-7204T/7304T Sensor Manager and LDAM 15-34 Displaying HDAM Information X To view HDAM control name information Use the show hdam control <control_name> characteristics command at either of the following command modes: Examples Config:0 >>show hdam control 5_4_8 characteristics InReach:0 >>show hdam control 5_2_8 characteristics Figure 15.4 shows an example of the HDAM Control Name Characteristics Screen. Port Slot Point 8 1 5 Description: Name 8_1_5 Active State Open Figure 15.4 HDAM Control Name Characteristics Screen X To display information for control outputs using a specific control name Use the show hdam control <control_name> status command at either of the following command modes: Examples Config:0 >>show hdam control 5_4_8 status InReach:0 >>show hdam control 5_2_8 status Figure 15.5 shows an example of the HDAM Control Name Status Screen. Port Slot Point 8 1 5 Name 8_1_5 Current State Opened Operational State On Figure 15.5 HDAM Control Name Status Screen X To view HDAM analog input characteristics using the analog name Use the show hdam analog <analog_name> characteristics command: Examples Config:0 >>show hdam analog 10_1_1 characteristics InReach:0 >>show hdam analog 10_1_1 characteristics LX Series Configuration Guide Displaying HDAM Information 15-35 Figure 15.6 shows an example of the HDAM Analog Name Characteristics Screen. Port Slot Point 10 1 1 Description: Name OfficeTemp State Min Enabled 5.0000 Max Margin 140.0000 1.0000 Units TempinF Figure 15.6 HDAM Analog Name Characteristics Screen X To display analog status information using a specific analog name Use the show hdam analog <analog_name> status command at either of the following command modes. Examples Config:0 >>show hdam analog 5_4_8 status InReach:0 >>show hdam analog 10_1_8 status Figure 15.7 shows an example of the HDAM Analog Name Status Screen. Port Slot Point Name 10 1 8 Native Units Value MilliAmp Value TemperatureInMyOfficeWithEWSRH 83.4203 TempinF Figure 15.7 13.2942 mA HDAM Analog Name Status Screen X To view HDAM mapping information Use the show hdam mapping all|<port_name> command at either of the following command modes. Examples Config:0 >>show hdam mapping 5_2_31 InReach:0 >>show hdam mapping all Configuring Alarming with LX-7204T/7304T Sensor Manager and LDAM 15-36 Displaying HDAM Information Figure 15.8 shows an example of the HDAM Mapping Screen. Name 8_1_1 8_1_2 8_1_3 8_1_4 8_1_5 8_1_6 8_1_7 8_1_8 Port 8 8 8 8 8 8 8 8 Slot 1 1 1 1 1 1 1 1 Point 1 2 3 4 5 6 7 8 Figure 15.8 HDAM Mapping Screen X To view HDAM port/slot/point characteristics Use the show hdam <port_number> slot <slot_list> point <point_list> characteristics command to display alarm, analog, and/or control characteristics on HDAM ports at either of the following command modes. Examples Config:0 >>show hdam 6 slot 4 point 12 characteristics InReach:0 >>show hdam 8 slot 1 point 1-6 characteristics Figure 15.9 shows an example of the HDAM Port/Slot/Point Characteristics Screen, if Slot 1 contains a Control Card. Port Slot Point 1 1 1 Description: 1 1 2 Description: 1 1 3 Description: 1 1 4 Description: 1 1 5 Description: 1 1 6 Description: 1 1 7 Description: 1 1 8 Description: Name 1_1_1 Active State Open 1_1_2 Open 1_1_3 Open 1_1_4 Open 1_1_5 Open 1_1_6 Open 1_1_7 Open 1_1_8 Open Figure 15.9 HDAM Port/Slot/Point Characteristics Control Card Screen LX Series Configuration Guide Displaying HDAM Information 15-37 Figure 15.10, “HDAM Port/Slot/Point Characteristics Alarm Card Screen” shows an example of the HDAM Port/Slot/Point Characteristics Screen, if Slot 2 contains an Alarm Card. Port Slot Point 1 2 1 Description: Name Audible Fault State Debounce Trap Trap Interval Setting Severity 1_2_1 Disabled Open 300 Enabled Minor this point is on port 1 slot 2 point 3 for my cellar door 1 2 2 Description: 1_2_2 Disabled Open 300 Enabled Minor 1 2 3 Description: 1_2_3 Disabled Open 300 Enabled Minor 1 2 4 Description: 1_2_4 Disabled Open 300 Enabled Minor 1 2 5 Description: 1_2_5 Disabled Open 300 Enabled Minor 1 2 6 Description: 1_2_6 Disabled Open 300 Enabled Minor 1 2 7 Description: . . . . 1_2_7 Disabled Open 300 Enabled Minor Figure 15.10 HDAM Port/Slot/Point Characteristics Alarm Card Screen Configuring Alarming with LX-7204T/7304T Sensor Manager and LDAM 15-38 Displaying HDAM Information Figure 15.11, “HDAM Port/Slot/Point Characteristics Analog Card Screen” shows an example of the HDAM Port/Slot/Point Characteristics Screen, if Slot 1 contains an Analog Card Port Slot Point Name State Minimum 1 1 1 Description: OfficeTemp Enabled 1 1 2 Description: NothingConnected Disabled -14.0000 100.0000 0.5000 PSI 1 1 3 Description: NothingConnected Disabled 20.8000 32.0000 2.5000 BP 5.0000 Maximum Margin 140.0000 Units 1.0000 TempinF . . . Figure 15.11 HDAM Port/Slot/Point Characteristics Analog Card Screen X To view HDAM port/slot/point status Use the show hdam <port_number> slot <slot_list> point <point_list> status command syntax to display alarm, analog, and/or control status on HDAM ports at either of the following command modes: Examples Config:0 >>show hdam 8 slot 6 point 8 status InReach:0 >>show hdam 8 slot 1 point 1-8 status InReach:0 >>show hdam 8 slot 2 point 3-15 status Figure 15.12 shows an example of the HDAM Port/Slot/Point Status Screen, if Slot 1 contains a Control Card. Port Slot Point Name Current State 1 1 1 1 1 1 1 1 1_1_1 1_1_2 1_1_3 1_1_4 1_1_5 1_1_6 1_1_7 1_1_8 Open Open Open Open Open Open Open Open 1 1 1 1 1 1 1 1 1 2 3 4 5 6 7 8 Operational State On On On On On On On On Figure 15.12 HDAM Port/Slot/Point Status Control Card Screen LX Series Configuration Guide Displaying HDAM Information 15-39 Figure 15.13 shows an example of the HDAM Port/Slot/Point Status Screen, if Slot 2 contains an Alarm Card. Port Slot Point 1 1 1 1 1 1 1 1 1 1 1 1 1 2 2 2 2 2 2 2 2 2 2 2 2 2 3 4 5 6 7 8 9 10 11 12 13 14 15 Name 1_2_3 1_2_4 1_2_5 1_2_6 1_2_7 1_2_8 1_2_9 1_2_10 1_2_11 1_2_12 1_2_13 1_2_14 1_2_15 Current Fired LastTime State Count Fired Faulted Faulted Faulted Faulted Faulted Faulted Faulted Faulted Faulted Faulted Faulted Faulted Faulted 5 5 5 5 5 5 5 13 5 5 5 5 5 Wed,20 Wed,20 Wed,20 Wed,20 Wed,20 Wed,20 Wed,20 Wed,20 Wed,20 Wed,20 Wed,20 Wed,20 Wed,20 Oct Oct Oct Oct Oct Oct Oct Oct Oct Oct Oct Oct Oct 2004 2004 2004 2004 2004 2004 2004 2004 2004 2004 2004 2004 2004 11:47:24 11:47:24 11:47:24 11:47:24 11:47:24 11:47:24 11:47:24 12:17:21 11:47:24 11:47:24 11:47:24 11:47:24 11:47:24 UTC UTC UTC UTC UTC UTC UTC UTC UTC UTC UTC UTC UTC Figure 15.13 HDAM Port/Slot/Point Status Alarm Card Screen Figure 15.14 shows an example of the HDAM Port/Slot/Point Status Screen, if Slot 1 contains an Analog Card. Port Slot Point 1 1 1 1 1 1 1 1 1 1 1 1 1 1 1 1 1 2 3 4 5 6 7 8 Name Native Units Value MilliAmp Value Officetemp NothingConnectedToPoint2 NothingConnectedToPoint3 NothingConnectedToPoint4 NothingThere BarometricPressureInMyOffice HumidityInMyOfficeWithEWSRH TemperatureInMyOfficeWithEWSRH N/A N/ A N/A N/A N/A 29.7128 43.1318 83.4203 0.0000 N/A N/A N/A 0.0195 16.7326 10.7789 13.2942 mA Hg %R TempinF mA mA mA mA Figure 15.14 HDAM Port/Slot/Point Status Analog Card Screen Configuring Alarming with LX-7204T/7304T Sensor Manager and LDAM 15-40 Displaying HDAM Information X To view HDAM status information Use the show hdam <port_number> status command to display both alarm, analog, and control status information on an HDAM port at either of the following command modes. Examples Config:0 >>show hdam 4 status InReach:0 >>show hdam 1 status Figure 15.15 shows a sample HDAM Port Status Screen. Time: Port Name: Temperature (Celsius): Power Supply A: Power A Input Status: Power A Output: Power A Input Voltage: Port_1 34.0 Present Powered 12V N/A Wed, 15 Mar 2006 11:47:24 UTC Device Number: 1 Power Supply Type: AC Power Supply B: Present Power B Input Status: No power Power B Output: 0V Power B Input Voltage: N/A Port Slot Point Name Current State Operational State 1 1 1 1 1 1 1 1 1_1_1 1_1_2 1_1_3 1_1_4 1_1_5 1_1_6 1_1_7 1_1_8 Open Open Open Open Open Open Open Open On On On On On On On On 1 1 1 1 1 1 1 1 1 2 3 4 5 6 7 8 Port Slot Point 1 1 1 1 1 1 1 1 1 2 2 2 2 2 2 2 2 2 1 2 3 4 5 6 7 8 9 n2345 1_2_2 1_2_3 1_2_4 1_2_5 1_2_6 1_2_7 1_2_8 1_2_9 Current State Fired Count Faulted Normal Faulted Faulted Faulted Faulted Faulted Faulted Faulted 5 0 5 5 5 5 5 5 5 LastTime Fired Wed,15 Mar 2006 11:47:24 UTC Wed,15 Wed,15 Wed,15 Wed,15 Wed,15 Wed,15 Wed,15 Mar Mar Mar Mar Mar Mar Mar 2006 2006 2006 2006 2006 2006 2006 11:47:24 11:47:24 11:47:24 11:47:24 11:47:24 11:47:24 11:47:24 . . . . Figure 15.15 HDAM Port Status Screen LX Series Configuration Guide UTC UTC UTC UTC UTC UTC UTC Configuring the LDAM Port 15-41 Configuring the LDAM Port All ports on an LX-Series unit other than port 0 (diagnostic/ management port and internal modem or RS485 port) can be configured as LDAM ports. X To configure ports as LDAM ports Use the following command syntax: Config:0 >>port async <port_list> access ldam Syntax where port_list Specifies the port(s) to use to control the LDAM. The list can contain single items (such as 1,3,4) or ranges (such as 1-8), or a combination. Press <RETURN> to configure the port as an LDAM port. Example Config:0 >>port async 6 access ldam Using the Alarm Input Commands This section explains how to configure the alarm input commands, including the following: Naming Alarm Inputs Configuring an Alarm Input Description String Defaulting the Description for an Alarm Input Enabling and Disabling SNMP Traps for Alarm State Changes Configuring the Fault State for Alarm Inputs Configuring a Severity Level for Alarm Inputs Resetting the Alarm Input Name to the Default Configuring Alarming with LX-7204T/7304T Sensor Manager and LDAM 15-42 Naming Alarm Inputs Naming Alarm Inputs The default name for an alarm input is canonically derived from the port number and point number. You can configure by the default name (if known). L You can use each point name after on the LX. You can’t use the same name on multiple ports or points. X To configure a descriptive name for any alarm input Use the following Privileged command syntax: ldam alarm <alarm_name_1> name <alarm_name_2> Syntax ldam alarm port <port_number> point <point_number> name <new_name> All names across the Master LX Unit must be unique. where alarm_name_1 Name of the alarm input to rename alarm_name_2 New alarm name to assign to the alarm input. The name must start with a letter, and the remainder of the name can contain only letters and/or numbers and/or underscores port_number Specifies the LDAM port number point_number A specific point for which to configure a name new_name New name for the point Examples Config:0 >>ldam alarm 5_2 name BankVaultDoor Config:0 >>ldam alarm port 5 point 2 name BankVaultDoor InReach:0 >>config ldam alarm port 5 point 2 name BankVaultDoor LX Series Configuration Guide Naming Alarm Inputs 15-43 X To configure an alarm input description string for a specific alarm Use the following command syntax: ldam alarm <alarm_name> description <string> Syntax ldam alarm port <port_number> point <point_number> description <string> where alarm_name Specifies an Alarm Input Name. The default name for an alarm input or control output is canonically derived from the port number and point number. port_number Specifies the LDAM port number. point_number Specifies point on which you want to configure a description string. Options are 1 and 2. string The description of the alarm input (a maximum of 63 characters long). Examples Config:0 >>ldam alarm 5_1 description lab door 1 Config:0 >>ldam alarm 3_2 description lab door 2 Config:0 >>ldam alarm port 2 point 1 description lab1 X To default the description for an alarm input Use the following command syntax to default the description for an alarm input for a specific alarm: ldam alarm <alarm_name> description <string> 2. Use the following command syntax to default the description for an alarm input for multiple alarms: ldam alarm port <port_number> slot [<slot_list>|all] point [<point_list>|all] default description <string> 1. Syntax Syntax where alarm_name Specifies an Alarm Input Name. The default name for an alarm input is canonically derived from the port number and point number. For example, the default name for the 1st alarm input on port 5 is 5_1. port_number Specifies the LDAM port number. Configuring Alarming with LX-7204T/7304T Sensor Manager and LDAM 15-44 Naming Alarm Inputs point_ number Specifies the Point for which you want to default the description. The options are 1 and 2. Example Config:0 >>ldam alarm 5_1 default description Config:0 >>ldam alarm 3_2 default description Config:0 >>ldam alarm port 2 point 1 default description Syntax X To enable and disable sending SNMP traps for alarm state changes Use the following command syntax: ldam alarm <alarm_name> trap enable ldam alarm <alarm_name> no trap ldam alarm port <port_number> point <point_number> trap enable ldam alarm port <port_number> point <point_number> no trap where alarm_name Specifies an Alarm Input Name. The value of alarm_ name can be a descriptive name or a default name. port_number Specifies the LDAM port number. point_number Specifies the point about which you want to send SNMP traps. Options are 1 and 2. enable This is the default setting. An SNMP trap will be sent when the Alarm Input specified changes state. Examples Config:0 >>ldam alarm SafedepositDoor trap enable Config:0 >>ldam alarm 5_1 no trap Config:0 >>ldam alarm port 2 point 2 trap enable X To configure the fault state for alarm inputs Use the following commands to configure the fault state for Alarm Inputs for a specific alarm: Syntax ldam alarm <alarm_name> fault state [open|closed] ldam alarm port <port_number> point <point_number> fault state [open|closed] LX Series Configuration Guide Naming Alarm Inputs 15-45 where alarm_name Specifies an Alarm Input Name. The value of alarm_ name can be a descriptive name or a default name. port_number Specifies the LDAM port number. point_number Specifies the point on which you want to change the fault state. Options are 1 and 2. open The point will be in Alarm when it is open. This is the default setting. closed The point will be in Alarm when it is closed. Examples Config:0 >>ldam alarm SafedepositDoor fault state open Config:0 >>ldam alarm 5_1 fault state closed Config:0 >>ldam alarm port 2 point 1 fault state open X To configure a severity level for alarm inputs for a specific alarm Use the following command syntax: ldam alarm <alarm_name> trap severity <severity_level> ldam alarm port <port_number> point <point_number> trap severity <severity_level> Syntax where alarm_name Specifies an Alarm Input Name. The value of alarm_ name can be a descriptive name or a default name. port_number Specifies the LDAM port number. point_number Specifies the point on which you want to set trap severity; either 1 or 2. severity_level SNMP Trap Severity Level used when SNMP Traps are sent for faults detected by the specified Alarm Inputs. The allowable values are Informational, Warning, Minor, Major, and Critical. The default is Minor. Examples Config:0 >>ldam alarm SafedepositDoor trap severity critical Config:0 >>ldam alarm 5_1 trap severity informational Config:0 >>ldam alarm port 2 point 1 trap severity minor Configuring Alarming with LX-7204T/7304T Sensor Manager and LDAM 15-46 Naming Alarm Inputs X To reset the alarm input name to default for a specific alarm or multiple alarms Use the following command syntax: Syntax ldam alarm <alarm_name> default name ldam alarm port <port_number> point <point_number> default name where alarm_name Specifies an Alarm Input Name. The value of alarm_ name can be a descriptive name or a default name. port_number Specifies the LDAM port number. point_number Specifies the point you want to reset to the default name. Options are 1 and 2. Examples Config:0 >>ldam alarm port 2 point 1 default name Config:0 >>ldam alarm port 2 point 2 default name Config:0 >>ldam alarm fan_window default name X To reset the alarm input point to default for a specific alarm or multiple alarms Use the following command syntax: Syntax ldam alarm <alarm_name> default point ldam alarm port <port_number> point <point_number> default where alarm_name Specifies an Alarm Input Name. The value of alarm_ name can be a descriptive name or a default name. port_number Specifies the LDAM port number. point_number Specifies the point you want to reset to the default name. Options are 1 and 2. Examples Config:0 >>ldam alarm port 2 point 1 default point Config:0 >>ldam alarm port 2 point 2 default point Config:0 >>ldam alarm fan_window default point LX Series Configuration Guide Using the Control Output Commands 15-47 Using the Control Output Commands This section explains how to configure the control output commands, including the following: Naming Control Outputs Configuring a Control Output Energize as Assert or Deassert Set Control Output Signal to Assert or Deassert Configuring a Control Output Description String Defaulting a Control Output Description Resetting Control Output Name to Default Setting Naming Control Outputs The default name for a control output is canonically derived from the port number and point number. For example, the default name for the 1st control output on the LDAM port 5 is 5_1. You can configure by the default name (if known), or by the physical location on the LDAM. X To configure a descriptive name for any control output Execute the following Privileged command: ldam control <control_name_1> name <control_name_2> Syntax where control_name_1 Specifies that the point being named is a Control Output. control_name_2 The new control name to assign to the control output. The names must be unique across the Master LX Unit. The name must start with a letter, and the remainder of the name can contain only letters and/or numbers and/or underscores. The limit is 31 characters. Examples Config:0 >>ldam control 5_1 name AuxACUnitON Configuring Alarming with LX-7204T/7304T Sensor Manager and LDAM 15-48 Naming Control Outputs X To set the energize state of a named control to assert or deassert for a specific control Use the following command syntax: Syntax ldam control <control_name> energize state [assert|deassert] X To set the energize state of a named control to assert or deassert for multiple controls Use the following command syntax: Syntax ldam control port <port_number> point <point_number> energize state [assert|deassert] where port_number The number of the LDAM port. control_name Specifies a Control Output Name. The default name for an alarm input or control output is canonically derived from the port number, slot number and point number. For example, the default name for the 1st control output being managed by LDAM port 5 is 5_1. point_number The point whose state you want to configure to assert or deassert. The only option is 1. assert|deassert Configure the specified Control Output energize state to Assert|Deassert. Assert is the default setting. Examples Config:0 >>ldam control 5_1 energize state assert Config:0 >>ldam control 3_1 energize state deassert Config:0 >>ldam control port 2 point 1 energize state assert LX Series Configuration Guide Naming Control Outputs 15-49 X To configure control output signal to assert or deassert for a specific control Use the following command syntax: ldam control <control_name> set [assert|deassert] Syntax X To configure control output signal as assert or deassert for multiple controls Use the following command syntax: ldam control port <port_number> point <point_number> set [assert|deassert] Syntax where port_number Number of the LDAM port control_name Specifies a Control Output Name. The default name for an alarm input or control output is canonically derived from the port number, slot number and point number. For example, the default name for the 1st control output being managed by LDAM port 5 is 5_1 point_number The point whose state you want to set to assert or deassert. The only option is 1 assert|deassert Set the specified Control Output signal to Assert|Deassert. Assert is the default setting. Examples Config:0 >>ldam control 5_1 set assert Config:0 >>ldam control 3_1 set deassert Config:0 >>ldam control port 2 point 1 set assert Configuring Alarming with LX-7204T/7304T Sensor Manager and LDAM 15-50 Naming Control Outputs X To configure a control output description string for a specific control Use the following command syntax: Syntax ldam control <control_name> description <string> ldam control port <port_number> point <point_number> description <string> where Examples control_name Specifies a Control Output Name. The default name for an alarm input or control output is canonically derived from the port number, slot number and point number. For example, the default name for the 1st control output being managed by LDAM port 5 is 5_1. port_number Specifies the LDAM port number. point_number The point whose description you want to set. The only option is 1. string The description of the control output (a maximum of 63 characters long). Config:0 >>ldam control Floor2Lab description lab door 1 Config:0 >>ldam control 3_1 description lab door 2 Config:0 >>ldam control port 2 point 1 description lab1 LX Series Configuration Guide Naming Control Outputs 15-51 X To default a control output default description for a specific control Use the following command syntax: ldam control <control_name> default description Syntax ldam control port <port_number> point <point_number> default description where Examples control_name Specifies a Control Output Name. The default name for an alarm input or control output is canonically derived from the port number, slot number and point number. For example, the default name for the 1st control output being managed by LDAM port 5 is 5_1. port_number Specifies the LDAM port number. point_number Specifies a point for which you want to default the description. The only option is 1. Config:0 >>ldam control Temp_AC default description Config:0 >>ldam control 3_1 default description Config:0 >>ldam control port 2 point 1 default description X To reset a control output name to its default settings for a specific control Use the following command syntax: ldam control <control_name> default name Syntax ldam control port <port_number> point <point_number> default name where Examples port_number Specifies the LDAM port number. point_number Specifies points you want to reset to the default name. The only option is 1. Config:0 >>ldam control port 2 point 1 default name Config:0 >>ldam control Door_Sign default name Configuring Alarming with LX-7204T/7304T Sensor Manager and LDAM 15-52 Naming Control Outputs X To reset a control output point to its default settings for a specific control Use the following command syntax: Syntax ldam control <control_name> default point ldam control port <port_number> point <point_number> default point where Examples port_number Specifies the LDAM port number. point_number Specifies points you want to reset to the default. The only option is 1. Config:0 >>ldam control port 2 point 1 default point Config:0 >>ldam control fan_window default point LX Series Configuration Guide Displaying LDAM Information 15-53 Displaying LDAM Information This section explains how to display LDAM show screens. X To view the LDAM alarm input characteristics using the alarm name Use the show ldam alarm all characteristics command: Examples Config:0 >>show ldam alarm all characteristics InReach:0 >>show ldam alarm all characteristics Figure 15.16 shows an example of the LDAM Alarm All Characteristics Screen. Time: Mon, 12 Dec 2005 01:34:16 UTC Port Name: Port_4 Alarm Port: 4 Point: 1 (CTS) Name: Server_alarm_for_Lab4 Description: The server alarm for Lab 4 Fault Trap Severity: Critical Fault State: Closed Fault Traps: Enabled Alarm Port: 4 Point: 2 (DSR) Name: PC_alarm_for_lab4 Description: The PC alarm for Lab 4 Fault Trap Severity: Major Fault State: Fault Traps: Enabled Alarm Port: 6 Point: 1 (CTS) Name: Door_alarm_for_Lab6 Description: The main door alarm for Lab 4 Fault Trap Severity: Critical Fault State: Fault Traps: Enabled Alarm Port: 6 Point: 2 (DSR) Name: window_alarm_for_lab6 Description: The window alarm for Lab 6 Fault Trap Severity: Major Fault State: Traps: Enabled Open Closed Open Figure 15.16 LDAM Alarm All Characteristics Screen Configuring Alarming with LX-7204T/7304T Sensor Manager and LDAM 15-54 Displaying LDAM Information X To display alarm characteristics for a specific alarm name or port/point Use the following command syntax: Syntax show ldam alarm <alarm_name> characteristics show ldam alarm port <port_number> point <point_number> characteristics Examples Config:0 >>show ldam alarm 4_1 characteristics InReach:0 >>show ldam alarm port 4 point 1 characteristics Figure 15.17 shows an example of the LDAM Alarm Name Characteristics Screen. Time: Mon, 12 Dec 2005 01:34:16 UTC Alarm Port: 4 Point: 1 (CTS) Name: Server_alarm_for_Lab4 Description: The server alarm for Lab 4 Fault Trap Severity: Critical Fault State: Fault Traps: Enabled Closed Figure 15.17 LDAM Alarm Name Characteristics Screen X To display alarm status information using a specific alarm name Use the following command syntax at either of the following command modes: Syntax show ldam alarm all status Examples Config:0 >>show ldam alarm all status InReach:0 >>show ldam alarm all status LX Series Configuration Guide Displaying LDAM Information 15-55 Figure 15.18 shows an example of the LDAM Alarm All Status Screen Time: Mon, 12 Dec 2005 01:34:16 UTC Port Name: Port_4 Alarm Port: 4 Point: 1 (CTS:LOW) Name: Door_alarm_for_Lab4 Current State: Normal Faulted Count: 10 Last time faulted: Mon, 12 Dec 2005 01:34:16 UTC Alarm Port: 4 Point: 2 (DSR:HIGH) Name: window_alarm_for_lab4 Current State: Faulted Faulted Count: 10 Last time faulted: Mon, 12 Dec 2005 01:34:16 UTC Figure 15.18 LDAM Alarm All Status Screen X To display alarm status using a specific alarm name or port/point Use the following command syntax: show ldam alarm <alarm_name> status show ldam alarm port <port_number> point <point_number> status Syntax Examples Config:0 >>show ldam alarm 4_1 status InReach:0 >>show ldam alarm port 4 point 1 status Figure 15.19 shows an example of the LDAM Alarm Name Status Screen. Time: Port Name: Mon, 12 Dec 2005 01:34:16 UTC Port_4 Alarm Port: 4 Point: 1 (CTS:LOW) Name: Door_alarm_for_Lab4 Current State: Normal Faulted Count: 10 Last time faulted: Mon, 12 Dec 2005 01:34:16 UTC Figure 15.19 LDAM Alarm Name Status Screen Configuring Alarming with LX-7204T/7304T Sensor Manager and LDAM 15-56 Displaying LDAM Information X To display all LDAM control output characteristics Use the following command syntax: Syntax show ldam control all characteristics Examples Config:0 >>show ldam control all characteristics InReach:0 >>show ldam control all characteristics Figure 15.20 shows an example of the LDAM Control All Characteristics Screen. Time: Mon, 12 Dec 2005 01:34:16 UTC Port Name: Port_4 Control Port: 4 Point: 1 (DTR) Name: Fan_control_Lab_1 Description: The fan controlling Lab1 Current State: Assert Energized State: Assert Control Port: 6 Point: 1 DTR) Name: Fan_control_Lab_6 Description: The fan controlling Lab6 Current State: Deassert Energized State: Deassert Figure 15.20 LDAM Control All Characteristics Screen X To display control characteristics using a specific control name or port/point Use the following command syntax Syntax show ldam control <control_name> characteristics show ldam control port <port_number> point <point_number> characteristics Examples Config:0 >>show ldam control 4_1 characteristics InReach:0 >>show ldam control port 4 point 1 characteristics LX Series Configuration Guide Displaying LDAM Information 15-57 Figure 15.21 shows an example of the LDAM Control Name Characteristics Screen. Time: Mon, 12 Dec 2005 01:34:16 UTC Port Name: Port_4 Control Port: 4 Point: 1 (DTR) Name: Fan_control_Lab_1 Description: The fan controlling Lab1 Current State: Deassert Energized State: Deassert Figure 15.21 LDAM Control Name Characteristics Screen X To display control status information using a specific control name Use the following command syntax at either of the command modes: Syntax show ldam control all status Examples Config:0 >>show ldam control all status InReach:0 >>show ldam control all status Figure 15.22 shows an example of the LDAM Control All Status Screen Time: Mon, 12 Dec 2005 01:34:16 UTC Port Name: Port_4 Control Port: 4 Point: 1 (DTR:Assert) Name: Fan_control_Lab_1 Operational State: On Control Port: 6 Point: 1 (DTR:Deassert) Name: Fan_control_Lab_6 Operational State: Off Figure 15.22 LDAM Control All Status Screen Configuring Alarming with LX-7204T/7304T Sensor Manager and LDAM 15-58 Displaying LDAM Information X To display control status using a specific control name or port/point Use the following command syntax: Syntax show ldam control <control_name> status show ldam control port <port_number> point <point_number> status Examples Config:0 >>show ldam control 4_1 status InReach:0 >>show ldam control port 4 point 1 status Figure 15.23 shows an example of the LDAM Control Name Status Screen. Time: Port Name: Mon, 12 Dec 2005 01:34:16 UTC Port_4 Control Port: 4 Point: 1 (DTR:Assert) Name: Fan_control_Lab_1 Operational State: Off Figure 15.23 LDAM Control Name Status Screen LX Series Configuration Guide Configuring PPP 16-1 CHAPTER 16 Configuring PPP This chapter describes how to configure PPP features. Configuring PPP 16-2 Configuring an IP Interface for PPP Configuring an IP Interface for PPP You can bind an IP interface to PPP and specify a dedicated asynchronous port for the IP interface to use for PPP Links. In addition, you can configure CHAP or PAP authentication, CCP negotiation, IPCP and LCP parameters, the PPP Mode, and the Remote IP address for PPP Links on an IP interface. The LX unit also supports PPP routing via static routing. With PPP routing, you can manage serially connected devices on remote LX units that do not have Ethernet connectivity. For more information on the LX implementation of PPP Routing, see “PPP Routing on the LX” on page 16-9. X To configure PPP on an IP interface 1. Example Use the interface command in Configuration Command Mode: Config:0 >>interface 2 This enters the Interface Command Mode for the specified interface (for example, Interface 2). The Interface Command prompt (such as Intf 2-2:0 >>) is displayed. 2. Example Execute the bind port async protocol ppp command to bind the IP interface to PPP, and to specify the asynchronous port that the IP interface will use for its PPP Links. In the following example, IP interface 2 is bound to PPP, and asynchronous port 4 is specified as the port that IP interface 2 will use for its PPP Links: Intf 2-2:0 >>bind port async 4 protocol ppp 3. Example Execute the ppp command to access the PPP Command Mode for the IP interface: Intf 2-2:0 >>ppp 4. Execute the authentication command to specify CHAP or PAP as the authentication method for PPP Links on the IP interface. In the following example, CHAP is specified as the authentication method: LX Series Configuration Guide Re-binding an IP Interface to Eth0 16-3 Example Ppp 2-2:0 >>authentication chap 5. Example Execute the outbound secret command to specify the outbound secret for PPP Links on the IP interface: Ppp 2-2:0 >>outbound chap secret wtrrrbbbba L Because CHAP is the authentication method specified in step 4, an outbound CHAP secret is specified in the preceding command. 6. Example Ppp 2-2:0 >>outbound username HenryW 7. Example Execute the outbound username command to specify the outbound client username for PPP Links on the IP interface: Execute the remote address command to specify the remote partner for PPP Links on the IP interface: Ppp 2-2:0 >>remote address 129.27.172.19 Re-binding an IP Interface to Eth0 When you bind an IP interface to PPP, that IP interface can only be used for PPP connections; the asynchronous port that is specified for PPP Links on the IP interface can only be used for PPP sessions on that interface. If you use the PPP-bound IP interface (or its dedicated asynchronous port) for any other purpose, you must re-bind the IP interface to Eth0. Use the default bind command, in the Interface Command Mode, to re-bind the IP interface to Eth0. In the following example, IP interface 2 is re-bound to Eth0: Example Intf 2-2:0 >>default bind The preceding default bind command also unbinds the asynchronous port that had been specified as a dedicated port for PPP Links on Interface 2. This port is now available for other purposes. Configuring PPP 16-4 Setting Optional PPP Parameters Setting Optional PPP Parameters The LX supports several optional parameters for PPP sessions, including Compression Control Protocol (CCP) negotiation and several settings for the Link Control Protocol (LCP) and Internet Protocol Control Protocol (IPCP). This section describes how to specify values for these parameters. L If you do not specify values for the optional parameters, the LX unit will use default values. The default values are sufficient to support most PPP Links. Inactivity Timeout The Inactivity Timeout is the length of time the PPP link will wait for an LCP echo reply before closing the link. X To specify the Inactivity Timeout Use the inactivity timeout command in PPP Command Mode: Example Ppp 2-2:0 >>inactivity timeout 6 CCP Negotiation By default, an IP interface does not negotiate CCP use with its remote partner. However, you can configure the IP interface to negotiate CCP use with its remote partner. X To enable CCP negotiation Execute the ccp enable command in PPP Command Mode: Example Ppp 2-2:0 >>ccp enable X To disable CCP negotiation Execute the no ccp command in PPP Command Mode: Example Ppp 2-2:0 >>no ccp LX Series Configuration Guide IPCP Accept Address 16-5 IPCP Accept Address You can configure the PPP link to accept negotiation of local or remote addresses. X To enable address negotiation on PPP Links Execute the ipcp accept address enable command in PPP Command Mode: Examples Ppp 2-2:0 >>ipcp accept local address enable Ppp 2-2:0 >>ipcp accept remote address enable By default, an LX IP interface does not accept the negotiation of local or remote addresses. X To disable address negotiation on PPP Links Execute the no ipcp accept address command: Examples Ppp 2-2:0 >>no ipcp accept local address Ppp 2-2:0 >>no ipcp accept remote address IPCP Compression By default, an IP interface will try to negotiate the use of Van Jacobson (VJ) compression over a PPP link. X To disable VJ compression over a PPP link Use the no ipcp compression command, in PPP Command Mode: Example Ppp 2-2:0 >>no ipcp compression X To re-enable VJ compression over a PPP link Execute the ipcp compression enable command in PPP Command Mode: Example Ppp 2-2:0 >>ipcp compression enable Configuring PPP 16-6 IPCP Failure Limit IPCP Failure Limit The IPCP Failure Limit is the number of attempts at IPCP option negotiation that can be made by the IP interface. X To specify the IPCP Failure Limit Use the ipcp failure limit command in PPP Command Mode: Example Ppp 2-2:0 >>ipcp failure limit 6 IPCP Timeout The IPCP Timeout is the length of time that the IP interface has for IPCP option negotiation. X To specify the IPCP Timeout Use the ipcp timeout command in PPP Command Mode: Example The default mode for the LX is passive. When configuring PPP between two LX units, one side must be set to active. Ppp 2-2:0 >>ipcp timeout 30 PPP Mode In PPP active mode, the port that is bound to the IP interface for PPP Links will periodically send PPP LCP negotiation packets. In PPP passive mode, the port that is bound to the IP interface for PPP Links is in listening mode; the port listens for incoming PPP LCP negotiation packets. X To specify the PPP Mode Use the mode command, in the PPP Command Mode: Examples Ppp 2-2:0 >>mode active Ppp 2-2:0 >>mode passive L When using mode, demand, or backup, the LCP negotiations will always assume active mode. LX Series Configuration Guide LCP Compression 16-7 LCP Compression By default, an IP interface will not try to negotiate the use of LCP compression over a PPP link. X To enable the negotiation of LCP compression over a PPP link Use the lcp compression enable command in PPP Command Mode: Example Ppp 2-2:0 >>lcp compression enable X To disable the negotiation of LCP compression over a PPP link Execute the no lcp compression command in PPP Command Mode: Example Ppp 2-2:0 >>no lcp compression LCP Echo Failure The LCP Echo Failure setting is the number of times that the IP interface can send an LCP echo request. X To specify the LCP echo failure setting Use the lcp echo failure command in PPP Command Mode: Example Ppp 2-2:0 >>lcp echo failure 6 Configuring PPP 16-8 LCP Echo Interval LCP Echo Interval The LCP Echo Interval is the interval between the sending of LCP echo requests. X To specify the LCP echo interval Use the lcp echo interval command in PPP Command Mode: Example Ppp 2-2:0 >>lcp echo interval 20 LCP Failure Limit The LCP Failure Limit is the number of attempts at LCP option negotiation that can be made by the IP interface. X To specify the LCP failure limit Use the lcp failure limit command in PPP Command Mode: Example Ppp 2-2:0 >>lcp failure limit 6 LCP Timeout The LCP Timeout is the length of time that the IP interface has for LCP option negotiation. X To specify the LCP Timeout Use the lcp timeout command in PPP Command Mode: Example Ppp 2-2:0 >>lcp timeout 30 LX Series Configuration Guide PPP Routing on the LX 16-9 PPP Routing on the LX PPP Routing makes it possible to access remote LX units that do not have Ethernet connections. PPP is established when the router dials your LX and pre-configured routes are activated to allow your NOC to manage the remote LX. In Figure 16.1, the NOC telnets to 197.168.1.1 2100-2300 to manage the serial devices. PPP 192.168.1.2 192.168.1.1 1 192.168.100.1/24 2 3 modem link router serial devices Figure 16.1 LX PPP Routing Configuring PPP 16-10 PPP Routing on the LX X To implement PPP Routing See “Command Mode Descriptions” on page 1-5 for information about accessing Configuration Command Mode. 1. L You must specify the IP address of your NOC as the remote partner for PPP Links with the remote address command in the PPP Command Mode. 2. 3. Example Configure an IP interface for PPP as described in “Configuring an IP Interface for PPP” on page 16-2. Access the Configuration Command Mode. Configure a static route to the NOC by executing the route command. The following example is a static route from the LX unit in Figure 16.1 on page 9 to the router at IP address 192.168.1.2: Config:0 >>route address 192.168.100.0 mask 255.255.255.0 gateway 192.168.1.2 X To display PPP characteristics for an IP interface Use the monitor/show interface ppp characteristics command. In the following example, the PPP characteristics are displayed for IP interface 2: Example Ppp 2-2:0 >>show interface 2 ppp characteristics X To display PPP characteristics for all IP interfaces Use the show interface all ppp characteristics command to show the PPP characteristics of all IP interfaces on the LX unit: Example Ppp 2-2:0 >>show interface all ppp characteristics LX Series Configuration Guide PPP Routing on the LX 16-11 Figure 16.2 shows an example of the PPP Characteristics Screen. Time: Interface Name: Interface_1 Mode: Passive CCP: Disabled Dialback Mode: ----------------IPCP----------------Remote IP Address: 0.0.0.0 VJ Compression: Disabled Failure Limit: 10 Accept Remote Address: Disabled Accept Local Address: Disabled Timeout: 4 -----------Authentication-----------Type: None Retry: 3 Timeout: 60 Outbound CHAP Secret: Not configured Outbound PAP Secret: Not configured Outbound Username: Wed, 18 Oct 2006 09:08:19 US/EASTERN Bound to: eth0 Backup Feature: N/A Inactivity Timeout: 0 -----------------LCP----------------Compression: Disabled Failure Limit: 10 Echo Failure Limit: 0 Echo Interval: 0 Timeout: 4 In-Reach Figure 16.2 PPP Characteristics Screen X To display the PPP status of an IP interface Use the monitor/show interface ppp status command. In the following example, the PPP status is shown for IP interface 2: Example Ppp 2-2:0 >>show interface 2 ppp status X To display the PPP status of all IP interfaces Use the following syntax to display PPP status information for all IP interfaces on the LX unit: Example Ppp 2-2:0 >>show interface all ppp status Configuring PPP 16-12 Configuring PPP Dial-On-Demand Figure 16.3 shows an example of the PPP Status Screen. Time: Interface Name: Local Address: Remote Address: Interface_1 N/A N/A LCP Link: LCP Compression: CCP Link: IPCP Link: VJ Compression: Backup Link: Closed Closed Closed Closed Closed N/A Thu, 27 Jul 2006 14:39:51 US/EASTERN Bound to: eth0 --------------TRANSMIT--------------Bytes: N/A Frames: N/A Errors: N/A ---------------RECEIVE--------------Bytes: N/A Frames: N/A Errors: N/A Figure 16.3 PPP Status Screen Configuring PPP Dial-On-Demand Circuits can reduce line charges by using bandwidth only when needed. When data must be forwarded across a switched circuit, the LX automatically activates the connection, transfers the data, and then based on inactivity, tears down the connection. There are two main reasons to use PPP Dial-On-Demand: If you do not have a LAN connection to the site to use. Use PPP demand to bring up a PPP link, to send traps and notification events, and to alert administrators to problems in remote locations. Use PPP Dial-On-Demand in conjunction with Trigger Action as a backup network connection in case your LAN goes down. LX Series Configuration Guide Configuring PPP Dial-On-Demand 16-13 Router X Port 17 LX Phone Number 1234 Modem Serial Serial Serial Figure 16.4 illustrates the sample used in the following procedure. Modem No LAN A.B.C.D Interface 2 X.Y.Z NMS Figure 16.4 PPP Dial-On-Demand Diagram X To configure PPP Dial-On-Demand 1. Example 2. Example Enter the Interface Mode: Config:0 >> interface 2 3. Example 4. Example Enable the modem on the port and define a dialout number: Config:0 >> port async 17 modem dial number 1234 Bind async port 17 to this interface and use ppp17 for the device name. This changes the access on port async 17 to PPP: Intf 2-2:>> bind async port 17 protocol ppp Enter a remote address. The remote address is an address on the peer network. This remote address is required to define the link as a PPP demand. Intf 2-2:>> ppp remote address A.B.C.D Configuring PPP 16-14 Configuring PPP Dial-On-Demand 5. Example 6. Example 7. Example Put the port into Dial on Demand mode using the existing mode. When you do this, the port only attempts to dial a modem and negotiate PPP when there is a demand to do so, such as when IP network traffic matching the interface’s PPP Remote IP Address appears on the unit. Intf 2-2:>> ppp mode demand When a timeout is set, the PPP link is up and no data packets are being sent or received across the link. Under these conditions, the LX tears down the PPP/dialup connection. This is typically used when the PPP mode is in “demand”, but may also be useful in non-demand modes. Intf 2-2:>>ppp inactivity timeout As the LX does not have a LAN connection, go to the Config:0 >> mode and set the system gateway to the remote PPP address, thereby directing all IP traffic to that address: Config:0 >>gateway A.B.C.d LX Series Configuration Guide PPP Backup 16-15 PPP Backup PPP Backup allows an LX to dial a “backup” PPP connection if contact to a given host is lost. The PPP connection is enabled as a dial-on-demand, and thus is only active as needed. The PPP backup system uses the trigger-action-rule subsystem to detect when contact to the ping host is lost, and then activate the dialon-demand service. Figure 16.5 PPP Dial Backup Diagram PPP backup becomes a Demand Circuit when LX B can’t ping its ping host 10.242.131.8 because the primary path is down. The connection will not dial unless traffic is destined for a device across the PPP link. Configuring PPP 16-16 PPP Backup The appropriate settings for the diagram shown in Figure 16.5 are as follows: LX A Settings InReach:0 >> config int 1 address 10.242.131.32 mask 255.255.255.0 InReach:0 >> config int 2 address 130.1.1.100 mask 255.255.255.0 InReach:0 >> config int 3 bind port async 33 protocol ppp InReach:0 >> config int 3 ppp remote address 10.242.131.48 LX B Settings InReach:0 >> config gateway 10.242.131.32 InReach:0 >> config int 1 address 10.242.131.48 mask 255.255.255.0 InReach:0 >> config int 2 bind port async 49 protocol ppp InReach:0 >> config int 2 ppp remote address 10.242.131.32 InReach:0 >> config int 2 ppp mode backup InReach:0 >> config int 2 ppp backup ping host 10.242.131.8 InReach:0 >> config int 2 ppp backup ping alternate host 130.1.1.101 InReach:0 >> config int 2 ppp backup ping interface 1 InReach:0 >> config int 2 ppp backup ping alternate interface 2 InReach:0 >> config int 2 ppp inactive time 30 (seconds) InReach:0 >> config int 2 ppp backup ping interval 45 (seconds) InReach:0 >> config int 2 ppp backup ping alternate interval 45 (seconds) LX Series Configuration Guide PPP Backup 16-17 X To activate the ping backup link when both ping targets are lost Use the following command: InReach:0 >>config int 2 ppp backup activate operand and X To deactivate the ping backup link when one or the other ping targets returns Use the following commands: InReach:0 >>config int 2 ppp backup deactivate operand or InReach:0 >>config int 2 ppp backup enable InReach:0 >>config po as 49 modem dialout number 2760 (phone# of LX A) InReach:0 >>config route address 130.1.1.0 mask 255.255.255.0 gateway 10.242.131.32 int 2 Configuring PPP 16-18 Displaying PPP Backup Information Displaying PPP Backup Information Use the show interface <interface_number> ppp characteristics command to display the PPP Characteristics Screen. An example of this screen follows: Time: Interface Name: Interface_1 Mode: Passive CCP: Disabled Dialback Mode: ----------------IPCP----------------Remote IP Address: 0.0.0.0 VJ Compression: Disabled Failure Limit: 10 Accept Remote Address: Disabled Accept Local Address: Disabled Timeout: 4 -----------Authentication-----------Type: None Retry: 3 Timeout: 60 Outbound CHAP Secret: Not configured Outbound PAP Secret: Not configured Outbound Username: Wed, 18 Oct 2006 09:08:19 US/EASTERN Bound to: eth0 Backup Feature: N/A Inactivity Timeout: 0 -----------------LCP---------------Compression: Failure Limit: Echo Failure Limit: Echo Interval: Timeout: Disabled 10 0 0 4 In-Reach Figure 16.6 PPP Characteristics X To display the PPP Backup Screen Use the show interface <interface_number> ppp backup command. An example of this screen follows: Time: Interface Name: Interface_2 Activate Operand: And ------------Primary Ping------------Host: 1.1.1.1 Interface: 1 Interval: 30 Count: 1 Fri, 18 Aug 2006 09:57:38 US/EASTERN Bound to: ppp1 Deactivate Operand: Or -----------Alternate Ping-----------Host: 1.1.1.2 Interface: 1 Interval: 30 Count: 1 Figure 16.7 PPP Backup LX Series Configuration Guide PPP Dialback 16-19 X To display the PPP Status Screen Use the show interface <interface_number> ppp status command. An example of this screen follows: Time: Interface Name: Local Address: Remote Address: Interface_1 N/A N/A LCP Link: LCP Compression: CCP Link: IPCP Link: VJ Compression: Backup Link: Closed Closed Closed Closed Closed N/A Thu, 27 Jul 2006 14:39:51 US/EASTERN Bound to: eth0 --------------TRANSMIT--------------Bytes: N/A Frames: N/A Errors: N/A ---------------RECEIVE--------------Bytes: N/A Frames: N/A Errors: N/A Figure 16.8 PPP Status PPP Dialback PPP Dialback provides a level of security by forcing the LX to call back to a specific phone number. It also helps you centralize billing from one location. This feature allows you to configure PPP dialback on both the server and client sides. X To configure PPP Dialback 1. In Interface mode, enable PPP Dialback on the server side: Intf 2-2: >> ppp dialback enable 2. Use the following command syntax to enter a PPP outbound number (up to 32 characters) for the server to call back on: Intf 2-2: >> ppp outbound dialback <telephone_number> X To display PPP Dialback information Use the show interface <interface_number> ppp characteristics command to display the PPP Settings Screen. Configuring PPP 16-20 PPP Dialback Figure 16.9 shows an example of this screen: Time: Interface Name: Interface_1 Mode: Passive CCP: Disabled Dialback Mode: ----------------IPCP----------------Remote IP Address: 0.0.0.0 VJ Compression: Disabled Failure Limit: 10 Accept Remote Address: Disabled Accept Local Address: Disabled Timeout: 4 -----------Authentication-----------Type: None Retry: 3 Timeout: 60 Outbound CHAP Secret: Not configured Outbound PAP Secret: Not configured Outbound Username: Wed, 18 Oct 2006 09:08:19 US/EASTERN Bound to: ppp Backup Feature: enabled Inactivity Timeout: 0 server -----------------LCP----------------Compression: Disabled Failure Limit: 10 Echo Failure Limit: 0 Echo Interval: 0 Timeout: 4 In-Reach Figure 16.9 PPP Characteristics Screen with PPP Dialback LX Series Configuration Guide RSA SecurID PPP Fallback 16-21 RSA SecurID PPP Fallback The LX PPP connection required you to type your username/ password prior to dialing/negotiating the link. This worked reliably for most forms of authentication. RSA SecurID, however, is a token based authentication, and is very time sensitive. Occasionally, the dial time/modem train/negotiation time was too variable, and sometimes took too long for the token to be valid once the connection was established. You can configure PPP so that RSA SecurID is more reliable. You can use Windows DUN (Microsoft Dial Up Networking terminal window), and select the option to "Open Terminal window after connecting". This allows you to be at the Port Async Login prompt. At this point all the variables have been eliminated, and you are actually connected to the port in INTERACTIVE mode. You can Login and authenticate via SecurID with no delay. After you have authenticated properly, you can enter the command "ppp" X To start the PPP negotiations Use the following command: InReach:0 > ppp The following message displays: The ppp is being started Configuring PPP 16-22 Sample Configuration Sample Configuration L Make sure you have a local user configured with which to authenticate. X To configure this feature 1. Example 2. Example Define an interface: Config:0 >>int 3 3. Example Define port async 3 to PPP: Intf 3-3:0 >>bind port async 3 protocol ppp 4. Example Set interface 3 to PPP: Intf 3-3:0 >>ppp 5. Example Define the address to be assigned to the dial-in peer: Ppp 3-3:0>> remote addr 1.2.2.2 6. Example Exit PPP mode: Ppp 3-3:0>> exit 7. Example 8. Example Define a SecurID server: Config:0 >>aaa rsa sec prim auth server addr 1.1.1.1 Exit the Interface mode: Intf 3-3:0 >>exit Configure the Async Port: 9. Config:0 >>port async 3 After you set up the PPP interface and the Port async is bound, change the access mode to local. The port is still a PPP port, but now enforces a LOCAL port level login before you can continue to PPP negotiations. LX Series Configuration Guide Sample Configuration 16-23 X To configure any form of authentication as if it were a Local port Use the following commands: Async3:0 >>access local Async3:0 >>authentication inbound rsa securid enable Async3:0 >>authentication fallback enable When the port is set up as a Special PPP-Local, you must authenticate via Local methods in order to move on to PPP. If there is no login at the local level, PPP will not attempt to connect. This is a security measure to enforce proper login. In Microsoft Windows DUN, make sure you enabled the options to "Show terminal window" at the Properties/Security tab in the interactive login section (Windows XP). The previous example only uses the Local authentication, with no PPP authentication. If you wish to also authenticate via PPP, you must enable PAP/CHAP and set up the interface authentication accordingly. L Fallback uses the local database only, not SecurID. The PPP Interface is displayed in the Port Async Characteristics screen. Configuring PPP 16-24 Sample Configuration X To display the Port Async Characteristics Screen Use the show port async <port_number> characteristics command: Figure 16.10 shows an example of this screen: Time: Port Number: 1 Access: Speed: Bits per Character: Stop Bits: Parity: Flow Control: Autohangup: DSR Wait: DTR Drop Time: Remote 9600 8 1 None Xon Disabled Enabled 2 Authentication: Auth. FallBack Attempts: RADIUS Accounting: TACACS+ Accounting: Local 0 Disabled Disabled Connect Prompt: Connect Prompt String: Connect Command: Disabled Wed, 21 Feb 2007 14:02:29 US/EASTERN Port Name: genlx Diag Port Device Name: /dev/ttyGN0 Banner: banner.default MOTD: motd.default Local Prompt: Login Autobaud Retry: 5 Max Mirror Connections: 1 Break: Break String/Control: Special Break String: IdleBuffer: Transparent Mode: Enabled Disabled Type a key to continue. Figure 16.10 Show Port Async Characteristics Screen LX Series Configuration Guide Enabled Configuring Redundant Ethernet 17-1 CHAPTER 17 Configuring Redundant Ethernet This chapter describes how to configure Redundant Ethernet. L It is considered normal to see a small number of carrier errors occur on the ethernet port during system initialization. These errors are benign and can be safely ignored. L If an LX-8000 Ethernet port is forced to 10 Mbps and the Ethernet port of its corresponding device is forced to 100 (meaning that auto-negotiation is disabled), the Link LED comes on even though you can’t pass data. The ethernet status screen (reached by typing show port ethernet <port_number> status) incorrectly displays the link as Link State: Up, even though no valid link has been established. Configuring Redundant Ethernet 17-2 Redundant Ethernet Redundant Ethernet This feature applies only to the LX-8000. MRV supports use of the Ethernet 2 port on a LX-8000 or LX4000T series unit. The second Ethernet port may be used as a normal network interface or to provide fault tolerance for Ethernet 1. If used as a second network interface, the LX can be connected to two IP networks at the same time and accept connections on either interface. When in fault-tolerant mode, the Ethernet 2 will take on the MAC address and IP information of Ethernet 1 after a link failure occurs. Two types of link failure may be detected: physical and logical. A physical link failure is triggered when link integrity is lost. A logical link failure occurs when no traffic is received in a defined interval. ARP is used for traffic generation in case no other network traffic is present. Fail-over is automatic. The backup link now becomes the primary link, even if connectivity is restored to the original “primary”. See the LX-Series Commands Reference Guide and the LX-Series Configuration Guide for further information. See the following configuration examples. Configuring Ethernet 2 as a Second Network Interface L This capability is not intended to replace a LAN router. Dynamic protocols such as RIP and OSPF are not supported, nor are other routing features such as UDP forwarding. Additionally, LAN routing performance is limited on the LX Series due to hardware limitations. Routing between ethernet segments is not a supported configuration, due to the preceding mentioned limitations. LX Series Configuration Guide Configuring Ethernet 2 as a Redundant Ethernet Link for Ethernet 1 17-3 X To configure Ethernet 2 as a second Ethernet port 1. Create Interface 2 (since Interface 1 is already configured): InReach:0 >> conf interface 2 2. Change interface 2 to use eth1: Intf 2-2:>> bind port ethernet 2 3. Configure an IP address and Mask: Intf 2-2:>>address 192.168.10.1 mask 255.255.255.0 4. Configure a Broadcast Address: Intf 3-3:>>broadcast 192.168.10.255 Configuring Ethernet 2 as a Redundant Ethernet Link for Ethernet 1 Use this procedure to configure a redundant link in case the primary link fails. Figure 17.1 shows a concept diagram: Switch B Switch A Primary Link Redundant Link LX Ethernet 0 Ethernet 1 Figure 17.1 Primary Link/Redundant Link Configuring Redundant Ethernet 17-4 Configuring Ethernet 2 as a Redundant Ethernet Link for Ethernet 1 L Because only one link is active at one time, the IP address and the MAC address are mapped to the active link. Therefore, in a fail over condition, the MAC address will change locations on your network. Older switches have difficulty with this dynamic change, and require time to age out the old MAC address. Use some caution when doing this. X To configure Ethernet 2 as a redundant Ethernet link for Ethernet 1 1. Create the interface: InReach:0 >> conf interface 3 2. Bond the Ethernet ports together: Intf 3-3:>> bind port ethernet 1 2 3. Configure an IP address and Mask: Intf 3-3:>> address 192.168.10.1 mask 255.255.255.0 Configure a Broadcast Address: Intf 3-3:>> broadcast 192.168.10.255 There are two mechanisms by which you can detect a primary link fault: physical link detection and logical link detection. Use the bonding link command for physical link detection, and the bonding link arp address and bonding link arp interval commands for logical link detection. 4. You can access the bonding commands in the Interface Mode. LX Series Configuration Guide Bonding Link 17-5 Bonding Link This command monitors the physical link of the primary ethernet port if it goes down and the secondary ethernet port comes up. When the secondary ethernet port comes up, the Mac address and the IP address are shifted to the secondary link. X To monitor the link by the physical connection, and to send a poll every second Use the following command syntax: Syntax Intf:1-1>> bonding link <number_of_milliseconds> Example Intf:1-1>> bonding link 1000 Bonding Link ARP Address This command monitors the primary link via ARP to a defined address on the network. ARP is used to generate traffic and receive a response, so the primary link will receive traffic in case no other network traffic is present. If the ARP target fails to respond, the primary link will only fail over if no traffic is received within twice the length of the ARP interval. The redundant link assumes the primary role. The MAC and IP addresses are shifted to the redundant link. X To monitor the link integrity using ARP Use the bonding link arp address command. If the ARP fails, the link is presumed to be down and the LX will switch over to the redundant link. Use the following command syntax: Syntax Intf:1-1>> bonding link arp address <A.B.C.D> Example Intf:1-1>> bonding link arp address 119.255.255.255 Configuring Redundant Ethernet 17-6 Bonding Link ARP Interval Bonding Link ARP Interval Use the bonding link arp interval command to configure an ARP interval of one second. X To configure an ARP interval Use the following command syntax: Syntax Intf:1-1>> bonding link arp interval <number_of_ milliseconds> Example Intf:1-1>> bonding link arp interval 1000 X To display the Bonding Characteristics Screen Use the show interface <interface_number> bonding characteristics command. Figure 17.2 shows an example of this screen: Time: Interface Name: Mode: Arp Address: Interface_2 N/A N/A Tue, 11 Jan 2005 10:51:10 US/EASTERN Bound to : eth0:1 Link Polling Interval: N/A Arp Polling Interval: N/A Figure 17.2 Bonding Characteristics Screen X To display the Bonding Status screen Use the show interface <interface_number> bonding status command: Figure 17.3 shows an example of this screen: Bonding Mode: fault-tolerance (active-backup) ARP IP Target: 10.242.131.230 ARP Interval 1000 Interface eth1: STANDBY MII Status: UP Redundant Fail-over count: 0 Interface eth0: ACTIVE MII Status: UP Redundant Fail-over count: 0 Figure 17.3 Bonding Status Screen LX Series Configuration Guide Defaulting the Binding 17-7 L The second Ethernet port is inactive during boot, whether it is being used as a second segment or as a redundant connection. Booting the image or parameters over the second segment is not supported. Defaulting the Binding X To delete a current binding 1. At the Interface level, enter: Intf 10-10:0 >> default bind 2. Save the configuration. 3. Perform reboot. l L Reboot is necessary in this software version, but will not be in a future release. Configuring Redundant Ethernet 17-8 Defaulting the Binding LX Series Configuration Guide Internal Modem 18-1 CHAPTER 18 Internal Modem This chapter describes how to configure the internal modem. Internal Modem 18-2 Configuring the Internal Modem for Dial-Out Configuring the Internal Modem for Dial-Out L When configuring ports for modems, autohangup should be enabled and modem control enabled. This is true for both dial-in and dial-out configurations. If you use this modem for either dial-in/dial-out circuit data, you do not need to configure anything on the LX other than port access. However, if you are using the modem for a dial-out IP GPRS connection to a subscribed ISP via PPP, you must perform the following procedure. X To configure the interface 1. Execute the following command: InReach>>config interface <interface_number> 2. Bind the port that contains the GPRS modem to the PPP Protocol: Intf 10-10:0 >>bind port async <port_number> protocol ppp where <port_number> is the internal modem port (port 5). 3. Enter the PPP Mode: Intf 10-10:0 >>ppp 4. Configure the PPP mode active: Ppp 10-10:0 >>mode active 5. Enable the remote address: Ppp 10-10:0 >>ipcp accept remote address enable 6. Enable the local address: Ppp 10-10:0 >>ipcp accept local address enable 7. If required by your ISP, enter an outbound user name: Ppp 10-10:0 >>outbound username <username> LX Series Configuration Guide Configuring the Internal Modem for Dial-Out 18-3 8. Enter an outbound PAP secret: Ppp 10-10:0 >>outbound pap secret <password> 9. Use the show interface <interface_number> ppp characteristics command to display the PPP Characteristics Screen. An example of this screen follows: Time: Interface Name: Interface_1 Mode: Passive CCP: Disabled Dialback Mode: ----------------IPCP----------------Remote IP Address: 0.0.0.0 VJ Compression: Disabled Failure Limit: 10 Accept Remote Address: Disabled Accept Local Address: Disabled Timeout: 4 -----------Authentication-----------Type: None Retry: 3 Timeout: 60 Outbound CHAP Secret: Not configured Outbound PAP Secret: Not configured Outbound Username: Wed, 18 Oct 2006 09:08:19 US/EASTERN Bound to: eth0 Backup Feature: N/A Inactivity Timeout: 0 -----------------LCP----------------Compression: Disabled Failure Limit: 10 Echo Failure Limit: 0 Echo Interval: 0 Timeout: 4 In-Reach Figure 18.1 PPP Characteristics Screen Internal Modem 18-4 Viewing Internal Modem Characteristics Viewing Internal Modem Characteristics L The following fields appear on the Port Async Modem screen only if a GSM/GPRS Internal Modem is installed. The “Modem Type”, “GSM/GPRS Received Signal Strength”, and “GSM/GPRS Channel Bit Error Rate” fields reside in the Show Port Async Modem screen. The fields show the modem type, as well as the Received Signal Strength and Channel Bit Error Rate of the modem. Use the show port async <port_number> modem command to display the Port Async Modem Screen. An example of this screen follows: Time: Port Number: 5 Control: Retry: Dialout Number: Init String: ATS0=1V1X4&K3^M Enabled 5 Fri, 11 Aug 2006 22:30:47 UTC Port Name: Port_5 Timeout: Pool: 45 Disabled Internal Modem Type: GSM/GPRS GSM/GPRS: Received Signal Strength: 10 GSM/GPRS: Channel Bit Error Rate: 5 Figure 18.2 Port Async Modem Screen LX Series Configuration Guide Alarm Input/Control Output Points 19-1 CHAPTER 19 Alarm Input/Control Output Points This chapter describes how to configure control output. The LX Series can be configured to provide two low voltage/low current Control Output signals per port using the DTR and RTS signals. By using a customer specialized interface design, you can control facility equipment on the LX Series product. Alarm Input/Control Output Points 19-2 Configuring Control Output Configuring Control Output You can configure exclusive control over DTR and/or RTS output signals. X To configure control output 1. Dedicate the port to the use of controlling DTR/RTS: InReach>>config port async <port_number> access control This disables modem control, flow control, autohangup, and autobaud. Telnet and SSH connections to the port will be denied, and you can’t log out of the port. Syntax 2. Raise or lower the DTR signal: InReach>>control port async <port_number> dtr high Syntax InReach>>control port async <port_number> dtr low If the port’s access is not “control”, or DTR is already in the state you are configuring, the command is not performed. The default state is low. 3. Syntax Raise or lower the RTS signal: InReach>>control port async <port_number> rts high InReach>>control port async <port_number> rts low If the port’s access is not “control”, or RTS is already in the state you are configuring, the command is not performed. The default state is low. LX Series Configuration Guide Configuring Control Output 19-3 X To display the Port Async Characteristics screen Use the show port async <port_number> characteristics command. The word Control is displayed in the Access field when this feature is enabled. Figure 19.1, “Port Async Characteristics Screen" shows an example of this screen: Time: Port Number: 1 Access: Speed: Bits per Character: Stop Bits: Parity: Flow Control: Autohangup: DSR Wait: DTR Drop Time: Remote 9600 8 1 None Xon Disabled Enabled 2 Authentication: Auth. FallBack Attempts: RADIUS Accounting: TACACS+ Accounting: Local 0 Disabled Disabled Connect Prompt: Connect Prompt String: Connect Command: Disabled Wed, 21 Feb 2007 14:02:29 US/EASTERN Port Name: genlx Diag Port Device Name: /dev/ttyGN0 Banner: banner.default MOTD: motd.default Local Prompt: Login Autobaud Retry: 5 Max Mirror Connections: 1 Break: Break String/Control: Special Break String: IdleBuffer: Transparent Mode: Enabled Enabled Disabled Type a key to continue. Figure 19.1 Port Async Characteristics Screen Alarm Input/Control Output Points 19-4 Configuring Control Output X To view DTR/RTS States Use the show port async <port_number> status command to display the Port Async Status Screen. The Output Signals: RTS and the Output Signals: DTR fields display the current setting. Figure 19.2, “Port Async Status Screen" shows an example of this screen with the entries highlighted: Time: Port Number: Port Lock Status: Speed: Bits per Character: Stop Bits: Parity: Flow Control: 1 Idle 115200 8 1 None Xon Thu, 27 Jul 2006 14:53:49 US/EASTERN Port Name: Port_1 --------------TRANSMIT--------------Transmit Bytes: 0 Last Transmit Char: 0x0 ---------------RECEIVE--------------Receive Bytes: 0 Last Receive Char: 0x0 -----------OUTPUT SIGNALS------------ --------------COUNTERS-------------RTS: Up Frame Errors: 0 DTR: Up Overrun Errors: 0 Parity Errors: 0 Buffer Overruns Errors: 0 ------------INPUT SIGNALS------------ Break Signals: 0 CTS: Down Local Accesses: N/A DSR: Up Remote Accesses: 0 Figure 19.2 Port Async Status Screen LX Series Configuration Guide Configuring Alarm Inputs via Trigger Action Rules 19-5 Configuring Alarm Inputs via Trigger Action Rules See the SignalNotice Example for more information. You can configure the LX-Series unit using the console CLI or by using the Graphical User Interface (GUI). You can configure the Alarm Inputs function using Signal-Notice or by using the CLI commands Trigger-Action-Rule. The following examples set up an Alarm Input using CTS and utilize the port DTR Control Output as the controlling voltage on Port 10. Additionally, when the Trigger events occur, an SNMP message is generated. X To configure alarm inputs via trigger action rules 1. Example Create a trigger: InReach:0 >> config Config:0 >> trigger Names of the form pa#ctsu p, pa#ctsd n are reserved for Signal Notice setup. Trigger-Action:0 >> trigger name pa10ctsh Trigger-pa10ctsh:0 >> signal port 10 cts high Trigger-pa10ctsh:0 >> exit Trigger-Action:0 >> trigger name pa10ctsl Trigger-pa10ctsl:0 >> signal port 10 cts low Trigger-pa10ctsl:0 >> end InReach:0 >> 2. Example Create an action: InReach:0 >> config Config:0 >> trigger Trigger-Action:0 >> action name pa10ctsh Action_pa10ctsh:0 >> command notify facility user priority notice message CTS is H on port name Lab1 Action_pa10ctsh:0 >> exit Trigger-Action:0 >> action name pa10ctsl Action_pa10ctsh:0 >> command notify facility user priority notice message CTS is L on port name Lab1 Action_pa10ctsl:0 >> end InReach:0 >> Alarm Input/Control Output Points 19-6 Configuring Alarm Inputs via Trigger Action Rules 3. Example Create rules to bind the trigger and the action: InReach:0 >> config Config:0 >> trigger Trigger-Action:0 >> rule name pa10ctsh Rule_pa10ctsh:0 >> trigger pa10ctsh Rule_pa10ctsh:0 >> action pa10ctsh Rule_pa10ctsh:0 >> exit Trigger-Action:0 >> rule name pa10ctsl Rule_pa10ctsl:0 >> trigger pa10ctsl Rule_pa10ctsl:0 >> action pa10ctsl Rule_pa10ctsl:0 >> end InReach:0 >> L The rules must be enabled. This will be shown later in the setup sequence. 4. Example Create the SNMP Trap Client: InReach:0 >> config Config:0 >> snmp Snmp:0 >> get client 0 x.x.x.x Snmp:0 >> set client 0 x.x.x.x Snmp:0 >> trap client 0 x.x.x.x Snmp:0 >> exit Config:0 >> snmp enable The LX Unit must have a trap client configured. Config:0 >> exit InReach:0 >> L x.x.x.x is the target SNMP management system IP address. 5. Create the Notification Profile for the Service: Example InReach:0 >> config You can create additional service profiles. Config:0 >> notification Notification:0 >> profile service ricksnmp snmp Notification:0 >> end InReach:0 >> LX Series Configuration Guide Configuring Alarm Inputs via Trigger Action Rules 19-7 L See the LX-Series Configuration Guide for more information. 6. Example Create the Notification Profile for the user: InReach:0 >> config Config:0 >> notification Notification:0 >> profile user ricksnmp service ricksnmp Noti_User_Info:0 >> facility user Noti_User_Info:0 >> priority notice Noti_User_Info:0 >> exit Notification:0 >> end InReach:0 >> 7. Enable the Rules: L Each rule can be enabled when it is created with the single command enable. In this step we will enable all rules configured in one step. Example InReach:0 >> config Config:0 >> trigger rule all enable Config:0 >> exit InReach:0 >> 8. 9. Example Select DTR or RTS as the controlling voltage for the Alarm Input signal. In this example DTR is used to provide the controlling voltage and the port # is port 10. Set the selected signal up as a Control Output with a default High state: InReach:0 >> config port async 10 access control InReach:0 >> control port async 10 dtr high L The control port command can be used to test the functionality of the configuration. Alarm Input/Control Output Points 19-8 Using Signal Notice to Set Up a Trigger-Action-Rule Using Signal Notice to Set Up a Trigger-Action-Rule The Trigger-Action-Rule setup can be simplified through the use of the Signal-Notice capability. X To create the Trigger, Rule and Action Use the following commands: Example This command creates two Triggers, two Rules and two Actions for the target signal on the target port with the form pa10ctsup and pa10ctsdn. A port range can be specified. InReach:0 >> config Config:0 >> port async 10 signal cts enable Config:0 >> exit InReach:0 >> Signal-Notice defaults to logging messages in syslog at a default level of notice. If the alarm circuit that is attached to the port in the preceding example is a normally closed contact and everything is setup correctly the user will receive an SNMP message when the DTR signal is transitioned via the software commands. In normal use the DTR signal will remain in the High state and changes at the physical contact will cause the messages to be generated. LX Signal Notice Ease-of-Use This feature allows you to use substitution characters for port, signal, and current state within the action command. It is an automated way of creating up to 192 trigger actions and rules using one or two simple commands. The % character is reserved for character substitutions. Syntax %p for port number %s for signal (CTS, DSR-DCD) %c for current state (high or low) %% translates to % Async 1-2:0 >>signal action notify message signal %s is %c on port %p LX Series Configuration Guide LX Signal Notice Ease-of-Use 19-9 The substitution is translated into the correct command message for the applicable port, signal, and state. For this action command to function, notification profiles must be configured. The following is an ease-of-use example: 1. Example Enter the range of ports on which to configure signal notification: Config:0 >>port async 1 2 2. Example Enable which signal to monitor (CTS, DSR-DCD, or all) for all ports within the port range: Async 1-2:0 >>signal cts enable where all monitors both CTS and DSR-DCD for High and Low rates. 3. Enter the signal action action command, using substitute characters: Example Async 1-2:0 >>signal action send trap message signal %s is %c on port %p This command generates the following action commands: Examples send trap message signal CTS is HIGH on port 1 send trap message signal CTS is LOW on port 2 L For the send trap command to function, the LX requires a configured SNMP trap client, and that SNMP be enabled. Alarm Input/Control Output Points 19-10 Port Async Signal Notice GUI Configuration Port Async Signal Notice GUI Configuration Several changes were made to the Port Async Signal Notice Configuration window. X To access the Port Async Signal Notice Configuration window 1. 2. 3. 4. Go to Port: Async and then choose a Port tab. At the Console window, click Signal Notif at the bottom of the window. The Signal Notif window appears. Select the number of the port(s) on which to configure or remove Signal Notification. Select Signal Notify. After you select the signals to track or remove, choose the options add and remove, or select the enable and disable options under Signal Status. Click OK or Apply to save your changes. If necessary, you can check the Action Command checkbox to change the default option command, then click Apply for your configuration to take affect. You can now run signal notice on a port of access type control. 5. LX Series Configuration Guide Configuring IPv6 20-1 CHAPTER 20 Configuring IPv6 This chapter describes how to configure IPv6. L The minimum MTU (Maximum Transmission Unit) size is 1280 (bytes) for an IPv6 interface. Setting the size below 1280 turns off IPv6. It also describes the command syntax for the ping, ssh, and telnet commands, which now support IPv6. Configuring IPv6 20-2 Configuring IPv6 Internet Protocol Configuring IPv6 Internet Protocol The major changes from IPv4 to IPv6 fall primarily into the following categories: Scope-Global Addressing Scope-Local Addressing 6to4 Tunneling X To configure IPv6 stateless autoconfiguration Example Use the following command syntax to enable or disable stateless auto-configuration of the IPv6 Scope-Global Address: Intf 1-1:0 >>ipv6 stateless autoconfiguration Intf 1-1:0 >>no ipv6 stateless autoconfiguration X To configure the number of IPv6 addresses on an interface Use the following command syntax to define the maximum number of IPv6 addresses assigned to an ethernet interface. The range is 1-4. Syntax Intf 1-1:0 >>ipv6 maximum addresses <number_of_addresses> Example Intf 1-1:0 >>ipv6 maximum addresses 4 X To set the number of IPv6 addresses on an interface to default Example Use the following command syntax to set the maximum number of IPv6 addresses assigned to an Ethernet interface to the default (4). Intf 1-1:0 >>ipv6 default maximum addresses LX Series Configuration Guide Configuring IPv6 Internet Protocol 20-3 X To configure the number of duplicate address detection probes to send Use the following command syntax to define the number of duplicate address detection probes to send when attempting to configure an IPv6 address on an interface. The range is 1-5. Syntax Intf 1-1:0 >>ipv6 probes <number_of_probes> Example Intf 1-1:0 >>ipv6 probes 5 X To set the number of duplicate address detection probes to the default Use the following command syntax to set the number of duplicate address detection probes to the default (1). Example Intf 1-1:0 >>ipv6 default probes X To configure or deleting a scope-global IPv6 address Use the following command syntax to configure or delete a Scope-Global IPv6 address if there are no routers advertising addresses, or if to configure another address on an interface. Intf 1-1:0 >>ipv6 address <ipv6_address/prefixLength> device <ethernet_device> Intf 1-1:0 >>no ipv6 address <ipv6_address/prefixLength> device <ethernet_device> Example Intf 1-1:0 >>ipv6 address 3ffe:303:14:42a0:9cff:fe00:8ad/64 device eth0 Intf 1-1:0 >>no ipv6 address 3ffe:303:14:42a0:9cff:fe00:8ad/64 device eth0 Configuring IPv6 20-4 Configuring IPv6 Internet Protocol X To configure or delete a route Use the following command syntax to configure or delete a route for the ipv6_address/prefixLength via the ipv6_address of the specified ethernet device. Syntax Config:0 >>ipv6 route address <ipv6_address/ prefixLength> device <ethernet_device> via <ipv6_address> Config:0 >>no ipv6 route address <ipv6_address/ prefixLength> device <ethernet_device> via <ipv6_address> Example Config:0 >>ipv6 route address 3ffe:303:14:42a0:9cff:fe00:8ad/64 device eth0 via 3ffe:303:14:42a0:9cff:fe00:8ac Config:0 >>no ipv6 route address 3ffe:303:14:42a0:9cff:fe00:8ad/64 device eth0 via 3ffe:303:14:42a0:9cff:fe00:8ac X To configure or delete a neighbor entry Use the following command syntax to configure or delete a neighbor entry for the destination ipv6_address whose ethernet address is the <ethernet_address> of the specified ethernet device. Syntax Config:0 >>ipv6 neighbor address <ipv6_address_of_ neighbor> lladdr <eth_address_of_neighbor> device <ethernet_device> Config:0 >>no ipv6 neighbor address <ipv6_address_of_ neighbor> lladdr <eth_address_of_neighbor> device <ethernet_device> Example Config:0 >>ipv6 neighbor address fe80::220:edff:febe:3cae lladdr 00:20:ed:be:3c:ae device eth0 Config:0 >>no ipv6 neighbor address fe80::220:edff:febe:3cae lladdr 00:20:ed:be:3c:ae device eth0 LX Series Configuration Guide Configuring IPv6 Internet Protocol 20-5 X To configure standard on-link tunneling Use the following command syntax to configure Standard OnLink tunneling on an interface going to any remote IPv4 host supporting tunneling on your local link. The command word “any” generates the tunnel’s local IPv6 address automatically. Syntax Config:0 >>ipv6 tunnel <tunnel_name> remote any local <ipv4_address_of_eth0> enable Example Config:0 >>ipv6 tunnel 6to4local remote any local 140.179.100.50 enable The maximum amount of tunnels per interface that can be configured is 4 (non-configurable). The tunnel name can be up to 10 characters in length. The tunnel names must be unique. If you reconfigure the IPv4 address on the “ethx” interface and a matching tunnel exists, the LX must dynamically reconfigure the existing 6to4 tunnel interface accordingly and present you with a message to that effect. If you delete the IPv4 address on the “ethx” interface and a matching tunnel exists, the LX must delete the existing 6to4 tunnel interface accordingly and present you with a message to that effect. Configuring IPv6 20-6 Configuring IPv6 Internet Protocol X To configure a remote tunnel via a tunnel broker Use the following command syntax to configure a remote tunnel via a tunnel broker: Syntax Config:0 >>ipv6 tunnel <tunnel_name> remote <ipv4_ address> ipv6 address <ipv6_address/prefixLength> local <ipv4_address_of_eth0> enable L MRV Communications is not responsible for acquiring the broker service for the end user. It is up to the user to subscribe to a tunnel broker who will provide the necessary configuration information. Example Config:0 >>ipv6 tunnel rem-6to4 remote 3ffe:303:14:42a0:9cff:fe00:8ad/64 ipv6 address 3ffe:303:14:42a0:9cff:fe00:8ad/65 local 140.179.100.50 enable The maximum amount of tunnels per interface that can be configured is 4 (non-configurable). The tunnel name can be up to 10 characters in length. The tunnel names must be unique. If you reconfigure the IPv4 address on the “ethx” interface and a matching tunnel exists, the LX must dynamically reconfigure the existing 6to4 tunnel interface accordingly and present you with a message to that effect. If you delete the IPv4 address on the “ethx” interface and a matching tunnel exists, the LX must delete the existing 6to4 tunnel interface accordingly and present you with a message to that effect. LX Series Configuration Guide Configuring IPv6 Internet Protocol 20-7 X To delete a tunnel Use the following command syntax to delete a tunnel, or to delete all tunnels: Syntax Config:0 >>no ipv6 tunnel all|<tunnel_name> Example Config:0 >>no ipv6 tunnel all Config:0 >>no ipv6 tunnel rem-6to4 X To configure the tunnel packet TTL Use the following command syntax to define the value for the packet TTL. The range is 0-255: Syntax Config:0 >>ipv6 tunnel <tunnel_name> ttl <ttl_value> Example Config:0 >>ipv6 tunnel rem-6to4 ttl 60 X To set the tunnel packet TTL to default Use the following command syntax to set the value of the packet TTL to the default (255): Syntax Config:0 >>ipv6 tunnel <tunnel_name> default ttl Example Config:0 >>ipv6 tunnel rem-6to4 default ttl Configuring IPv6 20-8 Configuring IPv6 Internet Protocol X To configure IPv6 on Network Time Protocol (NTP) Use the following command syntax to configure an NTP Server IPv6 address, or to delete all NTP Server addresses: Syntax Config:0 >>ntp server ipv6 address <ipv6_address> Config:0 >>no ntp server address Example Config:0 >>ntp server ipv6 address 3ffe:303:14:4:2a0:9cff:fe00:8ad X To configure an alternate IPv6 address on Network Time Protocol (NTP) Use the following command syntax to configure an alternate NTP Server IPv6 address or delete all alternate NTP Server addresses: Syntax Config:0 >>ntp server alternate ipv6 address <ipv6_address> Config:0 >>no ntp server alternate address L The new NTP daemon supports configuration of an alternate NTP server. You can configure the Primary NTP Server and the Alternate NTP Server with either IPv4 or IPv6 addressing. Example Config:0 >>ntp server alternate ipv6 address 3ffe:303:14:4:2a0:9cff:fe00:8ad X To configure a source interface on Network Time Protocol (NTP) Optionally, the NTP Source Interface allows you to configure which configured interface’s IPv6 source address to report when contacting the target server. In this case, this value defaults to interface 1. Use the following command syntax to specify the source address the LX sends when contacting the NTP server. Syntax Config:0 >>ntp source interface <interface_number> LX Series Configuration Guide Configuring IPv6 Internet Protocol 20-9 Example Config:0 >>ntp source interface 1 X To configure a service name and address Use the following command syntax to configure an IPv6 Service Name and Address: Syntax Config:0 >>service name <name> ipv6 address <ipv6_address> port <port_number> Example Config:0 >>service name Finance_Server ipv6 address 3ffe:303:14:4:2a0:9cff:fe00:8ad port 23 X To view the Service Enter the show service command. X To configure a RADIUS Primary Accounting Server IPv6 address Use the following command syntax to configure a primary RADIUS accounting server IPv6 address: Syntax AAA:0>>radius primary accounting server ipv6 address <ipv6_address> Example AAA:0>>radius primary accounting server ipv6 address 3ffe:303:14:4:2a0:9cff:fe00:8ad X To delete a RADIUS Primary Accounting Server IPv6 address Use the following command: AAA:0>>radius primary accounting server ipv6 address ::0 Configuring IPv6 20-10 Configuring IPv6 Internet Protocol X To configure a RADIUS Secondary Accounting Server IPv6 address Use the following command syntax to configure a secondary RADIUS accounting server IPv6 address: Syntax AAA:0>> radius secondary accounting server ipv6 address <ipv6_address> Example AAA:0>> radius secondary accounting server ipv6 address 3ffe:303:14:4:2a0:9cff:fe00:8ad X To delete a RADIUS Secondary Accounting Server IPv6 address Use the following command: AAA:0>>radius secondary accounting server ipv6 address ::0 X To configure a RADIUS Primary Authentication Server IPv6 address Use the following command syntax to configure a primary RADIUS authentication server IPv6 address: Syntax AAA:0>> radius primary authentication server ipv6 address <ipv6_address> Example AAA:0>>radius primary authentication server ipv6 address 3ffe:303:14:4:2a0:9cff:fe00:8ad X To delete a RADIUS Primary Authentication Server IPv6 address Use the following command: AAA:0>>radius primary authentication server ipv6 address ::0 X To configure a RADIUS Secondary Authentication Server IPv6 address Use the following command syntax to configure a secondary RADIUS authentication server IPv6 address. LX Series Configuration Guide Configuring IPv6 Internet Protocol 20-11 Syntax AAA:0>> radius secondary authentication server ipv6 address <ipv6_address> Example AAA:0>> radius secondary authentication server ipv6 address 3ffe:303:14:4:2a0:9cff:fe00:8ad X To delete a RADIUS Secondary Authentication Server IPv6 address Use the following command: AAA:0>>radius secondary authentication server ipv6 address ::0 X To configure the Primary DNS address Use the following command syntax to configure a primary DNS IPv6 server address: Syntax Config:0>> dns primary ipv6 <ipv6_address> Example Config:0>> dns primary ipv6 3ffe:303:14:4:2a0:9cff:fe00:8ad X To delete a Primary DNS address Use the following command: Config:0>> dns primary ipv6 : X To configure a Secondary DNS address Use the following command syntax to configure a secondary DNS IPv6 server address: Syntax Config:0>> dns secondary ipv6 <ipv6_address> Example Config:0>> dns secondary ipv6 3ffe:303:14:4:2a0:9cff:fe00:8ad X To delete a Secondary DNS address Use the following command: Config:0>> dns secondary ipv6 ::0 Configuring IPv6 20-12 Viewing IPv6 Status X To view IPv6 characteristics Use the show interface <interface_number> ipv6 characteristics command to display the Interface IPv6 Configured Characteristics Screen. Figure 20.1, “Interface IPv6 Characteristics Screen" shows an example of this screen: Time: Interface Name: Stateless Autoconfig: Maximum DAD Probes: Global Address/Prefix: Global Address/Prefix: Interface_1 Enabled Mon, 26 Aug 2002 09:56:22 UTC Bound to : eth0 Maximum Addresses: 4 1 3ffe:303:14:4:2a0:9cff:fe00:8ad/64 3ffe:405:22:14:2a0:9cff:fe00:8ad/64 Figure 20.1 Interface IPv6 Characteristics Screen Viewing IPv6 Status Use the show interface <interface_number> ipv6 status command to display the Interface IPv6 Status Screen. Figure 20.2, “Interface IPv6 Status Screen" shows an example of this screen: Time: Interface Name: Interface_1 Mon, 26 Aug 2002 12:10:36 UTC Bound to : eth0 3: eth0: <BROADCAST,MULTICAST,UP> mtu 1500 qlen 1000 inet6 fe80::2a0:9cff:fe00:8ad/64 scope link valid_lft forever preferred_lft forever inet6 fe80::2a0:9cff:fe00:8ad/64 scope global dynamic valid_lft 258935sec preferred_lft 602345sec Figure 20.2 Interface IPv6 Status Screen LX Series Configuration Guide Viewing the IPv6 NTP Address 20-13 X To view IPv6 tunnel information Use the show ipv6 tunnel all|<tunnel_name> command to display the IPv6 Tunnel Information Screen. Use the show ipv6 tunnel all command to display information about all current tunnels. Use the show ipv6 tunnel <tunnel_name> command to display information on a specific tunnel. Figure 20.3, “IPv6 Tunnel All Information Screen" shows an example of the screen: Tunnel Tunnel Tunnel Tunnel Tunnel Name Address: Local Address: Remote Address: TTL: 6to4local Tunnel Tunnel Tunnel Tunnel Tunnel Name Address: Local Address: Remote Address: TTL: rem-6to4 Figure 20.3 2002:8cb3:a940::1/16 140.179.100.50 any 244 2001:560:1f01:ffff::840/127 140.179.100.26 any 255 IPv6 Tunnel All Information Screen Viewing the IPv6 NTP Address Use the show ntp characteristics command to display the NTP IPv6 Address on the NTP Characteristics Screen. Figure 20.4, “NTP Characteristics Screen with NTP IPv6 Address" shows an example of this screen with the NTP IPv6 Server field highlighted: Time: NTP Daemon: Enabled NTP Server: 120.119.149.160 NTP IPv6 Server: NTP IPv6 Server Alternate: Tue, 11 Jul 2006 09:33:26 US/EASTERN NTP Source Interface: 1 NTP Server Alternate: 0.0.0.0 : ::0 Figure 20.4 NTP Characteristics Screen with NTP IPv6 Address Configuring IPv6 20-14 Viewing IPv6 Routes Viewing IPv6 Routes Use the show ipv6 routes device <interface_name> command to display the IPv6 route information. Figure 20.5, “IPv6 Routes Screen" shows an example of this screen: 3ffe:303:11:2::/64 proto kernel metric 256 mtu 1280 advmss 1220 metric 10 64 fe80::/64 metric 256 mtu 1280 advmss 1220 metric 10 64 ff00::/8 metric 256 mtu 1280 advmss 1220 metric 10 1 default via fe80::220:edff:febe:3caf proto kernel metric 1024 expires 29sec mtu 1280 advmss 1220 metric 10 64 Figure 20.5 IPv6 Routes Screen X To view IPv6 neighbors Use the show ipv6 neighbor device <interface_name> command to show the IPv6 neighbor information. Figure 20.6, “IPv6 Neighbors Screen" shows an example of this screen: fe80::220:edff:febe:3caf lladdr 00:20:ed:be:3c:af PERMANENT fe80::220:edff:febe:3cae lladdr 00:20:ed:be:3c:ae router STALE Figure 20.6 IPv6 Neighbors Screen LX Series Configuration Guide Viewing IPv6 Routes 20-15 X To view the Primary and Secondary Radius IPv6 addresses Use the show radius characteristics command to display the Radius Characteristics screen. Figure 20.7, “Radius Characteristics Screen" shows an example with the IPv6 addresses highlighted: Time: Tue, 11 Jul 2006 09:09:48 US/EASTERN Primary RADIUS Authentication Server: IP Address: 0.0.0.0 RADIUS Auth. UDP Port: 1812 IPv6 Address: ::0 Secret: Not configured Timeout: 5 Retry: 3 Secondary RADIUS Authentication Server: IP Address: 0.0.0.0 RADIUS Auth. UDP Port: 1812 IPv6 Address: ::0 Secret: Not configured Timeout: 5 Retry: 3 Primary RADIUS Accounting Server: IP Address: 0.0.0.0 RADIUS Acct. UDP Port: 1813 IPv6 Address: ::0 Secret: Not configured Timeout: 5 Retry: 3 Secondary RADIUS Accounting Server: IP Address: 0.0.0.0 RADIUS Acct. UDP Port: 1813 IPv6 Address: ::0 Secret: Not configured Timeout: 5 Retry: 3 Radius Accounting Server Period: 5 Local Subscriber: Disabled Source Interface: 1 Inbound RADIUS Authentication Serial Ports: Outbound RADIUS Authentication Serial Ports: RADIUS Accounting Serial Ports: RADIUS Authentication Interfaces: RADIUS Accounting Interfaces: Figure 20.7 Radius Characteristics Screen Configuring IPv6 20-16 Viewing IPv6 Routes X To view the Primary and Secondary DNS IPv6 server addresses Use the show system ip characteristics command to display the System IP Characteristics screen. Figure 20.8, “System IP Characteristics Screen" shows an example of this screen with the Primary and Secondary DNS IPv6 addresses highlighted: Time: Hostname: Domain Name suffix: Gateway: Primary DNS: Secondary DNS: Primary IPv6 DNS: Secondary IPv6 DNS: Wed, 21 Feb 2007 14:02:29 US/EASTERN aspdemo bos.mrv.com 0.0.0.0 120.159.128.17 120.159.176.254 ::0 ::0 Figure 20.8 System IP Characteristics Screen LX Series Configuration Guide IPv6 Additions to Ping, SSH, and Telnet 20-17 IPv6 Additions to Ping, SSH, and Telnet This section describes the syntax for the User level and Superuser level commands ping, ssh, and telnet, which now support IPv6. Table 20.1 Command Syntax for ping, ssh, and telnet Command Syntax Example Ping IPv6 InReach:0 >>ping [IPv6] InReach:0 >>ping ipv6 [<ip_address or ipv6_ address>|NAME] fe80::220:edff:fe4B:sc67 InReach:0 >>ssh [IPv6] InReach:0 >>ssh ipv6 [<ip_address or ipv6_ address> [NUMBER]]|[NAME [NUMBER]] [LOGIN NAME] fe80::220:edff:fe4B:sc67 InReach:0 >>telnet [IPv6] [<ip_address or ipv6_ address> [NUMBER]]|[NAME [NUMBER]] [<window_size>] InReach:0 >>telnet ipv6 SSH IPv6 Telnet IPv6 fe80::220:edff:fe4B:sc67 Configuring IPv6 20-18 Web Browser Support for IPv6 Web Browser Support for IPv6 The following web browsers have been validated to support IPv6 mode of operation with the LX-Series GUI: Mozilla (V1.7.8 for Linux) Microsoft Internet Explorer for Windows XP and preceding Mozilla supports the use of literal non Link-Local IPv6 addresses, as well as DNS names that translate to IPv6 addresses. Internet Explorer does not support literal IPv6 addresses, but does support DNS names and translate into IPv6 addresses. Neither browser supports the use of Link-Local IPv6 addresses, whether they be literal or DNS mapped addresses. Section 11.7 of RFC4007 explains that Link-Local addresses should not be used as URLs. LX Series Configuration Guide PART 3 Part 3 Additional Information A-1 APPENDIX A RADIUS Authentication RADIUS authentication occurs through a series of communications between the LX unit and the RADIUS server. After RADIUS authenticates a user, the LX unit provides that user with access to the appropriate network services. The RADIUS server maintains a database that contains user authentication and network service access information. A-2 RADIUS Authentication Process RADIUS Authentication Process The following example describes the steps in the RADIUS authentication process. In this example, the user attempts to gain access to an LX asynchronous port. 1. 2. The LX unit prompts the user for a username and password. The LX unit takes the username and password and creates an access-request packet identifying the LX unit making the request, the username and password, and the port being used. The LX unit then sends the access-request packet to the designated RADIUS server for authentication. L The user password is encrypted to prevent it from being intercepted and reused by an unwanted user. This is done by generating a random vector and placing it in the request header. A copy of the random vector is MD5 encoded using the configured secret. The user’s password is then encrypted by XORing it with the encoded copy of the random vector. 3. 4. 5. 6. The RADIUS server validates the request and then decrypts the password. The username and password are authenticated by the RADIUS server. Upon successful authentication, the RADIUS server sends an access-accept packet containing any specific configuration information associated with that user. The LX unit then grants the user the services requested. LX Series Configuration Guide RADIUS Authentication Process A-3 If at any point in the authentication process conditions are not met, the RADIUS server sends an authentication rejection to the LX unit and the user is denied access to the network. Figure 2.A.1, “RADIUS Authentication Process” shows an example of the RADIUS authentication process. User attempts to gain ac cess. Ac c ess to desired services is granted. LX unit sends access-request pac ket for authentic ation. Ac c ess-ac c ept returned to LX unit. Radius Server Host authenticates the user. Figure A.1 RADIUS Authentication Process The LX implementation of RADIUS supports the use of RADIUS secondary servers. The RADIUS secondary server is used when the RADIUS primary server can’t be accessed. A-4 RADIUS Authentication Attributes RADIUS Authentication Attributes Figure A.1 lists the RADIUS Authentication Attributes that are supported on the LX unit. L Some attributes appear in start records, but the majority of attributes appear in stop records (a few also appear in acct-on and acct-off records). RADIUS allows most authentication and configuration attributes to be logged. Table A.1 Supported RADIUS Authentication Attributes Attribute Name Description 01 User-Name Name of the user to authenticate. 02 User-Password The password for the user to authenticate. 03 CHAP-Password Indicates the CHAP challenge value found in the CHAP-Challenge attribute. 04 NAS-IP-Address IP address associated with the LX unit. 05 NAS-Port Port or circuit number associated with the request. 06 Service-Type Type of service allowed for the connection. The supported types are the following: NAS-Prompt Allows local port access for interactive sessions. The user is prohibited from accessing the Superuser command mode. This is true for local port access, Interface virtual port access, and access using the GUI. Authenticate-Only Allows local port access for interactive sessions, user is prohibited from accessing the Superuser Command Mode. This Service Type is allowed for local port access, Interface virtual port access and access using the GUI. In each case, the user is prohibited from Superuser access. LX Series Configuration Guide RADIUS Authentication Attributes A-5 Table A.1 Supported RADIUS Authentication Attributes (Continued) Attribute Name Description No-Service-Type Allows local port access for interactive sessions, user is prohibited from accessing the Superuser Command Mode. Administrative-User Allows local port access for interactive sessions. The user is allowed access to Superuser and Configuration Command Modes. This is true for local port access, Interface virtual port access and access using the GUI. Callback-NAS-Prompt After a Dialback connection is completed, the user will not have Superuser privileges. Callback-Administrative After a Dialback connection is completed, the user will have Superuser privileges. Framed Allows local port access for a Dial-in PPP user. Outbound-User Allows only remote port access. If the asynchronous remote-accessed port is configured for outbound RADIUS authentication, the LX requires the user's service-type to be Outbound-User; otherwise the user’s access is rejected. L All remote access ports on the LX require a Service Type of OutboundUser. 07 Framed-Protocol Used with a framed service type. Indicates the type of framed access (for example, PPP). 08 Framed-IP-Address The address to be configured for the user. 13 Framed-Compression The compression protocol for the circuit. 19 Callback - Number The Callback number in the packet will be used to call back the subscriber for a Callback (Dialback) connection. A-6 RADIUS Authentication Attributes Table A.1 Supported RADIUS Authentication Attributes (Continued) Attribute Name Description 24 State (challenge/ response) Sent by the server to the client in an Access-Challenge, and must be sent unmodified from the client to the server in any Access-Request reply. 25 Class Sent by the server , and then sent unmodified by the client to the accounting server. 28 Idle Timeout The amount of time (in seconds) before the idle user is disconnected. The minimum is 60 seconds (seconds are converted to minutes on the LX and rounded to the nearest minute). 32 NAS-Identifier The ID that identifies the LX unit to the RADIUS server. 40 Acct-Status-Type Indicates whether the session has started or stopped. The valid values are: 1 - Start 2 - Stop 42 Acct-Input-Octets A count of the input octets for the session. 43 Acct-Output-Octets A count of the output octets for the session. 44 Acct-Session-ID Session Identifier for the user login. 47 Acct-Input-Packets A count of the input packets for a PPP session. 48 Acct-Output-Packets A count of the output packets for a PPP session. 60 CHAP-Challenge 61 NAS-Port-Type LX Series Configuration Guide The type of port being used. The valid values are: 0 - Asynchronous RADIUS Access Request Packet Service Type A-7 RADIUS Access Request Packet Service Type If you telnet or SSH to a remote port, the service type is: Outbound For a PPP connection, the service type is: Framed User For any other access method, the service type is: NAS Prompt This allows the RADIUS service to distinguish where the client is connecting to. A-8 RADIUS Access Request Packet Service Type LX Series Configuration Guide B-1 APPENDIX B About RADIUS and TACACS+ Accounting RADIUS Accounting, and TACACS+ Accounting, are client/server account logging schemes that allow you to log user account information to a remote server in a per-client file. The file or record can contain information such as the user who logged in, the duration of the session, port number, Client IP address, and the number of bytes/packets that were processed by the LX unit. The use of RADIUS Accounting, or TACACS+ Accounting, solves the problems associated with local storage of large numbers of records. It also provides a method for billing customers for account usage. L RADIUS Accounting is a developing standard that is vendor extensible by design, including a provision for vendor-specific extensions. This allows for greater expandability of accounting information in the future. The following section describes RADIUS Accounting. See “TACACS+ Accounting Client Operation” on page B-4 for information about TACACS+ Accounting. B-2 RADIUS Accounting Client Operation RADIUS Accounting Client Operation If a user is validated under RADIUS, an accounting request (a start request) is sent to the RADIUS accounting server. As a result of the start request, a start record containing the following is created for each user session: User-name NAS-Identifier NAS-IP-Address NAS-Port NAS-Port-Type Acct-Status-Type Acct-Session-ID Acct-Input-Octets Acct-Output-Octets Acct-Input-Packets (PPP) Acct-Output-Packets (PPP) l The majority of the accounting record information appears in the stop record. The stop record is created when the port is logged out, provided that a matching start record was previously sent. The information in the stop record includes everything in the start record, and additional information, such as session time and bytes/packets transferred. There are two special records that are logged for RADIUS Accounting. Accounting-on Logged when the LX unit is initially started. Accounting-off Logged, if possible, when the LX unit is shut down. These records only contain the NAS-IP-Address. These accounting requests are only attempted if the RADIUS protocol is enabled because they only relate to the LX unit using the protocol and not to accounting on a specific port. LX Series Configuration Guide RADIUS Accounting Attributes B-3 RADIUS Accounting Attributes Table 1 lists the RADIUS Accounting Attributes that are supported on the LX unit. Table 1 Supported RADIUS Accounting Attribute Description 01 User-Name Name of the user to authenticate. 04 NAS-IP-Address IP address associated with the LX unit. 05 NAS-Port Port or circuit number associated with the request. 32 NAS-Identifier The ID that identifies the LX unit to the RADIUS server. 40 Acct-Status-Type Indicates whether the session has started or stopped. The valid values are: 1 - Start 2 - Stop 42 Acct-Input-Octets A count of the input octets for the session. 43 Acct-Output-Octets A count of the output octets for the session. 44 Acct-Session-ID Session Identifier for the user login. 47 Acct-Input-Packets A count of the input packets for a PPP session. 48 Acct-Output-Packets A count of the output packets for a PPP session. 61 NAS-Port-Type The type of port being used. The valid values are: 0 - Asynchronous B-4 TACACS+ Accounting Client Operation TACACS+ Accounting Client Operation If a user is validated under TACACS+, an accounting request (a start request) is sent to the TACACS+ accounting server. As a result of the start request, a start record containing the following is created for each user session: Start-time Bytes Bytes-in Bytes-out Paks (for PPP connections) Paks-in (for PPP connections) Paks-out (for PPP connections) Depending on the Accounting Period Interval, an accounting update request will be sent which will contain the same fields with the newer information. The majority of the accounting record information appears in the stop record. The stop record is created when the port is logged out, provided that a matching start record was previously sent. The information in the stop record includes everything in the start record, and the following: Stop-time Elapsed-time LX Series Configuration Guide TACACS+ Accounting Attributes B-5 TACACS+ Accounting Attributes Table 2 lists the TACACS+ Accounting Attributes that are supported on the LX unit. Table 2 Supported TACACS+ Accounting Attributes Attribute Description Service Either ppp for PPP connection, otherwise equals shell Protocol Equals ip in PPP connections only Task_id A unique ID for each set of start, update, and stop entries Start_time Time (in seconds since epoch) that the accounting started Stop_time Time (in seconds since epoch) that the accounting stopped Elapsed_time Number of seconds the user was logged on for Bytes Total number of bytes transferred Bytes_in Number of bytes received Bytes_out Number of bytes transmitted Paks Total number of packets transferred (for PPP connections) Paks_in Number of packets received (for PPP connections) Paks_out Number of packets transmitted (for PPP connections) B-6 TACACS+ Accounting Attributes LX Series Configuration Guide C-1 APPENDIX C TACACS+ Authentication and Authorization TACACS+ authentication occurs through a series of communications between the LX unit and the TACACS+ server. Once TACACS+ has authenticated a user, the LX unit provides that user with access to the appropriate network services. The TACACS+ server maintains a database that contains user authentication and network service access information. TACACS+ uses the Transport Control Protocol (TCP) on port 49 to ensure reliable transfer. The entire body of the packet is encrypted using a series of 16 byte MD5 hashes. The protocol is split up into 3 distinct categories: Authentication, Authorization, and Accounting. Authentication is the process of determining who the user is. Usually a user is required to enter in a user name and password to be granted access. Authorization is the process of determining what the user is able to do. The profile in the TACACS+ server should have a service of exec and a priv-lvl of 15 in order to access Superuser privileges, otherwise the user will only be able to be in user mode. Accounting records what the user has done and generally occurs after authentication and authorization. C-2 TACACS+ Authentication Example The TACACS+ superuser request attribute is independent from the TACACS+ login. The TACACS+ superuser request attribute is used to indicate which database to authenticate the superuser password against after a user is logged in. When a user types the enable command, and the TACACS+ superuser request is enabled, the enable password will be authenticated against the TACACS+ server database; otherwise it is checked against the LX database "system". TACACS+ Authentication Example The following example describes the steps in the TACACS+ authentication process. In this example, the user attempts to gain access to an LX asynchronous port. 1. 2. 3. 4. 5. 6. 7. The LX unit prompts the user for a username and password. The username is sent to the TACACS+ authentication start packet. The server responds with an authentication reply packet, which will either allow the user access or require a password. If a password is required, the user is prompted for one and the LX sends it to the server in an authentication continue packet. The server responds with a packet that contains an authentication status pass or an authentication status fail. If the request is successful, the user will be allowed to log in; otherwise the user will have two more chances to receive an authentication status pass back from the server. The LX unit then grants the user the services requested. LX Series Configuration Guide TACACS+ Authentication Attributes C-3 TACACS+ Authentication Attributes Table 1 lists the TACACS+ Authentication Attributes that are supported on the LX unit. Table 1 Supported TACACS+ Authentication Attributes Attribute Description 01 User-Name Name of the user to authenticate. 02 User-Password The password for the user to authenticate. If at any point in the authentication process conditions are not met, the TACACS+ server denies access to the network. Figure C-C.1 shows an example of the TACACS+ authentication process. User attempts to gain ac cess. Access to desired services is granted. LX unit initiates the authentication process. Authentication server authenticates the user. TACACS+ Server authenticates the user. Figure C.1 TACACS+ Authentication Process C-4 TACACS+ Authorization Attributes The LX implementation of TACACS+ supports the use of TACACS+ secondary servers. The TACACS+ secondary server is used when the TACACS+ primary server can’t be accessed. TACACS+ Authorization Attributes Table C.1 lists the TACACS+ Authorization Attributes that are supported on the LX unit. Table C.1 Supported TACACS+ Authorization Attributes Attribute Description 01 Auto-cmd Sends an auto-command. 02 Priv-level Set this value to 15 to enable rights. Auto Command The only valid command is “menu <menuname>”. The filename must already exist as a valid LX menu on the LX in the /config directory. If the menu does not exist, you are logged off after you are authenticated. If the menu does exist, you are prompted with the menu and will not be able to access the CLI. This attribute only applies if you are accessing the CLI (either remotely or locally). Example Enter the following in the TACACS+ configuration file on the TACACS+ server if to be presented with a menu: user bob { login = cleartext bob service = exec { autocmd = “menu demo_menu”} } where user bob is the username cleartext bob is the password exec is the login mode menu demo_menu is the menu file LX Series Configuration Guide Privilege Level C-5 Privilege Level L You must configure an authorization server address to access this privilege level. Refer to “Installing and Configuring a TACACS+ Server on a Network-Based Host” on page 2-26 for further information. You must set this value to the Superuser level. The level must be set to 15. Example Enter the following in the TACACS+ configuration file on the TACACS+ server if enable rights: user InReach { login = cleartext access service = exec { priv-lvl = 15} } where user InReach is the username cleartext access is the password exec is the login mode priv-lvl is the authorized level C-6 Privilege Level LX Series Configuration Guide D-1 APPENDIX D Linux Man Pages for iptables and ip6tables Commands This appendix contains the Linux man pages for the iptables command and the ip6tables command. See the man pages in this appendix for detailed information about the iptables command, which was introduced in Chapter 12, “Configuring iptables and ip6tables”. D-2 iptables man Pages iptables man Pages IPTABLES(8) IPTABLES(8) NAME iptables - IP packet filter administration SYNOPSIS iptables iptables iptables iptables iptables iptables iptables -[ADC] chain rule-specification [options] -[RI] chain rulenum rule-specification [options] -D chain rulenum [options] -[LFZ] [chain] [options] -[NX] chain -P chain target [options] -E old-chain-name new-chain-name DESCRIPTION Iptables is used to set up, maintain, and inspect the tables of IP packet filter rules in the Linux kernel. Several different tables may be defined. Each table con tains a number of built-in chains and may also contain user-defined chains. Each chain is a list of rules which can match a set of packets. Each rule specifies what to do with a packet that matches. This is called a `target', which may be a jump to a user-defined chain in the same table. TARGETS A firewall rule specifies criteria for a packet, and a target. If the packet does not match, the next rule in the chain is the examined; if it does match, then the next rule is specified by the value of the target, which can be the name of a user-defined chain or one of the special values ACCEPT, DROP, QUEUE, or RETURN. ACCEPT means to LX Series Configuration Guide let the packet through. DROP means to iptables man Pages D-3 drop the packet on the floor. QUEUE means to pass the packet to userspace (if supported by the kernel). RETURN means stop traversing this chain and resume at the next rule in the previous (calling) chain. If the end of a built-in chain is reached or a rule in a built-in chain with target RETURN is matched, the target specified by the chain policy determines the fate of the packet. TABLES There are current three independent tables (which tables are present at any time depends on the kernel configura tion options and which modules are present). -t, --table This option specifies the packet matching table which the command should operate on. If the kernel is configured with automatic module loading, an attempt will be made to load the appropriate module for that table if it is not already there. The tables are as follows: filter This is the default table. It contains the built-in chains INPUT (for packets coming into the box itself), FORWARD (for packets being routed through the box), and OUTPUT (for locally-generated packets). nat This table is consulted when a packet that creates a new connection is encountered. It consists of three built-ins: PREROUTING (for altering packets as soon as they come in), OUTPUT (for altering locally-generated packets before routing), and POSTROUTING (for altering packets as they are about to go out). mangle This table is used for special ized packet alteration. It has two built-in chains: PREROUTING (for altering incoming packets before routing) and OUTPUT (for altering locallygenerated packets before routing). OPTIONS The options that are recognized by iptables can be divided D-4 iptables man Pages into several different groups. COMMANDS These options specify the specific action to perform. Only one of them can be specified on the command line unless otherwise specified below. For all the long ver sions of the command and option names, you need to use only enough letters to ensure that iptables can differen tiate it from all other options. -A, --append Append one or more rules to the end of the selected chain. When the source and/or destination names resolve to more than one address, a rule will be added for each possible address combination. -D, --delete Delete one or more rules from the selected chain. There are two versions of this command: the rule can be specified as a number in the chain (starting at 1 for the first rule) or a rule to match. -R, --replace Replace a rule in the selected chain. If the source and/or destination names resolve to multiple addresses, the command will fail. Rules are num bered starting at 1. -I, --insert Insert one or more rules in the selected chain as the given rule number. So, if the rule number is 1, the rule or rules are inserted at the head of the chain. This is also the default if no rule number is specified. -L, --list List all rules in the selected chain. If no chain is selected, all chains are listed. It is legal to specify the -Z (zero) option as well, in which case LX Series Configuration Guide iptables man Pages D-5 the chain(s) will be atomically listed and zeroed. The exact output is affected by the other arguments given. -F, --flush Flush the selected chain. This is equivalent to deleting all the rules one by one. -Z, --zero Zero the packet and byte counters in all chains. It is legal to specify the -L, --list (list) option as well, to see the counters immediately before they are cleared. (See above.) -N, --new-chain Create a new user-defined chain by the given name. There must be no target of that name already. -X, --delete-chain Delete the specified user-defined chain. There must be no references to the chain. If there are, you must delete or replace the referring rules before the chain can be deleted. If no argument is given, it will attempt to delete every non-builtin chain in the table. -P, --policy Set the policy for the chain to the given target. See the section TARGETS for the legal targets. Only non-user-defined chains can have policies, and neither built-in nor user-defined chains can be policy targets. -E, --rename-chain Rename the user specified chain to the user sup plied name. This is cosmetic, and has no effect on the structure of the table. -h Help. Give a (currently very brief) description of D-6 iptables man Pages the command syntax. PARAMETERS The following parameters make up a rule specification (as used in the add, delete, insert, replace and append com mands). -p, --protocol [!] protocol The protocol of the rule or of the packet to check. The specified protocol can be one of tcp, udp, icmp, or all, or it can be a numeric value, repre senting one of these protocols or a different one. A protocol name from /etc/protocols is also allowed. A "!" argument before the protocol inverts the test. The number zero is equivalent to all. Protocol all will match with all protocols and is taken as default when this option is omit ted. -s, --source [!] address[/mask] Source specification. Address can be either a hostname, a network name, or a plain IP address. The mask can be either a network mask or a plain number, specifying the number of 1's at the left side of the network mask. Thus, a mask of 24 is equivalent to 255.255.255.0. A "!" argument before the address specification inverts the sense of the address. The flag --src is a convenient alias for this option. -d, --destination [!] address[/mask] Destination specification. See the description of the -s (source) flag for a detailed description of the syntax. The flag --dst is an alias for this option. -j, --jump target This specifies the target of the rule; i.e., what to do if the packet matches it. The target can be LX Series Configuration Guide iptables man Pages D-7 a user-defined chain (other than the one this rule is in), one of the special builtin targets which decide the fate of the packet immediately, or an extension (see EXTENSIONS below). If this option is omitted in a rule, then matching the rule will have no effect on the packet's fate, but the coun ters on the rule will be incremented. -i, --in-interface [!] [name] Optional name of an interface via which a packet is received (for packets entering the INPUT, FORWARD and PREROUTING chains). When the "!" argument is used before the interface name, the sense is inverted. If the interface name ends in a "+", then any interface which begins with this name will match. If this option is omitted, the string "+" is assumed, which will match with any interface name. -o, --out-interface [!] [name] Optional name of an interface via which a packet is going to be sent (for packets entering the FORWARD, OUTPUT and POSTROUTING chains). When the "!" argu ment is used before the interface name, the sense is inverted. If the interface name ends in a "+", then any interface which begins with this name will match. If this option is omitted, the string "+" is assumed, which will match with any interface name. [!] -f, --fragment This means that the rule only refers to second and further fragments of fragmented packets. Since there is no way to tell the source or destination ports of such a packet (or ICMP type), such a packet will not match any rules which specify them. When the "!" argument precedes the "-f" flag, the rule will only match head fragments, or unfrag mented packets. D-8 iptables man Pages -c, --set-counters PKTS BYTES This enables the administrater to initialize the packet and byte counters of a rule (during INSERT, APPEND, REPLACE operations) OTHER OPTIONS The following additional options can be specified: -v, --verbose Verbose output. This option makes the list command show the interface address, the rule options (if any), and the TOS masks. The packet and byte coun ters are also listed, with the suffix 'K', 'M' or 'G' for 1000, 1,000,000 and 1,000,000,000 multipli ers respectively (but see the -x flag to change this). For appending, insertion, deletion and replacement, this causes detailed information on the rule or rules to be printed. -n, --numeric Numeric output. IP addresses and port numbers will be printed in numeric format. By default, the pro gram will try to display them as host names, net work names, or services (whenever applicable). -x, --exact Expand numbers. Display the exact value of the packet and byte counters, instead of only the rounded number in K's (multiples of 1000) M's (mul tiples of 1000K) or G's (multiples of 1000M). This option is only relevant for the -L command. --line-numbers When listing rules, add line numbers to the begin ning of each rule, corresponding to that rule's position in the chain. --modprobe=<command> When adding or inserting rules into LX Series Configuration Guide a chain, use iptables man Pages D-9 command to load any necessary modules (targets, match extensions, etc). MATCH EXTENSIONS iptables can use extended packet matching modules. These are loaded in two ways: implicitly, when -p or --protocol is specified, or with the -m or --match options, followed by the matching module name; after these, various extra command line options become available, depending on the specific module. You can specify multiple extended match modules in one line, and you can use the -h or --help options after the module has been specified to receive help specific to that module. The following are included in the base package, and most of these can be preceded by a ! to invert the sense of the match. tcp These extensions are loaded if `--protocol tcp' is fied. It provides the following options: speci --source-port [!] [port[:port]] Source port or port range specification. This can either be a service name or a port number. An inclusive range can also be specified, using the format port:port. If the first port is omitted, "0" is assumed; if the last is omitted, "65535" is assumed. If the second port greater then the first they will be swapped. The flag --sport is an alias for this option. --destination-port [!] [port[:port]] Destination port or port range specification. flag --dport is an alias for this option. The --tcp-flags [!] mask comp Match when the TCP flags are as specified. The first argument is the flags which we should exam D-10 iptables man Pages ine, written as a comma-separated list, and the second argument is a comma-separated list of flags which must be set. Flags are: SYN ACK FIN RST URG PSH ALL NONE. Hence the command iptables -A FORWARD -p tcp --tcp-flags SYN,ACK,FIN,RST SYN will only match packets with the SYN flag set, and the ACK, FIN and RST flags unset. [!] --syn Only match TCP packets with the SYN bit set and the ACK and FIN bits cleared. Such packets are used to request TCP connection initiation; for example, blocking such packets coming in an interface will prevent incoming TCP connections, but outgoing TCP connections will be unaffected. It is equivalent to --tcp-flags SYN,RST,ACK SYN. If the "!" flag precedes the "--syn", the sense of the option is inverted. --tcp-option [!] number Match if TCP option set. udp These extensions are loaded if `--protocol udp' is fied. It provides the following options: speci --source-port [!] [port[:port]] Source port or port range specification. See the description of the --source-port option of the TCP extension for details. --destination-port [!] [port[:port]] Destination port or port range specification. See the description of the --destination-port option of the TCP extension for details. icmp This extension is loaded if `--protocol icmp' is speci fied. It provides the following option: LX Series Configuration Guide iptables man Pages D-11 --icmp-type [!] typename This allows specification of the ICMP type, which can be a numeric ICMP type, or one of the ICMP type names shown by the command iptables -p icmp -h mac --mac-source [!] address Match source MAC address. It must be of the form XX:XX:XX:XX:XX:XX. Note that this only makes sense for packets entering the PREROUTING, FORWARD or INPUT chains for packets coming from an ethernet device. limit This module matches at a limited rate using a token bucket filter: it can be used in combination with the LOG target to give limited logging. A rule using this extension will match until this limit is reached (unless the `!' flag is used). --limit rate Maximum average matching rate: specified as a num ber, with an optional `/second', `/minute', `/hour', or `/day' suffix; the default is 3/hour. --limit-burst number The maximum initial number of packets to match: this number gets recharged by one every time the limit specified above is not reached, up to this number; the default is 5. multiport This module matches a set of source or destination ports. Up to 15 ports can be specified. It can only be used in conjunction with -p tcp or -p udp. --source-port [port[,port]] Match if the source port is one of the given ports. D-12 iptables man Pages --destination-port [port[,port]] Match if the destination port is one of ports. the given --port [port[,port]] Match if the both the source and destination ports are equal to each other and to one of the given ports. mark This module matches the netfilter mark field associated with a packet (which can be set using the MARK target below). --mark value[/mask] Matches packets with the given unsigned mark value (if a mask is specified, this is logically ANDed with the mark before the comparison). owner This module attempts to match various characteristics of the packet creator, for locally-generated packets. It is only valid in the OUTPUT chain, and even this some packets (such as ICMP ping responses) may have no owner, and hence never match. --uid-owner userid Matches if the packet was created by a process with the given effective user id. --gid-owner groupid Matches if the packet was created by a process with the given effective group id. --pid-owner processid Matches if the packet was created by a process with the given process id. LX Series Configuration Guide iptables man Pages D-13 --sid-owner sessionid Matches if the packet was created by a the given session group. state This module, when combined with connection allows access to the connection tracking state packet. process in tracking, for this --state state where state is a comma separated list of the con nection states to match. Possible states are INVALID meaning that the packet is associated with no known connection, ESTABLISHED meaning that the packet is associated with a connection which has seen packets in both directions, NEW meaning that the packet has started a new connection, or other wise associated with a connection which has not seen packets in both directions, and RELATED mean ing that the packet is starting a new connection, but is associated with an existing connection, such as an FTP data transfer, or an ICMP error. unclean This module takes no options, but attempts to match pack ets which seem malformed or unusual. This is regarded as experimental. tos This module matches the 8 bits of Type of Service field in the IP header (ie. including the precedence bits). --tos tos The argument is either a standard name, (use iptables -m tos -h to see the list), or a numeric value to match. TARGET EXTENSIONS iptables can use extended target modules: the following D-14 iptables man Pages are included in the standard distribution. LOG Turn on kernel logging of matching packets. When this option is set for a rule, the Linux kernel will print some information on all matching packets (like most IP header fields) via the kernel log (where it can be read with dmesg or syslogd(8)). --log-level level Level of logging (numeric or see syslog.conf(5)). --log-prefix prefix Prefix log messages with the specified prefix; up to 29 letters long, and useful for distinguishing messages in the logs. --log-tcp-sequence Log TCP sequence numbers. This is a if the log is readable by users. security risk --log-tcp-options Log options from the TCP packet header. --log-ip-options Log options from the IP packet header. MARK This is used to set the netfilter mark value associated with the packet. It is only valid in the mangle table. --set-mark mark REJECT This is used to send back an error packet in response to the matched packet: otherwise it is equivalent to DROP. This target is only valid in the INPUT, FORWARD and OUTPUT chains, and user-defined chains which are only called from those chains. Several options control the nature of the LX Series Configuration Guide iptables man Pages D-15 error packet returned: --reject-with type The type given can be icmp-net-unreachable, icmphost-unreachable, icmp-port-unreachable, icmpproto-unreachable, icmp-net-prohibitedor icmp-hostprohibited, which return the appropriate ICMP error message (port-unreachable is the default). The option echo-reply is also allowed; it can only be used for rules which specify an ICMP ping packet, and generates a ping reply. Finally, the option tcp-reset can be used on rules which only match the TCP protocol: this causes a TCP RST packet to be sent back. This is mainly useful for blocking ident probes which frequently occur when sending mail to broken mail hosts (which won't accept your mail otherwise). TOS This is used to set the 8-bit Type of Service field in the IP header. It is only valid in the mangle table. --set-tos tos You can use a numeric TOS values, or use iptables -j TOS -h to see the list of valid TOS names. MIRROR This is an experimental demonstration target which inverts the source and destination fields in the IP header and retransmits the packet. It is only valid in the INPUT, FORWARD and PREROUTING chains, and user-defined chains which are only called from those chains. Note that the outgoing packets are NOT seen by any packet filtering chains, connection tracking or NAT, to avoid loops and other problems. SNAT This target is only valid in the nat table, in the D-16 iptables man Pages POSTROUTING chain. It specifies that the source address of the packet should be modified (and all future packets in this connection will also be mangled), and rules should cease being examined. It takes one option: --to-source <ipaddr>[-<ipaddr>][:port-port] which can specify a single new source IP address, an inclusive range of IP addresses, and optionally, a port range (which is only valid if the rule also specifies -p tcp or -p udp). If no port range is specified, then source ports below 512 will be mapped to other ports below 512: those between 512 and 1023 inclusive will be mapped to ports below 1024, and other ports will be mapped to 1024 or above. Where possible, no port alteration will occur. DNAT This target is only valid in the nat table, in the PRE ROUTING and OUTPUT chains, and user-defined chains which are only called from those chains. It specifies that the destination address of the packet should be modified (and all future packets in this connection will also be man gled), and rules should cease being examined. It takes one option: --to-destination <ipaddr>[-<ipaddr>][:port-port] which can specify a single new destination IP address, an inclusive range of IP addresses, and optionally, a port range (which is only valid if the rule also specifies -p tcp or -p udp). If no port range is specified, then the destination port will never be modified. MASQUERADE This target is only valid in the nat table, in the POSTROUTING chain. It should only be used with dynami cally assigned IP (dialup) connections: if you have a static IP address, you should use the SNAT target. Mas LX Series Configuration Guide iptables man Pages D-17 querading is equivalent to specifying a mapping to the IP address of the interface the packet is going out, but also has the effect that connections are forgotten when the interface goes down. This is the correct behavior when the next dialup is unlikely to have the same interface address (and hence any established connections are lost anyway). It takes one option: --to-ports <port>[-<port>] This specifies a range of source ports to use, overriding the default SNAT source port-selection heuristics (see above). This is only valid with if the rule also specifies -p tcp or -p udp). REDIRECT This target is only valid in the nat table, in the PRE ROUTING and OUTPUT chains, and user-defined chains which are only called from those chains. It alters the destina tion IP address to send the packet to the machine itself (locally-generated packets are mapped to the 127.0.0.1 address). It takes one option: --to-ports <port>[-<port>] This specifies a destination port or range or ports to use: without this, the destination port is never altered. This is only valid with if the rule also specifies -p tcp or -p udp). EXTRA EXTENSIONS The following extensions the standard distribution. are not included by default in ttl This module matches the time to live header. --ttl ttl Matches the given TTL value. TTL field in the IP D-18 iptables man Pages This target is used to modify the time to live field in the IP header. It is only valid in the mangle table. --ttl-set ttl Set the TTL to the given value. --ttl-dec ttl Decrement the TTL by the given value. --ttl-inc ttl Increment the TTL by the given value. ULOG This target provides userspace logging of matching pack ets. When this target is set for a rule, the Linux kernel will multicast this packet through a netlink socket. One or more userspace processes may then subscribe to various multicast groups and receive the packets. --ulog-nlgroup <nlgroup> This specifies the netlink group (1-32) the packet is sent. Default value is 1. to which --ulog-prefix <prefix> Prefix log messages with the specified prefix; up to 32 characters long, and useful fro distinguish ing messages in the logs. --ulog-cprange <size> Number of bytes to be copied to userspace. A value of 0 always copies the entire packet, regardless of its size. Default is 0 --ulog-qthreshold <size> Number of packet to queue inside kernel. this value to, e.g. 10 accumulates ten inside the kernel and transmits them as one multpart message to userspace. Default is backwards compatibility) LX Series Configuration Guide Setting packets netlink 1 (for iptables man Pages D-19 DIAGNOSTICS Various error messages are printed to standard error. The exit code is 0 for correct functioning. Errors which appear to be caused by invalid or abused command line parameters cause an exit code of 2, and other errors cause an exit code of 1. BUGS Check is not implemented (yet). COMPATIBILITY WITH IPCHAINS This iptables is very similar to ipchains by Rusty Rus sell. The main difference is that the chains INPUT and OUTPUT are only traversed for packets coming into the local host and originating from the local host respec tively. Hence every packet only passes through one of the three chains; previously a forwarded packet would pass through all three. The other main difference is that -i refers to the input interface; -o refers to the output interface, and both are available for packets entering the FORWARD chain. iptables is a pure packet filter when using the default `filter' table, with optional extension modules. This its size. Default is 0 --ulog-qthreshold <size> Number of packet to queue inside kernel. this value to, e.g. 10 accumulates ten inside the kernel and transmits them as one multpart message to userspace. Default is backwards compatibility) Setting packets netlink 1 (for DIAGNOSTICS Various error messages are printed to standard error. The D-20 iptables man Pages exit code is 0 for correct functioning. Errors which appear to be caused by invalid or abused command line parameters cause an exit code of 2, and other errors cause an exit code of 1. BUGS Check is not implemented (yet). COMPATIBILITY WITH IPCHAINS This iptables is very similar to ipchains by Rusty Rus sell. The main difference is that the chains INPUT and OUTPUT are only traversed for packets coming into the local host and originating from the local host respec tively. Hence every packet only passes through one of the three chains; previously a forwarded packet would pass through all three. The other main difference is that -i refers to the input interface; -o refers to the output interface, and both are available for packets entering the FORWARD chain. iptables is a pure packet filter when using the default `filter' table, with optional extension modules. This should simplify much of the previous confusion over the combination of IP masquerading and packet filtering seen previously. So the following options are handled differ ently: -j MASQ -M -S -M -L There are several other changes in iptables. SEE ALSO The iptables-HOWTO, which details more iptables usage, the NAT-HOWTO, which details NAT, and the netfilter-hackingHOWTO which details the internals. AUTHORS LX Series Configuration Guide iptables man Pages D-21 Rusty Russell wrote iptables, in early consultation with Michael Neuling. Marc Boucher made Rusty abandon ipnatctl by lobbying for a generic packet selection framework in iptables, then wrote the mangle table, the owner match, the mark stuff, and ran around doing cool stuff everywhere. James Morris wrote the TOS target, and tos match. Jozsef Kadlecsik wrote the REJECT target. Harald Welte wrote the ULOG target, TTL libipulog. match+target and The Netfilter Core Team is: Marc Boucher, James Morris, Harald Welte and Rusty Russell. Appendix 3 IPTABLES-SAVE(8) IPTABLES-SAVE(8) NAME iptables-save - Save IP Tables SYNOPSIS iptables-save [-c] [-t table] DESCRIPTION iptables-save is used to dump the contents of an IP Table in easily parseable format to STDOUT. Use I/O-redirection provided by your shell to write to a file. -c, --counters include the current values of all packet and byte counters in the output -t, --table tablename D-22 iptables man Pages restrict output to only one table. If output includes all available tables. not specified, BUGS None known as of iptables-1.2.1 release AUTHOR Harald Welte <[email protected]> SEE ALSO iptables-restore(8), iptables(8) The iptables-HOWTO, which details more iptables usage, the NAT-HOWTO, which details NAT, and the netfilter-hackingHOWTO which details the internals. Appendix 4 IPTABLES-RESTORE(8) IPTABLES-RESTORE(8) NAME iptables-restore - Restore IP Tables SYNOPSIS iptables-restore [-c] [-n] DESCRIPTION iptables-restore is used to restore IP Tables from data specified on STDIN. Use I/O redirection provided by your shell to read from a file -c, --counters restore the values of all packet and byte counters -n, --noflush don't flush the previous contents of the table. If not specified, iptables-restore flushes (deletes) all previous contents of the respective IP Table. BUGS None known as of iptables-1.2.1 release LX Series Configuration Guide ip6tables man Pages D-23 AUTHOR Harald Welte <[email protected]> SEE ALSO iptables-restore(8), iptables(8) The iptables-HOWTO, which details more iptables usage, the NAT-HOWTO, which details NAT, and the netfilter-hackingHOWTO which details the internals. See the man pages in this appendix for detailed information on the ip6tables command, which is introduced in Chapter 12, “Configuring iptables and ip6tables”. ip6tables man Pages IP6TABLES(8) IP6TABLES(8) NAME ip6tables - IPv6 packet filter administration SYNOPSIS ip6tables [-t table] -[AD] chain rule-specification [options] ip6tables [-t table] -I chain [rulenum] rule-specification [options] ip6tables [-t table] -R chain rulenum rule-specification [options] ip6tables [-t table] -D chain rulenum [options] ip6tables [-t table] -[LFZ] [chain] [options] ip6tables [-t table] -N chain ip6tables [-t table] -X [chain] ip6tables [-t table] -P chain target [options] ip6tables [-t table] -E old-chain-name new-chain-name DESCRIPTION Ip6tables is used to set up, maintain, and inspect the tables of IPv6 packet filter rules in the Linux kernel. Several different tables may be defined. Each table contains a number D-24 ip6tables man Pages of built-in chains and may also contain user-defined chains. Each chain is a list of rules which can match a set of packets. Each rule specifies what to do with a packet that matches. This is called a “target”, which may be a jump to a user-defined chain in the same table. TARGETS A firewall rule specifies criteria for a packet, and a target. If the packet does not match, the next rule in the chain is the examined; if it does match, then the next rule is specified by the value of the target, which can be the name of a user-defined chain or one of the special values ACCEPT, DROP, QUEUE, or RETURN. ACCEPT means to let the packet through. DROP means to drop the packet on the floor. QUEUE means to pass the packet to userspace (if supported by the kernel). RETURN means stop traversing this chain and resume at the next rule in the previous (calling) chain. If the end of a built-in chain is reached or a rule in a built-in chain with target. RETURN is matched, the target specified by the chain policy mine the fate of the packet. deter- TABLES There are currently two independent tables (which tables are present at any time depends on the kernel configuration options and which modules are present), as nat table has not been implemented yet. -t, --table table This option specifies the packet matching table which the command should operate on. If the kernel is configured with automatic module loading, an attempt will be made to load the appropriate module for that table if it is not already there. The tables are as follows: filter: This is the default table (if no -t option is passed. It contains the built-in chains INPUT (for packets coming into the box itself), FORWARD (for packets being LX Series Configuration Guide ip6tables man Pages D-25 routed ets). through the box), and OUTPUT (for locally-generated pack- mangle: This table is used for specialized packet alteration. Until kernel 2.4.17 it had two built-in chains: PREROUTING (for altering incoming packets before routing) and OUTPUT (for altering locally-generated packets before routing). Since kernel 2.4.18, three other built-in chains are also supported: INPUT (for packets coming into the box itself), FORWARD (for altering packets being routed through the box),and POSTROUTING (for altering packets as they are about to go out). OPTIONS The options that are recognized by ip6tables can be divided into several different groups. COMMANDS These options specify the specific action to perform. Only one of them can be specified on the command line unless otherwise specified below. For all the long versions of the command and option names, you need to use only enough letters to ensure that ip6tables can differentiate it from all other options. -A, --append chain rule-specification Append one or more rules to the end of the selected chain. When the source and/or destination names resolve to more than one address, a rule will be added for each possible address combination. -D, --delete chain rule-specification -D, --delete chain rulenum Delete one or more rules from the selected chain. There are two versions of this command: the rule can be specified as a number in the chain (starting at 1 for the first rule) or a rule to match. -I, --insert Insert one or more rules in the selected chain as the given rule number. So, if the rule number is 1, the rule or rules are inserted at the head of the chain. This is also the default if no D-26 ip6tables man Pages rule number is specified. -R, --replace chain rulenum rule-specification Replace a rule in the selected chain. If the source and/or destination names resolve to multiple addresses, the command will fail. Rules are numbered starting at 1. -L, --list [chain] List all rules in the selected chain. If no chain is selected, all chains are listed. As every other iptables command, it applies to the specified table (filter is the default), so mangle rules get listed by ip6tables -t mangle -n -L Please note that it is often used with the -n option, in order to avoid long reverse DNS lookups. It is legal to specify the -Z (zero) option as well, in which case the chain(s) will be atomically listed and zeroed. The exact output is affected by the other arguments given. The exact rules are suppressed until you use ip6tables -L v -F, --flush [chain] Flush the selected chain (all the chains in the table if none is given). This is equivalent to deleting all the rules one by one. -Z, --zero [chain] Zero the packet and byte counters in all chains. It is legal to specify the -L, --list (list) option as well, to see the counters immediately before they are cleared. (See above.) -N, --new-chain chain Create a new user-defined chain by the given name. no target of that name already. There must be -X, --delete-chain [chain] Delete the optional user-defined chain specified. There must be no references to the chain. If there are, you must delete or replace the referring rules before the chain can be deleted. If no argument is given, it will attempt to delete every non-builtin chain in the table. LX Series Configuration Guide ip6tables man Pages D-27 -P, --policy chain target Set the policy for the chain to the given target. See the section TARGETS for the legal targets. Only built-in (non-user-defined) chains can have policies, and neither built-in nor userdefined chains can be policy targets. -E, --rename-chain old-chain new-chain Rename the user specified chain to the user supplied name. This is cosmetic, and has no effect on the structure of the table. the -h Help. Give a (currently very brief) description of command syntax. PARAMETERS The following parameters make up a rule specification (as used in the add, delete, insert, replace and append commands). -p, --protocol [!] protocol The protocol of the rule or of the packet to check. The specified protocol can be one of tcp, udp, ipv6-icmp|icmpv6, or all, or it can be a numeric value, representing one of these protocols or a different one. A protocol name from /etc/protocols is also allowed. A "!" argument before the protocol inverts the test. The number zero is equivalent to all. Protocol all will match with all protocols and is taken as default when this option is omitted. -s, --source [!] address[/mask] Source specification. Address can be either a hostname (please note that specifying any name to be resolved with a remote query such as DNS is a really bad idea), a network IPv6 address (with/ mask), or a plain IPv6 address. (the network name isn’t supported now). The mask can be either a network mask or a plain number, specifying the number of 1’s at the left side of the network mask. Thus, a mask of 64 is equivalent to ffff:ffff:ffff:ffff:0000:0000:0000:0000. A "!" argument before the address specification inverts the sense of the address. The flag --src is an alias for this option. D-28 ip6tables man Pages -d, --destination [!] address[/mask] Destination specification. See the description of the s(source) flag for a detailed description of the syntax. flag --dst is an alias for this option. The -j, --jump target This specifies the target of the rule; i.e., what to do if the packet matches it. The target can be a user-defined chain (other than the one this rule is in), one of the special builtin targets which decide the fate of the packet immediately, or an extension (see EXTENSIONS below). If this option is omitted in a rule, then matching the rule will have no effect on the packet’s fate, but the counters on the rule will be incremented. -i, --in-interface [!] name Name of an interface via which a packet is going to be received (only for packets entering the INPUT, FORWARD and PREROUTING chains). When the "!" argument is used before the interface name, the sense is inverted. If the interface name ends in a "+", then any interface which begins with this name will match. If this option is omitted, any interface name will match. -o, --out-interface [!] name Name of an interface via which a packet is going to be sent (for packets entering the FORWARD and OUTPUT chains). When the "!" argument is used before the interface name, the sense is inverted. If the interface name ends in a "+", then any interface which begins with this name will match. If this option is omitted, any interface name will match. -c, --set-counters PKTS BYTES This enables the administrator to initialize the packet and byte counters of a rule (during INSERT, APPEND, REPLACE operations). OTHER OPTIONS The following additional options can be specified: Verbose -v, --verbose output. This option LX Series Configuration Guide makes the list command show the ip6tables man Pages D-29 interface name, the rule options (if any), and the TOS masks. The packet and byte counters are also listed, with the suffix “K”, “M” or “G” for 1000, 1,000,000 and 1,000,000,000 multipliers respectively (but see the -x flag to change this). For appending, insertion, deletion and replacement, this causes detailed information on the rule or rules to be printed. -n, --numeric Numeric output. IP addresses and port numbers will be printed in numeric format. By default, the program will try to display them as host names, network names, or services (whenever applicable). -x, --exact Expand numbers. Display the exact value of the packet and byte counters, instead of only the rounded number in K’s (multiples of 1000) M’s (multiples of 1000K) or G’s (multiples of 1000M). This option is only relevant for the -L command. --line-numbers When listing rules, add line numbers to the beginning of each rule, corresponding to that rule’s position in the chain. --modprobe=command When adding or inserting rules into a chain, use command to load any necessary modules (targets, match extensions, etc). MATCH EXTENSIONS ip6tables can use extended packet matching modules. These are loaded in two ways: implicitly, when -p or --protocol is specified, or with the -m or --match options, followed by the matching module name; after these, various extra command line options become available, depending on the specific module. You can specify multiple extended match modules in one line, and you can use the -h or --help options after the module has been specified to receive help specific to that module. The following are included in the base package, and most of these can be preceded by a ! to invert the sense of the match. D-30 ip6tables man Pages tcp These extensions are loaded if “--protocol tcp” is specified. provides the following options: It --source-port [!] port[:port] Source port or port range specification. This can either be a service name or a port number. An inclusive range can also be specified, using the format port:port. If the first port is omitted, "0" is assumed; if the last is omitted, "65535" is assumed. If the second port greater then the first they will be swapped. The flag --sport is a convenient alias for this option. --destination-port [!] port[:port] Destination port or port range specification. a convenient alias for this option. The flag --dport is --tcp-flags [!] mask comp Match when the TCP flags are as specified. The first argument is the flags which we should examine, written as a comma-separated list, and the second argument is a comma-separated list of flags which must be set. Flags are: SYN ACK FIN RST URG PSH ALL NONE. Hence the command ip6tables -A FORWARD -p tcp --tcp-flags SYN,ACK,FIN,RST SYN will only match packets with the SYN flag set, and the ACK, FIN and RST flags unset. [!] --syn Only match TCP packets with the SYN bit set and the ACK and RST bits cleared. Such packets are used to request TCP connection initiation; for example, blocking such packets coming in an interface will prevent incoming TCP connections, but outgoing TCP connections will be unaffected. It is equivalent to --tcpflags SYN,RST,ACK SYN. If the "!" flag precedes the "--syn", the sense of the option is inverted. --tcp-option [!] number Match if TCP option set. LX Series Configuration Guide ip6tables man Pages D-31 udp These extensions are loaded if “--protocol udp” is specified. provides the following options: It --source-port [!] port[:port] Source port or port range specification. See the description of the --source-port option of the TCP extension for details. --destination-port [!] port[:port] Destination port or port range specification. See the description of the --destination-port option of the TCP extension for details. ipv6-icmp This extension is loaded if ‘--protocol ipv6-icmp’ or ‘--protocol icmpv6’ is specified. It provides the following option: --icmpv6-type [!] typename This allows specification of the ICMP type, which can be a numeric IPv6-ICMP type, or one of the IPv6-ICMP type names shown by the command ip6tables -p ipv6-icmp -h mac --mac-source [!] address Match source MAC address. It must be of the form XX:XX:XX:XX:XX:XX. Note that this only makes sense for packets coming from an Ethernet device and entering the PREROUTING, FORWARD or INPUT chains. limit This module matches at a limited rate using a token bucket filter. A rule using this extension will match until this limit is reached (unless the “!” flag is used). It can be used in combination with the LOG target to give limited logging, for example. --limit rate Maximum average matching rate: specified as a number, with an optional ‘/second’, ‘/minute’, ‘/hour’, or ‘/day’ suffix; the D-32 ip6tables man Pages default is 3/hour. --limit-burst number Maximum initial number of packets to match: this number gets recharged by one every time the limit specified above is not reached, up to this number; the default is 5. multiport This module matches a set of source or destination ports. Up to 15 ports can be specified. It can only be used in conjunction with -p tcp or -p udp. --source-ports port[,port[,port...]] Match if the source port is one of the given ports. -sports is a convenient alias for this option. The --destination-ports port[,port[,port...]] Match if the destination port is one of the given ports. flag --dports is a convenient alias for this option. --ports port[,port[,port...]] Match if the both the source and destination ports are equal each other and to one of the given ports. flag - The to mark This module matches the netfilter mark field associated with a packet (which can be set using the MARK target below). --mark value[/mask] Matches packets with the given unsigned mark value (if a mask is specified, this is logically ANDed with the mask before the comparison). owner This module attempts to match various characteristics of the packet creator, for locally-generated packets. It is only valid in the OUTPUT chain, and even this some packets (such as ICMP ping responses) may have no owner, and hence never match. This is regarded as experimental. LX Series Configuration Guide ip6tables man Pages D-33 --uid-owner userid Matches if the packet was created by a process effective user id. with the given --gid-owner groupid Matches if the packet was created by a process with the given effective group id. --pid-owner processid Matches if the packet was created by a process process id. with the given --sid-owner sessionid Matches if the packet was created by a process in the given session group. TARGET EXTENSIONS ip6tables can use extended target modules: the following included in the standard distribution. are LOG Turn on kernel logging of matching packets. When this option is set for a rule, the Linux kernel will print some information on all matching packets (like most IPv6 IPv6-header fields) via the kernel log (where it can be read with dmesg or syslogd(8)). This is a "non-terminating target", i.e. rule traversal continues at the next rule. So if to LOG the packets you refuse, use two separate rules with the same matching criteria, first using target LOG then DROP (or REJECT). --log-level level Level of logging (numeric or see syslog.conf(5)). --log-prefix prefix Prefix log messages with the specified prefix; up to 29 letters long, and useful for distinguishing messages in the logs. --log-tcp-sequence D-34 ip6tables man Pages Log TCP sequence numbers. This is a security risk if the log readable by users. is --log-tcp-options Log options from the TCP packet header. --log-ip-options Log options from the IPv6 packet header. MARK This is used to set the netfilter mark value associated with the packet. It is only valid in the mangle table. --set-mark mark REJECT This is used to send back an error packet in response to the matched packet: otherwise it is equivalent to DROP so it is a terminating TARGET, ending rule traversal. This target is only valid in the INPUT, FORWARD and OUTPUT chains, and user-defined chains which are only called from those chains. The following option controls the nature of the error packet returned: --reject-with type The type given can be icmp6-no-route no-route icmp6-adm-prohibited adm-prohibited icmp6-addr-unreachable addr-unreach icmp6-port-unreachable port-unreach which return the appropriate IPv6-ICMP error message (portunreach is the default). Finally, the option tcp-reset can be used on rules which only match the TCP protocol: this causes a TCP RST packet to be sent back. This is mainly useful for blocking ident (113/tcp) probes which frequently occur when sending mail to broken mail hosts (which won’t accept your mail LX Series Configuration Guide ip6tables man Pages D-35 otherwise). DIAGNOSTICS Various error messages are printed to standard error. The exit code is 0 for correct functioning. Errors which appear to be caused by invalid or abused command line parameters cause an exit code of 2, and other errors cause an exit code of 1. BUGS Bugs? What’s this? ;-) on sparc64. Well... the counters are not reliable COMPATIBILITY WITH IPCHAINS This ip6tables is very similar to ipchains by Rusty Russell. The main difference is that the chains INPUT and OUTPUT are only traversed for packets coming into the local host and originating from the local host respectively. Hence every packet only passes through one of the three chains (except loopback traffic, which involves both INPUT and OUTPUT chains); previously a forwarded packet would pass through all three. The other main difference is that -i refers to the input interface; -o refers to the output interface, and both are available for packets entering the FORWARD chain. There are several other changes in ip6tables. SEE ALSO ip6tables-save(8), ip6tables-restore(8), iptables(8), iptablessave(8),iptables-restore(8). The packet-filtering-HOWTO details iptables usage for packet filtering, the NAT-HOWTO details NAT, the netfilter-extensionsHOWTO details the extensions that are not in the standard distribution, and the netfilter-hacking-HOWTO details the netfilter internals. See http://www.netfilter.org/. AUTHORS Rusty Russell wrote iptables, in early consultation with Michael Neuling. D-36 ip6tables man Pages Marc Boucher made Rusty abandon ipnatctl by lobbying for a generic packet selection framework in iptables, then wrote the mangle table, the owner match, the mark stuff, and ran around doing cool stuff everywhere. James Morris wrote the TOS target, and tos match. Jozsef Kadlecsik wrote the REJECT target. Harald Welte wrote the ULOG target, TTL match+target and libipulog. The Netfilter Core Team is: Marc Boucher, Martin Josefsson, Jozsef Kadlecsik, James Morris, Harald Welte and Rusty Russell. ip6tables man page created by Andras Kis-Szabo, based on man page written by Herve Eychenne <[email protected]>. Mar 09, 2002 IP6TABLES(8) LX Series Configuration Guide iptables E-1 APPENDIX E Advanced Features E-2 Multi-Level Command Execution Multi-Level Command Execution Multi-Level Command Execution is the ability to execute a command that resides in a command mode other than the current command mode. A command that is executed in this way is called a target command, and it must reside in a command mode that is nested in the current one. Figure 1.1 on page 1-2 shows the nesting of command modes in the LX CLI. In the following examples, the mode-access commands are configuration and menu. Example 1 A target command in the Interface command mode can be executed in the Configuration command mode. The command that precedes the target command is known as the mode-access command. The mode-access command is used to reach the command mode in which the target command resides. In the above example, the mode-access command is interface 1.In Example 1, the target command broadcast 123.43.34.34 is executed from the Configuration command mode: Config:0>>interface 1 broadcast 123.43.34.34 Example 2 You can have more than one mode-access command before a target command, depending on the number of command modes that must be traversed to execute the target command. In the Example 2, two mode-access commands are used to execute the open mark1 command from the Superuser command mode: InReach:0 >>configuration menu open mark1 LX Series Configuration Guide Executing Multi-Level Commands from the User Command Mode E-3 Executing Multi-Level Commands from the User Command Mode You can execute multi-level commands in the User command mode if you are logged in with an account that gives you access to the Configuration commands. When you execute a multi-level command from the User command mode, the command string must begin with enable system. This is an access-mode command that consists of the enable command and the Superuser password (system). In the following example, the target command is ssh v1: InReach:0 >enable system configuration ssh v1 Configuring the Notification Feature with Multi-Level Commands You need to execute the restart notification command, in the Superuser command mode, after you execute a multi-level command that effects the Notification Feature. The commands that effect the Notification Feature are those that reside in the Notification command mode and in its subordinate command modes.1 1. The subordinate command modes of the Notification command mode are User Service, User Information, Service Profile, Async Profile, Localsyslog Profile, Remotesyslog Profile, SMTP Profile, SNPP Profile, TAP Profile, and WEB Profile. Figure 1.1 on page 1-2 shows the nesting of command modes in the Notification command mode. E-4 Configuring the Notification Feature with Multi-Level Commands The restart notification command regenerates the notification configuration and re-starts syslogd. It is necessary to do this when you configure the Notification Feature from outside of the Notification context. (You are outside of the Notification context when you configure the Notification Feature from outside of the Notification command mode or one of its subordinate command modes.) For more information, refer to the restart notification command in the LX-Series Commands Reference Guide. You must specify the Service Profile type (protocol) in multilevel commands that affect the settings of Service Profiles. The commands that affect the settings of Service Profiles are those in the Async Protocol, Localsyslog Protocol, Remotesyslog Protocol, SMTP Protocol, SNPP Protocol, TAP Protocol, and WEB Protocol Command Modes. The format for such a multi-level command is as follows: <mode-access-cmd>* <protocol> <target-cmd> where mode-access-cmd The mode-access commands that are necessary to access the target command. protocol The Service-Profile type (protocol) of the Service Profile for which the command is being executed. target-cmd The target command. LX Series Configuration Guide Multi-Level Commands Examples E-5 The following are examples of multi-level commands in which the Service-Profile type (protocol) is specified before the target command: Config:0 >>notification profile service email smtp server 140.179.169.20 Config:0 >>notification profile service onboard async port 2 Config:0 >>notification profile service pager tap smsc 3776809977 Multi-Level Commands Examples The following are examples of multi-level commands. Note that the following is not an exhaustive list of multi-level commands. The following is a list of examples of some of the multi-level commands that could be executed from the User and Configuration command modes. Multi-Level Commands in User Command Mode InReach:0 >enable system zero all InReach:0 >enable system configuration dns secondary 119.20.112.3 InReach:0 >enable system configuration port async 4 break enable InReach:0 >enable system configuration port async 4 default port InReach:0 >enable system configuration interface 1 mtu 1200 InReach:0 >enable system enable system ssh E-6 Multi-Level Commands Examples Multi-Level Commands in Configuration Command Mode Config:0 >>interface 1 broadcast group 4 slave port async 2 Config:0 >>subscriber mark command log enable Config:0 >>menu open mark1 Config:0 >>subscriber mark access console enable Config:0 >>snmp get client 4 125.65.45.34 LX Series Configuration Guide F-1 APPENDIX F Enabling and Disabling TCP and IR Listener Ports F-2 Open Ports on the LX Open Ports on the LX Table 1 lists the ports that can be open on the LX. An asterisk (*) indicates the port is open by default Table 1 Open LX Ports Port Description Listener Port Setting fingerd---79 Disable fingerd to close port. snmp---161 Disable SNMP to close port. *ssh---22 Disable SSH to close port. *telnet---23 Disable telnet to close port. *http---80 Disable web to close port. *GUI---5040 Closes if 80 is disabled. Cluster---8100 Remove cluster secret to close port. Telnet--2100, 2200,.....,6700, 6800 SSH--2122, 2222,......6722, 6822 Port async TCP listener ports. The number of ports on your particular unit will determine how many ports are opened. For example, an 8-port unit will only go up to Telnet port 2800 and SSH port 2822. Refer to “Changing the Default TCP Listener Ports” on page F-3 for information on changing TCP Port defaults. LX Series Configuration Guide Changing the Default TCP Listener Ports F-3 Changing the Default TCP Listener Ports X To change the default async TCP listener port settings Type the following command in Interface Command Mode: Intf 1-1:0 >>serial 1 telnet port_number where 1 is the async port port_number is the open TCP port to switch to X To change the SSH port Type the following command in Interface Command Mode: Intf 1-1:0 >>serial 1 ssh port_number where 1 is the async port port_number is the open TCP port to switch to F-4 Changing the Default TCP Listener Ports LX Series Configuration Guide G-1 APPENDIX G RADIUS Vendor Dictionary Files IMPORTANT! The following example may not fit your specific RADIUS format. See your RADIUS server manual for more information. The standard MRV.dict file is available on your LX CDROM. The RADIUS server uses a dictionary file to convert between the numeric attributes and values used in RADIUS packets and human-readable ones. Most RADIUS packages uses a modular dictionary, consisting of the file named dictionary and vender specific files in sub-dictionaries. Each RADIUS attribute is assigned a unique number and name, which is than contained in a dictionary file on the RADIUS server. Currently, the RADIUS Authentication RFC defines approximately 95 attributes. The remaining values (up to 255) are reserved for future use. Vendor-specific attributes are additional attributes made by vendors to customize how RADIUS works with their products. One benefit of vendor-specific attributes is that it allows you to obtain a login menu without having to create an LX subscriber. Most RADIUS packages require you to add your vendor's attributes and values to a sub-dictionary. MRV uses vendor code 33. MRV provides a prepared sub-dictionary that specifies which attributes and values correspond to which numeric codes. Some RADIUS package formats are different and must be modified to work in their format. G-2 To get started, you must have your vendor's ID, and the list of attributes with possible values. X To edit the RADIUS file to include your vendor file 1. Open the file that contains the list of vendor ID numbers; for example, dict.vendors. 2. Add the following line for MRV: $add vendor 33 MRV 3. Add 4. the sub-dictionary MRV.dict to the dictionary. Either cut and paste the MRV.dict file into the primary dictionary file, or add the following line to the dictionary file: $include MRV.dict 5. Restart the RADIUS daemon. You can now start using your new vendor configuration. See Figure G.1, “Sample MRV.dict file" for more information. LX Series Configuration Guide G-3 # # dictionary.mrv # # Version:$Id: dictionary.mrv,v 1.0 2002/11/12 15:44:38 Exp $ # VENDOR MRV 33 ATTRIBUTE ATTRIBUTE ATTRIBUTE ATTRIBUTE ATTRIBUTE ATTRIBUTE ATTRIBUTE ATTRIBUTE ATTRIBUTE ATTRIBUTE ATTRIBUTE ATTRIBUTE ATTRIBUTE ATTRIBUTE MRV-Remote-Access-List 1 MRV-Port-Access-List 2 MRV-Outlet-Access-List 3 MRV-Outlet-Group-Access-List 4 MRV-Login-Mode 5 MRV-Menu-Name 6 MRV-Web-Menu-Name 7 MRV-Security-Level 8 MRV-User-Prompt 9 MRV-Command-Logging 10 MRV-Audit-Logging 11 MRV-Web-Access-List 12 MRV-Connect-Escape-Char 13 MRV-Port-ReadOnly-List 14 # ATTRIBUTE ATTRIBUTE MRV-Acct-Command-Log MRV-Acct-Audit-Log string string string string string string string string string string string string string string MRV MRV MRV MRV MRV MRV MRV MRV MRV MRV MRV MRV MRV MRV 100 string MRV 101 string MRV Figure G.1 Sample MRV.dict file G-4 RADIUS Vendor-Specific Attribute Settings RADIUS Vendor-Specific Attribute Settings The possible settings for RADIUS vendor-specific attribute are: MRV-Remote-Access-List = [telnet ssh web_server console] MRV-Port-Access-List = [# or Range] (example 1-48) MRV-Outlet-Access-List = [port async # :outlet #] (example: 8:1, 8:4) MRV-Outlet-Group-Access-List = [group#] (example: 3, 7) MRV-Login-Mode = [cli], [shell], [menu], or [raw menu] MRV-Menu-Name = [menu file name] (example: /config/M_demo_ menu) MRV-Web-Menu-Name = [web menu file] (example: /config/M_demo_ menu) MRV-Security-Level = [outlet read shell superuser] MRV-User-Prompt = [string] MRV-Command-Logging = [radius syslog]) MRV-Audit-Logging = [radius syslog]) MRV-Web-Access-List = [menu config cluster]) MRV-Connect-Escape-Char [^P] (letter can be any capitalized letter) MRV-Port-ReadOnly-List [# or Range] # Accounting MRV-Acct-Command-Log MRV-Acct-Audit-Log LX Series Configuration Guide RADIUS Vendor-Specific Attribute Settings G-5 L Radius Accounting must be configured on the serial port for the new vendor specific attributes “MRVCommand-Logging” and “MRV-Audit-Logging” to work. L A login mode of “menu” is required to run a menu on the CLI. A Web Access list containing “menu” is required to run a menu when logging into the GUI. Some values are mandatory for you to be granted access, and have definable defaults on the host. The mandatory attributes are Username and Password. The more attributes given, the more you can fit the session to your needs. L If there is no Service-Type, the session is granted as a "NAS-Prompt-user,” not an "administrator". The following lists a sample RADIUS profile for the vendor specific attributes: G-6 RADIUS Vendor-Specific Attribute Settings #ATTRIBUTE MRV-Remote-Access-List "bob" User-Password == "bob" Service-Type = NAS-Prompt-User, MRV-Remote-Access-List = "ssh" #ATTRIBUTE MRV-Port-Access-List (simple user on port 8) "bob" User-Password == "bob" Service-Type = NAS-Prompt-User, MRV-Port-Access-List = "8" #ATTRIBUTE MRV-Outlet-Access-List (power unit on port 8) "bob" User-Password == "bob" Service-Type = NAS-Prompt-User, MRV-Outlet-Access-List = "8:1-8" #ATTRIBUTE MRV-Outlet-Group-Access-List "bob" User-Password == "bob" Continued on next page LX Series Configuration Guide RADIUS Vendor-Specific Attribute Settings G-7 #ATTRIBUTE MRV-Login-Mode "bob" User-Password == "bob" Service-Type = Administrative-User, MRV-Login-Mode = "shell" #ATTRIBUTE MRV-Menu-Name (file demo_menu) "bob" User-Password == "bob" Service-Type = NAS-Prompt-User, MRV-Menu-Name = "/config/M_demo_menu", MRV-Login-Mode = “menu” #ATTRIBUTE MRV-Web-Menu-Name "bob" User-Password == "bob" Service-Type = NAS-Prompt-User, MRV-Web-Access-List = “menu”, MRV-Web-Menu-Name = "/config/M_demo_menu" #ATTRIBUTE MRV-Command-Logging 10 "bob" User-Password == "bob" Service-Type = NAS-Prompt-User, MRV-Command-Logging = “radius syslog” #ATTRIBUTE MRV-Audit-Logging 1 "bob" User-Password == "bob" G-8 RADIUS Vendor-Specific Attribute Settings LX Series Configuration Guide H-1 APPENDIX H Configuring rlogin Support rlogin establishes a remote login session from your terminal on the LX to a remote machine named hostname. Each remote machine may have a file named /etc/hosts.equiv containing a list of trusted hostnames with which it shares usernames. The remote authentication procedure determines whether a user from a remote host should be allowed to access the local system with the identity of a local user. Users with the same username on both the local and remote machine may rlogin from the machines listed in the remote machine’s /etc/hosts.equiv file without supplying a password. The rlogin feature enables a user to log onto a remote host system through a port on the LX, as shown in Figure H.1 on page 2. H-2 UNIX Host Remote Network Local Network In-Reach LX Unit User Terminal - User specifies domain name or host’s internet address, and an optional username. Figure H.1 Connecting to a Host through rlogin The user enters the domain name or IP address of the host system, and an optional different username, one that the host recognizes. The LX unit passes its IP address to the host, along with the username entered on the CLI rlogin command line or the LX login username. If the user did not enter a username on the rlogin command line, the LX unit forwards the login username of the port. Depending on the rlogin implementation at the UNIX host, this might be enough to allow the user to bypass the host’s login routine. LX Series Configuration Guide Considerations H-3 Considerations Each user must have an account on the remote host. Additionally, setting up the rlogin feature on the host may require you to modify other files. For example, on some UNIX hosts, you include an entry in /etc/hosts and the /etc/ hosts.equiv file and, optionally, each user’s .rhosts file. Then, when a user attempts to login to an account – using rlogin from an LX unit that matches an entry in the etc/hosts.equiv file – that user is automatically logged on to the host, as long as the user has a valid user account on the targeted remote host. The user is not prompted for a password. The rlogin feature is disabled by default on the LX unit. For security reasons, you might not want to use the rlogin feature with sensitive accounts, however, since anyone who knows the right username can log on to the host. Associated Commands You can enable/disable rlogin through these commands: Config:0 >>rlogin enable Config:0 >>no rlogin This command specifies that the user can make a connection using rlogin. The default is disabled. rlogin Log on to a host by specifying the username and host system. fred:0>rlogin 192.168.3.4 where # username fred will be passed to the target host. View information about an rlogin session. InReach:0>show users Displays a list of users, the session numbers, “rlogin”, protocol, and the IP address with which the rlogin session was initiated. H-4 Defining rlogin Dedicated Services Defining rlogin Dedicated Services L With dedicated rlogin service, you can’t specify a different username for rlogin. the only valid username is the port’s username. L When you define a port for dedicated service the user will not be able to access the In-Reach prompt when disconnected from the preferred host. When you define a port as preferred service the user will see the LX prompt when the rlogin session is disconnected. rlogin with Preferred Services Use the show port command to display the current preferred service setting for the port subscriber. Use this command to enable a preferred service using rlogin. L When you configure a subscriber with a Preferred Service, you set the subscriber’s profile to point to a specific host name. Thereafter, when the subscriber enters the protocol rlogin, followed by a carriage return, the LX host automatically fills in the host argument with the configured Preferred Service. L You can now use a domain name when configuring a subscriber’s Preferred Service or Dedicated Service. There is also no longer a restriction on the server name being in the local service table. MRV recommends that the LX be configured with a DNS and a domain name, and that the service name(s) be in the local service table. Syntax fred:0>rlogin fred:0>rlogin username george where #rlogin will pass along username george. LX Series Configuration Guide rlogin Transparent Mode H-5 rlogin Transparent Mode Use this feature to enable the LX to complete a ZMODEM binary file transfer using the rlogin feature. rlogin transparent enable L Within an rlogin session, characters are passed raw (without interpretation) and transparently. This allows the ZMODEM transfer to complete. H-6 rlogin Transparent Mode LX Series Configuration Guide References I-1 FIPS 140-2 Support APPENDIX I This appendix describes how to configure your LX-Series software to run in FIPS 140-2 mode of operation. Specific versions of the LX Series Software and associated ppciboot in conjunction with specific LX-Series Models will be FIPS 140-2 validated. MRV LX-Series FIPS 140-2 approval is software version and hardware platform specific. See product data sheets, MRV FIPS 140-2 literature, Web information and/or consult you sales representative for details. FIPS 140-2 (Federal Information Processing Standards Publication 140-2 Security Requirements for Cryptographic Modules) details the U.S. Government requirements for cryptographic modules. More information about the FIPS 140-2 standard and validation program is available on the NIST website at http://csrc.nist.gov/cryptval/. References More information on the LX-Series FIPS 140-2 is available from the following sources: The MRV Communications website (http://www.mrv.com) contains information on the full line of products from MRV. Contact MRV for sales and support information. You can find the NIST Validated Modules at the following website: (http://csrc.ncsl.nist.gov/cryptval/) I-2 FIPS 140-2 Standard FIPS 140-2 Standard FIPS 140-1 and its successor FIPS 140-2 are U.S. Government standards that provide a benchmark for implementing cryptographic software and hardware. They specify best practices for implementing cryptographic algorithms, handling key material and data buffers, and working with the operating system. This standard was published by the National Institute of Standards and Technology (NIST), and was adopted by the Canadian government’s Communications Security Establishment (CSE), and by the financial community through the American National Standards Institute (ANSI). Required FIPS 140-2 Validation FIPS 140-2 validation is required for sale of products implementing cryptography to the Federal Government. Although not all agencies are aware of this, more and more RFPs, contracts, and specifications are requiring FIPS 140-2 certification as a pre-requisite to bid proposals. While it was once possible to get a waiver signed, thus making a product exempt from these requirements for a limited amount of time, that practice was limited by FISMA. Therefore, obtaining a waiver is now rare. The financial community increasingly specifies FIPS 140-2 as a procurement requirement and is beginning to embrace it, wholly or in part, in its own standards. Finally, the security community values products that have completed this evaluation, as it carries the sanction of an independent third party. The FIPS 140-2 certification approval is tailored specifically for platforms containing both a Hardware and Software component. The LX-Series software and ppciboot in conjunction with the LX-Series Hardware platforms are the first series to be FIPS 140-2 validated, with other LX-Series platforms to follow. LX Series Configuration Guide Prerequisites I-3 The FIPS 140-2 approval is tied to both the specific Hardware platform and Software version. All LX-Series platforms such as the LX-4000 Series and LX-1000 Series can run the FIPS 140-2 version of LX software (linuxito and ppciboot). However, it is important to note that the FIPS 140-2 certification will apply only to the FIPS 140-2 validated version of software specifically configured to run in FIPS 140-2 mode of operation on MRV LX-Series listed platforms. Please take the time to review the following “Prerequisites” section. Prerequisites The following requirements must be met to use the product in a FIPS 140-2 compliant configuration: You must use the FIPS 140-2 validated versions of the LX linuxito and ppciboot software. Only specific versions of the LX software are tested by an accredited cryptographic module test lab. You must be running the software on the FIPS 140-2 tested LX-Series platform. FIPS 140-2 mode must be enabled on the LX-Series FIPS 140-2 validated unit(s). If you intend to use SNMP with FIPS 140-2, you must use the SNMP V3 version. You must place the provided tamper evident labels in the proper locations. Notes and Restrictions The default subscriber InReach password must be changed. The default ppciboot password must be changed. The default system password must be changed. All configured passwords must be greater than or equal to 6 characters in length. I-4 Applying Tamper Evident Labels If using an SNMP NMS or SNMP MIB browser, the application must support SNMPV3 and must support AES encryption. By default SNMP is disabled for security reasons. SNMP V3 must be enabled and configured fully on the LX in order to function with the NMS. SSH Clients must support sshV2, AES or 3DES ciphers, and HMAC-SHA1 or HMAC-SHA1-96 message authentication codes. Applying Tamper Evident Labels L To be FIPS 140-2 compliant, you must apply the tamper-evident labels before you power on and configure the LX unit. After the LX has been configured in FIPS 140-2 mode, the cover cannot be removed without signs of tampering. Applying tamper-evident labels to the LX unit will prevent anyone from opening the unit without your knowledge. X To seal the cover of the LX 1. Apply a tamper-evident label. First clean the LX surface of any grease or dirt before you apply the tamper-evident labels. LX Series Configuration Guide Applying Tamper Evident Labels I-5 2. Apply two labels each to the bottom left and right sides of the unit, as shown in Figure I-I.1. Place two tamper-evident seals on the lower left and right side edges of the LX. Make sure that half of each label covers the side surface of the LX, and that the other half of the label covers the bottom surface. Figure I.1 Location of the Tamper Evident Labels 3. 4. Record the serial numbers of the labels you attached to the LX unit. Allow 24 hours for the adhesive in the tamper-evident labels to cure. L You should periodically check the labels to ensure that no one has tampered with the unit. X To make sure that your software is FIPS 140-2 validated 1. 2. Log into the CLI. Enter the show version command at the InReach:0 > prompt: InReach:0 >show version I-6 Enabling FIPS 140-2 Mode of Operation The Show Version screen appears, with the relevant fields highlighted. Time: Wed, 21 Feb 2007 14:02:29 US/EASTERN Linux Kernel Version: Linux In-Reach Version: Software Version (Runtime): Software Version (Flash): Ppciboot Version: x.x.x.x xxx x.x.x.x (FIPS 140-2) x.x.x.x (FIPS 140-2) x.x.x.x (FIPS 140-2) Figure I.2 Show Version Screen If the software you are running has been FIPS validated, the word FIPS 140-2 appears to the right of the Software Version number and the ppciboot Version number. If FIPS 140-2 does not appear, your software has not been validated. Enabling FIPS 140-2 Mode of Operation IMPORTANT! If you want to configure your unit to run FIPS 140-2 Mode of Operation, you must do so before you attempt to configure the unit over and above the default settings. The act of enabling FIPS 140-2 mode will default the unit’s configuration. When FIPS 140-2 is enabled, the configuration file is returned to defaults. Therefore, if you fully configured your unit and then turned on FIPS 140-2, your configuration will return to factory defaults. FIPS 140-2 mandates this to ensure that any passwords with fewer than six characters are purged, and that all unsupported applications are disabled. L If you enable FIPS 140-2 Security, option [1] Boot from Network is set to Flash Only automatically. You can only update from the CLI or GUI while FIPS 140-2 is enabled. Option [4] Update ppciboot Firmware is disabled when FIPS 140-2 is enabled. The following passwords must be at least six characters long: Subscriber LX Series Configuration Guide Enabling FIPS 140-2 Mode of Operation I-7 Config ppciboot Radius Secret TACACS+ Secret PAP/CHAP Outgoing Secret SSH Public Key must be at least 1024 bits. The FIPS 140-2 Security option lets you enable or disable FIPS 140-2 mode of operation. Main Menu [1] Boot from: Image currently in flash: [2] Time Out, in seconds (0=disabled): [3] IP Configuration Menu [4] Update Ppciboot Firmware [5] Ethernet Network Link: [6] Change PPCiBoot password [7] FIPS 140-2 Security: [9] ppciboot image name: [0] software image name: [*] [D] [S] [B] Flash only 4.1.4 (FIPS 140-2) 8 auto yes ppciboot.img linuxito.img Reset to System Defaults Downgrade Ppciboot Firmware Save Configuration Boot System Make a choice: X To enable or disable FIPS 140-2 security 1. Press the number 7 (FIPS 140-2 Security). The following prompt appears: Enabling FIPS security will reset run-time configuration to defaults. Are you sure? (y/n): 2. 3. If you select y (this defaults the flash immediately), a Resetting Linux Configuration message appears, and the Main Menu reappears after a few seconds. If you select n, the Main Menu reappears immediately. If FIPS 140-2 is already enabled and to disable it, press 7 (FIPS 140-2 Security) from the Main Menu. I-8 Changing the Default ppciboot Password 4. Press B to Boot the system. Do this only after you have configured the ppciboot options and saved the configuration. Changing the Default ppciboot Password IMPORTANT! If you change the ppciboot password, be sure to write it down. If you do not remember your password, or the password is lost, you must return the unit to MRV to be defaulted. Defaulting the unit yourself will not clear the ppciboot password - you must return the unit to MRV. After enabling FIPS 140-2, you must enter a new ppciboot password of greater than six characters. The Change ppciboot Password option lets you change the ppciboot password for the unit. X To change the ppciboot password 1. 2. Press the number 6 (Change ppciboot Password). The following prompt is displayed: Enter your current ppciboot password: Enter the current ppciboot password at the above prompt. After you have entered the current ppciboot password, the following prompt is displayed: Enter your NEW password: 3. : Enter the new ppciboot password at the above prompt. The password must be greater than six characters long. After you have entered the new ppciboot password, the following prompt is displayed: Re-enter your NEW password: 4. Re-enter the new ppciboot password at the above prompt. A confirmation message is displayed. LX Series Configuration Guide Changing the Default Subscriber Password I-9 Changing the Default Subscriber Password It is widely known that the default password for the InReach user is access. If an unauthorized user knew this username/ password combination, he/she could log on to your LX unit. For this reason, you must change the InReach user’s password to something other than access. The password must be at least six characters long. X To change the default password for the InReach user 1. 2. Access the Configuration Command Mode. Access the Subscriber Command Mode for the InReach subscriber by entering the subscriber command with InReach as the command argument: Config:0 >>subscriber InReach 3. Enter the password command at the Subs_InReach >> prompt: Subs_InReach:0 >>password 4. Enter a new User password at the Enter your NEW password: prompt. The password will be displayed as asterisks, as in the following example: Enter your NEW password:*************** 5. Re-enter the new User password at the Re-Enter your NEW password: prompt. The password will be displayed as asterisks, as in the following example: Re-Enter your NEW password:*************** Changing the Default Configuration Password It is also widely known that the default Superuser password is system. To reduce the risk of an unauthorized user gaining access to the Superuser Command Mode, you must change this password to something other than system. The password must be at least six characters long. I-10 FIPS 140-2 Mode Console Access X To change the Configuration password for the LX unit 1. Access the Configuration Command Mode. 2. Enter the password command at the Config:0 >> prompt: Config:0 >>password 3. Enter a new Superuser password at the Enter your NEW password: prompt. The password will be displayed as asterisks, as in the following example: Enter your NEW password:*************** 4. Re-enter the new Superuser password at the Re-Enter your NEW password: prompt. The password will be displayed as asterisks, as in the following example: Re-Enter your NEW password: *************** FIPS 140-2 Mode Console Access When the LX is in FIPS 140-2 mode telnet is not allowed. Therefore, you must ssh to the unit in Version 2 mode ssh -l InReach 10.10.10.10 If non-FIPS 140-2 approved algorithms are being used, please see and edit the /etc/ssh/ssh_config file on your host system. Applications Unsupported in FIPS 140-2 Mode of Operation Listed below are all the unsupported FIPS 140-2 protocols and features, which are disabled when FIPS 140-2 mode of operation is enabled on the LX software. Table I.1 Unsupported FIPS 140-2 Protocols and Features Feature Impact Reason Telnet client/server Disabled Passwords are passed in plaintext rlogin client Disabled Passwords are passed in plaintext LX Series Configuration Guide Applications Unsupported in FIPS 140-2 Mode of Operation I-11 Table I.1 Unsupported FIPS 140-2 Protocols and Features (Continued) Feature Impact Reason Web GUI unencrypted Disabled Only AES encryption mode will be supported, customer is required to run FIPS 140-2 approved JRE on host machine SNMP v1 & v2 Disabled Community strings are passed in plaintext SSH V1 Client / Server Disabled Security flaws / known vulnerabilities Passwords/ Secrets less than 6 characters Disabled Due to FIPS 140-2 max authentication fail attempts Linux shell access Restricted Disabled access to secret and private keys Boot or load software image from network Disabled FIPS 140-2 requires DSA signatures on images, units must boot from FLASH Updating ppciboot.img from ppciboot menu Disabled FIPS 140-2 requires ppciboot to be updated from runtime software via CLI or GUI LDAP Disabled Passwords passed in plaintext Login mode shell Disabled Unfettered access Broadcast Groups Limited No support for groups that have a master/slave of TCP Fingerd Disabled Allows anyone to see who is logged in Boot config from network (tftp) Disabled Configuration sent in plaintext Save config to network (tftp) Disabled Configuration sent in plaintext No authentication Disabled Insecure Dedicated Services Disabled Passwords are passed in plaintext Port Async Connect Disabled Insecure I-12 Upgrading Software Table I.1 Unsupported FIPS 140-2 Protocols and Features (Continued) Feature Impact Reason TCP Pipe Disabled In plain text Upgrading Software The ppciboot.img.sign and linuxito.img.sign digital signature files are used to authenticate during loading. Place these files on the TFTP server. The LX unit will download them automatically. See “Upgrading the Software” on page 4-13 for more information on upgrading the software. FIPS 140-2 JCE Module Commands L These commands apply only if you want to use the GUI in FIPS 140-2 mode. L You can purchase FIPS 140-2 compliant JCE modules from two vendors. The vendors are listed below, along with the specific JCE Module name. Vendor JCE module name IBM IBMJCEFIPS RSA JSafeJCE L These commands are available only when the LX is running in FIPS 140-2 Mode. A new FIPS 140-2 JCE Module command allows you to name the web server FIPS 140-2 JCE Module. You can access it in the Configuration Command Mode. LX Series Configuration Guide Configuring a Web Server FIPS 140-2 JCE Module Name I-13 Configuring a Web Server FIPS 140-2 JCE Module Name Use the following command to configure a Web Server FIPS 140-2 JCE Module name. The module name is set by the module vendor. For example, if you are using RSA’s JSafe cryptographic module, the module name would be JSafeJCE. Enter no web_ server fips jcemodule to reset to the default, which is “null”. The module name can be up to 16 characters long. Config:0>>web_server fips jcemodule <module_name> Example Config:0>>web_server fips jcemodule JSafeJCE Config:0>>no web_server fips jcemodule Viewing the Web Server FIPS 140-2 JCE Module Name Use the show web characteristics command to display the Web Characteristics Screen. An example of this screen follows, with the new Web JCEModule field highlighted: Time: Web Server: Web Server Gui Port: Web Server Timeout: Web Banner: Wed, 19 Jul 2006 10:09:48 US/EASTERN Enabled 5040 20 Enabled Web Server Http Port: Web Encrypt: Web JceModule: 80 Disabled JsafeJCEFIPS Figure I.3 Show Web Characteristics Screen with Web JCEModule I-14 Viewing the Web Server FIPS 140-2 JCE Module Name LX Series Configuration Guide J-1 APPENDIX J NTP Client Overview For NTP to function, an LX Series NTP client must be able to access an NTP timeserver on the network. NTP runs over User Datagram Protocol (UDP), which in turn runs over IP. NTP is a tiered time distribution system with redundancy capability, and measures delays within the network and within the algorithms on the machine on which it is running. Using these tools and techniques, it synchronizes clocks to within milliseconds of each other when connected on a Local Area Network. The LX-Series provides an NTP Version 4 (RFC2030) implementation. The Network Time Protocol (NTP) defines a set of procedures for synchronizing clocks on hosts connected to a network with access to the Internet. NTP goes beyond simple routines that occasionally query a timeserver, and adjusts the local clock to a time value received from the server. LX Series Products act as a Client, which query defined timeserver hosts on the network. The LX Series allows the LX administrator to configure a Client mode Primary and an optional Client mode Alternate NTP Time Server target IP Address, which the LX NTP Client queries to obtain and synchronize its time and date. J-2 How NTP Works How NTP Works After a Primary Time Server address and the (optional) Alternate Time Server target address(es) are configured and NTP is enabled, the LX begins exchanging messages with the server(s) in order to calibrate propagation delay and coordinate Universal Time (UTC), which is the same as Greenwich Mean Time. Using engineered algorithms, the client (LX) adjusts its time and then continues a regular client/server campaign to maintain synchronization with the timeserver(s). NTP is extremely efficient, requiring no more than one packet per minute to synchronize Client and Server time within one millisecond of each other. In the event you configure only a Primary NTP timeserver, and the LX Client does not receive a response to its time request query, the NTP client backs off and the Client queries will halt for several minutes and then begin to query the Primary Server again. This cycle continues until such time that the Primary Server responds to the LX Series NTP Client timeserver requests. In the event both a Primary and Alternate NTP timeserver address are configured, the Client (LX) polls both configured timeservers. After the LX NTP Client establishes a UTC, the LX continues a regular client/server campaign to maintain synchronization with the timeservers. If the Primary Server no longer responds to the LX Client timeserver queries, it then continues querying the Alternate time server to adjust its date and time. The LX NTP Client then polls both the Primary and Alternate timeserver at approximately 1 minute intervals. The LX NTP Client makes several attempts to contact the primary server. Once these attempts fail it defers to polling only the Alternate server for approximately fifteen minutes. Once this sleep period expires, the Client (LX) again attempts to poll both the Primary and Alternate Servers. This cycle continues until the primary timeserver is reachable. LX Series Configuration Guide How NTP Works J-3 The LX Series syslog can be displayed when it polls the configured servers and notes time adjustments. This is seen in the log listing in the CLI show log command. Additionally, the show ntp status command lists specific data on the query between the LX and the configured and reachable NTP timeservers. J-4 How NTP Works LX Series Configuration Guide K-1 APPENDIX K Using Nested Menus This section explains how to use the Nested Menu feature. It covers the following topics: About the Nested Menu Feature Creating the Nested Menu File Configuring the LX to Support Nested Menus Sample Nested Menu Files You can enable or require nested menus for specific users. K-2 About the Nested Menu Feature About the Nested Menu Feature The Nested Menu Feature enables you to create menus, in up to 64 levels. Each menu level can have up to 40 entries. To enable the Nested Menu feature on the LX, you configure the subscriber profile with the menu file name for either or both a CLI session and for a GUI session to the LX. You can assign the same menu for each session or configure a different menu for each subscriber access type. You specify a menu file by name. The menu can span all menu levels if you want. The Top Level Menu 1 is displayed when the subscriber menu is displayed. L The size limit of the Nested Menus has been increased from 16 to 64. This allows you to configure, organize, and use more complex menus. LX Series Configuration Guide About the Nested Menu Feature K-3 Figure K.1 shows a eight-level menu structure. The top level menu is Menu 1. Each menu level can include individual commands to be performed, and menu items linking to the other menu levels, to execute more menu options. Menu 1 Menu 8 Main Menu 1 21 . . . . . . 20 40 Menu Options Menu 2 21 . . . 40 Menu 3 Show Commands 1 . . . 20 1 . . . 20 Menu 4 Port Characteristics Connect Commands 1 . . . 20 21 . . . 40 Menu 6 1 . . . 20 21 . . . 40 21 . . . 40 Menu 5 Enable Features 1 . . . 20 Menu 7 MIS Hosts 1 . . . 20 21 . . . 40 1 . . . 20 21 . . . 40 Figure K.1 A Eight-Level Menu Structure 21 . . . 40 K-4 How a Subscriber Obtains the Menus Figure K.2 shows what Menu 1 might look like: Menu1 1. 2. 3. 4. Show Commands Connect Commands Port Characteristics Enable Features Main Menu 21. Set Session Mode 26. Resume a Session 27. Disconnect a Session 40. Help Up one level:^U Top of Menu:^T Repaint:^R Logout:^L Enter number of selection or use arrow keys: Figure K.2 Sample Menu You can type the characters shown at the bottom of the menu to move up through the menu levels without choosing options, or to exit from the menus. You define these characters within the menu file. Users can use arrow keys (¦ and Ø) to move among the entries within a menu. You can also enter the item number (to position the cursor), and then press the return key. How a Subscriber Obtains the Menus When you log on to a port, if a menu file is defined and login mode is set to menu, the menu is displayed. You can then choose options from the various menus. If the menu is configured but login mode is set to CLI, the port reverts to the command interface. If you enter “menu”, the menu is displayed. LX Series Configuration Guide Creating the Menu File K-5 Creating the Menu File L Depending on which version of Windows Hyperterminal you are running, extra characters may appear in the automated terminal commands, and screen pauses may not work correctly. You can create menus in two ways: Import an existing menu to a new menu name - This quick and easy method makes a copy of an existing menu file. Refer to the LX-Series Configuration Guide and the LX-Series Commands Reference Guide for further details. From the CLI Configuration Menu level - Use simple menu creation and editing commands to create a menu file. This mechanism hides all file structure, syntax, and special character sets required for menu presentation. Refer to the LX-Series Configuration Guide and the LX-Series Commands Reference Guide for further details. Use the menu commands to: Define menu options Create text strings that prompt for input or specify menu titles Define keys for moving among the different menus An administrator can drop to the shell level and use “vi” to create a menu file /config/M_menu-file-name. To create a menu file using vi, you must use the following file structure and syntax: When using the GUI to create or modify a menu file, you must know the required menu file structure and syntax noted below. The menu files are stored in the /config directory. The required file name syntax is M_filename. K-6 Creating the Menu File Table K.1 lists the commands used within the menu file itself for creating nested menus: Table K.1 Nested Menu Commands Command Description %menu_file Defines the beginning of a menu file. %menu_start Defines the beginning of a menu. %menu_entry n Defines a menu entry. %menu n Opens a menu from within a menu. %menu_wait Waits for one command to complete, then prompt the user for input before executing the next command. %menu_noprompt Displays the menu without prompting the user after executing a command. %menu_eof Defines the end of a file. %menu_prompt Defines the menu entry prompt. %menu_continue Defines the menu continue prompt. %menu_top Defines menu control characters. %menu_up %menu_logout %menu_repaint The following sections describe these commands in detail. LX Series Configuration Guide %menu_file K-7 %menu_file The menu file must begin with %menu_file or the LX will not recognize it as a menu file. %menu_start n header This command indicates the beginning of a menu and specifies the menu number and menu header. The value of n is the menu number. Valid values are from 1 through 64. The specified header appears at the top of a menu. The default menu header is a maximum seven character string “Menu #”(where # indicates the menu number). You can append the default header string with a configurable header string up to 72 characters long (thus the total header length of 79 characters). Each menu can have its own unique header string. %menu_entry n entry-label command-string This command defines a menu option. The value of n is the entry number for the item on the menu. Follow the option number with a delimiting character such as a carriage return, line feed, or form feed. The text of entry-label appears on the line following %menu_ entry n. The label entry for each of the menu items is 1-40, and can include up to 79 characters. Follow the label with a delimiting character such as a carriage return, line feed, or form feed. Menu entries are sorted numerically, and entries 1-20 are left justified. If items 21-40 are created when you create the menu, the label for entries 1-20 become truncated after 36 characters. The command-string includes one or more LX commands to be executed when the user chooses the entry number. K-8 %menu n The command-string can include up to 135 characters. If you include more than one command, separate the commands with a semi-colon (;). If the command to be run is a shell level command, the command must begin with the @ character. For example, the following command shows the port characteristics and then the server time: show port characteristics;show clock You can include a wildcard character in a command to prompt for user input. For example, the command telnet # prompts the user to enter a network destination address. Another example is to connect to a local async port using the connect port async command. You can also execute a script file in a menu entry command string. Doing so provides a way of executing a string of commands that exceeds the 135-character limit of a menu entry. The format for the script command is: script script-file-name %menu n Opens the menu that you specify with the n variable. You can use this command in the command-string of the %menu_entry command. %menu_wait Wait for one command to complete, then prompt the user for input before executing the next command. This command is useful when you specify two or more Show/List/Monitor commands in a menu entry. The interface displays one screen, then waits and prompts for input before displaying another screen. Use the %menu_continue command to define this prompt. %menu_noprompt Redisplay the menu after executing commands, without prompting the user for input. LX Series Configuration Guide %menu_eof K-9 %menu_eof Indicates the end of a file. You can begin another file after this command appears, or use other menu commands. %menu_prompt prompt-text This command specifies a text string that explains how to select a menu option. This prompt appears at the bottom of the menu where the user enters an option number. The prompt text can include up to 64 characters. The default prompt text is “Enter Number of Selection or Use Arrow Keys:” %menu_continue continue-string This command specifies a text string that explains how to redisplay a menu after a command executes. The prompt text can include up to 64 characters. The default text is “Press <RETURN> to continue...” %menu_top x text-string This command specifies the menu key character that the user types to open the top level menu. The text-string, which can include up to 19 characters, describes the purpose of the character. A typical entry might be %menu_top T Top of Menu (this is the default). The key and the text appear at the bottom of the menu. %menu_up x text-string This command specifies the menu key character that the user types to open a previous menu one level up. The text-string, which can include up to 19 characters, describes the purpose of the character. A typical entry might be %menu_up U Up One Level (this is the default). The key and the text appear at the bottom of the menu. K-10 %menu_logout x text-string %menu_logout x text-string This command specifies the menu key character that the user types to log out of the menu. The text-string, which can include up to 19 characters, describes the purpose of the character. A typical entry might be %menu_logout Q Logout (this is the default). The key and the text appear at the bottom of the menu. %menu_repaint x text-string This command specifies the menu key character that the user types to refresh the menu screen. The text-string, which can include up to 19 characters, describes the purpose of the character. A typical entry might be %menu_repaint R Refresh (this is the default). The key and the text appear at the bottom of the menu. LX Series Configuration Guide Using Comment Lines in the Menu File K-11 Using Comment Lines in the Menu File Begin a comment line with an exclamation point (!) and follow it with the comment text. An example follows: %menu_end !start Menu 3. Menu 3 displays CONNECT commands. %menu_start 3 Connect Commands The first line specifies the end of a menu. The second line is a comment explaining that the next section of the file defines a new menu, Menu 3. The third line is a menu command that begins Menu 3. General Guidelines When you create the menu file, observe these guidelines: The first line of every menu file is %menu_file. You can define menus in any order within the file. Each menu must have a menu number. You can define menu entries in any order within a menu. The menu file requires that each menu entry item have a number. Debugging the Menu File A syntax error in the menu file prevents the file from executing when a user attempts to access their menu. If a menu item’s command is invalid, the user interface displays an error message. Error messages are seen when configuring the menu as well. For example, the following entry appears if an error occurs when you try to enter an invalid command: syntax error in command “menu-entry-command-string” K-12 Enabling the Menu Feature Enabling the Menu Feature A Subscriber Menu is a preconfigured menu that displays for a subscriber when he/she logs in to the LX unit. A menu is displayed when the subscriber logs into a physical port or establishes a GUI session, if configured for them. In order for a menu to be displayed automatically, their profile must have a menu name configured, and login mode set to menu. L A subscriber can be presented with a menu when they log into the LX CLI or login via the GUI. Use the menu name command to specify a menu for the subscriber: Subs_jack:0 >>menu name financegroup L The LX saves the menu file as /config/M_ financegroup. The subscriber menu file name appears this way on the show/monitor subscriber <subscriber_name> characteristics screen. The above command specifies that the menu financegroup will be displayed for the subscriber jack when he logs into the LX unit. Once the user logs into the LX, the menu is displayed. If you do not enable the login mode menu, the normal CLI prompt is displayed. When the menu name is configured, you can access the menu by entering the menu command at the CLI prompt. L The subscriber menu feature can be enabled for CLI login after the menu name has been set: Sub_jack:0>> login mode menu The command sets the Subscriber Login Mode to menu. LX Series Configuration Guide Enabling the Menu Feature K-13 You can also have menu access if you login to the LX via the GUI. 1. Configure the menu name you will need to gain access when you log in via the GUI: Subs_jack:0 >>web menu name <menu_name> 2. Configure web access to be in the menu mode: Subs_jack:0 >>web access menu enable Table K.2 Sample File 1 Sample file Command description %menu_file Indicates a valid menu file. !Start Menu 1 - Main Menu Comment line. %menu_start 1 Main Menu Defines the beginning of menu number 1, and assigns it the header “Main Menu.” %menu_entry 1 Show Commands %menu 2 Defines Menu Entry number 1, and assigns the name “Show Commands” to it. The %menu 2 command instructs the server to display Menu 2 when a user selects this entry. The <CR> specifies a carriage return as the delimiting character after the entry number and the display text. %menu_entry 2 Connect Commands %menu 3 Defines Menu Entry 2, and assigns the name “Connect Commands” to it. The %menu 3 command instructs the server to display Menu 3 when the user selects this entry. %menu_entry 3 Port Settings %menu 4 Defines Menu Entry 3, and assigns the name “Port Settings” to it. The %menu 4 command instructs the server to display Menu 4 when the user selects this entry. %menu_entry 4 Enable Features %menu 5 Defines menu entry 4, and assigns the name “Enable Features” to it. The %menu 5 command instructs the server to display Menu 5 when the user selects this entry. %menu_end Indicates the end of Menu 1. You can add more options to Menu 1 as long as they appear in the file between the %menu_start 1 command and the %menu_end command. !Start Menu 8 - Standalone Menu Comment line. Menu not in use at present (no links to access it). %menu_start 8 Menu Options Defines the beginning of Menu number 8, and assigns it the header “Menu Options.” %menu_entry 1 Disable pause feature no pause; %menu_noprompt Defines Menu Entry number 1, and assigns the name “Disable pause feature” to it. The command line includes the LX command that disables pause, and the menu command that redisplays the menu without prompting the user. K-14 Enabling the Menu Feature Table K.2 Sample File 1 (Continued) Sample file Command description %menu_entry 2 Connect to Hosts connect # Defines Menu Entry number 2, and assigns the name “Connect to Hosts” to it. The wildcard character # means “prompt for a destination when the user selects this entry.” %menu_entry 3 Port Information show port characteristics; %menu_wait;show port status Defines Menu Entry number 3, and assigns the name “Port Information” to it. The interface runs the SHOW PORT CHARACTERISTICS command when a user selects this entry. After the Port Characteristics display appears, the interface displays the prompt “Press New Line to continue,” which is defined later in this menu file. When the user presses the New Line key, the interface runs the SHOW PORT STATUS command. %menu_end Indicates the end of Menu 8. You can add more options to Menu 8 as long as they appear in the file between the %menu_start 8 commands and the %menu_end command. !Start Menu 2 - Displays Comment line. %menu_start 2 Show Commands Defines the beginning of Menu number 2, and assigns it the header “Show Commands.” The position of Menu 2 after Menu 8 in the menu file does not affect how the server displays them. The server orders the menus correctly. %menu_entry 1 Who is logged in show users Defines Menu Entry number 1, and assigns the name “Who is logged in” to it. The server executes the SHOW USERS command when the user selects this entry. %menu_entry 2 Display Devices show device sum Defines Menu Entry number 2, and assigns the name “Display Devices” to it. The server executes the SHOW DEVICE SUM command when the user selects this entry. %menu_entry 3 Display Port Status show port status Defines Menu Entry number 3, and assigns the name “Display Port Status” to it. The server executes the SHOW PORT STATUS command when the user selects this entry. %menu_end Indicates the end of Menu 2. You can add more options to Menu 2 as long as they appear in the file between the %menu_start 2 commands and the %menu_end command. %menu_prompt Enter an option number or use arrow keys. Specifies the menu entry prompt. %menu_continue Press New Line to continue. Specifies the menu continue prompt. %menu_up U Up one level Specifies U as the character that a user types to display the menu that is up one level from the current menu. %menu_top T Top of menu Specifies T as the character that a user types to open the top level menu. LX Series Configuration Guide Sample File 2 K-15 Table K.2 Sample File 1 (Continued) Sample file Command description %menu_logut Q Logout Specifies Q as the character that a user types to logout of the server port/menu. %menu_repaint R Repaint Specifies R as the character that a user types to repaint the screen. Sample File 2 %menu_file !---------------------------------------------------------! Level 1 Main Menu !---------------------------------------------------------!top menu %menu_start 1 Main Menu ! %menu_entry 1 Telnet session to host: connect#;%menu_noprompt ! %menu_entry 2 Rlogin session to host: rlogin #;%menu_noprompt ! %menu_entry 4 Verify Host Ping 10.10.20.51 ! %menu_entry 5 System Characteristics %menu 9 ! %menu_entry 6 Connect to Remote Port 2 connect port async 2 ! %menu_entry 11 Port Status %menu 4 ! %menu_entry 12 Show Port Parameters %menu 5 ! K-16 Sample File 2 %menu_entry 14 Access Remote Devices %menu 7 ! %menu_entry 15 Power Outlet Control %menu 8 ! %menu_entry 17 Server Tools %menu 2 ! %menu_entry 18 Server Information %menu 3 ! %menu_end ! !---------------------------------------------------------!Level 2 Menu 2 Server/Network Tools !---------------------------------------------------------! %menu_start 2 System Tools %menu_entry 1 Ping set priv system;ping #;set nopriv ena system ping # %menu_entry 2 List service table show service %menu_entry 4 Show LX Time/date show clock %menu_entry 5 show system log ena system show log %menu_entry 6 Show status all devices show device all status %menu_entry 40 Help ? %menu_end ! LX Series Configuration Guide Sample File 2 K-17 !---------------------------------------------------------! Level 2 Menu 3 Server Information !---------------------------------------------------------! %menu_start 3 Server Information %menu_entry 1 Main Parameters show system characteristics %menu_entry 2 Current Status show server status %menu_entry 3 Network Statistics show port eth 1 status %menu_entry 4 Domain Information ena system;show system characteristics %menu_entry 5 IP Information show interface 1 status; show interface 1 char %menu_entry 11 Show Users show users %menu_entry 12 show system status show system stat %menu_entry 13 LX power data show system power %menu_entry 14 %menu_entry 20 Help ? %menu_end !---------------------------------------------------------!Level 2 Menu 4 Port Status !---------------------------------------------------------! %menu_start 4 Port Status %menu_entry 1 Show Port 3 Status show port async 3 status %menu_entry 20 show users logged into port 5 K-18 Sample File 2 show port async 5 users %menu_entry 30 logout port 10 ena system logout port async 10 %menu_entry 34 show port 34 status show port async 34 status %menu_entry 11 Show Users show users %menu_entry 20 Help ? %menu_end ! !---------------------------------------------------------!Level 2 Menu 5 Set/Show Port Parameters !---------------------------------------------------------! %menu_start 5 Port Parameters %menu_entry 1 Show port Parameters show port characteristics %menu_entry 3 Show port status show port status %menu_entry 6 default port 3 ena system config portasync 3 default port %menu_entry 20 show port 3 settings show port async 3 characteristics %menu_entry 23 Help help %menu_end ! !---------------------------------------------------------!Level 2 menu 7 Set/Show Telnet Parameters !---------------------------------------------------------! %menu_start 7 Access remote devices on LAN %menu_entry 1 Connect to local port 3 LX Series Configuration Guide Sample File 2 K-19 Connect port async 3 %menu_entry 3 Telnet port 3 on LX 3 telnet 1.2.3.4 2300 %menu_entry 4 ssh to remote LX-4 ssh 1.2.3.4 InReach %menu_entry 5 Telnet to host Lane telnet lane %menu_entry 9 Go to Power Control %menu 8 %menu_entry 14 Go to system parameters %menu 9 %menu_entry 20 Help help %menu_end ! !---------------------------------------------------------!Level 2 Menu 8 Set/Show Power Control !---------------------------------------------------------! %menu_start 8 Power Tower config-control %menu_entry 1 Set port async 1 power ena system config port async access power %menu_entry 2 show port 1 char show port async 1 char %menu_entry 4 Show power tower status show port async 1 status %menu_entry 5 Power off/on outlet 1 ena system outlet 1:1 # %menu_entry 20 Help ? %menu_end K-20 Sample File 2 ! !---------------------------------------------------------!Level 2 menu 9 Set/Show PPP Parameters !---------------------------------------------------------! %menu_start 9 System Parameters %menu_entry 1 Show Logged in users show users %menu_entry 2 Show Port Status show port status %menu_entry 3 Show Ethernet Status show interface 1 status %menu_entry 4 Show IP Parameters show interface 1 status;%menu_wait;show system ppciboot %menu_entry 6 Show System Software show version %menu_entry 40 Show Cluster Status ena system show cluster status %menu_entry 20 Help ? %menu_end ! !---------------------------------------------------------!On the Level - Misc Parameters !---------------------------------------------------------! %menu_top t Top Menu %menu_up u Up a Menu Level %menu_logout x Logout %menu_repaint r Refresh %menu_continue CR to continue... LX Series Configuration Guide L-1 APPENDIX L Using LXPORTD This section explains how to use the LXPORTD feature. It covers the following topics: About LXPORTD LXPORTD man Pages Applications Examples You can enable LXPORTD for specific users. L-2 About LXPORTD About LXPORTD LXPORTD is a host utility that provides you with TCP connectivity between the IP/IPv6 host and the LX. Depending on how it is invoked, LXPORTD can read data from standard in (stdin), a pseudo terminal device, or a FIFO (named pipe) and send that data to the LX serial port or broadcast master port. Since the LX can turn off telnet negotiations, LXPORTD may be used to pass unaltered data. Likewise, with various options available (see the man pages below), data can be read from the LX serial port and sent back to the named pipe on the host. Currently, LXPORTD supports Linux 2.6.x, Solaris 5.8, and FreeBSD 5.4 systems. MRV has qualified sample operating systems, and can only provide limited support on other systems. LXPORTD man Pages L The -a option and the -r option are mutually exclusive. -a auth-file Lxportd will read from this auth-file for authentication. The authentication is the typical Linux username/password handshaking for tcp connections. If your connection partner utilizes this same method, but the prompts are different, edit the "auth-file" accordingly. If your connection partner uses different handshaking, the source file "lxportd.c" is available for changing. The contents of this file should contain 4 lines in this order: 1. login: - this is the standard Linux login prompt the connection partner should present to Lxportd. 2. username - this entry is the valid username of the connection partner. LX Series Configuration Guide LXPORTD man Pages L-3 3. Password: - this is the standard Linux password prompt the connection partner should present to Lxportd. 4. password - this entry is the valid password of the connection partner. -c config-file Read pseudo terminal names from config-file instead of using the Lxportd's allocation algorithm. This may be useful in restricting which PTYs are used or if your system has a unique PTY naming strategy. This option may only appear after the -T option. A sample config-file is: # # a '#" denotes a comment line # /dev/ptyq0 /dev/ptyq1 -d debug-level Sets the debug level. Increasing the level increases the verbosity of the messages displayed. The following values are supported. 1 - General information and any system error messages. 2 - Buffer processing information. 3 - select() information. Any value greater than 3 is set to 3. -D Disconnect from the Remote Access Server when the last close occurs on the user device which causes the error EIO to be sent to LXPORTD. This option may only appear after the -T option and it is invalid with the -P option. -f Remote Access Server connection will follow the pty open/close. This option may only appear after the -T option and it is invalid with the -P option. L-4 LXPORTD man Pages -k Use the keepalive function to detect the connection to the Remote Access no data transfer has taken place for the keepalive function will do the the loss of Server. When 60 seconds, following: 1. Attempt to connect - if the connection is refused, then it is still active and another keepalive will be sent after another 60 seconds of inactivity. 2. Attempt to connect - if the connection attempt gets another type of error, the keepalive will try again 2 more times at 10 second intervals. If the same failure exists, then the keepalive will start all over again after another 60 seconds of inactivity. 3. Attempt to connect - if the connection attempt succeeds, then the keepalive will start all over again after another 60 seconds of inactivity. -L port argument is a logical (TCP) port instead of a physical port. This argument needs to be specified if the default TELNET remote port was changed for the physical port. -o toggles PTY slave processing. This option toggles the processing done by the slave side of the PTY. The actions taken depend on the system type. This option is incompatible with the -D and -P options. -P pipe-name Creates a named pipe (FIFO).Data written to the file will be sent to the Remote Access Server port. Data read from this file will be data read from the Remote Access Server port, unless explicitly stated otherwise by use of the -w option. Ideally, the Remote Access Server port should be in a mode that LX Series Configuration Guide LXPORTD man Pages L-5 does not alter data in any way (transparent(raw) mode). Note that with pipes, a FIFO opened for reading will be in a pending state until the other end is opened for writing, and a FIFO opened for writing will be in a pending state until the other end is opened for reading. The -P and -T options are mutually exclusive. L The -a option and the -r option are mutually exclusive. -r Reset connection to Remote Access Server before sending data. -s create a symbolic link for ptyname. It may only appear after the -T option and is required on many BSD systems. -T pty-name Allocates a pseudo terminal and creates a link to it. Any data written to it is sent to the Remote Access Server port while data read from the Remote Access Server port is written to it. Ideally, the Remote Access Server port should be in a mode that does not alter data in any way (transparent (raw) mode). The -T and -P options are mutually exclusive. -w Write only mode. Any data received from the Remote Access Server is ignored. -x Converts LFs to LFCRs in data going to the Remote Access Server port. L-6 Applications Examples Applications Examples LXPORTD configuration uses the existing LX CLI configuration commands. The communication parameters between the LX async port(s) and the attached device must agree. You must configure IP parameters to communicate with the host in question via the network. Any LXPORTD option used that requires a change in a parameter on the LX must be adhered to. Basic LXPORTD Application An administrator or programmer at Company A needs to send the contents of a file residing on the Linux host via LXPORTD to port 7 of the remote LX. Connected to port 7 is a data gathering device. This may be a dumb terminal that is being monitored by a user, or a workstation with a serial port communications package that is waiting for incoming data. In this basic case, security is not an issue. Figure L.1 shows the set-up: LX Series Configuration Guide Basic LXPORTD Application L-7 Lxportd - Linux Host IP Address: 1.2.3.5 Ethernet Port 7 LX Communication Server IP Address: 1.2.3.4 Workstation Figure L.1 Basic LXPORTD Application X To configure the basic LXPORTD application: L It is assumed that there is IP connectivity between the Host and the LX in question. Therefore, the configuration for this is not explained here. 1. Enter the following commands: Config:0>>port async 7 access remote Config:0>>port async 7 no authentication inbound Config:0>>port async 7 no authentication outbound L-8 Advanced LXPORTD Application Config:0>>port async 7 no autohangup - This is needed if the device on the port is not providing the DSR signal to the port. Config:0>>port async 7 no telnet negotiations 2. At the host prompt, the user can now invoke Lxportd using the following syntax: cat (file) | ./lxportd (ip-address) (port number)" cat file.foo | ./lxportd 1.2.3.4 7" The contents of the file is piped to LXPORTD, which performs a TCP connection to port 7 of the remote LX whose IP address is 1.2.3.4. The data in question is then delivered to the attached terminal/workstation that is connected to port 7 of the LX. Advanced LXPORTD Application In the following example, the LXPORTD application uses RADIUS security and the Broadcast Groups capability available on the LX. The application programmer/administrator at Airport A is tasked with providing up-to-date flight information to over 100 TV monitors positioned in various places throughout the airport. Four LX 32 port units are used in this configuration, with one being the master unit on the network, and the other three LX units daisy-chained together (while at the same time, not needing network connectivity). Figure L.2 shows the set-up, followed with a complete configuration example. LX Series Configuration Guide Advanced LXPORTD Application L-9 Linux Host IP Address: 1.2.3.5 Ethernet LX 32 Port Master Unit TV Monitor TV Monitor TV Monitor TV Monitor TV Monitor Port 32 to Port 1 Port 32 to Port 1 Port 32 to Port 1 LX 32 Port Slave Unit #2 LX 32 Port Slave Unit #1 TV Monitor TV Monitor TV Monitor TV Monitor TV Monitor TV Monitor TV Monitor LX 32 Port Slave Unit #3 TV Monitor TV Monitor TV Monitor TV Monitor Figure L.2 LXPORTD Application with RADIUS Security and Broadcast Groups Capability LX 32 port master unit #1 configuration will consist of one broadcast master TCP port with serial ports 1-32 acting as the broadcast slaves. It is configured as follows: X To configure the LXPORTD application with RADIUS security and Broadcast Groups: L It is assumed that there is IP connectivity between the Host and the LX in question. Therefore, the configuration for this is not explained here. Enter the following commands: Config:0>>port async 1-32 access remote Config:0>>port async 1-32 no authentication inbound L-10 Advanced LXPORTD Application Config:0>>port async 1-32 no authentication outbound Config:0>>port async 1-32 no autohangup Config:0>>port async 1-32 no telnet negotiations Config:0>>port async 1-32 speed 57600 Config:0>>port async 1-32 flowcontrol cts Config:0>>port async 1-32 parity none Config:0>>port async 1-32 character 8 Config:0>>interface 1 broadcast group 1 master port tcp 1024 - this is the TCP port Lxportd will connect to at start-up time. Config:0>>interface 1 broadcast group 1 mode char pass characters along as the LX receives them. Config:0>>interface 1 broadcast group 1 virtual authentication radius enable - The security method will be RADIUS. It is assumed that RADIUS has already been set up on the LX and is functioning properly. Config:0>>interface 1 broadcast group 1 slave port async 1-32 - all 32 serial ports will be slaves. Ports 1-31 will have TV monitors attached. Port 32 will have a crossover cable attached that will go to port 1 of the next LX in line (see the diagram above and the LX32 port slave unit #1 configuration below). Config:0>>interface 1 broadcast group 1 enabled this enables the broadcast group. LX 32 port slave units #1, #2 and #3 configuration consist of one broadcast master async port (port 1), with serial ports 2-32 acting as broadcast slaves. All three LX slave units #1, #2, and #3 should be configured as follows (exceptions are noted below). Enter the following commands: Config:0>>interface 1broadcast group 1 master port async 1 LX Series Configuration Guide Advanced LXPORTD Application L-11 Config:0>>port async 1 no authentication inbound Config:0>>port async 1 no authentication outbound Config:0>>port async 1 no autohangup Config:0>>port async 1 no telnet negotiations Config:0>>port async 1 speed 57600 Config:0>>port async 1 flowcontrol cts Config:0>>port async 1 parity none Config:0>>port async 1 character 8 Config:0>>port async 2-32 access remote Config:0>>port async 2-32 no authentication inbound Config:0>>port async 2-32 no authentication outbound Config:0>>port async 2-32 no autohangup Config:0>>port async 2-32 no telnet negotiations Config:0>>port async 2-32 speed 57600 Config:0>>port async 2-32 flowcontrol cts Config:0>>port async 2-32 parity none Config:0>>port async 2-32 character 8 Config:0>>interface 1 broadcast group 1 master port async 1 - this port will be the broadcast master for this LX unit. All data entering this port from port 32 of the preceding LX32 unit (whether it be the master unit #1 or slave unit #2 and #3) is directed to all of the broadcast slaves on the LX unit in question. Config:0>>interface 1 broadcast group 1 mode char pass characters along as the LX receives them. Config:0>>interface 1 broadcast group 1 virtual authentication none - There will be no security method needed. L-12 Advanced LXPORTD Application Config:0>>interface 1 broadcast group 1 slave port async 2-32 - ports 2-32 will be slaves. Ports 2-31 will have TV monitors attached. Port 32 will have a crossover cable attached that will go to port 1 of the next LX32 slave unit in line. An exception to this is if it is the last LX slave unit in the chain. Config:0>>interface 1 broadcast group 1 enabled this enables the broadcast group. At the host prompt, you can now invoke LXPORTD using the following syntax. (The application programmer/administrator needs to have superuser privileges on the host): ./lxportd -T(device) -a(auth-file) -x -D (ip-address of LX32 master unit #1) -L (tcp port number) "./lxportd -T/dev/foo -a radius_auth_file -x -D 1.2.3.4 -L 1024" For explanations of the various options in the above two commands, refer to “LXPORTD man Pages” on page L-2. At this point, LXPORTD is invoked and is looking for the device to be written to. The application programmer can then program to write to device "/dev/foo" at any (or all) time. When this occurs, the redirect from the device "/dev/foo" is delivered to the LX32 master unit #1 on Broadcast TCP port 1024, which in turn pumps all received data out its broadcast slave async ports and out to the attached TV monitors. It also pumps out the same data to port 32, which delivers it to broadcast master async port 1 of LX32 slave unit #1. This port in turn delivers the data to all of its broadcast slave ports and their attached TV monitors, with port 32 of this unit repeating the process to the next LX 32 slave units, right down the line. LX Series Configuration Guide M-1 APPENDIX M Using LPD MRV supports the Line Printer Daemon (LPD) for network to serial port printing. M-2 Line Printer Daemon (LPD) Protocol Support Line Printer Daemon (LPD) Protocol Support The LX supports LPD based on RFC 1179 for network to serial port printing. LPD, or Line Printer Daemon, is the standard serial port printing protocol on Unix. It is available for every style of Unix, and is useful as a basic print spooler. Refer to the LX-Series Commands Reference Guide for detailed information on the following commands: X To enable or disable the LPD daemon Example When enabled, the LPD daemon starts, if it is not enabled already. The LX then accepts any and all print jobs for any configured queue as long as there is a valid IP address on the interface. Config:0 >>lpd enable Example When disabled, the LPD daemon stops, if it has not done so already. The LX will then not accept any print jobs for any configured queue. Config:0 >> no lpd X To enable/disable LPD on a physical port Examples Use this command to change the access on a specific port to LPD. LPD is not supported on the modem port and the diagnostic port. After configuring LPD access, you can configure print queues. All current rules for changing access apply also. When you change access from LPD to another type, any queues configured for this port are deleted. Async1:0 >> access lpd Config:0 >> port async <port_list> access lpd LX Series Configuration Guide Line Printer Daemon (LPD) Protocol Support M-3 X To configure standard LPD print queues Example Use this command to create a standard, non-load balancing print queue named <queue_name> for port <port_number> and enable it for printing. The <queue_name> can be up to 15 characters in length. Different queue names can be configured per port. A maximum of 50 queues can be configured on the LX. Keep in mind that you must configure the port to match the printer settings with respect to speed, parity, stop bits, data size, and flow control. Async1:0 >> lpd queue <queue_name> Async1:0 >> lpd no queue <queue_name> Example The following sample command creates a print queue named lxserial on port 1 and enables it for printing. Async1:0 >> lpd queue lxserial Example The following sample command deletes the print queue named lxserial on port 1. Async1:0 >> lpd no queue lxserial Example X To configure the Form Feed value Example Use this command to configure the form feed value of an existing print queue named <queue_name> on <port_ number>. This parameter determines where to insert the form feed when a print job is sent to a configured queue. The four <value> options are before, after, both, or none (the default). Async1:0 >> lpd queue <queue_name> form feed <value> Example The following sample command results in a form feed being sent after every print job to queue lxserial on port 1. Async1:0 >> lpd queue lxserial form feed after X To configure linefeed to linefeed/carriage return conversion Example Use this command to configure the "linefeed to linefeed/ carriage return" conversion for print jobs that are sent to a print queue named <queue_name> on <port_number>. This parameter converts all linefeeds in the print job to linefeed/ carriage returns. The default is enabled. Async1:0 >> lpd queue <queue_name> lf->lfcr enable M-4 Line Printer Daemon (LPD) Protocol Support Example When disabled, this command does not perform any linefeed conversions when jobs are sent to the print queue named <queue_name> on <port_number>. Async1:0 >> lpd no queue <queue_name> lf->lfcr Example The following command example converts every linefeed contained in the print file to a carriage return/linefeed when sent to queue lxserial on port 1. Async1:0 >> lpd queue lxserial lf->lfcr enable Example The following command example results in no conversion being done on any linefeed contained in the print file when sent to queue lxserial on port 1. Async1:0 >> lpd no queue lxserial lf->lfcr X To configure a Slave Print Queue and associate it with a Master Print Queue Load Balancing allows you to queue a print job to a master queue. The master queue prints to the first configured slave queue that is in an idle state and ready for printing, and then prints in round-robin fashion to all configured slaves after that. If that printer is busy for any reason, the print job is then directed to the next slave queue in an idle state. This feature requires a minimum of two configured print queues for it to function; at least one slave queue (but preferably more than one) that points to a Load Balance master queue, and the Load Balance master queue itself. L You should not print directly to the slave queue. Send print jobs to the associated load balance master instead. If necessary, the master can redirect print jobs to other available slave queues, but a slave queue cannot. Example Use the following command to configure a slave print queue named <queue_name> for <port_number> and associate it with the master print queue <queue_name>. There can be more than one slave queue per port. The master queue need not exist beforehand to configure this command. Async1:0 >> lpd queue slave <queue_name> master <queue_name> LX Series Configuration Guide Line Printer Daemon (LPD) Protocol Support M-5 Example The following command deletes a slave print queue named <queue_name> for <port_number> and disassociates it with respect to the master. Async1:0 >> lpd no queue slave <queue_name> Example The following command example configures a slave print queue named printer1 for port 1 and associates it with the master print queue lbanner. Async1:0 >> lpd queue slave printer1 master lbanner Example The following command example deletes a slave print queue named printer1 for port 1. Async1:0 >> lpd no queue slave printer1 X To configure the Form Feed Value of an existing Slave Print Queue Example Example Use this command to configure the form feed value of an existing slave print queue named <name> on <port_ number>. This command is used to determine where to insert the form feed character when a print job is sent to a configured queue. The options are before, after, both, or none (the default). Async1:0 >> lpd queue slave <queue_name> form feed <value> The following sample command causes a form feed to be sent after every print job to queue printer1 on port 1. Async1:0 >> lpd queue slave printer1 form feed after X To configure Linefeed to Linefeed/Carriage Return conversion on print jobs Example Use this command to configure the "linefeed to linefeed/ carriage return" conversion for print jobs that are sent to a slave print queue named <name> on <port_number>. This command converts all linefeeds in the print job to linefeed/ carriage returns. The default is enabled. Async1:0 >> lpd queue slave <queue_name> lf->lfcr enable Use the following command if you do not want to perform any linefeed conversions when jobs are sent to slave print queue named <queue_name> on <port_number>. M-6 Line Printer Daemon (LPD) Protocol Support Example Async1:0 >> lpd no queue slave <queue_name> lf->lfcr Example The following sample command results in the conversion of every linefeed contained in the print file to a carriage return/ linefeed sent to queue printer1 on port 1. Async1:0 >> lpd queue slave printer1 lf->lfcr enable Example The following sample command results in no conversion being done on any linefeed contained in the print file sent to queue printer1 on port 1. Async1:0 >> lpd no queue slave printer1 lf->lfcr X To configure a Load Balance Master Print Queue Example Use this command to configure a load balance master print queue named <queue_name>. Any configured slave queue that has this master queue associated with it now becomes its slave. Config:0 >> lpd queue master <queue_name> Example Use this command to delete the master queue <queue_ name>. This command does not delete any slave queues. Config:0 >> lpd no queue master <queue_name> Example The following sample command configures a load balance print queue named lbanner. Config:0 >> lpd queue master lbanner Example The following sample command deletes the load balance print queue named lbanner. Config:0 >> lpd no queue master lbanner X To enable/disable Queuing (Spooling) on a print queue Example Use this command to enable queuing (spooling) on a specific print queue or all print queues if the all keyword is used. The default is enable. Config:0 >> lpd queue <queue_name>|all spooling enable Use the following command to disable queuing (spooling) on a print queue or all print queues if the all keyword is used. Print jobs sent to this queue will be streamed to the printer. Any other job sent to it is held on the "lp" or "lpr" client until this print queue is idle. LX Series Configuration Guide Line Printer Daemon (LPD) Protocol Support M-7 Example Config:0 >> lpd queue <queue_name>|all spooling disable Example The following sample command enables spooling on a print queue named lxserial. Config:0 >> lpd queue lxserial spooling enable Example The following sample command disables spooling on a queue named lxserial. Config:0 >> lpd queue lxserial spooling disable X To start /stop printing on a print queue Example Use the following command to start printing on a print queue or all print queues if the all keyword is used. Any jobs in the spooling directory are then printed (if spooling is enabled). This is the default setting. Config:0 >> lpd queue <queue_name>|all printing start Example Use the following command to stop printing on a print queue or all print queues if the all keyword is used. You can still send print jobs to the queue, where they are spooled (if spooling is enabled). Config:0 >> lpd queue <queue_name>|all printing stop Example Use the following command to start printing on a print queue named lxserial: Config:0 >> lpd queue lxserial printing start Example Use the following command to stop printing on a print queue named lxserial: Config:0 >> lpd queue lxserial printing stop X To enable/disable printing and queuing on a print queue Example Use this command to enable printing and queuing (spooling) on a print queue, or all print queues if the all keyword is used. Print jobs are accepted. This is the default setting. Config:0 >> lpd queue <queue_name>|all up Example Use this command to disable printing and queuing (spooling) on a print queue, or all print queues if the all keyword is used. Print jobs are not accepted. Config:0 >> lpd queue <queue_name>|all down M-8 Line Printer Daemon (LPD) Protocol Support Example Use the following example to enable printing and queueing on all print queues: Config:0 >> lpd queue all up Example Use the following example to disable printing and queueing on a print queue named lxserial: Config:0 >> lpd queue lxserial down X To remove print jobs from queues Syntax Example Use this command from Superuser Mode on the LX to remove spooled jobs from a queue. The jobs to be removed are specified by job number, which you can obtain by typing the show lpd queue <queue_name> status command and observing the show screen. Use the keyword all in lieu of the job number to remove all jobs in a queue. InReach:0 >> lpd queue <queue_name> no job <job #|all> Use the following example to remove job 37 from a print queue named lxserial: InReach:0 >> lpd queue lxserial no job 37 X To redirect print jobs for a specific print queue to another print queue Print jobs being sent to one local print queue can be redirected to another local print queue. You can redirect the following types of print queue: • A standard print queue to another standard queue. • A standard print queue to a master queue. • A master queue to a standard queue. • A master queue to a master queue. • A slave queue to a standard queue. An error message is displayed if you do not follow these rules. Syntax Use this command from Configuration Mode on the LX to redirect all print jobs for a particular print queue to another print queue. Config:0 >> lpd queue <queue_name_to_be_redirected> redirect <destination_queue_name> LX Series Configuration Guide Line Printer Daemon (LPD) Protocol Support M-9 Example Use the following example to redirect the print jobs from a print queue named lxprinter to a print queue named backup-printer: Config:0 >> lpd queue lxprinter redirect backupprinter X To cancel a redirection of print jobs on a print queue to another print queue Syntax Example Use this command from Configuration Mode on the LX to cancel the redirection of all print jobs on a print queue to another print queue. Config:0 >> lpd queue <queue_name_that_was_redirected> no redirect Use the following example to cancel the redirection of the print jobs from a print queue named lxprinter: Config:0 >> lpd queue lxprinter no redirect X To display LPD information for a specific port or all ports. L If you attempt to show LPD queues for an async port not set for LPD access, a message is displayed to inform you that LPD is not configured on that port. Example Use the show port async <port_number>|all lpd queues command: InReach:0 >show port async 2 lpd queues Figure M.1 shows a sample Port LPD Queue Screen. Time: Sun, 09 Dec 2006 06:54:41 UTC Port Number: Print Queue Queue Type 2 Master Queue Form Feed Lf->lfcr lxserial printer1 Standard Slave N/A 1balance Before After Enabled Disabled Figure M.1 Port LPD Queue Screen M-10 Line Printer Daemon (LPD) Protocol Support X To display LPD information for a specific print queue or all print queues. Use the show lpd queue <queue_name> characteristics command to display the LPD Queue Characteristics screen for a specific queue. An example of this screen follows: Printer lxserial@LX Printing enabled Spooling enabled Jobs 0 Server none Subserver Redirect Status/(Debug) none Figure M.2 LPD Queue Characteristics Screen for a Specific Queue Use the show lpd queue all characteristics command to display the LPD Queue Characteristics screen for all queues. An example of this screen follows: Printer lbanner@LX lxserial@LX lxserial2@LX printer1@LX printer2@LX Printing enabled enabled enabled enabled enabled Spooling enabled enabled enabled enabled enabled Jobs 0 1 0 0 0 Server none none none none none Subserver Redirect Status/(Debug) printer1,printer2 2280 none none none Figure M.3 LPD Queue Characteristics Screen for All Queues X To display alternate LPD characteristics information for a specific print queue or all print queues. Use the show lpd queue <queue_name> alternate characteristics command to display the LPD Queue Alternate Characteristics screen for a specific queue. An example of this screen follows: Time: Mon, 29 Jan 2007 07:55:29 UTC Print Queue Queue Type Master Queue Redirect Queue Port lxprinter Standard N/A backup-printer 2 Figure M.4 LPD Queue Alternate Characteristics Screen for a Specific Queue LX Series Configuration Guide Line Printer Daemon (LPD) Protocol Support M-11 Use the show lpd queue all alternate characteristics command to display the LPD Queue Alternate Characteristics screen for all queues. An example of this screen follows: Time: Mon, 29 Jan 2007 07:55:29 UTC Print Queue Queue Type Master Queue Redirect Queue Port lxprinter testfor2 lxserial3 lxserial Standard Standard Slave Slave N/A N/A lbalance lbalance backup-printer N/A N/A N/A 2 3 3 4 Figure M.5 LPD Queue Alternate Characteristics Screen for All Queues X To display LPD status for a specific print queue or all print queues. Use the show lpd queue <queue_name> status command to display the LPD Queue Status screen for a specific queue. An example of this screen follows: Time: Tue, 27 Mar 2007 07:55:29 US/Eastern Server Printer: lxserial@LX Queue: no printable jobs in queue Server: no server active Status: job 'root@csdev+211' saved at 12:10:54.524 Rank Owner/ID Pr/Class Job Files done root@csdev+211 C/csdev 211 hosts Size Time 228 12:10:40 Figure M.6 LPD Queue Status Screen for a Specific Queue M-12 Line Printer Daemon (LPD) Protocol Support Use the show lpd queue all status command to display the LPD Queue Status screen for all queues. An example of this screen follows: Time: Mon, 29 Jan 2007 07:55:29 UTC Printer: lxtcp@LX Queue: no printable jobs in queue Printer: lbalance@LX (subservers printer1, printer2) Queue: no printable jobs in queue Status: no more jobs to process in load balance queue at 02:33:32.552 Printer: lxserial@LX (printing disabled) Queue: 1 printable job Server: no server active Rank Owner/ID Pr/Class Job Files 1 root@im1+37 I/im1 37 hosts Size Time 304 02:33:32 Printer: lxserial2@LX Queue: no printable jobs in queue Server Printer: printer1@LX (printing disabled) (serving lbalance) Queue: 1 printable job Server: no server active Rank Owner/ID Pr/Class Job Files Size Time 1 root@im1+37 I/im1 37 hosts 304 02:33:32 Server Printer: printer22@LX (serving lbalance) Queue: no printable jobs in queue Printer: testprinter@LX (printing disabled, spooling disabled) Queue: no printable jobs in queue Figure M.7 LPD Queue Status Screen for All Queues LX Series Configuration Guide N-1 Semicolons Embedded within Data Strings APPENDIX N The LX is ideal for making serial devices available for network access and service. Devices such as modems may be required to receive data strings to initiate dialout services. Some modems, as well as other serial devices, may be required to receive periodic serial data strings for synchronization purposes. In many cases, a semicolon is required within this data string. Normally, the LX command processor interprets the semicolon as a command separator. Now the LX has a mechanism to pass a datastream that includes the semicolon out a serial port. This is accomplished several ways via the shell level “echo” command. Assuming a serial device is connected to LX port async 11, and this device needs to receive a setup data string containing a semicolon, here are some examples of how to accomplish this: X To execute the shell echo command At the LX shell, type: LX:/# echo -n “AT&F +CBST=7,0,1; SO=1”>/dev/ttyGN10 1. Example 2. Example At the Superuser level of the CLI, enter: InReach:0>> shell command echo -n “AT&F +CBST=7,0,1; SO=1”>/dev/ttyGN10 3. Example At the Superuser level, call a script file by entering: InReach:0>> script datatoport.script N-2 L You must have a script file prepared prior to using the script command. The script files must be in /config. Example Example LX:/config# cat datatoport.script An example of the shell echo command within a script follows: “shell command echo -n “AT&F +CBST=7,0,1; SO=1”>/dev/ ttyGN10” L Note that the quotation marks at the beginning and end of the line in the script are required. The previous commands execute the shell echo command once. When you require periodic or frequent execution of this command, it is best to use a Trigger-Action with a trigger type Instant. For an Action command, you can use either the script command or the Superuser level CLI shell echo command, both described here. L When using the CLI shell command within the Action command, the entire command must be enclosed within quotation marks. This functionality is also supported in a Subscriber menu. The menu entry command can be either the script command or the entire CLI shell echo command. L When you use the shell command within a menu entry, you must enclose the entire command within quotation marks, just as you did with the string in the script file and the Trigger-Action Action command. LX Series Configuration Guide Setting Up Your Environment to Work with LDAP Version 3 O-1 LDAP Version 3 Environment Setup and Troubleshooting APPENDIX O Setting Up Your Environment to Work with LDAP Version 3 Use the following sample procedure to configure your LDAP Linux server for version 3 support. IMPORTANT! It is assumed that you are well versed in system administration, especially regarding installing packages, as well as LDAP itself. This procedure is intended only as a basic guide specific to the Linux environment. Your procedure may vary, depending on your operating system. Consult your System Administrator for instructions specific to your environment. 1. 2. Go to www.openldap.org and download the latest OpenLDAP stable Release. As of the V5.1.0 release, MRV supports version 2.3.32 of OpenLDAP. Install the package according to the directions in the INSTALL script. By default, the SLAPD daemon is installed in /usr/local/ libexec. By default, the OpenLDAP SLAPD configuration and necessary schemas are installed in /usr/local/etc/ openldap. The install paths may be different if your administrator has specified non-default paths. O-2 Setting Up Your Environment to Work with LDAP Version 3 In the /usr/local/etc/openldap directory, there is a slapd.conf file. The SLAPD daemon reads the contents of the slapd.conf file at startup. MAN pages for slapd and slapd.conf are available and contain vital information. There is also a schema sub-directory. MRV requires that certain schemas be added to the slapd.conf file (see the provided example of the slapd.conf file below). 3. In a Linux environment, invoke SLAPD using one of the following methods: • Invoke SLAPD from the command line using slapd -h (with the appropriate ldap or ldaps url). • Use the /etc/init.d/ldap start command. In both cases, the slapd.conf file is parsed and the SLAPD daemon is invoked. Please consult that file for particulars. L There is also an ldap.conf file, which can be used to test LDAP on the server itself with ldap commands, such as ldapsearch. MRV does not use this file. 4. 5. You must also configure the database for UIDs (User IDs) and DNs (Distinguished Names) with whatever tool is appropriate. One such tool is Phpldapadmin, a Web-based LDAP browser to manage your LDAP server. You can download this at http://phpldapadmin.sourceforge.net/. You must have valid certificates on the LDAP server, as well as a client certificate on the LX. You can create these certificates on the server using openssl commands or a shell script tool called CA.sh. Pointers to these certificates are configured in the slapd.conf (see below in the example slapd.conf) file. CA.sh is in the apps subdirectory of the OpenSSL package. OpenSSL must also be installed on the LDAP server. Go to http:// www.openssl.org/ for that software package. Note that the LX is currently at OpenSSL version 0.9.7l. LX Series Configuration Guide Sample Slapd.conf File O-3 IMPORTANT! Whatever method you choose, you must do the following: During certificate(s) creation, when you are prompted for the Common Name, you must enter either the hostname or the Host's IP Address. This Common Name must be the same in all certificates, and must match the hostname or Host IP Address configured as the LDAP server on the LX. Sample Slapd.conf File This section shows part of a slapd.conf file, and explains at a minimum what the LX requires. Each area specific to the LX is displayed, and is preceded by an explanation. The following screen includes the minimum schemas required, as noted in step 2 from above. # # See slapd.conf(5) for details on configuration options. # This file should NOT be world readable. # include/usr/local/etc/openldap/schema/core.schema include/usr/local/etc/openldap/schema/cosine.schema include/usr/local/etc/openldap/schema/inetorgperson.schema include/usr/local/etc/openldap/schema/nis.schema The following settings allow you to still use ldap version 2. Please note that as of LX code V5.2.0, version 2 will no longer be supported. # Allow LDAPv2 client connections. allow bind_v2 This is NOT the default. O-4 Sample Slapd.conf File In the following screen, HIGH means "all ciphers using key lengths greater than 128 bits"; MEDIUM is short for "all ciphers using key lengths equal to 128 bits", and +SSLv2:+SSL3 means "all ciphers specified in the SSL protocol, version 2 and 3, regardless of key strength". For a complete explanation of OpenSSL ciphers, including all supported wild cards, see the ciphers(1) man page. TLSCipherSuite HIGH:MEDIUM:+SSLv2:+SSLv3 The following settings specify the location of the Certificate Authority (CA) certificate. Note that you must also download this certificate to the LX using the new ldap update commands. TLSCACertificateFile /usr/local/etc/openldap/cacert.pem The following settings specify the location of the file that contains the SLAPD server certificate. TLSCertificateFile /usr/local/etc/openldap/servercert.pem The following settings specify the location of the file that contains the private key that matches the certificate stored in TLSCertificateFile above. TLSCertificateKeyFile /usr/local/etc/openldap/newkey.pem The following settings must be set to either never or allow. Please note that per RFC-2830, it is required that a valid certificate exist on the LX. TLSVerifyClient never|allow LX Series Configuration Guide Troubleshooting LDAP Connections O-5 The following screen is an example of a database (which was used for testing with the LX). Yours may be different. ####################################################################### # BDB database definitions ####################################################################### databasebdb suffix"dc=mrv,dc=com" rootdn"cn=Manager,dc=my-dom,dc=com # Cleartext passwords, especially for the rootdn, should # be avoided. See slappasswd(8) and slapd.conf(5) for details. # Use of strong authentication encouraged. rootpw secret The following screen displays the database directory path. # The database directory MUST exist prior to running slapd AND # should only be accessible by the slapd and slap tools. # Mode 700 recommended. directory /usr/local/var/openldap-data The following displays the minimum of what the LX requires. # Indices to maintain index objectClass eq Troubleshooting LDAP Connections When troubleshooting LDAP authentication issues, you should turn on LX debugging from the Superuser prompt: 1. Enter the debug port async <port_number> enable command to enable debugging on the LX port if you are authenticating to or from the port, or issue the debug system enable command if authenticating to the LX interface. 2. Enter 3. 4. the z all command - this zeroes out all of the logs. Attempt the LDAP authentication. Enter a show log and the show debug all commands - their output shows the authentication attempts and valuable debug messages. O-6 Troubleshooting LDAP Connections If the issue is not resolved by information provided in these logs, then you must capture the log(s) output and provide it to MRV support. You can save the above logs on your host via the LX CLI if you have the SFTP server running on your host with the following: 1. 2. 3. 4. Enter sftp <login-name> <IP address or hostname> and follow the login instruction. At the sftp prompt, enter get /var/log/syslog to place the syslog file on your host. At the sftp prompt, enter get /var/log/debug to place put the debug file on your host. At the sftp prompt, enter exit to exit out of the sftp session. Forward these files to MRV support. If your host does not support an SFTP server, then check to see if it supports a TFTP server. Do the following: 1. Drop to the LX shell , by issuing the shell command. 2. Enter cd /var/log/. 3. Issue tftp and follow the help commands. Forward these files to MRV support. If your host does not support either sftp or tftp, you must capture the log output using a terminal emulator that supports capturing output to a file. Forward these files to MRV support. L When you finish capturing the output, turn off debugging on the LX. If you do not, the logs can fill up quickly. Enter the no debug port async <port_number> command and/ or the no debug system command. LX Series Configuration Guide List of Procedures 1 Alphabetical List of Procedures X X X X X X X X X X X X X X X X X X X X X X X X X X X X X X X X To display the PPP status of all IP interfaces........................ 16-11 To display the port mapping for all IP interfaces ..................... 6-17 To enable and disable audible alarms .................................... 15-5 To access Cluster Configuration and Control............................ 13-5 To access SNMP commands ................................................ 14-16 To access the 5250/5150/4800 CLI from an LX unit ................. 10-8 To access the Configuration Command Mode............................. 9-6 To access the GUI Cluster Explorer windows: ........................ 13-27 To access the menu ............................................................. 4-17 To access the Notification command mode .............................. 5-18 To access the Port Async Signal Notice Configuration window....................................................... 19-10 To activate the ping backup link when both ping targets are lost ............................................................... 16-17 To add a rule to a chain ..................................................... 12-10 To add an SNMP GET client ................................................... 14-9 To add an SNMP SET client ................................................. 14-10 To add an SNMP Trap client ................................................ 14-11 To add an SNMP V3 access entry ......................................... 14-13 To add an SNMP V3 group entry .......................................... 14-12 To add an SNMP V3 user entry ............................................ 14-11 To add an SNMP V3 View Entry ........................................... 14-14 To add or remove a KerberosV5 Realm Name.......................... 2-41 To add or remove a Master Key Distribution Center (KDC) Server ..... ........................................................................................ 2-41 To add or remove a Slave KDC Server.................................... 2-41 To add Superuser privileges to a subscriber account ................ 8-17 To append a timestamp.......................................................... 7-4 To assign outlets to a group.................................................. 10-3 To automatically configure inbound and outbound authentication ...... ........................................................................................ 9-25 To boot from the network ..................................................... 4-18 To break the connection ....................................................... 3-19 To calibrate analog inputs................................................... 15-30 LX Series Configuration Guide 2 List of Procedures X To cancel a redirection of print jobs on a print queue to another print X X X X X X X X X X X X X X X X X X X X X X X X X X X X X queue ............................................................................... M-9 To change a Gateway address ............................................... 4-29 To change a Network Mask ................................................... 4-29 To change an IP Address ...................................................... 4-28 To change the Configuration password for the LX unit ...............I-10 To change the default async TCP listener port settings ............... F-3 To change the default password for the InReach user ................. I-9 To change the password from the CLI .................................... 4-39 To change the ppciboot password .......................................... 4-22 To change the ppciboot password ............................................ I-8 To change the rule order ...................................................... 12-8 To change the SFTP Key Passphrase ...................................... 4-10 To change the SSH port ......................................................... F-3 To change the subscriber password........................................ 8-16 To change the subscriber session mode .................................. 8-13 To change the Superuser password........................................ 2-11 To change the TFTP Server IP address.................................... 4-30 To change the User-level password of the InReach User ........... 2-11 To clear the current command line........................................... 1-3 To configure a bootup trigger ................................................ 11-7 To configure a clock-based duration outside of the set time....... 11-8 To configure a clock-based duration ....................................... 11-8 To configure a clock-based timer ........................................... 11-9 To configure a compound trigger ........................................... 11-7 To configure a control output default description for a specific control ..................................................................................... 15-20 To configure a control output default description for multiple controls ..................................................................................... 15-20 To configure a control output description string for a specific control . ..................................................................................... 15-19 To configure a control output description string for a specific control . ..................................................................................... 15-50 To configure a control output description string for multiple controls . ..................................................................................... 15-19 To configure a CTS signal trigger ......................................... 11-15 LX Series Configuration Guide List of Procedures 3 X X X X X X X X X X X X X X X X X X X X X X X X X X X X X To configure a date-based trigger .......................................... 11-9 To configure a day-based duration......................................... 11-8 To configure a day-based trigger ......................................... 11-10 To configure a descriptive name for a specific control output ... 15-16 To configure a descriptive name for any Alarm Input in the LX-7204T/7304T ...................................................... 15-5 To configure a descriptive name for any alarm input .............. 15-42 To configure a descriptive name for any analog input in the LX-7204T/7304T .................................................... 15-24 To configure a descriptive name for any control output........... 15-47 To configure a DSR/DCD signal trigger ................................. 11-15 To configure a humidity trigger ............................................. 11-9 To configure a Load Balance Master Print Queue ....................... M-6 To configure a LOCALSYSLOG service profile ............................. 5-6 To configure a name for a control output for multiple controls.............................................................. 15-17 To configure a new warning banner ....................................... 8-17 To configure a Pattern Trigger ............................................. 11-10 To configure a ping trigger ................................................. 11-11 To configure a port for access to the CLI of the 5250/5150/4800 unit ....................................................................................... 10-9 To configure a power input status threshold trigger................ 11-14 To configure a power input voltage threshold trigger .............. 11-14 To configure a power port async lost contact trigger............... 11-12 To configure a power trigger ............................................... 11-13 To configure a RADIUS Primary Accounting Server IPv6 address 20-9 To configure a RADIUS Primary Authentication Server IPv6 address .. ..................................................................................... 20-10 To configure a RADIUS Secondary Accounting Server IPv6 address ... ..................................................................................... 20-10 To configure a RADIUS Secondary Authentication Server IPv6 address ..................................................................................... 20-10 To configure a remote tunnel via a tunnel broker ..................... 20-6 To configure a REMOTESYSLOG service profile......................... 5-11 To configure a rotary on an IP interface.................................. 6-12 To configure a Secondary DNS address ................................ 20-11 LX Series Configuration Guide 4 List of Procedures X To configure a service name and address ............................... 20-9 X To configure a severity level for alarm inputs for a specific alarm ...... X X X X X X X X X X X X X X X X X X X X X X X X X X X ..................................................................................... 15-13 To configure a severity level for alarm inputs for a specific alarm ...... ..................................................................................... 15-45 To configure a severity level for alarm inputs for multiple alarms ...... ..................................................................................... 15-13 To configure a Slave Print Queue and associate it with a Master Print Queue............................................................................... M-4 To configure a source interface on Network Time Protocol (NTP) 20-8 To configure a source interface on SNMP ................................ 14-9 To configure a subscriber account for access to asynchronous ports .. ......................................................................................... 8-9 To configure a subscriber account for outlet access .................. 8-10 To configure a subscriber account for outlet group access ......... 8-10 To configure a TAP service profile ............................................ 5-7 To configure a temperature onboard trigger .......................... 11-16 To configure a temperature port trigger................................ 11-15 To configure a trigger to track a power failure ....................... 11-11 To configure alarm inputs via trigger action rules..................... 19-5 To configure an alarm input description string for a specific alarm..... ..................................................................................... 15-43 To configure an alarm input description string ......................... 15-7 To configure an alarm trigger................................................ 11-6 To configure an alternate IPv6 address on Network Time Protocol (NTP)............................................................................... 20-8 To configure an analog input description string ...................... 15-25 To configure an analog input description string ...................... 15-26 To configure an analog trigger .............................................. 11-7 To configure an ARP interval ................................................. 17-6 To configure an ASYNC service profile .................................... 5-10 To configure an escape character .......................................... 3-19 To configure an IP Assignment method................................... 4-28 To configure an IP interface .................................................... 6-4 To configure an LX asynchronous port as a POWER port ........... 10-2 To configure an SFTP Password ............................................... 4-9 LX Series Configuration Guide List of Procedures 5 X X X X X X X X X X X X X X X X X X X X X X X X X X X X To configure an SFTP Server IPv4 Address ................................ 4-9 To configure an SFTP Username .............................................. 4-9 To configure an SMTP service profile ...................................... 5-12 To configure an SNPP service profile ........................................ 5-6 To configure any form of authentication as if it were a Local port .......................................................... 16-23 To configure by default name or by physical location on the HDAM.... ..................................................................................... 15-24 To configure control output name as open or closed for a specific control ........................................................................... 15-18 To configure control output name as open or closed for multiple controls.......................................................................... 15-18 To configure control output signal as assert or deassert for multiple controls.......................................................................... 15-49 To configure control output signal to assert or deassert for a specific control ........................................................................... 15-49 To configure control output................................................... 19-2 To configure Ethernet 2 as a redundant Ethernet link for Ethernet 1 .. ....................................................................................... 17-4 To configure Ethernet 2 as a second Ethernet port ................... 17-3 To configure IPv6 on Network Time Protocol (NTP)................... 20-8 To configure IPv6 stateless autoconfiguration.......................... 20-2 To configure Linefeed to Linefeed/Carriage Return conversion on print jobs .................................................................................. M-5 To configure linefeed to linefeed/carriage return conversion ....... M-3 To configure or delete a neighbor entry .................................. 20-4 To configure or delete a route ............................................... 20-4 To configure or deleting a scope-global IPv6 address................ 20-3 To configure or remove Instance Mapping............................... 2-42 To configure ports as HDAM ports.......................................... 15-2 To configure ports as LDAM ports ........................................ 15-41 To configure PPP Dialback................................................... 16-19 To configure PPP Dial-On-Demand ....................................... 16-13 To configure PPP on an IP interface........................................ 16-2 To configure RADIUS authentication on the LX unit .................. 2-19 To configure RFC2217 server signature .................................. 9-13 LX Series Configuration Guide 6 X X X X X X X X X X X X X X X X X X X X X X X X X X X X List of Procedures To configure RS-485 duplex mode ......................................... 9-11 To configure RS-485 echo mode ............................................ 9-11 To configure RSA SecurID authentication................................ 2-34 To configure sensor access for an LX port ................................. 9-2 To configure session switch characters for a subscriber............. 8-15 To configure SNMP V3 for Authentication and No Privacy ........ 14-18 To configure SNMP V3 for Authentication and Privacy with Read-Only Access .......................................................................... 14-20 To configure SNMP V3 for Authentication and Privacy ............. 14-19 To configure SNMP V3 for No Authentication and No Privacy.... 14-18 To configure standard LPD print queues................................... M-3 To configure standard on-link tunneling.................................. 20-5 To configure TACACS+ authentication on the LX unit................ 2-25 To configure TCP/IP parameters with the Quick Start Configurator ....................................................... 2-2 To configure telnet max connections ...................................... 6-15 To configure the basic LXPORTD application: ............................. L-7 To configure the debounce interval for a specific alarm or multiple alarms ........................................................................... 15-10 To configure the Display String ............................................. 9-20 To configure the EM316LX settings ........................................ 4-31 To configure the fault state for alarm inputs for a specific alarm ....... ..................................................................................... 15-11 To configure the fault state for alarm inputs for multiple alarms........ ..................................................................................... 15-12 To configure the fault state for alarm inputs.......................... 15-44 To configure the File Transfer Protocol...................................... 4-9 To configure the Form Feed Value of an existing Slave Print Queue ... ........................................................................................ M-5 To configure the Form Feed value ........................................... M-3 To configure the interface..................................................... 18-2 To configure the IP settings .................................................. 4-26 To configure the LDAP Local Subscriber Feature....................... 2-18 To configure the LDAP version to pass to the authentication server ... ....................................................................................... 2-12 LX Series Configuration Guide List of Procedures 7 X To configure the LXPORTD application with RADIUS security and Broadcast Groups: ............................................................... L-9 X To configure the number of duplicate address detection probes to send X X X X X X X X X X X X X X X X X X X X X X X X X X ....................................................................................... 20-3 To configure the number of IPv6 addresses on an interface ....... 20-2 To configure the ppciboot image name ................................... 4-33 To configure the Primary DNS address ................................. 20-11 To configure the RFC2217 server........................................... 9-13 To configure the RSA SecurID Local Subscriber Feature for the LX unit ....................................................................................... 2-38 To configure the software image name ................................... 4-33 To configure the TACACS+ Local Subscriber Feature ................ 2-30 To configure the tunnel packet TTL ........................................ 20-7 To configure this feature .................................................... 16-22 To create a cluster............................................................... 13-8 To create a firewall and rules ................................................ 12-6 To create a Modem Pool ....................................................... 8-12 To create a rule allow outbound connections to a specific destination IP address ...................................................................... 12-11 To create a rule that prevents Telnet requests from a specific IP address ...................................................................... 12-12 To create a rule to drop packets based on the source IP address ............................................................ 12-10 To create a Service Profile ...................................................... 5-5 To create a subscriber account by copying ................................ 8-5 To create a user profile ........................................................ 5-14 To create and assign a Public Key to a Subscriber .................... 8-27 To create or modify a rule .................................................. 11-17 To create or modify a secret on a cluster node ........................ 13-7 To create or modify a subscriber account.................................. 8-5 To create or modify a trigger ................................................ 11-5 To create or modify an action................................................ 11-4 To create the Trigger, Rule and Action.................................... 19-8 To deactivate the ping backup link when one or the other ping targets returns........................................................................... 16-17 LX Series Configuration Guide 8 List of Procedures X To default a control output default description for a specific control ... X X X X X X X X X X X X X X X X X X X X X X X X X X X X X X X ..................................................................................... 15-51 To default a named control output ....................................... 15-22 To default a named control output ....................................... 15-22 To default from the CLI ........................................................ 4-39 To default from the Main Menu .............................................. 4-38 To default mirroring on async ports ....................................... 9-16 To default the Default subscriber account ................................. 8-3 To default the description for an alarm input ......................... 15-43 To default the description for an alarm input ........................... 15-8 To default the Login Banner File Name ................................... 6-20 To default the Login Banner File Name ................................... 9-21 To default the Message of the Day File ................................... 6-21 To default the Message of the Day File ................................... 9-26 To default the ppciboot image name ...................................... 4-33 To default the software image name ...................................... 4-34 To delete a current binding ................................................... 17-7 To delete a Primary DNS address......................................... 20-11 To delete a RADIUS Primary Accounting Server IPv6 address .... 20-9 To delete a RADIUS Primary Authentication Server IPv6 address ...... ..................................................................................... 20-10 To delete a RADIUS Secondary Accounting Server IPv6 address ....... ..................................................................................... 20-10 To delete a RADIUS Secondary Authentication Server IPv6 address... ..................................................................................... 20-11 To delete a rule................................................................... 12-7 To delete a Secondary DNS address..................................... 20-11 To delete a subscriber account ................................................ 8-6 To delete a tunnel ............................................................... 20-7 To delete the Login Banner File Name .................................... 6-20 To delete the Login Banner File Name .................................... 9-21 To disable a Broadcast Group.................................................. 7-6 To disable a rotary .............................................................. 6-14 To disable a rule in Rule command mode .............................. 11-18 To disable a rule in Trigger-Action command mode ................ 11-18 To disable address negotiation on PPP Links ............................ 16-5 LX Series Configuration Guide List of Procedures 9 X To disable an SNMP agent .................................................... 14-8 X To disable CCP negotiation ................................................... 16-4 X To disable SNMP traps for alarm state changes for a specific alarm ... ....................................................................................... 15-9 X To disable SNMP traps for alarm state changes for multiple alarms.... ....................................................................................... 15-9 X To disable the External I2C Bus............................................. 4-32 X To disable the IdleBuffer ........................................................ 9-4 X To disable the negotiation of LCP compression X X X X X X X X X X X X X X X X over a PPP link .................................................................. 16-7 To disable the Off option for outlets ....................................... 10-7 To disable VJ compression over a PPP link............................... 16-5 To discard non-broadcast data ................................................ 7-4 To display a Broadcast Group summary for all Broadcast Groups . 7-8 To display a list of available commands .................................... 1-3 To display alarm characteristics for a specific alarm name or port/point ................................................. 15-54 To display alarm status information using a specific alarm name....... ..................................................................................... 15-32 To display alarm status information using a specific alarm name....... ..................................................................................... 15-54 To display alarm status using a specific alarm name or port/point ..... ..................................................................................... 15-55 To display all LDAM control output characteristics .................. 15-56 To display alternate LPD characteristics information for a specific print queue or all print queues. .................................................. M-10 To display analog status information using a specific analog name .... ..................................................................................... 15-35 To display Broadcast Group characteristics for a single Broadcast Group ........................................................ 7-7 To display Broadcast Group characteristics for all Broadcast Groups .. ......................................................................................... 7-7 To display cluster information ............................................. 13-11 To display control characteristics using a specific control name or port/ point.............................................................................. 15-56 LX Series Configuration Guide 10 List of Procedures X To display control status information using a specific control name ... ..................................................................................... 15-57 X To display control status using a specific control name or port/point.. X X X X X X X X X X X X X X X X X X X X X X X X X X X ..................................................................................... 15-58 To display debug information .............................................. 13-19 To display global information .................................................. 1-4 To display information about actions ...................................... 11-5 To display information about power input: ............................ 11-21 To display information about rules ....................................... 11-19 To display information about triggers ................................... 11-17 To display information for control outputs using a specific control name ............................................................................. 15-34 To display interface port mapping .......................................... 6-17 To display interface status for an IP interface .......................... 6-18 To display IP interface summary information for all IP interfaces 6-18 To display KerberosV5 Characteristics .................................... 2-45 To display KerberosV5 Credentials ......................................... 2-45 To display KerberosV5 Status................................................ 2-46 To display KerberosV5 Summary ........................................... 2-46 To display LPD information for a specific port or all ports. .......... M-9 To display LPD information for a specific print queue or all print queues............................................................................ M-10 To display LPD status for a specific print queue or all print queues. ... ...................................................................................... M-11 To display PPP characteristics for all IP interfaces .................. 16-10 To display PPP characteristics for an IP interface.................... 16-10 To display PPP Dialback information ..................................... 16-19 To display rotary information for an IP interface ...................... 6-19 To display service profile characteristics for a single service profile.... ....................................................................................... 5-13 To display status information for a specific power control unit ........................................................... 10-15 To display status information for outlet groups ...................... 10-19 To display subscriber characteristics ...................................... 8-22 To display subscriber Default characteristics ............................. 8-3 To display subscriber TCP information for all subscribers........... 8-25 LX Series Configuration Guide List of Procedures 11 X To display summary information for all power control units ..... 10-19 X To display summary information for all X X X X X X X X X X X X X X X X X X X X X X X X X X X X X Temperature/Humidity Sensors ............................................. 9-3 To display the audit log for a subscriber ................................. 8-26 To display the Bonding Characteristics Screen ......................... 17-6 To display the Bonding Status screen ..................................... 17-6 To display the characteristics for all subscribers....................... 8-22 To display the characteristics of all service profiles................... 5-13 To display the characteristics of an IP interface ....................... 6-15 To display the command log for a subscriber ........................... 8-27 To display the contents of the audit log .................................. 8-21 To display the contents of the command log............................ 8-21 To display the current temperature and humidity readings for a specific Sensor .................................................................... 9-2 To display the current temperature and humidity readings for all Sensors.............................................................................. 9-2 To display the IdleBuffer field in the Port Async Characteristics screen ......................................................................................... 9-4 To display the interface characteristics of all IP interfaces ......... 6-16 To display the Interface Status Screen ..................................... 2-7 To display the members of the cluster .................................... 13-8 To display the Port Async Characteristics Screen.................... 16-24 To display the Port Async Characteristics screen ...................... 19-3 To display the Port Async Characteristics screen ...................... 9-17 To display the Port Async Users screen................................... 9-18 To display the PPP Backup Screen........................................ 16-18 To display the PPP status of an IP interface ........................... 16-11 To display the PPP Status Screen......................................... 16-19 To display the rotary information for all IP interfaces................ 6-19 To display the status for all outlet groups that are managed from the LX unit ........................................................................... 10-19 To display the status for all Power Control units..................... 10-15 To display the status information for all IP interfaces................ 6-18 To display the Subscriber Characteristics Screen...................... 3-20 To display the Subscriber Characteristics screen ...................... 9-18 To display the subscriber status for all subscribers ................... 8-24 LX Series Configuration Guide 12 X X X X X X X X X X X X X X X X X X X X X X X X X X X X X X X X List of Procedures To display the subscriber status ............................................ 8-24 To display the subscriber summary information ....................... 8-25 To display the subscriber TCP information............................... 8-24 To display User Profile characteristics for a specific user ........... 5-16 To display User Profile characteristics for all users ................... 5-16 To download ppciboot from the command-line interface............ 4-14 To download the sdconf.rec file ............................................. 2-39 To download the valid client certificate for the primary authentication server to the LX ................................................................ 2-13 To download the valid client certificate for the secondary authentication server to the LX............................................ 2-13 To echo incoming data at slave ports ....................................... 7-5 To edit the files ..................................................................... 4-3 To edit the files ..................................................................... 4-4 To edit the RADIUS file to include your vendor file .................... G-2 To enable 5250/5150/4800 authentication............................ 10-13 To enable a subscriber to change the password ....................... 8-16 To enable address negotiation on PPP Links ............................ 16-5 To enable an authentication type for a Broadcast Group ............. 7-5 To enable an SNMP agent ..................................................... 14-8 To enable and disable sending SNMP traps for alarm state changes ... ..................................................................................... 15-44 To enable and disable the analog state ................................. 15-29 To enable audit logging for a subscriber ................................. 8-20 To enable CCP negotiation .................................................... 16-4 To enable command logging for a subscriber ........................... 8-21 To enable fallback on a port .................................................. 3-13 To enable Fallback on the IP interface .................................... 6-11 To enable Kerberos authentication on the IP interface ................ 6-9 To enable KerberosV5 Authentication on the interface .............. 2-43 To enable LDAP authentication on the IP interface ..................... 6-9 To enable local authentication for inbound asynchronous ports .... 6-8 To enable LOCAL authentication on a console port ................... 3-10 To enable local authentication on the IP interface ...................... 6-8 To enable mirroring on async ports ........................................ 9-16 LX Series Configuration Guide List of Procedures 13 X To enable or disable accepting and sending of Forwardable Tickets ... ....................................................................................... 2-43 X To enable or disable display of the Command Prompt on an async port X X X X X X X X X X X X X X X X X X X X X X X X X X X X X during a connect ............................................................... 9-20 To enable or disable FIPS 140-2 security .................................. I-7 To enable or disable FIPS security ......................................... 4-23 To enable or disable generating debug information ................ 13-19 To enable or disable the LPD daemon...................................... M-2 To enable RADIUS accounting on the IP interface .................... 6-10 To enable RADIUS authentication on a console port ................ 3-11 To enable RADIUS authentication on the IP interface.................. 6-9 To enable read-only access for a subscriber ............................ 9-16 To enable RSA SecurID authentication on a console port........... 3-12 To enable RSA SecurID authentication on the IP interface ........... 6-9 To enable SCP .................................................................. 10-14 To enable SNMP traps for alarm state changes for a specific alarm .... ....................................................................................... 15-9 To enable SNMP traps for alarm state changes for multiple alarms .... ....................................................................................... 15-9 To enable TACACS+ accounting on the IP interface .................. 6-10 To enable TACACS+ authentication on a console port ............... 3-11 To enable TACACS+ authentication on the IP interface ............... 6-9 To enable telnet server urgent data ....................................... 4-12 To enable telnet server ........................................................ 4-12 To enable the Factory Reset Button ..................................... 10-10 To enable the IdleBuffer ......................................................... 9-4 To enable the management port............................................ 4-32 To enable the negotiation of LCP compression over a PPP link .................................................................. 16-7 To enable the Power Boot Sequence Feature on a port ........... 10-13 To enable the screen pause feature for a subscriber ................. 8-13 To enable Web browser access for a subscriber ......................... 8-9 To enable/disable LPD on a physical port ................................. M-2 To enable/disable printing and queuing on a print queue ........... M-7 To enable/disable Queuing (Spooling) on a print queue ............. M-6 To enter a nested command mode........................................... 1-4 LX Series Configuration Guide 14 X X X X X X X X X X X X X X X X X X X X X X X X X X X X X X X X X List of Procedures To enter a ppciboot image name ........................................... 4-24 To enter a software image name ........................................... 4-24 To execute the shell echo command........................................ N-1 To explicitly set the characteristics of an LX asynchronous port.... 3-4 To generate an SFTP Public/Private Key.................................. 4-10 To implement PPP Routing .................................................. 16-10 To load the configuration from network .................................... 4-7 To load the configuration........................................................ 4-5 To make sure that your software is FIPS 140-2 validated ............ I-5 To manually configure inbound and outbound authentication ..... 9-25 To modify a Default account ................................................... 8-3 To modify a rule.................................................................. 12-8 To modify the subscriber profile .......................................... 13-15 To monitor the link by the physical connection, and to send a poll every second .................................................................... 17-5 To monitor the link integrity using ARP................................... 17-5 To monitor the power threshold based on the sum of the load on multiple power units attached to an LX ............................... 11-13 To monitor the power threshold based on total power per input11-12 To name a cluster ............................................................. 13-21 To read the contents of the syslog file ...................................... 5-6 To reboot the LX-7204T/7304T ............................................. 15-3 To recreate the .Zip file for uploading....................................... 4-5 To redirect print jobs for a specific print queue to another print queue ........................................................................................ M-8 To re-enable the Off option for outlets.................................... 10-7 To re-enable VJ compression over a PPP link ........................... 16-5 To release the current lease.................................................... 2-6 To remove an entry ........................................................... 14-10 To remove an SNMP GET client ............................................. 14-9 To remove an SNMP Trap client ........................................... 14-11 To remove an SNMP V3 access entry.................................... 14-13 To remove an SNMP V3 user entry....................................... 14-12 To remove an SNMP V3 user entry....................................... 14-12 To remove an SNMP V3 View Entry ...................................... 14-14 To remove KerberosV5 Credentials ........................................ 2-43 LX Series Configuration Guide List of Procedures 15 X X X X X X X X X X X X X X X X X X X X X X X X X X X X X To remove Master Ports from a Broadcast Group ....................... 7-5 To remove ports from a rotary .............................................. 6-14 To remove print jobs from queues .......................................... M-8 To remove Slave Ports from a Broadcast Group ......................... 7-5 To renew the current lease ..................................................... 2-6 To reset a control output name to its default settings for a specific control ........................................................................... 15-51 To reset a control output point to its default settings for a specific control ........................................................................... 15-52 To reset a specific analog input name to the default setting..... 15-28 To reset alarm inputs to defaults for multiple points ............... 15-15 To reset analog inputs to default settings ............................. 15-27 To reset control outputs to default settings for a specific control ....... ..................................................................................... 15-23 To reset control outputs to default settings for multiple controls ....... ..................................................................................... 15-23 To reset multiple analog input names to the default setting..... 15-28 To reset the alarm input name to default for a specific alarm or multiple alarms ....................................... 15-46 To reset the alarm input name to default for a specific alarm... 15-14 To reset the alarm input name to default for multiple alarms... 15-14 To reset the alarm input point to default for a specific alarm or multiple alarms ....................................... 15-46 To reset the alarm input to default for a specific point ............ 15-15 To reset the EM316LX module ............................................... 4-31 To reset the unit to factory defaults from a Web browser .......... 2-48 To reset the unit to factory defaults from an LX asynchronous port ... ....................................................................................... 2-47 To reset the unit to factory defaults from the LX DIAG port ....... 2-47 To reset to the system defaults ............................................. 4-25 To retrieve the KerberosV5 Keytab ........................................ 2-42 To return to the previous command mode ................................ 1-4 To save changes to a rule................................................... 12-14 To save the configuration to flash ............................................ 4-2 To save the configuration to the network .................................. 2-9 To save the configuration to the network .................................. 4-3 LX Series Configuration Guide 16 X X X X X X X X X X X X X X X X X X X X X X X X X X X X List of Procedures To save the configuration ..................................................... 4-30 To save the configuration ..................................................... 4-32 To save the software image to flash ....................................... 4-19 To seal the cover of the LX ..................................................... I-4 To search a cluster for a port name or access method ............ 13-20 To send a user-generated message to the LX-7204T/7304T LCD panel ..................................................................................... 15-31 To set KerberosV5 Authentication on Port Async ...................... 2-43 To set the active state of a specific control to open or closed ... 15-21 To set the active state of multiple control outputs to open or closed .. ..................................................................................... 15-21 To set the async port to not wait for DSR before proceeding: .... 9-29 To set the async port to wait for DSR before proceeding: .......... 9-29 To set the banner on the LCD panel to defaults ..................... 15-31 To set the energize state of a named control to assert or deassert for a specific control ........................................ 15-48 To set the energize state of a named control to assert or deassert for multiple controls ........................................ 15-48 To set the escape character back to the default value............... 3-19 To set the Inactivity Timeout ................................................ 8-14 To set the KerberosV5 Local Subscriber Feature to only ............ 2-44 To set the LDAP Local Subscriber Feature to only..................... 2-18 To set the maximum number of virtual connections for a Broadcast Group ................................................................................ 7-6 To set the maximum sessions for a subscriber......................... 8-14 To set the maximum simultaneous connections for a subscriber...................................................................... 8-14 To set the number of duplicate address detection probes to the default ....................................................................................... 20-3 To set the number of IPv6 addresses on an interface to default ............................................................ 20-2 To set the RADIUS Local Subscriber Feature to only ................. 2-25 To set the RS-485 transmitter to always/RTS enable ................ 9-11 To set the RSA SecurID Local Subscriber Feature to only .......... 2-38 To set the speed or duplex mode of your Ethernet Network Link 4-21 To set the TACACS+ Local Subscriber Feature to only............... 2-30 LX Series Configuration Guide List of Procedures 17 X X X X X X X X X X X X X X X X X X X X X X X X X X X X X X X X X X To set the terminal type for a subscriber ................................ 8-12 To set the timeout ............................................................... 4-20 To set the tunnel packet TTL to default................................... 20-7 To set up a Broadcast Group ................................................... 7-2 To set up a connection between a serial console port and a port on the LX unit ............................................................................... 9-8 To set up a modem port for remote console management ........... 3-6 To set up the access rights for the subscriber if local authentication is used ................................................................................ 3-17 To set up the secret at the Quick Configuration Menu .............. 13-5 To share a subscriber......................................................... 13-22 To share an attribute ........................................................... 13-9 To share an interface ......................................................... 13-21 To share the authenticate image ......................................... 13-23 To share the message ........................................................ 13-24 To share the Telnet client ................................................... 13-25 To show all SNMP V3 access ............................................... 14-24 To show all SNMP V3 users ................................................. 14-24 To show all SNMP V3 view .................................................. 14-25 To show SNMP clients ........................................................ 14-23 To show the SNMP V3 access settings .................................. 14-25 To show the SNMP V3 group settings ................................... 14-26 To show the SNMP V3 miscellaneous settings ........................ 14-26 To show the SNMP V3 user settings ..................................... 14-27 To show the SNMP V3 view settings ..................................... 14-27 To show whether SNMP is enabled or disabled....................... 14-22 To specify a caller id security name.......................................... 3-7 To specify a caller id security number and name ........................ 3-8 To specify a caller id security number....................................... 3-8 To specify a custom user prompt ........................................... 8-12 To specify a dedicated service name for the subscriber ............. 8-19 To specify a descriptive name for an outlet group .................... 10-5 To specify a descriptive name for an outlet ............................. 10-5 To specify a menu for the subscriber...................................... 8-21 To specify a Preferred Service ............................................... 8-19 To specify a Telnet escape character ...................................... 8-18 LX Series Configuration Guide 18 X X X X X X X X X X X X X X X X X X X X X X X X X X X X X X X X X X X X List of Procedures To To To To To To To To To To To To To To To To To To To To To To To To To To To To To To To To To To To To specify specify specify specify specify specify specify specify specify specify specify specify specify specify specify specify specify specify specify specify specify specify specify specify specify specify specify specify specify specify specify specify specify specify specify specify a Telnet socket number for a serial port .................... 6-6 a unique SSH key for a subscriber ............................ 8-8 a Virtual Port Socket Number for SSH ....................... 6-7 a Virtual Port Socket Number for Telnet..................... 6-7 an SSH escape character ....................................... 8-18 an SSH socket number for a serial port ..................... 6-7 Dialback access for a subscriber ............................. 8-11 SSH access for a subscriber ..................................... 8-7 SSH as an access method ...................................... 3-18 Telnet access for a subscriber .................................. 8-7 Telnet as an access method ................................... 3-18 the 5250/5150/4800 Admin Name ........................ 10-11 the administrator login password .......................... 10-12 the default off time for an outlet group .................... 10-4 the Inactivity Timeout ........................................... 16-4 the Inbound/Outbound Login Banner File Name ........ 9-21 the IPCP Failure Limit............................................ 16-6 the IPCP Timeout ................................................. 16-6 the LCP echo failure setting ................................... 16-7 the LCP echo interval ............................................ 16-8 the LCP failure limit .............................................. 16-8 the LCP Timeout................................................... 16-8 the LDAP server settings on the LX unit ................... 2-15 the Login Banner File Name ................................... 6-20 the Message of the Day File Name .......................... 6-21 the Message of the Day File Name .......................... 9-26 the MTU for an IP interface ...................................... 6-7 the off time for a Power control unit ........................ 10-4 the off time for an outlet group .............................. 10-4 the PPP Mode ....................................................... 16-6 the RADIUS period ............................................... 2-24 the RADIUS server settings.................................... 2-20 the RSA SecurID server settings ............................. 2-34 the security level for a subscriber account................ 8-20 the SSH Keepalive Interval ..................................... 6-5 the SSH Keepalive Count ......................................... 6-5 LX Series Configuration Guide List of Procedures 19 X To specify the TACACS+ period ............................................. 2-33 X To specify the TACACS+ server authentication settings on the LX unit X X X X X X X X X X X X X X X X X X X X X X X X X X X ....................................................................................... 2-26 To specify the TACACS+ server authorization settings on the LX unit. ....................................................................................... 2-27 To specify the Web as an access method ................................ 3-18 To start /stop printing on a print queue ................................... M-7 To start the PPP negotiations .............................................. 16-21 To turn off an outlet based on a temperature sensor reading... 11-19 To turn on or off or reboot an outlet by name.......................... 10-6 To turn on or off or reboot an outlet by number....................... 10-6 To turn on or off or reboot an outlet group by name or number . 10-6 To unshare a subscriber: .................................................... 13-22 To unshare an attribute globally (across the entire cluster) ..... 13-11 To unshare an attribute locally ............................................ 13-11 To unshare an interface...................................................... 13-21 To unshare the authenticate image ...................................... 13-23 To unshare the message .................................................... 13-24 To unshare the Telnet client................................................ 13-25 To update ppciboot firmware: ............................................... 4-20 To update ppciboot using the ppciboot image name ................. 4-35 To update ppciboot via the ppciboot image name and host name .................................................................. 4-36 To update the LX-7204T/7304T firmware................................ 15-2 To update the ppciboot across all cluster members ................ 13-14 To update the ppciboot on an individual node........................ 13-14 To update the ppciboot via the ppciboot image name and host IP address ............................................................................ 4-36 To update the ppciboot via the ppciboot image name and host IPv6 address ............................................................................ 4-36 To update the software across all cluster members ................ 13-13 To update the software on an individual node........................ 13-13 To update the software using the software image name and host IP address ............................................................................ 4-35 To update the software using the software image name and host IPv6 address ............................................................................ 4-35 LX Series Configuration Guide 20 List of Procedures X To update the software using the software image name and host name X X X X X X X X X X X X X X X X X X X X X X X X X X X X X ....................................................................................... 4-34 To update the software using the software image name............ 4-34 To update the software ...................................................... 13-13 To update the software ...................................................... 13-14 To upgrade the software from the CLI .................................... 4-15 To use Cluster Automatic Discovery via the CLI ..................... 13-29 To use Cluster Automatic Discovery via the GUI .................... 13-30 To use Cluster Automatic Setup via the CLI........................... 13-33 To use Cluster Automatic Setup via the GUI .......................... 13-34 To validate cable configurations: ........................................... 3-14 To verify that a rotary has been disabled ................................ 6-15 To verify that Master Ports or Slave Ports have been deleted from a Broadcast Group ................................................................. 7-6 To view DTR/RTS States....................................................... 19-4 To view HDAM alarm input characteristics using the alarm name ...... ..................................................................................... 15-32 To view HDAM analog input characteristics using the analog name .... ..................................................................................... 15-34 To view HDAM control name information .............................. 15-34 To view HDAM mapping information..................................... 15-35 To view HDAM port characteristics information ...................... 15-33 To view HDAM port/slot/point characteristics......................... 15-36 To view HDAM port/slot/point status .................................... 15-38 To view HDAM status information ........................................ 15-40 To view IPv6 characteristics ................................................ 20-12 To view IPv6 neighbors ...................................................... 20-14 To view IPv6 tunnel information .......................................... 20-13 To view RFC2217 information................................................ 9-14 To view RS-485 information.................................................. 9-12 To view the LDAM alarm input characteristics using the alarm name.. ..................................................................................... 15-53 To view the Primary and Secondary DNS IPv6 server addresses ............................................................. 20-16 To view the Primary and Secondary Radius IPv6 addresses ..... 20-15 To view the Service ............................................................. 20-9 LX Series Configuration Guide List of Procedures 21 X X X X X To To To To To view view view view view whether the authenticate image is shared or unshared 13-23 whether the message is shared or unshared .............. 13-24 whether the Telnet client is shared or unshared ......... 13-25 which interfaces are shared or unshared ................... 13-22 which subscribers are shared or unshared ................. 13-22 LX Series Configuration Guide 22 List of Procedures LX Series Configuration Guide Index-1 Index . See IP interfaces Symbols 5250 units. See Power control units., 10-1 A access power, 10-2 Alarm Input Names default names, 15-4, 15-16, 1524, 15-47 descriptive names, 15-4, 15-16 Alarm Inputs debounce interval, configuring the, 15-10 Analog Input Names descriptive names, 15-24 asset tag assigning, 2-49 Asynchronous, 9-6 asynchronous port settings, 9-6 authentication inbound and outbound, 9-25 authentication type enabling, 7-5 B backup, 4-2 bonding link, 17-5 bonding link ARP address, 17-5 bonding link ARP interval, 17-6 Broadcast Groups. See Also Data Broadcast feature C cables CLI crossover, 3-2 straight-through, 3-2 defaulting from, 4-39 cluster creating, 13-8 displaying characteristics, 13-11 displaying debug information, 1319 displaying status, 13-12 sharing attributes within a, 13-9 unsharing attributes within a, 139 updating ppciboot across a, 13-14 updating software across a, 13-13 cluster automatic discovery, 13-29 cluster automatic setup, 13-33 Cluster Configuration and Control overview, 13-1 cluster secret creating, 13-5 creating via CLI, 13-7 quick configuration menu, 13-5 command syntax, xxi comment lines using in nested menu file, K-11 configuration saving to flash, 4-2 saving to the network, 4-3 stored in, 4-2 configuration file saving, 4-2 contact configuring, 2-50 Control Output Names default names, 15-4, 15-16, 1524, 15-47 descriptive names, 15-4, 15-16, LX Series Configuration Guide Index-2 15-24, 15-47 creating a default configuration file, 2-8, 4-8 D Data Broadcast feature broadcast groups, 7-2 broadcast groups, setting up, 7-2 discard parameter, 7-4 master ports, 7-1 master ports. See master ports slave ports. See slave ports timestamp parameter, 7-4 data buffering, configuring ports for, 9-8 default configuration file creating, 2-8, 4-8 loading, 2-8, 4-8 saving to the network, 2-9 default subscriber account modifying, 8-3 default subscriber accounts defaulting, 8-3 default template, 8-2 defaulting from CLI, 4-39 defaults booting from, 4-38 DEFINE/SET ALARM INPUT NAME command, 15-4, 15-16, 15-24, 1547 DEFINE/SET AMST ALARM INPUT DEBOUNCE INTERVAL command, 15-10 DEFINE/SET CONTROL OUTPUT NAME command, 15-4, 15-16, 15-24, 1547 LX Series Configuration Guide E Editing the Files in Windows, 4-4 Editing the Files on a Unix Host, 4-3 EM316LX Configuration menu enabling the External I2C Bus, 432 enabling the Management port, 431 Module Restart, 4-31 EM316LX configuration menu saving the configuration, 4-32 using, 4-31 escape characters specifying, 8-18 external units scripting on, 4-13 F FIPS enabling, I-6 JCE module commands, I-12 prerequisites, I-3 tamper-evident labels, I-4 FIPS support, I-1 G GUI Mode Configuration, 13-15 Menu, 13-15 H HDAM configuring a control output default description, 15-20 configuring a control output description string, 15-19 configuring a control output name as open or closed, 15-18 Index-3 configuring a name for a control output, 15-17 configuring analog input description string, 15-25, 15-26 configuring calibration, 15-30 configuring the debounce interval for an alarm, 15-10 configuring the default point for a named control output, 1522 configuring the fault state for alarm inputs, 15-11, 1512, 15-13, 15-14 configuring the HDAM port, 15-2 displaying HDAM information, 1532 enabling and disabling audible alarms, 15-5, 15-6, 15-7, 15-8 enabling and disabling SNMP traps for alarm state changes, 15-9 enabling/disabling analog input polling, 15-29 naming alarm inputs, 15-4 naming analog inputs, 15-24 naming control outputs, 15-16 rebooting the LX-7104, 15-3 resetting alarm inputs to defaults, 15-15 resetting an alarm input name to the default, 15-14, 15-15 resetting an analog input name to the default, 15-28 resetting analog inputs to defaults, 15-27 resetting control outputs to default settings, 15-23 sending user-generated messages to the LCD panel, 15-31 setting the active state of a named control, 15-21 setting the banner on the LCD panel to defaults, 15-31 updating firmware, 15-2 using alarm input commands, 154 using analog input commands, 15-24 using control output commands, 15-16 viewing alarm input characteristics, 15-32 viewing alarm status, 15-32 viewing analog input characteristics, 15-34 viewing analog status, 15-35 viewing HDAM control name characteristics, 15-34 viewing HDAM control name status, 15-34 viewing HDAM port characteristics, 15-33 viewing mapping information, 1535 viewing port HDAM status information, 15-40 viewing port/slot/point characteristics, 15-36 viewing port/slot/point status, 15-38 Help. See Online help. I inbound and outbound authentication, 9-25 Internal Modem LX Series Configuration Guide Index-4 configuring, 18-2 IP configuration acquiring, 4-39 IP Configuration menu changing the gateway address, 429 changing the network mask, 4-29 changing the TFTP server IP address, 4-30 changing the unit IP address, 428 choosing an IP assignment method, 4-28 IP configuration menu saving the configuration, 4-30 using, 4-26 IP firewall, 12-2 IP interfaces, 6-1 characteristics, displaying, 6-15 Local authentication, configuring, 6-8 port mapping, displaying, 6-17 RADIUS authentication, configuring, 6-8 Rotaries. See Rotaries setting up, 6-4 SSH Keepalive parameters, 6-5 SSH socket numbers, 6-6 status, displaying, 6-18 summaries, displaying, 6-18 Telnet socket numbers, 6-6 IPv6 configuring, 20-1 IR Listener ports, F-2 IR-4800 units. See Power control units. IR-5150 units. See Power control units. LX Series Configuration Guide K KerberosV5 setting up, 2-40 L LDAM configuring a control output default description, 15-51 configuring a control output description string, 15-50 configuring a control output name as high or low, 15-48, 1549 configuring alarm input description string, 15-43 configuring severity level for alarm inputs, 15-45 configuring the fault state for alarm inputs, 15-44 displaying LDAM information, 1553 enabling and disabling audible alarms, 15-43 enabling and disabling SNMP traps for alarm state changes, 15-44 naming alarm inputs, 15-42 naming control outputs, 15-47 resetting an alarm input name to the default, 15-46 resetting control outputs to default settings, 15-51, 15-52 using alarm input commands, 1541 using control output commands, 15-47 viewing alarm all status, 15-54 Index-5 viewing alarm input characteristics, 15-53, 1554 viewing alarm input status, 15-55 viewing control all status, 15-57 viewing control output all characteristics, 15-56 viewing control output characteristics, 15-56 viewing control output status, 1558 LDAP authentication setting up, 2-12 LDAP Version 3 setting up the environment, O-1 troubleshooting connections, O-5 Line Printer Daemon (LPD), M-1 loading a default configuration file, 28, 4-8 loading configuration from network, 4-7 loading the configuration, 4-5 login banner file, 6-20, 9-21 LXPORTD using, L-1 LXPORTD feature using the, L-1 M Main Menu boot from network, 4-18 configuring the EM316LX configuration menu, 4-23 configuring the IP configuration menu, 4-20 enabling/disabling FIPS security, 4-22, I-7 ppciboot image name, 4-23 saving the software image to flash, 4-19 setting the timeout, 4-20 software image name, 4-24 updating the ppciboot firmware, 4-20 Main menu booting the system, 4-26 resetting to system defaults, 4-25 saving the configuration, 4-25 setting the duplex mode of the Ethernet link, 4-21 setting the speed of the Ethernet link, 4-21 Master ports configuring, 7-2 removing, 7-5 timestamp option, 7-4 maximum telnet connections, 6-15 Message of the Day (MOTD) commands, 6-21, 9-26 modem caller ID, 3-7 modular adapters, 3-3 N nested menu feature creating the nested menu file, K-5 defined, K-2 general guidelines, K-11 how a port obtains menus, K-4 top level menu,, K-4 using comment lines, K-11 using the, K-1 Notification Feature facility, 5-2 priority, 5-2 LX Series Configuration Guide Index-6 O R Online help, displaying, xxi open LX ports, F-2 outlets, 10-3 grouping, 10-3 naming, 10-3, 10-5 off time, specifying, 10-4 rebooting, 10-6 status information, displaying, 10-19 turning on or off, 10-6 RADIUS accounting attributes, B-3 overview, B-1 setting up, 2-19 RADIUS Accounting Client Operation, B-2 RADIUS authentication attributes, A-4 overview, A-1 setting up, 2-19 REBOOT AMST PORT command, 15-3 rebooting the LX-7104, 15-3 Redundant Ethernet configuring, 17-1 remote console management security, setting up, 3-10 subscriber creation, 3-17 via direct serial connections, 3-4 via modem ports, 3-6 RLOGIN feature associated commands, H-3 considerations, H-3 Rotaries, 6-11 configuring, 6-12 disabling, 6-14, 6-15 information, displaying, 6-19 rotary ports, removing, 6-14 type, specifying, 6-13 P passwords, changing, 2-10 port async connect, 9-20 port mirroring, 9-15 Power control units, 10-1 off time, specifying, 10-4 summary information, displaying, 10-19 ppciboot downgrade, 4-40 ppciboot factory default settings, 416 ppciboot Main Menu upgrading software with, 4-17 PPP backup, 16-15 configuring, 16-2 configuring dial-on-demand, 1612 dialback, 16-19 displaying characteristics, 16-10 routing on the LX, 16-9 Securid PPP Fallback, 16-21 setting optional PPP parameters, 16-4 Public Key, configuring a, 8-27 LX Series Configuration Guide S saving configuration to the network, 4-3 scripting, 4-13 searching a cluster, 13-20 SecurID authentication setting up, 2-33 semicolons embedded within data Index-7 strings, N-1 Sensors. See Temperature/Humidity sensors serial port connections verifying, 3-13 Service Profile types ASYNC, 5-4 LOCALSYSLOG, 5-4, 5-6, 5-7, 510, 5-11, 5-12 REMOTESYSLOG, 5-4 SMTP, 5-4 SNMP, 5-4 TAP, 5-4 Service Profiles, 5-3 characteristics, displaying, 5-13 configuring, 5-5 creating, 5-5 Service Profiles. See Service Profiles. SFTP configuring, 4-9 Slave ports configuring, 7-2 discard option, 7-4 localecho option, 7-5 removing, 7-5 SNMP adding or removing an SNMP GET client, 14-9 adding or removing an SNMP SETclient, 14-10 adding or removing an SNMP trap client, 14-11 adding or removing an SNMP V3 access name, 14-13 adding or removing an SNMP V3 group, 14-12 adding or removing an SNMP V3 user, 14-11 adding or removing an SNMP V3 view name, 14-14 configuring an SNMP agent, 14-8 configuring SNMP V3 for authentication and privacy, 14-19 configuring SNMP V3 for read-only authentication and privacy, 14-20 displaying characteristics, 14-24 displaying SNMP information, 1422 enabling/disabling an SNMP agent, 14-8 LX SNMP Enterprise-specific traps, 14-6 LX SNMP standard traps, 14-5 management, 14-8 MIB-II system group configuration, 14-15 MRV Enterprise MIBs, 14-5 MRV standard MIBs, 14-5 network management system, 14-2 OID structure, 14-4 references, 14-28 security, 14-8 SNMP V3 commands, 14-17 viewing all SNMP V3, 14-25 viewing SNMP clients, 14-23 viewing SNMP V3 access, 14-24 viewing SNMP V3 access settings, 14-25 viewing SNMP V3 group settings, 14-26 viewing SNMP V3 miscellaneous settings, 14-26 viewing SNMP V3 settings, 14-24 viewing SNMP V3 user settings, 14-27 LX Series Configuration Guide Index-8 viewing SNMP V3 view settings, 14-27 SNMP MIB support, 14-28 SNMP V3 configuration, 14-15 software upgrading, 4-13 SSH Public Key authentication, 8-29 Subscriber accounts, 8-1 audit log, displaying, 8-26 characteristics, displaying, 8-22 command log, displaying, 8-27 creating, 8-5 deleting, 8-6 summary information, displaying, 8-25 TCP information, displaying, 8-25 Subscriber accounts. See also User Profiles Subscriber Default accounts characteristics, displaying, 8-3 subscriber password configuring, 8-16 syslogd message, configuring, 5-18 T TACACS+ accounting attributes, B-5 overview, B-1 setting up, 2-25 TACACS+ accounting attributes, B-4 TACACS+ authentication attributes, C-3, C-4 overview, C-1 setting up, 2-25 TCP ports, F-2 TCP/IP parameters obtaining from the network, 2-2 setting in Quick Start, 2-2 LX Series Configuration Guide setting in the LX CLI, 2-8 Telnet Client, 6-19 telnet server configuring, 4-12 Temperature/Humidity sensor connecting the, 9-1 Temperature/Humidity sensors, 9-1 configuring, 9-2 humidity, displaying, 9-2 summary information, displaying, 9-3 temperature, displaying, 9-2 template default, 8-2 the, L-1 trigger-action configuring, 11-1 typographical conventions, xxi U UNIX host editing files on, 4-3 upgrading software upgrading software and ppciboot with the command line interface, 4-14 User Profiles, 5-3, 5-14, 8-6 access methods, 8-7 audit logging, 8-20 command logging, 8-21 contact parameter, 5-14 dedicated service, 8-19 facility parameter, 5-15 menus, 8-21, K-12 preferred service, 8-19 priority parameter, 5-15 session and terminal parameters, 8-12 ssh escape, 8-18 Index-9 superuser privileges, 8-16 User Profiles. See User Profiles. V virtual max connections setting, 7-6 W Windows editing files in, 4-4 LX Series Configuration Guide