1
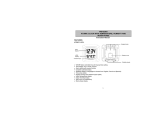
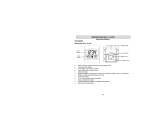
User’s Guide 6300772
Indoor/Outdoor
Wireless Weather Forecaster
Thank you for purchasing your Wireless Weather Forecaster from
RadioShack. Please read this user’s guide before installing, setting up,
and using your new weather forecaster.
Package Contents
• Weather Forecaster
• Remote Sensor
• Screws (2)
• User’s Guide
Features
• Transmits wirelessly up to 98 feet (30 meters)
• Predicts conditions with weather icon and temperature
trend
• Stores minimum and maximum indoor/outdoor
temperature and humidity readings
• Wall mounts for both weather forecaster and the sensor
• Works with up to three sensors (additional sensors not
included
w Important Installation and Location Notes
• During initial installation, the temperature and humidity sensors
may take up to an hour or more to acclimate to current conditions.
• Place the weather forecaster in a well-ventilated indoor area
located away from vents, heating or cooling elements, direct
sunlight, windows, doors, or any other openings.
• Place the sensor on a flat indoor or outdoor surface away from
direct sunlight and moisture. Make sure the forecaster and sensor
are within 98 feet (30m) of each other, without obstructions
between them. To avoid interference, place the forecaster and
sensor away from other electronic devices.
• If the sensor is placed outdoor, the sensor should be mounted high
enough off the ground where water,
snow, and rain cannot accumulate
and also high enough where it is
out of reach for children. The sensor
should be mounted onto a vertical
flat surface. Avoid location where
rain and water falls directly onto the
sensor.
2
Install Batteries
1. Insert two AAA batteries (not included) into the sensor
and two AAA batteries (not included) into the weather
forecaster, matching the polarity symbols (+ and –) marked
inside each battery compartment.
2. Press RESET on both units.
TX RESET
CHANNEL
123
RESET
Battery Notes:
• Reset your forecaster after
replacing the batteries or if the system malfunctions. When you
press RESET, all settings will return to default value, and all stored
information will be lost.
• When the low battery icon
appears or the display dims, replace
the batteries.
• Use alkaline batteries for longer usage, or use lithium batteries in
temperatures below –4°F (–20°C).
• Dispose of batteries promptly and properly. Do not burn or bury
batteries.
• Use only fresh batteries of the required size and recommended
type.
• Do not mix old and new batteries, different types of batteries
(standard, alkaline, or rechargeable), or rechargeable batteries of
different capacities.
• If you do not plan to use the forecaster for a month or more,
remove the batteries from the weather forecaster and the sensor.
Batteries can leak chemicals that can destroy electronic parts.
3
Moon Phase Display
Weather Forecast
Display
Outdoor Temperature
and Humidity with
Temperature Trend
Display
(Current, MAX, and MIN)
Indoor Temperature
and Humidity with
Temperature Trend
Display
(Current, MAX, and MIN)
Clock
Calendar
Press to turn on
the backlight for 7
seconds.
4
MODE
Press and hold for 3
seconds to enter clock
setting mode and moon
phase view mode.
MAX/MIN
•Press to display
current, maximum, and
minimum temperature
and humidity.
•Press and hold to
clear maximum and
minimum records when
MAX or MIN appears.
CHANNEL
•Press and hold to
search the sensors.
•Select sensor.
DOWN
Adjust the clock.
UP/°C/°F
•Change between
Celsius and Fahrenheit
•Adjust the clock.
5
Set the Weather Forecaster and the Sensor
1. If you are using more than one sensor (up to three), choose
a different channel for each sensor. Slide CHANNEL 1 2 3
to choose a channel. Press TX once after switching channel.
2. Place the sensor near the weather forecaster.
3. Press and hold CHANNEL to search for the sensors.
Icon
Description
The weather forecaster is
searching for a sensor.
A sensor channel has been
found.
The sensor channel cannot
be found.
Use the Weather Forecaster
1. Press CHANNEL to display the three different sensor
channels.
2. Select the temperature format by pressing UP/°C/°F.
3. Press MAX/MIN to select current, maximum, and minimum
temperatures and humidity.
4. When MAX or MIN appears, press and hold MAX/MIN to
clear all records.
6
Weather Forecast Display
Sunny
Slightly
Cloudy
Cloudy
Rainy
Temperature Trend
Rising
Steady
Falling
Set the Clock
1. Press and hold MODE until the hour digits of the clock
flash.
2. Press UP/ºC/°F or DOWN repeatedly to adjust settings;
press MODE to confirm and go to the next setting.
• The setting order is hour, minute, 12/24 hour format, year,
calendar format (day-month/month-day), month, day,
language (for the day of week).
• When you select the 12-hour format, PM appears.
• The language options for current time and the day of week
are :EN (English), GE (German), FR (French), IT (Italian), NE
(Dutch), ES (Spanish), and DA (Danish).
7
View Moon Phase
1. Press and hold MODE for 3 seconds to enter the clock
setting mode.
2. Press MODE repeatedly until the year, month, or day
digit flashes.
3. Press UP/°C/°F or DOWN to view the moon phase for
the next or previous year, month, or day. Press and hold
UP/°C/°F or DOWN to quickly go through the moon
phases:
New Moon
Waxing Crescent
First Quarter Waxing Gibbous
Waning Crescent Third Quarter Waning Gibbous
8
Full Moon
Hints and Tips
If the weather forecaster does not connect to the sensor, the
following actions may establish the connection:
• Press TX on the sensor and then press and hold CHANNEL.
• Relocate the sensor and/or the weather forecaster until
connection is found.
• The sensor may not function properly in extreme
temperatures which affects battery power. Replace the
batteries. The unit will resume proper function in more
moderate weather.
Care and Maintenance
• Handle the forecaster and sensor carefully. Do not drop
them.
• Keep the forecaster dry. If it gets wet, wipe it dry
immediately.
• Never submerge the product in water. This can cause
electrical shock and damage the product.
• Do not subject the forecaster to extreme force, shock, or
fluctuations in temperature or humidity.
• Do not tamper with internal components.
9
Specifications
Indoor Temperature Range................................. 32–122°F (0-50°C)
Outdoor Temperature Range......................-4 – 122°F (-20 – 50°C)
Temperature compensation range.........14 – 140°F (-10°C – 60°C)
Humidity Range...............................................................20% – 95%
Humidity Resolution..................................................................... 1%
Sensor RF Frequency.......................................................... 433 MHz
Channel Number............................................................................. 3
Specifications are subject to change and improvement without notice. Actual
product may vary from the images found in this document.
FCC Information
This equipment has been tested and found to comply with the limits for a Class
B digital device, pursuant to Part 15 of the FCC Rules. These limits are designed
to provide reasonable protection against harmful interference in a residential
installation. This equipment generates, uses, and can radiate radio frequency
energy and, if not installed and used in accordance with the instructions, may
cause harmful interference to radio communications. However, there is no
guarantee that interference will not occur in a particular installation. If this
equipment does cause harmful interference to radio or television reception, which
can be determined by turning the equipment off and on, the user is encouraged
to try to correct the interference by one or more of the following measures:
•Reorient or relocate the receiving antenna.
•Increase the separation between the equipment and receiver.
•Connect the equipment into an outlet on a circuit different from that to which
the receiver is connected.
•Consult your local RadioShack store or an experienced radio/TV technician for
help.
Product
Model
Indoor/Outdoor Wireless Weather Forecaster
6300772
RadioShack
Responsible
300 RadioShack Circle, Party
Fort Worth, TX 76102
Phone
817-415-3200
10
If you cannot eliminate the interference, the FCC requires that you stop using
your equipment. Changes or modifications not expressly approved by the
party responsible for compliance could void the user’s authority to operate the
equipment.
This device complies with Part 15 of the FCC rules. Operation is subject to the
following two conditions: (1) This device may not cause harmful interference, and
(2) This device must accept any interference received, including interference that
may cause undesired operation.
Limited Warranty
RadioShack warrants this product against defects in materials and workmanship
under normal use by the original purchaser for one (1) year after the date
of purchase from a RadioShack-owned store or an authorized RadioShack
franchisee or dealer. RADIOSHACK MAKES NO OTHER EXPRESS WARRANTIES.
This warranty does not cover: (a) damage or failure caused by or attributable to
abuse, misuse, failure to follow instructions, improper installation or maintenance,
alteration, accident, Acts of God (such as floods or lightning), or excess voltage
or current; (b) improper or incorrectly performed repairs by persons who are
not a RadioShack Authorized Service Facility; (c) consumables such as fuses or
batteries; (d) ordinary wear and tear or cosmetic damage; (e) transportation,
shipping or insurance costs; (f) costs of product removal, installation, set-up
service, adjustment or reinstallation; and (g) claims by persons other than the
original purchaser.
Should a problem occur that is covered by this warranty, take the product and the
RadioShack sales receipt as proof of purchase date to any RadioShack store in
the U.S. RadioShack will, at its option, unless otherwise provided by law: (a) repair
the product without charge for parts and labor; (b) replace the product with the
same or a comparable product; or (c) refund the purchase price. All replaced parts
and products, and products on which a refund is made, become the property
of RadioShack. New or reconditioned parts and products may be used in the
performance of warranty service. Repaired or replaced parts and products are
warranted for the remainder of the original warranty period. You will be charged
for repair or replacement of the product made after the expiration of the warranty
period.
RADIOSHACK EXPRESSLY DISCLAIMS ALL WARRANTIES AND CONDITIONS
NOT STATED IN THIS LIMITED WARRANTY. ANY IMPLIED WARRANTIES
THAT MAY BE IMPOSED BY LAW, INCLUDING THE IMPLIED WARRANTY
OF MERCHANTABILITY AND, IF APPLICABLE, THE IMPLIED WARRANTY OF
FITNESS FOR A PARTICULAR PURPOSE, SHALL EXPIRE ON THE EXPIRATION OF
THE STATED WARRANTY PERIOD.
EXCEPT AS DESCRIBED ABOVE, RADIOSHACK SHALL HAVE NO LIABILITY
OR RESPONSIBILITY TO THE PURCHASER OF THE PRODUCT OR ANY OTHER
PERSON OR ENTITY WITH RESPECT TO ANY LIABILITY, LOSS OR DAMAGE
11
CAUSED DIRECTLY OR INDIRECTLY BY USE OR PERFORMANCE OF THE
PRODUCT OR ARISING OUT OF ANY BREACH OF THIS WARRANTY, INCLUDING,
BUT NOT LIMITED TO, ANY DAMAGES RESULTING FROM INCONVENIENCE
AND ANY LOSS OF TIME, DATA, PROPERTY, REVENUE, OR PROFIT AND ANY
INDIRECT, SPECIAL, INCIDENTAL, OR CONSEQUENTIAL DAMAGES, EVEN IF
RADIOSHACK HAS BEEN ADVISED OF THE POSSIBILITY OF SUCH DAMAGES.
Some states do not allow limitations on how long an implied warranty lasts or
the exclusion or limitation of incidental or consequential damages, so the above
limitations or exclusions may not apply to you. This warranty gives you specific
legal rights, and you may also have other rights which vary from state to state. You
may contact RadioShack at:
RadioShack Customer Relations,
300 RadioShack Circle, Fort Worth, TX 76102 04/08
www.RadioShack.com
Complies with the European Union’s “Restriction of Hazardous
Substances Directive,” which protects the environment by
restricting specific hazardous materials and products.
©2013. RadioShack Corporation.
All rights reserved. RadioShack is a registered trademark used by RadioShack Corporation.
12
Printed
in China
05A13
6300772