1
1
2
REVOLUTIONSERIES
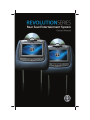
Rear Seat Entertainment System
Owner’s Manual
3
4
REVOLUTION LT Owner’s Manual
EN
Contents
Welcome ...................................................................... 6
Control Description of the Front Panel ............. 8
Functional Verification..........................................10
Remote Control Operations ...............................11
Button Function Descriptions ............................12
General Operating Instructions.........................15
How to use the DVD OSD Menu .......................17
How to use the Device OSD Menu ...................20
Playing an Audio CD..............................................21
Playing a MP3 Disc .................................................22
Connecting a USB Device ....................................23
Connecting a MP3 Device ...................................24
Troubleshooting .....................................................25
Specifications ...........................................................26
Compliance Information......................................28
Warranty ....................................................................29
Notes ...........................................................................30
© 2010 INVISION Automotive Systems, Inc. All rights reserved.
This manual, or any portion thereof, may not be reproduced
without the express written permission of INVISION Automotive Systems, Inc.
5
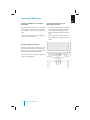
Welcome
Thank you for purchasing this REVOLUTION
headrest video monitor with built-in DVD player.
Before operating this system, read this manual
thoroughly and retain it for future reference.
t Full Function Remote Control
Important Notice
t 12V DC Power Input
It is unlawful in most jurisdictions for a person
to drive a motor vehicle which is equipped with
a television viewer or screen that is located in
the motor vehicle at any point forward of the
back of the driver’s seat, or that is visible, directly or indirectly, to the driver while operating the
vehicle. In the interest of safety, the unit should
never be installed where it will be visible, directly or indirectly, by the operator of the motor
vehicle. If your vehicle is equipped with a wireless rear seat audio system or any other wireless
IR device, power system off in order to operate
the DVD headrest system. If system is powered
on, the two systems may interfere with each
other canceling out or creating undesirable
audio through the wireless headphones.
Safety Precaution
For safety reasons, when changing video disc
it is recommended that the vehicle not be in
motion, and that you do not allow children
to unfasten safety belts to change disc or
make any adjustments to the system. System
adjustments can be accomplished using the
remote control unit, while safety belts remain
fastened. Enjoy your entertainment system
but remember that safety of all passengers
remains the number one priority.
Product Features
t 7-inch Color TFT-LCD Panel
(480x234) with 16:9 aspect
t Built-in Top-Loading Slot load DVD Player
t Infrared Transmitters for IR Wireless Headphones
t Audio/Video Source Input- 3 RCA Jacks
t USB 2.0 (optional)
t 1/8-inch Stereo Headphone Jack
t Forward Remote Sensor on the Front Panel
6
Welcome
t 5 Control Buttons on the Front PanelPOWER, SOURCE, STOP, PLAY, EJECT
t OSD (On Screen Display) Control
t FM Transmitter (may be optional)
Caution:
t Do not touch the inner pins of the jacks on
the front panel. Electrostatic discharge may
cause permanent damage to the device.
t Be sure to run the vehicle engine while using the device. Using this device without
running the engine can result in battery
drainage. To avoid the risk of battery
drainage, please remember to turn off the
device when the vehicle is not in use for
long periods of time.
EN
Wireless Headphones
This unit includes a built-in dual channel infrared transmitter for use with a wireless headphone. The volume can then be adjusted with
the controls on each headset. The wireless
headphone must be used within a line of sight
from the transmitter as infrared transmission,
like visible light, travels only in a straight line.
Wired Headphones
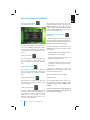
under the red “POWER” button on your remote
control. Next press the “Sound Around ON/
OFF” button to turn FM transmission on or off
as desired. Three buttons to right is the “Sound
Around SELECT” button which will cycle
through 6 possible stations (88.3, 88.7, 89.1,
89.5, 89.9, and 90.3MHz) for broadcasting audio to your radio. Once you’ve selected a frequency, you must then tune your radio to the
corresponding frequency. Try each station frequency until you achieve a clear audio signal.
There is a 1/8-inch headphone jack on the device that can be used with any standard stereo
headphone. Remove and save the protective
plastic cover to access the jacks. Remember
to replace the cover when the jacks are not in
use.
AV Input
An external AV device such as a DVD player,
video game device, or other audio/video
device may be connected to the unit by using
the “AV INPUT” port consisting of 3 RCA jacks
(Yellow: Video, Red: Audio-R, White: Audio-L).
To display and listen to the video/audio signal of this external source, connect the video
source RCA cables to the AV inputs on the
monitor. The video source will overide any
other video source for that monitor.
Wireless FM Transmitter
Your device may be equipped with an external
FM transmitter, which allows you to listen to
the audio signal by tuning your vehicle’s FM
radio to the selected frequency and turning
SOUND AROUND on with the remote. Whenever the SOUND AROUND is on, broadcast
radio reception may be poor. Performance will
vary based on geographic location. Turning
SOUND AROUND off will allow normal radio
reception.
How to use the FM Transmitter
Power up your system and place a disc in
monitor “A”. While pointing your remote at
the monitor press the “DVD A” button directly
Welcome
7
Control Description of the Front Panel
POWER
SOURCE
VIDEO
L AUDIO R
PLAY
STOP
AV INPUT
Model with DVD Player
DVD/CD/MP3 PLAYER MONITOR BX
POWER
SOURCE
VIDEO
L AUDIO R
AV INPUT
Model without DVD Player
8
Control Description of the Front Panel
EJECT
EN
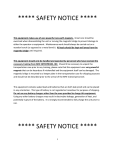
1. DVD Compartment Slot
(models with DVD Player)
2. Infrared Transmitters
These are used to transmit audio to the
wireless headphones.
3. IR Sensor - Forward Sensor Eye
Allow the remote control to navigate the
OSD (On Screen Display) on the device.
4. Level Lock & Release Latch
Allows the user to adjust the viewing angle
of the LCD panel or lock the panel into the
secure position.
5. TFT LCD Panel
7-inch TFT LCD Panel
6. POWER Button
Press this button to turn the system on or off.
7. SOURCE Button
Press this button to select between Monitor A, Monitor B, AUX/TV (if available), and
AUX 2 (if available).
8. USB Port (Optional)
You can play music and images stored on a
USB Device such as a USB memory stick or
memory card reader.
14. STOP Button
(models with DVD Player)
Press this button to stop playing the DVD/
CD.
15. EJECT Button
(models with DVD Player)
Press this button to eject the disc from the
DVD compartment.
Warnings
t Do not use any solvents or cleaning materials when cleaning the video device.
t Do not use any abrasive cleaners, that
may scratch the screen. Use only a lightly
dampened lint free cloth to wipe the
screen if it is dirty.
t Lock the LCD screen in the fully closed
position when not in use.
t Do not put pressure on the screen.
t Caution children to avoid touching or
scratching the screen, as it may become
dirty or damaged.
9. Video Input Jack (Yellow)
Connect using a cable (RCA connector).
10. Audio Input Jack (White)
Connect using a cable (RCA connector).
11. Audio Input Jack (Red)
Connect using a cable (RCA connector).
12. 1/8-inch Headphone Jack
Allow plug-in of wired headphones with
1/8-inch stereo connector plug for monitoring the audio from the program.
13. PLAY Button
(models with DVD Player)
Press this button to play the DVD/CD.
Control Description of the Front Panel
9
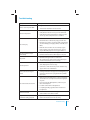
Functional Verification
10
Function Checks:
Look for:
Turn vehicle ignition to ON, depress power
button on each headrest monitor.
Monitor should power on and start up
screen should appear on screen.
Insert disc into DVD player, press ENTER
button on the remote control or front panel.
Disc should begin playing.
Listen with wireless headphones (be sure
to set to channel “A” to listen to Monitor A
and channel “B” to listen to Monitor B.
Audio should be heard through wireless
headphones.
Press SOURCE button on Monitor B until it
reads Monitor A.
DVD in Monitor A should be displayed on
Monitor B also.
Press SOURCE button on Monitor A until it
reads Monitor B.
DVD in Monitor B should be displayed on
Monitor A also.
Depress eject button on the remote control or front panel.
Disc should eject.
Turn on vehicle radio and set station to the
frequency set on FM transmitter
(if available).
Only audio from Monitor A should be
heard through vehicle speakers.
Functional Verification
Remote Control Operations
EN
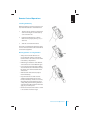
Installing the Battery
Before attempting to operate your remote control, install the batteries as described below.
1.
Turn the remote control face down. Press
down on the ridged area of the battery
cover and slide it off.
2.
Install two “AAA” batteries as shown.
Make sure that proper polarity (+ or -) is
observed.
3.
Slide the cover back until it clicks.
The remote control will only operate this device.
It is not a universal remote control and will not
control other equipment.
Warning/Caution on using batteries
t Always ensure that the batteries are
inserted with the positive and negative
terminals in the correct direction as shown
in the battery compartment.
t Different types of batteries have different
characteristics. Do not mix different types.
t Do not mix old and new batteries. Mixing
old and new batteries will shorten battery
life and/or cause chemical leaks from the
old batteries.
t When batteries fail to function, replace
them immediately.
t Keep the batteries out of the reach of
children. Should the batteries be swallowed, immediately consult a doctor. Also,
when disposing of used batteries, please
comply with governmental regulations or
environmental public institution rules that
apply in your country/area.
t Remove the batteries if the remote control
is not used for a month or longer.
Remote Control Operations
11
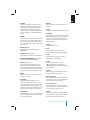
Button Function Descriptions
1
20
2
21
3
4
5
6
7
8
22
23
24
25
26
9
10
11
9
11
12
27
28
13
29
14
CLR
PLAY
15
16
17
18
19
12
Button Function Descriptions
INT
PAUSE
30
31
32
33
EN
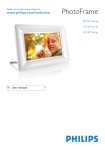
1. SOURCE
Any video equipment connected to the
audio/video inputs can be used with the
monitor by pressing this button. Each
time the button is pressed, the audio/
video source will change in the following
sequence: Monitor A, Monitor B, AUX/TV,
AUX 2.
2. POWER
Press the button to turn the device on. The
current video source will be displayed on
the screen, and the picture will appear in a
few seconds. Press the button again to turn
the device off.
3. DVD-Monitor A
Transmit IR codes for DVD mode of
MONITOR A.
4. TV-Monitor A (If available)
Transmit IR codes for TV mode of Monitor A.
5. SOUND AROUND ON/OFF (If available)
Turn the FM transmitter ON/OFF.
6. MUTE (for DVD only)
Press the button to shut off the sound
transmitted to the headphone stations.
The screen will display that the sound has
been turned off. Pressing the button again
restores sound to the previously set level.
7. MENU
Press the button to go to the Root Menu
included on the disc.
10. ENTER
Makes a selection or begins playback of
the disc.
11. TITLE
Navigate the title menu included in the disc.
12. SUBTITLE
Press this button. If the current disc has different subtitles options, this now appears
on the screen. Press this button repeatedly until you have reached your desired
subtitles option.
13. Numbers
Decimal number: 0 to 9.
14. CLR
Press this button to clear any wrong
numeric input from the number keypad.
15. PLAY
Press this button to Play a disc that is
inserted into the DVD Player.
16. STOP
Stop playing the movie or songs.
STOP PLAY: Resumes disc playback.
STOP STOP PLAY: Resumes from the beginning of the disc.
17. PAUSE
While playing, press this button to pause
the playback of the CD or DVD.
18. FR (Fast Rewind)
Press this button to search disc backward
continuously. There are 5 speed options to
choose: 2X, 4X, 8X, 16X, and 32X.
8. UP, DOWN
For DVD: Navigation button, you can
use this button to move the select bar to
items among the menu or file list. For TV:
Use these buttons to advance to the next
higher or lower channel. For OSD: Increase
or decrease the setting of selected item.
19. FF (Fast Forward)
Press this button to search disc forward
continuously. There are 5 speed options to
choose: 2X, 4X, 8X, 16X, and 32X.
9. LEFT, RIGHT
Navigation button; you can use this button
to move the select bar to one of the items
in the menu or file list.
20. SETUP
Navigate the Setup Menu. Please refer to
the appropriate section of this manual for
detailed information on each menu.
Button Function Descriptions
13
21. EJECT
Eject the disc from the disc compartment
or load the disc into the disc compartment.
22. TV-Monitor B (If available)
Transmit IR codes for TV mode of Monitor B.
23. 24. DVD-Monitor B
Transmit IR codes for DVD mode of Monitor B.
24. SOUND AROUND SELECT (If available)
Select a FM transmitter channel.
25. PIX (Picture Selection)
Each time the button is pressed, the picture
adjustment OSD, cycles through bars for
BRIGHTNESS, CONTRAST, SATURATION,
HUE, SHARPNESS, IR HEADPHONE, and
RESET. Once the desired adjustment bar
is displayed, use the UP/DOWN button
to adjust the setting. The bar display will
automatically disappear, if no adjustments
are made within 6 seconds or if any button
is pressed.
26. REPEAT
Press this button to switch the repeat mode
by ALL, TITLE, CHAPTER and cancel the repeat
mode while playing DVD-video. Other disc
types such as VCD, CD, and SVCD that only
have two repeat modes that can be selected:
TRACK and ALL
Note: Both repeat functions of VCD and SVCD
need the PBC status set to ON when available.
27. AUDIO
Press this button if the current disc has
different language options.
Press this button repeatedly until you have
reached your desired language option.
28. ANGLE
View with a different camera angle (the
button takes effect only on the DVD that
supports frames with multiple angles).
Press this button repeatedly until you have
reached your desired viewing angle.
14
Button Function Descriptions
29. DISPLAY
Show information on the screen including
title, chapter/track, time elapsed, and time
remaining, or turn off the display.
30. RANDOM
Play titles randomly.
31. INT (Intro/Scan)
Press this button to play each audio file for
10 seconds to scan/review the files. This
button acts as a toggle for this feature.
32. NEXT
When a disc has more than one Chapter,
Track, or File, you can move to another
Chapter/Track/File.
Press the button briefly during play to
select the next Chapter for DVD-video or
Track/File for VCD, SVCD, MP3, CD, etc.
33. PREV
When a disc has more than one Chapter,
Track, or File, you can move to another
Chapter/Track/File.
Press this button briefly during play to step
back to the previous Chapter for DVD-video
or Track/File for VCD, SVCD, MP3, CD, etc.
Note:
The remote control incorporates an infrared
sensor that relays signals from the remote
control to be controlled simply by pointing its
remote control at the remote sensor eye. This
provides control of auxiliary equipment such
as a video DVD player. The infrared sensor cannot relay signals from any other manufacturer’s
remote control to its respective component
connected to the AUX input, such as a DVD
player. In this case, you must use the remote
control supplied with the device.
General Operating Instructions
Turning the Device ON or OFF
Loading and Playing Discs
1.
Pivot the screen downward until a comfortable viewing angle is reached.
2.
Press the POWER button on the lower-left
corner of the front panel or the remote
control to turn the device on or off. When
in use, the controls will be lit.
Before you load a disc, make sure that it is compatible with the player. Note that the following
discs CANNOT be used with this player:
Optical disc- CD-1, CD-ROM, and DVD-ROM
Mini disc- CDG (audio only, not graphics)
3.
After the device has been turned on
and is displaying a picture, adjust the
viewing angle by pivoting the screen to
optimize the picture quality.
To Load and Play a Disc
4.
Remember to turn the device off and
pivot the LCD panel to the locked position when not in use.
When you press the POWER button the system turns on in DVD mode. Place the disc
about halfway into the disc compartment slot,
with the disc’s label facing the rear of the
vehcle. player, do NOT insert the disc at an
angle. The disc must be inserted straight into
the player.
DVD Basic
To get the most use out of each DVD, make
sure you read this section completely.
Regional Coding
Both the DVD player and disc are coded by
region. These regional codes must match in
order for the disc to play. If the codes do not
match, the disc will not play by default. The
system is preset to the region code designated for your area by the DVD Copy Control
Association. Other regions may not be played
in this system.
The disc will load automatically and begin to
play. (Some discs may start at the root menu,
where play must be selected to start movie.)
Depending on the disk and playback location
on the disc, the icon may be displayed in the
upper-left corner of the screen indicating that
still playback is not possible.
Type of Discs your DVD will play
DVD-Video: DVD contains video.
DVD +/- R: DVD contains video.
CD-DA: CD contains musical or sound content
only.
CD-Video: CD contains movie only.
CD-R/RW: A disc that contains audio files (for
example, a CD-R with downloaded MP3 files),
MPEG, or JPEG files.
General Operating Instructions
15
Notes on Discs
t To keep a disc clean, do not touch its surface. Handle the disc by its edge.
t Keep your discs in their cases or disc
magazines when not in use. Also, do not
subject disc to heat/high temperature.
Avoid leaving them in a parked vehicle or
on a dashboard/rear tray.
t Before playing, clean the discs with a
commercially available cleaning cloth.
Wipe each disc from the center out.
Do not use solvents such as benzene,
thinner, commercially available cleaners, or antistatic spray intended for
analog discs.
t Do not attach labels, or use discs with
sticky ink/residue. Such discs may stop
spinning when used, causing a malfunction, or may ruin the disc.
t Do not use any discs with labels or stickers
attached. The following malfunctions may
result from using such discs:
t Inability to eject a disc (due to a label
or sticker peeling off and jamming the
eject mechanism).
t Inability to read audio data correctly (i.e., playback skipping, or no
playback) due to heat shrinking of a
sticker or label causing a disc to warp.
16
General Operating Instructions
t Use only normal, round discs. If you
insert irregular, non-round, shaped
discs they may jam in the DVD player
or not play properly.
EN
How to use the DVD OSD Menu
EN
This section describes how to set and adjust
settings using the on-screen setup pages
included in the On-screen Display (OSD)
Menu. You can use the OSD menu screen to
adjust all the settings on your screen. Follow
the steps outlined below to select the function you desire, and refer to the pages indicated for more information.
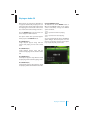
General Setup Menu
Press the SETUP button on the remote control, use the !"and the # or ! buttons
to navigate the Setup Page. Press ENTER to
select and then the ! to return to the submenu.
The OSD Lang sub-menu allows the user to
select the language for the on-screen display.
Press the right (forward)button and then use
the up and down buttons on the remote
control to select the desired language. The
user can select English, Simple / Traditional
Chinese, French, German, Italian, Spanish,
Portuguese or Korean for the OSD language.
Press ENTER to select and then the left (back)
button to return to the sub-menu.
Angle Mark Menu
(Accessible when no disc is loaded)
The angle mark is an option for different
viewing angles on the DVD.
Press the # or ! button to turn the angle
mark setting on or off. Press ENTER to select
and then the !" button to return to the submenu.
(Accessible when no disc is loaded)
To cancel using the Setup Display : Press the
SETUP button on the remote
OSD Language Menu
(Accessible when no disc is loaded)
How to use the DVD OSD Menu
17
EN
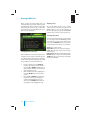
Audio Setup Menu
Quality Setup Menu
(Accessible when no disc is loaded)
(Accessible when no disc is loaded)
Press the SETUP button on the remote control, use the !"and the # or ! buttons
to navigate the Setup Page. Press ENTER to
select and then the ! to return to the submenu.
Press the SETUP button on the remote control, use the !"and the # or ! buttons
to navigate the Setup Page. Press ENTER to
select and then the ! to return to the submenu.
Speaker Setup Menu
Video Quality Setup Menu
Press the Setup button on the remote control. Press the #$ once to reach the Audio
Setup Page. Press ENTER to navigate to the
sub-menu. Use theuse the !"and #!to
navigate the sub-menus. Press the ENTER
or # button to select an item and then the
#! buttons to see the selection items. Press
ENTER to select and then the ! to return to
the sub-menu.
Press the SETUP button on the remote control, press the # to navigate to the Video
Setup Page. Press ENTER twice to enter the
sub-menu. Use the!"and the # or ! to
navigate the sub-menus. Press the ENTER
or # button to select an item and then the
#!"buttons to see the selection items. Press
ENTER to select and then the ! to return to
the sub-menu.
t5IF4QFBLFS4FUVQNFOVIBTUIFGPMMPXJOH
options: LT/RT, Stereo, V SURR and OFF.
t5IF %PMCZ %JHJUBM 4FUVQ NFOV IBT UIF GPMlowing options: Stereo, L-Mono, R-Mono and
Mix-Mono.
18
EN
Video Quality Setup
Option
Description
Range
Default
SHARPNESS
Adjust to soften or sharpen the picture
Low/Med/High
Default
BRIGHTNESS
Adjust to brighten or darken the picture.
-20 ~ +20
50
CONTRAST
Adjust to increase or decrease picture contrast.
-16 ~ +16
50
HUE
Adjust to increase or decrease the color hue
-09 ~ +09
50
SATURATION
Adjust to increase or decrease color intensity.
-09 ~ +09
50
19
How to use the Device OSD Menu
EN
Preference Setup Menu
(Accessible when no disc is loaded)
After navigating to the Parental sub- menu
under the Preference Page, use the #$ and
!" the buttons on the remote control to
select: KID SAFE (Children); G; PG; PG 13; PGR;
R; NC 17; ADULT. NOTE: The lower the value,
the more strict the limitation.
Setting the Parental Control
Password
1. Press the SETUP button and navigate to the
Password submenu under the Password Setup Page. The menu appears and allows you to
change the parental control password.
Press the SETUP button on the remote control, use the !"and the # or ! buttons
to navigate the Setup Page. Press ENTER to
select and then the ! to return to the submenu.
2. Press the # button and then press the
ENTER button on the remote control to enter
the sub-menu.
t0ME1BTTXPSE*OQVUUIFPMEQBTTXPSEPS
the default pass- word (6 digits).
Setting for Audio
This section of the Setup Menu allows the
user to control the audio stream in the
selected language for playback automatically.
t/FX1BTTXPSE*OQVUBOFXQBTTXPSE
digits) using numeric buttons.
t $POöSN 1BTTXPSE $POöSN UIF OFX
password by entering the same new password again.
Settings for Subtitle
This section of the Setup Menu allows the
user to turn the subtitles ON or OFF in the
selected language for playback automatically.
3. Scroll to the OK button and press the
ENTER button on the remote control. Your
password has been changed.
(Note: The default password is 136900)
Settings for Disc Menu
Default Setting
This section of the Setup Menu allows the
user to control the DVD disc menu in the
selected language.
Press the SETUP button on the remote control, navigate to the default sub-menu under
the Preference page using the !"and the #$
%&''()*+$
Settings for Parental
This section of the Setup Menu allows user to
control the content of movie playback from
G to ADULT. The parental control function
allows you to limit viewing to your
preference. The rating levels are from 1 to 8
and are country dependant.
20
How to use the Device OSD Menu
,-.**$'/.$#$%&''()$'/.)$0-.**$12314$'($
56--7$(&'$'/.$-.*.'$8'/9*$:&)5'9()$;9<<$)('$6::.5'$'/.$06-.)'6<$*.''9)=*>
Playing an Audio CD
EN
When playing an audio CD, the DISPLAY banner appears automatically. It displays the current track and the amount of time the track has
been playing, the total amount of time on the
disc and the current time running on the disc.
Using the REPEAT Feature
The default mode for the REPEAT feature is
OFF. Pressing REPEAT button on the remote
control consecutively changes the REPEAT
options as follows:
Press the DISPLAY button on the remote control to display the DISPLAY banner.
- repeat the track that is playing.
- repeat the disc that is playing.
The options below show you what happens
when you press the DISPLAY button.
Press DISPLAY (1x)
“Single Elapsed” appears along with the
current track playing and the time of that
track.
As you toggle through the options, the REPEAT
option changes. The track repeats once that
track has ended. The selected repeat option
loops repeatedly until you turn it off.
Press DISPLAY (2x)
“Single Remain” appears along with the
current track playing and the amount of time
left.
Press DISPLAY (3x)
“Total Elapsed” appears along with the current
track playing and the total time playing on CD.
Press DISPLAY (4x)
“Total Remain” appears along with the current
track playing and the amount of time left on CD.
Playing an Audio CD
21
Playing a MP3 Disc
EN
MP3 is a format for storing digital audio. An
audio CD-quality song can be compressed into
the MP3 format with very little loss of quality,
while taking up much less space. CD-R discs
that have been encoded in MP3 format can be
played on your DVD player.
Skipping Songs
Use the ! (NEXT) button on the remote
control to move to the next song. Use the "
(PREV) button to move to the beginning of
the currently playing song. Press the " (PREV)
button 2 times to move to the previous song.
Selecting a Play Mode
You can choose what order the songs will play
on a disc temporarily. The FOLDER play mode
is the default. To access the play mode operations, press the REPEAT button on the remote
control. The play mode options are as follows:
Selecting Folders and Songs
When an MP3 disc is inserted in the player, the
navigation screen appears automatically. You
can change folders and songs by navigating
the file system. The DVD player plays the songs
in the order they were burned to the disc.
1.
2.
3.
22
If a disc is playing, press the DISPLAY
button on the remote control, and then
press the UP or DOWN arrow buttons to
go through the folder list on the left side
of the navigation screen.
Once the folder you want is highlighted,
press the ENTER button on the remote
control
Press the UP or DOWN arrow button on
the remote control to go through the
song list and highlight the song you
want. Press the ENTER button to begin
the playback of the highlighted song.
Playing a MP3 Disc
Single: Play a selected song.
Repeat One: Repeat the song that is playing.
Folder: Play the folder in the order the songs
were recorded.
Folder Repeat: Repeat the folder that is playing.
Random: Play the songs in the random order.
Shuffle: Play the songs in random order (within the selected folder).
Connecting a USB Device
EN
You can connect a USB mass storage device
such as a USB memory stick, digital audio
player (USB mass storage class device) etc. to
the USB port of the REV LT unit.
The REV LT unit can play many popular formats
stored in a USB device, including but not
limited to the following file types: JPEG, JPG,
M2V, MP3, MPE, MPEG Formats (MPEG-1,
MPEG-2, MGEP-4), MPG, OGG, WMA and MWV.
Turn on the REV LT unit to watch the playback
picture if you playback a file. You can also control playback by reffering to the REV LT unit
screen.
Controls:
MENU – Return to the menu structure.
UP / DOWN – Moves the select bar up/down
within the selected menu/file list.
LEFT – Moves menu up one level / Returns to
the menu structure for some functions.
RIGHT – Selects menu item.
ENTER – Makes a selection or begins playback
of files.
PLAY – Press this button to play file
STOP – Stops playing the movie/song
PAUSE – While item is playing, press this button to temporarily stop the playback
FR (Fast Rewind) – Press to move backwards
(2x, 4x, 8x, 16x, 32x) within a file.
FF (Fast Forward) – Press to move forwards (2x,
4x, 8x, 16x, 32x) within a file.
PREV – Moves to previous file.
NEXT – Moves to next file.
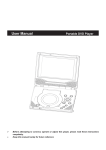
Sample of Root Directory:
Order of Tracks
File Structure:
The Rev LT unit plays the files in the order that
they were written to the USB drive. Therefore,
the playing order may not be the same as the
order shown on your device or as expected.
To access the file structure/menus, for the USB
device, you will need the remote control, set to
the appropriate systems (A or B).
Upon insertion, the USB device may begin
playing files automatically, returning to the
previous position, if it was unplugged during
a previous playback. To return to the menus,
press MENU or LEFT ARROW, depending on
the type of file being played. The current
directory will appear, listing all file types.
Music Playback: Screen will display: Folder
Location, Elapsed Time, and if available: Song
Title, Artist, and Album.
Connecting a USB Device
23
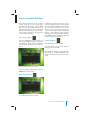
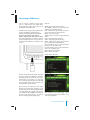
Connecting a MP3 Device
EN
Connecting a MP3 Device to your REV LT
Unit via USB
Connecting a MP3 Device to your
REV LT Unit via AV cable
Plug the MP3 Dock Connector to USB cable
into a high-power USB port on your REV LT
unit, and then connect the other end to the
player.
t Connect the device using an AV cable to
the headphones port . Note: Use the AV
cable made specifically for the device.
Other similar RCA-type cables might not
work.
See the documentation that came with your
device for more information.
t Connect the video and audio connectors
to the AV-IN ports on your REV LT unit, as
shown.
Charging the MP3 Player Battery
Connect the device to the USB port on your
REV LT unit. The REV LT unit must be turned on.
Depending on the device, it may or may not
charge when connected to the USB port.
Note: Not all devices are able to charge when
connected to the USB port.
24
Connecting a MP3 Device
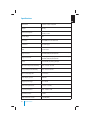
Troubleshooting
EN
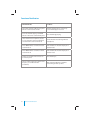
Symptom
Device does not power “ON”
Remedy
t Is ignition turned “ON”?
t Are batteries installed in remote control?
t Verify that the batteries in the remote control are good.
IR sensor inoperative
t Verify that the remote sensor eye is not obstructed.
t Verify that the infrared transmitter is affixed over the
sensor eye of the component to be controlled.
t Insert a disc with label side rear of the vehicle.
t Check if the disc is defective by trying another disc.
Disc won’t play
t Check the type of disc you put into DVD compartment
slot. This DVD player only plays DVDs, audio CDs, and
MP3s.
t Both the device and the disc are coded by region.
If the regional codes don’t match, the disc can’t be
played. This DVD player us set to region number 1.
Disc plays, but then stops
immediately
t The disc is dirty and needs cleaning.
t Condensation has formed. Allow player to dry out.
t Check that the signal source is connected.
No picture
Distorted picture
Cannot advance through a
movie
t The setting may be in the wrong status. Match your
monitor mode with the source correctly.
t Check the disc for fingerprints and clean with a soft
cloth, wiping from center to edge.
t Sometimes a small amount of picture distortion may
appear. This is not a malfunction.
t You cannot advance through the opening credits and
warning information that appears at the beginning of
movies because the disc is programmed to prohibit
that action.
t Make sure that the DVD player is connected properly,
and all cables are securely inserted into the appropriate jacks.
No sound or distorted sound
t If you are using the IR headphones, make sure you
turn on the IR power.
t Is volume turned “UP” on headphones?
t Is anything blocking signal between monitor and
headphones?
Device feels warm
Player does not respond to all
commands during playback
t When the device is in use for a long period of time, the
surface will be warm. This is normal.
t Operations are not permitted by the disc.
t Refer to the instructions in the disc inlay.
Troubleshooting
25
Specifications
EN
Dimensions
210(W) x 190(H) x 50(D) mm
Weight
.862 Kg
Power Consumption
Operation <17W
Standby <2.5W
LCD Backlight
LED
Resolution
480x3(RGB) x234 TFT LCD Panel
Luminance
450cd/m2 (typ.)
DVD
Slot-In Loader
Supported Disc
DVD (Single, Dual Layer), DVD-R/+R, DVD+R Dual layer,
DVD-RW/+RW, CD, CD-R, CD-RW
Supported Format
DVD (Single, Dual Layer), DVD-R/+R, DVD+R Dual layer,
DVD-RW/+RW, CD, CD-R, CD-RW
Source
Internal DVD, CD, Analog AV input
Operation Temperature/Humidity
-20°C~70°C/20~90% RH
Storage Temperature/Humidity
-30°C~85°C/5~95% RH
Expected Backlight Life
10,000 hours
Video Display System
NTSC/PAL
Supply Input Voltage
10V~16V DC
Maximum Input Current
1.3A (Vin = 10V DC)
Frequency Response
20Hz ~20KHz ± 1dB
Signal/Noise Ratio
≥ 85dB
Audio Distortion + Noise
≤ -80dB (1KHz)
26
Specifications
EN
Acoustic Noise
40dB
Control Button on the Front Panel
POWER, SOURCE, PLAY, STOP, EJECT
I/O Ports
1/8” Headphone Jack, AV In RCA Jacks
Audio Out (analog audio)0.4
(headphone)
Output Level: 2V ± 10%
Load Impedance (Audio Out)
10KΩ
Video Out Output Level
1Vp-p ± 20%
Load Impedance (Video Out)
75Ω
Wireless Audio
Dual channel infrared audio transmitter,
Support IR receiver stereo headphone
(reception: 0.9 m; 80°, 1.8 m; 50°)
IR Channels
Channels
A: 2.3/2.8 MHZ
B: 3.3/3.8 MHZ
3: Proprietary
4: Proprietary
27
Compliance Information
EN
FCC Notice
WEEE Notice
This device has been tested and found to comply with the limits for a Class B digital device,
pursuant to part 15 of the FCC Rules. These
limits are designed to provide reasonable protection against harmful interference in a residential installation. This device generates, uses,
and can radiate radio frequency energy, and if
not installed and used in accordance with the
instructions, may cause harmful interference
to radio communications. However, there is
no guarantee that interference will not occur
in a particular installation. If this device does
cause unacceptable interference to radio or
television reception, which can be determined
by turning the device off and on, the user is
encouraged to try to correct the interference
by one or more of the following measures:
Disposal of Old Electrical & Electronic Equipment (Applicable in the European Union and
other European countries with separate collection systems)
t Reorient or relocate the receiving antenna.
t Increase the separation between the
device and receiver.
t Connect the device into an outlet on a
circuit different from that to which the
receiver is connected.
t Consult your dealer or an experienced
radio/TV technician for help.
FCC Warning:
To assure continued FCC compliance, the user
must use the provided grounded power supply
cord and the shielded video interface cable with
bonded ferrite cores. Also, any unauthorized
change or modifications to this device would
void the user’s authority to operate this device.
This symbol on the product or on its packaging indicates that device shall not be treated
as household waste. Instead it shall be handed
over to the applicable collection point for the
recycling of electrical and electronic equipment. By ensuring this device is disposed
of correctly, you will help prevent potential
negative consequences for the environment
and human health, which could otherwise
be caused by inappropriate waste handling
of this device. The recycling of materials will
help to conserve natural resources. For more
detailed information about recycling of this
device, please contact your local city office,
your household waste disposal service or the
shop where you purchased the device. Applicable accessory: remote control.
Macrovision Notice
This product incorporates copyright protection
technology that is protected by U.S. patents
and other intellectual property rights. Use of
this copyright protection technology must be
authorized by Macrovision, and is intended
for home and other limited viewing uses only
unless otherwise authorized by Macrovision.
Reverse engineering or disassembly is prohibited.
28
Compliance Information
Warranty
EN
INVISION Automotive Systems Inc., (the “Company”) warrants to the original retail purchaser of
this product, when purchased from a participating new car dealership, that should this product
under normal use and conditions, be proven
defective in material or workmanship, such
defect(s) will be repaired or replaced with reconditioned product (at the Company’s option) without
charge for parts and repair labor when the work is
performed by the original dealership of purchase,
or an authorized representative of that dealership.
This Warranty will match the warranty of the
Original Equipment Manufacturer (“OEM”) when
installed on a new vehicle with a minimum of 36
months or 36,000 miles. If the product is installed
on a used vehicle, then only a 12 month or 12,000
mile Warranty from the date of installation will
apply. This Warranty is not applicable to any
extended warranty purchased.
To obtain repair or replacement within the terms
of this Warranty, the product must be returned to
a participating new car dealership for warranty
service or replacement. The dealership will perform troubleshooting to determine if repair or
replacement is warranted. If a participating dealership cannot be contacted, then the Purchaser
should contact the Company to obtain the name
and location of a dealership where service under
this Warranty can be obtained.
THE PURCHASE PRICE PAID BY PURCHASER FOR
THE PRODUCT.
This Warranty is in lieu of all other express warranties or liabilities. ANY IMPLIED WARRANTIES, INCLUDING ANY IMPLIED WARRANTY OF
MERCHANTABILITY, SHALL BE LIMITED TO THE
DURATION OF THIS WRITTEN WARRANTY. ANY
ACTION FOR BREACH OF ANY WARRANTY HEREUNDER, INCLUDING ANY IMPLIED WARRANTY OF
MERCHANTABILITY, MUST BE BROUGHT WITHIN
A PERIOD OF 48 MONTHS FROM THE DATE OF
ORIGINAL PURCHASE. IN NO CASE SHALL THE
COMPANY BE LIABLE FOR ANY CONSEQUENTIAL
OR INCIDENTAL DAMAGES FOR BREACH OF THIS
OR ANY OTHER WARRANTY, EXPRESS OR IMPLIED,
WHATSOEVER. No person or representative is
authorized to assume for the Company any liability other than expressed herein in connection with
the sale of this product.
Some states do not allow limitations on how long
an implied warranty lasts or the exclusion or limitation of incidental or consequential damage so
the above limitations or exclusions may not apply
to you. This Warranty gives you specific legal
rights and you may also have other rights which
vary from state to state.
This Warranty does not extend to the elimination
of externally generated static or noise, correction
of antenna problems, costs incurred for installation, removal or reinstallation of the product, or to
damage to digital memory devices, media devices, gaming devices, discs, speakers, accessories, or
vehicle electrical systems.
This Warranty does not apply to any product or
part thereof which, in the opinion of the Company, has suffered or been damaged through alteration, improper installation, mishandling, misuse,
neglect, accident, or by removal or defacement of
the factory serial number/bar code label(s). THE
EXTENT OF THE COMPANY’S LIABILITY UNDER
THIS WARRANTY IS LIMITED TO THE REPAIR OR
REPLACEMENT PROVIDED ABOVE AND, IN NO
EVENT, SHALL THE COMPANY’S LIABILITY EXCEED
Warranty
29
Notes
EN
30
Notes
EN
Notes
31
32
Notes