1
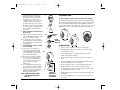
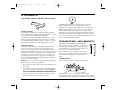
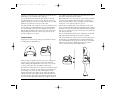
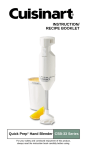
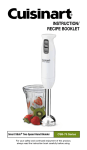
CSB-44N IB-4130
8/4/03
7:10 PM
Page 1
INSTRUCTION AND
RECIPE BOOKLET
CORDLESS RECHARGEABLE HAND BLENDER
For your safety and continued enjoyment of this product, always read the instruction book carefully before using.
CSB-44N
CSB-44N IB-4130
8/4/03
7:10 PM
Page 2
TABLE OF CONTENTS:
Important Safeguards . . . . . . . . . . . . . . . . . . . . . . . . . . . .Page 2
Introduction . . . . . . . . . . . . . . . . . . . . . . . . . . . . . . . . . . .Page 3
Features and Benefits . . . . . . . . . . . . . . . . . . . . . . . . . . . .Page 4
Before You Begin . . . . . . . . . . . . . . . . . . . . . . . . . . . . . . .Page 5
Assembly . . . . . . . . . . . . . . . . . . . . . . . . . . . . . . . . . . . . .Page 5
Operation . . . . . . . . . . . . . . . . . . . . . . . . . . . . . . . . . . . .Page 6
Turning Hand Blender ON & OFF . . . . . . . . . . . . . . . .Page 6
Helpful Hints . . . . . . . . . . . . . . . . . . . . . . . . . . . . . . . . .Page 6
Charging & Battery Life . . . . . . . . . . . . . . . . . . . . . . . . .Page 7
Attachments . . . . . . . . . . . . . . . . . . . . . . . . . . . . . . . . . . .Page 8
Storage Stand / Wall Brackets . . . . . . . . . . . . . . . . . . . . .Page 8
Storage Stand for Countertop Use . . . . . . . . . . . . . . . . .Page 8
Wall Mount Storage Option . . . . . . . . . . . . . . . . . . . . . .Page 9
Cleaning . . . . . . . . . . . . . . . . . . . . . . . . . . . . . . . . . . . . .Page 10
Disposal / Recycling of Batteries . . . . . . . . . . . . . . . . . . .Page 10
Recipe Table of Contents . . . . . . . . . . . . . . . . . . . . . . . . .Page 10
Recipes . . . . . . . . . . . . . . . . . . . . . . . . . . . . . . . . . . . . . .Page 11
Warranty . . . . . . . . . . . . . . . . . . . . . . . . . . . . . . . . . . . . .Page 15
Template for Wall Mount Storage . . . . . . . . . . . . . . . . . .Page 16
IMPORTANT
SAFEGUARDS
When using an electrical appliance, basic safety precautions
should always be followed, including the following:
1. READ ALL INSTRUCTIONS.
2. To protect against electrical shock, do not put the charger handle
or motor body of this hand blender in water or other liquid. The
drive shaft of this appliance, where blades are interchanged, has
been designed for submersion in water or other liquids. Never
submerge any other portion of this unit. If hand blender falls
into liquid, remove immediately. Carefully remove, clean and dry
unit thoroughly before continuing.
3. This appliance should not be used by children. To avoid possible
accidental injury, close supervision is necessary when any appliance
is used by or near children.
2
4. Do not operate in the presence of explosive and/or flammable fumes.
5. To avoid possibility of personal injury, always detach the charger
handle from the motor body before attaching or removing
blades and/or attachments.
6. Unplug charger handle from outlet when not in use, before putting
on or taking off parts and before cleaning.
7. Avoid contacting moving parts. Keep hands, hair, clothing, as well
as spatulas and other utensils away from attachments and mixing
container during operation to reduce risk of injury to persons,
and/or damage to the appliance. A spatula may be used, but must
be used only when the unit is not operating.
8. Remove detachable shaft from the blender before washing the
blades or shaft.
9. Blades and accessory attachments are SHARP. Handle carefully.
10. When mixing liquids, use a tall container or make small quantities
at a time to reduce spillage and possibility of injury.
11. Charger handle should be plugged into an electrical outlet away
from sink or hot surfaces.
12. Do not use an extension cord. Plug charger handle directly into an
electrical outlet.
13. Do not attempt to use this charger handle with any other product.
Also, do not attempt to charge the batteries with any other charger.
14. Do not use appliance for other than intended use.
15. Do not charge batteries with handle charger plugged into an
outdoor outlet.
16. Do not operate any appliance with a damaged cord or plug, or
after the appliance has malfunctioned or has been dropped or
damaged in any way, or is not operating properly. Return the
appliance to the nearest Cuisinart Repair Center for examination,
repair, or mechanical or electrical adjustment.
17. The use of attachments or accessories not recommended by
Cuisinart may cause fire, electrical shock or risk of injury.
18. Make sure the appliance is "OFF" and the motor has stopped
completely before putting on or taking off attachments, and
before cleaning.
CSB-44N IB-4130
8/4/03
7:10 PM
Page 3
19. This appliance is intended for household use only and not for
commercial or industrial use.
20. Do not use this hand blender for other than intended use of
preparing foods and beverages.
21. Use care when stirring hot liquids, to avoid splattering.
22. To reduce the risk of fire or electric shock, do not operate any
heating appliance beneath the mounted charging handle unit.
23. Do not mount the storage bracket/unit over or near any portion
of a heating or cooking appliance, or a sink or wash basin.
24. Unplug the charger handle from the outlet before attempting any
routine cleaning of the charger handle.
25. Do not operate a damaged charger. Have damaged charger
replaced immediately.
26. Do not incinerate the hand blender, even if it is severely
damaged. The batteries can explode in a fire.
27. This product contains nickel cadmium batteries which must
be recycled at the end of the life of the hand blender and
disposed of properly. (See Disposal / Recycling of Batteries.)
Do not incinerate or compost batteries, as they will explode at
high temperatures.
28. Leaks from battery cells can occur under extreme conditions. If the
liquid, which is a 20-35% solution of potassium hydroxide, gets on
the skin, (1) wash quickly with soap and water or (2) neutralize
with a mild acid such as lemon juice or vinegar. If the liquid gets
into eyes, flush them immediately with clean water for a minimum
of 10 minutes. Seek medical attention.
SAVE THESE
INSTRUCTIONS
FOR HOUSEHOLD
USE ONLY
INTRODUCTION
Blending has never been easier! Now you can bring your blender to
the food, rather than taking your food to the blender.
The Cuisinart® Cordless Rechargeable Hand Blender may be the most
convenient stick blender you ever own. Built with the same expertise
that made the Cuisinart® Food Processor a legend, it delivers up to
15 continuous minutes of powerful blending, without a cord.
Consider the possibilities. Take it to the stovetop to purée a pot of
simmering split pea soup or to blend pasta sauce just before serving.
Bring it out on the patio to mix up a pitcher of margaritas. Take it
to an out-of-the-way corner of the kitchen to quickly whip up a dip.
Wherever it goes, you get the perfect blend. And this hand blender is
comfortable. The handle is contoured to fit like your favorite kitchen
utensil. The rubberized grip won’t slip, even when hands are wet.
And we put the power button right on top, within easy reach of
your thumb.
As with all Cuisinart products, the Cordless Rechargeable Hand
Blender is designed to be easy to use. Prongs slide out of the charger
handle and into any wall outlet to recharge the batteries. The charger
handle can be left in the outlet whenever the blender is not in use to
guarantee up to 15 minutes of run time whenever you need it. The
Cordless Rechargeable Hand Blender is engineered to let the batteries
remain on continuous charge and to draw very little power while
connected.
Cuisinart is famous for easy cleanups, too, and this hand blender is no
exception. The detachable shaft is dishwasher safe, and the handle
wipes clean in seconds.
Enjoy the perfect blend with Cuisinart, wherever life takes you!
3
CSB-44N IB-4130
8/4/03
7:10 PM
Page 4
FEATURES AND BENEFITS
MODEL CSB-44N
1. Cordless Operation:
3. Batteries with Long Run Time Recharge Easily:
Runs up to 15 minutes under normal use (depending on specific
uses) and regains over half of full power within 3 hours. Full
charge in 12 to 24 hours. Normal time required for a blending
task is 10 seconds to 2 minutes.
4. Maximum Comfort Handle:
No cord! Operates on battery power.
2. Three Stages Snap Together Easily.
Disassemble for compact storage, either separately or together
in storage stand.
a.Charger Handle:
Batteries are in the handle. Release button allows this combination
handle and charger to detach from main motor body.
Plug extends from handle to plug charger into wall socket.
b.Motor Body:
Contains powerful DC motor.
c.Detachable Shaft:
The hand blender handle and power button are designed around
the way you actually hold a stirring utensil. The shape of this handle
gives you comfortable control and easy access to the power button.
Rubberized handle gives better grip, especially when your hands
are wet.
5. One Step ON/OFF
(Power) Button:
Press and hold the
rubberized power
button to operate
blender. Release
button to stop motor.
Release button allows shaft to detach from motor body
for easy cleaning in dishwasher or under running water
from faucet.
Charging
Light
On/Off
(Power)
Button
Charger
Handle
Handle
Release
Button
Motor Body
6. Plug-In Charger with Charging Light:
Plugs into wall outlet to recharge the batteries. Charging light
is on to let you know the outlet is in operation and batteries are
recharging. Light remains on when charging is completed.
Detach charger handle from motor body with release button,
slide wall plug out of housing, and plug directly into wall outlet.
No cords necessary.
7. Detachable Shaft:
Shaft
Release
Button
Easy to use, easy to clean and easy to store. Detach from motor
body by pressing release button. Rinse under faucet or put in top
shelf of dishwasher to clean.
8. Long Running Time:
Detachable
Shaft
4
The Cordless Rechargeable Hand Blender runs for 10 to 15 minutes
during normal use with a full charge. Maximum usage time for
most applications is only 1 to 2 minutes!
CSB-44N IB-4130
8/4/03
7:10 PM
Page 5
BEFORE YOU BEGIN
Place the package containing the Cuisinart® Cordless Rechargeable
Hand Blender on a sturdy surface. Unpack the hand blender from
its box by removing the upper protective insert. Carefully remove
each piece from the box.
Note: The blending blade is extremely sharp. Use caution when
removing and unpacking the storage stand. The blending blade
is stored in the storage stand.
9. Convenient Storage:
Storage stand is made of two pieces.
One side holds the detachable shaft. The
other holds the motor body, either with
or without the charger handle attached.
The 2 storage pieces snap together for
compact countertop storage of the motor
body and shaft. Detach and mount one
section to the wall and hang the entire
appliance from the wall as shown. The
appliance can also be hung from the wall with charger handle
detached. Use anchor and screws included with this appliance.
10. Easy To Clean:
The Cuisinart® Cordless Rechargeable Hand Blender has a
smooth surface that wipes clean instantly and easily. Detachable
shaft is dishwasher safe.
11.Mixing Beaker is Dishwasher & Microwave Safe:
See-through mixing beaker is
marked in liters and cups for
convenient measuring. Use for
drinks, shakes, salad dressings, etc.
Designed for easy gripping and
drip-free pouring.
12.Detachable Blending Blade:
Blade can be detached from shaft to
replace with the whipping disc, or
for cleaning. Blade can also be cleaned without detaching.
13.Detachable Whipping Disc:
Detach blade, then replace with this disc for whipping cream,
egg whites and some salad dressings.
Remove all support materials from the box and replace the upper
insert. Save packaging for possible repacking of the unit.
Before using the Cuisinart® Cordless Rechargeable Hand Blender
for the first time, we recommend that you wipe the unit with a clean,
damp cloth to remove any dirt or dust. Dry it thoroughly with a soft,
absorbent cloth. Handle carefully. Wash the blending blade, whipping
disc, mixing beaker and detachable shaft by hand or in the dishwasher
(upper rack only). Dry thoroughly before use. Read all instructions
completely for detailed operating procedures.
The batteries in your
Cuisinart® Cordless
Rechargeable Hand Blender
have not been charged. Before
the first use of this appliance,
the batteries must be charged
for 24 hours! See Charging and
Battery Life on page 7.
ASSEMBLY
Note: To avoid possibility of
personal injury, always detach
the charger handle from the
motor body before attaching or
removing blades and/or attachments.
1. Attach blade or whipping disc
to blender shaft.
For your safety, always detach the shaft from the motor body.
To insert the blade or whipping disc, hold the stem of the
blade/disc between your fingers. Match the raised notches
on the shaft to the open slots on the stem.
5
CSB-44N IB-4130
8/4/03
7:10 PM
Page 6
Once properly aligned, slide the
blade/disc onto the stem and push
firmly into position. To ensure that
the blade/disc is securely in place,
carefully press the center end of each
attachment back toward the shaft.
It is important to properly secure the
blade/disc to prevent separation during
use. Do not begin operating the hand
blender until the desired blade/disc
is secured!
OPERATION
2.
Turning Cordless Rechargeable Hand Blender ON/OFF:
Keep hands, hair, clothing and other utensils away from blending blade.
Press and hold rubberized ON/OFF button on top of handle to turn
motor ON. The ON/OFF button is marked “PRESS”. The hand
blender will continue to run as long as the switch is pressed in. To turn
hand blender off, release ON/OFF button and the motor will stop.
2. Attach/Detach blender shaft to
motor body.
3a.
Align blender shaft with motor body
as shown in illustration. Push together
until you feel and hear a click.
b. To detach: Press the release button
and pull the shaft away from the body.
Do not grasp shaft around the blade
or whipping disc.
a.
Thumb
Grip
Push
Thumb
Grip In
Helpful Hints:
3. Attach/Detach charger handle
to motor body.
After batteries are fully charged,
remove charger handle from wall
socket. Push down on thumb grip
and slide the plug to the retracted
position inside the housing.
b. Press the release button. Align two
slots on bottom of charger with two
tabs on top of motor body. Press
together until you hear a click and
the two sections fit together
without gaps.
c. To detach: Hold motor body firmly
in one hand. Detach charger handle
by pressing release button located at
top of motor body, then pull charger
handle away from motor body by
lifting up with other hand.
Note: Detach the changer handle
from the motor body after
each use.
1. Cut most solid foods into 1/2" cubes for easy blending.
a.
6
2. Pour liquid ingredients into the mixing container first, unless
recipe instructs otherwise.
3b.
3. To avoid splashing, do not pull the hand blender out of the
mixture while blender is running.
4. Do not let hand blender stand in a hot pot on stove while not
in use.
5. To prevent splashing, don't turn the hand blender ON until the
blade is beneath the surface of the mixture.
6. Do not put fruit pits, bones, or other hard material into the
blending mixture, as these are liable to damage the blade.
Press
release
button to
separate
or attach
7. Do not fill mixing containers too full. The level of mixture will
rise when blending, and can overflow.
8. Adding liquids that are warm, not cold, facilitates blending solids
with liquids.
9. For recipes calling for ice, use crushed ice (not whole cubes) for
best results.
CSB-44N IB-4130
8/4/03
7:10 PM
Page 7
CHARGING & BATTERY LIFE
Your Cuisinart® Cordless Rechargeable Hand Blender is equipped with
nickel cadmium batteries. We have selected these batteries to give you
maximum life and long running times, as well as rapid recharging times.
If you run your batteries down completely, it will take between 12 and
24 hours to completely recharge them. They will be over 50% charged
after only 3 hours. Normally, you will not run them down completely.
The normal running time with a full charge varies depending on what
you are blending, but you can expect up to 15 minutes. The maximum
time for most mixing tasks is up to 2 minutes.
CHARGING PROCEDURES
When brand new, the Cuisinart® Cordless Rechargeable Hand Blender
is not fully charged. Plug the charger handle into the electrical socket
and leave it plugged in for 24 hours to insure maximum operating
capability. For best performance, fully discharge and recharge the
battery 3 times before first use.
Thumb
To Charge
Grip
Detach charger handle from motor
body. Turn charger handle upside down.
Using the thumb grip on the underside
of the charger handle, push down
slightly and slide the plug as far as it
will go until it is fully exposed and
extending from the handle housing
(see illustration). Plug the prongs into
Push
a wall outlet. The batteries will begin
thumb
charging. The charging light will
grip out
be illuminated.
Continuous Charging
The unit is designed so that the batteries may remain on continuous
charge. It is recommended that the Cuisinart® Cordless Rechargeable
Hand Blender charger be kept plugged into a wall socket to charge, so
that it will always be ready to use. Leaving the unit on continuous charge
is very inexpensive in terms of the amount of electricity
being used.
Holding the Charge
The batteries will keep their charge even when not plugged in. The
batteries will lose approximately 1% of their total charge per month,
if they are not plugged in and charging.
Short Run Times
If after repeated use the run time seems to get shorter and the hand
blender has less power, it may not be the result of a faulty unit.
This condition can be remedied by allowing the Cuisinart® Cordless
Rechargeable Hand Blender to run until it stops. Then recharge the unit
for 24 hours for a new charge. This procedure improves the batteries’
capacity. You may need to repeat this a few times for the best results.
Charging Light
The charging light on the tip of the handle glows when the unit is
charging. This light will be illuminated even when the batteries are
fully charged. If the unit does not function, make sure that the charger
handle is securely plugged into the outlet, and check to see if the
outlet is controlled by a wall switch. Also, check for a blown house
fuse. Note that if this light is on, the charger is operating.
7
CSB-44N IB-4130
8/4/03
7:10 PM
Page 8
ATTACHMENTS:
(B) WHIPPING DISC ATTACHMENT
(A) BLENDING / MIXING / CHOPPING / MINCING BLADE
The Whipping Attachment is specially designed to add air and
volume to mixtures. Perfect for aerating egg whites, cream and
mayonnaise, this attachment makes mixtures light, frothy and thick.
Blending & Mixing
This specially designed blade is for mixing and stirring all kinds of
foods, including salad dressings, powdered drink products, soups and
sauces. It is also ideal for combining dry ingredients.
The blade mixes and stirs while adding a minimum of air to your
mixture. A gentle up-and-down motion is all you need to make the
most flavorful, full-bodied liquid recipes. Be careful never to remove
the Cuisinart® Hand Blender from the liquid while in operation.
Chopping & Mixing
This blade also chops and blends cooked fruits, vegetables and baby
foods. To chop or mince, always cut food into uniform pieces of
about 1/2" to ensure perfect results. Keep the Cuisinart® Cordless
Rechargeable Hand Blender directly over the food being processed,
while placing a free hand on the mixing container for support. You
may wish to place your free hand over the top of the container to
prevent chopped ingredients from escaping. Use a forceful up-anddown motion when chopping and blending. This allows the blade to
process the food more efficiently.
NOTE: If a piece of food becomes lodged in the guard surrounding
the blade, follow the safety instructions below:
When using this attachment, make sure there is extra room in the
mixing container for the recipe to grow! For most recipes such as
mayonnaise, beaten egg whites and whipped cream, hold the end of the
hand blender in the bottom of the container and turn it on for about
15 seconds. Then continue to process, lifting the hand blender almost to
the top of the liquid until mixture is thick.
STORAGE STAND / WALL BRACKETS
The Cuisinart® Cordless Rechargeable Hand Blender
includes a two part storage stand that can be assembled
into a single piece for countertop use. You can also separate
the stand into two pieces, and mount one of the pieces to
your wall to use as a wall storage bracket.
Storage stand kit consists of six (6) pieces: two anchor
bolts, two plastic wall anchors, and two storage pieces that
can fit together for countertop, or be separated for wall
mount.
Countertop Option
The two storage pieces fit together. (See diagram below.)
1. Release the power button and detach the charger handle from the
motor body.
2. After the power source is disconnected, use a spatula to carefully
remove the food lodged in the guard. Avoid injury. DO NOT
USE YOUR FINGERS TO REMOVE LODGED OBJECTS.
3. After the lodged food has been removed, reattach the charger
handle to the motor body and continue processing.
8
Align the two pieces back to back on a flat surface, with the
ring-shaped reservoirs facing right and left. The raised walls should
be in the middle. Lift up the right piece; align the two tabs in the back
CSB-44N IB-4130
8/4/03
7:10 PM
Page 9
with the two slots of the left piece. Gently slide the tabs into the slots
until both pieces are resting flat on the countertop.
place. Mark the wall with a pencil in the locations indicated for screw
holes by the template. Remove the template.
To store the hand blender, detach the shaft and place the bottom
part (blade guard) into one of the reservoirs. Place the motor body
(right side up) into the other reservoir. You should be able to read the
Cuisinart® logo when the motor body is in the stand.
With a drill, make a 3/16" starter hole for each screw. Place the plastic
anchor in each hole. Push completely into the hole with fingers, or
tap in gently with a hammer. Screw a mounting screw into each hole,
leaving 1/8" to 1/4" of the head and screw exposed.
The charger handle can be attached to the motor body when you store
the unit. This is especially helpful when you want the hand blender
close at hand during a heavy use period. Probably you will want to
plug the charger handle into the electrical socket to keep the battery
charged during other times. The counter storage unit can also be
placed in a cupboard or on a shelf.
Position the two mounting holes of the wall bracket over the screw
heads, and slide wall bracket down the wall until the bracket is resting
against the screw head, and will not slide any further. If the wall bracket
feels too loose against the wall, remove bracket, put screws further into
wall, and replace bracket.
Wall Mount Option
The charger handle can be attached to the motor body when you store
the unit. This is especially helpful when you want the hand blender
close at hand during a heavy use period. At other times, you probably
will want to keep the charger handle plugged into the electrical
socket to assure the battery is always 100% charged.
Separate the two plastic storage stand pieces. You will need only one
for wall mount. (See diagram below.)
Place the assembled hand blender into the wall bracket. The unit will
hang from the bracket, held in place by the motor body width.
When selecting a mounting location, be sure to leave enough room
above the storage stand for your hand to remove the Cuisinart®
Cordless Rechargeable Hand Blender. Also be sure to leave enough
room below the stand to allow the appliance to hang freely.
You will need to drill two holes 2-2/3" apart from each other, measured
from the center of each hole. To assist in proper location of holes for
the mounting screws, remove the wall mount template from this
instruction book. Place the template over the back of the wall unit,
aligning the outline of the template with the wall bracket. When you
have done this, place the template and wall bracket against the wall in
the desired location. Remove the wall bracket, leaving the template in
9
CSB-44N IB-4130
8/4/03
7:10 PM
Page 10
CLEANING:
RECIPE TABLE OF CONTENTS
Always clean the hand blender thoroughly after using.
BEVERAGES
Mochaccino Shake . . . . . . . . . . . . . . . . . . . . . . . . . . . Page 11
Strawberry-Banana Breakfast Shake . . . . . . . . . . . . . . Page 11
Mangolada . . . . . . . . . . . . . . . . . . . . . . . . . . . . . . . . . Page 11
Frothy Café Au Lait . . . . . . . . . . . . . . . . . . . . . . . . . . Page 12
Hand Blender
Detach the charger handle from the motor body before cleaning.
Remove the shaft with the blade from the motor body. The shaft with
the blade and the mixing/measuring beaker can be cleaned in the
dishwasher (upper rack), or by hand in hot water with a mild
detergent. It is not necessary to remove the blade from the shaft.
Clean the motor body and the charger handle with a sponge or damp
cloth only. Do not use abrasive cleansers which could scratch the surface.
Never immerse the motor body or charger handle in water.
When the appliance has malfunctioned or has been dropped or
damaged in any way, or it is not operating properly, return the
appliance to the nearest Cuisinart Repair Center for examination,
repair, or mechanical or electrical adjustment.
Suggestion: When processing foods with color (like carrots), the
plastic parts of the appliance can become discolored. Wipe these parts
with cooking oil before cleaning them with a mild detergent.
DISPOSAL / RECYCLING OF
BATTERIES
This product uses four nickel-cadmium rechargeable and recyclable
batteries. At the end of the batteries’ useful life, they should be
recycled. These batteries must not be incinerated or composted.
Nickel-cadmium batteries should not be put in municipal waste
systems. Contact your local waste collection agency for proper
recycling and disposal information for your area.
Please do not attempt to dismantle the charger handle to replace these
batteries on your own. Damage could result to the unit.
When it is time to replace and/or recycle the batteries, or to receive
additional instructions for disposing of old batteries, call toll-free
1-800-726-0190 to order a new charger handle which will include
the four new batteries. Or send the charger handle to Cuisinart,
150 Milford Road, E. Windsor, NJ 08520.
10
SAUCES/SOUPS/DRESSINGS
Basic Vinaigrette . . . . . . . . . . . . . . . . . . . . . . . . . . . . . Page 12
Blue Cheese Dip/Dressing . . . . . . . . . . . . . . . . . . . . . Page 12
Rustic Tomato Sauce . . . . . . . . . . . . . . . . . . . . . . . . . . Page 13
Yukon Bold Potato and Roasted Garlic Soup . . . . . . . Page 13
Provencal White Bean Soup . . . . . . . . . . . . . . . . . . . . Page 14
Fast and Fresh Applesauce . . . . . . . . . . . . . . . . . . . . . Page 14
DESSERTS
Sweetened Whipped Cream . . . . . . . . . . . . . . . . . . . . Page 15
ABOUT THE RECIPES
Nutritional analysis are based on number of servings indicated. If a
recipe produces a range of servings, analysis are based on the highest
serving yield for that particular recipe.
CSB-44N IB-4130
8/4/03
7:10 PM
Page 11
MOCHACCINO SHAKE
A shake ready in just seconds to satisfy the sweet tooth.
Makes 1 serving
1
1
1/2
1/2
1
Nutritional information per serving:
teaspoon instant espresso powder
tablespoon hot water
cup fat free milk
cup coffee ice cream or frozen yogurt
tablespoon fat free chocolate syrup
Dissolve the espresso powder in the hot water in the mixing beaker.
Add the milk, ice cream, and chocolate syrup. Insert the hand
blender. Turn blender ON and process using a gentle up-and-down
motion, about 15 to 20 seconds, until thick and smooth. Remove
charger handle from the hand blender. Serve immediately.
Nutritional information per serving:
Calories 239 (28% from fat) • carb. 35g • pro. 8g • fat 7g •
sat. fat 5g • chol. 32mg • sod. 144mg • calc. 267mg • fiber 0g
STRAWBERRY BANANA BREAKFAST SHAKE
A quick and wholesome breakfast that travels well when served in a
thermal mug. Make it even more nutritious by using calcium
enriched orange juice.
Makes 2 servings
1
10
1/2
1/2
1
Place all ingredients in mixing beaker in order listed. Insert the hand
blender fitted with the metal blending blade. Turn the blender ON
and process using a gentle up-and-down motion until smooth, about
20 to 30 seconds. Remove the charger handle from the hand blender.
Serve immediately.
cup chilled orange juice
fresh strawberries, hulled and quartered
fresh banana, cut into 1/2-inch pieces
cup fat free vanilla yogurt
tablespoon wheat germ
Calories 156 (5% from fat) • carb. 34g • pro. 5g • fat 1g • sat. fat 0g •
chol. 1mg • sod. 34mg • calc. 115mg • fiber 3g
MANGOLADA
A twist on the traditional piña colada, combining mango with the
tropical flavors of pineapple, coconut and rum.
Makes 2 servings
3/4
1
1/4
3
cup chilled pineapple juice
cup mango cubes (1/2 - inch), chilled
cup unsweetened “lite” coconut milk
ounces rum
Place ingredients in mixing beaker in order listed. Place the hand
blender, fitted with the metal mixing blade, into the beaker. Turn the
blender ON and process using a gentle up-and-down motion until
smooth, about 20 to 30 seconds. Remove the charger handle from
the hand blender. Serve immediately over crushed ice.
Nutritional information per serving:
Calories 218 (7% from fat) • carb. 27g • pro. 1g • fat 2g •
sat. fat 1g • chol. 0mg • sod. 5mg • calc. 19mg • fiber 2g
11
CSB-44N IB-4130
8/4/03
7:10 PM
Page 12
FROTHY CAFÉ AU LAIT
Frothing the milk turns everyday “joe” into a coffeehouse treat.
Makes 2 servings (mugs)
1/2
cup fat free milk
2-1/4
cups (20 ounces) freshly brewed hot coffee
Cocoa powder or ground cinnamon for garnish
Just as coffee completes its brewing cycle, place the milk in the
mixing beaker. Place the hand blender, fitted with the whipping disc,
into the beaker. Turn On and run for 15 to 20 seconds at the bottom
of the beaker, then use a gentle up-and-down motion to whip the
milk until frothy, about 45 to 60 seconds. Remove the charger handle
from the hand blender. Pour the coffee into the two mugs, sweeten
as desired, and top each with equal parts of the frothy, whipped milk.
Dust lightly with cocoa powder or ground cinnamon.
Nutritional information per serving (without sugar/sweetener):
Calories 29 (5% from fat) • carb. 4g • pro. 3g • fat 0g •
sat fat 0g • chol. 1mg • sod. 36mg • calc. 85mg • fiber 3g
BASIC VINAIGRETTE
Use this basic vinaigrette as a guide and change your vinegar/oil
flavors to come up with appropriate combinations to create exciting
salads. You may add other flavors such as crushed or roasted garlic,
chopped shallots, fresh or dried herbs, sun-dried tomatoes, honey or
lemon juice.
Makes 1 cup
1/4
1
3/4
12
cup wine vinegar
tablespoon Dijon mustard
cup salad or olive oil
kosher salt and freshly ground pepper to taste
Place all ingredients in the mixing container. Place hand blender,
fitted with the metal blending blade, into the beaker. Turn On and
blend using a gentle up-and-down motion until combined, about
10 to 15 seconds. Remove charger handle from hand blender. Keep
unused portions in an airtight container in the refrigerator up to
2 weeks.
Nutritional analysis per tablespoon:
Calories 91 (98% from fat) • carb. 0g • pro. 0g • fat 10g •
sat. fat 1g • chol. 0mg • sod. 23mg • calc. 0mg • fiber 0g
BLUE CHEESE DIP/DRESSING
Use as a dressing for crispy, chilled greens or as a dip for celery when
serving “Buffalo Wings.”
Makes about 1 cup
1/2
1/3
1/2
1
1
1/4
1/4
cup lowfat mayonnaise
cup fat free plain yogurt
cup crumbled blue cheese (about 2 ounces)
tablespoon dehydrated onion flakes
teaspoon cider vinegar
teaspoon kosher salt
teaspoon freshly ground black pepper
Place all ingredients in the mixing beaker. Place hand blender, fitted
with the metal blending blade, into the beaker. Turn ON and blend
using a gentle up-and-down motion until blended and creamy, about
20 to 30 seconds. Remove charger handle from hand blender. Cover
and chill for 30 minutes before serving to allow flavors to blend.
Nutritional information per tablespoon:
Calories 37 (78% from fat) • carb. 1g • pro. 1g • fat 3g •
sat. fat 1g • chol. 6mg • sod. 116mg • calc. 27mg • fiber 0g
CSB-44N IB-4130
8/4/03
7:10 PM
Page 13
RUSTIC TOMATO SAUCE
YUKON GOLD POTATO AND
ROASTED GARLIC SOUP
Makes about 5 cups
Makes eight cups (8 servings)
2
1
1
1
2
1
1
1/3
2
2
1/2
1/4
teaspoons extra virgin olive oil
onion (5 – 6 ounce), peeled and cut in 1/2-inch pieces
carrot (2 ounce), peeled and cut in 1/2-inch pieces
rib celery, trimmed and cut in 1/2-inch pieces
cloves garlic, peeled
teaspoon dried basil
roasted red bell pepper, cut in 1-inch pieces
cup dry white wine (such as vermouth)
tablespoons tomato paste
15-ounce cans recipe ready-diced tomatoes with juices
teaspoon kosher salt
teaspoon freshly ground black pepper
In a Cuisinart® 2-3/4 quart Saucepan, heat the olive oil over medium
heat. Add the onion, carrot, celery, garlic, and basil. Cover loosely
and cook until the vegetables are softened, 6 to 8 minutes. Stir in the
roasted red pepper, wine, tomato paste, and tomatoes. Bring to a
boil, then reduce heat and simmer for 35 to 40 minutes, loosely
covered. Uncover and simmer for 15 to 20 minutes longer to thicken.
Remove pan from heat and let stand 5 minutes. Insert the hand
blender fitted with the metal blending blade, and using a gentle
up-and-down motion, process the sauce until well blended, about
60 to 90 seconds. Process for shorter time if a more textured sauce
is preferred. Remove the charger handle from the hand blender.
Nutritional analysis per half cup serving:
Calories 47 (17% from fat) • carb. 8g • pro. 1g • fat 1g •
sat. fat 0g • chol. 0mg • sod. 194mg • calc. 26mg • fiber 2g
1
2
1/2
1
1
1
3-1/2
2
2
1
1/2
1
1/2
ounce peeled garlic cloves (8 – 12 cloves)
teaspoons extra virgin olive oil
tablespoon unsalted butter
medium onion (5 ounces), peeled, cut in 1/2-inch pieces
carrot (2 ounces), peeled, cut in 1/2-inch pieces
rib celery (2 ounces), peeled, cut in 1/2-inch pieces
cups fat free, low-sodium chicken or vegetable stock
cups water
pounds Yukon gold potatoes*, peeled, cut in 1/2 -inch slices
teaspoon herbs de Provence
cup evaporated fat free milk or half-and-half
teaspoon kosher salt
teaspoon ground white pepper
Preheat oven to 375°F. Place cloves of garlic in the center of a
12-inch square of foil, drizzle with 1 teaspoon of the olive oil and
toss to coat. Wrap the foil around the garlic and fold or crimp to
seal. Roast until garlic is tender, about 1 hour. Cool slightly before
using. (Garlic may be done ahead, and will keep in a resealable
container for 5 days in the refrigerator.)
While the garlic is roasting, heat remaining olive oil with butter in
a Cuisinart® 3-3/4 quart Saucepan over medium heat. Add the onion,
carrot, and celery. Reduce heat to low, cover loosely and cook until
vegetables are tender but not browned, 8 to 10 minutes. Stir in the
stock, water, potatoes, herbs de Provence, and roasted garlic. Raise
heat and bring to a boil. Reduce heat to medium low and simmer,
loosely covered, until potatoes are tender, about 20 minutes. Turn
off heat and let sit for 2 to 3 minutes.
Insert the hand blender and process using a gentle up-and-down
motion, moving the blender slowly throughout the saucepan until
well combined, smooth, and without any visible pieces of vegetables
remaining, about 1 to 2 minutes. Add half-and half, salt and pepper.
13
CSB-44N IB-4130
8/4/03
7:10 PM
Page 14
Insert the hand blender and process for an additional 30 to 40
seconds. Remove charger handle from hand blender. Serve hot.
Garnish with chopped fresh parsley if desired.
Nutritional information per serving (made with evaporated fat free milk):
Calories 54 (29% from fat) • carb. 6g • pro. 3g • fat 2g • sat. fat 0g •
chol. 1mg • sod. 420mg • calc. 67mg • fiber 1g
using a gentle up-and-down motion, blend until smooth and creamy,
about 1 to 1-1/2 minutes. Remove charger handle from hand blender.
Season with salt and pepper.
Serve the soup hot. Soup may be garnished with a sprinkling of
chopped fresh parsley and diced cooked bacon or ham.
Nutritional analysis per serving (without garnish):
Calories 182 (9% from fat) • carb 30g • pro. 12g • fat 2g •
sat. fat 0g • chol. 0mg • sod. 221mg • calc. 111mg • fiber 7g
PROVENÇAL WHITE BEAN SOUP
This hearty yet healthy soup can be ready to serve in about
30 minutes.
Makes 10 cups
FAST & FRESH APPLESAUCE
One pan, no fuss applesauce – make it as you like it, chunky or smooth.
Makes 3 cups
1
1
1/2
1/2
4
1
1
6
4
1
1
1/2
tablespoon “light” flavored olive oil
cup chopped onions
cup chopped carrots
cup chopped celery
cloves garlic, peeled
teaspoon herbs de Provence (may substitute dry thyme)
bay leaf
cups drained cooked white beans
(may use canned – rinse and drain)
cups low-sodium, low-fat chicken or vegetable stock
cup water
teaspoon kosher salt
teaspoon freshly ground white pepper
In a Cuisinart® 3-3/4 quart Saucepan, heat the oil over medium heat
and cook the onions, carrots, and celery until softened, but not
browned, about 6 to 8 minutes.
Stir in the herbs de Provence and bay leaf; cook for 1 minute. Add
stock, water and drained beans. Bring to a boil, then reduce heat
and simmer, partially covered, for 20 minutes. Turn off heat; remove
bay leaf and discard. Insert the hand blender fitted with the metal
blending blade into the saucepan. Turn the hand blender ON, and
14
2
1/4
1
pounds apples (your favorite, Red Delicious not
recommended), peeled, cored and cut into eighths
cup water
tablespoon fresh lemon juice
Combine all ingredients in a Cuisinart® 2-quart Saucepan. Bring to a
boil over high heat, then reduce heat to low, cover and simmer until
apples are fork tender, 12 to 15 minutes. Remove from heat and let
sit 5 minutes, still covered. Uncover and insert hand blender fitted
with the metal blending blade. Process using a gentle up-and down
motion until desired consistency is reached, using less time for a
chunkier sauce, about 20 to 60 seconds. Remove the charger handle
from the hand blender. Serve applesauce warm or chilled. Keeps
covered and refrigerated for 3 days.
Nutritional analysis per serving (1/2 cup):
Calories 81 (5% from fat) • carb. 21g • pro. 0g • fat 1g •
sat. fat 0g • chol. 0mg • sod 2mg • calc. 8mg • fiber 4g
Variations: Cinnamon Applesauce: add a cinnamon stick when
cooking the apples. Remove before processing.
Cranberry Applesauce: Substitute cranberry or cranapple juice for
the water and add 1/3 to 1/2 cup dried cranberries to the apples
before cooking.
CSB-44N IB-4130
8/4/03
7:10 PM
Page 15
Makes 1-1/2 cups whipped cream
We suggest you complete and return the enclosed warranty registration
card promptly. However, return of the card is not a condition of this
warranty and does not eliminate the need for the consumer to maintain
the original receipt of purchase.
1
1
1
If your unit should prove to be defective within the warranty period,
we will repair or replace it at our option without charge to you.
To obtain warranty service, simply send the defective product to:
Cuisinart, 150 Milford Road, E. Windsor, NJ 08520 or call
toll-free 800-726-0190.
SWEETENED WHIPPED CREAM
Whip cream to top desserts in just seconds.
cup heavy cream
tablespoon granulated sugar
teaspoon vanilla extract
Place all ingredients in mixing beaker. Place the hand blender,
fitted with the whipping disc, into the beaker. Turn the hand
blender ON and run for 10 seconds. Then use a gentle up-anddown motion to whip the cream until thickened, about 50 to 60
seconds. Remove the charger handle from the hand blender.
Nutritional analysis per tablespoon:
Calories 36 (89% from fat) • carb. 1g • pro. 0g • fat 4g •
sat. fat 2g • chol. 14mg • sod. 4mg • calc. 6mg • fiber 0g
FOR HOUSEHOLD
USE ONLY
CUISINART CORDLESS RECHARGEABLE
HAND BLENDER
®
LIMITED 3-YEAR WARRANTY
This limited warranty is available to consumers only. You are a
consumer if you own a Cuisinart® Cordless Rechargeable Hand
Blender which was purchased at retail for personal, family or
household use. Except as otherwise required under applicable state
law, this warranty is not available to retailers or other commercial
purchasers or owners.
We warrant that your Cuisinart® Cordless Rechargeable Hand Blender
will be free of defects in materials and workmanship under normal
home use for three years from the original date of purchase.
To facilitate the speed and accuracy of your return, please also enclose
$7.00 for shipping and handling of the product. CA residents need
only provide proof of purchase. Please be sure to include a return
address, daytime phone number, description of the product defect,
product serial number and any other information pertinent to the
product's return. Please pay by check or money order.
Your Cuisinart® Cordless Rechargeable Hand Blender has been
manufactured to the strictest specifications and has been designed for
use with authorized Cuisinart® accessories and replacement parts.
This warranty expressly excludes any defects or damages caused by
accessories, replacement parts or repair service other than those which
have been authorized by Cuisinart. This limited warranty does not
cover any damage caused by accident, misuse, shipment or other than
ordinary household use.
THIS WARRANTY EXCLUDES ALL INCIDENTAL OR
CONSEQUENTIAL DAMAGES. SOME STATES DO NOT
ALLOW THE EXCLUSION OR LIMITATION OF THESE
DAMAGES, SO THESE EXCLUSIONS MAY NOT APPLY TO
YOU. ALL APPLICABLE IMPLIED WARRANTIES, INCLUDING THE IMPLIED WARRANTY OF MERCHANTABILITY
AND FITNESS FOR A PARTICULAR PURPOSE, GIVEN TO
YOU BY LAW ARE HEREBY LIMITED IN DURATION TO
THIS WARRANTY.
This warranty gives you specific legal rights, and you may have other
rights which vary from state to state.
If you have any questions about the safety features of your Cuisinart®
Cordless Rechargeable Hand Blender, please call us, toll-free,
at 1-800-726-0190.
15
CSB-44N IB-4130
8/4/03
7:10 PM
Page 16
TEMPLATE FOR WALL MOUNTING
© 2003 Cuisinart
Cuisinart is a registered trademark of
Cuisinart
®
150 Milford Road
East Windsor, NJ 08520
Printed in China
02CU13103
IB-4130
16