1
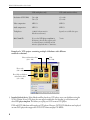
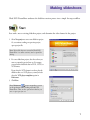
User Guide
Ulead Systems, Inc.
October 2002
First English edition for Ulead DVD PictureShow version 2.0, October 2002.
© 1992-2002 Ulead Systems, Inc.
All rights reserved. No part of this publication may be reproduced or transmitted in any form or by any
means, electronic or mechanical, including photocopying, recording or storing in a retrieval system, or
translated into any language in any form without the express written permission of Ulead Systems, Inc.
Software license
The software described in this document is furnished under a License Agreement which is included with
the product. This Agreement specifies the permitted and prohibited uses of the product.
Licenses and trademarks
ICI Library © 1991–1992 C-Cube Microsystems.
Ulead Systems, Inc., Ulead, the Ulead logo are trademarks of Ulead Systems, Inc. All other product
names and any registered and unregistered trademarks mentioned in this manual are used for
identification purposes only and remain the exclusive property of their respective owners.
Sample files
Files provided as samples on the program CD can be used for personal demonstrations, productions and
presentations. No rights are granted for commercial reproduction or redistribution of any sample files.
Headquarters:
North & South America:
Ulead Systems, Inc.
Ulead Systems, Inc.
http://www.ulead.com.tw
http://www.ulead.com
E-mail: [email protected]
E-mail: [email protected]
Japan:
Asia-Pacific:
Ulead Systems, Inc.
Ulead Systems, Inc.
http://www.ulead.co.jp
http://www.asiapac.ulead.com
E-mail: [email protected]
E-mail: [email protected]
Europe:
China:
Ulead Systems GmbH
Ulead Systems, Inc.
http://www.ulead.de
http://www.ulead.com.cn
http://www.ulead.co.uk
E-mail: [email protected]
http://www.ulead.co.uk/fr
E-mail: [email protected]
2
Welcome to
Ulead® DVD PictureShow
Easily create photo slideshows, complete with selection menus and background music, with Ulead
DVD PictureShow. Using a wizard-type workflow, DVD PictureShow guides you step by step
through the production process from start to finish. You can also include multimedia slideshows by
importing video files or Ulead Photo Explorer slideshow files. Create multiple slideshows for output
on a single disc, and burn slideshow discs in DVD, SVCD, or VCD format that can play on the
computer as well as standalone DVD/SVCD/VCD players.
What's new in this version
Take advantage of Ulead DVD PictureShow's new features to produce more exciting slideshows.
Here are some of the best new features you will find in DVD PictureShow:
#1
Add video as slideshows
#4
Include video files as multimedia slideshows
(including MPEG-1, MPEG-2, AVI, and
QuickTime movie files).
Add text with drop-down shadow on
individual photos.
#5
#2
Add transition effects
Add sound annotation and multiple
background music
Add narration or a sound file to individual
photos. In a photo slideshow, you can also
add single or multiple background music
with audio fade out effects.
Apply cool transition effects to your photo
slideshows. There are a wide selection of
transition effects to choose from.
#3
Add text on photos
Acquire photos
Get photos straight from a digital camera or
scanner and add them to your photo
slideshows. Ulead DVD PictureShow allows
transfer of photos from TWAIN or WIA
imaging devices.
#6
Print CD index pages and CD labels
Print index pages that visually show
slideshow contents. Create your own
custom-designed CD labels for your
slideshow disc.
3
Preparation
Before you start creating slideshows, have the photos and other media files ready, and plan ahead
what output format to use for burning the final slideshow disc. Also familiarize yourself first with the
Ulead DVD PictureShow program interface.
About file format types
Ulead DVD PictureShow supports a number of image formats that can be used to create photo
slideshows. Popular video and audio file formats can also be added to a slideshow project in DVD
PictureShow.
Image formats
• BMP, GIF, IFF, IMG, JP2 (JPEG 2000
with Exif ), JPC (JPEG 2000), JPG,
PNG, PSD, TIF
Video formats
• Animation and video:
AVI, FLC, FLI, FLX, GIF, MOV, QT,
MPG, QVT, WAV, AVA, MID, MP3
Audio formats
• WAV, MP3, MPA
Proprietary format
• Slideshow:
DPS (Ulead DVD PictureShow
project), UPS (Ulead DVD
PictureShow 1.0 project),
UES (Ulead Photo Explorer slideshow)
Selecting an output format
Ulead DVD PictureShow lets you create slideshows in three types of output formats: DVD, SVCD
or VCD.
In selecting a format, things to consider are:
1. The available burning hardware To output a DVD slideshow, you must have a DVD burner and DVD
recordable discs (DVD-R/RWs or DVD+R/RWs). For a VCD or SVCD slideshow, you will need a CD
burner and CD-R/RWs.
4
Ulead DVD PictureShow User Guide
2. The content and resolution of the slideshow In choosing an output format, take into consideration how
complex your slideshow will be composed and what your desired resolution is for the slideshow.
• If the slideshow is added with music, video or transition effects, the maximum number of images will
depend on the available disc space.
• Slideshows that are created for VCD can have varying resolutions, depending on their content:
• Imported video files and Ulead Photo Explorer slideshows that have transition effects will be
rendered as video in standard MPEG-1 resolution.
• The resolution of a photo slideshow depends on whether or not transition effects are applied.
Without transition effects, a photo slideshow will be created in high resolution still image format.
If with transition effects, the slideshow will be rendered as video in standard MPEG-1 resolution.
DVD (with photos only)
DVD (photos only and
with transition effects)
Resolution (NTSC/PAL)
720 x 480
720 x 576
720 x 480
720 x 576
Video compression
MPEG-2
MPEG-2
Audio compression
MPEG-1
MPEG-1
Total photos
depends on available disc space
depends on available disc space
Min/74 min CD
15 - 20 min.
Min/120 min DVD
90 - 120 min.
SVCD (with photos only)
SVCD (with transition effects)
Resolution (NTSC/PAL)
480 x 480
480 x 576
480 x 480
480 x 576
Video compression
MPEG-2
MPEG-2
Audio compression
MPEG-1
MPEG-1
Total photos
1,900 (if without music in
slideshows and menus)
depends on available disc space
Min/74 minCD
35 - 60 min.
5
Ulead DVD PictureShow User Guide
VCD (with photos only)
VCD (with transition effects)
Resolution (NTSC/PAL)
704 x 480
704 x 576
352 x 240
352 x 288
Video compression
MPEG-1
MPEG-1
Audio compression
MPEG-1
MPEG-1
Total photos
1,900 (if without music in
slideshows and menus)
depends on available disc space
Min/74 minCD
If you select VCD player compliant in
Preferences, then the disc capacity will
be reduced if music is added from 430
minutes of playback time to 70 minutes.
74 min.
Example of a VCD project containing multiple slideshows with different
rendered resolutions:
Photos with transition effect
(352 x 240)
Video
(352 x 240)
Photos only
(704 x 480)
Photo Explorer slideshow
with transition effect
(352 x 240)
3. Intended playback device If the slideshow will be played on a VCD player, create your slideshows using the
VCD 2.0 format. If your VCD player does not support variable-bit-rate decoding, go to Preferences and
select VCD player compliant. This allows you to play your VCD on most VCD players.
DVD and SVCD slideshows will not play on VCD players. However, SVCD/VCD slideshows can be played
on some DVD players that support the SVCD/VCD format and play CD-R/RWs.
6
Making slideshows
Ulead DVD PictureShow condenses the slideshow creation process into a simple five-step workflow.
Start
Start with a new or existing slideshow project, and determine the video format for the project.
1. Select New project to start a new slideshow project.
Or, to continue working on a previous project,
open a project file.
Note: Project files that were created in Ulead DVD
PictureShow 2 or earlier version(s) can be opened for
editing.
2. For a new slideshow project, also choose how you
want to output the project later on. For output,
you can burn a slideshow disc in DVD , SVCD, or
VCD format.
If you select the VCD format in order to play the
slideshow disc on a VCD player, you may need to
select the VCD player compliant option in
Preferences.
3. Click Next.
Note: Main menu
opens a menu where you can
set the preferences while working in Ulead DVD
PictureShow. There are also options here that let you
save or open a project, etc.
7
Ulead DVD PictureShow User Guide
Create Slideshow
The Create Slideshow step allows you to add slideshows to the project. This is also where you can
modify slideshows already included in the project.
Assembling different types of slideshows:
1. Click the buttons in the Create Slideshow dialog
box to choose the type of slideshow to add to the
project.
Photo
slideshow
Video
Ulead Photo
Explorer slideshow
• New Slideshow Use images from your
computer to create a photo slideshow.
• Add Video If you have multimedia slideshows
on video, you can import video files to the
project. Only a single video file can be added at
a time.
• Add UES Slideshow Import an existing Photo
Explorer Slideshow file (UES) to create the
slideshow.
2. If you have numerous images, video files, or Photo
Explorer slideshows scattered in different folders,
you can easily add those files to your project
without manually locating them. Simply click
Batch Collect to select which of the three types of
files to collect and add them to your project.
When collecting images, images in each subfolder
will be added as a separate photo slideshow in the
project.
Editing slideshows:
•
To rearrange slideshows in the project, drag and
drop the slideshow thumbnails to the desired order
in the Slideshow list window.
•
To edit a slideshow, double-click the slideshow
thumbnail or click
.
Notes:
• When you edit a Photo Explorer slideshow, it will
first be converted into a photo slideshow. A
confirmation message appears when you attempt to
open it for editing. Changes will reflect only in your
DVD PictureShow project and will not affect the
original Photo Explorer slideshow file.
• Video cannot be edited in DVD PictureShow.
8
Ulead DVD PictureShow User Guide
Creating photo slideshows
Creating a photo slideshow involves adding
images and four other steps for defining
settings for the slideshow. Click Add Photo to
open the Create Photo Slideshow dialog box
where you can start creating photo slideshows.
When the Create Photo Slideshow dialog box
opens, it will first display the Add Photo step
where you can add images to the slideshow. To
show the other steps, click More. When all
step buttons are shown, switch between steps
by clicking the buttons at the left side of the
dialog box.
More button
Add Photo
Add Photo lets you add images to a photo slideshow by selecting image files from folders in your
computer. You can also acquire images directly from a TWAIN or WIA compatible scanner or
digital camera.
Folder tree pane
File window
Adding images:
1. From the Folder tree pane, select the folder where
the images you want included in the slideshow are
located.
2. The images inside the selected folder are displayed
in the File window. Select the images you want
included in the slideshow then click Add Photo.
You can also double-click or drag the image to the
Image list to add it.
Note: Use Add All to insert all the images from the
selected folder to the slideshow.
Image list
9
Ulead DVD PictureShow User Guide
3. Rearrange the positions of the images of your
slideshow by clicking Arrange
. This opens a
dialog box where you can drag and drop the
images to change the order.
Tip: You can also rearrange the images directly on the
Image list. Drag and drop the images to rearrange
them.
4. To display each image at the same length of time,
specify a constant duration in Default duration.
5. You can add an audio file to the slideshow by
.
clicking Background music
This adds a single audio file only. To add multiple
files as background music, go to the Add
Background Music step.
Slideshow being previewed in
the Add Photo step
Note: When creating slideshows in the VCD format, it
may happen that the required CD space will be reduced
after adding background music. Also, when background
music is added to the slideshow, you won't be able to
use the remote control to go through the images in the
slideshows when viewing it on a stand alone DVD
player.
6. Preview how the slideshow looks like by clicking
.
Preview
7. Click OK to add the slideshow to the project. This
takes you back to the Create Slideshow step where
you can continue adding slideshows to the project.
Acquiring images from an imaging device:
1. Click Acquire and select either TWAIN or WIA in
the Acquire menu, depending on the type of
scanner or digital camera you are using.
2. Follow the dialog box instructions to specify file
names and folder to use for saving images.
3. Make sure you select Add acquired images to
slideshow. Otherwise, the acquired images will
only be saved to the destination folder and will not
be added to the photo slideshow you are working
on.
10
Note: WIA (Windows Imaging Acquisition) is a feature
in Microsoft Windows Me and Windows XP that
enables applications to directly interact with imaging
devices such as scanners or digital cameras. If you have
Ulead DVD PictureShow installed in either of these
Windows systems and your imaging device is WIA
compatible, you can directly acquire images in DVD
PictureShow without the need to install device drivers.
Ulead DVD PictureShow User Guide
Photo Options
In Photo Options, specify varying display durations for the images in the slideshow. For each image,
you can also add a textual description and include sound annotation.
1. In the Image list window, click the image you want
to customize.
2. To specify descriptive information about the
selected image, type your text in the Description
window.
3. Select Enable sound annotation to add sound to
the current image. Then, select one of the
following types of sound to be added:
• Embedded sound This option is enabled only
when the selected photo contains embedded
sound. Select this option to use its embedded
sound.
• Select sound file Allows you to select an audio
file (MP3, MPA, and WAV) to add to the image.
• Recorded sound Allows you to record ambient
sound or your voice narration and add it to the
image.
4. Determine the length of time to display the
selected image in the slideshow by selecting one of
these options:
Tip: If you added sound annotation to an image, you
may want to select Pause background music. This
temporarily pauses background music when an image is
displayed during slideshow playback. This may be
necessary when the sound annotation included with the
image does not blend well with the background music.
• Default duration Displays the image at the
preset duration defined in the Add Photo step.
• Custom Specify the desired length of time for
displaying the image.
• Same as sound annotation If the image is added
with sound, synchronize the duration of both
image and sound by selecting this option.
11
Ulead DVD PictureShow User Guide
Slideshow Options
The Slideshow Options step lets you add a transition effect and customize the overall appearance of
the slideshow.
1. Specify a descriptive title for the slideshow.
2. Select a Transition effect to apply between images
in the slideshow. This allows the slideshow to
smoothly advance from one image to the next.
Notes: Slideshows that are created for VCD can have
varying resolutions, depending on their content:
• Imported video files and Ulead Photo Explorer
slideshows will be rendered as video in standard
MPEG-1 resolution.
• The resolution of a photo slideshow depends on
whether or not transition effects are applied.
Without transition effects, a photo slideshow will be
created in high resolution still image format. If with
transition effects, the slideshow will be rendered as
video in standard MPEG-1 resolution.
Refer to page 5 to see the different resolutions.
3. Choose whether to add a solid color or texture
background for the slideshow. For images to fill the
whole screen when displayed, select Enlarge
images to fit .
Note: Images that have larger dimensions than the
screen size will automatically be fit into the screen size.
4. Select Text on screen to show information about
the slideshow and images. Select the checkboxes of
those information you want to be displayed.
Choose the desired Position where to display
information on-screen. Also determine the text
color and font type.
12
Ulead DVD PictureShow User Guide
Background Music
This step lets you add single or multiple background music to the slideshow. If you previously added
music in the Add Photo step, it will, by default, be treated as the initial background music in this
step, and will be applied starting from the first image in the slideshow.
Adding background music:
Folder tree pane
1. From the Folder tree pane, select the folder where
the desired music files are located.
2. To add background music starting at a certain
image in the slideshow, drag and drop the file(s)
onto the desired image in the Image list.
3. Repeat the above process to add more background
music to various parts of the slideshow.
Notes:
• To append more music files to a music clip, hold
down the [Ctrl] key and drag selected files from the
File window onto the starting image of the music
clip.
Also use the [Ctrl] key when you want to merge a
music clip to another clip in the music track.
• To move a music clip to another image, drag it to
the desired image. (Another way is to right-click the
music clip, select Move Music, and then click the
image where to move it to.)
If, originally, the image already had accompanying
music, the transferred clip will totally replace it.
Image list
Music track
Tip: Auto fade-out
toggles between adding and
removing fade-out sound effects. Applying fade-out
effects allows smooth transition of music throughout
the entire slideshow.
Each time you add music, be it single or multiple selected files, the selected music will be inserted as
a single clip in the Music track beneath the the range of images which it will play alongside with.
A music clip may
contain single or
multiple background
music.
13
Ulead DVD PictureShow User Guide
If the duration of a music clip is shorter than the total duration of the range of images which it was
applied to, the music will continuously be replayed until its corresponding images have all been
displayed. To avoid replaying music, you can synchronize the duration of images with the duration
of the music by checking both durations first before adding music.
Synchronizing durations of images and music:
1. In the Image list window, select a continuous range
of images on which to apply music. Hold down
the [Shift] key while you click each image.
2. You will see the total duration of the selected
images at the top right corner of the Image list
window.
3. From the Folder tree pane, select the folder where
the desired music file(s) are located.
4. Check the duration of the desired music file(s).
Only a single music file can be checked for its
duration at a time. In the File window, right-click
a music file and select File Information. The
duration will be shown in the Properties dialog
box. Manually sum up the duration of the music
files and make sure it exactly matches the image
duration in step 2.
5. If both durations are not the same, repeat step 4 to
select other music file(s) that will match the
duration of the images. If you do not want to make
other music selections, another alternative way to
synchronize the durations is to return to the Photo
Options step and individually adjust the duration
of the images.
6. Once you are able to make the durations of both
sides the same, add the music file(s) to the
slideshow.
Note: When you add or remove files from a music clip,
or when you move a music clip, the music clips may no
longer match the duration of images where they were
originally applied to.
14
Total duration of selected
images in Image list
Ulead DVD PictureShow User Guide
Preview Slideshow
The Preview Slideshow step automatically displays a preview of the photo slideshow you are
working on. Click Play/Pause to resume/pause the preview, or click Stop to end the preview.
Select Menu Template
In this step, you can create the selection menu to allow the viewer to instantly access the various
slideshows. DVD PictureShow provides several preset template layouts to set the theme of your
menus.
If you have multiple slideshows in your project, several menu pages may be created, depending on
the selected menu template. Click the navigation buttons inside the Preview window to go forward
or backward through the menu pages and customize them.
1. Select a preset template layout theme from the
drop-down menu.
2. Apply the desired preset template layout by
double-clicking the thumbnail from the list.
3. Click "My Title" on each menu page to give a
different descriptive title for each page.
4. Click the text near the slideshow holders in the
Preview window to enter a longer slideshow
description.
5. Use your own custom backgrounds for the layout
templates. Click Background image
to open
a dialog box where you can set your background.
Slideshow text changes are retained when
changing backgrounds.
6. Add music to your menus by clicking Background
music
. This opens a menu where you can
select the music file you want to add to the
slideshow selection menu. This background music
is different from the background music of your
slideshows.
7. Click Next.
The Show slideshow number option is only available when
creating DVD slideshows.
Tip: When creating your own menu backgrounds, the
recommended dimensions to use is either 640x480
pixels or 768x576 pixels. The background image will be
stretched to fill the entire TV screen. For image
dimensions other than the recommended size, to avoid
distortion, the ratio of the width and height need to be
4:3, same as a TV screen. Please also note that about
15% of edges (7.5% each side) will be outside the TV
screen and therefore not viewable.
15
Ulead DVD PictureShow User Guide
Select Output Options and Preview
This is where you can preview the slideshow and behavior of the selection menu you have created.
In this step, you can also select which additional items to include on the slideshow disc.
Previewing slideshow project:
1. Use the remote control to simulate the behavior of
the DVD, SVCD, or VCD slideshow created.
Note: To learn the functions of the buttons on the
remote control, please refer to the online help.
Selecting output options:
1. Select the checkboxes of items you want to include
on the slideshow disc.
The original project file, images, video, and sound
files that were used in creating your project as well
as copyright information can be included.
DVD Player can also be included on the slideshow
disc. This program allows you to view on your
computer the DVD, SVCD or VCD slideshow
disc that you created and burned using DVD
PictureShow.
Note: DVD player may not be available in some
editions of Ulead DVD PictureShow.
16
Ulead DVD PictureShow User Guide
Finish
This is the final step in the slideshow creation process. Determine how to output the slideshow
project and the settings for the device you want to use for burning the slideshow disc.
1. Select what type of output you want created out of
the slideshow:
• Record to CD/DVD Burns the DVD, SVCD
or VCD slideshow to the disc.
• Create disc image file Creates the disc image file
in the hard disk. This is the file used when
burning to a CD.
Note: Use the VCD/SVCD/DVD Disc Image
Recorder to burn the disc image file to a disc.
• Create DVD folders Creates a DVD volume in
your hard disk. This also allows the user to view
the file using DVD-Video player software in the
computer.
Notes:
• You will only be able to test the video content of the
DVD and not the selection menu when using DVD
software players. If you are satisfied with the results,
you can burn the folders to a disc and it will play on
stand alone players.
Tip: Click Erase to delete the contents of the CD-RW/
DVD-RW.
• Some software-based players may not be able to play
the slideshow with the correct timing.
2. Specify the CD-R/RW or DVD drive that you
want to use in burning the DVD, SVCD or VCD
slideshow and recording speed.
3. Click Advanced to select more CD/DVD burning
settings.
4. Enter a Disc volume label. Also specify the
number of disc copies to burn.
Troubleshooting tip: If you find that you get a "mosaiclike" pattern when you play your slideshow disc on a
VCD/SVCD/DVD player, or if the slideshow disc
cannot entirely play on the player, try to burn another
disc again, but this time, select the Do not close disc
option in the Advanced Settings dialog box. (Click
Advanced in the Finish step to open the Advanced
Settings dialog box.)
5. Click Start to start burning the disc(s).
17
Printing CD index
and CD label
Print index pages and custom-designed labels for your slideshow discs.
Printing CD index:
1. Click Print
and select Print CD Index.
2. In the General tab, select the Printer and Paper
size to use for printing. Click the available buttons
to choose between portrait and landscape
orientation for the printed pages.
Layout tab
Also specify the number of Copies to print.
3. Click the Layout tab.
4. Choose how to print thumbnails on the paper size
selected in the General tab.
• Fit selected paper size Uses the full paper size
when printing thumbnails.
• Fit CD cover size Prints thumbnails within the
standard CD cover size. The selected paper size
will not be completely filled up.
5. Choose what contents to print on the index pages.
You can print Slideshow thumbnails only,
Slideshow photos, All photos (continuous
printing), or print a single slideshow only.
6. Specify the number of rows and columns to print
on each index page.
7. Click the Text tab.
8. Select the check boxes of items you want printed
on the index pages. To print a disc title, type the
desired title in the provided text box.
Click the Font button beneath each item to apply
varying font types or styles.
9. Click Print to print the CD index pages.
18
Tip: The Enlarge thumbnail size option affects only
low-resolution photos. When selected, original photos
will be scaled up to fit the thumbnail frame size, which
may result in poorer print quality. When cleared,
photos will only be scaled to at most double their
original size, which enhances thumbnail prints.
Ulead DVD PictureShow User Guide
Printing CD label:
1. Click Print
and select Print CD Label.
2. Under Output options, select the Printer and
Paper size to use for printing. Click the available
buttons to choose between portrait and landscape
orientation.
3. If you will be designing and printing dual label
stickers on a single page, click the CD icons in
Edited CD label to switch between the two labels
and create different designs for each.
4. To apply a solid color as the base for the CD label,
click the color box and select a background color.
5. Click Add Image to select one or more images to
add on the CD label. To resize an image, drag the
surrounding handles. To move an image, click and
drag it to the desired position on the label.
6. Click the Image tab.
7. Adjust Brightness, Contrast and Transparency
levels of each added image.
Tips: If you added several elements, such as images and
text, on the CD label:
8. To add text, double-click on the CD image in the
preview window and type your text.
• Press [Ctrl] and click each element to select
multiple elements.
9. Click the Text tab.
10. Format each added text by changing the font type,
size, style, text color and alignment. Adjust the text
Transparency level accordingly.
11. Select the Shadow checkbox to add a drop-down
shadow to the selected text, and click the color box
to set the shadow color. Adjust the X/Y offset
values to set the shadow position in relative to the
position of the text.
• Right-click the selected elements and select
commands from the menu to align the elements,
arrange their order, etc.
Tip: The shadow position can also be flexibly adjusted
by simply dragging the shadow. The shadow has a
round, green handle which you can click and drag to
adjust its position.
12. Click Save CD Label to save your work on a CD
label file (*.UPL).
13. Click Print to print the CD label.
19
Ulead VCD/SVCD/DVD
Disc Image Recorder
The Ulead VCD/SVCD/DVD Disc Image Recorder allows you to burn previously saved disc image
files to a disc. Disc image files are files that contain the entire content of a storage medium (e.g.
CD-ROM). Disc image files help prevent the "buffer under run" problem from occurring when
burning and is also useful when you want to burn several copies of the same file. The VCD/SVCD/
DVD Disc Image Recorder is real easy to use, just open the disc image file (either Ulead Disc
Image files (IXA) or ISO disc image files), select the recording device and then start burning.
Select disc image file
Step 1
Step 2
1. Click Open to browse for the disc image file you
want to burn.
Select CD/DVD
recorder
2. Select the burning device to use in Drive and set
the recording speed.
3. Select Perform writing test before writing to
simulate the burning process first.
4. Select BURN-Proof™ disc protection to prevent
the “buffer under run” from occurring while
burning.
Step 3
Note: Your burning device must support the BURNProof™ technology in order to use it. Buffer under run
is the problem when the computer system fails to
deliver the data quickly enough to the CD/DVD when
burning.
Record to blank disc
5. Click Record CD/DVD to start burning the file to
the disc.
20