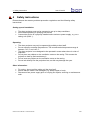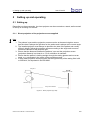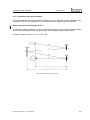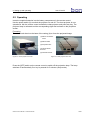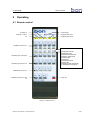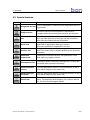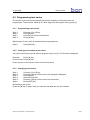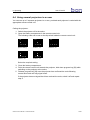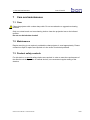
1
Instruction manual bon CP-33 ID chart projector GA bon CP-33 ID Rev 1.0 E 161105.doc PO Box 32 26 23581 Lübeck Phone: 0451/ 80 900-0 Fax: 0451/ 80 900-10 Sparkasse zu Lübeck (Sort code 230 501 01) Acc.No. 1 014 885 Commerzbank Lübeck (Sort code 230 400 22) Acc.No. 0 107 755 Stellmacherstraße 14 D-23556 Lübeck E-Mail: [email protected] Internet: www.bon.de Swift / BIC: HSHN DE H1 SPL IBAN: DE 2305 0101 0001 0148 85 Postbank Hamburg (Sort code 200 100 20) Acc.No. 409 22-204 bon Optic Vertriebsgesellschaft mbH – managing director: H. Jochen Kaber – HR Lübeck, HRB 3475 – VAT No. 161662634 Contents 1 Introduction .....................................................................................................3 2 Important information .....................................................................................4 2.1 2.2 System information............................................................................................. 4 Application and classification ............................................................................. 4 2.2.1 2.2.2 2.3 2.4 Application (appropriate use)............................................................................................. 4 Classification ..................................................................................................................... 4 Liability ............................................................................................................... 4 Scope of delivery................................................................................................ 5 3 Description of the device................................................................................6 4 Safety instructions ..........................................................................................7 5 Setting up and operating ................................................................................8 5.1 Setting up ........................................................................................................... 8 5.1.1 5.1.2 5.2 6 Operating.......................................................................................................... 10 Operating .......................................................................................................11 6.1 6.2 6.3 Remote control ................................................................................................. 11 Special features:............................................................................................... 12 Programming test series .................................................................................. 13 6.3.1 6.3.2 6.3.3 6.4 7 Direct projection of the projection screen supplied ............................................................ 8 Projection via a mirror system ........................................................................................... 9 Programming a test series .............................................................................................. 13 Calling up and ending a test series ................................................................................. 13 Changing a test series..................................................................................................... 13 Using several projectors in a room................................................................... 14 Care and maintenance ..................................................................................15 7.1 7.2 7.3 7.4 Care.................................................................................................................. 15 Maintenance..................................................................................................... 15 Product safety controls..................................................................................... 15 Repairs you can carry out yourself................................................................... 16 7.4.1 7.4.2 7.5 Replacing a fuse.............................................................................................................. 16 Replacing light bulbs ....................................................................................................... 17 Malfunctions ..................................................................................................... 17 8 Guarantee and disposal................................................................................18 9 Technical data ...............................................................................................19 GA bon CP-33 ID Rev 1.0 E 161105.doc 2/20 1 Introduction 1 bon CP-33 ID Introduction Dear Customer Thank you for purchasing our bon CP-33 ID chart projector. Please read the operating instructions carefully before using the projector. Keep these instruction manual safe for future use. Please observe the safety instructions. If you have any further questions, please contact our customer helpline. Meaning of the symbols in the operating instructions Caution! Please observe safety instructions with this symbol to prevent personal danger or damage to property. Important! Indicates particularly important information to maintain the function of the device/system or to extend its life. Note! Indicates information for correct use so that errors may be avoided. This publication may not be copied or transferred without prior agreement from bon Optic. bon Optic reserves the right to make changes in the interest of technical development. These operating instructions are not subject to updating. GA bon CP-33 ID Rev 1.0 E 161105.doc 3/20 2 Important information 2 bon CP-33 ID Important information 2.1 System information Name of device : bon CP-33 ID Manufacturer : bon Optic Vertriebsgesellschaft mbH Stellmacherstraße 14 D- 23556 Lübeck 2.2 Application and classification 2.2.1 Application (appropriate use) The chart projector CP-33 ID is designed to project various test charts to determine the visual acuities of the human eye. 2.2.2 Classification The CP-33 ID chart projector is a non-invasive active class 1 medical device in accordance with Council Directive 93/42/EEC (MDD). 2.3 Liability The chart projector is manufactured according to the current technical status and the recognised safety regulations and is tested in accordance with strict quality criteria. bon Optic only accepts liability for the safety, reliability and performance of the device if any changes or repairs have been carried out by a person authorised by bon Optic to do so the power supply to which the device is connected corresponds to DIN VDE 0100-710 the device is operated in accordance with these operating instructions the operator complies to the Ordinance on the Operation of Medical Devices (MPBetreibV). If the system is assembled, changed or repaired by an unauthorised person, if it is improperly maintained or not used as described in 2.2.1, the manufacturer is no longer liable. GA bon CP-33 ID Rev 1.0 E 161105.doc 4/20 2 Important information bon CP-33 ID 2.4 Scope of delivery 1 x CP-33 ID chart projector 1 x Instruction manual 1 x mains cable 1 x infrared remote control unit 4 x LR 03 AAA batteries 1 x projection board 1 x red/green glasses 1 x pole glasses 1 x dust cover 2 x T 250mA micro-fuse 1 x tilt arm 1 x spare bulb 1 x Allen key to open the casing 1 x Allen key to secure the tilt arm Optional accessories To mount/set up the device - table foot wall fixings For projection - Surface mirror Hinged joints GA bon CP-33 ID Rev 1.0 E 161105.doc 5/20 3 Description of the device 3 bon CP-33 ID Description of the device The CP-33 ID chart projector has a total of 32 test fields to determine the visual acuities of the human eye. The individual charts are very clearly reproduced thanks to the special design of the optotypes and the high resolution lens system. All tests are conveniently controlled using the infrared remote control, with a switching speed of 0.03 seconds. The projector enables you to program two separate test series. The Landolt rings meet the requirements stipulated in DIN 58220 and EN ISO 8596 and can therefore be used for expert statements or for eye tests for admission procedures. The projector has four sets of charts Landolt rings in acuity levels 0.1 to 2.0 Numbers in acuity levels 0.05 to 2.0 Illiterate Es in acuity levels 0.1 to 2.0 Children’s in acuity levels 0.1 to 1.0 Special features: Asticmatic fan test Red/green test Bichrome balance test Worth test Schober test Refraction balance test Heterophoria test Aniseikonia test (vertical) Aniseikonia test (horizontal) Stereo test GA bon CP-33 ID Rev 1.0 E 161105.doc 6/20 4 Safety instructions 4 bon CP-33 ID Safety instructions Please observe the statutory accident prevention regulations and the following safety instructions! Setting up and installation: The chart projector must not be operated or set up in damp conditions Avoid water splashing or spraying onto device Connect the device to a properly installed mains socket or power supply, e.g. on a testing unit (230V ∼). Operating: The chart projector may only be operated by suitably trained staff. Do not expose to extreme temperatures. The recommended temperature range is between +10° C and +40° C. The chart projector is not designed to be operated in areas where there is a risk of explosion. Do not place any objects on the ventilation vents on the casing. This causes the projector to heat up and can destroy it. Do not insert any objects on the ventilation vents on the casing. Do not look directly into the projection lens, as this may damage the eyes. Other information: To unplug - do not pull the cable; pull the plug itself. Ensure that the cable is not damaged (e.g. sharp edges or heat). Disconnect from power supply prior to carrying out repairs, servicing or maintenance work. GA bon CP-33 ID Rev 1.0 E 161105.doc 7/20 5 Setting up and operating 5 bon CP-33 ID Setting up and operating 5.1 Setting up Depending on the accessories, the chart projector can be mounted on a stand, wall mounted or set up on a testing unit column. 5.1.1 Direct projection of the projection screen supplied Note 1. The patients’ eyes and the projection screen must be at the same height to ensure that the chart is always the right size for the patient and is always at the correct angle. 2. The installed projector must always be placed to the side of the patient and usually differs in height. Adjust the projection screen according to the angle and to ensure maximum reflection of the projector light. 3. Ensure that the distance between the patients’ eyes and the projection screen (projection distance) is at least 4 m. 5 to 6 m distance is standard 4. Ensure that the patient is looking straight through the testing glasses and not at an angle, e.g. a phoropter in the centre of the projection screen. 5. If using other projection screens ensure that the light density of the testing field is 80 to 320 cd/m², as stipulated in ISO EN 8596. Projector Projection screen Patient’s eye Projection distance Figure 5-1: Direct projection (top view) GA bon CP-33 ID Rev 1.0 E 161105.doc 8/20 5 Setting up and operating 5.1.2 bon CP-33 ID Projection via a mirror system If it is not feasible to observe the minimum distance of 4 m, projection can be achieved using a system of mirrors (not supplied). Two surface mirrors with angle hinges are required. Please observe the information in 5.1.1 To achieve maximum reflection, to set up the surface mirrors (A and C) place a smaller plane mirror on the projection screen (B), taking care not to damage the projection screen. Projection distance: a + b = S1 + S2 = S3 + S4 S4 S3 S2 S1 Figure 5-2: Indirect projection (top view) GA bon CP-33 ID Rev 1.0 E 161105.doc 9/20 5 Setting up and operating bon CP-33 ID 5.2 Operating Insert the supplied batteries into the battery compartment in the remote control. Use the power switch (2) to switch the projector on and off. The chart projector is now operational. Aim the remote control towards the chart projector and press any key. The projector lamp is activated and the corresponding sight test is shown on the projection screen. Focussing Turn the thumb wheel on the base of the casing (4) to focus the projected image. (1) Mains connection/ fuses (2) Mains switch (3) Projection lens (4) Thumb wheel for focus (5) Infrared receiver Figure 5-3: Chart projector front view Figure 5-4: Chart projector back view Press the [OFF] switch on the remote control to switch off the projection lamp. The lamp switches off automatically if no key is pressed for 5 minutes (sleep mode). GA bon CP-33 ID Rev 1.0 E 161105.doc 10/20 6 Operating 6 bon CP-33 ID Operating 6.1 Remote control Program 2 Control-LED Program 1 / OUT Program step „next“ IN Program step „back“ Numbers 0,05 bis 2,0 a b c d e f g h i j Landolt rings 0,1 bis 0,25 Landolt rings 0,32 bis 2,0 Special functions: a) Astigmatic fan test b) Red/green test c) Bichrome balance test d) Refract. balance test e) Schober test f) Worth test g) Heterophoria test h) Stereo test i) Aniseikopy test (horizontal) j) Aniseikopy test (vertical) Illiterate Es 0,1 bis 2,0 Children’s pictures 0,1 bis 10 Lamp „off“ Figure 6-1: Remote control GA bon CP-33 ID Rev 1.0 E 161105.doc 11/20 6 Operating bon CP-33 ID 6.2 Special features: Key Name Function Astigmatic fan test Test for astigmatism. Determines the astigmatism with the fogging test. Red/green test Monocular spherical fine adjustment. Adjustment is complete when the red and green sections are the same. Bichrome balance test Worth test Schober test Binocular spherical fine adjustment with polarisation filters. One eye sees the fields on the right and the left and the other sees the fields at the top and bottom. Heterophoria and dominance test With red/green filters the white field is registered in both eyes (fusion). The coloured fields are registered in one eye. Red/green filters to determine heterophoria. Note: The results may be slightly falsified by the chromatic aberration. Refraction balance test Checking the refraction balance with polarisation filters. Both eyes only register one line. Heterophoria test Polarisation filters to determine heterophoria. Vertical and horizontal lines are seen monocularly. Aniseikonia test vertical Test with polarisation filters in a vertical direction to see if both retinal images are the same size. Aniseikonia test horizontal Test with polarisation filters in a horizontal direction to see if both retinal images are the same size. Stereo test Test to determine the stereo threshold with polarisation filters. The diagonal retinal disparity of the column pairs is 30, 100, 400 and 800 angular speed. GA bon CP-33 ID Rev 1.0 E 161105.doc 12/20 6 Operating bon CP-33 ID 6.3 Programming test series The remote control allows two separate test series consisting of 30 tests each to be programmed. These can be called up at a later stage with the program keys [1] and [2]. 6.3.1 Step 1: Step 2: Step 3: Step 4: Programming a test series Press the [1] or [2] key. Press [IN] key. Press key for the test selected first. Press [c] key. Repeat steps 3 and 4 until all selected tests are programmed. Step 5: 6.3.2 Press [Out] key. Calling up and ending a test series Call up the test series required with the program keys [1] or [2]. The first test is displayed. Next test: Press [c] key. Previous test: Press [d] key. Press any test on the remote control to end a test series. 6.3.3 Step 1: Step 2: Step 3: Step 4: Step 5: Step 6: Changing a test series Press the [1] or [2] key. Press the [c] key until the test to be changed is displayed. Press [IN] key. Select the new test. Press the [c] key until the end of the test series. Press [OUT] key. Shortening a test series: Press the [c] key in step 5 until you reach the test after the one to be ended. GA bon CP-33 ID Rev 1.0 E 161105.doc 13/20 6 Operating bon CP-33 ID 6.4 Using several projectors in a room You can use up to 5 separate projectors in a room, provided each projector is coded with the appropriate remote control unit. Coding the projector: 1. Switch the projector off at the mains. 2. Open the battery compartment in the remote control unit. The following code can be set on the dip switch inside the remote control unit: on on on 1 2 3 4 1 2 3 4 1 2 3 4 Switch 1 „on“ Switch 2 „on“ (Basic setting) on on 1 2 3 4 1 2 3 4 Switch 3 „on“ Switch 4 „on“ Select the required coding. 3. Close the battery compartment. 4. Point the remote control unit towards the projector, hold down program key [IN] while switching on the projector at the mains. 5. Release program key [IN] once the projector has confirmed the code following several short and one long signal tones. If the projector does not signal that it has received the code, switch it off and repeat step 4. GA bon CP-33 ID Rev 1.0 E 161105.doc 14/20 7 Care and maintenance 7 bon CP-33 ID Care and maintenance 7.1 Care Clean the projector with a clean damp cloth. Do not use abrasive or aggressive cleaning products. Only use a dust brush or a lens cleaning cloth to clean the projection lens or the infrared receiver. Do not use disinfection alcohol! 7.2 Maintenance Regular servicing is not required, provided the chart projector is used appropriately. Please contact bon Optic if repairs are required or in the event of technical problems. 7.3 Product safety controls For this device, no special safety checks are required. In order to meet the requirements of the directive on the operation of medical devices, we recommend regular testing of the electrics. GA bon CP-33 ID Rev 1.0 E 161105.doc 15/20 7 Care and maintenance bon CP-33 ID 7.4 Repairs you can carry out yourself 7.4.1 Replacing a fuse Fuse rating: see projector type plate. (1) Mains switch (2) Fuse element Figure 7-1: Chart projector back view 1) 2) 3) 4) Disconnect the mains cable before replacing the fuse. Open safety element (2) with a screwdriver. Remove the old fuse from its holder and insert the new fuse. Replace the fuse holder. GA bon CP-33 ID Rev 1.0 E 161105.doc 16/20 7 Care and maintenance 7.4.2 bon CP-33 ID Replacing light bulbs Note The type of bulb required varies according to the series. Please check which type of bulb is in your projector: a) 6V/20W G4 b) 12V/20W G4 c) 12V/30W PG 22 – 6.35 We explicity recommend using the bulbs we supply, as this ensures optimum lighting. Standard bulbs are not suitable and are not equivalent both in terms of their performance and the filament. We accept no liability for any damage if standard bulbs are used. Screws to open the casing Figure 7-2: Chart projector front view 1) 2) 3) 4) 5) 6) 7) Remove the mains cable Open the casing with the Allen key supplied and flip open. Ensure that the bulb has cooled down sufficiently. Remove the protective plate (for 12V/20W) Insert the new bulb, making sure not to touch it directly. Replace the protection plate and close the casing. Switch on the device to check that the new bulb works. Protection plate and bulb Figure 7-3: Chart projector is opened 7.5 Malfunctions If there are malfunctions in the electromagnet compatibility, contact the bon Optic customer service. GA bon CP-33 ID Rev 1.0 E 161105.doc 17/20 8 Guarantee and disposal 8 bon CP-33 ID Guarantee and disposal Should defects as the result of material or production errors occur within 24 months of purchase, we guarantee free-of-charge repair of the refraction unit or we will decide whether to offer you a free exchange, provided that: A receipt with the date of purchase can be provided. The device has been used properly and in accordance with the conditions of use. Repairs have not been carried out by anyone other than the bon Optic customer service team or persons authorised by bon Optic. Guarantee services do not result in extension of the guarantee, nor do they represent the start of a new guarantee. The sales guarantee is not applicable to second-hand products. The terms and conditions of trade of bon Optic also apply. Disposal This projector contains components that should not be disposed of in normal household waste. Please inform the waste disposal company or contact bon Optic. GA bon CP-33 ID Rev 1.0 E 161105.doc 18/20 9 Technical data 9 bon CP-33 ID Technical data Chart projector Dimensions (W/D/H): Weight: Input supply voltage: Supply frequency: Connection power: Protection category: Protection type: Device type: Fuse rating: Projection distance Selection speed: Inclination: 205 x 340 x 210 (mm) 5.5 kg 120 V/ 230 V 50/60 Hz 40 VA I IP 21 B 0.5 A T (120 V) / 0.25 A T (230 V) 2.5 – 6.5 m 0.03 s +/- 15° Operating conditions Ambient air temperature: Relative humidity: Air pressure: +10° C to +40° C 30% to 75% 700 hPa to 1060 hPa Type plate symbols Transport regulations Fuse Temperature: -5 °C to +45 °C (+23 °F to +113 °F) Read operating instructions Air pressure: 650 hPa to 1100 hPa Application part type B Relative humidity 25% to 80% Maximum conditions – no longer than 60 days in a row GA bon CP-33 ID Rev 1.0 E 161105.doc 19/20 Appendix bon CP-33 ID EU - KONFORMITÄTSERKLÄRUNG EC – DECLARATION OF CONFORMITY Hersteller-Adresse: (Manufacturer adress) bon Optic Vertriebsgesellschaft mbH Stellmacherstraße 14 D-23556 Lübeck Gerätetyp / UMDNS-CODE: (Device type/ UMDNS-CODE) Sehzeichenprojektor / (16-890) Chart projector / (16-890) Gerätebezeichnung: (Device name) Sehzeichenprojektor CP-33 ID / CP-33 IDB / CP-50 Chart projector CP-33 ID / CP-33 IDB / CP-50 Klassifizierung: (Classification) 1 (Richtlinie 93/42/EWG, Anhang IX, Regel 1) 1 (MDD 93/42/EEC, annex IX, rule 1) Wir erklären hiermit die Übereinstimmung des vorgenannten Produkts mit der EU-Richtlinie 93/42/EWG über Medizinprodukte. We declare the compliance of the device with the requirements of the Directive 93/42/EEC on medical devices. Angewandete Normen: (Applicable standards) DIN EN 60601-1 DIN EN 60601-1-2 EN 1441 (03/96) (09/94) (10/97) Überwachungsbehörde/ ID-Nr.: IMQ / 0051 (Notified body/ Identification number) Das Gerät ist gekennzeichnet mit / The device is marked with Lübeck, 01 June 2004 (H. Jochen Kaber, managing director) GA bon CP-33 ID Rev 1.0 E 161105.doc 20/20