1
WELCOME
Thanks for buying this Wharfedale 15”/19”/22” HD Ready Digital LCD TV. This
guide will help you set up and begin using your Wharfedale TV.
First, check the contents of your box with the parts checklist below:
t 8IBSGEBMFwwPSw)%3FBEZ%JHJUBM-$%57PS57%7%
t 3FNPUFDPOUSPM
t ""CBUUFSZY
t "VEJPDBCMFY
Now you can get started!
15”/19”/22” HD READY
DIGITAL LCD TV
User Manual
2
WHARFEDALE TV SML SCREEN D5.indd 1
14/9/07 11:55:35
WHARFEDALE | HD Ready Digital LCD TV | User Manual | Customer helpline: 0845 604 0105
WHARFEDALE TV SML SCREEN D5.indd 2
14/9/07 11:55:35
CONTENTS
IMPORTANT INFORMATION
WELCOME .......................................................................................................... 2
READ ALL INSTRUCTIONS BEFORE USE AND KEEP FOR FUTURE REFERENCE.
*.1035"/5*/'03."5*0/.................................................................................. 4
CAUTION
4"'&5:/05*$& .................................................................................................. 5
CAUTION
&-&$53*$"-$0//&$5*0/4................................................................................ 7
RISK OF ELECTRIC SHOCK
DO NOT OPEN
To reduce the risk of electric shock, do not remove the cover. No user serviceable
parts inside. Refer to qualified service personnel for servicing.
(&545"35&% ..................................................................................................... 8
(&550,/08:06357$0/530-4 .................................................................... 9
CLASS 1
LASER PRODUCT
(&550,/08:063573&.05&$0/530- ...................................................... 10
7*4*#-&"/%*/7*4*#-&-"4&33"%*"5*0/8)&/01&/&%"70*%&910463&50
#&".8"3/*/(-0$"5*0/*/4*%&0/-"4&3$07&34)*&-%
(&550,/08:06357%7%3&.05&$0/530-............................................... 11
REGION MANAGEMENT INFORMATION
$0//&$5*/(:06357...................................................................................... 12
This DVD player is designed and manufactured to respond to the Region
Management Information that is recorded on a DVD disc. If the Region number
described on the DVD disc does not correspond to the Region number of this DVD
Player, this DVD player cannot play that disc.
SETTING UP ...................................................................................................... 15
56/*/(:06357.............................................................................................. 16
64*/(:06357*/%*(*5"-.0%& ..................................................................... 17
This Region number of this DVD player is
64*/(:06357*/"/"-0(6&.0%& ................................................................ 23
64*/(:063%7%1-":&3$&35"*/.0%&-40/-:
.......................................... 26
RISK OF ELECTRIC SHOCK, DO NOT OPEN.
"%+645*/(:0631*$563&"/%"6%*04&55*/(4............................................. 30
Do not attempt to service this product yourself as opening or removing covers
may expose you to dangerous voltage or other hazards. Refer all servicing to
qualified service personnel.
41&$*'*$"5*0/ ................................................................................................. 32
TROUBLESHOOTING.......................................................................................... 33
130%6$5(6"3"/5&&...................................................................................... 34
WARNING
t 5 PSFEVDFUIFSJTLPGmSFPSFMFDUSJDTIPDLEPOPUFYQPTFUIJTQSPEVDUUPSBJO
or moisture. Position where there is no risk of splashing or dripping of liquids.
Do not place vases or any other objects filled with liquids on the unit.
t 5 PBWPJEmSFOPOBLFEnBNFTPVSDFTVDIBTMJUDBOEMFTTIPVMECFQMBDFEPO
or around the unit.
t " UMFBTUDNPGTQBDFTIPVMECFMFGUBSPVOEUIFBQQBSBUVTGPS
sufficient ventilation:
t 5IFWFOUJMBUJPOIPMFTNVTUCFLFQUDMFBSGSPNPCTUSVDUJPOT
t *ODBTFPGTNPLFPSVOVTVBMOPJTFTPSTNFMMTDPNJOHGSPNUIFVOJUTXJUDIJU
off, unplug it from the wall socket and contact your dealer or service centre.
WHARFEDALE | HD Ready Digital LCD TV | User Manual | Customer helpline: 0845 604 0105
WHARFEDALE TV SML SCREEN D5.indd 3
3
14/9/07 11:55:35
4
WHARFEDALE | HD Ready Digital LCD TV | User Manual | Customer helpline: 0845 604 0105
WHARFEDALE TV SML SCREEN D5.indd 4
14/9/07 11:55:35
SAFETY NOTICE
Before operation, make sure the operating voltage of this unit corresponds with
your house electrical supply; Do not place the unit on unstable or in dusty and
IVNJEQMBDFT/FWFSQVUUIFVOJUJOEJSFDUTVOMJHIUPSOFBSIFBUTPVSDFT"MMPX
enough space for proper ventilation; Please keep water away from the LCD-TV.
If water comes into contact with the LCD-TV, disconnect the power cord from the
power source, then wipe the set with a dry soft cloth; Do not remove the back
cover. If servicing is required, please refer to customer helpline.
t For your protection, please read these instructions completely and keep this
manual for future reference.
t 6
OQMVHUIFEFWJDFGSPNUIFXBMMTPDLFUXIFOJUJTOPUCFJOHVTFEGPSBMPOH
period of time. When there is lightning, unplug the unit from the wall socket
immediately. Never touch the aerial cable during lightning.
t 5IFEFWJDFJTOPUTVJUBCMFGPSDIJMESFOUPPQFSBUF
PROTECT YOUR DVD DISCS
t 5 PQSFWFOUEBNBHFPSFMFDUSPDVUJPOEPOPUQVTIPCKFDUTPGBOZLJOEUISPVHI
the openings in this device.
HANDLE DISCS PROPERLY
t 6
OQMVHUIFEFWJDFGSPNUIFXBMMTPDLFUCFGPSFDMFBOJOH%POPUVTFMJRVJE
cleaners or aerosol cleaners. Use a damp cloth for cleaning.
t %POPUUPVDIUIFQMBZCBDLTJEFPGUIFEJTD
t %POPUBUUBDIQBQFSPSUBQFUPUIFEJTD
t 1PXFSTVQQMZDPSETTIPVMECFSPVUFETBGFMZUPQSFWFOUEBNBHFUPUIFDPSE
t 1 MBDFUIF57JOTVDIBQPTJUJPOUIBUUIFTDSFFOJTOPUFYQPTFEUPEJSFDUTVOMJHIU
*UJTCFTUUPIBWFTPGUJOEJSFDUMJHIUJOHXIJMTUXBUDIJOH57"WPJEEBSL
FOWJSPONFOUTBOETDSFFOSFnFDUJPOBTUIFTFNBZDBVTFFZFGBUJHVF
HOW TO CLEAN A DISC
t ' JOHFSQSJOUTBOEEVTUPOUIFEJTDDBVTFQJDUVSFBOETPVOEEFUFSJBUJPO
Wipe the disc with a soft cloth from the centre outwards.
t 8
IFOUIF57IBTCFFONPWFEGSPNBDPMEQMBDFJUXJMMOFFEUJNFGPSUIF
moisture from inside to evaporate.
t *GZPVDBOOPUXJQFPGGUIFEVTUXJUIBTPGUDMPUIXJQFUIFEJTDMJHIUMZXJUIB
slightly moistened soft cloth and finish with a dry cloth.
t 6
TFBOJTPMBUFEQPXFSUSBOTGPSNFSEVSJOHNBJOUFOBODFBTUIFDIBTTJTPGUIF
device may be electrified.
t %
POPUVTFBOZUZQFPGTPMWFOUTVDIBTUIJOOFSCFO[JOFDPNNFSDJBMMZ
available cleaners or antiseptic spray for vinyl LPs. It may damage the disc.
t 5 IFNBJOTQMVHJTVTFEGPSEJTDPOOFDUJOHUIFEFWJDFBOEUPNBLFJU
easily accessible.
t .BLFTVSFUIFVOJUJTDPOOFDUFEUPBNBJOTTPDLFUXIJDIJTFBSUIFE
This product incorporates copyright protection technology that is protected by
U.S patents and other intellectual property rights. Use of this copyright protection
technology must be authorised by Macrovision, and is intended for home and other
limited viewing uses only unless otherwise authorised by Macrovision. Reverse
engineering or disassembly is prohibited.
To prevent fire or electric shocks please read the instruction before installing,
using and cleaning the television.
Please read all the instructions before operation; Please keep the manual for
future reference; Do not use any accessories that are not recommended by the
manufacturer.
WHARFEDALE | HD Ready Digital LCD TV | User Manual | Customer helpline: 0845 604 0105
WHARFEDALE TV SML SCREEN D5.indd 5
5
14/9/07 11:55:36
6
WHARFEDALE | HD Ready Digital LCD TV | User Manual | Customer helpline: 0845 604 0105
WHARFEDALE TV SML SCREEN D5.indd 6
14/9/07 11:55:36
ELECTRICAL CONNECTIONS
GET STARTED
CONNECTING TO POWER
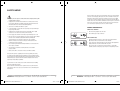
*OTFSUUIFCBUUFSJFTJOUPUIFSFNPUFDPOUSPMTFFJNBHF
1
Check that the voltage marked on the product corresponds with your supply
voltage. This product is fitted with a BS plug complying with BS1363. If this plug
is unsuitable or needs to be replaced, please note the following:
$
POOFDUUIFBFSJBMUPUIF57WJBUIFBOUFOOBJOQVUTPDLFUCPUUPNMFGUFEHF
PG57
3 Plug the TV into a wall socket and switch the socket on.
4 Switch the power on by pressing the power button on the TV set.
PLUG REPLACEMENT
If you need to replace the fitted plug:
WARNING
Never connect live or neutral wires to the earth terminal of the
QMVH0OMZmUBOBQQSPWFE"NQ#4"QMVHBOEUIFDPSSFDU
rated fuse. If in doubt, consult a qualified electrician.
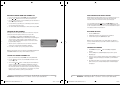
IMPORTANT
The wires in this mains lead are coloured as follows:
Blue
Brown
Neutral
AUTO SEARCH
5
FUSE
BLUE
(NEUTRAL)
N
Live
"TUIFDPMPVSTPGUIFXJSFTJOUIFNBJOTMFBEPGUIJTBQQBSBUVTNBZOPUDPSSFTQPOE
with the coloured markings identifying the terminals in your plug, proceed as follows:
OUTER
SLEEVE
U NITED K IN GDOM
NO
YES
CORD GRIP
5 AUTO SEARCH will appear on the TV display. Select YES and press MENU to
UVOFUIFDIBOOFMTTFFJNBHF
6 Use the number buttons on your remote control to change to the channel you
want to watch.
BROWN
(LIVE)
L
The wire which is coloured blue must be connected to the terminal, which is
marked with N or coloured blue. The wire which is coloured brown must be
DPOOFDUFEUPUIFUFSNJOBMXIJDIJTNBSLFE-PSDPMPVSFECSPXO"MXBZTFOTVSF
UIBUUIFQMVHDPSEHSJQJTGBTUFOFEDPSSFDUMZ*GB"#4
GVTFEQMVHJTVTFE
JUNVTUCFmUUFEXJUIB"GVTFDPOGPSNJOHUP#4BOECF"45"BQQSPWFE
If in doubt contact a qualified electrician.
"45&&-&$53*$"-130%6$$544)06-%/05
8
#&%*4104&%0'8*5))064&)0-%8"45&
1-&"4&3&$:$-&8)&3&'"$*-*5*&4&9*454
$)&$,8*5):063-0$"-"65)03*5:'03
3&$:$-*/("%7*$&
WHARFEDALE | HD Ready Digital LCD TV | User Manual | Customer helpline: 0845 604 0105
WHARFEDALE TV SML SCREEN D5.indd 7
7
14/9/07 11:55:36
8
WHARFEDALE | HD Ready Digital LCD TV | User Manual | Customer helpline: 0845 604 0105
WHARFEDALE TV SML SCREEN D5.indd 8
14/9/07 11:55:37
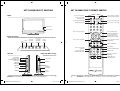
GET TO KNOW YOUR TV CONTROLS
GET TO KNOW YOUR TV REMOTE CONTROL
FRONT
Press to set a sleep timer
Press to switch off the
picture and sound
Press to switch to PC mode
"VUPBEKVTUJO1$NPEF
Remote sensor
Power indicator
STANDBY SLEEP
PC
Q.VIEW NICAM
AUTO AD DISPLAY MUTE
Press to switch off the sound
1
2
3
5
6
7
9
0
-/--
P.STD
v-
Source Menu
Button Button
SOURCE MENU
VOL-
VOL+
CH-
CH+
SSM
Press to open your DTV
channel list
POWER
7("JOQVU
HDMI input
MODE
HOLD
REVEAL
SIZE
TIME
INDEX
TEXT
EPG
D.MENU
Press to zoom into the picture
in digital mode
Teletext control buttons
Teletext button
Electronic Programme Guide
SUBTITLE
Subtitles on/off
OK
INFO
EXIT
Teletext fast colour
navigation buttons
Power Button
DVD slot
Stop
Play/Pause
Open/Close
Next
Previous
WHARFEDALE | HD Ready Digital LCD TV | User Manual | Customer helpline: 0845 604 0105
WHARFEDALE TV SML SCREEN D5.indd 9
ZOOM
P-
Exit the screen display in
digital mode
RIGHT SIDE (DVD sets only)
4$"35JOQVU
v+
MIX
FAV
"OUFOOBJOQVU
Earphone output
7(":1C1S47*%&0BVEJP
input interface
:1C1SJOQVU
S-VIDEO input
Press to switch between
analogue and digital modes
Use to scroll up or down
through the TV channels or
turn the volume up or down
SUBCODE
Use these arrow keys
to navigate the DTV menu
LEFT SIDE
MENU
Press to select sound mode
Power/
Standby
Button
8
SOURCE
P+
BACK (connections)
Use to scroll
up or down
through the
TV channels
4
Press to select screen display
DTV/TV
Press to select picture mode
Use to turn
the volume
up or down
Press to return to the channel
you were previously watching
9
14/9/07 11:55:37
10
WHARFEDALE | HD Ready Digital LCD TV | User Manual | Customer helpline: 0845 604 0105
WHARFEDALE TV SML SCREEN D5.indd 10
14/9/07 11:55:38
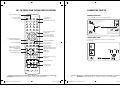
GET TO KNOW YOUR TV/DVD REMOTE CONTROL
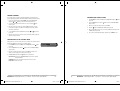
CONNECTING YOUR TV
Press to select picture mode
Press to switch off the
picture and sound
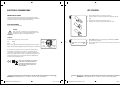
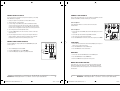
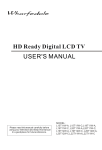
ANTENNA CONNECTION
STANDBY P.STD
OPEN/CLOSE
10+
SCAN
SWAP
CALL
Connect your aerial to the TV as shown in the picture below:
Press to open/close
the DVD player
MUTE
Multi-fam ily D we llings /Apartments
(Conne c t to wall a ntenna socket)
Press to switch off the sound
1
2
3
wall a ntenna
s ock et
4
ANT IN
R F c oa xia l wire ( 75 ohm)
5
6
7
9
0
-/--
8
NICAM
DTV/DVD
P+
vPress to zoom into the picture in
digital mode and DVD mode
ZOOM
STOP
SETUP PAUSE/STEP TUNE
Press to see the channel list
in Digital mode and the main
list in DVD mode
FWD
D.MENU
PRE
NEXT
EXIT
PROGRAM
EPG
PLAY/ENTER
DVD navigation buttons and
digital navigation buttons
outdoor
a ntenna
SUBTITLE
OK
ANGLE
TITLE/PBC
FAV
i
Be c are ful n ot to b e nd the b ronze
wire wh e n connec ting the antenna .
Single -fam ily D we llings / Hous e s
(Conne c t to w all jack for outdoor a ntenna)
IMPROVE YOUR SIGNAL
AUDIO
P-
Press to stop a DVD/CD
REV
Press to switch between DTV
and DVD mode
Use to scroll up or down
through the TV channels or
turn the volume up or down
v+
MENU
V HF a ntenna
U HF a ntenna
SOURCE
To improve picture quality in a poor signal area, use a signal amplifier
OPUTVQQMJFE
Press to pause a DVD/CD
Press to go to the
previous track/scene
Press to skip to the
next track/ scene
Electronic programme guide in
digital mode; Program settings
in DVD mode
Subtitles on/off
SEARCH
ANT IN
A-B
SLOW
D.CALL
REPEAT
SUBCODE
MIX
TEXT
HOLD
REVEAL
SIZE
TIME
MODE
Repeat a chapter, title of scene
in DVD mode
Teletext control buttons
Teletext fast colour
navigation button
WHARFEDALE | HD Ready Digital LCD TV | User Manual | Customer helpline: 0845 604 0105
WHARFEDALE TV SML SCREEN D5.indd 11
11
14/9/07 11:55:38
12
WHARFEDALE | HD Ready Digital LCD TV | User Manual | Customer helpline: 0845 604 0105
WHARFEDALE TV SML SCREEN D5.indd 12
14/9/07 11:55:39
CONNECT YOUR PC TO THE TV
CONNECT A VCR TO YOUR TV
:PVDBOVTFZPVS57BTBNPOJUPSGPSZPVSQFSTPOBMDPNQVUFSCZDPOOFDUJOHJU
XJUIB7("DBCMFOPUTVQQMJFE
There are two ways in which you can connect a VCR to your TV. Make sure that
both the TV and VCR are switched off before you connect them.
3FBEZPVSDPNQVUFSVTFSHVJEFBOEDIFDLJUIBTB7("DPOOFDUPS
2 Turn the power off on your TV and PC.
Connection Option 1
$
POOFDUB%UZQFQJO7("JOUFSGBDFDBCMFUPUIF7("WJEFPJOUFSGBDF
connector on the PC. Connect the other end of the cable to the PC interface
DPOOFDUPSPOUIF575JHIUFOUIFTDSFXTPOUIF7("DPOOFDUPSTBOEDPOOFDU
UIFBVEJPDBCMFOPUTVQQMJFE
UPUIFBVEJPJOQVUTPDLFUPOUIFCBDLPGUIF57
Set the VCR output switch to 3 or 4, then tune the TV to the same
channel number.
4 Turn on the power of the TV first and then the PC.
Connection Option 2
5 Press the SOURCE button on the TV or TV remote control to set the video
input mode to PC.
1 Connect the audio and S-VIDEO cables from the VCR output jacks to the TV
input jacks.
6 Once the image shows, if there is noise present, change the PC mode to
another resolution, change the refresh rate to another rate or adjust the
brightness and contrast on the menu until the picture is clear.
2 Insert a video tape into the VCR and press PLAY on the VCR.
CONNECT A DVD PLAYER TO YOUR TV
SCART INPUT
$POOFDUUIF%7%WJEFPPVUQVUT:1#13
UPUIF$0.10/&/5:1C1S
*/
socket on your TV.
$
POOFDUUIFTDBSUMFBEGSPNUIFFYUSFOBMEFWJDF%7%QMBZFS4FUUPQCPYPS
HBNFTDPOTPMF
UPUIF57TDBSUTPDLFU
2
1
3 Turn on the power of the TV first, then the VCR.
VCR
4 Press the SOURCE button on the TV to set the video input mode to S-VIDEO.
2 Press the SOURCECVUUPOUPTFMFDU4$"35NPEF
1 Turn on the DVD player and insert a DVD.
3 Press the PLAY button on the external device.
2 Press the SOURCE button to select COMPONENT.
3 Refer to the DVD player user guide for operating instructions.
HDMI INPUT
1 Connect the cable from the HDMI device to the TV HDMI socket.
2 Press the SOURCE button to select HDMI mode.
3 Refer to the HDMI device user guide for how to operate.
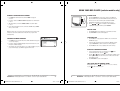
MOUNT YOUR TV ONTO THE WALL
If you have the 19” or 22” TV, you can mount it onto the wall by using a wall
CSBDLFUOPUTVQQMJFE
6TFNBDIJOFTDSFXT.YNNOPUTVQQMJFE
UP
TDSFXUIF57POUPUIFCSBDLFUOPUTVQQMJFE
4FFUIFXBMMCSBDLFUVTFSHVJEF
for instructions.
WHARFEDALE | HD Ready Digital LCD TV | User Manual | Customer helpline: 0845 604 0105
WHARFEDALE TV SML SCREEN D5.indd 13
13
14/9/07 11:55:40
14
WHARFEDALE | HD Ready Digital LCD TV | User Manual | Customer helpline: 0845 604 0105
WHARFEDALE TV SML SCREEN D5.indd 14
14/9/07 11:55:41
SETTING UP
TUNING YOUR TV
LOCATION
TUNING YOUR TV FOR DIGITAL CHANNELS
:PVXJMMOFFEUPQMBDFZPVS57OFBSZPVSQMVHTPDLFUTPUIFQPXFSDBCMFDBO
DPNGPSUBCMZSFBDI
BOEOFBSZPVSBFSJBMMFBE
1 Press the DTV/TV button so that DTV is displayed for a few seconds in the top
left corner of the screen.
2 Press D.MENU.
3 Using the
CONNECTION
button, scroll to Settings and press OK.
4 Scroll down to Installation and press OK again.
*OTFSUZPVS57BFSJBMMFBEJOUPUIF"OUFOOBJOQVUPOUIF57
5 Make sure First Time Installation is highlighted and press OK.
2 Insert the three-pin plug at the end of the power lead into a wall socket.
: PVXJMMCFBTLFEUPDPOmSNUIBUZPVXBOUUPTUBSUFirst Time Installation.
Highlight Yes and press OK. Choose between manual or automatic search,
then press OK.
3 Insert the batteries into the remote. Make sure they are inserted the right way
around, matching the polarity as indicated inside the battery compartment.
7 The search screen will be displayed and the search will begin. It will take
BGFXNPNFOUTTFFJNBHF
1
CAUTION OF BATTERY
t %
POPUBUUFNQUUPSFDIBSHFTIPSUDJSDVJUEJTBTTFNCMFIFBUPSUISPXUIF
batteries into a fire.
RETUNING YOUR TV FOR ANALOGUE CHANNELS
t 1 MBDJOHCBUUFSJFTXJUIXSPOHPSNJYFEQPMBSJUJFTXJMMSFTVMUJOEBNBHFUPUIF
batteries and/or may result in a malfunction of the unit.
1 Press the DTV/TV button so that TV is displayed for a few seconds in the top
left corner of the screen.
t %POPUNJYPMEBOEOFXCBUUFSJFT
t %JTQPTFPGCBUUFSJFTQSPQFSMZJOBDDPSEBODFXJUIMPDBMMBX
2
t %
POPUNJYBMLBMJOFTUBOEBSEDBSCPO[JOD
PSSFDIBSHFBCMF
OJDLFMDBENJVN
CBUUFSJFT
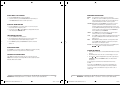
2 Press MENU then the V+ button twice until the TUNING menu appears on
TDSFFOTFFJNBHF
TU NIN G
TUNING PROGRAM
COUNTRY
AUTO SEARCH
U NITE D K INGDOM
3 Press the P- button so AUTO SEARCH is highlighted. Press V+ or V- to select
YES, then press MENU to confirm.
4 The TV will automatically search for channels and save each one.
The progress will be displayed on screen.
'PSEFUBJMTPOIPXUPBUUBDIPUIFSFRVJQNFOUUPZPVS57TFF(&550,/08:063
TV CONTROLS on page 9.
5 When the search is complete, AUTO SEARCH will shut and the first TV
channel found will be displayed.
SWITCHING YOUR TV ON
1 Press the STANDBY or the POWER button on the top of the TV or on your
remote control.
SWITCHING TO AN EXTERNAL SOURCE OTHER THAN TV
If you have attached a DVD player or similar device to the TV, you’ll need to tell
the TV to display the content from it. Simply press SOURCE repeatedly to cycle
through the options and stop when the required source name is displayed in the
top right corner of the screen.
2 The TV will turn on and the red light will turn green. This may take a
few moments.
3 The first time you switch on, a box will appear on screen asking if you’d like
to AUTO SEARCH for channels. Press P+/P- to select YES , then press MENU
UPDPOmSNUIFTFBSDIPSQSFTTV- then MENU to select NO and tune later,
UVSOUPQBHF
'PSEFUBJMTPGIPXUPQMVHJOPUIFSFRVJQNFOUTFF(&550,/08:06357
CONTROLS on page 9.
5 IF57XJMMBVUPNBUJDBMMZCFHJOUPTFBSDIGPSDIBOOFMT"QSPHSFTTCBSXJMM
appear on screen. This process will take a few moments.
5 When the search is complete, AUTO SEARCH will shut and the TV channel
TBWFEUPCVUUPOUIJTTIPVMECF##$
XJMMCFEJTQMBZFE
WHARFEDALE | HD Ready Digital LCD TV | User Manual | Customer helpline: 0845 604 0105
WHARFEDALE TV SML SCREEN D5.indd 15
15
14/9/07 11:55:41
16
WHARFEDALE | HD Ready Digital LCD TV | User Manual | Customer helpline: 0845 604 0105
WHARFEDALE TV SML SCREEN D5.indd 16
14/9/07 11:55:42
USING YOUR TV IN DIGITAL MODE
CHANGING THE CHANNEL
VIEWING THE ELECTRONIC PROGRAMME GUIDE (EPG)
Change the channel by keying in the channel number of the station you want to
watch using the numerical buttons.
1 Press the D. MENU button and scroll to Now/Next EPG using the
then press OK.
"MUFSOBUJWFMZVTFUIFP+ and P- buttons to move consecutively through your
channel list.
2 The page shows the current programme for every channel and the next
scheduled programme. Use the and buttons to scroll through the list.
From there you can see the TV schedule in two differnet ways:
If you press the blue button, the page shows the TV schedule as a list.
Highlight a channel from the list to the left of the screen using the and
buttons to see a list of its scheduled programmes displayed on the right.
The list is displayed in 2 hour sections; press the green button to see what’s
on later and the red button to move back. Use the blue and yellow buttons to
TLJQGPSXBSEBOECBDLUISPVHIEBZT:PVDBOOPUWJFXTDIFEVMFTPGQBTUEBUFT
or times.
ADJUSTING THE VOLUME
Use the V+ and V- buttons to turn the volume of your TV up or down.
Press MUTE to remove the sound altogether and simply press it a second
time to switch the sound back on.
VIEWING YOUR DIGITAL CHANNEL LIST
If you press the yellow button, the page shows the TV schedule as a timeline.
Use the , , and buttons to move the cursor around the timeline.
Use the red and green buttons to zoom in or out of the timeline. Use the blue
and yellow buttons to skip forward and back through days.
1 Switch to digital mode, press the D.MENU button and select Channel List.
:PVDBOTDSPMMUISPVHIUIFMJTUVTJOHUIF
and
button,
buttons.
3 Select a channel to view on the right of the screen by highlighting it and
pressing OKTFFJNBHF
3 Highlight a programme in any of the EPG modes and press INFO to bring up a
brief description of it.
3
4 To exit, press D.MENU again.
4 Press EXIT, EPG or D.MENU to exit EPG.
VIEWING THE DETAILS OF THE CURRENT PROGRAMME
RENAMING A CHANNEL IN YOUR CHANNEL LIST
Press INFO on the remote control to bring up the programme information banner.
It shows the currently showing programme, the next scheduled programme
BOEUIFSVOOJOHUJNFTPGFBDITFFJNBHF
4
1 Open your channel list by pressing D.MENU and selecting Channel List.
2 Using the and
it is highlighted.
The INFO button is used in DTV mode.In analogue tv mode, you can press the
DISPLAY button.
buttons, scroll to the channel you want to rename so that
3 Using the button, move the cursor to the Edit Name option at the bottom of
the screen and press OKTFFJNBHF
5
4 The name of the selected channel will appear below the mini screen to the
right which will be showing the channel you have selected. Use the and
buttons to move the cursor to the letter you want to change and use the
and buttons to scroll through letters, numbers and symbols until you find
the one you want.
5 Press OK to apply the new name to your channel list and press the D. MENU or
EXIT button to exit.
WHARFEDALE | HD Ready Digital LCD TV | User Manual | Customer helpline: 0845 604 0105
WHARFEDALE TV SML SCREEN D5.indd 17
17
14/9/07 11:55:42
18
WHARFEDALE | HD Ready Digital LCD TV | User Manual | Customer helpline: 0845 604 0105
WHARFEDALE TV SML SCREEN D5.indd 18
14/9/07 11:55:43
DELETING A CHANNEL FROM YOUR CHANNEL LIST
ACCESSING AND USING DIGITAL TELETEXT
1 Open your channel list by pressing D.MENU and selecting Channel List.
Digital text varies depending on what channel you are viewing when you access
it. Some channels offer special teletext services with extra channels and
interactive services. Some channels do not have any teletext pages.
2 Use the
and
buttons to move to the channel you want to delete.
3 Use the button to move the cursor to the Delete option near the bottom of
the screen and press OK to select.
5 The channel will be deleted immediately. To exit the channel list, press EXIT.
To access digital text press the
button. Use the and buttons to scroll
through the bookmarked pages and press OKUPTFMFDUPOF"MUFSOBUJWFMZZPVDBO
use the colour buttons to browse by section or use the number buttons to input a
three-digit page number and go directly to it.
CHECKING FOR NEW CHANNELS
DISPLAYING SUBTITLES
"
TDSFFOXJMMUIFOQPQVQBTLJOHZPVUPDPOmSNUIBUZPVXBOUUPEFMFUFUIF
selected channel. Press OK to accept.
New digital channels are always being added, even to freeview, so it’s good to
refresh your channel list regularly to make sure you’re up-to-date.
1 Press the SUBTITLE button.
2 Subtitles will now appear on all channels they are available for.
1 Press D. MENU, scroll to Settings, then Installation and press OK.
3 To switch them off, press the SUBTITLE button again.
2 Select AUTOMATIC SEARCH and press OK"XBSOJOHNFTTBHFXJMMBQQFBS
BOEZPVMMOFFEUPDPOmSNZPVXBOUUPDPOUJOVFXJUIUIFTFBSDI:PVS
previous channel list will be deleted and replaced. Select Yes to continue
by pressing OKTFFJNBHF
6
NOTE:PVDBOUVTFEJHJUBMUFMFUFYUTFSWJDFTXIJMFTVCUJUMFTBSFTXJUDIFEPO
If you try, a reminder will ask you if you’d like to switch the subtitles off so you
can access teletext.
3 When the search is complete the search screen will close and the first
channel in the channel list will automatically be displayed.
4 Press OK to see whether you’ve picked up any new channels.
CHANGING THE LANGUAGE
1 Press D. MENU, then press the
Press OK.
NOTE:PVDBONBOVBMMZTFBSDIGPSBDIBOOFMCZTFMFDUJOHManual Search from
the Installation Menu and choosing a channel number to search for.
button until Settings is highlighted.
2 From the Settings menu, highlight Language and press OK to open the
Language page.
SETTING UP A FAVOURITE CHANNEL LIST
3 From here you can ascertain the language for the audio and subtitles of each
programme. If the preferred language is unavailable, your TV will default
to English.
1 Open your channel list by pressing D.MENU and selecting Channel List.
2 Press the button to move the cursor to Favourites at the bottom of the
screen and press OK.
4 The Current option allows you to change the subtitle and audio language of
just the channel you are currently watching. Only the available languages
are displayed.
3 Then, using the and buttons, scroll through your channel list. When a
channel you want to select as a Favourites is highlighted press OK. The
OVNCFSXJMMBQQFBSOFYUUPUIFDIBOOFMOBNF:PVDBOTFMFDUEJGGFSFOU
lists of favourite channels. The number next to the channel will correspond to
UIFMJTUZPVDIPPTF:PVDBOSFQFBUUIJTQSPDFTTBTNBOZUJNFTBTZPVXBOU
adding as many channels as you like to your Favourites list.
WHARFEDALE | HD Ready Digital LCD TV | User Manual | Customer helpline: 0845 604 0105
WHARFEDALE TV SML SCREEN D5.indd 19
19
14/9/07 11:55:44
20
WHARFEDALE | HD Ready Digital LCD TV | User Manual | Customer helpline: 0845 604 0105
WHARFEDALE TV SML SCREEN D5.indd 20
14/9/07 11:55:44
LOCKING A CHANNEL
:PVDBOJODSFBTFUIFTFDVSJUZPGZPVSEJHJUBMQSPHSBNNFTBOEQSFWFOUZPVOH
viewers watching programmes that aren’t suitable for them by locking a channel.
CHANGING YOUR SECURITY CODE
1 Press D. MENU and scroll to Settings, then Configuration using the
Press OK.
1 Open your channel list by pressing D.MENU and selecting Channel List.
Using the and buttons, scroll to the channel you want to lock.
2 Scroll to the Lock option at the bottom of the screen using the
and press OK.
2 In the Configuration menu, use the
and press OK.
button
and
button to move to Parental Settings
3 Enter the security code, which is factory set to 0000.
3 Enter the factory set security code, which is 0000. For details on how to
DIBOHFUIJTTFFQBHF"QBEMPDLJDPOXJMMBQQFBSOFYUUPUIFDIBOOFM
name in the channel list.
4 To lock additional channels, highlight them using the
press OK.
button.
4 Press the
button to highlight Set Lock Key and press OK.
5 Enter a new 4 digit security code once in the Lock Key field and again in the
Confirm field and press OK.
buttons and
6 The security code will automatically be changed. Press D. MENU to exit.
5 Whenever anyone tries to select the locked channels they will be required to
input the security code first.
LOCKING PARTS OF THE SETTINGS MENU
Using menu lock, you can lock all of the menu or sections of the menu to prevent
unauthorised addition of new channels or settings changes.
1 Press D. MENU and scroll to Settings, then Configuration using the
Press OK.
2 In the Configuration menu, use the
and press OK.
7
button.
button to move to Parental Settings
& OUFSUIFTFDVSJUZDPEFXIJDIJTGBDUPSZTFUUPTFFJNBHF
'PS
details on how to change the security code see page 22.
4 Highlight Menu Lock and use the
button to choose between:
INSTALLATION: This locks the Installation Menu to prevent new channels
from being added.
MAIN MENU"MMNFOVTBDDFTTJCMFGSPNUIFNBJONFOVBSFMPDLFE
DISABLED: No menus are locked.
WHARFEDALE | HD Ready Digital LCD TV | User Manual | Customer helpline: 0845 604 0105
WHARFEDALE TV SML SCREEN D5.indd 21
21
14/9/07 11:55:44
22
WHARFEDALE | HD Ready Digital LCD TV | User Manual | Customer helpline: 0845 604 0105
WHARFEDALE TV SML SCREEN D5.indd 22
14/9/07 11:55:45
USING YOUR TV IN ANALOGUE MODE
VIEWING THE DETAILS OF AN ANALOGUE CHANNEL
RENAMING A CHANNEL IN YOUR CHANNEL LIST
1 Press MENU, then the V+ button twice until the TUNING menu appears
on screen.
1 Press MENU then the V+ button twice until the TUNING menu appears
on screen.
2 Press the P- button so TUNING PROGRAM is highlighted. Press the V+ button
to select.
2 Press the P- button so TUNING PROGRAM is highlighted. Press the V+ button
to select.
3 Press the V+ button repeatedly to cycle through the channels.
The programme showing in the background will change as your move
between channel details.
3 Using the P- button, scroll down to EDIT NAME. Press the V+ button to select.
4 Move the cursor through the characters of the existing name using the V+
and V- buttons. Use the P- and P+ buttons to change the letter or number.
5 Press MENU to store your changes and EXIT to exit.
VIEWING THE DETAILS OF THE CURRENT PROGRAMME
Press DISPLAY on the remote control to bring up the programme
information banner.
SKIPPING A CHANNEL FROM YOUR CHANNEL LIST
1 Press MENU, then the V+ button twice until the TUNING menu appears
on screen.
CHANGE THE ORDER OF YOUR CHANNEL LIST
2 Press the P- button so TUNING PROGRAM is highlighted. Press the V+ button
to select.
1 Press MENU, then the V+ button twice until the TUNING menu appears
on screen.
3 With the P- button, scroll down to SKIP. Press the V+ button to select ON.
2 Press the P- button so TUNING PROGRAM is highlighted. Press the V+ button
to select.
4 The TV will not stop on this channel anymore. If you want to re-include this
channel, you just have to go back to the SKIP menu and select OFF.
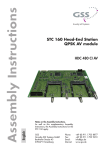
3 With the P- button, scroll down to EXCHANGE TFFJNBHF
1SFTTUIFV+
button to select.
4 When you have highlighted TO, use the V+ button to move the channel to
the position you want to place the channel in. For example, ITV1 may have
tuned to button number four and you may want it to correspond to button
number three.
5 When you have highlighted the new required position of the channel scroll
down with the V+ button to EXCHANGE. The channel will automatically be
moved to its new position.
5 Press EXIT to exit.
8
EXCH A N GE
ACCESSING AND USING TELETEXT
FROM :
4
TO :
3
Teletext varies depending on what channel you are viewing when you access it.
To access Teletext press . Use the colour buttons to browse by section or use
the number buttons to input a three-digit page number and go directly to it.
EXCH A NGE
DISPLAYING SUBTITLES
6 Press EXIT to exit.
Press the SUBTITLECVUUPOTFF(&550,/08:0633&.05&$0/530-on page
JGZPVBSFVOTVSFPGXIFSFUIJTCVUUPOJT
UPEJTQMBZUIFTVCUJUMF
WHARFEDALE | HD Ready Digital LCD TV | User Manual | Customer helpline: 0845 604 0105
WHARFEDALE TV SML SCREEN D5.indd 23
23
14/9/07 11:55:45
24
WHARFEDALE | HD Ready Digital LCD TV | User Manual | Customer helpline: 0845 604 0105
WHARFEDALE TV SML SCREEN D5.indd 24
14/9/07 11:55:45
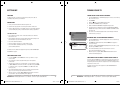
USING YOUR DVD PLAYER (certain models only)
PLAYING A DVD
MANUALLY SEARCHING FOR A CHANNEL
1 Press MENU, then the V+ button twice until the TUNING menu appears
on screen.
Data
S id
e
1 Press the DTV/DVD button on the remote control to enter DVD mode.
2 Place the DVD in the disc slot with the DVD label facing away from you
and the screen. The disc slot will only take standard-sized DVDs.
2 Press the P- button so TUNING PROGRAM is highlighted. Press the V+ button
to select.
3 The DVD will automatically load; most begin with a disc menu.
3 With the P- button, scroll down to MANUAL SEARCH. Press the V+ button
to select.
4 Use the , , and buttons to navigate around the DVD menu
to highlight the play option and then press PLAY/ENTER.
4 Use the V+ and V- buttons to tune the channel UP or DOWN and press MENU
when you have found it.
PAUSING A DVD
1 Press PAUSE/STEP to pause playback. The sound will also be muted.
NOTE:PVDBOmOFUVOFZPVSDIBOOFMTCZTFMFDUJOHUIFmOFUVOFPQUJPOGSPNUIF
Tuning menu. Use the V+ and V- buttons in the same way as you do when
manually tuning.
CHANGING THE MENU LANGUAGE
1 Press MENU, then the V+ button three times until the Function menu appears
POTDSFFOTFFJNBHF
2 Press the P- button to highlight Language and press the V+ button to scroll
through the available languages.
2 Press PLAY/ENTER to resume normal playback.
F U N CT IO N
IN PUT SOURCE
TV
LA N GUAGE
ENGLISH
T X T LA N GUAGE
PA N EUROPEA N
T X T EAST/WEST
EAST
BLU E SCREEN
ON
D ISPLAY MODE
4:3
RESET
C HI LD LOCK
STOPPING A DVD
9
1 Press the Q button to stop playback of a DVD. The TV screen will show
the DVD start-up logo.
2 Some discs will remember the moment at which the DVD was stopped,
so press PLAY/ENTER to recall the moment and continue playback.
3 Press the Q button twice to stop completely and clear the memory.
3 The language of the menu will change as you scroll through. When you get to
your preferred language, press EXIT to apply and exit the menu.
USING FAST FORWARD OR REWIND
1 To move forward through a disc more quickly, press the
To rewind through the disc, press the
button.
button.
2 Press the
or
button repeatedly to cycle through the available speeds,
XIJDIBQQFBSJOUIFUPQMFGUDPSOFSPGUIFTDSFFO99999BOE
normal playback speed.
3 Press PLAY/ENTER to resume normal playback.
SKIP TO THE NEXT OR PREVIOUS SCENE
During playback press the
button to skip to the next scene on the disc,
or press
to skip to the previous one.
WHARFEDALE | HD Ready Digital LCD TV | User Manual | Customer helpline: 0845 604 0105
WHARFEDALE TV SML SCREEN D5.indd 25
25
14/9/07 11:55:46
26
WHARFEDALE | HD Ready Digital LCD TV | User Manual | Customer helpline: 0845 604 0105
WHARFEDALE TV SML SCREEN D5.indd 26
14/9/07 11:55:47
USING SINGLE STEP PLAYBACK
ADDITIONAL DVD FUNCTIONS
1 Press the PAUSE/STEP button to pause the playback.
D.MENU
Press this button to return to the previous menu item.
2 To view the next frame, press the PAUSE/STEP button again. Each press
of the PAUSE/STEP button advances the film by one frame.
A-B
Use A-B to set a section of a DVD to repeat. Press A-B to mark the
start point and again to mark the end. The section will begin to be
repeated immediately. Press A-B to cancel the repetition.
PROGRAM During playback press PROGRAM to move directly to a section or
programme on the DVD. Press the digit buttons to select the
programme number that you want. When finished, move the cursor
to select START. The DVD will jump directly to that section and begin
to play. If you want to cancel this function, press PROGRAM and
move to STOP, then press PLAY/ENTER.
USING THE ZOOM FUNCTION
1 Press the ZOOMCVUUPOUP[PPNJOUPUIFJNBHFPOTDSFFO:PVDBOQSFTT
it repeatedly to further enlarge the picture.
2 In zoom mode use the , , and buttons to display a different section
of the enlarged picture on the screen.
SWITCHING ON SUBTITLES
SEARCH
Press SEARCH and use the numerical keys to enter the chapter
number you wish to go to and press PLAY/ENTER.
SLOW
Press SLOW to slow down playback speed. Repeated pressing varies
the speed of SLOW playback and eventually will resume normal
playback speed.
AUDIO
Many DVDs have multiple soundtracks. To change between them
press the AUDIO button. Wait three seconds before pressing the
button again, to cycle through the options.
1 Press the SUBTITLE button during playback.
2 The available languages will appear in the top left corner of the screen.
Press repeatedly until your desired subtitle language is shown.
3 Press SUBTITLE repeatedly until SUBTITLE OFF is shown to switch the
subtitles off.
TITLE/PBC Press this button to return to the title menu on some DVDs. Use the
, , and buttons to navigate around the menu.
USING REPEAT MODE
Press REPEAT once to repeat the chapter on a DVD, twice to repeat the currently
playing title or three times to repeat the whole contents of the disc.
PLAYING AN AUDIO CD
1 Insert a CD in the same way as you would a DVD, with the label facing away
from you.
CHANGING THE CAMERA ANGLE
2 The CD will load and a menu of the disc’s contents will appear on screen.
Some DVDs have multiple camera angles for some or all scenes. Press the
ANGLE button to change the camera angle. Different camera angles may include:
front, side, whole view or exterior.
3 Use the and buttons to highlight the track you wish to play and press
PLAY/ENTER, or just press PLAY/ENTER to listen to the whole CD from
the beginning.
:PVDBOTUPQQBVTFGBTUGPSXBSEPSGBTUSFXJOEB$%JOUIFTBNFXBZ
as a DVD.
:PVDBOBMTPVTFUIFREPEAT button to repeat a track, folder/album or the
contents of the whole disc. Press repeatedly to select what you would like
UPSFQFBU:PVDBOBMTPVTFUIFA-B function to repeat a certain section of
a track or CD.
WHARFEDALE | HD Ready Digital LCD TV | User Manual | Customer helpline: 0845 604 0105
WHARFEDALE TV SML SCREEN D5.indd 27
27
14/9/07 11:55:47
28
WHARFEDALE | HD Ready Digital LCD TV | User Manual | Customer helpline: 0845 604 0105
WHARFEDALE TV SML SCREEN D5.indd 28
14/9/07 11:55:47
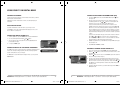
ADJUSTING YOUR PICTURE AND SOUND SETTINGS
PLAYING A JPEG CD
CHANGING THE PICTURE SETTINGS
*OTFSUB+1&($%JOUIFTBNFXBZBTZPVXPVMEB%7%PS"VEJP$%XJUIUIF
label facing away from you.
1 Press MENU to open the main menu, the first page of which is the picture
TFUUJOHTQBHFTFFJNBHF
2 The CD will load and a menu of the disc’s contents will appear on screen.
10
3 Use the and buttons to highlight the folder and picture you wish to view
and press PLAY/ENTER. Each image on the disc will show consecutively,
like a slideshow.
BRIGH TNESS
CON TRAST
SHARPNESS
COLOUR
NOISE REDUCT IO N
4 Press PAUSE/STEP during the slideshow to pause on one image.
5 Press the
or
previous one.
PICTURE
button to skip to the next image or return to the
50
50
2
50
OFF
2 Use the P- and P+ buttons to scroll through the options. They are:
BRIGHTNESS, CONTRAST and COLOUR - Use the V- and V+ buttons to select
a level between 0 and 100. The picture will adjust as you change the level.
SHARPNESS - Use the V- and V+ buttons to select a level between 0 and 4.
The picture will adjust as you change the level.
NOISE REDUCTION - Choose one of the preset picture levels from:
OFF/LOW/MID/HIGH.
3 Press MENU twice to apply your amended settings and exit the menu.
CHANGING YOUR SOUND SETTINGS
11
1 Press MENU, then the V+ button until the AUDIO menu appears on screen
TFFJNBHF
AUDIO
VOLUME
BALANCE
BASS
TREBLE
AUDIO MODE
AVL
50
50
50
50
VOICE
OFF
2 Use the P- and P+ buttons to scroll through the options. They are:
VOLUME, BALANCE, BASS, TREBBLE - Use the V- and V+ buttons to select a
level between 0 and 100. The sound will adjust as you change the level.
AUDIO MODE - Choose one of the preset audio modes from: Voice, Music,
Theatre, Personal.
AVLAUTO VOLUME) - Use the V- and V+ buttons to select On or Off.
3 Press MENU to apply your amended settings and exit the menu.
SETTING A SLEEP TIMER
The Sleep Timer allows you to set you TV to switch off automatically at a
predefined time.
1 Press the SLEEP button and press it repeatedly to cycle through the available
UJNFTUIFPQUJPOTBSF
" GUFSZPVIBWFDIPTFOUIFTMFFQUJNFSXBJUBGFXTFDPOETVOUJMUFYU
disappears from the screen.
3 When the set time has expired the TV will automatically turn off.
WHARFEDALE | HD Ready Digital LCD TV | User Manual | Customer helpline: 0845 604 0105
WHARFEDALE TV SML SCREEN D5.indd 29
29
14/9/07 11:55:48
30
WHARFEDALE | HD Ready Digital LCD TV | User Manual | Customer helpline: 0845 604 0105
WHARFEDALE TV SML SCREEN D5.indd 30
14/9/07 11:55:48
SPECIFICATION
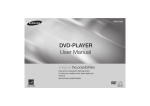
ADJUSTING FUNCTION SETTINGS
Specifications of the television that you have just purchased may vary from the
information in this table due to technical innovations.
1 Press MENU then the V+ button until the FUNCTION menu appears on
screen.
2 Scroll through the options using the P- and P+ buttons. They are:
INPUT SOURCE - Choose between TV, Scart, S-video, PC, Component, HDMI,
%57PS%7%
Model
LANGUAGE - Change the language used by the menus.
TEXT LANGUAGE- Select between pan european, greek or cyrillic.
TEXT EAST/WEST- Select between east or west.
BLUE SCREEN - Choose either On or Off.
DISPLAY MODE - Choose the size of the screen. Options are full screen,
16:9 or 4:3.
RESET – Press the V+ button to install the original settings back.
CHILD LOCK - Press the V+ button to access the CHILD LOCK menu.
1 From the Function menu, choose Child Lock TFFJNBHF
Enter the four-digit password which is factory set to 0000.
Picture, sound
system
1"-4&$".#(%,*--
Audio output
≥1.5W+1.5W
External input
port
$0.10/&/5JOQVU1$JOQVU47*%&0JOQVU"VEJPJOQVU
)FBEQIPOFPVUQVU4$"35JOQVU"OUFOOB)%.*JOQVU
Power
requirements
~150-240V 50/60Hz
Power
consumption
USING THE CHILD LOCK FUNCTION
12
C HI LD LOCK
PASSWORD
C HI LD LOCK
O FF
≤50W
≤60W
Temperature
Working: 5°C – 35°C
Storage: -15°C – 45°C
Humidity
Working: 20% – 80%
Storage: 5% – 90%
2 The Child Lock menu will open.
3 Scroll through the options using the P- and P+ buttons. They are:
-58"-58"-58"
L15T11W-C
L19T11W-C
L22T11W-C
Accessories
PASSWORD - to input your new password. When you have inputted the four
EJHJUTZPVXJMMCFQSPNQUFEUPFOUFSJUBHBJO:PVSOFXQBTTXPSEXJMMUIFOCF
automatically saved.
≤70W
Remote control
Batteries
Owner’s manual
"VEJPDBCMF
CHILD LOCK - Use the V- and V+ buttons to select On or Off.
NOTE
"MMTQFDJmDBUJPOTBSFTVCKFDUUPDIBOHFXJUIPVUOPUJDF
"MMRVBMJUJFTBSFBQQSPYJNBUFWBMVFT
WHARFEDALE | HD Ready Digital LCD TV | User Manual | Customer helpline: 0845 604 0105
WHARFEDALE TV SML SCREEN D5.indd 31
31
14/9/07 11:55:49
32
WHARFEDALE | HD Ready Digital LCD TV | User Manual | Customer helpline: 0845 604 0105
WHARFEDALE TV SML SCREEN D5.indd 32
14/9/07 11:55:49
TROUBLESHOOTING
PRODUCT GUARANTEE
To assist in location of possible faults use the help guide below:
Problem
No picture,
no sound
Check
This product is guaranteed against manufacturing defects for a period of
Check if the television is properly plugged in.
Check if the television has a proper supplied power source.
Check if electricity is available.
1 Year
This does not cover the product where the fault is due to misuse, abuse,
use in contravention of the instructions, or where the product has been the
subject of unauthorised modifications or alterations, or has been the subject
of commercial use.
Check if correct signals are input.
Blank screen
Press the SOURCE button to change the signal input to
TV input.
In the event of a problem with the product within the guarantee period please
call the customer helpline on 0845 604 0105. If the item is shown to have
IBEBOJOIFSFOUEFGFDUQSFTFOUBUUIFUJNFPGTBMF"SHPTXJMMQSPWJEFZPVXJUI
a replacement.
Restart the television if power supply is interrupted.
No sound
Press the MUTE button and verify if Mute mode is set.
Switch to another channel and verify if the same
problem happens.
Press the V+ button to see if the problem can be solved.
Poor sound
Check if the sound system is correct. Refer to the user
manual for adjustment.
No picture in
some channels
Check if correct channel is selected.
"EKVTUUIFBOUFOOB
Make adjustments by FINE TUNE and MANUAL SEARCH.
No colour for
some channel
programmes
CMBDLXIJUF
Check if the same problem exists in other channels.
Check out of picture and sound systems.
Refer to relative instructions in the Manual for
colour adjustment.
Spots with some
or all pictures
Check if the antenna is correctly connected.
Check if the antenna is in a good condition.
Make fine adjustment of channel.
Television out
of control
Disconnect the television from the power supply and 10
seconds later, connect the television to the power supply.
If the problem still exists, contact authorised after-sales
service for technical assistance.
:PVSTUBUVUPSZSJHIUTSFNBJOVOBGGFDUFE
(VBSBOUPS"SHPT-UE
"WFCVSZ#PVMFWBSE
Central Milton Keynes
MK9 2NW
NOTE
1 If the fault cannot be repaired using the above guide consult with your local
authorised service centre.
2 The TV set must only be repaired by a qualified registered service person.
Never attempt to remove the back cover as the TV set has dangerous
voltages inside that may cause a fatally or fire.
WHARFEDALE | HD Ready Digital LCD TV | User Manual | Customer helpline: 0845 604 0105
WHARFEDALE TV SML SCREEN D5.indd 33
33
14/9/07 11:55:49
34
WHARFEDALE | HD Ready Digital LCD TV | User Manual | Customer helpline: 0845 604 0105
WHARFEDALE TV SML SCREEN D5.indd 34
14/9/07 11:55:49
WHARFEDALE | HD Ready Digital LCD TV | User Manual | Customer helpline: 0845 604 0105
WHARFEDALE TV SML SCREEN D5.indd 35
35
14/9/07 11:55:49
WHARFEDALE TV SML SCREEN D5.indd 36
14/9/07 11:55:50