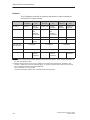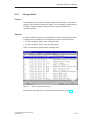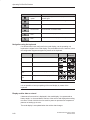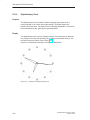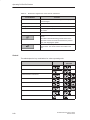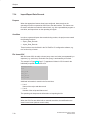
1
Preface, Contents
Introduction
1
Scope of Functions
ProTool/Pro
Runtime
2
Product Description
3
User’s Guide
Requirements for Commissioning
4
Commissioning
ProTool/Pro Runtime
5
Operating ProTool/Pro Runtime
6
Recipes
7
System Messages
A
SIMATIC HMI Documentation
B
SIMATIC HMI
Glossary, Index
6AV6594–1CA05–2AB0
Release 12/99
Trademarks
The registered trademarks of Siemens AG are listed in the Preface.
Some of the other designations used in these documents are also registered trademarks; the owner’s
rights may be violated if they are used be third parties for their own purposes.
Impressum
Editor and Publisher: A&D PT1.
Copyright Siemens AG 1999 All rights reserved
Disclaimer of Liability
The reproduction, transmission or use of this document or its contents is not
permitted without express written authority. Offenders will be liable for
damages. All rights, including rights created by patent grant or registration of
an utility model or design, are reserved.
We have checked the contents of this manual for agreement with the hardware and software described. Since deviations cannot be precluded entirely,
we cannot guarantee full agreement. However, the data in this manual are
reviewed regularly and any necessary corrections included in subsequent
editions. Suggestions for improvement are welcomed.
Siemens AG
Bereich Automatisierungs- und Antriebstechnik
Bedienen und Beobachten
Postfach 4848, D-90327 Nuernberg
E Siemens AG 1999
Technical data subject to change.
Siemens Aktiengesellschaft
Order no: 6AV6594–1CA05–2AB0
Preface
This manual
The ProTool/Pro Runtime User’s Guide is a part of the SIMATIC HMI
documentation. It describes:
S
S
S
commissioning the ProTool/Pro RT runtime software
downloading the configuration
operating the configuration
The description is applicable for the following Windows-based systems:
S
S
S
OP 37/Pro
SIMATIC Panel PC FI 25, FI 45, PC 670, PC 670T
Standard PC
An overview of the entire SIMATIC HMI documentation is provided in Appendix B.
Organization of the manual
The user’s guide is organized into the following chapters:
Chapter
1-2
Contents
Introduction and overview of functions
3
Area of use, short description of the objects within a configuration
and an overview of connection options to the PLC
4-5
Conditions for commissioning and downloading the configuration
6
Operating the runtime software
7
Handling recipes and data records
Appendix S System Messages
S SIMATIC HMI Documentation
ProTool/Pro Runtime User’s Guide
Release 12/99
i
Preface
Conventions
The following conventions are used in this User’s Guide:
VAR_23
Text which appears on the screen is displayed in a typewriter
font. This text includes: commands, file names, entries in dialog
boxes and system messages.
Tag
Dialogs, and fields and buttons in the dialogs, appear in italics.
File → Edit
Series of menu items are linked by arrows. The entire path to the
menu item is always specified.
F1
Key names are written in a different typeface.
History
The various editions of this User’s Guide correspond to the following versions of
the ProTool configuration software:
Edition
Comment
ProTool Version
07/98
First edition
as of V 5.0
01/99
Revised edition of the guide
as of V 5.1
12/99
New devices, new screen objects, recipes
as of V 5.2
Trademarks
The following names are registered trademarks of the Siemens AG:
ii
S
SIMATICR
S
SIMATIC HMIR
S
HMIR
S
ProToolR
S
ProTool/LiteR
S
ProTool/ProR
S
SIMATIC Multi PanelR
S
SIMATIC Multifunctional PlatformR
S
MP 270R
S
ProAgentR
ProTool/Pro Runtime User’s Guide
Release 12/99
Preface
Other support
In the case of technical queries, please contact the Siemens representatives in the
subsidiaries and branches responsible for your area.
SIMATIC Customer Support Hotline
Available worldwide, at all times:
Nuernberg
Johnson City
Singapur
SIMATIC Basic Hotline
Nuernberg
Johnson City
Singapur
SIMATIC BASIC Hotline
SIMATIC BASIC Hotline
SIMATIC BASIC Hotline
Local time
Mo - Fr 7:00 to 17:00
Local time
Mo - Fr 8:00 to 19:00
Local time
Mo - Fr 8:30 to 17:30
Telephone:
+49 (911) 895-7000
Telephone:
+1 423 461-2522
Telephone:
+65 740-7000
Fax:
+49 (911) 895-7002
Fax:
+1 423 461-2231
Fax:
+65 740-7001
E-Mail:
simatic.support@
nbgm.siemens.de
E-Mail:
simatic.hotline@
sea.siemens.com
E-Mail:
simatic.hotline@
sae.siemens.com
SIMATIC Premium Hotline
(charged, only with SIMATIC Card)
Time:
Mo - Fr 0:00 to 24:00
Telephone:
+49 (911) 895-7777
Fax:
+49 (911) 895-7001
ProTool/Pro Runtime User’s Guide
Release 12/99
iii
Preface
SIMATIC Customer Online Services
SIMATIC Customer Support offers comprehensive additional information
concerning SIMATIC products through its Online services as follows:
S
Up-to-date general information is provided
– in Internet under http://www.ad.siemens.de/simatic
– via the Fax-Polling under 08765–93 02 77 95 00
S
Up-to-date product information and downloads for practical use can be found:
– in Internet under http://www.ad.siemens.de/support/html–00/
Abbreviations
The abbreviations used in this user’s guide have the following meaning:
AG (PLC)
Programmable Logic Controller
AM
Alarm Message
ANSI
American National Standards Institute
AS 511
Protocol of the PU interface to SIMATIC S5
ASCII
American Standard Code for Information Interchange
CF
Compact Flash
CPU
Central Processing Unit
CSV
Comma Separated Values
DP
Decentralized Periphery
DSN
Data Source Name
EM
Event Message
HMI
Human Machine Interface
LED
Light Emitting Diode
MPI
Multipoint Interface (SIMATIC S7)
OLE
Object Linking and Embedding
OP
Operator Panel
OPC
OLE for Process Control
PC
Personal Computer
PLC
Programmable Logic Controller
PPI
Point to Point Interface (SIMATIC S7)
PU
Programming Unit
RAM
Random Access Memory
A list of all the specialist terms together with their explanations is provided in the
Glossary at the end of this guide.
iv
ProTool/Pro Runtime User’s Guide
Release 12/99
Contents
1
Introduction . . . . . . . . . . . . . . . . . . . . . . . . . . . . . . . . . . . . . . . . . . . . . . . . . . . . . . . . . . . .
1-1
2
Scope of Functions . . . . . . . . . . . . . . . . . . . . . . . . . . . . . . . . . . . . . . . . . . . . . . . . . . . . .
2-1
3
Product Description . . . . . . . . . . . . . . . . . . . . . . . . . . . . . . . . . . . . . . . . . . . . . . . . . . . .
3-1
4
5
3.1
3.1.1
3.1.2
3.1.3
3.1.4
3.1.5
3.1.6
3.1.7
3.1.8
Brief Description of Various Objects in a Configuration . . . . . . . . . . . . . . . .
Screens . . . . . . . . . . . . . . . . . . . . . . . . . . . . . . . . . . . . . . . . . . . . . . . . . . . . . . . .
Messages . . . . . . . . . . . . . . . . . . . . . . . . . . . . . . . . . . . . . . . . . . . . . . . . . . . . . .
Tags . . . . . . . . . . . . . . . . . . . . . . . . . . . . . . . . . . . . . . . . . . . . . . . . . . . . . . . . . . .
Functions . . . . . . . . . . . . . . . . . . . . . . . . . . . . . . . . . . . . . . . . . . . . . . . . . . . . . .
Printing . . . . . . . . . . . . . . . . . . . . . . . . . . . . . . . . . . . . . . . . . . . . . . . . . . . . . . . .
Archiving . . . . . . . . . . . . . . . . . . . . . . . . . . . . . . . . . . . . . . . . . . . . . . . . . . . . . . .
Protocols . . . . . . . . . . . . . . . . . . . . . . . . . . . . . . . . . . . . . . . . . . . . . . . . . . . . . . .
Scripts . . . . . . . . . . . . . . . . . . . . . . . . . . . . . . . . . . . . . . . . . . . . . . . . . . . . . . . . .
3-3
3-3
3-7
3-8
3-9
3-9
3-10
3-12
3-13
3.2
Connecting to the PLC . . . . . . . . . . . . . . . . . . . . . . . . . . . . . . . . . . . . . . . . . . .
3-14
Requirements for Commissioning . . . . . . . . . . . . . . . . . . . . . . . . . . . . . . . . . . . . . . .
4-1
4.1
Scope of Delivery . . . . . . . . . . . . . . . . . . . . . . . . . . . . . . . . . . . . . . . . . . . . . . .
4-2
4.2
System Requirements for PCs . . . . . . . . . . . . . . . . . . . . . . . . . . . . . . . . . . . .
4-3
4.3
Electrical Installation . . . . . . . . . . . . . . . . . . . . . . . . . . . . . . . . . . . . . . . . . . . . .
4-5
Commissioning ProTool/Pro Runtime . . . . . . . . . . . . . . . . . . . . . . . . . . . . . . . . . . . .
5-1
5.1
Installing and Configuring Windows . . . . . . . . . . . . . . . . . . . . . . . . . . . . . . . .
5-3
5.2
5.2.1
5.2.2
5.2.3
Install ProTool/Pro RT . . . . . . . . . . . . . . . . . . . . . . . . . . . . . . . . . . . . . . . . . . . .
SIMATIC Panel PC 670 and PC 670T . . . . . . . . . . . . . . . . . . . . . . . . . . . . . .
PC Without Runtime Software . . . . . . . . . . . . . . . . . . . . . . . . . . . . . . . . . . . .
Communication . . . . . . . . . . . . . . . . . . . . . . . . . . . . . . . . . . . . . . . . . . . . . . . . .
5-5
5-5
5-6
5-7
5.3
Retrofitting a Communication Processor . . . . . . . . . . . . . . . . . . . . . . . . . . . .
5-8
5.4
Settings for the OP 37/Pro . . . . . . . . . . . . . . . . . . . . . . . . . . . . . . . . . . . . . . . .
5-9
5.5
5.5.1
5.5.2
Downloading, Testing and Commissioning the Project . . . . . . . . . . . . . . . .
Scenarios . . . . . . . . . . . . . . . . . . . . . . . . . . . . . . . . . . . . . . . . . . . . . . . . . . . . . .
Simulation of a Project . . . . . . . . . . . . . . . . . . . . . . . . . . . . . . . . . . . . . . . . . . .
5-9
5-9
5-11
5.6
Starting a Project . . . . . . . . . . . . . . . . . . . . . . . . . . . . . . . . . . . . . . . . . . . . . . . .
5-16
5.7
Further Downloading Options . . . . . . . . . . . . . . . . . . . . . . . . . . . . . . . . . . . . .
5-17
ProTool/Pro Runtime User’s Guide
Release 12/99
v
Contents
6
Operating ProTool/Pro Runtime . . . . . . . . . . . . . . . . . . . . . . . . . . . . . . . . . . . . . . . . .
6-1
6.1
General Operation . . . . . . . . . . . . . . . . . . . . . . . . . . . . . . . . . . . . . . . . . . . . . .
6-1
6.2
Settings for the Runtime Software . . . . . . . . . . . . . . . . . . . . . . . . . . . . . . . . .
6-5
6.3
6.3.1
6.3.2
6.3.3
6.3.4
6.3.5
6.3.6
6.3.7
6.3.8
6.3.9
6.3.10
6.3.11
6.3.12
6.3.13
6.3.14
6.3.15
6.3.16
6.3.17
6.3.18
Operating Special Screen Objects . . . . . . . . . . . . . . . . . . . . . . . . . . . . . . . . .
Button . . . . . . . . . . . . . . . . . . . . . . . . . . . . . . . . . . . . . . . . . . . . . . . . . . . . . . . . .
Status Button . . . . . . . . . . . . . . . . . . . . . . . . . . . . . . . . . . . . . . . . . . . . . . . . . . .
Switches . . . . . . . . . . . . . . . . . . . . . . . . . . . . . . . . . . . . . . . . . . . . . . . . . . . . . . .
List Box . . . . . . . . . . . . . . . . . . . . . . . . . . . . . . . . . . . . . . . . . . . . . . . . . . . . . . . .
Message Line . . . . . . . . . . . . . . . . . . . . . . . . . . . . . . . . . . . . . . . . . . . . . . . . . . .
Message Window . . . . . . . . . . . . . . . . . . . . . . . . . . . . . . . . . . . . . . . . . . . . . . .
Message Page . . . . . . . . . . . . . . . . . . . . . . . . . . . . . . . . . . . . . . . . . . . . . . . . . .
Message Buffer . . . . . . . . . . . . . . . . . . . . . . . . . . . . . . . . . . . . . . . . . . . . . . . . .
Message View . . . . . . . . . . . . . . . . . . . . . . . . . . . . . . . . . . . . . . . . . . . . . . . . . .
Simple Message View . . . . . . . . . . . . . . . . . . . . . . . . . . . . . . . . . . . . . . . . . . .
Bar Graph . . . . . . . . . . . . . . . . . . . . . . . . . . . . . . . . . . . . . . . . . . . . . . . . . . . . . .
Trend Display . . . . . . . . . . . . . . . . . . . . . . . . . . . . . . . . . . . . . . . . . . . . . . . . . . .
Slider Control . . . . . . . . . . . . . . . . . . . . . . . . . . . . . . . . . . . . . . . . . . . . . . . . . . .
Analog Display . . . . . . . . . . . . . . . . . . . . . . . . . . . . . . . . . . . . . . . . . . . . . . . . . .
Date/Time . . . . . . . . . . . . . . . . . . . . . . . . . . . . . . . . . . . . . . . . . . . . . . . . . . . . . .
Digital/Analog Clock . . . . . . . . . . . . . . . . . . . . . . . . . . . . . . . . . . . . . . . . . . . . .
Password List . . . . . . . . . . . . . . . . . . . . . . . . . . . . . . . . . . . . . . . . . . . . . . . . . . .
Status/Force . . . . . . . . . . . . . . . . . . . . . . . . . . . . . . . . . . . . . . . . . . . . . . . . . . . .
6-7
6-8
6-9
6-10
6-11
6-12
6-12
6-14
6-15
6-16
6-17
6-18
6-19
6-21
6-22
6-23
6-24
6-25
6-27
Recipes . . . . . . . . . . . . . . . . . . . . . . . . . . . . . . . . . . . . . . . . . . . . . . . . . . . . . . . . . . . . . . . .
7-1
7.1
Overview . . . . . . . . . . . . . . . . . . . . . . . . . . . . . . . . . . . . . . . . . . . . . . . . . . . . . . .
7-1
7.2
Recipe Configuration . . . . . . . . . . . . . . . . . . . . . . . . . . . . . . . . . . . . . . . . . . . .
7-4
7.3
7.3.1
7.3.2
7.3.3
7.3.4
7.3.5
Editing Data Records . . . . . . . . . . . . . . . . . . . . . . . . . . . . . . . . . . . . . . . . . . . .
Recipe View . . . . . . . . . . . . . . . . . . . . . . . . . . . . . . . . . . . . . . . . . . . . . . . . . . . .
Recipe Screens . . . . . . . . . . . . . . . . . . . . . . . . . . . . . . . . . . . . . . . . . . . . . . . . .
Functions and PLC jobs . . . . . . . . . . . . . . . . . . . . . . . . . . . . . . . . . . . . . . . . . .
Import/Export Data Records . . . . . . . . . . . . . . . . . . . . . . . . . . . . . . . . . . . . . .
Reaction on Changing the Recipe Structure . . . . . . . . . . . . . . . . . . . . . . . .
7-6
7-7
7-15
7-17
7-18
7-21
A
System Messages . . . . . . . . . . . . . . . . . . . . . . . . . . . . . . . . . . . . . . . . . . . . . . . . . . . . . .
A-1
B
SIMATIC HMI Documentation . . . . . . . . . . . . . . . . . . . . . . . . . . . . . . . . . . . . . . . . . . . .
B-1
7
vi
ProTool/Pro Runtime User’s Guide
Release 12/99
Introduction
1
What is ProTool/Pro?
SIMATIC ProTool/Pro is an easy-to-use, high-performance visualization software
enabling the visualization of processes and runs under WindowsR 95/98,
WindowsR 2000 and WindowsR NT 4.0.
Modern automation concepts make great demands on process visualization. In
particular, process control in the machine-oriented sector must be able to satisfy
the demands made for high-performance and simple control of the processes. The
aim is to present process data to the operator quickly and clearly, and in a form
which can be easily understood; as a trend curve graphic, for example. It is
becoming increasingly important that process representations are presented in
ways which simplify the task of associating the graphics with the actual process. In
addition, there is a growing demand for the possibility to archive data, for quality
control purposes for example. This makes it necessary to archive process data
even in the machine-oriented sector. SIMATIC ProTool/Pro satisfies these
demands.
SIMATIC ProTool/Pro has been designed for the visualization and operation of
machines and small plants. The high-performance runtime software enables
reliable process control by providing short response times. One-touch operation on
the machine and reliable data acquisition present no problems.
ProTool/Pro components
SIMATIC ProTool/Pro consists of the ProTool/Pro CS configuration software and
ProTool/Pro Runtime (ProTool/Pro RT) process visualization software. Both
systems can run under WindowsR 95/98, WindowsR 2000 and WindowsR NT 4.0
operating systems.
ProTool/Pro CS is used to create a configuration on the configuration computer (PC
or PU) under WindowsR. ProTool/Pro RT is the program used to run the
configuration and visualize the process under WindowsR.
Windows-based systems
SIMATIC ProTool/Pro RT can be run on the following Windows-based systems:
S
S
S
Operator Panel OP 37/Pro
SIMATIC Panel PC, e.g. FI 25, FI 45, PC 670, PC 670T
Standard PC
ProTool/Pro Runtime User’s Guide
Release 12/99
1-1
Introduction
Authorization
If the SIMATIC ProTool/Pro RT runtime software is installed on a standard PC or a
SIMATIC Panel PC, the corresponding authorization is required to enable
unrestricted operation:
PC:
The authorization must be ordered separately.
SIMATIC Panel PC:
The authorization is supplied with the unit.
No authorization is necessary for the Operator Panel OP 37/Pro because it is
released by means of the hardware.
Functionality
The SIMATIC ProTool/Pro RT runtime software distinguishes itself through its full
graphic user interface which implements windows techniques. In addition to the
standard functions provided by SIMATIC operating units up to now, it also offers:
simple process visualization with a Windows-conform user interface
a large selection of standard input/output fields, bars, trend curves, vector
graphics and buttons
dynamic positioning of objects
the archiving of messages and process values
recipes
Visual Basic Script for user functions
standard connections to SIMATIC S5, SIMATIC S7 and SIMATIC 505 as well as
to PLCs from other manufacturers
A complete overview of the full functional scope of the SIMATIC ProTool/Pro RT
runtime software is provided in Chapter 2.
Objectives
This guide has been conceived for commissioning, maintenance and system
support engineers. It describes the commissioning and operation of the
SIMATIC ProTool/Pro RT runtime software.
Further information
Detailed descriptions of the creation of projects and configuration software
functions are provided in the ProTool Configuring Windows-based Systems user’s
guide and in the online help for ProTool/Pro CS.
Information on how to link the software to the various types of PLC can be found in
the Communication for Windows-based Systems user’s guide.
Any new information which could not be taken into account for printing in the
guides is provided in the Readme.wri file on the SIMATIC ProTool/Pro CD.
1-2
ProTool/Pro Runtime User’s Guide
Release 12/99
2
Scope of Functions
The table below summarizes the scope of functions offered by ProTool/Pro RT. The values
stated are maximum values that can be managed by the operating unit. These values are
restricted by the size of the memory.
Functions
Event messages
Number
2,000
Display
In message line/message window/
message display
Viewing all queued messages
In message page/message display
Length of message text per line
Alarm messages
70 characters
Lines per message
1
Process values in the message
text
8
Edit messages
4
Color-coding of different
message states
4
Number
2,000
Display
In message line/message window/
message display
Display type
Viewing all queued messages
Length of message text per line
First/Last, selectable
In message page/message display
70 characters
Lines per message
1
Process values in the message
text
8
Acknowledging individual alarm
messages
4
Acknowledge several alarm
messages simultaneously (group
acknowledgement)
16 acknowledgment groups
Edit messages
4
Color-coding of different
message states
4
Alarm_S
Display S7 messages
4
Message logging
Output on printer
4
ProTool/Pro Runtime User’s Guide
Release 12/99
2-1
Scope of Functions
Functions
Message buffer volatile
Capacity
1,024 message events
Viewing event/alarm messages
4
Deleting
4
Print
4
Simultaneously queued message
events (max.)
S
S
Message archive
500
Event messages:
or
Alarm messages:
Memory location
250
S
S
Capacity
Message logging
Time stamp of the occurrence
Date/time
Arrived, departed, acknowledged
Displaying
4
Printing (Print Screen)
4
Screen objects
2-2
Database
Restricted by storage medium
Message event
Screens
File
S
S
S
S
S
S
S
S
S
S
S
S
S
S
S
S
S
S
S
S
S
S
S
Graphic
Text
Output field
Input field
Symbolic output field
Selection field
Date/time
Graphic list
Vector graphic
Button
Status button
Switches
Invisible button
Trend display
Bar graph
Message display
Single message display
Status/Force
Password list
Recipe display
Slider controls
Analog display
Digital/Analog clock
ProTool/Pro Runtime User’s Guide
Release 12/99
Scope of Functions
Functions
Screens
S
S
S
S
S
Prompting
Softkey icons 1)
Dynamic attributes
Show/hide objects
TAB sequence
Help text
Fixed window
4
Limit monitoring
Inputs/outputs
4
Conversion functions
Inputs/outputs
4
Help text
Lines/characters
For messages
4
For screens
4
For screen objects
Archiving
Print functions
Password protection
S
S
S
S
S
S
S
Input field
Selection field
Button
Status button
Switches
Invisible button
Slider controls
Messages
4
Tags
4
Print screen
4
Direct message logging
4
Shift report
4
Number of passwords
50
Password level
Recipes
7/35
10 (0...9)
Number
255
Data records per recipe
2)
Total number of entries
5,000
Entries per recipe
3)
Online language switch
Number of languages
32
PU functions
(St t /F
(Status/Force)
)
SIMATIC S5
4
SIMATIC S7
4
Screen
Blanking circuit
4)
4
Scheduler
Trigger functions cylically or once
4
VB Script
User-specific expansions of
functionality
4
ProTool/Pro Runtime User’s Guide
Release 12/99
2-3
Scope of Functions
Functions
Communication
SIMATIC S5
S
S
AS511
PROFIBUS–DP
4
4
SIMATIC S7/M7
S
S
S
PPI (S7 protocol)
MPI (S7 protocol)
PROFIBUS–DP
(S7 protocol)
S
S
SIMATIC WinAC from
Version 2
OPC (client/server)
4
4
4
4
4
OPC
S
Client/Server
4
SIMATIC 505
S
S
NITP
PROFIBUS–DP
4
4
Connection to PLCs from other manufacturers
Allen Bradley (PLC-5, SLC 500)
S
S
S
DF1
DH+
DH485
4
Mitsubishi FX
4
4
4
Telemecanique TSX
S
S
1)
2)
3)
4)
Adjust
Uni-Telway
4
4
Not for standard PC and PC 670T.
Dependent on the storage medium.
Dependent on the number of licensed power tags. Power tags are tags linked to a process.
Standard screen saver for standard PC and SIMATIC Panel PC.
Information on how to link the software to the various types of PLC can be found in the
Communication for Windows-based Systems” user’s manual .
2-4
ProTool/Pro Runtime User’s Guide
Release 12/99
Product Description
3
Area of use
The SIMATIC ProTool/Pro RT runtime software shows its strengths wherever a
dedicated hardware visualization configuration has reached its limits. SIMATIC
ProTool/Pro RT can run on the following Windows-based systems under
WindowsR 95/98, WindowsR 2000 and WindowsR NT 4.0 operating systems:
S
S
S
Operator Panel OP 37/Pro
SIMATIC Panel PC, e.g. FI 25, FI 45, PC 670, PC 670T
Standard PC
SIMATIC ProTool/Pro RT is available in a wide range of variations:
S
S
S
as a pure software variant, e.g. for PCs
pre-installed, e.g. for SIMATIC Panel PC 670
installed ready for operation, e.g. for OP 37/Pro, FI 25, FI 45
The runtime software is capable of communicating with a wide range of PLCs. An
overview is provided in Chapter 3.2.
Function extensions in the ProTool/Pro CS configuration software
Since the runtime software can run on any Windows-based PC, the functions with
which the user is familiar can be combined according to individual requirements
and run on one hardware system.
SIMATIC ProTool/Pro CS offers an extended range of functions, which has become
possible as a result of a standardized operating system platform:
S
S
S
S
The new screen objects simplify the creation of process screens considerably.
Simple vector graphics can be created and dynamically updated directly in
ProTool/Pro CS. Graphics from numerous other graphics programs can be
integrated in a project. The user interface can be set out with a WindowsR look
and feel familiar to many users.
Archiving enables process data, such as tags and messages, to be buffered
over long periods. The amount of data that can be archived depends on the size
of the hard disk.
Expand the functionality of ProTool/Pro RT: Visual Basic scripts (VB Script)
enable the implementation of your own functions.
Optimized screen objects for touch-based operation enable operation without a
keyboard via operating unit touch panels.
ProTool/Pro Runtime User’s Guide
Release 12/99
3-1
Product Description
The screen object Recipe view enables easy and quick handling of recipes and
data records with a minimum of process configuration requirements. A specific
system can be mapped in Recipe screens and the user interface individually
laid out for editing data records.
The configuration software is now even easier to use. Readily available screen
objects, e.g. to display and edit recipes, messages and passwords or for system
diagnostics in respect of PLCs, simplify the creation of individual screens.
Menu options are available with which to convert existing projects for a new
target device. Use the Clipboard to copy sections from existing projects and
insert them in a new project.
Test the configuration without the plant being connected by using the simulator
supplied. This means it is no longer necessary to load a configuration on the
target system in order to test it.
3-2
ProTool/Pro Runtime User’s Guide
Release 12/99
Product Description
3.1
Brief Description of Various Objects in a Configuration
Objects in a configuration
A ProTool/Pro project is mainly comprised of screens with which to operate and
monitor a machine or plant. It is also possible to configure more objects, such as
messages, archives, recipes and scripts. Links are established to the PLC is made
by means of tags. The operating unit displays values from the PLC and accepts
values entered manually.
3.1.1
Screens
The process is visualized by means of screens. Screens show the operator the
current process status in the form of numerical values, bar graphs and trend curves
or in the analog displays. The current position of a production process can be
displayed by means of dynamic screen objects.
The configuration software contains screen objects, listed in the table below, which
can be used to create screens.
Screen object
Description
Graphic
Graphics can be used in the configuration, for
example, to display the system or as explanatory
symbols for display and operating elements which
have been configured.
Text
Texts are used in the configuration to label display
and operating elements, for example. Texts
cannot be modified on the operating unit.
The importance of different texts within a screen
can be emphasized by using different fonts and
formats.
Texts can be configured to cover several lines and
in different languages.
Input field
An input field is used to enter values that are
transferred to the PLC. Either numerical or
alphanumerical values can be entered.
Depending on the limit values configured, inputs
are rejected that are not within the respective
specified range of values.
The input can be protected by means of a
password.
Output field
ProTool/Pro Runtime User’s Guide
Release 12/99
An output field displays current values from the
PLC in numerical or alphanumerical form.
3-3
Product Description
Screen object
Description
Symbolic output field
A symbolic output field displays current values
from the PLC as plain text.
Example
Instead of the values 0 and 1 the symbolic output
field displays the texts Motor OFF and Motor
ON.
List box
The list box is used to enter a value selected from
a list, not physically entered character by
character. This enables a motor to be switched on
and off using the two entries ON and OFF.
Date/Time
This screen object is used to display and enter
the calendar date and time. The way the date and
time are displayed depends on the language set
on the operating unit.
Graphic list
A graphic list displays current values from the
PLC in the form of a graphic.
Example
Instead of the values 0 and 1, the graphic list
displays graphics which represent a closed and
an open valve.
Vector graphics
The following vector graphic objects can be
configured:
Line
Rectangle/Square
Rounded rectangle/square
Circle/Ellipse
Polyline/Polygon
These objects are combined to form vector
graphics with simple, basic geometrical shapes in
the configuration. The type, color and width of the
lines and the transparency, fill color, radius of
rounded corners etc. can be configured as
desired.
Button
3-4
A button is a virtual key on the operating unit
screen that can be assigned one or more
functions, depending on the configuration. When
the button is pressed, the functions configured for
the event Press are triggered. When the button is
released, the functions configured for the event
Release are triggered.
ProTool/Pro Runtime User’s Guide
Release 12/99
Product Description
Screen object
Status button
Description
A Status button is a display and operating
element which has one of two states: Touched
and Untouched. The states can be indicated by
means of text or graphics.
The Status button can be configured to be locking
(switch function) or non-locking (keying function).
Switch
A switch serves to enter and display a binary
status. It can only be switched on or off.
Invisible button
An invisible button is a transparent button that is
not displayed on the operating unit. If invisible
buttons are positioned, for example, on a graphic,
only parts of this graphic can be operated; a
motor or valve for example.
When an invisible button is pressed, the functions
configured for the event Press are triggered.
When the button is released, the functions
configured for the event Release are triggered.
Trend display
A trend display provides a particularly clear
representation of process data when displayed as
a continual progression.
Several different trend curves can be displayed
simultaneously in the trend curve display, e.g.
current and archived trend curves.
Bar graph
Bar graphs present a value from the PLC in the
form of a rectangular area. This makes it possible
to recognize from a single glance at the operating
unit how far away the current value is from the
limits or whether a specified setpoint has been
reached. Bar graphs are used, for example, to
display fill levels or quantities.
The direction, scaling, bar and background colors,
and labeling of the Y axis can be configured as
desired. Lines can also be displayed to mark limit
values.
Message view
Special filter criteria for displaying the volatile
message buffer and/or the message archive are
configured in the message view.
Simple message view
A simple message view can provide a subset of
the functionality of a message view. It can be
used, for example, to simply realize a message
line in a screen.
ProTool/Pro Runtime User’s Guide
Release 12/99
3-5
Product Description
Screen object
Description
Status/Force
Status/Force enables direct access to values in
the connected PLC (SIMATIC S5 and
SIMATIC S7) via the operating unit and to read
and write them. PLC operands can be monitored
and changed without having to connect an
additional programming unit or PC to the PLC.
This is particularly useful during the testing and
commissioning phase of your configuration.
Password list
The password list can be used to display, enter
and modify passwords on the operating unit.
Recipe view
A recipe view can be used to create, save and
transfer data records on the operating unit.
Slider control
Use a slider control to enter and display numerical
values in analog form. To enter values, move the
slider to the required position.
When used as a display element, the value is
represented by the position of the slider.
Analog display
An analog display indicates numerical values by
means of a pointer instrument.
Digital/Analog clock
A digital/analog clock enables the system time to
be displayed either as digits or as a traditional
clock with hands.
Information on operating the screen objects is provided in Chapter 6.
3-6
ProTool/Pro Runtime User’s Guide
Release 12/99
Product Description
3.1.2
Messages
Message classes
Messages indicate control-process events and states on the operating unit.
ProTool/Pro differentiates between the following message categories:
Event Messages
indicate a status in the process, for example, Motor ON. Event messages are
configured.
Alarm Messages
indicate an equipment failure, for example, Motor temperature too high.
Alarm messages are configured. Alarm messages must be acknowledged due
to their critical nature.
System messages
are triggered by the operating unit. They are not configured. System messages
indicate, for example, incorrect operations or communication faults. A selection
of important system messages for Windows-based systems is provided in
Appendix A.
S7 system messages
provide information on the status of the SIMATIC S7. They are not configured in
the ProTool/Pro CS configuration software. Refer to the S7 manual for the error
number indicated on the operating panel to determine the cause of the error.
ALARM_S
ALARM_S is an active message procedure. If an alarm occurs, the CPU actively
issues the respective message to all the network participants which are logged on.
This means that the operating unit is relieved of continuous polling of the message
area. ALARM_S messages are not configured in ProTool/Pro CS but in STEP 7.
The message numbers are automatically assigned during configuration in STEP 7.
The unique assignment of the message text is made according to these numbers.
The display of ALARM_S messages on the operating unit can only be configured
when a SIMATIC S7 PLC is used and the ProTool/Pro CS configuration software
has been integrated in STEP 7.
Buffering messages
All message events (arrived, departed, acknowledged) are stored in an internal
volatile buffer. This buffer can contain 1024 message events. If a message archive
has been configured, the message events are also stored in this message archive.
The message archive capacity is only restricted by the storage medium.
ProTool/Pro Runtime User’s Guide
Release 12/99
3-7
Product Description
Display messages
The events stored in the message buffer can be displayed according to different
criteria. The following predefined objects are available for display purposes:
Message line (refer to Page 6-12)
Message window (refer to Page 6-12)
Message page (refer to Page 6-14)
Message buffer (refer to Page 6-15)
Message view
– Message view with full functionality (refer to Page 6-16)
– Simple message view with restricted functionality (refer to Page 6-17)
3.1.3
Tags
Definition
Tags are fixed memory locations on the operating unit into which values are written
and/or read. The actions can be initiated from the PLC or by operations executed
on the operating unit.
Global and local tags
A fundamental distinction is made between the following types of tag:
Global tags
Global tags are process tags. They are used to establish a connection to the
PLC. An address must be assigned in the PLC for each global tag. The
operating unit accesses this address to write to or read from it.
Local tags
Local tags have no connection to the PLC. They are only available in the
operating unit. Local tags are created in order, for example, to enter limit values
via the operating unit.
VB script tags
Internal script tags must be defined with the DIM instruction and are only valid
within the VB Script procedure.
3-8
ProTool/Pro Runtime User’s Guide
Release 12/99
Product Description
3.1.4
Functions
Purpose
The ProTool/Pro CS configuration software provides a range of functions which
can be used in a project. Functions serve to:
set up the process on a process-specific basis
control the process
utilize properties of the operating unit
define system settings on-line on the operating unit
Using functions
Functions are linked to objects within the project, e.g. to buttons, keys, fields or
screens. In addition, events must be defined that trigger the functions, for example
“Press button” or “Release button”.
Not every function is available for each object. ProTool/Pro CS only provides those
functions in the selection list which can actually be used with the particular object
being configured.
When configuring functions, it is normally necessary to enter input parameters. For
example, in the case of the function Select Screen, an input parameter is the name
of the screen to be opened.
3.1.5
Printing
Print functions
The following print functions are available in Online mode:
Hardcopy
If the Hardcopy function is implemented in the configuration, the screen
currently displayed can be printed out.
Print messages
Each message event which occurs (arrived, departed, acknowledged) is logged
via the printer.
Print protocol
(Refer to Chapter 3.1.7)
Print message buffer
(Refer to Chapter 3.1.7)
ProTool/Pro Runtime User’s Guide
Release 12/99
3-9
Product Description
3.1.6
Archiving
Purpose
Different archives can be set up for message events and tags:
Message events
these relate to arriving, departing and acknowledging in the case of alarm
messages
Tags
these can be assigned to a previously defined archive during configuration.
During the process, it is necessary to specify when the value of the tag should
be written to the archive.
Alternatively, it is possible to specify the name of a file or an existing database for
the archives.
Archive storage in a CSV file
ProTool/Pro RT enables archives to be stored in a CSV file. In CSV format, table
columns are separated by hyphens and table rows are terminated by a line feed.
This enables archive data to be evaluated or edited easily, e.g. using an external
text editor or a spreadsheet program.
In order to store the archive data in a CSV file, a directory must be specified in the
ProTool/Pro CS configuration software. The storage location is thus referenced.
Archive storage in a database
ProTool/Pro RT also enables archives to be stored directly in a database instead of
a file. This means that the entire functionality of the database is available for further
processing and evaluating the archive data. The following databases have been
tested and approved for ProTool/Pro RT:
MS Access 97
MS SQL Server 6.5
In order to store archive data, a so called Data Source Name (DSN) must be
specified in the ProTool/Pro CS configuration software instead of a directory name.
The DSN is provides a precise reference to the database and its location.
3-10
ProTool/Pro Runtime User’s Guide
Release 12/99
Product Description
The following example emphasizes the necessary steps when using MS Access:
Step
1
Procedure
Configuring the archive in ProTool/Pro CS
Select the Archive dialog, Settings tab, Database memory location
for the archive to be stored in a database.
Enter the name in Data Source Name under which the archive
should be registered.
Enter the size of the archive and select the option FIFO buffer.
2
Configure the database on the runtime computer
Call in the ODBC32 configuration program from the Windows Start
menu under Settings → Control Panel.
Insert a new User DSN by using the Add button. The required
database driver must be selected.
Enter the DSN configured in ProTool/Pro CS in the dialog which
appears. This dialog is specific to the database.
No other settings are necessary for MS Access.
More settings must be defined for MS SQL servers. Please refer to
the database manual for information on these settings.
Note
The number of possible archives can also be restricted by the databases used,
e.g. by the configuration, license, etc.
Please refer to the database manual for information on this.
ProTool/Pro Runtime User’s Guide
Release 12/99
3-11
Product Description
3.1.7
Protocols
Application
Protocols are used to document process data and completed production cycles.
The ProTool/Pro CS configuration software defines the content and layout of the
various protocols and configures the event which should trigger protocol printout.
In this way, for example, it is possible to configure a protocol which is printed at the
end of a shift in order to document non-production times. It is also possible to
configure a protocol which can be used for documentation purposes within the
scope of product or quality tests.
Triggering events
Printout of the protocol during runtime is triggered either automatically (e.g. via a
scheduler) or manually (e.g. via a function key or softkey). The following events
can be configured to trigger printout:
Scheduler
Softkey/Function key
Modification of a tag value
Script
Print message buffer
A protocol can be configured so that it can be used to print the message buffer
contents. The following can be configured: the message categories to be printed,
the columns (message number, date, time, message text, etc.) and sorting (most
recent or oldest message first).
Special printing features
In order that the protocol is correctly printed, the printer connected during
runtime must support the paper format and layout of the protocol.
In the protocol, a tag value is read out and printed at the moment of printing. In
the case of protocols covering several pages, there may be a longer period of
time between printing the first and last page. Therefore, it is possible that the
same tag is assigned a different value on the last page than on the first.
3-12
ProTool/Pro Runtime User’s Guide
Release 12/99
Product Description
3.1.8
Scripts
Purpose
ProTool/Pro CS provides an interface for scripting with Microsoft Visual Basic
Script (VB Script). The VB scripts can be used to extend the configuration software
by adding customized functions. VB scripts are used similarly to functions.
Documentation
The detailed Microsoft documentation on VB scripts is contained within the scope
of the ProTool/Pro CS configuration software supplied.
ProTool/Pro Runtime User’s Guide
Release 12/99
3-13
Product Description
3.2
Connecting to the PLC
Overview
Table 3-1 provides an overview of the connection options of the
SIMATIC ProTool/Pro RT runtime software with various PLCs:
Table 3-1
ProTool/Pro RT connection options
SIMATIC S5 via AS511
S5–90U
S5–95U
S5–100U (CPU 100, 102, 103)
S5–115U (CPU 941, 942, 943, 944, 945)
S5–135U (CPU 928A, 928B)
S5–155U (CPU 946/947, 948)
SIMATIC S5 via PROFIBUS-DP 1)
S5–95U L2-DP Master
S5–115U (CPU 943, 944, 945)
S5–135U (CPU 928B)
S5–155U (CPU 946/947, 948)
SIMATIC S7 via PPI
S7–212
SIMATIC S7 via MPI
S7–200 (besides S7–212)
S7/M7–300 (all CPUs)
S7/M7–400 (all CPUs)
SIMATIC S7 via PROFIBUS-DP 2)
S7–200 (all CPUs with integrated PROFIBUS-DP interface) 3)
S7/M7–300 (all CPUs with integrated PROFIBUS-DP interface) 3)
S7/M7–300 with CPU342–5 3)
S7/M7–400 (all CPUs with integrated PROFIBUS-DP interface) 3)
S7/M7–400 with CPU443–5 3)
SIMATIC S7 via SIMATIC WinAC 4)
Internal communication
SIMATIC 505 via NITP
Point-to-point connection via RS232/RS422
SIMATIC 505 via PROFIBUS-DP 5)
All CPUs via CP5434–DP
3-14
ProTool/Pro Runtime User’s Guide
Release 12/99
Product Description
Table 3-1
ProTool/Pro RT connection options, continued
OPC 6)
S Client/Server
Allen Bradley via DF1, DH+ (KF2) and DH485 (KF3)
S PLC-5
S SLC 500
Mitsubishi
S FX
Telemecanique via Adjust and Uni-Telway
S TSX
1) Special function block required (see User’s Guide entitled
Communication for Windows-based Systems)
2) ProTool/Pro RT is an active node; communication takes place using the S7 protocol
3) Refer to Catalog ST70
4) Only with WindowsR NT
5) Special application required (see User’s Guide entitled
Communication for Windows-based Systems)
6) Only with WindowsR NT and WindowsR 2000. Not for OP 37/Pro
Information on how to link the software to the various types of PLC can be found in
the user’s guide entitled “Communication for Windows-based Systems”.
ProTool/Pro Runtime User’s Guide
Release 12/99
3-15
Product Description
3-16
ProTool/Pro Runtime User’s Guide
Release 12/99
Requirements for Commissioning
4
Which components do you need?
The SIMATIC ProTool/Pro CD contains both the configuration software for all
operating units and the runtime software to run the configuration. If the
configuration should be run on an operating unit without the runtime software being
installed at the factory (e.g. PC or SIMATIC Panel PC), both the runtime software
and the authorization must have been installed on the system beforehand. The
authorization for PCs must be ordered separately as a license disk.
The license is subdivided according to the number of process tags, known as
“power tags”. A process tag contains a connection to the PLC. Licenses are
available for power tags with 128, 256, 512 and 2048 tags. In addition, upgrades
(power packs) are available for upgrading to a greater number of power tags.
ProTool/Pro Runtime User’s Guide
Release 12/99
4-1
Requirements for Commissioning
4.1
Scope of Delivery
Operating units supported
SIMATIC ProTool/Pro supports all SIMATIC operating units and Windows-based
PCs. These operating units are divided into the following groups:
S
Text Displays
TD 17
S
Text-based display operator panels
OP 3, OP 5, OP 7, OP 15A, OP 15C, OP 17
S
Graphic display operator panels
OP 25, OP 27, OP 35, OP 37
S
Touch panels
TP 27-6, TP 27-10, TP 37
S
Windows-based systems
– TP 170A, MP 270, OP 37/Pro
– SIMATIC Panel PCs, e.g. FI 25, FI 45, PC 670, PC 670T
– Standard PC
S
C7 units
C7-621, C7-623, C7-624, C7-626, C7-633, C7-634
The subsequent descriptions in this guide only relate to the following
Windows-based systems:
S
OP 37/Pro
S
SIMATIC Panel PC
S
Standard PC
For detailed descriptions of the hardware and operation of the SIMATIC operating
units MP 270 and TP 170A, please refer to the respective equipment manual. An
overview of the SIMATIC HMI documentation available is provided in the
Appendix B of this guide.
Supported PLCs
An overview of the runtime software connection options to various PLCs is
provided in Chapter 3.2.
4-2
ProTool/Pro Runtime User’s Guide
Release 12/99
Requirements for Commissioning
4.2
System Requirements for PCs
Operating system
SIMATIC ProTool/Pro RT can be run under the following operating systems:
S
S
S
S
S
MicrosoftR WindowsR 95 with Service Pack 1 (Build 950a) or higher
MicrosoftR WindowsR 95 OSR 2 (Build 950b) or higher
MicrosoftR WindowsR 98
MicrosoftR WindowsR 2000
MicrosoftR WindowsR NT 4.0 with Service Pack 4 or 5
Note
Service Pack 1 must not be installed on a Windows 95R OSR 2 (Build 950b) or
higher.
If the required MicrosoftR Service Pack is not available on the PC, it can be
installed directly from the SIMATIC ProTool/Pro CD.
ProTool/Pro Runtime User’s Guide
Release 12/99
4-3
Requirements for Commissioning
Hardware
The PC hardware must fulfill the following requirements in order to operate the
ProTool/Pro RT runtime software:
WindowsR 95/98
Minimum
Rec.
Hardware
WindowsR NT 4.0
Minimum
Rec.
Processor
Pentium
Pentium
166 MMX
Graphic
VGA
PCI SVGA
PCI VGA
with
hardware
acceleration
PCI SVGA
PCI VGA
with
hardware
acceleration
AGP
Resolution
640 480
800 600
640 480
800 600
640 480
800 600
16 Mbytes
y32
Mbytes
32 Mbytes
y64 Mbyte
64 Mbytes
y128 Mbyte
RAM
1)
Hard disk (free
memory space)
Pentium 133
Pentium
200 MMX
WindowsR 2000
Minimum
Rec.
Pentium
200 MMX
Pentium II
366 MHz
y100 Mbyte
y100 Mbyte
y100 Mbyte
3.5’’ / 1.44 Mbytes
3.5’’ / 1.44 Mbytes
3.5’’ / 1.44 Mbytes
2)
Disk drive
CD-ROM
–
For
software
installation
–
For
software
installation
–
For software
installation
1) The amount of RAM required mainly depends on the size of the project, which is largely dependent on
the size of the graphics used.
2) Without taking archives into account. In addition to the space for ProTool/Pro RT, WindowsR also
requires a certain amount of free hard disk space, i.e. memory space must be reserved for the swap
file. The following equation has proved applicable:
Size of swap file = 3 size of RAM.
For further information, please refer to the WindowsR documentation.
4-4
ProTool/Pro Runtime User’s Guide
Release 12/99
Requirements for Commissioning
4.3
Electrical Installation
Connecting an OP 37/Pro to the PLC
The OP 37/Pro is connected to the PLC via the IF1A or IF1B interface. The
interface to be used depends on the design (RS232, RS422 or RS485).
Table 4-1 indicates which PLC can, in principle, be connected to which interface of
the OP 37/Pro. For more detailed information on this, please refer to the OP 37/Pro
Equipment Manual.
Table 4-1
Using the OP37/Pro interfaces
PLC
OP 37/Pro interface
SIMATIC S5
IF1 A
SIMATIC S7
IF1 B
In the OP 37/Pro BIOS, use the Integrated
Peripherals mask to set the Internal MPI/DP entry
to IRQ5 (presetting). This activates the ASPC2.
SIMATIC 505
IF1A or IF1B
If the IF1B interface is used, change the interface
setting in the OP 37/Pro BIOS. This is carried out
in the Integrated Peripherals screen under the
Serial 1 entry.
Allen Bradley via
IF1A or IF1B
S DF1
S DH+ (via KF2 module)
S DH485 (via KF3 module)
If the IF1B interface is used, change the interface
setting in the OP 37/Pro BIOS. This is carried out
in the Integrated Peripherals screen under the
Serial 1 entry.
Mitsubishi FX
IF1A or IF1B
If the IF1B interface is used, change the interface
setting in the OP 37/Pro BIOS. This is carried out
in the Integrated Peripherals screen under the
Serial 1 entry.
Telemecanique TSX
IF1A or IF1B
If the IF1B interface is used, change the interface
setting in the OP 37/Pro BIOS. This is carried out
in the Integrated Peripherals screen under the
Serial 1 entry.
Detailed information on connection to the PLC and cables to be used is provided in
the online help to the ProTool/Pro CS configuration software and in the
Communication for Windows-based Systems user’s guide.
ProTool/Pro Runtime User’s Guide
Release 12/99
4-5
Requirements for Commissioning
Connecting a PC to the PLC
The PC is connected to the PLC via one of the interfaces COM1 to COM4. Please
refer to the hardware manual provided by the manufacturer for instructions on how
to carry out electrical installation of your PC. A communications processor is
required to connect the PC to SIMATIC S7.
Table 4-2 indicates which communications processors are approved for use with
the PC.
Table 4-2
Approved communications processors
Communications processor
SIMATIC S5 via
PROFIBUS-DP
SIMATIC S7
CP5611 1)
4
4
CP5511 1)
4
4
CP5412
–
4
1) Installation instructions can be found on Page 5-8
Table 4-3 indicates the basic options for connecting the PC to the PLC. Detailed
information on connection to the PLC and cables to be used is provided in the
online help to the ProTool/Pro CS configuration software and in the Communication
for Windows-based Systems user’s guide.
Table 4-3
Using the PC’s interfaces
PLC
SIMATIC S5 via AS511
Interface on PC
COM1 to COM4
An RS232/TTY converter cable is required.
SIMATIC S5 via
PROFIBUS–DP
Via communications processor
SIMATIC S7
Via communications processor
(see Table 4-2)
(see Table 4-2)
SIMATIC 505
COM1 to COM4
OPC
Network card
Allen Bradley via
COM1 to COM4
S DF1
S DH+ (via KF2 module)
S DH485 (via KF3 module)
4-6
Mitsubishi FX
COM1 to COM4
Telemecanique TSX
COM1 to COM4
with RS485 interface card
ProTool/Pro Runtime User’s Guide
Release 12/99
Commissioning ProTool/Pro Runtime
5
Initial startup
The procedure for commissioning is dependent on whether the operating unit is a
ready-to-operate unit with the runtime software installed at the factory (e.g.
OP37/Pro, FI 25, FI 45) or a PC on which the runtime software must be installed by
the user.
S
Ready-to-operate SIMATIC operating unit
The ready-to-operate SIMATIC operating units are those in which the operating
system and ProTool/Pro RT runtime software are fully installed at the factory. An
authorization may not be necessary for the runtime software or it is supplied
with the unit, depending on the unit concerned.
S
SIMATIC operating unit with preinstalled runtime software
When commissioning the SIMATIC operating units PC 670 and PC 670T, the
runtime software must be installed from the operating unit hard disk using the
Setup program. An installation CD is not necessary.
Authorization for the runtime software is acquired with the operating unit; it is
enclosed with the unit.
S
PC without runtime software
If a PC is used, the runtime software must be installed from the SIMATIC
ProTool/Pro CD. In addition, an authorization for the runtime software is
required for each PC. The authorization must be ordered separately.
Note
The SIMATIC Panel PCs described in this guide are either ready-to-operate
systems or unit models with preinstalled runtime software.
This guide does not apply to SIMATIC Panel PCs without preinstalled runtime
software.
ProTool/Pro Runtime User’s Guide
Release 12/99
5-1
Commissioning ProTool/Pro Runtime
Procedure
The initial commissioning is organized into three steps. Not all the steps described
below are relevant to all the operating units.
Step
Procedure
Operating unit
1
Install and configure the WindowsR operating system
(Chapter 5.1)
PC
2
Install the ProTool/Pro RT runtime software
(Chapter 5.2)
PC
Download, test and start the project (Chapter 5.5)
All
3
SIMATIC Panel PC
Save configuration
The operating unit hard disk may cease to function after several years of use in a
hostile industrial environment. In order to ensure that all the programs and settings
can be reinstalled on a new hard disk without any problems, a detailed description
is enclosed with the unit explaining how to make a backup copy of the configuration
defined the hard disk.
Carry out the backup procedure according to the instructions set out in the
description so that the operating unit is ready for use after replacing the hard disk
and installing the backup data.
5-2
ProTool/Pro Runtime User’s Guide
Release 12/99
Commissioning ProTool/Pro Runtime
5.1
Installing and Configuring Windows
The following instructions describe the procedure for installing and configuring
WindowsR. These steps are necessary for the ProTool/Pro RT runtime software to
run correctly. Make a note of all the settings so that the runtime software can be
run if the operating unit hard disk needs to be replaced for any reason.
Step
1
Procedure
Install Windows (PC only)
Information on commissioning WindowsR is provided in the Windows
manual supplied.
2
Install service packs 1) (PC only)
S WindowsR 95
Install Service Pack 1 for WindowsR 95; this is contained on the
SIMATIC ProTool/Pro CD supplied. Start the following program on
the CD-ROM:
\servicep\win95\deutsch\setup.exe
This program guides the user through the installation procedure. This
directory contains documents from Microsoft that give a detailed
description of the installation procedure.
S WindowsR NT
Install service Pack 5 for Windows NT; this is contained on the
SIMATIC ProTool/Pro CD supplied. Start the following program on
the CD-ROM:
\servicep\winnt\deutsch\nt4sp5_i.exe
This program guides users through the installation procedure. This
directory contains documents from Microsoft, that give a detailed
description of the installation procedure.
3
Install printer driver
The ProTool/Pro RT runtime software can be used with any printer for
which a corresponding Windows printer driver is available. The printer
must be installed under Windows as the default printer because
ProTool/Pro RT only accesses the standard printer. No settings have to
be made for the printer in the runtime software itself.
The printer driver and installation instructions for your printer are
supplied by the printer manufacturer. Windows itself actually includes
suitable printer drivers for many printers. The printer drivers can be set
up via Start → Settings→ Printer→ New printer. The printer must be
specified as the default printer when installing it.
ProTool/Pro Runtime User’s Guide
Release 12/99
5-3
Commissioning ProTool/Pro Runtime
Step
Procedure
Define the following settings to enable messages to be printed line by
line:
For WindowsR95/98:
The Forward print jobs to printer option must be set under
printer properties. To do this, select the Properties dialog of the printer.
Click the Spool Settings button on the Details tab. The dialog Settings
for printing in background opens, in which to select the Print directly to
the printer option.
For WindowsR NT and WindowsR 2000:
The Print directly to the printer option must be set under
the printer properties. To do this, select the dialog Properties of the
printer. Click the Print directly to the printer option on the Print job
scheduling tab.
4
Activate multilanguage support
2)
In the case of certain languages with special character sets, such as
Greek, Polish, Russian, Slovenian, Czech or Hungarian, the
multilanguage support must be activated if WindowsR95/98 is used. To
do this, select Start → Settings → Control Panel. Activate
multilanguage support under Add/Remove Programs → Windows
Setup → Multilanguage Support.
5
Setting the time zone
Ensure that the correct time zone is set on the PC on which the runtime
software is to run. To set the time zone in Windows, select Start →
Settings → Control Panel→ Date/Time → Time Zone.
6
Set screen saver (option)
The majority of modern monitors no longer need a screen saver, indeed
a screen saver can actually be harmful to the CRT. These monitors
have a power management function which means they switch
themselves off as soon as the video signal has not been changed for a
user-defined period of time. A conventional screen saver prevents or at
least delays activation of this switch-off function that can lengthen the
service life of the screen. However, if a screen saver is required, only
the standard screen savers incorporated into Windows are approved for
use with ProTool/Pro RT.
1) Not necessary for WindowsR98
2) Not necessary for WindowsR NT and WindowsR 2000
5-4
ProTool/Pro Runtime User’s Guide
Release 12/99
Commissioning ProTool/Pro Runtime
5.2
Install ProTool/Pro RT
Note
Chapter 5.2 is only relevant for operating units in which the runtime software has
not been installed at the factory (e.g. PC 670 or PC).
5.2.1
SIMATIC Panel PC 670 and PC 670T
Installation
All the files required to install the runtime software are already contained in the
Backup directory on the operating unit hard disk. An installation CD is not
necessary.
Proceed as follows to install the runtime software using the Setup program:
Step
Procedure
1
Access the Backup directory and start the Setup program on Disk1.
2
Follow the installation instructions displayed on the screen and
3
install the license when prompted.
4
Start up the unit again.
ProTool/Pro Runtime User’s Guide
Release 12/99
5-5
Commissioning ProTool/Pro Runtime
5.2.2
PC Without Runtime Software
Condition
The ProTool/Pro RT runtime software is contained on the SIMATIC ProTool/Pro
CD. The runtime software requires a license to be able to run it. This must be
ordered separately. If no license has been ordered, ProTool/Pro RT can only run in
Demo mode. When running in Demo mode, a message appears at regular intervals
stating that the runtime software is not licensed.
A detailed description on installation of the license disk is provided in the
documentation enclosed entitled Start-up guide Copy Protection.
Installation
Proceed as follows to install the runtime software:
Step
1
Procedure
Install the runtime software from the CD.
If the ‘autorun’ function for your CD-ROM drive is activated, the CD
browser starts automatically after inserting the CD. If ‘autorun’ is not
active, start the install.exe program in the root directory of the
CD-ROM.
2
Use Language to select the user interface language of the Setup
program.
3
Select Installation and start the installation with ProTool/Pro RT.
4
Follow the installation instructions displayed on the screen and
5
install the license when prompted.
If there is no license available for the runtime software during
installation, it can be loaded later. Call in the authorsw.exe program
on the license disk and install the license.
5-6
ProTool/Pro Runtime User’s Guide
Release 12/99
Commissioning ProTool/Pro Runtime
5.2.3
Communication
Connection to the PLC
ProTool/Pro RT supports communication with the PLCs listed in 3.2. Connect the
operating unit to the PLC in order that the project can also be tested when
connected to the PLC. The simulator can also be started to test the project (Page
5-11). In this case, there is no need for a connection to the PLC.
Communication with PROFIBUS-DP
If the ProTool/Pro RT runtime software is to be run on SIMATIC S7 using the profile
PROFIBUS-DP and no connection is established, it is possible that the bus
parameters are incorrect.
Proceed as follows to reset the parameters to their default values:
Step
Procedure
1
Activate the Start menu and select Settings → Control Panel and open
the Set PU/PC interface dialog.
PROFIBUS must be selected in Component configuration used.
2
Click on the Properties button.
In Network Parameters, DP is selected as the profile.
3
Select Universal (DP/FMS) and confirm the selection with OK.
4
Click on the Properties button again.
In Profile, select DP again and confirm the selection with OK.
MPI setting
Step
Procedure
1
Activate the Start menu and select Settings → Control Panel and open
the Set PU/PC interface dialog.
2
Press the Properties button and set the parameters for the operating
unit on the MPI Network tab control so that it is the only master on the
bus.
Note
If several operating units must be operated via MPI, ensure that only
one unit is the master on the bus.
Detailed information on communication between the PLC and operating unit is
provided in the Communication for Windows-based Systems User’s Guide.
ProTool/Pro Runtime User’s Guide
Release 12/99
5-7
Commissioning ProTool/Pro Runtime
5.3
Retrofitting a Communication Processor
Purpose
The steps described below are only necessary if a CP5511 or CP5611
communication processor is retrofitted to enable connection to a SIMATIC S7.
Recommended procedure
First, install the runtime software before installing the communications processor.
Proceed as follows:
Step
Procedure
1
Install the Runtime software.
2
Switch off the operating unit.
3
Slot in the communications processor.
4
Start up the operating unit again.
The communications processor is detected and configured
automatically (Plug&Play function) when the PC is booted.
If the communications processor is installed before the runtime software, the
communications processor cannot be activated by the installation program.
Remedy:
Step
5-8
Procedure
1
Activate the Start menu, select Settings → Control Panel→ System
and select the device manager.
2
Remove the unrecognized component, PCI Network Controller, from
the list.
3
Start up the operating unit again.
The communications processor is detected and configured
automatically (Plug&Play function) when the PC is booted.
ProTool/Pro Runtime User’s Guide
Release 12/99
Commissioning ProTool/Pro Runtime
5.4
Settings for the OP 37/Pro
Settings in BIOS
Different settings must be defined in the BIOS of the OP 37/Pro, according to the
connection used. In the case of serial connections, the corresponding COM
interface must be activated.
Detailed information on this is provided in the OP 37/Pro Equipment Manual,
Communication for Windows-based Systems User’s Guide and in the online help
for the ProTool/Pro CS configuration software.
Direct key module
The optional direct key module for the OP 37/Pro is not supported by the
ProTool/Pro RT runtime software. The hardware based control of the direct key
module outputs via the OP 37/Pro keyboard can be used, however, without
restrictions.
5.5
Downloading, Testing and Commissioning the Project
5.5.1
Scenarios
Overview
ProTool/Pro RT is the application with which a project can be run on-line. However,
this project must first be created with the ProTool/Pro CS configuration software.
Detailed information on how to create projects can be found in the online Help of
the ProTool/Pro CS configuration software and in the ProTool Configuring
Windows-based Systems User’s Guide.
A number of scenarios are possible for testing the project:
S
The ProTool/Pro RT runtime software is installed on the same PC as the
ProTool/Pro CS configuration software (Page 5-10).
S
The ProTool/Pro RT runtime software is installed on a different PC from the
ProTool/Pro CS configuration software. In this case, the project must be
downloaded from the configuration computer to the target PC (Page 5-10).
S
The project runs on the OP37/Pro. In this case, the project must be downloaded
from the configuration computer to the OP37/Pro.
S
The project is first tested using the simulator. The project can be tested on the
same PC as that on which the configuration software is installed (Page 5-11).
ProTool/Pro Runtime User’s Guide
Release 12/99
5-9
Commissioning ProTool/Pro Runtime
Configuration software and runtime software are on the same PC
Create the project, for example, under the name Myproject.pdb, and then
compile it. Once compilation has been completed, a compiled file with the
extension *.fwd is stored in the same directory as the project file (for example,
Myproject.fwd). Double-click this file to start the ProTool/Pro RT runtime
software with this compiled project.
If the PC is connected to the PLC,the project can be tested immediately in
connection with the PLC.
Information on how to simulate the project without a PLC using the simulation
program is provided in Chapter 5.5.2.
Configuration software and runtime software are on different systems
Create the project, for example, under the name Myproject.pdb, and then
compile it. Once compilation has been completed, a compiled file with the
extension *.fwd, e.g. Myproject.fwd is stored in the same directory. Windows
provides the following options for downloading the compiled files:
S
Copy the *.fwd file on to a floppy disk and then from the disk to the target
system (PC). If the project is too large for one disk, use the disk transfer option.
S
Disk transfer:
In ProTool/Pro CS, select the menu option File → Download and select drive A:\
in the Destination Directory dialog. The operation-capable project file is
transferred to one or more disks in a compressed form.
In order to decompress the compressed project file on the target device,
activate the Start menu and select SIMATIC → ProTool/Pro RT → ProTool/Pro
Disk Transfer. Select the compressed file, e.g. Myproject.f00 in the Transfer
dialog and enter the destination directory in which the decompressed project file
should be copied.
S
Copy the file *.fwd file from WindowsR 95/98 to the target system via a
parallel or serial cable using the Direct Cable Connection option.
S
Copy the file *.fwd file from Windows R NT or WindowsR 2000 to the target
system via a parallel or serial cable using the Dial-Up Connection option.
S
Copy the *.fwd file to the target system via a network.
Double-click on the compiled project file to start the runtime software on the target
system.
5-10
ProTool/Pro Runtime User’s Guide
Release 12/99
Commissioning ProTool/Pro Runtime
5.5.2
Simulation of a Project
Function
The scope of delivery in respect of the ProTool/Pro RT runtime software contains a
simulator with which to test the project without a PLC. The simulator is a separate
application. It enables the user to test whether the screens, screen objects,
messages, etc. which have been configured function correctly.
The simulator simulates the PLC and
S
modifies the values of configured tags in a definable way:
e.g. incrementally, decrementally, sinusoidally, randomly or by shift bits
S
sets bits in bit-by-bit organized area pointers1):
By shifting the bits in the two area pointers Event Messages and Alarm
Messages, it is possible, for example, to trigger all the configured messages on
the operating unit.
A condition for simulation is that the ProTool/Pro RT runtime software is also
installed on the configuration computer.
Principle
The following steps describe the basic procedure for simulating a project.
Step-by-step instructions are provided in Table 5-1.
1. First of all, create a project as is to run later when connected to the PLC.
2. Save and compile the project.
3.
Start the simulator directly from the running configuration software by
clicking on the icon depicted or via menu options File → Test → Start Simulator.
If the simulator is started without having compiled the project beforehand,
compilation is automatically triggered.
4. When the project is simulated for the first time, the simulator is started with a
new, empty simulation table. If a simulation table already exists for the project, it
is opened.
All the settings are saved in simulation table *.sim defined for the simulation of
tags and area pointers (refer to Figure 5-1).
5. Now manipulate the project tags and area pointers in the simulation table.
6. It is possible to watch how the values change by switching the task from the
simulator to the project.
1) The simulator can simulate bit-by-bit organized area pointers (except trend transfer area), e.g. event
messages and alarm messages. The simulation of byte-by-byte oriented area pointers (e.g. data
mailbox or PLC job) is not possible.
ProTool/Pro Runtime User’s Guide
Release 12/99
5-11
Commissioning ProTool/Pro Runtime
Note
S Not all the configured tags are provided in the simulation table. Only referenced
tags are available for the simulation, i.e. only those tags used in the project e.g.
in a screen object.
S Since the simulator can only simulate the project offline, i.e. without a
connection to the PLC, the data formats are converted to internal ProTool/Pro
CS formats. Therefore, PLC-specific data formats cannot be realized.
Simulation table
Figure 5-1
Simulation table (example)
Figure 5-1 illustrates an example of a simulation table. All the settings defined in
this table for simulating the project can be saved in a file. In this case, select File →
Save in the simulator and enter a file name (*.sim).
This means that the project can be simulated again at a later date with saved
settings. A condition for this is that the tags and area pointers to be simulated in the
project have not be altered in the meantime.
5-12
ProTool/Pro Runtime User’s Guide
Release 12/99
Commissioning ProTool/Pro Runtime
Operate simulator
The following instructions provide a detailed description of the procedures for
operating the simulator.
Table 5-1
Simulator operation, step-by-step
Step
Procedure
1
Start the simulator directly from the running configuration software by
clicking on the icon depicted or via menu options File → Test → Start
Simulator.
2
When the project is simulated for the first time, the simulator is stated with a
new, empty simulation table. If a simulation table already exists for the project,
this is opened.
All the settings are saved in simulation table *.sim defined for the simulation
of tags and area pointers (refer to Figure 5-1).
Note
Use the two menu options File → Open and File→ Save to open and save the
simulation tables in the simulator. This does not open and save the project to
be simulated. To do this, use the corresponding menu options in the
configuration software.
3
Now manipulate the project tags and area pointers in the simulation table.
To do this, use the Tag column to select all the tags and area pointers to be
modified (refer to Footnote 1 on Page 5-11) and observed during the
simulation.
Click on the following symbol in the last line for each tag to be inserted:
4
Use the Format column to select the data format in which the values should be
represented in the table, e.g. Text, Dec, Hex or Bin.
The formats available are dependent on the configured data type.
5
Use the Write Cycle column to specify the intervals (in seconds) at which the
value is to be written in the project. The smallest unit that can be entered is
0.1 seconds.
ProTool/Pro Runtime User’s Guide
Release 12/99
5-13
Commissioning ProTool/Pro Runtime
Table 5-1
Simulator operation, step-by-step, continued
Step
6
Procedure
Use the Simulation column to specify the manner in which the value of the tag
is to be simulated:
S
Sinus
The value of the tag is changed in the form of a sine curve.
S
Random
The value of the tag is changed via a random function.
S
Incrementation
The value of the tag is continuously increased up to a specified maximum
value. The progression of the values corresponds to a positive saw-tooth
curve.
S
Decrementation
The value of the tag is continuously decreased down to a specified
minimum value. The progression of the values corresponds to a negative
saw-tooth curve.
S
Shift bit
A set bit is continuously shifted one position forward. The previous position
is reset each time. This enables all the configured event messages in the
area pointer Event Messages, for example, to be triggered in succession.
S
Display
The current value of the tag is displayed.
The simulation types available are dependent on the configured data type.
7
Use the Set value column to specify the start value for the simulation. This is a
numerical value. If you have selected the Shift bit option beforehand in the
Simulation column, the most significant bit of the value is taken as the initial bit
and the subsequent bits are appended after this bit.
To set a single value, enter it here, directly.
8
Enter minimum and maximum values in the MinVal and MaxVal columns,
respectively, for the simulation. The sinus curve, for example, is written within
the value range defined here.
9
Use the Period column to specify the interval, in seconds, in which a tag value
should be written in a project, e.g. sinusoidal. The smallest unit that can be
entered is 0.1 seconds.
10
If the check box is activated in the Start column, the simulation is started with
the specified values. After switching the task to project, the value changes are
visualized and can be observed.
To stop simulation, deactivate the Start check box.
5-14
ProTool/Pro Runtime User’s Guide
Release 12/99
Commissioning ProTool/Pro Runtime
Example of a simulation
The example in Figure 5-2 uses a sine curve to illustrate how the values of a tag
are written into the configuration in accordance with the settings in the simulator.
The following settings have been made in the simulator:
S
Set value = 0
S
MaxVal = 5
S
MinVal = –5
S
Write cycle = 10 * 1s
S
Period = 100 * 1s
Period = 100 s
Maximum value = 5
Start value = 0
Minimum value = –5
= Time stamp at which a value is written into the project
Figure 5-2
Simulating a tag as a sine curve
ProTool/Pro Runtime User’s Guide
Release 12/99
5-15
Commissioning ProTool/Pro Runtime
5.6
Starting a Project
Running a project in online operation
Once a project has been created, there are a number of different options with
which to start it. A condition for this is that the compiled project is initially
downloaded to the target system in cases where the configuration computer is not
simultaneously the target system.
S
Double-click on the *.fwd file generated. In this way, the ProTool/Pro RT
runtime software is started with the selected file.
S
Call in the ProTool/Pro RT runtime software under the program group SIMATIC
→ SIMATIC ProTool/Pro → SIMATIC ProTool Pro RT. The project file to be
started can be selected when the runtime software is running.
S
Call in the ProTool/Pro RT runtime software from the command line. The
command could, for example, be as follows:
c:\siemens\ptprorun\ptprorun.exe c:\proj\myproject.fwd
S
If a project should be opened directly following startup of the runtime software,
the file must be entered in the initialization file ptprorun.ini. The initialization
file is located in the same directory as the ProTool/Pro RT runtime software.
Enter the name of the project in the [configuration] section. The line
entered could read as follows:
LoadConfigFile=MyProject.fwd
Set up program icon
If the user wants to be able to start the project from the desktop by clicking on the
program icon, the following settings must be made:
Step
Procedure
1
Position the mouse on a free area of the desktop and click the right-hand mouse
button. Select New → Link from the context menu which appears.
2
Click on the Browse button in the subsequent dialog and select the program
ptrorun.exe.
3
Enter a name for the icon in the next dialog which appears.
4
Click on the Complete button.
5
Click on the new icon with the right mouse button and select menu option
Properties from the context menu which appears. Enter the ProTool/Pro RT
runtime software and the project to be started in the Target field. The call could
appear as follows, for instance:
c:\siemens\ptprorun\ptprorun.exe c:\project\myproject.fwd
Start project when booting the system
In order to automatically run a project each time the system is started, the
corresponding entry must be made in the Startup group in Windows. Firstly, create
an icon on the desktop as described above and then move this icon to the Startup
group by means of the Windows Explorer.
5-16
ProTool/Pro Runtime User’s Guide
Release 12/99
Commissioning ProTool/Pro Runtime
5.7
Further Downloading Options
Set up direct cable connection
A direct cable connection between PCs enables the transfer of files from one PC to
another. This method of data transfer can also be used to download a compiled
project file. A direct cable connection must be set up on both computers to be
connected. The parallel cable required for the direct cable connection can be
purchased from Siemens. Alternatively, it is possible to set up a direct cable
connection using a standard, commercially available, serial null modem cable.
Tables 5-2 and 5-3 provide a step-by-step description of how to configure the
runtime PC (PC on which the configuration runs) and the configuration PC (PC on
which the configuration was created) for a direct PC cable connection.
Table 5-2
Setting up a direct connection on the runtime PC
Settings on the runtime PC
Step
Procedure
1
Start the Direct Cable Connection program under
Start →⋅Programs → Accessories → Direct Cable Connection. 1)
2
Use the Direct Cable Connection dialog box to activate the Host
Computer option. 2)
3
Activate Start → Settings → Control Panel → Network to check the
properties of the communication driver in the tab control Configuration.
Only IPX/SPX-compatible protocol must be activated on the
Bindings tab of the Properties dialog box .
4
Then start the Direct Cable Connection program (steps 1 and 2).
5
Select Parallel cable to LPT1 as the connection setting.
6
In the next dialog box, click the File and Printer Enable button.
7
Click on the File and Printer Enable button once again in the next dialog
box that appears for entering the network settings. Activate the Other
users can access my files option.
8
The Password Protection option in the next dialog box must be
deactivated.
9
The runtime PC now monitors the interface and waits for data from the
configuration PC.
ProTool/Pro Runtime User’s Guide
Release 12/99
5-17
Commissioning ProTool/Pro Runtime
Table 5-2
Step
10
Setting up a direct connection on the runtime PC, continued
Procedure
Now enable one of the drives or a directory, for example c:\ptproj,
so that it can be accessed by the configuration PC. To do this, select
the desired directory in the Windows Explorer. Click the right mouse
button to open the context menu and select the Enable menu item.
Enter an enable name, for example PTProj.
1) If the program is not on the PC, install it before doing anything else. Select Start →
Settings → Control Panel → Add/Remove Programs. Then select the Windows Setup
tab, double-click Communications and then activate the Direct Cable Connection
check box.
2) If a dial-up network has not been installed, a prompt appears requesting insertion of
the Windows CD-ROM. The dial-up network is installed and the PC may be restarted.
The direct cable connection is already set up on an OP37/Pro. The directory and
enable name set up match those specified in Table 5-2 in Step 10. If this directory
will not be used, the directories which will be used on the OP37/Pro must be
enabled.
The ProTool/Pro RT runtime software is thus installed on the PC. Data can then be
downloaded, e.g. the compiled project file. The next step to take is to install and
configure the direct cable connection on the configuration PC.
Table 5-3
Setting up a direct connection on the configuration PC
Settings on the configuration PC
5-18
Step
Procedure
1
Start the Direct Cable Connection program under Start → Programs →
Accessories → Direct Cable Connection. 1)
2
In the dialog Direct Cable Connection, mark the option Guest
Computer. 2)
3
Activate Start → Settings → Control Panel → Network to check the
properties of the communication driver in the tab control Configuration.
Only IPX/SPX-compatible protocol must be activated on the
Bindings tab of the Properties dialog box.
4
Then start the Direct Cable Connection program (steps 1 and 2).
5
Select Parallel cable to LPT1 as the connection setting.
6
Connection to the runtime PC is now set up.
7
Once the connection has been set up, a prompt appears requesting the
name of the runtime PC. The name (e.g. OP37Pro) is located under
Start → Settings → Control Panel → Network on the Identification tab.
ProTool/Pro Runtime User’s Guide
Release 12/99
Commissioning ProTool/Pro Runtime
Table 5-3
Setting up a direct connection on the configuration PC, continued
Step
Procedure
8
Use Windows Explorer to link a drive with the directory provided on the
runtime PC (e.g. D:\). To do this, select the Explorer menu option
Options → Connect Network Drive. In this case, it is possible to connect
a drive with a network path enabled on the runtime, e.g.
\OP37Pro\PTProj.
9
Then use Windows Explorer, for example, to simply copy a compiled
project file from the configuration PC to the runtime PC. It is also
possible to download the compiled project file directly from the
ProTool/Pro CS configuration software to the runtime PC. Select the
menu option File → Download and use the Destination Directory dialog
to select the linked drive (e.g. D:\). Subsequently, each time a
downloading process is activated, the compiled project file is
automatically transferred to the runtime PC.
1) If the program is not on the PC, it must be installed before doing anything else. Select
Start → Settings → Control Panel → Add/Remove Programs. Select the Windows
Setup tab. Double-click Communications and then activate the Direct Cable
Connection check box.
2) If a dial-up network has not been installed, a prompt appears requesting insertion of
the Windows CD-ROM. The dial-up network is installed and the PC can be restarted.
Setting up a dial-up network connection
The Dial-Up Network provided by WindowsR95/98 or the RAS package from
WindowsRNT and WindowsR2000 can be used to set up a virtual network via
serial or parallel cables, Internet or modems.
Information concerning the installation of dial-up networks is provided in the
Windows documentation. In the case of WindowsR95, the WindowsR95 Plus
package with the communication server must be installed on the runtime PC. In the
case of WindowsR98, WindowsRNT and WindowsR2000, all the necessary
components are supplied.
ProTool/Pro Runtime User’s Guide
Release 12/99
5-19
Commissioning ProTool/Pro Runtime
5-20
ProTool/Pro Runtime User’s Guide
Release 12/99
6
Operating ProTool/Pro Runtime
6.1
General Operation
Overview
The operation of processes during runtime is dependent on the project created.
This chapter only contains general information regarding settings for the runtime
software and controlling predefined screen objects. Screen objects provide the
user with general system functions. Screen objects can be used in screens
implemented in a project and configured according to individual requirements.
Methods of operation
The ProTool/Pro RT runtime software can be operated via a mouse, keyboard or
touch screen. In the case of mouse or touch panel operation, it is of particular
advantage to integrate buttons, status buttons, switches and hidden buttons in the
project. When it is possible to influence a screen object by means of a mouse
action, the cursor symbol changes, by means of a button on the PC e.g. by the
symbol
Operating screens via the keyboard
The navigation options indicated in the Table 6-1 are available for carrying out
actions on a screen using the keyboard.
The type of cursor control via the keyboard can be defined in the ProTool/Pro CS
configuration software (refer to Page 6-6). This guide describes the settings for
ProTool versions from V 5.2.
Table 6-1
Operating screens via the keyboard
Navigation
PC
OP37/Pro
Panel PC
Move to next field right/left
Move to next field
below/above
Move in field right/left
ProTool/Pro Runtime User’s Guide
Release 12/99
6-1
Operating ProTool/Pro Runtime
S Use the Enter key
– to apply values (e.g. in input fields)
– to open list boxes
S Use the ESCAPE key to cancel input.
S Use the Tabulator key to access the next screen
object which can be acted upon according to the
configured tabulator sequence.
By pressing it simultaneously with the SHIFT key,
access is made in the reverse sequence.
S In order to navigate between screens, for example,
the function keys depicted on the right can be
assigned functions, e.g. Select Screen:
S In the case of the SIMATIC Panel PC, 36 function
keys can be assigned global and local functions:
...
...
...
...
S In the case of the OP37/Pro, 20 function keys can
be assigned global and local functions:
Global functions can be assigned to a further 16
function keys.
...
...
Note
If a function key is pressed directly after changing screens, the corresponding
function associated with the new screen is triggered before the screen is
generated.
Operating Windows via the keyboard
It is possible to control the operating unit operating system via the keyboard, if
necessary. Detailed information on this is provided in the Windows manual.
Examples of the most important key combinations for the OP 37/Pro and SIMATIC
Panel PC are depicted in Table 6-2.
Table 6-2
Operating Windows via the keyboard
Navigation
Operating unit
Open Start menu
Display pop-up menu for the marked element
Mark all
6-2
ProTool/Pro Runtime User’s Guide
Release 12/99
Operating ProTool/Pro Runtime
Table 6-2
Operating Windows via the keyboard, continued
Navigation
Operating unit
Display the properties of the marked element
Explorer:
Change folders
Change display area
Activate menu bar
Dialogs:
Continue to next field
Return to previous field
Open next tab
Open previous tab
Call help text
Help texts can be configured in ProTool/Pro CS for messages, screens and
operable screen objects. Help texts provide additional information and operating
notes on the operating units. Help text can involve information on permissible value
ranges regarding an input field or the cause and elimination of a fault related to an
error message.
Proceed as follows in order to call in the configured help text, e.g. for an input field:
Step
p
Procedure
OP37/Pro and Panel PC
PC
1
Select the required input field, e.g.
using the Tabulator key.
Click on the input field.
2
The LED in the HELP key lights up,
indicating that a help text is available.
Press the operating element, e.g.
function key F1, with which the
Display_Help_Text
function is linked.
y_
_
Press the HELP key.
3
The help text configured for the input field is displayed on the operating unit in
the language set. If a help text has also been configured for the current
screen, it is displayed too.
ProTool/Pro Runtime User’s Guide
Release 12/99
6-3
Operating ProTool/Pro Runtime
Language change
The ProTool/Pro CS configuration software enables a project to be stored in
numerous languages. Up to 32 of these editing languages can be loaded on the
operating unit at any one time. It is possible to switch between the languages
loaded on the operating unit online. Following a language change, all
language-dependent texts are displayed in the new language.
Language-dependent texts contain, e.g.:
S
S
S
S
S
Messages
Screens
Text lists
Help texts
Recipes
Conditions for changing languages
In order to change languages on the operating unit during runtime, the following
conditions must be fulfilled:
S
The selected language must have been loaded on the operating unit. The
project languages available during runtime are defined in ProTool/Pro CS under
System → Language Assignment: OP Languages.
S
The Language function must be assigned to an operating element, e.g. a
function key or button.
The language setting is stored by the operating unit, protected against a power
failure. After power supply is resumed, all language-dependent texts automatically
appear in the language last set.
6-4
ProTool/Pro Runtime User’s Guide
Release 12/99
Operating ProTool/Pro Runtime
6.2
Settings for the Runtime Software
Displaying the configuration on the target system
The ProTool/Pro CS configuration software can be used to define how the compiled
project is represented during runtime. The project can be displayed in full screen
mode or in a window which is smaller than the screen. In full screen mode, the
project takes up the entire screen. The screen no longer contains a window and
control elements (e.g. buttons).
In order to use the Full Screen view, select the menu option System → Settings in
ProTool/Pro CS. Select Display and mark the option Full Screen. If the taskbar no
longer needs to be displayed, deactivate it under Windows. Activate the Start
menu, select Settings → Taskbar and use the Taskbar Properties dialog to
deactivate the options Always on Top and Auto hide.
The full screen view provides more space during configuration as well, since there
is no window frame. Therefore, select the full screen setting before beginning with
the configuration.
Disable task switching
To prevent the user from calling up other applications during runtime, it is possible
to disable the task switching function in ProTool/Pro CS. Select the menu option
System → Settings and activate the options Lock Task Switching and Full Screen.
In addition, deactivate the Taskbar under Windows. Activate the Start menu, select
Settings → Taskbar and use the Taskbar Properties dialog to deactivate the options
Always on Top and Auto hide.
Note
If Lock Task Switching is selected, it is essential to assign the function Exit_runtime
to a key or button in the project. Otherwise, it is impossible to exit from ProTool/Pro
RT and Windows. The key combination CTRL + ALT+ DEL is also no longer
effective.
ProTool/Pro Runtime User’s Guide
Release 12/99
6-5
Operating ProTool/Pro Runtime
Cursor control compatibility (not PC)
The type of cursor control, e.g. within tabular structured screen objects (message
view, recipe view and status/force), can be configured. In this case, select menu
option System → Settings in the ProTool/Pro CS configuration software and use
the Settings dialog to activate or deactivate the option Cursor Control as with
V 5.10.
Using the new cursor control (check box deactivated), it is possible to navigate
within tables and list boxes simply by pressing the cursor keys without having to
implement the SHIFT key simultaneously.
Screen saver
S
OP37/Pro
A specific screen saver is available for the OP37/Pro which automatically
switches off the screen if no entry is made on the OP37/Pro within a defined
period. This screen saver is used in order to extend the service life of the
back-lighting. The screen saver is active by default.
Select the screen saver via Control Panel → Display→ Screen Saver. Select the
screen saver called ProTool.
S
Panel PC, PC
The majority of modern monitors no longer need a screen saver, indeed a
screen saver can actually be harmful to the CRT. These monitors have a power
management function which means they switch themselves off as soon as the
video signal has not been changed for a specific period of time, which the user
can define. A conventional screen saver prevents, or at least delays, activation
of this switch-off function which can lengthen the service life of the screen.
However, if a screen saver is required, only the standard screen savers
incorporated into Windows are approved for use with ProTool/Pro RT.
Setting the time zone
Ensure that the correct time zone is set for the operating unit. The time zone is set
in Windows by calling the Start menu and selecting Settings → Control Panel →
Date/Time → Time Zone.
6-6
ProTool/Pro Runtime User’s Guide
Release 12/99
Operating ProTool/Pro Runtime
6.3
Operating Special Screen Objects
Screen objects
This section provides information on operating the following screen objects:
S
Buttons/Switches:
– Buttons (Page 6-8)
– Status button (Page 6-9)
– Switches (Page 6-10)
S
List boxes (Page 6-11)
S
Messages
– Message line (Page 6-12)
– Message window (Page 6-12)
– Message page (Page 6-14)
– Message buffer (Page 6-15)
– Message view (Page 6-16)
– Simple message view (Page 6-17)
S
Bar graphs (Page 6-18)
S
Trend display (Page 6-19)
S
Sliders (Page 6-21)
S
Analog display (Page 6-22)
S
Calendar date/time, display and set:
– Date/Time (Page 6-23)
– Digital/Analog clock (Page 6-24)
S
Password list (Page 6-25)
S
Status/Force (Page 6-27)
Information concerning the Recipe View is provided in Chapter 7.3.1.
ProTool/Pro Runtime User’s Guide
Release 12/99
6-7
Operating ProTool/Pro Runtime
6.3.1
Button
Purpose
A button is a virtual key on the operating unit screen that can be operated by the
mouse or via the touch screen, according to the system.
Functions which have been assigned to buttons can be triggered, for example, by
the following, configurable events:
S
S
S
Clicking
Pressing
Releasing
S
Labeling
Buttons can be labeled statically or dynamically. In the case of dynamic labeling,
the text or graphic on the button changes during runtime according to the value
of a configured tag.
S
Operation acknowledgement
As soon as the operating element detects a valid operation, it responds with a
visual acknowledgement. The acknowledgement, however, does not infer that
the required action is actually being executed.
Display
Figure 6-1 illustrates an example of a button when pressed (right) and not pressed
(left).
Figure 6-1
Example of a button
Hidden buttons
Hidden buttons are transparent buttons which may lie over graphics, for example.
This enables plant parts which are graphically displayed on the operating unit to be
operated easily (e.g. a motor or valve).
If a hidden button is selected on the operating unit, its contour becomes visible as
long as the button remains selected. The contour enables the user to detect the
operable area of the button.
Control
6-8
S
Mouse and touch screen
Click the mouse pointer on the button or press it on the operating unit touch
screen.
S
Keyboard
Select the button, e.g. using the cursor keys, and press either the Enter key or
Spacebar.
ProTool/Pro Runtime User’s Guide
Release 12/99
Operating ProTool/Pro Runtime
6.3.2
Status Button
Purpose
The Status button is an operating and display element with the two states, ON and
OFF. Status buttons indicate the status of a device which cannot be determined
from the operating unit (e.g. a motor). At the same time, it is also possible to
change the status of the device concerned on the operating unit.
Behavior
The behavior of the Status button can be configured:
S
Switch:
The Status button toggles from one state to the other each time it is operated,
and remains in the respective state until it is operated again.
S
Key:
When operated, the Status button changes to the ON status. It remains in this
status as long as it is being pressed. When released, it automatically switches
back to OFF, its home position.
Functions which have been assigned to the Status button can be triggered, for
example, by the following configurable events:
S
S
S
Change of status
Pressing
Releasing
If the status of the Status button changes from the type switch due to a modification
of the configured tags, none of the described events is triggered.
Display
When the Status button is set to the switch type, the two states can be assigned
different texts or graphics in ProTool/Pro CS which are displayed on the Status
button during runtime.
Figure 6-2 illustrates an example of a Status button when pressed (left) and not
pressed (right).
Figure 6-2
The two statuses relate to the Status button when the Switch option is set
Operation
The Status button is operated as a normal button (refer to Page 6-8).
ProTool/Pro Runtime User’s Guide
Release 12/99
6-9
Operating ProTool/Pro Runtime
6.3.3
Switches
Purpose
A switch serves for the input and out of a binary status. It can only be switched on
or off. It is linked to a tag to do this. The status OFF corresponds to the value 0 (a
logical FALSE) of the tag linked to the switch. All tag values other than zero (a
logical TRUE) are interpreted as the status ON.
Behavior
Functions which have been assigned to the switch can be triggered, for example,
by the following, configurable events:
S
S
S
Change of status
Switch on
Switch off
If the switch status changes due to a change of the configured tag, none of the
events described is triggered.
Display
Figure 6-3 illustrates an example of two switches with different orientation.
Figure 6-3
Switches with different orientation
Control
6-10
S
Mouse and touch screen
Point to the moveable switch lever and move it to the opposite position.
S
Mouse
Double-click on the mouse in the sliding slot between the two switch statuses.
S
Keyboard
Select the switch, e.g. using the cursor keys, and press either the Enter key or
Spacebar.
ProTool/Pro Runtime User’s Guide
Release 12/99
Operating ProTool/Pro Runtime
6.3.4
List Box
Purpose
Values are entered in a list box by selection from a list provided (Figure 6-4), not
character-by-character.
Figure 6-4
List box in opened state (example)
Control
S
Mouse and touch screen
Click the mouse pointer in the list box or touch it on the operating unit touch
screen. In this case, the selection list opens up immediately. After selecting an
element from the list, the selection list is closed and the selected text appears in
the list box.
S
Keyboard
Select the required list box, e.g. using a cursor key. The field content changes
color when the field is accessed.
The following keys on the SIMATIC operating unit can be used to navigate in
the selection list:
Keys
Function
S Open selection list
S Confirm entry
or
or
or
ProTool/Pro Runtime User’s Guide
Release 12/99
The selection list is closed, the list box remains
active
Mark the next entry
Mark the previous entry
Terminate editing
The selection list is closed and the original content is
reset in the list box. The list box remains active.
6-11
Operating ProTool/Pro Runtime
6.3.5
Message Line
Purpose
A configured message line is always present, irrespective of the screen selected.
The message line displays the last alarm or event message received.
Display priorities
Alarm messages have priority over event messages. If there are no alarm
messages, or they have all been acknowledged, the event messages are
displayed.
Alarm messages flash to distinguish them from event messages.
6.3.6
Message Window
Purpose
The message window displays all queued messages without a time stamp. It is
possible to configure how the alarm messages are sorted. It is also possible to
select whether the latest or oldest message is displayed first.
Alarm messages
If one of the display modes Window/Window, Window/Line or Window/Off is
configured, the message window for alarm messages opens automatically as soon
as an alarm message arrives. Figure 6-5 illustrates an example.
Figure 6-5
6-12
Alarm message window (example)
ProTool/Pro Runtime User’s Guide
Release 12/99
Operating ProTool/Pro Runtime
Significance of the buttons
Call help text
Use this button to call in the help text configured for the
selected message.
Edit message
Use this button to trigger the function assigned to the
Edit Message event for the selected message.
Acknowledge alarm messages
Use this button to acknowledge an alarm message that
has not yet been acknowledged.
Event messages
In order to be able to open the event message window by means of the mouse or
keyboard the function Display_event_message_window, for example, must be
linked to a function key or button in the project.
System messages
The message window for system messages opens automatically as soon as a
system message arrives. The window closes automatically once the configured
duration for display has elapsed.
Use the ESCAPE key to close the message window manually.
ProTool/Pro Runtime User’s Guide
Release 12/99
6-13
Operating ProTool/Pro Runtime
6.3.7
Message Page
Purpose
The message page displays all queued messages with time stamp. It is possible to
configure how the alarm messages are sorted. It is also possible to select whether
the latest or oldest message is displayed first. An open message page is constantly
updated.
Structure
In order to be able to access the message page for event messages and/or alarm
messages from the operating unit, the following functions must be configured:
S
for event messages: Show_event_message_page
S
for alarm messages: Show_alarm_message_page
Figure 6-6 illustrates an example of the message page for alarm messages.
Figure 6-6
Alarm message page (example)
Information on the significance of the two buttons is provided on Page 6-12.
6-14
ProTool/Pro Runtime User’s Guide
Release 12/99
Operating ProTool/Pro Runtime
6.3.8
Message Buffer
Purpose
The message buffer displays all message events with time stamp. It is possible to
configure how the alarm messages are sorted. It is also possible to select whether
the latest or oldest message is displayed first. An open message buffer is
constantly updated.
Structure
In order to be able to access the message buffer for event messages and/or alarm
messages from the operating unit, the following functions must be configured:
S
for event messages: Show_event_message_buffer
S
for alarm messages: Show_alarm_message_buffer
Figure 6-7 illustrates an example alarm message buffer.
Figure 6-7
Alarm message buffer (example)
Information on the significance of the two buttons is provided on Page 6-12.
ProTool/Pro Runtime User’s Guide
Release 12/99
6-15
Operating ProTool/Pro Runtime
6.3.9
Message View
Purpose
Specific views of the message buffer (volatile or archive) are defined in the
message view. Various filter criteria are available in ProTool/Pro CS for this
purpose.
Structure
The message view (Figure 6-8) displays messages that are queued on the
operating unit or still have to be acknowledged. The message view also enables
acknowledgement of these messages.
Alternatively, the message view can also display a history of message events. In
this case, messages cannot be acknowledged.
Figure 6-8
Example of a message view
Significance of the buttons
Call help text
Use this button to call in the help text configured for the
selected message.
Edit message
Use this button to trigger the function assigned to the
Edit Message event for the selected message.
Acknowledge alarm messages
Use this button to acknowledge an alarm message that
has not yet been acknowledged.
6-16
ProTool/Pro Runtime User’s Guide
Release 12/99
Operating ProTool/Pro Runtime
Message categories
In order to be able to distinguish between the different message categories, they
are marked in the first column of the message view:
!
Alarm messages
blank
Event messages
$
System messages
S7
S7 messages
Column properties
When correspondingly configured, the column sequence and sorting within each
column can be modified during runtime.
6.3.10
S
Change column sequence
In order, for instance, to swap the columns Time and Date, position the mouse
on the column heading Date, press and hold the mouse button and move the
heading to the column heading Time.
S
Change sorting
In order to change the chronological sorting of the messages, double click in on
the column heading of one of the two columns Time or Date.
Simple Message View
Purpose
A simple message view provides a subset of the functionality of a message view
(Page 6-16). This provides a simple method with which, for example, to create a
message line to display event and system messages in a screen.
Structure
The simple message view cannot be operated. The figure below provides an
example of a simple message view with the following columns configured:
S
S
S
S
S
Date
Time
Message number
Message states
Message text
12.12.99 14:27:06 110001 K
Change to operating status ‘online’
12.12.99 14:27:07 140001 K
Connection discontinued: Station 2, Rack 0, Slot 0
ProTool/Pro Runtime User’s Guide
Release 12/99
6-17
Operating ProTool/Pro Runtime
6.3.11
Bar Graph
Purpose
Bar graphs present a value in the form of a rectangular area. This makes it
possible to recognize how far the current value is from the limits or whether a
specified setpoint has been reached by a single glance at the operating unit. Bar
graphs can be used to display fill levels or quantities, for example.
Display
It is possible to configure minimum and maximum values and the direction a bar
graph moves by increasing the tag value:
Figure 6-9 depicts three states of a horizontal bar graph:
1. Value drops below the minimum value configured
2. Value lies within the configured display range
3. Value exceeds the maximum value configured
Figure 6-9
6-18
Three states of a bar graph
ProTool/Pro Runtime User’s Guide
Release 12/99
Operating ProTool/Pro Runtime
6.3.12
Trend Display
Purpose
The trend display is a particularly clear form of displaying process data in a
continuous manner. In the case of processes that only change slowly, the trend
display can visualize events that have already occurred and provides access to,
and estimate of trends in the process sequence. On the other hand, data issued
concerning processes which run quickly can be easily evaluated using this form of
trend display.
Configurable properties
A number of different trends can be displayed simultaneously in the trend display.
The following properties of a trend can be configured:
S
Trend Type: Realtime trend or History trend
S
Triggering: Cycle triggering or Bit triggering
S
Limit values:The operating unit displays the points at which configured limit
values are reached or exceeded by changing the color of the trend display.
Structure
Figure 6-10 illustrates an example of a trend graphic with buttons configured for
navigating within the trend.
Figure 6-10
Operable trend display (example)
Navigation using buttons
The buttons configured enable the user to navigate in the trend display. The
individual buttons have the following functions:
ProTool/Pro Runtime User’s Guide
Release 12/99
6-19
Operating ProTool/Pro Runtime
Button
Function
Start/Stop
update
Interrupts updating of the trend display until the button is
pressed again.
Return to start
Jumps back to the start of trend recording.
Scroll back
Scrolls back one window width.
Scroll forward
Scrolls forward one window width.
Enlarge zoom
area
Extends the trend display horizontally.
Reduce zoom
area
Compresses the trend display horizontally.
Navigation using the keyboard
If no buttons have been configured in the trend display, use the operating unit
keyboard to navigate in the trend display. The precondition for this, however, is that
the configuration supports navigation by means of the keyboard.
Function
Function
PC
Return to start
Jumps back to the start of trend recording.
Scroll back
Scrolls back one window width.
Scroll forward
Scrolls forward one window width.
Enlarge zoom
area
Extends the trend display horizontally.
Reduce zoom
area
Compresses the trend display horizontally.
OP37/Pro
Panel PC
Note
It is not possible to interrupt updating of the trend display by means of the
keyboard.
Display archive data as a trend
If data stored in an archive is displayed in the trend display, it is represented as
history trends, i.e. the trend data is read out of the archive and displayed according
to events. Trends of this kind can be used for power-on processes or temperature
patterns on heating up an oven.
The trend display is not updated when the archive data changes.
6-20
ProTool/Pro Runtime User’s Guide
Release 12/99
Operating ProTool/Pro Runtime
6.3.13
Slider Control
Purpose
Use a slider control to enter and display numerical values in analog form. To enter
values, move the slider to the required position. When used as a display element,
the value is represented by the position of the slider.
Function
The slider control is linked to a tag. On moving the user-controlled slider, the
corresponding value is written to the tag. Conversely, when the tag value is
changed, the position of the moving slider is changed correspondingly, unless it
being moved by the operator at that moment.
Display
The figure on the right illustrates an example of a slider for
setting and displaying temperature values. The current value
(in this case: 50) appears as plain text and as a bar graph.
Control
S
Mouse and touch screen
Point to the moveable slider and move it to the desired
value.
S
Keyboard
In order to operate the slider, select it using a cursor key,
for example. Use the following keys to actually move the
slider:
Function
PC
OP37/Pro
Panel PC
Increase value continually
Decrease value continually
Increase/Decrease value in steps
of 5%
–
Move to maximum
value/minimum value
–
ProTool/Pro Runtime User’s Guide
Release 12/99
6-21
Operating ProTool/Pro Runtime
6.3.14
Analog Display
Purpose
An analog display indicates numerical values as a pointer instrument. Up to three
areas can be set up on the instrument dial, each with a different color background.
This enables visualizing different operating modes, e.g. normal operation, warning
area and danger area.
Function
The analog display is linked to a tag. When the tag value changes, the pointer
position changes correspondingly. The display can be configured to include a
non-return pointer. At runtime, the non-return pointer indicates the maximum value
reached so far by the value being displayed. It is reset when the current window is
opened.
The analog display is purely a display element. It cannot be used to enter values
on the operating unit.
Display
Figure 6-11 illustrates an example of an analog display indicating temperatures .
Figure 6-11
6-22
Example of a typical analog display
ProTool/Pro Runtime User’s Guide
Release 12/99
Operating ProTool/Pro Runtime
6.3.15
Date/Time
Purpose
The screen object Date/Time displays the current values for the time and/or date. If
appropriately configured, these details can be changed online.
The calendar date and time values are synchronized with the system values of the
operating system. The operating unit accesses these values in order, for example,
to assign a time stamp to message events.
Format
The format of the date and time depends on the language currently set. It
corresponds to standard international conventions:
Table 6-3
Examples of language-dependent formats for date/time
Language
g g
Example
Time
Date
long
short
German
Samstag, 6. November 1999
06.11.99
12:59:32
English (USA)
Saturday, November 06, 1999
11/6/99
12:59:32 pm
French
samedi 6 novembre 1999
06/11/99
12:59:32
Italian
sabato 6 novembre 1999
06/11/99
12.59.32
Spanish
(traditional)
sábado 6 de novembre de 1999
6/11/99
12:59:32
Note
When entering the date and time, ensure that the two values are separated by a
space.
ProTool/Pro Runtime User’s Guide
Release 12/99
6-23
Operating ProTool/Pro Runtime
6.3.16
Digital/Analog Clock
Purpose
The digital/analog clock provides the option of displaying the system time in
numbers (digital) or as a clock with hands (analog). The digital display also
includes the current date. The display format is language dependent. It is based on
the format defined by the operating unit operating system.
Display
The digital/analog clock is purely a display element. This means that the date and
time cannot be set using the operating unit. In order to set the date and time, use
the Date/Time screen object (refer to Page 6-23).
Figure 6-12 illustrates an example of a configured analog clock.
Figure 6-12
6-24
Example of a typical analog clock
ProTool/Pro Runtime User’s Guide
Release 12/99
Operating ProTool/Pro Runtime
6.3.17
Password List
Purpose
While the system is being configured using ProTool/Pro CS, operating elements
can be protected against unauthorized use by means of passwords. In this way,
important parameters and settings can only be changed by authorized personnel.
Password hierarchy
Hierarchically defined password levels from 0 to 9 exist for password protection
purposes. At the same time a password is assigned for a user or for an entire user
group, authorization is given to execute functions belonging to a specific password
level. If, for example, a user is assigned to password level 4, he or she is
authorized to execute functions of password levels 0 to 4.
Password level
Password level 0:
This minimum password level is assigned to functions that have no, or only a
minimal effect on the course of the process. In order to trigger functions assigned
to password level 0, no password needs to be entered on the operating unit.
Password levels 1 to 8:
Levels 1 to 8 are assigned according to the increasing importance of the functions.
The operating unit requests a password before a function with a password level
higher than 0 can be executed.
Password level 9
Only the supervisor (system support specialist or service technician) is granted
authorization to execute functions assigned to password level 9. The supervisor is
authorized to access all the functions on the operating unit.
Logging in on the operating unit (login)
After calling a password-protected function, the operating unit automatically
prompts the user to enter a password. Once entered, the password need not be
entered again in order to call in other functions of this password level or lower.
Logging off from the operating unit (logoff)
In order to prevent the software from being used by unauthorized persons, a
password level higher than 0 should not be left active on the operating unit over a
longer period of time. The following options are available to explicitly reset
passwords levels:
ProTool/Pro Runtime User’s Guide
Release 12/99
6-25
Operating ProTool/Pro Runtime
S
Configured logout time elapsed
If the operating unit is not operated within the period of time configured (logout
time), the current password level is automatically reset to 0.
S
Manual logoff
If the function Logoff_user is linked to an operating element in the project, it can
be used to reset the current password level to 0.
Password management
The operating unit can be used to enter individual members of staff in a password
list and assign password levels to them, according to their respective level of
responsibility. When processing the list, conclude each field entry by pressing the
Enter key. The password list contains all the passwords configured on the
operating unit. The list is coded and stored on the operating unit, protected against
a power failure.
Figure 6-13 illustrates an example of a password list with six entries.
Figure 6-13
Example of a password list
View password list
Only those passwords are displayed which have a password level equal to or lower
than that with which the user is currently logged in. If the operating unit is equipped
with a mouse or touch screen, the entries can be sorted according to name or
password level during runtime simply by clicking on the column heading.
Creating a password
The user can only edit the password list up to the level with which he is currently
logged in. All passwords used in the system must be unique. It is not possible to
assign identical passwords to different users. It is possible, however, to assign the
same password level to different users without any restrictions.
Deleting a password
To delete a password from the password list, overwrite the password level
assigned to it with 0.
6-26
ProTool/Pro Runtime User’s Guide
Release 12/99
Operating ProTool/Pro Runtime
6.3.18
Status/Force
Purpose
The operating unit can be used to access values in the PLC connected
(SIMATIC S5 and SIMATIC S7) online, directly, and to read and write them. This
means PLC operands can be monitored and changed in a simple manner without
having to connect an additional programming unit or PC to the PLC.
This option is particularly useful during the testing and commissioning phase of the
project.
Condition
In order to be able to access values in the PLC directly from the operating unit, the
following preconditions must be fulfilled:
S
The PLC connected must be a SIMATIC S5 or SIMATIC S7.
S
The project must contain the screen object Status/Force (Figure 6-14).
Structure
Figure 6-14 illustrates the basic structure of the screen object Status/Force.
Figure 6-14
Status/Force: Example for SIMATIC S7
Each line represents an operand. If the operating unit is equipped with a mouse or
touch screen, the column sequence on the operating unit can be changed. In order,
for instance, to swap the columns Format and Control Value, position the mouse on
the column heading Control Value press and hold the mouse button and move the
heading to the column heading Format.
Table 6-4 explains the meaning of the individual columns and buttons.
ProTool/Pro Runtime User’s Guide
Release 12/99
6-27
Operating ProTool/Pro Runtime
Table 6-4
Status/Force: Significance of the columns and buttons
Column/Button
Function
Connection
Select the PLC whose address range is to be displayed
and/or changed.
Type, DB Number, Offset, Bit
Specify the address in these columns.
Data Type, Format
The format of the output is defined in these columns.
Status Value
The operating unit displays the value read from the PLC in
this column.
Control Value
Enter the value to be written to the PLC in this column.
Use this button to update the display in the Status Value
column.
The button is locked after being pressed. None of the
input fields can then be used until the button is pressed
again, thus stopping the update.
Use this button to accept the new value in the Control
Value column. The control value is then written to the
PLC.
Control
The table depicts the key combinations for various operating units.
Function
PC
OP37/Pro
Panel PC
Operate Write button.
Operate Read button.
Select first field in current line.
Select last field in current line.
Select first field in current column.
Select last field in current column.
Delete current line.
Open list box.
6-28
ProTool/Pro Runtime User’s Guide
Release 12/99
Recipes
7.1
7
Overview
Purpose
The purpose of recipes is to transfer of quantities of related data together and
synchronously from the operating unit to the PLC and back again.
ProTool/Pro Runtime User’s Guide
Release 12/99
7-1
Recipes
Principles of operation
Using the example of the filing cabinet (Figure 7-1), the two terms Recipe and Data
Record should be defined because they are important for subsequent
understanding of the process.
Fruit juice plant
Grapefruit
Lemon
Nectar
Juice
Drink
Orange
Apple
Figure 7-1
7-2
Recipe and data record, using a filing cabinet as an analogy
ProTool/Pro Runtime User’s Guide
Release 12/99
Recipes
S
Recipe
Recipes correspond to the individual drawers of the filing cabinet illustrated
(e.g. grapefruit or lemon). The reference value fields (tags) belonging to the
particular recipe are defined in each drawer. The recipe defines the data
structure in ProTool/Pro CS. This structure cannot be subsequently modified on
the operating unit.
S
Data record
Data records correspond to the filing cards in the individual drawers of the
cabinet (e.g. Drink, Juice and Nectar). A data record contains the values for a
recipe. Data records are created, modified and deleted on the operating unit.
The data records are also stored on the operating unit. This saves storage
space on the PLC.
The Import/Export function provides the additional option of using external tools
to edit exported data records and then reimporting them on the operating unit.
Example of a recipe
An example for the use of a recipe is its application on a filling station of a fruit juice
system. The same filling station is used to produce orange drink, orange juice and
orange nectar. The mixing ratios are different for each product. The ingredients are
always the same.
Assume that a recipe called Mixture is created which has the following data
structure:
Tag
Name
Var_2
l orange
Var_3
l water
Var_4
kg sugar
Var_5
g flavor
The designations l Orange, g Aroma etc. of the tags are the so called entry
names.The entry names are also displayed on the operating unit. In this way, for
example, the tag Var_2 can be identified as the tag designating the mixture
component Orange.
The data records contain the values for the different drink types. The data records
may appear as follows, for instance:
Orange drink
Orange juice
Orange nectar
l orange
90
l orange
95
l orange
70
l water
10
l water
5
l water
30
kg sugar
1.5
kg sugar
0.5
kg sugar
1.5
g flavor
200
g flavor
100
g flavor
400
ProTool/Pro Runtime User’s Guide
Release 12/99
7-3
Recipes
7.2
Recipe Configuration
Basic procedure
The basic steps to configuring a recipe are listed below:
1. Define the structure of the recipe:
Assign tags to the recipe structure. These tags are provided with entries from
the data records.
Define a name for the recipe. This name is used to select the recipe in the
project and on the operating unit.
2. Set recipe tag properties
The following options can be configured in ProTool/Pro CS:
– Synchronize Tags
This option defines that the data from a data record has been read from the
PLC or data medium and written in the tag or read from the tags configured
for the recipe. This establishes a connection between the tags configured in
the recipe and the tags in the screens. When a data record is loaded, the
values are written to the tags used in the screens.
– Tags Offline
If this option is also activated, the values entered are only stored in the tags,
and not transferred to the PLC. Otherwise, values entered are transferred
directly to the PLC.
3. Define data record storage medium on the operating unit
The data storage location for data records can be configured. The following
settings are possible, depending on the destination device:
– any path and any drive
– internal flash
– storage card (PC card)
4. Set download synchronization
It is possible to configure whether the data records are downloaded to the PLC
with or without synchronization.
5. Creating a recipe screen
Configure one or more screens in order to create, store and download data
records on the operating unit.
Further information
Detailed information on how to create projects is provided in the online help to the
ProTool/Pro CS configuration software and in the ProTool Configuring
Windows-based Systems User’s Guide.
7-4
ProTool/Pro Runtime User’s Guide
Release 12/99
Recipes
System limits
The table provides an overview of the system limits for recipes according to the
units.
Elements
Target device
OP37/Pro
PC, Panel PC
Number of recipes
255
255
Data records per recipe
5000 1)
5000 1)
Total entries
5,000
5,000
Entries per recipe
2,048
2)
1) Dependent on storage medium used.
2) Dependent on the number of licensed power tags. Power tags are tags linked to a
process.
ProTool/Pro Runtime User’s Guide
Release 12/99
7-5
Recipes
7.3
Editing Data Records
In this chapter
This chapter provides information on how to edit data records on operating unit.
The following information is also included:
S
S
S
S
S
S
S
S
S
S
S
S
S
S
Layout of the recipe view (Page 7-7)
Displaying data records (Page 7-10)
Creating new data records (Page 7-10)
Copying data records (Page 7-11)
Modifying data records (Page 7-12)
Renaming data records (Page 7-13)
Deleting data records (Page 7-13)
Reading data records from the PLC (Page 7-14)
Downloading data records to the PLC (Page 7-14)
Editing data records in recipe screens (Page 7-15)
Functions and PLC jobs (Page 7-17)
Exporting/Importing data records (Page 7-18)
Exporting, editing and importing data records (Page 7-20)
Response following modification of recipe structure (Page 7-21)
Methods
Data records can be edited on the operating unit in tables or screens:
7-6
S
Tabular editing
The recipe view is available for the tabular editing of data records (Page 7-7).
The recipe view enables recipes and data records to be handled in an
uncomplicated, quick way.
It is typically used to edit data records of smaller recipes. Values entered on the
operating unit are not directly transferred to the PLC when entered.
S
Editing in recipe screens
The project engineer can use recipe screens (Page 7-15) to customize the user
interface for editing data records and, for example, simulating the system
visually by providing graphics and individual masks for entering data records.
This method is typically used for processing medium and large data records
offline in the recipe view. The values entered on the operating unit are only
saved in the tags, but not transferred directly to the PLC on input.
ProTool/Pro Runtime User’s Guide
Release 12/99
Recipes
7.3.1
Recipe View
Purpose
The recipe view is typically used to edit recipe data records in tabular form. This
provides an uncomplicated method of displaying, creating, copying, modifying,
deleting and downloading data records.
All descriptions on editing data records provided in this Chapter 7.3.1 relate purely
to the use of the recipe view. Information on editing data records in recipe screens
is provided in Chapter 7.3.2.
Display
Figure 7-2 illustrates an example of the layout of the recipe view. Some of the
operating and display elements can be configured so that they are faded out on the
operating unit.
Figure 7-2
Layout of the recipe view (example)
ProTool/Pro Runtime User’s Guide
Release 12/99
7-7
Recipes
Significance of the operating and display elements
No.
Function
Select recipe
If the corresponding function is enabled in ProTool/Pro CS, it is possible
to select a configured recipe in this selection field. The number of the
selected recipe is displayed to the right of the selection field. This
number is only relevant during the configuration. It cannot be modified
on the operating unit.
Select data record
As soon as a recipe has been selected, the data records available are
displayed in this field. In addition, the data record number is displayed to
the right. The number field only becomes active when the input of a data
record number is permitted, e.g. after changing the data record number
or creating a new data record.
View /Edit entries
This table contains all the entries which are configured in the selected
data record. Sorting complies to the configured sequence. The
right-hand column displays the associated values.
The entry names cannot be edited on the operating unit.
Create new data record
This button initiates the creation of a new data record. The
setpoint values are predefined with default values configured
as start values for the respective tags.
Key combinations:
Save data record
This button is used to save the current values of the date
record displayed on the operating unit data medium. The
memory location is specified in ProTool/Pro CS.
The data record is stored under the currently defined name
and number.
Key combinations:
Delete data record
This button is used to delete the data record currently
displayed for the defined recipe from the operating unit data
medium.
Key combinations:
Read data record from the PLC
This button is used to read the data record related to the
currently set recipe from the PLC and display the values on
the operating unit.
Key combinations:
7-8
ProTool/Pro Runtime User’s Guide
Release 12/99
Recipes
No.
Function
Write data record in the PLC
This button is used to write the current data record values in
the PLC.
Key combinations:
Status bar
The operating unit displays the status of the current operation in this
line, e.g. Downloading.
Note
S If the two options Synchronize Tags and Tags Offline are activated in the
project, the values from the table are applied when values in the tables and
screens are changed simultaneously.
S If the data record currently being edited in the recipe view is changed in the
background (e.g. by means of a PLC job), the recipe view is not automatically
updated.
Tips on operating the recipe view
S
Quick selection of recipes and data records
When the selection field is opened up, enter the first letter of the recipe or data
record to be selected to access the relevant area of long lists, thus speeding up
the selection procedure.
S
Edit entries
If the value marked in the recipe view is to be modified, it is initially deleted by
pressing one of the alphanumeric keys. This occurs with regard to all list
elements in Windows. In order to prevent this, proceed as follows:
– After selecting the value to be changed, press the Enter key. This clears the
marking.
– Move the text cursor to the relevant position by pressing the cursor key or
SHIFT and cursor key.
– Insert the modifications.
– Confirm the changes, e.g. by pressing the Enter key.
ProTool/Pro Runtime User’s Guide
Release 12/99
7-9
Recipes
Displaying data records
Proceed as follows to display data records on the operating unit data medium:
Step
1
Select recipe
Procedure
Step 1 is only possible when recipe selection has been
configured.
S Select the selection field for the configured recipes
(Position 1 in the figure on Page 7-7).
S Open the selection field and mark the required recipe in the
opened selection list.
S Confirm the selection.
2
Select data record
S Select the selection field for the existing data records
(Position 2 in the figure on Page 7-7).
S Open the selection field and mark the required data record in
the opened selection list.
S Confirm the selection.
The selected data record is loaded. The configured entries
are displayed in table form with name and setpoint value.
Creating new data records
Proceed as follows to create new data records on the operating unit:
Step
1
Select recipe
Procedure
S Select the required recipe, as described in Step 1 on
Page 7-10.
2
Create data record
S Press the keyy depicted on the left.
The name and number of the data record displayed are
deleted. The entries in the table are assigned the configured
start values.
3
Enter data record
name
S Enter a new data record name in the selection field for data
records (Position 2 in the figure on Page 7-7).
S After entering the data record name, the next free data
record number is automatically entered on the right. This
number can be changed, if necessary.
4
Change values
S Enter a setpoint value for each entry configured in the table
(Position 3 in the figure on Page 7-7).
5
Save data record
S Press the key depicted on the left.
Th new d
The
data
t record
d iis written
itt on th
the d
data
t medium.
di
The operating unit responds with a system message if the
name or number entered already exist. The writing process is
not executed in this case.
7-10
ProTool/Pro Runtime User’s Guide
Release 12/99
Recipes
Note
The data storage location for the new data record can be configured. The following
settings are possible, depending on the destination device:
S any path and any drive
S internal flash
S storage card (PC card)
Copying data records
In order to copy data records, save them under new names. Proceed as follows:
Step
1
2
Procedure
Select recipe and
data record
S Select the required recipe and the data record to be copied
Enter data record
name
S Enter a new data record name in the selection field for data
as described in Steps 1 and 2 on Page 7-10.
records (Position 2 in the figure on Page 7-7).
S After entering the data record name, the next free data
record number is automatically entered on the right. This
number can be changed, if necessary.
3
Save data record
S Press the keyy depicted on the left.
The new data record is written on the data medium.
The operating unit responds with a system message if the
name or number entered already exist.
ProTool/Pro Runtime User’s Guide
Release 12/99
7-11
Recipes
Changing data records
Proceed as follows to change existing data records:
Step
1
2
Procedure
Select recipe and
data record
S Select the required recipe and the data record to be changed
Change values
S Change the setpoint value in the table (Position 3 in the
as described in Steps 1 and 2 on Page 7-10.
figure on Page 7-7).
The entry names cannot be edited on the operating unit.
3
Save data record
S Press the keyy depicted on the left.
The modified data record overwrites the original data record
on the data medium.
Note
If large-scale modifications have been carried out in recipes in ProTool/Pro CS
and, after downloading the modified project, the data records on the operating unit
data medium deviate a great deal from the original recipe structure, it is
recommended to:
S reorganize the data medium:
Export the data records, delete the files with the prefix PTRCP_1) from the data
medium and import the data records again
or
S delete the files with the prefix PTRCP_1) from the data medium:
In this case, use Windows Explorer.
(Note: After the files have been deleted, the relevant data must be re-entered)
In this way, all the tags no longer used are deleted.
1) If necessary, only delete the files of the modified recipes
7-12
ProTool/Pro Runtime User’s Guide
Release 12/99
Recipes
Renaming data records
Proceed as follows to rename existing data records:
Step
1
2
Procedure
Select recipe and
data record
S Select the required recipe and the data record to be copied
Enter data record
name
S Enter a new data record name in the selection field for data
as described in Steps 1 and 2 on Page 7-10.
records (Position 2 in the figure on Page 7-7).
S After entering the data record name, the next free data
record number is automatically entered on the right. Reset
this number to its original value.
3
Save data record
S Press the key depicted on the left.
The data
Th
d
record
d iis written
i
on the
h d
data medium
di
under
d the
h new
name.
The operating unit responds with a system message if the
name or number entered already exist.
Deleting data records
Proceed as follows to delete data records on the operating unit data medium:
Step
1
2
Procedure
Select recipe and
data record
S Select the required recipe and the data record to be changed
Delete data record
S Press the keyy depicted on the left.
as described in Steps 1 and 2 on Page 7-10.
The data record is deleted from the data medium after
confirming a confirmation request.
ProTool/Pro Runtime User’s Guide
Release 12/99
7-13
Recipes
Reading data records from the PLC
Proceed as follows to update data records in the operating unit working memory
with values from the PLC:
Step
1
Select recipe
Procedure
S Select the required recipe, as described in Step 1 on
Page 7-10.
2
Read values
S Press the keyy depicted on the left.
S The current values are read from the PLC and displayed.
3
Edit data records
S The data can then be edited, e.g. values modified, saved,
downloaded to PLC, etc.
The operating unit responds with a system message if
downloading from the PLC is not possible because, in cases
where synchronization with the PLC is configured, for
example, the data mailbox is currently locked.
Downloading data records to the PLC
In order that a modified or new data record can take effect in the PLC, it must be
downloaded to the PLC.
Proceed as follows to download data records to the PLC:
Step
1
2
Procedure
Select recipe and
data record
S Select the required recipe and the data record to be
Write values
S Press the key depicted on the left.
downloaded as described in Steps 1 and 2 on Page 7-10.
PLC
The values are written in the PLC.
The operating unit responds with a system message if
downloading to the PLC is not possible because, in cases
where synchronization with the PLC is configured, for
example, the data mailbox is currently locked.
7-14
ProTool/Pro Runtime User’s Guide
Release 12/99
Recipes
7.3.2
Recipe Screens
Purpose
Recipe screens are typically representations of the system. The screens provide
display and operating elements with which to create, save, modify, delete and
download data records. Large recipes can be split into several topic-specific
screens and clearly displayed, e.g. with graphic elements.
Components for editing data records
In order to be able to edit data records in recipe screens on the operating unit, the
corresponding components, e.g. input/output fields and functions, must be
configured:
S
Recipe view:
Recipe screens can contain a recipe view (Page 7-7) not only to enable the
easy selection of recipes and data records but also for editing data records. The
configured functional scope of the recipe view can vary, according to the
intended purpose.
Information on editing data records with the recipe view is provided in Chapter
7.3.1. The instructions stipulated there generally also apply for editing data
records in recipe screens. However, in this case, input is performed in the
screens.
S
Functions:
Depending on whether a recipe view is configured in the project or not, and on
the properties assigned to it, there are various functions available to transfer
data records between operating unit and PLC, e.g.:
– Load_Data_Record
– Save_Data_Record
– Data_Record_PLC_to_Tags
– Data_Record_Tags_to_PLC
More functions and PLC jobs, which are linked to the downloading of data records,
are described in the Chapter 7.3.3.
Editing data records offline
The way in which data records are edited on the operating unit is defined during
configuration. It is typically used for the offline editing of data records in recipe
screens. Values entered on the operating unit are not directly transferred to the
PLC when entered.
Proceed as follows to edit data screens in recipe screens offline:
ProTool/Pro Runtime User’s Guide
Release 12/99
7-15
Recipes
Step
Procedure
1
Select a data record.
2
Trigger reading of the selected data record from the storage medium:
S With recipe view
It is automatically loaded on selecting the data record.
S Without recipe view
Activate the operating element linked with the Load_Data_Record function.
The function parameters must have been set accordingly beforehand.
3
The data of the data record is written to the tags.
4
Edit the tags using the configured input/output fields.
5
Save the modified tags.
S With recipe view
Click the Save button. If necessary, you must first specify a new name.
S Without recipe view
Activate the operating element linked with the Save_Date_Record. The
function parameters must have been set accordingly beforehand.
Editing data records online
In order to edit data records online, the option must either be defined during
configuration or the Recipe_Tags_Online_Offline function configured in the project.
In the case of online editing, the values entered are transferred directly to the PLC.
This method is normally used when commissioning the machine/system in order to
test, run-up and position.
Proceed as follows to edit data records on the operating unit online:
Step
Procedure
1
Select a data record.
2
Trigger reading of the selected data record from the storage medium:
S With recipe view
It is automatically loaded on selecting the data record.
S Without recipe view
Activate the operating element linked with the Load_Data_Record function.
The function parameters must previously have been set accordingly.
7-16
3
The data of the data record is written to the tags and thus also to the PLC.
4
Edit the tags using the configured input/output fields. This will simultaneously
change the values in the PLC as well.
ProTool/Pro Runtime User’s Guide
Release 12/99
Recipes
Step
5
Procedure
Save the modified tags.
S With recipe view
Click the Save button. If necessary, you must first specify a new name.
S Without recipe view
Activate the operating element linked with the Save_Date_Record. The
function parameters must previously have been set accordingly.
Note
When editing data records online, the entered values are transferred to the PLC
without synchronization. Therefore, when changing individual values, ensure that
no impermissible operating statuses occur in the machine/system.
7.3.3
Functions and PLC jobs
Functions
The following functions can be used to import and export recipe data records for
editing with external tools:
S Export_Data_Records
S Import_Data_Records
They can be used to import and export either individual data records or all data
records in a recipe, according to the configured parameters.
The following functions can be used to transfer data records between the PLC and
operating unit data medium.
S Data_Record_DAT_To_PLC
S Data_Record_PLC_To_DAT
The data medium is either the FLASH, memory card or hard disk, depending on
the operating unit. Both the recipe and data record must be specified as
parameters in which the values should be written.
PLC jobs
The following two PLC jobs can be used to transfer data records between the PLC
and operating unit automatically:
S
S
No. 69: “PLC → DAT” (read data record from PLC)
No. 70: “DAT → PLC” (write data record in PLC)
Information on PLC jobs is provided in the Communication for Windows-based
Systems User’s Guide.
ProTool/Pro Runtime User’s Guide
Release 12/99
7-17
Recipes
7.3.4
Import/Export Data Records
Purpose
When the appropriate features have been configured, data records on the
operating unit can be exported as CSV files to the data medium. This feature can
be used to edit data records with external tools, e.g. with a spreadsheet program or
text editor, and import them on the operating unit again.
Condition
In order to export and import data records during runtime, the project must contain
the following functions:
S
Export_Data_Records
S
Import_Data_Records
These functions must be linked in the ProTool/Pro CS configuration software, e.g.
to a function key or button.
File format CSV
With file format CSV, the table columns (entry name and value) are separated by a
separator (e.g. semicolon). Each table row (entry) is terminated by a line feed.
The example in Figure 7-2 (Page 7-7) appears as follows in CSV format for the
individually exported data record Juice:
Orange;Juice
3;2
Var_2;95
Var_3;5
Var_4;0.5
Var_5;100
Additional information is stored in the first two lines:
S
Line 1:
Name of the recipe and data record
S
Line 2:
Number of the recipe and data record
The operating unit interprets the information on importing the file.
Note
When the CSV files are edited with an external text editor, the modifications are
saved in text format (without control codes).
7-18
ProTool/Pro Runtime User’s Guide
Release 12/99
Recipes
Export/Import all data records in a recipe
When appropriately configured, all the data records in a recipe can be
imported/exported together. The CSV file for the example on Page 7-3 then
appears as follows:
Orange;Drink;Juice;Nectar
3;1;2;3
Var_2;90;95;70
Var_3;10;5;30
Var_4;1.5;0.5;1.5
Var_5;200;100;400
Additional information is stored in the first two lines:
S
Line 1:
Name of the recipe and all the configured data records
S
Line 2:
Number of the recipe and all the configured data records
The operating unit interprets the information on importing the file.
In this way, the CSV file can be used, for example, to create new data records by
means of a spreadsheet program (Figure 7-3). After importing the modified file, the
new data records can be used on the operating unit.
Figure 7-3
Create data records externally (example: MicrosoftR Excel)
ProTool/Pro Runtime User’s Guide
Release 12/99
7-19
Recipes
Exporting, editing and importing data records
Proceed as follows in order to export data records on the operating unit in a CSV
file, edit it using with an external tool (e.g. spreadsheet program or text editor) and
mport it back on the operating unit:
Step
1
Export data record
Procedure
S Press the operating element linked with the
Export_Data_Records function (e.g. function key or button).
Depending on the configuration, either all the data records
are exported to the data medium or only the data record
defined in the project.
The data records are exported in the file which was
configured in the parameter File Name in the function
Export_Data_Records.
S Copy the CSV file onto a transferable data medium (e.g.
disk) or in a directory which can be accessed by the external
tool.
2
Edit CSV file
S Carry out the modifications in the CSV file with an external
tool, e.g. MicrosoftR Excel or a text editor.
S Save the modifications on the data medium.
S Copy the CSV file back to the original directory.
3
Import data
records
S Activate the operating element linked with the
Import_Data_Records function.
The data records are copied in the data storage area
configured for the recipe.
Note
If data records should be exported and the CSV files edited on a different Windows
system using a spreadsheet program (e.g. MicrosoftR Excel), ensure that the
decimal separator and list separator are identical on the two different systems.
This setting can be changed in Windows by selecting Settings → Control Panel→
Language and using Numbers.
7-20
ProTool/Pro Runtime User’s Guide
Release 12/99
Recipes
7.3.5
Reaction on Changing the Recipe Structure
Standard behavior
The following section describes the standard behavior of the operating unit when it
detects differences between the data record structure stored on the data medium
and the recipe structure currently loaded on the operating unit.
Load and export data records, and write in the PLC
S
The data record on the data medium contains additional tags:
The values are rejected.
S
The data record on the data medium contains values which cannot be
converted to the assigned tag type:
The configured start value for the tag is used.
S
Tags are missing in the data record on the data medium:
The configured start value for the tag is used.
Note
The assignment is lost on changing the tag name.
Import data records
S
The imported data record contains additional tags:
The values are rejected.
S
The imported data record contains values which cannot be converted to the
assigned tag type:
The configured start value for the tag is used. This occurs, for example, when
the tag type in the project has been changed.
S
Tags are missing in the imported data record:
The configured start value for the tag is used.
Tip
Export the data record after changing the recipe structure and check the exported
values. In this case, observe the note on Page 7-12.
ProTool/Pro Runtime User’s Guide
Release 12/99
7-21
Recipes
7-22
ProTool/Pro Runtime User’s Guide
Release 12/99
System Messages
A
In this chapter
This chapter contains a selection of important system messages for
Windows-based systems. The table indicates when the messages occur and how
they, or their cause, can be cleared. Not every message is relevant for each
operating unit.
Message number
Operating unit system messages can be divided into various categories. The
information concerning the category to which a system message belongs is
included in the message number:
Message number
VVVVVV Message text
01
02
03
06
07
08
11
12
13
14
15
16
17
18
19
20
21
22
23
24
25
26
27
28
29
30
31
Printer
Scripts
Scale
Win32 functions
Win32 functions
Archives
Function
Trends
System information
Channels and connections: S7
Channels and connections: AS511
Networking
S7 diagnostics
Miscellaneous
Tags and area pointers
PLC coordination
PLC jobs
PLC channels
Views
Authorization
Status / Control
Passwords
Messages
PLC connection
Recipes
Alarm_S
Protocols
ProTool/Pro Runtime User’s Guide
Release 12/99
A-1
System Messages
The message category enables the identification of a general area in which the
cause of the fault is to be found.
Note
System messages are issued in the language currently set on the operating unit.
System message parameters
The system messages may contain parameters which are not decoded for the user
but which are relevant in respect of the cause of an error since they provide a
reference to the source code from ProTool/Pro Runtime. These parameters are
issued according to the text “Error code:”
Number
10000
Effect/Cause
The print job could not be started or was
terminated for an unknown reason.
The printer is incorrectly configured.
Or: There are no rights for a network printer
available.
Remedy
Configure the printer again.
Initiate the assignment of rights for a network
printer.
10001
No printer has been installed or no standard
printer configured.
Install a printer and/or mark one as standard
printer.
10002
The intermediate buffer for printing graphics
is full. Up to two graphics can be buffered.
Do not issue print jobs so quickly in
succession.
10003
Graphics can be buffered again.
–
10004
The intermediate buffer for printing lines in
text mode (e.g. messages) is full. Up to 1000
lines can be buffered.
Do not issue print jobs so quickly in
succession.
10005
Lines of text can be buffered again.
–
10006
The Windows print system reports an error.
Repeat the action, if necessary.
For information on the cause, refer to the text
printed and, if available, the error number.
Printing is not performed or it is incorrect.
20010
A fault has occurred in the script line called in Select the specified script line in the
from the specified script. Execution of the
configuration.
script function was, therefore, terminated.
Check tags, whether the types used are
In this case, it is advisable to check any
permissible.
previous system messages too.
Check Functions, whether the number and
types of parameter are correct.
20011
An error has occurred in a script called in by
the script specified. Execution of the script
function has, therefore, been terminated in
the subscript.
In this case, it is advisable to check any
previous system messages too.
20012
A-2
Inconsistent configuration data is present.
Therefore, the script could not be created.
Select the scripts from the configuration
which were directly or indirectly called in via
the specified script.
Check tags, whether the types used are
permissible.
Check Functions, whether the number and
types of parameter are correct.
Compile the configuration again.
ProTool/Pro Runtime User’s Guide
Release 12/99
System Messages
Number
Effect/Cause
Remedy
20013
VBScript.dll is not correctly installed.
Therefore, no scripts can be executed.
Re-install ProTool/Pro RT.
20014
A value is returned by the script function
which is not written in any configured return
tag.
Select the specified script in the
configuration.
Too many scripts have been triggered in
quick succession.
If more than 20 scripts are queued to be
processed, any subsequent scripts are
rejected.
In this case, the script indicated in the
message is not executed.
Check where the scripts are being triggered
from.
30010
The tag could not accept the function result,
e.g. in the case of exceeding the value
range.
Check the tag type of the function parameter.
30011
A function could not be executed because
Check the parameter value and tag type of
the function was assigned an invalid value or the invalid parameter.
type in the parameter.
If a tag is used as a parameter, check its
value.
40010
The function could not be executed since the Check the parameter types in the
parameters could not be converted to a
configuration.
common tag type.
40011
The function could not be executed since the Check the parameter types in the
parameters could not be converted to a
configuration.
common tag type.
50000
The operating unit receives data faster than it –
is capable of processing. Therefore, no
further data is received until the data
currently available has been processed.
Data exchange then resumes.
50001
Data exchange has been resumed.
–
60000
This message is generated by the function
“Display system messages”. The text to be
displayed is transferred to the function as a
parameter.
–
60010
The file could not be copied in the direction
defined because one of the two files is
currently open or the source/target path is
not available.
Restart the function or check the paths of the
source/target files.
20015
It is possible that the Windows NT user has
no access rights to one of the two files.
60011
70010
Check whether the script name has been
assigned a value.
Extend the times, e.g. the polling time of the
tags, which trigger the scripts.
Using Windows NT with NTFS: The user
executing ProTool/Pro RT must be granted
access rights for the files.
An attempt was made to copy a file to itself.
Check the path of the source/target file.
It is possible that the Windows NT user has
no access rights to one of the two files.
Using Windows NT with NTFS: The user
executing ProTool/Pro RT must be granted
access rights for the files.
The application could not be started because Check whether the application exists in the
it could not be found in the path specified or
specified path or close other applications.
insufficient memory space was available.
ProTool/Pro Runtime User’s Guide
Release 12/99
A-3
System Messages
Number
70011
Effect/Cause
The system time could not be modified. This
may be due to the following:
S an impermissible time was transferred in
the PLC job,
S the Windows NT user has no user rights
Remedy
Check the time which is to be set.
Under Windows NT: The user executing
ProTool/Pro RT must be assigned the rights
to modify the system time from Windows NT
(administration/user manager, guidelines).
to modify the system time.
70012
An error occurred when executing the
function “Exit Runtime” with the option “Exit
also Windows”.
Terminate all applications currently running.
Then terminate Windows.
Windows and ProTool/Pro RT are not
terminated.
A possible cause is that other applications
cannot be terminated.
70013
The system time could not be modified
because an invalid value was entered.
Incorrect separators may have been used.
Check the time which is to be set.
70014
The system time could not be modified. This
may be due to the following:
Check the time which is to be set.
S an impermissible time was transferred,
S the Windows NT user has no user rights
to modify the system time,
Under Windows NT: The user executing
ProTool/Pro RT must be assigned the rights
to modify the system time from Windows NT
(administration/user manager, guidelines).
S Windows rejects the setting request.
70015
The system time could not be read because
Windows rejects the reading function.
–
70016
An attempt was made to select a screen by
means of a function or job. This is not
possible because the screen number
specified does not exist.
Check the screen number in the function or
job with the screen numbers configured.
Refer the number to a screen, if necessary.
Or: a screen could not be generated due to
insufficient system memory.
80001
–
Store the file or table by executing a ‘move’
or ‘copy’ function.
80002
A line is missing in the specified archive.
–
80003
The copying process for archiving was not
successful.
–
In this case, it is advisable to check any
subsequent system messages, too.
80006
Since archiving is not possible, this causes a
permanent loss of the functionality.
In the case of databases, check whether the
corresponding data source exists and start
up the system again.
80009
A copying action has been completed
successfully.
–
80010
Since the path was incorrectly entered in
ProTool, this causes a permanent loss of the
functionality.
Configure the path for the respective archive
again and restart the system when the full
functionality is required.
A-4
ProTool/Pro Runtime User’s Guide
Release 12/99
System Messages
Number
80012
Effect/Cause
Remedy
Archive values are stored in a buffer. If the
values are read to the buffer faster than they
can be physically written (e.g. using a hard
disk), overloading may occur and recording
is then stopped.
Archive less values.
80013
The overload status no longer applies.
Archiving resumes the recording of all
values.
–
80014
The same action was triggered twice in quick –
succession. Since the process is already in
operation, the action is only carried out once.
80016
The archives are separated by the function
Close archive and the incoming entries
exceed the defined buffer size.
Or increase the recording interval.
Reconnect the archives.
All the jobs in the buffer are deleted.
80017
The incoming entries cause the defined
buffer size to be exceeded. This can be
caused, e.g. by several copying actions
being activated at the same time.
Terminate the copy process.
All the copy jobs in the buffer are deleted.
80018
All the archives are reconnected by means of –
the DB layer, e.g. after executing the function
Open_Archives.
Values are then written back into the tables.
80019
All the archives are separated from the DB
layer and all connections terminated, e.g.
after executing the function Close_Archives.
–
Values are temporarily buffered and written in
the tables when the connection is
re-established.
There is no connection to the storage
medium and a change can take place.
80020
80021
The max. number of simultaneously
activated copy actions has been exceeded.
Copying is not executed.
Wait until the current copying actions have
been completed and restart the last copy
action.
An attempt was made to delete an archive
which is still involved with a copy action.
Wait until the current copying action has
been completed and restart the last action.
Deletion has not been executed.
80022
An attempt was made to start a sequence
archive, which is not a sequence archive,
from an archive using the function
Start_Sequence_Archive.
No sequence archive is created.
80023
An attempt was made to copy an archive to
itself.
The archive is not copied.
Check the project for the following:
S the function Start_Sequence_Archive is
correctly configured.
S the variable parameters are being
correctly provided at the operating unit.
Check the project for the following:
S the function Copy_Archive is correctly
configured.
S the variable parameters are being
correctly provided at the operating unit.
ProTool/Pro Runtime User’s Guide
Release 12/99
A-5
System Messages
Number
80024
Effect/Cause
The function Copy_Archive is configured not
to permit copying when the target archive
already contains data (Parameter: Write
mode).
Remedy
Modify the function Copy_Archive in the
project, if necessary.
Before initiating the function, delete the target
archive.
The archive is not copied.
80025
The copy action is interrupted.
–
Data written up to this point is retained.
Deletion of the target table (if configured) is
not executed.
The cancellation is documented by an error
entry $RT_ERR$ at the end of the target
table.
110000
The operating mode status has been
changed. The operating mode is now offline.
–
110001
The operating mode status has been
changed. The operating mode is now online.
–
110002
The operating mode status has not been
changed.
Check the connection to the PLCs.
The operating status of the PLC specified is
changed by the function
PLC_Connect_Isolate.
–
110003
Check whether the address area for the area
pointer “Coordination” in the PLC is
available.
The operating mode is now offline.
110004
The operating status of the PLC specified is
changed by the function
PLC_Connect_Isolate.
–
The operating mode is now online.
110005
An attempt was made to use the function
PLC_Connect_Isolate to switch the specified
PLC to operating mode online although the
entire system is in operating mode offline.
This switch-over is not permissible.
Switch the complete system to operating
mode online and execute the function again.
The PLC remains in operating mode offline.
120000
The trend is not displayed because an
incorrect axis to the trend, or incorrect trend,
has been configured.
Change the configuration.
120001
The trend is not displayed because an
incorrect axis to the trend, or incorrect trend,
has been configured.
Change the configuration.
120002
The trend is not displayed because the tag
assigned tries to access an invalid PLC
address.
Check whether the data area for the tag
exists in the PLC, the configured address is
correct or the value range for the tag is
correct.
130000
The action was not executed.
Close other applications.
Delete files no longer required from the hard
disk.
130001
A-6
The action was not executed.
Delete files no longer required from the hard
disk.
ProTool/Pro Runtime User’s Guide
Release 12/99
System Messages
Number
130002
Effect/Cause
The action was not executed.
Remedy
Close other applications.
Delete files no longer required from the hard
disk.
140000
Online connection to the PLC has been
successfully established.
–
140001
Online connection to the PLC has been
disconnected.
–
140003
No tag updating or writing is executed.
Check the connection and whether the PLC
is switched on.
Check the parameter definitions in the
Control Panel using “Set PU/PC interface”.
Restart the system.
140004
No tag updating or writing is executed
because the access point or the subrack
configuration is incorrect.
Check the connection and whether the PLC
is switched on.
Check the access point or the subrack
configuration (MPI, PPI, PROFIBUS) in the
Control Panel with “Set PU/PC interface”.
Restart the system.
140005
No tag updating or writing is executed
because the address of the operating unit is
incorrect (possibly too high).
Use a different operating unit address.
Check the connection and whether the PLC
is switched on.
Check the parameter definitions in the
Control Panel using “Set PU/PC interface”.
Restart the system.
140006
No tag updating or writing is executed
because the baud rate is incorrect.
Select a different baud rate in ProTool/Pro
(according to subrack, profile,
communication peer, etc.).
140007
No tag updating or writing is executed
because the bus profile is incorrect
(see %1).
Check the user defined bus profile.
The following parameters could not be
entered in the registry:
Check the parameter definitions in the
Control Panel using “Set PU/PC interface”.
1:
2:
3:
4:
5:
6:
7:
8:
9:
10:
Restart the system.
Tslot
Tqui
Tset
MinTsdr
MaxTsdr
Trdy
Tid1
Tid2
Gap Factor
Retry Limit
ProTool/Pro Runtime User’s Guide
Release 12/99
Check the connection and whether the PLC
is switched on.
A-7
System Messages
Number
140008
Effect/Cause
Remedy
No tag updating or writing is executed
because the configuration data is incorrect:
Check the connection and whether the PLC
is switched on.
The following parameters could not be
entered in the registry:
Check the parameter definitions in the
Control Panel using “Set PU/PC interface”.
0:
1:
2:
3:
Restart the system.
4:
5:
General errors
Incorrect version
Profile cannot be entered in the registry.
Sub-network type cannot be entered in
the registry.
Target rotation time cannot be entered
in the registry.
Highest address (HSA) incorrect.
140009
No tag updating or writing is executed
because the module for the S7
communication was not found.
Re-install the module in the Control Panel
using “Set PU/PC interface”.
140010
No S7 communication peer could be found
because the PLC is switched off.
Switch the PLC on.
DP/T:
The option “Is not active as the only master”
is set in the Control Panel under “Set PU/PC
interface”.
DP/T:
If only one master is connected to the
network, deactivate the option “Is not active
as the only master” in “Set PU/PC interface”.
If the network has more than one master,
switch this master on. Do not modify any
settings here, otherwise a bus fault may
occur.
140011
No tag updating or writing is executed
because communication is interrupted.
Check the connection and that the
communication peer is switched on.
140012
There is an initialization problem (e.g. when
ProTool/Pro RT has been terminated in the
Task Manager).
Restart the operating unit.
Or start ProTool/Pro RT first and then the
other applications.
Or: another application (e.g. STEP7, WINCC)
is active with different bus parameters and
the driver cannot be started with the new bus
parameters (e.g. baud rate).
140013
The MPI cable is not plugged in and, thus,
there is no power supply.
Check the connections.
140014
–
Modify the operating unit address in the
configuration in PLC.
140015
Incorrect baud rate
Correct the incorrect parameters.
Or: incorrect bus parameter (e.g. HSA)
Or: OP address HSA
Or: incorrect interrupt vector (interrupt does
not arrive at the driver)
140016
–
Change the interrupt number.
140017
–
Change the interrupt number.
A-8
ProTool/Pro Runtime User’s Guide
Release 12/99
System Messages
Number
150000
Effect/Cause
No more data is read or written.
This can have various causes:
S The cable is defective.
S The PLC does not respond, is defective,
Remedy
Check that the cable is plugged in, the PLC
is operational, the correct interface is used.
Reboot the system if the system message is
displayed continuously.
etc.
S Connection made to the wrong interface.
S The system is overloaded.
150001
Connection is re-established because the
cause of the interruption has been
eliminated.
–
160000
No more data is read or written.
Check that the cable is plugged in, the PLC
is operational, the correct interface is used.
This can have various causes:
S The cable is defective.
S The PLC does not respond, is defective,
Reboot the system if the system message is
displayed continuously.
etc.
S Connection made to the wrong interface.
S The system is overloaded.
160001
Connection is re-established because the
cause of the interruption has been
eliminated.
–
160010
There is no connection to the server
because the server identification (CLS-ID)
cannot be established.
Check the access rights.
Values cannot be read or written.
160011
There is no connection to the server
because the server identification (CLS-ID)
cannot be established.
Values cannot be read or written.
160012
There is no connection to the server
because the server identification (CLS-ID)
cannot be established.
Values cannot be read or written.
Check, for example, whether:
S the server name is correct
S the computer name is correct
S the server is registered
Check, for example, whether:
S the server name is correct
S the computer name is correct
S the server is registered
Information for experienced users:
Interpret the value from HRESULT.
170000 1)
S7 diagnostics messages are not displayed
because it is not possible to logon to the S7
diagnostics with this unit. The service
program is not supported.
–
170001 1)
The S7 diagnostics buffer cannot be
displayed because communication with the
PLC has been switched off.
Switch the PLC online
1700021)
The S7 diagnostics buffer cannot be
–
displayed because reading in the diagnostics
buffer (SZL) was terminated due to an error.
ProTool/Pro Runtime User’s Guide
Release 12/99
A-9
System Messages
Number
Effect/Cause
Remedy
170003 1)
The display of an S7 diagnostics message is
not possible. An internal error %2 has been
reported.
170004 1)
The display of an S7 diagnostics message is –
not possible. An internal error with error class
%2, error number %3 has been reported.
170007 1)
It is not possible to read in the S7 diagnostics –
buffer (SZL) because it was terminated with
an internal error with error class %2 and error
code %3.
180000
A component/OCX receives configuration
data with a version identification which is not
supported.
Install a newer component.
180001
The system is overloaded because too many
actions have been activated simultaneously.
S Increase the configured cycle times or
Not all the actions can be executed, some
are rejected.
S Generate the messages slower (polling).
S Trigger the scripts and functions at
–
basic clock.
greater intervals.
S If the message appears more frequently:
Restart the operating unit.
190000
It is possible that the tag will not be updated.
–
190001
The tag is updated following an error status
after the cause of the last error state has
been eliminated (return to normal operation).
–
190002
The tag is not updated because
communication to the PLC has been
switched off.
Switch on communication via the function
“Set Online”.
190004
The tag is not updated because the
configured address is not available for this
tag .
Check the configuration.
190005
The tag is not updated because the
configured PLC type does not exist for this
tag .
Check the configuration.
190006
The tag is not updated because it is not
Check the configuration.
possible to map the PLC type in the tag type.
190007
The tag values are not modified because the
connection to the PLC has been terminated
or the tag is offline.
Switch Online or re-establish connection to
the PLC.
190008
The threshold values configured for the tag
have been violated, e.g. by
Observe the configured or current threshold
value of the tag.
S an entered value,
S a function,
S a script.
190009
An attempt has been made to assign a value
to a tag which is outside the value range
permitted for this type.
Observe the value range for the tag type.
E.g. a value of 260 entered for a byte tag or
a value of -3 for a signless word tag
A-10
ProTool/Pro Runtime User’s Guide
Release 12/99
System Messages
Number
190010
Effect/Cause
The tag is described with values too often
(e.g. in a loop triggered by a script).
Remedy
Increase the time interval between the
multi-writing tasks.
Values are lost because the maximum of 100
event have been stored in the buffer.
190011
There are two causes for this message:
S The value entered could not be written to Ensure that the value entered is within the
the configured PLC tag because it was
either above or below the value range.
The input is rejected and the original
value is reset.
S Connection to the PLC has been
value range of the PLC tags.
Check the connection to the PLC.
interrupted.
190012
It is not possible to convert a value from a
source format to a target format, e.g.:
Check the value range or type of the
variable.
S A value should be assigned to a counter
which is outside the valid,
PLC-dependent value range.
S A tag of the type Integer should be
assigned a value of the type String.
190100
The area pointer is not updated because the Check the configuration.
configured address for this area pointer is not
available.
Type:
1
Event messages
2
Alarm messages
3
PLC acknowledgment
4
Operating unit acknowledgment
5
LED assignment
6
Trend request
7
Trend transfer 1
8
Trend transfer 2
No.
is the consecutive number displayed in
ProTool/Pro.
190101
The area pointer is not updated because it is
not possible to map the PLC type in the area
pointer type.
–
Parameter type and no.:
See message 190100
190102
The area pointer is updated following an
error status after the cause of the last error
state has been eliminated (return to normal
operation).
–
Parameter type and no.:
See message 190100
200000
Coordination is not executed because the
address configured in the PLC does not
exist/has not been set up.
Change the address or set up the address in
the PLC.
200001
Coordination is not executed because the
address configured in the PLC cannot be
written.
Change the address or set up the address in
the PLC in an area which can be written.
ProTool/Pro Runtime User’s Guide
Release 12/99
A-11
System Messages
Number
Effect/Cause
Remedy
200002
Coordination is not executed at present
because the address format of the area
pointer does not match the internal storage
format.
– (Internal error)
200003
Coordination can be executed again
because the last error status has been
eliminated (return to normal operation).
–
200004
It is possible that coordination is not
executed.
–
200005
No more data is read or written.
Check that the cable is connected and the
PLC is in order.
This can have various causes:
S The cable is defective.
S The PLC does not respond, is defective,
Reboot the system if the system message is
displayed continuously.
etc.
S The system is overloaded.
210000
Jobs are not processed because the
address configured in the PLC does not
exist/has not been set up.
Change the address or set up the address in
the PLC.
210001
Jobs are not processed because the
address configured in the PLC cannot be
written to/read from.
Change the address or set up the address in
the PLC in an area which can be written
to/read from.
210002
Jobs are not executed because the address – (Internal error)
format of the area pointer does not match the
internal storage format.
210003
The job mailbox is processed again because
the last error status has been eliminated
(return to normal operation).
–
210004
It is possible that the job mailbox is not
processed.
–
210005
A PLC job was triggered by an impermissible Check the PLC program.
number.
210006
A fault occurred while attempting to execute
the PLC job. The PLC job is, therefore, not
executed.
Check the parameter types in the PLC job.
Compile the configuration again.
Observe the subsequent/previous system
message, if appropriate.
220000 2)
See footnote
220001
The tag is not downloaded because the
Change the configuration.
associated channel/the unit does not support
downloading the data type bool/bit.
220002
The tag is not downloaded because the
Change the configuration.
associated channel/the unit does not support
downloading the data type byte.
220003
The associated driver could not be uploaded. Install the driver by re-installing ProTool/Pro
It is possible that the driver is not installed.
RT.
A-12
See footnote
ProTool/Pro Runtime User’s Guide
Release 12/99
System Messages
Number
Effect/Cause
Remedy
220004
Communication is terminated and no update
is executed because the cable is not
connected or is defect etc.
Check the connection.
220005
Communication is running.
–
220006
The connection is established to the
specified PLC via the specified interface.
–
220007
The connection to the specified PLC at the
specified interface is disconnected.
Check that:
S
S
S
S
the cable is plugged in,
the PLC is OK,
the correct interface is used,
the configuration is OK (interface
parameters, protocol settings, PLC
address).
Reboot the system if the system message is
displayed continuously.
220008
The PLC driver cannot access the specified
interface or open it. It is possible that another
application is using this interface or an
interface is used which is not available on
the target device.
Terminate all the programs which access the
interface and reboot the computer.
Use another interface which is available in
the system.
There is no communication with the PLC.
230000
The value entered could not be accepted.
The entered value is rejected and the
previous value is specified again.
Enter a permissible value.
Either the value range has been exceeded or
impermissible characters were entered.
230002
Since the current password level is
inadequate or the password dialog box was
closed with ESC, the entry is rejected and
the previous value is specified again.
Activate an adequate password level using
Login.
230003
Changeover to the specified screen is not
executed because the screen is not
available/configured. The current screen
remains selected.
Configure the screen.
Runtime is operating in Demo mode.
Load the license.
240000 3)
Check the selection function.
There is either no Stopcopy license or it is
defect.
2400013)
Runtime is operating in Demo mode.
Load an adequate license / powerpack.
Too many tags are configured for the
installed version.
2400023)
Runtime is operating with a time-limited
standby authorization.
Restore the full authorization.
240003
Authorization cannot be executed.
Restart ProTool/Pro RT or reinstall it.
ProTool/Pro RT is running in Demo mode.
240004
Error during reading the standby
authorization.
ProTool/Pro RT is running in Demo mode.
ProTool/Pro Runtime User’s Guide
Release 12/99
Restart ProTool/Pro RT, install the
authorization or repair the authorization (see
Commissioning Instructions Software
Protection).
A-13
System Messages
Number
Effect/Cause
Remedy
250000
The tag in the specified line in Status/Control
is not updated because the address
configured for this tag is not available.
Check the set address and then check that
the address has been set up in the PLC.
250001
The tag in the specified line in Status/Control
is not updated because the PLC type
configured for this tag is not available.
Check the set address.
250002
The tag in the specified line in Status/Control
is not updated because it is not possible to
map the PLC type in the tag type.
Check the set address.
260001
A password has been entered which is
unknown to the system. Therefore, the
lowest password level has been set. This
corresponds to the status following Logout.
Enter a known password in the password
input field (with corresponding level).
260002
A password has been entered whose
assigned level does not permit execution of
the function.
Modify the password level in the password
input field or enter a password with a
sufficiently high level.
The password level currently set is displayed
for information purposes.
270000
A tag is not displayed in the message
because it attempts to access an invalid
address in the PLC.
Check whether the data area for the tag
exists in the PLC, the configured address is
correct or the value range for the tag is
correct.
270001
There is a unit-dependent limit as to how
many messages may be queued
simultaneously in order to be displayed (see
GHB). This limit has been exceeded.
–
The display no longer contains all the
messages.
However, all the messages are recorded in
the message buffer.
270002
Messages are displayed from the archive for
which there is no data in the current project.
Delete the old archive data, if necessary.
Placeholders are issued in the messages.
280000
Connection is re-established because the
cause of the interruption has been
eliminated.
–
280001
No more data is read or written.
Check that the cable is plugged in, the PLC
is operational, the correct interface is used.
This can have various causes:
S The cable is defective.
S The PLC does not respond, is defective,
Reboot the system if the system message is
displayed continuously.
etc.
S Connection made to the wrong interface.
S The system is overloaded.
280002
A connection is used which requires a
function module in the PLC.
–
The function block has replied.
Communication can now proceed.
A-14
ProTool/Pro Runtime User’s Guide
Release 12/99
System Messages
Number
280003
Effect/Cause
Remedy
A connection is used which requires a
function module in the PLC.
Check that the cable is plugged in, the PLC
is operational, the correct interface is used.
The function block does not reply.
Reboot the system if the system message is
displayed continuously.
The remedy is dependent on the error code:
1: The function block must set the COM bit
in the response container.
280004
The online connection to the PLC has been
interrupted. There is no data exchange at
present.
2:
The function block may not set the
ERROR bit in the response container
3:
The function block must respond within
the specified time (timeout)
4:
Establish an online connection to the
PLC
Check the PLC parameters in ProTool Pro:
baud rate, block length, station address.
Check that the cable is plugged in, the PLC
is operational, the correct interface is used.
Reboot the system if the system message is
displayed continuously.
290000
The tag could not be read or written. It is
assigned the start value.
Check in the configuration that the address
has been set up in the PLC.
The message can be entered in the
message buffer for up to four more failed
tags, if necessary. After that, the message
number 290003 is issued.
290001
An attempt has been made to assign a value
to a tag which is outside the value range
permitted for this type.
Observe the value range for the tag type.
The message can be entered in the
message buffer for up to four more failed
tags, if necessary. After that, the message
number 290004 is issued.
290002
It is not possible to convert a value from a
source format to a target format.
Check the value range or type of the
variable.
The message can be entered in the
message buffer for up to four more failed
tags, if necessary. After that, the message
number 290005 is issued.
290003
This message is issued when message
number 290000 is triggered more than five
times.
Check in the configuration that the tag
addresses have been set up in the PLC.
In this case, no further individual messages
are generated.
290004
This message is issued when message
number 290001 is triggered more than five
times.
Observe the value range for the tag type.
In this case, no further individual messages
are generated.
ProTool/Pro Runtime User’s Guide
Release 12/99
A-15
System Messages
Number
290005
Effect/Cause
This message is issued when message
number 290002 is triggered more than five
times.
Remedy
Check the value range or type of the
variable.
In this case, no further individual messages
are generated.
290006
The threshold values configured for the tag
have been violated by values entered.
Observe the configured or current threshold
value of the tag.
290007
There is a difference between the source
and target structure of the recipe currently
being processed. The target structure
contains an additional data record tag which
is not available in the source structure.
Insert the specified data record tag in the
source structure.
The data record tag specified is assigned its
start value.
290008
There is a difference between the source
and target structure of the recipe currently
being processed. The source structure
contains an additional data record tag which
is not available in the target structure and
therefore cannot be assigned.
Remove the specified data record tag in the
specified recipe from the project.
The value is rejected.
290010
The storage location configured for the
recipe is not permitted.
Check the path specification configured.
Possible cause:
Impermissible characters, write protected,
data medium full or does not exist.
290011
The data record specified by the number
does not exist.
Check the source for the number (constant
or variable value).
290012
The recipe specified by the number does not
exist.
Check the source for the number (constant
or variable value).
290013
An attempt was made to save a data record
under a data record number which already
exists.
S Check the source for the number
The process is not executed.
(constant or variable value).
S Delete the data record beforehand.
S Change the function parameter
“Overwrite”.
290014
The file specified to be imported could not be
found.
S Check the file name.
S Ensure that the file is in the specified
directory.
290020
Acknowledgement that downloading of data
records from operating unit to PLC has
started.
–
290021
Acknowledgement that downloading of data
records from operating unit to PLC has been
completed without any errors.
–
A-16
ProTool/Pro Runtime User’s Guide
Release 12/99
System Messages
Number
290022
Effect/Cause
Acknowledgement that downloading of data
records from operating unit to PLC has been
terminated due to an error.
Remedy
Check the configuration:
S have the tag addresses been set up in
the PLC?
S does the recipe number exist?
S does the data record number exist?
S has the function parameters “Overwrite”?
290023
Acknowledgement that downloading of data
records from the PLC to the operating unit
has started.
–
290024
Acknowledgement that downloading data
records from the PLC to the operating unit
has been completed without any errors.
–
290025
Acknowledgement that downloading of data
records from the PLC to the operating unit
has been terminated due to an error.
Check the configuration:
S have the tag addresses been set up in
the PLC?
S does the recipe number exist?
S does the data record number exist?
S has the function parameters “Overwrite”?
290026
An attempt has been made to read/write a
data record although the data mailbox is not
free at present.
Set the data mailbox status to zero.
This error may occur in the case of recipes
for which downloading with synchronization
has been configured.
290027
No connection to the PLC can be
established at present. Therefore, the data
record can neither be read nor written.
Check the connection to the PLC.
Possible cause:
No physical connection to the PLC (no cable
plugged in, cable is defect) or the PLC is
switched off.
290030
This message is issued after reselecting a
screen that contains a recipe display in
which a data record has already been
selected.
Reload the data record from the data
medium or retain the current values.
290031
While saving, it was detected that a data
record with the specified number already
exists.
Overwrite the data record or cancel the
process.
290032
While exporting data records, it was detected Overwrite the file cancel the process.
that file with the specified name already
exists.
290033
Confirmation request before deleting data
records.
–
290041
A data record or file cannot be saved
because the data medium is full.
Delete files no longer required.
ProTool/Pro Runtime User’s Guide
Release 12/99
A-17
System Messages
Number
290042
Effect/Cause
An attempt was made to execute several
downloads/memory functions
simultaneously.
Remedy
Trigger the function again after waiting a
short period.
The last action was not executed.
290050
Acknowledgement that the exportation of
data records has started.
–
290051
Acknowledgement that the exportation of
data records has been completed
successfully.
–
290052
Acknowledgement that the exportation of
data records has been terminated due to
errors.
Ensure that the structure of the data records
on the data medium and the current recipe
structure on the operating unit are identical.
290053
Acknowledgement that the importation of
data records has been started.
–
290054
Acknowledgement that the importation of
data records has been completed
successfully.
–
290055
Acknowledgement that the importation of
data records has been terminated due to
errors.
Ensure that the structure of the data records
on the data medium and the current recipe
structure on the operating unit are identical.
290056
The value in the specified line/column could
not be read/written without errors.
Check the specified line/column.
The action was canceled.
300000
Process monitoring (e.g. with PDiag or
Modify the configuration in the CPU.
S7-Graph) has been programmed incorrectly.
More messages are displayed
simultaneously than specified in the technical
data related to the CPU. The CPU cannot
manage subsequent Alarm_S messages
and transfer them to the operating units.
310000
An attempt is being made to print too many
protocols simultaneously.
Wait until printout of the last active protocol
has been concluded.
Since only one protocol can be printed at a
time, the print job is rejected.
Repeat the print job, if necessary.
An error occurred on triggering the printer.
The protocol is either not printed or printed
with errors.
Evaluate the additional system message,
related to this message, which is also issued.
310001
Repeat the print job, if necessary.
1)
The optional parameter %1 at the start of the message may contain an identification for the S7 connection
when several S7s are in parallel operation and are connected to diagnostics equipment.
2) A WinCC channel provides the message texts via an interface. This text is issued via this message.
ProTool/Pro RT has no influence on this text.
3) The specified text comes from the component resources.
A-18
ProTool/Pro Runtime User’s Guide
Release 12/99
System Messages
Procedure in the case of “internal errors”
Please proceed as follows in the case of all system messages related to “internal
errors”:
1. Start up the operating unit again.
2. Download the configuration again.
3. Switch the operating unit off, stop the PLC and then restart both.
4. If the error occurs again, please contact the SIMATIC Customer Support. Make
reference to the specified error number and message tags.
ProTool/Pro Runtime User’s Guide
Release 12/99
A-19
System Messages
A-20
ProTool/Pro Runtime User’s Guide
Release 12/99
SIMATIC HMI Documentation
B
Target groups
This manual is part of the SIMATIC HMI documentation. The documentation is
aimed at the following target groups:
S
Newcomers
S
Users
S
Configurers
S
Programmers
S
Commissioning engineers
How the documentation is organized
The SIMATIC HMI documentation consists of the following components:
S
User’s Guides for:
– Configuration software
– Runtime software
– Communication between PLCs and operating units
S
Equipment Manuals for the following operating units:
– SIMATIC PC
– MP (Multi Panel)
– OP (Operator Panel)
– TP (Touch Panel)
– TD (Text Display)
– PP (Push Button Panel)
S
Online Help on the configuration software
S
Start-up Guides
S
First Steps
Overview of complete documentation
The following table provides an overview of the SIMATIC HMI documentation and
shows you when you require the different documents.
ProTool/Pro Runtime User’s Guide
Release 12/99
B-1
SIMATIC HMI Documentation
Documentation
Target Group
Content
First Steps with ProTool
Newcomers
This documentation guides you step by step through
the configuration of
Product Brief
S a screen with various objects
S changing from one screen to another
S a message.
This documentation is available for:
S OP 3, OP 5, OP 7, OP 15, OP 17
S OP 25, OP 27, OP 35, OP 37, TP 27, TP 37
S Windows-based systems
ProTool
Configuring
Windows-based Systems
Configurers
Provides information on working with the ProTool/Pro
configuration software. It contains
S information on installation
S basic principles of configuration
S a detailed description of configurable objects and
User’s Guide
functions.
This documentation is valid for Windows-based
systems.
ProTool
Configuring
Graphics Displays
Configurers
Provides information on working with the ProTool
configuration software. It contains
S information on installation
S basic principles of configuration
S a detailed description of configurable objects and
User’s Guide
functions.
This documentation is valid for graphic display
operating units.
ProTool
Configuring
Text-based Displays
Configurers
Provides information on working with the ProTool/Lite
configuration software. It contains
S information on installation
S basic principles of configuration
S a detailed description of configurable objects and
User’s Guide
functions.
This documentation is valid for text-based display
operating units.
ProTool
Configurers
Online Help
ProTool/Pro Runtime
User’s Guide
Provides information on the configuration computer
while working with ProTool. Online Help contains
S
S
S
S
Commissioning
engineers,
Users
context-sensitive help
detailed instructions and examples
detailed information
all the information from the user guide.
Provides information on working with ProTool/Pro
Runtime software. It contains
S installation of the ProTool/Pro Runtime visualization
software
S commissioning and running the software on
Windows-based systems.
B-2
ProTool/Pro Runtime User’s Guide
Release 12/99
SIMATIC HMI Documentation
Documentation
Target Group
Content
Copy Protection
Start-up Guide
Commissioning
engineers,
Users
The ProTool/Pro Runtime visualization software is a
copyright product. This manual contains information on
the installation, repair and uninstallation of
authorizations.
Application Example
Newcomers
ProTool is supplied with example configurations and
the corresponding PLC programs. This documentation
describes how you
Start-up Guide
S load the examples onto the operating unit and PLC
S run the examples and
S upgrade the connection to the PLC to suit your own
specific application.
SIMATIC Panel PC 670
Equipment Manual
MP 270
Equipment Manual
TP 170A
Equipment Manual
Commissioning
engineers,
Users
Describes the computer unit and operating unit of the
SIMATIC Panel PC 670.
Commissioning
engineers,
Users
Describes the hardware and the general operation of
Windows-based Panels:
S
S
S
S
installation and commissioning instructions
a description of the equipment
operating instructions
instructions for connecting the PLC, printer and
programming computer,
S maintenance instructions.
OP 37/Pro
Equipment Manual
Commissioning
engineers,
Users
Describes the hardware, installation and inclusion of
upgrades and options for the OP 37/Pro.
TP 27, TP 37
Equipment Manual
Commissioning
engineers,
Users
Describes the hardware and general operation.
It contains
OP 27, OP 37
Equipment Manual
OP 25, OP 35, OP 45
Equipment Manual
programming computer,
S operating modes
S operating instructions
S description of the standard screens supplied with
OP 7, OP 17
Equipment Manual
OP 5, OP 15
Equipment Manual
the operating unit and how to use them
TD 17
Equipment Manual
OP 3
Equipment Manual
PP 7, PP 17
Equipment Manual
ProTool/Pro Runtime User’s Guide
Release 12/99
S installation and commissioning instructions
S a description of the equipment
S instructions for connecting the PLC, printer and
S fitting options
S maintenance and fitting of spare parts.
Commissioning
engineers,
Users,
Programmers
Describes the hardware of the OP3, its general
operation and the connection to the SIMATIC S7.
Commissioning
engineers,
Users
Describes the hardware, installation and
commissioning of push-button panels PP 7 and PP 17.
B-3
SIMATIC HMI Documentation
Documentation
Target Group
Content
Communication
Programmers
Provides information on connecting text-based and
graphics displays to the following PLCs:
User’s Guide
S
S
S
S
SIMATIC S5
SIMATIC S7
SIMATIC 500/505
drivers for other PLCs
This documentation describes the
S configuration and parameters required for
connecting the devices to the PLC and the network
S user data areas used for exchanging data between
operating unit and PLC.
Communication for
Windows-based Systems
Programmers
Provides information on connecting Windows-based
systems to the following PLCs:
S
S
S
S
S
S
S
User’s Guide
SIMATIC S5
SIMATIC S7
SIMATIC 505
OPC
Allen Bradley PLC-5/SLC 500
Mitsubishi FX
Telemecanique TSX
This documentation describes the
S configuration and parameters required for
connecting the devices to the PLC and the network
S user data areas used for exchanging data between
operating unit and PLC.
Other PLCs
Programmers
Online Help
Provides information on connecting devices to PLCs,
such as:
S
S
S
S
S
S
S
OPC
Mitsubishi
Allen Bradley
Telemecanique
Modicon
Omron
SIMATIC WinAC
When the drives are installed, the relevant Online Help
is installed at the same time.
ProAgent for OP
User’s Guide
Configurers
Provides the following information about the ProAgent
optional package (process diagnosis) for OPs
S configuring system-specific process diagnosis
S detecting, locating the cause of and eliminating
process errors,
S customizing standard diagnostic screens supplied
with the software.
B-4
ProTool/Pro Runtime User’s Guide
Release 12/99
Glossary
Acknowledgement
Acknowledgement of an alarm message on the operating unit confirms that it has
been noted. After acknowledgement, the message disappears from the operating
unit. Alarm messages can be acknowledged either on the operating unit or PLC.
Alarm messages can be compiled into groups so that several messages can be
acknowledged simultaneously.
Acknowledgement groups
During configuration, several alarm messages can be compiled to form an
acknowledgement group. After acknowledging the first message, all the other
messages belonging to the same group are simultaneously acknowledged. This
enables, for example, acknowledgement of alarm messages for the cause of a
fault and all resulting faults (group acknowledgement).
Alarm message
Provides information on the operating unit concerning operating errors on the
machine or system connected to the PLC. The message text may also contain
current measured values.
Since alarm messages indicate abnormal operating status, they must be
acknowledged.
Alarm time
Time interval between the arrival and departure of an alarm message.
Archive
A memory area on a data storage medium in which messages or tags can be
stored. The size of the archive is defined in ProTool/Pro CS.
ProTool/Pro Runtime User’s Guide
Release 12/99
Glossary-1
Glossary
Area pointer
Defines a memory area in the PLC for data exchange between the PLC and
operating unit.
Bar graphs
Represent values from the PLC as rectangular areas. This is a way of displaying
filling levels or workpiece numbers, for example, on the operating unit.
Baud rate
Rate of speed at which data is downloaded. Baud rate is specified in Bit/s.
Blank
Switch off or fade out the screen saver.
Boot
A loading process which downloads the operating system in the working memory
of the operating unit
Buttons
A virtual button on the operating unit screen. Buttons on operating units with touch
screens are contact sensitive.
Configuration
Definition of system–specific default settings, messages and screens using the
configuration software ProTool.
Glossary-2
ProTool/Pro Runtime User’s Guide
Release 12/99
Glossary
Data record
Is a recipe containing data. A recipe can be comprised of several data records.
When a data record is downloaded, all the assigned data is transferred to the PLC
together and synchronously.
Display period
Defines whether and how long a system message is displayed on the operating
unit.
Download
The transfer of run–capable project data to the operating unit. Connect the
operating unit to the configuration computer with a standard cable beforehand.
Download mode
Operating unit operating mode in which data can be downloaded from the
configuration computer to the operating unit (also refer to Download).
Event
Functions are triggered after defined events are received, e.g. on pressing or
releasing a button. Events can be configured according to objects.
Event message
Provides information on the operating unit concerning the operating statuses of the
machine or system connected to the PLC. The message text may also contain
current measured values.
Fixed window
The window which always appears at the top of the operating unit screen. The
content of the fixed window is independent of the screen currently open.
ProTool/Pro Runtime User’s Guide
Release 12/99
Glossary-3
Glossary
Flash memory
Programmable memory which can be electrically deleted and written to again
segment–by–segment.
Function key
Key on the operating unit to which a configurable function can be assigned. A
function key with a global function assignment always initiates the same function
regardless of the screen currently open. A function key with a local function
assignment (softkey) can have a different function for each screen.
Global tag
This is a process tag linked to the PLC. Global tags have a fixed address in the
PLC. The operating unit accessed this address for reading and writing purposes.
Graphics list
A list in which each value relates to a tag assigned to a graphic. This enables, for
example, the assigned graphic to be displayed on the operating unit output field
instead of the value.
Group acknowledgement
During the configuration, each alarm message can be assigned to an
acknowledgement group. When the alarm message is acknowledged, all the
other alarm messages in the same group are simultaneously acknowledged.
Hardcopy
Represents a printout of the current screen content. Windows called in on top are
not printed.
Help text
Configurable, additional information on messages, screens and fields. The help
text concerning an alarm message can, for example, contain information on the
cause of the fault and methods of elimination.
Glossary-4
ProTool/Pro Runtime User’s Guide
Release 12/99
Glossary
Hidden buttons
Buttons which are only visible during configuration, not on the operating unit. If
hidden buttons are superimposed on components in the process screen, the
respective components can be operated by clicking the button with the mouse or
pressing them on the touch screen.
Icon
Pixel graphic of a fixed size, e.g. assigned to a softkey, to identify its function.
Input field
Enables the user to enter values which are subsequently downloaded to the PLC.
Limit value
Configurable values of a tag defining a value range. Attempts to define values
outside these limits, may cause the following effects on the operating unit:
S
Input field
input is rejected
S
Output field
values are displayed in the configured color
S
Trend/Bar
values are displayed in the configured color
Local tag
Is a tag which is not linked to the PLC. Local tags are only available on the
operating unit.
Logout time
Configurable interval of time after which the password level is reset to zero when
the operating unit is not used.
ProTool/Pro Runtime User’s Guide
Release 12/99
Glossary-5
Glossary
Message arrival
Time at which a message was triggered by the PLC or operating unit.
Message buffer
Memory area on the operating unit in which message events can be stored in
chronological order as they arrive. Event messages and alarm messages are
stored in separate message buffers.
Message departure
Time at which a message was withdrawn by the PLC.
Message events
These are stored in chronological order in the operating unit message archive.
Message events consist of:
S
Message arrival
S
Message acknowledgement
S
Message departure
Message indicator
A graphical symbol displayed on the operating unit when at least one alarm
message is present.
Message logging
Printout of messages parallel to their display on the operating unit display.
Multi Panel
Multi–functional, configurable operating unit with graphics display and WindowsR
CE operating system for operating and monitoring machines and systems.
Normal operation
Operating unit operating mode in which messages are displayed and screens can
be operated.
Glossary-6
ProTool/Pro Runtime User’s Guide
Release 12/99
Glossary
Object
Is a component part of a screen or message. Depending on the object type,
objects serve to display or enter texts and values on the operating unit.
Operator Panel
Operating unit which can be configured for operating and monitoring machines and
systems.
Output field
Displays current values from the PLC on the operating unit.
Password
A character string which must be entered on the operating unit before a protected
function can be activated. Each password is assigned to a password level.
Password level
The rights to use operating units can be specifically restricted to certain users and
user groups. To do this, the individual functions and operating elements are
assigned to hierarchically defined password levels. The password level linked to
the password allocates the rights to execute functions on the operating unit
belonging to that level or lower.
PCL
HewlettR Packard (Printer Control Language).
PCMCIA
Personal Computer Memory Card International Association
Joint operation of computer companies with the aim of defining one international
standard for memory cards and PC expansion cards. Cooperation with JEIDA.
PLC
General term for units and systems with which the operating unit communicates
(e.g. SIMATIC S7 or PC).
ProTool/Pro Runtime User’s Guide
Release 12/99
Glossary-7
Glossary
PLC job
PLC jobs can be used by the PLC to trigger functions on the operating unit, e.g.
display a screen.
Power–up test
Checks the status of the CPU and memory each time the power is switched on.
Print screen
Printout of a copy of the screen contents.
Process screen
The display of process values and process progress on the operating unit in the
form of screens, which may contain graphics, texts and values.
Profile trend curve
A type of trend curve whereby, after setting a triggering bit, all the trend values are
read from the PLC and displayed on the operating unit as a curve. Profile trend
curves are excellent for displaying quick changes in cases where the overall view
(profile) of the trend is the feature of interest, not the individual values.
Programmable controller
PLC from the SIMATIC S5 series (e.g. AG S5-115U/135U).
Programmable system
PLC from the SIMATIC S7 series (SIMATIC S7-200/300/400).
ProTool/Pro CS
Full graphics based configuration software for the entire SIMATIC HMI unit range
and for Windows–based systems.
ProTool/Pro RT
Process visualization software with which the project created with ProTool/Pro CS
can be run on a Windows–based system.
Glossary-8
ProTool/Pro Runtime User’s Guide
Release 12/99
Glossary
Recipe
A combination of tags to a fixed data structure. The data structure configured can
be assigned data on the operating unit and is then referred to as a data record.
The use of recipes ensures that when a data record is downloaded, all the
assigned data is transferred to the PLC together and synchronously.
Remaining buffer
Configurable size of the message buffer. In the case of a buffer overflow, the
operating unit deletes message events until the configured remaining buffer
capacity is reached.
RS232
Standard interface for serial data transfer at a defined voltage level. Transmitter
and receiver are electrically connected.
RS485
Standard interface for serial data transfer at a very high transmission rate.
Runtime software
The program visualization software SIMATIC ProTool/Pro RT with which the project
created using ProTool/Pro CS can be run on your Windows–based system.
Screen
A screen displays all the logically related process data on the operating unit,
whereby the individual values can be modified. Screens are composed of static
and dynamic parts. Static parts refer to text and graphics, dynamic parts to input
and output fields.
Selection field
Contains a list of entries from which one can be selected on the operating unit.
ProTool/Pro Runtime User’s Guide
Release 12/99
Glossary-9
Glossary
Softkey
Function key on the operating unit with a local function assignment. The function
triggered by a softkey varies according to the screen currently open.
Start screen
The first screen, which automatically appears after the unit has started up.
Status button
A status button is a display and operating element with two possible states: ON
and OFF, i.e. touched and untouched. Both states can be configured for display
with text or graphics, which then label the status button.
Status/Force tag
Screen object with which individual address areas in the connected SIMATIC S5 or
SIMATIC S7 can be accessed for reading and writing directly from the operating
unit.
Superuser
A user with permissions to trigger functions of the highest password level. The
superuser has access to all the operating unit functions.
System message
Provides information on the operating unit concerning internal statuses of the
operating unit and PLC.
Glossary-10
ProTool/Pro Runtime User’s Guide
Release 12/99
Glossary
Tag
A defined memory location in which values can be read from and written to. This
can be performed from the PLC or via the operating unit. Depending on whether
the tag is linked to the PLC or not, a distinction is made between “global” tags
(process tags) and “local” tags.
Trend curve
Curve type by which just one curve value is read from the PLC per cycle or trigger
resulting in a curve display. If the configured number of measured values is not
achieved, each new value overwrites the oldest value. Trend curves are especially
suited to displaying continual progress.
ProTool/Pro Runtime User’s Guide
Release 12/99
Glossary-11
Glossary
Glossary-12
ProTool/Pro Runtime User’s Guide
Release 12/99
Index
A
C
Accepting, Status/Force, 6-28
Acknowledgement, alarm message, 6-13, 6-16
Acknowledgment groups, alarm message, 2-1
Activate multilanguage support, 5-4
Alarm message buffer, example, 6-15
Alarm message page, 6-14
Alarm messages, 2-1, 3-7, 6-12
acknowledge, 6-13, 6-16
ALARM_S, 3-7
Allen Bradley, 2-4, 3-15
Analog clock, 6-24
Analog display, 3-6, 6-22
Archive, configuring, 3-11
Archive storage
CSV file, 3-10
Database, 3-10
Archiving, 2-3, 3-1, 3-10
Area of use, 3-1
Area pointer, simulation, 5-11
Authorization, 1-2, 4-1, 6-25
password protection, 6-25
AUTHORSW.EXE, 5-6
Autorun function, 5-6
C7 units, 4-2
Calendar dates, 6-23
Capacity, message buffer, 2-2
CD–ROM, 4-4
Change
data record, 7-12
language, 6-4
recipe structure, 7-21
Change column sequence, Message display,
6-17
Change of status, event, 6-9, 6-10
Change structure, recipe, 7-21
Circle, 3-4
Clicking , event, 6-8
Client/Server, 2-4, 3-15
Clipboard, 3-2
Clock, 6-24
Color change, Trend curve display, 6-19
Color changes, selection field, 6-11
Column properties, Message display, 6-17
Commissioning, 5-1
requirements, 4-1
Communication, 2-4, 5-7
Communication processor, 5-8
Communications processor, 4-6
Compatibility, cursor control, 6-6
B
Components of ProTool/Pro, 4-1
Backing up the configuration, 5-3
Compress, trend display, 6-20
Backup, 5-2
Configuration backup, 5-3
Backup copy of the configuration, SIMATIC opeConfiguration backup copy, SIMATIC operating
rating unit, 5-2
unit, 5-2
Bar graph, 3-5, 6-18
Configuration software, 1-1, 1-2
BIOS, OP 37/Pro, 5-9
Configure, database, 3-11
Bit triggering, 6-19
Configuring, Windows, 5-3
Buffering, Messages, 3-7
Connectable PLCs
Button, 3-4, 6-8
OP37/Pro, 4-5
accepting (Status/Force), 6-28
PC, 4-6
Message display, 6-16
Connection, 1-2, 5-7
Messages, 6-13
OP37/Pro to PLC, 4-5
Status/Force, 6-28
PC to PLC, 4-6
updating (Status/Force), 6-28
Status/Force, 6-28
Buttons
Contour, 6-8
hidden, 6-8
Control Value, 6-28
Trends, 6-19
ProTool/Pro Runtime User’s Guide
Release 12/99
Index-1
Index
Conventions, Date/Time, 6-23
Conversion functions, 2-3
Convert, 3-2
Copy, 3-2
data records, 7-11
Copy protection, 5-6
Create, data record, 7-10
CSV file, 3-10, 7-18, 7-19
Cursor control, compatibility, 6-6
Cursor movement, 6-1
Cycle triggering, 6-19
D
Data record
change, 7-12
copy, 7-11
create, 7-10
definition, 7-2, 7-3
editing, 7-6
import, 7-21
number, 7-5
renaming, 7-13
save, 7-10
save as, 7-13
Data records
deleting, 7-13
display, 7-10
downloading to PLC, 7-14
editing, 7-20
export/import, 7-18
exporting, 7-20
importing, 7-20
read from PLC, 7-14
Data records per recipe, 2-3
Data Source Name, 3-10
Data structure, 7-3
Data Type, Status/Force, 6-28
Database, 2-2, 3-10
configuration, 3-11
Date, 6-23
Date/Time, 3-4
DB Number, Status/Force, 6-28
Decrementation, 5-14
Delete
data records, 7-13
password, 6-26
Demo mode, 5-6
Digital clock, 3-6
Digital/Analog clock, 3-6, 6-24
Direct cable connection, 5-17
Direct key module, 5-9
Index-2
Disk transfer, 5-10
Display
alarm messages, 2-1
analog, 6-21
data records, 7-10
event messages, 2-1
messages, 3-8
numeric values, 6-21, 6-22
Settings, 6-5
Display elements, Recipe display, 7-8
Display fill level, 6-18
Display priorities, Messages, 6-12
Display type, alarm messages, 2-1
Display_event_message_window, function, 6-13
Documentation, B-1
Downloading
data records to PLC, 7-14
project, 5-9
DSN, 3-10
Duration of display, 6-13
Dynamic labeling, 6-8
E
Edit
data records, 7-6, 7-20
messages, 6-13, 6-16
Electrical installation, 4-5
Ellipse, 3-4
Enlarge, trend display, 6-20
Enter
numeric values, 6-21
password, 6-26
Entering, password, 6-25
Entries, number, 7-5
Entry name, 7-3
Event message screen, 6-14
Event messages, 2-1, 3-7, 6-13
Events, 6-8, 6-9, 6-10
Example
recipe, 7-3
simulation, 5-15
Export
data record, 7-18
data records, 7-20
Extend, trend display, 6-20
External PLC, 2-4
F
File format, CSV, 7-18
ProTool/Pro Runtime User’s Guide
Release 12/99
Index
Filter criteria, Message display, 6-16
Flash, 7-4, 7-11
Flashing, messages, 6-12
Floppy disk drive, 4-4
Format
Date/Time, 6-23
Status/Force, 6-28
Full screen mode, 6-5
Function extensions, 3-1
Function keys, 6-2
Functionality, 1-2, 2-1
Functions, 3-9
Data_Record_DAT_To_PLC, 7-17
Data_Record_PLC_To_DAT, 7-17
Data_Record_PLC_to_Tags, 7-15
Data_Record_Tags_to_PLC, 7-15
Display_event_message_window, 6-13
downloading data records, 7-15
Export_Data_Records, 7-17, 7-18, 7-20
Import_Data_Records, 7-17, 7-18, 7-20
Language, 6-4
Load_Data_Record, 7-15
Logoff_user, 6-26
Save_Data_Record, 7-15
Show_alarm_message_buffer, 6-15
Show_alarm_message_page, 6-14
Show_event_message_buffer, 6-15
Show_event_message_page, 6-14
G
General operation, 6-1
Global tags, 3-8
Graphic, 3-3, 4-4
Graphic display units, 4-2
Graphic list, 3-4
Graphics, 3-1
Group acknowledgement, 2-1
H
Hard disk, 4-4
Hardcopy, 3-9
Hardware, 4-4
Help text, 2-3
Call, 6-3
messages, 6-13, 6-16
Hidden buttons, 6-8
Hierarchy, Password, 6-25
Home position, Status button, 6-9
ProTool/Pro Runtime User’s Guide
Release 12/99
I
Import
data record, 7-18
data records, 7-20
Incrementation, simulator, 5-14
Information, Documentation, 1-2
Initial startup, 5-1
Initial value, tags, 7-21
Input field, 3-3
Installation
electrical, 4-5
ProTool/Pro RT, 5-5
Windows, 5-3
Installation language, 5-6
Installing printer, 5-3
Interfaces, OP37/Pro, 4-5
Interrupt, trend display, 6-20
Invisible button, 3-5
J
Jump, trend display, 6-20
K
Key, Status button, 6-9
Keyboard action, screens, 6-1
Keyboard operation
Screens, 6-1
Windows, 6-2
L
Labeling, buttons, 6-8
Language change, 6-4
Language switch, 2-3
Languages
changing, 6-4
number of, 2-3
Layout, recipe view, 7-7
LED, 6-3
Length, message text
alarm messages, 2-1
event messages, 2-1
Level, Password, 6-25
License disk, 4-1, 5-6
Limit monitoring, 2-3
Limit values, Trend curve display, 6-19
Line, 3-4
Index-3
Index
Lines per message
alarm messages, 2-1
event messages, 2-1
List, passwords, 6-26
List box, 3-4, 6-11
Literature, B-1
Local tags, 3-8
Logging in, 6-25
Logging off, 6-25
Login, 6-25
Logoff, 6-25
Logoff_user, function, 6-26
M
Management, Password, 6-26
Maximum value, bar graph, 6-18
Message archive, 2-2, 3-7
Message buffer, 2-2, 3-8, 6-15
capacity, 2-2
print, 3-9
Message categories, 6-17
Message category, A-2
Message classes, 3-7
Message events, 2-2, 3-7
Message line, 3-8, 6-12
Message logging, 2-1, 2-2
Message number, A-1
Message page, 3-8, 6-14
Message view, 3-5, 3-8, 6-16
simple, 3-5, 6-17
Message window, 3-8, 6-12
Messages, 3-7
buffering, 3-7
display, 3-8
edit, 6-13, 6-16
print, 3-9
simulation, 5-11
Minimum value, bar graph, 6-18
Mitsubishi, 2-4, 3-15
N
Navigation, Trends, 6-19
non–return pointer, 6-22
Null modem cable, 5-17
Index-4
Number
alarm messages, 2-1
data records per recipe, 7-5
entries, 7-5
event messages, 2-1
languages, 2-3
passwords, 2-3
Recipes, 2-3
recipes, 7-5
O
Objectives, 1-2
Objects in a configuration, 3-3
Offline
editing data records, 7-15
tags, 7-4
Offset, Status/Force, 6-28
Online, editing data records, 7-16
OP37/Pro, 1-1
Connectable PLCs, 4-5
settings, 5-9
OPC, 2-4, 3-15
Operand, Status/Force, 6-27
Operate, simulator, 5-13
Operating, runtime software, 6-1
Operating , special screen objects, 6-7
Operating elements, recipe view, 7-8
Operating system, 1-1, 4-3
Operating units, 4-2
Operation, via keyboard, 6-1
Operation acknowledgement, 6-8
Operator Panel, 1-1
Output field, 3-3
P
Panel PC, 1-1
Password
delete, 6-26
Management, 6-26
set up, 6-26
Password hierarchy, 6-25
Password level, 6-25
Password levels, number of, 2-3
Password list, 3-6, 6-25, 6-26
ProTool/Pro Runtime User’s Guide
Release 12/99
Index
Password protection, 2-3
Passwords, number of, 2-3
PC, connectable PLCs, 4-6
PC card, 7-4, 7-11
PLC
connecting, 3-14
Connection, 4-2
simulation, 5-11
PLC jobs, 7-17
PLC operands, 6-27
Pointer instrument, 6-22
Polygon, 3-4
Polyline, 3-4
Positioning, 7-16
Power Tags, 4-1, 7-5
Pressing, event, 6-8, 6-9
Print
message buffer, 3-9
Messages, 3-9
protocols, 3-9
Print functions, 2-3
Printing, 3-9
Process tags, 3-8
Process values
alarm messages, 2-1
event messages, 2-1
Process visualization software, 1-1
Processor, 4-4
Product Description, 3-1
Project
Automatic start, 5-16
compilation, 5-10
downloading, 5-9
languages, 6-4
simulation, 5-11
start, 5-16
test, 5-7
transfer, 5-10
Prompting, 2-3
Protocols, 3-12
print, 3-9
SIMATIC 505, 2-4
SIMATIC S5, 2-4
SIMATIC S7/M7, 2-4
ProTool/Pro, 1-1
Components, 1-1
ProTool/Pro components, 1-1
ProTool/Pro Runtime, Installation, 5-5
PU functions, Status/Force tag, 2-3
Purpose of recipes, 7-1
ProTool/Pro Runtime User’s Guide
Release 12/99
Q
Quick selection of data records, 7-9
R
RAM , 4-4
Random, Simulator, 5-14
Read, data record from PLC, 7-14
Realtime trend, 6-19
Recipe screens, 3-2, 7-15
Recipe view, 3-2, 3-6, 7-7, 7-15
layout, 7-7
operating elements, 7-8
Recipes, 2-3, 7-1
change structure, 7-21
configuring, 7-4
definition, 7-2, 7-3
example, 7-3
name, 7-4
number, 7-5
overview, 7-1
Rectangle, 3-4
Reduce, trend display, 6-20
Releasing, event, 6-8, 6-9
Renaming, data records, 7-13
Reset, Password level, 6-25
Resolution, 4-4
Runtime
operation, 6-1
Software, 1-1
Start configuration, 5-16
S
Save
data record, 7-10
simulation, 5-12
Scenarios, commissioning, 5-9
Scope of delivery, 4-2
Scope of functions, 2-1
Screen, 2-3
Screen change, 6-2
Screen objects, 2-2, 6-7
Screen saver, 5-4, 6-6
Screens, 2-2, 2-3, 3-3
Scripting, 3-13
Scripts, 3-13
Selection list, 6-11
Index-5
Index
Separator , 7-18
Service Pack, 4-3
Set up
direct cable connection, 5-17
Password, 6-26
Set up program icon, 5-16
Settings
Date/Time, 6-23
full screen, 6-5
OP37/Pro, 5-9
Runtime software, 6-5
Setup program, 5-5
Shift bit, 5-11
Shift report, 2-3
Show_alarm_message_buffer, Function, 6-15
Show_alarm_message_page, Function, 6-14
Show_event_message_buffer, Function, 6-15
Show_event_message_page, Function, 6-14
SIMATIC HMI documentation, B-1
SIMATIC Panel PC, 1-1
Simple message view, 3-5, 6-17
Simulation
example, 5-15
save, 5-12
Simulation table, 5-11, 5-12, 5-13
Simulator, 3-2, 5-7, 5-11
operate, 5-13
Sinus, Simulator, 5-14
Slider control, 3-6, 6-21
Sorting
Message buffer, 6-15
Message display, 6-17
Message page, 6-14
password list, 6-26
Spreadsheet program, 3-10, 7-18
Square, 3-4
Standard PC, 1-1
Start, updating trend display, 6-20
Start configuration, 5-10
Starting a project, 5-16
Status button, 3-5, 6-9
Status Value, 6-28
Status/Force, 2-3, 3-6
Status/force, 6-27
Stop, updating trend display, 6-20
Storage card, 7-4, 7-11
Storage location, data records, 7-4, 7-11
Structure of the documentation, B-1
Supervisor, 6-25
Swap file, 4-4
Switch, 3-5
Status button, 6-9
Index-6
Switch off, event, 6-10
Switch on, event, 6-10
Switches, 6-10
Symbolic output field, 3-4
Synchronization, data records, 7-4
System limits, 7-5
System messages, 3-7, 6-13
List, A-1
System requirements, 4-3
Systems ready for operation, 3-1
T
Tabulator sequence, 6-2
Tags, 3-8
initial value, 7-21
offline, 7-4
synchronizing, 7-4
value simulation, 5-11
Target groups, B-1
Task switching
lock, 6-5
Simulator, 5-11
Telemecanique, 2-4, 3-15
Test, 3-2, 5-7
Text, 3-3
Text Displays, 4-2
Text editor, 7-18
Text–based display units, 4-2
Time, 6-23
Time details, Date/Time, 6-23, 6-24
Time stamp, 6-14, 6-15, 6-23
Time zone
OP37/Pro, 6-6
setting, 5-4
Time/Date, 3-4
Tips on the recipe view, 7-9
Touch panels, 3-1, 4-2
Transparent buttons, 6-8
Trend display, 3-5, 6-19
Trend type, 6-19
Triggering, Trends, 6-19
U
Unauthorized use, 6-25
Updating
Status/Force, 6-28
trend display, 6-20
Use, unauthorized, 6-25
ProTool/Pro Runtime User’s Guide
Release 12/99
Index
V
VB Script, 2-3, 3-1
VB script, tags, 3-8
Vector graphics, 3-4
View, Password list, 6-26
Virtual key, 6-8
Windows, 1-1
configuring, 5-3
install, 5-3
Windows–based systems, 1-1, 4-2
Writing, data records to PLC, 7-14
Z
W
WinAC, 2-4, 3-14
ProTool/Pro Runtime User’s Guide
Release 12/99
Zoom, trend display, 6-20
Zoom area, enlarge/reduce (trend display), 6-20
Index-7
Index
Index-8
ProTool/Pro Runtime User’s Guide
Release 12/99