1
Digital Solutions Division
Strata CIX and CTX
IPT/DKT Telephone
Telephone Administrator Manual
December 2004
Publication Information
Toshiba America Information Systems, Inc., Digtal Solutions
Division, reserves the right, without prior notice, to revise this
information publication for any reason, including, but not
limited to, utilization of new advances in the state of technical
arts or to simply change the design of this document.
Further, Toshiba America Information Systems, Inc., Digital
Solutions Division, also reserves the right, without prior
notice, to make such changes in equipment design or
components as engineering or manufacturing methods may
warrant.
CIX-AG-DKIPT-VA
Version A, December 2004
CAUTION!
© Copyright 2004
Toshiba America Information Systems, Inc.
Digital Solutions Division
All rights reserved. No part of this manual, covered by the
copyrights hereon, may be reproduced in any form or by any
means—graphic, electronic, or mechanical, including
recording, taping, photocopying, or information retrieval
systems—without express written permission of the publisher
of this material.
Strata is a registered trademark of Toshiba Corporation.
Stratagy is a registered trademark of Toshiba America
Information Systems, Inc.
Trademarks, registered trademarks, and service marks are the
property of their respective owners.
Do not use cleansers that contain benzene, paint thinner, alcohol or other solvents on the telephone’s
rubber feet. The color of the rubber may transfer to the desk or mounting surface.
TOSHIBA AMERICA INFORMATION SYSTEMS, INC. (“TAIS”)
Digital Solutions Division License Agreement
IMPORTANT: THIS LICENSE AGREEMENT (“AGREEMENT”) IS A LEGAL AGREEMENT BETWEEN YOU (“YOU”) AND TAIS. CAREFULLY READ THIS LICENSE AGREEMENT. USE OF ANY
SOFTWARE OR ANY RELATED INFORMATION (COLLECTIVELY, “SOFTWARE”) INSTALLED ON OR SHIPPED WITH A TAIS DIGITAL SOLUTIONS PRODUCT OR OTHERWISE MADE AVAILABLE TO
YOU BY TAIS IN WHATEVER FORM OR MEDIA, WILL CONSTITUTE YOUR ACCEPTANCE OF THESE TERMS, UNLESS SEPARATE TERMS ARE PROVIDED BY THE SOFTWARE SUPPLIER. IF
YOU DO NOT AGREE WITH THE TERMS OF THIS LICENSE AGREEMENT, DO NOT INSTALL, COPY OR USE THE SOFTWARE AND PROMPTLY RETURN IT TO THE LOCATION FROM WHICH YOU
OBTAINED IT IN ACCORDANCE WITH APPLICABLE RETURN POLICIES. EXCEPT AS OTHERWISE AUTHORIZED IN WRITING BY TAIS, THIS SOFTWARE IS LICENSED FOR DISTRIBUTION
THROUGH TAIS AUTHORIZED CHANNELS ONLY TO END-USERS PURSUANT TO THIS LICENSE AGREEMENT.
1. License Grant. The Software is not sold; it is licensed upon payment of applicable charges. TAIS grants to you a personal, non-transferable and non-exclusive right to use the copy of the Software
provided under this License Agreement. You agree you will not copy the Software except as necessary to use it on one TAIS system at a time at one location. Modifying, translating, renting, copying,
distributing, printing, sublicensing, transferring or assigning all or part of the Software, or any rights granted hereunder, to any other persons and removing any proprietary notices, labels or marks from the
Software is strictly prohibited except as permitted by applicable law; you agree violation of such restrictions will cause irreparable harm to TAIS and provide grounds for injunctive relief, without notice,
against you or any other person in possession of the Software. You and any other person whose possession of the software violates this License Agreement shall promptly surrender possession of the
Software to TAIS, upon demand. Furthermore, you hereby agree not to create derivative works based on the Software. TAIS reserves the right to terminate this license and to immediately repossess the
software in the event that you or any other person violates this License Agreement. Execution of the Software for any additional capabilities require a valid run-time license.
2. Intellectual Property. You acknowledge that no title to the intellectual property in the Software is transferred to you. You further acknowledge that title and full ownership rights to the Software will remain
the exclusive property of TAIS and/or its suppliers, and you will not acquire any rights to the Software, except the license expressly set forth above. You will not remove or change any proprietary notices
contained in or on the Software. The Software is protected under US patent, copyright, trade secret, and/or other proprietary laws, as well as international treaties. Any transfer, use, or copying of the
software in violation of the License Agreement constitutes copyright infringement. You are hereby on notice that any transfer, use, or copying of the Software in violation of this License Agreement constitutes
a willful infringement of copyright.
3. No Reverse Engineering. You agree that you will not attempt, and if you employ employees or engage contractors, you will use your best efforts to prevent your employees and contractors from
attempting to reverse compile, reverse engineer, modify, translate or disassemble the Software in whole or in part. Any failure to comply with the above or any other terms and conditions contained herein
will result in the automatic termination of this license and the reversion of the rights granted hereunder back to TAIS.
4. Limited Warranty. THE SOFTWARE IS PROVIDED “AS IS” WITHOUT WARRANTY OF ANY KIND. TO THE MAXIMUM EXTENT PERMITTED BY APPLICABLE LAW, TAIS AND ITS SUPPLIERS
DISCLAIM ALL WARRANTIES WITH REGARD TO THE SOFTWARE, EITHER EXPRESS OR IMPLIED, INCLUDING, BUT NOT LIMITED TO, THE WARRANTY OF NON-INFRINGEMENT OF THIRD
PARTY RIGHTS, THE WARRANTY OF YEAR 2000 COMPLIANCE, AND THE IMPLIED WARRANTIES OF MERCHANTABILITY AND FITNESS FOR A PARTICULAR PURPOSE. THE ENTIRE RISK AS
TO THE QUALITY AND PERFORMANCE OF THE SOFTWARE IS WITH YOU. NEITHER TAIS NOR ITS SUPPLIERS WARRANT THAT THE FUNCTIONS CONTAINED IN THE SOFTWARE WILL MEET
YOUR REQUIREMENTS OR THAT THE OPERATION OF THE SOFTWARE WILL BE UNINTERRUPTED OR ERROR-FREE. HOWEVER, TAIS WARRANTS THAT ANY MEDIA ON WHICH THE
SOFTWARE IS FURNISHED IS FREE FROM DEFECTS IN MATERIAL AND WORKMANSHIP UNDER NORMAL USE FOR A PERIOD OF NINETY (90) DAYS FROM THE DATE OF DELIVERY TO
YOU.
5. Limitation Of Liability. TAIS’ ENTIRE LIABILITY AND YOUR SOLE AND EXCLUSIVE REMEDY UNDER THIS LICENSE AGREEMENT SHALL BE AT TAIS’ OPTION REPLACEMENT OF THE MEDIA OR
REFUND OF THE PRICE PAID. TO THE MAXIMUM EXTENT PERMITTED BY APPLICABLE LAW, IN NO EVENT SHALL TAIS OR ITS SUPPLIERS BE LIABLE TO YOU FOR ANY CONSEQUENTIAL,
SPECIAL, INCIDENTAL OR INDIRECT DAMAGES FOR PERSONAL INJURY, LOSS OF BUSINESS PROFITS, BUSINESS INTERRUPTION, LOSS OF BUSINESS INFORMATION/DATA, OR ANY
OTHER PECUNIARY LOSS OF ANY KIND ARISING OUT OF THE USE OR INABILITY TO USE THE SOFTWARE, EVEN IF TAIS OR ITS SUPPLIER HAS BEEN ADVISED OF THE POSSIBILITY OF
SUCH DAMAGES. IN NO EVENT SHALL TAIS OR ITS SUPPLIERS BE LIABLE FOR ANY CLAIM BY A THIRD PARTY.
6. State/Jurisdiction Laws. SOME STATES/JURISDICTIONS DO NOT ALLOW THE EXCLUSION OF IMPLIED WARRANTIES OR LIMITATIONS ON HOW LONG AN IMPLIED WARRANTY MAY LAST, OR
THE EXCLUSION OR LIMITATION OF INCIDENTAL OR CONSEQUENTIAL DAMAGES, SO SUCH LIMITATIONS OR EXCLUSIONS MAY NOT APPLY TO YOU. THIS LIMITED WARRANTY GIVES YOU
SPECIFIC RIGHTS AND YOU MAY ALSO HAVE OTHER RIGHTS WHICH VARY FROM STATE/JURISDICTION TO STATE/JURISDICTION.
7. Export Laws. This License Agreement involves products and/or technical data that may be controlled under the United States Export Administration Regulations and may be subject to the approval of the
United States Department of Commerce prior to export. Any export, directly or indirectly, in contravention of the United States Export Administration Regulations, or any other applicable law, regulation or
order, is prohibited.
8. Governing Law. This License Agreement will be governed by the laws of the State of California, United States of America, excluding its conflict of law provisions.
9. United States Government Restricted Rights. The Software is provided with Restricted Rights. The Software and other materials provided hereunder constitute Commercial Computer Software and
Software Documentation and Technical Data related to Commercial Items. Consistent with F.A.R. 12.211 and 12.212 they are licensed to the U.S. Government under, and the U.S. Government’s rights
therein are restricted pursuant to, the vendor’s commercial license.
10. Severability. If any provision of this License Agreement shall be held to be invalid, illegal or unenforceable, the validity, legality and enforceability of the remaining provisions hereof shall not in any way
be affected or impaired.
11. No Waiver. No waiver of any breach of any provision of this License Agreement shall constitute a waiver of any prior, concurrent or subsequent breach of the same or any other provisions hereof, and no
waiver shall be effective unless made in writing and signed by an authorized representative of the waiving party.
12. Supplier Software. The Software may include certain software provided by TAIS suppliers. In such event, you agree that such supplier may be designated by TAIS as a third party beneficiary of TAIS with
rights to enforce the Agreement with respect to supplier’s software.
YOU ACKNOWLEDGE THAT YOU HAVE READ THIS LICENSE AGREEMENT AND THAT YOU UNDERSTAND ITS PROVISIONS. YOU AGREE TO BE BOUND BY ITS TERMS AND CONDITIONS. YOU
FURTHER AGREE THAT THIS LICENSE AGREEMENT CONTAINS THE COMPLETE AND EXCLUSIVE AGREEMENT BETWEEN YOU AND TAIS AND SUPERSEDES ANY PROPOSAL OR PRIOR
AGREEMENT, ORAL OR WRITTEN, OR ANY OTHER COMMUNICATION RELATING TO THE SUBJECT MATTER OF THIS LICENSE AGREEMENT.
Toshiba America Information Systems, Inc.
Digital Solutions Division
9740 Irvine Boulevard
Irvine, California 92618-1697
United States of America
DSD 020905
5932
Toshiba America Information Systems, Inc.
Digital Solutions Division
Limited Warranty
Toshiba America Information Systems, Inc., (“TAIS”) warrants that this telephone equipment (except for fuses, lamps, and other
consumables) will, upon delivery by TAIS or an authorized TAIS dealer to a retail customer in new condition, be free from defects
in material and workmanship for twenty-four (24) months after delivery. This warranty is void (a) if the equipment is used under
other than normal use and maintenance conditions, (b) if the equipment is modified or altered, unless the modification or
alteration is expressly authorized by TAIS, (c) if the equipment is subject to abuse, neglect, lightning, electrical fault, or accident,
(d) if the equipment is repaired by someone other than TAIS or an authorized TAIS dealer, (e) if the equipment’s serial number is
defaced or missing, or (f) if the equipment is installed or used in combination or in assembly with products not supplied by TAIS
and which are not compatible or are of inferior quality, design, or performance.
The sole obligation of TAIS or Toshiba Corporation under this warranty, or under any other legal obligation with respect to the
equipment, is the repair or replacement by TAIS or its authorized dealer of such defective or missing parts as are causing the
malfunction with new or refurbished parts (at their option). If TAIS or one of its authorized dealers does not replace or repair such
parts, the retail customer’s sole remedy will be a refund of the price charged by TAIS to its dealers for such parts as are proven to
be defective, and which are returned to TAIS through one of its authorized dealers within the warranty period and no later than
thirty (30) days after such malfunction, whichever first occurs.
Under no circumstances will the retail customer or any user or dealer or other person be entitled to any direct, special, indirect,
consequential, or exemplary damages, for breach of contract, tort, or otherwise. Under no circumstances will any such person be
entitled to any sum greater than the purchase price paid for the item of equipment that is malfunctioning.
To obtain service under this warranty, the retail customer must bring the malfunction of the machine to the attention of one of
TAIS’ authorized dealers within the twenty-four (24) month period and no later than thirty (30) days after such malfunction,
whichever first occurs. Failure to bring the malfunction to the attention of an authorized TAIS dealer within the prescribed time
results in the customer being not entitled to warranty service.
THERE ARE NO OTHER WARRANTIES FROM EITHER TOSHIBA AMERICA INFORMATION SYSTEMS, INC., OR
TOSHIBA CORPORATION WHICH EXTEND BEYOND THE FACE OF THIS WARRANTY. ALL OTHER WARRANTIES,
EXPRESS OR IMPLIED, INCLUDING THE WARRANTIES OF MERCHANTABILITY, FITNESS FOR A PARTICULAR
PURPOSE, AND FITNESS FOR USE, ARE EXCLUDED.
No TAIS dealer and no person other than an officer of TAIS may extend or modify this warranty. No such modification or
extension is effective unless it is in writing and signed by the vice president and general manager, Digital Solutions Division.
Contents
Introduction
Organization....................................................................................................................... iii
How to Use This Guide...................................................................................................... iii
Conventions ........................................................................................................................iv
Related Documents/Media...................................................................................................v
Chapter 1 – Administrator Mode
Functions..............................................................................................................................1
General Operation ................................................................................................................2
Administrator Mode..........................................................................................................3
Chapter 2 – DKT/IPT Settings
FB Buttons ...........................................................................................................................8
Telephone Programming Mode .........................................................................................10
Telephone Program Option Reset...................................................................................10
Dial Pad and Button Beeps .............................................................................................11
Speakerphone/Microphone Sensitivity Adjustment .......................................................11
Call Waiting and Camp-on Ring Tone Over Handset/Headset Option..........................12
Reset and Adjust the LCD Contrast................................................................................12
DKT2000 Mode On/Off ....................................................................................................13
Turn DKT2000 Mode On/Off ........................................................................................13
Changing the Functions of the Flex and Msg Buttons (DKT3001 only)...........................14
Redial/Feature Button Activation/Deactivation .............................................................14
Msg/Feature Button Activation/Deactivation.................................................................15
Headset Transmitter Level Adjustment .............................................................................15
Strata CIX and CTX Telephones Administrator
12/04
i
Contents
Chapter 3 – IPT2008-SDL Settings
Initializing the IP Telephone..............................................................................................16
IPT Setup Instructions........................................................................................................17
IP Telephone Start Up Sequence ....................................................................................18
IP Telephone Function Settings .........................................................................................19
Setting the IP Telephone Headset Transmit Volume.........................................................20
Viewing IP Telephone Terminal Information....................................................................20
Chapter 3 – IPT2008-SDL Settings
Configurations....................................................................................................................21
Loop Back Test...............................................................................................................22
Network Settings ............................................................................................................25
Advanced Network Settings ...........................................................................................31
Sound Settings ................................................................................................................37
Key Repeat......................................................................................................................40
Other Setting...................................................................................................................42
Initialize ..........................................................................................................................44
Reset ...............................................................................................................................47
Factory ............................................................................................................................47
Index ......................................................................................................................................51
ii
Strata CIX and CTX Telephones Administrator
12/04
Introduction
This Telephone Administrator Manual provides Administrator level instructions for
the Toshiba Strata CTX28, CTX 100-S, CTX100, and CTX670 telephone systems
• Strata IP telephone (IPT1020-SD, IPT2010-SD, IPT2020-SD and IPT2008-SDL)
• Strata DKT3000- and 2000-series digital telephones
• Strata Digital Add-on Module (DADM)
• Strata IP Add-on Module (IADM2020)
• Strata Direct Station Selection (DSS) console
Organization
• Chapter 1 – Administrator Mode
• Chapter 2 – DKT/IPT Settings
• Chapter 3 – IPT2008-SDL Settings
How to Use This Guide
This guide provides in-depth instructions for the IPT1020-SD, IPT2000-series,
DKT3000- and DKT2000-series telephones and their features. Most telephone users
can use the “Strata CTX DKT/IPT Quick Reference Guide” instead of this guide.
Strata CIX and CTX Telephones Administrator
12/04
iii
Introduction
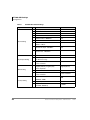
Conventions
Conventions
Conventions
Description
Note
Elaborates specific items or references other information. Within some
tables, general notes apply to the entire table and numbered notes apply to
specific items.
Important!
Extension
Number
Calls attention to important instructions or information.
Press to answer a call to the Extension Number. Each station can have
multiple extension buttons. Incoming calls ring the extension button(s)
from the top down. For example, station 10’s extensions ring 10-1 first,
then 10-2, 10-3, and 10-4. A station is considered busy when all
extensions are being used.
Note
$ULDO%ROG
The naming convention for DKT assignments within Toshiba is
Directory Numbers. For clarity and ease of understanding, the
terms Extension Number and Phantom Extension Number will be
used in this document in lieu of PDN and PhDN.
Represents telephone buttons.
shows a multiple PC keyboard or telephone button entry. Entries without
spaces between them show a simultaneous entry.
+
Example: Delete+Enter.
Entries with spaces between them show a sequential entry.
Example: + .
Tilde (~)
See Figure 10
iv
Means “through.” Example: 350~640 Hz frequency range.
Grey words within the printed text denote cross-references. In the
electronic version of this document (Library CD-ROM or FYI Internet
download), cross-references appear in blue hypertext.
Strata CIX and CTX Telephones Administrator
12/04
Introduction
Related Documents/Media
Related Documents/Media
Note Some documents listed here may appear in different versions on the
CD-ROM or in print. To find the most current version, check the version/date in
the Publication Information on the back of the document’s title page.
Refer to the following for more information:
• Strata CIX and CTX IPT/DKT Telephone User Guide
• Strata CIX Application and Documentation Library CD-ROM
• Strata CTX Winadmin Application Software and CTX/DK/Partner Products
Documentation Library CD-ROM
• Internet FYI > Documentation for all Strata CIX and CTX Manuals
Strata CIX and CTX Telephones Administrator
12/04
v
Introduction
Related Documents/Media
vi
Strata CIX and CTX Telephones Administrator
12/04
Administrator Mode
1
This chapter contains some of the functions that can be performed using
Administrator Mode.
Important!
These functions require Strata CTX release 2.22 or higher software.
You can access the Administrator mode using either the DKT2000 or DKT3000 series
telephones. Toshiba recommends using the DKT3020-SD.
To access the Admin mode, the telephone must be enabled for this function in system
programming by the telephone system administrator.
Functions
Using the soft keys on your telephone, you can program the following functions in
Administrator mode:
• Phone Name – enter the Extension (PDN) name for any telephone in the Strata
CTX
• Door Name – enter door phone name
• System SD/Name1 – enables you to program system speed dial names
• Station SD/Name1 – enables you to program station speed dial names for any
station in the system
• CO Line Name – program CO line names
• DNIS Name – program DNIS names
1
The Admin telephone mode allows speed dial names to be programmed but the actual speed dial numbers
are programmed using the speed dial programming procedures in this guide.
Strata CIX and CTX Telephones Administrator
12/04
1
Administrator Mode
General Operation
General Operation
³ Use these buttons to navigate the different functions
Navigation Button
Function
Mode
Previous Menu; exit Admin mode
Scroll
Next Item/screen (Forward) or move cursor to Right column
Page
Previous Item/screen (Back) or move cursor to Left column
Hold
Enter
Notes
• You can use Scroll/Page button to select Menu and Hold key to enter the Menu.
• You can enter digits or alphanumeric Name from Dial Pad.
• You can use the Mode button to back a screen
...or
you can use the Mode button while entering a Name or Number to go back to a
Prompt Screen.
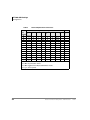
You can enter alphanumeric
characters from the dial pad
(shown in Table 1).
Note When using the
Alphanumeric dial pad,
use Page to Back Space
and delete a character;
use Scroll to enter a
space in a name.
2
Table 1
Dial Pad Alphanumeric Characters
Number of times to press
Dial Pad
the dial pad button
Buttons
1
2
3
4
.
:
A
B
C
D
E
F
G
H
I
J
K
L
M
N
O
P
Q
R
T
U
V
W
X
Y
(
)
&
5
,
‘
!
&
*
#
S
?
Z
/
1
2
3
4
5
6
7
8
9
0
Strata CIX and CTX Telephones Administrator
12/04
Administrator Mode
General Operation
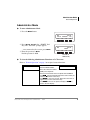
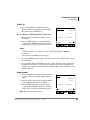
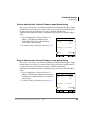
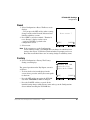
Administrator Mode
³ To enter Administrator Mode
1. Press the 0RGH button.
BC2
NOV 20
SK1
NO. 304
THURSDAY
SK2
SK3
4:20
SK4
7587
2. Press 6FUROO. (6FUROO is the “ADMIN” Soft
Key. The “Password” prompt appears.
...or to return to the first screen, press 0RGH.
3. Enter the password + +ROG.
Default password = 0000
BC2
NO. 304
ADMIN
SK1
SK2
SK3
SK4
7588
Press SK3, the
ADMIN Soft Key
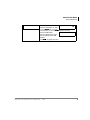
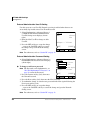
³ To view the following Administrator Functions or LCD screens
Refer to “General Operation” on page 2 to navigate between functions.
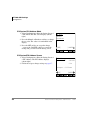
PHONE NAME
Press +ROG.
DN ID
Enter the DN ID number.
This is the extension number
(PDN) of the telephone.
Enter the Phone Name that corresponds with that DN ID.
Press +ROG pressing Hold will register the name and let you
make the next Phone name entry.
Press 0RGH to cancel or go back. Note: Once the name is
registered you cannot cancel the entry.
Press 3DJH to move to the previous display or 6FUROO to
move to the next display.
Strata CIX and CTX Telephones Administrator
12/04
3
Administrator Mode
General Operation
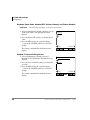
DOOR NAME
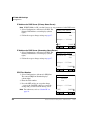
SYSTEM SD/NAME
Note To enter a speed
dial number, refer
to Speed Dial in the
Advanced section
of this guide.
STATION SD/ NAME
Note To enter a speed
dial number, refer
to Speed Dial in the
Advanced section
of this guide.
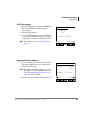
CO LINE NAME
4
Press +ROG.
DOOR PHONE NO.
01
Enter the Door Phone number
(01~24).
Enter the Door name that corresponds with that Door
Number.
Press +ROG pressing Hold will register the name and let you
make the next Phone name entry.
Press 0RGH to cancel or go back. Note: Once the name is
registered you cannot cancel the entry.
Press 3DJH to move to the previous display or 6FUROO to
move to the next display.
Press +ROG.
IDX
Enter the Speed Dial Index
(000~799).
Press 0RGH to return to the previous screen.
000
Enter the alphanumeric name.
IDX 000 04258536
Press +ROG to register
TOSHIBA BC2
alphanumeric name
corresponding to the entered speed dial index.
Press +ROG.
Enter the DN ID. This is the
extension number (PDN) of the
telephone.
DN ID
304
Pressing 0RGH lets you return to the previous screen and
+ROG registers the entry.
Enter the speed dial index
DN 304 IDX 00
(00~99).
304
TOSHIBA BC2
Enter the alphanumeric name.
Press +ROG to register alphanumeric name corresponding to
the entered speed dial index.
Press +ROG.
CO LINE
304
Enter the CO Line number
(1~264).
Pressing 0RGH lets you return to the previous screen and
+ROG registers the entry.
Enter the alphanumeric name that corresponds to the CO
Line Number.
Strata CIX and CTX Telephones Administrator
12/04
Administrator Mode
General Operation
DNIS NAME
Press +ROG.
ILG
Enter the ILG number (1~128).
Pressing 0RGH lets you return
to the previous screen and +ROG registers the entry.
Enter the DID number
ILG 003 DID
Enter the alphanumeric name
that corresponds to the DID
Number
Press +ROGto register the entry.
Strata CIX and CTX Telephones Administrator
12/04
003
5
Administrator Mode
General Operation
6
Strata CIX and CTX Telephones Administrator
12/04
DKT/IPT Settings
2
This chapter explains how to enter data for your IP and DKT telephones (IPT2010-SD
and IPT2020-SD only).
Important!
• This chapter does not apply to the Strata CTX28.
• The IPT2010-SD telephone should not be used to program the telephone system.
• Make sure you have the following information before doing any of the steps found
in this chapter:
IP address, subnet mask number, router address, Station ID, CTX Strata Net node
number, IP address for the BIPU-M2A, etc.
Notes
You may want to enter a period or backspace when performing the following steps.
While in telephone programming mode (Press ++++ROG (simultaneously) to
enter programming mode), you can use these buttons for the following functions:
• Press to enter a period.
• Press 9RO W to backspace.Press 6SNU to cancel entry and start over.
Strata CIX and CTX Telephones Administrator
12/04
7
DKT/IPT Settings
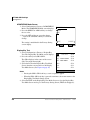
FB Buttons
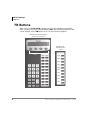
FB Buttons
When you press ++++ROG (simultaneously) to enter telephone programming
mode, you may need to press Feature Buttons ()%). The following illustrations show
you the location of these )% buttons on 20, 10, and 14 button telephones.
FB buttons for 20-button phones
IPT1020-SD, and IPT2020-SD
FB buttons for
10-button phones
SK1
SK2
SK3
IPT2010
SK4
Soft Keys
FB10
FB20
FB10
FB09
FB19
FB09
FB08
FB18
FB08
FB07
FB17
FB06
FB16
FB05
FB15
FB04
FB14
FB03
FB13
FB02
FB12
FB10
FB11
FB07
FB06
FB05
FB04
FB03
FB02
FB01
7734
8
Strata CIX and CTX Telephones Administrator
12/04
DKT/IPT Settings
FB Buttons
FB buttons for 14-button phones
DKT3014-SDL
Mode
Feature
Page
Scroll
Q
Z
Msg
Spdial
Mic
Redial
Spkr
Cnf/Trn
Vol
FB07
FB14
FB06
FB13
FB05
FB12
FB04
FB11
FB03
FB10
FB02
FB09
FB01
FB08
Hold
5442
Strata CIX and CTX Telephones Administrator
12/04
9
DKT/IPT Settings
Telephone Programming Mode
Telephone Programming Mode
The DKT3000-series and IPTs enable you to set a number of features directly from the
phone, including: Call Waiting Tone (On/Off), Flex Key, Msg Key, LCD contrast,
Speakerphone/Microphone Room Noise Sensitivity (On/Off), and Country settings.
“Telephone Programming Mode A” programs settings on a ROM chip inside the
telephone.
Note Some of the procedures use Feature Buttons (FB1, FB2, etc.). When your
telephone is in Programming Mode, the flexible buttons are numbered as
Feature Buttons, as shown at the beginning of this chapter.
³ To place your telephone in Programming Mode
³ Press ++++ROG simultaneously. The LCD displays “DKT PROGRAM
MODE” and “SELECT=”. Your phone will not ring if it receives a call while in
Programming Mode.
³ To exit from Programming Mode
³ Go Off- and On-hook or wait for 30 seconds for Programming Mode to
automatically time out.
Telephone Program Option Reset
This function resets all Programming Mode option settings to their default setting.
1.
2.
3.
4.
10
Press ++++ROG (simultaneously).
Press 9RO V + 0VJ (0VJ LED On means reset is set to activate)
Press +ROG to activate reset.
Go off-hook, then on-hook to exit the program mode.
Strata CIX and CTX Telephones Administrator
12/04
DKT/IPT Settings
Telephone Programming Mode
Dial Pad and Button Beeps
Digital telephones can emit a “beep” sound whenever a dial pad or feature button is
pressed. The “beeps” are On by default. Follow these steps to turn the “beeps” On or
Off on 3000-series DKTs.
1. Press ++++ROG (simultaneously).
2. Press .
3. Press Feature Button 1 (FB1) to toggle On/Off.
FB1, LED On: buttons beep.
FB1, LED Off: buttons do not beep.
4. Press +ROG to set the option.
5. You must also go off-hook, then on-hook to exit the program mode.
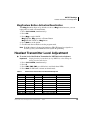
Speakerphone/Microphone Sensitivity Adjustment
When you are using the speakerphone, high ambient noise levels may cause the party
you are talking with to be to cut off frequently. If this happens, follow these steps to
lower the sensitivity of the microphone on a 3000-series telephone. The default is
normal sensitivity.
1. Press ++++ROG (simultaneously).
2. Press .
3. Press Feature Button 3 (FB3) to toggle On/Off.
FB3, LED On: Lower sensitivity
FB3, LED Off: Normal sensitivity
4. Press +ROG to set the option.
5. Go off-hook, then on-hook to exit the program mode.
Strata CIX and CTX Telephones Administrator
12/04
11
DKT/IPT Settings
Telephone Programming Mode
Call Waiting and Camp-on Ring Tone Over Handset/
Headset Option
Call Waiting and Camp-on tones are sent to a busy telephone’s speaker to indicate that
a call is waiting. Call Waiting and Camp-on Tones can be sent, as an option, to the
telephone handset or headset, in addition to the speaker. Follow these steps to turn
handset/headset Call Waiting and Camp-on tone On/Off for a 3000-series telephone.
The default is Off.
1. Press ++++ROG (simultaneously).
2. Press .
3. Press Feature Button 4 (FB4) to toggle On/Off.
FB4, LED On: Call Waiting tone
FB4, LED On: No Call Waiting tone
4. Press +ROG to set the option.
5. Go off-hook, then on-hook to exit the program mode.
Reset and Adjust the LCD Contrast
³ To adjust LCD Contrast for the LCD Telephones
1. Press ++++ROG (simultaneously).
2. Press and hold down the 0LF button, and press and release 9RO V or 9RO W
repeatedly.
Each time you press 9RO V or 9RO W, the contrast increases or decreases. There are
eight steps in either direction. To return to the middle setting, repeat “Step 1”
above.
3. Press +ROG to reset the LCD contrast.
4. Go off-hook, then on-hook to exit the program mode.
³ To reset LCD Contrast for the DKT3014-SDL
1. Press ++++ROG (simultaneously).
2. Press 0RGH.
3. Press 0VJ so that the 0VJ LED is On.
12
Strata CIX and CTX Telephones Administrator
12/04
DKT/IPT Settings
DKT2000 Mode On/Off
4. Press +ROG. This sets the LCD lightness/darkness contrast on the middle setting.
5. Go off-hook, then on-hook to exit the program mode.
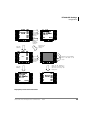
³ Test the Display on Large LCD Telephones (DKT3014-SDL only)
1.
2.
3.
4.
5.
6.
7.
8.
Press ++++ROG (simultaneously).
Press 3DJH.
Press . LCD screen is blank.
Press . Each segment shows three vertical lines, in all eight rows.
Press . Each segment contains five short horizontal lines, in all eight rows.
Press . Each segment contains a pattern of small dots, in all eight rows.
Press . All of the available characters, including numbers, display.
Go off-hook, then on-hook to exit the program mode.
DKT2000 Mode On/Off
If you have a cordless telephone (DKT2204-CT or DKT2304-CT) that is connected to
a 3000-series telephone, you must place your DKT into 2000-mode before connecting
the cordless telephone; otherwise, the 3000-series telephone will not work.
In 2000-mode:
• Only 16 characters by two lines display on the LCD.
• LCD Feature button does not work
• Spdial button does not work
Turn DKT2000 Mode On/Off
Important!
You must change the mode on DKT3000 telephone before connecting a
DKT2204-CT or DKT2304-CT to the DKT3000.
1. On the DKT3000 telephone, press ++++ROG (simultaneously).
2. Press .
3. Press )% (or )% on the DKT3014). LED On = 2000 telephone. LED Off =
3000 telephone.
Strata CIX and CTX Telephones Administrator
12/04
13
DKT/IPT Settings
Changing the Functions of the Flex and Msg Buttons (DKT3001 only)
4. Press +ROG.
5. Lift the handset to exit programming mode. Wait a few seconds for the telephone
to reset itself.
6. Connect Cordless Telephone to DKT3000 Telephone.
Changing the Functions of the Flex and
Msg Buttons (DKT3001 only)
You can change the functions of the Flex and Msg buttons on your DKT3001
telephone to be different from the defaults.
Redial/Feature Button Activation/Deactivation
Your )OH[ button has been set to act as a 5HGLDO button by default. However, you can
reprogram the )OH[ button to work as Flexible Button, as it set in system
programming. These steps enable you to change how the button functions.
1. Press ++++ROG (simultaneously).
2. Press .
3. Press 0VJ to toggle On/Off
0VJ LED On: )OH[ button works as Feature Button (FB3)
0VJ LED Off: )OH[ button works as a 5HGLDO button.
4. Press +ROG to set the option.
5. Go off-hook, then on-hook to exit the program mode.
Notes
• If you program the Flex button to work as Flexible Button 3, you can press * to
redial.
• If the Flex button is changed to function as FB3, FB3 must be assigned to a
feature by your system administrator in System Programming.
14
Strata CIX and CTX Telephones Administrator
12/04
DKT/IPT Settings
Headset Transmitter Level Adjustment
Msg/Feature Button Activation/Deactivation
Your 0VJ button has been set by default to work as a 0VJbutton; however, you can
reprogram it to work as Feature Button.
1. Press ++++ROG (simultaneously).
2. Press .
3. Press 0VJ to toggle On/Off.
0VJ LED On: 0VJoperates as Feature Button
0VJ LED Off: Works as a 0VJ button.
4. Press +ROG to set the option.
5. Go off-hook, then on-hook to exit the program mode.
Note If the Msg button is changed to function as FB2, FB2 must be assigned to a
feature by your system administrator in System Programming.
Headset Transmitter Level Adjustment
³ To set the level of the Headset Transmitter for DKT3000-series telephones
Unplug headset from modular jack of BHEU1A, when making the
setting from the table below.
Press ++++ROG (simultaneously).
Press .
Press )%,)%,)%(see table below), and check these LEDs.
Press +ROG. In Off-hook, it returns to normal mode.
Important!
1.
2.
3.
4.
Table 2
Volume Level Transmitted from Headset Microphone
LEDS
FB1
FB2
OFF
OFF
ON
OFF
OFF
ON
ON
ON
OFF
OFF
ON
OFF
OFF
ON
ON
ON
Note ON means LED ON
FB3
OFF
OFF
OFF
OFF
ON
ON
ON
ON
Strata CIX and CTX Telephones Administrator
BHEU SW2
NORMAL (default)
LOW
+12 dB
-11 dB
+8 dB
-15 dB
+4 dB
-19 dB
0 dB
-23 dB (default)
-4 dB
-27 dB
-8 dB
-31 dB
-12 dB
-35 dB
-16 dB
-39 dB
OFF means LED OFF
12/04
15
DKT/IPT Settings
Initializing the IP Telephone
Important!
• On the IPTs, the soft keys do not have names such as Page, Mode, Scroll and
Feature. In the manual, the soft keys are referenced as SK1, SK2, SK3 and SK4
from Left to Right.
• On the IPT2010-SD, use the soft key SK3 (Scroll) to switch between FB1~FB10
and FB11~FB20.
Initializing the IP Telephone
CAUTION! If you initialize the IP telephone, all settings return to default.
1. Press ++++ROG (simultaneously).
2. Press 9RO V.
Note Steps 3~5 are optional.
3. Press )% to initialize the telephone’s function settings (LED On = initialize,
LED Off = don’t initialize). See “IP Telephone Function Settings” on page 19 for
details.
4. Press )% to initialize LCD contrast setting (LED On = initialize, LED OFF =
don’t initialize).
5. Press )% to initialize the telephone’s IP network connection settings (LED On =
initialize, LED Off = don’t initialize). See “IPT Setup Instructions” below for
details.
6. Press +ROG again to complete the initialization process.
7. Go off-hook and hang up.
16
Strata CIX and CTX Telephones Administrator
12/04
DKT/IPT Settings
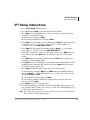
IPT Setup Instructions
IPT Setup Instructions
1. Press ++++ROG (simultaneously).
2. Press , then press +ROGto select the Network Setting Mode.
3. Press )% to see if the DHCP server is in use or not. Press one of the following
(normally, use : manual setting):
: manual setting, then press +ROG.
: auto setting by DHCP server, then press +ROG.
4. Press )%. Enter the IP address for this IPT and press +ROG. To enter the period in
an IP address, press the button on your dialpad (e.g., if the IP address is
“192.168.1.241,” press ).
5. Press )%. Enter the subnet mask number and press +ROG. (e.g., if the subnet
mask address is “255.255.255.0, press ).
6. If the IPT is connected to a router or other gateway device, press )%. Enter the
router address, then press +ROG. Only used if Step 3, above, is set for manual
setting.
7. Press )%. Enter a Station ID for the IPT and press +ROG. This is usually your
telephone’s primary number (PDN).
8. Press )% to enter the CTX Strata Net node number of the CTX node that contains
the BIPU-M3A to which this IPT interfaces, then press +ROG. This FB setting is
for CTX networked systems only.
9. Press )% for BIPU IP address mode. Press one of the following:
: manual setting, then press +ROG. Press )% and enter the BIPU IP address,
then press +ROG. (e.g., if the BIPU IP address is “192.168.1.241,” enter it in this
format ).
: auto setting by broadcast, then press +ROG.
: auto setting by multicast (IPT doesn’t support multicast setting in this first
release), then press +ROG.
10. Press +ROG again to set all the above data.
11. Go off-hook and hang up. The IPT will search for the BIPU-M1A, initialize and
then set the IP address (from 20 sec. to 60 sec.). Time, Date and PDN displays on
LCD when the information is set.
Note See “IP Telephone Start Up Sequence” below for an explanation of the LCDs
that you will see during this procedure.
Strata CIX and CTX Telephones Administrator
12/04
17
DKT/IPT Settings
IPT Setup Instructions
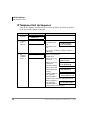
IP Telephone Start Up Sequence
After the IP telephone network setting has been programmed, the following displays
occur after the IP telephone is hung-up:
Action
1.
IPT
initializes.
2.
IPT
searches
for IP
address.
LCD Indication
Remarks
INITIALIZING
PLEASE WAIT...
IPaddress setting...
Possible errors:
• IP address is not
set.
IPaddress setting...
Can’t set IPaddress
• No DHCP server,
etc.
If error occurs, IP address setting is carried out
continuously.
3.
IPT
searches
for BIPU/
LIPU.
Searching BIPU...
Retries every 10 seconds.
Possible errors:
• BIPU is not found
“time out.”
Searching BIPU.
BIPU not found
• BIPU is not found
(Station ID
automatic setting).
Searching BIPU.
Can’t get StationID
• BIPU is not found
(StationID manual
setting)
Searching BIPU.
StationID unmatch
• Multicast address is
not registered
Not exist Multicast addr
(BIPU IP address
setting mode is automatic setting by multicast)
• BIPU IP address is
not registered
Not exist BIPU address
(BIPU IP address
setting mode is manual setting.
18
Strata CIX and CTX Telephones Administrator
12/04
DKT/IPT Settings
IP Telephone Function Settings
Action
LCD Indication
4.
Registering
to BIPU
5.
Registering
completion
- normal
action.
Remarks
When registering fails, IPT retries by starting at
Step 2 again.
Error message:
Registering IPT
“Exxx” is error
Can’t register IPT:EXXX
number.
Registering IPT
LCD data is indicated from
the system. Example:
NO. 205
FEB 28 THURSDAY 01:09
IP Telephone Function Settings
These steps enable you to turn On/Off button beeps, room noise cancellation, handset
Busy Override, and headset volume control. You can also adjust the setting for carbon
headsets vs. non-carbon headsets.
1. Press ++++ROG (simultaneously).
2. Press then +ROG.
3. Press the Feature Buttons to turn the LEDs On/Off (see Table 3).
Table 3
IP Telephone Function Settings
FB
FB1
LED ON
LED OFF
Buttons beep.
Buttons do not beep.
FB3
Speakerphone/Microphone sensitivity
is lower.
Speakerphone/Microphone sensitivity is
normal.
FB4
Enable handset Busy Override (BOV)
tone.
Disable handset BOV.
FB11
Turn LED On if carbon headset is
attached.
Turn LED Off if carbon headset is not
attached.
4. Press +ROG to set the above data.
5. Go off-hook and hang up.
Strata CIX and CTX Telephones Administrator
12/04
19
DKT/IPT Settings
Setting the IP Telephone Headset Transmit Volume
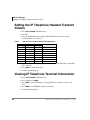
Setting the IP Telephone Headset Transmit
Volume
1. Press ++++ROG (simultaneously).
2. Press .
3. Press the Feature Buttons to turn the LEDs On/Off for the desired volume
transmission level (see Table 4).
Table 4
Volume Level Transmitted from Headset Microphone
FB3
ON
ON
ON
ON
OFF
OFF
OFF
OFF
LEDS
FB2
ON
ON
OFF
OFF
ON
ON
OFF
OFF
FB1
ON
OFF
ON
OFF
ON
OFF
ON
OFF
Transmit Level
Level 7 (min.)
Level 6
Level 5
Level 4
Level 3 (initial value)
Level 2
Level 1
Level 0 (max.)
4. Press FB4 for handset voice output in speakerphone mode (LED On = with, LED
Off = without).
5. Press +ROG to set the above data.
6. Go off-hook and hang up.
Viewing IP Telephone Terminal Information
1. Press ++++ROG (simultaneously).
2. Press , then press +ROG.
3. Press )% to view IPT firmware version (application and boot versions, read
only).
4. Press )% to view IPT MAC address (read only).
5. Go off-hook and hang up.
20
Strata CIX and CTX Telephones Administrator
12/04
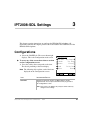
3
IPT2008-SDL Settings
This chapter contains instructions to configure the IPT2008-SDL telephone. All
instructions found in this chapter pertain to the items found in the CONFIG tab of the
IPT2008-SDL telephone.
Configurations
³ Select the CONFIG tab. The screen shown right
displays. This is the Configurations main screen
³ To access any of the screens that relates to an item
on the Configurations screen
³ Press the soft key that corresponds to the item.
The details pertaining to that item display.
Note The following table explains each of the items
%QPHKIWTCVKQPU
6GTO+PHQ-G[4GRGCV
0GVYQTM0GV&KCI
#FXCPEG(CEVQT[
5QWPF+PKVKCNK\G
1VJGTU4GUGV
displayed on the Configurations screen.
2*10'
%10(+)
9'$
ITEM
INFORMATION DISPLAY
Term Info
Displays the Software Version, the MAC address and the
Regional Code. You can press the EXIT soft key to go back to
the Configurations screen.
Note This screen is for display only and you cannot make any
changes to the settings.
Strata CIX and CTX Telephones Administrator
12/04
21
IPT2008-SDL Settings
Configurations
ITEM
INFORMATION DISPLAY
Network
Displays or sets the DHCP, IP Address, Subnet, the default
gateway, station information and LIPU Address.
Advance
Displays the Primary Name Server, the Secondary Name Server,
GRQ Port, RRQ Port, and AP Address
Sound
Displays settings for Keybeep, Roam Noise, Handset BOV, and
Carbon Headset
Others
Key Repeat
Net Diag
Factory
Initialize
Reset
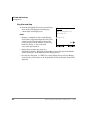
Loop Back Test
³ Select Configuration > Network Diagnosis > Loop
Back Test.
Notes
• Press EXIT to move back a screen.
• An IP address of current Ping send-to party is
displayed in the second line.
• The result of Ping executed last is displayed in the
third line. (Ping result is confirmed only on this
screen.)
22
.QQR$CEM6GUV
2KPIVQ
.CUV4GUWNV
2KPI#FFTGUU5GVVKPI
2KPI5VCTV
=':+6? 2*10' %10(+)
9'$
Strata CIX and CTX Telephones Administrator
12/04
IPT2008-SDL Settings
Configurations
³ Setting Ping Send-to Address
1. Press the Ping Address soft key. The Ping Address
Setting Screen displays (shown right.
2. Using the dial pad, press 1 ~ 0 and * to enter an IP
address or change an IP address. Input the
delimiter “.” by pressing key.
Press 9RO W to backspace.
3. Press 6(7 soft key to go back to the Loop Back
Test Screen (after rewriting the NV-RAM data if an
IP address is changed). (“Ping to xxx.xxx.xxx.xxx”
will display the IP address after the setting
change.)
2KPI#FFTGUU5GVVKPI
%WTTGPV
0GY
$CEMURCEG8QN&QYP
=5'6?=%#0%'.? 2*10'
%10(+)
9'$
Note Pressing the SET soft key can cause the screen
to move to the Input Error Screen if an error
occurred when entering the IP address (shown
right).
4. Press the OK soft key on the Error Screen to go to
the Address Setting Screen.
Note In five seconds after displaying the Input Error
Screen, the screen automatically moves to the
Address Setting Screen. (The address that has
resulted in an input error will be displayed as it
is when moving to the Address Setting
Screen.)
'4414
+NNGICN&CVC
=1-? 2*10'
%10(+)
9'$
5. Select the CANCEL soft key to cancel the intended setting change and to move to
the Loop Back Test Screen without rewriting the NV-RAM data.
Strata CIX and CTX Telephones Administrator
12/04
23
IPT2008-SDL Settings
Configurations
Ping Start and Stop
³ From the Loop Back Test Screen, press the Ping
Start soft key. The Pinging Screen displays
(shown right) and Pinging starts.
Notes
2KPIKPI
2KPIVQ
'ZGEWVKPI
• Pinging is attempted ten times on the Pinging
Screen and is stopped automatically. The screen
will move to the Loop Back Test Screen. The
result is displayed in the third line of the Loop
Back Test Screen as “Last result n/10
(successful operations/10).”
2KPI5VQR
=':+6? 2*10'
%10(+)
9'$
• During Ping execution, the progress is
displayed by showing “Executing n/10 (number of successful operations/number
of trial operations)” in the third line on the Pinging Screen.
• Pressing the “Ping Stop” or “EXIT” key on the Pinging Screen will stop Pinging
and cause the screen to move to the Loop Back Test Screen. Then the result will be
displayed.
24
Strata CIX and CTX Telephones Administrator
12/04
IPT2008-SDL Settings
Configurations
Network Settings
³ To access the Network Setting screens
³ Select the CONFIG tab, then Network soft key.
Note There are two screens for Network Settings (shown below). Use the “J” and
“I” soft keys to move from one screen to another and to go back to the
Configurations main screen.
0GVYQTM5GVVKPI &*%210
+2#FFT
5WDPGV
&HNV)9
5VCVKQP
=5'6?
=%#0%'.? 2*10'
%10(+)
9'$
0GVYQTM5GVVKPI
0QFG
+27/QFG$TQCFECUV
+27#FT
=5'6?
=%#0%'.? 2*10'
Screen 1
%10(+)
9'$
Screen 2
The general operation on the Network Settings screens is as follows:
• To view details of an item displayed on the screens above, press the soft key that
corresponds to that item.
• Press the SET soft key to rewrite the NV-RAM data if any setting of a minor item
is changed. The screen will move to the Resetting Selection Screen. (The Resetting
Selection Screen will be described in detail later.)
• Press the SET soft key to go to the Configurations Screen without rewriting the
NV-RAM data if no setting change of a minor item is made.
• Press the CANCEL soft key to cancel all the intended setting changes in the minor
items and to go to the Configurations Screen without rewriting the NV-RAM data.
Strata CIX and CTX Telephones Administrator
12/04
25
IPT2008-SDL Settings
Configurations
DHCP Server Settings
1. Select Configuration > Network > DHCP. The
DHCP Mode screen displays.
The current default set is underlined.
2. Press the ON or OFF soft keys to change the set
value.
3. Press the SET soft key to accept the change.
...or press the CANCEL soft key to cancel the
change.
Notes
&*%2/QFG
10
1((
=5'6?=%#0%'.? 2*10'
%10(+)
9'$
• The Network Setting Screen displays when you press SET or CANCEL.
• DHCP is underlined in the display if you changed the setting.
• If the DHCP setting is changed from ON to OFF, then the “IP Addr” setting on the
Network Setting screen will be initialized to the initial value.
• The IPT2008-SDL gets its IP address, Subnet mask, Default Gateway, DNS server
address from DHCP server.
26
Strata CIX and CTX Telephones Administrator
12/04
IPT2008-SDL Settings
Configurations
IP Address
³ Select Configuration > Network > IP Addr. The
IP Address screen displays (shown right).
The current IP Address displays.
³ To change settings on the screen
The following applies to the IP Address, Subnet
Mask, Default Gateway, and Primary DNS Server.
1. Use the dial pad (1~0, *) to enter a new IP
address.
+2#FFTGUU
%WTTGPV
0GY
$CEMURCEG8QN&QYP
=5'6?=%#0%'.? 2*10'
%10(+)
9'$
Use on the dial pad to enter a period (.) in an IP
address.
2. Press the SET soft key to select the setting change and go back to the Network
Setting Screen.
On the Network Setting Screen, the item you changed will be underlined in the
display (in this case the IP Address).
3. Pressing the SET soft key can give you an Error Screen if you incorrectly entered
the address.
4. Press the OK soft key on the Error Screen to correct the entry. Five seconds after
the Error Screen displays, the screen automatically goes back to the appropriate
setting screen (in this case the IP Address) and the address that resulted in an error
will be displayed.
5. Press the CANCEL soft key to cancel the setting change and to go to the Network
Setting screen.
Strata CIX and CTX Telephones Administrator
12/04
27
IPT2008-SDL Settings
Configurations
Subnet Mask
1. Select Configuration > Network > Subnet. The
Subnet Mask screen displays (shown right). The
current subnet displays on the one-line text field.
2. Follow the steps to change settings on page 27.
5WDPGV/CUM
%WTTGPV
0GY
$CEMURCEG 8QN&QYP =5'6?=%#0%'.? 2*10'
Default Gateway Address
1. Select Configuration > Network > Dflt-GW. The
Default GW Address screen displays (shown
right). The current default Gateway Address
displays on the one-line text field.
2. Follow the steps to change settings on page 27.
9'$
&GHCWNV)9#FFTGUU
%WTTGPV
0GY
$CEMURCEG8QN&QYP
=5'6?=%#0%'.? 2*10'
28
%10(+)
%10(+)
9'$
Strata CIX and CTX Telephones Administrator
12/04
IPT2008-SDL Settings
Configurations
Station ID
³ Select Configuration > Network > Station.
The Station ID screen displays (shown right).
The current Station ID displays.
³ To Change or Add Information on this screen
1. Enter the New Station ID to change or add a
Station ID.
2. Press the SET soft key to accept the change
...or press the CANCEL soft key to cancel the
change and go to the Network Setting screen.
5VCVKQP+&
%WTTGPV
0GY
$CEMURCEG8QN&QYP
=5'6?=%#0%'.? 2*10'
%10(+)
9'$
Notes
• Use the dial pad (1~0) to change or enter a new Station ID. Press 9RO W to
backspace.
• You can enter a maximum of seven digits.
• Pressing the SET soft key can give you an Error Screen if you incorrectly entered
the Station ID.
• Press the OK soft key on the Error Screen to correct the entry. Five seconds after
the Error Screen displays, the screen automatically goes back to the appropriate
setting screen (in this case the IP Address) and the address that resulted in an error
will be displayed.
Node Number
1. Select Configuration > Network Setting Screen
2 > Node. The current Node displays (shown
right).
2. Enter the Node. You must be first program this
node in eManager, Program 150, FB09.
3. Press the SET soft key to accept the change
...or press the CANCEL soft key to cancel the
change and go to the Network Setting screen.
Note Refer Station ID notes above.
Strata CIX and CTX Telephones Administrator
12/04
0QFG
%WTTGPV
0GY
$CEMURCEG8QN&QYP
=5'6?=%#0%'.? 2*10'
%10(+)
9'$
29
IPT2008-SDL Settings
Configurations
CIX System /IPU Address Mode
1. Select Configuration > Network Setting Screen 2
> IPU Mode. The IPU screen displays (shown
right).
2. Press the Manual or Broadcast soft key to change
the set value. The value set is underlined in the
display.
3. Press the SET soft key to accept the change
...or press the CANCEL soft key to cancel the
change and go to the Network Setting screen.
+27/QFG
/CPWCN
$TQCFECUV
=5'6?=%#0%'.? 2*10'
CIX System/IPU Address Screen
1. Select Configuration > Network Setting Screen 2
> IPU Address. The IPU Address displays
(shown right).
2. Follow the steps to change settings on page 27.
9'$
+27#FFTGUU
%WTTGPV
0GY
$CEMURCEG8QN&QYP
=5'6?=%#0%'.? 2*10'
30
%10(+)
%10(+)
9'$
Strata CIX and CTX Telephones Administrator
12/04
IPT2008-SDL Settings
Configurations
Advanced Network Settings
³ To access the Advanced Network Setting screens
³ Select the CONFIG tab, then Advanced soft key.
Note There are two screens for Advanced Settings (shown below). Use the “J” and
“I” soft keys to move from one screen to another, and to go back to the
Configurations main screen.
#FXCPEGF5GVVKPI 2&05
5&05
)432QTV
4432QTV
#2#FFT
=5'6?
=%#0%'.? 2*10'
%10(+)
9'$
#FXCPEGF5GVVKPI
#FOKPA7
#FOKPA.
75'4+&
2#55914&
2*10' %10(+) 9'$
Screen 2
Screen 1
The general operation on the Network Settings screens is as follows:
• To view details of an item displayed on the screens above, press the soft key that
corresponds to that item.
• Press the SET soft key to rewrite the NV-RAM data if any setting of a minor item
is changed. The screen will move to the Resetting Selection Screen. (The Resetting
Selection Screen will be described in detail later.)
• Press the SET soft key to go to the Configurations Screen without rewriting the
NV-RAM data if no setting change of a minor item is made.
• Press the CANCEL soft key to cancel all the intended setting changes in the minor
items and to go to the Configurations Screen without rewriting the NV-RAM data.
Strata CIX and CTX Telephones Administrator
12/04
31
IPT2008-SDL Settings
Configurations
IP Address for DNS Server (Primary Name Server)
Note If DHCP Mode is ON, you don’t have to set any parameters for the DNS server.
1. Select Configuration > Advanced > P-DNS. The
2TKOCT[&05#FFTGUU
Primary DNS Address screen displays (shown
%WTTGPV
right).
0GY
2. Follow the steps to change settings on page 27.
$CEMURCEG8QN&QYP
=5'6?=%#0%'.? 2*10'
%10(+)
9'$
IP Address for DNS Server (Secondary Name Server)
1. Select Configuration > Advanced > P-DNS. The
5GEQPFCT[&05#FFTGUU
Primary DNS Address screen displays (shown
%WTTGPV
right).
0GY
2. Follow the steps to change settings on page 27.
$CEMURCEG8QN&QYP
=5'6?=%#0%'.? 2*10'
GRQ Port Number
1. Select Configuration > Advanced > GRQ Port.
The current GRQ Port Number displays
(shown right).
2. Enter the New number.
3. Press the SET soft key to accept the change
...or press the CANCEL soft key to cancel the
change and go to the Network Setting screen.
Note For other notes, refer to “Station ID” on
page 29.
32
%10(+)
9'$
)432QTV0WODGT
%WTTGPV
0GY
$CEMURCEG8QN&QYP
=5'6?=%#0%'.? 2*10'
%10(+)
9'$
Strata CIX and CTX Telephones Administrator
12/04
IPT2008-SDL Settings
Configurations
RRQ Port Number
1. Select Configuration > Advanced > RRQ Port.
The current RRQ Port Number displays
(shown right).
2. Enter the New number.
3. Press the SET soft key to accept the change
...or press the CANCEL soft key to cancel the
change and go to the Network Setting screen.
Note For other notes, refer to “Station ID” on
page 29.
4432QTV0WODGT
%WTTGPV
0GY
$CEMURCEG8QN&QYP
=5'6?=%#0%'.? 2*10'
Application Server Address
1. Select Configuration > Advanced > AP Addr.
The current Application Server Addr screen
displays (shown right).
Note The Application Server Address can be an
IP Address or a URL (alphanumeric). See
“Dial Pad Alphanumeric Characters” on
page 34 to enter the URL.
2. Follow the steps to change settings on page 27.
12/04
9'$
#RRNKECVKQP5GTXGT#FFT
%WTTGPV
0GY
$CEMURCEG8QN&QYP
=5'6?=%#0%'.? 2*10'
Strata CIX and CTX Telephones Administrator
%10(+)
%10(+)
9'$
33
IPT2008-SDL Settings
Configurations
Table 5
Dial Pad Alphanumeric Characters
Dial
Number of times to press the dial pad button
Pad
1
2
3
4
5
6
7
8
Buttons
space
a
b
c
A
B
C
goto a
d
e
f
D
E
F
goto d
g
h
i
G
H
I
goto g
j
k
l
J
K
L
goto j
m
n
o
M
N
O
goto m
p
q
r
s
P
Q
R
S
t
u
v
T
U
V
goto t
w
x
y
z
W
X
Y
Z
VW
.
/
:
@
_
~
QG
“
#
$
%
^
&
‘
(
UG
*
+
,
;
<
=
>
?
WK
]
‘
{
l
}
goto .
Press 9RO W button to back space
Press for all punctuation marks
Press to toggle between Alpha and Numeric modes
Press to enter a period.
34
9
goto p
goto w
!
)
[
Strata CIX and CTX Telephones Administrator
12/04
IPT2008-SDL Settings
Configurations
External Administration Terminal IP Address Upper Bound Setting
This screen can be used to set an External Administration Terminal IP Address Upper
Bound. External accessing is not enabled if the Upper and Lower bound IP addresses
are initial values (0.0.0.0). External accessing is enabled if the External
Administration Terminal IP address is within the Upper and Lower bound IP address
range.
1. Select Configuration > Advanced Screen 2 >
Admin_U. The External Administration
Terminal IP Address Upper Bound Setting
screen displays (shown right).
2. To change settings, follow the steps on page 27.
#FOKP#FFT7RRGT$QWPF
%WTTGPV
0GY
$CEMURCEG8QN&QYP
=5'6?=%#0%'.? 2*10'
%10(+)
9'$
External Administration Terminal IP Address Lower Bound Setting
This screen can be used to set an External Administration Terminal IP Address Upper
Bound. External accessing is not enabled if the Upper and Lower bound IP addresses
are initial values (0.0.0.0). External accessing is enabled if the External
Administration Terminal IP address is within the Upper and Lower bound IP address
range.
1. Select Configuration > Advanced Screen 2 >
Admin_L. The External Administration Terminal
IP Address Lower Bound Setting screen displays
(shown right).
2. To change settings, follow the steps on page 27.
#FOKP#FFT.QYGT$QWPF
%WTTGPV
0GY
$CEMURCEG8QN&QYP
=5'6?=%#0%'.? 2*10'
Strata CIX and CTX Telephones Administrator
12/04
%10(+)
9'$
35
IPT2008-SDL Settings
Configurations
External Administration User ID Setting
Use this screen to set an User ID. External accessing is enabled when the user can
successfully log in with correct User ID and Password
1. Select Configuration > Advanced Screen 2
> USER ID. The External Administration
User ID Setting screen displays (shown
right).
2. Enter the New User ID to change or add a
User ID.
3. Press the SET soft key to accept the change
...or press the CANCEL soft key to cancel
the change and go to the Network Setting
screen.
75'4+&
%WTTGPV
0GY
$CEMURCEG8QN&QYP
=5'6?=%#0%'.? 2*10'
%10(+)
9'$
Note For other notes, refer to “Station ID” on page 29.
External Administration Password Setting
³ Select Configuration > Advanced Screen 2 >
PASSWORD. The Password screen displays
(shown right).
³ To change or add a new password
Note The Password can be alphanumeric, see
“Dial Pad Alphanumeric Characters” on
page 34 to enter the Password.
2#55914&
%WTTGPV
0GY
0GY#ICKP
$CEMURCEG8QN&QYP
=5'6?=%#0%'.? 1. Press the Current soft key (left), then enter
2*10' %10(+) 9'$
the Current Password.
2. Press the New soft key (left), then enter the New Password.
3. To confirm the change, re-enter the new password in the New Again field using the
New Again soft key (left).
4. Press the SET soft key to accept the change
...or press the CANCEL soft key to cancel the change and go to the Network
Setting screen.
Note For other notes, refer to “Station ID” on page 29.
36
Strata CIX and CTX Telephones Administrator
12/04
IPT2008-SDL Settings
Configurations
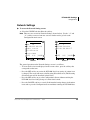
Sound Settings
³ To access the Sound Setting screens
³ Select the CONFIG tab, then Sound soft key.
Note There are two screens for Sound Settings (shown below). Use the “J” and
“I” soft keys to move from one screen to another and to go back to the
Configurations main screen.
5QWPF5GVVKPI -G[DGGR10
4QQO0QKUG1((
*CPFUGV$181((
%CTDQP*CPFUGV1((
%CTDQP*GCFUGV1((
=5'6?
=%#0%'.? 2*10'
%10(+)
9'$
5QWPF5GVVKPI
*GCFUGV6Z%VN0QTOCN
*GCFUGV6Z8QN
*CPFUGV4Z/QFG1((
%QOHQTV0QKUG1((
=5'6?
=%#0%'.? 2*10'
Screen 1
%10(+)
9'$
Screen 2
The general operation on the Network Settings screens is as follows:
• To view details of an item displayed on the screens above, press the soft key that
corresponds to that item.
• Press the SET soft key to rewrite the NV-RAM data if any setting of a minor item
is changed. The screen will move to the Resetting Selection Screen. (The Resetting
Selection Screen will be described in detail later.)
• Press the SET soft key to go to the Configurations Screen without rewriting the
NV-RAM data if no setting change of a minor item is made.
• Press the CANCEL soft key to cancel all the intended setting changes in the minor
items and to go to the Configurations Screen without rewriting the NV-RAM data.
Strata CIX and CTX Telephones Administrator
12/04
37
IPT2008-SDL Settings
Configurations
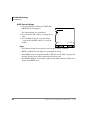
Keybeep, Room Noise, Handset BOV, Carbon Handset, and Carbon Headset
Important!
The following steps apply to all of the above items.
1. Select Configuration > Sound > Keybeep (or any
of the above items). The appropriate screen
displays.
2. Press the ON or OFF soft keys to change the set
value.
3. Press the SET soft key to accept the change.
...or press the CANCEL soft key to cancel the
change.
The setting is underlined in the Sound screen
display.
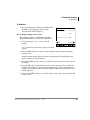
Headset Tx Control Setting Screen
1. Select Configuration > Sound (screen 2) >
Headset Tx Ctl. The Headset Tx Control screen
displays.
2. Press the Low or Normal soft keys to change the
set value.
3. Press the SET soft key to accept the change.
...or press the CANCEL soft key to cancel the
change.
The setting is underlined in the Sound screen
display.
38
-G[DGGR
10
1((
=5'6?=%#0%'.? 2*10'
%10(+)
9'$
*GCFUGV6Z%QPVTQN
.QY
0QTOCN
=5'6?=%#0%'.? 2*10'
%10(+)
9'$
Strata CIX and CTX Telephones Administrator
12/04
IPT2008-SDL Settings
Configurations
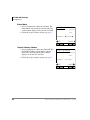
Headset Tx Volume Setting Screen
³ Select Configuration > Sound (screen 2) >
Headset Tx Vol. The Headset Tx Volume screen
displays.
³ To Change or Add Information on this screen
1. Enter the New field with the volume level.
2. Press the SET soft key to accept the change
...or press the CANCEL soft key to cancel the
change and go to the Sound Setting screen 2.
*GCFUGV6Z8QNWOG
%WTTGPV
0GY
/KP
/CZ
$CEMURCEG8QN&QYP
=5'6?=%#0%'.?
2*10' %10(+)
9'$
Notes
• Use the dial pad (1~0) to change or enter volume level. Press 9RO W to backspace.
• You can enter a maximum of seven digits.
• Pressing the SET soft key can give you an Error Screen if you incorrectly entered
the Station ID.
• Press the OK soft key on the Error Screen to correct the entry. Five seconds after
the Error Screen displays, the screen automatically goes back to the Headset Tx
Volume screen and the number that resulted in an error will be displayed.
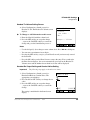
Handset Rx Output Setting and Comfort Noise Setting
Important!
The following steps apply to the above two items.
1. Select Configuration > Sound (screen 2) >
Handset Rx Mode or Comfort Noise. The
appropriate screen displays.
2. Press the ON or OFF soft keys to change the set
value.
3. Press the SET soft key to accept the change.
...or press the CANCEL soft key to cancel the
change.
The setting is underlined in the Sound screen
display.
Strata CIX and CTX Telephones Administrator
12/04
*CPFUGV4Z/QFG
10
1((
=5'6?=%#0%'.? 2*10'
%10(+)
9'$
39
IPT2008-SDL Settings
Configurations
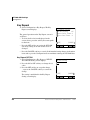
Key Repeat
³ Select Configuration > Key Repeat. The Key
Repeat screen displays.
The general operation on the Key Repeat screens is
as follows:
• To view details of an item displayed on the
screens above, press the soft key that corresponds
to that item.
• Press the SET soft key to rewrite the NV-RAM
data if any setting of an item on this screen is
changed.
-G[4GRGCV5GVVKPI
1((105GVVKPI10
4GRGCV&GNC[6KOGT
4GRGCV4CVG6KOGT
=5'6?=%#0%'.? 2*10'
%10(+)
9'$
• Press the CANCEL soft key to cancel all the intended setting changes in the minor
items and to go to the Configurations Screen without rewriting the NV-RAM data.
Key Repeat OFF/ON
1. Select Configuration > Key Repeat > OFF/ON.
The OFF/ON Setting screen displays.
2. Press the ON or OFF soft keys to change the set
value.
3. Press the SET soft key to accept the change.
...or press the CANCEL soft key to cancel the
change.
The setting is underlined in the Key Repeat
Setting screen display.
40
1((105GVVKPI
10
1((
=5'6?=%#0%'.? 2*10'
%10(+)
9'$
Strata CIX and CTX Telephones Administrator
12/04
IPT2008-SDL Settings
Configurations
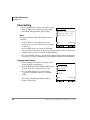
Repeat Delay Timer and Repeat Rate Timer
Important!
The following steps apply to the above two items.
³ Select Configuration > Key Repeat > Repeat
Delay Timer or Repeat Rate Timer. The
appropriate screen displays (shown right).
³ To Change or Add Information on this screen
1. Enter the New Repeat Delay Timer to change the
setting.
Note Use the dial pad 1~5 and 9RO W to backspace.
For Repeat Delay Timer: 1 (short) to 5 (long).
For Repeat Rate Timer: 1 (fast) to 5 (slow)
4GRGCV&GNC[6KOGT
%WTTGPV
0GY
5JQTV
.QPI
$CEMURCEG8QN&QYP
=5'6?=%#0%'.?
2*10' %10(+)
9'$
2. Press the SET soft key to accept the change
...or press the CANCEL soft key to cancel the change and go to the Network
Setting screen.
Notes
• Pressing the SET soft key can give you an Error Screen if you incorrectly entered
the Station ID.
• Press the OK soft key on the Error Screen to correct the entry. Five seconds after
the Error Screen displays, the screen automatically goes back to the Repeat Delay
Timer or Repeat Rate Time screen and the number that resulted in an error will
display.
Strata CIX and CTX Telephones Administrator
12/04
41
IPT2008-SDL Settings
Configurations
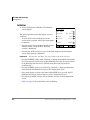
Other Setting
³ Select Configuration > Others. The Others screen
displays. This screen contains Language, Input
timer Mode and Input Timer Value settings.
Notes
The general operation on the Key Repeat screens is
as follows:
• To view details of an item displayed on the
screens above, press the soft key that corresponds
to that item.
1VJGT5GVVKPI
.CPIWCIG'PINKUJ
75%#
+PRWV6KOGT/QFG1((
+PRWV6KOGT8CNWG
=5'6?=%#0%'.? 2*10'
%10(+)
9'$
• Press the SET soft key to rewrite the NV-RAM
data if any setting of an item on this screen is changed. The screen goes back to the
Configuration screen after rewriting the NV-RAM data.
• Press the CANCEL soft key to cancel all the intended setting changes in the minor
items and to go to the Configurations Screen without rewriting the NV-RAM data.
Language Mode Setting
1. Select Configuration > Others > Language. The
Language Mode screen displays.
2. Press the English (US/CA), English (UK), French
or Spanish soft keys to change the set value.
3. Press the SET soft key to accept the change.
...or press the CANCEL soft key to cancel the
change.
The setting is underlined in the Key Repeat
Setting screen display
42
.CPIWCIG/QFG
'PINKUJ
75%#
'PINKUJ
7-
(TGPEJ
5RCPKUJ
=5'6?=%#0%'.? 2*10'
%10(+)
9'$
Strata CIX and CTX Telephones Administrator
12/04
IPT2008-SDL Settings
Configurations
Input Timer Mode Setting Screen
1. Select Configuration > Others > Input Timer
Mode. The Input Timer Mode Setting screen
displays.
2. Press the ON or OFF soft keys to change the set
value.
3. Press the SET soft key to accept the change.
...or press the CANCEL soft key to cancel the
change.
The setting is underlined in the Others Setting
screen display.
+PRWV6KOGT/QFG
10
1((
=5'6?=%#0%'.? 2*10'
%10(+)
9'$
Input Timer Value Setting Screen
³ Select Configuration > Others > Input Timer
Value. The appropriate screen displays (shown
right).
³ To Change or Add Information on this screen
1. Enter the New Repeat Delay Timer to change the
setting.
Note Use the dial pad 1~3 and 9RO W to backspace.
For Input Timer Value: 1 (fast) to 3 (slow)
2. Press the SET soft key to accept the change
...or press the CANCEL soft key to cancel the
change and go to the Other Setting screen.
+PRWV6KOGT8CNWG
%WTTGPV
0GY
(CUV5NQY
$CEMURCEG8QN&QYP
=5'6?=%#0%'.? 2*10'
%10(+)
9'$
Notes
• Pressing the SET soft key can give you an Error Screen if you incorrectly entered
the Station ID.
• Press the OK soft key on the Error Screen to correct the entry. Five seconds after
the Error Screen displays, the screen automatically goes back to the Repeat Delay
Timer or Repeat Rate Time screen and the number that resulted in an error will
display.
Strata CIX and CTX Telephones Administrator
12/04
43
IPT2008-SDL Settings
Configurations
Initialize
³ Select Configuration > Initialize. The Initialize
screen displays.
The general operation on the Key Repeat screens is
as follows:
• To view details of an item displayed on the
screens above, press the soft key that corresponds
to that item.
+PKVKCNK\G
#NN&CVC.%&
0GVYQTM-G[4GRGCV
5QWPF1VJGTU
$TQYUGT(CEVQT[
=':'%?=%#0%'.?
• You can toggle between all the items found on the
Initialize screen, except All Data. The item
selected is underlined.
2*10'
%10(+)
9'$
• Selecting the All Data soft key selects all the items displayed on the Initialize
screen and all items are underlined.
Important!
Pressing the “All Data” key twice will not cancel the selection.
• Pressing the EXEC soft key while “Network” is displayed underlined will initialize
the selected item and will rewrite the NV-RAM data and cause the screen to move
to the Resetting Selection Screen. (The Resetting Selection Screen will be
described later.)
• Pressing the EXEC soft key any item except “Network” is displayed underlined
will rewrite the NV-RAM data and go to the Configuration screen.
• If no setting change is made to the items and the EXEC key is pressed, the NVRAM data will not be rewritten and goes to the Configuration screen.
• Pressing the CANCEL soft key will not initialize and goes to the Configuration
screen.
• Table 6 on page 45 shows the Initial values of Settings:
44
Strata CIX and CTX Telephones Administrator
12/04
IPT2008-SDL Settings
Configurations
Table 6
IPT2008-SDL Default Settings
Major items
Network Diagnosis
Network Setting
(Basic)
Network Setting
(Advanced)
Minor items
Initial value
1
Ping address
0.0.0.0
1
DHCP server mode <ON/OFF>
2
IP address
127.0.0.1
3
Subnet mask
255.255.255.0
4
Default router address
0.0.0.0
ON
5
Station ID
blank
6
Node number
blank
7
Libra Server/IPU address setting
<Manual / broadcast>
broadcast
8
Libra Server/IPU IP address setting
during manual setting
0.0.0.0
1
IP address setting for DNS Server
(Primary Name Server)
2
IP address setting for DNS Server
(Secondary Name Server)
0.0.0.0
3
GRQ port number
<1024-65535>
1718
4
RRQ port number
<1024-65535>
1719
5
IP address setting for application server
6
External administration terminal IP
address upper bound
0.0.0.0
7
External administration terminal IP
address lower bound
0.0.0.0
External administration user ID
9999
External administration password
9999
8
9
Strata CIX and CTX Telephones Administrator
12/04
0.0.0.0
0.0.0.0
45
IPT2008-SDL Settings
Configurations
Table 6
IPT2008-SDL Default Settings
Major items
Sound Setting
Minor items
Initial value
1
Key beep <ON/OFF>
ON
2
Room noise <ON/OFF>
OFF
3
Handset BOV <ON/OFF>
OFF
4
Carbon handset <ON/OFF>
OFF
5
Carbon headset <ON/OFF>
OFF
6
Headset Tx control <Normal / Low>
Normal
7
Headset Tx volume
<0:Min ñ 7:Max>
3
Handset Rx output <ON/OFF>
OFF
8
Key Repeat Setting
Other Setting
Comfort noise <ON/OFF>
1
Key repeat <OFF/ON>
ON
2
Repeat delay timer
<1:Short ñ 5:Long>
1
3
Repeat rate timer
<1:Fast ñ 5:Slow>
1
1
Language mode
<English (US/CA) / English (UK) /
French / Spanish>
English(US/CA)
2
Input timer mode <ON/OFF>
OFF
3
Input timer value
<1:Fast ñ 3:Slow>
<1:Fast ñ 3:Slow>
1
Factory Setting
46
ON
9
ADM/DEBUG mode
<DEBUG / ADM>
2
Display/Key Test
3
Display mode
<IPT2008 / DKT3014)
ADM
IPT2008
Strata CIX and CTX Telephones Administrator
12/04
IPT2008-SDL Settings
Configurations
Reset
1. Select Configuration > Reset. The Reset screen
displays
...or if you press the SET soft key when a setting
change is made on the Network, Advanced and
Initialize subsidiary screens.
2. Press EXEC to reset the terminal. “Terminal is
reset. (Restart)” displays on the screen.
...or press CANCEL to go back to the
Configurations screen.
3. Select restart.
4GUGVGZGEWVG!
=':'%?=%#0%'.? 2*10'
%10(+)
9'$
Note If the screen moves to the Configurations
screen without resetting, even though there are changes in subsidiary item
settings, then “Reset” will flicker (black and white) to prompt you to reset.
Reset does not flicker if there were no setting changes in subsidiary items.
Factory
³ Select Configuration > Factory. The Factory
Setting screen displays.
The general operation on the Key Repeat screens is
as follows:
• To view details of an item displayed on the
screens above, press the soft key that corresponds
to that item.
• Press the SET soft key to rewrite the NV-RAM
data if the ADM/DEBUG Mode is changed.
(CEVQT[5GVVKPI
#&/&'$7)/QFG#&/
&KURNC[-G[6GUV
&KURNC[/QFG+26
=5'6?=%#0%'.? 2*10'
%10(+)
9'$
• Press the CANCEL soft key to cancel all the
intended setting changes under Factory items and to go to the Configurations
Screen without rewriting the NV-RAM data.
Strata CIX and CTX Telephones Administrator
12/04
47
IPT2008-SDL Settings
Configurations
ADM/DEBUG Mode Screen
1. Select Configuration > Factory > IADM/DEBUG
Mode. The ADM/DEBUG Mode screen displays.
2. Press the DEBUG or ADM soft keys to change
the set value.
3. Press the SET soft key to accept the change.
...or press the CANCEL soft key to cancel the
change.
The setting is underlined in the Factory Setting
screen display.
Display/Key Test
1. Select Configuration > Factory > Display/Key
Test. The Display/Key Test Mode screen displays.
2. Press the soft key next SK01~SK14.
The SKxx displays in the center of the screen
(Key Test mode shown right).
3. Select the LCD on the Display/Key Test Mode
Screen, then the screen to move to the Display
Test Mode Screen. (See Figure on page 49).
#&/&'$7)/QFG
&'$7)
#&/
=5'6?=%#0%'.? 2*10'
%10(+)
9'$
5-.%&':+65-
5-5-
5-5-
DISPLAY/KEY
TEST MODE
5-5-
5-5-
5-5-
5-5-
Notes
• Pressing the SK01~SK14 soft keys, seven test patterns appear.
• When the SK01~SK14 soft key is pressed seven times, the screen returns to the
Display/Key Test Mode Setting Screen.
4. Select the EXIT on the Display/Key Test Mode Screen to close the Display/Key
Test Mode Screen and to go to the Factory Setting Screen (TEST tab disappears).
48
Strata CIX and CTX Telephones Administrator
12/04
IPT2008-SDL Settings
Configurations
5-.%&':+65-
5-5-
5-5-
&+52.#;-';
5-5-
6'56/1&'
5-5-
5-5-
5-5-
Select the EXIT
and press the
enter key
(CEVQT[5GVVKPI
#&/&'$7)/QFG#&/
&KURNC[-G[6GUV
&KURNC[/QFG+26
=5'6?=%#0%'.? 6'56
2*10' %10(+) 9'$
2*10'
Display/Key Test Mode Screen
%10(+)
9'$
Factory Setting Screen
Press the
Display/Key
Test key.
Select the LCD
and press the
enter key
Press the
SK03 Key
5-.%&':+65-
5-5-
5-5-
5-5-
5-
5-5-
5-5-
5-5-
2*10'%10(+) 9'$ 6'56
When the SK key(SK01 to
SK14 key) is pressed under 7
times, It will return to this
screen.
Select the LCD
and press the
enter key
2*10'%10(+) 9'$
Display/Key Test Mode Screen
6'56
Display Test Mode Screen
When the SK key(SK01 to
SK14 key) is pressed 7 times
after move to the Key Test
Mode Screen.
Press the
EXIT Key
(CEVQT[5GVVKPI
#&/&'$7)/QFG#&/
&KURNC[-G[6GUV
&KURNC[/QFG+26
=5'6?=%#0%'.? 6'56
2*10' %10(+) 9'$
Factory Setting Screen
5-.%&':+65-
5-5-
5-5-
&+52.#;-';
5-5-
6'56/1&'
5-5-
5-5-
5-5-
6'56
2*10' %10(+) 9'$
Display/Key Test Mode Screen
Display/Key Test Screens Flow Chart
Strata CIX and CTX Telephones Administrator
12/04
49
IPT2008-SDL Settings
Configurations
Display Mode
1. Select Configuration > Factory > Display Mode.
The Display Mode screen displays.
2. Press the IPT2008 or DKT3014 soft keys to
change the set value.
Press the SET soft key to accept the change.
...or press the CANCEL soft key to cancel the
change.
The setting is underlined in the Factory Setting
screen display.
50
&KURNC[/QFG
+26
&-6
=5'6?=%#0%'.? 2*10'
%10(+)
9'$
Strata CIX and CTX Telephones Administrator
12/04
Index
A
F
about this book
conventions, iv
how to use this guide, iii
organization, iii
related documents, v
feature button activation, 14
I
IPT1020-SD, 21
M
B
microphone/speaker
sensitivity adjustment, 11
busy override, 12
buttons
extension, iv
R
redial, 14
C
S
camp-on ring tone, 12
speakerphone, 11
D
T
deactivation, 14
digital telephone
upgrade
EXV\RYHUULGHFDPSRQULQJWRQH
RYHUKDQGVHWKHDGVHW, 12
PLFURSKRQHVSHDNHU
sensitivity adjustment, 11
DKT2000 mode, 13
transmission levels, 15
E
extension number, iv
Strata CIX and CTX Telephones Administrator
12/04
51
Index
T~T
52
Strata CIX and CTX Telephones Administrator
12/04