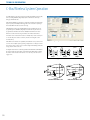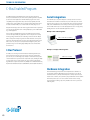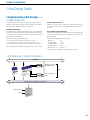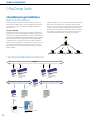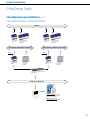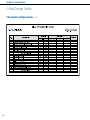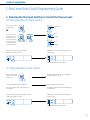
1
Technical
Information
Technical Information
C-Bus Wireless System Operation
The C-Bus Wireless product range incorporates a family of C-Bus Radio Frequency (RF)
devices, including Wall Plates, Plug Adaptors, Remote Control and a Gateway to
Category 5 Wired C-Bus units.
C-Bus Wireless Wall Plates are designed to easily replace standard, 240V wall switches.
They incorporate patented Clipsal technology and are two wires devices requiring no
Neutral (240VAC Active and Load connections only).
All C-Bus Wireless units incorporate Clipsal C-Bus’ unique Learn Mode functions for
programming devices. Wall Plates, Plug Adaptors and the Gateway unit can also be
programmed via the C-Bus Toolkit software. Multiple C-Bus Wireless units can be
linked into a common network using Learn Mode or the C-Bus Toolkit software.
Associations can be created between buttons on multiple units, so that a button press
on one unit will operate a button on another (and the connected lights or other
electrical devices).
C-Bus Wireless units include scene capabilities, which allow the user to perform a series
of actions across multiple outputs by pressing a single button. For example, on arrival
home a home owner could use a scene to switch on lights in the hallway, kitchen and
lounge, and also switch on a heater.
Programming a C-Bus Wireless via C-Bus Toolkit Software
10 second
press
The diagrams below show two of the many possible basic C-Bus Wireless unit installations.
Room A uses stand-alone units, which can be switched via the Wireless Remote Control.
Room B uses networked units where buttons on one unit can operate other units or
trigger scenes.
2 second
press
1
3
Step 1
Step 2
Step 3
Grouping C-Bus Wireless Units via Learn Mode
Room A
Standalone C-Bus Wireless Units
194
Room B
Networked C-Bus Wireless Units
Technical Information
C-Bus Wireless System Operation
Basic Operation
C-Bus Wireless Network Security
Buttons on a Wireless Wall Plate or Plug Adaptor are organised in pairs that control the
output channels (local control buttons). Remaining pairs (free buttons) are used to
control outputs on other units when multiple C-Bus Wireless units are configured as
part of a network. For example, the figure below shows a 6 button, 2 channel ULTI
Wireless Dimmer unit. Its buttons perform the following functions:
• Buttons 1 and 2 control the first channel. (A quick press on either button toggles
the channel on or off. A long press on button 1 or 2 dims down or up respectively).
• Buttons 3 and 4 control the second channel.
• Buttons 5 and 6 are unused when the unit is used as a stand-alone unit. They may
be used to control outputs on other units when part of a multi-unit network.
C-Bus Wireless units can optionally use 128-bit encrypted messages to communicate
with each other. This results in a highly secure network.
Nearby C-Bus Wireless Networks
It is possible to have several separate networks present alongside each other without
interfering, as each separate C-Bus Wireless network has an automatically assigned,
unique ‘House Code’.
When a C-Bus Wireless Wall Plate or Plug Adaptor unit is first installed, it functions as
a stand-alone unit. In this basic default mode, the unit functions as a dimmer or switch,
depending on the model.
C-Bus Wireless Modes of Operation
C-Bus Wireless Plug Adaptors have one output channel (a single, 240VAC socket) and
two buttons. Wall plate units are available in one or two output channel versions, with
two, four, six or eight buttons (eight button, NEO only). Each channel controls one or
more lights or other electrical devices connected to its output.
Mode 1
1
2
local control
buttons
free buttons
5
6
Two output channels
C-Bus Wireless units have five major modes of operation.
Stand-Alone Mode
In this mode, C-Bus Wireless Wall Plates and Plug Adaptors acts as stand-alone dimmers
or switches and make no use of the inbuilt wireless capabilities. No setup is required
for this mode, Plug Adaptors simply plug into the mains, and Wireless Wall Plates are
installed by a licensed electrician in place of existing wall switches. The buttons on the
units control the local dimming or switching channels of the unit only.
Mode 2
Simple Remote Controlled Mode
In this mode, a C-Bus Wireless Wall Plate acts as a standalone dimmer or switch and
a C-Bus Wireless Remote Control operates the Wall Plate from a distance. This mode is
simple to set up and is suitable for small installations where networking is not needed.
C-Bus Wireless Wall Plate or Plug Adaptor units are controlled using a C-Bus Wireless
Remote: In this mode, the buttons on the Wireless Wall Plate control the local dimming
or switching channels of the unit, and the Remote Control is linked to buttons on a
Wall Plate using a Learn Mode operation. No PC is required.
C-Bus Wireless Networks
To experience the full capabilities of wireless operation, C-Bus Wireless units must be
linked together to form a network.
To communicate with each other, units within the same network should be located
within 15 to 20 meters of each other. This distance depends on building materials used.
Up to 30 units may be connected within the same C-Bus Wireless network.
15 to 20 metres
195
Technical Information
C-Bus Wireless System Operation
C-Bus Wireless Modes of Operation (cont’d)
Mode 3
Networked Mode
In this mode, a C-Bus Wireless Wall Plate acts as a dimmer or switch and multiple C-Bus
Wireless units can be linked to each other with the C-Bus Wireless technology. This
mode is simple to setup, and is suitable for more complex installations. In this mode,
local control buttons control the dimming or switch channel of the unit, and may also
control other C-Bus Wireless units. Free buttons can control the dimmer or switch
channels of other units via a C-Bus Wireless network established using Learn Mode
operations. The operation of buttons is set using Learn Mode operations or using the
C-Bus Toolkit Software.
15 to 20 metres
Mode 4
Networked with Remote
In this mode, a C-Bus Wireless Wall Plate acts as a dimmer or switch and multiple
C-Bus Wireless units can be linked to each other with the C-Bus Wireless technology.
Local control buttons control the dimming or switch channel of the unit, and may
also control other C-Bus Wireless units. Free buttons can control the dimmer or switch
channels of other units via a C-Bus Wireless network established using Learn Mode
operations or C-Bus Toolkit software. Buttons on the Wireless Remote are linked to
Wall Plate and Plug Adaptor buttons as desired.
Shift
All
Off
196
Mode 5
Networked Mode in Combination with Category 5 Wired C-Bus Units
The C-Bus Wireless Gateway is used to link a C-Bus Wireless network to a C-Bus
Category 5 wired network. It is functionally equivalent to a C-Bus Network Bridge.
Using the Gateway, C-Bus Wireless and Category 5 networks can communicate
and interact with each other. Both Wireless and Category 5 networks use the same
command structure, and are 100% compatible.
Technical Information
C-Bus Wireless Quick Start Guide
Creating Your Network (getting your units to talk to each other)
STEP 1
STEP 2
STEP 4
STEP 3
Press & hold top two buttons Press top two buttons on
Press top two buttons
Press & hold top left
on first switch for 10 sec next switch for 10 sec until again while they are still button and do two quick
until they flash alternately
they flash alternately
flashing rapidly (within presses to top right button.
(entering Learn Mode).
(entering Learn Mode).
approx 5 sec).
Lights will flash rapidly
for several seconds.
STEP 5
STEP 6
Wait until switches
returns to learn mode
and buttons flash
alternately.
Press & hold top
two buttons on either
switch for 1 sec
(exit Learn Mode).
You’re done!
Quick Tips
• When a switch is put into learn mode the buttons will flash rapidly for approx 5 sec - this is normal.
It is best to wait for them to flash slowly before performing your next task unless specified (such as step 3 above).
• You can network more than one switch at a time - repeat steps 2 and 3 on following switches before performing steps 4 to 6
• Network a plug adaptor exactly the same way as a switch - the buttons are just vertical instead of horizontal.
• Once all of your switches are networked they will all automatically go into learn mode the next time it is entered on one of the switches.
• It is best to network all of your switches and plug adaptors before moving on to grouping buttons and creating scenes.
Grouping Buttons (getting a button on one or more switches to turn on a light on another switch)
IMPORTANT: If your switch controls two separate lights, you MUST enter learn mode using the two buttons that are connected to the light you wish to control.
STEP 2
STEP 1
STEP 3
STEP 4
OR
Press & hold the two buttons that are
connected to the light you want to operate
for 10 sec until they flash alternately.
Press the button that
Press the button(s) on
controls the light you want other switch(es) that you
to operate. That light
want to control the light
should now turn on.
you have turned on.
Press & hold top two
buttons on either switch
for 1 sec.
You’re done!
Quick Tips
• You can turn on a light from several switches - repeat step 3 on other buttons you would like to operate the light before performing step 4.
• If the grouped buttons flash after performing step 3, it means you have held the button too long and it has become a timer.
If this happens, simply press it twice. This will unnasign the button as a timer it, and reassign it as a group.
• If learn mode is entered on a switch whose lights have been used in a group, those buttons will become illuminated after a few seconds instead of flashing alternately.
Learn
Learn
Use
Use
Use
197
Technical Information
C-Bus Wireless Quick Start Guide
Creating Scenes (dimming and turning several lights on or off with the press of one button)
IMPORTANT: Before you can create scenes you must:
Part 1:Create a Scene Button as per below
Part 2:Ensure that any buttons that will be included in your scene have either been used in a “group” as per above “Grouping Buttons” section
OR “grouped to itself” as per Step 2 below. This is because buttons require an individual “ID” number to be included in a scene which is
only given to a button when it is used in a group or grouped to itself.
Part 1 - Create your Scene Button
Creating the button you want to control your scene.
STEP 1
STEP 2
STEP 3
Press & hold top two
buttons for 10 sec until
they flash alternately.
Double quick-press
the button you want
to control your scene.
Press & hold top
two buttons for 1 sec.
You’re done!
Part 2 - Grouping a Button to “itself”
Creating an ID number - if button has not been included in group.
STEP 1
STEP 2
STEP 3
Press & hold top two
buttons for 10 sec until
they flash alternately.
Press the button you
want to “group to itself”.
Press & hold top
two buttons for 1 sec.
You’re done!
Part 3 - Create your Scene
Now that you have created your scene button and made sure all of your buttons have their own ID number - it’s time to create your scene.
STEP 1
Press & hold the scene
button for 10 sec until
it flashes (entering Scene
Learn Mode).
STEP 2
STEP 3
Turn on any lights to the
Press the scene
desired level for your scene.
button for 2 sec
This may include plug
(exit Scene Learn Mode).
adaptors with lamps.
Learn
You’re done!
Learn
Use
Use
Use
Learn
Quick Tips
• If a light you have included in your scene does not turn on it may mean it has not been “grouped” - see “Important, Part 2” section above.
• To create an “all off” button for when you go to bed or leave the house, put the scene key into learn mode, then go around your house
and turn every light on then off, then exit scene learn mode. The scene button will now turn every light off in your home with one press.
• Why not create an “all on” scene in your bedroom as an emergency panic button.
• Another great idea is a dimly lit scene in your hallway for when you get up at night to check on the kids.
Learn
Use
Use
Learn
Use
Learn
Use
Use
198
Use
Technical Information
C-Bus Wireless Quick Start Guide
Programming Your Remote Control
(getting the buttons on your remote control to turn your lights on and off)
STEP 1
STEP 2
Learn
STEP 3
STEP 4
STEP 5
STEP 6
STEP 7
Press & hold top two
buttons for 1 sec.
Slide switch to “use” mode
and replace back cover.
Learn
Use
Use
Use
Press & hold top two buttons Remove the remote back
on any switch for 10 sec cover and slide switch to
until they flash alternately.
the “learn” position.
Press the button on
the remote you want
to control your light.
Press the button on the Wait until switches return
switch that you want to to learn mode and buttons
control with your remote.
flash alternately.
You’re done!
Quick Tips
• To program other remote buttons at the same time, simply repeat steps 3 to 5 before performing steps 6 and 7.
• If you want to reassign a remote button that you have used previously, you must first clear it by doing steps 1 to 2 above, then press the remote button you wish to clear, then do
quick double press on any button on the switch.
• The “scene” button on the remote allows each remote button to perform a second function. To program the second function, simply press the “Scene” button so that two light bulbs
appear in the remote’s blue display immediately before performing step 3 above.
199
Technical Information
C-Bus Enabled Program
The C-Bus Enabled program is Clipsal’s Open Systems program for third party
developers and manufacturers, who wish to develop and integrate C-Bus compatible
products and software applications. The C-Bus Enabled program ensures 100%
compatibility between applications and products developed by third parties and
existing products. It also facilitates the successful and seamless integration between
the robust and reliable C-Bus protocol standard with other third party protocols.
Companies that develop products and software programs which meet the requirements
of the program, and which have been certified by Clipsal, may use the C-Bus Enabled
logo on their equipment.
As part of this program, Clipsal has developed new applications and messaging
structures that support third party applications such as security and access control,
metering, heating, ventilation and air-conditioning control and others. The Clipsal
C-Bus control system is widely recognised as the Asian standard for control system
architecture, with local manufacture of products and technical support in this region.
C-Bus is a low cost, microprocessor based, distributed intelligence system, with
patented message structure realising high reliability and robust communications
between devices.
C-Bus Protocol
The C-Bus protocol is designed on the International Standards Organization (ISO)
‘Open Systems Interconnection’ seven-layer reference model for communication
protocols. The protocol utilises high speed, full duplex communications and provides
constant feedback on the operational status of inputs and outputs, including the ability
to interrogate the status of specific modules. The protocol utilises communication
algorithms based on Synchronous Carrier Sense, Multiple Access with Collision Detection,
implemented with Collision Avoidance (CSMA/CD-CA) standards (IEEE Standard 802).
Serial Integration
The serial C-Bus protocols permits third parties to develop software to interface to
the C-Bus via the serial RS232 communications port. The C-Bus protocol document
defines the message syntax, to issue commands and retrieve status directly from the
C-Bus, via the C-Bus PC Interface. This technique of interfacing is particularly useful
between C-Bus and microprocessor embedded applications such as security systems,
building and home controllers and HVAC equipment for instance.
Example 1: PC to C-Bus Integration
COM 1 - C-Bus RS232 Serial Port
5500PC
Example 2: Security to C-Bus Integration
C-Bus RS232 Serial Port
5500PC
Hardware Integration
The C-Bus Enabled program permits the direct implementation of the C-Bus core
onto third party equipment. Clipsal have developed a masked processor with the
embedded software core, which permits third parties to develop “input and output
modules” such as switches, sensors, dimmers, relays and dimmable electronic ballasts.
The C-Bus input and output cores consist of all the electronic interface circuitry,
network impedance matching components, and C-Bus transceivers to provide full
C-Bus integration.
200
Technical Information
C-Bus Enabled Program
Software Integration
C-Gate
C-Lution
C-Gate, Clipsal’s server application is a software application that provides a computer
database model of the C-Bus network. When installed on a computer, C-Gate
automatically models the C-Bus networks attached to it, any changes to the network
or network parameters are automatically updated in the C-Gate database. C-Gate
provides a high level interface to third party programmers, diminishing the need for
software developers to know the C-Bus protocol. C-Gate is written in Java, and is fully
compatible with Windows, Linux and Unix operating systems. C-Gate may be embedded
into third party applications and is ideal for interfacing between building management
system software and C-Bus for instance, and provides the gateway between C-Bus
and other protocols. Clipsal C-Gate is a software program available in various network
configurations, pricing is available through Clipsal Integrated Systems.
C-Lution, Clipsal’s SCADA software includes a driver library to interface with proprietary
equipment such as Building Management Systems (BMS), Programmable Logic
Controllers (PLC), Remote Terminal Units (RTU), etc. Over 130 3rd party hardware and
software protocols are available for integration. C-Lution supports data exchange
between applications via OPC (open access to field data), ODBC (import/export data
in standard database formats), DDE and API.
Example 2: C-Lution SCADA - 3rd Party Network Integration
Clipsal
C-Bus SCADA
Software
PLC
ModBus
Clipsal C-Gate
RTU
Example 1: BMS to C-Bus Integration
Johnson Controls Metasys BMS
DCS
Ethernet
LAN
7x
8x
9x
1x
2x
3x
10x
11x
12x
7x
8x
9x
4x
5x
6x
1x
2x
3x
10x
11x
12x
4x
5x
6x
C-Bus Network
C
7 8 9 101112
A
12 34 5 6
A
B
Ethernet Hub
E5500CN
TCP/IP Socket
How To Apply
Clipsal C-Gate
C-Bus Network
Ethernet
5500PC
7x
8x
9x
1x
2x
3x
10x
11x
12x
7x
8x
9x
4x
5x
6x
1x
2x
3x
10x
11x
12x
4x
5x
6x
C-Bus Network
C
7 8 9 101112
A
12 34 5 6
A
B
The C-Bus Enabled Program is open to all third party companies who have a desire or
need to interface to the industry standard C-Bus control system. The serial protocols
and C-Bus core are available through Clipsal Integrated Systems. Companies must first
make an application to Clipsal, and must enter a confidentiality agreement. Clipsal
provides technical support and ongoing updates to the C-Bus documentation to all
registered companies and provides the certification for the C-Bus Enabled Program.
Ethernet Hub
E5500CN
201
Technical Information
C-Bus Design Guide
Clipsal C-Bus is a control system that can be used to control lighting, electrical equipment,
audio-visual equipment and other electronic systems in commercial, hotel, industrial
and residential installations. A reduction in the amount of mains cabling, reduced
installation times, energy savings and extra control system functionality make C-Bus
a cost effective alternative to conventional wiring. C-Bus is a microprocessor based
system and requires an installer to program the operating variables and control
relationships between C-Bus Units. This guide outlines a suggested method for design
and installation using C-Bus, and should be read in conjunction with the C-Bus
Technical Manual (5000M/2), which provides a detailed overview of the C-Bus system.
Objective
2 Methods of System Design
Design Philosophy
There are several methods of designing and installing C-Bus. An overview of the
installation approach is shown below.
Specification
Site Plan
Planning
1 Introduction
The C-Bus System
Map System Requirements
Determine Hardware
Requirements
This guide provides a system to aid C-Bus designers; to design and plan C-Bus
installations. Additional technical support is offered by Clipsal Integrated Systems
offices. If assistance is required, contact your local CIS office.
Select Network
Topology
System Requirements
Create Project /
Project Manager
The first step in using C-Bus is to define what is required of C-Bus; that is, how devices
and electrical loads are to be controlled and what features are required by the installation.
Installation
Define Network Topology
Topology Manager
Electrical
Installation & Unit
Programming
C-Bus Installation
Software
Comissioning
Commission Installation
202
Design Changes /
Expansion /
Upgrade
Technical Information
C-Bus Design Guide
2 Methods of System Design
Installation Approach
Planning and Design
The most important phase of any C-Bus installation is in the planning and design of
the system. Accurate planning requires a good understanding of the capabilities of the
system, and the requirements of a successful installation (refer to the Design Checklist).
It is also an advantage to fully define the functional specifications for the installation
before design work begins. In this way, designers can realise the full potential of the
C-Bus system, and get maximum performance from it.
The planning phase usually involves mapping the system requirements, and determining
the hardware needs of an installation. Thought should be given as to the placement of
the hardware, and the cabling requirements. Programming & functionality requirements
should also be fully investigated at this stage. Strict adherence to any documentation
procedures is necessary.
Installation
Once the design phase has been completed, installation may begin. Several simple
steps are typically followed:
• Implementation of Programming Requirements of the Design on a Personal
Computer (Build C-Bus Database).
• Unit Initialisation and Programming (One at a Time).
• Cabling and Electrical Installation of the Hardware.
• Finalization and Further Programming of Units on the Network as required.
The details of the design are first input into a personal computer using the C-Bus
Installation Software. Hardware should then be initialised (on a Unit by Unit basis).
This involves the assignment of a Unit Address to each Unit, one at a time. In this way
Units can be uniquely identified once installed on the Network. It is recommended
that each Unit be clearly labeled for easy identification before final electrical fitting
takes place. Testing and any further programming may be undertaken at this time,
or tackled once all Units have been physically installed.
Commissioning
Subject to compliance with the specification, the system may now be commissioned.
Modifications or design review can be undertaken at any time, often requiring
programming changes only. A well designed system should seldom call for the
installation of new hardware, except where revised specifications dictate the necessity.
Programming Principles
All C-Bus devices require programming (with the exception of Power Supplies).
This is achieved by dedicated software running on a Personal Computer.
Unit programming is carried out to achieve the following objectives:
• Create/Define Units on the C-Bus Network
• Identify each Unit using the C-Bus addressing convention
• Create/Define/Edit control relationships between Inputs and Outputs
• Edit Unit operating parameters
The operating parameters vary from Unit to Unit, depending on it’s type. They include:
• Key Functions
• Timer Functions
• Dimming Functions
• Toggle (On/Off) Control
• Preset Levels
• Custom/Other Functions
• Output Switching Logic Assignments
• Power Fail Recovery Status
• Power Up Sequences
• Dimming Rates
• Indicator Options
• Sensor Switching Conditions
• Override Controls (Enable/Disable)
• Error Status Options
203
Technical Information
C-Bus Design Guide
3 Implementing C-Bus Designs
Addressing Conventions
Introduction
Once a basic list of hardware requirements has been established, planning of the
programming requirements of an installation can begin. The C-Bus system uses
a simple addressing scheme to identify Units, Groups, Applications, Areas, and
Networks. The purpose of each parameter will be discussed in the next section.
Group Addressing
The Group Address is usually related to the output connected to the terminal of the
Output Unit. Hence the Group Address should accurately describe the load or device
being controlled. Alternatively, numerical designators can be used for describing
outputs such as lighting circuits. Up to 255 Groups in a single C-Bus network can be
defined (255 minus the number of Area Addresses defined).
Valid Group Address description include:
• Bedroom Lights
• L4-2B
• Main Office Lights
• A4-2L-3
• Pool Pump
The default Group is “Unused”.
Area Addressing
The Area Address is a convenient method of addressing multiple output channels
collectively. Large areas consisting of many Units may be controlled from a single
point on the C-Bus system. Individual loads (Groups) can still be controlled. Each Unit
(Inputs and Outputs) in a control area must be assigned the same Area Address. The
Area Address must be unique and must not be repeated as a Group Address in that
Application or Network. Up to 255 Areas can be defined (255 minus the number of
Group Addresses defined).
Examples of valid Areas are:
• House Lights
• Banquet Room Lights
• Outside Lights
The default Area is “Unused”.
Application Addressing
Applications are used in the C-Bus system to divide the Network into independent
functional systems. All Group Addresses in any Unit are associated with that Unit’s
Application, and commands issued by an Input Unit will affect only Output Units with
matching Application and Group Addresses. Up to 255 Application Addresses can be
used. By default, two Applications have been defined: Lighting and Heating. Clipsal
Integrated Systems has reserved and defined commands for other Applications such
as security and metering, for more information contact Clipsal Integrated Systems. The
installer has the facility to define other Applications.
Input Units and Output Units within one Application will operate independently of
other devices in another Application, even if Group Addresses are repeated across
Applications on the same Network.
Examples of valid Applications are:
• Lighting
• Heating
• Air-conditioning
• Security
The default Application is “Lighting”.
The default Group is “Unused”.
Network Addressing
The Network Address is used to identify Networks in a Multi-Network C-Bus installation.
Each Network may be interconnected using a C-Bus Network Bridge.
The Unit Address of the Network Bridge must match the Network Address of the adjacent
Network. This applies to both sides of the Bridge, and is required to successfully establish
communications between these Networks. The C-Bus Installation Software automates
this task by reserving Network Addresses for use as Network Bridge Unit Addresses.
This is achieved using the configuration information as defined by the Network
Topology. In practice the Network Address describes a physical region, area or entity.
Up to 255 unique Network Addresses can be defined.
Examples of valid Networks are:
• First Floor
• Movie Theatre
• My House
• Building 12A
The default Network is the “Local Network”.
204
Technical Information
C-Bus Design Guide
3 Implementing C-Bus Designs (cont’d)
Assigning Addressing
Systematic Address Allocation
Unit Addresses are assigned in an ascending order on an installation plan, traversing
left to right, up and down. This process is repeated systematically until all Units are
covered off.
The C-Bus design requires that all Units on the Network are uniquely identified by a
Unit Address. Loads must also be assigned a control Group Address. Various methods
of assigning addresses and their descriptions are now discussed.
Grid Method of Addressing
The Grid Method is the procedure whereby Unit Addresses are conveniently allocated
to C-Bus Units as a function of physical location in the installation. A grid consisting
of 10 columns by 10 rows is superimposed over the site plan locating C-Bus Units and
loads. This defines the Unit Addresses.
Reserved Addressing (Recommended)
With 255 unique three digit decimal Unit addresses available to the designer, an allocation
or block of numbers could be assigned to specific C-Bus device types. This is known as
‘Reserved Addressing’ .
A typical Reserved Addressing scheme is shown below;
• PC Interface*
000
• Four Channel Relays
010-019
• Four Channel Dimmers 020-029
• One Gang Key Inputs
030-039
• PIR Occupancy Sensors 040-049 etc…
This method does however have limitations, when:
• Two or more Units are located in the same physical grid co-ordinate.
• The grid size exceeds 10 columns by 10 rows, for large or diverse projects
(more than the maximum 100 Units are required for multiple Network installations.)
When the Grid Method becomes insufficient, alternative methods need to be explored.
* The PC Interface must be allocated the Unit Address 000 in every Project.
C-Bus Addressing - Example Configuration
240VAC
240VAC
240VAC
Load 1
Load 1
Meeting Room Lights
Managers Office
Area 1
4 Channel Voltage
Free Relay (Learn)
L5504RVF
Load 3
Load 4
East Corridor Lights
Toilet
36VDC
Power Supply
5500PS
C-Bus Network / 1000 Meters / 100 Devices
Managers Office
Area 1
Neo Key
Input (Learn)
E5058NL
205
Technical Information
C-Bus Design Guide
4 Specifiying Large Installations
Multi-Network Installations
C-Bus Network Interfaces can also be used when large systems are required. The C-Bus
Network Interface is a 10-Base T Ethernet compliant device. This allows a C-Bus
network to be connected to an Ethernet network. In this approach each C-Bus network
is treated as a separate network and the only limitations to system design are PC
hardware resources (memory) and network bandwidth, dependent on the response
times required. For large systems where central control with real time response is
required, the C-Bus Ethernet Network Interface approach is recommended.
The C-Bus system has been designed for a maximum number of 100 Units on each
Network. When an installation requires control exceeding this number then Networks
may be interconnected with the use of C-Bus Network Bridges or C-Bus Ethernet
Network Interfaces.
Procedures and Design
The design process and procedures are the same as previously discussed. Each Network
and its operation needs to be defined separately. By partitioning the design, sub-systems
can be defined and programmed in a systematic process. The way in which the Networks
are interconnected is called the Network Topology. When using Bridges, it is recommended
that attempt be made to minimise the ‘depth’ of the Network Topology. Minimizing
the depth ensures faster communications between the Local Network and Remote
Networks. It is further suggested that in such applications the Local Network functions
purely as a ‘Backbone Network’, servicing all other Networks, with no active Input or
Output elements ie, the Local Network consists of the; PC Interface, Power Supplies,
and Network Bridges.
00
Local
01
01
02
03
04
Network 1
Network 2
Network 3
Network 4
C-Bus Network Bridge Interface Architecture
Power Supply
5500PS
4 Channel Voltage
Free Relay (Learn)
L5504RVF
Power Supply
5500PS
C-Bus Network / 1000 Meters / 100 Devices
Neo Key
Input (Learn)
E5058NL
RS232
Software Required
Windows™ 98SE, XP, ME, 2000
C-Bus Toolkit Software
5000S/3
206
4 Channel Voltage
Free Relay (Learn)
L5504RVF
C-Bus Network / 1000 Meters / 100 Devices
Network Bridge
5500NB
PC Interface
5500PC
240VAC
240VAC
240VAC
240VAC
240VAC
Neo Key
Input (Learn)
E5058NL
Technical Information
C-Bus Design Guide
4 Specifiying Large Installations (cont’d)
C-Bus Ethernet Network Interface Architecture
Power Supply
5500PS
4 Channel Voltage
Free Relay (Learn)
L5504RVF
Power Supply
5500PS
C-Bus Network / 1000 Meters / 100 Devices
9-12VDC
Network Interface
5500CN
240VAC
240VAC
240VAC
240VAC
240VAC
4 Channel Voltage
Free Relay (Learn)
L5504RVF
C-Bus Network / 1000 Meters / 100 Devices
9-12VDC
Neo Key
Input (Learn)
E5058NL
Network Interface
5500CN
Neo Key
Input (Learn)
E5058NL
10/100 Mbps Fast Ethernet Switch
95ESW24P10
Ethernet 10/100/1000
Software Required
Windows™ 98SE, XP, ME, 2000
C-Bus Toolkit Software - 5000S/3
Clipsal C-Gate - 5000CGx
Optional User Software
Clipsal Schedule Plus - 5000SPx
Clipsal SCADA Software
207
Technical Information
C-Bus Design Guide
5 Design Documentation
Documenting Hardware Installation
Documenting Programming Requirements
Documentation of the hardware installation is usually best achieved through CAD
generated site drawings, presented in the conventional industry standard format.
The following drawing shows an example of a typical installation plan. The drawing
shows product to be installed, and their location. Switching and other control relationships
are also depicted using easily decipherable conventions similar to those used for
conventional wiring.
There is a different template for each different C-Bus device type, where appropriate
controls that are relevant for that type of Unit are presented.
As with any conventional electrical installation, documentation of the details of the design
are required. This documentation is not only used throughout the planning stages, but
also provides an invaluable record as to the placement of hardware, and the cabling
structures employed. In addition, vital information may be communicated between
the designer or the specifier, and the installer, where contract labour is to be utilised.
All C-Bus programming requirements for any given project can be specified during the
planning process. This allows ‘on-paper’ design of the Unit configuration, and can form
a part of the documentation retained as a matter of record once the installation has
been completed. Typically tables are used to specify all Units required for the installation,
and can further be used as a template for the allocation of addresses. Control relationships
can easily be established, and basic operating parameters dictated. Programming the
Units on a C-Bus Network then becomes a simple matter of transferring the design
information from paper, to the PC using the C-Bus Installation Software, and downloading
to the hardware.
6 Programming Methods
There are three preferred methods for programming the C-Bus modules; this chapter discusses these alternatives. Programming is conducted using a C-Bus PC Interface to connect
to the C-Bus Network. Programming can also be completed using C-Bus Learn Mode - see attached section on Learn Mode.
4 Channel Voltage
Free Relay (Learn)
L5504RVF
240VAC
4 Channel Pro Series
Dimmer (Learn)
L5104D5
36VDC
Power Supply
5500PS
240VAC
240VAC
240VAC
C-Bus Network / 1000 Meters / 100 Devices
PC Interface
5500PC
Neo Key
Input (Learn)
E5058NL
Scene Master
5035NIRSL
RS232
Software Required
Windows™ 98SE, XP, ME, 2000
C-Bus Toolkit Software
5000S/3
208
Touch Screen
SC5000CT
Technical Information
C-Bus Design Guide
The Units are initialized one at a time, on-the-bench or in an office environment.
The Units may or may not be fully programmed at this stage. Any programming
variables may be entered, including control relationships, and then the Units are
installed into the building. It is important that the contractor uses the labels provided
with the C-Bus Units to record the Unit Address, Network and Part Number (Part Name),
such as location, to ensure correct placement of the Unit on site. Once installed, any
further programming changes can be entered, and the installation may be commissioned.
It is important that each module has a unique Unit Address otherwise unpredictable
behavior may result.
Method 2, Programming The System In-site
The Unit Addressing may be programmed on site, one Unit at a time, as they are
installed. The installer should mark the label provided and attach it to the Unit, with
the Unit Address, Network, Part Number, and location. All other programming variables
are then entered, including control relationships.
Method 3, As Installed Programming
In this method, all Units are installed into the building, unprogrammed. Factory default
settings of the Unit Address for all products in the C-Bus range is 255. The Network
will exhibit unpredictable behavior at this stage, since Unit Addresses will not be
unique. The C-Bus Toolkit Software v3.0 incorporates a new Network Unraveller
facility. This has the ability to detect and resolve Unit Addressing conflicts automatically
during a Network scan. The Unraveller has limited capabilities, and should not be
relied upon to unravel large Networks at the time of installation.
This method has the advantage of not requiring any pre-programming of C-Bus Units,
however this comes at a price. Once the Network has been unravelled, and a unique
Unit Address assigned to all Units, each must be located and identified within the
installation using the labels provided. This process may be aided using the Quick Toggle
facilities built into the Installation Software, but can be cumbersome for larger Networks.
The installer should mark the label provided and attach it to the Unit, with the Unit
Address, Network and Part Number.
With the Units installed, and with each Unit having a unique Unit Address, each Unit
may in turn be interrogated on the C-Bus Network, and the operating parameters and
control relationships programmed into it. Individual Unit programming, programming
the system in-situ, or as installed programming may be used, but each method is prone
to misuse and error. If the Unit Addresses are incorrectly programmed or if the equipment
is incorrectly placed in an installation, unpredictable behavior may result. The designer
and installer must ensure the planning process and installation documentation are
correct, and the placement of the equipment proceeds in a systematic manner.
Identification labels should be used on all C-Bus Units. The templates have been
produced to simplify the task of allocating Addressing information and assist in the
programming methods as recommended by Clipsal Integrated Systems.
Labels are included with PC Interface and Network Bridge Units. Completed labels can
be stuck on to the rear of the product. Alternatively, the label may be adhered to the
front of any wall mounted Unit (such as a Key Input Unit) for easy reference without
the need to remove any screws. In this case the label should be positioned on the
edge of the grid plate such that it will be covered by the surround when snapped in
place. Key input plates may also be labeled according to key function, or controlled
load, for the benefit of the user. 2000 Series and metal plate input Units may be hot
stamped or engraved as appropriate. Classic (C2000) Series plates incorporate a small
label window. Typical label examples include ‘Warehouse’, ‘Office’, ‘Entry’, ‘Welcome’,
‘Goodbye’, and ‘Party’. Contact your local Clipsal sales representative for more information.
C-Bus Learn Mode
Learn Mode is designed for contractors to program small to medium scale systems
without the use of a PC. This method is well suited to small networks, with simple
functionality. Networks with a large number of devices and complex functions should
be programmed using the C-Bus Installation Software. Learn Mode is activated by
pressing the manual override keys on an output unit for a predetermined time. For
more information on programming Learn Mode see the following section for an in
depth guide.
240VAC
240VAC
6 Programming Methods (cont’d)
Method 1, Individual Unit Programming
12 Channel Voltage
Free Relay (Learn)
L5512RVF
C-Bus Network / 1000 Meters / 100 Devices
Neo Key
Input (Learn)
E5058NL
209
Technical Information
C-Bus Design Guide
7 C-Bus Wiring Rules
C-Bus is a safe extra low voltage electronic control system, primarily used in mains
rated load control applications. A C-Bus Network consists of various Input, Output, and
System Support Units which are interconnected using Unshielded Twisted Pair (UTP)
LAN cable. Some simple rules should be observed when specifying or designing any
C-Bus installation.
Power Supplies
The C-Bus Power Supplies and C-Bus Output units provide the safe extra low voltage
of 36VDC to the Network. Each C-Bus Unit typically requires 18mA current to operate
and each Power Supply is capable of supplying current to 17 C-Bus Units. When a
Network consists of more than 17 Units, additional Power Supplies can be added to
the Network to restore the C-Bus voltage levels to within operating limits between
15-36VDC Distributed Power Supplies will share the Network load evenly.
• One C-Bus Power Supply for every 17 C-Bus Units, and
• Distribute Power Supplies evenly on the C-Bus Network
The C-Bus Power Supply is a specially designed Unit offering the impedance
characteristics essential for communication signal propagation on C-Bus. Ordinary
36VDC power supplies must not be used in conjunction with C-Bus.
Maximum Cable Length
This depends on Network impedance resulting from the choice of cable type. The cable
has a finite and known impedance comprising of resistive and capacitive components,
which should be taken into account when designing a C-Bus system. The upper limit
of cable length at which communication can no longer be guaranteed reliably for
Category 5 UTP cable is 1000 meters.
• The maximum cable length between any two Units on a Network should be limited
to less than 1000 meters.
• Allow a maximum total cable length of 1000 meters on each Network.
• A Network Bridge should be used to split the installation into multiple Networks
when the total cable length exceeds 1000 meters on any single Network.
210
Network Size
The maximum number of C-Bus Units on any Network should not exceed 100 Units.
If an installation requires more than 100 Units, then a new Network should be added,
connected through a Network Bridge.
• A maximum of 100 standard C-Bus Units per Network.
• A maximum of 255 Networks per Installation.
Network Topology
C-Bus devices can be interconnected as a part of a single, or multiple Network
installations. Segregation of a large Network into multiple Networks may be required
for any of the following reasons:
• When the required C-Bus cable length exceeds 1000 meters;
• To overcome addressing limitations;
• To reduce local communications traffic on the Bus, and thus speed up response times;
• To accommodate the physical layout/structure of the building (for example in a
multi story building, one Network per floor may be required);
The following basic guidelines should be observed:
• Minimize the depth of the Network Topology for faster, more effective communications;
• Consider use of C-Bus Ethernet Network Interface units to integrate with a high
speed Ethernet backbone.
• Distribute Units on separate Networks proportionally to avoid communications and
power supply issues (for example 120 Units required - split into two Networks of
60 Units each where possible, rather than say 100 Units on the first Network and
20 Units on the second).
Technical Information
C-Bus Design Guide
8 Practical Wiring Considerations
The C-Bus is designed to operate at a safe, extra-low voltage of 36VDC, with optical
and/or galvanic isolation from mains voltages. The installer must ensure that acceptable
wiring practices for extra low voltage cabling are adopted with C-Bus.
Laying of C-Bus Cabling and Precautions
In particular, the routing of the C-Bus cable near mains wiring, where physical separation
criteria between cables need to be satisfied. In this respect C-Bus is treated as a data
cable, and the same practices should be employed. The C-Bus, operating at the safe
extra low voltage of 36VDC, allows electrical work to be performed on the C-Bus side
while the system is powered on. The C-Bus side with short circuit protection ensures
that the equipment will not be damaged if the supply is shorted for an indefinite
period. The installer needs to be aware that shorting the C-Bus Network will disable
operation of the C-Bus Network as long as the short circuit persists. A benefit of the
C-Bus method of wiring is that wiring of the C-Bus Units may be accomplished in a
number of ways. The C-Bus Units are all wired in parallel on the Bus, and the Units
may be daisy chained, or be part of a branch/star structure or a combination of these.
Closed loop ring structures are not recommended.
If the C-Bus Network cabling must cross mains voltage cabling it is preferred that the
cross over is done at right angles.
Installation of every Unit on the C-Bus Network requires connection to the Unshielded
Twisted Pair C-Bus Network Cable. This connection is polarity sensitive, and is clearly
marked on the terminal block of the Unit.
Clipsal has Category 5 cable for use with C-Bus (Catalogue Number 5005C305B). The
cable features eight single core conductors (four Unshielded Twisted Pairs (UTP),
encased in a pink outer sheathing. Pink has been chosen in order to distinguish
between the C-Bus cabling in an installation. A second feature is that the cable may
for short runs be routed into a switchboard close to mains cable.
The outer sheath insulation resistance is suitable for this application. The following
illustration shows the recommended technique for cable termination giving optimum
performance, and immunity from electromagnetic interference (EMI).
Close proximity parallel runs with mains voltage cables should be avoided where possible.
The C-Bus Network cable is kept at least 50 millimeters from mains voltage cabling,
in accordance with the appropriate safety standards (AS/NZS 3100) or as determined
by local regulations. It is recommended that, wherever possible, at least 100mm
segregation is maintained for superior communications performance.
• The type of cable used in a C-Bus installation usually consists of solid core conductors.
This cable type is prone to stretching or breaking if badly installed.
• Multiple pairs of UTP may be used in parallel, remembering to preserve the twisted
pair nature of the cable. The resulting increase in conductor cross sectional area serve
to reduce any voltage drop over the length of the cable.
C-Bus Terminations
Care must be taken when connecting C-Bus Units to the Network. The reliability of the
system, and the quality of the installation depends upon the reliability and quality of
the termination made. The Category 5 cable used in C-Bus installations consists of
solid core conductors. This type of cable is typically very brittle, and will break easily.
They are not tolerant to multiple rewiring. It is strongly recommended that a fresh
termination is always made when adding and replacing C-Bus Units, modifying the
system, or rewiring the installation. Using bootlace crimps, or ferrules provides the
most reliable termination.
Terminate of devices mounted in distribution boards requires an RJ45 crimp tool.
Terminated interconnect leads are provided with each DIN rail output unit.
Note: The mutual twist of solid and dotted conductors of opposing colored conductors.
This ensures a good electrical termination, with favorable common mode noise
characteristics.
Orange
Blue
Orange/White
Brown
Blue/White
Green
Brown/White
Green/White
C-Bus
Connection
Mutual Twist
Other / Spare
(Not Required for
Normal C-Bus Applications)
Pink Cable Sheath
Individual Colours Twisted
Orange
Orange/White
Blue
Blue/White
Brown
Brown/White
Green
Green/White
211
Technical Information
C-Bus Design Guide
8 Practical Wiring Considerations (cont’d)
Connection to A Personal Computer
Connection of the PC Interface to the Serial Communication Port of a Personal
Computer is made via the 9 pin D type connector or 2 x RJ45 jacks fitted on the Unit.
The installer may also provide access to the PC Interface through a wall mounted
connector, such as the Clipsal 2231/1 data connection plate.
Connection can also be via a C-Bus Network Interface. This will require a C-Bus
Network Interface to be connected to an Ethernet Hub or Switch and a PC with an
Ethernet compatible Network Interface Card (NIC).
Placement of C-Bus Equipment
The placement of C-Bus Output, and System Support Units in any installation is made
with consideration to available space, in relation to other service requirements, such as
air-conditioning ducts and accessibility for maintenance purposes. Many choose to
install the C-Bus hardware in a Clipsal Distribution Panel, located adjacent the relevant
Distribution Board. Input Units are placed as required. Take particular heed of any
specific installation instructions shipped with the product. Sensor devices such as the
Light Level and Temperature Sensors, as well as the Passive Infra Red (PIR) Occupancy
Sensor all require special consideration when choosing an installation location. This
avoids false triggering and erroneous sensor readings.
Every effort should be made to avoid placing C-Bus Equipment Network cabling in
proximity to sources of excessive electrical noise or other electromagnetic interference
(for example heavy inductive motor load switching).
Megger Testing
Megger testing of an electrical installation which has C-Bus Units connected will
not cause any damage to the C-Bus Units. Since C-Bus Units contain electronic
components, the installer should interpret megger readings with due regard to the
nature of the circuit connection. Operation on Isolated Supplies Isolated supplies such
as local generator sites may have inadequate output frequency stability to allow C-Bus
dimmer Units to function correctly. The dimming ability of the C-Bus Dimmer Units
can be affected if the mains supply frequency is out of the specified range. The use of
isolated supplies does not affect the operation of any other C-Bus devices.
Operation on Inverter Supplies
All C-Bus Units which are mains powered are designed to operate from sinusoidal
voltage waveforms. Any inverter which produces a square-wave voltage output may
cause damage to or degrade the performance of the C-Bus devices connected to it.
The C-Bus Units have been designed to operate, over an ambient temperature range
between 0˚C and 45˚C, the Units should be placed away from heat sources such as
air-conditioning compressor outlets and hot water services, and Units should not be
covered by insulation material if mounted in the roof space. Avoid installing mains
powered C-Bus equipment in areas of high humidity, such as bathrooms and laundries.
Working Live on the C-Bus Network
One of the many advantages of the C-Bus safe extra low DC operating voltage, is that
connections can be made whilst the Network is still powered up. Should a short circuit
occur while this is happening, the Power Supply’s output current limiting/overload
circuitry will protect it from damage for an indefinite period of time.
Over Voltages and Transients
Short Circuits on the C-Bus Network
Output Units will assume the state defined on the hardware signifying to the user
that a C-Bus wiring fault has occurred. Units on the C-Bus Network will be rendered
inoperable until such time as the short circuit is removed. No damage can result from
such a short circuit.
C-Bus Side
The C-Bus Network connection of every C-Bus Unit incorporates transient protection
circuitry to safeguard against the effects of unintentionally induced transient voltages.
During transient conditions, information may be lost, however the C-Bus system
incorporates a mechanism to recover from such losses. If the C-Bus is run between
buildings, or there is a likely hood of over voltage conditions, then over voltage
protection is recommended on the C-Bus cable. The over voltage equipment used
should have a rated continuous operating voltage of approximately 50VDC such as an
in-line telephone filter or similar.
212
Mains Side
The mains voltage must be limited to the range specified for any Unit which is mains
powered. Each Unit incorporates transient protection circuitry, and additional external
power surge protection devices is recommended to be used to enhance system
immunity to power surges. It is strongly recommended that over voltage equipment is
installed to protect the C-Bus equipment from transients and over voltage conditions.
Clipsal offer the 970 range of over voltage and over current equipment for this application.
Open Circuits on the C-Bus Network
An open circuit on the C-Bus Network may result from a poor termination, or in the
unlikely event of a cable breakage. If C-Bus Units are daisy chained on the Network,
an open circuit may effectively remove C-Bus power from the rest of the Network.
Underpowered or missing Units will not appear on the Network, and will not operate
correctly. This is a good reason to distribute power supplies on any C-Bus Network.
An open circuit will not otherwise affect operation of the C-Bus Network. No damage
can result from an open circuit.
LC1
ECP1
ECP
D2
D1
EF
R1
D5
D4
D3
PIR
PIR
PIR
R9
A/C
D10
D9
D8
D7
D6
D12
R10
A/C
R11
A/C
D13
Reception
PIR
Entrance
D17
D16
D15
R8
R7
SC
C.I.S. Building - 1st Floor Plan
R4
R3
LL
R2
D11
R12
A/C
PIR
PIR
PIR
PIR
Control Room
R5
D14
D18
SC
CSS
EF
R6
Exhaust Fan
EF
Light Level Sensor
LL
Relay No.
Dimmer No.
Rx x
Dx x
Load Center Panel
Energy Control Panel
Central Selector Switch
Motion Sensor
PIR
ECP
Scene Control Switch
SC
4 Key Input Unit
2 Key Input Unit
1 Key Input Unit
Air- Condition
A/C
Downlight
Fluorescent
Legend :
Technical Information
C-Bus Design Guide
9 Example Configurations
Commercial Office Lighting Control System Architecture
213
214
R15
Manager Rm.
LC2
ECP2
ECP
D19
R14
R13
R31
A/C
Manager Rm.
R17
R16
R20
D20
A/C
R29
C.I.S. Building - 2nd Floor Plan
R32
A/C
Manager Rm.
R21
Computer
Manager Rm.
R19
R18
R23
R33
A/C
Meeting Room
R24
D23
D22
A/C
R30
SC
R28
EF
C.I.S. Division
R22
D21
R27
D25
R26
D26
PIR
PIR
EF
R25
Exhaust Fan
EF
Relay No.
Dimmer No.
Dx x
Load Center Panel
Energy Control Panel
Central Selector Switch
Rx x
ECP
Light Level Sensor
Motion Sensor
PIR
LL
Scene Control Switch
SC
4 Key Input Unit
2 Key Input Unit
1 Key Input Unit
Air- Condition
A/C
Downlight
Fluorescent
Legend :
(Men)
Toilet
(Women)
Toilet
D245
Technical Information
C-Bus Design Guide
9 Example Configurations (cont’d)
Commercial Office Lighting Control System Architecture
R37
R49
LL
R36
R38
LC3
ECP3
D29
R52
A/C
Conference Room
D28
R35
Graphic Dept.
R34
D27
ECP
EF
A/C
SC
R41
R40
R53
A/C
Show Room
Corridor
EF
C.I.S. Building - 3rd Floor Plan
D32
D31
D30
R39
Administration
A/C
R50
R42
A/C
R51
R54
A/C
SC
R45
EF
Account Room
R43
D33
PIR
R47
R56
R46
EF
R44
PIR
PIR
EF
R48
Exhaust Fan
EF
Relay No.
Dimmer No.
Dx x
Load Center Panel
Energy Control Panel
Central Selector Switch
Rx x
ECP
Light Level Sensor
Motion Sensor
PIR
LL
Scene Control Switch
SC
4 Key Input Unit
2 Key Input Unit
1 Key Input Unit
Air- Condition
A/C
Downlight
Fluorescent
Legend :
(Men)
Toilet
(Women)
Toilet
R55
Technical Information
C-Bus Design Guide
9 Example Configurations (cont’d)
Commercial Office Lighting Control System Architecture
215
216
1st FL
2nd FL
3rd FL
CSS
x3
x7
x1
x4
x2
UTP Cat5
SC
x2
SC
x5
x2
LL
x8
PIR
x2
PIR
x3
PIR
ECP
ECP
ECP
EF
A/C
EF
A/C
EF
A/C
C.I.S. Building - C-Bus Riser Diagram
x1
LL
x1
SC
x1
THW 2x2.5 Sq. mm.
Technical Information
C-Bus Design Guide
9 Example Configurations (cont’d)
Technical Information
C-Bus Design Guide
9 Example Configurations (cont’d)
217
Technical Information
C-Bus Design Guide
9 Example Configurations (cont’d)
218
Technical Information
C-Bus Design Guide
9 Example Configurations (cont’d)
219
Technical Information
C-Bus Design Guide
9 Example Configurations (cont’d)
220
Technical Information
C-Bus Design Guide
9 Example Configurations (cont’d)
Energy Control Panel
Ventilation
100
142
TM
142
850
65
85
216
500
150
500
inside View
Side View
front View
All Dimensions in mm. (WxHxD)
E
N
A/L
1A
OFF
OFF
1B
2A
2B
3A
OFF
OFF
3B
4A
C-Bus
A/L
E
Unit
C-Bus
Voltage Free Relay
C-Bus CONNECTIONS
E
N
4B
Unit
N
1A 1B
2
3
7
8
9
4
5
Power Supply
2A 2B
3A 3B
4A 4B
5A 5B
N
A/L
7A 7B
C-Bus
8A 8B
9A 9B 10A 10B 11A 11B
1 2 3 4 5
1
2
3
4
5
6
7
8
12A 12B
2A
2B
3A
OFF
OFF
3B
4A
N
4B
A/L
Unit
C-Bus
Voltage Free Relay
N
Power Supply
C-Bus CONNECTIONS
A/L
1A
OFF
OFF
1B
2A
2B
3A
OFF
OFF
3B
4A
4B
6 7 8 A/L N
E
Dimmer
N
A/L
C-Bus
2
3
4
5
6
7
8
6 7 8 A/L N
E
Dimmer
C-Bus
N
A/L
1A 1B
1
2
3
7
8
9
4
5
1 2 3 4 5
2
3
4
6
7
8
RS-232
6 7 8 A/L N
RS-232
A/L
5
1A
OFF
OFF
1B
2A
2B
3A
OFF
OFF
3B
4A
A/L
Unit
C-Bus
Voltage Free Relay
C-Bus CONNECTIONS
E
N
4B
N
Power Supply
C-Bus CONNECTIONS
A/L
1A
OFF
OFF
1B
2A
2B
3A
OFF
OFF
3B
4A
4B
Unit/
Comms
Unit
Dimmer
C-Bus
C-Bus CONNECTIONS
PC Interface
C-Bus CONNECTIONS
E
2A 2B
3A 3B
4A 4B
5A 5B
6A 6B
E
6
12
C-Bus
Voltage Free Relay
N
A/L
1
2
3
7
8
9
4
5
7A 7B
8A 8B
9A 9B 10A 10B 11A 11B
1A 1B
2A 2B
3A 3B
4A 4B
5A 5B
12A 12B
N
A/L
1A 1B
1
2
3
7
8
9
4
5
6A 6B
10 11
2A 2B
3A 3B
4A 4B
5A 5B
6A 6B
7A 7B
8A 8B
9A 9B 10A 10B 11A 11B
12A 12B
1A 1B
2A 2B
3A 3B
5A 5B
6A 6B
8A 8B
9A 9B 10A 10B 11A 11B
12A 12B
6
12
Voltage Free Relay
C-Bus CONNECTIONS
E
6
N
A/L
1
2
3
7
8
9
4
5
4A 4B
6
Unit
10 11
12
C-Bus
Voltage Free Relay
N
A/L
7A 7B
8A 8B
9A 9B 10A 10B 11A 11B
1 2 3 4 5
1
2
3
4
5
6
7
8
12A 12B
6 7 8 A/L N
Unit
C-Bus
Voltage Free Relay
Unit
10 11
C-Bus CONNECTIONS
C-Bus CONNECTIONS
1
A/L
C-Bus CONNECTIONS
Unit
Unit
N
C-Bus
C-Bus
Voltage Free Relay
C-Bus CONNECTIONS
1 2 3 4 5
1
N
Unit
Unit
C-Bus
E
Unit
C-Bus CONNECTIONS
C-Bus CONNECTIONS
C-Bus
C-Bus
E
6A 6B
Voltage Free Relay
C-Bus
E
OFF
1B
12
Unit
E
OFF
Unit
10 11
C-Bus CONNECTIONS
E
1A
6
Unit
C-Bus
A/L
C-Bus CONNECTIONS
C-Bus CONNECTIONS
A/L
1
N
Unit
10 11
12
Voltage Free Relay
C-Bus CONNECTIONS
E
N
A/L
7A 7B
1 2 3 4 5
1
2
3
4
5
6
7
8
6 7 8 A/L N
Unit
Dimmer
C-Bus
C-Bus CONNECTIONS
Dimmer
C-Bus CONNECTIONS
energy control Panel
energy control Panel
energy control Panel
(ecP1)
(ecP2)
(ecP3)
221
Technical Information
C-Bus Design Guide
9 Example Configurations (cont’d)
C-Bus Basic Wiring Diagram
Energy Control Panel 2 (ECP2)
E
N
A/L
1A 1B
2A 2B
3A 3B
4A 4B
5A 5B
6A 6B
Relay Unit
12 CH. Relay (10A/CH.)
to Next Floor
C-Bus CONNECTIONS
E
N
A/L
7A 7B
8A 8B
9A 9B
1A3A
1B3B
10A 10B
11A 11B
2A 2B
12A 12B
4A 4B
Relay Unit
4 CH. Relay (20A/CH.)
C-Bus CONNECTIONS
UTP Cat.5
E
N
1
A/L
2 3
4 5
6 7 8 A/L N
Dimmer Unit
(Single Line)
36Vdc
8 CH. Dimmer
C-Bus CONNECTIONS
2
nd
FL.
Energy Control Panel 1 (ECP1)
220 Vac
E
N
A/L
1A 1B
2A 2B
3A 3B
4A 4B
5A 5B
6A 6B
Relay Unit
C-Bus CONNECTIONS
7A 7B
8A 8B
9A 9B
10A 10B
Key Input Unit
11A 11B
12A 12B
or
Relay Control by
Key Input Unit (SW.)
Sensor or Computer
Load Center
220 Vac
Local Switch
E
N
A/L
RST
1A 1B
2A 2B
3A 3B
4A 4B
5A 5B
6A 6B
Relay Unit
C-Bus CONNECTIONS
Motion Sensor
7A 7B
8A 8B
9A 9B
10A 10B
11A 11B
12A 12B
1
2
CH1
3
4
CH2
5
6
CH3
7
8
CH4
9
10
Load
4CH. Relay
20A. Unit
N
Local Switch
N
A/L
E
N
A/L
Power
Supply
C-Bus CONNECTIONS
Example C-Bus Wiring & Control
220 Vac
220 Vac
1
2 3
4 5
6 7 8 A/L N
Dimmer Unit
C-Bus CONNECTIONS
st
1 FL.
Control Room
to Control Room
PCI
RS-232
Computer
C-Bus CONNECTIONS
Or
222
Local Switch
Central Selector Switch
Touch Screen
Technical Information
C-Bus Design Guide
9 Example Configurations (cont’d)
Integrated Home Automation System
Audio Visual & IR Equipment
Tuner 96.1 FM
4 Channel Voltage Free
Changeover Relay (Learn)
L5504RVFC
CD 1 Track 4
3:25
Infra-red Emitter 8050LD
Amplifier & CD Player
240VAC
240VAC
4 Channel Voltage
Free Relay (Learn)
L5504RVF
HVAC / Motorised Blinds & Shutters
4 Channel Pro Series
Dimmer (Learn)
L5104D5
Power Devices / Appliances
240VAC
Lighting Control / Dimming
240VAC
Infrared Output Module
5034NIRT
C-Bus Network / 1000 Meters / 100 Devices
Occupancy
Sensor
E5751L
Neo Key
Input (Learn)
E5058NL
Scene Master
5035NIRSL
Touch Screen
SC5000CT
Bus Coupler Input PC Interface
5104BCL
5500PC
MinderPRO
Automation Controller
5302TCU8/8
MinderPRO
LED Keypad
5316KP
PIR Sensor 90˚
5420/90F
PC Interface
Security & Integration
Input Switch
Software Required
Windows 98SE, XP, ME, 2000
C-Bus Toolkit Software - 5000S/3
Clipsal HomeGate - 5000HG
PSTN Telephone Network
223
Technical Information
C-Bus Design Guide
9 Example Configurations (cont’d)
PDA/WEB Tablet Integration
4 Channel Voltage
Free Relay (Learn)
L5504RVF
240VAC
4 Channel Pro Series
Dimmer (Learn)
L5104D5
36VDC
Power Supply
5500PS
240VAC
240VAC
240VAC
C-Bus Network / 1000 Meters / 100 Devices
PC Interface
5500PC
10/100 Mbps Fast Ethernet Switch
95ESW24P10
Ethernet 10/100/1000
224
Web Tablet - 3rd Party
Clipsal PremiseGateway™
5900 Series
Technical Information
C-Bus Design Guide
9 Example Configurations (cont’d)
Integrated to 3rd Party Media Control Systems - Crestron/AMX/Phast
240VAC
240VAC
240VAC
240VAC
4 Channel Voltage
Free Relay (Learn)
L5504RVF
4 Channel Pro Series
Dimmer (Learn)
L5104D5
36VDC
Power Supply
5500PS
C-Bus Network / 1000 Meters / 100 Devices
PC Interface
5500PC
Neo Key
Input (Learn)
E5508NL
Scene Master
5035NIRSL
RS232
Crestron / AMX/ Phast
Controller
Touch Panel
225
Technical Information
C-Bus Learn Units Quick Programming Guide
1. Entering Learn Mode
Hold down a toggle key on any output unit for 10 seconds.
Unit and C-Bus indicators on Output Units will flash alternatively.
Note: These two indicators may initially flash together for up
to 20 seconds before flashing alternatively.
All loads and indicators will turn off except the one pressed All indicators
which will turn on.
on Input Units
will turn off.
2. Choosing the Electrical Load to be Controlled
Press the toggle key switches on the Output Units which turn on the desired lights.
Unit and C-Bus indicators continue to flash alternatively.
The selected lights and indicators are switched on.
3. Selecting the Key Input Switches to Control the Chosen Loads
3A. Setting Input Keys as On/Off Switches
Press the Key Inputs
required to control the
selected loads.
The switches required to
control the loads will be
illuminated.
Exit Learn Mode by pressing any toggle switch on a Relay Output Unit for 2 seconds.
C-Bus2 will now Learn the relationship and will return to normal operation.
Units and C-Bus indicators will stop flashing.
226
Technical Information
C-Bus Learn Units Quick Programming Guide
3. Selecting the Key Input Switches to Control the Chosen Loads
3B. Setting Input Keys as Dimmer Switches
Press one key for a single
operated dimmer.
toggle dimmer
OR
Press two keys on the
same unit for two key
operated dimmer. The
first key pressed will be
an on/up key and the
second key pressed will
be the off/down button.
1
1
2
on/up
off/down
2
Exit Learn mode by pressing any toggle switch on
a Dimmer Output Unit for 2 seconds.
on/up
off/down
C-Bus2 will now Learn the relationship and will return to
normal operation.
Units and C-Bus Indicators will stop flashing.
3C. Setting Input Keys as Timer Switches
Hold down a key until the
indicator comes on, then
release the key.
Continuing to hold down the key will cause the indicator
to double flash every one second.
The key switch will flash at one second intervals.
Each double flasah represents 5 minutes.
Note: Exiting Learn Mode at this point will make the key
a 5 second timer.
For example, releasing the key after 4 double flashes gives
a 20 minute timer.
Exit Learn Mode by pressing any toggle switch on a Relay
or Dimmer Output Unit for 2 seconds.
C-Bus2 will now Learn the relationship and will return to
normal operation.
Units and C-Bus Indicators will stop flashing.
227
Technical Information
C-Bus Learn Units Quick Programming Guide
4. Setting C-Bus2 Movement Sensors to Control the Chosen Electrical Loads
Using a screwdriver, change the light level setting on the
bottom of the C-Bus2 Movement Sensor.
Indoor Sensor
228
The red indicator behind the Sensor Windor will flash once.
Outdoor Sensor
Wait for the indicator to double flash (after 5 seconds)
then immediately (within 1 second) turn the adjusting
trimpot back the other way.
The red indicator behind the Sensor Window will then come
on and stay on. The unit is now ready to learn its time out.
Changing the setting again will cause the indicator to begin
double flashes.
Each double flasah represents a 5 minute timer duration.
Turn the adjustment trimpot back the other way.
The indicator will single flash showing that a timer
function has been set.
Exit Learn Mode by pressing any toggle switch on a Relay
or Dimmer Output Unit for 2 seconds.
C-Bus2 will now Learn the relationship and will return to
normal operation.
Note: If the indicator stays off then go back to the first step.
Index
INDEX
Index by Catalogue Number
Catalogue
Number
Catalogue
Number
PAGE
Number
Catalogue
Number
PAGE
Number
Catalogue
Number
PAGE
Number
751
148
5030URC
69
5070THPSS
54
5350RG/2
167
753
150
5030URCCABLE
69
5080CTC
72
5350UCM
170
5430
179
5031H2TC7
64
5080CTCF
72
5350ZTS
172
5460
178
13, 14, 15, 16, 17, 32, 36
5351CT
171
5352CTM
171
560011
560884
5031NIRL
68
5080LC-8
96
5031NL
39
5080SD
95
13, 15, 17
5031PE
66
5082F
33
5352EXL16/0
168
3855TXBA GB
122
5031PEWP
66
5082NL
33
5352EXL8/0
168
3855TXBC GB
122
5031RDTSL
54
5084F
33
5352EXL8/8
168
5031TS
65
5084NL
33
5352TEXS8/8
169
5000BUR
52
5000CG
104
5031V2TC7
64
5084TX
36
5354RVF
171
5000CG10
104
5032NL
39
5085DF
29
5358RVF
171
5000CG5
104
5034NIRL
68
5085DL
29
5388CU/2
163
5000CG50
104
5034NIRT
94
5086F
33
5388SE/2
169
5000CGUNL
104
5034NL
39
5086NL
33
5400/4R
176
5000CTCNA
72
5034NS
73
5088TX
36
5400ARC
177
5000CTCPS
72
5034TX
68
5088TXC
36
5400EX8
176
5000CTCWB
72
5034TX12
68
5100BCS
101
5400RF
177
5000CTD
70
5035NIRSL, WE
74
5100HSC
94
5400RWC
5000CTWB
70
5035NIRSLTR, GB
74
5100NA
51
5400S/2
174, 175
5000HG/3
102
5035NIRSLTR, WE
74
5100NLA
5000HG5/3
102
5035TX
70, 74
5000HGUP3
102
5038TX
90
5050CTC
5000S/3
101
5000SP/3
103
5000SP5/3
5000SPUNL/3
177
75, 76, 77
5400WR
177
5100RP
94
5401BP
178
36
5100TAU
67
5403BP
178
72
5100TMB
67
5404BP
178
5050CTCF
72
5101R
93
5412KP
176
5050CTS
70
5102BCLEDL
57
5420/100PB
184
103
5050IS
37
5102RVF
93
5420/110/12RMP
182
103
5050OS
37
5104BCL
57
5420/110/12RP
181
5000SPUP3
103
5050SD
19, 21, 23, 35
5150DMB
78
5420/110/15RK
181
5002RL20
91
5052NL
35
5150DMX
78
5420/110/15RMK
182
5005C305B
52
5052NRI
37
5150SMB
78
5420/30PB
184
5005C305BHF
52
5052NRP
37
5300EN/2
173
5420/360
183
5008B164/3L
46
5054NL
35
5301DS
167
5420/360/28RA
183
5008S164/3L
46
5054NRP
37
5302T16/16KP
163
5420/360/28RB
183
5012B164/4L
46
5055DL
31
5302T24/24KP
163
5420/60PB
184
5012S164/4L
46
5058NL
35
5302T32/32KP
163
5420/90F
180
5016B162/3L
46
5058NRP
37
5302T8/8KP
163
5430E
179
5016B164/6L
46
5070THB, BK
54
5302TCU16/16
163
5430HS
179
5016S162/3L
46
5070THBPG, WE
54
5302TCU24/24
163
5440MB
179
5016S164/6L
46
5070THBR, BK
54
5302TCU32/32
163
5440WS
179
5020B164/7L
46
5070THBRPG, WE
54
5302TCU8/8
163
5450SC
179
5020S164/7L
46
5070THBRSS
54
5316KP
165
5460/12/7B
178
5024B162/4L
46
5070THBSS
54
5316KPH216
166
5460FD
178
5024B163/3L
46
5070THP, BK
54
5350/315UT
170
5460FS
178
5024B164/8L
46
5070THPPG, WE
54
5350/434UT
170
5460HD
178
5024S162/4L
46
5070THPR, BK
54
5350CB
170
5460MRF
178
5024S163/3L
46
5070THPRPG, WE
54
5350IRM
172
5460RF
178
5024S164/8L
46
5070THPRSS
54
5350PS16/3
173
5460TSNC
178
5000RL20
229
PAGE
Number
INDEX
Index by Catalogue Number
Catalogue
Number
PAGE
Number
Catalogue
Number
PAGE
Number
Catalogue
Number
PAGE
Number
Catalogue
Number
PAGE
Number
5460TSNO
178
5600ICK
99
5882D2L1AA
15
BS5000CTCF
72
5475AC4/8/8
186
5600ICP
99
5882D2T1AA
17
C5031NIRL
68
5475CR4/8/8
187
5600IWK
98
5882R8F1AA
13
C5031NL
40
5475CV
189
5600IWP
98
5884D1L2AA
15
C5032NL
40
5475ENPS
186
5600ODP
100
5884D1T2AA
17
C5034NIRL
68
5475EX8/8
188
5600P24/3750AU
97
5884D2L1AA
15
C5034NIRT
94
5475KFE
193
5600P24/500AU
96
5884D2T1AA
17
C5034NL
40
5475PCE
193
560110R
97
5884R4F2AA
13
C5034NS
5475PCES
193
560125D
97
5884R8F1AA
13
E3015
139
5475PREE
190
560125R
97
5886D1L2AA
15
E3015/10US
139
5475PRES
191
5610/220/2K4
144
5886D1T2AA
17
E3015/15
139
5475PRESK
192
5610/220/3K8
144
5886D2L1AA
15
E3015/16CS
139
5475UK256
186
5610/220/4K8
144
5886D2T1AA
17
E3015/16CSE
139
5480/420BBA
155
5610/230/2K4
144
5886R4F2AA
13
E3015CS
139
5480/420BDA
151
5610/230/3K8
144
5886R8F1AA
13
E3015CSE
139
5480/420BDVB
152
5610/230/4K8
144
5888TXBA
26
E3015D
139
5480/420BLA
154
5610/240/2K4
144
5888TXBC
26
E3015US
139
5480/420BLB
153
5610/240/3K8
144
5901M23000
141
E3031/1M
140
5480/420CBA
155
5750WPL
60
5903M23000
141
E3031CLV
133
5480/420CDA
151
5751L
61
5913M23000
143
E3031DLV EAGS
131
5480/420CDVB
152
5753L
62
750WP
149
E3031DMBLV EGGS
132
5480/420CLA
154
5753PEIRL
63
750WPR
149
E3031DMBWLV EGGS
132
5480/420CLB
153
5800WCGA
27
751MB
148
E3031EKTHLV EAGS
129
5480/480CLB
153
5800WCGC
27
751R
148
E3031LV EAGS
130
5480/600BDA
151
5812D2T1AA
25
752/135U
145
E3031RJ
140
5480/600BLB
153
5812D3L1AA
25
752/225CU
146
E3031RJ5E
140
5480AP
161
5812D3L1EA
24
752/225CUI
147
E3031STVM
140
5480DSA
162
5812D3L1EC
24
753R
150
E3031STVS
140
5480DSB
163
5812R10F1AA
25
8050/2LD
94
E3031TV
140
5480DSBA
160
5812R13F1EA
24
8050LD
94
E3031TVF
140
5480DSBB
160
5812R13F1EC
24
A5031NL
44
E3031WLV EAGS
132
5480DSCA
160
5850F
36
A5032NL
44
E3032CLV
133
5480DSCB
160
5852D2L1AA
21
A5034NL
44
E3032DLV EAGS
131
5480MBA
158
5852D2T1AA
23
B5031NL
45
E3032DMLV EAGS
132
5480MBB
158
5852R8F1AA
19
B5032NL
45
E3032LV EAGS
130
5480VPB
159
5854D1L2AA
21
B5034NL
45
E3032RJ
140
5480VPC
159
5854D1T2AA
23
BA5031NL
44
E3032RJ5E
140
5484VPBA
157
5854D2L1AA
21
BA5032NL
44
E3032TD
140
5484VPCA
157
5854D2T1AA
23
BA5034NL
44
E3032VTV
140
5500CN
47
5854R4F2AA
19
BB5000CT
70
E3032VTVFM/2
140
5500NB
49
5854R8F1AA
19
BB5000CTC
72
E3033DMBLV EAGS
132
5500PACA
59
5858D1L2AA
21
BB5000CTCF
72
E3033LV EAGS
130
5500PC
48
5858D1T2AA
23
BB5031NL
45
E3426
139
5500PS
50
5858D2L1AA
21
BB5032NL
45
E3426/10US
139
5501RE
55
5858D2T1AA
23
BB5034NL
45
E3426/16CS
139
5502DAL
82
5858R4F2AA
19
BS5000CT
70
E3426/16S
139
5504RDP
89
5858R8F1AA
19
BS5000CTC
72
E3426CS
139
73
230
INDEX
Index by Catalogue Number
Catalogue
Number
231
PAGE
Number
Catalogue
Number
PAGE
Number
Catalogue
Number
PAGE
Number
Catalogue
Number
PAGE
Number
E3426US
139
E5084F
32
E5882D2T1AA
16
L5504D2A
79
E3426US2
139
E5084NL
32
E5882D2T1EC
16
L5504D2AP
79
E3851R8F1EA GB
119
E5086F
32
E5882R8F1AA
12
L5504D2AU
79
E3851R8F1EA WE
119
E5086NL
32
E5882R8F1EC
12
L5504D2U
79
E3851R8F1EC GB
119
E5101TR
93
E5884D1L2AA
14
L5504D2UP
79
E3851R8F1EC WE
119
E5102TRVF
93
E5884D1L2EC
14
L5504RD
88
E3851WTXBA GB
121
E5400
174
E5884D1T2AA
16
L5504RDP
88
E3851WTXBA WE
121
E5400/16CB
175
E5884D1T2EC
16
L5504RVF
84
E3851WTXBC GB
121
E5400P12/800BS
158
E5884D2L1AA
14
L5504RVF20
87
E3851WTXBC WE
121
E5422S/2
174
E5884D2L1EC
14
L5504RVF20P
87
E3852D2L1EA GB
120
E5500TPS
50
E5884D2T1AA
16
L5504RVFC
92
E3852D2L1EA WE
120
E5504GI
56
E5884D2T1EC
16
L5504RVFCP
92
E3852D2L1EC GB
120
E5504TRDP
89
E5884R4F2AA
12
L5504RVFP
84
E3852D2L1EC WE
120
E5750WPL
60
E5884R4F2EC
12
L5508D1A
80
E3852D2L2EA GB
120
E5751L
61
E5884R8F1AA
12
L5508D1AP
80
E3852D2L2EA WE
120
E5852D2L1AA
20
E5884R8F1EC
12
L5508DSI
81
E3852D2L2EC GB
120
E5852D2L1EC
20
E5886D1L2AA
14
L5508DSIP
81
E3852D2L2EC WE
120
E5852D2T1AA
22
E5886D1L2EC
14
L5508RVF
85
E3852R4F2EA GB
119
E5852D2T1EC
22
E5886D1T2AA
16
L5508RVFP
85
E3852R4F2EA WE
119
E5852R8F1AA
18
E5886D1T2EC
16
L5512RVF
86
E3852R4F2EC GB
119
E5852R8F1EC
18
E5886D2L1AA
14
L5512RVFP
86
E3852R4F2EC WE
119
E5854D1L2AA
20
E5886D2L1EC
14
LE5101TD20
77
E3854WTXBA GB
121
E5854D1L2EC
20
E5886D2T1AA
16
LE5102TD10
76
E3854WTXBA WE
121
E5854D1T2AA
22
E5886D2T1EC
16
LE5104TD5
75
E3854WTXBC GB
121
E5854D1T2EC
22
E5886R4F2AA
12
LE5504TAMP
83
E3854WTXBC WE
121
E5854D2L1AA
20
E5886R4F2EC
12
LE5504TD2A
79
E5031/2TC7
64
E5854D2L1EC
20
E5886R8F1AA
12
LE5504TD2AP
79
E5031NIRL
68
E5854D2T1AA
22
E5886R8F1EC
12
LE5504TD2AU
79
E5031NL
43
E5854D2T1EC
22
E8071VMP
156
LE5504TD2U
79
E5031PE
66
E5854R4F2AA
18
E8071VMS
156
LE5504TRD
88
E5031TS
65
E5854R4F2EC
18
E8072VMPIR
156
LE5504TRDP
88
E5032NL
43
E5854R8F1AA
18
E8074VMPIR
156
LE5504TRVF
84
E5032VNL
43
E5854R8F1EC
18
ET3025
139
LE5504TRVF20
87
E5034NIRL
68
E5858D1L2AA
20
ET3025D
139
LE5504TRVF20P
87
E5034NIRT
94
E5858D1L2EC
20
ET3426
139
LE5504TRVFC
92
E5034NL
43
E5858D1T2AA
22
ET3727V GS
134
LE5504TRVFCP
92
E5034NS
73
E5858D1T2EC
22
ET3727V WW
134
LE5504TRVFP
84
E5050IS
37
E5858D2L1AA
20
L5101D20
77
LE5508TD1A
80
E5050OS
37
E5858D2L1EC
20
L5102D10
76
LE5508TD1AP
80
E5052NL
34
E5858D2T1AA
22
L5104D5
75
LE5508TDSI
81
E5054DL
30
E5858D2T1EC
22
L5112D10B2
78
LE5508TDSIP
81
E5054NL
34
E5858R4F2AA
18
L5112D12B2
78
LE5508TRVF
85
E5058NL
34
E5858R4F2EC
18
L5112D16B2
78
LE5508TRVFP
85
E5082F
32
E5858R8F1EC
18
L5112D20B2
78
LE5512TRVF
86
E5082NL
32
E5858R8F1TA
18
L5501RBCP
55
LE5512TRVFP
86
E5084DF
28
E5882D2L1AA
14
L5504AMP
83
R5060WB
38
E5084DL
28
E5882D2L1EC
14
L5504AUX
58
R5061NL
38
INDEX
Index by Catalogue Number
Catalogue
Number
PAGE
Number
Catalogue
Number
PAGE
Number
Catalogue
Number
PAGE
Number
R5062VNL
38
U201DST600 000
106
U31EKTH LV
125
R5063NL
38
U201DST600 000
106
UAC21SW/P
118
R5064VNL
38
U201DST600 000 10X
106
UAC22SW/P
118
R5066NL
38
U201DST600 001
106
UAC24SW/P
118
R5068NL
38
U201DST600 001
106
UAX-001
111
SC5000CT
70
U201DST600 001 10X
106
UAX-001
105,106,107, 109, 110
SC5031BNL
41
U201SCN02A 000
110
UAX-003
111
SC5031NIRL
68
U201SCN02A 000 10X
110
UAX-004
111
SC5031NL
41
U201SCN02A 001
110
UC21CN
116
SC5032BNL
41
U201SCN02A 001 10X
110
UC21D/P
118
SC5032NL
41
U201SDP16A 000
109
UC21DM
115
SC5034BNL
41
U201SDP16A 000 10X
109
UC21DP
116
SC5034NIRL
68
U201SDP16A 001
109
UC21SW
115
SC5034NIRT
94
U201SDP16A 001 10X
109
UC21SWP/P
118
SC5034NL
41
U201SPM/1
117
UC22CN
116
SC5034NS
73
U201SPM/2
117
UC22DM
115
SL5031BNL
42
U201SRY2KW 000
105
UC22DP
116
SL5031NIRL
68
U201SRY2KW 001
105
UC22SW
115
SL5031NL
42
U201SRY2KW 001 10X
105
UC22SWP/P
118
SL5032BNL
42
U202DSF05A 001
107
UC24SWP/P
118
SL5032NL
42
U202DSF10A 000
107
UC31AV
138
SL5034BNL
42
U202DSF10A 000 10X
107
UC31RJ
137
SL5034NIRL
68
U202DSF10A 001 10X
107
UC31TV
137
SL5034NIRT
94
U202DST600 000
106
UC32HDMS
128
SL5034NL
42
U202DST600 000
106
UC32TD
138
73
SL5034NS
U202DST600 000 10X
106
UC32TVFM
137
U101DFR400 XBL
108
U202DST600 001
106
UC33HBPDM
128
U101DFR400 XBL1
108
U202DST600 001
106
UC426
136
U101DFR400 XBLC
108
U202DST600 001 10X
106
UCT 426
136
U101RWM001
111
U202SCN04A 000
110
US31BP
126
U102RWM001
111
U202SCN04A 000 10X
110
US31BP A00
126
U103RHH001 BPW
112
U202SCN04A 001
110
US31BP B00
126
U103RHH001 BPW1
112
U202SCN04A 001 10X
110
US31RJ 000
135
U105RHH001 BPW
112
U202SDP10A 000
109
US31TV 000
135
U105RHH001 BPW1
112
U202SDP10A 000 10X
109
US31TV 000
135
U106RWM001
111
U202SDP10A 001 10X
109
US32DMRJ 000
127
U10NRS1001 XX0
114
U202SDP16A 001
109
US32DMRJ 000
127
U10NRS1002 XX0
114
U202SPM/1
117
US32TD 000
136
U10NRSI001 XX1
114
U202SPM/2
117
US33DMRJ
127
U10NRSI002 XX1
114
U202SRY2KW 000
105
US33DMRJ A00
127
U10XARR001 200
113
U202SRY2KW 001
105
US33DMRJ B00
127
U10XARR001 201
113
U202SRY2KW 001 10X
105
US426
134
U10XARR001 210
113
U204SPM/1
117
US426 000
134
U201DSF05A 000
107
U204SPM/2
117
US727H
128
U201DSF05A 000 10X
107
U20NRUD001 X00
124
UST426
134
U201DSF05A 001
107
U20NRUD001 X01
124
U201DSF05A 001 10X
107
U31EKTH
125
Catalogue
Number
PAGE
Number
232
INDEX
Index by Product Description
catalogue Description
PAGE Number
catalogue Description
PAGE Number
C-Bus Technology
12 Channel 10A Relay Range
86
C-Bus USB Zone Thermostat
2 Channel DALI Gateway Range
82
C-Bus ULTI Family Key Input Units
2000 Series Key Input Units
39
Australian/US Standard
33
4 Channel 10A Relay Range
84
British Standard
32
4 Channel 20A Relay Range
Dynamic Labelling Technology
Learn Enabled
87
Australian/US Standard
29
4 Channel Analogue Output Range
83
British Standard
28
4 Channel Changeover Relay Range
92
C-Gate Server Application Software
4 Channel Dimmer Range
79
Clock Modules
64
4 Channel Relay Driver Range
104
Colour Touch Screens
71
Learn Enabled
88
Dual Relay Module
91
Non Learn Mode
89
E2000 Series Key Input Units
43
8 Channel 10A Relay Range
85
Ethernet Network Interface
47
8 Channel Dimmer Range
80
General Input Unit
56
8 Channel DSI Gateway Range
81
High Power Architectural Series Dimmer Range
78
A Style Deep Curve Metal Plates
44
HomeGate Software, v3.0
Accessories
102
Indoor Motion Sensor
C-Bus NEO Family Key Input Units
37
360 Degrees
62
C-Bus ULTI Family Key Input Units
36
90 Degrees
61
Accessories for Colour Touch Screen
72
Indoor Multi-Sensor, 360 Degrees
63
Audio Amplifiers
97
Infrared Output Units
94
Audio Distribution Unit
96
Infrared Receivers
68
Audio Matrix Switcher
95
Light Level Sensors
66
Audio Speakers
Monochrome Touch Screens
70
99
Network Analyser
51
Indoor, Rectangular
98
Network Bridge
49
Outdoor, Shelf Top
100
Network Burden
52
Auxiliary Input Unit
58
Outdoor Motion Sensor, 110 Degrees
60
Pascal Automation Controller
59
Indoor, Circular
B Style Flat Metal Plates
Flat Metal Plates
45
PC Interface
48
Flat Metal Plates and Multi-Gang Series
46
Power Supply
50
Bus Coupler
57
Professional Series Dimmer Range
C2000 Classic Series Key Input Units
40
1 Channel Dimmer 20A, Learn Enabled
77
C-Bus Motorized Blinds/Curtains/Shutter Relay, 250VAC, No C-Bus Power Supply
55
2 Channel Dimmer 10A, Learn Enabled
76
4 Channel Dimmer 5A, Learn Enabled
75
C-Bus NEO Family Key Input Units
Australian/US Standard
35
Reflection Key Input Units
38
British Standard
34
SC2000 Slimline Series Key Input Units
41
Scene Controllers
73
Australian/US Standard
31
Scene Master Scene Controllers
74
British Standard
30
Schedule Plus Software, v3.0
C-Bus Network Cable
55
Single and Two Channel Relay Range
93
36
Single Relay Module
90
SL2000 Eclipse Series Key Input Units
42
Telephone Interface
67
Dynamic Labelling Technology
C-Bus Remote Controls
C-Bus Toolkit Software, v3.0
C-Bus USB PC Interface
233
54
101
53
103
INDEX
Index by Product Description
catalogue Description
PAGE Number
catalogue Description
PAGE Number
Temperature Sensors
65
Courtesy Panel Cover Plates
128
Universal Remote Control
69
Courtesy Panels
127
Wireless Gateway
27
Key Card Switch
125
Wireless NEO Family
Shaver Socket
128
Leading Edge Dimmers
Universal Input/Output Modules
124
Australian/US Standard
21
NEO Family Electrical Accessories
British Standard
20
Socket Outlets
139
Telephone and Data Sockets
140
Australian/US Standard
19
Television Sockets
140
British Standard
18
Universal Socket Outlets
139
Relay Output
NEO-i Series
Trailing Edge Dimmers
Australian/US Standard
23
FreeLocate Switches
121
British Standard
22
Leading Edge Dimmer
120
Wireless Plug Adaptors
Remote Controls
122
Australian Standard
25
Switches
119
British Standard
24
ULTI Family
Wireless Remote Controls
26
Curtain Switch Cover Plates
116
Wireless ULTI Family
Curtain Switches
110
Leading Edge Dimmers
Dimmer Cover Plates
115
Australian/US Standard
15
Double Pole Switch Cover Plates
116
British Standard
14
Double Pole Switches
109
Fluorescent Dimmers
107
Australian/US Standard
13
FreeLocate Switches
111
British Standard
12
Lamp Dimmer
108
Remote Controls
112
Relay Output
Trailing Edge Dimmers
Australian/US Standard
17
Repeater
113
British Standard
16
Serial Interface
114
Switch Cover Plates
115
Universal Dimmers, EMC Compliant
106
Universal Voltage Switches
105
ULTI Family Electrical Accessories
EZinstall Technology
Hotel Room Control Solution, NEO ELV
AV Module Cover Plates
138
AV Sockets
136
Dual Data Module Cover Plates
138
Courtesy Panels
132
Dual Data Sockets
136
Curtain Switches
133
Switched Sockets
134
Dimmers
131
Telephone/Data Module Cover Plates
137
Key Card Switch
129
Telephone/Data Socket
135
Shaver Sockets
134
Television Module Cover Plate
137
Switches
130
Television Sockets
135
TV/FM Sockets
135
Hotel Room Control Solution, ULTI Family
Bedside Console
123
Unswitched Socket Cover Plates
136
Bell Press Switch
126
Unswitched Sockets
134
Bell Press Switch Cover Plate
128
234
INDEX
Index by Product Description
catalogue Description
PAGE Number
catalogue Description
PAGE Number
i.m.pressTM
360 Degrees Motion Sensors
183
i.m.pressTM Switch Cover Plates
118
90 Degrees Motion Sensors
180
Double Pole i.m.press Switch Cover Plates
118
Access Control Equipment
177
i.m.pressTM Switch Cover Plate, A-Format
118
Battery
178
Commissioning Tool
172
Current Transformers
171
Door Station
167
Enclosure
173
141
Expansion Modules, Local
168
143
Expansion Modules, Slave
169
Home Safe Expansion Modules
176
Home Safe Keypad
176
Home Safe Security System
174
Home Safe Security System, C-Bus Enabled
175
Infrared Module
172
Interface Modules
170
LCD Keypad
166
LED Keypad
165
MinderPRO Premise Automation Controller
163
Photoelectric Beam Detectors
184
150
Power Supply
173
Outdoor 110 Degrees
149
Reed Relay Modules
171
Outdoor 90 Degrees
148
Reed Switches
178
Tamper Switches
178
146
Warning Devices
179
Corridors
145
Wireless Buttonpads
178
Dual Technology
147
Wireless Radio Equipment
177
Mechanism
TM
Clipsal PremiseGateway™
Clipsal PremiseGateway™
Protocol Gateway
Energy Controller
Energy Controller
144
Occupancy Sensors
Passive Infrared Sensors
Indoor 360 Degrees
Ultrasonic Sensors
360 Degrees
Intercom Systems
Clipsal Security
Access Control Systems
162
Audio Intercom Stations
161
Video Door Stations
160
Video Intercom Stations
159
4 Reader Module
187
Video Surveillance Equipment
Access Control Panel
185
Bullet Cameras
155
Converter Module
189
Digital Modulators
156
Expansion Module
188
Dome Cameras
151
Key FOBs
193
Long Body Cameras
153
Keycards
193
Mounting Brackets
158
Proximity Card Reader & Keypad, S-Series
192
Power Supply
158
Proximity Card Reader, E-Series
190
Quad Processors
157
Proximity Card Reader, S-Series
191
Vandal Resistant Dome Cameras
152
Weatherproof IR Cameras
154
Alarm Panels
235
Audio Door Stations
110 Degrees Motion Sensors
181
110 Degrees Motion Sensors, Dual Technology
182
C-Bus technology | SOFTWARE Packages
C-Gate Server Application Software
C-Gate is a powerful server application, designed to provide a high-level interface between third party systems and the
C-Bus control system. Developers and system integrators can use C-Gate to integrate their products to C-Bus.
A high level command and event interface allows control and monitoring of a C-Bus network without detailed
knowledge of C-Bus protocol. The C-Gate Server software can be located on a separate server machine or can run in the
background on a personal computer.
C-Gate uses industry standard TCP/IP protocols to support:
• Multiple C-Bus networks - connected to a TCP/IP backbone network.
• Multiple connections - from one or more front end or building management systems using TCP/IP sockets.
• Simple connection to web servers for Internet based control and monitoring.
5500PC
5000CG
RS232
C-Bus Network
3rd Party
Systems
5500PC
t
e
n
r
e
th
E
7x
8x
9x
10 x
1 1x
12x
7x
8x
9x
10 x
11x
12x
1x
2x
3x
4x
5x
6x
1x
2x
3x
4x
5x
6x
C-Bus Network
C
B
A
7 8 9 101112
12 3 4 5 6
Ethernet Hub
Terminal Server
5500CN
Fiber/UTP/Coaxial
Catalogue Number
5000CG
5000CG5
5000CG10
5000CG50
5000CGUNL
104
Description
C-Gate Software, Single Network License
C-Gate Software, Five Network License
C-Gate Software, Ten Network License
C-Gate Software, Fifty Network License
C-Gate Software, Unlimited Network License
C-Bus Network
PRODUC T FEATURES
• Open standard TCP/IP interface for integration to third party
systems - Building management systems, CCTV, access
control, fire alarm, HVAC, SCADA, Java applications, Web
Servers and Web Browsers.
• Utilise standard Ethernet technology products to network
multiple C-Bus networks over a standard LAN or WAN.
• High speed monitoring & control of Clipsal C-Bus devices.
• Utilise standard Ethernet technology products to run C-Bus
over different media i.e. fiber optic, UTP or coaxial cable.
• Connectivity of multiple C-Bus networks through serial,
terminal server or C-Bus Network Interface options.
• A number of C-Bus networks can be managed in parallel
high speed, hence control is rapid and monitoring is accurate
even when multiple networks are involved.
• C-Gate allows C-Bus networks to be connected across TCP/IP
backbone network as well as through a local TCP/IP interface.
• Operates in Windows and Linux OS environments.
AUSTRALIA
Tel: +618 8269 0511
Fax: +618 8340 1724 / 8436 1678
PHILIPPINES
Tel: +63 2 860 7999
Fax: +63 2 896 7229
CHINA
Tel: +86 21 2401 2500
Fax: +86 21 6485 3223 / 7831
SINGAPORE
Tel: +65 6415 3288
Fax: +65 6415 3289
HONG KONG
Tel: +852 2487 0261
Fax: +852 2487 0110
SOUTH AFRICA
Tel : +27 11 254 6400
Fax: +27 11 254 6640
INDIA
Tel: +91 11 41590000
Fax: +91 11 41678010 / 41678011
SRI LANKA
Tel : +94 112 343512 / 114 737702
Fax: +94 114 724 054
INDONESIA
Tel: +62 21 630 6430
Fax: +62 21 631 6279
TAIWAN
Tel: +886 2 8751 6388
Fax: +886 2 8751 6389
KOREA
Tel: +82 2 1588 2630
Fax: +82 2 2631 5268
THAILAND
Tel: +662 617 5555
Fax: +662 617 5501
MALAYSIA
Tel: +603 5519 1111
Fax: +603 5519 4378
UNITED ARAB EMIRATES
Tel: +971 6 5570 777
Fax: +971 6 5570 333
NEW ZEALAND
Tel: +64 9 576 3403
Fax: +64 9 576 1015
UNITED KINGDOM
Tel: +44 870 608 8608
Fax: +44 870 608 8606
PAKISTAN
Tel: +92 21 506 7278
Fax: +92 21 506 3369
VIETNAM
Tel: +84 8 810 8773
Fax: +84 8 810 8776
Our Distributor
Clipsal reserves the right to change specifications, modify design and discontinue items
without incurring obligation and whilst every effort is made to ensure that description,
specifications and other information in this catalogue are correct, no warrant is given in
respect thereof and the company shall not be liable for any error therein.
© 2008 Clipsal Asia
www.clipsal-asia.com