1
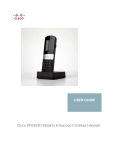
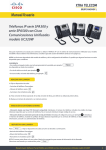
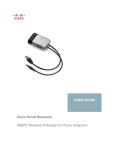
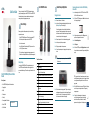
Welcome
Quick Start Guide
2
Thank you for choosing the Cisco SPA302D. This guide describes how to
physically set up and register your Cisco SPA302D to the Cisco SPA232D ATA.
It also describes how to perform some basic tasks, such as placing and
answering calls, and configuring basic phone options.
1
Cisco SPA302D Features
Charging the Handset
STEP 1 Remove the back cover of the handset.
Correct battery placement is shown on the label inside the battery
compartment. If the batteries are charged, the handset turns on when
the batteries are inserted. If the batteries are not charged, the handset
turns on when it is placed into the charging cradle.
STEP 3 Remove the protective film from the handset and charging cradle.
• Active Internet connection
STEP 4 Insert the power clip into the power adapter.
• Active Public Switched Telephone Network (PSTN) connection or Voice
over IP (VoIP) phone service account
STEP 5 Plug the power adapter into the power source.
STEP 6 Connect the power adapter into the charging cradle in the port shown
below.
Table 1 Handset Features
• Cisco SPA302D Mobility Enhanced Cordless Handset
• Charging Cradle
• Belt Clip
Use only size AAA Ni-MH 800 mAh (1.2V) rechargeable batteries in the
Cisco SPA302D handset. Place the handset in the charging cradle for a
recommended initial charge of 10 hours before using the handset for the first
time.
1
2
3
4
5
6
7
8
9
10
• Power Adapter
• Power Clip
• Two rechargeable AAA batteries
• Product CD-ROM
• Quick Start Guide
Quick Start Guide for more information.
STEP 2 On the Cisco SPA302 handset, press the Select button in the center of
the 4-way navigation keypad.
(See Battery Warning in “Before You Begin.”)
• Cisco SPA232D Mobility Enhanced ATA, which has an integrated DECT
Base Station to provide telephone service for the SPA302D
Battery Warning
Registering the Handset to the Cisco SPA232D Mobility
Enhanced ATA
STEP 2 Insert the two AAA rechargeable batteries (included) into the handset.
Before You Begin
• PC with web browser, for using web-based system management tools
(Microsoft Internet Explorer, Mozilla Firefox, and Apple Safari are supported)
Package Contents
Handset Setup and Registration
STEP 1 Install and configure the Cisco SPA232D. See the Cisco SPA232D
Before you begin the installation, make sure that you have the following
equipment and services:
Cisco SPA302D Mobility Enhanced Cordless
Handset
3
11
Version en français sur CD
12
13
14
Receiver.
Handset display.
Right softkey. Press the softkey to perform the action shown in the
lower right of the handset display.
End Call button. Press the button and hold it to turn off the handset.
Keypad.
Mute button.
Microphone.
Speakerphone button. Press this button during a call to use the
speakerphone.
Start Call button.
Left softkey. Press the softkey to perform the action shown in the lower
left of the handset display.
4-way navigation keypad. Press the arrow buttons to move up, down,
left, or right through menus displayed on the handset.
Center Select button.
Headset port.
Speaker.
STEP 3 Using the navigation arrows, scroll to the Settings icon and
press the center navigation button to select it.
STEP 4 Select Handset Registration.
STEP 5 Select Register.
STEP 6 On the Cisco SPA232D, press the Page/Registration button and hold
it down for at least seven seconds until the green status light flashes
quickly.
CAUTION Only use the power adapter designed for use with Cisco SPA300
Series devices.
TIP: If you press the button for fewer than seven seconds, the green
status light flashes slowly, indicating the unit is in “paging” mode and is
not in registration mode. Registration will not work if the unit is in
paging mode.
STEP 7 The default PIN is blank, so do not enter a PIN. Press the left softkey to
STEP 7 Place the handset into the charging cradle. The light on the charging
cradle appears solid green when the handset is charging. Charge the
handset for a minimum of 10 hours before using the handset for the
first time to ensure that the handset is fully charged.
confirm that you want to register the handset. The “registering”
message appears.
STEP 8 To verify that the handset registered to the base station,
confirm that the signal strength icon is solid (not flashing)
and that the handset ID, such as Handset 1 or Handset 2,
appears near the top right corner of the display screen.
4
Using Your Cisco SPA302D
Putting a Call on Hold
To put a call on hold, press the left softkey to select Options. Scroll to
Hold and press the center Select button. The hold icon and onscreen message indicates a call is on hold.
Placing a Call
To place a call, do one of the following tasks:
• Enter the number on the keypad and press the green Start Call button.
Depending on your phone system configuration, you may have to enter a
digit, such as 9, before entering the number to place an external call.
To resume the call, press the left softkey to select Options. Scroll to
Resume and press the center Select button. The active call icon
indicates the call is active again.
• To use the speakerphone, enter the number on the keypad and press the
Speakerphone button.
Ending a Call
To end a call, do one of the following tasks:
Answering or Ignoring a Call
• Press the red End Call button.
To answer an incoming call, do one of the following tasks:
• Press the right softkey to select End Call.
Adjusting Volume and Muting
To adjust the audio volume during a call: Press the right arrow button on the 4way navigation keypad to increase the volume. Press the left arrow button to
decrease the volume.
To adjust the ringtone volume when a call is not in progress: Press the right
arrow button to increase the volume. Press the left arrow button to decrease
the volume.
To turn off the ringer, continue to press the left arrow button until the
message on the display and the ringer off icon indicate that the ringer
is turned off.
To mute the handset microphone, press the Mute button on the
handset. The mute icon appears at the top of the handset display.
• Press the Start Call button.
Using Call Waiting
• Press the left softkey to select Answer.
Configuring Call Preferences
If call waiting is enabled, while on a call, a beep tone will alert you of a second
incoming call.
You can configure the following preferences:
• Press the Speakerphone button to answer with the speakerphone.
To answer the call, press the left softkey to select Answer and put the first call
on hold. To ignore the call, press the right softkey to select Ignore.
To decline to answer a call, press the right softkey to select Ignore.
To return to the first call, do one of the following tasks:
Americas Headquarters
Cisco Systems, Inc.
170 West Tasman Drive
San Jose, CA 95134-1706
USA
www.cisco.com
Small Business Support, Global: www.cisco.com/go/sbsc
• Block Caller ID—Prevents your number from displaying on the Caller ID of
numbers that you call.
• Press the left softkey to select Options and choose Swap to place the
current call on hold and return to the first call. The active call is shown at the
top of the screen and is indicated by the active call icon.
• Block Anonym Call—Blocks incoming calls to your handset from callers
who have blocked their caller ID.
To transfer a call:
STEP 1 Press the left softkey to select Options.
Cisco and the Cisco logo are trademarks or registered trademarks of Cisco and/or its affiliates in the
U.S. and other countries. To view a list of Cisco trademarks, go to this URL: www.cisco.com/go/
trademarks. Third-party trademarks mentioned are the property of their respective owners. The
use of the word partner does not imply a partnership relationship between Cisco and any other
company. (1110R)
© 2012 Cisco Systems, Inc. All rights reserved.
NOTE Depending on how your handset is configured (connected to the IP
network or the PSTN), these preferences may not be available on your
handset.
To configure features such as Do Not Disturb, Call Waiting, and more:
STEP 2 Scroll to Transfer and press the Select button.
STEP 1 Press the Select button to view the available preferences.
STEP 3 Enter the number to which to transfer. The Cisco SPA302D
STEP 2 Scroll to Call Settings and press the Select button again.
automatically dials the number.
STEP 4 You can transfer before the called number answers, or you can wait to
speak to the called number. To transfer, press the left softkey to select
Options, scroll to Transfer, then press the left softkey button.
changes.
Turning the Handset On and Off
To turn the handset off and on, press and hold the End Call button.
NOTE Placing the handset into the cradle automatically turns the handset on,
even if it has been shut off.
Accessing Additional Handset Functions
You can access additional handset functions by pressing the Select button.
The table below lists some of these functions; for more information, see the
Cisco SPA302D Mobility Enhanced Cordless Handset User Guide, available
on Cisco.com.
Call History
Contacts
View a list of calls placed from and received by the
handset. Use the left and right arrow buttons to
filter calls by Incoming, Outgoing, and Missed
status.
View lists of private and shared contacts.
• Call Waiting—If call waiting is enabled, while on a call, a beep tone will alert
you of a second incoming call.
• Press the right softkey to select End Call to end the active call and return to
the call on hold.
Transferring a Call
78-20317-01
• Do Not Disturb—Incoming calls do not reach your handset. (They will not
display in the Received Calls list.)
STEP 6 Press the left softkey (Save), or the center Select button to save your
STEP 3 Press the Select button to choose Call Preferences.
STEP 4 Press the up or down arrow button to scroll to the setting you want to
configure.
STEP 5 Use the right and left arrow buttons to turn the feature on or off.
5
Where to Go From Here
Support
Cisco Small Business
Support Community
www.cisco.com/go/smallbizsupport
Cisco Small Business
Support and Resources
www.cisco.com/go/smallbizhelp
Cisco Small Business
Firmware Downloads
www.cisco.com/go/software
Cisco Small Business
Open Source Requests
www.cisco.com/go/
smallbiz_opensource_request
Regulatory Compliance
and Safety Information for
the Cisco SPA302D
www.cisco.com/en/US/products/ps10998/
prod_installation_guides_list.html
Select a link to download firmware for Cisco
Small Business Products. No login is
required.
Product Documentation
Call Settings
Configure or view call preferences, speed dials,
call forwarding, and other options.
Settings
Perform handset registration, configure network
settings, choose ringtones, update handset
software, perform a factory reset to restore the
handset to its original settings, view handset
information (such as model and software version)
and view and configure other options.
Cisco Small Business
www.cisco.com/go/300phones
SPA300 Series IP Phones
Cisco Small Business
Analog Telephone
Adapters
www.cisco.com/go/smallbizvoicegateways
Cisco Small Business
Cisco Partner Central
for Small Business
(Partner Login Required)
www.cisco.com/web/partners/sell/smb
Cisco Small Business
Home
www.cisco.com/smb