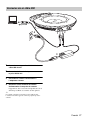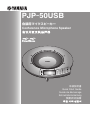
1
PJP-50USB 会議用マイクスピーカー Conference Microphone Speaker VOL 3 CLEAR 1 4 7 2 5 6 MIC MUTE 9 8 0 STANDBY ENTER MENU 取扱説明書 Quick Start Guide Guide de démarrage Schnellstartanleitung 快捷启动指南 빠른 시작 설명서 Contents Japanese ( 日本語 ) .................................................................. 1 English ..................................................................................... 12 French (Français) ................................................................... 22 German (Deutsch).................................................................. 30 Chinese ( 中文 ) ...................................................................... 38 Korean (한국어) ...................................................................... 46 はじめに ヤマハ PJP-50USB をお買い上げいただきありがとうございます。本機は TV 会議システムや Web 会議シ ステムに接続して、音声端末として機能する会議用マイクスピーカーです。 本書中の警告や注意を必ず守り、正しく安全にお使いください。 本書はなくさないように、大切に保管してください。 ■箱の中身をご確認ください • PJP-50USB(本機) (1 個) • USB ケーブル(1 本) • AC アダプター(1 個)(PJP-PS04 または PJP-PS02 [地域によって異なる] ) • CD-ROM(1 枚) • 電源コード(1 本) • 保証書(1 枚) • 取扱説明書(本書)(1 冊) 安全上のご注意 本機を安全にお使いいただくために 以下の点を必ず守ってお使いください。 ■安全のための注意事項を守る 詳しくは、2 ∼ 3 ページをご覧ください。 ■故障したら使用を中止する。 お買い上げの販売店またはヤマハのサポート窓口にご連絡ください。 マークの意味 本書では、本機を安全にお使いいただくため、守っていただきたい事項に次のマークを表示していますので、 必ずお読みください。 警告 人体に危険を及ぼしたり、装置に大きな損害を与える可能性があることを示しています。必ず守ってくださ い。 注意 機能停止を招いたり、各種データを消してしまう可能性があることを示しています。十分注意してください。 • 本書の記載内容を一部または全部を無断で転載することを禁じます。 • 本書の内容および本体の仕様は、改良のため予告なく変更されることがあります。 • 本機を使用した結果発生した情報の消失等の損失については、当社では責任を負いかねます。保証は本 機の物損の範囲に限ります。予めご了承ください。 サポート窓口のご案内 本機に関する技術的なご質問やお問い合わせは、下記へご連絡ください。 ■お客様ご相談窓口 TEL:053-460-2822 ご相談受付時間 9 時∼ 12 時、13 時∼ 17 時 (土・日・祝日、弊社定休日、年末年始は休業とさせて頂きます) ■お問い合わせページ http://www.yamaha.co.jp/projectphone/support/ Japanese 1 警告 本機を安全にお使いいただくために、下記のご注意 をよくお読みになり、必ず守ってお使いください。 • 電源を入れたままケーブル類を接続しないでくだ さい。感電や故障、本機および接続機器の破損の 恐れがあります。 • 本機(付属品を含む)は日本国内仕様であり、海 外の規格などには準拠しておりません。 • 本機のポートに指や異物を入れないでください。 感電や故障、ショートの原因となります。 • 本機は一般オフィス向けの製品であり、人の生命 や高額財産などを扱うような高度な信頼性を要求 される分野に適応するようには設計されていませ ん。 本機を誤って使用した結果発生したあらゆる損失 について、当社では一切その責任を負いかねます ので、あらかじめご了承ください。 • 本機を他の機器と重ねて置かないでください。熱 がこもり、火災や故障の原因となることがありま す。 • 付属の AC アダプター、電源コードは国内専用で す。AC100V(50/60Hz)のコンセントに接続 して使用してください。それ以外のコンセントに 接続した場合、火災や感電、故障の原因となるこ とがあります。 • 本機を使用する場合は、付属の AC アダプター (PJP-PS04 または PJP-PS02 [地域によって 異なる])をお使いください。それ以外の AC ア ダプターを使用した場合、火災や感電、故障の原 因となることがあります。 • 本機から発煙や異臭がするとき、内部に水分や薬 品類が入ったときは、直ちに電源コードをコンセ ントから抜いてください。そのまま使用を続ける と、火災や感電のおそれがあります。 • 濡れた手で電源コードを触らないでください。感 電や故障の原因となることがあります。 • 電源コードを傷付けたり、無理に曲げたり、引っ 張ったりしないでください。火災や感電、故障、 ショート、断線の原因となります。 • 電源コードの上に重いものを載せたり、電源コー ドをステープルで止めたりしないでください。火 災や感電、故障、ショート、断線の原因となりま す。 • 電源コードを熱器具に近づけないでください。火 災や感電、故障、ショート、断線の原因となりま す。 • 安全のため、電源コードは容易に外すことのでき るコンセントに接続してください。家具の後ろな ど、手の届かない場所にあるコンセントには接続 しないでください。 • 本機を落下させたり、強い衝撃を与えたりしない でください。内部の部品が破損し、感電や火災、 故障の原因となります。 • 本機を分解したり、改造したりしないでくださ い。火災や感電、故障の原因となります。 2 Japanese • 近くに雷が発生したときは、電源コードやケーブ ル類を取り外し、使用をお控えください。落雷に よって火災や故障の原因となることがあります。 • 本機は水平な安定した場所に設置してください。 立てかけたり不安定な場所に設置したりすると、 落下や転倒して破損や故障の原因となります。 • 本機を長期間使用しないときは、電源ケーブルを 必ずコンセントから外してください。感電や故障 の原因となることがあります。 • 本機を下記の場所には設置しないでください。水 滴の混入により、火災や感電の原因となります。 − 浴室、加湿器を過度にきかせた部屋など − 雨や雷、水がかかるところ • 心臓ペースメーカーをご使用のお客様は、本機が 情報処理装置電波障害自主規制協議会(VCCI) の基準に基づくクラス B の情報技術装置であり、 本機に近接する範囲で電磁波を受けることをご承 知おきください。 注意 使用上のご注意 本機の故障や動作不良を防止するために、下記のご 注意をよくお読みになり、必ず守ってお使いくださ い。 • 本機の使用方法や設定を誤って使用した結果発生 したあらゆる損失について、当社では一切その責 任を負いかねますので、あらかじめご了承くださ い。 • 本機に触れる際は、人体や衣服から静電気を除去 するなど、静電気対策を行ってください。故障の 原因となります。 • 誤動作や故障により本機の記録内容が変化・消失 する場合があります。重要なデータはお客様の責 任のもと、定期的に記録されることをお奨めいた します。 • 電源プラグのほこり等は定期的にふき取ってくだ さい。ほこり等が付着した状態で使用すると、故 障や動作不良の原因となります。 • 電源プラグは根元まで確実に差し込んでくださ い。正しく接続しないと、故障や動作不良の原因 となります。 • 直射日光や暖房器等の風が当たる場所、温度や湿 度が高い場所には、置かないでください。故障や 動作不良の原因となります。 • 極端に低温の場所や温度差が大きい場所、結露が 発生しやすい場所で使用しないでください。故障 や動作不良の原因となります。結露が発生した場 合は、電源コードをコンセントから抜き、乾燥さ せ、充分室温に慣らしてから使用してください。 • ほこりが多い場所や油煙が飛ぶ場所、腐蝕性ガス がかかる場所、磁界が強い場所に置かないでくだ さい。故障や動作不良の原因となります。 • 無線機やテレビなどの近くに置かないでくださ い。電磁波や磁気により動作不良の原因となりま す。 • 本機を修理や移動等の理由により輸送する場合に は、必ず本機の設定を記録しておいてください。 • 本機のご使用にあたり、周囲の環境によっては電 話、ラジオ、テレビなどに雑音が入る場合があり ます。この場合は本機の設置場所、向きを変えて みてください。 • 本機を譲渡する際は、マニュアル類も同時に譲渡 してください。 • 本機を廃棄する場合には不燃物ゴミとして廃棄し てください。または、お住まいの自治体の指示に 従ってください。 ■電波障害自主規制について この装置は、情報処理装置等電波障害自主規制協 議会 (VCCI) の基準に基づくクラス B 情報技術装 置です。この装置は、家庭環境で使用することを 目的としていますが、この装置がラジオやテレビ ジョン受信機に近接して使用されると、受信障害 を引き起こすことがあります。 取扱説明書に従って正しい取り扱いをしてくださ い。 ■高調波について JIS C 61000-3-2 適合品 JIS C 61000-3-2 適合品とは、日本工業規格「電 磁両立性−第 3-2 部:限度値−高調波電流発生限 度値(1 相当たりの入力電流が 20A 以下の機器) 」 に基づき、商用電力系統の高調波環境目標レベル に適合して設計・製造した製品です。 ■輸出について この装置は、 「外国為替及び外国貿易法」で定めら れた規制対象貨物(および技術)に該当するため、 輸出または日本国外への持ち出しには、同法およ び関連法令の定めるところに従い、日本政府によ る輸出許可を得る必要があります。 Japanese 3 本書の表記について ■略称について ■詳細な技術情報について 本書ではそれぞれの製品について、以下のように略 称で記載しています。 • Yamaha PJP-50USB:本機 本機を使いこなすためには、PC の設定やインター ネット、ネットワークに関する詳しい知識が必要と なる場合があります。付属のマニュアルではこれら の情報について解説しておりませんので、詳しくは 市販の解説書などを参考にしてください。 • ヤマハプロジェクトフォン:PJP • Microsoft® Windows®:Windows • Microsoft® Windows® 7:Windows 7 • Microsoft® Windows Vista®: Windows Vista • Microsoft® Windows XP®:Windows XP • Microsoft® Windows 2000 Professional®: Windows 2000 Professional 4 Japanese ■商標について • Microsoft 、Windows は米国 Microsoft 社の米 国およびその他の国における登録商標です。 本製品のお客様サポートについて(サポート規定) ヤマハ株式会社は本製品を快適に、またその性能・ 機能を最大限に活かしたご利用が可能となりますよ うに以下の内容・条件にてサポートをご提供いたし ます。 1. サポート方法 1 FAQ、技術情報、設定例、ソリューション例等の 2 3 4 5 Web 掲載 電話でのご質問への回答 お問い合わせフォームからのご質問への回答 カタログ送付 代理店・販売店からの回答 ご質問内容によっては代理店・販売店へご質問内 容を案内し、代理店・販売店よりご回答させてい ただく場合がありますので予めご了承のほどお 願い致します。 6 再現性がない、及び特殊な環境でしか起きない等 7 8 9 0 2. サポート項目 1 製品仕様について 2 お客様のご利用環境に適した弊社製品の選定に ついて 3 簡易なネットワーク構成での利用方法について 4 製品の修理について 5 代理店または販売店のご紹介 A の事象に関しては、解決のための時間がかかった り適切なサポートが行えない場合があります。 オンサイト保守・定期保守等は代理店にて有償に て行います。詳細な内容は代理店にご確認をお願 い致します。 他社サービス、他社製品、及び他社製品との相互 接続に関してのサポートは弊社 Web 上に掲載し ている範囲に限定されます。 やむを得ない事由により本機の返品・交換が生じ た場合は、ご購入店経由となります。尚、交換、 返品に際しましてはご購入店、ご購入金額を証明 する証憑が必要となります。 製品の修理は代理店・販売店経由で受付けさせて 頂きます。弊社への直接持ち込みはできません。 また、着払いでの修理品受付は致しておりませ ん。発送は弊社指定の通常宅配便(国内発送の み)にて行わせて頂きます。修理完了予定期間は 変更になる場合がありますのでご了承のほどお 願い致します。尚、保証期間中の無償修理(無償 例外事項)等の詳細規定は保証書に記載しており ます。 上記サポート規定は予告なく変更されることが あります。 3. 免責事項・注意事項 1 回答内容につきましては正確性を欠くことのな 2 3 4 5 いように万全の配慮をもって行いますが、回答内 容の保証、及び回答結果に起因して生じるあらゆ る事項について弊社は一切の責任を負うことは できません。 また、サポートの結果又は製品をご利用頂いたこ とによって生じたデータの消失や動作不良等に よって発生した経済的損失、その対応のために費 やされた時間的・経済的損失、直接的か間接的か を問わず逸失利益等を含む損失及びそれらに付 随的な損失等のあらゆる損失について弊社は一 切の責任を負うことはできません。 尚、これらの責任に関しては弊社が事前にその可 能性を知らされていた場合でも同様です。但し、 契約及び法律でその履行義務を定めた内容は、そ の定めるところを遵守するものと致します。 ファームウェアの修正は弊社が修正を必要と認 めたものについて生産終了後 2 年間行います。 実ネットワーク環境での動作保証、性能保証は 行っておりません。 期日・時間指定のサポート、及び海外でのご使 用、日本語以外でのサポートは行っていません。 お問い合わせの回答を行うにあたって、必要な情 報のご提供をお願いする場合があります。情報の ご提供がない場合は適切なサポートができない 場合があります。 Japanese 5 各部の名称とはたらき 上面 1 2 VOL 3 2 1 5 CLEAR 4 8 7 6 MIC MUTE 9 # 0 STANDBY ENTER MENU 3 4 5 6 78 9 0 A 7 1 マイクインジケーター 本機の電源が入ると LED が青色点灯し、マイク ミュート時に消灯します。 / キー 設定項目を選んだりカーソルを移動する際に押しま す。 2 アレイマイク 8 ENTER キー/ MENU キー 発話者の音声を取得します。上面に 8 個配列されて います。 • 設定を確定する際に押します。 3 キー 拡張用です。 4 キー/ • 設定メニューを表示する際に押します。 9 数字キー 設定項目を選択する際に押します。 STANDBY キー • 設定項目を表示中、トップ画面に戻る際に押しま す。 • 本機をスタンバイモードに設定する際に、長押し します。 0 MIC MUTE キー 本機のマイクを一時的に停止(ミュート)する際に 押します。ミュート中は、MIC MUTE キーの周りに ある LED がオレンジ色に点灯します。 もう一度 MIC MUTE キーを押すとミュートは解除され、LED が消 灯します。 y ヒント ス タ ン バ イ モ ー ド か ら 復 帰 す る 場 合 は、 STANDBY キーを長押しします。 キー/ 5 ディスプレイ 本機の状態を表示します。 6 CLEAR キー 設定を保存せずに取り消したり前の画面に戻る際に 押します。 6 Japanese A VOL + / −キー スピーカーの音量を調整する際に押します。長押し すると連続して音量を上げ下げできます。 側面 1 2 DC IN 12V 1 USB ポート PC と USB ケーブルで接続します。 3 4 IN AUDIO OUT 3 AUDIO IN 端子 オーディオ機器や PC のライン出力端子またはヘッ ドフォン出力端子に接続します。 2 DC IN 12V 端子 付属の AC アダプターを接続します。 4 AUDIO OUT 端子 オーディオ機器や PC のライン入力端子またはマイ ク入力端子に接続します。 底面 1 認証ラベル 2 以下の情報が記載されています。 • MODEL No.:本機の機器名が記載されていま す。 • SER.:製品を管理/区分するための製造番号 (シリアル番号)が記載されています。 2 アレイスピーカー 音声を出力します。底面に 4 個配列されています。 3 アジャスター 設置した台や机が平坦でないなどの理由で本機が安 定しない場合に、脚部の高さを調整します。 1 2 3 トップ画面 1 USB モード USB モードの設定が表示されます。 AUD:オーディオモードで動作します。 TEL :テレフォニーモードで動作します。 2 マイクレベル マイクの音声入力レベルが表示されます。 MIC 1 2 3 再生音量 345 スピーカーの音声出力レベルが表示されます。 4 USB 表示 本機が PC に USB 接続されている場合に表示され ます。 5 スピーカーミュート スピーカーミュート時に表示されます。 Japanese 7 接続 接続する前にご確認ください ■USB ケーブル(USB で PC に接続する場合) 付属の USB ケーブルをご用意ください。 ご注意 ■本機を接続する PC の仕様 本機を接続する PC には、以下のシステム環境が必 要です。 • OS:Windows 7、Windows Vista SP1 以上 (32bit 版) 、Windows XP SP2 以上 (32bit 版) 、Windows 2000 Professional SP4 付属の USB ケーブル以外は使用しないでください。それ 以外の USB ケーブルを使用した場合、動作に問題が生じ る可能性があります。 • USB 端子:USB1.1 以降(USB 2.0 対応を推奨) ■音声接続ケーブル(USB 以外で PC や外部機 器と接続する場合) • 1台のPCに本機以外の会議用マイクスピーカーを接続す ることはできません。 音声接続ケーブル(ステレオミニケーブル)を 2 本 ご用意ください。 • 本機と PC は、直接接続してください。USB ハブを経由し て接続すると、動作に問題が生じる可能性があります。 y ヒント • PC 本体の使用状況(作業負荷やメモリ残の状況)などに より、まれに音声再生が途切れることがあります。 テレビ会議システムは、機種によって音声入力/出力端子 の形状が異なる場合があります。その場合はご使用のテレ ビ会議システムの音声入力/出力端子の形状に合ったプラ グ形状の音声接続ケーブルをお使いください。テレビ会議 システム側に接続するプラグの種類に関わらず、プロジェ クトフォン側に接続するプラグはステレオミニプラグで す。 8 Japanese ご注意 USB ケーブルで接続する USB 端子へ 4 1 2 3 1 付属のUSB ケーブルで本機とPCを接続す る。 2 DC IN 12V端子にACアダプターを接続す る。 3 電源コードを AC アダプターに接続する。 4 電源コードをコンセントに接続する。 本機の電源が入ります。起動音が鳴り、マイク インジケーターが点灯します。 y ヒント 本機は PC から標準の USB オーディオデバイスとして認 識されるため、USB ドライバーを別途インストールする必 要はありません。 Japanese 9 音声接続ケーブルで接続する 音声入力端子へ 5 3 4 1 本機の AUDIO IN 端子と PC やテレビ会議 システムの音声出力端子を接続する。 2 本機の AUDIO OUT 端子と PC やテレビ会 議システムの音声入力端子を接続する。 3 DC IN 12V端子にACアダプターを接続す る。 4 電源コードを AC アダプターに接続する。 5 電源コードをコンセントに接続する。 本機の電源が入ります。起動音が鳴り、マイク インジケーターが点灯します。 10 Japanese 2 1 音声出力端子へ 主な仕様 総合 外部インターフェース: USB2.0 Full Speed、アナログ入出力各 1 系統 (ステレオミニジャック)、AC アダプター接続用コネ クター(DC 12V IN) 最大消費電力: オーディオ マイク: 8個 スピーカー: 4個 最大 :9.0W 周波数帯域: 電波障害規格: 録音周波数帯域:200 ∼ 20,000Hz 再生周波数帯域:300 ∼ 20,000Hz VCCI クラス B 動作環境: 動作温度 :0 ∼ 40 ℃、動作湿度 :20 ∼ 85% 信号処理: 適応型エコーキャンセラー、ノイズリダクション、マ イクアレイ制御 寸法: 283.4(W)× 51.5(H)× 297.5(D)mm 重量: 1.4kg(AC アダプター含まず) 電源: AC100V(50 / 60Hz) 付属品: USB ケーブル(2.0m)、AC アダプター(1.8m) 、 電源コード(2.0m) 、CD-ROM、取扱説明書、保証書 PC 動作環境: 対応 OS:Microsoft®Windows®7/Vista/XP/ 2000 USB 端子:USB1.1 以降(USB2.0 対応を推奨) その他 ファームウェアリビジョンアップ(PC より USB で 転送) Japanese 11 IMPORTANT SAFETY INSTRUCTIONS 10 CAUTION RISK OF ELECTRIC SHOCK DO NOT OPEN CAUTION: TO REDUCE THE RISK OF ELECTRIC SHOCK, DO NOT REMOVE COVER (OR BACK). NO USER-SERVICEABLE PARTS INSIDE. REFER SERVICING TO QUALIFIED SERVICE PERSONNEL. • This graphic symbol is intended to alert you to the presence of important operating and maintenance (servicing) instructions in the literature accompanying the appliance. 2 3 4 5 6 7 8 9 12 Explanation of Graphical Symbols This graphic symbol is intended to alert you to the presence of uninsulated “dangerous voltage” within the product’s enclosure that may be of sufficient magnitude to constitute a risk of electric shock to persons. 1 11 Read Instructions – All the safety and operating instructions should be read before you operate the product. Retain Instructions – The safety and operating instructions should be retained for future reference. Heed Warnings – All warnings on the product and in the operating instructions should be adhered to. Follow Instructions – All operating and use instructions should be followed. Cleaning – Unplug this product from the PC and wall outlet before cleaning. Do not use liquid cleaners or aerosol cleaners. Attachments – Do not use attachments not recommended by the product manufacturer as they may cause hazards. Water and Moisture – Do not use this product near water – near a bath tub, wash bowl, kitchen sink, or laundry tub; in a wet basement; or near a swimming pool; and the like. Accessories – Do not place this product on an unstable cart, stand, tripod, bracket, or table. The product may fall, causing serious injury to a child or adult, and serious damage to the product. Use only with a cart, stand, tripod, bracket, or table recommended by the manufacturer, or sold with the product. Any mounting of the product should follow the manufacturer’s instructions, and should use a mounting accessory recommended by the manufacturer. A product and cart combination should be moved with care. Quick stops, excessive force, and uneven surfaces may cause the product and cart combination to overturn. 13 14 15 16 17 18 19 20 12 English Power Sources – This product should be operated only from the type of power source indicated on the mark. Grounding or Polarization – This product may be equipped with a polarized alternating current line plug (a plug having one blade wider than the other). This plug will fit into the power outlet only one way. This is a safety feature. If you are unable to insert the plug fully into the outlet, try reversing the plug. If the plug should still fail to fit, contact your electrician to replace your obsolete outlet. Do not defeat the safety purpose of the polarized plug. USB Cable Protection – USB cable should be routed so that they are not likely to be walked on or pinched by items placed upon or against them, paying particular attention to cords at plugs, convenience receptacles, and the point where they exit from the product. Lightning – For added protection for this product during a lightning storm, or when it is left unattended and unused for long periods of time, unplug it from the PC and wall outlet. This will prevent damage to the product due to lightning and power-line surges. Overloading – Do not overload wall outlets, extension cords, bend cords, or integral convenience receptacles as this can result in a risk of fire or electric shock. Object and Liquid Entry – Never push objects of any kind into this product through openings as they may touch dangerous voltage points or short-out parts that could result in a fire or electric shock. Never spill liquid of any kind on the product. Servicing – Do not attempt to service this product yourself as opening or removing covers may expose you to dangerous voltage or other hazards. Refer all servicing to qualified service personnel. Damage Requiring Service – Unplug this product from the PC and wall outlet and refer servicing to qualified service personnel under the following conditions: a) When the USB cable is damaged, b) If liquid has been spilled, or objects have fallen into the product, c) If the product has been exposed to rain or water, d) If the product does not operate normally by following the operating instructions. Adjust only those controls that are covered by the operating instructions as an improper adjustment of other controls may result in damage and will often require extensive work by a qualified technician to restore the product to its normal operation, e) If the product has been dropped or damaged in any way, and f) When the product exhibits a distinct change in performance - this indicates a need for service. Replacement Parts – When replacement parts are required, be sure the service technician has used replacement parts specified by the manufacturer or have the same characteristics as the original part. Unauthorized substitutions may result in fire, electric shock, or other hazards. Safety Check – Upon completion of any service or repairs to this product, ask the service technician to perform safety checks to determine that the product is in proper operating condition. Heat – The product should be situated away from heat sources such as radiators, heat registers, stoves, or other products (including amplifiers) that produce heat. COMPLIANCE INFORMATION STATEMENT (DECLARATION OF CONFORMITY PROCEDURE) Responsible Party: Refer to the warranty Address: Refer to the warranty This device complies with the requirements listed in FCC regulations, Part 15 for Class “B” digital devices. If you are using a cardiac pacemaker, please note that this device can radiate radio frequency energy in the area near the product. Telephone: Refer to the warranty Hours of operation: Refer to the warranty Type of Equipment: Conference Microphone Speaker Model Name: PJP-50USB This device complies with Part 15 of the FCC Rules. Operation is subject to the following two conditions: 1) this device may not cause harmful interference, and 2) this device must accept any interference received including interfernce that may cause undesired operation. See user manual instructions if interference to radio reception is suspected. FCC INFORMATION (for US customers) 1 IMPORTANT NOTICE: DO NOT MODIFY THIS UNIT! This product, when installed as indicated in the instructions contained in this manual, meets FCC requirements. Modifications not expressly approved by Yamaha may void your authority, granted by the FCC, to use the product. 2 IMPORTANT: When connecting this product to accessories and/or another product use only high quality shielded cables. Cable/s supplied with this product MUST be used. Follow all installation instructions. Failure to follow instructions could void your FCC authorization to use this product in the USA. 3 NOTE: This product has been tested and found to comply with the requirements listed in FCC Regulations, Part 15 for Class “B” digital devices. Compliance with these requirements provides a reasonable level of assurance that your use of this product in a residential environment will not result in harmful interference with other electronic devices. This equipment generates/uses radio frequencies and, if not installed and used according to the instructions found in the users manual, may cause interference harmful to the operation of other electronic devices. Compliance with FCC regulations does not guarantee that interference will not occur in all installations. If this product is found to be the source of interference, which can be determined by turning the unit “OFF” and “ON”, please try to eliminate the problem by using one of the following measures; Relocate either the product generating the interference or the device that is being affected by the interference. Utilize power outlets that are on different branch (circuit breaker of fuse) circuits or install AC line filter/s. In the case of radio or TV interference, relocate/ reorient the antenna. If the antenna lead-in is 300 ohm ribbon lead, change the lead-in to coaxial type cable. If these corrective measures do not produce satisfactory results, please contact your local retailer authorized to distribute this type of product. If you can not locate the appropriate retailer, please contact the responsible party stated on the warranty, Address: Refer to the warranty The above statements apply ONLY to those products distributed by the responsible party stated on the warranty. English 13 CAUTION: READ THIS BEFORE OPERATING YOUR UNIT. 1 2 3 4 5 6 7 8 9 10 11 12 13 14 15 16 17 18 19 20 To assure the finest performance, please read this manual carefully. Keep it in a safe place for future reference. Install this unit in a well ventilated, cool, dry, clean place with at least 10 cm on the top, 10 cm on the left and right, and 10 cm at the back of this unit — away from direct sunlight, heat sources, vibration, dust, moisture, and/or cold. Locate this unit away from other electrical appliances, motors, or transformers to avoid humming sounds. Do not expose this unit to sudden temperature changes from cold to hot, and do not locate this unit in an environment with high humidity (i.e. a room with a humidifier) to prevent condensation inside this unit, which may cause an electrical shock, fire, damage to this unit, and/or personal injury. Avoid installing this unit where foreign object may fall onto this unit and/or this unit may be exposed to liquid dripping or splashing. On the top of this unit, do not place: – Other components, as they may cause damage and/or discoloration on the surface of this unit. – Burning objects (i.e. candles), as they may cause fire, damage to this unit, and/or personal injury. – Containers with liquid in them, as they may fall and liquid may cause electrical shock to the user and/or damage to this unit. Do not cover this unit with a newspaper, tablecloth, curtain, etc. in order not to obstruct heat radiation. If the temperature inside this unit rises, it may cause fire, damage to this unit, and/or personal injury. Do not plug in this unit to a wall outlet until all connections are complete. When using this unit, be sure to use the supplied AC adapter (PJP-PS04 or PJP-PS02 [depending on the regions]). Using other AC adapter may cause an electrical shock, fire, and/or damage to this unit. Do not operate this unit upside-down. It may overheat, possibly causing damage. Do not use force on switches, knobs, and/or cords. When disconnecting the USB cable from the PC or the power cable from the wall outlet, grasp the plug: do not pull the cable. Do not use force on the power cable to prevent a fire, electrical shock, damage to this unit, short circuit, and/or disconnection. Do not clean this unit with chemical solvents; this might damage the finish. Use a clean, dry cloth. Only voltage specified on this unit must be used. Using this unit with a higher voltage than specified is dangerous and may cause fire, damage to this unit, and/or personal injury. Yamaha will not be held responsible for any damage resulting from use of this unit with a voltage other than specified. Do not attempt to modify or fix this unit. Contact qualified Yamaha service personnel when any service is needed. When not planning to use this unit for long periods of time (i.e. vacation), disconnect the AC power plug from the wall outlet. Condensation will form when the surrounding temperature changes suddenly. Disconnect the power cable from the outlet and USB cable from the computer, then leave this unit alone. When using the unit for a long time, the unit may become warm. Disconnect the cables, then leave the unit alone for cooling. Install this unit near the wall outlet and where the AC power plug can be reached easily. To prevent damage by lightning, keep the cables disconnected during a lightning storm. 14 English 21 Do not install this product upside down or in upright position, or mount it on a wall. Install the product on a stable, flat surface by orienting it horizontally. 22 Do not install this product near television sets and/or wireless devices to prevent operation failure caused by electromagnetic waves and/or magnetism. This unit is not disconnected from the AC power source as long as it is connected to the AC wall outlet, even if this unit itself is turned off. This state is called the standby mode. In this state, this unit is designed to consume a very small quantity of power. FOR CANADIAN CUSTOMERS To prevent electric shock, match wide blade of plug to wide slot and fully insert. This Class B digital apparatus complies with Canadian ICES-003. WARNING TO REDUCE THE RISK OF FIRE OR ELECTRIC SHOCK, DO NOT EXPOSE THIS UNIT TO RAIN OR MOISTURE. WARNING This is a class B product. In a domestic environment this product may cause radio interference in which case the user may be required to take adequate measures. WARNING This equipment will be inoperable when mains power fails. ■ For U.K. customers If the socket outlets in the home are not suitable for the plug supplied with this appliance, it should be cut off and an appropriate 3 pin plug fitted. For details, refer to the instructions described below. Note The plug severed from the mains lead must be destroyed, as a plug with bared flexible cord is hazardous if engaged in a live socket outlet. ■ Special Instructions for U.K. Model IMPORTANT THE WIRES IN MAINS LEAD ARE COLOURED IN ACCORDANCE WITH THE FOLLOWING CODE: Blue: NEUTRAL Brown: LIVE As the colours of the wires in the mains lead of this apparatus may not correspond with the coloured markings identifying the terminals in your plug, proceed as follows: The wire which is coloured BLUE must be connected to the terminal which is marked with the letter N or coloured BLACK. The wire which is coloured BROWN must be connected to the terminal which is marked with the letter L or coloured RED. Making sure that neither core is connected to the earth terminal of the three pin plug. Introduction Thank you for purchasing Yamaha PJP-50USB. This product is a microphone/speaker unit to be connected to a video or web conference system for use as its audio terminal. For your safety, please read all safety instructions and precautions stated in this manual carefully and keep it in a safe place for future reference. ■ Check the contents • • • • • • PJP-50USB (this unit) x 1 AC adapter (PJP-PS04 or PJP-PS02 [depending on the regions]) x 1 Power cable x 1 USB cable x 1 CD-ROM x 1 Quick Start Guide (this manual) x 1 ■ About this Manual • In this manual, the product names are described as follows. – Yamaha PJP-50USB: this unit – Yamaha Projectphone: PJP – Microsoft® Windows®: Windows – Microsoft® Windows® 7: Windows 7 – Microsoft® Windows Vista®: Windows Vista – Microsoft® Windows XP®: Windows XP – Microsoft® Windows 2000 Professional®: Windows 2000 Professional • Detailed knowledge on the computer, Internet, and network may be required to utilize this unit at its full performance. As the provided manual does not give detailed technical information, please also refer to commercially available books as required. • This manual is printed prior to production. Design and specifications are subject to change in part as a result of improvements, etc. ■ About trademarks • Microsoft and Windows are registered trademarks of Microsoft Corporation in the United States and other countries. Information for Users on Collection and Disposal of Old Equipment This symbol on the products, packaging, and/or accompanying documents means that used electrical and electronic products should not be mixed with general household waste. For proper treatment, recovery and recycling of old products, please take them to applicable collection points, in accordance with your national legislation and the Directives 2002/96/EC. By disposing of these products correctly, you will help to save valuable resources and prevent any potential negative effects on human health and the environment which could otherwise arise from inappropriate waste handling. For more information about collection and recycling of old products, please contact your local municipality, your waste disposal service or the point of sale where you purchased the items. [For business users in the European Union] If you wish to discard electrical and electronic equipment, please contact your dealer or supplier for further information. [Information on Disposal in other Countries outside the European Union] This symbol is only valid in the European Union. If you wish to discard these items, please contact your local authorities or dealer and ask for the correct method of disposal. English 15 Controls and Functions Top panel 1 2 VOL 3 2 1 5 CLEAR 4 8 7 6 MIC MUTE 9 # 0 STANDBY ENTER MENU 3 4 5 6 78 1 Microphone indicators When this unit is turned on, the LEDs light in blue. The LEDs are turned off while the microphones are being muted. 2 Arrayed microphones The eight microphones on the top panel pick up the voices of the talkers. 3 Reserved for future extension. 4 / STANDBY • While the setting item is being displayed, press the key to return to the top screen. • Hold down the key to set the system to the standby mode. y Hold / STANDBY to exit the standby mode. 5 Display The LCD shows the current status of this unit. 6 CLEAR Press the key to cancel a setting without saving it or to return to the previous screen. 16 English 9 0 A 7 / Press either key to select a setting item or move the cursor up or down. 8 ENTER/MENU • Press the key to enter a setting. • Press the key to display the setting menu. 9 Numeric keys Press the key to select a setting item. 0 MIC MUTE Press the key to temporarily defeat (mute) the microphones of this unit. The key lights in orange when muted. Pressing the key when the microphones are muted releases the mute and turns the LED off. A VOL +/– Press either key to adjust the speaker volume. Holding either key increases or decreases the volume continuously. Side panel 1 2 DC IN 12V 1 USB port Connect to the PC using a USB cable. 3 4 IN AUDIO OUT 3 AUDIO IN terminal Connect to the line output terminal or the headphone output terminal of an audio equipment or PC. 2 DC IN 12V terminal Connect the provided AC adapter. 4 AUDIO OUT terminal Connect to the line input terminal or the microphone input terminal of an audio equipment or PC. Bottom panel 1 Serial label The label carries the following information. • MODEL No.: Model number of this unit. • SER.: Serial number for use in management/ distinction of this unit. 2 2 Arrayed speakers The four arrayed speakers on the bottom panel for use in output of the audio. 3 Adjuster If you cannot place this unit stably because of the shape of the desk or other reasons, adjust the foot height using the adjuster. 1 2 3 Top screen 1 USB mode Displays the setting of the USB mode. AUD : This unit functions in the audio mode. TEL : This unit functions in the telephony mode. Volume 2 MIC Displays the audio input level of the microphones. 3 Volume Displays the audio output level of the speakers. 1 2 345 4 USB indicator Lights up when this unit is connected to the PC using a USB cable. 5 Speaker mute Lights up when the speakers are muted. English 17 Connection Check the following before connecting this unit to the PC ■ System requirement Prepare the supplied USB cable. The PC connected to this unit should meet the following system requirement. • OS: Windows 7, Windows Vista SP1 or later (32 bit), Windows XP SP2 or later (32 bit), Windows 2000 Professional SP4 • USB port: USB 1.1 or later (USB 2.0 recommended) Note Notes Be sure to use the supplied USB cable. Otherwise operation failure may be caused. • You can not connect more than one conference microphone speaker to the PC at the same time. • Connect this unit and the PC directly. Connecting them through a USB hub may cause problems in operation. • Audio reproduction may be interrupted depending on the PC usage situations (workloads or available memory space). ■ USB cable (when connecting to a PC using a USB cable) ■ Audio connection cable (when connecting to a PC or external device without using a USB cable) Prepare two audio connection cables (stereo mini-jack cables). y The designs of the audio input/output terminals of video conference systems vary depending on the models. Always use audio connection cables having the plugs matching the audio input/output terminals of the connected video conference system. Note that the plugs connected to the Projectphone should always be the stereo mini plugs. 18 English Connection using a USB cable To USB port 4 1 2 3 1 Connect this unit to the PC using the supplied USB cable. 2 Connect the AC adapter to the DC IN 12V terminal. 3 Connect the power cable to the AC adapter. 4 Connect the power cable to the AC outlet. This unit is turned on. The start-up sound plays and the microphone indicators light up. y You do not need to install the USB driver separately because this unit is recognized as a basic audio device by the PC. English 19 Connection using audio connection cables To audio input terminal 5 3 4 1 Connect the AUDIO IN terminal of this unit to the audio output terminal of the PC or video conference system. 2 Connect the AUDIO OUT terminal of this unit to the audio input terminal of the PC or video conference system. 3 Connect the AC adapter to the DC IN 12V terminal. 4 Connect the power cable to the AC adapter. 5 Connect the power cable to the AC outlet. This unit is turned on. The start-up sound plays and the microphone indicators light up. 20 English 2 1 To audio output terminal Specifications General Interface: USB 2.0 (full), Analog I/O (stereo-mini), AC adapter (DC 12V IN) Power consumption (max): Approx. 9.0 W Radio interference standard: FCC Part 15 (US) EN55022 (EU) Operating environment: Temperature: 0 to 40°C (32 to 104°F), Humidity: 20 to 85% Audio Microphones: 8 units Speakers: 4 units Frequency bandwidth: For recording: 200 to 20,000 Hz For playback: 300 to 20,000 Hz Signal processing: Adaptive echo canceller, Noise reduction, Microphone array control Dimensions (W x H x D): 283.4 x 51.5 x 297.5 mm (11-3/16" x 2-9/32" x 11-23/32") Weight (excl. AC adapter): 1.4 kg (3.09 lbs) Power source: 100 to 240 V AC (50/60 Hz) Accessories: USB cable (2.0 m), AC adapter (1.8 m), Power cable (2.0 m), CD-ROM, Quick Start Guide PC environment: OS: Microsoft® Windows® 7/Vista/XP/2000 USB port: USB 1.1 or later (USB 2.0 recommended) Other: Firmware revision upgrade (transfer from PC through USB) English 21 ATTENTION: LISEZ CE QUI SUIT AVANT D’UTILISER L’APPAREIL. 1 2 3 4 5 6 7 8 9 10 11 12 13 14 Pour utiliser l’appareil au mieux de ses possibilités, lisez attentivement ce mode d’emploi. Conservez-le soigneusement pour référence. Installez cet appareil dans un endroit frais, bien aéré, sec et propre; ménagez un espace d’au moins 10 cm au dessus, 10 cm à gauche et à droite et 10 cm à l’arrière de l’appareil – veillez à ce qu’il soit à l’abri de la lumière du soleil, des sources de chaleur, des vibrations, des poussières, de l’humidité et du froid. Placez l’appareil loin des équipements, moteurs et transformateurs électriques, pour éviter les ronflements parasites. N’exposez pas l’appareil à des variations brutales de température, ne le placez pas dans un environnement très humide (dans une pièce contenant un humidificateur, par exemple). Cela peut entraîner la formation de condensation à l’intérieur de l’appareil et poser un risque d’électrocution, d’incendie, d’endommagement de l’appareil ou de blessure. Installez l’appareil dans un endroit où aucun objet ne risque de tomber dessus, en veillant à ce l’appareil soit à l’abri de tout liquide ou source d’éclaboussures. Ne posez jamais sur le dessus de l’appareil: – D’autres appareils, car cela pourrait endommager la surface de l’appareil ou provoquer sa décoloration. – Des objets se consumant (comme une bougie, par exemple), car cela pourrait provoquer un incendie, un endommagement de l’appareil ou des blessures. – Des récipients contenant des liquides, car cela pourrait provoquer une électrocution ou un endommagement de l’appareil. Ne couvrez jamais l’appareil d’un journal, d’une nappe, d’un rideau, etc. car cela empêcherait l’évacuation de la chaleur. Une hausse de la température à l’intérieur de l’appareil pourrait provoquer un incendie, un endommagement de l’appareil ou des blessures. Ne raccordez pas l’appareil à une prise de courant avant que tous les branchements ne soient effectués. Veillez à toujours alimenter l’appareil avec l’adaptateur secteur fourni (PJP-PS04 ou PJP-PS02 [En fonction de la région]). L’utilisation de tout autre adaptateur secteur pourrait causer une électrocution, un incendie et/ou endommager l’appareil. N’utilisez jamais l’appareil quand il est sens dessus dessous. Il risquerait de chauffer anormalement et d’être endommagé. Manipulez toujours les commutateurs, commandes et/ou cordons de l’appareil avec douceur. Quand vous débranchez le câble USB du PC ou le cordon d’alimentation de la prise murale, saisissez toujours la fiche. Ne tirez jamais sur le câble même. Ne manipulez jamais brusquement le cordon d’alimentation afin d’éviter les risques d’incendie, d’électrocution, de dommage, court-circuit et/ou débranchement inopiné de l’appareil. N’utilisez jamais de solvant pour nettoyer l’appareil, car cela risquerait d’endommager sa finition. Utilisez un chiffon sec et propre. Alimentez toujours l’appareil en respectant la tension prescrite. Tout branchement à une prise de courant de tension trop élevée est dangereux et peut provoquer un incendie, un endommagement de l’appareil ou des blessures. Yamaha décline toute responsabilité pour tout dommage résultant de l’alimentation de l’appareil avec un courant de tension autre que prescrite. 22 French 15 Ne tentez pas de modifier ni de réparer l’appareil. Contactez un centre de SAV Yamaha pour tout travail de réparation. 16 Si vous ne comptez pas utiliser l’appareil pendant une période prolongée (à la veille d’un long congé, par exemple), débranchez la fiche du cordon d’alimentation de la prise de courant. 17 La condensation se forme lorsque la température ambiante change brusquement. Débranchez le cordon d’alimentation de la prise de courant et le câble USB de l’ordinateur et laissez reposer l’appareil. 18 La température de l’appareil peut augmenter lors d’une utilisation prolongée. Débranchez les câbles et laissez l’appareil refroidir un moment. 19 Installez cet appareil à proximité d’une prise de courant facile d’accès. 20 En cas d’orage, débranchez tous les câbles afin d’éviter tout risque d’endommagement occasionné par la foudre. 21 N’installez pas ce produit sens dessus dessous ni en position verticale et ne le fixez pas au mur. Posez-le uniquement à plat sur une surface stable et de niveau. 22 Installez cet appareil à l’écart des téléviseurs et/ou dispositifs sans fil afin d’éviter les problèmes de fonctionnement causés par les ondes électromagnétiques et/ou phénomènes magnétiques. Cet appareil n’est pas déconnecté du secteur tant qu’il reste branché à la prise de courant. Il se trouve alors “en veille”. En mode veille, l’appareil consomme une très faible quantité de courant. POUR LES CONSOMMATEURS CANADIENS Pour éviter les chocs électriques, introduire la lame la plus large de la fiche dans la borne correspondante de la prise et pousser jusqu’au fond. Cet appareil numérique de la classe B est conforme à la norme NMB-003 du Canada. AVERTISSEMENT POUR RÉDUIRE LES RISQUES D’INCENDIE OU DE SECOUSSE ÉLECTRIQUE, N’EXPOSEZ PAS CET APPAREIL À LA PLUIE OU À L’HUMIDITÉ. AVERTISSEMENT Ce produit fait partie des produits de Classe B. Dans un environnement domestique, ce produit peut causer des interférences radio, dans lequel cas l’utilisateur devra prendre les mesures nécessaires. Introduction Nous vous remercions d’avoir choisi le Yamaha PJP-50USB. Cet appareil est un combiné microphones/haut-parleurs servant d’interface de communication au sein d’un système de conférence web ou vidéo. Pour votre sécurité, nous vous conseillons de lire attentivement toutes les précautions d’utilisation figurant dans ce manuel et de conserver ce dernier en lieu sûr pour toute référence ultérieure. ■ Vérification du contenu de l’emballage • • • • • • PJP-50USB (cet appareil) x 1 Adaptateur secteur (PJP-PS04 ou PJP-PS02 [En fonction de la région]) x 1 Cordon d’alimentation x 1 Câble USB x 1 CD-ROM x 1 Guide de démarrage (ce manuel) x 1 ■ A propos de ce manuel • Les noms de produits figurant dans ce manuel font référence aux produits suivants: – Yamaha PJP-50USB: cet appareil – Yamaha Projectphone: PJP – Microsoft® Windows®: Windows – Microsoft® Windows® 7: Windows 7 – Microsoft® Windows Vista®: Windows Vista – Microsoft® Windows XP®: Windows XP – Microsoft® Windows 2000 Professional®: Windows 2000 Professional • L’exploitation optimale de cet appareil pourrait requérir une connaissance approfondie de l’informatique, de l’internet et des réseaux. Ce manuel ne fournit pas d’explications techniques détaillées. Si nécessaire, procurez-vous la documentation technique ad hoc disponible dans le commerce. • Ce manuel a été imprimé avant la production. La conception et les spécifications du produit sont susceptibles d’être modifiées en vue d’améliorations ou à d’autres fins. ■ A propos des marques commerciales • Microsoft et Windows sont des marques déposées de Microsoft Corporation aux Etats-Unis et dans d’autres pays. Information concernant la Collecte et le Traitement des déchets d’équipements électriques et électroniques. Le symbole sur les produits, l’emballage et/ou les documents joints signifie que les produits électriques ou électroniques usagés ne doivent pas être mélangés avec les déchets domestiques habituels. Pour un traitement, une récupération et un recyclage appropriés des déchets d’équipements électriques et électroniques, veuillez les déposer aux points de collecte prévus à cet effet, conformément à la réglementation nationale et aux Directives 2002/96/EC. En vous débarrassant correctement des déchets d’équipements électriques et électroniques, vous contribuerez à la sauvegarde de précieuses ressources et à la prévention de potentiels effets négatifs sur la santé humaine qui pourraient advenir lors d’un traitement inapproprié des déchets. Pour plus d’informations à propos de la collecte et du recyclage des déchets d’équipements électriques et électroniques, veuillez contacter votre municipalité, votre service de traitement des déchets ou le point de vente où vous avez acheté les produits. [Pour les professionnels dans l’Union Européenne] Si vous souhaitez vous débarrasser des déchets d’équipements électriques et électroniques veuillez contacter votre vendeur ou fournisseur pour plus d’informations. [Information sur le traitement dans d’autres pays en dehors de l’Union Européenne] Ce symbole est seulement valables dans l’Union Européenne. Si vous souhaitez vous débarrasser de déchets d’équipements électriques et électroniques, veuillez contacter les autorités locales ou votre fournisseur et demander la méthode de traitement appropriée. French 23 Commandes et fonctions Panneau supérieur 1 2 VOL 3 2 1 5 CLEAR 4 8 7 6 MIC MUTE 9 # 0 STANDBY ENTER MENU 3 4 5 6 78 1 Témoins de microphones Quand cet appareil est sous tension, les diodes sont allumées en bleu. Ces diodes s’éteignent quand vous désactivez les microphones. 9 0 A 7 / Appuyez sur un de ces boutons pour choisir un paramètre ou déplacer le curseur vers le haut ou vers le bas. 2 Microphones Les huit microphones du panneau supérieur captent la voix des interlocuteurs. 8 ENTER/MENU • Appuyez sur ce bouton pour valider le réglage effectué. • Appuyez sur ce bouton pour afficher le menu de réglages. 3 Réservé à une fonction ultérieure. 9 Touches numériques Utilisez ces touches pour choisir un paramètre. 4 / STANDBY • Quand un paramètre est affiché, appuyez sur ce bouton pour retourner à l’écran principal. • Maintenez ce bouton enfoncé pour mettre l’appareil en mode de veille. 0 MIC MUTE Appuyez sur ce bouton pour désactiver temporairement (sourdine) les microphones de l’appareil. Le bouton s’allume en orange quand les micros sont désactivés. Pour réactiver les micros, appuyez sur ce bouton; les diodes s’éteignent. y Maintenez veille. / STANDBY enfoncé pour quitter le mode de 5 Affichage L’écran LCD affiche le statut de l’appareil. 6 CLEAR Appuyez sur ce bouton pour annuler un réglage sans le sauvegarder ou retourner à l’écran précédent. 24 French A VOL +/– Utilisez ces boutons pour régler le volume des hautparleurs. Pour augmenter ou diminuer le volume de façon continue, maintenez le bouton correspondant enfoncé. Panneau latéral 1 2 DC IN 12V 3 4 IN AUDIO OUT 1 Port USB Sert à brancher l’appareil à un ordinateur à l’aide d’un câble USB. 3 Prise AUDIO IN Raccordez cette prise à la sortie audio ou sortie casque d’un périphérique audio ou ordinateur. 2 Prise DC IN 12V Branchez-y l’adaptateur secteur fourni. 4 Prise AUDIO OUT Raccordez cette prise à l’entrée ligne ou entrée microphone d’un périphérique audio ou ordinateur. Panneau inférieur 1 Etiquette de modèle L’étiquette mentionne les informations suivantes: • MODEL No.: numéro de modèle de l’appareil. • SER.: numéro de série de l’appareil (servant au SAV et à l’identification de l’appareil). 2 2 Rangée de haut-parleurs Les quatre haut-parleurs en rangée sur la face arrière de l’appareil reproduisent la voix des interlocuteurs. 3 Dispositif de réglage Si la forme du bureau ou toute autre raison vous empêche de mettre l’appareil bien à plat, réglez la hauteur de ses pieds à l’aide du dispositif de réglage. 1 2 3 Ecran principal 1 Mode USB Affiche le réglage du mode USB. AUD : L’appareil fonctionne en mode audio. TEL : L’appareil fonctionne en mode téléphonie. Volume 2 MIC Affiche le niveau d'entrée audio des microphones. 3 Volume Affiche le volume des haut-parleurs. 1 2 345 4 Témoin USB S’allume quand vous raccordez l’appareil à un PC avec un câble USB. 5 Sourdine S’allume quand les haut-parleurs sont temporairement désactivés. French 25 Connexions Vérifiez les points suivants avant de brancher l’appareil à un PC ■ Câble USB (connexion à un PC via un câble USB) Préparez le câble USB fourni. Note Utilisez exclusivement le câble USB fourni. L’utilisation d’un autre câble pourrait entraîner un fonctionnement erratique. ■ Câbles audio (connexion à un PC ou un périphérique externe sans le câble USB) Préparez deux câbles audio (à fiches minijack stéréo). y La configuration des prises d’entrée/de sortie des systèmes de conférence vidéo varie d’un modèle à l’autre. Choisissez toujours des câbles audio disposant de fiches adaptées aux prises d’entrée et de sortie de votre système de conférence vidéo. Veillez à toujours brancher exclusivement des câbles à fiches minijack stéréo au Projectphone. 26 French ■ Configuration requise Veillez à ce que le PC raccordé à cet appareil dispose de la configuration système suivante : • Système d’exploitation: Windows 7, Windows Vista SP1 ou version plus récente (32 bits), Windows XP SP2 ou version plus récente (32 bits), Windows 2000 Professional SP4 • Port USB: USB 1.1 ou norme ultérieure (norme USB 2.0 recommandée) Notes • Vous ne pouvez brancher qu’un seul microphone/haut-parleur de conférence à la fois au PC. • Raccordez directement cet appareil au PC. Les relier en passant par un hub (répartiteur) USB risquerait en effet de causer des problèmes de fonctionnement. • Selon l’utilisation du PC (notamment l’activité du processeur et la mémoire RAM disponible), il se pourrait que vous remarquiez des coupures de son. Connexion via un câble USB Raccorder au port USB 4 1 2 3 1 Raccordez cet appareil au PC à l’aide du câble USB fourni. 2 Raccordez la fiche de l’adaptateur secteur à la prise DC IN 12V. 3 Raccordez le cordon d’alimentation à l’adaptateur secteur. 4 Branchez l’autre extrémité du cordon d’alimentation à une prise de courant. L’appareil est alors sous tension. Il produit un son de démarrage et allume ses témoins de microphones. y Il est inutile d’installer séparément le pilote USB. En effet, l’ordinateur identifie l’appareil comme un périphérique audio ordinaire. French 27 Connexion via des câbles audio Raccorder à l’entrée audio 5 3 4 1 Raccordez la prise d’entrée AUDIO IN de cet appareil à la sortie audio de votre PC ou système de conférence vidéo. 2 Raccordez la prise de sortie AUDIO OUT de cet appareil à l’entrée audio de votre PC ou système de conférence vidéo. 3 Raccordez la fiche de l’adaptateur secteur à la prise DC IN 12V. 4 Raccordez le cordon d’alimentation à l’adaptateur secteur. 5 Branchez l’autre extrémité du cordon d’alimentation à une prise de courant. L’appareil est alors sous tension. Il produit un son de démarrage et les témoins de microphones s’allument. 28 French 2 1 Raccorder à la sortie audio Fiche technique Caractéristiques générales Interface: USB 2.0 (full speed), E/S analogiques (mini stéréo), adaptateur secteur (DC 12V IN) Consommation (max): Environ 9,0 W Norme d’interférences radio: FCC Part 15 (US) EN55022 (EU) Conditions d’utilisation: Température: 0~40 °C, Humidité: 20~85 % Son Microphones: 8 micros Haut-parleurs: 4 unités Plage de fréquence: Pour la prise de son: 200~20.000 Hz Pour la reproduction: 300~20.000 Hz Traitement du signal: Annulateur d’écho adaptatif, réduction de bruit, commande des rangées de microphones Dimensions (L x H x P): 283,4 x 51,5 x 297,5 mm Poids (sans l’adaptateur secteur): 1,4 kg Alimentation: 100~240 V AC (50/60 Hz) Accessoires: Câble USB (2,0 m), adaptateur secteur (1,8 m), cordon d’alimentation (2,0 m), CD-ROM, Guide de démarrage Configuration de l’ordinateur: Système d’exploitation: Microsoft® Windows® 7/Vista/ XP/2000 Port USB: USB 1.1 ou norme ultérieure (norme USB 2.0 recommandée) Autres: Mise à jour de révision du micrologiciel (pour le transfert vers PC via USB) French 29 VORSICHT: VOR DER BEDIENUNG DIESES GERÄTES DURCHLESEN. 1 2 3 4 5 6 7 8 9 10 11 12 13 Um optimales Leistungsvermögen sicherzustellen, lesen Sie bitte die Anleitung aufmerksam durch. Bewahren Sie die Anleitung danach für spätere Nachschlagzwecke sorgfältig auf. Installieren Sie dieses Gerät einem gut belüfteten, trockenen, sauberen Ort mit einem Abstand von mindestens 10 cm an der Oberseite, 10 cm an der linken und rechten Seite sowie 10 cm an der Rückseite des Geräts, entfernt von direktem Sonnenlicht, Wärmequellen, Erschütterungen, Staub und/oder Feuchtigkeit. Stellen Sie dieses Gerät entfernt von anderen elektrischen Haushaltgeräten, Motoren oder Transformatoren auf, um Brummgeräusche zu vermeiden. Setzen Sie dieses Gerät keinen plötzlichen Temperaturänderungen von kalt auf warm aus, und stellen Sie dieses Gerät nicht an Orten mit hoher Luftfeuchtigkeit auf (z.B. in Räumen mit Luftbefeuchtern), um Kondensation im Inneren des Gerätes zu vermeiden, da es anderenfalls zu elektrischen Schlägen, Feuer, Beschädigung dieses Gerätes und/oder zu persönlichen Verletzungen kommen kann. Vermeiden Sie die Aufstellung dieses Gerätes an Orten, an welchen Fremdkörper in das Gerät fallen können bzw. an welchen Flüssigkeiten auf das Gerät verschüttet werden können. Stellen Sie auf der Oberseite des Gerätes niemals folgendes auf: – Andere Komponenten, da diese Beschädigung und/oder Verfärbung der Oberfläche dieses Gerätes verursachen können. – Brennende Objekte (z.B. Kerzen), da diese Feuer, Beschädigung des Gerätes und/oder persönliche Verletzungen verursachen können. – Mit Flüssigkeiten gefüllte Behälter, da diese umfallen und die Flüssigkeit auf das Gerät verschütten können, wodurch es zu elektrischen Schlägen für den Anwender und/oder zu Beschädigung des Gerätes kommen kann. Decken Sie dieses Gerät niemals mit Zeitungen, Tischdecken, Vorhängen usw. ab, damit die Wärmeabfuhr nicht behindert wird. Falls die Temperatur im Inneren des Gerätes ansteigt, kann es zu Feuer, Beschädigung des Gerätes und/oder zu persönlichen Verletzungen kommen. Schließen Sie dieses Gerät erst an eine Wandsteckdose an, nachdem alle anderen Anschlüsse ausgeführt wurden. Verwenden Sie das mit diesem Gerät gelieferte Netzteil (PJPPS04 oder PJP-PS02 [Je nach Region verschieden]). Die Verwendung eines anderen Netzteils kann zu elektrischem Schlag, Brand oder Beschädigung dieses Gerätes führen. Stellen Sie dieses Gerät niemals mit der Unterseite nach oben auf, da es sonst beim Betrieb zu Überhitzung mit möglichen Beschädigungen kommen kann. Wenden Sie niemals Gewalt bei der Bedienung der Schalter, Knöpfe und Verbindungen an. Wenn Sie das USB-Kabel vom Computer bzw. das Netzkabel von der Wandsteckdose abziehen, fassen Sie das Kabel stets beim Stecker. Niemals am Kabel ziehen. Wenden Sie niemals Gewalt bei der Handhabung des Netzkabels an, um Brand, elektrischen Schlag, Beschädigung dieses Gerätes, Kurzschluss und/oder Abbruch der Verbindung zu vermeiden. Reinigen Sie dieses Gerät niemals mit chemisch behandelten Tüchern; anderenfalls kann das Finish beschädigt werden. Verwenden Sie ein reines, trockenes Tuch. 30 German 14 Verwenden Sie nur die für dieses Gerät vorgeschriebene Netzspannung. Falls Sie eine höhere als die vorgeschriebene Netzspannung verwenden, kann es zu Feuer, Beschädigung dieses Gerätes und/oder zu persönlichen Verletzungen kommen. Yamaha kann nicht verantwortlich gemacht werden für Schäden, die auf die Verwendung dieses Gerätes mit einer anderen als der vorgeschriebenen Spannung zurückzuführen sind. 15 Versuchen Sie niemals ein Modifizieren oder Ändern dieses Gerätes. Falls eine Wartung erforderlich ist, wenden Sie sich bitte an einen Yamaha-Kundendienst. 16 Falls dieses Gerät für längere Zeit nicht verwendet wird (z. B. während des Urlaubs), sollte das Netzkabel von der Wandsteckdose abgezogen werden. 17 Es kommt zu Kondensatbildung, wenn die Umgebungstemperatur plötzlich ändert. Ziehen Sie den Netzstecker aus der Steckdose und das USB-Kabel vom Computer ab; lassen Sie das Gerät anschließend ruhen. 18 Falls Sie das Gerät für längere Zeit in Betrieb halten, kann sich das Gerät erwärmen. Lösen Sie die Kabel, und lassen Sie das Gerät anschließend abkühlen. 19 Stellen Sie dieses Gerät in der Nähe einer leicht zugänglichen Wandsteckdose auf. 20 Um eine Beschädigung durch Blitzeinschlag zu vermeiden, lassen Sie die Kabel während eines Gewitters nicht angeschlossen. 21 Dieses Gerät darf weder auf dem Kopf noch auf der Kante aufgestellt oder an der Wand montiert werden. Stellen Sie das Gerät waagrecht auf einer ebenen Fläche ab. 22 Stellen Sie dieses Gerät nicht in der Nähe eines Fernsehers und/ oder drahtlosen Geräts auf, um Betriebsstörungen aufgrund von elektromagnetischen und magnetischen Einflüssen zu verhindern. Dieses Gerät ist nicht vom Netz abgetrennt, so lange der Netzstecker an eine Netzdose angeschlossen ist, auch wenn das Gerät selbst ausgeschaltet wurde. Dieser Status wird als Bereitschaftsmodus bezeichnet. Auch in diesem Status weist das Gerät einen geringen Stromberbrauch auf. WARNUNG UM DIE GEFAHR EINES FEUERS ODER EINES ELEKTROSCHOCKS ZU VERMEIDEN, DARF DAS GERÄT WEDER REGEN NOCH FEUCHTIGKEIT AUSGESETZT WERDEN. WARNUNG Dies ist ein Produkt der Klasse B. In Wohngebieten kann dieses Produkt Störungen des Rundfunk- und Fernsehempfangs verursachen; in diesem Fall kann von Benutzer verlangt werden, angemessene Abhilfemaßnahmen zu ergreifen. Einleitung Vielen Dank für den Kauf eines Yamaha PJP-50USB. Bei diesem Gerät handelt es sich um eine Mikrofon-Lautsprecher-Kombination, die an einem Video- oder WebKonferenzsystem angeschlossen als Audioterminal fungiert. Bitte lesen Sie die in dieser Anleitung aufgeführten Sicherheitshinweise gründlich durch und bewahren Sie die Anleitung danach für spätere Nachschlagzwecke sorgfältig auf. ■ Lieferumfang • • • • • • PJP-50USB (dieses Gerät) x 1 Netzteil (PJP-PS04 oder PJP-PS02 [Je nach Region verschieden]) x 1 Netzkabel x 1 USB-Kabel x 1 CD-ROM x 1 Schnellstartanleitung (vorliegende Anleitung) x 1 ■ Über diese Anleitung • Folgende Produkte werden in dieser Bedienungsanleitung wie folgt erwähnt. – Yamaha PJP-50USB: dieses Gerät – Yamaha Projectphone: PJP – Microsoft® Windows®: Windows – Microsoft® Windows® 7: Windows 7 – Microsoft® Windows Vista®: Windows Vista – Microsoft® Windows XP®: Windows XP – Microsoft® Windows 2000 Professional®: Windows 2000 Professional • Ausführliche Kenntnisse über Computer, Internet und Netzwerke können erforderlich sein, um alle Möglichkeiten dieses Geräts voll auszuschöpfen. Da die mitgelieferte Anleitung keine detaillierten technischen Informationen enthält, können Sie nach Bedarf auch auf im Handel erhältliche Fachliteratur zurückgreifen. • Vorliegende Bedienungsanleitung wurde vor der Produktion gedruckt. Änderungen des Designs und der technischen Daten im Sinne ständiger Verbesserungen sind vorbehalten. ■ Über Warenzeichen • Microsoft und Windows sind eingetragene Warenzeichen der Microsoft Corporation in den USA und anderen Ländern. Verbraucherinformation zur Sammlung und Entsorgung alter Elektrogeräte Befindet sich dieses Symbol auf den Produkten, der Verpackung und/oder beiliegenden Unterlagen, so sollten benutzte elektrische Geräte nicht mit dem normalen Haushaltsabfall entsorgt werden. In Übereinstimmung mit Ihren nationalen Bestimmungen und den Richtlinien 2002/96/EC, bringen Sie alte Geräte bitte zur fachgerechten Entsorgung, Wiederaufbereitung und Wiederverwendung zu den entsprechenden Sammelstellen. Durch die fachgerechte Entsorgung der Elektrogeräte helfen Sie, wertvolle Ressourcen zu schützen und verhindern mögliche negative Auswirkungen auf die menschliche Gesundheit und die Umwelt, die andernfalls durch unsachgerechte Müllentsorgung auftreten könnten. Für weitere Informationen zum Sammeln und Wiederaufbereiten alter Elektrogeräte, kontaktieren Sie bitte Ihre örtliche Stadt- oder Gemeindeverwaltung, Ihren Abfallentsorgungsdienst oder die Verkaufsstelle der Artikel. [Information für geschäftliche Anwender in der Europäischen Union] Wenn Sie Elektrogeräte ausrangieren möchten, kontaktieren Sie bitte Ihren Händler oder Zulieferer für weitere Informationen. [Entsorgungsinformation für Länder außerhalb der Europäischen Union] Dieses Symbol gilt nur innerhalb der Europäischen Union. Wenn Sie solche Artikel ausrangieren möchten, kontaktieren Sie bitte Ihre örtlichen Behörden oder Ihren Händler und fragen Sie nach der sachgerechten Entsorgungsmethode. German 31 Bedienungselemente und deren Funktion Oberseite 1 2 VOL 3 2 1 5 CLEAR 4 8 7 6 MIC MUTE 9 # 0 STANDBY ENTER MENU 3 4 5 6 78 1 Mikrofon-Leuchten Wenn dieses Gerät eingeschaltet ist, brennen die Leuchten blau. Die Leuchten brennen nicht, während die Mikrofone stumm geschaltet sind. 2 Angeordnete Mikrofone Die acht Mikrofone an der Oberseite nehmen die Stimmen der Sprecher auf. 3 Reserviert für zukünftige Erweiterung. 4 / STANDBY • Während die Einstellung angezeigt wird, diese Taste drücken, um zur obersten Anzeige zurückzukehren. • Die Taste gedrückt halten, um das System in den Bereitschaftsmodus zu schalten. y / STANDBY gedrückt halten, um den Bereitschaftsmodus zu verlassen. 5 Display Die Leuchte zeigt den gegenwärtigen Status dieses Geräts an. 6 CLEAR Diese Taste drücken, um die Einstellung ungespeichert aufzuheben oder zur vorhergehenden Anzeige zurückkehren. 32 German 9 0 A 7 / Eine dieser Tasten drücken, um eine Einstellung zu wählen oder den Cursor aufwärts/abwärts zu bewegen. 8 ENTER/MENU • Diese Taste drücken, um eine Einstellung einzugeben. • Diese Taste drücken, um das Einstellmenü anzuzeigen. 9 Zifferntasten Diese Tasten drücken, um ein Einstellung zu wählen. 0 MIC MUTE Diese Taste drücken, um die Mikrofone an diesem Gerät zeitweilig stumm zu schalten. Die Taste leuchtet während der Stummschaltung orange. Wird diese Taste bei stumm geschalteten Mikrofonen gedrückt, wird die Stummschaltung aufgehoben die Leuchten erlöschen. A VOL +/– Mit diesen Tasten kann die Lautsprecherlautstärke eingestellt werden. Durch Druck auf die entsprechende Taste wird die Lautstärke gesenkt bzw. angehoben. Geräteseite 1 2 DC IN 12V 1 USB-Port Über ein USB-Kabel mit dem Computer verbinden. 2 DC IN 12V-Buchse Das mitgelieferte Netzteil anschließen. 3 4 IN AUDIO OUT 3 AUDIO IN-Buchse Mit der Audio- oder Kopfhörer-Ausgangsbuchse eines Audiogeräts oder PC verbinden. 4 AUDIO OUT-Buchse Mit der Audio- oder Mikrofon-Eingangsbuchse eines Audiogeräts oder PC verbinden. Unterseite 1 Seriennnummerschild Das Schild trägt folgende Informationen. • MODEL No.: Modellnummer dieses Geräts • SER.: Seriennummer für die Identifizierung und Verwaltung dieses Geräts. 2 2 Angeordnete Lautsprecher Die vier an der Unterseite angeordneten Lautsprecher dienen zur Tonwiedergabe. 3 Einsteller Mit diesem Einsteller kann die Fußhöhe eingestellt werden, falls dieses Gerät nicht stabil auf der benutzten Oberfläche aufgestellt werden kann. 1 2 3 Obere Anzeige 1 USB-Modus Zeigt die Einstellung des USB-Modus an. AUD : Dieses Gerät befindet sich im Audiomodus. TEL : Dieses Gerät befindet sich im Telefonmodus. Volume 2 MIC Zeigt den Audioeingangspegel der Mikrofone an. 3 Volume Zeigt den Audioausgangspegel der Lautsprecher an. 1 2 345 4 USB-Anzeige Leuchtet, wenn dieses Gerät mit einem USB-Kabel am Computer angeschlossen ist. 5 Lautsprecher-Stummschaltung Leuchtet, wenn die Lautsprecher stumm geschaltet sind. German 33 Anschluss Folgendes prüfen, bevor Sie dieses Gerät am Computer anschließen. ■ USB-Kabel (Anschluss an einen Computer mit USB-Kabel) ■ Systemanforderungen Der anzuschließende Computer muss folgenden Systemanforderungen entsprechen. • Betriebssystem: Windows 7, Windows Vista SP1 oder höher (32-Bit), Windows XP SP2 oder höher (32-Bit), Windows 2000 Professional SP4 • USB-Port: USB 1.1 oder später (USB 2.0 empfohlen) Das mitgelieferte USB-Kabel vorbereiten. Hinweise Hinweis • Es kann jeweils nur ein Konferenz-Mikrofonlautsprecher am Computer angeschlossen werden. • Eine direkte Verbindung zwischen diesem Gerät und dem Computer herstellen. Die Verwendung eines USB-Hubs kann Betriebsstörungen verursachen. • Die Einsatzbedingungen des Computers (Arbeitsbelastung, verfügbarer Speicher usw.) können eine Unterbrechung der Audiowiedergabe verursachen. Sie müssen das mitgelieferte USB-Kabel verwenden. Anderenfalls könnten Betriebsstörungen erfolgen. ■ Audiokabel (Anschluss an Computer oder externes Gerät ohne USB-Kabel) Zwei Audiokabel (mit Stereo-Miniklinken) vorbereiten. y Die Auslegung der Audio-Eingangs- und -Ausgangsbuchsen hängt vom Modell des Video-Konferenzsystems ab. Achten Sie stets darauf, Audiokabel zu verwenden, die den Audio-Eingangsund -Ausgangsbuchsen des angeschlossenen VideoKonferenzsystems entsprechen. Für den Anschluss an ein Projectphone sollten stets Stereo-Miniklinken verwendet werden. 34 German Anschluss mit USB-Kabel Zum USB-Port 4 1 2 3 1 Dieses Gerät mit dem mitgelieferten USBKabel am Computer anschließen. 2 Das Netzteil an die DC IN 12V-Buchse anschließen. 3 Das Netzkabel am Netzteil anschließen. 4 Das Netzkabel an die Steckdose anschließen. Dieses Gerät ist eingeschaltet. Der Startton erklingt und die Mikrofon-Leuchten brennen. y Der USB-Treiber braucht nicht gesondert installiert zu werden. Der Computer erkennt dieses Gerät als grundlegendes Audiogerät. German 35 Anschluss mit Audiokabeln Zur AudioEingangsbuchse 5 3 4 1 Die AUDIO IN-Buchse dieses Geräts mit der Audio-Ausgangsbuchse des Computers oder Video-Konferenzsystems verbinden. 2 Die AUDIO OUT-Buchse dieses Geräts mit der Audio-Eingangsbuchse des Computers oder Video-Konferenzsystems verbinden. 3 Das Netzteil an die DC IN 12V-Buchse anschließen. 4 Das Netzkabel am Netzteil anschließen. 5 Das Netzkabel an die Steckdose anschließen. Dieses Gerät ist eingeschaltet. Der Startton erklingt und die Mikrofon-Leuchten brennen. 36 German 2 1 Zur AudioAusgangsbuchse Technische Daten Allgemeines Schnittstelle: USB 2.0 (vollständig), Analog I/O (Stereo-Miniklinke), Netzteil (DC 12V IN) Max. Leistungsaufnahme: Ca. 9,0 W Funkstörstandard: FCC Part 15 (US) EN55022 (EU) Betriebsumgebung: Temperatur: 0 bis 40 °C (32 bis 104 °F), Luftfeuchtigkeit: 20 bis 85% Audio Mikrofone: 8 Stück Lautsprecher: 4 Stück Frequenzbandbreite: Aufnahme: 200 bis 20.000 Hz Wiedergabe: 300 bis 20.000 Hz Signalverarbeitung: Adaptive Echounterdrückung, Rauschunterdrückung, Mikrofon-Anordnungsregelung Abmessungen (B x H x T): 283,4 x 51,5 x 297,5 mm (11-3/16" x 2-9/32" x 11-23/32") Gewicht (ohne Netzteil): 1,4 kg (3,09 lbs) Stromversorgung: 100 bis 240 V AC (50/60 Hz) Zubehör: USB-Kabel (2,0 m), Netzteil (1,8 m), Netzkabel (2,0 m) CD-ROM, Schnellstartanleitung Systemumgebung: Betriebssystem: Microsoft® Windows® 7/Vista/XP/2000 USB-Port: USB 1.1 oder später (USB 2.0 empfohlen) Sonstiges: Firmwareaktualisierung (USB-Übertragung vom Computer) German 37 注意:在操作本机之前请阅读此部分 1 2 3 4 5 6 7 8 9 10 11 12 13 请仔细阅读此手册,以确保最好的使用效果。请将它保 存在安全的地方以备将来参考。 将本机安装到通风良好,凉爽,干净的场所。机器的顶 部空隙不小于 10 厘米:左右两侧空隙不小于 10 厘米: 背面空隙不小于 10 厘米。---- 要远离直射阳光,热 源,震动,灰尘,潮湿和 / 或阴冷的地方。 请将本设备远离其它电子设备,马达或变压器以避免产 生干扰音。 请勿在温差变化巨大的地方使用本机,请勿将本机放置 在高湿度的环境中 (例如有加湿器的房间)以防止本机 内部发生结露,否则将可能导致触电、火灾、损坏本 机,甚至伤害到人。 请勿将设备安装在外部物体可能跌落和/或造成液体滴 落或泼溅到的地方。在设备的顶部,请勿放置以下物 品: - 其它设备:因为它们会对本机表面造成损坏和/或导 致变色。 - 燃烧物体 (如蜡烛),因为它们可能导致火灾,对设 备造成损害和/或造成人体伤害。 - 装有液体的容器,因为容器会摔落,并且液体会引起 用户触电和/或损坏本机。 为不阻断热量散发,请勿使用报纸,桌布,窗帘等物品 遮盖本设备。如果设备内的温度升高,可能会引起火 灾,损害本机,和/或导致人受到伤害。 在完成所有连接前,请勿将本设备插头连接到墙壁上的 插座。 使用本设备时,请确认使用配套的 AC 适配器 (PJP-PS04 或 PJP-PS02 [因地区不同而异])。如果使用其它 AC 适配器可能会造成电击,起火和/或损坏本设备。 操作设备时请勿倒置,否则会引起机体过热,并可能损 坏设备。 不可施力于开关、旋钮、和/或导线部位。 从计算机上拔下 USB 线或者从墙壁插座拔下电源线插头 时,请捏住插头部位,切勿拉拽导线。 不可施力于电源线以防止火灾,触电,对设备的损坏、 短路和/或断电。 请勿使用化学溶剂清洁本设备,这可能损坏机壳涂层。 请使用洁净的干布。 10 14 只能使用本机规定的电压。在本设备上使用比规定值高 的电压是危险的,并可能导致火灾,造成设备损坏和/ 或人体伤害。Yamaha 不对由于在本设备上使用非规定电 压而造成的任何损害负责。 15 请勿尝试改装或维修本设备。当需要任何维修时,请联 系 Yamaha 专业维修人员。 16 如果长时间不使用本设备 (如休假),请预先从墙上插 座拔除本设备的电源插头。 17 如果环境温度变化剧烈,就可能形成结露。请将电源线 插头与墙上的插座断开,并将 USB 线从电脑上拔下后, 单独放置设备。 18 长时间使用本设备时,会出现设备过热,请断开电源 线,并将设备单独冷却放置。 19 请将本设备安装在墙壁插座附近,且便于插上 AC 电源 插头的地方。 20 为了防止闪电对设备造成损伤,在闪电雷雨的天气,请 断开电源线。 21 本产品不可倒置或垂直安装,也不可安装于墙上。本产 品应安装在平稳的水平面上。 22 不要将本产品安装在电视机或其它无线装置附近,以防 止电磁波和/或磁场引起的操作失败。 即使本机自身关闭,只要本机还与 AC 墙上插头连接, 它就未与 AC 电源断开。 此状态被称为待机模式。 在 此状态下,本机被设定为仅消耗非常少量的电力。 警告: 为减少火灾或电击的危险,严禁将设备暴露在雨水或 潮湿环境中。 警告: 这是 B 级产品。在室内环境内会造成无线电干扰,在 此情况下使用者必须采取相应步骤。 该标记附加在出售到中华人民共和国的电子信息产品上。 环形中的数字表示的是环境保护使用期限的年数。 ○ : 表示该有毒有害物质在该部件所有均质材料中的含量均在 SJ/T 11363-2006 标准规定的限量要求以下。 × : 表示该有毒有害物质至少在该部件的某一均质材料中的含量超出 SJ/T 11363-2006 标准规定的限量要求。 有毒有害物质或元素 部件名称 铅 (Pb) 汞 (Hg) 镉 (Cd) 六价铬 (Cr(VI)) 多溴联苯 (PBB) 多溴二苯醚 (PBDE) 电路板 × ○ ○ ○ ○ ○ 外壳箱体 ○ ○ ○ ○ ○ ○ 面板显示器 × ○ ○ ○ ○ ○ 扬声器单元 ○ ○ ○ ○ ○ ○ ○ ○ ○ ○ ○ ○ 麦克风单元 38 Chinese 介绍 感谢您购买 Yamaha PJP-50USB。 本产品是一套麦克风 / 扬声器装置,作为连接视频或网络会议系统的音频终端。 为了您的安全起见,请仔细阅读本手册中规定的所有安全说明和预防措施,并将其放在安全地方以备将来参 考。 • • • • • • 检查内容 PJP-50USB (本设备)x 1 AC 适配器 (PJP-PS04 或 PJP-PS02 [因地区不同而异])x 1 电源线 x 1 USB 线 x 1 CD-ROM x 1 快捷启动指南 (本手册)x 1 关于本手册 • 在本说明书中,产品名称采用以下描述。 – Yamaha PJP-50USB: 本设备 – Yamaha Projectphone: PJP – Microsoft® Windows®:Windows – Microsoft® Windows® 7: Windows 7 – Microsoft® Windows Vista®:Windows Vista – Microsoft® Windows XP®:Windows XP – Microsoft® Windows 2000 Professional®:Windows 2000 Professional • 要想使用本设备的全部性能,需要掌握关于计算机、因特网以及网络的详细知识。 由于本手册不能提供详 细的技术信息,请根据需要另外参考从市面上购买的其它书籍。 • 本手册在生产之前便已印刷。 因此设计和规格可能因后来的改进而有所更改。 关于商标 • Microsoft 和 Windows 是 Microsoft Corporation 在美国和其它国家或地区的注册商标。 Chinese 39 控制面板和功能 顶部 1 2 VOL 3 2 1 5 CLEAR 4 8 7 6 MIC MUTE 9 # 0 STANDBY ENTER MENU 3 4 5 6 78 1 麦克风指示器 当本设备打开时,指示灯为蓝色。当麦克风被转为静 音时,指示灯则关闭。 9 0 A 7 / 按其中任一键可选择一个设置项目或上下移动光标。 2 阵列麦克风 位于顶部面板的 8 个麦克风用于接收说话者的声音。 8 ENTER/MENU • 按此键进行设置。 • 按此键显示设置菜单。 3 用于今后扩展。 9 数字键 按此键选择设置项。 4 / STANDBY • 正显示设置项目时,可按此键返回到顶部屏幕。 • 长按此键可让系统进入待机模式。 0 MIC MUTE 按此键可暂时退出本设备的麦克风 (静音)。静音时 按键灯光为橙色。 当麦克风静音时,按此键可退出静音模式,按键灯光 关闭。 y 按 / STANDBY 可退出待机模式。 5 显示屏 液晶屏显示本设备当前状态。 6 CLEAR 按此键可取消并不保存设置,或返回到上一级屏幕。 40 Chinese A VOL +/按其中任一键可调整扬声器音量。长按任一键可持续 加大或减小音量。 侧面 1 2 DC IN 12V 1 USB 端口 使用 USB 连线连接到电脑。 3 4 IN AUDIO OUT 3 AUDIO IN 终端 连接到线路输出终端,或音频设备或电脑的耳机输出 终端。 2 DC IN 12V 终端 连接配套的 AC 适配器。 4 AUDIO OUT 终端 连接到线路输入终端,或音频设备以及电脑的麦克风 输入终端。 底部 1 序列号标签 标签包含以下信息。 • MODEL No.:本设备的型号。 • SER.:本设备使用时的管理 / 区别序列号。 2 2 阵列扬声器 排列于底部面板的四个扬声器用于输出音频。 3 调节器 因桌子形状或其它原因无法稳定摆放本设备时,可使 用调节器调整足部高度。 1 2 3 顶部屏幕 1 USB 模式 显示 USB 模式的设置。 AUD : 本设备功能处于音频模式。 TEL : 本设备功能处于电话模式。 2 MIC 显示麦克风的音频输入音量。 3 再生音量 显示扬声器的音频输出音量。 1 2 345 4 USB 指示器 当使用 USB 连线连接本设备到电脑时灯亮。 5 扬声器静音 扬声器静音时灯亮。 Chinese 41 连接 在连接本设备到电脑前请确认以 下事项 USB 连线 (当使用 USB 连线连接电脑时) 准备配套的 USB 连线。 注意 系统要求 连接到本设备的电脑必须满足以下系统要求。 • OS: • Windows 7,Windows Vista SP1 或更高版本 (32 bit), Windows XP SP2 或更高版本 (32 bit), Windows 2000 Professional SP4 • USB 端口 : USB 1.1 或更高版本 (推荐 USB 2.0) 请务必使用配套的 USB 连线。否则可能造成操作失败。 注意 • 不可同时连接多个会议麦克风扬声器到电脑。 • 直接连接本设备和电脑。如通过 USB 集线器连接可能导致操 作中出现问题。 • 根据电脑的使用情况 (工作量或可用记忆内存),可能导 致音频断续。 音频连线 (当不是使用 USB 连线连接电脑或 其它外部设备时) 准备两根音频连线 (立体声迷你插孔连线)。 y 根据型号调整视频会议系统的音频输入 / 输出终端的款式。 请务必使用匹配连接视频会议系统的输入 / 输出终端的带有 插头的音频连线。注意连接 Projectphone 的插头必须是立 体声迷你插头。 42 Chinese 使用 USB 连线连接 连接到 USB 端口 4 1 2 3 1 使用配套的 USB 连线连接本设备和电脑。 2 连接 AC 适配器到 DC IN 12V 终端。 3 连接电源线和 AC 适配器。 4 连接电源线和交流电源插座。 本设备已打开。播放开始音乐,麦克风指示器灯 亮。 y 无须单独安装 USB 驱动器,因为本设备是公认的电脑基本音 频设备。 Chinese 43 使用音频连线连接 连接到音频输入 终端 5 3 4 1 连接本设备的 AUDIO IN 终端到电脑或视频会议系 统的音频输出终端。 2 连接本设备的 AUDIO OUT 终端到电脑或视频会议 系统的音频输入终端。 3 连接 AC 适配器和 DC IN 12V 终端。 4 连接电源线和 AC 适配器。 5 连接电源线和交流电源插座。 本设备打开。播放开始音乐,麦克风指示器灯 亮。 44 Chinese 2 1 连接到音频输出 终端 规格 常规 接口: USB 2.0 (全速版),模拟 I/O (Stereo-Mini), AC 适配器 (DC 12V IN) 功率 (最大): 约 9.0 W 无线电干扰标准: GB9254-1998 运行环境: 温度: 0 至 40°C (32 至 104°F), 湿度: 20 至 85% 音频 麦克风: 8个 扬声器: 4个 频率带宽: 录音:200 至 20,000 Hz 播放:300 至 20,000 Hz 信号处理: 适应式回声消声器,降噪,麦克风阵列控件 尺寸 (W x H x D): 283.4 x 51.5 x 297.5 mm (11-3/16" x 2-9/32" x 11-23/32") 重量 (不包括 AC 适配器): 1.4 kg (3.09 lbs) 电源: 100 至 240 V 交流电 (50/60 Hz) 附件: USB 连线 (2.0 米),AC 适配器 (1.8 米),电源线 (2.0 米),CD-ROM,快捷启动指南 计算机环境: 操作系统: Microsoft® Windows® 7/Vista/ XP/2000 USB 端口:USB 1.1 或更高版本 (推荐 USB 2.0) 其它: 固件版本升级 (通过 USB 从计算机传输) Chinese 45 주의 : 제품 사용 전에 반드시 아래 내용을 읽어보시기 바랍니다 . 1 최상의 성능으로 이 제품을 유지하시려면 본 설명서를 잘 읽 으셔야 합니다. 본 설명서는 추후에도 참조할 수 있도록 안전 한 곳에 보관하십시오. 2 본 제품은 통풍이 잘 되는 건조하고 깨끗한 장소에 설치하고 상하좌우로 최소 10cm 이상의 공간이 유지되게 하십시오. 직 사광선, 열원, 진동, 먼지, 습기, 냉기에 닿지 않게 하십시오. 3 진동음이 발생하지 않도록 제품을 다른 전자기기, 모터, 변압 기 근처에 두지 마십시오. 4 본 제품을 온도가 급격히 상승하는 장소나 습도가 높은 장소 (즉, 가습기가 비치된 방)에 설치하지 마십시오. 제품 내부의 응결로 인해 쇼크, 화재, 제품 손상, 부상 등이 발생할 수 있습 니다. 5 이물질이 떨어지거나 액체가 튈 수 있는 곳에 본 제품을 설치 하지 마십시오. 본 제품 위에 다음과 같은 것들을 올려놓지 마십시오. – 기타 보조장비 - 제품이 손상되거나 제품 표면이 변색될 수 있습니다. – 열원(양초 등) - 제품이 손상되거나 화재 및 부상이 발생할 수 있습니다. – 액체가 들어 있는 용기 - 용기가 넘어져 액체가 쏟아지면 쇼크 및 제품 손상 등이 발생할 수 있습니다. 6 방열이 원활하게 이루어질 수 있도록 본체를 신문, 식탁보, 커튼 등으로 덮지 마십시오. 본체 내부의 온도가 상승하면 화 재, 제품 손상, 부상이 발생할 수 있습니다. 7 모든 연결이 완료될 때까지 본체의 전원 코드를 콘센트에 연 결하지 마십시오. 8 이 제품을 사용할 때에는 함께 제공된 AC 어댑터(PJP-PS04 또는 PJP-PS02 [지역에 따라 다름] )를 사용하십시오. 다 른 AC 어댑터를 사용하면 쇼크, 화재 및 제품 손상이 발생할 수 있습니다. 9 본 제품을 뒤집은 상태로 사용하지 마십시오. 과열로 인해 손 상될 수 있습니다. 10 스위치나 손잡이, 코드에 무리한 힘을 가하지 마십시오. 11 PC에서 USB 케이블을 빼낼 때나 콘센트에서 전원 코드를 빼 낼 때는 플러그를 잡고 빼내십시오. 케이블을 잡지 마십시오. 12 전원 케이블에 무리한 힘을 가하여 화재나 감전, 제품 손상, 합선 및 단전이 일어나는 일이 없도록 하십시오. 13 본체를 화학용제로 세척하지 마십시오. 외형이 손상될 수 있 습니다. 깨끗한 마른 천을 사용하십시오. 14 본 제품에 지정된 전압만 사용해야 합니다. 지정된 수치보다 더 높은 전압을 사용하는 것은 매우 위험하며 화재, 장비 손 상, 부상 등의 원인이 될 수 있습니다. 야마하 는 지정되지 않 은 전압의 사용으로 인한 모든 손상에 대한 책임을 지지 않습 니다. 15 본 제품의 개조나 수리를 시도하지 마십시오. 서비스가 필요 한 경우에는 공식 야마하 서비스 직원에게 문의하십시오. 16 장기간 사용하지 않을 경우에는(휴가 등), 벽면 콘센트에서 AC 전원 플러그를 뽑아주시기 바랍니다. 17 주변 온도가 급격하게 변하면 수분 응결이 발생할 수 있습니 다. 이 경우에는 콘센트에서 전원 코드를 뽑고 컴퓨터에서 USB 케이블을 뽑은 후 본체를 그대로 두십시오. 18 본 제품을 오랫동안 사용하면 제품의 온도가 상승할 수 있습 니다. 케이블을 제거하고 본체가 식을 수 있도록 그대로 두십 시오. 19 본 제품은 벽면 콘센트에 가깝고 AC 전원 플러그에 쉽게 닿 을 수 있는 장소에 설치해 주시기 바랍니다. 46 Korean 20 번개에 의한 손상을 방지할 수 있도록, 번개가 칠 때에는 케 이블을 빼 두십시오. 21 본 제품을 거꾸로 설치하거나 세워서 설치하지 마십시오. 벽 에 걸어서도 안됩니다. 제품을 눕혀서 평평한 장소에 설치하 십시오. 22 텔레비전이나 무선 장치 근처에 제품을 설치하여 전자파나 자기로 인한 작동 오류를 발생시키는 일이 없도록 하십시오. 전원을 껐다 할지라도 AC 벽면 콘센트의 케이블을 뽑지 않았다면 AC 전원은 여전히 연결되어 있습니다. 이 상태 를 '대기 모드'라고 합니다. 이 때 제품은 극소량의 전원을 소모하게 됩니다. 주의 화재 및 쇼크의 위험을 줄일 수 있도록 본 제품을 비나 습 기에 노출시키지 마십시오. 주의 이 기기는 가정용(B급)으로 전자파적합등록을 한 기기로 서 주로 가정에서 사용하는 것을 목적 으로 하며,모든 지 역에서 사용할 수 있습니다. 개요 Yamaha PJP-50USB을 구입해 주셔서 감사합니다. 이 제품은 비디오나 웹컨퍼런스 시스템에 연결하여 오디오 단자로 사용할 수 있는 마이크/스피커 장치입니다. 안전한 사용을 위해 본 설명서에 제시된 모든 안전 지침 및 주의사항을 자세히 읽어보시고, 추후에도 참조할 수 있도록 설명서를 안전한 장소에 보관하십시오. ■ 다음과 같은 내용물이 있는지 확인하십시오. • • • • • • PJP-50USB (본 제품) x 1 AC 어댑터 (PJP-PS04 또는 PJP-PS02 [지역에 따라 다름] ) x 1 전원 케이블 x 1 USB 케이블 x 1 CD-ROM x 1 빠른 시작을 위한 설명서(본 설명서) x1 ■ 설명서 정보 • 본 설명서에서 제품명은 다음과 같이 제시되어 있습니다. – Yamaha PJP-50USB: 본 제품 – Yamaha Projectphone: PJP – Microsoft® Windows®: Windows – Microsoft® Windows® 7: Windows 7 – Microsoft® Windows Vista®: Windows Vista – Microsoft® Windows XP®: Windows XP – Microsoft® Windows 2000 Professional®: Windows 2000 Professional • 본 제품의 성능을 최대한으로 활용할 때 컴퓨터나 인터넷, 네트워크에 대한 상세한 지식이 필요할 수도 있습 니다. 제공된 본 설명서에는 상세한 기술적 정보가 제시되어 있지 않으므로 필요한 경우에는 시중에 유통되 고 있는 서적을 참조하십시오. • 본 설명서는 제품 생산 전에 인쇄되었습니다. 디자인 및 사양은 품질 개선 등으로 인해 변경될 수도 있습니다. ■ 상표 정보 • Microsoft 및 Windows는 미국과 기타 국가의 Microsoft Corporation 등록 상표입니다. Korean 47 PJP-50USB_qsg.book Page 48 Tuesday, October 7, 2008 1:21 PM 제어장치 및 기능 상단 패널 1 2 VOL 3 2 1 5 CLEAR 4 8 7 6 MIC MUTE 9 # 0 STANDBY ENTER MENU 3 4 5 6 78 1 마이크 표시장치 제품의 전원을 켜면, LED는 파란색으로 켜집니다. 마이크가 MUTE 상태일 때에는 LED가 꺼집니다. 9 0 A 2 배열된 마이크 상단 패널에 있는 8개의 마이크가 화자의 음성을 감지 합니다. 7 / 설정 항목을 선택하거나 커서를 상하 이동하려면 각 키를 누르십시오. 8 ENTER/MENU • 키를 누르면 설정이 입력됩니다. • 키를 누르면 설정 메뉴가 표시됩니다. 3 이후 제품 기능을 확장시킬 때 사용. 9 숫자 키 키를 눌러 설정 항목을 선택합니다. 4 / STANDBY • 설정 항목이 표시되면, 키를 눌러 화면 맨 위로 돌아 갑니다. • 키를 계속 누르고 있으면 시스템이 대기 모드로 설 정합니다. 0 MIC MUTE 마이크를 일시적으로 비활성화(무음)시키려면 이 키 를 누르십시오. 키가 무음 상태가 되면 오렌지색이 켜 집니다. 마이크가 무음일 때 이 키를 한 번 더 누르면 무음 설정 이 해제되고 LED가 꺼집니다. y / STANDBY 를 누르면 대기모드에서 벗어나게 됩니다. 5 디스플레이 LCD는 제품의 현재 상태를 보여줍니다. 6 CLEAR 저장하지 않고 설정을 취소하거나 이전 화면으로 돌 아가려면 해당 키를 누르십시오. 48 Korean A VOL +/이 두 키를 눌러 스피커 볼륨을 조정합니다. 한 쪽 키를 계속 누르고 있으면 볼륨이 계속 높아지거나 낮아집 니다. PJP-50USB_qsg.book Page 49 Tuesday, October 7, 2008 1:21 PM 측면 패널 1 2 DC IN 12V 1 USB 포트 USB 케이블을 사용하여 PC를 연결합니다. 3 4 IN AUDIO OUT 3 AUDIO IN 단자 오디오 장비나 PC의 라인 출력 단자나 헤드폰 출력 단 자에 연결합니다. 2 DC IN 12V 단자 함께 제공된 AC 어댑터를 연결합니다. 4 AUDIO OUT 단자 오디오 장비나 PC의 라인 입력 단자나 마이크 입력 단 자에 연결합니다. 하단 패널 1 일련 라벨 라벨에는 다음 정보가 포함됩니다. • MODEL No.: 본 제품의 모델 번호. • SER.: 관리/구분을 위한 일련 번호. 2 2 배열된 스피커 하단 패널에 있는 4개의 배열된 스피커는 오디오 출력 용도입니다. 3 조절장치 책상의 모양이나 기타 이유로 제품을 안정적으로 배 치할 수 없을 경우에는 조절 장치를 사용하여 풋 높이 를 조정합니다. 1 2 3 상단 화면 1 USB 모드 USB 모드의 설정을 표시합니다. AUD : 오디오 모드에서 작동합니다. TEL : 텔레포니 모드에서 작동합니다. Volume 1 2 2 MIC 마이크의 오디오 입력 레벨을 표시합니다. 3 Volume 스피커의 오디오 출력 레벨을 표시합니다. 345 4 USB 표시장치 USB 케이블을 사용하여 본 제품을 PC에 연결할 때 켜 집니다. 5 스피커 무음 스피커가 무음으로 설정되어 있을 때 켜집니다. Korean 49 연결 본 제품을 PC 에 연결하기 전에 다 음 사항을 확인해 주시기 바랍니다 ■ USB 케이블(USB 케이블을 사용하여 PC에 연결하는 경우) 함께 제공된 USB 케이블을 준비합니다. ■ 시스템 사양 본 제품에 연결할 PC는 다음의 시스템 요구조건을 충 족해야 합니다. • OS: Windows 7, Windows Vista SP1 이상 (32 bit), Windows XP SP2 이상 (32 bit), Windows 2000 Professional SP4 • USB 포트: USB 1.1 또는 이후 버전 (USB 2.0 권장) 유의사항 유의사항 반드시 함께 제공된 USB 케이블을 사용하십시오. 다른 케이 블을 사용할 경우 작동 오류가 생길 수 있습니다. • 컨퍼런스 한 개 이상의 마이크 스피커를 PC에 한꺼번에 연 결할 수 없습니다. • 제품과 PC를 바로 연결합니다. 이를 USB 허브를 통해 연결 할 경우 작동에 결함이 생길 수 있습니다. • 오디오 재생은 PC 사용 상황(작업부하 혹은 가용 메모리 공 간)에 따라 방해를 받을 수 있습니다. ■ 오디오 연결 케이블 (USB 케이블을 사용하 지 않고 PC나 외부 장치에 연결하는 경우) 오디오 연결 케이블 2개를 준비합니다 (스테레오 미니 잭 케이블). y 비디오 컨퍼런스 시스템의 오디오 입출력 단자의 설계는 모 델에 따라 달라집니다. 연결된 비디오 컨퍼런스 시스템의 오 디오 입출력 단자와 일치하는 플러그의 오디오 연결 케이블 을 항상 사용하십시오. Projectphone에 연결된 플러그는 항상 스테레오 미니 플러그여야 합니다. 50 Korean PJP-50USB_qsg.book Page 51 Tuesday, October 7, 2008 1:21 PM USB 케이블을 사용한 연결 USB 포트에 연결 4 1 2 3 1 함께 제공된 USB 케이블을 사용하여 PC에 본 제 품을 연결합니다. 2 AC 어댑터를DC IN 12V 단자에 연결합니다. 3 전원 케이블을 AC 어댑터에 연결합니다. 4 전원 케이블을 AC 콘센트에 연결합니다. 제품의 전원이 켜집니다. 시작음이 울리면서 마이 크 표시장치가 켜집니다 y 이 제품은 PC에서 기본 오디오 장치로 인식하므로 USB 드라 이버를 별도로 설치할 필요는 없습니다. Korean 51 PJP-50USB_qsg.book Page 52 Tuesday, October 7, 2008 1:21 PM 오디오 연결 케이블을 이용한 연결 오디오 입력 단 자에 연결 5 3 4 1 본 제품의 AUDIO IN 단자를 PC나 비디오 컨퍼런 스 시스템의 오디오 출력 단자에 연결합니다. 2 본 제품의 AUDIO OUT 단자를 PC나 비디오 컨퍼 런스 시스템의 오디오 입력 단자에 연결합니다. 3 AC 어댑터를DC IN 12V 단자에 연결합니다. 4 전원 케이블을 AC 어댑터에 연결합니다. 5 전원 케이블을 AC 콘센트에 연결합니다. 제품의 전원이 켜집니다. 시작음이 울리면서 마이 크 표시장치가 켜집니다. 52 Korean 2 1 오디오 출력 단자 에 연결 사양 일반 인터페이스: USB 2.0 (전체), Analog I/O (스테레오-미니), AC 어댑터 (DC 12V IN) 전력소비 (최대): 약 9.0 W 오디오 마이크: 8개 스피커: 4개 무선 장애 표준: KN22 주파수 대역폭 녹음 시: 200 ~ 20,000 Hz 재생 시: 300 ~ 20,000 Hz 작동 환경: 적정 온도: 0 - 40°C (32 - 104°F) 적정 습도: 20 - 85% 신호 처리: 적절한 반향 소거장치, 소음 감쇄, 마이크 배열 제어 치수 (넓이 x 높이 x 깊이): 283.4 x 51.5 x 297.5 mm (11-3/16" x 2-9/32" x 11-23/32") 중량 (AC 어댑터 제외): 1.4 kg (3.09 lbs) 전력원: 100 ~ 240 V AC (50/60 Hz) 부속품: USB 케이블 (2.0 m), AC 어댑터 (1.8 m), 전원 케이블 (2.0 m), CD-ROM, 빠른 시작 설명서 컴퓨터 환경: OS: Microsoft® Windows® 7/Vista/XP/2000 USB 포트: USB 1.1 또는 이후 버전 (USB 2.0 권장) 기타: 펌웨어 개정 업그레이드 (USB를 통해 PC에서 전송) Korean 53 © 2010 Yamaha Corporation. All rights reserved. HEAD OFFICE Yamaha Corporation, Sound Network Division Nakazawa-cho 10-1, Naka-ku, Hamamatsu, Japan 430-8650 Tel: +81-53-460-3468 As of November 2010 Printed in Japan WY14550