1
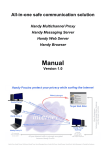
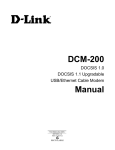
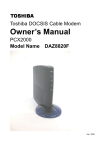
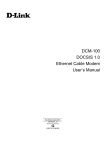
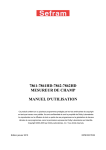
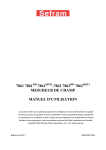
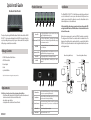
Quick Install Guide
Product Overview
Installation
Broadband Cable Modem
The D-Link DCM-301 DOCSIS™ 3.0 Cable Modem provides high-speed Internet
access to the Internet. You can use your cable modem to directly connect one
computer in your network to the Internet or connect to a Broadband router to
allow multiple devices to share the Internet.
1
Thank you for purchasing the D-Link Broadband Cable Modem, which is an MCNS
DOCSIS™ 3.0 cable modem featuring the latest DOCSIS technology. Follow the
easy steps in this guide to properly set up your cable modem. Please verify that
all the package contents below are available.
Package Contents
• DCM-301 Broadband Cable Modem
• CAT5 Ethernet Cable
• Power Adapter
•Stand
• Quick Install Guide
2
3
4
5
6
Power LED
A solid green light indicates a proper connection to the power
supply. The light will blink during boot-up.
2
Downstream (DS) LED
A solid green light indicates a non-bonded (single channel)
connection is successfully made. The light will blink while searching
for a downstream connection.
3
W/DS LED
A solid green light indicates a bonded (multi-channel) connection
is successfully made.
4
Upstream (US) LED
A solid green light indicates a successful upstream connection. The
light will blink while performing upstream ranging.
5
Online LED
6
LAN LED
1
A solid green light indicates a connectivity to the Internet.
A solid green light indicates connectivity to your router or
computer
After you install the cable modem, you must contact your cable provider (ISP)
and register the MAC address. The MAC address is located on the label on the
bottom of the modem.
Below are two common ways to connect your DCM-301 modem to your network.
The diagram on the left shows the connection with a broadband router. The
diagram on the right shows the connection directly to a computer. Note that the
DCM-301 can be placed horizontal or vertical using the included stand (as seen
in the diagrams below).
Your Network
SetupRouter)
Network
Setup (with
Cable Outlet
Network Your
Setup
(without
Router)
Network
Setup
Power Adapter (Included)
Splitter (Not Included)
Cable Outlet
Splitter (Not Included)
DCM-301
DCM-301
To TV
To TV
If any of the above items are missing, please contact your reseller.
Router
Ethernet Cable (Included)
7
Requirements
Verify that you have these items before beginning the installation:
• A cable-line splitter (not included), if you plan to have the cable modem and
a television connected to the same wall cable outlet.
• An active two-way cable line.
• Subscription with a cable Internet Service Provider.
DCM-301
8
9
10
11
7
Ethernet Port
Connect to the WAN (Internet) port on your router or to an Ethernet
port on your computer using an Ethernet cable.
8
Reset Button
Press and hold the reset button with a paper clip for 10 seconds to
reset the router to the factory default settings.
9
Coaxial Connector
Connect the cable coaxial cable to this connector. If you are sharing
this connection with a TV, you must use a coaxial splitter (not
included).
10
Power Port
11
Power Button
Connect the supplied power adapter.
Press to turn the modem on or off.
Power Adapter (Included)
1
LAN
2
INTERNET
RESET
USB
ON/OFF
AC IN
3
AR RT
Ethernet Cable (Included)
Connecting the Cable Modem (with Router)
Connecting the Cable Modem (without Router)
Step 1:
Power off your router.
Step 1:
Power off your computer.
Step 2:
If you are replacing the modem, disconnect all cables and unplug the power to
your old modem.
Step 2:
If you are replacing the modem, disconnect all cables and unplug the power to
your old modem.
Step 3:
Connect the coaxial cable from your wall to the cable modem’s CATV cable
connector. If you plan to have the cable connected to a television as well as the
cable modem, you must use a cable line splitter (not included).
Step 3:
Connect the coaxial cable from your wall to the cable modem’s CATV cable
connector. If you plan to have the cable connected to a television as well as the
cable modem, you must use a cable line splitter (not included).
Step 4:
Plug the cable modem’s power adapter into a wall outlet or surge protector and
into the cable modem’s power port.
Step 4:
Plug the cable modem’s power adapter into a wall outlet or surge protector and
into the cable modem’s power port.
Step 5:
Plug one end of the Ethernet cable into the cable modem’s Ethernet port and the
other end of the cable into the WAN or Internet port on your router.
Step 5:
Plug one end of the Ethernet cable into the cable modem’s Ethernet port and the
other end of the cable into the Ethernet adapter of your computer.
Step 6:
In most cases you will have to call your cable company (Internet Provider) and
register the MAC address of the D-Link modem. The MAC address is on a label
on the bottom of the modem.
Step 6:
In most cases you will have to call your cable company (Internet Provider) and
register the MAC address of the D-Link modem. The MAC address is on a label
on the bottom of the modem.
Step 7:
When the modem is working properly, the Power, DS, US, Online, and LAN LEDs
will all be lit.
Step 7:
When the modem is working properly, the Power, DS, US, Online, and LAN LEDs
will all be lit.
Troubleshooting
1. Power LED is not on.
• Verify the power adapter is plugged into a working outlet or power
strip and seated in the power port.
• Press the power button on the back of the modem.
2. Cannot connect to the Internet.
• You must contact your Internet provider and register the MAC address
of the modem (located on the bottom of the modem). If you skip this
step you will not be able to connect.
• Verify all cables are connected properly.
• If the LEDs on the modem are indicating that you are connected to the
Internet (verified by your Internet provider) and you are connected to a
router, you may have to reset and reconfigure your router.
Technical Support
Having trouble installing your new product? D-Link’s website contains the latest
user documentation and software updates for D-Link products. U.S. customers can
contact D-Link Technical Support through our website or by phone.
United States
Telephone: (877) 453-5465
Internet: http://support.dlink.com
Copyright ©2013 D-Link Corporation/D-Link Systems, Inc. All rights reserved. D-Link and the D-Link logo are registered trademarks of
D-Link Corporation or its subsidiaries in the United States and other countries. Other trademarks are the property of their respective
owners. Product specifications, size and shape are subject to change without notice, and actual product appearance may differ from
that depicted on the packaging. Visit www.dlink.com for more details.
Version 5.0 | December 19, 2013