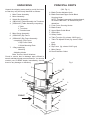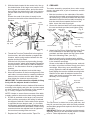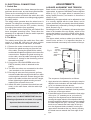
1
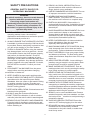
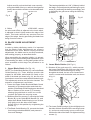
BANDSAW
12”(305mm) & 14”(355mm)
Model Nos. CBS12WC & CBS14WC
Part Nos.
6460070
&
6460050
OPERATING & MAINTENANCE
INSTRUCTIONS
1/97
Thank you for selecting this CLARKE Bandsaw .
Before attempting to operate the machine, please read this instruction manual thoroughly, and follow all
directions carefully. By doing so you will ensure the safety of both yourself and others around you, and at the
same time, you should look forward to the Bandsaw giving you long and trouble free service.
GUARANTEE
This CLARKE product is guaranteed against faulty manufacture for a period of 12 months from the date of
purchase. Please keep your receipt which will be required as proof of purchase. This guarantee is invalid if the
product is found to have been abused or tampered with in any way, or not used for the purpose for which it
was intended.
Faulty goods should be returned to their place of purchase, no product can be returned to us without prior
permission. This guarantee does not effect your statutory rights.
CONTENTS
Page
General Safety Precautions ......................................................... 3
Additional Safety Precautions for Bandsaws ............................... 4
Electrical Installation .................................................................... 4
Main Component Illustration ........................................................ 5
Assembly ..................................................................................... 6
Adjustments ................................................................................. 8
Blade Renewal ............................................................................. 10
Dust Extraction ............................................................................ 10
Maintenance ................................................................................ 10
Tips on Bandsaw Use .................................................................. 11
Ripsawing .................................................................................... 11
Cross Cutting ............................................................................... 11
Troubleshooting ........................................................................... 11
Specifications ............................................................................... 12
Parts lists & Diagrams
Floor Stand .................................................................. 12
CBS12WC ................................................................... 13 - 14
CBS14WC ................................................................... 15 - 17
2
11. DRUGS, ALCOHOL, MEDICATION. Do not
operate machine while under the influence of
drugs, alcohol or any medication.
SAFETY PRECAUTIONS
GENERAL SAFETY RULES FOR
OPERATING MACHINERY
12. USE RECOMMENDED ACCESSORIES. The use
of improper accessories could be hazardous.
WARNING:
13. NEVER LEAVE MACHINE RUNNING
UNATTENDED. Turn power OFF. Do not leave
the machine until it comes to a complete stop.
As with all machinery, there are certain hazards
involved with their operation and use.
Exercising respect and caution will
considerably lessen the risk of personal injury.
However, if normal safety precautions are
overlooked, or ignored, personal injury to the
operator may result.
14. EARTH ALL MACHINES. If the machine is
equipped with three-pin plug, it should be plugged
into a three-pin electrical socket. Never remove
the earth pin.
15. AVOID DANGEROUS ENVIRONMENT. Don’t use
power machines in damp or wet locations or
expose them to rain. Keep your work area well
illuminated. DO NOT use in explosive atmosphere
(around paint, flammable liquids etc).
1. READ and BECOME FAMILIAR with the entire
operating manual. Learn the machines’
applications and limitations as well as the specific
potential hazards peculiar to it.
16. KEEP CHILDREN AWAY. All visitors should be
kept a safe distance from the work area,
especially whilst operating the unit.
2. ALWAYS ENSURE THAT ADEQUATE LIGHTING
is available. A minimum intensity of 300 lux should
be provided. Ensure that lighting is placed so that
you will not be working in your own shadow.
17. MAINTAIN MACHINE IN TOP CONDITION. Keep
tools sharp and clean for the best and safest
performance. Follow maintenance instructions.
3. CHECK for DAMAGE. Before using the machine,
any damaged part, such as a guard etc., should
be checked to ensure that it will operate properly,
and perform its intended function. Check for
alignment of moving parts, breakage of parts,
mountings, and any other condition that may effect
the machines’ operation. Any damage should be
properly repaired or the part replaced. If in doubt,
DO NO USE the machine. Consult your local
dealer.
18. DON’T OVERREACH. Keep your proper footing
and balance at all times. For best footing wear
rubber soled footwear. Keep floor clear of oil, scrap
wood, etc.
19. WEAR PROPER APPAREL. Loose clothing or
jewellery may get caught in moving parts. Wear
protective hair covering to contain long hair.
20. MAKE WORKSHOP CHILDPROOF. Lock all
machines when not in use by removing the safety
keys if fited, and store in a safe location.
4. DISCONNECT the MACHINE from the power
supply before servicing and when changing
accessories or blades etc.
21. NEVER STAND ON THE MACHINE. Serious
injury could occur if the machine is tipped or if a
cutting tool is accidentally contacted. Do not store
materials above or near a machine, such that it is
necessary to stand on the machine to reach them.
5. KEEP GUARDS in place and in working order.
6. ALWAYS WEAR SUITABLE SAFETY GOGGLES
manufactured to the latest European Safety
Standards. Also use a face or dust mask if cutting
or sanding operation is dusty. Everyday eyeglasses do not have impact resistant lenses, they
are NOT safety glasses.
22. HANDLE WITH EXTREME CARE Whenever
transporting or installing the machine, and always
use a lifting appliance wherever possible. Plan your
installation carefully, taking into accoount any lifting
appliances which may be required.
7. KEEP WORK AREA CLEAN. Cluttered areas and
benches invite accidents.
23. ALWAYS use in a well ventilated area. Remove
sawdust frequently, and clean sawdust out from
the interior of the machine to avoid producing a
potential fire hazard.
8. ALWAYS wear Ear Protectors/Defenders
9. DON’T FORCE the Machine. It will do a better
and safer job at the rate for which it was designed.
10.REMOVE ADJUSTING KEYS AND SPANNERS.
Form the habit of checking to see that keys and
adjusting wrenches are removed from the machine
before switching on.
24. AVOID ACCIDENTAL STARTING. Ensure the
switch is OFF before plugging in to the mains.
25. BE AWARE that many accidents are caused by
carelessness due to familiarity. ALWAYS
concentrate on the job in hand, no matter how
trivial it may seem.
3
ELECTRICAL INSTALLATION
ADDITIONAL SAFETY RULES
FOR BANDSAWS
•
•
•
•
•
•
•
•
•
•
•
Connect the mains lead to a standard, 230 Volt (50Hz)
electrical supply through an approved 13 amp BS
1363 plug, or a suitably fused isolator switch.
Use a Push Stick or scrap of wood to do the
pushing and guiding, when sawing small pieces
which require the fingers to be close to the blade.
Set the blade guide block assembly as close as
possible to the workpiece.
Switch off the saw, and make sure the blade has
come to a complete stop before clearing sawdust
or off-cuts from the table.
Keep the saw properly adjusted, paying particular
attention to the blade tension and tracking, and
position of the blade guides.
Disconnect the saw from the mains supply before
removing the front cover.
Make sure there are no nails or foreign objects in
the part of the workpiece to be sawn.
Be extra cautious with very large or small, or
irregularly shaped workpieces.
Set up the machine and make all adjustments with
the power OFF.
i.e. Tilting the table,
Adjusting the saw blade guard
Adjusting the saw blade guides
Adjusting the Blade tension
Adjusting the Blade tracking, etc.
DO NOT operate the machine with the covers off.
They must all be in place and securely fastened
when performing any operation.
When cutting large or oversize stock, always
ensure the material is supported at table height.
Any adjustable component must be securely
locked in position to ensure it cannot vibrate free
during operation.
•
When sawing curves, make relief cuts to allow
removal of scrap material. This will prevent undue
twisting or binding of the saw blade. Make the
relief cuts before starting the curved cut.
•
When sawing, hold material firmly, and feed into
blade at a moderate speed.
•
Be sure to use the correct blade size and type.
WARNING! THIS APPLIANCE MUST BE
EARTHED
IMPORTANT: The wires in the mains lead are
coloured in accordance with the following code:
Green & Yellow - Earth
Blue - Neutral
Brown - Live
As the colours of the flexible lead of this appliance
may not correspond with the coloured markings
identifying terminals in your plug proceed as follows:
Connect GREEN & YELLOW coloured cord to
terminal marked with a letter “E” or Earth symbol
“ “ or coloured GREEN or GREEN & YELLOW.
Connect BROWN coloured cord to plug terminal
marked with a letter “L” or coloured RED.
Connect BLUE coloured cord to plug terminal
marked with a letter “N” or coloured BLACK.
If this appliance is fitted with a plug which is moulded
on to the electric cable (i.e. non-rewirable) please note:
1. The plug must be thrown away if it is cut from the
electric cable. There is a danger of electric shock
if it is subsequently inserted into a socket outlet.
2. Never use the plug without the fuse cover fitted.
3. Should you wish to replace a detachable fuse
carrier, ensure that the correct replacement is
used (as indicated by marking or colour code).
4. Replacement fuse covers can be obtained from
your local dealer or most electrical stockists.
5. The fuse in the plug must be replaced with one of
the same rating (13 amps) and this replacement
must be ASTA approved to BS1362.
Important: If a cable extension is needed, it is
essential to comply with the following data.
Voltage
• DO NOT saw any material that does not have a
flat surface on which
to bear, unless a
suitable support is
used. Round or
tubular work has a
tendency to roll, and
causes the blade to
‘bite’.
Do not cut unless it is securely clamped or blocked.
• Ensure the bandsaw is permanently and securely
fixed in position before operating.
4
Extension length Cable Section
230v
Up to 20m
2.5mm2
230v
From 20 to 50m
4mm2
UNPACKING
PRINCIPAL PARTS
Unpack the shipping carton and lay out all the items
so that they may be clearly identified as follows:
(Ref. Fig. 1)
A Blade Tension Adjuster Knob
1. Main Frame Assembly
B Blade Guard and Upper Guide Block
Securing Knob.
NOTE: This item is mounted on the back panel,
on model CBS12WC, as indicated by the
dotted line.
2. Motor Assembly
3. Switch Box Assembly
4. (CBS12WC) Table Assembly c/w Trunnions
4 (CBS14WC) Table Assembly comprising:
1 Table
C Front Cover Securing Knobs
2 Trunnions
D Blade Guard
E Upper Blade Guide Block
1 Trunnion base
5. Mitre Gauge Assembly
F Switch Box
6. (CBS12WC) Rip Fence
G Safety Switch
6. (CBS14WC) Rip Fence Assembly
H Table Trunnion (fig. shows 12WC type)
I Table Tilt Adjuster Knob (fig. shows 12WC
comprising:1 Rip Fence
1 Rip Fence Guide
type)
J Motor
1 Guide Mounting Plate
K Rip Fence (fig. shows 12WC type)
L Mitre Gauge
7. 1 Bag containing
Allen Key
Adjusting Knobs
M Dust Extraction Outlet
Bolts, Screws, Nuts & Washers
Check to ensure that no damage was suffered in
transit, and that all parts are accounted for. You should
contact your CLARKE dealer immediately, should
there be any damage or deficiency
A
Fig. 1
C
B
D
G
K
E
F
L
I
H
J
C
FRONT
M
5
3. Remove the nuts and washers from the motor
mounting studs.
ASSEMBLY
Plan your installation. Ensure adequate floor space is
available, with good lighting and ventilation, and an
adequate electrical supply is close at hand.
4. Place the motor on to the studs, with the pulley
through the hole in the casing. DO NOT replace
the nuts or washers at this point.
Any protective coating on the Band Saw should be
removed using a cloth moistened with paraffin.
DO NOT use acetone, petrol or paint thinners.
5. Open the front cover by unscrewing the upper and
lower securing knobs.
IMPORTANT:
If you have not purchased the optional floor stand,
ensure the bandsaw is securely mounted on a strong
stable worktop, and of sufficient height so that you do
not have to bend your back to perform normal operations. Tighten the mounting bolts snugly, but take care
NOT TO overtighten.
If you have purchased the stand, it should be assembled first. The main body of the machine is then located and bolted down to it before assembly of other
components.
Take great care from this point to avoid any
contact with the saw blade. Remember that
carelessness can cause severe personal injury.
6. Behind the lower wheel, hangs a drive belt.
Carefully, so as to avoid
the saw blade and also not to trap
your fingers, arrange it so that it is
OFF the pulley, and around the
shaft ie. BEHIND the large pulley.
A. THE STAND ASSEMBLY
7. Fit the belt over the motor
pulley (lifting the motor with
pulley slightly,gives
adequate clearance).
1. Attach the braces to the legs as shown in fig. 2,
using the inside set of holes on each brace, (i.e.the
length will be at its shortest). Ensure a flat washer
is located next to each nut. Do not tighten the
nuts at this stage.
8. Carefully fit the belt to the
larger lower wheel pulley.
Sufficient slack is provided
by moving the motor on its’
elongated mounting holes.
2. Attach the stand platform to the legs but do not
tighten the nuts. Similarly, a flat washer should
be located next to each nut.
3. Ensure the stand assembly is resting on even,
level ground, and rock it to ensure that no part is
under stress, before tightening all nuts. Check to
ensure that the overall shape of the stand is
symmetrical, and is completely stable when all
nuts are tight and the platform is level.
Casing
9. Replace the washers and
nuts on to the motor
Lower
Wheel
mounting studs, and move
the motor on its mountings
so that tension is applied to the belt.
Belt tension is correct when the belt can be moved
1/2” either side of the centre line, in the middle of
its run, using moderate thumb pressure.
Fig. 2
Tighten the motor mounting nuts firmly.
C. THE TABLE
1. CBS12WC
B. THE MOTOR
1. Locate the motor pulley and
slide it on to the motor shaft
with the boss facing
inwards.
2. Using a straight edge, align
the face of the pulley
with the end of the motor
shaft, as shown in the
diagram, and lock it in this
position by tightening the
hex. socket screw.
Straight Edge
The table is shipped with the trunnions, tapered pin
and table insert attached. Before installing, remove
the taper pin, loosen the hex. head screws securing
the trunnions to the under side of the table, and tap
out the table insert.
Motor
Pulley
1. Raise the Upper Guide
Block and Blade Guard
assembly, and secure
it at the top of its’ travel
with knob B, fig.1.
Motor
2. Carefully guide the saw
blade through the table
slot from the front, as
shown in fig.4.
6
Fig. 4
3. With the blade located in the centre hole, line up
the slotted holes of the larger rear trunnion, with
the long and short table tubes, and at the same
time position the slotted hole in the front trunnion
into the other end of the long tube, as shown in
fig 5.
Ensure the ends of the tubes sit neatly in the
grooves on the inside of the slotted holes in each
trunnion.
Fig. 5
Rear
Trunnion
Long Table
Tube
2. CBS14WC
The table assembly comprises three main components, the table itself, a pair of trunnions, and the
trunnion base.
1. Bolt the trunnions to the underside of the table,
ensuring the two table securing bolts are in place
as shown in fig 6, and the trunnion with the scale
attached is bolted to the front table mounting, so
that the scale faces towards the front of the
table. Leave the bolts finger tight.
2. Secure the trunnion base to the main body with
the nuts and bolts provided, and tighten firmly.
Front
Trunnion
Trunnion Base
Mtg Bolts
Table Stop
Screw
Fig. 6
Bolt trunnions
to table
Table Tilt
Adj. Knob
Table securing
bolt
Trunnion
Tension Bolt
Trunnion Base
Trunnion Mtg
Bolts
Table Tilt
Adj. Knob
3. Attach the Rip Fence Guide Bar Mounting Plate
to the underside of the table with the screws
provided, and then attach the Rip Fence Guide
Bar to the Mounting Plate, (see fig.7).
4. Thread the Trunnion Tension Bolt in through the
front trunnion, with a flat washer up against the
trunnion, and a spring washer between the flat
washer and the bolt head.
With the bolt fully home and protruding through
the rear trunnion, attach a flat washer followed by
a spring washer, and finally the table tilt adjuster
knob. i.e. the flat washer must be up against the
trunnion.
Do not tighten the adjuster knob at this stage.
4. Mount the table on the trunnion base, with the
table securing bolts protruding through the holes
in the trunnion mountings.
Screw on the table tilt adjusting knobs, and rock
the table, to bed the trunnions snugly on to their
mountings. When they move smoothly and
evenly, tighten the table tilt adjuster knobs, and
finally tighten the trunnion to table mounting bolts.
Slacken off the table tilt adjuster knobs once
again, and check to ensure the table moves
smoothly on its mountings.
Fig. 7
5. Move the trunnions on their mountings away from
each other, to ensure there is a working clearance
between the trunnions and the table tubes, and
then tighten the trunnion mounting bolts.
Table Stop Screw
IMPORTANT:The table should be capable of tilting
freely with the adjuster knob is loosened.
If it is tight and difficult to move, slacken off the trunnion
mounting bolts slightly and prise the trunnions apart
on their mountings, in the direction of the arrows in
fig. 5. Finally, re-tighten the mounting bolts.
Rip Fence
Guide Bar
Rip Fence
Guide Bar
Mounting Plate
NOTE: It helps, to ensure free movement of the table,
to apply grease to the trunnion slots during assembly.
6. A scale is provided on the larger (rear) trunnion,
with a pointer mounted on the casing to indicate
the degree of table tilt. Set the table so the pointer
is opposite the zero degres mark, (i.e. the table
is horizontal) and tighten the table tilt adjuster knob.
The table should be firm and stable, if there is any
movement when the adjuster knob is tightened,
the trunnion mounting bolts are loose.
Table Tilt Adjuster Knob
7. Replace the Table Insert and the Taper Pin.
7
The Rip Fence is slotted on to the guide bar, and
may be secured into place with the knob provided,
and the Mitre gauge when required, sits in the groove
in the table.
IMPORTANT: Before use, the table must be correctly
adjusted, and set to the horizontal position. Please
refer to ‘Table Adjustments’ on page 8.
D. ELECTRICAL CONNECTIONS
ADJUSTMENTS
1. Switch Box
A. BLADE ALIGNMENT AND TENSION
On the left hand side of the frame, between the upper
and lower wheel covers, are two loosely fitted screws.
These are the mountings for the switch box.
Blade tension is effected by raising or lowering the
upper wheel, by means of the Blade Tension Adjuster
Knob (A, fig. 1) The upper wheel is mounted on a
spring loaded trunnion, and tension is therefore a
matter of ‘feel’.
Remove the screws and attach the switch box, with
the safety bar on the wheel cover sitting snugly against
the safety switch.
Additionally, the upper wheel can be adjusted so that
it is correctly aligned with the lower wheel, and to
ensure the blade will run centrally about both wheels.
This adjustment is effected by turning the Alignment
Knob, shown in fig. 8.
Screwing the knob ‘in’ (clockwise), will cause the upper
wheel to tilt inwards at the top slightly, which in turn
causes the blade to run on the outside of the wheel.
Screwing the Knob anticlockwise, has the opposite
effect.
The Upper wheel carries a rubber tyre which has a
convex outer surface. It is important therefore to
ensure the blade runs exactly in the centre of the tyre.
The safety switch operates when the wheel cover is
opened. The safety bar, mounted on the wheel cover,
pushes the switch into the OFF position, thereby
preventing the machine from operating.
You will notice that the Safety Bar and Switch Box
have elongated mounting holes. These allow the
assembly to be adjusted so that the switch operates
immediately the door is opened.
2. The Motor
Two cables extend from the switch box. One cable
carries a 13 amp BS 1360 plug, the other, shorter
cable is now connected to the motor, as follows:
2.1 Remove the motor connector box cover plate.
2.2 Remove the gland securing nut from the end
of the cable, (leaving the gland ON the cable),
and thread the cable through the hole in the motor
connector box. Replace the gland securing nut
on the cable, once the cable is through the hole,
and secure it, loosely for the time being, so that
the cable is not held.
Fig. 8
Blade
Tension
Adj. Knob
Wheel
Alignment
Knob
2.3 Connect the YELLOW/GREEN wire to the
EARTH terminal, which is attached to the
casing.
2.4 The other two wires are connected to the other
two terminals on the terminal block.
2.5 Ensuring all wires are firmly secured, pull any
excessive cable that may be inside the box, back
out through the cable inlet. Ensure there is a little
slack in the cable and the wires are NOT taught,
before tightening the gland securing nut and
replacing the connector box cover.
The sequence of adjustment is as follows:
1. Apply tension to the blade by screwing the tension
adjuster knob clockwise until the blade feels firm
on its’ run between the two wheels.
2.6 Attach the cable, (between the switch box and
motor), to the main frame, with the cable clips
provided.
2. Turn the upper wheel clockwise, by hand, and
observe the reaction of the blade, and its position
on the tyre of the upper wheel
Your Band Saw is now fully assembled, but
3. If the blade begins to move towards the front edge
of the tyre, (i.e. towards you as you look at it),
slowly turn the alignment screw anticlockwise,
causing the upper wheel to tilt outwards at the top,
thereby causing the blade to move further towards
the back edge of the tyre. Conversly, if the blade
tends to run towards the back edge of the tyre,
turn the alignment knob clockwise, moving the
upper wheel inwards at the top, thereby causing
the blade tomove towards the front edge of the
tyre.
before use, it is MOST IMPORTANT that the
following adjustments are made. It is equally
important that these adjustments are
constantly checked and maintained.
8
This bearing should be set 1/64” (0.04mm) behind
the blade, and is adjusted by slackening the grub
screw (E), positioning the bearing accordingly, and
re-tightening the grub screw using the Allen key
provided.
Adjust carefully so that the blade runs smoothly
along the middle of the tyre, and lock the alignment
knob in place with the locknut on its threaded shaft.
(see fig. 9)
Adjuster Knob
Fig. 9
Fig 10
D
E
Locknut
4. Before closing the door on the CBS14WC , ensure
the wire brush which is adjacent to the lower wheel,
is adjusted so that it lightly brushes the edge of the
wheel. This brush removes any saw dust from the
edge of the wheel, thereby preventing the blade from
being forced off course.
F
A
C
G
B
B. BLADE GUIDE ADJUSTMENT.
NOTES:
E
D
In order to obtain satisfactory results, it is important
that the Blade Guide Adjustments are properly
maintained at all times. Before carrying out these
adjustments, the blade must be correctly tensioned,
and tracking properly, as described above.
G
A
When assembling the machine initially, it is advantageous to carry out the blade guide adjustments, prior
to assembling the table, as the blade guides are far
more accessible at this stage.The procedure is as
follows:
F
B
B
C
2. Lower Blade Guides (Ref Fig 11)
2.1 Slacken off the grub screw (K), which secures
the Lower Guide Block (M), and move the Lower
Guide Block so that the bearings run neatly
alongside the blade, but not so far forward as to
come in contact with the blades teeth, as shown
in fig. 11.
1. Upper Blade Guide (Ref Fig. 10)
NOTE: The Guide Block Bracket (G), carries the Blade
Guide Bearings (A). These bearings provide side
support for the blade, and should run neatly on the
sides of the blade (as shown in fig 10), but not so far
forward as to come into contact with the blades’ teeth.
Fig.11
This adjustment must be the first to be checked. The
sequence of adjustment is as follows:
H
D
1.1 Lower the Upper Guide Block and Blade Guard
Assembly to its lowest position and check the
position of the Blade Guide Bearings as described
above. Slacken off the screw (F) if necesary,
allowing the guide block to move in or out as
required. Re-tighten the securing screw.
A
K
L
1.2 Slacken off the two screws (C), securing the Guide
Blocks (B), to the Guide Block Bracket (G), and
adjust each Blade Guide Bearing in turn so that
they lightly touch the sides of the blade.
Secure firmly in this position by re-tightening the
screws (C).
M
A
1.3 The Blade Guide Bearing (D), prevents the blade
from being pushed backwards, and protects it
from tooth damage.
9
2.2 The Lower Guide bearings (A) should lightly touch
the sides of blade. Slacken off the securing screws
(L), and move each bearing in turn so that it just
touches the side of the blade. Re-tighten securing
screws (L)
2.3 Slacken the grub screw (H), which secures the
shaft carrying The Blade Guide Bearing (D), and
adjust the position of the bearing so that it is1/64”
behind the blade (as shown in fig. 10).
Re-tighten the grub screw, using the Allen key
provided
BLADE RENEWAL
1. Disconnect the mains cable from the supply.
2. Slacken off blade tension using the adjuster knob
on top of the machine.
3. Raise the upper blade guard and guide block to
the top of its travel, and secure in position.
C. TABLE ADJUSTMENTS
4. Remove the Table Insert and Taper pin.
For all normal sawing operations, it is important to
ensure that the table is set at 90O to the blade. This is
checked by sliding an engineers square on the table,
up to the blade (with the blade correctly tensioned),
and carrying out a visual inspection.
If necessary slacken off the table tilt adjuster knobs,
and move the table until you are satisfied it is square
with blade, then re-tighten the table tilt adjuster knobs.
5. Open the Wheel Cover, and ease the blade off
the upper and lower wheels, taking care that the
blade does not ‘spring’ as this could cause serious
injury. It is advisable to wear proper clothing,
i.e. long sleeves and goggles.
6. Replace the new blade over the lower wheel first,
then easing it over the upper wheel, ensuring the
teeth point down towards the table.
In the case of the CBS14WC, it may be necessary to
slacken off the lock nut, and screw ‘in’ the table stop
screw (see fig.6 & 7, page 7), in order for the table to
come square.
7. Carry out all adjustments. i.e. Upper Wheel
alignment and Blade Guide Bearings, as described
on pages 8 and 9.
With the table tilt adjuster knobs tight, check to ensure
the pointer beneath the table, is correctly set to zero
on the scale on the side of the trunnion. If necessary,
slacken the pointer securing screw, and re-set the
pointer to zero.
8. When changing a blade on the 14WC, check to
ensure the wire brush inside the lower wheel
housing, which keeps the lower wheel rim free from
sawdust etc., ensuring the saw blade maintains a
true path on the wheel, is brushing lightly against
the rim of the wheel. Adjust as necessary.
The CBS14WC also requires the table stop to be
screwed ‘out’ until it comes into contact with the table.
It is then locked in place with the lock nut. This facility
allows the table to be moved quickly and accurately
to horizontal when the machine has been used for
cutting mitres etc. If a reverse mitre is required, (up
to 15O), it will be necessary to slacken the table stop
screw lock nut, and screw the stop screw ‘in’ by the
required amount to achieve your reverse mitre.
DUST EXTRACTION
A dust extraction outlet is provided which may be
connected to a vacuum cleaner or a dust extraction
machine such as the CLARKE CDE35, as and
when the need arises.
Please see your CLARKE dealer for details.
MAINTENANCE
D. MICRO SWITCH ADJUSTMENTS
It is essential to ensure the operating lever of the micro
switch is correctly adjusted to ensure it trips the switch
immediately the door is opened. It must not be
possible, under any circumstances, for the machine
to operate when the door is open.
The operating lever mounting holes are elongated,
as are the mounting holes of the switch box. This
allows the lever and switch box to be adjusted
independantly and/or together, to obtain the best
possible action, so that the switch is operated
immediately the door is opened. It may take one or
two attempts to obtain satisfactory alignment.
After use
1. Accumulated dust and chips should be removed
from inside the bandsaw. Open the front cover
and use a brush or vacuum cleaner at the end of
every work session.
2. ALWAYS Lower the Blade Guide Block and Guard
Assembly to its lowest position.
3. ALWAYS slacken off blade tension.
Periodically
1. Apply a coat of wax paste to the table surface which
will allow the wood stock to glide across it smoothly
and effortlessly.
E. UPPER AND LOWER WHEEL
BEARINGS
If it becomes necessary at some stage to disassemble the machine completely, the upper and
lower wheel bearing blocks must be adjusted to
ensure the wheels are in perfect alignment. This
operation should only be carried out by a qualified
technician, and you should contact your CLARKE
dealer for advice.
2. Inspect electric cables to ensure they are not
cracked or damaged in any way. Damaged cables
should be renewed immediately.
3. Inspect the blade for damaged teeth. If any are
broken, the blade should be renewed.
10
BLADE GUIDES
FREEHAND SAWING
Blade guides should be inspected regularly for wear
or chipping. When replacing guides replace all guides
at the same time, both upper and lower.
The ease with which many different and varied
shapes can be cut is one of the most important
features of the bandsaw. Select a blade suitable for
cutting the smallest radius in the work you have
planned. See your CLARKE dealer for replacement
or alternative blades.
BEARINGS
All bearings used in the construction of your bandsaw
and its motor are sealed and lubricated for life.
TIPS ON USING YOUR
BANDSAW
When freehand cutting, always feed the work slowly
so that the blade can follow the line you wish to saw.
Make sure not to drag the work off line, forcing the
blade sideways, or twisting it.
For all cutting operations, the upper guide block and
blade guard assembly should be adjusted to be just
clear of the work being cut. Not only does this provide
the best safety for the operator, but it also brings the
blade guides closer to the work giving more accurate
results and easier control.
In many cases, it is helpful to rough cut about 6mm
away from the line. For difficult curves which may be
too tight for the blade, make relief cuts onto the face
of the curve so that these scraps will fall as the final
radius is sawn.
Use both hands to feed the workpiece in to the blade.
The work must be held flat on the table at all times to
prevent binding of the blade. Use a steady even
pressure just sufficient to keep the blade cutting.
CONSUMABLES
A range of bandsaw blades, is available for your
Bandsaw to help you get maximum use from your
machine.
Always use a rip fence or mitre guide where possible
to eliminate any sideways slip of the work. This is
most important when the table is tilted to an angle.
Consumables are obtainable from your CLARKE
Dealer. If you have any difficulty in obtaining them,
please contact the CLARKE Customer Service
Department.
Always plan your work ahead. The tradesmans’ rule
is “measure twice, cut once”. It is best to finish a cut in
one continuous operation, but frequent backtracking
may be necessary.
TROUBLE SHOOTING
BREAKING BLADES
Turn off the motor and allow the blade to come to a
complete stop before backing the blade out of the cut.
The breaking of blades is a common problem with
band saws, and the following are some of the causes
associated with this problem.
Remember that the blade removes material during
the cut. This gap created by the blade is called the
‘kerf’, and must be allowed for when cutting to exact
sizes. Plan your cut so that the kerf is the scrap side
of the lines you wish to cut. If necessary, allow a little
more for finish sanding.
1. Faulty alignment
2. Blade guides incorrectly adjusted.
3. Feeding the work too fast.
RIP SAWING
4. Forcing or twisting the blade around a tight radius.
This term refers to the cutting of the timber with the
grain, rather than at a right angles to the grain. You
can rip wood freehand to a previously drawn line, but
best results are obtained by using the rip fence. If the
table is set at a level angle, set the rip fence to the left
hand side of the blade, allowing you to use your right
hand to hold the work firmly against the fence.
5. Blade too tight.
6. Dull teeth.
7. Blade is badly welded or brazed.
8. Blade left running when not in use.
CROSS CUTTING
This term refers to cutting timber at right angles to the
grain. This type of cut can also be made freehand, but
the mitre guide is used to ensure accurate results.
The mitre guide can be adjusted to a 45° angle to
produce mitre cuts, or with the table tilted as well compound mitre cuts. Make sure the work is held
firmly against the table and against the face of the
mitre guide. Be careful to keep your fingers away from
the blade, particularly at the end of the cut.
REMEMBER
ALWAYS disconnect your bandsaw from the
power supply when troubleshooting, or
carrying out adjustments or maintenance.
11
PARTS LIST & DIAGRAM
FLOOR STAND (Optional)
Part No. 6460075
1
2
3
4
5
6
7
8
9
10
11
Stand Top
Screw 3/8”
Leg
Brace - Side
Brace Front and Rear
Bolt Cap Hd. Sq. Shoulder
Hex. Nut 5/16”
Washer
Hex. Nut 14”
Foot - Rubber Pad
Screw
FMEBS14S01
FMEBS14S02
FMEBS14S03
FMEBS14S04
FMEBS14S05
FMEBS14S06
FMEBS14S07
FMEBS14S08
FMEBS14S10
FMEBS14S11
FMEBS14S12
FLOOR STAND SPECIFICATIONS
Dimensions
710 x 540 x 550mm
Weight
13 kg
SPECIFICATIONS
CBS12WC
CBS14WC
Motor ............................................... 230V 509Hz 1Ph ................. 230V 509Hz 1Ph
Power Rating ......................... 1/2 HP ................................. 1HP
Speed .................................... 1420 RPM ........................... 1420 PRM
Capacitor ............................... 16 uF 350V.......................... 100uF 250V
Current Rating ....................... 3.5 Amps ............................. 5.5 Amps
Blade Speed ...................................... 660 M/min ........................... 700 M/min
Blade Length ..................................... 2300 mm ............................. 2500 mm
Cutting Capacity ................................ 305 x 155 mm ..................... 340 x 190 mm
Table Size ......................................... 305 x305 mm ...................... 380 x 380 mm
Table Tilt ............................................ 45O right - 15O left ................ 45O right - 15O left
Dimensions ........................................ 610 x 480 x 1080 mm ......... 690 x 520 x 1210 mm
Weight net/gross ............................... 51 kg ................................... 81.5 kg
For Spare Parts and Servicing, please contact your nearest dealer, or
CLARKE International, on one of the following numbers.
PARTS - 0181 558 6696
SERVICE - 0181 556 4443
PARTS & SERVICE FAX - 0181 558 3622
12
CBS12WC
PARTS LIST
No. Description
1
2
3
4
5
6
7
8
9
10
12
13
14
15
16
17
18
19
20
21
22
23
24
25
26
27
28
29
30
31
32
33
34
35
36
37
38
39
40
41
42
43
44
45
46
47
48
49
50
51
52
53
54
55
56
57
58
59
60
Frame
Base
Upper Wheel Box
Lower Wheel Box
Strengthener
Frame
Lower Steel Pin
Table Support Tube
Pin
Wheel Cover
Upper Steel Pin
Bottom Switch Plate
Guide Bar
Pin
Guide Bar Holder
Blade Guard
Steel Ball
Spring
Screw
Clamping Plate
Washer
Screw
Bearing Guide Rod
Bearing
Retaining Ring
Blade Guide Holder
Screw 3/16x1/2
Pin
Guide Block
Hex. Nut
Upper Wheel Shaft
Bearing
Retaining Ring
Tyre
Upper Wheel
Upper Wheel Hinge
Support Bracket
Spring
Adjusting Nut
Spring pin
Guide Post Bracket
Tension Screw
Washer
Nut
Tilt Screw
Washer
Nut
Screw
Screw
Washer
Set Screw
Switch
Washer
Screw
Washer
Set Screw
Nut
Washer
Pin
No. Description
Part No.
61
62
63
64
65
66
67
68
69
70
71
72
73
74
75
76
77
79
80
81
82
83
84
85
87
88
89
90
91
92
93
94
95
96
97
98
99
100
101
102
103
104
105
106
107
108
109
110
111
112
113
114
115
116
117
118
119
-
FMEBS12S001
FMEBS12S002
FMEBS12S003
FMEBS12S004
FMEBS12S005
FMEBS12S006
FMEBS12S007
FMEBS12S008
FMEBS12S009
FMEBS12S010
FMEBS12S012
FMEBS12S013
FMEBS12S014
FMEBS12S015
FMEBS12S016
FMEBS12S017
FMEBS12S018
FMEBS12S019
FMEBS12S020
FMEBS12S021
FMEBS12S022
FMEBS12S023
FMEBS12S024
FMEBS12S025
FMEBS12S026
FMEBS12S027
FMEBS12S028
FMEBS12S029
FMEBS12S030
FMEBS12S031
FMEBS12S032
FMEBS12S033
FMEBS12S034
FMEBS12S035
FMEBS12S036
FMEBS12S037
FMEBS12S038
FMEBS12S039
FMEBS12S040
FMEBS12S041
FMEBS12S042
FMEBS12S043
FMEBS12S044
FMEBS12S045
FMEBS12S046
FMEBS12S047
FMEBS12S048
FMEBS12S049
FMEBS12S050
FMEBS12S051
FMEBS12S052
FMEBS12S053
FMEBS12S054
FMEBS12S055
FMEBS12S056
FMEBS12S057
FMEBS12S058
FMEBS12S059
FMEBS12S060
13
Screw
Screw
Pointer
Dust Outlet
Screw
Motor
Pulley
Screw
Washer
Bearing Bracket
Washer
Screw
Hex. Screw
Hex. Screw
Washer
Retaining Ring
Bearing
Lower Wheel Shaft
Key
Lower Wheel
Wheel Protector
Driven Pulley
Strengthener
Saw Blade
Knob
Table
Rear Trunnion
Front Trunnion
Washer
Screw
Washer
Screw
Washer
Ring
Safety Bar
Power Cable
Washer
Cable Clip
Taper Pin
Screw
Screw
Washer
Trunnion Tension Bolt
Stud
Screw
Grommet
Motor Cable
Key 5x5x23mm
Screw 6x10mm
Screw 5/16x1”
Blade Protector
Screw 5/16x3/8”
Switch Protector
Table Insert
Screw 4x10mm
Stud 5/16x2”
Screw 5/16”
Mitre Gauge Assy.
Rip Fence Assy
Part No.
FMEBS12S061
FMEBS12S062
FMEBS12S063
FMEBS12S064
FMEBS12S065
FMEBS12S066
FMEBS12S067
FMEBS12S068
FMEBS12S069
FMEBS12S070
FMEBS12S071
FMEBS12S072
FMEBS12S073
FMEBS12S074
FMEBS12S075
FMEBS12S076
FMEBS12S077
FMEBS12S079
FMEBS12S080
FMEBS12S081
FMEBS12S082
FMEBS12S083
FMEBS12S084
FMEBS12S085
FMEBS12S087
FMEBS12S088
FMEBS12S089
FMEBS12S090
FMEBS12S091
FMEBS12S092
FMEBS12S092
FMEBS12S094
FMEBS12S095
FMEBS12S096
FMEBS12S097
FMEBS12S098
FMEBS12S099
FMEBS12S100
FMEBS12S101
FMEBS12S102
FMEBS12S103
FMEBS12S104
FMEBS12S105
FMEBS12S106
FMEBS12S107
FMEBS12S108
FMEBS12S109
FMEBS12S110
FMEBS12S111
FMEBS12S112
FMEBS12S113
FMEBS12S114
FMEBS12S115
FMEBS12S116
FMEBS12S117
FMEBS12S118
FMEBS12S119
FMEBS12S120
FMEBS12S121
PARTS DIAGRAM
CBS12WC
14
PARTS LIST
CBS14WC
No. Description
Part No.
No. Description
Part No.
1
2
3
4
5
6
7
8
9
10
11
12
13
14
15
16
17
18
19
20
21
22
23
24
25
26
27
28
29
30
31
32
33
34
35
36
37
38
39
40
41
42
43
44
45
46
47
48
49
50
51
52
53
54
55
56
57
58
59
60
FMEBS14P01
FMEBS14P02
FMEBS14P03
FMEBS14P04
FMEBS14P05
FMEBS14P06
FMEBS14P07
FMEBS14P08
FMEBS14P09
FMEBS14P10
FMEBS14P11
FMEBS14P12
FMEBS14P13
FMEBS14P14
FMEBS14P15
FMEBS14P16
FMEBS14P17
FMEBS14P18
FMEBS14P19
FMEBS14P20
FMEBS14P21
FMEBS14P22
FMEBS14P23
FMEBS14P24
FMEBS14P25
FMEBS14P26
FMEBS14P27
FMEBS14P28
FMEBS14P29
FMEBS14P30
FMEBS14P31
FMEBS14P32
FMEBS14P33
FMEBS14P34
FMEBS14P35
FMEBS14P36
FMEBS14P37
FMEBS14P38
FMEBS14P39
FMEBS14P40
FMEBS14P41
FMEBS14P42
FMEBS14P43
FMEBS14P44
FMEBS14P45
FMEBS14P46
FMEBS14P47
FMEBS14P48
FMEBS14P49
FMEBS14P50
FMEBS14P51
FMEBS14P52
FMEBS14P53
FMEBS14P54
FMEBS14P55
FMEBS14P56
FMEBS14P57
FMEBS14P58
FMEBS14P59
FMEBS14P60
61
62
63
64
65
66
67
68
69
70
71
72
73
74
75
76
77
78
79
80
81
82
83
84
85
86
87
88
89
90
91
92
93
94
95
96
97
98
99
100
101
102
103
104
105
106
107
108
109
110
111
112
113
114
115
116
117
118
119
120
FMEBS14P61
FMEBS14P62
FMEBS14P63
FMEBS14P64
FMEBS14P65
FMEBS14P66
FMEBS14P67
FMEBS14P68
FMEBS14P69
FMEBS14P70
FMEBS14P71
FMEBS14P72
FMEBS14P73
FMEBS14P74
FMEBS14P75
FMEBS14P76
FMEBS14P77
FMEBS14P78
FMEBS14P79
FMEBS14P80
FMEBS14P81
FMEBS14P82
FMEBS14P83
FMEBS14P84
FMEBS14P85
FMEBS14P86
FMEBS14P87
FMEBS14P88
FMEBS14P89
FMEBS14P90
FMEBS14P91
FMEBS14P92
FMEBS14P93
FMEBS14P94
FMEBS14P95
FMEBS14P96
FMEBS14P97
FMEBS14P98
FMEBS14P99
FMEBS14P100
FMEBS14P101
FMEBS14P102
FMEBS14P103
FMEBS14P104
FMEBS14P105
FMEBS14P106
FMEBS14P107
FMEBS14P108
FMEBS14P119
FMEBS14P110
FMEBS14P111
FMEBS14P112
FMEBS14P113
FMEBS14P114
FMEBS14P115
FMEBS14P116
FMEBS14P117
FMEBS14P118
FMEBS14P119
FMEBS14P120
Left Bracket Upper Housing.
Right Bracket
Bracket Upper Mount
Bracket Upper Wheel
Pivot Pin
Spring
Square Nut
Angle Bracket
Upper Wheel Shaft
Upper Wheel
Bearing
Retaining Ring
Hex. Nut
Tyre
Lower Mtg Bracket
Retaining Ring
Lower Wheel Shaft
Key
Driven Pulley
Lower Wheel
Washer 5/16”
Screw Hex. Head 5/16x3/4”
Screw Hex Head 1/4x3/4”
Trunnion
Screw Hex Head 5/16x1-1/4”
Lower Guide Bracket
Bearing Guide Rod
Ball Bearing
Retaining Ring
Bearing Guide Rod
Hex. Nut 1/4”
Lower Blade Guide Holder
Hex. Head Screw 1/4”
Scale
Trunnion Base
Table Tilt Adjuster Knob
TableLocking Screw
Hex. Head Screw 1/4x3/4”
Table
Washer 1/4”
Blade Guard
Guide Bar Holder
Guide Bar
Spring Pin
Clamping Plate
Set Screw 1/4x1/2”
Washer 1/4”
Hex Head Screw 1/4x1/2”
Upper Blade Guide Holder
Upper Bearing Mount Block
Retaining Washer 3/8”
Hex. Head Screw 5/16”
Pin 3x10mm
Bearing
Saw Blade 102x1/2”
Spring Pin 3x30mm
Tapered Pin
Table Insert
Ball Bearing
Steel Ball 5/16” dia
15
Spring 8mmx18
Set Screw 3/8x3/8”
Rod Lower Bearing Guide
Trunnion Clamp Shoe
Screw
Screw
Ring
Rod Lower Bearing Guide
Pin
Screw Hex 5/16x3”
Nut Hex 5/16”
Pointer
Screw 3/16x1/4”
Rip Fence
Rip Fence Guide Plate
Rip Fence Guide
Rip Fence Knob
Screw
Mitre Gauge complete
Knob
Switch Button Protector
Hex. Nut 1/4”x1/2”
Switch Push Button
Screw Lock Knob 5/16x1”
Screw Tension 3/8”
Washer 1/4”
Screw Hex. 1/4x3/4”
Screw Tilt 5/16x1-7/8”
Hex. Screw 5/16x1-1/4”
Adjusting Screw 5/16x1/2”
Lower Bearing Housing
Screw Round Head 1/4x1/2”
Dust Outlet
Motor 1 HP
Screw Hex 5/16x3/8”
Pulley 2-1/2”
Key 5x5x40mm
Door Upper Wheel
Lock Knob Screw 1/4”
Set Screw M6x1x6
V-Belt
Nut Hex 5/16”
Washer 5/16
Nut Hex 1/4”
Power Cable
Copper Brush
Support Plate
Screw
Gland
Screw hex 1/4x5/8”
Screw Rd. Head 3/16x3/8”
Bearing Guard
Screw
Switch Plate
Screw
Screw
Switch Lever
Pin
Screw 5/16x3”
Base and Frame
PARTS DIAGRAM
CBS14WC
16
PARTS DIAGRAM
CBS14WC
17