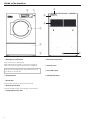
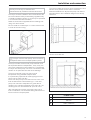
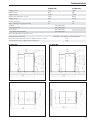
1
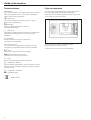
Operating instructions
Dryers
Gebruiksaanwijzing
Droogautomaten
PT 8257 WP
PT 8337 WP
To avoid the risk of accidents or damage to the machine it is
essential to read these instructions before installing,
commissioning and using it for the first time.
en, nl - GB, NL
M.-Nr. 07 986 860
2
Contents
Warning and Safety instructions . . . . . . . . . . . . . . . . . . . . . . . . . . . . . . . . . . . . . . . . . . . . . . . . . . . . . . . . . . . . . . . 4
Caring for the environment . . . . . . . . . . . . . . . . . . . . . . . . . . . . . . . . . . . . . . . . . . . . . . . . . . . . . . . . . . . . . . . . . . . 7
Guide to the machine . . . . . . . . . . . . . . . . . . . . . . . . . . . . . . . . . . . . . . . . . . . . . . . . . . . . . . . . . . . . . . . . . . . . . . . . 8
Control elements. . . . . . . . . . . . . . . . . . . . . . . . . . . . . . . . . . . . . . . . . . . . . . . . . . . . . . . . . . . . . . . . . . . . . . . . . . . . . 9
Drying. . . . . . . . . . . . . . . . . . . . . . . . . . . . . . . . . . . . . . . . . . . . . . . . . . . . . . . . . . . . . . . . . . . . . . . . . . . . . . . . . . . . 11
Sort the laundry. . . . . . . . . . . . . . . . . . . . . . . . . . . . . . . . . . . . . . . . . . . . . . . . . . . . . . . . . . . . . . . . . . . . . . . . . . . . . 11
Before using for the first time . . . . . . . . . . . . . . . . . . . . . . . . . . . . . . . . . . . . . . . . . . . . . . . . . . . . . . . . . . . . . . . . . . 12
Switch the machine on and load the drum . . . . . . . . . . . . . . . . . . . . . . . . . . . . . . . . . . . . . . . . . . . . . . . . . . . . . . . . 12
Select a programme . . . . . . . . . . . . . . . . . . . . . . . . . . . . . . . . . . . . . . . . . . . . . . . . . . . . . . . . . . . . . . . . . . . . . . . . . 12
Card operation / coin mechanism . . . . . . . . . . . . . . . . . . . . . . . . . . . . . . . . . . . . . . . . . . . . . . . . . . . . . . . . . . . . . 15
Card access operation . . . . . . . . . . . . . . . . . . . . . . . . . . . . . . . . . . . . . . . . . . . . . . . . . . . . . . . . . . . . . . . . . . . . . . . 15
Drying using coin mechanism C 4060 / C 4065 / C 4070 . . . . . . . . . . . . . . . . . . . . . . . . . . . . . . . . . . . . . . . . . 15
Additional options . . . . . . . . . . . . . . . . . . . . . . . . . . . . . . . . . . . . . . . . . . . . . . . . . . . . . . . . . . . . . . . . . . . . . . . . . 16
Start date and time . . . . . . . . . . . . . . . . . . . . . . . . . . . . . . . . . . . . . . . . . . . . . . . . . . . . . . . . . . . . . . . . . . . . . . . . . . 16
Programme stop . . . . . . . . . . . . . . . . . . . . . . . . . . . . . . . . . . . . . . . . . . . . . . . . . . . . . . . . . . . . . . . . . . . . . . . . . . . . 17
Programme cancellation . . . . . . . . . . . . . . . . . . . . . . . . . . . . . . . . . . . . . . . . . . . . . . . . . . . . . . . . . . . . . . . . . . . . . . 17
Changing the programme order . . . . . . . . . . . . . . . . . . . . . . . . . . . . . . . . . . . . . . . . . . . . . . . . . . . . . . . . . . . . . . . . 17
Programme information . . . . . . . . . . . . . . . . . . . . . . . . . . . . . . . . . . . . . . . . . . . . . . . . . . . . . . . . . . . . . . . . . . . . . . 17
Programme overview . . . . . . . . . . . . . . . . . . . . . . . . . . . . . . . . . . . . . . . . . . . . . . . . . . . . . . . . . . . . . . . . . . . . . . . 18
Standard programmes . . . . . . . . . . . . . . . . . . . . . . . . . . . . . . . . . . . . . . . . . . . . . . . . . . . . . . . . . . . . . . . . . . . . . . . 18
Bedding . . . . . . . . . . . . . . . . . . . . . . . . . . . . . . . . . . . . . . . . . . . . . . . . . . . . . . . . . . . . . . . . . . . . . . . . . . . . . . . . . . 20
Buildings maintenance . . . . . . . . . . . . . . . . . . . . . . . . . . . . . . . . . . . . . . . . . . . . . . . . . . . . . . . . . . . . . . . . . . . . . . . 20
Emergency services . . . . . . . . . . . . . . . . . . . . . . . . . . . . . . . . . . . . . . . . . . . . . . . . . . . . . . . . . . . . . . . . . . . . . . . . . 21
Wet cleaning . . . . . . . . . . . . . . . . . . . . . . . . . . . . . . . . . . . . . . . . . . . . . . . . . . . . . . . . . . . . . . . . . . . . . . . . . . . . . . . 21
Professional for the home . . . . . . . . . . . . . . . . . . . . . . . . . . . . . . . . . . . . . . . . . . . . . . . . . . . . . . . . . . . . . . . . . . . . . 23
Optional modules . . . . . . . . . . . . . . . . . . . . . . . . . . . . . . . . . . . . . . . . . . . . . . . . . . . . . . . . . . . . . . . . . . . . . . . . . . 25
Operating data . . . . . . . . . . . . . . . . . . . . . . . . . . . . . . . . . . . . . . . . . . . . . . . . . . . . . . . . . . . . . . . . . . . . . . . . . . . . . 25
Peak load cut-out . . . . . . . . . . . . . . . . . . . . . . . . . . . . . . . . . . . . . . . . . . . . . . . . . . . . . . . . . . . . . . . . . . . . . . . . . . . 26
Problem solving guide . . . . . . . . . . . . . . . . . . . . . . . . . . . . . . . . . . . . . . . . . . . . . . . . . . . . . . . . . . . . . . . . . . . . . . 27
Error messages. . . . . . . . . . . . . . . . . . . . . . . . . . . . . . . . . . . . . . . . . . . . . . . . . . . . . . . . . . . . . . . . . . . . . . . . . . . . . 27
After sales service . . . . . . . . . . . . . . . . . . . . . . . . . . . . . . . . . . . . . . . . . . . . . . . . . . . . . . . . . . . . . . . . . . . . . . . . . . 28
Cleaning and care . . . . . . . . . . . . . . . . . . . . . . . . . . . . . . . . . . . . . . . . . . . . . . . . . . . . . . . . . . . . . . . . . . . . . . . . . . 29
Fluff filter . . . . . . . . . . . . . . . . . . . . . . . . . . . . . . . . . . . . . . . . . . . . . . . . . . . . . . . . . . . . . . . . . . . . . . . . . . . . . . . . . . 29
Tumble dryer. . . . . . . . . . . . . . . . . . . . . . . . . . . . . . . . . . . . . . . . . . . . . . . . . . . . . . . . . . . . . . . . . . . . . . . . . . . . . . . 29
Cleaning the heat exchanger . . . . . . . . . . . . . . . . . . . . . . . . . . . . . . . . . . . . . . . . . . . . . . . . . . . . . . . . . . . . . . . . . . 30
Installation and connection . . . . . . . . . . . . . . . . . . . . . . . . . . . . . . . . . . . . . . . . . . . . . . . . . . . . . . . . . . . . . . . . . . 31
Fitting the dryer and the heat pump unit . . . . . . . . . . . . . . . . . . . . . . . . . . . . . . . . . . . . . . . . . . . . . . . . . . . . . . . . . 32
Levelling the machine. . . . . . . . . . . . . . . . . . . . . . . . . . . . . . . . . . . . . . . . . . . . . . . . . . . . . . . . . . . . . . . . . . . . . . . . 33
Installation on a raised plinth . . . . . . . . . . . . . . . . . . . . . . . . . . . . . . . . . . . . . . . . . . . . . . . . . . . . . . . . . . . . . . . . . . 33
Payment system . . . . . . . . . . . . . . . . . . . . . . . . . . . . . . . . . . . . . . . . . . . . . . . . . . . . . . . . . . . . . . . . . . . . . . . . . . . . 33
Communication module XKM RS232 . . . . . . . . . . . . . . . . . . . . . . . . . . . . . . . . . . . . . . . . . . . . . . . . . . . . . . . . . . . . 33
Electrical connection . . . . . . . . . . . . . . . . . . . . . . . . . . . . . . . . . . . . . . . . . . . . . . . . . . . . . . . . . . . . . . . . . . . . . . . . 34
Intake air, room air . . . . . . . . . . . . . . . . . . . . . . . . . . . . . . . . . . . . . . . . . . . . . . . . . . . . . . . . . . . . . . . . . . . . . . . . . . 34
Condensate drain . . . . . . . . . . . . . . . . . . . . . . . . . . . . . . . . . . . . . . . . . . . . . . . . . . . . . . . . . . . . . . . . . . . . . . . . . . . 34
Technical data . . . . . . . . . . . . . . . . . . . . . . . . . . . . . . . . . . . . . . . . . . . . . . . . . . . . . . . . . . . . . . . . . . . . . . . . . . . . . 35
Abbreviated operating instructions PT 8257 / 8337 WP . . . . . . . . . . . . . . . . . . . . . . . . . . . . . . . . . . . . . . . . . . . 37
3
Warning and Safety instructions
Explanation of the Warning and Safety
symbols on the machine
It is essential to read these operating
instructions.
– items soiled with grease or oil which have not been
properly cleaned beforehand. Use heavy-duty
detergents where necessary to clean heavily soiled
garments, e.g. workwear. If necessary consult the
detergent manufacturer for advice.
With sensitive fabrics there may be a danger of them
self igniting if dried for too long. They should be
removed as soon as the programme has finished or if
there is a power cut.
Keep a fire extinguisher near the machine at all times.
Please refer to specific instructions, e.g.
Installation instructions
~ Do not unload laundry from the drum until the
Caution, hot surfaces.
~ Check that all pockets of workwear etc. are empty
Caution, voltage up to 1000 volts.
cooling down phase has been completed.
Hot laundry can self ignite and cause a fire when
folded or put away.
to avoid the danger of inflammable objects, e.g.
cigarette lighters, matches, candles or cosmetics
being placed in the dryer.
~ If the dryer is installed in a public area, the owner
must ensure that it can be operated safely.
Earthing
~ This tumble dryer is not intended for outdoor use.
Technical and electrical safety
~ This machine must only be installed and
To avoid the risk of accidents and damage to the
machine read the operating instructions carefully
before using it for the first time. They contain
important information about the installation, safety,
use and maintenance of the machine. Keep them
in a safe place and ensure that new users are
familiar with the content. Pass them on to any
future owner/user of the machine.
commissioned by a Miele authorised technician.
~ The electrical safety of this machine can only be
guaranteed if connected to a correctly installed
earthing system on site. It is most important that this
basic safety requirement is observed and tested
regularly, and where there is any doubt, the on-site
electrical wiring should be inspected by a qualified
electrician. The manufacturer cannot be held liable
for the consequences of an inadequate earthing
system (e.g. electric shock).
Correct application
~ The machine is only completely isolated from the
~ This dryer must only be used for drying articles
electricity supply either when it is switched off at the
isolator switch or the mains fuse has been withdrawn.
which were washed in water and which have a care
label stating that the article is suitable for machine
drying.
~ To prevent the risk of fire, the following must
not be dried in this tumble dryer (with the exception
of those fabrics which can be dried in the Special
Programmes specifically designed for them):
– fabrics which contain a large proportion of rubber,
foam rubber or rubber-like materials.
– items which have been treated with inflammable
cleaning agents.
– items which have been splashed with hair lacquer,
hair spray, nail varnish remover or similar
substances.
– items which have been soiled with oils or residues
containing grease (kitchen oils, cosmetics etc.).
– items soiled with wax or other chemicals (e.g.
mops and floor cloths).
– damaged items which contain padding or fillings
(e.g. pillows, jackets).
4
~ Unauthorised repairs could result in unforeseen
dangers for the user, for which Miele cannot accept
liability. Repairs should only be undertaken by a
Miele approved service technician, otherwise any
subsequent damage will not be covered by the
guarantee.
~ Faulty components must only be replaced by
genuine Miele original spare parts. Only when these
parts are fitted can the safety standards of the
machine be guaranteed.
Warning and Safety instructions
~ This machine must not be operated in the same
room as dry cleaning machines which use solvents
containing chlorofluorocarbons (CFCs). Escaping
vapours break down during combustion into
hydrochloric acid which can have a detrimental effect
on both the laundry and the machine. Even when
such machines are installed in separate rooms, care
should be taken to ensure that no exchange of air
can take place.
~ The dryer must have a constant supply of fresh air.
Vapours containing chlorine, fluorine or other solvents
must not be able to reach the dryer.
~ The (cool) air intake vents are located at the back
of the dryer and the exhaust vent in the lid. These
must not be blocked or hindered in any way. Do not
cover the machine lid with cloths, boxes or similar
items (see installation instructions).
~ Benzine, petrol, paraffin or any easily flammable
liquid must not be stored or used near the tumble
dryer. Fire and explosion risk.
~ To ensure the correct performance of the tumble
dryer and to prevent the risk of faults and fire, it is
important to check the machine and carry out
maintenance on a regular basis.
Use
~ The tumble dryer is must only be operated if the
heat pump module is connected to the electricity
supply and attached to the tumble dryer.
Ensure that the room in which the dryer is located is
sufficiently ventilated (see installation instructions).
~ Make sure that the heat pump is attached to the
tumble dryer correctly. There must be no gap
between the heat pump and the dryer. It must not be
possible to gain access between the heat pump and
the machine. Danger of injury.
~ This tumble dryer is not intended for use by
people with reduced physical, sensory or mental
capabilities, or lack of experience or knowledge,
unless they are supervised whilst using it or have
been shown how to use it by a by a person
responsible for their safety.
~ Keep children away from the tumble dryer at all
times. It is not a toy! To avoid the risk of injury do not
allow them to play on or near it or to play with the
controls. Supervise children whilst you are using it.
~ Always close the door after use to avoid the risk of
~ Any removable outer panels must be back in
place, and all moving or electrical parts shielded
before the machine is switched on.
~ Whilst the dryer is in use, the porthole glass and
drum door frame can become very hot. Laundry will
also be very hot if you remove it early.
~ Always make sure that the drum is stationary
before reaching into the machine to remove laundry.
Reaching into a moving drum is extremely
dangerous.
~ Take care in the area of the hinges of the drum
door and the fluff filter compartment flap and also the
maintenance panel at the rear. Danger of injury.
Ensure that you always use the handles and the quick
release catches. Be aware of possible hazards when
installing the dryer and the heat pump.
~ The drum door must be able to be opened to its
fullest extent. This area must not be restricted by
doors or structural features.
~ Do not use the dryer without the fluff filter in place.
Fire risk.
A damaged fluff filter must be replaced before the
machine is used again.
Otherwise fluff and lint will cause a blockage in the
airways and the heating system, and the correct
functioning of the machine cannot be assured.
~ Cleaning and disinfecting agents often contain
chlorine-based substances. Do not let such agents
come into contact with the stainless steel surfaces, as
the chlorine can have a corrosive effect and cause
rust. Use chlorine-free agents for washing and
disinfecting and also for cleaning stainless steel
surfaces to protect them from corrosion. If in doubt,
confirm with the manufacturer that their product is
suitable. If any agent containing chlorine comes into
contact with the stainless steel surfaces, wipe it away
immediately with clean water. Then dry with a soft
cloth.
~ Do not use a pressure washer or hose to clean the
tumble dryer. Only the heat exchanger and the area
behind the maintenance panel (accessed via the
quick release catches on the rear) may be rinsed with
a jet of water (max. 4 bar).
~ After use, the refrigerant pipework and adjacent
components can present a danger as the surfaces
can be hot or cold and components can be under
pressure. Wait until the unit has had time to cool
down before opening any outer panels.
– children climbing into the dryer or hiding things in
it.
– pets or other small animals climbing into it.
~ Do not use a machine with damaged controls or
cables. These must be repaired before it is used
again.
~ Do not damage, remove or bypass the safety
features, fixtures and control elements of this
machine.
5
Warning and Safety instructions
Precautions to take if there is a leakage of
refrigerant
Using accessories
~ The refrigerant circuit in the heat pump unit
contains a non-poisonous, odourless refrigerant
(R134a) which evaporates rapidly when it is released.
It is heavier than air and so poses a risk of
asphyxiation in small, unventilated rooms.
expressly approved by Miele. Using spare parts or
accessories from other manufacturers will invalidate
the guarantee, and Miele cannot accept liability.
~ If you detect any damage to the copper pipework
on the heat pump unit, do not operate the machine
and vacate the room.
– Alert everyone present to the danger.
– Please refer to the Safety Data Sheet for more
information on the handling of refrigerant.
6
~ Accessory parts may only be fitted when
Disposing of your old machine
~ Before disposing of an old machine, first make the
door lock unusable. This way you will prevent
children from accidentally locking themselves in and
endangering their lives.
Keep these instructions in a safe and accessible
place.
Caring for the environment
Disposal of the packing material
Tips on saving energy
The transport and protective packing has been
selected from materials which are environmentally
friendly for disposal.
This heat pump tumble dryer uses the latest
technology and will give energy savings of approx.
50% when compared to a conventional dryer which
uses electric heating. The following tips may help you
to make further reductions in energy consumption.
Rather than just throwing these materials away,
please ensure they are recycled.
,Ensure that any plastic wrappings, bags, etc
are disposed of safely and kept out of the reach of
babies and young children. Danger of suffocation.
Disposing of your old machine
Electrical and electronic machines often contain
materials which, if handled or disposed of incorrectly
could be potentially hazardous to human health and
to the environment. They are, however, essential for
the correct functioning of your machine. Please do
not therefore dispose of it with your household waste.
Make sure that your laundry is thoroughly spun
before drying. This saves time and energy.
Rinsing the laundry using hot water in the final rinse
helps to reduce the residual moisture level, and the
residual heat in the laundry will help keep processing
time down, thus saving energy.
Sort textiles according to:
- fabric and weave,
- drying level required,
- residual moisture levels.
For greater economy dry a full load. Underloading is
uneconomical. Overloading will impair the drying
result and the laundry finish. Keeping the fluff filters
and heat exchanger clean helps maintain the
efficiency of the dryer, keeps drying times to a
minimum and energy consumption levels down.
Ensure that the room is well ventilated.
Please dispose of it at your local community waste
collection / recycling centre or contact your Dealer for
advice. Ensure that it presents no danger to children
while being stored for disposal.
See the "Warning and Safety" section of this booklet
for further details.
7
Guide to the machine
b
g
a
f
h
c
d
i
e
a Emergency stop switch
Only for use in an emergency.
After resolving the problem, reset the emergency
stop switch by turning the groved disc clockwise.
Do not use the Emergency stop switch to turn off
the dryer in normal use.
b Control panel
c Drum door
Pull the door handle to open the drum door.
d Access to fluff filter
Pull the handle to open the fluff filter compartment.
e 4 adjustable screw feet
8
f Electrical connection
g Exhaust vent
h Air intake vents
i Condensate drain
Guide to the machine
d PC / Optical interface
Control elements
This interface is used for transferring data to the
control unit from a PC and vice versa.
a Display
1
Cottons dry plus
0%
e Rotary selector
2
Cottons dry
0%
3
Cottons damp
20%
Turning the selector brings up options and menus in
the display.
Pressing the selector confirms your selection.
FC
A
f Chip card reader (optional)
After switching on, the "Welcome" display will appear
for a short time followed by the programme list. The
most recently used programme is highlighted.
b Function buttons
The six buttons underneath the display are the
function buttons. These buttons have specific
functions depending on the status of the machine.
These functions will be listed in the display above the
buttons and will be highlighted once selected.
If the machine is reprogrammed to "Direct button
allocation" the first 6 programmes listed in the display
can be selected directly via these buttons.
If the machine has been programmed for card
operation, you can only use those programmes
stored on the card to dry laundry.
Insert the card in the direction of the arrow (on the
card).
g I Mains on switch
Switches the machine on.
h 0 Mains off switch
Switches the machine off.
c Start button
The lightring will flash when a selected programme
can be started. Pressing the Start button will start the
programme. After a programme has started, pressing
this button will show the display as it was before the
start of the programme.
9
Guide to the machine
Function buttons
Chip card operation
f Stop/End
The function button on the right-hand side is used to
stop a programme after it has started. Pressing it
again finishes the programme.
The chip card is supplied without any programmes.
See the programming instruction booklet for
information on transferring data from the control unit
to the chip card and vice versa.
[ Block plus
The relevant programme block (e.g. Pre-dry) is
added to the programme.
FC Settings
Press this button to switch to another
language temporarily.
m Start time
Pressing this button before the start of a programme
displays the message that a start time can be
selected.
K Information
Press this button to call up programme
information in the display.
ü Change order
The order of the programme in progress can be
changed or programme blocks can be repeated.
A Back
Takes you back to the previous display.
e/- Indicates that there is more
information on next or previous line.
S Save
See the programming instruction booklet.
$ Programme locked
Once a locked programme has been started, the End
button can only be used to stop and cancel it during
the first minute.
%
Programme unlocked
\ Operating data
Data transfer
10
The chip card can store a maximum of 30
programmes, each with 6 blocks.
The back of the chip card can be labelled.
Drying
Sort the laundry
Not all textiles are suitable for machine drying.
Please read the instructions given on the garment
care label.
The meaning of the care symbols:
q = Dry at normal temperature
r = Dry at low temperature
s = Do not tumble dry
Sort the laundry according to fibre type and weave to
ensure even drying and to prevent the risk of damage
to textiles.
,To prevent the risk of fire, the following
must not be dried in this tumble dryer (with the
exception of those fabrics which can be dried in
the Special Programmes specifically designed for
them):
- fabrics which contain a large proportion of
rubber, foam rubber or rubber-like materials.
- items which have been treated with inflammable
cleaning agents.
- items which have been splashed with hair
lacquer, hair spray, nail varnish remover or similar
substances.
- items which have been soiled with oils or
residues containing grease (kitchen oils,
cosmetics etc.).
- items soiled with wax or other chemicals (e.g.
mops and floor cloths).
- items with damaged padding or fillings (e.g.
pillows, jackets).
- items soiled with grease or oil which have not
been properly cleaned beforehand. Use
heavy-duty detergents where necessary to clean
heavily soiled garments, e.g. workwear. If
necessary consult the detergent manufacturer for
advice.
This can cause the drying process to go on for too
long, or to not finish at all. Open zips before drying.
Loopknit and woven textiles (e.g. T-shirts and
underwear) have a tendency to shrink depending on
their quality. This is made worse by over-drying. Do
not use the "Cottons dry plus" for these textiles.
Starched laundry can be machine dried. Select the
most appropriate programme for ironing by hand or
machine.
Sort the laundry according to the level of dryness
required. It is not necessary to sort according to size.
Duvet covers and pillow cases should be closed to
prevent smaller items rolling up inside them.
For greater economy dry a full load. Underloading is
uneconomical. Overloading will impair the drying
result and the laundry finish.
Rinsing the laundry using hot water in the final rinse
helps to reduce the residual moisture level, and the
residual heat in the laundry will help keep processing
time down, thus saving energy.
The following textiles should not be machine
dried:
Woollens and wool blends as these tend to matt and
shrink. Partially dry these using in the "Woollens"
programme.
Pure linen tends to roughen if tumble dried. Please
follow instructions given on the care label.
Important:
Textiles with large metal accessories such as
buckles, hooks and zip tags should be placed in a
laundry bag or a pillow case before drying. This is to
protect the drum from scratches and dents during
drying.
Garments with closed metal zips can cause the
sensor electrodes in the drum ribs to be bridged.
11
Drying
Max. load (dry weight of laundry)
The machine must be commissioned by a Miele
service technician or a dealer authorised by the
manufacturer before it is used for the first time. For
gas heated machines in the U.K. this must be
carried out by a Gas Safe registered technician.
PT 8257 WP
PT 8337 WP
Drum volume in litres
250
Before using for the first time
325
1, 2, 3, 4, 5 Cottons
Before loading the dryer with laundry you should wipe
the internal drum surface with a soft, dry cloth.
10-13 kg
Switch the machine on and load the drum
5 kg
13-16 kg
6, 7, 8 Minimum iron
6.6 kg
^ Switch on the on-site mains switch.
9 Woollens
^ Press the I "On" button in.
4 kg
5.2 kg
10 Delicates / Synthetics
The Welcome screen will appear.
2 kg
Miele
2.6 kg
11, 12 Timed drying
PROFESSIONAL
10-13 kg
PT 8xx7
13-16 kg
13, 14 Proofing, Outerwear
Welcome
5-6.6 kg
6.6-9 kg
This is followed by the programme list (with the most
recently used programme highlighted).
1
Cottons dry plus
0%
2
Cottons dry
0%
3
Cottons damp
To prevent the risk of damaging laundry make
sure it cannot be trapped when the door is closed.
20%
FC
A
^ Close the drum door
Select a programme using the rotary selector.
^ Open the drum door.
^ Load the drum.
The pre-sorted laundry should be loaded loosely in
the drum.
Make sure any dispensing aids such as detergent
balls have been removed from the laundry.
12
Select a programme
This machine is equipped with an electronic sensor
system that continually monitors the moisture level of
the laundry.
As soon as the required dryness is reached the
laundry is cooled down. At the end of this cooling
down phase the drying programme is automatically
finished.
Drying
When the [ "Blockplus" function button is pressed,
the following will appear in the display:
Standard programmes:
– For drying cotton and linen textiles
1 Cottons dry plus
2 Cottons dry
0%
2 2
0%
24 %
3 Cottons damp
20 %
4 Cottons damp
25 %
5 Cottons damp
40 %
0 %
10.0 / 13.0 kg
Pre-drying
e
A
Drying
[
– For drying synthetic and mixed fibre textiles
6 Minimum iron dry
Cottons dry
m
The [ field is highlighted.
Press the function button again to deselect the
function.
If you do not wish to make any further alterations to
the programme:
0%
7 Minimum iron damp 10 %
^ Press the "Start" button. The programme will start.
8 Minimum iron damp 20 %
9 Woollens
5 min.
10 Delicates
20 %
If you wish to make alterations before the start of
the programme, e.g. to the load size, temperature
or residual moisture:
– For airing textiles
11Timed drying cool air
^ Confirm your choice of programme by pressing the
rotary selector.
15 min.
The following (example) will appear in the display:
– For drying small loads of laundry or for
finishing drying individual items
12 Timed drying warm air
2
0 %
20 min.
Cottons dry
10.0 / 13.0 kg
Drying
70°C
e
A
Cooling down
– For drying and proofing outerwear textiles
m
13 Proofing
14 Outerwear
The max. load will be shown at the far right of the
display.
1
Cottons dry plus
0%
2
Cottons dry
0%
3
Cottons damp
20%
FC
A
Load weight
You can enter the weight of the load manually before
the start of the programme.
2
^ Turn the rotary dial to select a programme (e.g.
Programme 2 Cottons dry).
Select the additional option [ "Blockplus" if
required
(this is not available on standard programmes)
^ Confirm your choice of programme by pressing the
rotary selector.
0 %
Cottons dry
10,0
Drying
13.0 kg
70°C
Cooling down
m
e
A
^ Turn the rotary dial to highlight the load. Press the
dial to confirm your selection. Turn the dial to alter
the weight and confirm your selection by pressing
it.
The following (example) will appear in the display:
22
0 %
Cottons dry
10.0 / 13.0 kg
Drying
70°C
Cooling down
[
m
e
A
^ If wished you can now select a programme block,
e.g. Pre-drying by pressing the [ "Blockplus"
function button.
13
Drying
Temperature in 1 °C increments from cold, 30 to
max. 80 °C .
^ Turn the rotary dial to select the "Temperature" field
(70 °C for drying) and press it to confirm your
selection.
2
0 %
Cottons dry
Drying
70°C
e
A
m
^ Turn the rotary dial to alter the temperature value
and then press it to confirm your selection.
Residual moisture in
1 % increments from -4 to 40 % .
Cottons dry
13.0 kg
Drying
70°C
Cooling down
A
m
^ Turn the rotary dial to alter the residual moisture
level and then press it to confirm your selection.
^ Press the Start button and the programme selected
will commence
0 %
Anti-crease
Ready at 12:35
m
FC
K
The programme end time is displayed,the buzzer
sounds and the anti-crease phase commences. The
drum will rotate at intervals to keep the laundry from
creasing.
This is useful if laundry is not going to be unloaded as
soon as the programme finishes.
^ Unload the drum.
Make sure nothing is left behind in the drum. If
items are left in the dryer, they could be damaged
by overdrying when the dryer is next used.
,Do not unload laundry from the drum until after
the cooling down phase has been completed.
Hot laundry can self-ignite and cause a fire when
folded or put away.
^ Check the fluff / lint filter and clean if necessary.
2
Cottons dry
Check lint filter
A
Cottons dry
Drying
f
Programme finished
Once a programme has started the programme
sequence will appear in the display.
2
Cottons dry
^ Open the drum door.
^ Turn the rotary dial to select the "Residual moisture"
field (0 %) and press it to confirm your selection.
0 %
2
Programme finished
13.0 kg
Cooling down
2
At the end of a programme
>40 %
Cooling down
Ready at 12:35
m
K
f
In the 2nd line of the display, drying in this example,
the actual residual moisture level (>40%) will also be
shown. The 3rd line displays the following
programme block.
A reminder will appear in the display when the filter
need to be cleaned. The filter should be cleaned as
soon as the programme finishes.
If the message continues to show in the display after
you have cleaned the filter, check the heat exchanger
behind the maintenance panel at the rear. Clean the
heat exchanger, if necessary (see "Cleaning and
care").
The time that the programme will finish (12:35) is
shown on the right hand side of the display.
If no more laundry is to be processed:
The programme end display has a self-learning
function and will not show an accurate reading until
the programme has been run several times.
^ Press the 0 "Off" button to switch the machine off.
14
^ Close the drum door
^ Switch off the on-site mains switch.
Card operation / coin mechanism
Cards on which a programme has been saved can
only be used on the machine type for which they
have been written.
Unwritten cards can be used universally.
If the card is inserted the wrong way round the
following message will appear in the display:
§
^ Press the "On" I button to switch the
machine on.
The Welcome screen will appear.
Card fault
Card incorrectly inserted in card reader.
ü
A
^ Insert the card the right way round in the card
reader.
If the card is not the right one for the machine it is
being used in, the following message will appear in
the display:
Card operation
Programmes on the card are only suitable
for machine type PT 8507
A
^ Insert the correct card for the machine in the card
reader.
Card access operation
Programmes requiring special procedures are written
onto a card which is then used to run the programme.
"Card access" has be activated via the supervisor
level in the machine.
The machine will then only run programmes by using
a card (on which one programme has been saved).
Programmes in the machine's control unit cannot then
be accessed.
^ Insert the card in the reader.
The programmes listed on the card will
appear in the display.
Card operation
17
Protective clothing
45 °C
18
Minimum iron
60 °C
FC
A
^ Use the rotary selector to highlight the programme
you want to use. Press the rotary dial to select the
programme you have highlighted.
^ Press the Start button. The programme will start.
After pressing the "Start" button you can remove the
card from the reader. The programme is deleted from
the machine's memory once it has finished.
Drying using coin mechanism C 4060 /
C 4065 / C 4070
If the machine is not operated in the following order
you will lose your money or tokens!
A Load the drum and close the door.
B Press the I "On" button.
C Select a programme
D Insert coins or tokens.
E Press the "Start" button.
,Never insert any other card or object into the
card reader!
15
Additional options
Language selection
The following (example) will appear in the display:
The language shown in the display can be changed
briefly before starting a programme if you wish. To do
so use the button underneath the flag symbol.
Start time:
2
Cottons dry
16
: 10
13.0 kg
Start date: 2.4.2003
After selection press the start button.
1
Cottons dry plus
0%
2
Cottons dry
0%
3
Cottons damp
20%
A
m
FC
A
If you press the FC button the following will appear
in the display:
Settings
Back <-
Main menu
Language
Supervisor level
FC
A
^ Press the rotary dial to confirm your selection of the
"Language" menu.
The current time and date will then appear. The input
field for hours will be highlighted.
^ Press the rotary dial to change the hour.
Turn the rotary dial to alter the hour and then press
it to confirm your selection.
^ Then turn the rotary dial to select the "Minutes" field
and press it to confirm your selection.
Turn the dial to alter the minutes and then press it
to confirm your selection.
^ Then turn the rotary dial to select the "Start date"
field and press it to confirm your selection.
Turn the dial to alter the date and then press it to
confirm your selection.
^ Do the same for the month and the year.
Settings
deutsch
Language F
english (GB)
After setting the required start date and time:
español
^ Press the Start button and the programme selected
will commence at the time specified.
FC
A
The display will now contain the following information:
^ Turn the rotary dial to highlight the language you
want and then press the dial to confirm your
selection.
The FC function button can be pressed to change
to a different language temporarily. By highlighting
the language the display will immediately change to
show the language selected. If the programme is not
started, or no other buttons or controls are activated
in the next 5 minutes the language will revert back to
the default setting.
The language will revert back to the default setting 5
minutes after the end of a programme with the door
open.
Start date and time
If you want a programme to start at a later time use
the m button for "Start date and time".
To set a date and time
After selecting your programme, the following
(example) will appear in the display:
2
0 %
Cottons dry
13.0 kg
Drying
70°C
Cooling down
m
^ Press the m "Start date and time" button.
16
e
A
2
0 %
Cottons dry
13.0 kg
Drying
16:15 -2.4.2009
Start 6:00-3.4.2009
m
A
The current time and date as well as the start time will
be displayed.
^ If the door is opened again you will have to press
the Start button again.
To cancel the start time and date function
Press the m "Start date and time" button again or
press A"Back", and any changes will be rejected.
Additional options
Programme stop
^ Press the S "Save" button and then press "Start" to
reorganise the programme order or press the A
"Back" button to go back to programme stop and
not change the programme order.
To halt the programme press the f button.
The programme remains stationary.
2
Cottons dry
Programme stop
Programme information
ü
f
To continue the programme press the "Start" button.
Pressing the K "Information" button will call up further
information about the programme e.g.:
2
Cottons dry
Start date and time: 10.7.2009
Start time: 9:47
Programme cancellation
m
To cancel a programme press the f "Stop/End"
button twice in succession.
K
e
f
Time after start: 0h 23 min
Time left: 0h 11min
Changing the programme order
Progr.-End: 10: 21 h
The order of the programme in progress can be
changed or programme blocks can be repeated.
Area: 1 Drying
^ Press the f button and the programme will stop.
2
e
Block: 1 Pre-drying
Exhaust temperature Actual: 59 °C
e
Cottons dry
Exhaust temperature Required: 74 °C
Programme stop
Air intake temperature: Actual: 125 °C
ü
f
^ After pressing the ü button the current area or
block will appear in the display.
See also "Programme structure" in the Progamming
Manual.
Air intake temperature: Required: 150 °C
Peak load: No
Anti-crease: 3 s./87s./60 min
Exhaust / Recirculation: Recirculation
2
Reorganise -> 2 Cottons dry
Area 1: Drying
S
e
Cottons dry
Block end signal Yes
Programme stop
e
e
A
A
^ Press the A "Back" button to return to the
programme sequence display.
Area 1: Drying
Block 1: Pre-drying
S
A
^ Turn the rotary dial to select the area, and then
press it to confirm your selection.
Select Area: 1 Drying, or 2 Cooling down and
confirm your selection.
^ Turn the rotary dial to select the block and then
press it to confirm your selection.
Select Block: Drying 1-10, or Cooling down 1-10
and confirm your selection.
17
Programme overview
Standard programmes
Programme
Fabric type
1 Cottons - extra dry 0 %
(Normal+)
Multi-layered and bulky cotton and linen textiles which do
not get dry in the Cottons dry programme.
2 Cottons - dry 0 %
(Normal)
Single and multi-layered cotton and linen textiles.
max. load capacity
(kg, dry weight)
PT 8257
PT 8337
10-13
13-16
Synthetic, cotton and mixed fibre textiles which are to be PT 8257
machine ironed.
PT 8337
5.0 kg
6.6 kg
For fluffing up woollen garments. This programme does
not dry woollens.
PT 8257
PT 8337
4.0
5.2
10 Delicates 20 %
Delicate cotton, synthetic and mixed fibre fabrics.
PT 8257
PT 8337
2.0
2.6
11 Timed drying - cool air
(15 min.)
Items which need airing only.
PT 8257
PT 8337
10-13
13-16
12 Timed drying - warm air
(20 min.)
For drying small loads of laundry or for finishing drying
individual items.
3 Cottons - damp 20 %
(Machine iron)
4 Cottons - damp 25%
(Machine iron)
Cotton and linen textiles which are to be machine ironed.
5 Cottons - damp 40 %
(Machine iron)
6 Minimum iron - dry 0 %
(Normal)
7 Minimum iron - damp 10 %
(Machine iron)
8 Minimum iron - damp 20 %
(Machine iron)
9 Woollens
(5 min.)
18
Programme overview
Programme
13 Proofing
(Normal)
Fabric type
For drying microfibre fabrics, skiwear, fine, closeweave
cotton garments (poplin) or tablecloths which are
suitable for drying in a tumble dryer and have been
treated to provide a water and dirt resistant finish.
This programme includes a proofing fixing phase.
Only use proofing agents containing fluorochemical compounds which are stated by the
manufacturer as being "suitable for use on membrane textiles".
Fire hazard. Do not dry items which have been treated with proofing agents containing
paraffin.
14 Outerwear
max. load capacity
(kg, dry weight)
PT 8257
PT 8337
5.0 - 6.6
6.6 - 9.0
Outerwear which is suitable for drying in a tumble dryer.
19
Programme overview
Bedding
Programme
Down duvets
Fabric type
Feather and down filled duvets and pillows.
Dries to 0 % residual moisture, Tumble phase, Cooling down phase
Synthetic duvets
Synthetic duvets and pillows.
Dries to 0 % residual moisture, Tumble phase, Cooling down phase
Natural fibre blankets Natural fibre quilts and blankets.
max. load capacity (kg, dry weight)
PT 8257 1 single duvet or 2 pillows (10)
PT 8337 3 pillows or
(13)
1 pillow + 1 single duvet
The loads quoted are estimates and will
vary depending on the size and volume
of the duvets.
3 min. drying phase, Cooling down phase.
Natural fibre blankets and quilts must not be dried completely in a
tumble dryer, as this could cause the fibres to matt. These should
only be partially dried in a tumble dryer.
Buildings maintenance
,Items that have not been washed thoroughly and may still contain residual wax or chemicals are a fire
hazard.
Wash heavily soiled items very thoroughly before drying them, ensuring that you use sufficient detergent and
select a high temperature. If in doubt, wash the items several times.
Programme
Mops
Fabric type
Cotton mops
Dries to 0 % residual moisture, Cooling down phase.
Microfibre mops
max. load capacity
(kg, dry weight)
PT 8257
PT 8337
10
13
PT 8257
PT 8337
5.6
7.0
Microfibre mops
Dries to 0 % residual moisture, Cooling down phase.
Cleaning cloths
Microfibre cloths, dusters
Dries to 0 % residual moisture, Cooling down phase.
20
Programme overview
Emergency services
Programme
Face masks
Fabric type
Face masks with
head straps
45 min. drying phase, Cooling down phase.
Breathing masks may only be dried if special holders (available as an
optional accessory) are fitted in the drum.
Protective clothing
Protective clothing (e.g. as used by the fire
brigade), overalls, jackets, trousers
Dries to 0% residual moisture, Tumble phase, Cooling down phase
For best results, dry items inside out.
Proof protective
clothing
For all textiles that have been treated with a
proofing agent
max. load capacity (kg, dry weight)
PT 8257
PT 8337
max. no. holders / masks
4
8
4
12
PT 8257 approx. 1 - 2 suits
(1 jacket + 2 trousers or 2 jackets)
PT 8337 approx. 2 suits (or 3 jackets)
PT 8257
PT 8337
5.0 - 6.6 kg
6.6 - 9.0 kg
Dries to 0 % residual moisture, Tumble phase, Cooling down phase
Only use proofing agents containing fluorochemical compounds which
are stated by the manufacturer as being "suitable for use on membrane
textiles".
Fire hazard. Do not dry items which have been treated with proofing
agents containing paraffin.
Wet cleaning
Programme
WetCare sensitive
Fabric type
For non washable garments
3 min. drying phase, Cooling down phase.
WetCare silks
For non washable garments which crease easily
Dries to 15 % residual moisture, Cooling down phase.
WetCare intensive
Washable garments
Dries to 0 % residual moisture, Cooling down phase.
max. load capacity (kg,
dry weight)
PT 8257 approx. 4.0 - 5.0
PT 8337 apporx. 5.0 - 6.6
PT 8257 approx. 4.0 - 5.0
PT 8337 approx. 5.0 - 6.6
PT 8257 approx. 5.0 - 6.6
PT 8337 approx. 6.6 - 9.0
21
Programme overview
Equestrian
,Metal buckles and fasteners etc. should be removed to protect the items being dried and the drum. If it is
not possible to remove them, then cover them with protective bags.
Programme
Horse blankets
Fabric type
max. load capacity
(kg, dry weight)
Horse blankets, saddle-cloths, gaiters, boots, bandages, textile
halters
PT 8257
PT 8337
Dries to 0 % residual moisture, Tumble phase, Cooling down phase
10
13
Wool horse blankets Horse blankets with high percentage of wool
5 min. drying phase, Cooling down phase.
Load (individual items)
Dryer
22
Saddle cloths/
Numnahs
Summer
blankets
Winter
blankets
PT 8257
7
2
1
PT 8337
9
2-3
1-2
Programme overview
Professional for the home
Programme
Fabric type
Cottons extra dry
Cotton and linen textiles
Cottons normal
Cotton, linen and mixed fibre textiles
Coloureds
Cotton, linen and mixed fibre textiles
Dark coloureds
Dark cotton, linen and mixed fibre textiles
Minimum iron
Delicates
max. load capacity
(kg, dry weight)
PT 8257
PT 8337
10-13
13-16
Synthetic and mixed fibre textiles
PT 8257
PT 8337
5.0
6.6
Synthetic and mixed fibre textiles
PT 8257
PT 8337
2.0
2.6
Dries to 20 % residual moisture
Bed linen
Cotton and mixed fibre bed linen
PT 8257
PT 8337
10-13
13-16
Jersey bed linen
Cotton and mixed fibre bed linen
PT 8257
PT 8337
5.0
6.6
Silk and satin bed
linen
Silk, rayon and satin bed linen
Down duvets and
pillows
Down duvets and pillows
PT 8257
PT 8337
10
13
See chart for max. loads
Washable quilts,
blankets
Synthetic duvets, quilts and blankets
See chart for max. loads
Cotton table linen
Cotton and linen table cloths and serviettes
PT 8257
PT 8337
10-13
13-16
Mixed fibre table
linen
Synthetic and mixed fibre table cloths and serviettes
PT 8257
PT 8337
5.0
6.6
Outerwear
Mixed fibre summer and winter coats, jackets and ski wear
PT 8257
PT 8337
5.0 - 6.6
6.6 - 9.0
Silks handcare
Silk blouses and shirts, dresses, trousers, skirts, coats, evening
wear, bridal wear, fake fur, rayon, satin, acetate and viscose
textiles
PT 8257
PT 8337
4.0
5.2
Woollens handcare
Washable woollens and wool mixtures
23
Programme overview
Programme
Fabric type
max. load capacity
(kg, dry weight)
Proofing
Thermal fixing of proofing agent on outerwear
Hot air
For drying small loads of laundry or for finishing drying individual PT 8257
items.
PT 8337
Cool air
Airing of individual items using cool air.
Smoothing
Cotton and linen fabric.
Smooths out creasing caused during the spin cycle in the washing machine. Remove
garments as soon as the programme has finished and leave to finish drying at room
temperature.
PT 8257
PT 8337
5.0 - 6.6
6.6 - 9.0
10-13
13-16
PT 8257
PT 8337
5.0
6.6
Denim
(Machine iron)
Denim garments, e.g. jeans, jackets, skirts, shirts.
Shirts
(Machine iron)
Shirts and blouses
Towelling
Single and multi-layered cotton textiles.
Towels, dressing gowns, face flannels, towelling bedding.
PT 8257
PT 8337
10-13
13-16
Reactivate
Outerwear which is suitable for drying in a tumble dryer.
Makes the fibres more water-repellant.
PT 8257
PT 8337
5.0 - 6.6
6.6 - 9.0
Automatic
Mixed loads of garments suitable for the Cottons and Minimum PT 8257
iron programmes. Sort according to colour.
PT 8337
5.0
6.6
Load capacity chart for single duvets and pillows (dry weight)
Loads quoted in the chart are the maximum permissible!
The loads quoted are estimates and will vary depending on the size and volume of the duvets and pillows.
Type
max. load capacity
PT 8257
10 kg 1 single duvet or 2 pillows
PT 8337
13 kg 3 pillows or 1 pillow + 1 single duvet
One single duvet is the equivalent of approximately two pillows.
24
Optional modules
Operating data
By pressing the \ "Operating data" button, the
module can be used to read or delete operating data
either before the start of a programme, or after it has
finished.
Operating data module ~ Total data
Total time power on: 200,987 h
e
A
Operating hours: 123456 h
\
Other options:
1
Cottons dry plus
0%
2
Cottons dry
0%
3
Cottons damp
20%
\
FC
A
After pressing the \ button the following will appear
in the display:
Operating data module
Total time power on: 200,987 h
Operating hours: 123,456 h
Duration heating active: 123,456 h
Duration drive motor active: 93,456 h
Programme starts: 23,456
Programme stops: 567
Programme cancellations: 67
Amount of laundry: 1,234,567 kg
Energy: 12,345,678 kWh
Total data
Programme data
\
e
A
Programme data
Operating data module
Selection choice:
Programme data
– Total data
Delete data
e
A
\
In this option all programme data is collated and
summarised.
After selecting Programme data the following
(example) will appear in the display:
– Programme data
Programme data contains all the data called up
during a programme.
Operating data module~ Programme data
– Delete data
- Module (delete total data including programme
data)
- Total data (only delete total data)
- Programme data (only delete programme data)
Pressing the button again deselects the \
"Operating data" option.
1
Cottons dry plus
0 %
2
Cottons dry
0 %
\
e
A
Select the programme you want from the list and
press the rotary dial to call up a list of all programme
starts including date and start time for that
programme (Cottons dry plus in the example).
Programme data ~ 1 Cottons dry plus
If there is no more memory available in the operating
data module a message will appear after pressing
the "Start" button to say that the operating data will be
overwritten.
Date: 21.05.2009 Start time: 11:30
Date: 21.05.2009 Start time: 12:30
\
e
A
If you press the A "Back" button or do not press the
"Start" button within 30 seconds, the display will revert
to the way it was before starting the programme.
Select the required programme start from the list for
programme 1 Cottons dry plus and confirm your
choice by pressing the rotary dial.
Total data
Programme data ~ 1 Cottons dry plus
Date: 21.05.2009 Start time: 11:30
Operating data module
Name: Smith
Total data
Programme data
\
e
A
\
e
A
After selecting Total data, the following (example) will
appear in the display:
25
Optional modules
Other options:
Town: Abingdon
Serial number: 12345678
Machine type: PT 8337
Load size: 13 kg
+ Button: Activated
Programme start: 11:30
Programme finished: 12:05
Total operating time: 0 h 35 min
Electrical energy: 12.5 kWh
Gas energy: 0 kWh
Steam energy: 0 kWh
Programme change: 2 (after making your selection and
pressing the rotary dial only the last 3 stops and starts will
be displayed.)
The module menu option can be used to delete the
total data and programme data from the operating
data memory.
The total data option can only be used to delete the
total data from the operating data. The programme
data option can only be used to delete programme
data from the operating data.
After making your selection and pressing the rotary
dial you will be prompted to enter your password.
Password: _ _ _ _
ABCDEFGHIJKLMNOPQRSTUVWXYZ
0123456789
K
S
A
Programme fault: None (only the last 3 faults are saved.)
Area 1: Drying
Block1: Pre-drying
Process type: Residual moisture
Value: 15 %
Actual residual moisture: 15 %
Duration: 6 min
Max. exhaust temperature: 72 °C
Max. air intake temperature: 122 °C
After keying in your password or inserting your
supervisor level key card in the reader the following
security prompt will appear in the display:
Area1: Drying
Block2: Drying
Process type: Residual moisture
Value: 0 %
Actual residual moisture: 0 %
Duration: 6 min
Max. exhaust temperature: 78 °C
Max. air intake temperature: 138 °C
After pressing the S button the data will be deleted!
Delete operating data?
S
A
Peak load cut-out
Information on peak load cut-out
Switching the dryer off externally whilst a drying
process is running shortens the functional life of the
heat pump unit.
Area2: Cooling down
Block: Cooling down
Process type: Cooling down
Value: 50 %
Actual temperature: 50 °C
Duration: 3 min
Max. exhaust temperature: 52 °C
Max. air intake temperature: 95 °C
Residual moisture: -3 %
This dryer can be integrated into an energy
management system even though its very low energy
consumption makes a cut-out unnecessary.
Please note that if this tumble dryer is integrated into
a peak-load cut out management system, the unit
must not be switched off.
Information about operational status is provided via
the Miele peak load cut-out interface. Please note that
for control purposes the energy requirement of all
appliances which cannot be switched off must be
stored in the energy management system.
Delete data
Operating data module
Programme data
Delete data
[
e
A
After selecting Delete data the following message will
appear in the display:
Operating data module~ Delete data
Module: 21.02.2009
Total data: 12.07.2009
[
26
e
A
,Accessing the internal wiring of the dryer by
bypassing the Miele peak load cut-out interface is
not permitted.
Problem solving guide
Error messages
,Repairs to electrical, gas or steam operated
machines may only be carried out by a suitably
qualified person in accordance with national and
local safety regulations. For gas heated machines
in the U.K. this must be a Gas Safe registered
technician. Repairs and other work by unqualified
persons could be dangerous. The manufacturer
cannot be held liable for unauthorised work.
A message will flash in the display if there is a
problem either before starting a programme or once it
has started:
If any of the following messages still appear after five
re-starts of the machine the following general fault
message will appear:
§
System fault
Call the Service Department
if restart does not work.
f
Whenever the machine is switched on or the
programme list is called up the controls carry out an
analysis of the system. All modules and sensors, data
from the operating system, drying programmes and
languages are tested.
If a fault is detected in a programme or a language
the following symbol will appear in the display §.
The programme or language affected cannot be
selected.
1
Cottons dry plus
2
Cottons dry
3
Cottons damp
0%
0%
20%
The display remains dark.
There is no power to the machine.
§
f
Settings
Back <-
Language
Deutsch
^ Check the mains switch and the on-site fuses.
§
English §
FC
Fan fault
Programme stopped. Press the start
button. Motor overheating.
A
f
^ Allow the motor to cool down.
If a fault is found in a language that has already been
selected the following message will appear:
§
§
Data fault
Function restricted
Machine fault
Call the Service Department
if restart does not work.
f
Language defect
f
^ Call the Service Department.
m
Drive motor fault
Programme stopped. Press the start
button. Motor overheating.
f
^ Allow the motor to cool down.
27
Problem solving guide
Leaking condensate
y
Power cut
Programme stop
Press the start button.
f
^ The programme can be continued by pressing the
"Start" button.
§
Heating system fault
Programme stopped. Press the start button.
Programme will run without heating
f
^ To continue the programme without heating press
the "Start" button.
Call the Service Department.
If condensate leaks from the unit, check that the
collection tray is positioned correctly in the drain and
that there is no soiling present in the drain. This is
accessible via the maintenance panel in the base
area at the rear.
Decreasing efficiency of the unit
The unit is designed for an ambient room temperature
of up to 45 °C. It is possible to operate the dryer at a
higher temperature without any problems on a
temporary basis. However, if the temperature is
constantly above 45 °C, an external supply of cool air
must be ensured. You can reduce the strain on the
unit by ensuring that the heat exchanger is always
kept free of fluff and other soiling. This will reduce
wear and tear and increase the life of your unit.
If, over time, you notice that the efficiency of the unit
is decreasing and that drying durations are
noticeably longer, check the following:
– the fluff filter in the dryer for soiling
– the heat exchanger in the heat pump for soiling
§
Heating system fault
– that the seal between the dryer and the heat pump
is not impaired
Call the Service Department
if restart does not work.
– the air intake and exhaust of the heat pump
f
^ Call the Service Department.
§
Pressure monitor fault
After sales service
Call the Service Department
if restart does not work
In the event of any faults please contact your Dealer
or the nearest Service Department.
f
^ If the programme still will not start please call the
Service Department.
§
– the room temperature. If the temperature is
constantly above 45 °C, we recommend that you
ensure an external supply of fresh air and that the
exhaust air is extracted externally.
When contacting the Service Department, please
quote the Model, Serial number (SN) and Material
number (M.Nr) of your machine. These are shown on
the data plate.
Card fault
Card incorrectly inserted in card reader.
A
^ Insert the card the right way round in the card
reader.
This is visible above the door aperture or at the back
of the machine.
Please let the Service Department know any error
message that has appeared in the display.
Should you require spare parts ensure that you only
use genuine original Miele Spare Parts (and
remember to let the Spare Parts
Department know the model, serial number and
material number of your machine).
28
Cleaning and care
Fluff filter
,Do not use the dryer without the fluff filter in
place. Fire risk.
A damaged fluff filter must be replaced before the
machine is used again.
Otherwise fluff and lint will cause a blockage in the
airways, the heating system and the exhaust vent,
and the correct functioning of the machine cannot
be assured.
The fluff filter collects any fluff and lint from the
laundry. It should be cleaned at least once a day and
when "Check fluff filter" appears in the display.
If there is a large amount of fluff and lint, the filter will
need to be cleaned several times a day.
The fluff filter must not be removed. When cleaning it,
do so with care and make sure it does not get
damaged.
^ The housing, control panel and any plastic
components should be cleaned using a suitable
mild cleaning agent, or with a soft damp cloth. Rub
dry with a soft cloth after cleaning.
^ If starched laundry has been dried, the drum
should be wiped out with a damp cloth afterwards.
Do not clean the machine with abrasive cleaning
agents.
Check the seal and the catch of the drum door, the
fluff filter panel and the maintenance panel and the
connection between the dryer and the heat pump
unit.
The air intake vents are located at the back of the
dryer and the exhaust vent in the machine lid. These
must not be blocked or hindered in any way. Do not
cover the machine lid with cloths or similar items.
The area surrounding the machine, in particular
around the air intake, must be kept free of dust and
fluff at all times. If taken into the dryer, they can
cause faults with the machine.
The following should be checked and cleaned once
a year by a Miele authorised service technician:
– the entire interior of the dryer
– the fins on the exhaust fan
^ Open the fluff compartment panel.
^ Wipe the fluff off the filter by hand. Never use
pointed or sharp edged objects to do this.
Tumble dryer
Before any cleaning or maintenance switch the dryer
off at the on-site mains switch.
,Do not use a high pressure cleaner or hose to
clean the tumble dryer.
29
Cleaning and care
Cleaning the heat exchanger
Regular and specialist maintenance of the entire
system will maintain the high efficiency of the unit and
help increase the lifespan of its components.
During use, fluff from textiles as well as detergent
residues and other elements present in the
condensed steam collect on the heat exchanger.
Soiling on the heat exchanger reduces heat transfer
to the air and in so doing the efficiency of the unit.
This is why it is important to have the heat exchanger
cleaned annually, or where there is a heavy build-up
of fluff or the dryer is operated very frequently, more
often by a Miele authorised service technician.
– Make sure that the unit is completely
disconnected from the mains electricity supply.
There must be no voltage present.
– Open the maintenance panel on the back of the
heat pump unit. Place the maintenance panel to
one side safely (danger or injury and tripping over
it).
– Before starting the rinsing process, take out the
collection tray and remove coarse soiling from it.
This will prevent the drain from becoming blocked.
Replace the collection tray before you start rinsing.
– Use a jet of water (max. 4 bar) to rinse the heat
exchanger thoroughly for several minutes. The
use of pressure washers or cleaning agents
containing chlorine, sand, sodium carbonate or
acid is not permitted. You can use a vacuum
cleaner or brush to clean the heat exchanger.
Ensure that the slats are not bent or damaged.
The use of water is permitted only within the
specific area of the heat exchanger described.
– Make sure that you provide adequate drainage for
the water used for cleaning to avoid flooding the
dryer or the room in which it is located.
– Remove any soiling which has not been rinsed out.
30
– Clean the collection tray and check the drain for
any blockages.
– Make sure heat exchanger is enclosed by the
maintenance panel before operating the unit again.
– Make sure that no electrical parts have come into
contact with water before supplying electricity to
the unit again.
– Avoid touching the slats to protect them from
damage and wear gloves to prevent cuts to your
hands.
,Water may be used to clean the heat
exchanger (in the area behind the maintenance
panel) only. Using water to clean the dryer and
other parts is not permitted. Danger to life from
electric shock.
,To ensure the correct performance of the
tumble dryer and to prevent the risk of faults and
fire, it is important to check the machine and carry
out maintenance on a regular basis.
Installation and connection
This dryer must only be installed and
commissioned by a Miele authorised technician.
This dryer must be installed in strict accordance with
local and national safety and building regulations by
a suitably qualified engineer. It must only be operated
in a room with sufficient ventilation.
Read the instructions supplied before installing and
using it for the first time.
To ensure suitable access for future maintenance and
service work, please ensure that the minimum
distances between the dryer/heat pump unit and the
wall specified on the installation diagram are strictly
observed.
Do not install the tumble dryer in a room where there
is a risk of frost occurring.
Minimum distance to wall for maintenance and
service work: 500 mm
,The dryer and the heat pump unit must not be
transported without the transport pallet in place.
The dryer module and the heat pump module must
be separated before transportation, even it they are
only to be transported a short distance. Transporting
the dryer and heat pump unit when connected to one
another is not permitted and will cause damage.
The dryer and heat pump unit may only be
transported using suitable transport aids.
It is particularly important to avoid tipping the heat
pump unit by more than 30°.
Leave the heat pump unit to stand for one hour in its
final location before commissioning it. If the heat
pump unit has been subjected to a great deal of
vibration or it has been tipped by more than 30°, the
standing time can be extended to up to 24 hours.
After transporting the dryer and heat pump unit to
their final location, use a suitable lifting mechanism to
lift them off the transport pallet.
PT 8257 / 8337
x
1400 mm
y
906 mm
z
1205 / 1393 mm
31
Installation and connection
Fitting the dryer and the heat pump unit
Remove the lid of the dryer.
Guide the mains connection cable through the heat
pump unit and connect it to the dryer (see "Electrical
connection").
Plug the connector on the heat pump-dryer
connection cable into the socket on the dryer.
Tip the heat pump unit slightly so that the lower
bracket on the heat pump unit fits over the lower
edge on the dryer (see small inset diagram). Make
sure the heat pump unit is level. Moving the dryer
forwards is now no longer be possible.
The dryer is placed in front of the air vents on the
heat pump unit. Use the feet to align the dryer and
heat pump unit so that they are standing horizontal
and parallel with one another.
The clamping bracket on the heat pump unit is fitted
under the lid on the dryer (see small inset diagram).
Secure the dryer lid with screws.
Make sure that process air cannot leak between the
dryer and the heat pump unit.
32
Installation and connection
Levelling the machine
The dryer and heat pump unit do not require a plinth.
However, make sure that any uneven areas of the
floor are made level.
The dryer and heat pump unit must be perfectly level
to ensure correct functioning.
b Drill holes for clamps
The screw feet A can be adjusted to align the dryer
and the heat pump unit.
After aligning correctly you will need to use a
screwdriver to secure discs B to the floor plate.
Allow the unit to acclimatise to the room
temperature and leave to stand for at least one
hour before commissioning.
Payment system
This dryer can be fitted with a coin control unit.*
A suitable adapter* is required for this. The dryer has
to be reprogrammed for a payment system. This has
to be carried out by an authorised Miele service
technician.
Empty the coin box every day. This prevents too
many coins or tokens collecting in the coin box,
which could lead to the dryer being out of service.
* These can be obtained from Miele or your Miele
Dealer.
Installation on a raised plinth
The dryer and heat pump unit can be installed on a
raised concrete plinth.
,If the dryer and heat pump unit are installed on
an on-site plinth, they must be secured with
clamps. Otherwise there is the danger of them
falling off the plinth.
Communication module XKM RS232
This dryer can fitted with a communication module
which enables it to be linked to a PC via a serial
interface.
The slot for the communication module is located on
the rear of the dryer.
An editor programme is available from Miele.
^ Secure the front feet of the dryer with the clamps
supplied.
33
Installation and connection
Electrical connection
Intake air, room air
The electrical components of this dryer comply with
IEC 335-1, IEC 335-2-11 and IEC 335-2-40.
Electrical connection may only be carried out by a
suitably qualified technician in strict accordance with
local and national safety regulations (BS 7671 in the
UK).
Please observe the wiring diagram supplied.
Please ensure that the voltage and frequency of the
dryer as quoted on the data plate comply with the
on-site supply.
(AL) Exhaust air, (ZL) Intake air, (KA) Condensate
drain
The dryer may only be operated in a room where
sufficient cool, fresh air is available. If the ambient
temperature is constantly above 45 °C, the circulatory
system of the heat pump unit should be connected to
a fresh air supply and the exhaust air should be
extracted externally.
Condensate drain
(EL) Electrical connection, (SLA) Peak load cut-out
Connection should be made via a suitable isolator
which complies with local and national safety
regulations and which is easily accesible for
disconnecting the dryer from the electricity supply.
Provision must be made on site to switch off all poles.
Switches with a minimum all-pole contact gap greater
than 3 mm are suitable for isolating the dryer. These
include circuit breakers, fuses and relays (IEC/EN
60947).
If the dryer is disconnected from the electricity supply
ensure adequate measures are taken to ensure that it
cannot be reconnected to the electricity supply until
all work has been carried out.
After the dryer has been connected to the electricity
supply check the phase rotation of the compressor.
,In the case of incorrrect phase rotation, a loud
buzzing noise will be heard. Incorrect rotation of
the compressor will cause damage to the unit and
it must be shut down immediately.
34
The heat pump tumble dryer is a condenser dryer.
Condensate is drained separately via a drain in the
base.
The condensate drain C 30 mm is located at the rear
of the heat pump unit and can be connected to a
floor gully by means of a hose or pipe with a gradient.
,After setting up and connecting the dryer and
heat pump unit, ensure that all outer casing parts
are correctly fitted back into position.
Technical data
PT 8257 WP
PT 8337 WP
Height in mm
1400
1400
Width in mm
906
906
Depth in mm
1205
1393
Depth with door open in mm
1835
2023
Weight in kg
298
314.5
Drum volume in l
250
325
Max. capacity in kg (dry laundry)
13
16
Voltage
See data plate
Connected load
See data plate
Fuse rating
See data plate
Test certificates awarded
See data plate
Max. load bearing in operation in N
Product safety standard
IEC 335-1, IEC 335-2-11, IEC 335-2-40
Emission sound pressure level in dB (A), EN ISO 11204
< 70
Sound power level in dB (A), EN ISO 9614-2
< 80
PT 8257 WP
PT 8337 WP
35
36
Abbreviated operating instructions PT 8257 / 8337 WP
1. Sort the laundry
Not all textiles are suitable for machine drying. Please read the instructions given on the
garment care label.
q = Dry at normal temperature
r = Dry at low temperature
s = Do not tumble dry
^ Sort the laundry according to fibre type and weave
2. Switch the machine on and load the drum
^ Press the "On" button I in
^ Open the drum door and load the laundry
3. Select a programme using the rotary selector
Standard programmes:
1 Cottons dry plus
0%
2 Cottons dry
0%
3 Cottons damp
20 %
4 Cottons damp
25 %
5 Cottons damp
40 %
6 Minimum iron dry 0 %
7 Minimum iron damp
10 %
8 Minimum iron damp
20 %
9 Woollens
5 min.
10 Delicates
20%
11 Timed drying cool 15 min.
12 Timed drying warm 20 min.
13 Proofing
14 Outerwear
4. Press the start button and the programme selected will commence
5. A buzzer will sound at the end of the programme
^ Open the drum door and unload the laundry
2
Cottons dry
Programme finished
Anti-crease
6. If no more laundry is to be processed:
^ Close the drum door
^ Then switch the dryer off using the 0 "Off" switch
^ Check the fluff / lint filter and clean if necessary.
Ready at 12:35
m
FC
K
f
37
38
39
Alteration rights reserved/0611
M.-Nr. 07 986 860 / 00