1
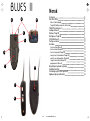
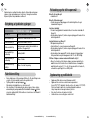
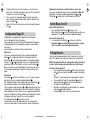
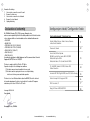
NO
®
TANGO VII
EN
CIBS OFFICE
NO
EN
15
User manual
14
17
e
c b
a d
11
e
da
b
c
16
12
13
18
20
21
19
1
User manual CIBS Office 1g
User manual CIBS Office 1g
22
23
24
2
BLUES II
NO
EN
NO
Norsk
4
3
9
Gratulerer
Om CIBS Office
Blues II (halsslyngen)
Tango VII (trådløs sender for fasttelefon)
CIBS Office funksjoner
Lading av Blues II
Montere Tango VII
Konfigurere Tango VII
Slå På/Av Blues II
Paring av enheter
Hvordan...
5
6
justere volum (Blues II)
justere volum (Tango VII)
justere tonenivået (Tango VII)
svare på en telefonsamtale (Tango VII)
avslutte en telefonsamtale (Tango VII)
ringe fra fasttelefon (Tango VII)
programmere (Blues II)
2
1
10
Betydning av lysdioder og farger
Fabrikkinnstilling
Feilsøking og ofte stilte spørsmål
Oppbevaring og vedlikehold
EN
5
5
6
6
8
8
8
9
10
10
11
11
11
11
11
12
12
12
13
13
14
14
7
8
3
User manual CIBS Office 1g
User manual CIBS Office 1g
4
NO
EN
NO
Gratulerer
Blues II (halsslyngen)
Gratulerer med din nye CIBS Office. Vi håper du får mye glede av
løsningen som skal gi deg veldig god lyd fra din fasttelefon.
Denne brukerveiledningen vil sørge for at du kommer i gang, slik at
du får mest mulig glede av din nye løsning. Din hjelpemiddelsentral
leverer en rekke tilleggsprodukter som utvider funksjonaliteten til dette
produktet ytterligere.
Før bruk, bør Blues II lades helt opp (se side 8 for veiledning).
Ladetiden er på ca. 2 timer.
Vær oppmerksom på!
Sammen med tilkoblet hodesett/øreplugger kan halsslyngen (Blues II)
avgi lyd med kraftig volum. Å utsette seg for dette kan føre til permanent
hørselsskade. Vær varsom når du øker volumet slik at du unngår slike
skader.
Se illustrasjonene på side 2 for forklaring av punktene nedenfor:
•
Svarknapp 1 :
Brukes for å svare på innkommende telefonanrop.
•
Inngang for lading og tilleggsutstyr 2 :
Her tilkobles lader for strømuttak, samt annet tilleggsutstyr med
2,5mm jack kontakt.
•
USB-inngang 3 :
Brukes til lading av enheten via USB-kabel til en datamaskin.
•
Hodesettutgang 4 :
Kan tilkobles øreplugger med mikrofon (tilleggsutstyr),
standard hodesett (tilleggsutstyr) og
hodesett med mikrofon (tilleggsutstyr).
Brukes når du ikke har på høreapparatene.
•
Mikrofon
Vær varsom ved bruk av enhetene når du er engasjert i en aktivitet som
krever din fulle oppmerksomhet.
•
Gjør aldri forsøk på å demontere enhetene selv. Bare godkjente
forhandlere eller serviceverksteder kan åpne produktene. Ta kontakt
med hjelpemiddelsentralen hvis noen deler av produktene må skiftes.
Batteriindikator-lampe 6 :
Viser batterinivået på Blues II.
Se tabell på side 13 for forklaring av lyssignalet.
•
Av/På-knapp 7 :
Slår på og av enheten.
Oppbevares utilgjengelig for barn:
Plastposene som produktet og ekstrautstyret er pakket i, er ikke leketøy
for barn. Posene i seg selv, eller de små delene de inneholder, kan føre
til kvelning hvis de svelges.
•
Volumknapp 8 :
Skyves oppover for høyere lyd, og nedover for lavere lyd.
•
Paringsknapp 9 :
Setter Blues II i paringsmodus.
•
Hurtigoppringningsknapp 10 :
Denne funksjonen er ikke tilgjengelig når Blues II er tilkoblet Tango
VII.
Antenning av brennbare atmosfærer
Ikke bruk CIBS Office i omgivelser hvor det er fare for antenning av
brennbare gasser.
EN
5
Tango VII (trådløs sender for fasttelefon)
Se illustrasjonene på side 1 for forklaring av punktene nedenfor
Om CIBS Office
CIBS Office består av 2 enheter: Blues II (halsslynge) og
Tango VII (trådløs sender for fasttelefon).
5
User manual CIBS Office 1g
•
Velger for telefonrør 11 :
Brukes til å få telefonsamtalen over i telefonrøret.
•
Velger for dialogmodus 12 :
Denne funksjonen er ikke tilgjengelig på Tango VII.
•
Velger for Blues II 13 :
Brukes til å få telefonsamtalen over i Blues II.
User manual CIBS Office 1g
6
NO
EN
NO
CIBS Office funksjoner
•
Volumkontroll for telefonrør 14 a/b:
Justerer volumet på telefonsamtalen i telefonrøret.
•
Volumindikasjon for telefonrør 14 c:
Indikerer volumet på telefonsamtalen i telefonrøret.
•
Konfigurasjonknapp 14 d:
Brukes til å konfigurere Tango VII til å fungere mot din fasttelefon.
•
Paringsknapp 14 e:
Setter Tango VII i paringsmodus.
•
Tonekontroll for telefonrør 15 :
Justerer tonenivået på telefonsamtalen i telefonrøret.
•
Volumkontroll for Blues II 16 a/b:
Justerer volumet på telefonsamtalen til Blues II.
•
Volumindikasjon for Blues II 16 c:
Indikerer volumet på telefonsamtalen til Blues II.
•
Mikrofonfølsomhetsknapp 16 d:
Brukes til å justere mikrofonfølsomheten til Tango VII.
•
Tonekontroll for Blues II 17 :
Justerer tonenivået på telefonsamtalen til Blues II.
•
Kommunikasjonslys 18
Viser om Tango VII er tilkoblet Blues II.
•
Inngang for telefonrør 19 :
Her tilkobles telefonrøret til din fasttelefon.
•
Inngang for telefonapparat 20 :
Her tilkobles din fasttelefon, med den vedlagte ledningen.
•
Inngang for rørløfter (tilleggsutstyr) 21 :
Her tilkobles rørløfter som kan gjør at du kan svare en
telefonsamtale trådløst fra din Blues II.
•
Audioutgang 22 :
Her tilkobles ekstern teleslyngeforsterker og lignende.
•
Dialoginngang 23 :
Ikke tilgjengelig på Tango VII.
•
Strøm-inngang 24 :
Tilkobling for medfølgende strømforsyning.
En trådløs forsterker for bordtelefoner uten Bluetooth.
Ved bruk av Tango VII og Blues II kan man føre en telefonsamtale
trådløst med en rekkevidee på opptil 40 meter. Tango VII vil også
forsterke lyden i det eksisterende telefonrøret.
Lading av Blues II
Pass på at at Blues II er oppladet før du begynner å bruke den.
Du kan lade Blues II på følgende måter:
• Gjennom lader for stikkontakt
• Direkte fra PC-en med USB-kabel
• Gjennom dobbel bordlader (tilleggsutstyr)
Ved lading vil Batteriindikator-lampen 6 blinke rødt.
Når Blues II er fullt oppladet vil Batteriindikator-lampen 6
lyse konstant blått.
Ved lavt batterinivå vil Batteriindikator-lampen 6 blinke rødt samtidig
vil du høre et lydsignal på Blues II.
Merk: Levetiden på batteriet vil bli vesentlig redusert hvis
utstyret ligger uladet i lengre perioder. Vi anbefaler derfor at du lader
opp utstyret minst en gang i måneden.
Når driftstiden på batteriet begynner å bli svekket, og du ønsker
å få skiftet det, må det sendes inn til din hjelpemiddelsentral.
Artikkelnummeret på batteriet er: 956-001
Montere Tango VII
Bruk medfølgende strømforsyning og sett den inn i strøm-inngang 24 .
Tango VII vil da slå seg på automatisk. Dette vil du se ved at alle lampene
på Tango VII lyser. Tango VII har ingen av/på-knapp. Den vil automatisk
gå i standby modus når den ikke er i bruk.
All lyd fra Blues II høres kun hvis du benytter høreapparatet/CI i
T eller MT stilling og har slyngen rundt halsen, eller om det brukes
øreplugger/hodesett.
7
EN
User manual CIBS Office 1g
1. Finn ledningen som går fra telefonrøret til telefonapparatet.
Koble denne ledningen ut av telefonapparatet og inn i
inngang for telefonrør 19 .
2. Den vedlagte ledningen (60cm) settes inn i telefonapparatet der
hvor ledning i punkt 1 ble frakoblet. Koble den andre enden inn i
inngang for telefonapparat 20 .
3. Rørløfter (tilleggsutstyr) skal kobles inn i inngang for rørløfter 21 .
User manual CIBS Office 1g
8
NO
EN
NO
Konfigurere Tango VII
Slå På/Av Blues II
Konfigurering betyr å tilpasse Tango til ditt telefonapparat.
Se på konfigureringslisten på siste side.
Står din telefon oppført på konfigureringslisten så benytter du det
konfigureringstallet som står ved din telefon og går videre til
alternativ a.
Hvis ikke telefonen er oppført i konfigureringslista går du videre til
alternativ b.
Alternativ a.
Trykk ned konfigurasjonsknappen 14 d ved hjelp av en penn eller
lignende mens du konfigurerer. Du vil nå få et lyspunkt på
volumindikasjon for telefonrør 14 c som indikering av konfigureringstallet. Konfigureringstallet 01 er nederst og 08 er øverst på lyssøylen.
Trykk på 14 a eller 14 b for å velge ditt konfigureringstall.
Slipp konfigurasjonsknappen 14 d når du har stilt inn på riktig konfigureringstall. Test nå om du hører summetonen samt lyd fra mikrofonen ved
å blåse på den. Tango er nå ferdig konfigurert.
Alternativ b.
Trykk på velger for telefonrør 11 for aktivering av telefonrøret.
Hold konfigurasjonsknappen 14 d ned ved hjelp av en penn eller lignende
mens du konfigurerer. Du vil nå få et lyspunkt på
volumindikasjon for telefonrør 14 c som indikering av konfigureringstallet. Konfigureringstallet 01 er nederst og 08 er øverst på lyssøylen.
Løft av røret på telefonapparatet og trykk på 14 a eller 14 b inntil du hører
summetonen godt via telefonrøret. Blås så i mikrofonen for å høre om
den virker. Hvis den ikke virker så stepper du til neste konfigureringstall
og gjentar mikrofontesten. Tango er ferdig konfigurert når du har
summetone og mikrofonen i telefonrøret virker.
Konfigurasjonsknappen 14 d kan da slippes opp. Hvis man bruker for
lang tid på konfigureringen faller summetonen bort og telefonrøret må
da legges på og løftes av igjen for videre konfigurering.
Konfigurering av mikrofonfølsomhet (styrke på din stemme)
Trykk ned og hold knapp 16 d med penn eller lignende mens du justerer
følsomheten ned/opp ved hjelp av knappene 16 a og 16 b.
Lyssøyle 16 c indikerer nivået for følsomheten
9
User manual CIBS Office 1g
EN
Slik slår du på Blues II:
• Trykk og hold inn Av/På-knappen 7 inntil du ser et blått lys på
Batteriindikator-lampen 6 , samtidig som du hører et lydsignal via
teleslyngen eller via tilkoblet hodesett på Blues II.
Slik slår du av Blues II:
• Trykk og hold inn Av/På-knappen 7 inntil du ser et rødt lys på
Batteriindikator-lampen 6 , samtidig som du hører et lydsignal via
teleslyngen eller via hodesettet på Blues II.
Paring av enheter
Enhetene må programmeres for å kunne kommunisere med hverandre.
Dette gjøres ved å koble disse sammen trådløst (paring).
NB! Det er viktig at Blues II og Tango VII er innenfor en avstand på
mindre enn 1 meter under paring og at Blues II er fullt oppladet.
Alle enheter i CIBS Office (Blues II og Tango VII) er fra leverandør ferdig
sammenparet. Hvis det skulle oppstå feil slik at paringen forsvinner kan
du bruke veiledningen under.
Pare Blues II mot Tango VII
• Slå på Blues II.
• Trykk og hold inn paringsknappen 9 inntil du ser
Batteriindikator-lampen 6 blinker vekselsvis rødt og blått,
samt at du hører en dobbeltone.
• Blues II er nå klar for paring i ca. 3 minutter.
• Trykk og hold inn Tango VII’s paringsknapp 14 e inntil du ser at
kommunikasjonslys 18 blinker vekselsvis rødt og blått.
• Tango VII er nå klar for paring.
• Når Blues II og Tango VII er paret sammen vil
kommunikasjonslys 18 lyse konstant blått.
• Hvis paringen ikke er vellykket, gjentas prosedyren.
User manual CIBS Office 1g
10
NO
EN
NO
Hvordan...
…… justere volum (Blues II)
• Lyden kan justeres trinnvis (trykk for hvert lydnivå) eller ved at
man holder volumknappen 8 på Blues II inne i ønsket retning til
man har oppnådd ønsket lydnivå.
• Du vil høre et lydsignal når lyden er justert til laveste og høyeste
nivå.
• Blues II husker siste voluminnstilling, slik at når den slåes av og på
vil den starte på samme voluminstilling.
…… justere volum (Tango VII)
• For telefonrør
-- Pass på at Tango VII lyser på volumindikasjon for telefonrør 14 c.
Hvis den ikke gjør det trykker du på velger for telefonrør 11
-- Justér volumet ved å trykke på
volumjustering for telefonrør 14 a/b
-- Nivået på volumet vil du se i volumindikasjon for telefonrør 14 c.
• For halsslynge (Blues II)
-- Pass på at Tango VII lyser på volumindikasjon for Blues II 16 c.
Hvis den ikke gjør det trykker du på velger for Blues II 13
-- Justér volumet ved å trykke på
volumjustering for Blues II 16 a/b
-- Nivået på volumet vil du se i volumindikasjon for Blues II 16 c.
…… justere tonenivået (Tango VII)
• For telefonrør
-- Pass på at Tango VII lyser på volumindikasjon for telefonrør 14 c.
Hvis den ikke gjør det trykker du på velger for telefonrør 11
-- Justér tonenivået ved å trykke på
tonejustering for telefonrør 15
• For halsslynge (Blues II)
-- Pass på at Tango VII lyser på volumindikasjon for Blues II 16 c.
Hvis den ikke gjør det trykker du på velger for Blues II 13
-- Justér tonenivået ved å trykke på
tonejustering for Blues II 17
…… svare på en telefonsamtale (Tango VII)
• Gjennom telefonrør
-- Pass på at Tango VII lyser på volumindikasjon for telefonrør 14 c.
Hvis den ikke gjør det trykker du på velger for telefonrør 11 .
-- Løft av telefonrøret på din fasttelefon.
-- Du vil da få telefonsamtalen i telefonrøret.
11
User manual CIBS Office 1g
• Gjennom halsslynge (Blues II)
-- Pass på at Tango VII lyser på volumindikasjon for Blues II 16 c.
Hvis den ikke gjør det trykker du på velger for Blues II 13 .
-- Trykk på svarknappen 1 .
-- Løft av telefonrøret på din fasttelefon.
-- Du vil da få telefonsamtalen i Blues II.
-- NB! Ved bruk av rørløfter (tilleggsutstyr) vil du få ringesignalet
direkte i halsslyngen og du kan enkelt svare telefonsamtalen
ved å trykke på svarknappen 1 .
Du slipper da å ta av telefonrøret.
EN
…… avslutte en telefonsamtale (Tango VII)
• Gjennom telefonrør
-- Legg på telefonrøret på din fasttelefon.
• Gjennom halsslynge (Blues II)
-- Legg på telefonrøret på din fasttelefon.
-- Trykk på svarknappen 1 .
-- NB! Ved bruk av rørløfter (tilleggsutstyr) vil du kunne avslutte
samtalen ved å trykke på svarknappen 1 . Du slipper da å legge
på telefonrøret.
…… ringe fra fasttelefon (Tango VII)
• Gjennom telefonrør
-- Pass på at Tango VII lyser på volumindikasjon for telefonrør 14 c.
Hvis den ikke gjør det trykker du på velger for telefonrør 11 .
-- Løft av telefonrøret på din fasttelefon, og slå ønsket
telefonnummer.
-- Du vil da få telefonsamtalen i telefonrøret.
• Gjennom halsslynge (Blues II)
-- Pass på at Tango VII lyser på volumindikasjon for Blues II 16 c.
Hvis den ikke gjør det trykker du på velger for Blues II 13 .
-- Trykk på svarknappen 1 .
-- Løft av telefonrøret på din fasttelefon, og slå ønsket
telefonnummer.
-- Du vil da få telefonsamtalen i Blues II.
• NB! Ved bruk av rørløfter (tilleggsutstyr) vil rørløfteren automatisk
løfte av røret når du trykker på svarknappen 1 .
Du slipper da å ta av telefonrøret.
…… programmere (Blues II)
• Gå inn på www.commidt.com, for å laste ned både bruksanvisning
og programmet (CIBS Interface).
• I programmet CIBS Interface har du disse mulighetene:
-- Slå på og av medhør (mulighet for å høre din egen stemme)
-- Lese av serienummer
User manual CIBS Office 1g
12
NO
EN
NO
Tips:
Ved bruk av den vedlagt roterbare skjorte -/bluse klipsen kan man
redusere støy som kommer av at enheten er i bevegelse mot klær.
Klipsen trykkes fast på baksiden av Blues II.
Feilsøking og ofte stilte spørsmål
Blues II slår seg ikke på!
• Lad batteriet.
Blues II vil ikke lades opp!
• Forsikre deg om at ladepluggen sitter skikkelig i Blues II og at
strømuttaket fungerer.
Betydning av lysdioder og farger
Batteriindikator-lampe 6
Hva du ser
Hva det innebærer for Blues II
Konstant blått lys
Batteriet er innfor nivået 20% - 100%
Blinkende rødt lys
Batterinivå mindre enn 20%
Blinkende blått lys
Innkommende samtale (kun ved bruk av
rørløfter, tilleggsutstyr)
Konstant blått lys
ved lading
Lading fullført
Blinkende rødt lys
ved lading
Blues II lades
Skiftende blått og
rødt lys
Blues II er klar for paring
Jeg hører spraking!
• For best mulig lydkvalitet må du ha Blues II innenfor rekkevidde til
Tango VII.
• Hvis du bruker hodesett, forsikre deg om at pluggen til hodesettet er
skikkelig koblet til.
Jeg kan ikke høre noe i Blues II!
• Øk lydvolumet på Blues II.
• Sjekk at Blues II er paret sammen med Tango VII.
• Hvis du bruker hodesett, forsikre deg om at pluggen til hodesettet er
skikkelig koblet til.
• Hvis du bruker høreapparat/CI, forsikre deg om at slyngen ligger
riktig rundt halsen og at høreapparatet står i T eller MT stilling.
Vil Blues II fungere sammen med annet Bluetooth-utstyr?
• Blues II er konstruert for å kunne fungere sammen med de fleste
mobiltelefoner. Dette forutsetter at mobiltelefonen er kompatible
med Bluetooth versjon 1.1, 1.2 eller 2.0 og som støtter et hodesett-,
en handsfree-profil og/eller en A2DP-profil.
Fabrikkinnstilling
•
•
•
13
EN
Denne funksjonen sletter paringen til Blues II. Alle innstillinger som
er gjort etter at du mottok enheten vil også bli slettet.
Trykk og hold inne paringsknappen 9 .
Når du hører to dobbelttoner er enheten resatt.
Slå så av Blues II. Når du da slår på enheten igjen, vil du se at den
automatisk går i paringsmodus (Batteriindikator-lampen 6 blinker
vekselsvis rødt og blått). Dette indikerer at enheten er satt tilbake til
fabrikkinnstilling.
User manual CIBS Office 1g
Oppbevaring og vedlikehold
•
•
•
•
Oppbevar alltid enhetene med strømmen avslått
Oppbevar ikke enhetene ved ekstreme temperaturer
(over 45°C/113°F, inkludert i direkte sollys, eller under -10°C/14°F).
Dette kan forkorte batteriets levetid og kan påvirke bruken.
Høye temperaturer kan også redusere ytelsen.
Ikke utsett enhetene for væske eller fukt.
Hold enhetene rene ved hjelp av en tørr klut.
User manual CIBS Office 1g
14
NO
NO
English
EN
Congratulations
About CIBS Office
Blues II (Neck Loop)
Tango VII ((wireless transmitter for desk telephones)
The functions of CIBS Office
Charging of Blues II
Installing the Tango VII
Configure Tango VII
Switch Blues II on/off
Pairing the units
How to...
adjust the volume (Blues II)
adjust the volume (Tango VII)
adjusting the tone level (Tango VII)
answer a telephone call (Tango VII)
end a telephone call (Tango VII)
make a call from your desk phone (Tango VII)
programme (Blues II)
Description of light diodes and colours
Factory default settings
Trouble shooting and FAQ
Storage and maintenance
15
User manual CIBS Office 1g
User manual CIBS Office 1g
EN
5
5
6
6
8
8
8
9
10
10
11
11
11
11
11
12
12
13
13
14
14
15
4
NO
EN
NO
Congratulations
Blues II (Neck Loop)
Congratulations with your new CIBS Office. We hope you get a lot of
pleasure from this solution which gives you better sound from your
landline phone.
This manual will help you to get started and ensure that you get the most
out of your new solution. Your local dealer offers a range of
accessories which will further enhance the functionality of this product.
Before use, the unit must be fully charged (see page 8 for instructions).
Charging time is approximately 2 hours.
Be aware!
When connected to a headphones/earbuds the Neck Loop (Blues II) can
emit audio of a very high volume. Exposure to this may cause permanent
hearing damage. Be careful when increasing the volume to avoid such
injuries.
Be careful when using the devices while engaged in activities which
demand your full attention.
Never attempt to dismantle the product yourself. Only approved local
dealers or service centres may open the products. Contact your local
dealer if any parts of the unit need replacing.
Answer button 1 :
Used to answer incoming phone calls.
•
Socket for charging and accessories 2 :
The accompanying power supply cable is connected here,
as well as other accessories with 2.5 mm jack.
•
USB socket 3 :
To charge the neck loop by connecting it to a computer
•
Headphone socket 4 :
Socket to connect earbuds with microphone, or standard
headphones (accessories).
Used when you are not using a hearing aid.
•
Microphone
•
Battery indicator light 6 :
Indicates the battery level of the Blues II.
See the table on page 13 for an explanation of the light signals.
•
On/Off button 7 :
To switch the unit on and off.
•
Volume control 8 :
Push upwards for higher volume and downwards for lower volume.
5
•
Pairing button 9 :
Press to set Blues II in pairing mode.
•
Ignition of flammable atmospheres
Do not use CIBS Office in environments where there is a danger of
igniting combustible gasses.
Speed-Dial button 10 :
This function is not available when Blues II is connected to Tango VII.
Tango VII (wireless transmitter for desk telephones)
CIBS Office consists of two devices: Blues II (Neck Loop) and Tango VII
(wireless transmitter for desk telephones).
5
•
Keep out of reach of children:
The plastic packaging of the product and accessories are not children’s
toys. The packaging or the small parts it contains may cause choking if
swallowed.
About CIBS Office
User manual CIBS Office 1g
EN
See the illustrations on page 2 for an explanation of the points below
See the illustrations on page 1 for an explanation of the points below
•
Selector for the telephone handset 11 :
Press to receive the phone call through the telephone handset.
•
Selector for dialogue mode 12 :
This function is not available on Tango VII.
•
Selector for Blues II 13 :
Press to receive the phone call through the Blues II.
User manual CIBS Office 1g
6
NO
EN
7
NO
•
Volume control for the telephone handset 14 a/b:
Press to adjusts the volume of the conversation through the
telephone handset.
•
Volume indicator for the telephone handset 14 c:
Indicates the volume of the conversation through the
telephone handset.
•
Configuration button 14 d:
Press to configure Tango VII, in order to get optimal communication
with your telephone.
•
Pairing button 14 e:
Press to set the Tango VII in pairing mode.
•
Tone adjustment for the telephone handset 15 :
Press to adjusts the tone level of the conversation through the
telephone handset.
•
Volume control for Blues II 16 a/b:
Press to adjusts the volume of the conversation through Blues II.
•
Volume indicator for Blues II 16 c:
Indicates the volume of the conversation through Blues II.
•
Microphone sensitivity button 16 d:
Press to adjust the microphone sensitivity in Tango VII.
•
Tone adjustment for Blues II 17 :
Press to adjusts the tone level of the conversation through Blues II.
•
Communication light 18
Indicates connection between Tango VII and Blues III
•
Input for the telephone handset 19 :
This is where you connect the telephone handset of
your desk phone.
•
Input for the desk phone 20 :
This is where you connect your desk phone with the
accompanied cable.
•
Input for handset lifter (accessory) 21 :
This is where you connect the handset lifter, which enables you to
answer the phone call remotely via your Blues II.
•
Audio output 22 :
This is where you connect e.g. external telecoil amplifier etc.
•
Dialogue input 23 :
Not available on Tango VII
•
Power input 24 :
Connection for the accompanied power supply.
EN
In order to receive sound from the Blues II, you need to put your hearing
aid/CI in T or MT position and wear the neck loop around your neck.
Alternatively, you can connect earbuds/headphones to the Blues II.
The functions of CIBS Office
CIBS Office offers a wireless solution for your desk phone.
By connecting Tango VII to your desk phone and wearing
Blues II neck loop, you can enjoy a wireless conversation on the phone,
with a range up to 40 meters. Tango VII also amplifies the sound in the
telephone handset.
Charging of Blues II
Make sure that Blues II is fully charged before using it.
You can charge Blues II the following ways:
• Using the charger for wall outlet.
• Directly from a PC by USB cable (accessory)
• Using the Twin Charger Cradle (accessory)
When charging, the Battery indicator lamp 6 will flash red.
When Blues II is charged, the Battery indicator lamp 6 will illuminate
solid blue.
When the battery is low, the Battery indicator lamp 6 will flash red and
at the same time you will hear a sound signal from the Blues II.
NOTE: The lifetime of the battery will be significantly reduced if
the device is left uncharged for long periods. We advise you to charge the
device at least once a month.
When the operation time of the battery begins to decrease and you wish
to replace it, please send it to your local dealer.
The article number of the battery is: 956-001
User manual CIBS Office 1g
Installing the Tango VII
Connect the accompanying power supply to the power socket 24 .
Tango VII will switch itself on automatically. This will be indicated by all
the lights illuminating for some seconds. Tango VII does not have an
on/off switch, but will automatically go into stand-by mode when not in
use.
User manual CIBS Office 1g
8
NO
EN
NO
1. Find the cable that connects the telephone receiver to the desk
phone. Detach it from the desk phone and connect it to the input for
telephone receiver on the Tango VII 19
2. Then, connect the accompanied cable (60cm) to the desk phone
where the above cable was detached (1), and to the input for desk
phone on Tango VII 20 .
3. Handset lifter (accessory) can be connected to the input for handset
lifter 21 .
Configuration Tango VII
Configuration means adapting the Tango VII to your desk phone.
See the Configuration list on the last page.
If your desk phone is listed on the attached Configuration list, apply the
configuration digit that corresponds with your phone, and continue to
alternative a.
If your desk phone is not listed, continue to alternative b.
Alternative a.
Use a pen or similar pointed object to press and hold configuration
button 14 d. The configuration number is indicated by a light in the
indicator bar 14 c, with configuration number 01 at the bottom and 08 at
the top. Press 14 a or 14 b repeatedly to select the configuration digit of
your phone. When the correct digit is selected, release the button 14 d.
Make sure that you can hear the dialling tone in your phone and check
the microphone by blowing on it. Tango VII is now successfully configured.
Alternative b.
Press button 11 to activate the telephone receiver. Use a pen or similar
pointed object to press and hold configuration button 14 d.
The configuration number is indicated by a light in the indicator bar 14 c,
with configuration number 01 at the bottom and 08 at the top.
Lift the telephone handset and press 14 a or 14 b repeatedly until you hear
the dialling tone clearly through the receiver. Check that the microphone
works by blowing on it. If not, step to the next configuration number and
repeat the microphone test. When you both hear the dialling tone and the
microphone works, your Tango VII is successfully configured.
The configuration button 14 d can then be released.
If too much time elapses, the dialling tone will cease and you must
replace the handset and lift it again in order to continue configuration.
9
User manual CIBS Office 1g
Configuration of microphone sensitivity (loudness of your voice)
Use a pen or similar pointed object to press and hold button 16 d, while
adjusting the sensitivity up or down by pushing button 16 a or 16 b.
The light bar 16 c indicated the level of microphone sensitivity.
EN
Switch Blues II on/off
How to switch the Blues II on:
• Press and hold the On/off button 7 until you see the
Battery indicator lamp 6 turn blue. Simultaneously you will hear a
signal via the T-Loop or via connected headphones/earbuds.
How to switch the Blues II off:
• Press and hold the On/off button 7 until you see the Battery
indicator lamp 6 turn red. Simultaneously you will hear a signal
via the T-Loop or via connected headphones/earbuds.
Pairing the units
The units must be programmed to be able to communicate, with each
other. This is done by connecting these together wirelessly (pairing).
NOTE! It is important that Blues II and Tango VII are within a distance of
less than 1 meter during pairing and that Blues II are fully charged.
Pair Blues II with the Tango VII
• Press and hold the pairing button 9 until the Battery indicator
light 6 flashes alternately red and blue and you hear a double
tone.
• The Blues II is now ready to pair for approximately 3 minutes.
• Press and hold the Tango VII’s pairing button 14 e until the
communication light 18 flashes alternately red and blue.
• The Tango VII is now ready to pair.
• When Blues II and Tango VII are paired together the communication light 18 will light stable blue.
• If the pairing was unsuccessful, repeat the procedure.
User manual CIBS Office 1g
10
NO
EN
NO
How to...
…… adjust the volume (Blues II)
• The volume can be adjusted gradually (press once for each volume
level) or by pressing the volume button 8 in the desired direction
until the desired volume has been reached.
• You will hear a signal when the volume has reached the highest or
lowest level.
• The Blues II remembers its last volume position, so that when
switched off and on it will start at the same volume position.
…… adjust the volume (Tango VII)
• For the telephone handset
-- Make sure that Tango VII is lit on the volume indicator for the
telephone handset 14 c. If not, press the selector for telephone
handset 11
-- Adjust the volume by pressing the volume control for the
telephone handset 14 a/b
-- You will see the sound level in the volume indicator for the
telephone handset 14 c.
• For the neck loop (Blues II)
-- Make sure that Tango VII is lit on the volume indicator for
Blues II 16 c. If not, press the selector for Blues II 13
-- Adjust the volume by pressing the volume control for
Blues II 16 a/b
-- You will see the sound level in the volume indicator for
Blues II 16 c.
…… adjust the tone level (Tango VII)
• For the telephone handset
-- Make sure that Tango VII is lit for the volume indicator for the
telephone handset 14 c. If not, press the selector for telephone
handset 11
-- Adjust the tone level by pressing the tone adjustment
for the telephone handset 15
• For the neck loop (Blues II)
-- Make sure that Tango VII is lit on the volume indicator for
Blues II 16 c. If not, press the selector for Blues II 13
-- Adjust the tone level by pressing the tone adjustment
for Blues II 17
…… answer a telephone call (Tango VII)
• Through the telephone handset
-- Make sure that Tango VII is lit for the volume indicator for the
telephone handset 14 c. If not, press the selector for telephone
handset 11
11
User manual CIBS Office 1g
-- Lift the handset from your telephone.
-- You will then hear the call through the telephone handset.
• Through neck loop (Blues II)
-- Make sure that Tango VII is lit on the volume indicator for
Blues II 16 c. If not, press the the selector for Blues II 13 .
-- Press the answer button 1 .
-- Lift the handset from your telephone.
-- You will then hear the call in Blues II.
-- Note! By using a handset lifter (optional), you will hear the ring
signal directly in the neck loop, and you can easily answer the
call by pressing the answer button 1 . Then you do not need to
lift the handset.
EN
…… end a telephone call (Tango VII)
• Through the telephone handset
-- Replace the handset of your telephone.
• Through neck loop (Blues II)
-- Replace the handset of your telephone.
-- Press the answer button 1 .
-- Note! By using a handset lifter (optional), you will be able to
close the call by pressing the answer button 1 . Then you do not
need to replace the handset.
…… make a call from your desk phone (Tango VII)
• Through the telephone handset
-- Make sure that Tango VII is lit for the volume indicator for the
telephone handset 14 c. If not, press the selector for telephone
handset 11 .
-- Lift the handset of your telephone, and dial the desired
telephone number.
-- You will then hear the call through the telephone handset.
• Through neck loop (Blues II)
-- Make sure that Tango VII is lit on the volume indicator for
Blues II 16 c. If not, press the the selector for Blues II 13 .
-- Press the answer button 1 .
-- Lift the handset of your telephone, and dial the desired
telephone number.
-- You will then hear the call in Blues II.
-- Note! By using a handset lifter (optional), the handset lifter will
automatically lift the handset when you press the
answer button 1 . Then you do not need to lift the handset.
User manual CIBS Office 1g
12
NO
EN
NO
…… programme (Blues II)
• Go to www.commidt.com to download both the operating
instructions and the programme (CIBS Interface).
• The CIBS Interface programme offers the following options:
-- Turn on or off monitoring voice
(enables you to hear your own voice)
-- Locate the serial number
Useful tips:
Using the accompanying shirt/blouse clip can reduce noise caused by the
device rubbing off clothing. The clip can be attached to the rear of the
Blues II, in the slot on the desired side
By using the external microphone (accessory, article no: 901-001) you
can use the Blues II under your clothing, offering even better sound to
your audience. These and other microphones are connected at the
socket
Description of light diodes and colours
Battery indicator light 6 :
What you see
What this implies for the Blues II
Solid blue light
The battery level is between 100% - 20%
Flashing blue light
Incoming call (only when using the handset
lifter, accessory)
Flashing red light
The battery level is below 20%
Solid blue light (while
charging)
Charging complete
Flashing red light (while
The Blues II is charging
charging)
Alternate blue and red
light
13
Factory default settings
•
•
•
•
EN
This function will delete the stored pairing to the Blues II.
Any settings made after you received the device will also be deleted.
Press and hold the pairing button 9 . First you will hear a double
tone which indicates the device is set to pairing mode. You must
keep the button pressed until you hear the second double tone.
The flashing red and blue ligth will still flash
Switch off the Blues II. When you switch the device on again, it will
automatically go into pairing mode (the battery indicator light 6 will
flash alternately red and blue). This indicates that the device has
been reset to factory settings.
Trouble shooting and FAQ
The Blues II will not switch on!
• Charge the battery
The Blues II will not charge!
• Make sure the charge plug is connected correctly in the Blues II and
that the power supply is working.
I hear crackling!
• For best possible quality the Blues II must be within range of the
Tango VII.
• If you are using headphones, make sure the plug to the headphones
is correctly connected.
I cannot hear anything from the Blues II!
• Increase the volume of the Blues II.
• Check that the Blues II is paired to the Tango VII.
• If you are using headphones, make sure the plug to the headphones
is correctly connected. If you are using the hearing device, make sure
the coil is lying correctly around the neck and that the hearing device
is set to T or MT.
Will the Blues II and Tango VII work with other Bluetooth devices?
• The Blues II and Tango VII is made to work with most Bluetooth
products. This depends on the Bluetooth product being compatible
with Bluetooth version 1.1, 1.2 or 2.0, supporting headsets, handsfree
and/or A2DP profile.
The Blues II is ready to pair
User manual CIBS Office 1g
User manual CIBS Office 1g
14
NO
NO
Certification and safety approvals
Storage and maintenance
EN
•
•
•
•
Always store the Blues II in a safe place with the power
switched off.
Do not store the Tango VII or Blues II in extreme temperatures
(over 45°C/113°F, in direct sunlight, or below -10°C/14°F).
Do not expose the Tango VII or BluesFCC
II to rain or other liquids.
Clean the devices with a dry cloth. Dette produktet er designet
for å imøtekomme Federal
Communications Commission (FCC)
sin krav og reguleringer.
Your mobile device is also designed
to meet the requirements for
exposure to radio waves established
by the Federal Communications
Commission (USA) and Industry
Canada.
Information about this device model
can be found at www.fcc.gov/oet/
fccid by searching the equipment
COMMidt-logo
Logoen COMMidt® er beskyttet, og
all bruk av denne logo må avklares
med COMMidt.
15
User manual CIBS Office 1g
EN
CE
This product is CE marked accordingly to the provisions of the
R & TTE Directive (99/55/EC), COMMidt AS, declares that this product is in
compliance with the essential requirements and other relevant
provisions of Directive 1995/5/EC.
For further information, please consult: http://www.commidt.com
Bluetooth
The Bluetooth word® and logos are owned by the Bluetooth SIG, Inc. and any
use of such marks by COMMidt AS is under licence. Other trademarks and trade
names are those of their respective owners.
Electrical and electronic equipment (EEE) contains materials,
components and substances which can be dangerous and
detrimental to human health and the environment if waste
electrical and electronic equipment (WEEE) is not disposed of
correctly. Products marked with the “crossed-out waste bin”
symbol shown below are electrical and electronic equipment.
This symbol indicates that waste electrical and electronic
equipment must not be discarded along with unsorted household waste, but must
be collected separately. In the development and manufacture of your COMMidt
product, high-quality materials and components have been used which can
be recycled.When disposing of electrical and electronic equipment you should
therefore make use of a collection arrangement intended for this purpose, which
may involve either delivery at your local collection point or recycling station or
collection at your home. Further information should be obtained from your local
dealer.
Batteries contain substances that may be harmful to human health
and the environment if not handled properly.
Batteries are labelled with a crossed dustbin as shown.
It symbolizes that waste batteries must not be disposed of as
unsorted municipal waste, but must be collected separately.
Some batteries are also labelled with the chemical symbol Hg (mercury), Cd
(cadmium) or Pb(lead). This is particularly harmful substances, and therefore it is
important that these batteries will be collected.
It is important that you hand your waste batteries to the collection systems which
are established. On this way you help to ensure that batteries are recycled in
accordance with the law and will not unduly impact the environment.
When disposing of waste batteries you must use a collection system established
for that purpose whether it be handed in at your local collection point or recycling
or collected directly from the household. Detailed information must be obtained
from the local authorities.
User manual CIBS Office 1g
A
NO
EN
NO
Removal of the battery:
1. Unscrew the screw on the rear of the unit
2. Remove the front cover
3. Unscrew the screw on the circuit board.
4. Remove the circuit board
5. Unplug the battery
EN
Declaration of conformity
Konfigurasjons tabell/ Configuration Table
We COMMidt, Kirkegata 57-59, 7600 Levanger, Norway declare
under our own responsibility that the Bluetooth products to which this declaration
refers conforms withthe relevant standards or other standardised documents.
•93/42/EØF
•NS-EN12182
•ETSIEN301489-1V1.4.1(2002-08)
•ETSIEN301489-17V1.2.1(2002.08)
•EN300328V1.6.1(2004-11)
•EN61000-4-3,5.1
•EN61000-4-2,5.2
According the regulations in Radio Equipment and Telecommunications Terminal
Equipment (R&TTE) Directive 1999/5/EC
This device complies with Part 15 of the FCC Rules.
Operation is subject to the following two conditions:
(1) this device may not cause harmful interference, and
(2) this device must accept any interference received, including
interference that may cause undesired operation.
This device is a class 2 Bluetooth device (max 2 mW EIRP). Due to the low level
of transmit output power the device is not subject to the routine RF exposure
valuation as per Section 2.1093 of the FCC rules.
Levanger 2009-04-24
Roar Austvik
Type telefonapparat / Telephone type
Nr./No.
Alcatel, Reflex, Ericsson, Telenor Venus, Siemens,
Ludia, Nortel, Meridian
1
Panasonic, Teleste
2
Ascom Eurit/office Unipax6,
EB/ABB’s push-button series, B&O 500/2000
Eldre/older Sopho K8-24
Eldre/older Mine, UP 16/small, Tellus 30 ISDN
3
ZO, Telli 4000, Telleste SLO2000, Zodiac 308,
Zodiac Freedom
4
Amanda 520 VDU, Digital 2000, New VDU, Delta Analog
5
Telcom Europe S431, Hagenuk S322
6
TBK Concorde 1/2
7
Bang & Olufsen 1600/2400/2500
8
ILLUSTRASJON/ ILLUSTRATION
5
Managing Director, COMMidt
B
User manual CIBS Office 1g
b
a
4
User manual CIBS Office 1g
H
b
b
C