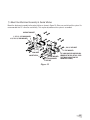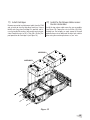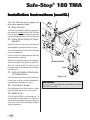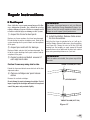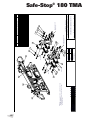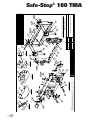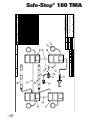
1
(Model 9182)
Compact TMA That Meets NCHRP 350, TL-3
ENERGY ABSORPTION
Corporate Offices:
35 East Wacker Dr., 11th Floor
Chicago, IL 60601-2076
Telephone: (312) 467-6750
FAX: (312) 467-1356
http://www.energyabsorption.com/
SYSTEMS, INC.
A Quixote Company
Saving Lives By Design
Engineering and Manufacturing Facilities:
Rocklin, CA
Pell City, AL
Installation/Operation
Safe-Stop® 180 TMA
Safe-Stop® 180 TMA
Table of Contents
Functional Description ....................................... 2
Safety Instructions .............................................. 3
Installation ......................................................... 8
Operation Instructions ....................................... 21
Limitations & Warnings ..................................... 22
Maintenance ...................................................... 23
I. Routine maintenance................................ 23
Impor
tant Intr
oductor
y Notes
Important
Introductor
oductory
This manual contains important information on the
Safe-Stop 180 TMA (Truck Mounted Attenuator). Proper
installation and operation of the Safe-Stop 180 TMA is
essential to assure maximum performance. Take the time
to review this entire manual thoroughly prior to installing and/or operating the Energy Absorption Systems, Inc.
Safe-Stop 180 TMA.
If you need additional information, or have any questions
about the Safe-Stop 180 TMA, please call Energy Absorption Systems' Customer Service Department at 1-88832-ENERG.
II. Detaching and Attaching......................... 25
III. Lubrication.............................................. 27
IV. Technical specifications ........................... 28
Repair ................................................................. 29
RETURN GOODS POLICY
Before returning any goods for credit please contact
Energy Absorption Systems Inc. Customer Service
Department at 1-888-32-ENERG or your local
distributor for proper instructions.
I. Post Impact ............................................... 29
Troubleshooting Guide ........................................ 34
Installation Drawings ........................................... 42
Quick Reference Troubleshooting Guide............... 57
Functional Description
The Safe-Stop 180 TMA is a Truck Mounted Attenuator
designed to reduce the risk of injury to passengers of an
errant vehicle and to the driver of the truck to which the
system is attached. The system mounts on the rear of a
truck and may be used in stationary applications, such
as a truck blocking a work zone and mobile operations,
such as striping, sweeping, plowing, etc.
The Safe-Stop 180 TMA consists of the following basic
components: a collapsible frame assembly; two crushable cartridges; a support structure; an impact face and
an underride (see Figure 1).
2
Safety Instructions
For maximum safety, the operator should stand at the rear of the truck, on the curb side, (see Figure 2). When tilting
the TMA, care should be taken to stay clear of all moving parts.
CARTRIDGE B ASSY
CARTRIDGE A ASSY
SUPPORT STRUCTURE
REAR OF TRUCK
Figure 1
SOCKET HITCH UNDERRIDE
STAND HERE (FOR CONTROLS
ON RIGHT SIDE OF TRUCK)
MOVING PARTS DURING
FULL DESIGN IMPACTS AND
FOLDING OPERATION
CONTROLS MAY BE
RELOCATED TO THIS SIDE
CARTRIDGE
CARTRIDGE
TRUCK
CONTROLS
STAND HERE (FOR CONTROLS
ON LEFT SIDE OF TRUCK)
Figure 2
3
Safe-Stop® 180 TMA
Safety Instructions (cont’
d.)
(cont’d.)
1. The TMA should be rigidly fastened to the truck. In the
horizontal position, the bottom of the TMA should be
280 to 330 mm [11" to 13"] from the ground and level
(see Figure 3). *The TMA should be left in the folded
position whenever it is not being used as an impact
attenuator. The TMA has impact absorption capacity in
the folded position that has been successfully tested to
NCHRP 350 Test Level 2 (70 km/h) for specified design
impacts. See the “Limitations and Warnings” Section
for additional information.
2. Jacks may be used to support the folded TMA when
it is off the truck. The jacks must be stored while the
TMA is attached to the truck. The jacks can be stored
on the brackets provided on the support frame. (See
Figure 3). If you are subject to vandalism, prepare
another storage plan.
3. Make sure all pivot pins are in position and that all
retaining pins are installed correctly (see Figure 4).
PIVOT PIN
RETAINING PIN
Figure 4
*The Safe-Stop 180 TMA shall be employed in the unfolded position: At all times while operating as either a
Barrier Vehicle or Shadow Vehicle.
The Safe-Stop 180 TMA should be in the "unfolded" position when: Transporting short distances at a low speed,
Transporting at a speed much lower that adjacent traffic,
and Transporting in areas where vehicle ride characteristics and maneuverability are maintainable.
The Safe-Stop 180 TMA should be in the "folded" position when: Transporting long distances at a high speed,
Transporting at a speed near the speed of adjacent traffic, and Transporting under conditions of compromised
maneuverability typically when the large turning radius
clearance needed for the extended TMA is not safe.
305±25 mm [12"±1"]
STORE JACKS HERE WHILE
TMA IS ATTACHED TO TRUCK
Figure 3
4
305±25 mm [12"±1"]
4. The Safe-Stop 180 TMA is designed to safely absorb
a crash, and to support its own weight. Do not drag
the TMA or place anything on its top: damage may
result. Do not sit, stand or lean on any part of the
TMA (see Figures 5 & 6).
7. Be sure all persons are standing clear before folding
or unfolding the TMA. Be sure the system is stopped
in full folded position before allowing anyone directly
behind the folded system (see Figures 7 & 9).
NO ONE TO BE ALLOWED BEHIND ELEVATED TMA
Figure 5
Figure 7
8. Ballast and other heavy objects MUST BE ADEQUATELY
ANCHORED to the truck to prevent shifting during an
impact. (The force on the tie-down straps could be 20
times the weight of the ballast.)
Figure 6
5. Before raising or lowering the TMA, the operator
should be trained as to its proper operation. Refer
to the Operation Instructions in this manual.
6. Folding the TMA provides the best maneuverability
and driving characteristics. It is permissible, during
restricted city driving and high-speed travel, to have
the TMA folded to its 180° position. Refer to local
agency policies as required for additional guidance.
Unfold the system either before, or as soon as possible after, entering a job site or beginning shadow
vehicle operations. Remember that it is recommended that the support vehicle be stopped for TMA
folding and unfolding.
Figure 8
5
Safe-Stop® 180 TMA
Safety Instructions (cont’
d.)
(cont’d.)
9. The agency responsible for the truck should inspect
it for adequate operator safety equipment (e.g., seat
belts, head rests, etc.)
10. It is recommended that the Safe-Stop 180 TMA be
mounted to trucks that weigh between 7300 kg
[16,090 lbs.] and 9000 kg [19,845 lbs.] for optimum
impact performance.
11. Make sure that the performance and safety of the
TMA is not impaired by damage or corrosion.
WARNING!
Failure to comply with these instructions can result in
improper TMA performance and possible personal
injury. This TMA is intended to be used as a crash
attenuator on the rear of trucks which meet the design
specifications for this system.
12. Regular maintenance of the TMA is important for safe
use. Refer to the maintenance section of this manual
for additional information.
14. This system is a crash cushion and is therefore used
in high risk areas. Stay clear of traffic whenever possible. If an accident is to occur, even during a design
impact, there may be fragments from the truck or
impacting vehicle that could cause injury.
15. The hydraulic assembly was designed to fold and
unfold the TMA system as described. Any other use
may be hazardous to people or equipment.
•
Do not use the system to push a load.
•
Do not use the raised end of the system to support any load.
•
Do not use any part of the TMA for towing or
hauling a load. This could cause the lift mechanism to malfunction, and may reduce the impact
performance.
16. The system must be in the unfolded position to perform properly during an impact. Do not leave the
system raised, even slightly, when on the job.
•
Regular inspection of frame members, cartridges
and pins is necessary to ensure proper system
performance.
17. Be sure the truck is appropriate for attaching a TMA.
See the installation section for further details
•
Regular inspection of hoses is important. A broken or damaged hose will cause the system to
quit functioning properly.
Definition-The BARRIER VEHICLE is the truck on which
a TMA is mounted, while positioned upstream (towards
the direction that traffic is approaching) of a work zone.
•
Keep electrical connections at the pump motor/
solenoid clean to prevent arcing. Clean any hydraulic spills or leakage to prevent bodily injury,
fire, etc.
The SHADOW VEHICLE is the truck on which a TMA is
mounted, which is following behind a moving operation
such as striping, spraying, etc.
13. The driver should be extra cautious while backing
the truck with the TMA in the up or down position,
so that injury and/or damage will not result.
6
THE USE OF A TMA ON THE BACK OF A TRUCK WILL:
SHADOW VEHICLE
WITH TMA
TMA
• Gradually stop the impacting vehicle*
• Protect the occupants of the impacting vehicle *
• Protect the shadow vehicle occupants*
SKID DISTANCE
• Reduce damage to the shadow vehicle*
WITHOUT TMA
• Affect the skid (roll ahead) distance of an impacted
truck (see figure 9). KEEP WORK CREWS CLEAR!
CONTROLLING SKID DISTANCE (ROLL AHEAD):
• Skid distance is significantly increased and is less
predictable for lightweight shadow vehicles
SAME
WILL NOT:
SKID DISTANCE
Figure 9
• Skid distance is reduced and is more consistent
when heavier shadow vehicles are used.
• Preferred truck GVW rating is:
9072 kg [20,000 lbs.] to 27,215 kg [60,000 lbs.]
• Recommended Curb Weight of truck is:
7300 kg [16,090 lbs.] to 9000 kg [19,845 lbs.]
*DESIGN SPEED IMPACTS:
• 100 km/h [62 mph] for 820 and 2000 kg
[1808 and 4410 lbs.] vehicles.
7
Safe-Stop® 180 TMA
Installation Instructions
Read and understand all instructions before beginning
installation.
13. 13/16" diameter bit and pilot drill for same
The truck rating (GVW) should be 9072 kg [20,000 lbs.]
min. The weight of the vehicle should be between 7300
and 9000 kg [16,090 and 19,845 lbs.] for optimum impact performance.
15. Torque wrench - 120 Nm [90 ft-lbs.]
The system must be attached to the truck by welding
parts to the frame. Do not weld forward of the rear leaf
spring hangers to ensure structural integrity of frame.
Use AWS qualified welders to ensure durable attachment
of the TMA system. Disconnect the truck battery before
any welding on truck or TMA.
17. Forklift
14. Center punch
16. Hydraulic fluid (use Dexron® III fluid only)*
*Shipped with system
Preparation
3A) Installation Must Be Performed On A
Level Surface
The truck frame must be suitable and accessible for
mounting a TMA system. If there are any questions regarding the suitability, contact the Customer Service Department for assistance.
The system’s framework is very heavy and pivots in several areas. Until the framework is secured with the cables,
it can swing out in an approximate 4 m [13’] radius from
either side of the truck. A level surface is required to
maintain control of the framework when it is being extended to its full length.
1) Shipping list
3B) Truck ballast
Check the shipping list against the actual parts to make
sure all items were received. Review the drawing package and familiarize yourself with the assembly and part
numbers.
Use a bubble level to verify that the truck is parked on a
level surface. The truck should be as close to the final
driving weight as possible. If ballast must be added to
achieve the 7300 kg [16,090 lbs] minimum weight, add
it at this time. Ballast must be properly anchored to the
truck to keep it in place during an impact. Ideally, an
adequately sized truck, that requires no ballast, should
be used. Because the 953 kg [2100 lb] weight of the
rearward protruding TMA is supported by the back of the
shadow vehicle, care must be taken not to exceed the
manufacturer's published maximum axle loads. To ensure that the driving characteristics of the vehicle are
maintained, the manufacturer's recommended center-ofgravity zone should also be adhered to.
2) Assemble Necessary tools:
Recommended Tools
1. Welding equipment (for 1/2" plate) GMAW or SMAW
2. Cutting torch
3. Hammer
4. Drift pin or alignment pin (12” long)
4) Check for interference
5. Tape measure
Before attempting to install the underride, check for interference problems.
6. 1/2" drive socket wrench w/6” extension
7. 1/2" drive sockets (9/16", 1-1/8", 1-1/2", 9/16” deep well)
8. Open end wrenches (9/16", 1-1/8", 1-1/2")
9. 12" crescent wrenches - (2)
10. Marking implement (pencil, soap stone)
11. Floor jack
12. Drill motor for 13/16" diameter bit
8
The System folds such that the impact face is very close
to the mounting location. See Figure 32 page 28. If you
are using something other than a standard socket receiver hitch underride refer to special instructions supplied with your assembly then skip to step 8.
Temporarily position the underride socket receiver under
truck frame as shown (refer to Figure 12) and check for
interference problems. Interference problems with tail
lights, springs, dump bodies (in the up or down positions), etc., should be corrected before proceeding.
STEPS
4&5
STEP
6
UNDERRIDE
SOCKET
RECEIVER
STEP
7
ATTACHMENT
ASSEMBLY
STEP
12
SUPPORT
FRAME
SUPPORT
MOUNT
STEPS
8&9
5) Underride Assembly
STEP
11
STEP
10
Figure 10
With the truck at its actual driving weight, parked on a
level surface, measure the distance from the ground to
the bottom of the truck frame. A distance of 711±25 mm
[28±1"] is required. Spacers may be added to the bottom of the frame to achieve this height (see figure 13
and the Underride Assembly drawing on page 49).
CAUTION: The truck frame is high carbon steel.
To avoid cracking, do not weld, or apply excessive heat, to the bottom flange, forward of
rear-most leaf spring hangers.
Prime and paint all welded areas.
Note: The truck’s springs may settle with the
weight of the TMA, sometimes, as much as 50 mm
[2"]. Adjust the height to compensate for anticipated settling.
Position the socket receiver at the rear end of the frame so
that the 76 x 387 mm [3 x 15 1/4"] flat bar is along the
outside of the frame member and the socket receiver tube
is flush with the end of frame. If spacers are required,
weld them to the receiver tube and lap the spacer splices
(pieces of 10 x 51 x 103 mm [3/8 x 2 x 4"] flat bar) across
the socket receiver tube and spacer at the rear-most location (see underride assembly drawing). The top of the
socket receiver tubes must be 711 ± 25 mm [28 ± 1"] from
the level ground for proper system height (see Figure 12).
Weld the socket receiver tube to the bottom of the truck
frame with the 76 x 387 mm [3 x 15 1/4"] flat bar on the
outer side of the frame (see Figure 11).
Note: All welding must be performed by a welder
certified to AWS D14.3-82 or AWS D1.1 in accordance with the underride drawing. Disconnect
truck battery before welding.
UNDERRIDE
SOCKET
RECEIVER
FLAT BAR
Figure 11
864 mm [34"] NOMINAL
UNDERRIDE
SOCKET RECEIVER
TRUCK
FRAME
FLAT BAR
710 mm [28"]
NOMINAL
Measure from the back end of the frame forward to the
rear-most leaf spring hanger, or any other obstruction
on the bottom of the frame that may interfere with the
socket receiver. A minimum of 305 mm [12"] is required
(see the Underride Assembly drawing on page 49).
TRUCK FRAME
Figure 12
9
Safe-Stop® 180 TMA
Installation Instructions (cont’
d.)
(cont’d.)
TRUCK FRAME
TRUCK FRAME
711 mm ± 25 mm [28" ± 1"]
762 mm ± 25 mm [30" ± 1"]
SPACER TUBES
SPACER SPLICE
(USE ONLY ON
REAR SPACER TUBE)
FLUSH WITH
END OF FRAME
UNDERRIDE SOCKET RECEIVER
UNDERRIDE SOCKET RECEIVER
LEV
EL
GR
OU
ND
LEV
EL
GR
OU
ND
WITHOUT SPACERS
WITH SPACERS
Note: Left and right underride socket receivers
must be parallel with each other and level.
Figure 13
Socket Hitch (Left Side Shown)
6) Socket Hitch Assembly
Install the socket hitches and pin them into place
using the 1 x 6 ¼" hitch pins and retainer pins
shipped with the system.
HITCH & RETAINER PINS
SOCKET HITCHES
Figure 14
10
7) Mount the Attachment Assembly to Socket Hitches
Mount the attachment assembly to the socket hitches as shown in Figure 15. Shims are used to level the system. It is
recommended that 1/2" shims be used initially. This may be adjusted once the system is assembled.
SUPPORT BRACKET
2 1/2" X 3 1/4" BAR WASHER
3 1/4" X 3 1/4" BAR WASHER
1X3 1/2" HEX BOLT
1" FLAT WASHER
12GA SHIM
SOCKET HITCH
1" FLAT WASHER
1" LOCK WASHER
1" HEX NUT
1/2" SHIM (ONE PER SIDE RECOMMENDED AT INITIAL SETUP. LEVEL
THE TMA BY ADJUSTING THE
NUMBER OF SHIMS)
Figure 15
11
Safe-Stop® 180 TMA
8) Attach the Support Frame / Backup to
the Attachment Assembly
Move the system to the truck and pin the support
frame/backup assembly to the attachment assembly,
as shown in Figure 16. The assembly is to be installed
while frame is still collapsed with forklift slings supporting the system. Use the upper set of mounting
holes for the attachment.
BACKUP ASSEMBLY
HITCH PIN WITH
HAIR PIN COTTER
SUPPORT BRACKET (RIGHT)
HITCH PIN WITH
SUPPORT MOUNT (RIGHT)
HAIR PIN COTTER
BAR WASHER
1/2" X 3 1/4" X 3 1/4"
SUPPORT BRACKET (LEFT)
1" X 3 1/2"
HEX BOLT, G8
1" FLAT WASHER
1" X 3 1/2" HEX BOLT, G8
1" FLAT WASHER
BAR WASHER
1/2" X 2 1/2" X 3 1/4"
SUPPORT MOUNT (LEFT)
1" HEX NUT
1" LOCK WASHER
1" FLAT WASHER
*SHIMS, 1/4" X 5" X 10"
*SHIMS, 12GA X 5" X 10"
BAR WASHER
1/2" X 3 1/4" X 3 1/4"
Figure 16
12
*USE SHIMS AS NECESSARY TO ACHIEVE
PROPER SYSTEM GROUND CLEARANCE
9) Extend the Support Frame
With the TMA pinned to Attachment Assembly, slowly
and evenly pull the frame out to its full extent.
WARNING!
Even when supported by forklift, frame
can be unwieldy. Use extreme care.
WARNING!
Until the cables are installed, the system
may shift to one side.
ALIGNMENT CABLES
ALIGNMENT CABLES
Figure 17
13
Safe-Stop® 180 TMA
Installation Instructions (cont’
d.)
(cont’d.)
WARNING!
TORQUE TO 34 NM (25 FT-LBS.)
For proper System performance, only use Release
Cables supplied by Energy Absorption Systems, Inc.
Failure to use the correct equipment could lead to
fatigue or result in poor System performance.
10) Install the Bottom Release Cable
across the Arm Assemblies.
RELEASE CABLE
Verify that the frame is extended as far as it will go. Install the Bottom Release Cable across Arm Assemblies.
(see Figure 18). Torque the nuts to 34 Nm (25 ft-Ibf) making sure that roughly an equal amount of threads protrude from nuts on both ends of cable. Lock cable in place
using remaining fasteners as "jam" nuts.
TORQUE TO 34 NM (25 FT-LBS.)
Figure 18
14
11) Install Cartridges
Remove one end of each alignment cable from the TMA
and set aside to clear the top side of each bay. Using a
forklift and sling, place Cartridge B in position and secure it using the flat washers, lock washers and nuts provided. Torque the nuts to 120 ± 7 Nm [90 ± 5ft-lbs.] Repeat procedure for Cartridge A (see Figure 19).
12) Install the Top Release Cables across
the Arm Assemblies
Install the top release cable across the arm assemblies
(see Figure 18). Torque the nuts to 34 Nm (25 ft-Ibf),
making sure that roughly an equal amount of threads
protrude from nuts on both ends of cable. Lock cable in
place using the remaining fasteners as "jam" nuts.
CARTRIDGE A
CARTRIDGE B
Figure 19
15
Safe-Stop® 180 TMA
Installation Instructions (cont’
d.)
(cont’d.)
13) Install and Adjust the Alignment Cables
There are four alignment cables (two for each bay). Attach
the alignment cables as shown in Figure 20. Measure the
diagonals of each bay and adjust the cables so that the diagonal measurements in each bay are the same within the
given tolerance (A = B ± 5 mm [3/16"], C = D ± 5 mm [3/16"])
and taught. Cables are "taut" when they deflect 38 mm - 50mm
[1 1/2" - 2"] when pressed by hand at the midpoint. Lock
each cable in place using the second nut as a “jam nut”.
14) Install and Tension the Cartridge Support Cables
There are six cartridge support cables. Install the cables
as shown in Figure 21.
Attach thimble end of all cartridge support cables to the
intermediate frame using the provided shackles. Pass the
stud end of the cable through the corresponding cartridge
chain loop, and attach as shown in Figure 21 using a die
spring, washer and nuts.
To properly tension the cartridge support cables, tighten
the first nut on one cable until all slack is removed, then
tighten it until the tensioning springs have been compressed to 32 mm [1 ¼"] in height. Lock this nut in place
with the second "jam" nut. Repeat this procedure with
the other cables.
SOCKET HITCHES NOT
SHOWN FOR CLARITY
A
C
B
Figure 20
16
D
15) Install Side Guides
There are four side guides, two for bay 1 and two for bay 2.
Attach guides as shown in Detail 21b and tighten bolts.
16) Adjust the Height and Levelness of the
System Frame
Verify that the system frame is 305 ± 25 mm [12" ± 1"]
from the ground at the front and rear of the system. It
may be necessary to add shims to the socket hitch in
order to adjust the levelness of the cartridge. See Figures 21 & 21a.
IMPACT FRAME
SIDE GUIDE
SOCKET HITCH
SHIMS MAY BE ADDED OR REMOVED
HERE AS NECESSARY TO ACHIEVE
LEVELNESS OF SYSTEM
Detail 21b
CARTRIDGE
SUPPORT CABLE
Detail 21a
32 mm [1 1/4"]
WASHER
NUTS
SHACKLE
CARTRIDGE
SUPPORT CABLE
SIDE GUIDE
SEE DETAIL 21B
SEE DETAIL 21a
305 mm ± 25 mm [12" ± 1"]
305 mm ± 25 mm [12" ± 1"]
INTERMEDIATE FRAME
SIDE GUIDE
SEE DETAIL 21B
Figure 21
17
Safe-Stop® 180 TMA
Installation Instructions (cont’
d.)
(cont’d.)
17) Connect the Lights and Controls
Locate the female TMA socket connector in a convenient
location on the truck. Make sure that the electrical cord
on the TMA can reach this location.
For support vehicles with combined tail and clearance
lights, connect a jumper between pins 2 and 6 on the
backside of the male TMA plug connector (see VIEW
A-A, Figure 22.) Connect the 7-pin plug to the socket on
the truck.
The Truck battery must be of the proper voltage. The
Safe-Stop 180 TMA is available in 12 volt and 24 volt systems. Be sure the system and truck are compatible. Be
sure to use standard safety practices when attaching the
battery cables (e.g. do not let the ends of the cables touch,
etc.) Do not run the battery cables around sharp corners
or metal work, or in other areas that would pinch or cut
the cables. Connect the battery cable to the pump motor
(see the hydraulic assembly in drawing package).
The controls at the rear of the truck should be mounted
to the support frame, on the non-traffic side (side closest to the curb). If they are not, move the rocker switch
to the other side by compressing the four tabs on the
back side of the switch towards the switch body. Securely
fasten cable ties to secure any loose wiring to the TMA
frame. Mount the cab switch box inside the cab within
easy reach of the driver, and plug in the cab switch box at
the mating connector on the TMA.
REVERSE LIGHTS
7 PIN FEMALE SOCKET
GROUND
CLEARANCE, SIDE MARKER
AND IDENTIFICATION LAMPS
TAIL LAMPS
RIGHT TURN
LEFT TURN
STOP LAMPS
View A-A
Back side of socket
(Truck) connector
SEE VIEW A-A
A
A
Figure 22
18
18) Check the Hydraulic System
The hydraulic system is pre-assembled and tested for
operation and leaks before shipping. The pump is wired
as shown on the hydraulic assembly drawing. Before
operating the system, remove the vent plug from the fill
port of the hydraulic reservoir and check to see if the
reservoir is full. With the TMA unfolded, the fluid should
be just visible. Add only Dexron® III fluid if it is not. Do
not overfill. Replace the vent plug in the filler port (Be
careful not to cross thread it.)
PUMP
RESERVOIR FILL PORT
Read Operation Instructions (see page 21: Folding and
Unfolding the System). Making sure all electrical and hydraulic lines will not be damaged, use the switch at the
rear of the truck to fold and unfold the system twice. This
purges air from the system and verifies operation.
Also, cycle the system using the cab switches to verify
proper operation.
Note: Continuous operation may run down truck
battery.
Figure 23
19
Safe-Stop® 180 TMA
Installation Instructions (cont’
d.)
(cont’d.)
Note: The TMA can only be supported on
jacks when completely folded.
19) Store the Jacks
The jacks are provided to facilitate the attachment
and removal of a folded Safe-Stop 180 TMA from
the truck. Retrieve jacks set aside earlier and place
them in the storage positions as shown in Figure 24.
20) Check System Lights For Proper
Operation
Verify that all the turn / stop / tail / reverse lights are
working properly. Replace any bulbs that are out.
There are two light circuits on the TMA. Verify both
circuits are operational.
Raise the system to the folded position and verify
secondary lights are working.
With the system unfolded, lights on the impact face
will be on and lights on the midframe will be off.
STORAGE POSITIONS
With the system folded, the lights on the
midframe will be on and the lights on the impact
face will be off.
JACKS
21) Verify the Position of the Hydraulic / Electrical Lines.
Check the location of all the hydraulic and electrical lines to be sure they will not be damaged during folding and unfolding of the system.
22) Final Check of System
Check the tightness of all of the fasteners. Double
check the height and levelness of the system.
23) Ready to Use
The Safe-Stop 180 TMA is now ready for use. To
ensure proper and safe operation, all TMA users
should be given operating and safety training, as
given in this manual and as specified by the owner
and local regulations.
20
Figure 24
WARNING!
Jacks are to be removed from Arm Assemblies and stored
when TMA is in service.
Operation Instructions
Before operating the Safe-Stop 180 TMA, thoroughly read
and understand these instructions and the safety section
of this manual. Verify that the system is properly installed
and in working order. For proper impact performance,
the TMA must be equipped with one Safe-Stop 180 Type A
Cartridge and one Safe-Stop 180 Type B Cartridge, in their
proper positions as shown in Figure 19 on page 15.
The Safe-Stop 180 TMA has been equipped with a hydraulic pump that can be used to fold the TMA from its
extended position. The controls are located on one side
of the support frame. A set of controls is also located in
the truck cab. The controls on the support frame should
be mounted to the non-traffic side of the system. To
change the mounting, see "Connect the Lights and Controls" section in the Installation Instructions.
While folding or unfolding the Safe-Stop 180 TMA from
outside the cab, the operator must stand on the nontraffic side of the truck. Always stay clear of moving parts.
Folding and Unf
olding the S
ystem
Unfolding
System
CAUTION: Make sure the area above and behind the system is clear of all objects before
proceeding. Under no circumstances should
anyone be allowed behind the system when it
is being folded or unfolded. When operating
from the cab, always be aware of objects behind and above the Safe-Stop 180 TMA.
Folding and unfolding the system: The rocker switch operates by pushing and holding the switch down on the
end towards the desired direction (unfold or fold).
The system will not serve its intended purpose when
folded. The TMA must be unfolded during shadow or
barrier vehicle operations. The truck and Safe-Stop 180
TMA combination offers the best driving characteristics
when folded. Driving with the system in the folded position is permissible and recommended during restricted
city driving and extended high-speed travel. Be sure to
unfold the system either before, or as soon as possible
after, entering into a site. Remember that it is recommended that the support vehicle be stopped for TMA folding and unfolding.
The Safe-Stop 180 TMA should only be operated while
the truck is at rest. Jarring or severe bumping of the system while folding or unfolding may cause damage to the
system or injury to the operator.
The pump is not intended for continuous operation. The
pumps motor has a thermal cut-out switch to protect
the motor from overheating. The thermal cut-out switch
will reset when the temperature of the electric motor
has cooled down.
21
Safe-Stop® 180 TMA
Limitations and Warnings
The SafeStop 180 TMA (Truck Mounted Attenuator) has
been tested and evaluated per the recommendations of
the National Cooperative Highway Research Program
(NCHRP) Report 350*. The SafeStop 180 TMA is capable
of decelerating and stopping small cars and light trucks
of 820 and 2000 kg [1808 and 4410 lbs.] when the rear
of the system is impacted at 100 km/h [62 mph]. In the
unfolded position, the SafeStop 180 passed test #50, 51,
52 and 53 at Test Level 3 (100 km/h). Tests 50 (small car)
and 51 (light truck) are straight on impacts, test 52
(light truck) is an offset impact and test 53 (light truck)
is an angle impact. In the folded position, the
Safe-Stop 180 passed test #51 at Test Level 2 (70 km/h).
To achieve optimum impact performance, the
Safe-Stop 180 TMA must be mounted to a truck with a
traveling weight between 7300 kg and 9000 kg
[16,090 and 19,845 lbs.]. The system must be level and
the bottom of the system must be 305 ± 25 mm
[12” +/- 1”] above the ground.
Impacts that exceed the design capabilities described in
this manual (vehicle weight, speed and impact angle) may
not result in acceptable crash performance as described
in NCHRP 350, relative to structural adequacy, occupant
risk and vehicle trajectory factors.
* copy may be obtained from:
Transportation Research Board
National Research Council
2101 Constitution Avenue, N.W.
Washington, D.C. 20418
It is also available at:
http://safety.fhwa.dot.gov/programs roadside_hardware.htm
22
*The Safe-Stop 180 TMA shall be employed in the unfolded position: At all times while operating as either a
Barrier Vehicle or Shadow Vehicle.
The Safe-Stop 180 TMA should be in the "unfolded" position when: Transporting short distances at a low speed,
Transporting at a speed much lower that adjacent traffic,
and Transporting in areas where vehicle ride characteristics and maneuverability are maintainable.
The Safe-Stop 180 TMA should be in the "folded" position when: Transporting long distances at a high speed,
Transporting at a speed near the speed of adjacent traffic, and Transporting under conditions of compromised
maneuverability typically when the large turning radius
clearance needed for the extended TMA is not safe.
Maintenance
Before performing any Maintenance on the Safe-Stop 180 TMA, thoroughly read and understand the Maintenance
Section and the Safety Section of this manual.
I. Routine Maintenance
Description
Interval
1. Height and Levelness - The height and levelness of the system is important to its impact performance. Check regularly and adjust as necessary: See Figure 25.
A/R*
305±25 mm [12"±1"]
305±25 mm [12"±1"]
FLAT LEVEL SURFACE
Figure 25
2. Fasteners - Check the tightness of the fasteners monthly. See the drawings for the locations of
the fasteners. Be sure to check bolts attaching the cartridges to the support structure. Lock
washers should be fully compressed.
1 month
3. Cables - (System unfolded)
A. Cartridge Support Cables - The spring length should be 34mm (1 1/4"). (Ref Pg 17 - Fig. 21)
B. Alignment Cables - Crossing cables are of equal length +/- 5mm (3/16") and deflect 3850mm (1 1/2-2"). (Ref. Pg 16)
C. Release Cables - Torqued to 34 Nm (25ft-lbs). Ref. Pg 14)
4. Jacks - Check the condition of the wheels on the jacks monthly or as required.
1st day,
1st week,
then 1 month
1 month
A/R*
5. Lights - Replace the lights as required.
*A/R = as required
23
Safe-Stop® 180 TMA
Maintenance (cont’
d.)
(cont’d.)
Description
Interval
6. Pins - Check all pins. Prior to each use, check all pins to make sure they are held in position by
a retaining pin as required.
Each use
7. Lubrication - Lubricate as described in the Lubrication Section (Maintenance Section - III) of
this manual.
Varies see Section III
8. Hydraulic Pump - Clean the hydraulic pump as required. Check fluid level and electrical connections monthly. Remove all residue or debris on or around the pump.
1 month
9. Hydraulic Ram - Clean the hydraulic ram as required. Check monthly. Remove all residue or
debris on or around the ram.
1 month
10. Hydraulic Hoses - Check all hydraulic hoses for damage, leaks or cracks. Replace damaged or
leaking hoses.
Each use
11. Clean System - Clean the frame assembly, cartridges and support structure and impact face
from dirt and salt as required. Check monthly. The system can be cleaned with mild soap
solution. Always check lubrication after cleaning.
1 month
24
II. Detac
hing and At
tac
hing the
Detaching
Attac
taching
System to the Truc
k
ruck
1) Detaching the System from the truck
Be sure the TMA and the truck are on level ground.
A. Raise the system to the folded position.
B. Remove the jacks from the storage location
and install them on the active mounts as
shown in Figures 26 and 27.
C. Extend the jacks until the weight of the system is supported.
INSTALL JACKS ON
ACTIVE MOUNTS
5°
5°
TILTING OF THE JACK AT THE ANGLES OF
±5 DEGREES FROM VERTICAL IS NORMAL
AND IS DUE TO THE TOLERANCE IN THE
ATTACHMENT PIN TO ENSURE EASE OF
INSTALLATION AND REMOVAL.
Figure 27
STORAGE MOUNTS
INSTALL JACKS ON
ACTIVE MOUNTS
Figure 26
D. Unplug the light harness and disconnect the
positive and negative cables from the pump.
Unplug the cab switch box at the mating connector on the TMA.
E. Remove the socket hitches from the underride socket receivers by removing 1 x 6 ¼"
hitch pins and retainer pins.* See Figure 28.
(If the alignment is off, making removal difficult, it may be necessary to adjust jacks or
temporarily unmount the TMA from the
socket hitches. This can be done by removing the two 1 ¼ x 7 " hitch pins and retainer
pins as shown in Figure 29.) Loosen the hardware to ease interference. Be sure to retighten.
F.
HITCH PIN
SOCKET HITCHES
UNDERRIDE SOCKET RECEIVER
Figure 28
Move the TMA away from the truck.
25
Safe-Stop® 180 TMA
Maintenance (cont’
d.)
(cont’d.)
BACKUP ASSEMBLY
HITCH PIN WITH
HAIR PIN COTTER
SUPPORT BRACKET (RIGHT)
HITCH PIN WITH
SUPPORT MOUNT (RIGHT)
HAIR PIN COTTER
BAR WASHER
1/2" X 3 1/4" X 3 1/4"
SUPPORT BRACKET (LEFT)
1" X 3 1/2"
HEX BOLT, G8
1" FLAT WASHER
1" X 3 1/2" HEX BOLT, G8
1" FLAT WASHER
BAR WASHER
1/2" X 2 1/2" X 3 1/4"
SUPPORT MOUNT (LEFT)
1" HEX NUT
1" LOCK WASHER
1" FLAT WASHER
*SHIMS, 1/4" X 5" X 10"
*SHIMS, 12GA X 5" X 10"
BAR WASHER
1/2" X 3 1/4" X 3 1/4"
*USE SHIMS AS NECESSARY TO ACHIEVE
PROPER SYSTEM GROUND CLEARANCE
Figure 29
2) Attaching the System to the Truck
A. Move the TMA to truck.
B. Install the socket hitches into the underride
socket receivers and pin them into place
using 1 X 6 ¼" pin and retainer pin. If alignment is off, making the assembly difficult, it
may be necessary to adjust jacks or temporarily unmount the socket hitches from the
TMA. Be sure the retainer pins are installed
correctly and cannot fall out.
26
C. Plug in the light harness and connect the
positive and negative cables to the pump.
Plug in the cab switch box at the mating connector on the TMA.
D. Retract the jacks completely and relocate
them to the storage location.
E. Check hydraulic/electrical system for proper
operation.
F.
Verify system is level and 280-330 mm
[11" - 13”] above level ground.
3) Change Hydraulic Fluid
III. Lubrication
When handling hydraulic fluid, use appropriate
measures to prevent spillage. Clean any spillage
immediately.
1) Add Hydraulic Fluid
Add hydraulic fluid as required and check the fluid level
monthly. The reservoir is full when TMA is UNFOLDED
AND when the fluid level is just visible inside the fill
port. Use only Dexron® III Hydraulic fluid. Figure 30
shows the location of the hydraulic fluid fill port.
PUMP
RESERVOIR FILL PORT
ADD HYDRAULIC FLUID HERE
Change the hydraulic fluid every 2 years, or if you
strongly suspect the oil is contaminated with water.
Use Dexron® III fluid only. The empty oil capacity of
the reservoir, hoses, and cylinders is approximately
4 quarts (the capacity of the reservoir alone is approximately 2 ½ quarts).
The reservoir and hydraulic system may need to be
filled and cycled several times to remove air that may
be in the system.
Caution: When refilling an empty system, do
not attempt to fold or unfold the system more
than 60 degrees until after cavitation has
ceased. Always stay clear of a moving TMA.
As the TMA is folded/unfolded, the pump will cavitate when the reservoir is emptied. Add fluid until
system will raise to 60 degrees without cavitating.
After that, cycle the system beyond 60 degrees and
add fluid as necessary. the reservoir should be full
(oil just visible at the filler port) when the TMA is
fully UNFOLDED. If this procedure is not followed,
the TMA may come down faster than expected
(whether folding or unfolding).
Figure 30
2) Oil Swivel jacks
Oil the swivel jacks every six months as shown in
Figure 31.
OIL JACK HERE
Figure 31
27
Safe-Stop® 180 TMA
Maintenance (cont’
d.)
(cont’d.)
IV
hnical Specif
ications
IV.. Tec
echnical
Specifications
1) Weight
Cartridge A
157 lbs.
71 kg
Cartridge B
185 lbs
84 kg
Frame Components
1672 lbs
758 kg
Jacks
86 lbs
39 kg
Total
2100 lbs
953 kg
2) Dimensions
2.4 m [7'-10"]
For details on replacement parts, refer to the drawing package. The drawings include the part numbers and descriptions. For replacement parts, call
customer service: 1-(888)-32-ENERG.
4) Operating rates
The system folds to the folded position in approximately 35 to 40 seconds (based on a fully charged
battery).
The system unfolds to the unfolded position in approximately 35 to 40 seconds (based on a fully
charged battery).
2 m [6'-10"] MAX.
0.10 m [4"] MIN.
3) Replacement Parts
Figure 32
2.4 m [7'-9"]
Figure 34
4.4 m [14'-5"]
1.3 m [4'-2"]
MAX.
711 mm [2'-4"]
303 mm ± 25 mm [1'-0" ± 1"]
Figure 33
28
Repair Instructions
I. P
ost Impact
Post
WARNING!
Note: Only the correct parts manufactured by Energy Absorption Systems, Inc. should be used to
repair a damaged system. Failure to comply could
result in reduced safety or damage to the system.
For proper System performance, only use Release
Cables supplied by Energy Absorption Systems, Inc.
Failure to use the correct equipment could lead to
fatigue or result in poor System performance.
1) Inspect the frame for bent parts.
Replace any frame members that have been damaged.
Do not attempt to weld or straighten parts. Refer to the
system drawings for the part numbers and descriptions
of the parts.
2) Inspect pins and bolts for damage.
Replace all bolts and pins that have been damaged. Refer to the system drawings for the part numbers and descriptions of the parts.
3) Expand system and detach one end of
each alignment cable.
Caution: Frames may swing side to side.
5) Install the Bottom Release Cable across
the Arm Assemblies.
Verify that the frame is extended as far as it will go. Install the Bottom Release Cable across Arm Assemblies.
(see Figure 35). Torque the nuts to 34 Nm (25 ft-Ibf)
making sure that roughly an equal amount of threads
protrude from nuts on both ends of cable. Lock cable in
place using remaining fasteners as "jam" nuts.
WARNING!
Until the cables are installed, the system may shift to
one side.
TORQUE TO 34 NM (25 FT-LBS.)
Extend the frame and detach one end of each of the four
alignment cables.
4) Remove cartridges and spent release
cables.
Remove the crushed cartridges.
RELEASE CABLE
Do not attempt to repair a damaged cartridge. For full
impact capacity the cartridges will need to be replaced
even if they were only crushed slightly.
TORQUE TO 34 NM (25 FT-LBS.)
Figure 35
29
Safe-Stop® 180 TMA
Repair Instructions (cont’
d.)
(cont’d.)
6) Install Cartridges
Remove one end of each alignment cable from the TMA
and set aside to clear the top side of each bay. Using a
forklift and sling, place Cartridge B in position and secure it using the flat washers, lock washers and nuts provided. Torque the nuts to 120 ± 7 Nm [90 ± 5ft-lbs.] Repeat procedure for Cartridge A (see Figure 36).
7) Install the Top Release Cables across the
Arm Assemblies
Install the top release cable across the arm assemblies
(see Figure 35). Torque the nuts to 34 Nm (25 ft-lbs),
making sure that roughly an equal amount of threads
protrude from nuts on both ends of cable. Lock cable in
place using remaining fasteners as "jam" nuts.
CARTRIDGE A
CARTRIDGE B
Figure 36
30
8) Reinstall and Adjust the Alignment Cables
9) Replace Side-Guides
There are four top cables (two for each bay). Reattach
the alignment cables as shown in Figure 37. Measure
the diagonals of each bay and adjust the cables so that
the diagonal measurements in each bay are the same
(A = B ± 5 mm [3/16"], C = D ± 5 mm [3/16"]). Lock each
cable in place using the second nut as a “jam nut” (see
Detail 37).
The Side-Guides must be inspected and replaced if damaged. The Side-Guides are sacrificial and can be easily
attached to their respective mounts. Side-Guides are necessary for proper System alignment during an impact
and must be in place to ensure proper performance characteristics during System operation in an impact.
SOCKET HITCHES NOT
SHOWN FOR CLARITY
A
C
B
D
Figure 37
31
Safe-Stop® 180 TMA
Repair Instructions (cont’
d.)
(cont’d.)
9) Install and Tension the Cartridge Support Cables
There are six cartridge support cables. Pass the stud end
of the cable through the corresponding cartridge chain
loop, and attach as shown in Figure 38 using a die spring,
washer, and nuts.
To properly tension the cartridge support cables, tighten
the first nut on one cable until all slack is removed, then
tighten it until the tensioning springs have been compressed to 32 mm [1 ¼"] in height. Lock this nut in place
with the second "jam" nut. Repeat this procedure with
the other cables.
SOCKET HITCH
10) Adjust the Height and Levelness of the
System Frame
SHIMS MAY BE ADDED OR REMOVED
HERE AS NECESSARY TO ACHIEVE
LEVELNESS OF SYSTEM
Verify that the system frame is 305 ± 25 mm [12" ± 1"]
from the ground at the front and rear of the system. It
may be necessary to add shims to the socket hitches in
order to adjust the levelness of the cartridge. See Figure
38a.
Detail 38a
CARTRIDGE
SUPPORT CABLE
32 mm [1 1/4"]
WASHER
NUTS
SHACKLE
CARTRIDGE
SUPPORT CABLE
305 mm ± 25 mm [12" ± 1"]
SEE DETAIL 38a
Figure 38
32
11) Verify Position of Hydraulic / Electrical
Lines
Check the location of all the hydraulic and electrical lines
to make sure they will not be damaged during the folding
and unfolding of the system.
12) Check System Lights For Proper Operation
Verify that all the turn / stop / tail / reverse lights are
working properly. Replace any bulbs that are out.
There are two light circuits on the TMA. Verify both circuits are operational.
Raise the system to folded position and verify secondary
lights are working.
With the system unfolded, lights on the impact face will
be on and lights on the midframe will be off.
With the system folded, the lights on the midframe will
be on and the lights on the impact face will be off.
14) Final check
Check the tightness of all the fasteners. Check all steel
cables to verify that they are properly attached and tightened.
15) Ready to Use
The system is now ready for use.
33
Safe-Stop® 180 TMA
Troubleshooting Guide
Safety Notes
1) Always wear eye protection when working on or
around machinery or power tools, and while working with hydraulics.
2) Do not attempt to control a hydraulic leak with your
hand. High-pressure hydraulic fluid can puncture the
skin and cause severe injury or death. Use extreme
caution when working on hydraulic systems.
In general, consult Energy Absorption Systems' Customer
Service Department if problems associated with operating or repairing the TMA should arise. This guide is meant
to be an aide for performing minor repairs, not a detailed
repair manual. NOTE: For any problems not listed here,
contact Energy Absorption Systems.
Test Eq
uipment
Equipment
The following is a recommended list of test equipment
required to troubleshoot D.C. powered hydraulic systems.
1. PRESSURE GAGE
A 34450 kPa [5000 psi] pressure gage, preferably
glycerin filled, is a valuable and relatively inexpensive tool for checking pressure in the various sections of the circuit.
2. D.C. TEST LIGHT
A test light is a light bulb with one lead wired to an
alligator clip and the other lead connected to a metal
probe. It is used to check for the presence of a voltage in the electrical circuit. With the alligator clip
grounded, the light glows when the probe comes into
contact with a hot electrical component.
3. CONTINUITY LIGHT
A continuity light is like a test light but contains its own
battery. It is used for testing electrical circuits when the
components are not connected to a power source.
34
4. VOLT METER
A D.C. voltmeter can be used to troubleshoot voltage problems. Two common uses are: 1) Ground
one probe while using the other to probe hot leads in
search of the available voltage at the point where the
second probe is connected. 2) Measure a voltage
drop in a wire or component by connecting one probe
to one end and the remaining probe to the other end
of the item in question.
5. OHM METER
Note: All tests conducted with an ohmmeter must
be done with the power source disconnected from
the system.
An ohmmeter is used to measure resistance and is
useful when working with solenoid coils. On some
coils the wire resistance is large enough that a D.C.
test light might not illuminate, falsely indicating an
open circuit (infinite resistance). A successful coil
test, however, should always show some non-infinite value of resistance.
6. ASSORTED HOSSES, PRESSURE FITTINGS
These can be used to connect and/or isolate certain parts
of a hydraulic circuit for diagnosing hydraulic problems.
If you suspect problems, do not operate the system.
Diagnose and repair, or contact Energy Absorption Systems' Customer Service Department for assistance.
Hy
draulic Fluid
Hydraulic
1. PURPOSE
The main purpose of hydraulic fluid is to transfer
power from the pump to the actuators. Secondary
tasks include reducing metal on metal friction, and
preventing the formation of rust and sludge. These
traits are achieved when the oil has a good lubricity
(slipperiness), and with additives that inhibit oxidation and the entrainment of air and water in the oil,
respectively. The viscosity (thickness) of the oil must
be appropriate for the operating temperature to minimize unwanted leakage, and to lubricate the close
fitting parts in the system.
Additionally, the oil must be compatible with the seals
used in the system. Finally, the oil must be able to
pour or flow at the lowest expected operating temperature so that it can enter the reservoir and pump
for use. For all of these reasons, automatic transmission fluid (ATF, Dexron®) has been found to be
the best readily available fluid for the job in most
climate conditions.
2. SELECTING FLUIDS FOR APPLICATIONS OUTSIDE
ATF'S OPERATING TEMPERATURE RANGE
NOTE: Consult Energy Absorption Systems' Customer Service Department when considering and
before changing hydraulic fluid to assure compatibility with existing components.
When looking for fluids that can be used in place of
ATF or for applications where the operating temperature is outside the range of ATF, the following specifics should be discussed with your local oil distributor:
Pour Point
-37 deg. C [-35 deg. F]
Viscosity Index
Hy
draulic S
ystem
Hydraulic
System
Finding & Solving Problems
CAUTION: Repair of hydraulic components
should only be performed by fully qualified individuals or hydraulic shops. In most cases,
the customer should contact Energy Absorption Systems' Customer Service Department for
advice on repair or replacement of TMA parts.
All replacement components must be approved
for use or provided by Energy Absorption Systems to guarantee quality and correctness.
Hydraulic system failures can occur in several ways:
A gradual or sudden loss of pressure or flow, a loss
of power at the pump, or other difficulties. Any of
the system's components could be the cause. Start
with the checklist below that most applies to the
symptom at hand.
B. The Pour Point must be below the lowest anticipated temperature that will be encountered.
D. The viscosity (SUS) should lie between 80 and
375 in the operating range, with the ideal viscosity near 200 SUS.
E. The viscosity index should be as high as possible. As an example, ATF has the following specs
as listed by most oil manufacturers:
[1] Viscosity (SUS)
37 deg. C [100 def. F]
185 to 205
99 deg. C [210 deg. F]
45 to 55
145 to 165
Note: In a cold weather emergency application only,
SAE 10W non-detergent oil can be mixed by volume with no more than 30% #1 fuel oil or kerosene.
A. Fluid must be compatible with Buna-N sealing
compounds.
C. It should contain Rust or Oxidation inhibitors as
well as other detergent type inhibitors.
-44 deg. C [-45 deg. F]
Note: Avoid the use of Teflon tape on hydraulic
fittings as it can easily jam valves and cause failures in the hydraulic system.
1. MOTOR DOES NOT START
•
Improper ground. Check ground connections.
•
Improper or low voltage supply. Check voltave supply from truck power.
•
Electrical system inoperative: Verify that cable from
battery is correctly attached.
•
Failed motor solenoid: Replace, taking note of correct wire locations for reassembly. (Call first)
35
Safe-Stop® 180 TMA
Troubleshooting Guide (cont'd.)
2. SYSTEM OPERATES ROUGH or ERRATIC
•
Worn components (valves, cylinders, etc.): Check
for cause of wear. Replace worn parts with correct
components.
Restriction in lines or cylinder check valves: Remove
the load on cylinders, clean lines or valves, replace
hoses if necessary.
•
Insufficient or no oil in system, pump losing prime:
Fill system, check for leaks.
•
Ground fault: Check for loose wire leads, verify that
pump is securely mounted to TMA frame and that
the truck lighting plug is correctly attached.
•
•
Wrong oil in system (should be Dexron® II or III):
Change oil.
4. SYSTEM OPERATES TOO FAST
•
Clogged or dirty cylinder check valve: Remove the
load on cylinders, disassemble cylinder check valve
and clean (see section on Cylinder Check Valves).
•
Oil line restricted, line dirty or collapsed: Clean or
replace oil line.
•
Dirty pump: Clean exterior and check for contaminated oil. If necessary, drain, flush, and refill system
with approved oil.
•
•
•
Worn components (valves, cylinders, etc.): Check
for cause of wear. Replace worn parts with correct components.
Leakage: Check all components, verify tightness of
fittings, and inspect hoses for wear while system is
idle. Replace damaged hoses or fittings.
Excessive loading (especially any features not originally installed by Energy Absorption Systems): Remove excessive load.
3. SYSTEM OPERATES SLOWLY or CAVITATES
•
Low voltage: Verify voltages with D.C. voltmeter and
check truck charging system.
•
Internal fixed flow controls
Contact Energy Absorption Systems.
reversed:
5. PUMP OVERHEATS
•
Incorrect, low volume, or dirty oil: Add or change oil
as necessary.
•
Excessive internal leakage (pump): Replace the pump
(contact Energy Absorption Systems).
•
Restriction in lines or cylinder check valves: Remove
the load on cylinders, clean lines or valves, replace
hoses if necessary.
•
Insufficient heat radiation: Clean dirt and mud from
reservoir and components.
6. NOISY PUMP
•
Low oil level, incorrect or foamy oil: Replace or add
oil as necessary.
•
Suction line or inlet screen plugged: Consult Energy
Absorption Systems.
•
Worn or damaged pump: Replace the pump (contact
Energy Absorption Systems).
7. LOAD DROPS WHEN SYSTEM IS LOCKED
•
Oil viscosity too high or cold oil: Allow oil to warm
up before operating or replace with oil intended for
correct operating temperature range.
•
Leaking cylinder seals or fittings: Remove the load
on cylinders, inspect for damaged hoses or fittings,
tighten fittings or replace hoses if necessary.
•
Low oil level: Check reservoir and add oil as necessary.
•
•
Air in system: Check for leaks and tighten as necessary. Cycle the system several times to relieve air
from system.
Faulty counter balance valve: Remove the load on
cylinders. Clean or replace the appropriate counter
balance valve components.
8. LEAKY CYLINDER(S)
•
Oil leaks: Tighten fittings, replace seals or damaged
lines.
36
•
Seals worn or damaged: Replace the cylinder.
•
Rod damaged: Replace the cylinder.
Pressure Relief Val
ve
alv
Counter Balance Val
ve
alv
1. PURPOSE:
1. PURPOSE
A. Limit the maximum pressure in the hydraulic system to a safe level.
B. Keep the motor amperage (and battery drain) at
a minimum when the cylinders dead head (reach
full stroke).
The counter balance valve allows free flow of hydraulic oil into and out of the cylinders, but blocks the
flow when there is no pump pressure. The counter
balance valve locks the system when the pump is
not running.
2. ADJUSTING RELIEF VALVE (on the pump)
WARNING!
Note: In general, do not adjust the relief valve. It is
set to the correct operating pressure at the factory.
When the system is stopped at an intermediate angle,
there will be pressure on the oil in the hoses between
the counter balance valve and cylinders! This pressure
is supporting the load of the folding bay! ALWAYS make
sure the TMA is completely folded or completely
unfolded before loosening a hose fitting or servicing
any check valve! This will minimize the chance of injury
from an uncontrolled falling load, or spray of highpressure oil.
A. Symptoms of incorrect pressure relief adjustment
1. Relief pressure too high
a. Battery current draw is excessive.
b. Motor RPM is slow.
2. Relief pressure too low.
a. Motor RPM is fast.
b. System will not fold (cylinders will not
extend).
c. Excessive turbulence in reservoir.
Note: On applications where a hydraulic component is being replaced, contact Energy Absorption
Systems' Customer Service Department to verify
component compatibility.
WARNING!
Do not exceed pressure rating for hydraulic system
components! System pressure is set to 2200 psi at
the factory.
2. REPAIRING COUNTER BALANCE VALVE
A. Symptoms
If the TMA exhibits a slow drifting of the folding bay when the pump is not running, one of
the following may be true:
1. The counter balance valve has become
blocked by foreign debris in the oil line.
2. The piston ring seals inside the cylinders have
been compromised.
B. Repair procedure
1. Blocked cartridge
a. Again, make sure the system is completely folded or completely unfolded.
b. Remove the cartridges from the valve
body, being cautious of oil spray from
residual pressure in the system.
37
Safe-Stop® 180 TMA
Troubleshooting Guide (cont'd.)
c. Clean the cartridge using compressed
air, making sure to direct the air away
from anyone's face. Avoid breathing the
oil mist that this process may create.
d. Reinstall the cartridge as they were before disassembly.
2. Piston ring seal
a. Refer to the following section on Hydraulic Cylinders.
Note: If the cartridge valve has failed in some other
way, do not attempt to repair it. Replace it with a
new valve by contacting Energy Absorption Systems' Customer Service Department.
Hy
draulic C
ylinder
s
Hydraulic
Cylinder
ylinders
Caution: Never allow anyone underneath the
moving portion of the Safe-Stop 180 TMA.
Block out all loads and disconnect electrical
contacts prior to performing any service on
hydraulic equipment.
1. TROUBLESHOOTING
If you suspect problems with the hydraulic cylinders on
the TMA, you may need to remove the cylinders from the
TMA for repair or replacement. The cylinders can only
be removed when the TMA is completely folded. Double
check that all electrical contacts between the TMA and
support vehicle have been disconnected prior to performing any work on the hydraulic system.
A cracked, bent, or leaky cylinder may need repair, but
should almost always be replaced to ensure proper, reliable performance.
38
2. CYLINDER REPLACEMENT
A. Completely fold the TMA.
B. Unplug all electrical connections between the
TMA and the support vehicle.
C. See TMA drawing 3526806-0000. Loosen (but
do not disconnect) the "Follower Link Pivot" and
the "Push Link Pivot" where they are bolted to
the "Weldment, Front Intermediate Frame" and
the "Weldment, Rear Intermediate Frame", respectively.
D. At the top end of the cylinder rod, loosen the set
screw and push out the short 1" diameter pin,
making note of the alignment and location of all
linkage components for later reassembly.
E. Disconnect the hoses leading into the cylinder at
two convenient locations, and place temporary
caps on the hoses or cylinder ports to prevent
spillage or contamination.
F.
At the bottom end of the cylinder body, remove
the set screw from the frame and push out the
long 1" diameter pin, making note of the alignment and location of all components for later
reassembly.
G. The cylinder should now be free. Reinstall a new
cylinder in the reverse order of these removal
steps, making sure to properly align and (where
necessary) tighten all components. Use blue
thread locker (medium strength) on all fasteners.
Note: See the section on Hydraulic System Priming. You will likely need to prime the system if you
are installing a new or "dry" cylinder.
3. REPAIRING CYLINDERS
Replace any faulty or damaged cylinders with a new cylinder.
Hy
draulic S
ystem P
riming
Hydraulic
System
Priming
Safe-Stop® 180 TMA hydraulic systems come direct from
the factory primed and ready to operate. Priming should
only be necessary after changing the oil or if you have
recently repaired a leak.
2. CHECK FOR THESE PROBLEMS WHEN A SYSTEM
FAILS TO PRIME:
•
Correct pump mounting, with the motor on top
and reservoir at the bottom. All Safe-Stop 180
TMAs should have vertically mounted pumps.
Mounting a pump in some other orientation
would prevent the suction line from picking up
oil, causing cavitation. NOTE: Vertical mount
pumps have a label stating such designation.
•
A solid plug in the reservoir filler port instead of
a vent plug (see Reservoir section).
1. PRIMING PROCESS
Systems that have been disassembled for repair require priming for proper performance. The hydraulic system is said to be primed when all hoses & the
cylinders are full of oil, and the air has been expelled.
The reservoir should be full of oil (oil just visible at
the filler port) when the TMA is UNFOLDED. Prime
the pump as follows:
A. Detach the long hoses where they connect to the
cylinder. Note which hoses connect to the top
and bottom of the cylinder.
B. Jog the pump by briefly depressing the "FOLD"
button until clean oil flows from two of the hoses.
C. Repeat this process for the other two hoses by
briefly depressing the "UNFOLD" button.
D. Replace and retighten all four hoses.
CAUTION: Do not completely fold or unfold the
TMA until it has been jogged a few times to
work out any air in the system. Add oil at the
filler port any time that the pump begins to
cavitate.
E. Jog the system a few times by depressing "FOLD"
or "UNFOLD" (depending on the current state of
the TMA).
Reser
voir
Reserv
Note: Do not use a solid plug or fill cap without a
filter/breather element, or damage will be caused
to the pump and/or reservoir.
1. USE RECOMMENDED FLUID:
Fill reservoir with Dexron® III or ATF (See Hydraulic
Fluid section).
2. PROPER FILLING:
A. With the TMA UNFOLDED (cylinders fully retracted), fill the reservoir so that oil can just be
seen in the filler port.
B. Operate the unit several times starting with short
cylinder strokes, increasing the length of each
successive stroke.
C. Recheck oil level often and add as necessary to
keep the pump from picking up air.
D. Reinstall the filter/breather plug provided.
39
Safe-Stop® 180 TMA
Troubleshooting Guide (cont'd.)
3. RESERVOIR PROBLEMS
A. Clear oil flowing out of the filler port usually means
the reservoir was completely filled before the cylinders were fully collapsed (TMA unfolded).
B. Foamy oil flowing out of the filler port points to
one of the following:
1. Air present in the system; the response is
usually spongy, or the cylinders may move
with a jerking motion.
2. There is no drop tube or "down spout" on the
return line so that the oil is not returning to
the bottom of the reservoir.
C. Water in the oil:
Water can enter the reservoir through the filler
port if the unit is left outdoors or washed with a
high-pressure washer. Protect the unit, whenever possible, and change the oil if you suspect
contamination. In cold weather the water could
freeze, preventing the pump from working until
the ice melts.
Electrical P
Prroblems
WARNING!
REMOVE ALL RINGS, WATCHES, JEWELRY, ETC.
PROIOR TO DOING ANY ELECTRICAL WORK!
1. LOW VOLTAGE
Operating D.C. (direct current) power units efficiently
requires proper voltage. Any attempt to operate below the minimum required voltage could cause system failure.
A. Signs that point to low voltage are:
1. Motor won't run because solenoid won't
shift.
2. Motor running at reduced speed.
40
B. Minimum voltage requirements:
1. Between the motor stud and ground: 9.0 volts
at max. load.
C. Causes for low voltages are:
1. Improper ground. Check grounds.
2. Battery capacity too small.
3. Cable ends not electrically secure to battery
cable.
4. Battery cable size too small for load and
length of run. Copper #4 automotive battery
cable is the recommended min. size. Larger
copper battery cable (#2, #1, #0, or #00) may
be required for cable lengths over 30 feet to
keep performance from deteriorating.
5. The pump ground is established through the
battery ground cable. Clean any dirt or rust
from cable to achieve proper ground.
6. Burnt contacts on motor solenoid.
D. Check for low voltage as follows (requires a voltmeter):
1. On alternator equipped vehicles, verify that
the battery voltage is approximately 13.5
volts with no electrical accessories operating and the engine running.
2. Operate the TMA while an assistant uses the
voltmeter to probe each connection, cable
end, and cable from the battery all the way
back to the motor stud. Note the voltage
losses. Make necessary repairs. Increase
the voltage above the minimum as required.
Note: Check the ground connections as well; remove any paint, rust, and dirt that may be acting
as insulators.
2. D.C. MOTORS
Before concluding that the hydraulic pump is malfunctioning:
•
Verify that all connections are secure and that
the problem does not lie somewhere else.
•
Check ground.
•
Check brushes for wear, and replace if necessary.
Note: A motor that does not turn in freezing weather
could be caused by frozen water in the oil.
If it has been verified that the pump is defective, contact Energy Absorption Systems' Customer Service
Department for assistance.
3. ELECTRICAL SWITCHES
A. If you suspect that a switch is defective, use one
of these three methods to test the operation of
the switch:
4. The small post on each solenoid connects to
the control circuit on one side and the other
small post connects to ground. This circuit
activates the solenoid (and hence the pump)
when energized.
4. ELECTRICAL POLARITY
The pump motor and all controls have a negative
ground.
5. ELECTRICAL SHORTS OR OPEN CIRCUITS
A. Shorts occur when wires with power come in
contact with a ground. A short will cause a fuse
to blow or a wire to burn. Look for pinched or
cut wires.
B. An open circuit is simply a break which prohibits
current flow. Look for pinched or cut wires.
1. First check grounds.
2. Use a continuity light to test the switch (see
Test Equipment section).
3. Use a circuit test light to test the switch (see
Test Equipment section).
B. Motor solenoid switches:
The solenoid switches found on the hydraulic
pump are four post style solenoid. They should
be constructed and wired such that:
1. The large posts with the connecting bar must
be attached to the cable from the battery.
2. The same post (shared hot lead) provides
power to the control circuit.
3. The remaining large posts attach to the motor wires.
41
Safe-Stop® 180 TMA
42
43
44
5
SEE NOTE 1
4
3 SEE NOTE 2
NOTES:
1. LOCATE AND TIGHTEN ITEMS 3 APPROXIMATELY AS SHOWN TO SECURE HYDRAULIC AND ELECRIECAL
LINES TO THE SUPPORT FRAME. ALLOW HOSES/CABLES TO LOOP AT ALL PIVOT POINTS.
2. DRILL HOLE IN IMPACT FRAME TO SECURE BAR LIGHT CABLE.
3. SECURE ANY LOOSE CABLES OR HOSES WITH REMAINING CABLE TIES, ITEM 3.
4. ITEM 5 MAY BE PLACE ON EITHER SIDE. IF PLACED ON THE LEFT SIDE, ROUTE CABLE THROUGH
STRUCTUAL TUBING WITH HYDRAULIC HOSES. IF PLACED ON THE RIGHT SIDE LOOP AND SECURE
EXCESS CABLE WITH ITEM 3.
SEE NOTE 4
SCALE 1 / 10
2 PLACES
DETAIL A
2
Revisions
A
SEE NOTE 1
TMA9182LC
NEXT ASSEMBLY:
SEE PARTS LIST
MATERIAL:
PCN
Date Rev By Chk. App. Q.C.
2
3
4
2795281-0000
3
5
9/30/2004
DATE:
9/29/2004
DATE:
10/8/2004
DATE:
6/1/2004
DATE:
9/13/2004
DATE:
A
2755223-0000
2705101-0000
3526800-0000
4
352682A-0000
2
SCALE:
STOCK NO.
1
ITEM
3526820-0000
FILE:
S. Trageser
Q.C.
A. Cox
APPROVED:
J. Espinoza
CHECKED:
R. Brougher
DESIGNED:
D. Hayes Jr.
DRAWN:
1
2
UNLESS OTHERWISE SPECIFIED
TOL ANGULAR: C1a
TOL LINEAR:
C 1/16"
1/2"
ASSEMBLY NO. 3526820-0000
SCALE 1 / 10
DETAIL B
4"
3526820-0000
DRAWING:
SHEET:
1
of
1
SUPPORT FRAME ASSY,9182
Q1/4"
2
REV
-
1
1:15
B
4
SWITCH ASSY,CONTROL,9182
1
TIE,NYLON,3/16X8
RIVET,ST,SD612BS,3/16X3/4,DH
1
22
LIGHTING/WIRING ASSY,TMA 9182
QTY.
SUPPORT FRAME PREASSY,9182
DESCRIPTION
PARTS LIST
Safe-Stop® 180 TMA
45
12
NOTES:
1. SEE SHEET 2 FOR INSTALLATION DETAILS.
2. ELECTRICAL WIRES FROM ITEM 1 OMITTED FOR CLARITY.
3
1
10
10
2
ADD # 12
Revisions
8
7
352682A-0000
NEXT ASSEMBLY:
4
6
9
4
SEE PARTS LIST
MATERIAL:
Date Rev By Chk. App. Q.C.
1989 4/22/05 A DPH JME RCB STT
PCN
11
9
5
9
2715316-0100
2699141-0100
2708003-0100
2704153-0100
2703003-0140
2715329-0000
2715319-0000
2715335-0100
5
6
7
8
9
10
11
12
SCALE:
HOSE ASSY,HYDRAULIC,M/F ENDS,140
2703004-0100
4
9/27/2004
DATE:
9/24/2004
DATE:
10/7/2004
DATE:
6/1/2004
DATE:
8/18/2004
DATE:
NUT,HX,NYLON LOCK,1/4,P
2715315-0100
1:8
3526806-0000
DRAWING:
SHEET:
1
of
HYDRAULIC ASSY,9182
ASSEMBLY NO. 3526806-0000
ELBOW,#4M-JIC X #4F-JIC-S,P
HOSE ASSY,HYDRAULIC,16, CYL TOP
HOSE ASSY,HYDR,30,PUMP SUP
WASHER,FLAT,1/4X5/8,P
BOLT,HX,1/4X1 3/4,G2,P
TEE,#4 M-JIC,P
ELBOW,#4 M-JICX#6 M-ORB,P
COUPLING,#4 MORB X #4 MJIC,P
2703001-0000
VALVE,HYDRAULIC,COUNTER BALANCE
HYDRAULIC PUMP ASSY,9182
DESCRIPTION
PARTS LIST
3
3526807-0000
STOCK NO.
2
1
ITEM
3526806-0000
FILE:
S. Trageser
Q.C.
R. Brougher
APPROVED:
J. Espinoza
CHECKED:
R. Brougher
DESIGNED:
D. Hayes Jr.
DRAWN:
11
9
UNLESS OTHERWISE SPECIFIED
TOL ANGULAR: C1a
TOL LINEAR:
C 1/16"
2
REV
A
2
2
2
4
2
2
2
2
4
2
1
1
QTY.
46
1
11
11
2
4
5
6
9
NOTES:
1. HOSES TO BE ROUTED AS SHOWN.
2. PRESET COUNTERBALANCE VALVE (ITEM 2):
A) C1, V1 - SCREW ALL THE WAY OUT, TURN IN 1 7/8 TURNS.
B) C2, V2 - SCREW ALL THE WAY OUT.
3. SUPPORT FRAME & ELECTICAL WIRES FROM ITEM 1 OMITED FOR CLARITY.
3
9
7
8
10
SEE SHEET 1
Revisions
9
9
Date Rev By Chk. App. Q.C.
1989 4/22/05 A DPH JME RCB STT
PCN
3526806-0000
FILE:
S. Trageser
Q.C.
R. Brougher
APPROVED:
J. Espinoza
CHECKED:
R. Brougher
DESIGNED:
D. Hayes Jr.
DRAWN:
9/27/2004
DATE:
9/24/2004
DATE:
10/7/2004
DATE:
6/1/2004
DATE:
8/18/2004
DATE:
2
10
1
SCALE:
1:12
EXTEND
RET.
V1
9
C2
V2
DN
EXTEND
RET.
11
3526806-0000
DRAWING:
SHEET:
2
of
HYDRAULIC ASSY,9182
ASSEMBLY NO. 3526806-0000
C1
UP
2
REV
A
Safe-Stop® 180 TMA
47
NOTES:
1. CABLES AND WIRES NOT SHOWN FOR CLARITY.
2. DIMENSIONS ARE IN INCHES UNLESS OTHERWISE SPECIFIED.
14
3
16
11
5
14
R. Brougher
APPROVED:
J. Espinoza
CHECKED:
R. Brougher
DESIGNED:
R. Cummins
DRAWN:
12
15
5
Date Rev By Chk. App. Q.C.
3
13
7
6
4
1
2
1
1
1
2
4
6
BOLT,HX,5/16X3/4,G2,P
WASHER,FLAT,5/16 X 11/16,P
WASHER,LOCK,5/16,P
NUT,HX,5/16,P
PUMP,MARINE GD,VERT,12V
NUT,HX,LOCK,3/8,GC,P
SCREW,SOCKET HD,10-32X1,S
WRAP,SHRINK,1/4
2700971-0100
2708131-0100
2708171-0100
2704081-0100
2723671-0000
2704243-0100
2706812-0300
2020961-0000
10
11
12
13
14
15
16
19
9/30/2004
DATE:
9/30/2004
DATE:
10/8/2004
DATE:
5/31/2004
DATE:
9/20/2004
DATE:
SCALE:
1:3
ASSEMBLY NO. 3526807-0000
10
-
3526807-0000
DRAWING:
SHEET:
1
of
1
HYDRAULIC PUMP ASSY, 9182
POWER CABLE GROUND WIRE
BLACK
2
B
4
NUT,HX,#10-32,S
2704861-0300
9
REV
2
WASHER,LOCK,#10,S
2708601-0300
8
(3526800-0000)
2
BOLT,HX,3/8X3,G2,P
2701311-0100
7
B
4
WASHER,LOCK,3/8,P
2708041-0100
6
+
2
WASHER,FLAT,3/8X1,P
2708021-0100
5
19
1
BOLT,HX,3/8X3/4,G
2701020-0000
4
P
1
BRACKET,PUMP,TMA 9182,PT
2715401-0000
3
(3526808-0000)
1
QTY.
BUZZER,6-28V,80-95DB
2757857-0000
2
DESCRIPTION
PARTS LIST
ELECTRICAL BOX,HYDRAULIC PUMP
STOCK NO.
3526808-0000
1
ITEM
3526807-0000
FILE:
Q.C.
1951 1/19/05 B RGC JME RCB STT S. Trageser
PCN
4
1945 12/13/04 A DPH JME RCB STT
2
8
UNLESS OTHERWISE SPECIFIED
TOL ANGULAR: C1a
TOL LINEAR:
C 1/16"
DELETE ITEMS 17 & 18
11
9
SEE PARTS LIST
MATERIAL:
GREEN
WHITE WIRE WAS BLUE
Revisions
1
10
3526806-0000
BLUE
NEXT ASSEMBLY:
WHITE
GREEN
BLACK
48
4
5
12
13
7
9
NOTES:
1. ITEM 5 (2724902-0000) TO BE PLUGGED INTO ITEM 6 (2724903-0000).
2. ITEMS 5, 8, 12, & 13 ARE TO BE LOCATED ON THE SAME SIDE AS DRAIN HOLE IN ITEM 1.
8
9
R. Brougher
APPROVED:
J. Espinoza
CHECKED:
R. Brougher
DESIGNED:
D. Hayes Jr.
DRAWN:
2757006-0000
2755157-0000
2724902-0000
2724903-0000
2755219-0000
2755222-0000
2755217-0000
2755231-0000
2755112-0000
2755113-0000
3
4
5
6
7
8
9
11
12
13
10/8/2004
DATE:
10/8/2004
DATE:
10/8/2004
DATE:
5/31/2004
DATE:
9/17/2004
DATE:
2705181-0000
2
SCALE:
STOCK NO.
2755224-0000
1
ITEM
3526808-0000
FILE:
Q.C.
1951 1/19/05 B RGC JME RCB STT S. Trageser
Date Rev By Chk. App. Q.C.
4
3
ITEM 5 WAS 2724120-0000 & ITEM 6 WAS 2724123-0000
PCN
1
11
UNLESS OTHERWISE SPECIFIED
TOL ANGULAR: C1a
TOL LINEAR:
C 1/16"
1945 12/13/04 A DPH JME RCB STT
SEE PARTS LIST
MATERIAL:
DELETED ITEM 10,ADDED ITEMS 12 & 13
Revisions
3526807-0000
NEXT ASSEMBLY:
3
DESCRIPTION
PARTS LIST
1:3
3526808-0000
DRAWING:
SHEET:
1
of
1
REV
ELECTRICAL BOX,HYDRAULIC PUMP
ASSEMBLY NO. 3526808-0000
1
2
WIRE,WHITE,PUMP,CONN
WIRE,GREEN,PUMP,CONN
SOLENOID,MOTOR STARTER, PUMP,12V
CABLE W/PLUG,BOX,9182
CABLE,BUZZER & GROUND,9182
JUMPER,16 GA,W/CONNECTORS
CABLE,BATTERY,4 GA,25FT,QUECK END
CABLE,POWER,4FT,QUICK END
CONNECTION,PUMP SOLENOID
RELIEF,STRAIN,M-PRF,.39-.56,1/2 NPT
RIVET,MONOBOLT,1/4
ENCLOSURE,COMPACT,NEMA 4X,9 HOLES
B
1
1
2
2
1
1
1
1
1
4
4
1
QTY.
Safe-Stop® 180 TMA
49
50
A
B
9/12/02
11/19/02
5/16/05
REMOVED ITEMS 4 & 13
UPDATED BACKUP
UPDATED ITEM 2
C
Rev
Date
Revision
RGC JME RCB
DK JME AAP
DK STT AAP
By Chk. App.
NOTES:
1. USE ITEMS 11 & 12 AS REQUIRED TO ACHIEVE PROPER SYSTEM
GROUND CLEARANCE.
2. IF INTERFERENCE OCCURS WHILE INSTALLING BOLT, ITEM 7,
OMIT WASHER, ITEM 10.
3
3
7
3
10
11
SEE NOTE 1
1
SEE NOTE 2
12
10
NEXT ASSEMBLY:
TMA9180
3526087-0000.idw
FILE:
A. Porterfield
APPROVED:
JME
CHECKED:
A. Porterfield
DESIGNED:
D. Kohfeld
DRAWN:
SEE NOTE 2
3
9
8/23/2002
DATE:
8/23/2002
DATE:
8/11/2002
DATE:
8/22/2002
DATE:
8
7
10
2751752-0000
2751753-0000
2699541-0100
5
6
7
2508031-0000
2508251-0000
11
12
SCALE:
9
8
LEFT SUPPORT MOUNT
(273336L-0000)
10
ASSEMBLY NO. 3526087-0000
5
3526087-0000
DRAWING:
SHEET:
1
of
1
REV
ATTACHMENT ASSEMBLY,TMA 9180
6
SHIM,12 GA X5X10,PT
SHIM,1/4X5X10,PT
1=10
RIGHT SUPPORT MOUNT
(273336R-0000)
5
6
2708191-0000
2
WASHER, LOCK, 1, G
2708241-0000
9
10
WASHER, FLAT, 1 x 2 1/2, G
NUT, HEX, 1, G8, P
BOLT, HX, 1X3 1/2, G8, P
FLT ST 1/2X2 1/2X3 1/4,W/HOLE,PT
FLT ST 1/2X3 1/4X3 1/4,W/HOLE,PT
PIN, HITCH, 1 1/4 x 7, P, w/HAIRPIN COTTER
BRACKET,SUPPORT,LEFT,TMA 9180,PT
BRACKET,SUPPORT,RIGHT,TMA9180,PT
DESCRIPTION
PARTS LIST
2704161-0400
8
2702222-0100
2751754-0000
2
3
2751755-0000
STOCK NO.
1
ITEM
C
8
8
16
8
8
8
2
2
2
1
1
QTY.
Safe-Stop® 180 TMA
51
15
A
11
37
43
7
8
Revisions
3
10
11
13
5
49
6
2724106-0000
2724242-0000
2702541-0100
12
13
14
1
12
F
R. Brougher
#44 QTY WAS 19.3
2008 6/3/05
C DPH JME RCB STT
ADDED #49 & DETAIL F,#13 WAS 2724128-0000
2750089-0000
2725381-0000
2735711-0000
2735712-3200
2750471-0000
2750661-0000
2735512-0000
37
38
39
40
41
42
43
2704011-0100
35
2715011-0000
2704031-0100
34
36
2704008-0100
33
DECAL,SAFESTOP 9182,APPROVED OPT TESTS
DECAL,WARNING,HANDS/FEET CLEAR
DECAL,USE ENERGY REPLACEMENT PARTS
DECAL,PRODUCT,SAFE-STOP 180 TMA
DECAL,CAUTION,ALL PRODUCTS
DECAL,CAUTION,STAY CLEAR
DECAL,RELEASE CABLE TORQUE,9180
GREASE FITTING,1/4-28,STR
NUT,HX,1/2,P
NUT,HX,3/8,P
NUT,HX,NYLON LOCK,3/8,P
NUT,HX,NYLON LOCK,1/4,P
WASHER,FLAT,1/2X1 3/8,P
WASHER,LOCK,1/2,P
WASHER,FLAT,3/8 ID X13/16 OD,P,HRD
WASHER,LOCK,3/8,P
WASHER,FLAT,1/4X5/8,P
BOLT,HX,1/2X1 1/4,G5,P
BOLT,HX,1/2X2 3/4,G2,P
BOLT,HX,1/2X6,G5,P
BOLT,HX,3/8X3,G2,P
BOLT,HX,3/8X1,G5,P
BOLT,HX,1/4X2 3/4,G5,P
WASHER,FLAT,1 1/4 ID X 2 3/4 OD,G
SPACER 1/4X1X2 1/4,W/HOLES,PT
BUMPER,RUBBER,3 1/8X5X3.5H,2 HOLES
SPACER 1/2X3X4 1/2,W/HOLES,PT
PIN,HITCH,1 1/4 OD X7,W/OUT HANDLE,P
PIN,COTTER,3/16X1 1/2,P
PIN,CLEVIS,1X3 1/2,P
JACK BRACKET ASSY,SQ,9182
GUARD/SWITCH MOUNT,9182,PT
CABLE,5/16X100,5/8 STUDS
HYDRAULIC CYLINDER ASSY,9182
HYDRAULIC ASSY,9182
ARM,REAR,W/MOUNT,9182,PT
ARM,FRONT,W/MOUNT,9182,PT
ARM,REAR,9182,PT
ARM,FRONT,9182,PT
IMPACT FRAME,9181,PT
WELDMENT,REAR INT FRAME,9181,PT
WELDMENT,FRONT INT FRAME,9182,PT
BACKUP,TMA 9182,PT
DESCRIPTION
PARTS LIST
9/30/2004
DATE:
9/30/2004
DATE:
10/8/2004
DATE:
6/1/2004
DATE:
9/10/2004
DATE:
SCALE:
1:25
352682A-0000
DRAWING:
SHEET:
1
of
3
SUPPORT FRAME PREASSY,9182
ASSEMBLY NO. 352682A-0000
44
2712272-0000
TAPE,REFLECTIVE,1 1/2 RED/WHITE
(PARTS LIST CONTINUED ON SHEET 2)
352682A-0000
FILE:
Q.C.
1972 3/28/05 B DPH RCB AJC STT S. Trageser
R. Brougher
APPROVED:
J. Espinoza
CHECKED:
1936 11/30/04 A RGC JME RCB STT
Date Rev By Chk. App. Q.C.
D. Hayes Jr.
DRAWN:
DESIGNED:
ADDED ITEMS 45,46,47 & 48
PCN
SCALE 1 / 10
4 PLACES
DETAIL F
2708041-0100
28
2704153-0100
2708003-0100
27
2708011-0100
2699008-0100
26
32
2699010-0100
25
31
2701374-0100
24
2708181-0100
2701311-0100
23
30
2699100-0100
22
2708022-0100
2701112-0100
21
29
2708733-0000
20
2751760-0000
2021487-0000
18
19
2751761-0000
17
2715402-0100
2742340-0000
11
3526805-0000
16
SEE NOTE 3
23" 44
3526806-0000
9
2724102-0000
6
10
2724100-0000
5
2724103-0000
2751814-0000
4
8
2724114-0000
3
2724101-0000
2724108-0000
2
7
2724104-0000
STOCK NO.
1
ITEM
SCALE 1 / 10
10
4
UNLESS OTHERWISE SPECIFIED
TOL ANGULAR: C1a
TOL LINEAR:
C 1/16"
2702151-0100
2
23" 44
SEE PARTS LIST
MATERIAL:
15
37
6
38
3526820-0000
NEXT ASSEMBLY:
DETAIL A
5
NOTES:
1. LOCATE ALL DECALS AND REFLECTIVE AS SHOWN. LENGTH OF ITEM 44 IS INDICATED NEXT TO EACH
ITEM CALLOUT. SEE SHEETS 2 & 3 FOR ADDITIONAL DECAL AND TAPE PLACEMENT.
2. SEE SHEET 2 FOR ADDITIONAL DECAL DETAILS OF BACKUP AND INTERMIDIATE FRAME DETAILS.
3. AFTER ASSEMBLY FILL AXLE SLEEVES WITH STANDARD BEARING GRASE UNTIL GREASE IS VISIBLE
AT ENDS OF SLEEVE.
4, HYDRAULIC HOSES AND ELECTRICAL WIRES FROM ITEM 9 NOT SHOWN FOR CLARITY.
9
14
37
43
REV
C
17.3
2
2
3
1
1
2
4
2
8
4
2
2
4
12
6
12
4
4
4
4
4
10
2
2
2
4
2
2
24
24
4
2
4
2
1
2
2
2
2
1
1
1
1
QTY.
52
34
46
9
47
23
29
24
39
18
B
40
17
1
BACKUP DETAIL
SCALE 1 / 6
DETAIL B
41
G
35
26
48
E
47
PCN
46
2
44 14"
44 18"
R. Brougher
APPROVED:
J. Espinoza
CHECKED:
R. Brougher
DESIGNED:
D. Hayes Jr.
DRAWN:
44 14"
44 17"
Date Rev By Chk. App. Q.C.
44 14"
10
#44 LENGTH 17 WAS 29
2008 6/3/05
C DPH JME RCB STT
C
9/30/2004
DATE:
9/30/2004
DATE:
10/8/2004
DATE:
6/1/2004
DATE:
9/10/2004
DATE:
DESCRIPTION
PARTS LIST
19
44 49.5"
3
22
27
33
21
10
29
44 17"
DECAL,JACK PLACEMENT
20
32
44 18"
27
DECAL,CAUTION,SWITCH LIGHT,TMA9182
DECAL,SWITCH,FOLD,SAFESTOP 180
DECAL,SWITCH,UNFOLD,SAFESTOP 180
FLT ST 1/8X2X2,W/HOLES,PT
22
28
SCALE:
1:12
352682A-0000
DRAWING:
SHEET:
2
of
3
SUPPORT FRAME PREASSY,9182
ASSEMBLY NO. 352682A-0000
REV
INTERMEDIATE FRAME/HYDRAULIC DETAIL
2750202-0000
49
D
2735510-0000
2735017-0000
47
48
2735018-0000
46
STOCK NO.
2723008-0000
45
ITEM
352682A-0000
FILE:
Q.C.
ADDED #49 & DETAIL G
15
14
30
30
36
SCALE 1 / 6
DETAIL D
16
1972 3/28/05 B DPH RCB AJC STT S. Trageser
35
31
SCALE 1 / 6
DETAIL C
42
42
1936 11/30/04 A RGC JME RCB STT
Revisions
18
30
49
ADDED ITEMS 45,46,47 & 48
25
SCALE 1 / 6
2 PLACES
DETAIL G
NOTES:
1. LOCATE REFLECTIVE, ITEM 44, AS SHOWN. LENGTH ITEM 44 USED IS INDICATED NEXT TO CALLOUT.
2. APPLY ALL DECALS APPROXIMATELY AS SHOWN.
3. APPLY THREAD LOCKER (LOCTITE 242, 290, OR EQUIVALENT) TO ITEMS 21, 22, AND 26.
28
SCALE 1 / 6
DETAIL E
48
C
45
6
2
2
2
4
QTY.
Safe-Stop® 180 TMA
53
NOTES:
1. APPLY ALL DECALS APPROXIMATELY AS SHOWN.
FRONT ARM DETAIL
7
37
43
SEE SHEETS 1 & 2
SEE SHEETS 1 & 2
SEE SHEET 1
Revisions
8
13
Date Rev By Chk. App. Q.C.
Q.C.
R. Brougher
2008 6/3/05
C DPH JME RCB STT
352682A-0000
FILE:
1972 3/28/05 B DPH RCB AJC STT S. Trageser
1936 12/14/04 A RGC JME RCB STT
PCN
APPROVED:
J. Espinoza
CHECKED:
R. Brougher
DESIGNED:
D. Hayes Jr.
DRAWN:
9/30/2004
DATE:
9/30/2004
DATE:
10/8/2004
DATE:
6/1/2004
DATE:
9/10/2004
DATE:
SCALE:
REAR ARM DETAIL
5
38
ASSEMBLY NO. 352682A-0000
6
1:10
352682A-0000
DRAWING:
SHEET:
3
of
3
SUPPORT FRAME PREASSY,9182
37
REV
C
54
1
3
13
16
5
12
6
10
9
14
19
ADD #19 & 20,#17 QTY WAS 4,#15 QTY WAS 17
Date Rev By Chk. App. Q.C.
2
11
4
2008 6/3/05
8
2755221-0000
2021081-0000
2755413-0000
2021241-0000
2755238-0000
16
17
18
19
20
10/8/2004
DATE:
10/8/2004
DATE:
10/8/2004
DATE:
6/1/2004
DATE:
8/23/2004
DATE:
2755215-0000
15
7
2755214-0000
14
2755213-0000
9
2755210-0000
2734641-0000
8
2755212-0000
2734572-0000
7
13
3526097-0000
6
12
3526096-0000
5
2755211-0000
352681R-0000
4
11
352681L-0000
3
2755228-0000
352682R-0000
10
352682L-0000
2
SCALE:
STOCK NO.
1
ITEM
3526800-0000
FILE:
B DPH JME RCB STT S. Trageser
Q.C.
R. Brougher
APPROVED:
J. Espinoza
CHECKED:
R. Brougher
DESIGNED:
D. Hayes Jr.
DRAWN:
UNLESS OTHERWISE SPECIFIED
TOL ANGULAR: C1a
TOL LINEAR:
C 1/16"
1931 11/11/04 A DPH JME RCB STT
PCN
TO BUZZER (3526807-0000)
SEE PARTS LIST
MATERIAL:
ITEM 15 QTY WAS 16,ITEM 9 QTY WAS 4
Revisions
17
17
3526820-0000
NEXT ASSEMBLY:
N.T.S.
3526800-0000
DRAWING:
SHEET:
1
of
3
REV
LIGHTING/WIRING ASSY,TMA 9182
ASSEMBLY NO. 3526800-0000
DIODE HARNESS,LARGE CONNECTOR
WRAP,SHRINK,3/4
JUMPER,2 POLE,3/8 CENTER
WRAP,SHRINK,1/2
SWITCH W/CABLE ASSY
DIODE HARNESS
CABLE,JUMPER TO LIGHT SWITCH
CABLE ASSY,MID TO TAILLIGHT,LEFT
CABLE,TAILLIGHT RIGHT TO LEFT
CABLE,MID TO TAILLIGHT,RIGHT
SWITCH/BRACKET ASSY,9182
WIRE HARNESS W/7 PIN CONNECTOR
GROMMET,LIGHT,SIDE,#10704
LIGHT,CLEARANCE,2 1/2,R(10202R)
LIGHT BAR ASSY,ICC,TAIL,12V,9180
LIGHT BAR ASSY,ICC,MID,12V,9180
LAMP ASSY,TAIL,RIGHT,12V,9182
LAMP ASSY,TAIL,LEFT,12V,9182
LAMP ASSY,MID,RIGHT,12V,9182
LAMP ASSY,MID,LEFT,12V,9182
DESCRIPTION
PARTS LIST
B
5
8
4
10
1
12
1
1
1
1
1
1
4
4
1
1
1
1
1
1
QTY.
Safe-Stop® 180 TMA
55
SEE DETAIL A
15
352682L-0000
SCALE 1:1
DETAIL B
LEFT MID LIGHT (ITEM 1)
Revisions
ADDED #20
CHANGED SOME WIRE COLORS
Date Rev By Chk. App. Q.C.
2008 6/3/05
Q.C.
R. Brougher
APPROVED:
J. Espinoza
CHECKED:
R. Brougher
DESIGNED:
3526800-0000
FILE:
352682R-0000
10/8/2004
DATE:
10/8/2004
DATE:
10/8/2004
DATE:
6/1/2004
DATE:
8/23/2004
DATE:
SCALE:
RIGHT MID LIGHT (ITEM 2)
D. Hayes Jr.
DRAWN:
20
B DPH JME RCB STT S. Trageser
1931 11/11/04 A DPH JME RCB STT
PCN
SEE DETAIL B
ASSEMBLY NO. 3526800-0000
N.T.S.
3526800-0000
DRAWING:
SHEET:
2
of
3
REV
LIGHTING/WIRING ASSY,TMA 9182
SCALE 1:1
DETAIL A
B
SEE DETAIL B
15
SHEET 2
56
352681L-0000
LEFT TAIL LIGHT (ITEM 3)
SEE SHEETS 1 & 2
CHANGED SOME WIRE COLORS
Revisions
18
Date Rev By Chk. App. Q.C.
2008 6/3/05
Q.C.
R. Brougher
APPROVED:
352681R-0000
10/8/2004
DATE:
10/8/2004
DATE:
10/8/2004
DATE:
6/1/2004
DATE:
8/23/2004
DATE:
SCALE:
ASSEMBLY NO. 3526800-0000
3526800-0000
DRAWING:
SHEET:
3
of
3
REV
LIGHTING/WIRING ASSY,TMA 9182
N.T.S.
RIGHT TAIL LIGHT (ITEM 4)
3526800-0000
FILE:
B DPH JME RCB STT S. Trageser
1931 11/11/04 A DPH JME RCB STT
PCN
J. Espinoza
CHECKED:
R. Brougher
DESIGNED:
D. Hayes Jr.
DRAWN:
SEE DETAIL B
15
SHEET 2
18
B
Safe-Stop® 180 TMA
Quic
k Reference
Quick
Troubleshooting Guide
System operates
rough or eraratic
Page 1
Check oil level
Check oil for
contamination
See Troubleshooting Guide,
Hydraulic section
Check hydraulic
system for leaks
Check for loose
wires
Check for frame
binding
Check for worn
components
See Troubleshooting Guide,
Electrical section
Replace all worn
components
57
Safe-Stop® 180 TMA
Quic
k Reference
Quick
Troubleshooting Guide
System operates
slowly or cavitates
Check ground at
pump and battery
Check voltage to
pump
See Troubleshooting Guide,
Electrical section
Check oil level
Check for leaks
Check for worn
components
Motor does not
start
See Troubleshooting Guide,
Hydraulic section
Replace all worn
components
Check ground at
pump and battery
Check voltage to
pump
Check starter
solenoid
Check rocker
switch
58
See Troubleshooting Guide,
Electrical section
Page 2
Quic
k Reference
Quick
Troubleshooting Guide
Noisy pump
Page 3
Check oil level
Check oil for
contamination
Check hydraulic
system for leaks
See Troubleshooting Guide,
Hydraulic section
Check counter
balance valve
Check for worn
components
Replace all worn
components
59
Customer Service Department
USA
Phone 1-888-323-6374
Asia Pacific
Phone +65 6276 3398
Fax 1-312-467-1356
Fax +65 6276 6218
Europe
Phone +44-1473-221-105
Fax +44-1473-221-106
Distributed by:
Boylan Group,
Head Office: Ste 7, 3rd Floor,
448
Pacific
Highway
35 East
Wacker
Dr., 11th Floor
Artarmon
Chicago, IL2064
60601-2076
Engineering and Manufacturing Facilities:
Rocklin, California and Pell
City,9425
Alabama
www.boylan.net.au
(02)
3000
ENERGY ABSORPTION
SYSTEMS, INC.
Rev. 3/13/06
A Quixote Company
Saving Lives By Design
http://www.energyabsorption.com/
Part No. 2750986-0000
© 2005 Energy Absorption Systems, Inc.