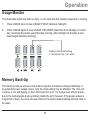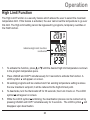
1
Owners Manual HTC621W 7-Day Programmable Thermostat 3600W HTC625W 7-Day Programmable Thermostat 4000W HTC627-347W 7213110100R06 7-Day Programmable Thermostat 5200W Congratulations on your purchase of this Dimplex line-voltage thermostat. Your new thermostat is preprogrammed by the installer and ready to use. Please take the time to read and understand this manual so you can begin to enjoy the convenience this product offers. Features • CSA C828 Performance Certified • 7 day programming with 4 settings per day • High Power up to 4000W (HTC625W) or 5200W (HTC627-347W) • Ideal for baseboard heaters, convectors, radiant ceilings and electric fan-forced heating systems • Temperature setting and display in °C or °F • Precise temperature control set in half degrees • TRIAC system (quiet operation) • Cycle rates for proportional heating • Usage Monitor (tracks total run time) • Maximum temperature limit set point feature • Pre-comfort recovery system (begins to warm up before preset time) • Room Temperature and Set Point Temperature display • Heating Power Level display • Clock display in 12 or 24-hour format • Backlit LCD screen • Internal Rechargeable backup for clock and settings • Built-in surge protection • Setting range: +5°C to +35°C (41°F to 95°F) • Simple 2-wire installation Specifications Rating HTC621W HTC625W HTC627-347W 120V~240V AC, 60Hz 240V~347V AC, 60Hz Maximum Load Minimum Load 15A, 3600W @ 240V, 1800W @ 120V 16.6A, 4000W @ 240V, 2000W @ 120V 15A, 5200W @ 347V, 3600W @ 240V 2 300W @ 240V This product is for use with high voltage system (HTC621W & HTC625W 120V~240V, HTC627-347W - 240V~347V) with a minimum load of 300W; it is not designed for use with low voltage (24V) central heating & air conditioning systems or wall mounted furnaces. In order to avoid fire, shock or death, shut off power supply at the circuit breaker or fuse and test that the power is off before wiring. This product must be installed in accordance with the Canadian Electrical Code, and in the province of Quebec, by a qualified electrician. Dimplex assumes no responsibility for damages caused by improper wiring. Improper installation automatically voids the warranty. • Verify that the heating appliance that is being connected is within the specified load range. • Confirm voltage is within the device rating. • For wiring, use copper conductors only. • Must be mounted on a certified electrical box. Keep this manual in a safe place for future reference. Contact us at: www.dimplex.com/customer_support For Troubleshooting and Technical Support OR Toll-Free 1-888-DIMPLEX (1-888-346-7539) Monday to Friday 8:00 a.m. to 4:30 p.m. EST Please have your model number and product serial number ready. 3 Table of Contents Step-by-step Installation . . . . . . . . . . . . . . . . . . . . . . . . . . . . . . . . . . . . . . . . . . . 5 LCD Display. . . . . . . . . . . . . . . . . . . . . . . . . . . . . . . . . . . . . . . . . . . . . . . . . . . . 7 Location of Buttons. . . . . . . . . . . . . . . . . . . . . . . . . . . . . . . . . . . . . . . . . . . . . . . 8 Option Settings . . . . . . . . . . . . . . . . . . . . . . . . . . . . . . . . . . . . . . . . . . . . . . . . . . 9 Option 1: Choosing 12- or 24-hour Format. . . . . . . . . . . . . . . . . . . . . . . . . . 9 Option 2: Selecting the Heat Cycle Rate. . . . . . . . . . . . . . . . . . . . . . . . . . . . 9 Option 3: Enabling the Pre-Comfort Recovery Feature. . . . . . . . . . . . . . . . 11 Option 4: Selecting the Temperature Unit (°C or °F). . . . . . . . . . . . . . . . . . 12 Setting Time and Day . . . . . . . . . . . . . . . . . . . . . . . . . . . . . . . . . . . . . . . . . . . . 12 Program Periods. . . . . . . . . . . . . . . . . . . . . . . . . . . . . . . . . . . . . . . . . . . . . . . . 13 Samples of Temperature Settings. . . . . . . . . . . . . . . . . . . . . . . . . . . . . . . . . . . 14 Default Setting. . . . . . . . . . . . . . . . . . . . . . . . . . . . . . . . . . . . . . . . . . . . . . . 14 Custom Setting . . . . . . . . . . . . . . . . . . . . . . . . . . . . . . . . . . . . . . . . . . . . . . 14 Setting Program Schedules. . . . . . . . . . . . . . . . . . . . . . . . . . . . . . . . . . . . . . . . 15 Copy Program Function. . . . . . . . . . . . . . . . . . . . . . . . . . . . . . . . . . . . . . . . . . 16 Restoring Default Programs and Options. . . . . . . . . . . . . . . . . . . . . . . . . . . . . 17 Temporary Temperature Override. . . . . . . . . . . . . . . . . . . . . . . . . . . . . . . . . . . 17 Hold Function . . . . . . . . . . . . . . . . . . . . . . . . . . . . . . . . . . . . . . . . . . . . . . . . . . 18 Heating Power Level Display. . . . . . . . . . . . . . . . . . . . . . . . . . . . . . . . . . . . . . 18 Usage Monitor. . . . . . . . . . . . . . . . . . . . . . . . . . . . . . . . . . . . . . . . . . . . . . . . . . 19 Memory Back-Up. . . . . . . . . . . . . . . . . . . . . . . . . . . . . . . . . . . . . . . . . . . . . . . . 19 High Limit Function. . . . . . . . . . . . . . . . . . . . . . . . . . . . . . . . . . . . . . . . . . . . . . 20 Troubleshooting. . . . . . . . . . . . . . . . . . . . . . . . . . . . . . . . . . . . . . . . . . . . . . . . . 21 Limited 2-Year Warranty . . . . . . . . . . . . . . . . . . . . . . . . . . . . . . . . . . . . . . . . . . 23 4 Installation Step-by-step Installation 1. Remove the old thermostat carefully and identify the two wires from the wall box. 2. Gently remove the faceplate from the right side of the new thermostat. Note: Do not remove the screws from the back of the unit as these screws hold the thermostat together. Remove Faceplate To remove the faceplate, genly pull the right side of the thermostat. The faceplate should come off easily. 3. Using the wire nuts provided, securely fasten each wire from the new thermostat to a wire in the wall box. Refer to the wiring diagram on the next page. Note: Ensure no bare wire is exposed. 5 Installation Step-by-step Installation . . . continued *120V ~ 240V AC Lines 4. Mount the new thermostat onto the wall box using the two screws provided through the mounting holes, and then replace the faceplate. (Place 2 screws in either the 2 right holes or the 2 left holes). If mounting on a single gang box, use the two mounting holes on the left side, in order to avoid fire or shock. 5. Reconnect power supply. 6 LCD Display 7 Location of Buttons 8 Option Settings This thermostat has 4 OPTION settings that you can change. The OPTION data will appear on the lower pane of the screen. Option 1: Choosing 12- or 24-hour Format • Press and hold SET for 3 seconds to enter the Option Setting mode. will flash on screen. (Note: The 12-hour format is the default setting.) • Press or to toggle between the 12- and 24-hour format. Option 2: Selecting the Heat Cycle Rate To provide precise, consistent and economical heating, this thermostat has an adjustable heat cycle rate. The cycle rate determines the on/off time cycles that the thermostat uses to reach and maintain the desired temperature. Certain cycle rates are more efficient when used with certain types of electric heating systems. Selecting the correct cycle rates help maintain an even temperature, which has proven to reduce energy usage to reduce energy usage while improving comfort. Cr Cycle Rates Cr-0 OFF (fixed span) Cr-1 20 seconds Cr-2 240 seconds (4 minutes) 9 Operation Option 2: Selecting the Heat Cycle Rate . . . continued Cr 0 is a fixed span (no cycling), with a variance of +/- 0.3°C (+/- 0.6°F). The heating unit will operate at full power and the power bar will appear full. This function is for users who do not want their electric heating devices turning on and off frequently. This is the recommended setting for fan-assisted electric heating devices. Cr 1 (Default) is a 20 second cycle rate with proportional heating. This means the heating will be turned on and off once every 20 seconds to provide a stable room temperature. This cycle rate allows a proportional level of power to the heating device. This is indicated on the thermostat display by the power bar which will be partially filled; indicating the amount of power going to the heater. This setting is recommended for non-fan assisted baseboards and electric heating devices and will provide the most energy efficient heating and a stable temperature. Cr 2 is a 240 second span. This means the heating will be turned on and off once every 240 seconds. This is the recommended setting for fan assisted heaters, radiant ceilings and convectors. 1. While it is still in the Options Setting mode, press SET again to advance to the second option (CR:1 will flash on screen). 2. Press or to select the cycle rate 10 Operation Option 3: Enabling the Pre-Comfort Recovery Feature This thermostat is equipped with a Pre-comfort Recovery feature which activates the heating system in advance of the actual set program time so that the room will be at the desired temperature at the start of the program time. It is normal for the system to be activated earlier than the actual set program time (up to an hour). The Pre-comfort Recovery feature can be disabled, if desired. If this feature is turned off, heating will only be initiated at the exact start time of the program period. 1. Press SET again to advance to the third option - Pre-comfort Recovery feature (rE:1 will flash on screen) 2. Press or to adjust setting: • rE:0 Pre-comfort Recovery feature is disabled • rE:1 Pre-comfort Recovery feature is enabled 11 Operation Option 4: Selecting the Temperature Unit (°C or °F) Celsius (°C) is the default temperature unit; no action is required if this is the desired temperature display. 1. Press SET again to advance to the final option. The current temperature will appear on screen. 2. Press or to toggle between the °C or °F IMPORTANT: If you wish to use Fahrenheit (°F), it is important to choose this temperature unit before you begin programming the thermostat. If you proceed to set programs using the default mode in Celsius (°C), then change to Fahrenheit (°F) or vice versa, all programs set by the user will be deleted and will reset to factory defaults. Setting Time and Day 1. Press SET to enter the clock setting mode. (SET appears and the clock symbol/ time flashes). 2. Press ate). or to scroll to the correct time of day. (TIP: Hold the button to acceler- 3. Press DAY repeatedly to change the day of the week. (Weekday symbols to flash). 4. Press SET to end the time mode; or wait 15 seconds to return to normal display. 12 Operation Program Periods For maximum energy savings, this thermostat is equipped with 7-day programming – you can program 4 settings per day for each day of the week. This thermostat is preprogrammed for your convenience, or you can set your own programs as desired. The program periods (P1, P2, P3 and P4) allow you to set the temperature settings and start times throughout the day. P1: Morning During the morning, when you may prefer to wake up to a warmer temperature. P2: Day The time you leave home is usually an energy-savings period; when the temperature can be reduced to minimize energy consumption. If you are staying home on a particular day, you may override this setting by manually adjusting the temperature using the button. P3: Evening This the time you return home when you prefer to set the temperature to a comfortable level. Generally, the temperature is set to warmer settings during fall/winter and to cooler settings during spring/summer. If you stay home during the day, periods 1, 2 and 3 can be set at the same temperature level. P4: Night This is the time you go to bed, also an energy savings period. You may set the temperature to your desired energy saving level to save on heating cost. 13 Operation Samples of Temperature Settings Default Setting The factory default setting will activate automatically; convenient for people who are away from home during the day and who wish to maximize energy savings. Period Time Heat Set Point Morning 6:00 AM 69.0°F (20.5°C) Day 8:00 AM 63.5°F (17.5°C) Evening 5:00 PM 70.0°F (21.0°C) Night 10:00 PM 62.5°F (17.0°C) Custom Setting An example of a custom programming; convenient for people who are at home during the day and want the home warm all day and cooler at night. Period Time Heat Set Point Morning 7:00 AM 69.0°F (20.5°C) Day 8:00 AM 69.0°F (20.5°C) Evening 5:00 PM 69.0°F (20.5°C) Night 11:00 PM 62.5°F (17.0°C) 14 Operation Setting Program Schedules First, select the day you wish to program; then select the start times and temperature settings for all four programs periods. Scroll through the daily Program Periods in this order: P1, P2, P3, P4. You may select any weekday to begin. Program Periods Temperature Seng Clock Symbol Weekdays Start Time 1. Press PROG to enter the program setting mode. 2. Press DAY to select the day you wish to program. (P1 will appear ). 3. Press or to set the desired temperature. 4. Press or to set the start time. 5. Press PROG again to set the time and temperature for the next periods (P2, P3 and P4). 6. Press PROG to exit program mode. 7. Repeat the above steps until the time and temperature settings for each day of the week are programmed. 15 Operation Copy Program Function Using this thermostat’s COPY function is an easy and convenient way to copy the programming for all four period settings (P1, P2, P3 and P4) from one day to another instead of programming each day individually. Press PROG to enter Program Seng Mode Press COPY to copy all four programming periods 1. If you are not already in the program mode, press PROG to enter the program setting mode. 2. Press DAY to select the day you wish to copy from. 3. Press COPY; the COPY symbol will appear and the next weekday will flash. 4. Press DAY to select the day you wish to copy the programs to. 5. Press COPY again to copy settings for all four program periods; the COPY symbol will disappear to indicate that the COPY function is complete. 6. Repeat the above steps to copy the program to another day. Tip: If you press COPY 12 times consecutively, the programmed settings will be copied for the entire week. 16 Operation Restoring Default Programs and Options If you have difficulty programming your thermostat, you may wish to restore the factory default settings and begin again. 1. Press and hold SET for 3 seconds to enter the option setting mode. 2. Press and hold PROG for 3 seconds to restore all programs to factory defaults. Note: This will restore the default programs and option settings but will not affect the clock. To reset the clock, press RESET (The RESET button must be pressed gently by using a small blunt object). This will revert the clock back to 9:00 AM Monday morning. Temporary Temperature Override This function allows you to temporarily override the temperature setting for the current time period. The thermostat will automatically return to the programmed settings at the next program period. Press or manually to adjust to the desired temperature setting. The temperature can be set in half-degree increments (0.5 °C or 0.5 °F). Tip: Press and hold or button to change the setting more rapidly. 17 Operation Hold Function This function allows you to permanently adjust the temperature setting for all time periods. It maintains a constant temperature and disables all programmed settings. 1. Press HOLD to enter the hold mode; the HOLD symbol appears. 2. Press 3. To cancel the HOLD function at anytime, press HOLD again. The HOLD symbol will disappear or to manually adjust to the desired temperature setting Display current output power level Indicated “HOLD” funcon is on Heating Power Level Display When the thermostat activates the heating system, the Heat “On” symbol will appear. Equipped with an intelligent proportional regulation system, this thermostat will determine the amount of power needed by the electric heater to maintain the room temperature at precisely the set temperature. The “Power Bar” (A) will indicate the current output power level. 1 BAR = 20% and 10 BARS = 100% 18 Operation Usage Monitor The thermostat tracks the total run time, i.e. the total time the heating equipment is running. 1. Press USAGE once to view USAGE TODAY (starts at midnight). 2. Press USAGE again to view USAGE THIS WEEK (total time from Monday to current day; automatically resets every Monday morning, after midnight on Sunday. A new week begins Monday morning). Displays total me heang is running per day / per week Memory Back-Up The memory back-up will save and protect programs and option settings indefinitely. If an extended power outage occurs, only the clock setting may be affected. The clock will continue to run and display on the LCD screen for up to 1 to 2 days even without power, due to the rechargeable back-up battery inside the unit. However, if the power outage is longer than 2 days, the clock will revert back to the factory default setting and will need to be reset. 19 Operation High Limit Function The High Limit Function is a security feature which allows the user to select the maximum temperature limit. If this feature is activated, the user cannot set the temperature to go over this limit. The High Limit setting cannot be bypassed by programs, temporary overrides or the Hold function. Indicates High Limit Funcon is acvated 1. To activate the function, press or in the program temperature pane. until the desired high limit temperature is shown 2. Press USAGE and COPY simultaneously for 3 seconds to activate this function. A LOCK symbol will appear on screen. 3. All existing programs will be scanned and if an existing temperature setting is above the new maximum set point, it will be reduced to the high-limit set point. 4. To deactivate, turn the thermostat off for 30 seconds, then turn it back on. The LOCK symbol will appear on screen. 5. While the LOCK symbol is blinking, the deactivation process can be carried out by pressing USAGE and COPY simultaneously for 3 seconds. . The LOCK symbol will disappear upon deactivation. 20 Troubleshooting Problem Solution The LCD screen is blank or abnormal • • • The thermostat housing feels hot to the touch Make sure the thermostat is fully installed. Check that the power supply has been reconnected at the circuit breaker or fuse. If the heater or heating appliance has a power switch of its own, check to see that it is in the ON position. When working at full capacity, the thermostat housing may reach a temperature of approx. 45°C to 50°C (113°F to 122°F). This is normal and does not affect the operation of the thermostat. The thermostat is rated to operate safely at these temperatures; ensure that the thermostat is not near heat sensitive or flammable materials such as exposed wood or wallpaper. The heating system is constantly running Make sure the temperature is not set too high. The heating system seems to cycle too often Make sure the selected cycle matches the heating system (see pages 9 and 10 for details). 21 Troubleshooting . . . continued Problem Solution Heating is not activated at the programmed time • • • • The heating system will not activate • • • Temperature settings will not change Review the programming guide to ensure the programs have been entered correctly. Check that the clock has been set to the correct time (e.g. AM and PM are reversed). Reset programs: Press SET for 3 seconds to enter option mode, then press PROG for 3 seconds to clear program settings only. Reset all: Press and hold the and buttons at the same time to restore all settings to factory defaults. Check the LCD display to see if there has been a power failure. If the LOCK symbol appears on the LCD screen when you increase the temperature, the High Limit Function is activated. (To deactivate, see page 18 for details.) Check the heating device to see if it is disabled or if the circuit breaker is open. Make sure the temperature is set to the acceptable range: 5°C to 35°C (41°F to 95°F). 22 Limited 2-Year Warranty This product, excluding battery, comes with a two-year (2) warranty against manufacturer's defects in workmanship and material. The warranty allows for repair or replacement product at Dimplex’s discretion. Dimplex accepts no liability for labour related costs. (Note: Shipping and handling charges are not included under this warranty). The product is not guaranteed against wear or breakage due to misuse and/or abuse. To make a determination as to the serviceability of the unit, please contact our Technical Support Department at 1-888-346-7539 (Hours of Operation: 8:30AM to 4:30PM EST, Monday to Friday) or via email at www.dimplex.com/customer_support. Should it be determined that a replacement is required, arrangements will be made as to the return or disposal of the original unit and the shipping of the replacement unit. IMPORTANT NOTICE TO ENSURE THE SAFE INSTALLATION AND OPERATION OF YOUR THERMOSTAT, IT IS STRONGLY RECOMMENDED THAT IT BE INSTALLED BY A CERTIFIED ELECTRICIAN. The manufacturer assumes no liability or responsibility whatsoever for incorrect wiring or any damages resulting thereof. Improper installation voids this warranty. This product is for use with high voltage system (HTC621W & HTC625W 120V~240V, HTC627-347W - 240V~347V) with a minimum load of 300W; it is not designed for use with low voltage (24V) central heating & air conditioning systems or wall mounted furnaces. 23