1
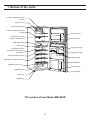
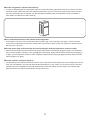
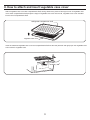
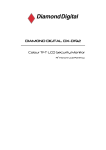
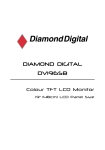
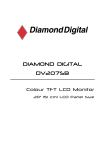
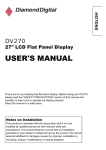
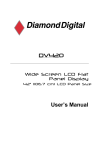
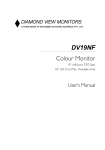
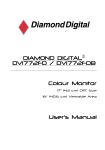
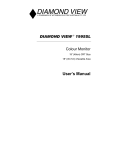
Refrigerator-Freezers
OPERATING INSTRUCTIONS
MODEL: MR-260R
1. Names of the parts
Freezer compartment shelf
(Small)
Plastic ice tray
Ice cube storage box
Freezer compartment shelf
(Large)
Freezer pocket
Temperature control
(freezer compartment)
Door gaskets
Slide chilled case
Chilled tray
Egg rack (Large)
Temperature control
(refrigerator compartment)
(See page 3)
Egg rack (Small)
Room light (See page 6)
Adjust pocket
Refrigerator compartment shelf
Bottle pocket
Vegetable case cover
Bottle stopper
Vegetable case
Door gaskets
Drain pan
Levelling leg
This picture shows Model MR-260R
2
2. Installation
Install on a completely flat and rigid surface.
Level the refrigerator by rotating the levelling leg located in the front of the right corner.
The refrigerator is then solidly positioned.
Leave a 2-cm space between the sides of the refrigerator and the walls.
Leave a 10-cm space between the top of the refrigerator and the ceiling.
Choose a location which is not exposed to the sun, which is relatively free from dust, heat and humidity, and which
offers good ventilation. This is to guarantee that the heat radiation will not be impaired.
3. Electrical connection
Important: For personal safety, this appliance must be properly grounded.
The refrigerator should always be plugged into its own individual electrical outlet.
This is recommended for best performance and also to prevent overloading of the house wiring circuits, which may
cause a fire hazard. Extension cords are not recommended.
Be sure that the proper voltage is provided from the outlet.
If your refrigerator has a grounding plug, use it correctly. The 3-point plug must be inserted into a mating 3-point
grounded receptacle. If the installation does not have a proper 3-point grounding wall receptacle, it must be
changed to the proper type. The ground point should never be cut or removed.
If your refrigerator has an ungrounding plug, connect the ground wire to the ground connection screw provided at
the lower, rear side of the refrigerator.
4. Operation
1. Temperature control
HI
LOW
MID
REFRIGERATOR CONTROL
(A)
(B)
The freezer and refrigerator controls are inter-liked. To change the temperature in the freezer for example,
the freezer (A) and refrigerator (B) controls must be adjusted.
For normal coldness in both compartments, set (A) to "MID" and set (B) to "MID".
For maximum coldness in both compartments, (A) remains at "MID" and set (B) to "HI".
For the freezer to be colder than normal, set (A) to "HI" and (B) to "HI".
For the refrigerator to be colder than normal, set (A) to "LOW" and (B) remains at "HI".
2. Automatic defrosting
Thanks to the built-in automatic defrosting timer and the defrosting heater, defrosting is performed automatically in this
refrigerator.
There is, therefore, no need to defrost it. Water produced during defrosting passes through the drainage hose at the rear
and collects in the drain pan at the lower part of the refrigerator’s back.
Then, it automatically evaporates with the heat from the radiator.
3
3. Ice making
Pour water into each of the sections of the ice tray up to the water line. Insert the tray completely into the ice tray
holder. The ice cubes will not separate easily from the ice tray if you add too much water.
Once the ice cubes are made, turn the lever until the ice cubes fall into the ice cube storage box.
The ice cube storage box will break if you attempt to make ice directly in the ice cube storage box.
4. Slide chilled compartment
This slide chilled compartment is cooled down to about 0oC to preserve freshness of foods stored for a long time.
Lid
Chilled case
Opens by pulling out the case.
CAUTION:
Before closing the refrigerator compartment door, make sure that the chilled case is pushed in all the way
(the lid is closed correctly).
Remove the lid and chilled case as in the figure and proceed with cleaning.
Comes off by pulling out the case, open the lid, then pull out while holding the right-hand side with the lid moved
towards the left-hand side. (Fig. 1)
Comes off by pulling the case out all the way, then pulling out while holding and lifting the edge of the case upwards.
Comes off by pulling the case out all the way, then pulling out while holding and lifting the edge of the case upwards.
(Fig. 2)
Fig. 1
Fig. 2
Lift the chilled tray up from the projection at the rear center of the tray.
Install the chilled tray with the projection at the rear center of the chilled case.
Do not put any items under the chilled tray. Cool air must flow under the tray.
4
5. Door racks
The door racks can be used to store all those little things that seem to get in the way. If you put small items in one place,
you will find that there is more room inside the refrigerator for the larger things.
Free pocket with egg tray
The free pocket can hold many eggs. (Fig. 1)
If you turn half the egg tray over, you will be able to store small items along with eggs. (Fig. 2)
You can even turn the whole egg tray over and store small items in the free pocket instead of eggs. (Fig. 3)
Fig. 1
Fig. 2
Fig. 3
Bottle pocket
There are some spaces for large bottles at the right.
The bottles are stored at an angle so that it is easy to put them in and take them out.
Depending on the type, commercially sold water cooler bottles may touch the shelf or foodstuffs when placed
in the door pocket, preventing the door from closing firmly.
Adjust pocket
The direction of the adjust pocket can be changed according to the size of the foods to be stored in the pocket.
Large food containers such as beer bottles can be accommodated in the bottle pocket if you install the adjust pocket in
the upper position.
Adjust pocket
6. How to remove pockets
Remove the door racks as in the figures to proceed with cleaning.
This pocket comes off by pushing it lightly upward.
Free pocket
Adjust pocket
Bottle pocket
5. Maintenance
When performing maintenance, make absolutely sure that the power plug is first disconnected from the power outlet.
Dip a soft cloth into cold or lukewarm water, wring it out well and wipe.
If you do not clean the door gasket (especially the lower part) when it is dirty, the gasket will get easily damaged.
Therefore, keep it clean at all times.
Do not clean with cleanser, acids, benzine, thinner, boiling water, soap powder, chemical cloths or neutral detergents.
These will damage the paint finish and material of your refrigerator.
CAUTION
Do not apply water directly to the refrigerator.
This may result in a breakdown, power leakage or fire.
The drain pan gets dirty very easily and if it is not cleaned regularly, bad odours will be produced. Get into the habit
of cleaning this pan regularly.
1. How to remove the drain pan
Pull the refrigerator away from the walls.
Remove the drain pan as shown.
When removing the drain pan, pull up on the drain pan at a slight angle so it does not contact the drainpipe.
To install, insert the drain pan completely so the drainpipe is located above the drain pan.
(Failure to insert the drain pan completely can lead to water leaks, noise, and vibration.)
2. How to replace the room light
Important: Unplug the power cord. Failure to unplug the power cord may cause an electric shock.
Pull out the room light cover toward you by pressing the lower convex part up to remove the room light cover.
Remove the room light at the right of the temperature control inside of the refrigerator compartment.
Purchase a room light of 240V/15W (capE-12) from a store.
HI
LOW
MID
REFRIGERATOR CONTROL
6. Suggestions for safety
The suggestions below apply to the operation of your home electric refrigerator. Mitsubishi Electric Corporation recommends these safety precautions.
If your old refrigerator is still around the house but not in use, be sure to remove the door(s). This will ensure that
children will not get trapped inside.
Never unplug your refrigerator by pulling on the wire. Always take hold of the plug firmly and pull it straight out of the
receptacle.
Do not operate your refrigerator in the presence of explosive fumes.
Fizzy drinks should not be frozen.
Avoid immediate consumption of ice lollies and other similar frozen food items.
If the power cord is damaged, call our Mitsubishi Service Center for the replacement, in order to avoid a hazard.
Keep ventilation openings, in the appliance enclosure or in the built in structure, clear of obstruction.
Do not use mechanical devices or other means to accelerate the defrosting process.
Do not use electrical appliance inside the food storage compartments of the appliance.
The appliance is not intended for use by young children or infirm persons without supervision.
Young children should be supervised to ensure that they do not play with the appliance.
7. Troubleshooting
When the refrigerator does not operate
Check if there is a power failure.
Check if the power cord is plugged into the power outlet.
Check that the fuse (or circuit-breaker) has not blown.
When the refrigerator is cooling excessively
The temperature control dial may be set too high.
If you place foodstuffs containing a lot of moisture directly under the cool air outlets, they will freeze easily.
This does not indicate a malfunction.
When you hear a sound like water flowing
A sound like water flowing is the refrigerant (cooling gas) flowing. It does not indicate a malfunction.
When the refrigerator is not cooling sufficiently
The food may be packed too tightly together which will block the flow of cool air.
You may have put something hot or a lot of foodstuffs into the refrigerator.
The door may not have been closed properly.
The door gasket may be damaged.
The refrigerator may not be well ventilated.
There may be insufficient clearance between the refrigerator and the surfaces immediately beside and above.
The temperature control dial may not be set properly.
When the refrigerator’s cabinet front heats up
In order to safeguard against condensation, there is an anticondensation pipe which heats up the cabinet front when
actuated. A warm cabinet front does not indicate a malfunction. (The more the door is opened and closed, the more
the anti-condensation pipe is actuated. It is also actuated immediately after the refrigerator has been installed. In
other words, the cabinet front often heats up.)
When condensation forms on the outside of the refrigerator
Condensation may form on the outside when the humidity is high, such as during a wet season. This is the same
result as the condensation formed when chilled water is poured into a glass. It does not, therefore, indicate a failure.
Wipe dry with a dry cloth.
When the power plug is disconnected and connected again, and the compressor ceases to rotate
When the power plug is disconnected from the power outlet and then immediately plugged in again, the compressor
may not start up again. Therefore, when unplugging the power plug, always wait at least 5 minutes before plugging it
in again. (If the compressor ceases to rotate completely, keep the power plug unplugged and wait at least 5 minutes
before plugging it in again.)
When the cabinet’s side panel heats up
The side panel of the cabinet will heat up when the door is opened and closed frequently, when installing the unit and
when the unit operates in summer with high outside temperatures. In such cases, do not touch the panel. This heat
buildup is due to the dissipation of the heat absorbed from inside the cabinet over the whole of the cabinet’s side
panel and it does not mean that something is wrong with the unit.
8
8. How to attach and insert vegetable case cover
Attach Vegetable case cover with compartment shelf, During attachment, place left and right corner of Vegetable case
cover under compartment shelf and put the edge of Vegetable case cover into the rail, Vegetable case cover should fit
into the rail of compartment shelf.
Refrigerator compartment shelf
Vegetable case cover
Insert the attached Vegetable case cover and compartment shelf into the rails (both left and right) upon the vagetable case.
Then insert the vegetable case.
9
MITSUBISHI ELECTRIC CORPORATION
HEAD OFFICE : MITSUBISHI DENKI BLDG., MARUNOUCHI,TOKYO 100. TELEX : J24532 CABLE MELCO TOKYO
Distributed by
MITSUBISHI ELECTRIC AUSTRALIA PTY LTD.
(Incorporated in New South Wales) ABN 58 001 215 792
New South Wales:
348 Victoria Road,
Rydalmere NSW 211
Ph : (02) 9684 7777
Queensland:
Unit 12, 469 Nudgee Road
Hendra, QLD 4011
Ph : (07) 3623 2000
Western Australia:
Unit 5, 329 collier Road,
Bassendean WA 6054
Ph : (08) 9377 3400
Victoria / Tasmania:
Unit 4, 303 Burwood Highway
East Burwood VIC 3151
Ph : (03) 9262 9855
South Australia / NT:
77 Port Road
Hindmarsh SA 5007
Ph:(08) 8340 2000
Distributed by
BLACK DIAMOND TECHNOLOGIES LIMITED (BDT)
Wellington Office (Head Office)
1 Parliament Street
PO Box 30-772
Lower Hutt
Ph : (04) 560 9100
Fax : (04) 560 9133
Auckland Office
Unit1, 4 Walls Road
Penrose
Auckland PO Box 12-726
Ph: (09) 526 9340
Fax : (09) 526 9369
Christchurch Office
Suite 2, Level 1
37 Manderville Street
Chistchurch PO Box 1604
Ph : (03) 341 7052
Fax : (03) 341 7054