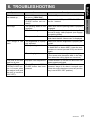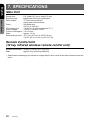
1
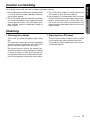
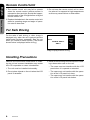
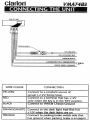
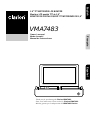
English
5.8" TFT MOTORIZED LCD MONITOR
Moniteur LCD assisté TFT de 5,8"
MONITOR DE CRISTAL LÍQUIDO TFT MOTORIZADO DE 5,8"
VMA7483
Français
Owner's manual
Mode d’emploi
Manual de instrucciones
Español
Thank you for purchasing the Clarion VMA7483.
Nous vous remercions d’avoir acheté le Clarion VMA7483.
Muchas gracias por la adquisición del VMA7483 Clarion.
English
Español
English
Owner’s Manual
* Please read this owner’s manual in its entirety
before operating this equipment.
* Antes de utilizar el equipo, lea completamente
este Manual de instrucciones.
* After reading this manual, be sure to keep it in
a handy place (e.g., glove compartment).
* Después de haber leído este manual, guárdelo
a mano (p. ej., en la guantera).
If you sell the motor vehicle, please leave the
manual in it so that the new owner can use it.
Cuando venda su automóvil, deje en él el
manual de instrucciones a fin de que pueda
utilizarlo el nuevo usuario.
* Read the contents of the enclosed warranty
card and keep it with this manual.
* Lea el contenido de la tarjeta de garantía
adjunta, y guárdela con este manual.
English
Français
Français
* Lisez tout le mode d’emploi avant de mettre
l’appareil en service.
* Après avoir lu ce mode d’emploi, prenez soin
de le conserver dans un endroit pratique (par
ex: la boîte à gants).
Si vous vendez votre véhicule à moteur,
laissez-y le manuel de façon que le nouveau
propriétaire puisse l’utiliser.
Mode d’emploi
* Lisez le contenu de la carte de garantie comprise et conservez-la avec ce manuel.
Español
Français
■Contents
1. PRECAUTIONS ................................................ 3
Caution on Handling ......................................... 5
Cleaning ........................................................... 5
Remote Control Unit ......................................... 6
For Safe Driving ................................................ 6
Handling Precautions ....................................... 6
2. FEATURE ......................................................... 7
3. PACKAGE CONTENTS ................................... 7
4. NAMES OF PARTS AND THEIR FUNCTIONS ...... 8
Main Unit (when the LCD panel is on) ............. 8
Rear Panel ........................................................ 9
Image Select Switch Setting ............................ 9
Remote Control .............................................. 10
5. OPERATIONS ................................................ 12
Starting Up and Retracting the LCD Panel .... 12
Selection of the screen mode (size) .............. 14
Setup .............................................................. 15
6. TROUBLESHOOTING ................................... 17
7. SPECIFICATIONS .......................................... 18
Main Unit ........................................................ 18
Remote Control Unit
(14 key infrared wireless remote control unit) ....... 18
Español
Manual de
instrucciones
■Table des matières
■Índice
1. PRÉCAUTIONS .............................................. 19
Précautions de manipulation .......................... 21
Nettoyage ....................................................... 21
Télécommande ............................................... 22
A des fins de sécurité routière ....................... 22
Précautions d'utilisation ................................. 22
2. CARACTÉRISTIQUES ................................... 23
3. CONTENU DE L'EMBALLAGE ..................... 23
4. NOM DES PIÈCES ET LEURS FONCTIONS . 24
Appareil principal
(lorsque l'écran LCD est allumé) ................... 24
Panneau arrière .............................................. 25
Réglage du sélecteur d'image ....................... 25
Télécommande ............................................... 26
5. OPÉRATIONS ................................................ 28
Ouverture et fermeture de l'écran LCD ......... 28
Sélection du mode d'écran (taille) ................. 30
Configuration .................................................. 31
6. DÉPANNAGE ................................................. 33
7. SPÉCIFICATIONS .......................................... 34
Appareil principal ............................................ 34
Télécommande (télécommande sans fil à
infrarouge à 14 touches) ................................ 34
1. PRECAUCIONES ........................................... 35
Precauciones sobre el manejo ...................... 37
Limpieza ......................................................... 37
Unidad de control remoto ............................... 38
Para conducir con seguridad ......................... 38
Precauciones de manejo ................................ 38
2. CARACTERÍSTICAS ..................................... 39
3. CONTENIDO DEL PAQUETE ....................... 39
4. NOMBRES DE LAS PARTES Y SUS
FUNCIONES .................................................. 40
Unidad principal (con el panel
del cristal líquido desplegado) ....................... 40
Panel posterior ............................................... 41
Ajuste del selector de imagen ........................ 41
Control remoto ................................................ 42
5. OPERACIONES ............................................. 44
Desplegado y replegado del panel de cristal
líquido ............................................................. 44
Selección del modo (tamaño) de pantalla ..... 46
Configuración ................................................. 47
6. SOLUCIÓN DE PROBLEMAS ...................... 49
7. ESPECIFICACIONES .................................... 50
Unidad principal ............................................. 50
Unidad de control remoto ............................... 50
2
VMA7483
7. Keep drinks and drops from umbrellas away
from the set. Water may damage the internal
circuitry.
8. Do not let lit cigarettes or other hot objects
touch the set. Doing so may damage or deform the cabinet.
9. In extremely cold temperatures, the movement
of the picture may be slow and the picture may
be dark, but this is not a malfunction. The set
will work normally once the temperature increases.
10.Small black and shiny dots inside the liquid
crystal panel are normal for liquid crystal products.
This equipment has been tested and found to comply with the limits for a Class B digital device,
pursuant to Part 15 of the FCC Rules. These limits are designed to provide reasonable protection
against harmful interference in a residential installation. This equipment generates, uses, and
can radiate radio frequency energy and, if not installed and used in accordance with the instructions, may cause harmful interference to radio communications. However, there is no guarantee
that interference will not occur in a particular installation. If this equipment does cause harmful
interference to radio or television reception, which can be determined by turning the equipment
off and on, the user is encouraged to consult the dealer or an experienced radio/TV technician
for help.
VMA7483
3
Owner’s Manual
1. This set is for use in DC 12V, negative ground
vehicles. Be sure to consult your store of purchase or a Clarion-designated service outlet
before installing it on DC 24V cars.
2. Do not operate the set in ways other than
described in this guide. Doing so may damage it.
3. Safety first! For rear seat use only. Do not
install on dashboard or anywhere else that
would permit monitor to be viewed by the
driver. Monitor must not be located in the
motor vehicle at any point forward of the back
of the front seats. Monitor must never be used
in any manner that will distract driver or interfere with driver’s safe operation of the motor
vehicle.
4. Be careful not to run down the car battery
while using the set with the car stopped.
5. For safety, install the set in a position at which
it cannot be seen by the driver.
6. Do not disassemble or modify the set. Doing
so may damage it.
English
1. PRECAUTIONS
CAUTION
English
USE OF CONTROLS, ADJUSTMENTS, OR PERFORMANCE OF PROCEDURES OTHER THAN
THOSE SPECIFIED HEREIN, MAY RESULT IN HAZARDOUS RADIATION EXPOSURE.
THE COLOR LCD MONITOR SHOULD NOT BE ADJUSTED OR REPAIRED BY ANYONE EXCEPT PROPERLY QUALIFIED SERVICE PERSONNEL.
Owner’s Manual
INFORMATION FOR USERS:
CHANGES OR MODIFICATIONS TO THIS PRODUCT NOT APPROVED BY THE MANUFACTURER
WILL VOID THE WARRANTY AND WILL VIOLATE FCC APPROVAL.
WARNING
MONITOR AND TUNER MUST BE INSTALLED AND USED ONLY IN ACCORDANCE WITH THESE
INSTRUCTIONS. FAILURE TO DO SO MAY CAUSE DAMAGE TO THE VEHICLE OR THE MONITOR, MAY RESULT IN AN ACCIDENT, AND MAY VIOLATE THE LAW. CLARION DISCLAIMS
ANY LIABILITY FOR ANY DAMAGES THAT MAY RESULT FROM A FAILURE TO INSTALL AND
USE THIS UNIT AS STATED IN THESE INSTRUCTIONS.
4
VMA7483
Caution on Handling
3. The LCD panel surface is easily marred. Do
not scratch or hit it with hard objects.
4. Any moisture or condensation that is formed
on the LCD panel must be wiped away immediately using cotton wool or a soft cloth. Failure to do so could lead to discoloration and
stains and any water that enters the unit could
lead to failure.
Cleaning
• Cleaning the cabinet
Use a soft, dry cloth and gently wipe off the
dirt.
For tough dirt, apply some neutral detergent
diluted in water to a soft cloth, wipe off the dirt
gently, then wipe again with a dry cloth.
• Cleaning the LCD panel
The LCD panel tends to collect dust, so wipe
it off occasionally with a soft and dry cloth.
The surface is easily scratched, so do not rub
it with hard objects.
Do not use benzine, thinner, car cleaner, etc.,
as these substances may damage the cabinet
or cause the paint to peel. Also, leaving rubber of plastic products in contact with the cabinet for long periods of time may cause stains.
VMA7483
5
Owner’s Manual
1. Do not expose the LCD panel to pressure when
it is on as this may cause damage, deformation or other failures.
2. The LCD panel must be retracted inside the
unit, when the vehicle is to be parked outside
for long periods of time. (The LCD panel operates normally within a temperature range of
0°C to 60°C.)
English
For a longer service life, be sure to read the following cautions.
Remote Control Unit
English
1. The remote control unit may fail to operate
when the remote control receiver sensor is
exposed to direct sunlight. Should this happen,
block the path of the sunlight before using the
remote control unit.
3. Do not leave the remote control unit in a location where it is exposed to high temperatures
as this may cause failure or deformation.
Owner’s Manual
2. Replace the batteries in the remote control unit
when its operating range and angle of operation start to decrease.
For Safe Driving
For the sake of safe driving, a video image is
displayed only when the car is parked (and the
hand brake has been engaged). Stop the car
when you intend to watch a video. (The screen
shown below is displayed while driving.)
STATUS
VCR
AUDIO PROG.
AUTO
OFF
ONLY
TIME
5s
Image displayed while driving
Handling Precautions
Observe the instructions listed below in installing the unit as incorrect installation may render
the LCD inoperable or cause a breakdown.
3. Observe the following instructions when installing a decorative case on the unit.
1. The unit must be installed horizontally.
• The case must not interfere with the LCD
panel when it is opened or retracted.
2. Do not place objects on the unit when the LCD
panel is retracted.
• The case must not interfere with the operation of the LCD panel lock lever.
• The case must not interfere with the operation of the LCD panel lock button.
6
VMA7483
■ 5.8" color LCD panel
Equipped with a 5.8" TFT active matrix color LCD panel, the unit provides realistic, vivid reproduction
of video images.
The Image Select switch allows you to flip the image vertically to allow installation of the unit in the
ceiling or in a console box.
3. PACKAGE CONTENTS
• VMA7483 ........................................................ 1
• Remote control unit (RCB-130-103) .............. 1
• Remote control sensor ................................... 1
• Connecting cable ........................................... 1
VMA7483
7
Owner’s Manual
■ Function for flipping the image vertically
English
2. FEATURE
English
4. NAMES OF PARTS AND THEIR FUNCTIONS
Main Unit (when the LCD panel is on)
Owner’s Manual
LCD panel
LCD panel lock button
Locks the LCD panel in its
retracted state.
The LCD panel
OPEN/CLOSE button does
not operate when the lock
button is engaged.
LCD panel lock lever
Remote control sensor
LCD panel OPEN/CLOSE button
Remote control signal infrared eye
8
VMA7483
Use the installation
bracket and secure it to
a console box or the like.
Rear Panel
English
Expansion terminal(RGB)
Video input
Owner’s Manual
Remote control
connector
Connect the supplied
remote control sensor
to this connector.
Image Select switch
Changing the switch setting flips
the image vertically. Set this
switch as required by unit
installation.
Power connector
Connect the supplied power cable
to this connector.
Image Select Switch Setting
Observe the following instruction in installing the unit.
Note:
The unit must be installed horizontally.
●Console box installation
●Ceiling installation
Installation surface
Installation surface
Set the Image Select switch to position “UP”.
Set the Image Select switch to position “DOWN”.
VMA7483
9
Remote Control
English
●Remote control sensor
Owner’s Manual
LCD panel OPEN/CLOSE button
• Hold down this button for 1 second to start up
the LCD panel.
The LCD panel is retracted when the button is
held down a second time.
• Pressing this switch while the display is on
switches the unit between video and RGB
display.
Remote control signal infrared eye.
●Remote control unit (RCB-130)
Power button
Turns the power on and off.
Adjusting buttons
Adjust BRIGHT/HUE/COLOR.
AUTO/TIME button
• Press this button to display the
LCD panel auto startup screen.
• Hold down this button for 2
seconds to display the LCD panel
retraction delay setup screen.
•
••
•
Setup buttons (1 to 5)
• Use to select ON or OFF when the LCD panel
auto startup screen is displayed.
• Set the retraction delay (1 to 5 seconds) when
the LCD panel retraction delay setup screen is
displayed.
Set button (RTN)
This button is used to complete settings in the
setup screen.
10
VMA7483
Remote Control
English
●Remote control operation
Aim the remote control unit at the remote control
sensor (supplied) within a 30° horizontal and
vertical angle.
Owner’s Manual
Reception sensor window
30˚
30˚
Inserting the Batteries
RGB button
Switches between video and RGB
display.
WIDE button
Each time this button is pressed, the
display changes in the following
order: NORMAL → WIDE →
F. WIDE → CINEMA → NORMAL.
Adjust button
Displays the image adjustment
screen and allows you to select
BRIGHT, HUE or COLOR.
1. Turn the remote control unit over, then slide
the rear cover in the direction of the arrow.
2. Insert the AA (UM-3/1.5V) batteries that came
with the remote control unit facing in the directions shown in the figure, then close the
rear cover.
Notes:
Using batteries improperly can cause them to explode. Take note of the following points:
• When replacing batteries, replace both batteries with new ones.
• Do not short-circuit, disassemble or heat batteries.
• Do not dispose of batteries into fire or water.
• Dispose of spent batteries properly.
AA (UM-3/1.5V)
Batteries
MONITOR button
Turns the monitor screen on and off.
Rear cover
Rear side
VMA7483
11
English
5. OPERATIONS
Starting Up and Retracting the LCD Panel
WARNING
Owner’s Manual
To prevent battery depletion, operate the
unit with the engine on.
Notes
• The angle of the LCD panel cannot be adjusted. Attempts to adjust the angle could damage the unit.
• When the LCD panel stops half-way out, press
the LCD panel OPEN/CLOSE button to retract
it. Then press it once again to open it.
• Check for any object that maybe in the way
before trying to re-open panel.
• Do not move the LCD panel Lock button to the
“LOCK ON” position when the LCD panel is
open as the LCD panel and the LCD panel lock
lever will interfere with each other when the
panel is retracted, which could damage the
unit.
Opening the LCD Panel
1. Turn the ignition key to ACC or ON.
2. Slide the LCD panel lock button to “LOCK
OFF”.
LCD panel lock button
(LOCK OFF)
(LOCK ON)
CAUTION
Be sure not to get your fingers caught between the LCD panel and the unit or the
instrument panel.
Note:
The LCD panel cannot be opened when the LCD
panel lock button is in the “LOCK ON” position.
3. Hold down the LCD panel OPEN/CLOSE button on the remote control for 1 second.
This action opens the LCD panel and turns it
on.
LCD panel
OPEN/CLOSE button
Turning off the panel
Press the power button to turn off the panel.
12
VMA7483
Starting Up and Retracting the LCD Panel
2. Hold down the LCD panel OPEN/CLOSE button on the remote control sensor for 1 second.
This action turns off the power and automatically retracts the LCD panel.
Notes:
• The LCD panel is automatically retracted when
the ignition key is set to OFF.
• When the unit is not to be used for a long period of time or when you leave the car, make
sure to retract the LCD panel.
• Exposing the LCD panel to force when it is being retracted will damage it.
Precautions to Be Taken When Driving on Bad Roads
When driving on bad roads such as dirt roads or
in a desert, retract the LCD panel and slide the
LCD panel lock button to “LOCK ON” to protect
the LCD panel.
Note that the button must be in the “LOCK ON”
position when the unit is installed in the ceiling
of a car.
LCD panel lock lever
LCD panel lock button
3. Switch the LCD panel lock button to the
“LOCK ON” position when the LCD panel has
been retracted.
LCD panel lock button
(LOCK OFF)
(LOCK ON)
VMA7483
13
Owner’s Manual
1. Make sure that the LCD panel lock button is
set to “LOCK OFF”.
The LCD panel OPEN/CLOSE button does
not operate when this button is set to “LOCK
ON”.
Note:
• If an attempt is made to retract the LCD panel
when the LCD panel lock button has not been
fully set to the “LOCK OFF” position, the LCD
panel and the LCD panel lock lever will interfere and damage the unit.
English
Retracting the LCD Panel
Selection of the screen mode (size)
English
The following screen display modes are supported: normal, full wide, wide and cinema.
Owner’s Manual
Notes:
• Various screen display modes are available on
this monitor.
If you select the screen display mode which is
different from the image ratio of software, such
as a TV program, it differs in appearance from
the original image. Please keep this in mind
and select the appropriate screen display
mode.
• If you reduce or enlarge an image using the
screen display mode switching function (full
wide, cinema, etc.) of this monitor with profit
in mind or for any purpose of making the public watch it or listen to it, it may infringe the
rights of the author who is protected under the
copyright law.
Selecting a screen display mode
Pressing the WIDE button switches the screen display mode as follows: NORMAL→WIDE
→F•WIDE→CINEMA→NORMAL→
❈ The screen display mode can be set for each video source.
●Normal mode
NORMAL
Picture of a normal TV program (4:3)
●Cinema mode
CINEMA
This mode enlarges a normal picture in all, and allows
you to enjoy the picture in a larger size.
However, the upper and lower parts of the picture,
or the right and left parts of the picture will be missed.
14
VMA7483
●Wide mode
WIDE
This mode enlarges a normal picture only horizontally
and fully to the screen edges.
(This enlarges the picture in a small area in the center,
and in a large area in the proximity of the right and left
side of the screen. This enlarges the picture in a
natural manner with a lesser feeling of being out of
harmony.)
●Full wide mode
F WIDE
This mode enlarges a picture only horizontally and
fully to the screen edges in a balanced manner.
Setup
Setting Automatic LCD Panel Startup
Note:
This function is not available while driving or when
an RGB screen is displayed.
1. Press the AUTO/TIME button to display the
AUTO selection screen.
AUTO SEL
O N
OFF
WIDE
RTN
2. Press the setup button (1) to select “ON”.
The Î mark is displayed to the left of “ON”.
Sets unit to “ON”
To protect the LCD panel, it is automatically retracted when the engine is turned off or the ignition key is moved to the ACC OFF position.
It is possible to set a retraction delay between
engine turn off and start of LCD retraction.
• The default setting is 5 seconds.
• This setting is designed to prevent the LCD
panel opened as the ignition key is moved to
ACC ON from being automatically retracted
when power from a weak battery is temporarily
cut off and it takes longer to start the engine.
• The panel can be retracted in the normal way
by pressing the LCD panel OPEN/CLOSE button also during the retraction delay interval.
Note:
This function is not available while driving or when
an RGB screen is displayed.
1. Hold down the AUTO/TIME button for 2 seconds to display the TIME selection screen.
TIME SEL
1sec
2sec
3sec
Sets unit to “OFF”
Noes:
• When the setup button is in the “ON” position,
the LCD panel is automatically started up when
the ignition key is moved to ACC .
• The LCD panel can be opened and retracted
using the LCD panel OPEN/CLOSE button
when the setup button is set to “ON”.
• Set the setup button to “OFF” when you wish
to cancel this function.
3. The previous screen is displayed by pressing
the set button (RTN).
4sec
5sec
WIDE
RTN
2. Use the setup buttons (1 to 5) to set the retraction delay.
The Î mark is displayed to the left of the selected time.
Sets a delay of 1 second.
Sets a delay of 2 seconds.
Sets a delay of 3 seconds.
Sets a delay of 4 seconds.
Sets a delay of 5 seconds.
3. The previous screen is displayed by pressing
the set button (RTN).
VMA7483
15
Owner’s Manual
This function starts the LCD panel automatically
when the ignition key is moved to ACC.
* The default setting is “OFF”.
Setting LCD Retraction Delay
English
* The operations on this page are performed with
the remote control unit.
Setup
English
Adjusting screen brightness, hue
and color
Owner’s Manual
Note:
This function is not available while driving or when
an RGB screen is displayed.
1. Press the adjust button (ADJ) to display the
image adjustment screen.
2. Press the adjust button (ADJ) to select the
item to be adjusted.
* Each time the adjust button (ADJ) is pressed,
the screens are displayed in the following order:
BRIGHT → HUE → COLOR → first screen.
3. Press the Adjusting buttons (a/d)to adjust.
Adjusting
mode
Press a
Press d
Brightness
adjustment
(BRIGHT)
The image
becomes
darker.
The image
becomes
brighter.
Hue
adjustment
(HUE)
The image
becomes
redder.
The image
becomes
greener.
Color
adjustment
(COLOR)
The image
becomes
lighter.
The image
becomes
more
saturated.
16
VMA7483
● Brightness adjusting screen
(BRIGHT)
● Hue adjusting screen (HUE)
● Color adjusting screen (COLOR)
Cause
Remedy
Is the LCD panel lock button set to “LOCK ON”?
Set the LCD panel lock button to “LOCK OFF”.
Is the LCD panel OPEN/
CLOSE button set correctly?
Hold down the LCD panel OPEN/CLOSE button for 1 second.
The parking brake is not
engaged.
Make sure that the parking brake is properly
engaged.
The car is being driven.
No image can be displayed while driving. Park
the car to enjoy video playback (and engage
the parking brake).
The power is off.
To view a video tape, turn on the power switch
and check that the video screen is displayed.
The brightness is improperly adjusted.
Make sure that the brightness is properly adjusted.
Poor operating conditions
This happens when the temperature in the car
is below 0°C or above 60°C. Lower the temperature to normal (around 25°C) and check
again.
The ceiling light is on.
The screen is dark at night to prevent glare.
(The screen also becomes dark in the daytime when the ceiling lights are turned on.)
The color is too faint
and hue is poor
Improper color adjustment
Check whether or not the hue and color has
been properly adjusted.
The LCD panel
OPEN/CLOSE button is lit even when
the engine is off (and
the key is turned to
ACC OFF).
The LCD panel OPEN/
CLOSE button has been
pressed.
The LCD panel OPEN/CLOSE button, when
pressed, stays lit for about a second even
when the engine has been turned off (and the
key is set to ACC OFF position).
No image
The image is too
dark
VMA7483
17
Owner’s Manual
Symptom
The screen cannot
be started up
English
6. TROUBLESHOOTING
English
7. SPECIFICATIONS
Main Unit
Owner’s Manual
: 5.8" (width 127 mm ✕ height 72 mm)
: transparent TN liquid crystal panel
: TFT (thin-film transistor)
Active matrix drive method
Pixels
: 280,800 pixels
234 (V) ✕ 1200 (H)
VTR image input
: 1.0±0.2 V p-p (input impedance 75 Ω)
Power voltage
: 13.2 DC V (10.8 to 15.6 V)
Current consumption : 1.5 A or less
Mass
: approx. 1.5 kg
External dimensions : 191.7 (W) ✕ 52 (H) ✕ 165.5 (D) mm
7-9/16" (W) ✕ 2-1/16" (H) ✕ 6-1/2" (D)
Display size
Display format
Drive method
Remote Control Unit
(14 key infrared wireless remote control unit)
External dimensions : 44 (W) ✕ 110 (H) ✕ 27.2 (D) mm
Mass
: approx. 80 g (including batteries)
* Specifications and design are subject to change without prior notice for the sake of product improvement.
18
VMA7483