1
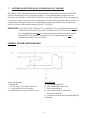
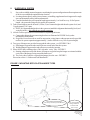
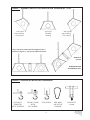
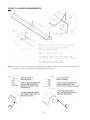
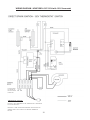
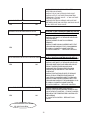
INSTALLATION / OWNER’S MANUAL
STS-JZ
&
IQ
SERIES
LOW INTENSITY TUBE TYPE
INFRA RED HEATERS
FOR YOUR SAFETY:
FIELD CONVERTIBILITY:
Do not store or use gasoline or other flammable
vapours and liquids in the vicinity of this or any
other appliance.
“The conversion shall be carried out in accordance
with the requirements of the authorities having
jurisdiction and in accordance with the
requirements of the B149.1 ( latest edition)
INSTALLATION CODE” in Canada, and the ANSI
Z223.1 (latest edition) in the U.S.A.
If you smell Gas:
>Shut off gas to the appliance
>Extinguish any open flames
>Don’t touch electrical switches
>Call your Gas supplier immediately
!
Warning:
Must be installed in accordance to all National and
Local Codes by a qualified licenced gas fitter.
Improper installation, adjustment, alteration, service
or maintenance can cause property damage, injury
or death. Read the installation, operating and
maintenance instructions thoroughly before installing
or servicing this equipment
GP-MSJS-BX-05A
STS-JZ / IQ Manual
RD: May, 2005
R.L. 5
KH
NOTICE:
The Manufacturer reserves the right to make changes to equipment and specifications without obligation or
notification.
This publication, or parts thereof, may not be reproduced in any form, without prior written consent from
The Manufacturer.
Unauthorized use or distribution of this publication is strictly prohibited.
Schwank Inc.
5285 Bradco Boulevard
Mississauga, Ontario,
L4W 2A6
Phone: (905) 712-4766
Fax: (905) 712-8336
1-866-361-0417
PO Box 988, 2 Schwank Way
Waynesboro, Georgia,
USA 30830
Phone: (706) 554-6191
Fax: (706) 554 9390
1-877-446-3727
e-mail: [email protected]
http://www.schwankheaters.com
InfraSave Inc.
Mississauga, Ontario,
Waynesboro,Georgia,
Phone: 1-866-INFRASV (463-7278)
Fax: 1-866-724-9265
http://www.infrasave.com
e-mail: [email protected]
GAS INFRA-RED TUBE HEATER
STS-JZ / IQ SERIES
LOW INTENSITY TUBE TYPE
INFRA RED HEATERS
Table of Contents
1.
2.
2.1
3.
4.
5.
6.
7.
8.
9.
10.
11.
12.
13.
14.
15.
16.
17.
18.
19.
20.
21.
22.
23.
24.
25.
GENERAL .............................................................................................................................. 1
INSTALLATION IN COMMERCIAL AIRCRAFT HANGARS ...................................... 1
INSTALLATION IN COMMERCIAL GARAGES ............................................................ 1
INSTALLATIONS OTHER THAN SPACE HEATING .................................................... 1
TUBE LENGTHS AND CORRESPONDING BTU INPUT RATINGS AVAILABLE ... 2
PRE INSTALLATION SURVEY .......................................................................................... 4
MOUNTING CLEARANCES ............................................................................................... 4
SYSTEMS INCORPORATING 90° ELBOWS AND 180° ELBOWS ............................... 6
SUSPENSION SYSTEM ........................................................................................................ 7
BURNER AND TUBE INSTALLATION ........................................................................... 10
FOCUS SHIELD REFLECTOR INSTALLATION.......................................................... 13
FLUE VENTING .................................................................................................................. 16
COMBUSTION AIR DUCT ................................................................................................ 18
GAS SUPPLY INSTALLATION ......................................................................................... 19
HEATER EXPANSION ....................................................................................................... 21
ELECTRICAL AND THERMOSTAT WIRING............................................................... 22
HIGH ALTITUDE INSTALLATIONS ............................................................................... 22
LIGHTING INSTRUCTIONS ............................................................................................ 22
RECOMMENDED MAINTENANCE ............................................................................... 22
SEQUENCE OF OPERATION HONEYWELL - S87J-1034 .......................................... 23
WIRING DIAGRAM - HONEYWELL S87J1034 WITH 120 V THERMOSTAT ........ 24
TROUBLESHOOTING GUIDE - HONEYWELL S87J-1034 120V THERMOSTAT . 25
WIRING DIAGRAM - 24 VOLT OPTION -HONEYWELL S87J-1034 ........................ 27
SPARK IGNITION CIRCUIT ............................................................................................ 28
FLAME SENSING CIRCUIT - HONEYWELL S87C DSI CONTROL ..................... 29
COMMISIONING REPORT .............................................................................................. 30
OPTIONAL COMPONENTS: FOR STS-JZ / IQ SERIES TUBE HEATERS .............. 32
ORIFICE - ALTITUDE CONVERSION CHART ............................................................ 36
LIMITED WARRANTY ...................................................................................................... 37
GP-MSJS-BX-05A
STS-JZ / IQ Manual
RD: May, 2005
R.L. 5
KH
1.
GENERAL
Installation of the STS-JZ / IQ Series gasfired tube heaters must conform to all Schwank heating installation
design procedures including ventilation. All local, provincial and national code requirements including the current
latest edition B149.1 INSTALLATION CODE” in Canada, and ANSI Z223.1 in the U.S.A. for gas burning
appliances and equipment. The latest edition Electrical Code PART 1 CSA C22.1 in Canada and ANSI/
NFPA N0 70 in the U.S.A. must also be observed. Due to ever changing standards and requirements, revision
to our equipment and installation procedures may be necessary. In case of discrepancies, the latest installation
manual will take priority.
The STS-JZ / IQ heater may be installed for heating of non-residential indoor spaces. It is beyond the scope
of these instructions to embrace all conditions that will be encountered. All system piping must be supported in
accordance with acceptable practice, local codes, and applicable standards.
2.
INSTALLATION IN COMMERCIAL AIRCRAFT HANGARS
The Low Intensity Heaters are suitable for use in aircraft hangars when installed in accordance with the following.
NFPA No 409 (latest edition)
A. A minimum clearance of 10 ft above either the highest fuel storage compartment or the highest engine
enclosure of the highest aircraft which may occupy the hangar. The clearance to the bottom of the heater
shall be measured from the upper surface of either the fuel storage compartment or the engine enclosure,
whichever is higher from the floor.
B. A minimum clearance of 8 ft must be maintained from the bottom of the heater in other sections of the
aircraft hangars, such as offices and shops, which communicate with areas for servicing or storage. Refer
to section 5 for proper mounting clearances to combustibles.
C. Heaters must be located so as to be protected from damage by aircraft and other objects, such as cranes
and movable scaffolding.
D. Heaters must be located so as to be accessible for servicing and adjustment.
2.1 INSTALLATION IN COMMERCIAL GARAGES
The Low Intensity Heaters are suitable for use in commercial garages when installed in accordance with
ANSI/NFPA No. 88B 1985 (latest edition), which states clearances to combustible construction or material
in storage, from heater and vent, must conform to standard NFPA No. 54 (ANSI Z223.1 latest edition), in
the U.S.A. and the CSA B149.1-00, and CAN1.2.16-M81 in Canada. “Overhead heaters shall be
installed at least (8) feet above the floor”. In addition, they shall be located high enough to maintain the
minimum distance to combustibles, as shown on the heater rating plate, between the heater and any vehicles
parked below the heater.
3.
INSTALLATIONS OTHER THAN SPACE HEATING
Use for process applications will void the C.S.A. certification and may require field inspection and/or
certification.
1
GP-MSJS-BX-06A
STS-JZ / IQ Manual
RD: SEPT, 2005
R.L. 6
KH
4.
TUBE LENGTHS AND CORRESPONDING BTU INPUT RATINGS AVAILABLE
MOD EL
BTU/HR INPUT
0' TO 4500’
ABOVESEA
LE V E L
OVERALL
HEATER
LENGTH* (FT)
APPROX NET
WEIGHT IN LBS
STS-JZ / IQ 200-70
200,000
69’ 8”
324
STS-JZ / IQ 200-60
200,000
60'
282
STS-JZ / IQ 200-50
200,000
50’ 4”
239
STS-JZ / IQ 175-70
175,000
69’ 8”
324
STS-JZ / IQ 175-60
175,000
60'
282
STS-JZ / IQ 175-50
175,000
50’ 4”
239
STS-JZ / IQ 155-60
155,000
60'
282
STS-JZ / IQ 155-50
155,000
50’ 4”
239
STS-JZ / IQ 155-40
155,000
40’ 8”
197
STS-JZ / IQ 130-50
130,000
50’ 4”
239
STS-JZ / IQ 130-40
130,000
40’ 8”
197
STS-JZ / IQ 130-30
130,000
31'
154
STS-JZ / IQ 110-50
110,000
50’ 4”
239
STS-JZ / IQ 110-40
110,000
40’ 8”
197
STS-JZ / IQ 110-30
110,000
31'
154
STS-JZ / IQ
80-40
80,000
40’ 8”
197
STS-JZ / IQ
80-30
80,000
31'
154
STS-JZ / IQ
80-20
80,000
21’ 4”
111
STS-JZ / IQ
60-30
60,000
31'
154
STS-JZ / IQ
60-20
60,000
21’ 4”
111
STS-JZ / IQ
45-20
45,000
21’ 4”
111
STS-JZ / IQ
45-10
45,000
11’ 8”
68
*Manufactured and shipped in 10–ft. lengths. Due to the swaged approximate 4” overlap, total length is slightly shorter
than multiples of 10 feet. Overall length of heater includes the Burner.
2
3
GP-MSJS-BX-06A
STS-JZ / IQ Manual
RD: SEPT, 2005
R.L. 6
KH
5.
PRE INSTALLATION SURVEY
The STS-JZ / IQ heating system must have gas piping of the correct diameter, length, and arrangement to
function properly. For this reason, a layout drawing is necessary. Carefully survey area to be heated, and for
best results, whenever possible, place burner and combustion chamber in coldest area.
6.
MOUNTING CLEARANCES
This heater must be mounted with at least minimum clearances between the reflector surface and
combustibles as shown in FIG-1, TABLE 3, ON PAGE 5. Positioning of lights, sprinkler heads, overhead
doors, storage areas,gas and electrical lines, parked vehicles, cranes and any other possible obstruction or
hazard should be evaluated before installation.
Heaters should also be located and installed to provide a minimum clearance of 24 inches from the end of the
burner housing to allow for servicing and cleaning of burner, blower and controls.
For recommended heater placement refer to TABLE 2 (below).
TABLE 2 RECOMMENDED HEATER PLACEMENT
MOUNTING
HE IGHTS
“FE E T”
MOD E L
MA X IMUM
D IS TA NC E
B E TWE E N
HE ATE RS IN
" FE E T"
HORIZONTA L
D IS TA NC E – OUTS ID E WA LL
TO HE ATE R LONG A X IS
PA RA LLE L TO WA LL IN ”FE E T"
S TS -JZ / IQ 200
18 – 25
50
17 – 25
S TS -JZ / IQ 175
18 – 25
50
17 – 25
S TS -JZ / IQ 155
16 – 21
45
15 – 20
S TS -JZ / IQ 130
15 – 21
40
15 – 20
S TS -JZ / IQ 110
13 – 19
35
13 – 18
S TS -JZ / IQ
80
10 – 16
30
12 – 16
S TS -JZ / IQ
60
8 – 14
25
11 – 15
S TS -JZ / IQ
45
6 – 10
20
8 – 12
A NGLE
C OMB US TIB LE
C LE A RA NC E
IMPORTANT: SINGLE OR MULTIHEATER PLACEMENT MUST BE SUCH THAT
CONTINUOUS OPERATION OF HEATER(S) WILL NOT CAUSE
COMBUSTIBLE MATERIAL OR MATERIALS IN STORAGE TO REACH A
TEMPERATURE IN EXCESS OF 160O F.
4
FIGURE 1 MINIMUM CLEARANCES TO COMBUSTIBLES
D
A
E
B
B
F
C
G
TABLE 3 MINIMUM CLEARANCES TO COMBUSTIBLES
S U S P E N D E D AT AN AN GLE U P
TO 45 D E GR E E S
MOD E L
SU SPEN D ED
H OR IZON TALLY
D
E
F
G
A
B
C
S TS -JZ / IQ 200
6”
1”
57”
68”
6.5”
22”
68”
S TS -JZ / IQ 175
4.5”
1”
47”
68”
5.5”
20”
68”
S TS -JZ / IQ 155
3.5”
1”
44”
64”
5.5”
19”
64”
S TS -JZ / IQ 130
3.3”
1”
35”
56”
4.5”
11”
60”
S TS -JZ / IQ 110
2”
1”
26”
54”
3.5”
10”
54”
S TS -JZ / IQ
80
1.75”
1”
23”
38”
3”
6”
36”
S TS -JZ / IQ
60
1.5”
1”
17”
34”
2.5”
5.5”
34”
S TS -JZ / IQ
45
2.25”
1”
24”
32”
2.75”
7”
32”
5
GP-MSJS-BX-06A
STS-JZ / IQ Manual
RD: SEPT, 2005
R.L. 6
KH
7.
SYSTEMS INCORPORATING 90° ELBOWS AND 180° ELBOWS
The STS-JZ / IQ Series radiant tube heater can be installed in configurations as illustrated in FIGURE 2.
(below) with a maximum of two 90o elbows per heater. The use of radiant elbows reduces the total
maximum vent allowable. See SECTION 11 (PAGE 15): Re: Flue venting.The 90o elbows are shipped as
a kit with one coupler, one reflector and one plate hanger, for 180° elbows you must order 2 x 90° kits. An
optional angle mounting elbow kit is also available and must be ordered with elbow kits. The Reflectors
must be secured to each of the plate hangers, See FIG: 6 (PAGE 8).
IMPORTANT: On Models STS-JZ / IQ 200 and 175, a minimum of 30’ of straight radiant tube must be
connected to the burner before any elbow. On Models 155,130, 110 and 80, a minimum of
20’ of straight Radiant tube must be connected to the burner before any elbow. And on
Models STS-JZ / IQ 60 and 45, a minimum of 10' of straight radiant tube must be
connected to the burner before any elbow.
FIGURE 2 SYSTEM CONFIGURATIONS
Venting Options
A Flue Vent through wall 4”
B Flue Vent through wall or roof 6”
C Flue vent through roof
D Flue Vent into building, exhaust fan
interlocked with heater
E Combustion air intake from outside through wall
Combustion
System Configuration
1 Straight line
2 “U” tube with 2 x 900 degree elbow kits
3 “L” tube with 900 degree elbow kit
4 Twinned tubes into common TEE flue vent
6
8.
1)
2)
3)
4)
5)
SUSPENSION SYSTEM
Survey the available structural supports, considering the system configuration and heat requirements
of the area to establish the optimum heater location.
a) Locating a heater directly under joists or beams, or installing supplemental steel support rail or angle
iron can substantially reduce labour and materials
b) Consider that the heater will expand in length approximately ½ to 1inch for every 10 ft of system
length – the greater the firing rate, the greater the expansion
Tube system hangers must be located: 1) in line; 2) at a common height with the tube system level; and
3) approximately 116" apart.
a) NOTE: It is important that the tubes in the system are installed in alignment horizontally (level) and
vertically (in line) – this will help prevent tube separation
#8 Jack Chain or equivalent is recommended for suspending the heater
a) Connect the chain to the structure using hardware as illustrated in FIGURE 8 or by other
mechanically sound means
b) If rigid devices such as rods are used for suspension, swing joints or other means must be provided
to allow for system expansion (approximately ½ inch to 1inch for every 10 ft of system length).
Two types of hangers are provided to suspend the tube system – see FIGURES 3 & 4
a) Plate hangers support the tubes and reflectors at each end of the tube system
b) Webbed hangers support tubes and reflectors at each tube junction
Please NOTE that each hanger has a ‘flat’ side and a ‘cavity’ side – FIGURE 3
a) Starting at the burner end of the heater: all hangers except the last plate hanger are oriented with the
cavity side of the hanger facing toward the burner end
b) The cavity side of only the vent end plate hanger faces the vent - FIGURE 3
Proceed to section “9. Burner and Tube Installation”
FIGURE 3 MOUNTING BOTH PLATE HANGER TYPES
Intermediate Webbed Hanger
(note cavity side always faces Burner).
7
Use solid End Plate
Hanger at Burner
and Vent ends
(note cavity)
GP-MSJS-BX-06A
STS-JZ / IQ Manual
RD: SEPT, 2005
R.L. 6
KH
FIGURE 4 TYPICAL HANGER & SUPPORT SPACING RECOMMENDATIONS
FIGURE 5 REFLECTOR STABILIZER
FIGURE 6 PLATE HANGER/ELBOW INSTALLATION
4
2
4
6
3
6
5
1
3
5
JS-0508-JZ
1. Webbed-Hanger
2. Reflectors
3. Webbed-Hanger Flange UNDER Reflector
2
4. Webbed Hanger Flange to mount UNDER the next
Reflector
5. 900 Elbow (shown)
6. Tube/Elbow Coupler
8
FIGURE 7 HANGER / REFLECTOR ORIENTATION HORIZONTAL TO 45°
Side ring for
angle mounting
at 45° degrees
Top ring for
horizontal
mounting
Side ring for
angle mounting
at 45° degrees
Using 2 x 90° elbows will transform straight tubes into a
horizontal or angled “U” tube system as illustrated below
RETURN IS
ON TOP
BURNER MUST BE
LOWER THAN VENT
FIGURE 8 SUGGESTED MOUNTING HARDWARE
EYE BOLT
THROUGH
HOLE IN BEAM
BEAM CLAMP
WITH
EYE SCREW
EYE SCREW
9
PIPE RING
OR CLEVIS
HANGER
BAR-JOIST
CLAMP
GP-MSJS-BX-06A
STS-JZ / IQ Manual
RD: SEPT, 2005
R.L. 6
KH
9.
BURNER AND TUBE INSTALLATION
PRIOR TO PROCEEDING with the tube installation:
Refer to section “8. System Suspension”
IF a 90° or 180° elbow is to be installed in the system, refer NOW to the Elbow Kit installation
instructions supplied with the elbow kit
NOTE:
i)
Models STS-JZ/IQ 175 & 200 have an unpainted alumatherm tube with flange as the first tube,
and an unpainted aluminized steel tube as the second tube; all subsequent lengths are painted
steel
ii) If a turbulator is required in the system, it is factory installed inside clearly labelled tube(s) with
instruction as to where the tube(s) must be installed at the vent end of the system
1) All hangers must be:
a) Suspended at the same height = horizontal alignment of tubes
b) In a straight line = vertical alignment of tubes
c) Spaced 116" apart = correct spacing for reflector attachment
d) Oriented with the “cavity side” facing the burner end of the system (except the last plate hanger at
the vent end = the cavity side faces the vent)
2) Insert the swaged end of the first tube (tube with flange) through the 4" hole in the first plate hanger –
FIGURE 3
a) Ensure the ‘cavity’ side of the hanger faces the burner end of the system
b) Slide a Torctite tube coupler past the swage onto the tube
i) The final position of the coupler will be on the ‘burner-end’ side of the hanger
c) Guide the tube into the second hanger (webbed) – ensure the cavity side of the hanger faces the
burner end of the system
d) Position the first plate hanger 2 inches from the tube flange – this will ensure access to bolt the
burner to the flange
e) Check that the first tube is level
3) Install a focus shield reflector over the first tube - secure with sheet metal screws to the hanger at each
end
4) Install three reflector stabilizers on the bottom of the reflector
a) Equally space stabilizers with one at the reflector center point
b) Firmly bend the end tabs on each stabilizer up over the ‘trough’ at each side of the reflector
5) Slide a Torctite tube coupler past the swage onto the next tube to be installed
6) Insert the swaged end of the tube into the next hanger to support its weight
7) Slide the female end of the second tube over the swage of the first tube
a) Ensure that the swage on the first tube is fully inserted into the second tube
b) Adjust the hanger so that it is located on the second tube, approximately 2" from the end of the tube
– in this location the hanger supports both tubes.
c) Slide the Torctite coupler into position across the center of the joint
10
d) IMPORTANT: TOURQUE THE COUPLER BOLTS TO 40 FT-LBS
e) The coupler is now in place on the ‘burner-end’ side of the hanger
8) CHECK THAT THE SECOND TUBE IS LEVEL, ALIGNED HORIZONTALLY AND
VERTICALLY WITH THE FIRST TUBE – MAKE ADJUSTMENT AT SUSPENSION POINTS
AS REQUIRED
9) Install the reflector over the second tube fastening to the hangers at each end
10) Repeat the previous steps assembling one section of tube and reflector at a time until the system is
complete
11) ENSURE THAT THE SYSTEM IS LEVEL AND THAT ALL TUBES ARE ALIGNED
HORIZONTALLY AND VERTICALLY – MAKE ADJUSTMENT AT SUSPENSION POINTS AS
REQUIRED
12) Mount the Burner to the first tube flange using the four nuts and bolts provided
a) TIGHTEN THE BOLTS IN AN OPPOSITE CORNER SEQUENCE AND ENSURE THAT
THE BURNER IS IN HORIZONTAL ALIGNMENT WITH THE TUBE
13) The ‘center of gravity’ of the burner is slightly off-center to the tubes. So, in order to prevent side
rotation of the burner:
Install a support chain from the eye hook on the burner to a point approximately 8 to 10 inches
away (towards the burner) from the first tube hanger
i) DO NOT fasten the chain from the burner to the first hanger suspension point
The chain will angle back over the burner and allow “straight back” movement of the burner when
the system heats up and expands
FIGURE 10 BOLTING BURNER TO FLANGED TUBE
· Align the four bolts through the flange adapter on tube flange, secure tightly with lock washers and nuts
· Do not loosen or remove fifth nut (#1) directly below burner cup
· Secure suspension chain to eye hook in order to stabilize burner with chain in angled position
HEATER SHOULD BE SPACED AWAY FORM A WALL OR OBSTRUCTION THAT WOULD RESTRICT OR LIMIT
ACCESS TO THE SIDES OF THE BURNER PANEL FOR SERVICE OR REPAIRS.
(SEE PRE-INSTALLATION SURVEY AND MOUNTING CLEARANCES)
11
GP-MSJS-BX-06A
STS-JZ / IQ Manual
RD: SEPT, 2005
R.L. 6
KH
TABLE 4
MODEL
TURBULATOR LENGTH
(IF REQUIRED)
TURBULATOR LENGTH
(IF REQUIRED )
MOD EL
STS-JZ / IQ 200-70/60/50
10’
STS-JZ / IQ 110-40
10'
STS-JZ / IQ 175-70/60/50
10’
STS-JZ / IQ 110-30
14'
STS-JZ / IQ 155-60
not required
STS-JZ / IQ
80-40
10’
STS-JZ / IQ 155-50
not required
STS-JZ / IQ
80-30
14'
STS-JZ / IQ 155-40
10'
STS-JZ / IQ
80-20
14'
STS-JZ / IQ 130-50
not required
STS-JZ / IQ
60-30
14’
STS-JZ / IQ 130-40
10'
STS-JZ / IQ
60-20
14'
STS-JZ / IQ 130-30
14'
STS-JZ / IQ
45-20
5’
STS-JZ / IQ 110-50
not required
STS-JZ / IQ
45-10
5’
NOTE: Where required the STS-JZ / IQ Series Heaters will be supplied with the turbulators factory
installed into the end tube(s) of the system configuration, and the tubes marked for easy identification
on site.
FIGURE 11 COUPLER
4
1
3
5
2
1.
2.
3.
4.
Tube
Tube Coupler
Swaged section of tube
Point at which the Swaged tube slides into
other section of tube
5. Line of the joint
Once the two tubes are joined together,
place the centre of the Coupling over the
line of the joint and torque to 40ft/lbs.
12
FIGURE 13 MOUNTING FOCUS SHIELD REFLECTOR TO PLATE HANGER
1
2
3
4
Webbed Hanger Flange under Reflector
Screws to secure Reflector to Plate Hanger.
Chain Hole for horizontal suspension
Chain Hole for 45° suspension
5 Opening for Tube
6 Reflector
7 The following Reflector will mount over
and onto this side of the Webbed Hanger.
NOTE: For suspension between 1° and 44°, use both
suspension points 3 and 4 (see details Fig.15 on
Page 13).
10. FOCUS SHIELD REFLECTOR INSTALLATION
The focus shield reflector system can be adjusted to either side up to 45° from horizontal. SEE FIGURE 15
(PAGE 13), FIGURE 7(PAGE 9) Note that for both horizontal and angle mounting, the tube must be level
along its length. Improper mounting can result in overheating of controls and combustible materials. Use only
non-combustible mounting hardware.
13
GP-MSJS-BX-06A
STS-JZ / IQ Manual
RD: SEPT, 2005
R.L. 6
KH
FIGURE 15 HANGER ARRANGEMENTS
NOTE: Except for the vent end plate hanger, all hangers must be installed with the cavity side facing the burner end of
the system - the cavity side of the vent end hanger must face the vent
1
1
14
FIGURE 16 REFLECTOR EXTENSIONS
(optional - if required )
10”
•
•
Using “S” Hooks attach the two
Reflectors.
Make sure “S” Hooks are closed
15
GP-MSJS-BX-06A
STS-JZ / IQ Manual
RD: SEPT, 2005
R.L. 6
KH
11. FLUE VENTING
THIS STS-JZ / IQ SERIES IS APPROVED FOR BOTH DIRECT AND INDIRECT VENTING
APPLICATIONS. THE SYSTEM MUST NOT BE OPERATED WITHIN A NEGATIVE AIR CONDITION, UNLESS
COMBUSTION AIR IS BROUGHT IN FROM OUTSIDE DIRECTLY TO THE BURNER.
IF A SEVERE NEGATIVE PRESSURE IS EXPERIENCED OR ANTICIPATED, THE SECOND PORT (BARB) ON
THE BLOCKED FLUE SWITCH SHOULD BE CONNECTED DIRECTLY TO OUTSIDE AIR USING 1/4”
PLASTIC HOSE FROM BLOCKED FLUE SWITCH TO OUTSIDE OF BUILDING (NOT SUPPLIED).
INDIRECT VENTED APPLICATION
A length of ‘C’ Vent is to be installed on the swaged end of the last tube before any Tee or Elbow is fitted.
When the heater is installed and indirectly vented, it is required in Canada that the heater be electrically
interlocked to an independent exhaust fan by means of an Air Proving Switch. The exhaust fan must be sized
to create 3CFM for every 1000 Btu/hr or fraction thereof, of total input of installed equipment. Consult
CSA.B149.1-00 latest edition for requirements.
In the USA when a heater is installed unvented the system requires consideration of normal infiltration and
introduction of outside air by natural or mechanical means, and/or electrically interlocked to an independent
exhaust fan. Consult your local codes and ANSI Z223.1 latest edition. for all venting requirements, and
practices.
DIRECT VENTED APPLICATION
A length of ‘C’ Vent is to be installed on the swaged end of the last tube before any Tee or Elbow is fitted.
All venting must be single wall “C” vent except that portion of vent passing through a combustible wall or
roof then type “B” vent may be used as per CSA’s interim requirement. When venting horizontally, the flue
vent system must slope downwards approximately 1/4" per foot toward the vent terminal, starting at the
termination of the radiant tube. For horizontal through the wall venting, the approved 4" or 6" horizontal wall
vent terminal (JA- 0528/9) should be used and mounted 18" from the outside wall to the inside edge of
terminal opening to alleviate back pressure caused by turbulent wind conditions (See Fig. 17). This will also
ensure flue gases are directed away from the structure to protect building materials from degredation by the
exhausted flue gases. It is the sole responsibility of the installer to be familiar with current local codes or
ANSI Z223.1 / CSA.B149.1-00 latest editions for all venting requirements, and practices.
The heater is designed to operate with single wall 4” diameter 26 gauge minimum exhaust vent.
When vent and combustion air are taken through the roof, the exhaust vent should always terminate higher than
the combustion air intake, to prevent recycling the products of combustion back into the heater.
16
Figure 17
The total maximum allowable combined length of vent and combustion air duct is 80' for STS-JZ / IQ 200,
175, 155 and 130, and 50' for STS-JZ / IQ 110, 80, 60 and 45. Total maximum allowable combined vent and
duct is reduced by ten feet for every 90o elbow installed in the vent or duct. Should the tube system be installed
with a 90o or with a 180o elbow in the radiant tube, 10 ft or 20 ft respectively must be deducted from the length
of vent and duct. Neither the individual flue vent nor the combustion air duct is to exceed 50 ft in length.
Exceeding the allowable lengths may create condensation problems and will void CSA Design Certification.
The horizontal flue vent shall not terminate less than the following guidelines except where indicated in brackets:
·
One feet above grade level, unless its location is adjacent to public walkways, then it has to be not less than
seven feet.
·
Must be installed to prevent blockage by snow and protect building materials from degradation by flue
gases.
·
Directly below a soffit or over- hang.
·
Directly above a gas utility meter or service regulator.
·
Twelve inches from combustion air inlet of any heater with input up to 100,000 Btu/hr.
·
Three feet from combustion air inlet of any heater over 100,000 BTU.
·
Within six feet of a mechanical air supply inlet to any building.
·
Twelve inches from sides and bottom and eighteen inches from top when installed close to the corner of
a building.
·
All vent pipe with a slipfit connection must be mechanically secured. A length of ‘C’ Vent is to be installed
on the swaged end of the last tube before any Tee is fitted.
As an Option, two heaters may be vented through an approved common 4" X 4" X 6" Vent Tee, supplied by
the manufacturer. The two heaters must then be controlled by a single common thermostat or “ON/OFF”
switch.
GP-MSJS-BX-06A
17
STS-JZ / IQ Manual
RD: SEPT, 2005
R.L. 6
KH
Where the vent pipe passes through areas where the ambient temperature is likely to produce condensation of
the flue gases, the vent pipe shall be insulated with a suitable material as approved and specified by the
insulation manufacturer.Check with the manufacturers Technical Support as to the maximum vent temperature
requirements.
The vent system must always be adequately supported to prevent sagging.
(See Fig 4 Page 8)
FIGURE 18 FLUE VENT CONNECTION
FLUE VENT END
OF TUBE
For Direct and Indirect Venting it is recommended to install a length of ’C’ Vent onto the end of the
last tube before any fittings are installed. The “C” Vent connection should be slipped onto the tube
and positioned approx 6” beyond the swaged portion of the 4” tube and must be secured with sheet
metal screws.
PLEASE SEE SECTION 14: HEATER EXPANSION (PAGE 20).
12. COMBUSTION AIR DUCT
Where heater is operated in a negative air condition or in contaminated air atmosphere such as
woodworking shops, air for combustion must be ducted from outside to intake flange on blower. The total
maximum combined length of vent and combustion air duct is 80' for STS-JZ / IQ-200, 175, 155 and 130,
and 50' for STS-JZ / IQ 110, 80, 60 and 45. Neither the individual flue vent or combustion air duct is to
exceed 50'. The total maximum allowable combined vent /air duct is reduced by ten feet for every 90o vent
elbow installed.
18
Do not install filters on the combustion air intake.
For ease of installation, this heater has an optional fresh air intake duct hood. It can be used as an outdoor
intake hood to bring combustion air to the heater from outside. If drawing in fresh air from outside, it is
recommended as per common Engineering practice, that any single wall pipe exposed to cold air must be
insulated to prevent condensation. If heater is being vented horizontally through the wall and combustion air
is ducted in from outside to the Burner, it is advisable to create a trap at the Burner. The trap is created by
dropping the pipe below the level of the tube (much like a plumbing trap using elbows or a flexible
connector) before connecting it to the fresh air intake on top of the Burner box, Do not use flexible dryer
hose for air inlet duct, the corrugated sides of this tubing add too much restriction to the air flow. A good
quality industry approved insulated flex is allowed.
Minimum air intake inlet distances:
Æ Three feet above grade
Æ Twelve inches from flue vent terminal of heaters with input up to 100,000 Btu’s/hr.
Æ Three feet from flue vent terminal of any heaters over 100,000 Btu/hr.
CAUTION: In installations where chlorinated Hydrocarbons are in use, such as Trichloroethylene or
Chloroethylene Nu it is essential that combustion air be brought in from noncontaminated
areas. Burning the fumes from these gases will create Hydrochloric acid fumes, which are
detrimental to humans, equipment and buildings. Typical sources of other contaminants are
paint removers, paints, refrigerants, solvents, adhesives, degreasers, lubricants, pesticides,
etc.
13. GAS SUPPLY INSTALLATION
It is recommended that a locally approved flexible connector supplied by the distributor, be installed
between the heater and gas piping. The heater must be isolated from the gas supply piping system by closing
its individual manual shut off valve (supplied by installer) during any pressure testing of the gas supply piping
system.
CAUTION: If a rigid gas pipe connection is made, then compensation for normal gas supply pipe
expansion, and radiant tube expansion must be provided. All piping must conform to local
codes.
SEE SECTION 14: ( PAGE 20) HEATER EXPANSION
19
GP-MSJS-BX-06A
STS-JZ / IQ Manual
RD: SEPT, 2005
R.L. 6
KH
DO NOT use pressures greater than 1/2 psig. to pressure check the heater.
TEST FOR LEAKS: All gas piping and connections must be tested for leaks after the installation
is completed.
Apply soap suds solution to all connections and joints and if bubbles appear, leaks have been detected and
must be corrected. DO NOT USE A MATCH OR OPEN FLAME OF ANY KIND TO TEST FOR
LEAKS. NEVER OPERATE THE HEATER WITH LEAKING CONNECTIONS.
The supply system should be checked first with heater turned “OFF” followed by another check with heater
turned “ON”.
IMPORTANT: The minimum supplyline pressure at the inlet to the heater regulator must not, in
any instance, be lower than 5.5 inches of water column pressure for natural gas
and 11.0 inches of water column pressure for propane gas. The supply line gas
pressure must be checked with all the heater (s) operating.
Installation of a gas line (trap) “drip leg” is required at the inlet connection tee
following the pipe drop to the heater. Failure to provide a “drip leg” could result in
condensation and foreign matter passing into the gas valve. Failure to install a
“drip leg” in the gas line will void the warranty.
TABLE 5
GAS TYPE
Natural Gas
Propane
LINE PRESSURE
INC H WATER C OLUMN
MINIMUM
MAXIMUM
5.0
11.0
14.0
14.0
MANIFOLD PRESSURE
INC H WATER C OLUMN
AT-TAPIN GAS VALVE
3.5
10.0
NOTE:
Access to the manifold pressure test port is on the top of the valve. A 3/16" Allen Wrench is necessary to check
this. When checking or setting the manifold pressure, a water manometer should be used. Gauges which
measure in ounces per square inch or pounds per square inch are not accurate enough to properly measure or
set the pressure. PLEASE SEE NEXT SECTION ON HEATER EXPANSION.
20
14. HEATER EXPANSION
The Btu/hr input and the tube length determine the overall expansion that occurs in a tube system. A typical infrared tube installation
will expand toward both the Burner and the vent end. In order to address this issue it is suggested that the gas line, flue vent, and
combustion air intake (if used) shall be installed in such a manner that the normal expansion of the heater will be accommodated.
Tube Le ngth in Fe e t
Btu/Hr Input Rating
Approximate Ove rall Expans ion
10 ft
45,000
1”
20 ft / 30 ft
45,000
1 1/4”
20 ft / 30 ft
60,000
1 1/2”
20 ft / 30 ft / 40 ft
80,000
1 3/4”
20 ft / 30 ft / 40 ft / 50 ft
110,000
2”
30 ft / 40 ft / 50 ft
130,000
2”
40 ft / 50 ft / 60 ft
155,000
2 1/2”
40 ft / 50 ft / 60 ft
175,000
2 3/4”
50 ft
200,000
2 3/4”
60 ft
130,000
2 1/2”
60 ft
200,000
3 1/4”
21
GP-MSJS-BX-06A
STS-JZ / IQ Manual
RD: SEPT, 2005
R.L. 6
KH
15. ELECTRICAL AND THERMOSTAT WIRING
(SEE WIRING DIAGRAMS PAGES 23, 26)
Wiring must be done in accordance with local codes. The total load of all heaters must be considered in
determining the required contact rating of the controlling thermostat or switch. Each tube heater requires
120V, 60 HZ electrical power sized for 145VA. The heater can be controlled by the Tru-Temp
Thermostat, a line voltage Thermostat or by an “ON/OFF” switch. Any heater(s) intended for 24v
thermostat control must be ordered with the 24v control options.
WARNING: The heater must be electrically grounded in accordance with the National Electrical Code.
ANSi/NFPA 70 or current Canadian Electrical code CSA C22.1.
16. HIGH ALTITUDE INSTALLATIONS
Canada: All of the STS-JZ / IQ radiant tube heaters are approved for altitudes zero to 4500 feet above sea
level and do not require de-rating.
USA if a heater is to be installed at altitudes above 2000 ft, the input must be reduced by 4% per 1000 ft. If
your local utility de-rates the heat content in the gas supply, no modification of the heater is required. If the
gas supply is not de-rated, the orifice must be changed according to the chart on page 36. Check with your
local utility regarding de-rating of this appliance.
17. LIGHTING INSTRUCTIONS
Refer to the lighting instructions on the outside cover of the burner housing. Again, if the unit locks out on
safety, main power to the unit must be manually interrupted for a 30 second reset period before the heater can
be restarted.
NOTE:
On initial installation, the unit may lock out on safety owing to the length of time
required to bleed air from the gas piping system.
18. RECOMMENDED MAINTENANCE
1. Inspect the venting system each heating season and repair or replace worn parts as required.
2. Check the inlet air opening and the blower periodically, cleaning off any lint or foreign matter, as it is
important that the flow of combustion and ventilation air must not be obstructed. In addition we recommend
the entire system be checked once a year by a qualified service technician.
3. Lubricate Blower motor, by adding several drops of oil to oil ports located on the left hand side of the
motor.
THE TUBE HEATER BURNER IS COMPLETELY FACTORY ASSEMBLED AND TESTED. ANY ALTERATION VOIDS
THE CSA CERTIFICATION AND MANUFACTURER’S WARRANTY. FOR ADDITIONAL INFORMATION, CONTACT
YOUR LOCAL DISTRIBUTOR OR MANUFACTURER.
22
19. SEQUENCE OF OPERATION HONEYWELL - S87J-1034
The S87 is powered by a 25v transformer and activated when the thermostat calls for heat. On every call for
heat the S87J will delay start-up to provide a 30 second system pre-purge. When the S87 is activated by a
thermostat or call for heat an internal transformer provides power to the electronic generator circuit for Spark
Ignition and the safety lockout timing begins. At the same time, the S87 opens the gas controls main valve
allowing gas to flow to the main Burner.
The S87 Control Module performs the following basic functions:
• Provides a 30 second system pre-purge
• Supplies power to the electronic pulse-generator circuit for the Spark Igniter (30,000 volts open circuit).
• Allows 21 seconds for Ignition trial (TFI) before system safety lockout occurs.
• Senses the Burner flame for safe lighting
• Shuts off the spark after the Burner is lit.
The STS-JZ / IQ Burner with direct spark ignition, sequence is as follows :
1. Upon a call for heat by the line voltage Thermostat or “ON/OFF” switch, the Blower and the 120/24 volt
Transformer are powered simultaneously with 115 volts.
1a. Field installed 24 volt option: The 120 volt supply to heater will power the 120v/24v Transformer and
the 120V side of the Blower switching relay simultaneously. A call for heat by the 24 volt Thermostat
energizes the 24 volt control circuit and the 24v/120 volt relay powering the Blower.
2. The 24 volt control circuit powers the DSI control in series through the normally open Air Pressure Switch
(APS) and the normally closed Blocked Flue Switch (BFS).
3. The Blower creates a positive pressure and closes a normally open contact inside the Air Proving Switch
(APS).
4. 24 volts supplied to the DSI control initiates the 30 second prepurge cycle.
5. After completing the 30 second pre-purge cycle the DSI control generates high voltage to the Spark
Igniter, and 24 volts to energize the Gas Valve.
6. The Burner will light and establish a steady flame.
7. Once the flame sensor determines there is a steady flame established, with a minimum flame signal of 1.5
uA the spark igniter is then de-energized.
8. In the event ignition does not occur, the safety circuit will function to interrupt gas flow after approximately
21 seconds and lock the system out. No further gas will flow until the power has been manually interrupted
for a period of 30 seconds. This will reset the ignition module and the operating sequence will restart at
step #1
9. If the blower does not run, the blower air pressure switch (normally open contact) does not close and
power is not supplied to the ignition control.
GP-MSJS-BX-06A
23
STS-JZ / IQ Manual
RD: SEPT, 2005
R.L. 6
KH
WIRING DIAGRAM - HONEYWELL S87J1034 with 120 V thermostat
LEAVE JUMPER
IN UNLESS 24V
RELAY IS BEING
INSTALLED
THERMOSTAT OPTIONS:
INSTALL 120V THERMOSTAT IN SERIES WITH 3 PRONGED
PLUG RECEPTACLE .
REMOVE 3 WIRE CORD FROM HEATER AND INSTALL IN
SERIES WITH 120V SUPPLY TO HEATER TERMINAL
BLOCK.
24
TROUBLESHOOTING GUIDE - HONEYWELL S87J-1034 120V THERMOSTAT
APPLY 115 VOLTS - GREEN LIGHT IS ON
SET THERMOSTAT TO CALL FOR HEAT
ON 24V OPTION ONLY:
THE SWITCHING RELAY ENERGIZES, SENDING
115 VOLTS TO THE BLOWER
COMBUSTION AIR BLOWER STARTS
CHECK IF 115 VOLTS PRESERNT AT BLOWER IF
SO.....REPLACE DEFECTIVE BLOWER
NO
ON 24V OPTION ONLY:
•CHECK FOR 115V FROM SWITCHING RELAY.
•CHECK 24V SIDE OF RELAY VOLTAGE.
•CHECK 115V LINE SIDE OF RELAY VOLTAGE
•CHECK OPERATION OF BOTH CIRCUITS.
YES
•IF NO SWITCHING IS TAKING PLACE......
REPLACE THE SWITCHING RELAY
A.P.S. HAS CLOSED (B.F.S. IS CLOSED)
24 VOLTS PRESENT AT DSI CONTROL.
AMBER LIGHT IS ON
YES
•CHECK AIR INTAKE AND FLUE ARE NOT
OBSTRUCTED
•CHECK PRESSURE TUBE IS CONNECTED AND
NOT BLOCKED OR KINKED.
•CHECK IF AIR PROVING SWITCH IS CLOSING
WHEN BLOWER IS RUNNING.
•CHECK AIR PRESSURE WITH MANOMETER.
REPLACE ANY DEFECTIVE SWITCHES.
NO
SPARK IGNITER / SENSOR
YES
•CHECK DSI CONTROL FUSE FOR CONTINUITY.
•VISIBLY CHECK IF IGNITER IS SHORTING OUT.
•CHECK GROUND WIRING.
•REMOVE AND INSPECT IGNITER AND LEAD.
•CHECK BOOT OF THE IGNITION CABLE FOR
SIGNS OF MELTING OR OVERHEATING, IF SO
TAKE PROTECTIVE ACTION TO SHIELD CABLE
AND BOOT FROM EXCESSIVE TEMPERATURES.
•CHECK CERAMIC INSULATOR AND CAP.
•CHECK SPARK GAP SETTING IS 3/16”. (ADJUST
BY MOVING THE GROUND PRONG ONLY.)
•PERFORM IGNITION LEAD TEST (SEE SPARK
IGNITION CIRCUIT INSTRUCTIONS)
•GOOD SPARK.....REPLACE IGNITER
•NO SPARK/OR WEAK.....REPLACE CONTROL
NO
24V TO GAS VALVE - RED LIGHT IS ON
CONTINUED
25
GP-MSJS-BX-06A
STS-JZ / IQ Manual
RD: SEPT, 2005
R.L. 6
KH
•CHECK FOR GOOD SPARK AT IGNITER........
(SEE PREVIOUS PAGE).
•CHECK FOR 25 VAC ACROSS GAS VALVE.
•CHECK OUTPUT VOLTAGE FROM CONTROL
TERMINALS TO GAS VALVE.....IF NO VOLTAGE
REPLACE CONTROL.
•CHECK ELECTRICAL WIRING, AND VOLTAGE
BETWEEN IGNITION CONTROL AND GAS VALVE.
•IF OK, REPLACE GAS VALVE.
MAIN BURNER LIGHTS
YES
NO
SPARK STOPS WHEN BURNER LIGHTS
CONTROL IS NOT SENSING FLAME WITHIN THE
21 SECOND TFI AND IS STILL TRYING TO LIGHT
NO
•CHECK CONTINUITY OF SENSOR CABLE AND
GROUND WIRE
•CHECK BURNER FLAME IS COVERING
SENSOR.
•CHECK FLAME SIGNAL IN SERIES WITH THE
GROUND AND MODULE FOR 1.5UA MINIMUM.
•IF SIGNAL IS LOWER CHANGE IGNITER.
•IF CHECKS ARE OK.......REPLACE CONTROL.
YES
SYSTEM RUNS UNTIL CALL FOR HEAT ENDS
YES
NOTE: IF IGNITION CONTROLS GOES INTO A
LOCKOUT, SHUT DOWN BURNER AND RESTART.
•CHECK CONTINUITY OF SENSOR CABLE AND
GROUND WIRE AS A POOR GROUND COULD
RESULT IN ERRATIC BEHAVIOUR AND
NUISANCE SHUTDOWNS EVEN THOUGH
OPERATION IS NORMAL AT THE TIME OF
CHECKOUT.
•CHECK FOR EXCESSIVE HEAT AT SENSOR
INSULATOR AS TEMPERATURES ABOVE
1000°F(538°C) CAUSES SHORT TO GROUND.
•CHECK FLAME SIGNAL IN SERIES WITH THE
GROUND AND MODULE FOR A MINIMUM 1.5UA.
•IF SIGNAL IS LOWER CHANGE IGNITER.
•IF CHECKS ARE OK.....REPLACE CONTROL.
NO
CALL FOR HEAT ENDS: SYSTEM SHUTS OFF
YES
•CHECK TEMPERATURE CONTROLLER.
•CHECK FOR PINCHED WIRING, REMOVE GAS
VALVE LEAD AT CONTROL , IF VALVE CLOSES,
RECHECK THE TEMPERATURE CONTROLLER
AND WIRING.
• IF VALVE STAYS OPEN....REPLACE GAS
VALVE
NO
TROUBLESHOOTING ENDS
SE S87J DSI CHECK
26
WIRING DIAGRAM - 24 VOLT OPTION -HONEYWELL S87J-1034
(with jumper removed)
THERMOSTAT OPTIONS:
INSTALL 120V THERMOSTAT IN SERIES WITH 3 PRONGED
PLUG RECEPTACLE .
REMOVE 3 WIRE CORD FROM HEATER AND INSTALL IN
SERIES WITH 120V SUPPLY TO HEATER TERMINAL BLOCK.
27
GP-MSJS-BX-06A
STS-JZ / IQ Manual
RD: SEPT, 2005
R.L. 6
KH
20. SPARK IGNITION CIRCUIT
The step-up transformer in the ignition control provides spark ignition at 30,000 volts (open circuit). To
check the spark ignition circuit, proceed as follows.
•
•
•
Shut off gas supply to the gas control
Disconnect the ignition cable at the ignition control stud terminal to isolate the circuit from the Spark
Igniter or Igniter / Sensor
Prepare a short jumper lead, using heavily insulated wire such as ignition cable
CAUTION
In the next step, DO NOT allow fingers to touch either the stripped end of the jumper
or the stud terminal. This is a very high voltage circuit and electrical shock can result.
•
Perform this test immediately upon energizing the system before the Ignition Control goes into safety
lockout and interrupts the spark circuit. Touch one end of the jumper firmly to the ignition control GND
terminal. (DO NOT remove the existing ground lead.) Slowly move the other end of the jumper wire
toward the stud terminal on the Ignition Control to establish a spark.
• Pull the wire away from the stud and note the length of gap at which spark discontinues.
• A spark length of 1/8 in. (3mm) or more indicates satisfactory voltage output. If no arc can be
established, or the maximum spark is less than 1/8 in. (3mm), and power to the Ignition Control input
terminals was proved, replace the Ignition Control.
Turn off the power and reconnect the Ignition Wire to the Ignition Control stud. Disconnect the Ignition Wire
from the Igniter and repeat the steps above by grounding the wire out to the tube body this time. Turn on the
power and pull the wire away from the tube and note the length of gap at which the spark discontinues. If
there is no spark or weak spark replace the Ignition Wire.
SPARK IGNITER SET UP
3/16”
Please use the following diagram for checking the
Igniter gap.
If the gap is incorrect all adjustments should be
made with the GROUND PRONG/PIN ONLY!
DO NOT BEND THE IGNITER PRONG!!!!
1/4”
The black bars located at the lower right corner can
be used as a guide for adjustment.
28
21.
FLAME SENSING CIRCUIT - HONEYWELL S87C DSI CONTROL
Flame current is the current which passes through the flame from the sensor to ground. The minimum flame
current necessary to keep the Honeywell S87C system from lockout is 1.5 uAmps (microamps). The
output of the flame sensing circuit cannot be checked directly on the S87C Control body. The flame
sensing circuit current can be checked by bridging the flame sensing current from the sensor to the
S87C as follows.
1. Connect a meter (dc microammeter scale) in series with the flame sensor wire as shown below.
Using the Honeywell W136A Test Meter or equivalent. Disconnect the sensor wire from the
S87C, Connect the red (positive) meter lead to the free end of the sensor wire. Connect the
black (negative) meter lead to the quick-connect sensor terminal on the S87C.
2. Restart the system and read the meter. The flame sensor current must be at least 1.5 uA and steady. If
the reading is less than 1.5uA or unsteady, see LOW OR UNSTEADY FLAME CURRENT section,
below.
If a flame is present at sensor and a reading of zero uA is obtained, check for a secondary ground
connection to the 25V (GND) terminal. If secondary connection exists, temporarily remove
connection and measure flame current again.
LOW/ UNSTEADY FLAME CURRENT
If the current to the S87C flame circuit is less than
connect to
Sensor spade
wire from
on S87C
1.5 uA or is unsteady, check the burner flame,
sensor
flame sensor location and electrical connections as
follows.
Electrical Connections and Shorts
Connections at the flame sensor must be clean
and tight. If wiring needs replacement, use
moisture- resistant #18 wire rated for continuous
duty up to 1050 C [2210 F].
1”
1/4” to 1/2”
Flame Sensor
The flame signal is best when about 1 in. [25 mm]
of flame rod is immersed in the burner flame. A bent
flame rod, or mounting bracket or a cracked
ceramic in-sulator can affect flame signal. Replace
flame sensor if necessary.
A good rectifying flame is
achieved with approx 1” of
sensor in a strong blue
flame, positioned 1/4” to
1/2” away from flame
source surface.
Burner Flame
The flame sensor must be constantly immersed in
flame. Check burner flame conditions as shown
opposite. Observe Burner rating plate for the
correct gas pressure, and check it with a
manometer. If gas pressure is OK
check gas line and orifice for obstructions.
A lazy or weak flame is
not a good rectifying
flame. Check gas pressure
and gas line/orifice etc for
insects.and spider
cocoons.
29
GP-MSJS-BX-06A
STS-JZ / IQ Manual
RD: SEPT, 2005
R.L. 6
KH
22. COMMISIONING REPORT
AS PER I&O MANUAL AND LOCAL CODES
CONTRACTOR NAME: ................................................................................DATE................................
ADDRESS:............................................................................................................................................
............................................................................................................................................................
CITY:........................................................................................
PHONE:...................................................................................
CELL: .....................................................................................
JOB SITE......................................................................................................CITY................................
HEATER MODEL NUMBER:................................................................................
HEATER SERIAL NUMBER: ................................................................................
EQUIPMENT HAS BEEN FACTORY FIRED AND TESTED BEFORE DELIVERY, NEVERTHELESS
IT IS NOT A PLUG IN APPLIANCE..IT DOES REQUIRE COMMISSIONING AND FIELD ADJUSTMENTS
TO ENSURE THAT SITE CONDITIONS ARE COMPATIBLE WITH THIS HEATER, AND TO
ALLEVIATE NUISANCE CALL BACKS FOR THE CONTRACTOR, THE FOLLOWING
START-UP NEEDS TO BE COMPLETED BY THE LICENSED GAS INSTALLER.
A CONTRACTOR
CALLING
FOR
TECHNICAL SUPPORT
A CONTRACTOR
CALLING
FOR
TECHNICAL
SUPPORT,
MUST
PROVIDE
THE
FOLLOWING
INFORMATION
FROM
COMPLETED
MUST PROVIDE FOLLOWING INFORMATIONHIS
FROM
COMMISSIONING REPORT (NEXT PAGE)
HIS COMPLETED COMMISSIONING REPORT
ON NEXT PAGE
FAX COMPLETED FORM TO TECHNICAL SERVICES: CANADA - 905-712-8336 USA - 706-554-9390
30
TO BE COMPLETED BY THE LICENSED INSTALLER:
PATIO HEATER COMMISSIONING REPORT
TYPE OF GAS:
NG
LP
IS HEATER EXPOSED TO CHEMICAL OR CORROSIVE ATMOSPHERE:
YES
NO
IS AN OPEN FLAME COMPATIBLE WITH THE INSTALLED LOCATION:
YES
NO
MINIMUM CLEARANCES CONFORM AS PER I&O MANUAL:
YES
NO
IF THIS IS A HIGH ALTITUDE AREA WHAT IS THE ALTITUDE ABOVE SEA LEVEL
Feet
IS HEATER SHORT AXIS HORIZONTAL WITH THE VENTURI ON TOP:
YES
NO
IS GAS SUPPLY LINE ADEQUATELY SIZED FOR SYSTEM VOLUME:
YES
NO
HAVE GAS LINES AND BRANCHES BEEN PURGED OF AIR:
YES
NO
THIS HEATER WAS FIELD TEST FIRED WITHOUT ANY MALFUNCTION:
YES
NO
INLET GAS SUPPLY PRESSURE WITH HEATER OPERATING:
WC"
GAS VALVE OUTLET (Manifold) PRESSURE WITH HEATER OPERATING:
WC"
HAS THE WIRING POLARITY BEEN MAINTAINED THROUGHOUT:
YES
WHAT IS THE VOLTAGE READING AT THE IGNITION MODULE:
NO
VOLTS
WHAT IS THE FLAME SIGNAL STRENGTH IN uA FROM SENSOR:
uA (microamps)
IS THE HEATER CONTROLLED BY A THERMOSTAT:
YES
NO
IS THE THERMOSTAT STRATEGICALY LOCATED:
YES
NO
TOTAL HEATERS SUPPLIED FROM ONE SINGLE TRANSFORMER:
TOTAL
WHAT IS THE RATING OF THE TRANSFORMER IN VA:
V.A.
WHAT IS THE TOTAL LENGTH OF THE LOW VOLTAGE WIRING:
FEET
WHAT IS THE GAUGE OF THE LOW VOLTAGE WIRING:
DOES THE HEATER HAVE GOOD ELECTRICAL GROUNDING:
GAUGE
YES
NO
* FAX COMPLETED FORM TO TECHNICAL SERVICES: CANADA - 905-712-8336 USA - 706-554-9390
31
GP-MSJS-BX-06A
STS-JZ / IQ Manual
RD: SEPT, 2005
R.L. 6
KH
23. OPTIONAL COMPONENTS: FOR STS-JZ / IQ SERIES TUBE HEATERS
Flue Vent Terminals
JA-0528-XX
JA-0529-XX
4” wall horizontal
6” wall horizontal
Flue Vent Terminals
JA-0530-XX
JA-0531-XX
4” roof vertical
6” roof vertical
Torctite Coupler (c/w 2 bolts)
JA-0516-SW
Vent Tee 4” x 4” x 6”
(2 couplers optional)
JA-0514-XX
32
90 degree Aluminized Steel Elbow Kit*
*Kit includes: elbow, coupler, reflector
and plate hanger.
JS-0508-JZ
For 180 degree Elbow Applications
order 2 x 90 degree Elbow Kits.
Flexible Gas Connerctor
JL-0771-FF
Line Voltage Thermostat
(Not to be used in corrosive or wet environments)
JL-0772-XX
10’ Tube & Reflector Extension Kit
(1-10” steel tube, 1-10’ Reflector, 1 hanger, 1
coupler, 3 reflector stabilizers
TS-1010-CX
33
GP-MSJS-BX-06A
STS-JZ / IQ Manual
RD: SEPT, 2005
R.L. 6
KH
TruTemp Thermostat
(Do not use in wet or corrosive environments)
JM-0150-XX
Low Voltage Thermostat - 24 volts
(Not to be used in wet or corrosive environments)
JS-0568-KT
24 Volt Option
Single heater per Thermostat
(for field mounting in Burner housing)
(TruTemp or 24 Volt Thermost extra)
JS-0568-KT
24 Volt Option
Multiple Heaters per Thermostat
(for field mounting in burner housing)
JM-0303-KT
34
Hanging Chain
(box of 50ft)
JL-0798-XX
Touch Up Paint - High Temperature
369g aerosol can
JA-0587-XX
Tube Protection Screen - 5 feet long
JA-0780-XX
Side Reflector Extension 10” deep, 10 ft long each
JS-0509-XX-P
35
GP-MSJS-BX-06A
STS-JZ / IQ Manual
RD: SEPT, 2005
R.L. 6
KH
24. ORIFICE - ALTITUDE CONVERSION CHART
STD
ORIFICE
DMS
2000
3000
4000
5000
6000
7000
8000
STS-JZ / IQ-45N
JS-0729-DM
JS-0729-DM
JS-0730-DM
JS-0730-DM
JS-0730-DM
JS-0730-DM
JS-0731-DM
JS-0731-DM
STS-JZ / IQ-45L
JS-0746-DM
JS-0746-DM
JS-0746-DM
JS-0748-DM
JS-0748-DM
JS-0748-DM
JS-0749-DM
JS-0749-DM
STS-JZ / IQ-60N
JS-0725-DM
JS-0726-DM
JS-0727-DM
JS-0727-DM
JS-0728-DM
JS-0728-DM
JS-0729-DM
JS-0729-DM
STS-JZ / IQ-60L
JS-0742-DM
JS-0742-DM
JS-0743-DM
JS-0743-DM
JS-0743-DM
JS-0744-DM
JS-0744-DM
JS-0745-DM
STS-JZ / IQ-80N
JS-0718-DM
JS-0719-DM
JS-0719-DM
JS-0720-DM
JS-0721-DM
JS-0722-DM
JS-0723-DM
JS-0724-DM
STS-JZ / IQ-80L
JS-0736-DM
JS-0738-DM
JS-0739-DM
JS-0739-DM
JS-0740-DM
JS-0741-DM
JS-0742-DM
JS-0742-DM
STS-JZ / IQ-110N
JS-0752-MM
JS-0751-MM
JS-0750-MM
JS-0709-DM
JS-0711-DM
JS-0719-IN
JS-0713-DM
JS-0714-DM
STS-JZ / IQ-110L
JS-0731-DM
JS-0732-DM
JS-0732-DM
JS-0732-DM
JS-0733-DM
JS-0734-DM
JS-0735-DM
JS-0736-DM
STS-JZ / IQ-130N
JS-0758-MM
JS-0757-MM
JS-0756-MM
JS-0755-MM
JS-0703-DM
JS-0704-DM
JS-0705-DM
JS-0720-IN
STS-JZ / IQ-130L
JS-0729-DM
JS-0729-DM
JS-0730-DM
JS-0730-DM
JS-0730-DM
JS-0730-DM
JS-0731-DM
JS-0731-DM
STS-JZ / IQ-155N
JS-0725-IN
JS-0764-MM
JS-0763-MM
JS-0762-MM
JS-0761-MM
JS-0760-MM
JS-0759-MM
JS-0758-MM
STS-JZ / IQ-155L
JS-0714-IN
JS-0735-MM
JS-0729-DM
JS-0734-MM
JS-0733-MM
JS-0733-MM
JS-0730-DM
JS-0713-IN
STS-JZ / IQ-175N
JS-0767-MM
JS-0766-MM
JS-0766-MM
JS-0765-MM
JS-0765-MM
JS-0764-MM
JS-0763-MM
JS-0763-MM
STS-JZ / IQ-175L
JS-0721-DM
JS-0723-DM
JS-0723-DM
JS-0724-DM
JS-0725-DM
JS-0726-DM
JS-0727-DM
JS-0728-DM
STS-JZ / IQ-200N
JS-0730-IN
JS-0774-MM
JS-0773-MM
JS-0773-MM
JS-0772-MM
JS-0728-IN
JS-0771-MM
JS-0770-MM
STS-JZ / IQ-200L
JS-0719-DM
JS-0720-DM
JS-0720-DM
JS-0721-DM
JS-0722-DM
JS-0723-DM
JS-0725-DM
JS-0726-DM
MODEL NO.
FOR USE AT ALTITUDES ABOVE (FEET)
36
LIMITED WARRANTY CERTIFICATE
FOR GAS-FIRED INFRA-RED LOW INTENSITY TUBE HEATERS: STS-JZ / IQ, STV-JZ / IV, STW-JZ / IW, SPW-JZ /
IWP & STR-JZ SERIES
The Manufacturer warrants that this product is free from defects in material or workmanship under normal use and service subject to
the terms of this document.
THREE YEAR WARRANTY
Subject to the conditions and limitations stated herein, during the term of this limited warranty, we will supply any component part
(at our option a new or repaired component part) of the heater as defined below, excluding any labor , which the Manufacturer’s examination determines to be defective in workmanship or material for a period of three years (3 years) from the date of installation,
25.
LIMITED
WARRANTY
unless otherwise specified
below.
This warranty
applies to the heater’s original owner, and subsequent transferees and only if the
unit is installed and operated in accordance with the printed instructions accompanying the unit and in compliance with all applicable installation, building codes and good trade practices. Warranty is only applicable to Schwank components, other parts are limited
to their own Manufacturers warranty. (1 year)
TEN YEAR WARRANTY
The Manufacturer warrants the burner sub-assembly comprising of ceramic and immediate metal tubing, and the radiating tubes
(excluding couplings) for a period of ten years. (10 years)
WHAT IS NOT COVERED
The Manufacturer shall not be responsible for any expenses, including service, labor, diagnosis, analysis, material or transportation
charges incurred during removal or reinstallation of this product, or any of its components or parts. All labor or service charges shall
be paid by the owner. This warranty does not cover heating products improperly installed, misused, exposed to or damaged by negligence, accident, corrosive or contaminating atmosphere, water, excessive thermal shock, impact, abrasion, normal wear due to use,
alteration or operation contrary to the owner’s manual or if the serial number has been altered, defaced or removed. This warranty
shall not apply if the input to the heating product exceeds by more than 2% of the rated input on the rating plate. The Manufacturer
shall not be liable for any default or delay in performance by its warranty caused by any contingency beyond its control, including
war, government restrictions, or restraints, strikes, fire, flood, acts of God, or short or reduced supply of raw materials or products.
WARRANTY PROCEDURE
To establish the installation date for any purpose under this Limited Warranty, you must retain the original records that can establish
the installation date of your unit. If you do not provide such documents, the start date of the term of this Limited Warranty will be
based upon the date of unit manufacture, plus thirty (30) days. Failure to maintain the equipment through regular annual service
maintenance by a qualified service technician shall void the warranty.
LIMITATIONS AND EXCLUSIONS
This document contains all warranties made by the Manufacturer and may not be varied, altered or extended by any person. There
are no promises, or agreements extending from the Manufacture other than the statements contained herein. THIS WARRANTY IS
IN LIEU OF ALL WARRANTIES EXPRESSED OR IMPLIED, TO THE EXTENT AUTHORIZED BY THE LAWS OF THE
JURISDICTION, INCLUDING SPECIFICALLY THE WARRANTIES OR MERCHANTIBILITY OF FITNESS FOR A PARTICULAR PURPOSE.
It is understood and agreed that the Manufacturer’s obligation hereunder is limited to repairing or replacing parts determined to be
defective as stated above. In no event shall the Manufacturer be responsible for any alleged personal injuries or other special, incidental or consequential damages. As to property damages, contract, tort or other claim the Manufacturer’s responsibility shall not
exceed the purchase priced paid for the product.
All replacement parts will be warranted for the unused portion of the warranty coverage period remaining on the applicable unit.
Some Authorities do not allow certain warranty exclusions or limitations on how long a warranty lasts or the exclusions or limitations of incidental or consequential damages. In such cases, the above limitations or exclusions may not apply to you and are not
intended to do so where prohibited by law. This warranty gives you specific legal rights. You may also have other rights which
vary by each jurisdiction.
5285 BRADCO BLVD. MISSISSAUGA, ON, L4W 2A6
2 SCHWANK WAY, WAYNESBORO, GEORGIA. 30830-8336
SCHWANK INC.
INFRASAVE INC.
Ph: 905-712-4766 Fax: 905-712-8336
Ph: 1-866– INFRASV (463 7278) Fax: 1-866-724 –9265
37
GP-DSTX-BX-02A
JZ Series Warranty
AUGUST 2005
RL: 2
KH
GP-MSJS-BX-06A
STS-JZ / IQ Manual
RD: SEPT, 2005
R.L. 6
KH