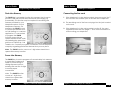
1
User’s Guide
4666-200(2003 04) C
Regency™ Series 200
Single Line Telephone
User’s Guide
User’s Guide
Notes
Safety Precautions, Care and Maintenance
When using your telephone equipment, follow basic safety
precautions to reduce the risk of fire, shock and injury to persons:
1. Read all instructions.
2. Follow all warnings and instructions marked on the product.
3. Before cleaning, unplug this product from the wall. Use a
damp cloth for cleaning. Do not use liquid cleaners or
aerosol cleaners.
4. Do not use this product near water, for example, near a
bathtub, washbowl, kitchen sink or laundry tub, in a wet
basement, or near a swimming pool.
5. Do not place this product on an unstable cart, stand, or table.
The product may fall, causing damage to the product.
6. Do not block or cover the slots and openings in the cabinet
and on the back or bottom of the product. Do not place the
product on the bed, sofa, rug, or other similar surface.
7. Do not place this product near or over a radiator or heat
register.
8. Do not place this product in a built-in installation unless proper
ventilation is provided.
9. Never push objects of any kind into this product through
cabinet slots. This could result in fire or electric shock. Never
spill liquid of any kind on the product.
10. To reduce the risk of electric shock, do not disassemble this
product. When service or repair is required, take it to a
qualified serviceperson.
Regency™ Series 200 Single Line Telephone
17
Regency™ Series 200 Single Line Telephone
User’s Guide
User’s Guide
Using the Features and Options
Safety Precautions, Care and Maintenance
11. Unplug this product from the wall outlet and refer servicing to
qualified personnel under the following conditions:
a) If liquid has been spilled into the product.
b) If the product has been exposed to rain or water.
c) If the product does not operate according to the
operating instructions.
d) If the product has been dropped or the cabinet has been
damaged.
e) If the product exhibits a distinct change in performance.
12. Do not use the telephone (other than a cordless type) during
an electrical storm. There is a remote risk of electrical shock
from lightning.
13. Do not use the telephone to report a gas leak if the telephone
is in the vicinity of the leak.
14. Keep the telephone dry. Wipe immediately if wet. Liquids
may contain minerals that can corrode the electronic circuits.
15. Use and store the telephone in a moderate temperature
environment. Extreme temperatures can shorten the life of
electronic devices, damage batteries and distort or melt
plastic parts.
16. Keep the telephone away from excessive dust and dirt.
17. Wipe the telephone with a damp cloth occasionally to keep
it looking new. Do not use harsh chemicals, cleaning solvents
or strong detergents to clean the telephone.
Regency™ Series 200 Single Line Telephone
Handset Volume Control
With the handset off-hook, press
the arrows on the VOLUME key
repeatedly to increase or
decrease the volume. The
volume of the handset receiver
can be increased by 12 to 18
decibels.
Note:
The handset volume control switch will automatically reset back
to its normal level when hanging up. This will ensure that the
handset volume resets back to normal for the next phone call.
Flash Key
The FLASH key is an electronic
timed line break of 600 milli
seconds, like hanging up
momentarily, that is used for
accessing line features provided
by your telephone company or
by your telephone system. For
example, many times a flash is
used for accessing features such
as Call Waiting. When used in a Centrex application, it can be
used to access other features like Call Pick-Up, Call Transfer, etc.
Contact your telephone system coordinator or your local
telephone company for further information regarding your line
features.
Regency™ Series 200 Single Line Telephone
16
User’s Guide
User’s Guide
Using the Features and Options
Redial Key
The REDIAL key is used to automatically redial the last number
dialed.
To use:
1 Lift the handset.
Table of Contents
Congratulations on the purchase of your Regency™ Series single
line telephone. This high precision electronic device includes
advanced features suitable for use in today’s environment and
requires minimum maintenance. It is simple to install and easy to
use — especially with your Telephone Company operating
features.
Read this user’s guide to become familiar with all aspects of your
new telephone:
2
Press the REDIAL key.
3
The number that was last
dialed will automatically
be dialed.
Getting to know the Features . . . . . . . . . . . . . . . . . . . . . . . . . . . . . . .Page 1
Learning about the Function Keys . . . . . . . . . . . . . . . . . . . . . . . . . . .Page 2
Connection Points . . . . . . . . . . . . . . . . . . . . . . . . . . . . . . . . . . . . . . . .Page 3
Installing the Telephone . . . . . . . . . . . . . . . . . . . . . . . . . . . . . . . . . . . .Page 5
• Checking the parts list . . . . . . . . . . . . . . . . . . . . . . . . . . . . . . . . . . .5
• Connecting the handset cord . . . . . . . . . . . . . . . . . . . . . . . . . . . .5
• Connecting the line cord
..............................6
In Use Line Indicator
Wall Mounting the Telephone . . . . . . . . . . . . . . . . . . . . . . . . . . . . . . .Page 7
The LED will illuminate to indicate
that another phone is in use and
sharing the same line.
Programming the Telephone . . . . . . . . . . . . . . . . . . . . . . . . . . . . . . .Page 9
• Flash into Memory . . . . . . . . . . . . . . . . . . . . . . . . . . . . . . . . . . . . . . .9
• Pause into Memory . . . . . . . . . . . . . . . . . . . . . . . . . . . . . . . . . . . . . .9
• Message Retrieval Button Programming . . . . . . . . . . . . . . . . . . .10
• Retrieving Messages . . . . . . . . . . . . . . . . . . . . . . . . . . . . . . . . . . . .11
• Speed Dial Programming . . . . . . . . . . . . . . . . . . . . . . . . . . . . . . . .11
• Placing a Call from Speed Dial . . . . . . . . . . . . . . . . . . . . . . . . . . .12
• Ringer Volume . . . . . . . . . . . . . . . . . . . . . . . . . . . . . . . . . . . . . . . . .13
Using the Features and Options . . . . . . . . . . . . . . . . . . . . . . . . . . . .Page 14
• Data Port . . . . . . . . . . . . . . . . . . . . . . . . . . . . . . . . . . . . . . . . . . . . .14
• Hold Key . . . . . . . . . . . . . . . . . . . . . . . . . . . . . . . . . . . . . . . . . . . . . .14
• Redial Key . . . . . . . . . . . . . . . . . . . . . . . . . . . . . . . . . . . . . . . . . . . .15
• In Use Line Indicator . . . . . . . . . . . . . . . . . . . . . . . . . . . . . . . . . . . .15
• Handset Volume Control . . . . . . . . . . . . . . . . . . . . . . . . . . . . . . . .16
• Flash Key . . . . . . . . . . . . . . . . . . . . . . . . . . . . . . . . . . . . . . . . . . . . . .16
Notes . . . . . . . . . . . . . . . . . . . . . . . . . . . . . . . . . . . . . . . . . . . . . . . . . .Page 17
Regency™ Series 200 Single Line Telephone
15
Regency™ Series 200 Single Line Telephone
User’s Guide
User’s Guide
Getting to know the Features
Using the Features and Options
The FEATURES of this telephone are:
Data Port
• Single line
The data port (jack) on the side of the base unit is used to plug in
any standard telephone device such as a:
•
5 Speed Dial memory locations
•
* One touch message retrieval feature
•
Electronic hold with a back-lit indicator
•
In-use line status indicator
•
Tone dialing
•
•
•
•
fax machine
base station for a
cordless telephone
computer modem
answering machine
Note: There is a plastic safety plug inserted into the data jack
which must be removed using a small tool such as tweezers.
•
Ringer volume control
•
Convenient data port
•
Handset volume control (ADA compliant)
•
Last number redial key
•
Flash Key
Hold Key
•
Pause key
•
Desk or wall mountable
To use, press the HOLD key. The key will
illuminate indicating that the line is on
hold.
•
Fully modular, easy to install
BE SURE TO UNPLUG THE TELEPHONE LINE CORD FROM THE REAR OF
THE TELEPHONE PRIOR TO REMOVING THIS SAFETY PLUG.
When placing a caller on hold, the
handset can be returned to its on-hook
position. The line will not be disconnected. To return to the caller,
lift the handset.
* Message Manager (voice mail) is a features that requires a
subscription to your local Telephone Company. This telephone
feature will not work unless you are a subscriber.
Regency™ Series 200 Single Line Telephone
1
Regency™ Series 200 Single Line Telephone
14
User’s Guide
User’s Guide
Programming The Telephone
Learning about the Function Keys
Ringer Volume
The switch used to adjust the ringer volume is located on the right
side of the telephone base. To adjust the loudness of the ringing,
slide the switch to the desired position of HI, LOW or OFF. The
factory sets the ringer volume to the HI position.
Low profile design, hearing aid
compatible.
Speed Dial Keys
Used to dial frequently called numbers
from programmed memory.
Index Card
Used for listing stored caller information
for speed dial.
Store Key
Used for storing memory locations.
Redial/Pause Key
Redials the last number dialed. Pause
is used to program a 3 second delay
in speed dialing.
Flash Key
Provides a 600ms timed line break.
Useful to retrieve call-waiting calls.
Numeric Dial Pad
Large keys used for outbound dialing
and programming memory locations.
Handset Volume Control Key
Controls the loudness of the handset
when off hook.
In Use Light
Shows the line is in use when illuminated.
Hold Key
Used to place caller on hold.
Regency™ Series 200 Single Line Telephone
13
Message Retreival Button
Press to retrieve voicemail messages
(if you subscribe to Message Manager).
Regency™ Series 200 Single Line Telephone
2
User’s Guide
User’s Guide
Connection Points
Programming The Telephone
Programming a Speed Dial Key
Right side
Data Port
1
While in ‘OFF HOOK’ state, press the STORE key.
2
Using the keypad, enter the number to be stored.
3
After entering the number, press the ‘Speed Dial Key’ location
to store the number. The number for that location is now
stored.
4
To exit, place the phone handset on base (ON HOOK).
5
To delete an incorrect entry, repeat steps 1, 3 and 4.
Placing a Call from a Speed Dial Location:
Left side
Rear
1
Lift the handset.
2
Press the Memory Location Key to dial the number.
Handset Jack
Line Cord Connector
See chart on page 5 for description of connection points.
Regency™ Series 200 Single Line Telephone
3
Regency™ Series 200 Single Line Telephone
12
User’s Guide
User’s Guide
Programming The Telephone
Retrieving Messages
Connection Points
This table explains the labels in the diagram:
Message Retrieval Feature
CONNECTION
POINT
FUNCTION
1
If you lift the handset to make a
call, and you hear an interrupted
dial tone, this means you have a
message in the voice mail
(Message Manager).
Data port
Convenient port for connecting a computer,
modem, base station for a cordless phone, fax
or answering service.
Note: A safety plug found inserted in the data
port must be removed before use.
Handset jack
2
Press the Message Retrieval Button
to automatically call your voice
mail (Message Manager).
Modular receptacle for connecting the handset
coil cord.
Line cord
receptacle
Modular receptacle for connecting telephone
line cord.
Note: The Message Retrieval Button
must be programmed before messages can be retrieved. See
page 10 for programming instructions.
Speed Dial Programming
The Regency 200 features 5 speed dial locations convenient for
dialing frequently used telephone numbers. Each speed dial
location can store up to 32 digits.
Prgramming Notes:
For program understanding, read
these notes before beginning the
programming process.
1
Speed dial programming must
be done with the telephone
plugged into the telephone line.
2
Telephone programming should
be performed with the telephone off-hook.
Regency™ Series 200 Single Line Telephone
11
Regency™ Series 200 Single Line Telephone
4
User’s Guide
User’s Guide
Installing the Telephone
Programming The Telephone
Checking the Parts List
Message Retrieval Button Programming (Voice Mail)
Ensure you have the following parts:
The Regency 200 was designed with a Message Retrieval feature.
When the Message Retrieval button is pressed, the set will
automatically call voice mail systems (Message Manager). As an
option, the Message Retrieval button can also store your voice
mail password that is used to retrieve messages.
1. 7’ Modular
telephone line cord.
2. 10’ Modular coiled
handset cord.
3. 8" Modular wall
mount telephone
line cord.
4. Wall mount clip.
2
1
3
4
Connecting the handset cord
1
Plug one end of the handset cord into the modular jack on
the handset.
2
The remaining end of the handset cord plugs into the jack
located on the left side of the base unit.
Handset Cord
Regency™ Series 200 Single Line Telephone
5
Programming the Message Retrieval Button
1
While in ‘OFF HOOK’ state,
press the STORE key.
2
Using the keypad, enter the
number required to call your
voicemail system. If entering a
password/PIN* number into
memory following this number,
be sure to add pauses after the
telephone number sequence
to cause a delay before the password is released.
3
After entering the number, press the Message Retrieval Button
to store the number.
4
To exit, place phone handset on base (ON HOOK).
5
To delete an incorrect entry, repeat steps 1, 3 and 4.
* CAUTION: When a PIN or password is programmed into memory,
other users can obtain the messages. A password is not required
to be programmed.
Regency™ Series 200 Single Line Telephone
10
User’s Guide
User’s Guide
Programming The Telephone
Installing the Telephone
Flash into Memory
Connecting the line cord
The FLASH key is a storable function into memory that is used to
provide a 600 milli second timed line break, like hanging up
momentarily. This function may be required for accessing line
features provided by your
telephone system or local
telephone company. For
example, the FLASH is used
to access line features such
as Call Waiting. In a centrex
application, it is convenient
to program the FLASH
function along with the
system feature access code
and labeling the speed dial
position as CallPick-Up, Call
Transfer, etc. Contact your system coordinator or local telephone
company regarding special line features that you may have.
1
If the telephone is to be desk mounted, plug one end of the 7’
line cord into the modular jack at the rear of the telephone.
2
The remaining end of the line cord plugs into the jack located
on the wall.
3
If the telephone is to be wall mounted, use the 8" line cord
supplied instead. See also pages 7 - 8 for more information on
wall mounting your telephone.
Note: The FLASH function counts as 1 digit when stored into a
speed dial memory location.
Pause into Memory
The PAUSE key is used to program a 3 second delay into memory.
A speed dial number may
need to pause during its
dialing sequence prior to
entering the next set of digits
to ensure proper
connections
Note: The PAUSE function
counts as 1 digit when
stored into a speed dial
memory location.
Regency™ Series 200 Single Line Telephone
9
Regency™ Series 200 Single Line Telephone
6
User’s Guide
User’s Guide
Wall Mounting the Telephone
Wall Mounting the Telephone
Wall Mounting the Telephone
Wall Mounting the Telephone (Continued)
1
2
First, remove the clip provided in the
set by sliding it straight up (Figure 1) ,
and replace with the Wall Mount Clip
found in the packaging, as shown
(Figures 2-3).
Wall Mount Clip
The bottom of the Regency 200 has a mounting wedge that
must be re-positioned for wall mount use. This wedge will allow
the telephone to be at the correct angle when wall mounted.
To install the wedge for wall mounting, press the two release
tabs as shown (Figure 4). The wedge will snap off (Figure 5).
Rotate the wedge 180 degrees and snap into place in the
wall mount position (lower end of base)( (Figure 6 & Figure 7).
Figure 5
Figure 4
Figure 1
Figure 2
Figure 3
Desk Top Position
Wall Mount Position
Figure 6
3
Regency™ Series 200 Single Line Telephone
7
Figure 7
Insert the short line cord into the jack at the rear of the
telephone. Plug the opposite end into the jack on wall.
Regency™ Series 200 Single Line Telephone
8