1
ENEE408G Multimedia Signal Processing
Mobile Computing and Pocket PC
Programming Manual
Guan-Ming Su
Min Wu
K. J. Ray Liu
Department of Electrical and Computer Engineering
University of Maryland at College park
Last Updated: September 23, 2003
Contents
Part I. A Brief Introduction to Pocket PC
2
1. Compaq iPAQ Pocket PC H3760 Series
2. Operating Pocket PC
3. Microsoft ActiveSync
2
3
3
Part II. Microsoft Windows® Platform SDK for Pocket PC
1. Desktop WinCE Emulation
2. Desktop Pocket PC 2002 Emulation
Part III. Microsoft eMbedded Visual Basic 3.0 (eVB)
1. Design Environment and Programming
2. Build A Simple Program
3. Prepare for the Distribution of An eMbedded Visual Basic Program
4. Install the Software Program in Pocket PC
5. Add More Components to A Project
6. Winsock - TCP/IP and InfraRed Communication
7. Windows CE API
Part IV. Microsoft eMbedded C++ 3.0 (eVC)
1. Integrated Design Environment (IDE)
2. eVC Demo Project-1: Digital Image Processing - Handheld Image
Processor
3. eVC Demo Project-2: Digital Video Processing - Video Player
4. eVC Demo Project-3: Digital Speech Processing - Spectrum Analyzer
5. eVC Demo Project-4: Digital Audio Processing - Digital Piano
6. Troubleshooting
Part V. Further References
ENEE408G Fall 2003 (Update 09/23/2003)
Mobile Computing and Pocket PC Programming
4
4
4
5
5
8
10
10
11
14
16
19
19
20
32
48
61
70
74
1
Part I. A Brief Introduction to Pocket PC
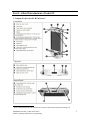
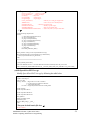
1. Compaq iPAQ Pocket PC H3760 Series1
Front Panel
Top panel
Bottom Panel
1
From Compaq iPAQ Pocket PC H3700 Series reference Guide from iPAQ H3760 Package CD.
ENEE408G Fall 2003 (Update 09/23/2003)
Mobile Computing and Pocket PC Programming
2
2. Operating Pocket PC
A useful document explaining how to operate and use the iPAQ can be found in the CD
of your iPAQ package. Under the directory, COMPAQ/Docs/, you can find a file
named PPC PDF H3700.pdf. You can start with reading this reference.
You can check out the eBook, How to do everything with your Pocket PC at
www.netlibrary.com. This eBook gives many examples explaining how to use Pocket
PC in our daily life.
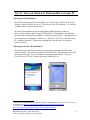
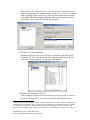
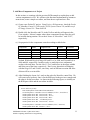
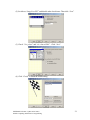
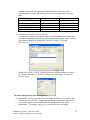
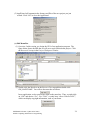
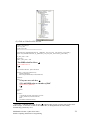
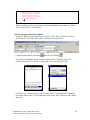
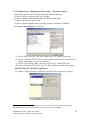
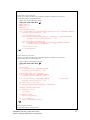
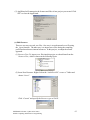
3. Microsoft ActiveSync:
Microsoft ActiveSync is an interface for transferring files and communicating between
Pocket PC and Desktop PC. If you have your own PC, you can create a Partnership
between these two devices. Every file under the Desktop PC folder, Pocket PC My
Documents, and the Pocket PC folder, My Document, will be synchronized. If you are
using a PC in Jasmine, you can be a Guest without setting up a Partnership.
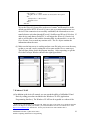
The figure above shows the Microsoft ActiveSync Window. You can transfer files by
clicking the “Explore” button. A window that is similar to PC’s File Explorer Window
will pop up. For more details about Microsoft ActiveSync, please refer to the abovementioned document, PPC PDF H3700.pdf .
ENEE408G Fall 2003 (Update 09/23/2003)
Mobile Computing and Pocket PC Programming
3
Part II. Microsoft Windows® Platform SDK for Pocket PC2
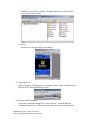
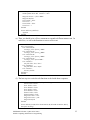
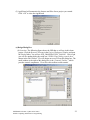
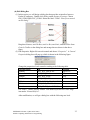
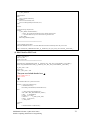
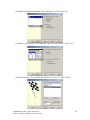
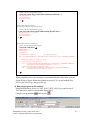
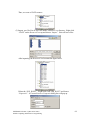
1. Desktop WinCE Emulation
The WinCE emulator can be executed from Start Æ Programs Æ 408g Æ Microsoft
Windows Platform SDK for Pocket PC Æ Desktop Pocket PC Emulation. You will see
a window shown in the left figure below.
We can use this emulator to test our applications without the physical device.
However, this emulator doesn’t support all Pocket PC’s functionalities. Note that the
execution time of programs on emulator is faster than on real device. The emulator has
its own directory in desktop PC, which is in c:\Windows CE Tools\wce300\MS Pocket
PC\ emulation\palm300. This directory emulates the root directory of a physical
Pocket PC device.
2. Desktop Pocket PC 2002 Emulation3
The device we use in this course runs on an operating system known as Microsoft
Pocket PC 2002. The emulator for this device is Pocket PC 2002 emulator and we will
use it most of the time. You can find this executable program under C:\Program
Files\Windows CE Tools\ Common\Playman\bin\Emulator.exe.
WinCE Emulator
Pocket PC 2002 Emulator
2
The Microsoft Windows® Platform SDK for Pocket PC and eMbedded Visual Tools (in Part III) can be
downloaded from http://www.microsoft.com/mobile/developer/downloads/default.asp
3
Pocket PC 2002 SDK can be downloaded from
http://www.microsoft.com/mobile/developer/downloads/ppcsdk2002.asp
ENEE408G Fall 2003 (Update 09/23/2003)
Mobile Computing and Pocket PC Programming
4
Part III. Microsoft embedded Visual Basic 3.0
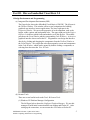
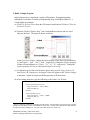
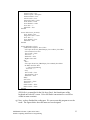
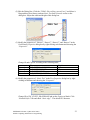
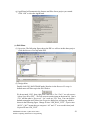
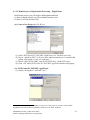
1.Design Environment and Programming
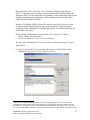
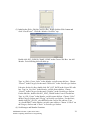
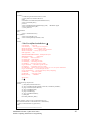
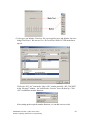
(a) Integrated Development Environment (IDE)
The figure below shows the eMbedded Visual Basic (eVB) IDE. The left part is
the Toolbox Window. This window offers several components for building
graphical user interface in most applications. The lower right part is the
Properties Window. We can set the properties of each component, such as the
height, width, caption, and background color. The upper right part is the Project
Explorer. It indicates which forms and modules are in this project. The middle
part shows the Form Window and the corresponding Code Windows. A form is a
graphical interface shown on Pocket PC. Programmers can design the interface
directly by clicking and dragging the components from the Toolbox Window to
the Form Window. We can put the codes that respond to events and components
in the Code Window, which can be opened by double clicking a component, or
selecting from the menu bar View Æ Code.
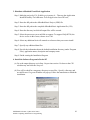
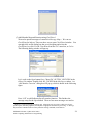
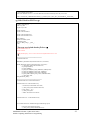
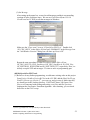
(b) Remote Tools
There are several useful tools under Tools Æ Remote Tools
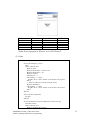
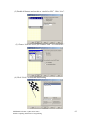
(1) Windows CE Platform Manager Configuration
The left figure below shows the Configure Platform Manager. We use this
manager to build initial connection between desktop and Pocket PC. After
setting up the connection, we can execute the eVB codes on Pocket PC.
ENEE408G Fall 2003 (Update 09/23/2003)
Mobile Computing and Pocket PC Programming
5
Choose Pocket PC (Default Device) or Pocket PC 2002 (Default Device) by
double clicking that item. Another window called Device Properties as shown
in the right figure below will pop up. There are three different ways to build
connection. The first transport component, Microsoft ActiveSync, usually
works well. If not, try the TCP/IP and PPP transport.
(2) Windows CE Control Manager
Another useful tool is the Control Manager, in which we can add ActiveX
Controls4 (.dll, .ocx). By clicking the device and selecting Control Æ Add
New Control from menu bar, we can easily add controls5.
(3) Windows CE Remote File Viewer
After setting the Windows CE Platform Manager Configuration, we can use
Windows CE Remote File Viewer to view, import and export files in the
4
An ActiveX control, like a built-in control, is an object that you put on a form to enable or enhance a user's
interaction with an application. ActiveX controls have events and can be incorporated into other controls
5
To enable the new ActiveX Control in eVB, we need the corresponding version in your PC. Under
Windows 2000 Command Prompt window, use command “regsvr32 dllname” to register a new control.
ENEE408G Fall 2003 (Update 09/23/2003)
Mobile Computing and Pocket PC Programming
6
Pocket PC or Pocket PC emulator. To import/export files, you can use the
yellow arrows in the toolbar.
(4) Zoom
Zoom is a tool for capturing a screen display.
(c) Choosing device
While running the eVB program, we can choose to run it under an emulator or the
physical device from the following list box.
(d) Reference and Component
Except the components shown in the Toolbox Window, we could add more
components from Project Æ Reference and Components in the eVB menu bar.
ENEE408G Fall 2003 (Update 09/23/2003)
Mobile Computing and Pocket PC Programming
7
2. Build A Simple Program
In this sub-section, we implement a simple eVB program. Programming under
eMbedded Visual Basic is similar to Programming using Visual Basic under PC ‘s
Visual Studio environment
(a) Click File Æ New Project from the eVB menu bar and choose Windows CE for the
Pocket PC Project.
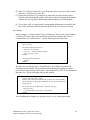
(b) From the Toolbox Window, drag 6 four CommandButton objects and one Label
object to the form. The layout is shown as follows.
In the Properties Window, change the Name property of the four CommandButtons
to “bnOriginal”, “bnR”, “bnG”, “bnB”, respectively. Change the Caption property
of those CommandButtons to “Flower”, “R”, “G”, “B”, respectively. Change the
Caption property of Label to “Multimedia Signal Processing”.
(c) To add an ImageCtl object on the form, choose Microsoft CE Image Control 3.0
from Project Æ Components. An ImageCtl icon will appear on the Toolbox. Drag it
to the form. Adjust its Height and Width properties to fit in the form.
(d) After setting properties, type the following codes in the Code Window.
Option Explicit
Private Sub bnOriginal_Click()
ImageCtl1.Picture = "flower.BMP"
ImageCtl1.Refresh
End Sub
Private Sub bnR_Click()
ImageCtl1.Picture = "flower_r.BMP"
ImageCtl1.Refresh
End Sub
6
Here by “dragging” a button we mean the following actions: click the button icon in the Toolbox window,
and then use your mouse to draw a bounding box on the form. A button with a default name and attributes
will show up in the bounding box. You can create other objects in a similar way.
ENEE408G Fall 2003 (Update 09/23/2003)
Mobile Computing and Pocket PC Programming
8
Private Sub bnG_Click()
ImageCtl1.Picture = "flower_g.BMP"
ImageCtl1.Refresh
End Sub
Private Sub bnB_Click()
ImageCtl1.Picture = "flower_b.BMP"
ImageCtl1.Refresh
End Sub
Private Sub Form_Load()
ImageCtl1.Picture = "flower.BMP"
ImageCtl1.Refresh
End Sub
Private Sub Form_OKClick()
App.End
End Sub
The last sub-function is for terminating the program when we click the OK button
in the upper-right side of the form.
(e) Put the files flower.BMP, flower_r.BMP, flower_g.BMP and flower_b.BMP7 in the
directory, C:\ Windows CE Tools\wce300\MS Pocket PC\ emulation\ palm300.
(f) Save the project and files by File Æ Save Project As.
(g) Select the device as Pocket PC emulation.
(h) Click Run Æ Execute from the eVB menu bar and the result will be shown in the
emulator. You can use your mouse to click those buttons to see what happens.
Under the emulation environment, the mouse emulates the behavior of stylus.
7
You can download those files from course web site. It is noteworthy that Pocket PC supports at most 16
bits to represent a color image. You can reduce the color depth by using image processing software, such
as Paint Shop Pro.
ENEE408G Fall 2003 (Update 09/23/2003)
Mobile Computing and Pocket PC Programming
9
3. Distribute eMbedded Visual Basic Application
Step 1. Make the project by File Æ Make projectname.vb… Then use the Application
Install Wizard by ToolsÆRemote ToolsÆApplication Install Wizard,
Step 2. Enter the full path to the eMbedded Basic Project (.EBP) file.
Step 3. Enter the full path to the compiled eMbedded Basic Application file (.VB)
Step 4. Enter the directory in which all output files will be created.
Step 5. Select the processors you would like to support. To support iPAQ H3760, the
device we use in this course, choose Arm 1100.
Step 6. Select any additional ActiveX controls or references that you want to install.
Step 7. Specify any additional data files.
Step 8. Provide the information about the default installation directory (under \Program
Files), application name, description and company name.
Step 9. Finish creating the Installation Program.
4. Install the Software Program in Pocket PC
(a) Go to the output directory set in Step 4 in previous section. Go down to the CD1
sub-directory and click the Setup.exe.
(b) You will be asked for a temporary directory to store files. Specify a directory and
an Add/Remove Programs Window will pop up. Follow the instructions to finish the
installation.
ENEE408G Fall 2003 (Update 09/23/2003)
Mobile Computing and Pocket PC Programming
10
5. Add More Components to A Project
In this section, we continue with the previous RGB example to explain how to add
various components in eVB. We will move the functions implemented by buttons to
menu items, create a simple text editor, and learn how to open and save files.
(a) Create a new Pocket PC project. From Project Æ Components, check the Pocket
PC MenuBar Control 3.0, Microsoft CE File System Control 3.0, and Microsoft
CE Image Control 3.0. Then click OK.
(b) Double click the MenuBar and File in the Toolbox and they will appear in the
Form window. It doesn’t matter where those components locate since they will
be invisible during runtime. We set their Names as “MenuBar1” and “File1”,
respectively.
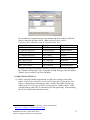
(c) Set properties for the components created according to table below.
Component
Name
ImageCtl
commandButton
Label
TextBox
TextBox
ImageCtl1
bnSave
Label1
Text1
Text2
Caption/Text
Visible
Scrollbars
Save
File name with path
“”
“”
True
False
False
False
False
2-vbVertical
0-vbSBNone
Set both Width and Height of ImageCtl1 and Text1 as 2400, and Top and Left as
1080 and 600, respectively. In other words, we make these two components
overlap with each other. Put the Label1, Text2, and bnSave in the upper, middle
and lower part of the form, respectively. Don’t worry about their overlapping
with the ImageCtl1 and TextBox, since they work in different occasion and some
of them will be set to invisible.
(d) After finishing the layout, let’s work on the codes for MenuBar control first. We
will create two dropmenus. One is for the RGB used in the previous example and
the other is for the text editor. As shown in the following figure, we initially set
the RGB part visible and the text editor invisible.
Option Explicit
Private Sub Form_Load()
Dim mnuDropMenu As MenuBarLib.MenuBarMenu
Set mnuDropMenu = MenuBar1.Controls.AddMenu("Colors", "mnuColors")
mnuDropMenu.Items.Add , "mnuColorsR", "Red"
mnuDropMenu.Items.Add , "mnuColorsG", "Green"
mnuDropMenu.Items.Add , "mnuColorsB", "Blue"
mnuDropMenu.Items.Add , , , mbrMenuSeparator
mnuDropMenu.Items.Add , "mnuColorsO", "Flower"
Set mnuDropMenu = MenuBar1.Controls.AddMenu("Text", "mnuText")
mnuDropMenu.Items.Add , "mnuSave", "Save"
ENEE408G Fall 2003 (Update 09/23/2003)
Mobile Computing and Pocket PC Programming
11
mnuDropMenu.Items.Add , "mnuOpen", "Open"
mnuDropMenu.Items.Add , "mnuNew", "New"
ImageCtl1.Picture = "flower.BMP"
ImageCtl1.Refresh
Text1.Visible = False
Text1.Text = ""
Text2.Visible = False
Text2.Text = ""
End Sub
Private Sub Form_OKClick()
App.End
End Sub
(e) Then, we should write a Select statement to respond to different menu event. In
each Case, we call a sub-function to react to each event.
Private Sub MenuBar1_MenuClick(ByVal Item As MenuBarLib.Item)
Select Case Item.Key
Case "mnuColorsR"
rearrange_colors "flower_r.BMP"
Case "mnuColorsG"
rearrange_colors "flower_g.BMP"
Case "mnuColorsB"
rearrange_colors "flower_b.BMP"
Case "mnuColorsO"
rearrange_colors "flower.BMP"
Case "mnuSave"
aIO_File False, True, "Save"
Case "mnuOpen"
aIO_File False, True, "Open"
Case "mnuNew"
aCreate_NewFile
End Select
End Sub
(f) The last step is to write the sub-functions to deal with those responses.
Private Sub rearrange_colors(ByVal path As String)
Label1.Visible = False
Text1.Visible = False
Text1.Enabled = False
Text2.Visible = False
Text2.Enabled = False
bnSave.Visible = False
bnSave.Enabled = False
ImageCtl1.Visible = True
ImageCtl1.Picture = path
ImageCtl1.Refresh
End Sub
Private Sub aIO_File(ByVal txt1B As Boolean, ByVal txt2B As Boolean, ByVal_
bnCaption As String)
ENEE408G Fall 2003 (Update 09/23/2003)
Mobile Computing and Pocket PC Programming
12
Text1.Visible = txt1B
bnSave.Visible = True
bnSave.Caption = bnCaption
bnSave.Enabled = True
Label1.Visible = True
ImageCtl1.Visible = False
Text2.Visible = txt2B
Text2.Enabled = txt2B
Text2.Text = ""
SIPVisible = True
End Sub
Private Sub aCreate_NewFile()
Text1.Visible = True
ImageCtl1.Visible = False
Text1.Text = ""
Text1.Enabled = True
SIPVisible = True
End Sub
Private Sub bnSave_Click()
If InStr(bnSave.Caption, "Save") Then
File1.Open Text2.Text, fsModeOutput, fsAccessWrite, fsLockWrite
File1.LinePrint Text1.Text
Text1.Visible = False
Text1.Text = ""
SIPVisible = False
MsgBox "Save OK"
Else
Dim s
File1.Open Text2.Text, fsModeInput, fsAccessRead, fsLockWrite
Do While Not File1.EOF
s = File1.LineInputString
Text1.Text = s
Loop
Text1.Visible = True
Text1.Enabled = True
SIPVisible = False
End If
File1.Close
Text2.Visible = False
Text2.Text = ""
Label1.Visible = False
bnSave.Visible = False
End Sub
SIPVisible is a controller for the Soft Input Panel, the formal name of the
keyboard on Pocket PC screen. Users will find it convenient if we set SIP as
visible in some occasions.
(g) Now, we have finished the coding part. We can execute this program to see the
result. The figures below show the menu we have designed.
ENEE408G Fall 2003 (Update 09/23/2003)
Mobile Computing and Pocket PC Programming
13
The left figure below shows the result after selecting Text Æ Open. The right
figure shows the result of a file after we enter a file name and click the Open
button.
6. Winsock – TCP/IP and InfraRed Communication
Mobility is one of the most important characteristics of Pocket PC. It provides the
versatile capabilities for Pocket PC to communicate with other devices. eMbedded Visual
Basic offers Winsock control to set up sockets8 between devices. In this section, we
implement a small program for HTTP request using Winsock control.
(1) Include Microsoft Widows CE Winsock Control 3.0 using Project Æ Components.
(2) Layout a form as follows and set the properties of the components according to
the table below.
8
Sockets are software layer between the application and transfer protocol on network communications.
ENEE408G Fall 2003 (Update 09/23/2003)
Mobile Computing and Pocket PC Programming
14
Component
Name
Caption/Text
Scrollbars
Winsock
commandButton
TextBox
TextBox
TextBox
Winsock1
btnRequest
txtServer
txtResource
txtOutput
Request
“server name”
“/test.html”
“”
0-vbSBNone
0-vbSBNone
2-vbVertical
Set the Protocol property of Winsock1 as 0-sckTCPProtocol.
(3) Codes:
Option Explicit
Private Sub btnRequest_Click()
Dim s
On Error Resume Next
WinSock1.Close
WinSock1.RemoteHost = txtServer.Text
WinSock1.RemotePort = 80
WinSock1.Connect
txtOutput.Text = ""
If Err.Number <> 0 Then
MsgBox "Error:" & Err.Number & vbCrLf & Err.Description
End If
s = "GET" & txtResource.Text & vbCrLf & vbCrLf
WinSock1.SendData s
If Err.Number <> 0 Then
MsgBox "Error:" & Err.Number & vbCrLf & Err.Description
End If
End Sub
Private Sub Form_OKClick()
App.End
End Sub
Private Sub WinSock1_DataArrival(ByVal bytesTotal As Long)
Dim sRecieveDate
On Error Resume Next
WinSock1.GetData sRecieveDate
ENEE408G Fall 2003 (Update 09/23/2003)
Mobile Computing and Pocket PC Programming
15
If Err.Number <> 0 Then
MsgBox "Error:" & Err.Number & vbCrLf & Err.Description
Else
txtOutput.Text = sRecieveDate
WinSock1.Close
End If
End Sub
We set the Winsock1.RemoteHost as the server’s name9 and RemotePort as the
default port 80 for HTTP. Winsock1.Connect sets up a connection between two
devices. If the connection is successfully established, the client and server can
transfer data to each other through Winsock1.SendData and Winsock1.Getdata. If
other device sends data to Pocket PC, it will trigger the Winsock1_DataArrival
and we will be able to deal with the incoming data. As shown above, we use On
Error Resume Next to catch any run time error. The Err object contains the
information about the error.
(4) Make sure the http server is working and put a text file in the www root directory,
so that we can run a test by setting the server name and the file we want to get.
The left figure below shows the program interface. After requesting, we get the
file in the txtOutput Window shown in the right figure below.
7. Windows CE API
(a) In addition to the ActiveX controls, we can extend the ability of eMbedded Visual
Basic by calling procedures included in the Windows CE API (Application
Programming Interface). The Windows CE API can be regarded as a subset of the
9
In this case, it’s the machine we used with eVB. Make sure there exists an http server inside the machine
If there is no http server inside your machine, you can download the freeware “Lil’ HTTP server” from
http://www.summitcn.com/ and install it. Set the port, IP and server name and then start it.
ENEE408G Fall 2003 (Update 09/23/2003)
Mobile Computing and Pocket PC Programming
16
Microsoft Win32 API. Those API’s are a collection of dynamic-link libraries
(DLLs10) containing many procedures used by Windows-based desktop platforms.
With these DLLs, we can expand the eVB capability, such as displaying windows and
graphics, managing memory and power, and accessing persistent storage, which
cannot be done by built-in controls.
Windows CE platform SDK for Pocket PC provides a text file, Winceapi.txt, that
contains predefined declarations for many of the Windows CE API procedures
commonly used in eMbedded Visual Basic applications. To call those functions, we
should follow the syntax:
[Scope] Declare Function|Sub {FunctionName} Lib “{Library File Name}” _
[Alias “Library Function Name”] _
({Function Parameter List}) As {Function Return}
We can use the convenient API Viewer to use those Constants, Declares, or Types
from this file.
(1) First, we run an API Viewer from Start Æ Programs Æ 408g Æ Microsoft
eMbedded Visual Tools Æ Tools Æ Api Text Viewer.
10
DLL is an executable file that contains one or more exportable functions. In other words, another
executable files (EXE or DLL) can call those functions. In general, DLLs have much simpler structure
than EXE files, since DLLs do not have graphical interfaces or Windows message processors. However,
we cannot use eMbedded Visual Basic to create our own DLLs. We can make API calls from eVB, instead.
ENEE408G Fall 2003 (Update 09/23/2003)
Mobile Computing and Pocket PC Programming
17
(2) From File Æ Open on the API Viewer menu bar, select winceapi.txt file from the
directory C:\Windows CE Tools\ Bin .
(3) Choose the desired API Type and pick an item in the Available Items list box.
Click the Add button and the syntax of the selected item will appear in the bottom
textbox. We can copy those declarations and paste them in our eVB program.
(4) To use those APIs, we must put the corresponding declarations in a module (.bas
file, not the form file) and must put them in the General Declarations section.
(b) Example
In this example, we simply call the Playsound function. First, create a new Windows
CE Pocket PC Project, put a Commandbutton on the form. Rename the Name of
Commandbutton as “bnPlaySound”. Put the following codes in the form
Option Explicit
Dim af As Long
Private Sub bnPlaySound_Click()
Dim title_wave As String
title_wave = "\\Windows\\Alarm1.WAV"
music_play (title_wave)
End Sub
Private Sub Form_OKClick()
App.End
End Sub
We add a new module by Porject Æ Add Module. We add the Playsound API
declaration in this module. The declaration can be obtained according to what we
have learned in the previous sub-section. The constant SND_SYNC is also obtained in
the same way. Put the following codes in this module.
Option Explicit
Public Const SND_SYNC = &H0
Public Declare Function PlaySound Lib "Coredll" Alias "PlaySoundW"_
(ByVal lpszName As String, ByVal hModule As Long, ByVal dwFlags As _
Long) As Long
Private Sub music_play(ByVal music_filename As String)
Dim af As Long
af = PlaySound(music_filename, 0, SND_SYNC)
End Sub
After finishing these settings, we can play alarm1.wav by clicking the button.
ENEE408G Fall 2003 (Update 09/23/2003)
Mobile Computing and Pocket PC Programming
18
Part IV. Microsoft eMbedded Visual C++ 3.0 (eVC)
11
1. Integrated Design Environment (IDE)
Microsoft eMbedded Visual C++ (eVC) has almost the same appearance as the IDE of
VC. The window to the left is the Project Workspace Window, which shows the current
classes, resources12, and files used in your project. The window to the right is the Edit
Window and you may do coding and edit menus, dialog boxes here. The window at the
bottom is the Output Window and it will display messages that result from compiling and
linking your program.
The tools under eVC menu bar Tools are the same as eVB. Please refer to Section III.1.
(b). In the following sections, we use four demo projects related to multimedia signal
processing as a guideline to eVC programming. In section IV.6 troubleshooting, we list
several solutions to some common questions that programmers may encounter.
Demo Project 1
Demo Project 2
Demo Project 3
Demo Project 4
11
You may want to download Microsoft eMbedded Visual C++ 4.0 (Microsoft Windows CE .NET) from
http://msdn.microsoft.com/vstudio/device/datasheet.asp (Release Date: 15 Apr 2002).
12
Resources consist of a wide range of elements, including interface elements, (such as a icon, bitmap, or
cursor), customized resources that hold data an application demands, version resources that are used by
setup APIs, and menus and dialog boxes. You can add new resources to your project and modify those
resources using the resource editor. Most Visual C++ wizards will automatically generate a .rc file for your
project.
ENEE408G Fall 2003 (Update 09/23/2003)
Mobile Computing and Pocket PC Programming
19
2. eVC Demo Project-1: Digital Image Processing – Handheld Image Processor
In this demo project, you will design a handheld image processor and learn
(1) how to build a dialog based Application by Microsoft eMbedded Visual C++,
(2) how to install a control (e.g. button) on a dialog box,
(3) how to use Device Independent Bitmap (DIB) in WinCE environment,
(4) how to perform digital image processing.
(a) Create a new project by File Æ New from eVC menu bar.
(1) Select “WCE Pocket PC 2002 MFC AppWizard (exe)” on the Projects tap.
(2) Key in “ImageProcPPC” on Project name edit box and select a Location for this
project. Also check “Create new workspace”.
(3) Check “Win32[WCE ARM]” and “Win32[WCE x86]” on the CPUs box13.
(4) Click “OK” and a WCE Pocket PC 2002 MFC AppWizard window will pop up.
(b) WCE Pocket PC 2002 MFC AppWizard
(1) Choose “Dialog Based” and press “Next”.
13
If Pocket PC 2002 SDK is not available, you may create a new project by an older version of MFC
AppWizard, such as WCE MFC AppWizard or WCE Pocket PC MFC AppWizard.
ENEE408G Fall 2003 (Update 09/23/2003)
Mobile Computing and Pocket PC Programming
20
(2) Set title as “ImageProcPPC” and disable other check items. Then click “Next”.
(3) Check “Yes, please” and “As a shared DLL”. Click “Next”.
(4) Click “Finish” to finish the initial setting.
i.
ENEE408G Fall 2003 (Update 09/23/2003)
Mobile Computing and Pocket PC Programming
21
(5) AppWizard will summarize the features and files of new project you created.
Click “OK” to close the AppWizard.
(c)Design Dialog Box
(1) Overview: The following figure shows the IDE that we will use in this demo
project. Click the ResourceView tap in the Project Workspace Window and open
the Dialog folder. You will see IDD_IMAGEPROCPPC_DIALOG. Click it and
you will see another dialog box with text “TODO: Place dialog controls here”
shown in the Edit Window. We will design our own GUI on this dialog box. The
small window to the right of this dialog box is the “Controls Toolbar”, which
provides control components. We will use this toolbar to add controls.
ENEE408G Fall 2003 (Update 09/23/2003)
Mobile Computing and Pocket PC Programming
22
(2) Edit the Dialog Box. Click the “TODO: Place dialog controls here” and delete it.
Drag and drop four Buttons and one Static Text from Controls toolbar to the
dialog box. Adjust the width and height of this dialog box.
(3) Modify the properties of “Button1”,“Button2”, “Button3”, and “Button4” in the
Push Button Properties dialog box by right clicking each button and choosing the
“Properties”.
Change ID and Caption according to the following table.
Button1
Button2
Button3
Button4
ID
IDC_BUTTON_OPENFILE
IDC_BUTTON_SHOW
IDC_BUTTON_RED
IDC_BUTTON_SAVEFILE
Caption
Open
Show
Red
Save
(4) Modify the properties of “Static Text” in the Text Properties dialog box by right
clicking each button and choosing the “Properties”.
Change ID to IDC_STATIC_DRAWIMAGE and set the Caption as blank. Click
“Extended Styles” tab and check “Static edge”. The edited GUI becomes
ENEE408G Fall 2003 (Update 09/23/2003)
Mobile Computing and Pocket PC Programming
23
(5) Add Member Map and Function using ClassWizard
We need to put the messages of controls in a Message Map14. We can use
ClassWizard to help us. There are three ways to open ClassWizard window. You
can right click on the dialog box that we are designing and select the
ClassWizard, or click ViewÆ ClassWizard from the eVC menu bar, or Ctrl-w.
The following dialog window will pop up.
Let’s work on the Open button first. Choose IDC_BUTTON_OPENFILE in the
Object IDs window. Double click BN_CLICKED in the Messages window. An
“Add Member Function” dialog box will pop up, which is shown in the following
figure.
Press “OK” to add OnButtonOpenfile member function. This finishes the
message setup for the Open button. There are four more messages we need to
14
Windows is a message-based-event-driven OS. All programs wait (by using a while loop) for any
possible inputs, make the judgments, and dispatch to appropriate functions for processing. A Message
Map associates a handler function with a particular message, command, or notification.
ENEE408G Fall 2003 (Update 09/23/2003)
Mobile Computing and Pocket PC Programming
24
establish. Repeat the same procedures described above. The Object ID’s,
corresponding Messages, and Message Functions are shown in the following
table.
Object ID
CImageProcPPCDlg
IDC_BUTTON_OPENFILE
IDC_BUTTON_SHOW
IDC_BUTTON_RED
IDC_BUTTON_SAVEFILE
Message
WM_PAINT
BN_CLICKED
BN_CLICKED
BN_CLICKED
BN_CLICKED
Message Function
OnPaint
OnButtonOpenfile
OnButtonShow
OnButtonRed
OnButtonSavefile
(5) Add Member Variable using ClassWizard
To change the properties of controls when we execute applications in run-time,
we need to assign names (variables) to the desired controls (MFC class). We can
add member variables by clicking the “Member Variables” tab in the
ClassWizard.
Double click on IDC_STATIC_DRAWIMAGE, the following dialog box shows
up. Change “Category” to “Control” and type “m_DrawImage” in “Member
variable name”.
(d) Add existing classes (files) to our project
(1) Click on the FileView tap in the Project Workspace Window. You will see that
WCE Pocket PC 2002 MFC AppWizard has already automatically generated
several files, which can be compiled and run, though without any useful
functionality. To complete our project, we need to do our own coding.
ENEE408G Fall 2003 (Update 09/23/2003)
Mobile Computing and Pocket PC Programming
25
(2) Add existing files to this project.
The fundamental image structure used in Windows and Windows CE is BITMAP.
To facilitate using BITMAPs, several programmers have wrapped sufficient
functions into a class (C++). In this project, we use the existing classes
(DIBSectionLite) developed by Mr. Chris Maunder15.
(i) Download files, copy and paste the following two files to your current working
directory: DIBSectionLite.cpp, DIBSectionLite.h.
(ii) Click Project Æ Add to Project Æ Files from the eVC menu bar.
Add these two files into this project and click OK. You will find that the
FileView becomes the following figure. We can do our own programming now.
15
DIBsectionLite can be downloaded from http://www.codeproject.com/bitmap/dibsection.asp
ENEE408G Fall 2003 (Update 09/23/2003)
Mobile Computing and Pocket PC Programming
26
(e)Edit ImageProcPPCDlg.h16
// ImageProcPPCDlg.h : header file
// Author: Guan-Ming Su
// Date: 9/23/2003
#if !defined(AFX_IMAGEPROCPPCDLG_H__50A20CED_5408_4999_9422_3B87C2F19B2F__INCLUDED_)
#define AFX_IMAGEPROCPPCDLG_H__50A20CED_5408_4999_9422_3B87C2F19B2F__INCLUDED_
#if _MSC_VER >= 1000
#pragma once
#endif // _MSC_VER >= 1000
// Add your own required header Æ
#include "DIBSectionLite.h"
// Å
/////////////////////////////////////////////////////////////////////////////
// CImageProcPPCDlg dialog
class CImageProcPPCDlg : public CDialog
{
// Construction
public:
CImageProcPPCDlg(CWnd* pParent = NULL);
// standard constructor
// Add your own public functions and variables here Æ
void DrawBITMAP(void);
CDIBSectionLite m_pDib;
CSize sz;
TCHAR filenamein[255];
BYTE* dibit;
BOOL bExistFile;
// user defined member function for draw bitmap
// class of DIBSectionLite
// size of the image
// file name of the read in file
// memory space to manipulate BITMAP
// indicator to check whether a file is open in the application
// Å
// Dialog Data
//{{AFX_DATA(CImageProcPPCDlg)
enum { IDD = IDD_IMAGEPROCPPC_DIALOG };
CStatic
m_DrawImage;
//}}AFX_DATA
// ClassWizard generated virtual function overrides
//{{AFX_VIRTUAL(CImageProcPPCDlg)
protected:
virtual void DoDataExchange(CDataExchange* pDX); // DDX/DDV support
//}}AFX_VIRTUAL
// Implementation
protected:
HICON m_hIcon;
// Generated message map functions
//{{AFX_MSG(CImageProcPPCDlg)
virtual BOOL OnInitDialog();
afx_msg void OnButtonOpenfile();
afx_msg void OnButtonRed();
afx_msg void OnButtonSavefile();
afx_msg void OnButtonShow();
afx_msg void OnPaint();
//}}AFX_MSG
DECLARE_MESSAGE_MAP()
};
Notice that “// Add your own code Æ” and “//Å” indicates that you may put some codes in these areas.
In this example, we use italic red font for the added codes ( to distinguish from the codes already
automatically generated by eVC).
16
ENEE408G Fall 2003 (Update 09/23/2003)
Mobile Computing and Pocket PC Programming
27
//{{AFX_INSERT_LOCATION}}
// Microsoft eMbedded Visual C++ will insert additional declarations immediately before the previous line.
#endif // !defined(AFX_IMAGEPROCPPCDLG_H__50A20CED_5408_4999_9422_3B87C2F19B2F__INCLUDED_)
(f)Edit ImageProcPPCDlg.cpp
// ImageProcPPCDlg.cpp : implementation file
// Use DIBsectionLite http://www.codeproject.com/bitmap/dibsection.asp
//
// Author: Guan-Ming Su
// Date: 9/23/2003
#include "stdafx.h"
#include "ImageProcPPC.h"
#include "ImageProcPPCDlg.h"
#ifdef _DEBUG
#define new DEBUG_NEW
#undef THIS_FILE
static char THIS_FILE[] = __FILE__;
#endif
/////////////////////////////////////////////////////////////////////////////
// CImageProcPPCDlg dialog
CImageProcPPCDlg::CImageProcPPCDlg(CWnd* pParent /*=NULL*/)
: CDialog(CImageProcPPCDlg::IDD, pParent)
{
//{{AFX_DATA_INIT(CImageProcPPCDlg)
// NOTE: the ClassWizard will add member initialization here
//}}AFX_DATA_INIT
// Note that LoadIcon does not require a subsequent DestroyIcon in Win32
m_hIcon = AfxGetApp()->LoadIcon(IDR_MAINFRAME);
}
void CImageProcPPCDlg::DoDataExchange(CDataExchange* pDX)
{
CDialog::DoDataExchange(pDX);
//{{AFX_DATA_MAP(CImageProcPPCDlg)
DDX_Control(pDX, IDC_STATIC_DRAWIMAGE, m_DrawImage);
//}}AFX_DATA_MAP
}
BEGIN_MESSAGE_MAP(CImageProcPPCDlg, CDialog)
//{{AFX_MSG_MAP(CImageProcPPCDlg)
ON_BN_CLICKED(IDC_BUTTON_OPENFILE, OnButtonOpenfile)
ON_BN_CLICKED(IDC_BUTTON_RED, OnButtonRed)
ON_BN_CLICKED(IDC_BUTTON_SAVEFILE, OnButtonSavefile)
ON_BN_CLICKED(IDC_BUTTON_SHOW, OnButtonShow)
ON_WM_PAINT()
//}}AFX_MSG_MAP
END_MESSAGE_MAP()
/////////////////////////////////////////////////////////////////////////////
// CImageProcPPCDlg message handlers
BOOL CImageProcPPCDlg::OnInitDialog()
{
CDialog::OnInitDialog();
// Set the icon for this dialog. The framework does this automatically
// when the application's main window is not a dialog
SetIcon(m_hIcon, TRUE);
// Set big icon
SetIcon(m_hIcon, FALSE);
// Set small icon
CenterWindow(GetDesktopWindow());
ENEE408G Fall 2003 (Update 09/23/2003)
Mobile Computing and Pocket PC Programming
// center to the hpc screen
28
// TODO: Add extra initialization here
// Add you own initialization here Æ
bExistFile = FALSE;
//Å
return TRUE; // return TRUE unless you set the focus to a control
}
// #############################################
// ##
Open File
##
// #############################################
void CImageProcPPCDlg::OnButtonOpenfile()
{
// TODO: Add your control notification handler code here
// Add your own codes here Æ
// Construct the Open File Window
CString strFilter = "Bitmap Files (*.bmp)|*.bmp|All Files (*.*) |*.*||";
CfileDialog dlg(TRUE, NULL, NULL, OFN_HIDEREADONLY|OFN_EXPLORER, strFilter, NULL);
if (dlg.DoModal() == IDOK) { // if open file window works
if( m_pDib.Load(dlg.GetPathName()) == TRUE ){
// load Bitmap to DibSectionLite class
if( m_pDib.GetBitCount() != 24 ){
// currently, we only deal with 24 bps Bitmap
MessageBox(_T("Must be 24 bits"));
bExistFile = FALSE;
return;}
sz = m_pDib.GetSize(); // get dimension of bitmap and allocate memory for Image Processing
if( bExistFile == TRUE ){ // if a previous bitmap exists, delete the allocated memory and new one
delete[] dibit;}
else{ bExistFile = TRUE;
}
dibit = new BYTE[3*sz.cx*sz.cy];
}}
else{
// if fail to open a file and load a bitmap
MessageBox(_T("Fail to load MBP"));
return;
}
// Å
}
// #################################
// ##
Save File
##
// #################################
void CImageProcPPCDlg::OnButtonSavefile()
{
// TODO: Add your control notification handler code here
// Add your own codes here Æ
// Construct the Save File Window
CString strFilter = "Bitmap Files (*.bmp)|*.bmp|All Files (*.*) |*.*||";
CfileDialog dlg(FALSE, NULL, NULL, OFN_HIDEREADONLY|OFN_EXPLORER, strFilter, NULL);
if( bExistFile == TRUE ){
// we cannot save a bitmap without any existing bitmap in memory
if (dlg.DoModal() == IDOK) {
if( m_pDib.Save(dlg.GetPathName()) == FALSE ){
MessageBox(_T("Fail to save MBP"));
return;}}}
// Å
}
// ###########################################################
// ##
Image Processing ( display red component ) ##
// ###########################################################
void CImageProcPPCDlg::OnButtonRed()
{
// TODO: Add your control notification handler code here
// Add your own codes here Æ
long i;
ENEE408G Fall 2003 (Update 09/23/2003)
Mobile Computing and Pocket PC Programming
29
dibit = (BYTE*)m_pDib.GetDIBits();
// set pointer to access the bitmap
for(i=0; i < 3*sz.cx*sz.cy ; i=i+3){ // set blue and green component as zero, i.e. keep red
dibit[i] = 0;
dibit[i+1] = 0; }
DrawBITMAP() ;
// draw the modified bitmap
// Å
}
// ###################################
// ##
Show Bitmap
##
// ###################################
void CImageProcPPCDlg::OnButtonShow()
{
// TODO: Add your control notification handler code here
// Add your own codes here Æ
DrawBITMAP() ;
// Å
}
// #####################################################
// ##
Draw Bitmap on the application
##
// #####################################################
// Add your own member function here Æ
void CImageProcPPCDlg::DrawBITMAP()
{
sz = m_pDib.GetSize();
CDC* pDC = m_DrawImage.GetDC();
CRect rect;
m_DrawImage.GetClientRect(&rect);
int recH, recW, showH, showW;
recW=rect.Width();
// Calculate Display area
recH=rect.Height();
showW=rect.left +(recW- sz.cx)/2;
showH=rect.top + (recH - sz.cy)/2;
m_pDib.Draw(pDC,CPoint(showW,showH));
// draw bitmap on CStatic control
}
//Å
void CImageProcPPCDlg::OnPaint()
{
CPaintDC dc(this); // device context for painting
// TODO: Add your message handler code here
// Add your own codes here Æ
m_DrawImage.RedrawWindow(NULL, NULL, WCE_IF(0, RDW_ERASENOW )); // redraw window
DrawBITMAP() ;
// <-// Do not call CDialog::OnPaint() for painting messages
}
(i) Run your program on the Pocket PC Emulator.
Prepare a 24-bit color BMP file and name it as “InFrame.BMP”. Transfer this file to
the root directory of the Pocket PC emulator or real device 17. In the eVC IDE, select
17
The root directory is one-level higher than the “My Documents” directory. Please refer section IV.6.3 for
instructions on file transfer.
ENEE408G Fall 2003 (Update 09/23/2003)
Mobile Computing and Pocket PC Programming
30
the Platform as Pocket PC 2002, Win32 [WCE x86] Debug, and Pocket PC 2002
Emulation, which is shown as follows.
Click the compile icon
and then execute icon
.
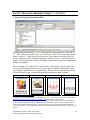
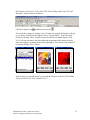
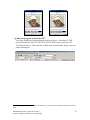
You can load an image by clicking “Open” button. An open file dialog box will pop
up ( as shown in the below left figure). Select “Inframe.BMP”. You will see the
picture by clicking “Show” button ( as shown in the below middle figure). Click
“Red” will convert remove the blue and green component of the picture and only
show the red part ( as shown in the below right figure). You can save this modified
picture by clicking “Save” button.
You can also try it on real device by choosing the Platform as Win32 [WCE ARM]
Debug and Pocket PC 2002 (default device).
ENEE408G Fall 2003 (Update 09/23/2003)
Mobile Computing and Pocket PC Programming
31
3. eVC Demo Project-2:Digital Video Processing – Video Player
In this part, we will design a video player and learn
(1) how to build an application with single document by eVC,
(2) how to put RGB data into DIB (Device Independent Bitmap) directly,
(3) how to add List Box, Edit Box, and Slider Control and initialize them, and
(4) how to set a timer to display video periodically.
(a) Create a new Project by File Æ New
(1) Select “WCE Pocket PC 2002 MFC AppWizard (exe)” on the Projects tap.
(2) Key in “VideoProcPPC” on Project name edit box and select a Location for this
project. Also check “Create new workspace”.
(3) Check “Win32[WCE ARM]” and “Win32[WCE x86]” on the CPUs box18.
(4) Click “OK” and a WCE Pocket PC 2002 MFC AppWizard window will pop up.
(b) WCE Pocket PC 2002 MFC App Wizard
(1) Choose “Single document” and check “Document/View architecture support”.
18
If Pocket PC 2002 SDK is not available, you may create a new project by an older version of MFC
AppWizard, such as WCE MFC AppWizard or WCE Pocket PC MFC AppWizard.
ENEE408G Fall 2003 (Update 09/23/2003)
Mobile Computing and Pocket PC Programming
32
(2) Check “Basic MenuBar” on Control bar type and disable all features on the top
part. Click “Next”.
(3) Check “Yes, please” and “As a shared DLL”. Click “Next”.
(4) Select the Base Class of CVideoProcPPCView as “CFormView”. Click “Finish”.
ENEE408G Fall 2003 (Update 09/23/2003)
Mobile Computing and Pocket PC Programming
33
(5) AppWizard will summarize the features and files of the new project you just
created. Click “OK” to close the AppWizard.
(c) Edit Menu Bar
(1) Overview: In this section, we design the GUI of our application program. The
figure below shows the IDE that we will use to work on this demo project. Click
the ResourceView tap in the Project Workspace Window.
(2) Double click the Menubar on the ResourceView tap and then double click
IDR_MAINFRAME. You will see the menu bar as follows.
In our application, we do not need any item on the menu bar. Thus, we right click
on “Edit” and choose “Cut”. For “Tools”, we only keep “About VideoProcPPC”,
which can display copyright information, such as your name.
ENEE408G Fall 2003 (Update 09/23/2003)
Mobile Computing and Pocket PC Programming
34
(d) Edit Dialog Box
(1) In this section, we will design a dialog box that provides an interface between
Pocket PC and users. Double click Dialog on the ResourceView tap. Choose
IDD_VIDEOPROCPPC_FORM. Delete the label “TODO: Place form controls
on this dialog.”
Drag three Buttons, one Edit Box, one List Box, one Static, and one Slider from
Controls Toolbar to the dialog box and arrange them as shown in the above
figure.
(2) Edit Properties: Right click on each control and choose “Properties”. A Control
Properties dialog box will pop up, which is shown in the following figure.
Change the properties of each control according to the following table.
Original Name
Button1
Button2
Button3
ListBox1
Slider1
Edit1
Static1
ID
IDC_BTN_OPENFILE
IDC_BTN_PLAY
IDC_BTN_STOP
IDC_LIST_RATE
IDC_SLIDER_FRAME_INDEX
IDC_EDIT_FRAME
IDC_STATIC_showBITMAP
Caption
Open YUV
Play
Stop
For “Static1” control, choose “Border” item under Styles tab and “Static Edge”
item under “Extended Styles”.
After modification, we will get a dialog box with the following new look.
ENEE408G Fall 2003 (Update 09/23/2003)
Mobile Computing and Pocket PC Programming
35
(3) Initialize the Slider, Edit Box, and List Box: Right click the Slider button and
click “ClassWizard”. Click the “Member Variables” tap.
Double click IDC_SLIDER_FRAME_INDEX on the Control IDs Box. An Add
Member Variable dialog box will show up.
Type “m_Slider_Frame_Index” in the Member variable name edit box,. Choose
“Control” in the Category list box and “CSliderCtrl” in the Variable type list box.
Likewise, for the List Box, double click IDC_LIST_RATE in the Control IDs edit
box. Type “m_List_Rate” in the Member variable name edit box. Choose
“Control” in the Category list box and “CListBox” in the Variable type list box.
For the Edit Box, double click IDC_EDIT_FRAME in the Control IDs edit box.
Type “m_Edit_Frame” in the Member variable name edit box. Choose “Value”
on the Category list box and “CString” in Variable type list box. For the Static,
double click IDC_STATIC_showBITMAP in the Control IDs edit box. Type
“m_showBITMAP” in the Member variable name edit box. Choose “Control” on
the Category list box and “CStatic” in Variable type list box.
(4) Set Messages and Member Functions
ENEE408G Fall 2003 (Update 09/23/2003)
Mobile Computing and Pocket PC Programming
36
We can add more required messages and member functions using ClassWizard,
which is shown in the figure above. Make sure the Project is set to
“VideoProcPPC” and Class name is “CViewProcPPCView”.
Object ID
CVideoProcPPCView
CVideoProcPPCView
CVideoProcPPCView
CVideoProcPPCView
IDC_BTN_OPENFILE
IDC_BTN_PLAY
IDC_BTN_STOP
IDC_LIST_RATE
Message
OnDraw
OnInitialUpdate
WM_HSCROLL
WM_TIMER
BN_CLICKED
BN_CLICKED
BN_CLICKED
LBN_DBLCLK
Member function
OnDraw
OnInitialUpdate
OnHScroll
OnTimer
OnBtnOpenfile
OnBtnPlay
OnBtnStop
OnDblclkListRate
Set up the messages and member functions of all objects listed in the table above
by (i) double clicking Object IDs, (ii) double clicking Messages, and (iii) adding
Member function in the ClassWizard Window.
(e) Edit VideoProcPPCDoc.h
(1) Before we do any further programming, we add some existing codes to this
project. Click Project Æ Add to Project Æ Files from the eVC menu bar. You
will see a dialog box for inserting new files. Add the files DIBSectionLite.cpp,
DIBSectionLite.h, DVP.cpp, and DVP.h to this project. DIBSectionLite19 deals
with the Bitmap, while DVP is concerned with video processing. After inserting,
the FileView tap becomes the figure below.
19
DIBSectionLite is provided by Chris Maunder. It can be downloaded at
http://www.codeproject.com/bitmap/dibsection.asp
ENEE408G Fall 2003 (Update 09/23/2003)
Mobile Computing and Pocket PC Programming
37
(2) Click on VideoProcPPCDoc.h20
// VideoProcPPCDoc.h : interface of the CVideoProcPPCDoc class
// Author : Guan-Ming Su
// Date: Aug 2002
// update: July 5 2003
/////////////////////////////////////////////////////////////////////////////
#if !defined(AFX_VIDEOPROCPPCDOC_H__5B9D8AFA_3247_4263_82D7_15053107F9CB__INCLUDED_)
#define AFX_VIDEOPROCPPCDOC_H__5B9D8AFA_3247_4263_82D7_15053107F9CB__INCLUDED_
#if _MSC_VER >= 1000
#pragma once
#endif // _MSC_VER >= 1000
// Put DIBSectionLite.h here Æ
#include "DIBSectionLite.h"
// Å
class CVideoProcPPCDoc : public CDocument
{
protected: // create from serialization only
CVideoProcPPCDoc();
DECLARE_DYNCREATE(CVideoProcPPCDoc)
// Attributes
public:
// Put your own code here Æ
// We add DIBSection as a member of DOC
CDIBSectionLite m_DIBSection;
//Å
// Operations
public:
// Overrides
// ClassWizard generated virtual function overrides
//{{AFX_VIRTUAL(CVideoProcPPCDoc)
public:
virtual BOOL OnNewDocument();
Notice that “// Add your own code Æ” and “//Å” indicates that you may put some codes in these areas.
In this example, we use italic red font for the added codes (to distinguish from the codes already
automatically generated by eVC).
20
ENEE408G Fall 2003 (Update 09/23/2003)
Mobile Computing and Pocket PC Programming
38
virtual void Serialize(CArchive& ar);
//}}AFX_VIRTUAL
// Implementation
public:
virtual ~CVideoProcPPCDoc();
#ifdef _DEBUG
virtual void AssertValid() const;
virtual void Dump(CDumpContext& dc) const;
#endif
protected:
// Generated message map functions
protected:
//{{AFX_MSG(CVideoProcPPCDoc)
// NOTE - the ClassWizard will add and remove member functions here.
// DO NOT EDIT what you see in these blocks of generated code !
//}}AFX_MSG
DECLARE_MESSAGE_MAP()
};
/////////////////////////////////////////////////////////////////////////////
//{{AFX_INSERT_LOCATION}}
// Microsoft eMbedded Visual C++ will insert additional declarations immediately before the previous line.
#endif // !defined(AFX_VIDEOPROCPPCDOC_H__5B9D8AFA_3247_4263_82D7_15053107F9CB__INCLUDED_)
(f) Edit VideoProcPPCView.h
// VideoProcPPCView.h : interface of the CVideoProcPPCView class
// Author: Guan-Ming Su
// Date: Aug 2002
// update: July 5 2003
/////////////////////////////////////////////////////////////////////////////
#if !defined(AFX_VIDEOPROCPPCVIEW_H__21B7E638_7D17_40EC_85FA_2599C0D7BD34__INCLUDED_)
#define AFX_VIDEOPROCPPCVIEW_H__21B7E638_7D17_40EC_85FA_2599C0D7BD34__INCLUDED_
#if _MSC_VER >= 1000
#pragma once
#endif // _MSC_VER >= 1000
// Put your own include header here Æ
#include "DIBSectionLite.h"
#include "DVP.h"
//Å
class CVideoProcPPCView : public CFormView
{
protected: // create from serialization only
CVideoProcPPCView();
DECLARE_DYNCREATE(CVideoProcPPCView)
public:
//{{AFX_DATA(CVideoProcPPCView)
enum { IDD = IDD_VIDEOPROCPPC_FORM };
CStatic
m_showBITMAP;
CListBox m_List_Rate;
CSliderCtrl
m_Slider_Frame_Index;
CString m_Edit_Frame;
//}}AFX_DATA
// Attributes
public:
CVideoProcPPCDoc* GetDocument();
ENEE408G Fall 2003 (Update 09/23/2003)
Mobile Computing and Pocket PC Programming
39
// Operations
public:
// Overrides
// ClassWizard generated virtual function overrides
//{{AFX_VIRTUAL(CVideoProcPPCView)
public:
virtual BOOL PreCreateWindow(CREATESTRUCT& cs);
virtual void OnInitialUpdate();
protected:
virtual void DoDataExchange(CDataExchange* pDX); // DDX/DDV support
virtual void OnDraw(CDC* pDC);
//}}AFX_VIRTUAL
// Implementation
public:
virtual ~CVideoProcPPCView();
#ifdef _DEBUG
virtual void AssertValid() const;
virtual void Dump(CDumpContext& dc) const;
#endif
protected:
// Put User defined variable here Æ
UINT TimerID;
// Timer ID
UINT TimerStep; // Timer Step for turn on/off timer
BYTE* YFrameData; // memory space for Y data
BYTE* CbFrameData;
// memory space for Cb data
BYTE* CrFrameData; // memory space for Cr data
FILE *pInputFile; // File
BITMAPINFOHEADER bmiHeader; //Bitmap header infom
BITMAPINFO bmInfo;
// bitmoap info
int VideoRate; // Video refresh rate
int VideoFormat; // Video Format,
int VideoWidth; // Video width in a frame
int VideoHeight; // Video hdight in a frame
int VideoBytes; // Total bytes for YUV in a frame
long int NumFrame; // total number of frame in a file
int VideoPixel; // Total number of pixel in a frame
int CVideoPixel; // Number of U(or V) pixel in a frame, for 4:2:0, it's equal to VideoPixel/4
long int YUVFileOffSet; // current frame offset in a file
long int VideoStartIndex; // current frame index of video for displaying
int SliderMax;
// Max value of slider
int SliderMin;
// Min value of slider
CBitmap *bitmap;
// CBITMAP
BYTE* dibits;
// Å
// Generated message map functions
protected:
//{{AFX_MSG(CVideoProcPPCView)
afx_msg void OnHScroll(UINT nSBCode, UINT nPos, CScrollBar* pScrollBar);
afx_msg void OnTimer(UINT nIDEvent);
afx_msg void OnBtnOpenfile();
afx_msg void OnBtnPaly();
afx_msg void OnBtnStop();
afx_msg void OnDblclkListRate();
//}}AFX_MSG
DECLARE_MESSAGE_MAP()
};
#ifndef _DEBUG // debug version in VideoProcPPCView.cpp
inline CVideoProcPPCDoc* CVideoProcPPCView::GetDocument()
{ return (CVideoProcPPCDoc*)m_pDocument; }
#endif
/////////////////////////////////////////////////////////////////////////////
ENEE408G Fall 2003 (Update 09/23/2003)
Mobile Computing and Pocket PC Programming
40
//{{AFX_INSERT_LOCATION}}
// Microsoft eMbedded Visual C++ will insert additional declarations immediately before the previous line.
#endif // !defined(AFX_VIDEOPROCPPCVIEW_H__21B7E638_7D17_40EC_85FA_2599C0D7BD34__INCLUDED_)
(g) Edit VideoProcPPCView.cpp
// VideoProcPPCView.cpp : implementation of the CVideoProcPPCView class
// Author: Guan-Ming Su
// Date: Aug 2002
// update: July 5 2003
#include "stdafx.h"
#include "VideoProcPPC.h"
#include "VideoProcPPCDoc.h"
#include "VideoProcPPCView.h"
#ifdef _DEBUG
#define new DEBUG_NEW
#undef THIS_FILE
static char THIS_FILE[] = __FILE__;
#endif
// Put your own include header file here Æ
#include "DIBSectionLite.h"
#include "DVP.h"
TCHAR filenamein[255]; //has to be here otherwise GetOpenFileName doesn't work
// Å
/////////////////////////////////////////////////////////////////////////////
// CVideoProcPPCView
IMPLEMENT_DYNCREATE(CVideoProcPPCView, CFormView)
BEGIN_MESSAGE_MAP(CVideoProcPPCView, CFormView)
//{{AFX_MSG_MAP(CVideoProcPPCView)
ON_WM_HSCROLL()
ON_WM_TIMER()
ON_BN_CLICKED(IDC_BTN_OPENFILE, OnBtnOpenfile)
ON_BN_CLICKED(IDC_BTN_PALY, OnBtnPaly)
ON_BN_CLICKED(IDC_BTN_STOP, OnBtnStop)
ON_LBN_DBLCLK(IDC_LIST_RATE, OnDblclkListRate)
//}}AFX_MSG_MAP
END_MESSAGE_MAP()
/////////////////////////////////////////////////////////////////////////////
// CVideoProcPPCView construction/destruction
CVideoProcPPCView::CVideoProcPPCView()
: CFormView(CVideoProcPPCView::IDD)
{
//{{AFX_DATA_INIT(CVideoProcPPCView)
m_Edit_Frame = _T("");
//}}AFX_DATA_INIT
// TODO: add construction code here
}
CVideoProcPPCView::~CVideoProcPPCView()
{
}
void CVideoProcPPCView::DoDataExchange(CDataExchange* pDX)
{
CFormView::DoDataExchange(pDX);
//{{AFX_DATA_MAP(CVideoProcPPCView)
ENEE408G Fall 2003 (Update 09/23/2003)
Mobile Computing and Pocket PC Programming
41
DDX_Control(pDX, IDC_LIST_RATE, m_List_Rate);
DDX_Control(pDX, IDC_SLIDER_FRAME_INDEX, m_Slider_Frame_Index);
DDX_Text(pDX, IDC_EDIT_FRAME, m_Edit_Frame);
//}}AFX_DATA_MAP
}
BOOL CVideoProcPPCView::PreCreateWindow(CREATESTRUCT& cs)
{
// TODO: Modify the Window class or styles here by modifying
// the CREATESTRUCT cs
return CFormView::PreCreateWindow(cs);
}
/////////////////////////////////////////////////////////////////////////////
// CVideoProcPPCView diagnostics
#ifdef _DEBUG
void CVideoProcPPCView::AssertValid() const
{
CFormView::AssertValid();
}
void CVideoProcPPCView::Dump(CDumpContext& dc) const
{
CFormView::Dump(dc);
}
CVideoProcPPCDoc* CVideoProcPPCView::GetDocument() // non-debug version is inline
{
ASSERT(m_pDocument->IsKindOf(RUNTIME_CLASS(CVideoProcPPCDoc)));
return (CVideoProcPPCDoc*)m_pDocument;
}
#endif //_DEBUG
/////////////////////////////////////////////////////////////////////////////
// CVideoProcPPCView message handlers
void CVideoProcPPCView::OnDraw(CDC* pDC)
{
// TODO: Add your specialized code here and/or call the base class
// Put your own code here Æ
CVideoProcPPCDoc* pDoc = GetDocument();
ASSERT_VALID(pDoc);
CRect rect;
m_showBITMAP.GetClientRect(&rect);
int recH, recW, showH, showW;
recW=rect.Width();
// Calculate Display area
recH=rect.Height();
showW=rect.left +(recW-VideoWidth)/2;
showH=rect.top + (recH-VideoHeight)/2;
pDoc->m_DIBSection.Draw(pDC, CPoint(showW,showH));
// Å
}
void CVideoProcPPCView::OnHScroll(UINT nSBCode, UINT nPos, CScrollBar* pScrollBar)
{
// TODO: Add your message handler code here and/or call default
// Put your own code here Æ
if(nSBCode == SB_THUMBPOSITION){
YUVFileOffSet=nPos*(VideoPixel+2*CVideoPixel);
VideoStartIndex=nPos-1;}
if( NumFrame >0) {
CVideoProcPPCDoc* pDoc = GetDocument();
ENEE408G Fall 2003 (Update 09/23/2003)
Mobile Computing and Pocket PC Programming
42
ASSERT_VALID(pDoc);
CClientDC aDC(&m_showBITMAP);
YUVFileOffSet=VideoStartIndex*VideoBytes;
pInputFile=_wfopen(filenamein,_T("rb")); // open file
if(pInputFile!=NULL){ // open file successfully
fseek(pInputFile,YUVFileOffSet,SEEK_SET);
fread(YFrameData,sizeof(BYTE),VideoPixel,pInputFile);
fread(CbFrameData,sizeof(BYTE),CVideoPixel,pInputFile);
fread(CrFrameData,sizeof(BYTE),CVideoPixel,pInputFile);
fclose(pInputFile); }
// Convert YUV(YCbCr) data into RGB (in dibits) by YUV2RGB function in DVP.cpp
YUV2RGB(YFrameData,CbFrameData,CrFrameData,dibits,VideoWidth,VideoHeight);
pDoc->m_DIBSection.SetBitmap(&bmInfo,dibits);
this->OnDraw(&aDC);
// Display current frame
CString strFrameIndex;
strFrameIndex.Format(_T("%d "),VideoStartIndex); // convert integer to string
_tprintf(_T("%s"), (LPCTSTR) strFrameIndex);
m_Edit_Frame=strFrameIndex;
UpdateData(FALSE);}
// Å
// Disable the default OnHScroll Æ
// CFormView::OnHScroll(nSBCode, nPos, pScrollBar);
// Å
}
void CVideoProcPPCView::OnTimer(UINT nIDEvent)
{
// TODO: Add your message handler code here and/or call default
// Put your own code here Æ
if (VideoStartIndex>=NumFrame){ // if we reach the last frame, stop displaying
TimerStep=0;}
if( TimerStep==1){ // button Play is clicked
CVideoProcPPCDoc* pDoc = GetDocument();
ASSERT_VALID(pDoc);
CClientDC aDC(&m_showBITMAP);
if(VideoStartIndex<NumFrame){ // increate frame index
VideoStartIndex=VideoStartIndex+1; }
// Display current frame index
m_Slider_Frame_Index.SetPos(VideoStartIndex); // Set slider to current frame index
CString strFrameIndex;
strFrameIndex.Format(_T("%d "),VideoStartIndex); // convert integer to string
_tprintf(_T("%s"), (LPCTSTR) strFrameIndex);
m_Edit_Frame=strFrameIndex;
UpdateData(FALSE);
// calculate the current frame position in file
YUVFileOffSet=VideoStartIndex*VideoBytes;
pInputFile=_wfopen(filenamein,_T("rb")); // open file
if(pInputFile!=NULL){ // open file successfully
fseek(pInputFile,YUVFileOffSet,SEEK_SET);
fread(YFrameData,sizeof(BYTE),VideoPixel,pInputFile);
fread(CbFrameData,sizeof(BYTE),CVideoPixel,pInputFile);
fread(CrFrameData,sizeof(BYTE),CVideoPixel,pInputFile);
fclose(pInputFile); }
// Convert YUV(YCbCr) data into RGB (in dibits) by YUV2RGB function in DVP.cpp
YUV2RGB(YFrameData,CbFrameData,CrFrameData,dibits,VideoWidth,VideoHeight);
// Set Bitmap
ENEE408G Fall 2003 (Update 09/23/2003)
Mobile Computing and Pocket PC Programming
43
else{
pDoc->m_DIBSection.SetBitmap(&bmInfo,dibits);
this->OnDraw(&aDC);
}
// Button Stop is pressed
TimerStep = 0;
KillTimer(TimerID); }
// Å
CFormView::OnTimer(nIDEvent);
}
void CVideoProcPPCView::OnBtnOpenfile()
{
// TODO: Add your control notification handler code here
// Put your own code here Æ
FILE *pInputFile;
OPENFILENAME ofn;
TimerStep=0;
VideoStartIndex=0; // initial start display frame index
memset(&ofn,0,sizeof(ofn));
ofn.lStructSize=sizeof(ofn);
ofn.lpstrFile=filenamein;
ofn.nMaxFile=255;
ofn.lpstrFilter=_T("Vidio Files:*.yuv\0*.yuv\0All Files:*.*\0*.*\0\0");
ofn.lpstrInitialDir=NULL;
if(GetOpenFileName(&ofn)==TRUE) { // if successfully get open file name
pInputFile=_wfopen(filenamein,_T("rb")); // open file
if(pInputFile!=NULL){ // open file successfully
fseek(pInputFile,0,SEEK_END);
long int lastPos;
lastPos=ftell(pInputFile);
NumFrame=lastPos/VideoBytes; // Calculate Number of frame in this file
fclose(pInputFile);
m_Slider_Frame_Index.SetRangeMin(1,FALSE); // reset slider max and min
m_Slider_Frame_Index.SetRangeMax(NumFrame,FALSE);
UpdateData(FALSE);
}
else{
MessageBox(_T("Cannot Open File"),MB_OK);} } // fail to open file
else{ MessageBox(_T("Cannot Get Open File Name"),MB_OK); }
// Å
}
void CVideoProcPPCView::OnBtnPaly()
{
// TODO: Add your control notification handler code here
// Put your own code here Æ
int interval ;
if(NumFrame >0 ){
interval= 1000/VideoRate;
TimerID = SetTimer(99, interval, NULL);
TimerStep = 1;}
// Å
}
void CVideoProcPPCView::OnBtnStop()
{
// TODO: Add your control notification handler code here
// Put your own code here Æ
TimerStep=0;
// Å
// stop timer
}
void CVideoProcPPCView::OnDblclkListRate()
{
ENEE408G Fall 2003 (Update 09/23/2003)
Mobile Computing and Pocket PC Programming
44
// TODO: Add your control notification handler code here
// Puy your own code here Æ
int nCount;
nCount=m_List_Rate.GetCurSel();
TimerStep=0; // stop timer
switch(nCount){
case 0:
VideoRate=1; break;
case 1:
VideoRate=5; break;
case 2:
VideoRate=10; break;
case 3:
VideoRate=20; break;
case 4:
VideoRate=24; break;
default:
VideoRate=30;
break;}
// Å
}
void CVideoProcPPCView::OnInitialUpdate()
{
CFormView::OnInitialUpdate();
// TODO: Add your specialized code here and/or call the base class
// Put your initialization here Æ
// Initialize video parameters
VideoFormat=0; // initial format is QCIF
VideoRate=30;
// initial rate is 30 frame per second
VideoWidth=176; // initial width of video for QCIF
VideoHeight=144; // initial height of video for QCIF
VideoStartIndex=0; // initial start display frame index
VideoPixel=(int)(VideoWidth*VideoHeight);
CVideoPixel=VideoPixel/4;
VideoBytes=VideoPixel+2*CVideoPixel;
YUVFileOffSet=0;
TimerStep=0;
// initial working space for BITMAP
dibits=new BYTE[3*VideoPixel];
// Initialize Y Cb Cr memory space
YFrameData=new BYTE[VideoPixel];
CbFrameData=new BYTE[CVideoPixel];
CrFrameData=new BYTE[CVideoPixel];
// Initialize Controller
m_Slider_Frame_Index.SetRangeMin(1,FALSE); // set min tick on slider
m_Slider_Frame_Index.SetRangeMax(100,FALSE); // set max tick on slider
m_List_Rate.AddString(_T("01")); // add string on list box
m_List_Rate.AddString(_T("05"));
m_List_Rate.AddString(_T("10"));
m_List_Rate.AddString(_T("20"));
m_List_Rate.AddString(_T("24"));
m_List_Rate.AddString(_T("30"));
m_List_Rate.SetCurSel(4);
m_Edit_Frame=_T("0");
// set edit box caption as "0"
UpdateData(FALSE); // update controller
// Initialize Bitmap header as 24 bits true color
bitmap=new CBitmap();
bmiHeader.biSize =sizeof(BITMAPINFOHEADER);
bmiHeader.biWidth = VideoWidth;
bmiHeader.biHeight = VideoHeight;
bmiHeader.biPlanes = 1;;
ENEE408G Fall 2003 (Update 09/23/2003)
Mobile Computing and Pocket PC Programming
45
bmiHeader.biBitCount =24;
bmiHeader.biCompression= BI_RGB;;
bmiHeader.biSizeImage= 3*VideoPixel;
bmiHeader.biClrUsed = 16777216;
bmiHeader.biClrImportant = 16777216;
bmInfo.bmiHeader=bmiHeader;
// Å
}
When compiling, some error messages on precompiled header may show up. Please
refer to section IV.6.1 for solutions.
(i) Run your program on the emulator:
In the eVC IDE, select the Platform as Pocket PC 2002, Win32 [WCE x86] Debug,
and Pocket PC 2002 Emulation, which is shown in the figure below.
Compile you program by clicking
and run it by clicking
.
You will see an interface shown in the left figure below. Click the “Open YUV”
button, and an Open File Window will pop up. Let’s select one YUV file.
Click the “Play” button to play a video or drag “Slider” to any position to randomly
access this video. Also, you can change the value in the “Rate” list box to slow down
the video.
ENEE408G Fall 2003 (Update 09/23/2003)
Mobile Computing and Pocket PC Programming
46
(j) Run your program on the Pocket PC21
You can to compile and run this program in the real device. From the eVC IDE,
choose Platform as Pocket PC 2002, Win32[WCE ARM] Debug, and Pocket PC
2002[Default Device]. Then click the compile and execute buttons. Enjoy your new
pocket video player.
21
This demo project is not optimized for real Pocket PC. You will observe that the refresh rate of video is
slow.
ENEE408G Fall 2003 (Update 09/23/2003)
Mobile Computing and Pocket PC Programming
47
4. eVC Demo Project-3:Digital Speech Processing – Spectrum Analyzer
In this demo project, you will design a spectrum analyzer and learn
(1) how to load, save, and record a wave file and,
(2) how to design a Menu Bar and Open File Window dialog box,
(3) how to draw data on screen, and
(4) how to perform digital speech processing, such as Fast Fourier Transform.
(a) Create a new Project by File Æ New
(1) Select “WCE Pocket PC 2002 MFC AppWizard (exe)” on the Projects tap
(2) Key in “AudioProcPPC” on Project name edit box and select a Location for this
project. Also check “Create new workspace”.
(3) Check “Win32[WCE ARM]” and “Win32[WCE x86]” on the CPUs box22
(4) Click “OK” and a WCE Pocket PC 2002 MFC AppWizard window will pop up.
(b)WCE Pocket PC 2002 MFC AppWizard
(1) Choose “Single document” and check “Document/View architecture support”.
22
If Pocket PC 2002 SDK is not available, you may create a new project by an older version of MFC
AppWizard, such as WCE MFC AppWizard or WCE Pocket PC MFC AppWizard.
ENEE408G Fall 2003 (Update 09/23/2003)
Mobile Computing and Pocket PC Programming
48
(2) Disable all features and choose “Basic MenuBar” on Control bar type.
(c) Choose “generate source file comments” and “As a shared DLL”. Click “Next”.
(d) Select the Base class of CSpeechProcPPCView as CView. Click “Finish”.
ENEE408G Fall 2003 (Update 09/23/2003)
Mobile Computing and Pocket PC Programming
49
(g) AppWizard will summarize the features and files of new project you created.
Click “OK” to close the AppWizard.
(c) Edit Menu
(1) Overview: The following figure shows the IDE we will use in this demo project.
Click the ResourceView tap in the IDE.
(2) Design Menu
Double click IDR_MAINFRAME under Menubar in the ResourceView tap. A
default menu will show up in the Edit Window.
We do not need “Edit”, thus, right click it and cut it. For “Tools”, we only reserve
“About SpeechProcPPC”. We will create two main items on the menu bar. One is
“File” and the other is “Spectrum”. Let’s work on “File” first. You can click the
dashed rectangular and a Menu Item Properties dialog box will pop up, which is
shown in the following figure. Change ID into “IDR_MAIN_FILE”, Caption into
“&File”, (“&F” means that you can press “Alt” and “F” to access this item), and
Caption ID into “IDS_FILE”.
ENEE408G Fall 2003 (Update 09/23/2003)
Mobile Computing and Pocket PC Programming
50
So far, we have already created the File main menu item. We need to add four sub
items, Open File, Save File, Record Start, Record Stop, and Play, under this main
menu item. Let’s work on the first item, Open File. Right click the dashed
rectangular above the File menu item and choose “Properties”. You will see
another dialog box shown below. Modify ID as ID_FILE_OPEN and Caption as
“&Open”. Make the other three items by the same procedures. Set ID (Caption)
for Save File, Record Start, Record Stop and Play as ID_FILE_SAVE (&Save),
ID_FILE_StartRecord (REC start), ID_FILE_StopRecord (REC Stop), and
ID_FILE_Play (&Play), respectively. We finish the design of the first main menu
item.
Repeat the same procedures described above to create Spectrum main menu item.
Set its properties according to the following figure.
For the functionality of plotting waveform and FFT, we need to add two sub-items
under this Spectrum item. Double click the dashed rectangular box that is above
Spectrum, another Menu Item Properties dialog box will pop up.
You can create two new sub-items whose ID are ID_SPECTRUM_WAVEFORM
and ID_SPECTRUM_FFT, respectively, Caption are “Waveform” and “FFT”,
respectively. Finally, the menu becomes the following figure.
ENEE408G Fall 2003 (Update 09/23/2003)
Mobile Computing and Pocket PC Programming
51
(3) Set Message
After setting up the menu bar, we need to add messages and their corresponding
reactions if users click those items. We can use ClassWizard (from View Æ
ClassWizard in eVC IDE) to edit the messages in Windows.
Make sure the “Class name” is set to “CSpeechProcPPCView”. Double click
“ID_FILE_OPEN” in the Object IDs box and “COMMAND” in the Messages box.
An “Add Member Function” dialog box will show up. Press “OK”.
Repeat the same procedure for other five objects whose Object ID are
ID_FILE_SAVE, ID_FILE_StartRecord, ID_FILE_StopRecord, ID_FILE_Play,
ID_SPECTRUM_WAVEFORM and ID_SPECTRUM_FFT, respectively. Now, we
already set up the GUI and messages. It’s time to move to programming part.
(d)Edit SpeechProcPPCView.h
(1) Before we do any further programming, we add some existing codes to this project.
From Project Æ Add to ProjectÆ Files in the eVC IDE, add the files PloyXY.cpp,
PlotXY.h, filewav.cpp, filewav.h23, spectrum.cpp, and spectrum.h. Make sure they
are already put in the working directory. Files PlotXY draws 2-D figures, files
filewav are concerned with reading and writing .wav files, and files spectrum
implement the Fast Fourier Transform algorithm. After inserting, you can check
those files on the FileView tap.
23
filewav.cpp and filewav.h are provided by Andres Kwasinski.
ENEE408G Fall 2003 (Update 09/23/2003)
Mobile Computing and Pocket PC Programming
52
(2) We add some variables used in this project in the header file24.
// SpeechProcPPCView.h : interface of the CSpeechProcPPCView class
//
/////////////////////////////////////////////////////////////////////////////
#if !defined(AFX_SPEECHPROCPPCVIEW_H__019C5F5E_9CBE_434B_A914_8688ABC3757E__INCLUDED_)
#define AFX_SPEECHPROCPPCVIEW_H__019C5F5E_9CBE_434B_A914_8688ABC3757E__INCLUDED_
#if _MSC_VER >= 1000
#pragma once
#endif // _MSC_VER >= 1000
class CSpeechProcPPCView : public CView
{
protected: // create from serialization only
CSpeechProcPPCView();
DECLARE_DYNCREATE(CSpeechProcPPCView)
// Attributes
public:
CSpeechProcPPCDoc* GetDocument();
// Operations
public:
// Overrides
// ClassWizard generated virtual function overrides
//{{AFX_VIRTUAL(CSpeechProcPPCView)
public:
virtual void OnDraw(CDC* pDC); // overridden to draw this view
virtual BOOL PreCreateWindow(CREATESTRUCT& cs);
protected:
//}}AFX_VIRTUAL
// Implementation
public:
virtual ~CSpeechProcPPCView();
#ifdef _DEBUG
virtual void AssertValid() const;
virtual void Dump(CDumpContext& dc) const;
#endif
protected:
Notice that “// Add your own code Æ” and “//Å” indicates that you may put some codes in these areas.
In this example, we use italic red font for the added codes (to distinguish from the codes already
automatically generated by eVC).
24
ENEE408G Fall 2003 (Update 09/23/2003)
Mobile Computing and Pocket PC Programming
53
// Put your own protected data here Æ
int show_spectrum_type; // display type of figure
long int NumSample;
// number of sample
int* Sample;
// sample data
int FigureWidth;
// width of figure
int FigureHeight;
// height of figure
bool m_bOneFileExist;
// indicator for a existing file in application
MMRESULT mr;
// return value for access WAVE function
HWAVEIN hWaveIn;
// handel for microphone input
HWAVEOUT hWaveOut;
// handel for speaker output
WAVEHDR MICbuffer;
// buffer for microphone input
WAVEFORMATEX RecordWavFileFmt; // Defines the format of waveform audio data.
// Å
// Generated message map functions
protected:
//{{AFX_MSG(CSpeechProcPPCView)
afx_msg void OnFileOpen();
afx_msg void OnSpectrumFft();
afx_msg void OnSpectrumWaveform();
afx_msg void OnFileSave();
afx_msg void OnFILEStartRecord();
afx_msg void OnFILEStopRecord();
afx_msg void OnFILEPlay();
//}}AFX_MSG
DECLARE_MESSAGE_MAP()
};
#ifndef _DEBUG // debug version in SpeechProcPPCView.cpp
inline CSpeechProcPPCDoc* CSpeechProcPPCView::GetDocument()
{ return (CSpeechProcPPCDoc*)m_pDocument; }
#endif
/////////////////////////////////////////////////////////////////////////////
//{{AFX_INSERT_LOCATION}}
// Microsoft eMbedded Visual C++ will insert additional declarations immediately before the previous line.
#endif // !defined(AFX_SPEECHPROCPPCVIEW_H__019C5F5E_9CBE_434B_A914_8688ABC3757E__INCLUDED_)
(e)Edit SpeechProcPPCView.cpp
Modify SpeechProcPPCView.cpp by following the table below.
// SpeechProcPPCView.cpp : implementation of the CSpeechProcPPCView class
//
// Author: Guan-Ming Su
// Date: Aug 2002
// History: 7/6/2003 : 1. Support Save a wave file : WriteWav
//
2. Fix the starting point coodinate in DrawXY
//
3. Add recoding funtionality
//
7/21/2003: 1. Support Playback from file and recoridng buffer
#include "stdafx.h"
#include "SpeechProcPPC.h"
#include "SpeechProcPPCDoc.h"
#include "SpeechProcPPCView.h"
#ifdef _DEBUG
#define new DEBUG_NEW
#undef THIS_FILE
static char THIS_FILE[] = __FILE__;
#endif
// Put your include header file here Æ
#include <math.h>
ENEE408G Fall 2003 (Update 09/23/2003)
Mobile Computing and Pocket PC Programming
54
#include <mmreg.h>
#include "PlotXY.h"
#include "filewav.h"
#include "spectrum.h"
// ## IMPORTANT! It has to be here otherwise GetOpenFileName doesn't work
TCHAR in_filename[255];
TCHAR out_filename[255];
// Å
/////////////////////////////////////////////////////////////////////////////
// CSpeechProcPPCView
IMPLEMENT_DYNCREATE(CSpeechProcPPCView, CView)
BEGIN_MESSAGE_MAP(CSpeechProcPPCView, CView)
//{{AFX_MSG_MAP(CSpeechProcPPCView)
ON_COMMAND(ID_FILE_OPEN, OnFileOpen)
ON_COMMAND(ID_SPECTRUM_FFT, OnSpectrumFft)
ON_COMMAND(ID_SPECTRUM_WAVEFORM, OnSpectrumWaveform)
ON_COMMAND(ID_FILE_SAVE, OnFileSave)
ON_COMMAND(ID_FILE_StartRecord, OnFILEStartRecord)
ON_COMMAND(ID_FILE_StopRecord, OnFILEStopRecord)
ON_COMMAND(ID_FILE_Play, OnFILEPlay)
//}}AFX_MSG_MAP
END_MESSAGE_MAP()
/////////////////////////////////////////////////////////////////////////////
// CSpeechProcPPCView construction/destruction
CSpeechProcPPCView::CSpeechProcPPCView()
{
// TODO: add construction code here
// Put your initial setting here -->
// for recoring buffer
MICbuffer.lpData = new char[1000000];
MICbuffer.dwBufferLength = 1000000;
MICbuffer.dwFlags = 0;
// for recording wave format
RecordWavFileFmt.wFormatTag = WAVE_FORMAT_PCM;
RecordWavFileFmt.cbSize = 0;
RecordWavFileFmt.nSamplesPerSec = 11025;
RecordWavFileFmt.wBitsPerSample = 8;
RecordWavFileFmt.nChannels = 1;
RecordWavFileFmt.nBlockAlign = RecordWavFileFmt.nChannels * RecordWavFileFmt.wBitsPerSample / 8;
RecordWavFileFmt.nAvgBytesPerSec = RecordWavFileFmt.nSamplesPerSec*RecordWavFileFmt.nBlockAlign;
m_bOneFileExist = FALSE;
show_spectrum_type=0;
FigureWidth=230;
FigureHeight=260;
// Å
}
CSpeechProcPPCView::~CSpeechProcPPCView()
{
}
BOOL CSpeechProcPPCView::PreCreateWindow(CREATESTRUCT& cs)
{
// TODO: Modify the Window class or styles here by modifying
// the CREATESTRUCT cs
return CView::PreCreateWindow(cs);
}
/////////////////////////////////////////////////////////////////////////////
ENEE408G Fall 2003 (Update 09/23/2003)
Mobile Computing and Pocket PC Programming
55
// CSpeechProcPPCView drawing
void CSpeechProcPPCView::OnDraw(CDC* pDC)
{
CSpeechProcPPCDoc* pDoc = GetDocument();
ASSERT_VALID(pDoc);
// TODO: add draw code for native data here
// Put your own Digital Signal Processing codec here -->
if(show_spectrum_type==1){ // plot waveform
// call drawing funtion in PlotXY.cpp and PlotXY.h
DrawXY(pDC,Sample,NumSample,5,3,FigureWidth, FigureHeight); }
else if(show_spectrum_type==2){ // ------------- FFT
double* data;
int* dataAmp;
int NumData;
int i;
NumData=(unsigned long)pow(2, (int)floor( log(NumSample)/log(2) ));
data=new double[2*NumData+1];
dataAmp=new int[NumData];
data[0]=0;
for(i=0;i<NumData;i++){
data[2*i+1]=Sample[i]; // real part
data[2*(i+1)]=0; } // imaginary part
// call FFT function, in spectrum.cpp and spectrum.h
four1(data, (unsigned long)NumData, 1);
for(i=0;i<NumData;i++){
dataAmp[i]=(int)10*log10(sqrt(data[2*i+1]*data[2*i+1]+data[2*(i+1)]*data[2*(i+1)] ));
// call drawing funtion in PlotXY.cpp and PlotXY.h
DrawXY(pDC,dataAmp,NumData,5,3,FigureWidth, FigureHeight);
// Å
}
}
}
/////////////////////////////////////////////////////////////////////////////
// CSpeechProcPPCView diagnostics
#ifdef _DEBUG
void CSpeechProcPPCView::AssertValid() const
{
CView::AssertValid();
}
void CSpeechProcPPCView::Dump(CDumpContext& dc) const
{
CView::Dump(dc);
}
CSpeechProcPPCDoc* CSpeechProcPPCView::GetDocument() // non-debug version is inline
{
ASSERT(m_pDocument->IsKindOf(RUNTIME_CLASS(CSpeechProcPPCDoc)));
return (CSpeechProcPPCDoc*)m_pDocument;
}
#endif //_DEBUG
/////////////////////////////////////////////////////////////////////////////
// CSpeechProcPPCView message handlers
// ####### Open a File ##########
void CSpeechProcPPCView::OnFileOpen()
{
// TODO: Add your command handler code here
// Put your own codes to open file Æ
int i;
int iRetn;
WAVEFORMATEX WavFileFmt; // Defines the format of waveform audio data.
ENEE408G Fall 2003 (Update 09/23/2003)
Mobile Computing and Pocket PC Programming
56
BYTE* InDataBuf;
// buffer for read in data
ULONG TotInSamples;
// number of sample
OPENFILENAME ofn; // This structure contains information the operating system uses
// to initialize the system-defined Open or Save As dialog box.
// After the user closes the dialog box, the system returns
// information about the user's selection in this structure
memset(&ofn,0,sizeof(ofn)); // Allocate memory for ofn
ofn.lStructSize=sizeof(ofn); // Initial setting for ofn
ofn.lpstrFile=in_filename;
ofn.nMaxFile=255;
ofn.lpstrFilter=_T("Audio Files:*.wav\0*.wav\0All Files:*.*\0*.*\0\0"); // required file ext
ofn.lpstrInitialDir=NULL;
if(GetOpenFileName(&ofn)==TRUE){ // Show up the Open File Dialog Box
InDataBuf=new BYTE[MAXINSIZE];
iRetn=ReadWav(in_filename,&WavFileFmt,&TotInSamples,InDataBuf); // file in filewav.cpp
if(iRetn!=0){
MessageBox(_T("Fail to load data"));
return; }
NumSample=TotInSamples;
if( m_bOneFileExist == TRUE ){ // if there already exists a file, redefine the memory
delete[] Sample; }
m_bOneFileExist = TRUE;
// set up the flag to indicate a file is in this application
Sample=new int[NumSample];
for(i=0;i<NumSample;i++){
Sample[i]=(int)InDataBuf[i];}
delete[] InDataBuf;
MICbuffer.dwBufferLength = NumSample;
for( i =0; i < NumSample; i++ ){
// load data to MCIbuffer for playback
MICbuffer.lpData[i] = Sample[i]; }
}
//Å
}
// ####### Save a File #############
void CSpeechProcPPCView::OnFileSave()
{
// TODO: Add your command handler code here
// Put your own codes to save files Æ
long i;
OPENFILENAME ofn;
if( m_bOneFileExist == FALSE ){
MessageBox(_T("No data exist for saving out"));
}
else{ // if there is a file in application, then we allow saving files
memset(&ofn,0,sizeof(ofn)); // Allocate memory for ofn
ofn.lStructSize=sizeof(ofn); // Initial setting for ofn
ofn.lpstrFile=out_filename;
ofn.nMaxFile=255;
ofn.lpstrFilter=_T("Audio Files:*.wav\0*.wav\0All Files:*.*\0*.*\0\0"); // required file ext
ofn.lpstrInitialDir=NULL;
BYTE* OutBuffer;
OutBuffer = new BYTE[NumSample];
for( i = 0; i < NumSample; i++){
OutBuffer[i] = (BYTE)Sample[i]; }
if(GetSaveFileName(&ofn)==TRUE){ // Show up the Save File Dialog Box
// call WriteWav to save wave file
WriteWav(&RecordWavFileFmt, NumSample, OutBuffer, out_filename); }}
//Å
ENEE408G Fall 2003 (Update 09/23/2003)
Mobile Computing and Pocket PC Programming
57
}
// ####### Start to record ##########
// function was provided by Fall 2002 Group 4 iTalk5000: Josh Merti, Pall Kunchai, and Vijay Kumar
void CSpeechProcPPCView::OnFILEStartRecord()
{
// TODO: Add your command handler code here
// Put your own codes here Æ
DWORD callback = 0;
DWORD instance = 0;
DWORD open = 0;
//Open microphone for recording
if( (mr = waveInOpen(&hWaveIn, 0, &RecordWavFileFmt, callback, instance, open)) != MMSYSERR_NOERROR ){
MessageBox(_T("Fail in waveInOpen")); return;
}
//prepare the buffer for audio recording
if( (mr = waveInPrepareHeader(hWaveIn, &MICbuffer, sizeof(MICbuffer))) != MMSYSERR_NOERROR)
MessageBox(_T("Fail in waveInPrepareHeader"));
return;
}
{
//if that succeeds, link the mic input data to buffer
if((mr = waveInAddBuffer(hWaveIn, &MICbuffer, sizeof(MICbuffer))) != MMSYSERR_NOERROR) {
MessageBox(_T("Fail in waveInAddBuffer"));
return;
}
//Å
//if that succeeds, start recording
mr = waveInStart(hWaveIn);
}
// ####### Stop Record ##########
// function was provided by Fall 2002 Group 4 iTalk5000: Josh Merti, Pall Kunchai, and Vijay Kumar
void CSpeechProcPPCView::OnFILEStopRecord()
{
// TODO: Add your command handler code here
// Put your own codes here Æ
long i;
//close microphone
if((mr = waveInStop(hWaveIn)) != MMSYSERR_NOERROR)
MessageBox(_T("Fail in waveInStop"));
return;
}
{
//Reset microphone state so it can be reopened later
if( (mr = waveInReset(hWaveIn)) != MMSYSERR_NOERROR)
MessageBox(_T("Fail in waveInReset")); return;
}
{
if ( (mr = waveInClose(hWaveIn)) != MMSYSERR_NOERROR)
MessageBox(_T("Fail in waveInClose")); return;
}
{
//close lpData buffer
//Reset buffer structure so it can be reused
mr = waveInUnprepareHeader(hWaveIn, &MICbuffer, sizeof(WAVEHDR));
NumSample = MICbuffer.dwBytesRecorded;
if( m_bOneFileExist == TRUE ){
delete[] Sample;}
m_bOneFileExist = TRUE;
Sample= new int[NumSample];
for( i =0; i < NumSample; i++ ){
Sample[i] = (BYTE)MICbuffer.lpData[i]; }
//Å
}
// ####### Plot FFT ##########
void CSpeechProcPPCView::OnSpectrumFft()
ENEE408G Fall 2003 (Update 09/23/2003)
Mobile Computing and Pocket PC Programming
58
{
// TODO: Add your command handler code here
// put your codes here to deal with reaction for this item -->
show_spectrum_type =2; // FFT
CClientDC aDC(this);
this->OnDraw(&aDC);
// Å
}
// ####### Plot waveform #########
void CSpeechProcPPCView::OnSpectrumWaveform()
{
// TODO: Add your command handler code here
// put your codes here to deal with reaction for this item -->
show_spectrum_type=1; // waveform
CClientDC aDC(this);
this->OnDraw(&aDC);
// Å
}
void CSpeechProcPPCView::OnFILEPlay()
{
// TODO: Add your command handler code here
// put your codes here Æ
DWORD callback = 0;
DWORD instance = 0;
DWORD open = 0;
if( m_bOneFileExist == TRUE ){
// Open speaker for playback
if( (mr = waveOutOpen(&hWaveOut, 0, &RecordWavFileFmt, callback, instance, open))!= MMSYSERR_NOERROR)
{
MessageBox(_T("Fail in waveOutOpen")); return;
}
// Å
//prepare the buffer for audio playback
if( (mr = waveOutPrepareHeader(hWaveOut, &MICbuffer, sizeof(MICbuffer))) != MMSYSERR_NOERROR)
MessageBox(_T("Fail in waveOutPrepareHeader")); return;
}
//if that succeeds, link the playback output data to buffer
if((mr = waveOutWrite(hWaveOut, &MICbuffer, sizeof(MICbuffer))) != MMSYSERR_NOERROR) {
MessageBox(_T("Fail in waveOutWrite")); return;
}
}
{
}
When compiling, some error messages on precompiled headers may show up in the
Output Window. Please follow the solution in section IV.6.1 to deal with the files
filewav.cpp, PlotXY.cpp, and spectrum.cpp.
(f) Run your program on the emulator.
Select the Platform as Pocket PC 2002, Win32 [WCE x86] Debug, and Pocket PC
2002 Emulation, which is shown in the figure below.
Compile your program by
and run it by
ENEE408G Fall 2003 (Update 09/23/2003)
Mobile Computing and Pocket PC Programming
59
You will see the GUI on the emulator.
You can select a wave file by File Æ Open. To observe the waveform, you can click
Spectrum Æ Waveform. To observe the FFT, click Spectrum Æ FFT.
Waveform
FFT
You can start to record a sound clip by clicking File->REC start and stop by File ->
REC stop. The recorded sound or opened wave file can be played by using File>Play. You can view the waveform and FFT of this recorded sound. Also, you can
save it as a wave file through File -> Save.
(g) Modification
You can extend your project by adding more functions under the Spectrum main
menu item and setting different show_spectrum_type value and the corresponding
reaction in CSpeechProcView::OnDraw. A useful reference and codes, named
Numerical Recipes, can be obtained from http://www.nr.com.
ENEE408G Fall 2003 (Update 09/23/2003)
Mobile Computing and Pocket PC Programming
60
5. eVC Demo Project-4: Digital Audio Processing – Digital Piano
In this demo project, you will design a digital piano and learn
(1) how to import external .wav file as internal resource, and
(2) how to use PlaySound.dll API.
(a). Create a New Project by File Æ New
(1) Select “WCE Pocket PC 2002 MFC AppWizard (exe)” on the Projects tap
(2) Key in “AudioProcPPC” on Project name edit box and select a Location for this
project. Also check “Create new workspace”.
(3) Check “Win32[WCE ARM]” and “Win32[WCE x86]” on the CPUs box25
(4) Click “OK” and a WCE Pocket PC 2002 MFC AppWizard window will pop up.
(b). WCE Pocket PC 2002 MFC AppWizard
(1) Choose “Dialog Base” and click “Next”.
25
If Pocket PC 2002 SDK is not available, you may create a new project by an older version of MFC
AppWizard, such as WCE MFC AppWizard or WCE Pocket PC MFC AppWizard.
ENEE408G Fall 2003 (Update 09/23/2003)
Mobile Computing and Pocket PC Programming
61
(2) Disable all features and set title as “AudioProcPPC”. Click “Next”.
(5) Choose “Generate source file comment” and ” As a shared DLL”
(4) Click “Finish” to finish the initial setting.
ENEE408G Fall 2003 (Update 09/23/2003)
Mobile Computing and Pocket PC Programming
62
(5) AppWizard will summarize the features and files of new project you created. Click
“OK” to close the AppWizard.
(c) Edit Resource:
There are two ways to read .wav files. One way is to read external wave file using
the _fopen function. The other way is to import wave files during the compiling
period and treat them as internal resources. In this project, we adopt the second
approach.
(1) ResourceView: To import .wav files into this project, we should start from the
ResourceView, which is shown in the following figure.
(2) Insert New Resource: Right click on the “AudioProcPPC resources” folder and
choose “Insert”.
Click “Custom” and specify the Resource type as WAVE.
ENEE408G Fall 2003 (Update 09/23/2003)
Mobile Computing and Pocket PC Programming
63
Thus, we create a WAVE resource.
(3) Import .wav file: Put all .wav files under \AudioProc\res directory. Right click
“WAVE” on the ResourceView tap and choose “Import”. Select all wave files.
After importing, the ResourceView becomes the figure below.
Delete the “IDR_WAVE1”. Right click each “IDR_WAVE” and choose
“Properties”. A Custom Resource Properties dialog box will pop up.
ENEE408G Fall 2003 (Update 09/23/2003)
Mobile Computing and Pocket PC Programming
64
Change the text in the ID list box into the text in the File name edit box. For
example, if we import file A.wav, and we will observe a string, res\A.wav, in the
File name edit box. Change its ID into “A”. (It includes quotation marks). We
can check the result of importing from the ResourceView and FileView tap.
(d). Interface Design:
(1) Double click DialogÆIDO_AUDIOPROCPPC_DIALOG on the ResourceView
tap.
(2) Controls: Delete the “TODO: Place dialog controls here”. Drag a Static Text from
Controls Toolbar and drop on the dialog box. Right click and choose
“Properties”. Set the Caption as “Capstone Piano”. Also, drag and drop a button.
Change its width and height. To generate the same size for the other buttons, you
can click the first button, copy, and paste it several times. To align those buttons,
you can use “Layout” from eVC menu bar and choose “Align”, “Space Evenly”,
and “Make Same Size”. The final layout is shown in the following figure.
ENEE408G Fall 2003 (Update 09/23/2003)
Mobile Computing and Pocket PC Programming
65
(3) Messages and Member Functions: We can set up Messages and Member functions
using ClassWizard. We can use View Æ ClassWizard from eVC IDE menu bar to
open it.
Click each “IDC_btn” item in the “Object IDs” window and click “BN_CLICKED”
in the “Message” window. An “Add Member Function” box will show up. Click
“OK” to add those member functions.
After setting up the required member functions, we can add our own codes.
ENEE408G Fall 2003 (Update 09/23/2003)
Mobile Computing and Pocket PC Programming
66
(e) Edit AudioProcPPCDlg.cpp26
// AudioProcPPCDlg.cpp : implementation file
// Author: Guan-Ming Su
// Date: Aug 2002
#include "stdafx.h"
#include "AudioProcPPC.h"
#include "AudioProcPPCDlg.h"
#ifdef _DEBUG
#define new DEBUG_NEW
#undef THIS_FILE
static char THIS_FILE[] = __FILE__;
#endif
/////////////////////////////////////////////////////////////////////////////
// CAudioProcPPCDlg dialog
CAudioProcPPCDlg::CAudioProcPPCDlg(CWnd* pParent /*=NULL*/)
: CDialog(CAudioProcPPCDlg::IDD, pParent)
{
//{{AFX_DATA_INIT(CAudioProcPPCDlg)
// NOTE: the ClassWizard will add member initialization here
//}}AFX_DATA_INIT
// Note that LoadIcon does not require a subsequent DestroyIcon in Win32
m_hIcon = AfxGetApp()->LoadIcon(IDR_MAINFRAME);
}
void CAudioProcPPCDlg::DoDataExchange(CDataExchange* pDX)
{
CDialog::DoDataExchange(pDX);
//{{AFX_DATA_MAP(CAudioProcPPCDlg)
// NOTE: the ClassWizard will add DDX and DDV calls here
//}}AFX_DATA_MAP
}
BEGIN_MESSAGE_MAP(CAudioProcPPCDlg, CDialog)
//{{AFX_MSG_MAP(CAudioProcPPCDlg)
ON_BN_CLICKED(IDC_btnA, OnbtnA)
ON_BN_CLICKED(IDC_btnB, OnbtnB)
ON_BN_CLICKED(IDC_btnC, OnbtnC)
ON_BN_CLICKED(IDC_btnD, OnbtnD)
ON_BN_CLICKED(IDC_btnE, OnbtnE)
ON_BN_CLICKED(IDC_btnF, OnbtnF)
ON_BN_CLICKED(IDC_btnG, OnbtnG)
//}}AFX_MSG_MAP
END_MESSAGE_MAP()
/////////////////////////////////////////////////////////////////////////////
// CAudioProcPPCDlg message handlers
BOOL CAudioProcPPCDlg::OnInitDialog()
{
CDialog::OnInitDialog();
// Set the icon for this dialog. The framework does this automatically
// when the application's main window is not a dialog
SetIcon(m_hIcon, TRUE);
// Set big icon
SetIcon(m_hIcon, FALSE);
// Set small icon
CenterWindow(GetDesktopWindow());
// center to the hpc screen
// TODO: Add extra initialization here
Notice that “// Add your own code Æ” and “//Å” indicates that you may put some codes in these areas.
In this example, we use italic red font for the added codes (to distinguish from the codes already
automatically generated by eVC).
26
ENEE408G Fall 2003 (Update 09/23/2003)
Mobile Computing and Pocket PC Programming
67
return TRUE; // return TRUE unless you set the focus to a control
}
void CAudioProcPPCDlg::OnbtnA()
{
// TODO: Add your control notification handler code here
PlaySound(_T("A"), :: AfxGetInstanceHandle(), SND_RESOURCE | SND_SYNC );
}
void CAudioProcPPCDlg::OnbtnB()
{
// TODO: Add your control notification handler code here
PlaySound(_T("B"), :: AfxGetInstanceHandle(), SND_RESOURCE | SND_SYNC );
}
void CAudioProcPPCDlg::OnbtnC()
{
// TODO: Add your control notification handler code here
PlaySound(_T("C"), :: AfxGetInstanceHandle(), SND_RESOURCE | SND_SYNC );
}
void CAudioProcPPCDlg::OnbtnD()
{
// TODO: Add your control notification handler code here
PlaySound(_T("D"), :: AfxGetInstanceHandle(), SND_RESOURCE | SND_SYNC );
}
void CAudioProcPPCDlg::OnbtnE()
{
// TODO: Add your control notification handler code here
PlaySound(_T("E"), :: AfxGetInstanceHandle(), SND_RESOURCE | SND_SYNC );
}
void CAudioProcPPCDlg::OnbtnF()
{
// TODO: Add your control notification handler code here
PlaySound(_T("F"), :: AfxGetInstanceHandle(), SND_RESOURCE | SND_SYNC );
}
void CAudioProcPPCDlg::OnbtnG()
{
// TODO: Add your control notification handler code here
PlaySound(_T("G"), :: AfxGetInstanceHandle(), SND_RESOURCE | SND_SYNC );
}
(f). Run your program on the real Pocket PC Device
Because the emulator does not support the functionality of a speaker, we should testify
our program on the real device. Select the Platform as Pocket PC 2002, Win32 [WCE
ARM] Debug, Pocket PC 2002 [Default Device], which is shown in the following
figure.
ENEE408G Fall 2003 (Update 09/23/2003)
Mobile Computing and Pocket PC Programming
68
Click the compile icon
to compile your program and then click the execute icon
to run it. You will see the Capstone Piano!
Remember to turn on your Pocket PC’s speaker. You can click each button and
play this piano. Enjoy it!
ENEE408G Fall 2003 (Update 09/23/2003)
Mobile Computing and Pocket PC Programming
69
6. Troubleshooting
(a) Q: How to solve the problem while eVC compiles a project after importing new
files and the Output Window shows a message shown below.
C:\temp\VideoProcPPC\DVP.cpp(64) : fatal error C1010: unexpected end of file while looking for precompiled
header directive
Generating Code...
Error executing cl.exe.
VideoProcPPC.exe - 1 error(s), 0 warning(s)
A: This is a problem with the precompiled header. eVC will generate
precompiled headers to save some time when you recompile this project.
However, when you add new files into this project, these new files do not have
the precompiled headers. eVC cannot find their precompiled headers and will
output the message above. To solve this problem, you can right click on these
.cpp files on the FileView tap, and choose the Setting; or from eVC menu bar,
click Project Æ Setting. You will see a Project Settings window.
On C/C++ tap, choose the Category as Precompiled Headers and check “Not
using precompiled headers” for those new imported files.
(b) Q: When eVC recompiles a program, the Output Window shows a message with
“Cannot not find Debug/*.exe, error executing link.exe” or a error message box
A: This is because the *.exe is currently running under the debug mode.
Therefore, you need to terminate this program before you recompile it. It is
noteworthy that even if you click “OK” button to close this program and it
disappears on your screen, this program is still running in main memory under the
Pocket PC 2002 OS. Be aware of that it happens both on emulator and real
device. You need to terminate this program using the following procedures.
Step-1: Click StartÆ Settings, a Settings window will show up.
ENEE408G Fall 2003 (Update 09/23/2003)
Mobile Computing and Pocket PC Programming
70
Step-2: Choose Memory on the System tap of the Settings Window. Another
window will show up.
Step-3: Click on the Running Programs tap, and we will see a Running Program
List. Click on the executing program *.exe and press the Stop button to
terminate it.
Step 1
Step 2
Step 3
(c) Q: How can I transfer (import/export) files to emulator?
A: We need to handle WinCE emulator and Pocket PC 2002 emulator differently.
(1) For WinCE emulator, you can directly access and copy/paste files in
C:\Window CE Tools\wce300\MS Pocket PC\emulation\palm300. This folder
is the root directory of a WinCE emulator.
(2) For Pocket PC 2002 emulator, we should use Windows CE remote File
Viewer. There are two ways to open this viewer.
(i) The first way is already mentioned in section III.1.(b).(3). We can open the
viewer from the Tools on the eVC menu.
(ii) You can directly run this viewer by double clicking it in the folder
C:\Program Files\Windows CE Tools\ Common\Playman\bin\cefilevw.exe
You will see the File Viewer as follows.
You can import/export files by clicking the two yellow arrows or the File
on menu bar.
Note: Once you restart the Pocket PC 2002 emulator, all files will be cleared.
In this case, you should export files to emulator again.
(d) Q: How can I convert char to Unicode?
A:
ENEE408G Fall 2003 (Update 09/23/2003)
Mobile Computing and Pocket PC Programming
71
(1) WinCE uses Unicode by which each character is represented by 2 bytes. The
easiest way to convert char to Unicode is to use the _T() function. For
example, to convert “filenamein” to Unicode, you can simply use
_T(“filenamein”). To declare a Unicode array, you should use TCHAR
instead of char.
(2) You also can convert string between ANSI character and Unicode by calling
C run-time functions.
(i) mbstowcs - Convert a multi-byte (ANSI) string to wide character string
(Unicode)
(ii) wcstombs - Convert a wide character string to multi-byte string
A small example is listed in the below table.
WCHAR szwcBuffer[100];
Char szBuffer[100];
Char* lpszConvert = “ANSI string to convert”;
WCHAR* lpszwcConvert = _T(“Unicode string to convert”);
Int nChars;
nChars = mbstowcs(szwcBuffer, lpszConvert, 100);
nChars = wcstombs(szBuffer, lpszwcConvert, 100);
(e) Q: How can I detect the events of hardware control buttons, such as navigation
buttons, on the Pocket PC front panel?
A: Hardware control buttons are treated as keyboard keys. Pressing a hardware
control keys results in WM_KEYDOWN and WM_KEYUP messages as well as a
WM_CHAR message if the virtual key matches a Unicode character. Here is an
example using WM_KEYDOWN. Click View Æ ClassWizard from eVC menu
bar, double click WM_KEYDOWN in the messages list box. You can edit codes
by pressing “Edit Code”.
void CHardwareKeyDemoDlg::OnKeyDown(UINT nChar, UINT nRepCnt, UINT nFlags)
{
// TODO: Add your message handler code here and/or call default
switch(nChar){
case VK_LEFT:
MessageBox(_T("Left navigation key is pressed"));
break;
case VK_RIGHT:
MessageBox(_T("Right navigation key is pressed"));
break;
case VK_UP:
MessageBox(_T("Up navigation key is pressed"));
break;
case VK_DOWN:
MessageBox(_T("Down navigation key is pressed"));
break;
}
CDialog::OnKeyDown(nChar, nRepCnt, nFlags);
}
(f) Q: How can I debug programs?
A: Under Windows Programming environment, we do not have a command
prompt window to print out data using printf or cout. There are several ways
to debug Windows programs.
ENEE408G Fall 2003 (Update 09/23/2003)
Mobile Computing and Pocket PC Programming
72
(1) Use the MessageBox function. E.g.
MessageBox(_T(“Cannot Open files”),MB_OK).
(2) Use the eVC Debugger.
(i) In the Edit Window, right click the line where you want to set a
breakpoint, and click Insert/Remove Breakpoint.
Here is an example. After setting a breakpoint for the line,
NumSample=TotInSamples, you will see a red dot in front of it.
(ii) Run the debugger by BuildÆ Start Debug from the eVC menu bar.
You will see the debug toolbar.
(iii) Execute your program. The Debugger will stop at the breakpoint you
set. You can observe the variables and objects on the bottom of eVC
IDE shown below. The left window is the Variables window and the
right one is the Watch Window. You can add variables that you are
interested in the Watch Window. In this example, we add NumSample.
(3) Use Trace function. Please refer to the MSDN Help.
ENEE408G Fall 2003 (Update 09/23/2003)
Mobile Computing and Pocket PC Programming
73
Part V. Further Reference
1.eMbedded Visual Tools’ built-in Help
Both eVB and eVC have built-in Help accessible from their menu bars. It offers a lot
of useful material about Pocket PC programming.
2.Books:
(a) Nick Grattan: Pocket PC, Handheld PC Developer’s Guide with Microsoft
eMbedded Visual Basic, Prentice Hall PTR, 2001.
(b) Chris Tacke and Timothy Bassett, EMbedded Visual Basic: Windows CE and
Pocket PC Mobile Applications, Sams, 2001.
(c) Douglas Boling: Programming Windows CE, Microsoft Press, 2001.
(d) Nick Grattan and Marshall Brain: Windows CE 3.0 Application Programming,
Prentice Hall PTR, 2000.
(e) eBooks: eVB and eVC for Windows CE are very similar to VB and VC for
desktop. You can find VB, VC, and MFC eBooks from http://www.netlibrary.com.
3. Web Sites
(a) Microsoft Pocket PC: http://www.microsoft.com/mobile/pocketpc/default.asp
(b) Microsoft MSDN: http://msdn.microsoft.com
(c) Pocket PC Developer Network: http://www.pocketpcdn.com/
(d) Pocket PC magazine: http://www.pocketpcmag.com
(e) CodeGuru: http://www.codeguru.com/
(f) Code Project: http://www.codeproject.com/
(g) FunctionX: http://www.functionx.com/visualc/
ENEE408G Fall 2003 (Update 09/23/2003)
Mobile Computing and Pocket PC Programming
74