1
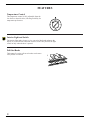
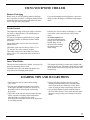
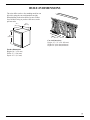
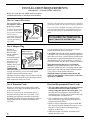
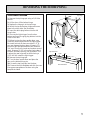
Monogram.
Use and Care Guide
for ZDW24
Wine Chiller
TM
Monogram.
Wine Chiller
Introduction
Your new Monogram wine chiller makes an eloquent statement of style,
convenience and kitchen planning flexibility. Whether you chose it for
its purity of design or the assiduous attention to detail, you’ll find that your
Monogram wine chiller’s superior blend of form and function will delight
you for years to come.
The information on the following pages will help you operate and maintain
your wine chiller properly.
If you have any other questions—please call the
GE Answer Center® (800.626.2000).
Contents
Appliance Registration .................3
Built-In Dimensions .....................7
Care and Cleaning ........................6
Consumer Services .....................10
Features.........................................4
Important Phone Numbers..........10
Installation Requirements .............8
Loading Tips and Suggestions......5
2
Model and Serial Numbers ...........3
Operating Instructions ..................5
Repair Service...............................3
Reversing the Door Swing............9
Warranty......................................11
Questions?
Call GE Answer Center®
800.626.2000
Write down the model and serial numbers.
You’ll find them on a label on the lower front frame.
These numbers are also on the Consumer Product Ownership Registration
Card that came with your wine chiller. Before sending in this card, please
write these numbers here:
Model Number
Serial Number
Use these numbers in any
correspondence or service calls
concerning your wine chiller.
If you received a damaged wine chiller…
Immediately contact the dealer (or builder) that sold you the wine chiller.
3
FEATURES
Temperature Control
4
LDER
5
CO
1
OFF
7
Interior Light and Switch
The interior light makes it easy to view your wine labels and enhances the
display of your collection. When the switch is in the OFF position, the light
comes on only when the door is opened.
Pull-Out Racks
The bottom five racks pull out so bottles can be more
easily added or removed.
4
3
2
6
The temperature control is fully adjustable from the
low forties to the mid sixties, allowing flexibility for
temperature preferences.
USING YOUR WINE CHILLER
Remove Packaging
Before using, be sure all packing materials and tape
have been removed. There is a shipping bracket below
the handle. Remove the bracket and replace the three
screws with the white plug buttons.
If you are discarding an old refrigerator, remove the
doors to reduce the danger of children being trapped
inside.
Set the Control
Position your wine inventory accordingly (i.e. white
wines in the cooler zones and red in the warmer
zones).
To set the control, turn
it to the middle thermostat
4
setting. Once the bottles are
3
loaded, allow at least
48 hours before making
any adjustments to the
initial setting.
LDER
5
CO
6
2
1
OFF
7
The temperature range of the wine chiller is from the
low forties to the mid sixties. The middle range is
approximately 55°F.
As with any refrigeration product, there is a slight
temperature variance at different locations within
the cabinet.
The coolest bottles will be in the rear of the four
middle shelves.
The bottles on the top two shelves will be 3°F. to
7°F. warmer. This is the warmest location.
The bottles in the front of the middle four shelves
will be 1°F. to 4°F. warmer than those at the rear of
the shelves.
Insert Wine Bottles
The top two racks each hold six bottles, two deep with
the necks alternating front to back.
The middle four racks each hold eight bottles, two
deep with necks alternating front to back.
The bottom rack holds six bottles and is loaded with
necks facing the rear. Tall bottles should not be loaded
on the bottom rack because they may prevent the door
from closing.
LOADING TIPS AND SUGGESTIONS
• The bottom rack may be removed for storing
“jug” wines.
• You may store magnums and other large bottles
on the upper right and left positions or on any of
the middle racks by removing the rack directly
above them.
• The bottles on the top rack, directly under the light,
will be exposed to a slightly higher temperature
when the light is on. Position your wines
accordingly and remember to turn off the light when
it is no longer needed.
• Keep wines that you plan to use for everyday
drinking and entertaining on the front half of the
racks where labels are completely visible. Place
wines for aging or longer term storage in the rear.
• Do not allow children to climb, stand or hang on
the wine chiller shelves. They could seriously injure
themselves and possibly cause damage to the wine
chiller.
5
CARE AND CLEANING
Unplug the wine chiller before cleaning.
Condenser
Cabinet
Be sure that nothing obstructs the required air flow
openings in the front of the cabinet.
For best performance, brush or vacuum lint and dirt
from the condenser once a year. Unscrew the grille
on the bottom front of the cabinet to access the
condenser.
The painted cabinet can be washed with mild soap
and water. Rinse thoroughly with clear water. Never
use abrasive scouring powders.
Interior
Glass Door
Wash the inside with mild soap and water or baking
soda and water.
Do not use an abrasive powder, solvent, polish cleaner
or undiluted detergent.
Use a glass cleaner or mild soap and water and a soft
cloth to clean the glass door. Do not use any abrasive
powders.
Door Gasket
Light Bulb Replacement
The vinyl gasket may be cleaned with mild soap and
water, a baking soda solution or a mild scouring
powder. Rinse well.
Unplug the wine chiller before replacing the light
bulb.
The light shield is held in place by three screws.
Remove the screws and light shield to remove the
light bulb. Replace with the same type bulb—a
15-watt, intermediate base bulb.
In the Event of a Power Failure
If the power fails, open the door as infrequently as
possible to maintain the temperature. A gradual rise
in temperature should not have any adverse effect
on the wine.
If it is extremely hot, you may want to move the
wine to the coolest location you can find until power
is restored.
6
Do not store or use gasoline or other flammable
vapors and liquids in the vicinity of this or any
other appliance.
BUILT-IN DIMENSIONS
The wine chiller can be a free-standing model or can
be built in using the cut-out dimensions at right.
When building in the wine chiller, be sure to allow
for a full door swing so you have full access to the
pull-out racks.
241/8″
(613 mm)
237/8″
(606 mm)
341/2″
(876 mm)
Cut-out dimensions:
Height: 341/2–35″ (876–889 mm)
Width: 24″ (610 mm) minimum
Depth: 24″ (610 mm) minimum
Product dimensions:
Height: 341/2″ (876 mm)
Width: 237/8″ (606 mm)
Depth: 241/8″ (613 mm)
7
INSTALLATION REQUIREMENTS
IMPORTANT…PLEASE READ CAREFULLY
Before it is used, the wine chiller must be properly
installed and located as described in this manual.
How to Connect Electricity
For personal safety,
this appliance must be
properly grounded.
To reduce the possibility
of electric shock, the
power cord is equipped
with a 3-prong
(grounding) plug which
mates with a standard
3-prong (grounding)
wall outlet.
Have the wall outlet and circuit checked by a qualified
electrician to make sure the outlet is properly grounded.
If you have only a standard two-prong wall outlet, it is
your personal responsibility and obligation to have it
replaced with a properly grounded three-prong wall
outlet.
Insure proper ground
exists before using.
DO NOT, UNDER ANY CIRCUMSTANCES,
CUT OR REMOVE THE THIRD (GROUND)
PRONG FROM THE POWER CORD.
Use of Adapter Plug
Because of
Temporary Method
potential safety
(Adapter plugs not
hazards under
permitted in Canada.)
certain conditions,
Align large prongs/slots.
we strongly
recommend against
use of an adapter
plug. However, if
you must use an
Insure proper grounding
adapter, where local
and firm connection exist
codes permit, a
before use.
TEMPORARY
CONNECTION may be made to a properly grounded
2-prong wall outlet by use of a UL-listed adapter
available at most local hardware stores.
The larger slot in the adapter must be aligned with the
larger slot in the wall outlet to provide proper polarity
in the connection of the power cord.
Use of an adapter plug will increase the clearance
needed for the back of the wine cooler.
CAUTION: Attaching the adapter ground terminal to a
wall outlet cover screw does not ground the appliance
unless the cover screw is metal, and not insulated, and
the wall outlet is grounded through the house wiring.
You should have the circuit checked by a qualified
electrician to make sure the outlet is properly grounded.
When disconnecting the power cord from the
adapter, always hold the adapter in place with one
hand while pulling the power cord plug with the other
hand. If this is not done, the adapter ground terminal
is very likely to break with repeated use.
Should the adapter ground terminal break, DO
NOT USE the appliance until a proper ground has
again been established.
Use of Extension Cords
Electrical Requirements/Power Cords
Because of potential safety hazards under certain
conditions, we strongly recommend against the use
of an extension cord.
However, if you must use an extension cord, it is
absolutely necessary that it be a UL-listed, 3-wire
grounding type appliance extension cord having a
grounding type plug and outlet and that the electrical
rating of the cord be 15 amperes (minimum) and
120 volts.
• The wine chiller should always be plugged into its
own individual electrical outlet which has a
voltage rating that matches the rating plate. This
provides the best performance and also prevents
overloading house wiring circuits which could cause
a fire hazard from overheated wires.
• Never unplug the wine chiller by pulling on the
power cord. Always grip the plug firmly and pull
straight out from the outlet.
• Repair or replace immediately all power cords that
have become frayed or damaged. Do not use a cord
that shows cracks or abrasion damage along its
length or at either end.
• When moving the wine chiller, be careful not to
damage the power cord.
8
REVERSING THE DOOR SWING
TO REVERSE THE DOOR
1. Remove the top hinge pin using a 1/8″ Allen
wrench.
2. Lift the door off the bottom hinge.
3. Replace the hinge pin in the top hinge.
4. Switch the top and bottom hinges and move
them to the other side. See illustration.
5. Insert the white plug buttons into the old
hinge holes.
6. Unscrew the light trigger from the door
bottom and insert the gray plug buttons into the
holes on the door.
7. Before turning the door upside down, new
holes will need to be drilled for the light trigger.
Be careful not to drill down more than 1/2″ or
you may damage the door glass. Measure 121/4″
from the right side and make a mark. Measure
3/4″ over from the first mark and make a second
mark. Measure 11/16″ in from the front edge of
the door and make a mark. See illustration. This
is where the new holes will be drilled using a
5/32″ drill bit. Install the light trigger.
8. Remove the top hinge pin.
9. Turn the door upside down and place the
door on the bottom hinge pin.
10. Screw the top hinge pin into the door.
11. Remove the old nameplate and stick the new
Monogram nameplate on the door using the
template included.
Top Hinge
Bottom Hinge
Light Trigger
Top of the Door
11/16″
3/4″
121/4″
Front of the Door
9
With the purchase of your new Monogram appliance, receive the assurance that if you ever
need information or assistance from GE, we’ll be there. All you have to do is call—toll-free!
GE Answer Center®
800.626.2000
You can call any time. The GE Answer Center®
service is open 24 hours a day, 7 days a week.
In-Home Repair Service
800-444-1845
We provide expert repair service, scheduled at a time
that’s convenient for you.
Our factory-trained technicians know your appliance
inside and out—so most repairs can be handled in just
one visit.
For Customers With Special Needs…
800.626.2000
GE will provide Braille controls for a variety of
Monogram appliances, and a brochure to assist in
planning a barrier-free kitchen for persons with
limited mobility.
Consumers with impaired hearing or speech who have
access to a TDD or a conventional teletypewriter may
call 800-TDD-GEAC (800-833-4322) to request
information or service.
Service Contracts
800-626-2224
With a service contract GE Consumer Service will still
be there after your warranty expires.
With a multiple-year contract, you’re assured of future
service at today’s prices.
Parts and Accessories
800-626-2002
Individuals qualified to service their own appliances
can have parts or accessories sent directly to their home.
VISA, MasterCard and Discover cards are accepted.
Further Service
If for some reason you are not happy with the service you
receive, here are three steps to follow for further help.
First, contact the people who serviced your appliance.
Explain why you are not pleased.
Next, if you are still not pleased, write all the
details—including your phone number—to:
Consumer Relations
GE Appliances
Louisville, KY 40225
10
Finally, if your problem is still not resolved, write:
Major Appliance Consumer Action Program
20 North Wacker Drive
Chicago, IL 60606
YOUR MONOGRAM WINE CHILLER
WARRANTY*
WHAT IS COVERED
FULL ONE-YEAR WARRANTY
For one year from date of original
purchase, we will provide, free of
charge, parts and service labor
in your home to repair or replace
any part of the wine chiller that fails
because of a manufacturing defect.
WHAT IS NOT COVERED
Staple sales slip or cancelled check
here. Proof of original purchase date
is needed to obtain service
under warranty.
FULL FIVE-YEAR WARRANTY
For five years from date of original
purchase, we will provide, free of
charge, parts and service labor
in your home to repair or replace
any part of the sealed refrigerating
system (the compressor, condenser,
evaporator and all connecting
tubing) that fails because of a
manufacturing defect.
• Service trips to your home to
teach you how to use the product.
Read your Use and Care material.
If you then have any questions
about operating the product please
contact your dealer or our
Consumer Affairs office at the
address below, or call, toll free:
GE Answer Center®
800.626.2000
consumer information service
• Improper installation.
*****************************
This warranty is extended to
the original purchaser and any
succeeding owner for products
purchased for ordinary home use
in the 48 mainland states, Hawaii
and Washington, D.C. In Alaska the
warranty is the same except that it
is LIMITED because you must pay
to ship the product to the service
shop or for the service technician’s
travel costs to your home.
All warranty service will be
provided by our Factory Service
Centers or by our authorized
Customer Care® servicers during
normal working hours.
Should your appliance need
service, during warranty period
or beyond, call 800-444-1845.
If you have an installation problem,
contact your dealer or installer.
You are responsible for providing
adequate electrical and other
connecting facilities.
• Replacement of house fuses or
resetting of circuit breakers.
• Failure of the product if it is used
for other than its intended
purpose or used commercially.
• Damage to product caused
by accident, fire, floods or acts
of God.
WARRANTOR IS NOT
RESPONSIBLE FOR
CONSEQUENTIAL DAMAGES.
Some states do not allow the exclusion or limitation of incidental or consequential damages, so the above limitation or exclusion
may not apply to you. This warranty gives you specific legal rights, and you may also have other rights which vary from state to state.
To know what your legal rights are in your state, consult your local or state consumer affairs office or your state’s Attorney General.
Warrantor: General Electric Company
If further help is needed concerning this warranty, write:
Manager—Consumer Affairs, GE Appliances, Louisville, KY 40225
Model ZDW24
11
Pub. No. 49-6915
Part No. 162D7749P002
12-96 CG
Monogram.
TM
General Electric Company
Louisville, KY 40225