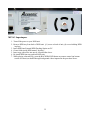
1
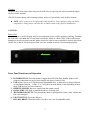
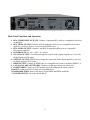
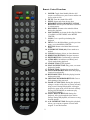
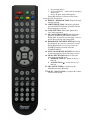
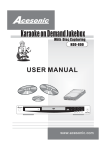
User Manual KOD-3000 Karaoke-On-Demand Jukebox NOTE – Your Acesonic KOD-3000 Karaoke-On-Demand Jukebox arrives with everything you need to start making music and performing except a microphone, amplifier, and speakers. These can be obtained from Acesonic, or you can use any standard audio equipment that conforms to contemporary standards. Thank you for purchasing Acesonic KOD-3000 Karaoke-On-Demand Jukebox. Acesonic takes pride in providing its customers with only the most advanced and highest quality products on the market. With proper care and use you will get many years of satisfying use from your Acesonic product. Be sure to keep original packaging in case re-shipping is required for returns or repairs. Care and cleaning: Use a slightly damp cloth to clean the front panel and other surfaces of the KOD3000. Avoid placing the device in damp or wet areas. Allow sufficient room around the device to provide sufficient air flow. 1 First Things First Before using your KOD-3000, there are a few things you should do and know: Check to see that your local power outlets supply the correct voltage for the AC adaptor. Excluding the hard drive compartment, do not open the device as there are no user-serviceable parts inside. For repairs, contact your local Acesonic distributor, an Authorized Service Center or Acesonic. When the system will not be used for a long time, disconnect the power plug from the wall and remove all connecting cables for proper storage. Table of Contents Getting Started...........................................................................................................................................3 Player Specifications..................................................................................................................................4 USB Specifications....................................................................................................................................4 Video Signal Formats.................................................................................................................................4 Audio Signal Formats................................................................................................................................4 Features......................................................................................................................................................5 Cleaning.....................................................................................................................................................6 Before Operation........................................................................................................................................6 Front / Back Panel Functions and Operation..........................................................................................7-8 Remote Control Operation....................................................................................................................9-10 Basic Operation...................................................................................................................................11-32 Importing to HDD via USB Flash Drive………………………………………………………..15 Firmware Upgrade………………………………………………………………………………20 Wi-Fi Setup………………………………………………………………………………….22-25 MP3+G Superimpose…………………………………………………………………………...29 Troubleshooting..................................................................................................................................33-35 FAQ (Frequently Asked Questions).........................................................................................................35 Firmware Updates....................................................................................................................................36 Safety, Warnings, and Precautions......................................................................................................36-38 Technical Specifications...........................................................................................................................39 iPad & Android Tablet Operation…………………………………………………………………...39-41 Song Import..............................................................................................................................................42 Adding Songs to HDD via External Docking Station (optional)……………………………………43-53 2 Getting Started Your Acesonic KOD-3000 Karaoke-On-Demand Jukebox is designed for years of enjoyment. Please take a moment to review the following instructions for proper use and care of your player. Included Accessories Your KOD-3000 includes the following items: ACESONIC KOD-3000 Karaoke-On-Demand Jukebox (1) User Manual (1) Remote Control (1) HDMI Cable (1) RCA Cable (optional) Network Router (optional) Power Cord (1) If your box is missing any of these items, contact your Acesonic dealer. Precautions Player precautions: Avoid dust, moisture, and water. Do not place the player in a moist environment or where dust will build up (ie. near a fan). If exposed to water, immediately turn off the player and unplug. Consult your dealer or an authorized service center – using the player in this state could cause fires or fatal electric shocks. Avoid high temperatures. Do not place the player in direct sunlight or near any heaters. Unplug the player when it will not be in use for an extended period of time. Use the plug, not the cord, to disconnect the player from its wall outlet. Never handle the power cord with wet hands. Replace the cord if it is damaged or if wires are exposed, and check it every few months for signs of wear and use. Installation precautions: Select and area that is level, dry, and with a moderate temperature all year. Do not use the player on its side. Do not place the player next to items that vibrate such as speakers. Do not put heavy objects on top of your player. Allow space for your player to ventilate. The vents on your player are designed to circulate air and moderate its internal temperature. Blocking these vents may damage the player. User Repair Precautions No parts of this player are to be serviced by the user. If the player fails to operate or if you feel it needs servicing, turn off the player, unplug it, and contact an Acesonic dealer, Authorized Service Center, or Acesonic. 3 Player Specifications One year Manufacturer’s Warranty Lifetime technical support Worldwide video compatibility with settings for NTSC, PAL, and HDMI video formats Universal power supply: AC 100 ~ 240 V Player dimensions: 1' 2” (W), 1' 5 1/16” (L), 3 5/16” (H) Designed in the U.S.A. USB 2.0 Specifications (Compatible Media Formats) Your KOD-3000 is a robust player that can accept a wide variety of media formats (USB flash drives formatted in FAT32, USB hard drives formatted in NTFS and FAT32 up to 2TB) Audio: MP3/LRC, AC3, AAC, WMA, WMA Pro Video: MPG-TS, MP3+G, VOB, MPEG1/2/4, Xvid, MKV, AVI, WMV9, VC1, H.264 Some methods of encoding (“ripping”) audio and video formats may affect playback. Use standard or pre-set encoding settings, if possible. Disc capturing capability allows you to transfer your favorite CD+G, VCD, or DVD discs directly to the hard drive. File defects may also affect video quality. The media formats not described in this manual are incompatible with the unit. Video Signal Formats The KOD-3000 supports: NTSC, a broadcast format generally found in the U.S., Canada, most countries in South America, Japan, South Korea, and the Philippines. PAL format, which is used in many parts of Europe, Asia, and South America. HDMI 1.3 format, the standard for 1080-HD digital video delivery featuring deep color. Check your video device to see which standard it is compatible with. Audio Signal Formats The KOD-3000 features RCA Composite, Component, and HDMI delivery of audio featuring Dolby TrueHD, and DTS HD-Master audio and automatic audio syncing. 4 Features The KOD-3000 is a multi-function professional hard drive Karaoke-On-Demand Jukebox. This KOD is perfect for the club, DJs, KJs, pub, rentals, restaurants, other public entertainment or if you simply want to have the ultimate karaoke system for any occasion! Internet access allows you to download additional songs contents for your karaoke library. Blu-Ray Disc playback delivers exceptional Full HD 1080 video resolution. Upscaling delivers exceptional image quality from standard DVDs with up to 1080 (via HDMI output). Multi-format feature supports all types of karaoke and video formats (i.e. CD+G, MP3G, MP3, MKV, MPEG1/2/4, WMV, AVI). MP3+G Superimpose - You can replace any MP3+G’s background with your video(s). (requires optional External HDD Docking Station and the removal of HDD) Supports high capacity HDD’s (up to 4TB) and unlimited song capacity expansion via attached network drive. Song Import – easily update your song library using batch imports/uploading (via USB port). Media Center allows you to enjoy your family photos, videos, or simply listen to your favorite tunes. Use your iPad® or Android tablets as a fully functional remote control or for song search features! Connect up to 250 devices at the same time. 1 - front USB 2.0 port for adding songs, media playback Easily find your songs by Language, Title, Artist, Genre, and Gender. Full karaoke function with 2 microphone inputs. Song Database Management. Via a Network Drive, multiple KOD-3000 units (with/without a local HDD) can be set up for client-server file-sharing functionality for a large local or commercial environment(s). Supports Unicode up to 20 different languages. RS-232 port can be connected to a coin-acceptor, receive commands from a PC, or a central controller for maximum integration Disc Capture capability allows you to transfer your favorite CD+G, VCD, or DVD discs directly to the hard drive. Built-in multiple-key encryption protects all of your contents, while separate users can be assigned different keys to avoid unwanted file-sharing. Future Updates - Firmware updates with new features released frequently. Blu-Ray Disc features Supports the following disc types: BD-ROM, BD-R, BD-RE, DVD, DVD+/-R, DVD+RW, CD+G, VCD, Audio CD BD Profiles – Profile 1.1 (Bonus View), Profile 2.0 (BD-Live) Video D/A Converter – 12bit/148.5MHz Audio D/A Converter – 24bit/192kHz 5 Cleaning Use a soft cloth to clean the surface of the unit. Always wipe from the center to the edges. DO NOT use circular motions. DO NOT use household cleaning products on the unit, unless they are specifically formulated for cleaning player products. NOTE: Never attempt to play cracked or unsupported files with your player. It may cause the player to malfunction. Before Operation Playable Media This unit supports the following formats: MP3, WAV, WMA, MPEG-1, MPEG-2 (MPG/VOB), MPEG-4 (AVI), JPEG, and MP3+G files Above media is playable on the following discs: Blu-Ray Discs, BD-ROM, BD-R, BD-RE, DVD, DVD+R, DVD+RW, VCD, CD-DA, CD-R, CD-RW, CD+G, CD, and Data Discs Encoding methods of some media formats may affect the playback (e.g. Unable to fast forward or fast backward or load time). Be sure that the encoding process conforms to the standards for that particular format. Dirty, scratched, warped, and defective discs may cause a considerable time delay during the loading and reading of the disc. In extreme cases, this may render the disc completely unreadable by the player. NOTES REGARDING DISCS The image may be poor, noisy, or grainy due to actual defects on the disc itself. Some functions may not be possible on all discs as described in this manual. Handling and Cleaning of Discs Handling Always, when handling discs, hold from its’ edges. NEVER write on any surface of the disc as it may render the disc unreadable. Store discs in a clean and dry environment. Storing discs vertically will also help prevent warping. After use, insert disc(s) into jacket or case to minimize wear and tear. DO NOT bend or press disc. Do not expose the disc to direct sunlight or any heat source. 6 Cleaning *Wipe the discs from time to time using a soft cloth. Always wipe from the center towards the edges, NOT in circular motions. *DO NOT clean with any other cleaning solution, unless it is specifically made for disc cleaning. NOTE: Discs revolve at very high speeds inside of players. Never attempt to play cracked or warped discs; doing so may cause the disc to shatter inside or the player to malfunction. CAUTION: Power Cord Handle the power cord by its plug only. Do not unplug the power cord by tugging or yanking. Touching the cord while your hands are wet may lead to an electric shock or a short circuit. If the cord becomes damaged or its wires become exposed, please replace the cord as soon as possible in order to prevent an electric fire or shock. Check the power cord every few months to ensure it is functioning properly. Front Panel Functions and Operation 1. POWER BUTTON: Press this button to toggle the KOD-3000 from Standby Mode to ON (requires connection to a power source and the rear power switch is ON). 2. USB: Allows access via a USB keyboard, flash/thumb drive, or hard drive for media playback or song import function. USB 1, 2, or 3 will show up in the Media Center depending on how many USB devices you have connected. 3. REMOTE SENSOR: Receives signals from the remote control. 4. DATA LIGHT: Will flash as internal hard drives are being read. 5. MICROPHONE INPUTS: Two microphone inputs with adjustable volume, delay volume and time, and echo gain. 6. EJECT BUTTON: Ejects the disk tray. 7. BLU-RAY DRIVE: Insert disc media. See above for a list of compatible media. 7 Back Panel Functions and Operation 1. RCA COMPONENT OUTPUTS: Connect a component RCA cable to a compatible television or amplifier. 2. RCA VIDEO OUTPUT: Connect an RCA composite video jack to a compatible television or amplifier. (cannot be used in conjunction with HDMI source…) 3. RCA AUDIO OUTPUT: Connect L and R RCA composite audio jacks to a compatible television or amplifier. 4. POWER INPUT: AC 100 ~ 240V / 50 ~ 60 Hz. 5. COAXIAL OUTPUT: Coaxial digital output to connect with a digital amplifier or receiver for Dolby Digital or DTS sound. 6. OPTICAL OUTPUT: SPDIF Optical output for connection with a digital amplifier or receiver for Dolby Digital or DTS sound. 7. HDMI OUTPUT: Connect an HDMI cable to a compatible television or amplifier (HDMI 1.3). 8. LAN (LOCAL AREA NETWORK): Connects via Ethernet cable to a network drive 9. IR EXTENDER: Connect to an IR extender device for additional IR remote control. 10. RS-232: Connect an RS-232 cable to a compatible device. 11. HARD DISK PORT: Remove this port to insert HDD1 and HDD2 hard disks. 12. POWER SWITCH: Turns the unit on and off. 8 Remote Control Functions 1. POWER: Toggle from Standby Mode to ON (requires connection to a power source and the rear power switch is ON). 2. MUTE: Turns the sound ON or OFF. 3. EJECT: Opens and closes the tray door. 4. RED/GREEN/YELLOW/BLUE FUNCTION BUTTONS: Screen-specific functions as denoted in various menus. 5. DISC MENU: Returns to the main disc Menu during disc playback. 6. POP-UP MENU: Activates the disc Pop-Up Menu (if available) or EDIT MENU in the MEDIA CENTER. 7. GOTO: Go to a specific point during disc playback. 8. MENU: Go to the Main Menu, go to the previous menu, or exit the MEDIA CENTER. 9. RETURN: Return to the Main Menu from submenus. 10. NUMERIC KEYPAD (0-9): Enter numbers as needed. 11. CLEAR: Backspace, delete, or clear characters. 12. DIRECTION BUTTONS: Navigate in menus. 13. ENTER BUTTON: Confirm entry or selection. 14. AUDIO MPX: Switch between 'Melody' and 'Vocal' modes during playback. 15. STOP BUTTON: STOP playback. 16. PLAY/PAUSE BUTTON: Play, pause, or resume playback of media 17. INFO BUTTON: Displays the current playlist. 18. FAST FORWARD BUTTON: Shifts the playing location forward quickly. 19. REWIND BUTTON: Shifts the playing location backwards quickly. 20. SKIP TRACK FORWARD BUTTON: Goes to the beginning of the next track. 21. ZOOM / CUE BUTTON: During disc playback, enlarges a section of the video or picture currently being viewed. During HD playback, will toggle playback to pause at the end of the track currently playing (PAUSE MODE) or continuous play (CONTINUE MODE) 22. SLOW / DELETE BUTTON: During disc playback, will cycle through the slow motion settings. During HD playback, will remove a song from the playlist. 23. A-B / INSERT BUTTON: During disc playback, allows you to repeat a segment of a track until stopped. To use this function: 9 1. Set a starting point A. 2. Set an end point B. Afterwards, the unit plays from A to B. 3. Press A-B again, until A-B disappears. During HD playback, will insert a track to the playlist after the current track. 24. REPEAT / REPEAT BUTTON: Repeats the track currently playing. 25. SUBTITLES BUTTON: During disc playback, press the SUBTITLES button repeatedly until the desired language is selected. 26. ANGLE BUTTON: During disc playback, to view, where applicable. 27. PIP / BACKGROUND BUTTON: During disc playback, switches the PIP feature on and off. During MP3+G playback, used to toggle a video or picture that is playing in the background. 28. BOOKMARK / FAVORITE BUTTON: During disc playback, lets you save a position or a scene. During HD playback, lets you save a track to a FAVORITE memory location in the MY FAVORITE MENU. 29. PAGE UP AND DOWN BUTTONS: Scrolls up or down through file lists one full page at a time. 30. MUSIC KEY BUTTONS: Raise or lower the pitch. Only used in HD mode. 1. SHARP BUTTON (♯) - Raises the key by a half step. 2. FLAT BUTTON (♭) - Lowers the key by a half step. 31. MIC VOL BUTTONS (+/-): Bring up the Microphone menu in HD mode. 32. MUSIC VOL BUTTONS (+/-):Adjust the volume of music audio output. 10 BASIC OPERATIONS Flip on the POWER SWITCH on the rear of the unit to place the KOD-3000 into Standby Mode. Turn ON the KOD-3000 using the POWER BUTTON on the front panel or remote. When powering on the unit, please wait for the unit to load. Main Menu Operations: Use the DIRECTION BUTTONS to select an option from the Main Splash Screen. Press the ENTER BUTTON to choose an option. Pressing the RETURN BUTTON will exit to the next highest menu level. 11 Song Search NOTE: Search queries on the KOD-3000 are case sensitive! Play a song: 1. Press ENTER to go into the Song Search. 2. Use the DIRECTION BUTTONS and press ENTER to add a highlighted song to the playlist. 3. While a song is playing, press MENU to toggle the Song Search Menu. 4. Press the PAGE UP and DOWN BUTTONS to scroll through file lists one full page at a time. Search for a song: 1. Use the LEFT & RIGHT DIRECTION BUTTONS to navigate the menu. 2. Use the UP & DOWN DIRECTION BUTTONS to search for songs by Language, Title, Genre, Artist, or Gender. 3. Press the YELLOW BUTTON for Title Search. 1. Type in the song name using the DIRECTION BUTTONS and ENTER to display available songs. 2. Navigate to the right of the menu and press ENTER to add a song to the playlist. 3. Press the RED BUTTON to change the language. 4. Press the BLUE BUTTON for Artist Search. 1. Type in the artist name using the DIRECTION BUTTONS and ENTER to display available artists. 2. Press the RED BUTTON to change the language. 3. Navigate to the right of the menu and press ENTER to choose an artist and bring up the artist's song page. 4. Use the DIRECTION BUTTONS and ENTER to add a song to the playlist. 12 Skip a song 1. Press the STOP button to stop playback of the current song and go to the next song. Add a song to the playlist. 1. During playback, press the MENU BUTTON to bring up the song search menu. 2. Search and highlight a song and press ENTER to add a song to end of the playlist. 3. Search and highlight a song and press INSERT to insert a song after the current song. Delete a song from the playlist 1. During playback, press the INFO BUTTON to bring up the playlist. 2. Use the DIRECTION BUTTONS and highlight a song and press DELETE to remove a song from the playlist. Microphone Settings Menu 1. When in HD playback, press the MIC VOL + or – BUTTONS to bring up the Microphone Settings Menu. 2. Navigate the Microphone Settings Menu using the UP and DOWN DIRECTION BUTTONS. 3. Press the LEFT and RIGHT DIRECTION BUTTONS or the MIC VOL + or – BUTTONS when MIC1 Volume or MIC2 Volume is selected to increase or decrease Microphone 1 or Microphone 2 volumes. 4. Press the LEFT and RIGHT DIRECTION BUTTONS or the MIC VOL + or – BUTTONS when Delay Volume is selected to increase or decrease the volume of the delay effect. 5. Press the LEFT and RIGHT DIRECTION BUTTONS or the MIC VOL + or – BUTTONS when Delay Time is selected to increase or decrease the amount of time between the delay effect. 6. Press the LEFT and RIGHT DIRECTION BUTTONS or the MIC VOL + or – BUTTONS when Echo Gain is selected to increase or decrease the amount of echo. 13 My Favorite Add My Favorite songs to the playlist 1. Press ENTER to go into My Favorite to list the 10 Memory Locations for Favorite songs. 2. Use the DIRECTION BUTTONS and ENTER to go into any of the Memory Locations to list the Favorite songs stored in that Memory Location. 3. Press ENTER to add a song to the playlist. Add songs to My Favorites 1. While a song is playing press FAVORITE to add the song to a Favorite Memory Location. 1. Use the DIRECTION BUTTONS to choose a Favorite Memory Location for the song. 2. Press ENTER to select the sub menu. 3. Press FAVORITE again to add the song to the Favorite Memory Location. Remove a song from a Favorite Memory Location 1. Press ENTER to go into My Favorite to list the 10 Memory Locations for Favorite songs. 2. Use the DIRECTION BUTTONS to highlight a Memory Location and press ENTER to go into a Memory Location. 3. Use the DIRECTION BUTTONS to highlight the song you want to remove. 4. Press DELETE twice to remove the song from a Favorite Memory Location. 14 Song Manager - Use the DIRECTION BUTTONS and ENTER to choose an option. Import music files to the HDD from USB flash drive 1. In the USB flash drive, create a folder called mp3gsong_add. 2. Insert all music files (CD-G, MP3-G) into the folder above. NOTE: File names must be modified in the following format… Artist-SongTitle.cdg/mp3/g (ie. Mike-Tomorrow.cdg; Mike-Tomorrow.mp3 + MikeTomorrow.g 3. Plug the USB flash drive into the KOD unit, go to SONG MANAGER, select SONG IMPORT, and select USB. Import video files to the HDD from USB flash drive 1. In the USB flash drive, create a folder called mtvsong_add. 2. Insert all video files (MPG-TS, MPEG1/2/4, Xvid, MKV, AVI, WMV9, VC1, H.264) into the folder above. 3. Plug the USB flash drive into the KOD unit, go to SONG MANAGER, select SONG IMPORT, and select USB. Import and Re-index files 1. Navigate to SONG MANAGER -> SONG REINDEX 2. Press ENTER to re-index the newly added songs to the searchable database Network drive 1. If you know the IP address, Share Name, User Name, and Password you can access a Network Drive via an Ethernet cable. 2. Press ENTER when Apply is highlighted to access the Network Drive. 15 Disc Rip 1. Navigate to Disc Ripping. 2. Insert a CDG, VCD, or DVD disc to be ripped. The drive will detect the disc. 3. Use the DIRECTION BUTTONS and ENTER to select and un-select the tracks that you want to rip, or choose 'Select All' to rip all tracks on the disc. 4. Press the GREEN button to begin the ripping process, or the RED button to exit. 5. During the ripping process, use the RETURN key to abort the process. Song editor 1. Navigate to Song Editor 2. Use the UP AND DOWN BUTTONS and ENTER or the GREEN BUTTON to choose a song you want to edit. 1. Use the UP AND DOWN BUTTONS and ENTER to navigate to TITLE, and ARTIST. 1. Use the DIRECTION BUTTONS and ENTER to type in your desired song information. Use the backspace button or DELETE to erase characters. Use the GREEN BUTTON to confirm, or RED BUTTON to exit. 2. Use the UP AND DOWN BUTTONS to navigate to LANGUAGE, and the LEFT AND RIGHT ARROWS to change the language. 3. Press RETURN to exit to the previous menu. 3. If you want to remove a song from the database, highlight a song and hit the RED BUTTON. 1. Press ENTER to remove the song, and RETURN to cancel. 16 Media Center Access media 1. Connected media sources will be displayed in the Media Center Menu. 2. Use the DIRECTION BUTTONS and ENTER to navigate the folders for your connected media or HDDs 3. Press the ENTER or PLAY BUTTON to play it. NOTE: Media will be indexed into Photo, Music, Video, and AVCHD folders. 4. For Blu-Ray movies stored on connected HDDs, choose the BDMV folder to play the movie Play Blu-Ray, DVD, or VCD disc 1. Press EJECT on the front panel to open the disc tray. 2. Place a disc in the disc tray. 3. Press EJECT to close the disc tray. 4. The disc will automatically play. 5. A menu may be displayed before playback when inserting a Blu-Ray, DVD, or VCD disc. From the menu, you may select a desired item to be played. 6. Press STOP to end playback. 7. You can resume playback by pressing the PLAY button. 8. Press the STOP button twice to stop playback completely. 9. Press the PLAY / PAUSE button to pause playback. 10. During playback, press FAST FORWARD or FAST BACKWARD to select from 2, 3, 4, or 5X the normal playback speed. 17 11. Press MENU to access the disc pop-up menu and DIRECTION BUTTONS to navigate the menu. Menu options depend on the type of disc being played. Press ENTER to choose a setting. 1. Title select 2. Chapter select 3. Time 1. Title elapsed 2. Title remaining 3. Chapter elapsed 4. Chapter remaining 4. Playback modes (DVD) 1. Normal 2. Shuffle Chapter 3. Shuffle Title 4. Shuffle All 5. Random Chapter 6. Random Title 7. Random All 5. Multiplex audio modes 6. Angle view 7. Subtitle 8. Subtitle Style (BD) 9. Second Video (BD) 10. Second Audio (BD) 11. Bitrate 12. Still Off 13. Instant Search 14. Instant Replay Create a playlist 1. Navigate to a folder containing media. 2. Press the POP-UP MENU BUTTON. 3. Navigate the POP-UP MENU using the DIRECTION BUTTONS to select or clear all media to be added to playlist. 4. Navigate to specific media using the DIRECTION BUTTONS and press the POP-UP MENU BUTTON to add specific items to the playlist. Edit your playlist 1. Go into the Playlist folder in the Media Center. 2. Press the POP-UP MENU BUTTON. 3. Navigate the POP-UP MENU using the DIRECTION BUTTONS to select or clear all media to be removed from the playlist. 4. Navigate to specific media using the DIRECTION BUTTONS and press the POP-UP MENU BUTTON to remove specific items from the playlist. 18 Setup – Use the DIRECTION BUTTONS and ENTER to choose an option. Auto Play 1. Use the NUMERIC KEYPAD to type in Song Numbers in the Start and End fields to auto play the songs in shuffle mode. 2. Use the ENTER key to confirm it. 19 Firmware Upgrade 1. Locate and Download the latest KOD firmware from http://www.acesonic.com/kod3kfirmware.html 2. Unzip latest KOD firmware file(s) to disc or USB flash device. 3. Insert a disc or USB device containing appropriate upgrade software. 4. Go to SETUP menu and select #2 UPGRADE. 5. Select BD Loader (disc) or USB (USB device). DO NOT DISCONNECT THE UNIT DURING THE UPGRADE PROCESS! 20 Karaoke Settings 1. 2. 3. 4. 5. 6. Show Song No Repeat Mode Default Melody Music Volume MIC Settings Software AP - indication of song number throughout system - different repeat modes for repeat setting - option to play just the melody or melody + vocal - modification to volume of music - microphone settings, including volume, threshold, echo, and delay - configuration for Wi-Fi dongle attachment on front USB port 21 Wi-Fi Setup Wi-Fi Dongle (included) 1. Insert included Wi-Fi dongle into front USB port 2. From MAIN MENU, select SETUP 3. From SETUP, select KARAOKE SETTINGS 4. From KARAOKE SETTINGS, select SOFTWARE AP 5. Please take note of NETWORK NAME (SSID) and WPA PASSWORD as this is Network and password needed to connect 6. Scroll down to SERVICE and select ENABLE 7. Scroll down to APPLY and press SELECT on remote NOTE: If you are having difficulties connecting and/or having the device communicate with the unit, please select SETUP -> KARAOKE SETTINGS -> SOFTWARE AP and select a different channel. Do not obstruct visual path of wifi dongle as that will hinder it’s ability to communicate with your device(s). 22 Wi-Fi Network Router (optional) 1. Connect Network Router to KOD unit, utilizing an Ethernet cable, from KOD unit to one of the router’s Ethernet port(s) (optional D-Link router should have Ethernet ports highlight in Blue). 2. 3. 4. 5. Power on the Network Router then your KOD unit. From MAIN MENU, select SETUP. Inside SETUP, from GENERAL SETTING, scroll down to NETWORK. In INTERNET CONNECTION, select ENABLED. 23 6. In INTERFACE, select ETHERNET. 7. In IP SETTING, select AUTO. 8. Go back to MAIN MENU and select SETUP 9. Inside SETUP, select (5) SYSTEM INFORMATION 10. Take note of IP Address listed as it will be needed in setting up your application connection. NOTE: When connecting to your mobile device, please select Wi-Fi Network; NETWORK NAME (SSID) – DLINK. There should be no WPA PASSWORD associated with the new Network Router. If you 24 are still having problems with connecting mobile device with Network Router, please contact us at [email protected]. Preference – Press the LEFT and RIGHT DIRECTION BUTTONS to navigate the main preference categories. Press the UP and DOWN DIRECTION BUTTONS or ENTER to enter or exit a main preference category. 1. General Setting 1. System - Press the LEFT and RIGHT DIRECTION BUTTONS or ENTER to enter and exit the Sub-Menu. Press the UP and DOWN DIRECTION BUTTONS to navigate the SubMenu. 1. Screen Saver 1. Press the RIGHT DIRECTION BUTTON or ENTER to select the Sub-Menu. 2. Press the UP and DOWN DIRECTION BUTTONS to select “On” or “Off.” 3. Press the ENTER BUTTON to confirm it. 2. Disc Auto Playback 1. Press the RIGHT DIRECTION BUTTON or ENTER to select the Sub-Menu. 2. Press the UP and DOWN DIRECTION BUTTONS to select “On” or “Off.” 3. Press the ENTER BUTTON to confirm it. 3. CEC (Consumer Electronics Control) 1. Press the RIGHT DIRECTION BUTTON or ENTER to select the Sub-Menu. 2. Press the UP and DOWN DIRECTION BUTTONS to select “On” or “Off.” 25 3. Press the ENTER BUTTON to confirm it. 4. Load Default 1. Press the RIGHT DIRECTION BUTTON or ENTER to bring up the prompt. 2. Use the LEFT and RIGHT DIRECTION BUTTONS and ENTER to select OK or CANCEL. 2. Language - Press the LEFT and RIGHT DIRECTION BUTTONS or ENTER to enter and exit the Sub-Menu. Press the UP and DOWN DIRECTION BUTTONS to navigate the Sub-Menu. 1. OSD (On Screen Display) 1. Press the RIGHT DIRECTION BUTTON or ENTER to select the Sub-Menu. 2. Press the UP and DOWN DIRECTION BUTTONS to select “English,” “Chinese,” or “Trade Chinese.” 3. Press the ENTER BUTTON to confirm it. 2. Menu 1. Press the RIGHT DIRECTION BUTTON or ENTER to select the Sub-Menu. 2. Press the UP and DOWN DIRECTION BUTTONS to select “English,” “French,” “Chinese,” “Spanish,” or “German.” 3. Press the ENTER BUTTON to confirm it. 3. Audio 1. Press the RIGHT DIRECTION BUTTON or ENTER to select the Sub-Menu. 2. Press the UP and DOWN DIRECTION BUTTONS to select “English,” “French,” “Chinese,” “Spanish,” or “German.” 3. Press the ENTER BUTTON to confirm it. 4. Subtitle 1. Press the RIGHT DIRECTION BUTTON or ENTER to select the Sub-Menu. 2. Press the UP and DOWN DIRECTION BUTTONS to select “English,” “French,” “Chinese,” “Spanish,” or “German.” 3. Press the ENTER BUTTON to confirm it. 3. Playback - Press the LEFT and RIGHT DIRECTION BUTTONS or ENTER to enter and exit the Sub-Menu. Press the UP and DOWN DIRECTION BUTTONS to navigate the Sub-Menu. 1. Closed Caption 1. Press the RIGHT DIRECTION BUTTON or ENTER to select the Sub-Menu. 2. Press the UP and DOWN DIRECTION BUTTONS to select “On” or “Off.” 3. Press the ENTER BUTTON to confirm it. 2. Angle Mark – Turn on to enjoy scenes from different angles, where applicable 1. Press the RIGHT DIRECTION BUTTON or ENTER to select the Sub-Menu. 2. Press the UP and DOWN DIRECTION BUTTONS to select “On” or “Off.” 3. Press the ENTER BUTTON to confirm it. 3. PIP Mark (Picture-In-Picture) 1. Press the RIGHT DIRECTION BUTTON or ENTER to select the Sub-Menu. 2. Press the UP and DOWN DIRECTION BUTTONS to select “On” or “Off.” 3. Press the ENTER BUTTON to confirm it. 4. Secondary Audio Mark 1. Press the RIGHT DIRECTION BUTTON or ENTER to select the Sub-Menu. 2. Press the UP and DOWN DIRECTION BUTTONS to select “On” or “Off.” 3. Press the ENTER BUTTON to confirm it. 26 5. Last Memory 1. Press the RIGHT DIRECTION BUTTON or ENTER to select the Sub-Menu. 2. Press the UP and DOWN DIRECTION BUTTONS to select “On” or “Off.” 3. Press the ENTER BUTTON to confirm it. 4. Security - Press the LEFT and RIGHT DIRECTION BUTTONS or ENTER to enter and exit the Sub-Menu. Press the UP and DOWN DIRECTION BUTTONS to navigate the Sub-Menu. 1. Change Password 1. Press the RIGHT DIRECTION BUTTON or ENTER to select this option. 2. Use the NUMERIC KEYPAD to enter the current password. 3. If the password is correct you will be prompted to enter and confirm a new password. 4. Press the RETURN BUTTON to cancel. 2. Parental Control 1. Press the RIGHT DIRECTION BUTTON or ENTER to select this option. 2. Use the NUMERIC KEYPAD to enter the current password. 3. If the password is correct you will be taken to a Sub-Menu. 4. Press the UP and DOWN DIRECTION BUTTONS to select “Off,” “KID SAFE,” “G,” “PG,” “PG-13,” “PGR,” “R,” “NC-17,” or “ADULT.” 5. Press the ENTER BUTTON to confirm it. 6. Press the RETURN BUTTON to cancel. 3. Country Code 1. Press the RIGHT DIRECTION BUTTON or ENTER to select this option. 2. Use the NUMERIC KEYPAD to enter the current password. 3. Press the UP and DOWN DIRECTION BUTTONS to select the appropriate country. 4. Press the ENTER BUTTON to confirm it. 5. Press the RETURN BUTTON to cancel. 5. Network - Press the LEFT and RIGHT DIRECTION BUTTONS or ENTER to enter and exit the Sub-Menu. Press the UP and DOWN DIRECTION BUTTONS to navigate the Sub-Menu. 1. Internet Connection 1. Press the RIGHT DIRECTION BUTTON or ENTER to select this option. 2. Press the UP and DOWN DIRECTION BUTTONS to select “Enable” or “Disable.” 3. Press the ENTER BUTTON to confirm it. 2. Interface 1. Press the RIGHT DIRECTION BUTTON or ENTER to select this option. 2. Press the UP and DOWN DIRECTION BUTTONS to select “Ethernet” or “Wireless.” 3. Press the ENTER BUTTON to confirm it. 3. Information 1. Press the RIGHT DIRECTION BUTTON or ENTER to display network information. 2. Press the RETURN BUTTON to exit. 4. Connection Test 1. Press the RIGHT DIRECTION BUTTON or ENTER to test the network 27 connection. 5. IP Setting 1. Press the RIGHT DIRECTION BUTTON or ENTER to select this option. 2. Press the UP and DOWN DIRECTION BUTTONS to select “Auto” or “Manual.” 3. Press the ENTER BUTTON to confirm it. 2. Display Setting 1. TV - Press the LEFT and RIGHT DIRECTION BUTTONS or ENTER to enter and exit the Sub-Menu. Press the UP and DOWN DIRECTION BUTTONS to navigate the Sub-Menu. 1. TV Screen 1. Press the RIGHT DIRECTION BUTTON or ENTER to select the Sub-Menu. 2. Press the UP and DOWN DIRECTION BUTTONS to select “16:9 Full,” “16:9 Normal,” “4:3 Pan&Scan,” or “4:3 Letterbox.” 3. Press the ENTER BUTTON to confirm it. 2. Resolution 1. Press the RIGHT DIRECTION BUTTON or ENTER to select the Sub-Menu. 2. Press the UP and DOWN DIRECTION BUTTONS to select “Auto,” “480I/576I,” “480P/576P,” “720P,” “1080I” or “1080P.” 3. Press the ENTER BUTTON to confirm it. 3. TV System 1. Press the RIGHT DIRECTION BUTTON or ENTER to select the Sub-Menu. 2. Press the UP and DOWN DIRECTION BUTTONS to select “NTSC,” “PAL,” or “Multi.” 3. Press the ENTER BUTTON to confirm it. 28 4. Color Space 1. Press the RIGHT DIRECTION BUTTON or ENTER to select the Sub-Menu. 2. Press the UP and DOWN DIRECTION BUTTONS to select “RGB,” “YCbCr,” “YCbCr422,” or “Full RGB.” 3. Press the ENTER BUTTON to confirm it. 5. HDMI Deep Color 1. Press the RIGHT DIRECTION BUTTON or ENTER to select the Sub-Menu. 2. Press the UP and DOWN DIRECTION BUTTONS to select “30 bits,” “36 bits,” “48 bits,” or “Off.” 2. Video Process - Press the LEFT and RIGHT DIRECTION BUTTONS or ENTER to enter and exit the Sub-Menu. Press the UP and DOWN DIRECTION BUTTONS to navigate the Sub-Menu. 1. Video Adjust 1. Press the RIGHT DIRECTION BUTTON or ENTER to select the Sub-Menu. 2. Press the UP and DOWN DIRECTION BUTTONS to select and adjust “Brightness,” “Contrast,” “Hue,” or “Saturation.” 3. Press the RETURN BUTTON to exit. 2. Sharpness 1. Press the RIGHT DIRECTION BUTTON or ENTER to select the Sub-Menu. 2. Press the UP and DOWN DIRECTION BUTTONS to select “High,” “Middle,” or “Low.” 3. Press the ENTER BUTTON to confirm it. 3. Motion Video Process - Press the LEFT and RIGHT DIRECTION BUTTONS or ENTER to enter and exit the Sub-Menu. 1. Video Mode 1. Press the RIGHT DIRECTION BUTTON or ENTER to select the Sub-Menu. 2. Press the UP and DOWN DIRECTION BUTTONS to select “Standard,” “Vivid,” or “Smooth.” 3. Press the ENTER BUTTON to confirm it. 29 3. Audio Setting 1. Audio Output - Press the LEFT and RIGHT DIRECTION BUTTONS or ENTER to enter and exit the Sub-Menu. Press the UP and DOWN DIRECTION BUTTONS to navigate the Sub-Menu. 1. SPDIF – choose settings for the Coaxial and Optical outputs 1. Press the RIGHT DIRECTION BUTTON or ENTER to select the Sub-Menu. 2. Press the UP and DOWN DIRECTION BUTTONS to select “Bitstream,” “PCM,” “Reencode,” or “Off.” 3. Press the ENTER BUTTON to confirm it. 2. HDMI – choose settings for the HDMI output 1. Press the RIGHT DIRECTION BUTTON or ENTER to select the Sub-Menu. 2. Press the UP and DOWN DIRECTION BUTTONS to select “Bitstream,” “PCM,” “Reencode,” or “Off.” 3. Press the ENTER BUTTON to confirm it. 3. Down_samp - downsampling 1. Press the RIGHT DIRECTION BUTTON or ENTER to select the Sub-Menu. 2. Press the UP and DOWN DIRECTION BUTTONS to select “48K,” “96K,” or “192K.” 3. Press the ENTER BUTTON to confirm it. 4. DRC 1. Press the RIGHT DIRECTION BUTTON or ENTER to select the Sub-Menu. 2. Press the UP and DOWN DIRECTION BUTTONS to select “Off,” “On,” or “Auto.” 3. Press the ENTER BUTTON to confirm it. 2. Speaker Setting - Press the LEFT and RIGHT DIRECTION BUTTONS or ENTER to enter and exit the Sub-Menu. Press the UP and DOWN DIRECTION BUTTONS to 30 navigate the Sub-Menu. 1. Configuration 1. Press the RIGHT DIRECTION BUTTON or ENTER to select the Sub-Menu. 2. Press the UP and DOWN DIRECTION BUTTONS to select “2.x,” “3.x,” “4.x,” “5.x,” or “6.x.” 3. Press the ENTER BUTTON to confirm it. 4. Subsequent menus will appear to allow you to select the appropriate surround and subwoofer configuration for your speakers. 5. Press the RETURN BUTTON to exit. 2. Test tone 1. Press the RIGHT DIRECTION BUTTON or ENTER to select the Sub-Menu. 2. Your speaker configuration will appear for you to select Size, Trim, and Delay settings for each channel. 3. Press the RETURN BUTTON to exit. 3. Post Process - Press the LEFT and RIGHT DIRECTION BUTTONS or ENTER to enter and exit the Sub-Menu. Press the UP and DOWN DIRECTION BUTTONS to navigate the Sub-Menu. 1. EQ – select from available equalization settings 1. Press the RIGHT DIRECTION BUTTON or ENTER to select the Sub-Menu. 2. Press the UP and DOWN DIRECTION BUTTONS to select “Off,” “Rock,” “Pop,” “Live,” or “Dance.” 3. Press the ENTER BUTTON to confirm it. 2. UpMix 1. Press the RIGHT DIRECTION BUTTON or ENTER to select the Sub-Menu. 2. Press the UP and DOWN DIRECTION BUTTONS to select “Off,” or “NEO6.” 3. Press the ENTER BUTTON to confirm it. 4. System Information – displays the current software version and the unit's MAC address. 31 MP3+G Superimpose 1. Turn off the power to your KOD unit. 2. Remove HDD tray from back of KOD unit. {(1) screw on back of unit; (4) screws holding HDD in place} 3. Insert HDD into External HDD Docking Station on PC. 4. Create folder inside HDD named “bgvideo”. 5. Insert .mpg video files into newly created folder above. 6. Re-install HDD into tray and into KOD unit. 7. While playing a karaoke file, press the BACKGROUND button on remote control (on bottom section of remote) to shuffle through background videos inputted in the procedure above. 32 Troubleshooting Incorrect operations are often mistaken for trouble and malfunctions. If you suspect that something is wrong with the unit, check the list below for sometimes the troubles lie within another component. Remember to try inspecting other components and electrical appliances in use. If the trouble cannot be rectified even after exercising the steps listed below, contact Acesonic at +1-626-820-0645 to inquire about repairs. Reset to factory settings Resetting the unit to factory defaults will likely solve more than 90% of problems encountered. 1. Remove any disc from the disc tray. 2. Power the unit down then back up using the rear Power Switch (not the Power Button or the remote). 3. Power the unit back up using the Power Switch and turn the unit ON using the Power Button. 4. Restore the factory settings through the Preferences Menu. 1. General Setting 2. System 3. Load Default 4. Yes The disc automatically ejects back out when the disc tray is closed Dirty or warped disc. The disc was not seated properly in the disc tray. Region number on the disc does not conform to the unit. Cannot execute disc playback Condensation has formed inside the player. Disc playback stops Press the STOP BUTTON on the remote. Press the PLAY BUTTON on the remote to restart playback. Picture disturbance during playback The player is compatible with Macro-Vision System copy guard. Some discs include a copy prevention signal, and when this type of disc is played back, stripes, etc may appear on some sections of the picture depending on the TV. This is not a malfunction. When recorded or copied there is a disturbance in the playback picture This player is compatible with copy prevention technology. Some discs include a copy prevention signal and the copy guard system will prevent proper playback. Improper operation of TV set occurs Some TVs that have wireless remote functions may not operate properly with this remote control. 33 No sound Inspect the KOD-3000 to confirm it is connect to audio equipment and that the audio equipment or TV is connected to the player. Check that the volume levels on the TV and audio equipment are audible. Check the cables connecting the player to audio equipment or TV. The digital signal is prohibited for some discs. The PAUSE mode is engaged. Distorted sound Check connections on the KOD-3000 and audio equipment or TV. Check input and volume settings on the audio equipment or TV. The connection is made to the amplifier's PHONO connection. Try connecting to a LINE in connection instead. No picture Check the connections between the TV and/or audio equipment and the KOD-3000. Check the TV to see if its on the correct input or channel to view the player. Screen is black and white, wavey, or contains static The unit is in the wrong video mode Distorted picture Check connections between the TV and the KOD-3000. Check the TV to see if its on the correct input or channel to view the player. Inspect the RCA or HDMI cable. No power Check to see that the AC power cord is plugged into the wall and the player. No microphone volume Check microphone connection. The microphone is turned off. Many microphones have an on/off switch. Set the microphone volume in the microphone menu that is accessed via the remote control. The unit is not correctly connected to an amplifier or TV. There is microphone feedback and screeching The microphone is too close to the speakers. Move the microphone further away or lower the volume of the microphone input. Remote won't work Ensure that there is a clear path between the KOD-3000 and the remote control or decrease the angle between the remote control and the sensor. Replace the batteries. Move the remote control closer to the sensor. The batteries are incorrectly positioned in the remote. Remove and reseat the batteries. 34 The KOD-3000 boots up to a blue screen There may be possible hard drive damage or database corruption. service at +1-626-820-0645. Call Acesonic customer The unit cannot read the USB device The device may be incompatible When connecting via RCA cables (yellow, red, white), the screen shows “Please, Connect the HDMI”. This unit will not operate with both RCA (yellow, red, white) and HDMI connections. Must use either RCA orHDMI. Turn on your KOD unit and retrieve supplied remote. Rapidly press INFO on remote 10 to 15 times. This should allow RCA mode to work. NOTE: If you reconnect HDMI, you will have to go through this procedure again to get picture from a RCA source. FAQ (Frequently Asked Questions) 1. No microphone sound? Check of the microphone volume in SETUP -> KARAOKE SETTINGS -> MIC SETTINGS 2. Remote controller doesn't work? 3. No picture? Check batteries. Check if RCA or HDMI video connections are properly connected. 4. How many songs can I transfer to my KOD-3000 HD? This is dependent entirely upon the HDD capacity and the file format(s) in which you choose to save your songs. 5. No sound? Check if RCA or HDMI audio connections are properly connected. Firmware Updates For the latest updates please visit http://www.acesonic.com/kod3kfirmware.html. Safety, Warnings, and Precautions Mises en garde, precautions et procedures de surete The lightning-with-arrowhead symbol inside a triangle alerts the user that potentially dangerous voltage in the product enclosure may constitute a risk of electric shock. The exclamation point within a triangle alerts the user to important operating, maintenance, and servicing information in this User Manual. 35 CAUTION To reduce the risk of electric shocks, fire, and possible injuries, you should not remove screws, buttons, jacks, or any part of the enclosure; or expose the product to rain or moisture FCC ADVISORY (U.S.A.) 1. This equipment has been tested and found to comply with the limits for a Class B digital device, pursuant to part 15 of the FCC Rules. These limits are designed to provide reasonable protection against harmful interference in a residential installation. This equipment generates, uses, and can radiate radio frequency energy and, if not installed and used in accordance with the instructions, may cause harmful interference to radio communications. However, there is no guarantee that interference will not occur in a particular installation. If this equipment does cause harmful interference to radio or television reception, which can be determined by turning the equipment off and on, the user is encouraged to try correcting the problem by one or more of the following measures: Increasing the distance between the radio/TV equipment and the KOD-3000 Connecting the radio/TV equipment to an outlet on a different circuit than the one into which the receiver is plugged If necessary, consulting the dealer or an experienced radio/TV technician for help 2. IMPORTANT: When connecting the KOD-3000 to audio equipment, use only high-quality, shielded cables such as what is supplied with this product. Follow all installation instructions. Do not modify the equipment in any way, as this could void your FCC authorization to use the device in the U.S.A. FOR CANADA/POUR LE CANADA Caution: To prevent electric shock, match the wide blade of the plug to the wide slot, and fully insert. Attention: Pour eviter les chocs electriques, introduire la lame la plus large de la fiche dans la borne correspondante de la prise et pousser jusquau fond. This product does not exceed the Class B limits for radio noise emissions from digital devices as set out in the Canadian standard for interference-causing equipment (“Digital Apparatus, ICES-003” from the Department of Communications). Cet appareil numerique respecte les limites de bruits radio electriques applicable aux appareils numeriques de Classe B prescrites dans la normesur le materiel brouilleur (“Appareils Numeriques, NMB-003” edictee par le Ministre des Communications). 36 CLASS 1 LASER PRODUCT DANGER: Visible laser radiation when open and interlock has failed or is defeated. Avoid direct exposure to the beam. CAUTION: Do not open the top cover. There are no user serviceable parts inside the unit. all servicing to qualified service personnel. Leave CAUTION: Disconnect the electrical plug to shut off the power completely. The POWER on the unit is not off from the electrical plug when the POWER SWITCH on the back panel is not in the ON position. Important Safety Procedures 1. 2. 3. 4. 5. Read these instructions. Keep these instructions. Heed all warnings. Follow all instructions. Do not use this product near water, on wet surfaces, or in paces where moisture may accumulate. Do not expose the device to dripping or splashing, and do not place items filled with liquids – such as vases, beverages, etc – on top. Clean only with a dry cloth. 6. Do not block any ventilation openings or set device on carpets or rugs. Maintain sufficient room on all sides for airflow. 7. Do not install near any heat sources such as radiators, heat registers, stoves, or other apparatus (including amplifiers) that produce heat. 8. Do not defeat the safety purpose of the polarized or grounding type plug. A polarized plug has two blades with one wider than the other. A grounding type plug has two blades and a third grounding prong. The wide blade or the the third prong are provided for your safety. If the provided plug does not fit into your outlet, consult an electrician for replacement of the obsolete outlet. 9. Protect the power cord from being walked on or pinched particularly at plugs, convenience receptacles, and the point where they exit from the apparatus. 10. Only use attachments and accessories specified by the manufacturer. 11. Use only with the cart, stand, tripod, bracket, or table specified by the manufacturer, or sold with the apparatus. When a cart is used, use caution when moving the cart. 12. Unplug this apparatus during lightning storms or if unused for a long period of time. Use apparatus combination to avoid injury from tip-cover. 13. Refer all servicing to qualified service personnel. Servicing is required when the apparatus has been damaged in any way, such as when the power supply cord or plug is damaged, liquid has been spilled or objects have fallen into the apparatus, the apparatus has been exposed to rain or moisture, does not operate normally, or has been dropped. 14. This product should be operated only from the type of power source indicated on the marking label. If you are not sure of the type of power supply to your home, consult your product dealer or local power company. For products intended to operate from battery power, or other sources, refer to the operating instructions. 15. An outside antenna system should not be located in the vicinity of overhead power lines or 37 other electric light or power circuits, or where it can fall into such power lines or circuits. When installing an outside antenna system, be extremely careful not to touch such power lines or circuits, as contact when them could be fatal. 16. Do not overload wall outlets, extension cords, or integral convenience receptacles as this can result in a risk of fire or electric shock. 17. Never push objects of any kind into this product through openings as they may touch dangerous voltage points or short-out parts that could result in a fire or electric shock. Never spill liquid of any kind on the product. 18. When replacement parts are required, be sure the service technician has used replacement parts specified by the manufacturer or have the same characteristics as the original part. Unauthorized substitutions may result in fire, electric shock, or other hazards. 19. Following any servicing or repair of this product, ask the service technician to perform the appropriate safety checks to ensure the product is in proper operating condition. 20. The product should be mounted to a wall or ceiling only as recommended by the manufacturer. Any mounting of the product should follow the manufacturer instructions, and should use a mounting accessory recommended by the manufacturer. 21. If your product is not operating correctly or exhibits a marked change in performance and you are unable to restore normal operation by following the detailed procedures in its operating instructions, do not attempt to service it yourself as opening or removing covers may expose you to dangerous voltage or other hazards. Refer all servicing to qualified service personnel. NOTE: With proper care and maintenance, your KOD-3000 Karaoke-On-Demand Jukebox will give you years of dependable, enjoyable use. Make sure you are using proper power sources and good (unfrayed) cables at all times. Remember, any alterations or user repairs performed on the device voids your warranty. Technical Specifications Full Function Blu-ray Disc Media Type: BD-ROM, BD-R, BD-RE, DVD, DVD±R, DVD+RW, VCD BD Profiles: Profile 1.1 (Bonus View), Profile 2.0 (BD-Live) Video D/A Converter: 12bit/148.5MHz Audio D/A Converter: 24bit/192kHz Sophisticated Karaoke Functions ◦ Dynamic Changing Background Video in MP3G ◦ Song Database Management 1 x HDMI Connection Output (HDMI 1.3) 1 x CVBS Output 1 x YPbPr Output 1 x Optical Output 1 x Coaxial Output 1 x USB 2.0 Ports 1 x Ethernet Network Interface (RJ-45) 2 x Microphone Inputs Multi-format Media Support 38 Audio: MP3/LRC, AC3, AAC, WMA, WMAPro Video: MPEG1/2/4, Xvid, ISO, MKV, AVI, WMV9, VC1, H.264 Karaoke-On-Demand Total Solution IP-Based Media Streaming Secure Media Connectivity Download Protection for all types of content iPad & Android Tablet Operation In order to use your iPad or Android tablet to control your KOD-3000, please follow the directions below. You could also visit our website (http://www.acesonic.com/hditem.php?id=8), scroll down to the bottom of the page, and view the instructional videos. 1. Upgrade your KOD unit’s firmware by visiting http://www.acesonic.com/kod3kfirmware.html and downloading the latest firmware in .zip format and unzipping files into USB flash drive. Please refer to Page 21 of this Manual. 2. Download KOD-3000 Songbook application for either device(s): Android (https://docs.google.com/file/d/0B6aRVVnb7lm-RkZicEg3MGliY0k/edit?usp=sharing) Apple (https://itunes.apple.com/us/app/acesonic-kod3000-songbook/id633424827?mt=8&ignmpt=uo%3D2). 3. From MAIN MENU, select SETUP. 4. From SETUP, select (3) KARAOKE SETTINGS. 5. From (3) KARAOKE SETTINGS, select SOFTWARE AP 6. Scroll down to SERVICE, and select ENABLE 7. Scroll down to APPLY, and select [APPLY THE SETTING] a) This should activate the front USB port for the Wifi Dongle. Your Wifi Dongle indicator should be blinking. 39 1. Once opening up your downloaded KOD-3000 Songbook application, you should arrive at the MAIN MENU. a) SONG SEARCH i. Displays a list of all your songs within your HDD b) CATEGORIES c) PLAYLIST d) PLAYBACK CONTROL e) MY FAVORITE f) SETUP 2. Select SETUP 40 3. Once in SETUP, select FIND KOD-3000 HOST 4. Two options should appear: (1) Auto Discover (2) Manual IP a) Auto Discover i. Select Auto Discover, and your mobile device should automatically find your KOD unit’s signal (ie. 192.168.12.1) ii. Select the displayed IP that Auto Discover found to Connect. b) Manual IP (recommended for router connection) i. Please have IP Address noted from MAIN MENU -> SETUP -> (5) SYSTEM INFORMATION ii. Enter your IP Address information that you noted from above… 5. Select SYNC KOD-3000 SONG DATABASE. 6. Song Database should be downloaded to your mobile device and should display a Confirmation message once done. 7. Enjoy your KOD-3000 unit with your Songbook application! 41 Song Importing Information For Song Importing instructions, please refer to the pages of this Owner’s Manual: Import from USB flash drive (Pg. 15) Import from taking out KOD HDD and utilizing External SATA HDD Docking Station (Pg. 43 53) 42 Adding Songs to HDD via External Docking Station (optional) 1. Turn off the power to your KOD unit. 2. Remove HDD tray from back of KOD unit. {(1) screw on back of unit; (4) screws holding HDD in place} 3. Insert HDD into External HDD Docking Station on PC. a) Drivers should automatically install on your computer. b) Once Drivers are installed, depending on your computer’s preferences, a new window should automatically open up with either i. Autoplay window 1. Under GENERAL OPTIONS, select OPEN FOLDER TO VIEW FILES. ii. KOD HDD window 43 MP3+G Songs 44 1. Select mp3gsong.txt file and open. 45 2. 3. 4. 5. 6. For encoding, select whatever is already selected. Select all by pressing CTRL + A. Once all characters are highlighted, Copy all by pressing CTRL + C. Open spreadsheet software (ie. Excel) and paste by pressing CTRL-V. As shown above, the Spreadsheet should now display all songs within your KOD unit’s hard drive. a. COLUMN A: ID i. This is a Number ID for ease of reference to song within this list only. b. COLUMN B: NUM i. This is a Song Number needed to input your song. c. COLUMN C: TITLE i. This is the Song Title. d. COLUMN D: PINYIN i. Input ? for Unknown e. COLUMN E: LANG i. E – English ii. M – Mandarin iii. C – Cantonese iv. T - Taiwanese v. KR – Korean vi. JP – Japanese vii. SPA – Spanish f. COLUMN F: LEN i. COPY content in Column F g. COLUMN G: ARTIST i. This is the Artist of the song. h. COLUMN H: GENDER i. M – Male ii. F – Female iii. G – Group i. COLUMN I: COUNTRY 46 j. k. l. m. n. o. p. q. r. s. i. US – United States ii. CH – China iii. KR – Korea iv. JP – Japanese v. SPA – Spanish countries COLUMN J: GENRE i. POP – Pop COLUMN K: TRACK i. L – Left ii. R – Right COLUMN L: VOLUME i. #, # (LEFT, RIGHT) COLUMN M: TYPE i. MP3G ii. MTV COLUMN N: AR i. VCD ii. DVD iii. ? – Unknown COLUMN O: SUBTITLE i. Input ? for Unknown COLUMN P: DATE i. Date of Song Released COLUMN Q: PATH i. Path location of particular music. COLUMN R: BG_PATH i. Path location of particular background. COLUMN S: BG_SEEK i. Input ? for Unknown t. u. COLUMN T: REMARK 47 i. Input ? for Unknown 48 MTV Songs 49 50 1. 2. 3. 4. 5. 6. Select mtvsong.txt file and open. For encoding, select whatever is already selected. Select all by pressing CTRL + A. Once all characters are highlighted, Copy all by pressing CTRL + C. Open spreadsheet software (ie. Excel) and paste by pressing CTRL-V. As shown above, the Spreadsheet should now display all songs within your KOD unit’s hard drive. a. COLUMN A: ID i. This is a Number ID for ease of reference to song within this list only. b. COLUMN B: NUM i. This is a Song Number needed to input your song. c. COLUMN C: TITLE i. This is the Song Title. d. COLUMN D: PINYIN i. Input ? for Unknown e. COLUMN E: LANG i. E – English ii. M – Mandarin iii. C – Cantonese iv. T - Taiwanese v. KR – Korean vi. JP – Japanese vii. SP – Spanish f. COLUMN F: LEN i. Input ? for Unknown g. COLUMN G: ARTIST i. This is the Artist of the song. h. COLUMN H: GENDER i. M – Male ii. F – Female iii. G – Group i. COLUMN I: COUNTRY 51 j. k. l. m. n. o. p. i. US – United States ii. CH – China iii. KR – Korea iv. JP – Japanese v. MX – Mexico COLUMN J: GENRE i. BALLAD ii. POP iii. ROCK iv. R&B v. HIP-HOP vi. ? for Unknown COLUMN K: TRACK i. L – Left ii. R – Right iii. <#> for Audio Track COLUMN L: VOLUME i. #, # (LEFT, RIGHT) COLUMN M: TYPE i. MP3G ii. MTV COLUMN N: AR i. VCD ii. DVD iii. 1080 iv. ? – Unknown COLUMN O: SUBTITLE i. Input ? for Unknown COLUMN P: DATE i. Date of Song Released 52 q. COLUMN Q: PATH i. Path location of particular music. 53