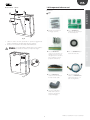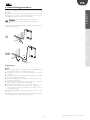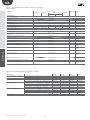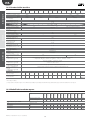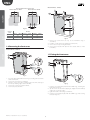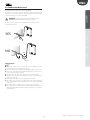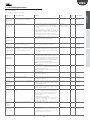
1
humiSteam Wellness umidificatori per bagni turchi humidifiers for steam baths Manuale d’installazione User manual ITA consentita dalla normativa applicabile, in nessun caso CAREL S.p.A., i suoi dipendenti o le sue filiali/ affiliate saranno responsabili di eventuali mancati guadagni o vendite, perdite di dati e di informazioni, costi di merci o servizi sostitutivi, danni a cose o persone, interruzioni di attività, o eventuali danni diretti, indiretti, incidentali, patrimoniali, di copertura, punitivi, speciali o consequenziali in qualunque modo causati, siano essi contrattuali, extra contrattuali o dovuti a negligenza o altra responsabilità derivanti dall’ utilizzo del prodotto o dalla sua installazione, anche se CAREL S.p.A. o le sue filiali/ affiliate siano state avvisate della possibilità di danni. AVVERTENZE Gli umidificatori CAREL S.p.A. sono prodotti avanzati, il cui funzionamento è specificato nella documentazione tecnica fornita col prodotto o scaricabile, anche anteriormente all’acquisto, dal sito internet www.carel.com. Ogni prodotto CAREL S.p.A., in relazione al suo avanzato livello tecnologico, necessita di una fase di qualifica/configurazione/programmazione affinché possa funzionare al meglio per l’applicazione specifica. La mancanza di tale fase di studio, come indicata nel manuale, può generare malfunzionamenti nei prodotti finali di cui CAREL S.p.A. non potrà essere ritenuta responsabile. Il cliente (costruttore, progettista o installatore dell’equipaggiamento finale) si assume ogni responsabilità e rischio in relazione alla configurazione del prodotto per il raggiungimento dei risultati previsti in relazione all’installazione e/o equipaggiamento finale specifico. CAREL S.p.A. in questo caso, previ accordi specifici, può intervenire come consulente per la buona riuscita della installazione/start-up macchina/utilizzo, ma in nessun caso può essere ritenuta responsabile per il buon funzionamento dell’umidificatore ed impianto finale qualora non siano state seguite le avvertenze o raccomandazioni descritte in questo manuale, o in altra documentazione tecnica del prodotto. In particolare, senza esclusione dell’obbligo di osservare le anzidette avvertenze o raccomandazioni, per un uso corretto del prodotto si raccomanda di prestare attenzione alle seguenti avvertenze: SMALTIMENTO L’umidificatore è composto da parti di metallo e parti di plastica. In riferimento alla Direttiva 2002/96/CE del Parlamento Europeo e del Consiglio del 27 gennaio 2003 e alle relative normative nazionali di attuazione, informiamo che: 1. sussiste l’obbligo di non smaltire i RAEE come rifiuti urbani e di effettuare, per detti rifiuti, una raccolta separata; 2. per lo smaltimento vanno utilizzati i sistemi di raccolta pubblici o privati previsti dalla leggi locali. È inoltre possibile riconsegnare al distributore l’apparecchiatura a fine vita in caso di acquisto di una nuova; 3. questa apparecchiatura può contenere sostanze pericolose: un uso improprio o uno smaltimento non corretto potrebbe avere effetti negativi sulla salute umana e sull’ambiente; 4. il simbolo (contenitore di spazzatura su ruote barrato) riportato sul prodotto o sulla confezione e sul foglio istruzioni indica che l’apparecchiatura è stata immessa sul mercato dopo il 13 Agosto 2005 e che deve essere oggetto di raccolta separata; 5. in caso di smaltimento abusivo dei rifiuti elettrici ed elettronici sono previste sanzioni stabilite dalle vigenti normative locali in materia di smaltimento. • PERICOLO SCOSSE ELETTRICHE L’umidificatore contiene componenti sotto tensione elettrica. Togliere l’alimentazione di rete prima di accedere a parti interne, in caso di manutenzione e durante l’installazione. • PERICOLO PERDITE D’ACQUA L’umidificatore carica/scarica automaticamente e costantemente quantità d’acqua. Malfunzionamenti nei collegamenti o nell’umidificatore possono causare perdite. • PERICOLO DI USTIONE L’umidificatore contiene componenti ad alta temperatura, ed eroga vapore a 100°C/ 212°F. Garanzia sui materiali: 2 anni (dalla data di produzione, escluse le parti di consumo). Attenzione: • • • • • • • • • • • • Omologazioni: la qualità e la sicurezza dei prodotti CAREL S.P.A. sono garantite dal sistema di progettazione e produzione certificato ISO 9001, L’installazione del prodotto deve obbligatoriamente comprendere una connessione di terra, utilizzando l’apposito morsetto di colore giallo-verde presente nell’umidificatore. Condizioni ambientali e tensione di alimentazione devono essere conformi ai valori specificati nelle etichette ‘dati di targa’ del prodotto. Il prodotto è progettato esclusivamente per umidificare ambienti in modo diretto o mediante sistemi di distribuzione (condotte). Installazione, utilizzo e manutenzione devono essere eseguite da personale qualificato, consapevole delle precauzioni necessarie e in grado di effettuare correttamente le operazioni richieste. Per la produzione di vapore si deve utilizzare esclusivamente acqua con caratteristiche indicate nel presente manuale. Tutte le operazioni sul prodotto devo essere eseguite secondo le istruzioni contenute nel presente manuale e nelle etichette applicate al prodotto. Usi e modifiche non autorizzati dal produttore sono da considerarsi impropri. CAREL S.p.A. non si assume alcuna responsabilità per tali utilizzi non autorizzati. Non tentare di aprire l’umidificatore in modi diversi da quelli indicati nel manuale. Attenersi alle normative vigenti nel luogo in cui si installa l’umidificatore. Tenere l’umidificatore fuori dalla portata di bambini e animali. Non installare e utilizzare il prodotto nelle vicinanze di oggetti che possono danneggiarsi a contatto con l’acqua (o condensa d’acqua). CAREL S.p.A. declina ogni responsabilità per danni conseguiti o diretti a seguito di perdite d’acqua dell’umidificatore. Non utilizzare prodotti chimici corrosivi, solventi o detergenti aggressivi per pulire le parti Interne ed esterne dell’umidificatore, salvo non vi siano indicazioni specifiche nei manuali d’uso. Non fare cadere, battere o scuotere l’umidificatore, poiché le parti interne e di rivestimento potrebbero subire danni irreparabili. nonché dal marchio . CAREL S.p.A. adotta una politica di continuo sviluppo. Pertanto si riserva il diritto di effettuare modifiche e miglioramenti a qualsiasi prodotto descritto nel presente documento senza preavviso. I dati tecnici presenti nel manuale possono subire modifiche senza obbligo di preavviso. La responsabilità di CAREL S.p.A. in relazione al proprio prodotto è regolata dalle condizioni generali di contratto CAREL S.p.A. pubblicate nel sito www. carel.com e/o da specifici accordi con i clienti; in particolare, nella misura 3 “Wellness” +030220571 - rel. 3.2 - 09.04.2009 ITA Indice 1. INTRODUZIONE E MONTAGGIO 7 8.3 Pulizia e manutenzione cilindro ...................................................................32 8.4 Collegamento boiler modelli trifase UE025...UE065................................32 8.5 Pulizia e manutenzione altri componenti ...................................................32 1.1 humiSteam Wellness (UEW*) ......................................................................... 7 1.2 Dimensioni e pesi............................................................................................... 7 1.3 Apertura dell’imballo ........................................................................................ 7 1.4 Posizione a parete ............................................................................................. 7 1.5 Fissaggio a parete ............................................................................................... 7 1.6 Rimozione del cofano frontale ........................................................................ 8 1.7 Montaggio del cofano frontale ....................................................................... 8 1.8 Componenti ed accessori ................................................................................ 9 2. COLLEGAMENTI IDRAULICI 9. SCHEMI ELETTRICI 9.1 Schema modelli monofase UE001…UE009 ............................................33 9.2 Schema modelli trifase UE003…UE018 ....................................................34 9.3 Schema modelli trifase UE025…UE065 ....................................................35 10. CARATTERISTICHE GENERALI E MODELLI 36 10.1 Modelli humiSteam Wellness e caratterische elettriche .....................36 10.2 Caratteristiche tecniche .............................................................................. 37 10.3 Modelli tubi condotta vapore ...................................................................... 37 10.4 Modelli distributori di vapore a getto concentrato ...............................38 10.5 Modelli distributori lineari ...........................................................................38 10 2.1 Acqua di alimentazione ................................................................................. 11 2.2 Acqua di drenaggio.......................................................................................... 11 3. DISTRIBUZIONE DEL VAPORE 33 12 3.1 Distributori CAREL a getto (SDPOEM00**) .............................................. 12 3.2 Distributori CAREL lineari (DP***DR0) ..................................................... 12 3.3 Tubo di condotta vapore ................................................................................ 12 3.4 Tubo di drenaggio condensa ........................................................................ 13 4. COLLEGAMENTI ELETTRICI 14 4.1 Predisposizioni passaggio dei cavi elettrici ............................................... 14 4.2 Collegamento cavo di alimentazione elettrica ........................................ 14 4.3 Collegamento sonde di temperatura (M2.1- M2.8) ................................. 14 4.5 Contatto allarme (M6.1 - M6.3) .................................................................... 15 4.6 Collegamento utenze (luce, ventilatori, sanificazione, essenze) ........... 15 5. TERMINALE REMOTO, MODEM PER GSM E RETE DI SUPERVISIONE 17 5.1 Terminale display remoto ................................................................................17 5.2 Collegamento rete GSM (invio SMS) ...........................................................17 5.3 Rete di supervisione (J19) ...............................................................................17 6. AVVIO E INTERFACCIA UTENTE 18 6.1 Avvio .................................................................................................................... 18 6.2 Spegnimento ..................................................................................................... 18 6.3 Interfaccia utente ............................................................................................. 18 6.4 Menù di Gestione ........................................................................................... 19 7. CONFIGURAZIONI PRINCIPALI 21 7.1 Lingua .................................................................................................................. 21 7.2 Data e ora ........................................................................................................... 21 7.3 Sonde di temperatura .................................................................................. 21 7.4 Essenze................................................................................................................ 21 7.5 Fasce Orarie ......................................................................................................22 7.6 Ventilatori ............................................................................................................22 7.7 Sanificazione ......................................................................................................23 7.8 Impostazioni avanzate (solo personale qualificato) .................................23 7.9 Copia delle impostazioni (back-up) ............................................................24 7.10 GSM (invio SMS in caso di allarme) ...........................................................25 7.11 Abilitazione network di supervisione ..........................................................25 7.12 Procedura manuale (solo personale qualificato).....................................25 7.13 Visualizzazione allarmi ...................................................................................26 7.14 Info-menù .........................................................................................................27 7.15 Scarico meccanico dell’acqua del cilindro .................................................27 8. MANUTENZIONE E PARTI DI RICAMBIO 28 8.1 Parti di ricambio modelli UE001…UE018 ..................................................28 8.2 Parti di ricambio modelli UE025…UE065 .................................................30 5 “Wellness” +030220571 - rel. 3.2 - 09.04.2009 ITA 1. INTRODUZIONE E MONTAGGIO Gamma di umidificatori isotermici ad elettrodi immersi dotati di display a cristalli liquidi per il controllo e la distribuzione di vapore nei bagni turchi. Attenzione: Durante il funzionamento dell’umidificatore l’involucro metallico esterno si riscalda, e la parte posteriore appoggiata alla parete può raggiungere temperature superiori a 60 °C. Modelli disponibili (identificabili attraverso il codice riportato sul prodotto): • UE001, UE003, UE005, UE008, UE009, UE010, UE015, UE018: più piccoli con capacità di produzione di vapore fino a 18 kg/h, allacciamenti idraulici sotto la base dell’umidificatore; • UE025, UE035, UE045, UE065: più grandi con capacità di produzione di vapore da 25 a 65 kg/h, allacciamenti idraulici a lato dell’umidificatore. Distanze dalle pareti Modelli UE001…UE018 Modelli UE025…UE065 ≥ 200 installatore 1.1 humiSteam Wellness (UEW*) ≥ 200 ≥ 200 ≥ 200 ≥ 500 ≥ 200 utente ≥ 700 1.2 Dimensioni e pesi ≥ 700 <0,5° Modelli UE001…UE018 B ≥ 400 Modelli UE025…UE065 A B A Fig. 1.b C C Montare l’umidificatore a parete tramite la staffa di supporto già fissata sull’umidificatore, utilizzando il kit di viti in dotazione (per le quote in mm vedi Fig. 1.d). Istruzioni per il fissaggio: 1. svitare la staffa a parete da quella per l’umidificatore; 2. fissare la staffa a parete (vedi Fig. 1.c), controllando con una bolla (livella) la posizione orizzontale; se il montaggio viene eseguito su parete in muratura possono essere utilizzati i tasselli plastici (Ø 8 mm) e le viti (Ø 5 mm x L= 50 mm) in dotazione; 3. appendere l’umidificatore alla staffa utilizzando il profilo che si trova sul bordo superiore dello schienale; 4. bloccare l’umidificatore alla parete per mezzo del foro praticato sulla mezzeria posteriore della macchina. Per i pesi e le dimensioni vedi Tab.1.a. Fig. 1.a dimensioni A (mm) B C pesi (kg) imballato vuoto installato* UE001… UE008 365 275 620 16 13,5 19 UE009… UE018 365 275 712 20 17 27 UE025… UE045 545 375 815 39 34 60,5 UE045**… UE065 635 465 890 51 44 94 Tab. 1.a *= in condizioni operative riempito d’acqua; **= modello a 230 Vac Modelli UE001…UE018 X 1.3 Apertura dell’imballo staffa controllare l’integrità dell’umidificatore alla consegna e notificare immediatamente al trasportatore, per iscritto, ogni danno che possa essere attribuito ad un trasporto incauto o improprio; trasportare l’umidificatore nel luogo di installazione prima di rimuoverlo dall’imballo, afferrando il collo da sotto; aprire la scatola di cartone, togliere i distanziali di materiale antiurto e sfilare l’umidificatore, mantenendolo sempre in posizione verticale. Modelli UE025…UE065 X 1.4 Posizione a parete • l’unità è progettata per un montaggio a parete con una portata staffa sufficiente per sopportare il peso in condizioni operative (vedi il par. successivo “Fissaggio a parete”). I modelli UE025...UE065 possono essere posizionati a pavimento; • pergarantire una corretta distribuzione del vapore, posizionare l’umificatore vicino al punto di distribuzione del vapore; • posizionare l’umidificatore in piano orizzontale, osservando gli spazi minimi (vedi Fig. 1.b) per consentire le operazioni necessarie di manutenzione. Fig. 1.c 7 “Wellness” +030220571 - rel. 3.2 - 09.04.2009 assistenza 1.5 Fissaggio a parete ITA Modelli UE025…UE065: Distanze delle forature a parete Modelli UE001…UE018 Modelli UE025…UE065 X X = installatore = = 1 = 4 Y Y = = 3 Z 2 Fig. 1.d utente distanze (mm) X Y Z UE001…UE018 270 360 - Modelli UE025…UE045 310 655 250 UE045*…UE065 400 730 315 Fig. 1.f 1. 2. 3. 4. * solo modelli con tensione 230 Vac 1.6 Rimozione del cofano frontale rimuovere le viti sul tetto dell’umidificatore utilizzando un cacciavite; afferrare il cofano dall’alto sollevandolo per circa 200 mm; rimuovere il cofano sfilandolo in avanti; rimuovere la pellicola protettiva (su tutte le superfici esterne dell’umidificatore). assistenza Modelli UE001…UE018: 1.7 Montaggio del cofano frontale Modelli UE001…UE018: 1 2 5 1 3 4 4 3 2 Fig. 1.e 1. ruotare la targhetta ovale con il logo CAREL e scoprire la testa della vite di messa a terra; 2. allentare la vite con un cacciavite; 3. afferrare il cofano ai lati, sollevarlo di circa 200 mm, e sganciarlo dai Fig. 1.g 1. ruotare la targhetta rossa ovale con il logo CAREL fino a scoprire il bordi in rilievo dell’umidificatore; foro di fissaggio sottostante; 4. rimuovere il cofano sfilandolo in avanti; 5. rimuovere la pellicola protettiva. 2. calzare il cofano sul telaio (tenendolo in posizione leggermente rialzata e obliqua) fino a battuta dei bordi sullo schienale; 3. fissare con un cacciavite la vite di messa a terra, assicurando il serraggio; 4. ruotare la targhetta rossa ovale con il logo CAREL fino a coprire il foro di fissaggio. “Wellness” +030220571 - rel. 3.2 - 09.04.2009 8 ITA Modelli UE025…UE065: 1.8 Componenti ed accessori Aperto l’imballo e tolto il cofano fontale dell’umificatore verificare la presenza di: installatore 2 1 kit cod. 98C565P009 composto da connettori per la scheda elettronica kit cod. 98C565P012 composto da connettore con etichetta e pressacavo per il collegamento dei cavi utenze (luce, ventilatori, essenze e pompa di sanificazione) filtro cod. 98C565P016 per elettrovalvola di carico kit cod. 98C565P018 composto da connettori per morsetti contatto pulito solo nei modelli UE025… UE065: cod. FWHDCV0000 valvola di non ritorno con tubo di collegamento utente kit di viti con tasselli per il montaggio a parete; Fig. 1.h 1. calzare il cofano sul telaio (tenendolo in posizione leggermente rialzata e obliqua) fino a battuta dei bordi sullo schienale; 2. fissare con un cacciavite le viti sul tetto dell’umidificatore. Fig. 1.i solo nei modelli UE025… UE065: tubo in plastica angolare (collegamento acqua di drenaggio). 9 “Wellness” +030220571 - rel. 3.2 - 09.04.2009 assistenza Attenzione: nei modelli UE025…UE065 aprire il vano elettrico dell’umidificatore tramite la serratura con impronta a taglio. ITA 2. COLLEGAMENTI IDRAULICI installatore Attenzione: prima di procedere togliere l’alimentazione elettrica. Modelli UE001…UE018 Modelli UE025…UE065 4 2 1 2 3 utente 1 3 7 4 4 5 5 6 assistenza 6 Fig. 2.a Collegamenti idraulici: 1. installare una valvola manuale a monte dell’impianto (per poter assicurare l’interruzione dell’acqua di alimentazione); 2. collegare l’umidificatore all’acqua di alimentazione, e applicare il filtro in dotazione (cod. 98C565P016) all’ingresso dell’elettrovalvola di carico. Nei modelli UE001...UE 0018 utilizzare un tubo flessibile con gli attacchi da 3/4’’G (vedi par. “10.2 Caratteristiche tecniche” pag. 37, tubo flessibile CAREL compatibile: cod. FWH3415000). Nei modelli UE025... UE065 collegare il tubo flessibile con la valvola di non ritorno in dotazione (cod. FWHDCV0000), per evitare che l’acqua all’interno dell’umidificatore non entri a contatto con quella di rete; 3. installare un filtro meccanico per trattenere eventuali impurità solide (da collegare a valle del rubinetto); 4 allacciare un tratto di tubo elettricamente non conduttivo per il drenaggio (resistente a temperature di 100 °C e con un diametro interno minimo di 40 mm); 5 predisporre un imbuto per garantire l’interruzione di continuità nella tubatura di drenaggio; 6 collegare un sifone per evitare ritorno di odori (diametro interno minimo 40 mm); 7 nei i modelli UE025...UE065: collegare un tubo di scarico dalla vasca di fondo dell’umidificatore (può confluire nell’imbuto utilizzato per il drenaggio). Attenzione: ad installazione ultimata spurgare la tubazione di alimentazione per circa 30 minuti convogliando l’acqua direttamente nello scarico senza introdurla nell’umidificatore. Ciò per eliminare eventuali scorie e sostanze di lavorazione, che potrebbero intasare la valvola di carico e provocare schiuma durante l’ebollizione dell’acqua. Predisposizioni per i collegamenti idraulici: Modelli UE001…UE018 Modelli UE025…UE065 Legenda: A. B. C. A B B A C Fig. 2.b “Wellness” +030220571 - rel. 3.2 - 09.04.2009 10 ingresso acqua di alimentazione uscita acqua di drenaggio uscita acqua drenaggio vasca di fondo (solo modelli UE025…UE065) ITA 2.1 Acqua di alimentazione Attività ioni idrogeno (pH) Conducibilità specifica a 20 °C (σR, 20 °C) Solidi totali disciolti (cR) Residuo fisso a 180 °C (R180) Durezza totale (TH) Durezza temporanea Ferro + Manganese Cloruri Silice Cloro residuo Solfato di Calcio Impurità metalliche Solventi, diluenti, detersivi, lubrificanti unità di misura μS/cm acque acque a basso normali contenuto di sali min. max. min. max. 7 8,5 7 8,5 350 1250 125 350 mg/l (1) mg/l (1) mg/l CaCO3 100 (2) mg/l CaCO3 60 (3) mg/l Fe+Mn = ppm Cl = = mg/l SiO2 mg/l Cl= mg/l CaSO4 = mg/l 0 mg/l 0 (1) (1) 400 300 0,2 30 20 0,2 100 0 0 (1) (1) 50 (2) 30 (3) = = = = = 0 0 (1) (1) 160 100 0,2 20 20 0,2 60 0 0 utente caratteristiche acqua di alimentazione installatore Utilizzare solo acqua di acquedotto con: • pressione compresa tra 0.1 e 0.8 MPa (1 e 8 bar), temperatura compresa tra 1 e 40 °C e portata istantanea non inferiore a quella nominale dell’elettrovalvola di alimentazione, la connessione è di tipo G3/4M (vedi par. “10.2 Caratteristiche tecniche” pag. 37); • durezza non superiore a 40 °fH (pari a 400 ppm come CaCO3), intervallo di conducibilità: 125...1250 μS/cm; • assenza di composti organici. Tab. 3.a (1) assistenza = valori dipendenti dalla conducibilità specifica; in genere: CR ≅0,65 * σR, 20 °C; R180 ≅0,93 * σR, 20 °C (2) = non inferiore al 200% del contenuto di cloruri in mg/l CL (3) = non inferiore al 300% del contenuto di cloruri in mg/l CL Non esiste alcuna relazione attendibile tra durezza e conducibilità dell’acqua Attenzione: • non effettuare trattamenti dell’acqua con addolcitori, possono causare la formazione di schiuma, compromettendo il funzionamento della macchina; • non aggiungere sostanze disinfettanti o composti anticorrosivi nell’acqua, poiché potenzialmente irritanti; • è sconsigliato l’uso d’acqua di pozzo, industriale oppure prelevata da circuiti di raffreddamento e, in generale, di acqua potenzialmente inquinata (chimicamente o batteriologicamente). 2.2 Acqua di drenaggio • contiene le stesse sostanze disciolte nell’acqua di alimentazione, ma in quantità maggiori; • può raggiungere 100 °C di temperatura; • non è tossica e può essere drenata nel sistema di raccolta delle acque bianche. 11 “Wellness” +030220571 - rel. 3.2 - 09.04.2009 ITA utente installatore 3. DISTRIBUZIONE DEL VAPORE Per una corretta diffusione del vapore è indispensabile l’uso di un distributore di vapore proporzionato alla potenzialità dell’umidificatore. Inoltre, è importante posizionare il distributore in una zona del bagno turco facilmente raggiungibile dalle condotte dell’umidificatore (vedi Fig. 3.a come esempio di impianto). 3.1 Distributori CAREL a getto (SDPOEM00**) Possono essere montati in asse orizzontale o verticale (foro verso l’alto). Vedi par. “10.4” pag. 38 per i modelli di distributori compatibili con gli umidificatori. Istruzione per il montaggio (vedi Fig.3.b): • praticare sulla parete una serie di fori secondo la dima di foratura del distributore; • inserire il distributore; • fissare la flangia con 4 viti. 50 A B Y 3 X 2 dimens 4 31,5 100 6 5 X D C B Y 8 °2 assistenza X A 57,5 31,5 50 1 50 31,5 31,5 Fig. 3.a 7 Fig. 3.c A Legenda: C 1 2 3 4 5 6 7 8 B B A Fig. 3.b Legenda: A. ingresso vapore B. drenaggio condensa C. uscita vapore. le dimensioni del foro variano a seconda dei modelli di distribuore: modello SDPOEM0000: foro da praticare manualmente, fino 30 mm di diametro); modello SDPOEM0012: diametro del foro 12 mm; modello SDPOEM0022: diametro del foro 22 mm. D dima di foratura supporto di fissaggio a forma di “L” (dove previsto) guarnizione della flangia ingresso vapore (ØA) scarico condensa (ØB) vite di fissaggio (vedi foglio di istruzione in dotazione con il distributore) lunghezza (a seconda dei modelli di distributore, vedi par. “10.5” pag. 38) l’inclinazione (circa 2°) per lo scarico della condensa. diametro del foro su parete (ØY) Dimensioni in mm ØA ØB ØY Ø X Nota: se si usano tubi di condotta vapore con diametro interno di 30 mm asportare il tratto di ingresso del vapore di 22 mm. DP***D22R0 22 10 58 35 68 distributori CAREL lineari DP***D30R0 DP***D40R0 30 40 10 10 68 89 45 60 77 99 Tab. 3.a Attenzione: 1. montare il distributore leggermente inclinato (almeno 2°, per evitare il ritorno di condensa); 2. il supporto di fissaggio a forma di “L” (vedi particolare 1 Fig. 3.c) è 3.2 Distributori CAREL lineari (DP***DR0) fornito con i distributori di vapore modelli da DP085* a DP025*. Per lunghezze inferiori il supporto può essere fornito come optional (cod. 18C478A088). Possono essere montati in asse orizzontale. Vedi par. “10.5” pag. 38 per i modelli di distributori compatibili con gli umidificatori. Istruzione per il montaggio (vedi Fig.3.c): • praticare sulla parete una serie di fori secondo la dima di foratura del distributore (presente nell’imballo del distributore); • inserire il distributore con i fori del vapore verso l’alto; • fissare la flangia con 4 viti. “Wellness” +030220571 - rel. 3.2 - 09.04.2009 3.3 Tubo di condotta vapore • utilizzare tubi flessibili CAREL (max. 4 m di lunghezza, vedi par. “10.3” pag. 37). Tubi non flessibili possono rompersi e causare perdite di vapore; • evitare la formazione di sacche o di sifoni (causa di condensa); • evitare strozzature del tubo per effetto di curvature brusche o di attorcigliamenti. • fissare con fascette metalliche le estremità del tubo alle connessioni dell’umidificatore e del distributore di vapore affinché non si sfilino per effetto della temperatura. 12 ITA 3.4 Tubo di drenaggio condensa installatore Durante il funzionamento dell’umidificatore parte del vapore può condensare, causando perdite di efficienza e rumorosità (sotto forma di gorgoglii). Per scaricare questi accumuli collegare alla base del distribuotore un tubo di drenaggio con un sifone e una pendenza minima di 5° (vedi Fig. 3.d). Tubi CAREL di drenaggio condensa: cod. 1312353APG Attenzione: il sifone del tubo di drenaggio condensa l’umidificatore deve essere riempito con acqua prima di avviamento. utente Esempio di corretta e sbagliata installazione del tubo di condotta vapore e di drenaggio condensa: NO assistenza SI NO NO Fig. 3.d Verifiche finali i tubi di uscita del vapore sono diretti verso l’alto ed il distributore ha una pendenza di almeno 2° verso l’alto (vedi Fig. 3.c); le estremità del tubo sono assicurate agli attacchi con fascette metalliche; le curve della tubazione sono abbastanza ampie (raggio > 300 mm) da non causare pieghe o strozzature; nel percorso della tubazione del vapore non sono presenti sacche di accumulo per la condensa; i percorsi delle tubazioni del vapore e della condensa sono conformi a quanto descritto in questo capitolo (vedi Fig. 3.d); la lunghezza del tubo del vapore non è superiore a 4 metri; le pendenze della tubazione del vapore sono sufficienti per un corretto trascinamento della condensa (> 20° per i tratti in salita, > 5° per i tratti discendenti); la pendenza della tubazione della condensa è almeno pari a 5° in ogni punto; il tubo della condensa è provvisto di sifone (riempito d’acqua prima dell’avviamento) per evitare la fuoriuscita di vapore. 13 “Wellness” +030220571 - rel. 3.2 - 09.04.2009 ITA 4.1 Predisposizioni passaggio dei cavi elettrici 4.2 Collegamento cavo di alimentazione elettrica Modelli Monofase Modelli UE001…UE018 Modelli Trifase am iSte humness ll We AP1 AP2 GND am iSte humness ll We interno macchina, vista dall’alto AP1 AP2 GND esterno macchina, vista da sotto utente installatore 4. COLLEGAMENTI ELETTRICI L N L1 L2 L3 Fig. 4.c (vista interno macchina, vano elettrico) Attenzione: collegare il cavo giallo-verde alla presa di terra (GND). Fig. 4.a Modelli UE025…UE065 esterno macchina, vista laterale assistenza 4.3 Collegamento sonde di temperatura (M2.1- M2.8) • l’umidificatore può essere collegato fino a due sonde per misurare e regolare la temperatura all’interno del bagno turco. Il collegamento con due sonde permette una misurazione “mediata” della temperatura (con possibilità di attribuire un “peso” diverso per ogni sonda, vedi par. “7.3 Sonde di temperatura”, pag. 21); • è possibile collegare sonde attive (forniscono un segnale in tensione o in corrente, modello CAREL: ASET030001), o sonde NTC (resistenza variabile). 1 Per il collegamento utilizzare il kit di connessione “a otto vie” (fornito nell’imballo) e far uscire i cavi dall’umidificatore attraverso il “passacavo” (Figg. 4.a o 4.b). 3 2 Collegamenti sonde attive CAREL: Fig. 4.b Legenda Figg. 4.a e 4.b: 1. 2. 3. ingresso cavo di alimentazione elettrica; ingresso (previa foratura della parte plastica) cavi utenze: pompa di sanificazione, essenze, ventilatori, luce. ingresso cavi sonde. Nei modelli UE001...UE018 staccare la “linguetta” di plastica ed utilizzarla come ferma cavo (bloccandola sulle sedi tramite viti pre-installate). M.2 M.7 M.8 M.2.1 M.2.2 M.2.3 M2.4 M.2.5 M.2.6 M.2.7 M.2.8 OUT T GND +G OUT T GND +G 3 1 2 Fig. 4.d (particolare scheda elettronica, vano elettrico dell’umidificatore) “Wellness” +030220571 - rel. 3.2 - 09.04.2009 14 ITA Collegamenti sonde NTC CAREL: M.7 M.8 M.2.1 M.2.2 M.2.3 M2.4 M.2.5 M.2.6 M.2.7 M.2.8 4.5 Contatto allarme (M6.1 - M6.3) Predisposizione per la segnalazione a distanza della presenza di uno o più allarmi. NTC NTC 1 2 NC C NO F US NTC NTC 3 installatore M.2 Nota: in ambito industriale (CEI EN61000-6-2) i cavi che escono dalla macchina non devono superare i 30 m di lunghezza, ad eccezione della sonda ambiente, (morsetti M2 pin 1-2-3-4-5-6) dell’ingresso digitale ON/OFF remoto (morsetto M2 pin 7-8) e del cavo schermato per la comunicazione RS485. E M.5 M.6 utente Fig. 4.e (particolare scheda elettronica, vano elettrico dell’umidificatore) M.6.3 1 sonda CAREL 1 2 sonda CAREL 2 (se disponibile) 3 ON/OFF remoto (contatto chiuso= umidificatore abilitato; contatto aperto= umidificatore disabilitato, in standby) M.6.2 M.6.1 Legenda Figg. 4.d e 4.e: Fig. 4.g (particolare scheda utenze, vano elettrico dell’umidificatore) Caratteristiche elettriche: 250 Vac; Imax: 2 A resistivi 2 A induttivi. 4.6 Collegamento utenze (luce, ventilatori, sanificazione, essenze) Configurazione ingresso sonde (connettori pin strip JS5, JS6) L’umidificatore dispone di una morsettiera per collegare le utenze collocata sotto la scheda elettronica (vedi figura di seguito per i collegamenti). M.2 A seconda del tipo di connessione, è possibile ottenere la tensione desiderata su tutte le uscite delle utenze (12 V, 24 V, 230 V o contatto pulito). P1+ G P1- P2- F P2+ P3- PS E P3+ D VE- C PS L- B VI+ L+ A VI- JS5 VE+ JS6 Fig. 4.f (particolare scheda elettronica, nel vano elettrico dell’umidificatore) pin strip configurazioni 0…10 Vdc 2...10Vdc JS5 posizioni 0...1 Vdc, 4…20/0…20 mA, sonde NTC Fig. 4.h (particolare scheda utenze, vano elettrico dell’umidificatore) sonda 1 Legenda: A B C D E F G configurazione base JS6 sonda 2 configurazione base Attenzione: • per evitare sbilanciamenti di regolazione collegare elettricamente la luce (L+ L-); ventilatore immissione (VI+ VI-); ventilatore estrazione (VE+ VE-); pompa sanificazione (PS PS); pompa essenza 3 (P3+ P3-); pompa essenza 2(P2+ P2-); pompa essenza 1 (P1+ P1-). massa delle sonde (o dei regolatori esterni) alla massa del controllore dell’umidificatore; • per il funzionamento dell’umidificatore collegare i morsetti M2.7 e M2.8 all “ON/OFF remoto” attraverso un contatto di abilitazione oppure attraverso un ponticello (soluzione standard, default). Se i morsetti non sono collegati, tutti i dispositivi interni ed esterni pilotati dal controllore vengono disabilitati, con l’eccezione della pompa di scarico limitatamente allo scarico per inattività prolungata. 15 “Wellness” +030220571 - rel. 3.2 - 09.04.2009 assistenza Nota: in corrispondenza delle morsettiere di rinvio (allarme, utenze varie) è necessario utilizzare fascette per evitare eventuali disconnessioni di cavi. Se si utilizzano sonde diverse da quelle CAREL indicate, verificare: • segnale in tensione 0…1 Vdc, 0…10 Vdc, 2…10 Vdc, morsetto M2.1 (GND: M2.2); • segnale in corrente: 4…20, 0…20 mA, morsetto M2.4 (GND: M2.6). Inoltre, a seconda del tipo di alimentazione: • +15 V, morsetto M2.3; • + 1 Vdc 135 ohm, morsetto M2.4. ITA ♦ “Utenze alimentate con tensioni diverse” L’umidificatore attiva ma non alimenta le utenze. Questa modalità consente di alimentare le utenze esternamente e con tensioni diverse. installatore Tipi di connessione utenze ♦ “Utenze alimentate con la stessa tensione” L’umidificatore alimenta e attiva con la stessa tensione le utenze collegate. Questa modalità si ottiene applicando ai morsetti AP1 e AP2 un’alimentazione da 12 V, 24 V o 230 V. Procedura: 1. rimuovere la morsettiera estraibile (composta da 2 pezzi) dal connettore B e sconnettere i cavi L, N; Inserire la morsettiera in dotazione (cod.98C565P018) sul connettore B e ricollegare i cavi L (morsetto 1) e N (morsetto 8); 2. ponticellare i morsetti AP1 e AP2; 3. inserire la morsettiera in dotazione (cod. 98C565P012) nel connettore A e collegare le utenze (vedi Fig. seguente). Procedura: inserire la morsettiera in dotazione (cod. 98C565P012) nel connettore A e collegare le utenze (vedi Fig. seguente). Nota: • carico massimo per ogni utenza: 2 A; • AP1 e AP2 sono protetti da fusibili da 6.3 A. Nota: • carico massimo per ogni utenza: 2 A; • AP1 e AP2 sono protetti da fusibili da 6.3 A; • le utenze devono essere protette adeguatamente da sovraccarico e B from pCOe P3P 3+ P1P 1+ P2P 2+ PS PS VE V E+ VIVI+ L L+ A to pCOe B from pCOe 14 13 12 11 10 9 8 7 6 5 4 3 2 1 P3P 3+ P1P 1+ P2P 2+ PS PS VE V E+ VIVI+ L L+ assistenza 14 13 12 11 10 9 8 7 6 5 4 3 2 1 12/24/230 Vac Imax= 6 A AP1 AP2 A AP1 AP2 utente corto circuito. 3 2 to pCOe 1 external power supply Fig. 4.i Fig. 4.j Verifiche finali la tensione nominale dell’umidificatore corrisponde a quella di targa; i fusibili installati sono adeguati alla linea ed alla tensione di alimentazione; è stato installato un sezionatore di linea per poter interrompere la tensione nell’umidificatore; l’umidificatore è stato connesso a terra correttamente; il cavo di alimentazione di potenza è fissato al fermacavo antistrappo; i morsetti M2.7 e M2.8 sono ponticellati o collegati ad un contatto di abilitazione al funzionamento; se si usano sonde non CAREL: la massa delle sonde è collegata elettricamente a quella della scheda dell’umidificatore; se l’umidificatore è pilotato da un regolatore esterno, la massa del segnale è collegata elettricamente alla massa del controllo. “Wellness” +030220571 - rel. 3.2 - 09.04.2009 16 ITA 5.1 Terminale display remoto 5.2 Collegamento rete GSM (invio SMS) Il terminale display può essere staccato dall’umificatore e spostato in un altro luogo. A seconda della distanza che si desidera raggiungere è necessario munirsi di: • fino 50 metri: cavo telefonico a 6 vie e due ferriti (cod. 0907858AXX) (vedi Fig. 5.a); • fino 200 metri: due schede CAREL TCONN6J000, cavi telefonici a 6 vie e un cavo AWG20-22 schermato a 3 coppie ritorte (per collegamento delle due schede, Fig. 5.b). L’umidificatore può essere configurato per inviare messaggi SMS di allarmi e malfunzionamenti (vedi par. “7.10”, pag. 25). humiSteam Wellness J19 2b 1 Nota: per riempire lo spazio lasciato vuoto dal terminale display sul telaio dell’umidificatore utilizzare Kit CAREL cod. HCTREW0000. 2c 2a MODEM 3 utente Collegamento remoto del terminale fino a max 50 m humiSteam Wellness 2 1 2d J18 2 3 installatore 5. TERMINALE REMOTO, MODEM PER GSM E RETE DI SUPERVISIONE Fig. 5.c (interno umificatore, vano elettrico) Legenda: 2 Fig. 5.a • • • • Legenda: 1 2 3 scheda elettronica PCOI00MDM0 (da collegare sul connettore J19 della scheda dell’umidificatore) kit GSM CAREL PLW0P65M00, composto da: cavo telefonico (fino a 50 m di distanza); due ferriti (cod. 0907858AXX) da applicare agli estremi del cavo telefonico; terminale display remoto. 3 2.a modem 2.b antenna (con calamita alla base) 2.c cavo seriale 2.d alimentatore SIM card da inserire nel modem. Assicurarsi che non sia attivata la password di accesso (PIN number) Collegamento remoto del terminale fino a 200 m 5.3 Rete di supervisione (J19) humiSteam Wellness 1 L’umidificatore può essere collegato alle seguenti schede opzionali: J18 2 SC A J14 C B J15 1 2 3 1 2 3 schede opzionali caratteristiche supportati PCOS004850 permette l’interfacciamento diretto del controllore ad una rete RS485 protocolli CAREL, modbus® PCO10000F0 permette l’interfacciamento del controllore ad una rete LON in FTT10 dopo opportuna programmazione permette la comunicazione tramite BACnet 8802.3 Ethernet, BACnet/IP e MS/TP permette la comunicazione tramite BACnet MS/TP via porta RS485 LON-Echelon permette l’interfacciamento diretto del controllore in RS232 con un modem esterno CAREL per collegamenti remoti 3 4 PCO1000WB0 2 SC A J14 C 5 B PCO1000BA0 J15 1 2 3 1 2 3 3 PCO100MDM0 Fig. 5.b Legenda: 1 2 3 4 5 cavo telefonico (fino a 0,8 m di distanza); scheda CAREL TCONN6J000; pin strip J14 e J15 in posizione 1-2 (alimentazione elettrica disponibile sui connettori telefonici A, B e C e a vite SC); cavo AWG20-22 schermato a 3 coppie ritorte per spostare il terminale display fino a 200 m. Collegamento con la scheda TCONN6J00: morsetto SC funzione 0 TERRA (calza) 1 +VRL 2 GND 3 RX/TX4 RX/TX+ 5 GND 6 +VRL terminale display remoto Winload BACnet BACnet J19 M.2 M.7 M.8 Fig. 5.d (particolare scheda elettronica, vano elettrico dell’umidificatore) Attenzione: per le connessioni tLAN e pLAN in ambito domestico (CEI EN 55014-1) e residenziale (CEI EN 61000-6-3) utilizzare cavo schermato (con schermo connesso a GND). Questa avvertenza si applica anche per i cavi che escono dalla macchina. 17 “Wellness” +030220571 - rel. 3.2 - 09.04.2009 assistenza 1 ITA 6. AVVIO E INTERFACCIA UTENTE installatore Prima di avviare l’umidificatore verificare: Maschera “Semplice” collegamenti idraulici: Fig. 2.a pag. 10. In caso di perdite d’acqua non avviare l’umidificatore prima di aver ripristinato il problema; distribuzione del vapore: Fig. 3.d pag. 13; collegamenti elettrici cap. “4” pag. 14. 1 2 3 4 6.1 Avvio 5 1 1 Fig. 6.b ON Legenda: simbolo 0 utente 2 funzione giorno e mese temperatura impostata come set point (può essere modificata con i tasti UP o DOWN) 3 temperatura interna al bagno turco (rilevata dalla/e sonda/e) 4 ora e minuti 5 fasce orarie impostate (quando lampeggia indica che una fascia oraria è in corso) 6 luce accesa all’interno del bagno turco Essenza (es. Mint) essenza abilitata (erogata quando l’umidificatore produce vapore) 1 2 se il cilindro è nuovo svolgere un prelavaggio (il cilindro viene riempito e svuotato per tre volte, pulendo le pareti interne da impurità, vedi par. “7.12” pag. 25). 6.2 Spegnimento 1 6 svuotare l’acqua presente nel cilindro per evitare ristagni (scarico manuale dalla maschera “Accesso rapido di ON/OFF” vedi pagina successiva, o par. “7.15” pag. 27); 2 1 assistenza 0 OFF Maschera “Principale” 1 6.3 Interfaccia utente 2 8 1 4 2 5 3 6 7 6 5 3 4 Fig. 6.c Legenda: simbolo funzione temperatura impostata come set point (può essere modificata con i tasti UP o DOWN) 2 temperatura interna al bagno turco (rilevata dalla/e sonda/e) 3 luce accesa all’interno del bagno turco 4 fasce orarie impostate (quando lampeggia indica che una fascia oraria è in corso) 5 produzione di vapore (senza “nuvola” produzione di vapore in stand-by) 6 ventilatore di immissione (ventiliatore 1) in funzione 7 ventilatore di estrazione (ventiliatore 2) in funzione 8 quando in movimento indica il funzionamento dei ventilatori, quando fermo indica ventilatori abilitati ma in stand-by Essenza (es. Mint) essenza abilitata (erogata quando l’umidificatore produce vapore) Dalla maschera “Principale” è possibile accedere alle maschere: • tasto ENTER: “Accesso rapido ON/OFF” • tasto PRG: “Menù di configurazione”. 1 Fig. 6.a Legenda tastiera: tasto funzione elenco allarmi attivi 1 allarme accesso alla maschera di “Menù di gestione” 2 PRG 3 4 5 ESC UP ENTER 6 DOWN (password = 77) ritornare alla maschera “Semplice” o “Principale” incrementare il valore di set point dalla maschera “Principale”: accesso alla maschera “Accesso rapido ON/OFF” dalla maschera “Semplice”: selezione tipo di essenza ENTER e PRG: spostarsi dalla maschera “Semplice” a quella “Principale” (e viceversa). diminuire il valore di set point L’umidificatore produce vapore quando la temperatura registrata (visualizzata al centro maschera con caratteri grandi) è inferiore quella di set point (in alto con caratteri più piccoli). Set point: soglia di temperatura massima al di sopra della quale l’umidificatore non produce più vapore (può essere modificato con i tasti UP e DOWN). Per visualizzare la temperatura interna al bagno turco e il valore di set point sono disponibili due tipi di maschere: • “Semplice”: con possibilità di modificare set point e tipo di essenze; • “Principale”: con possibilità di modificare set point, tipo di essenze e accesso alle maschere “Accesso rapido ON/OFF” e “Menù di gestione”. “Wellness” +030220571 - rel. 3.2 - 09.04.2009 18 ITA Maschera “Allarmi” Fig. 6.d Permette di: • abilitare la produzione di vapore (ON) e attivare la funzione scarico manuale(**); • selezionare il tipo di essenza (1, 2, 3); • abilitare la sanificazione (ON); • accendere la luce (ON/OFF/AUTO)(*). Fig. 6.e Indica la presenza di un allarme, premere per visualizzare. Maschera “Menù di gestione” (*) In modalità AUTO la luce è accesa se tutte le abilitazioni alla produzione di vapore (abilitazione da tastiera, contatto remoto o BMS) sono attive. Se sono abilitate le fasce orarie, la luce rimane accesa (se tutte le abilitazioni sono attive) solo nel periodo di funzionamento ON delle fasce orarie (vedi par 7.5). NOTA: la luce viene gestita dal controllo solo se la funzione viene abilitata. Per abilitare la luce dal sottomenu “Manutenzione hardware” premere: • ENTER per confermare; • DOWN fino a visualizzare la maschera “altre opzioni” • ENTER per posizionare il cursore sul valore del parametro “abilita luce” (SI/NO); • UP o DOWN per abilitare la luce (SI); • ESC più volte per tornare alla maschera principale Fig. 6.f Per accedere premere: • PRG dalla maschera “Principale”; • ENTER per posizionare il cursore sullo “0” ; • UP o DOWN per inserire la password “77”; • ENTER per confermare ed entrare nei sotto-menù di gestione: 1. Utente ; 2. Essenza ; 3. Gestione ventilatori ; 4. Manutenzione (info , software , hardware ); 5. Sanificazione ; 6. Storico allarmi ; 7. Network ; 8. GSM . (**) Scarico manuale dell’acqua presente nel cilindro: • accedere alla maschera di “Accesso rapido ON/OFF”, • posizionare il cursore su “vapore”; • premere contemporaneamente per qualche secondo i tasti UP e DOWN. La stessa procedura può essere ripetura per fermare lo scarico in atto. Il menù di gestione, i sotto-menù e le maschere sono circolari, e ripercorrono il percorso anche in senso opposto. Attenzione: • la maschera “Accesso rapido ON/OFF” visualizza solo le funzioni abilitate in fase di configurazione. • con produzione di vapore disabilitata (OFF) è possibile abilitare manualmente i ventilatori di immissione e estrazione; • se l’umidificatore è abilitato ma non produce, verificare le seguenti possibili cause: soluzioni la temperatura del bagno turco è superiore a quella di set point attendere che la temperatura del bagno scenda sotto il livello di set point verificare l’errore e provvedere alla risoluzione (vedi par. “7.13” pag. 26) disattivare la procedura manuale (sotto-menù par. “7.12”, vedi pag. 25) disabilitare la fascia oraria (vedi par. “7.5“ pag. 22), o modificare secondo le esigenze. Tab. 6.a sono presenti allarmi che bloccano la produzione di vapore (tasto ALLARME lampeggiante). L’umidificare è impostato in “procedura manuale” sono attive fasce orarie di funzionamento (icona CLOCK lampeggiante sul display); 19 “Wellness” +030220571 - rel. 3.2 - 09.04.2009 assistenza utente Funzione tasti: • ENTER : spostare il cursore all’interno della maschera; • UP o DOWN: abilitare/disabilitare. possibili cause installatore Maschera “Accesso rapido ON/OFF” ITA Utilizzo della tastiera nel menù di gestione 6.4 Menù di Gestione installatore 1 Utente 2 Essenze 3 Ventilatori 4 Manutenzione Orologio Programmi Programma (*) Prog. Sett. (*) T. set point (*) Abilita descrizioni (i) Essenza 1 (*) Essenza 2 (*) Essenza 3 (*) V. Immissione (*) V. Estrazione (*) 1 Manutenzione Info utente 2 Manutenzione Software assistenza 3 Manutenzione Hardware 5 Sanificazione 6 Storico Allarmi 7 Network 8 Gsm (*) Sanific. (*) Sanific. Fase 1 Sanific. Fase 2 Storico (**) Supervisione Sms 1 (*) Sms 2 (*) (**) tasto allarme PRG ESC UP e DOWN ENTER Uscite SW (**) Valori Nom. (**) Cilindro Stato (**) Sys info (**) Funzioni Speciali Funzioni Speciali Disabilita Svuotamento Soglia conducibiltà Parametri regolazione Sw Input/output Backup Recupero Setup Essenze Essenze Ventilatori Sonda Temperatura 1 Sonda Temperatura 1 Altre Opzioni Procedura Man. Proc. manuale Procedura manuale (*) Per ripristinare un allarme in corso premere nuovamente il tasto ALLARME. Attenzione: prima di premere il tasto ESC premere il tasto ENTER per salvare l’ultima modifica svolta. (**) Promemoria a cura dell’installatore Nomi scelti per le essenze Essenza 1: …………………………………. Essenza 2: …………………………………. Essenza 3: …………………………………. (*) (*) Tab. 6.b (*) (**) maschere presenti se le funzioni (programmi, essenze ventilatori, manutenzione, sanificazione, Network, Gsm) sono state abilitate. Per esempio: le maschere del sotto-menù “ventilatori” sono visibili solo se abilitate attraverso il sotto-menù “Manutenzione hardware”; valori di sola lettura. “Wellness” +030220571 - rel. 3.2 - 09.04.2009 funzione accesso alla maschera allarmi con visualizzazione dell’allarme in corso se presente (il tasto lampeggia)(*) dalla maschera “Principale”: accesso al menù di gestione ritornare alla maschera precedente(**) • nel “menù di gestione”: navigare in maniera circolare nei sotto-menù, maschere, parametri (ripercorrendo il tragitto anche in senso opposto) • all’interno di una maschera: modificare i valori dei parametri (YES/NO, ON/OFF, range di temperatura,…) • selezionare un sotto-menù, maschere, parametri • salvare le modifiche dei parametri e posizionare il cursore sul parametro successivo 20 ITA 7.1 Lingua l’umidificatore svolge internamente il seguente calcolo: Il terminale display può essere configurato in: italiano, francese, spagnolo, inglese, tedesco. Tm= (Ts1*W1/100) + (Ts2*W2/100) Tm= temperatura visualizzata sul display Ts1 e Ts2= temperatura rilevate dalle due sonde W1 e W2= pesi attribuite alle due sonde, valore percentuale (W1+W2=100) Per modificare la lingua, premere dalla maschera “Principale”: • PRG; • ENTER; • UP o DOWN per inserire password “77”; • ENTER; • DOWN (3 volte) fino a visualizzare il sotto-menù “Manutenzione”; • ENTER; • DOWN (1 volta) fino a visualizzare il sotto-menù “Manutenzione Software”; • ENTER; • DOWN (5 volte) fino a visualizzare maschera “Sw Input/output”; • ENTER (2 volte) per posizionare il cursore sul parametro “lingua”; • UP o DOWN per modificare la lingua; • ENTER per confermare la lingua selezionata e tornare alla maschera “Principale”. installatore 7. CONFIGURAZIONI PRINCIPALI Per esempio, con i seguenti valori: Ts1= 42° W1= 60% Ts2= 44° W2= 40% Tm= (42*60/100) + (44*40/100)= 42,8 °C Le essenze vengono erogate nel bagno turco quando l’umidificatore è in produzione e la temperatura raggiunge il 70% del valore di set point. Per esempio: con set point 50°C l’essenza verrà erogata quando l’umidificatore è in produzione e la temperatura misurata supera 35°C. Nota: all’interno della maschera “Sw Input/output” è possibile scegliere anche il tipo di unità di misura °C-Kg/h (valore preimpostato, default) o °F-lbs/hr. utente 7.4 Essenze Attenzione: assicurarsi che la pompa esterna delle essenze sia correttamente collegata. Abilitazione essenze 7.2 Data e ora 7.3 Sonde di temperatura L’umidificatore può gestire fino a due sonde di temperatura: • con una sonda, il valore registrato viene direttamente visualizzato sul display; • con due sonde, i valori registrati vengono “mediati” attraverso un calcolo interno dell’umidificatore, e il risultato visualizzato sul display (**). Attraverso la maschera “Sonda temperatura” (sotto-menù “Manutenzione hardware”) è possibile impostare percentualmente la rilevanza di una sonda rispetto l’altra (parametro “pesi sonde”). Inoltre, per ogni sonda è possibile impostare minimo e massimo di scala e valore di offset. Impostazione tempi funzionamento delle essenze Dal sotto-menù “Essenze” premere: • ENTER per selezionale maschera “Essenza 1”; • ENTER per confermare e posizionare il cursore sul parametro “Tempo ON”; • UP o DOWN per modificare i secondi di funzionamento (ON) dell’essenza 1; • ENTER per confermare e posizionare il cursore sul parametro “Tempo OFF”; • UP o DOWN per modificare i secondi di non funzionamento (OFF) dell’essenza 1; • ENTER per confermare e posizionare il cursore sul parametro “nome”; • UP o DOWN per modificare il nome dell’essenza, es.: Mentolo (*); • ripetere la stessa procedura (tempi di ON, OFF e nome essenza) per le altre essenze abilitate; • al termine premere ESC più volte per tornare alla maschera “Principale”. Impostazione sonde sonda 1 Dal sotto-menù “Manutenzione hardware ” premere: sonda 2 assistenza Dal sotto-menù “Manutenzione Hardware” premere: • ENTER per confermare; • DOWN per selezionale maschera “Essenze” (essenze 1 e 2); • ENTER per confermare; • UP o DOWN per abilitate (SI) essenza 1; • ENTER per confermare; • UP o DOWN per abilitate (SI) essenza 2; • ENTER per confermare; • DOWN per selezionale maschera “Essenze” (essenza 3); • ENTER per confermare; • UP o DOWN per abilitate (SI) uscita essenza 3; • ENTER per confermare; • ESC 2 volte per tornare al menù di gestione. Per impostare data e ora accedere al sotto-menù “Utente” e premere: • ENTER per visualizzare la maschera “orologio”; • ENTER per spostare il cursore sulla prima cifra dell’ora; • UP o DOWN per modificare la prima cifra dell’ora; • ENTER confermare e spostare il cursore sulla seconda cifra dell’ora; • proseguire con i tasti UP/DOWN e ENTER per impostare minuti, giorno (numero), mese, anno, giorno (dal lunedì alla domenica); • ENTER per confermare • DOWN fino alla maschera “Sonda di temperatura 1” • ENTER per confermare e spostare il cursore sul parametro “tipo di sonda” • UP o DOWN per selezionare il tipo di sonda (*) • ENTER per salvare e spostare il cursore su “abilita sonda 2”; • UP o DOWN per abilitare la seconda sonda (SI); • ENTER per spostare il cursore su “pesi sonde” (**) (UP e DOWN per modificare i pesi delle 2 sonde e ENTER per salvare e spostare il cursore); • ENTER per ritornare ad inizio maschera; • DOWN per accedere alla maschera “Sonda di temperatura 1”; • ENTER per spostare il cursore sui valori min. e max. scala e offset (UP e DOWN per modificare il valore e ENTER per salvare e spostare il cursore); • ESC fino a visualizzare la maschera “Principale”. (*) Caratteri e simboli per nominare le essenze: A M Y + B N Z - C O 0 * D P 1 : E Q 2 ; F R 3 , G S 4 ( H T 5 ) I U 6 / J V 7 # K W 8 L X 9 Funzione tasti: • UP o DOWN per modificare i caratteri; • ENTER per salvare e spostare il cursore sul carattere successivo. È possibile utilizzare fino 10 caratteri. Riportare i nomi delle essenze nello spazio “Promemoria a cura dell’installatore” pag. 20. (*) Sonde configurabili: NTC, 0…1 V, 2…10 V, 0…10 V, 0…20 mA, 4…20 mA, 0…135 ohm, 135…1000 ohm (**) per ottenere un valore di temperatura misurato con due sonde, 21 “Wellness” +030220571 - rel. 3.2 - 09.04.2009 ITA • ENTER fino a spostare il cursore ad inizio maschera; • DOWN per accedere alla maschera successiva “Prog. Sett.”: all’interno di installatore Si possono impostare fino a tre essenze, selezionabili attraverso la maschera “Accesso rapido di ON/OFF” o la maschera “Semplice”. Sul display appare il nome o numero dell’essenza scelta. questa maschera è possibile assegnare il tipo di fascia oraria (P1, P2, P3, P4) ad ogni giorno della settimana. Utilizzare tasti ENTER per spostare il cursore e UP o DOWN per modificare il valore; • ESC più volte per tornare alla maschera “Principale”. 7.5 Fasce Orarie Impostano l’accensione/spegnimento e la variazione del set point dell’umidificatore secondo orari e giorni stabiliti. E’ possibile scegliere due tipi di fasce di programmazione: Sul display compare il simbolo orarie entrano in vigore). Impostazione fasce set point variabile “Programmi Temp.”: 1. Fasce giornaliere (parametri “Programmi ON/OFF”): impostano nell’arco di 24h quante volte abilitare o disabilitare la produzione di vapore: Dal sotto-menù “Utente” premere: • ENTER per confermare; • DOWN fino ad accedere alla maschera “Programmi”; • ENTER (2 volte) per confermare e spostare il cursore su “programmi temp.”; • UP o DOWN per abilitate (SI) il parametro “programmi temp.”; • ENTER per tornare ad inizio maschera; • DOWN fino ad accedere alla maschera “T. Set point”: all’interno di questa maschera è possibile personalizzare fino quattro valori di set point all’interno di una giornata (Z1, Z2, Z3, Z4). Utilizzare tasti ENTER per spostare il cursore e UP o DOWN per modificare il valore; • ESC più volte per tornare alla maschera “Principale”. • 2 periodi di funzionamento giornalieri (parametri P1-1 e P1-2) OFF utente 0 ON OFF ON P1-1 OFF 24h P1-2 • 1 periodo di funzionamento giornaliero (parametro P2) OFF ON 0 OFF 24h P2 (che lampeggerà quando le fasce • Umidificatore abilitato per tutto il giorno (parametro P3) ON 0 Sul display compare il simbolo entrano in vigore). 24h (che lampeggerà quando le fasce • Umidificatore NON abilitato per tutto il giorno (parametro P4) OFF assistenza 0 7.6 Ventilatori 24h L’utilizzo dei ventilatori di immissione ed estrazione permettono di: • garantire un ricambio d’aria; • effettuare i cicli di sanificazione; • creare “l’effetto nebbia”. E’ possibile associare le modalità di funzionamento (P1, P2, P3, P4) ad ogni giorno della settimana (dal lunedì alla domenica). 2. Fasce “Set point variabile” (parametri “Programmi Temp.”): 4 diversi set point di temperatura che variano all’interno di una giornata (parametri Z1, Z2, Z3, Z4). Abilitazione dei ventilatori Dal sotto-menù “Manutenzione Hardware” premere: • ENTER per confermare • DOWN fino ad accedere alla maschera “Ventilatori” • ENTER per posizionare il cursore su “v. immissione” • UP o DOWN per abilitare (SI) il ventilatore di immissione • ENTER per posizionare il cursore su v. estrazione • UP o DOWN per abilitare (SI) il ventilatore di estrazione • ESC più volte per tornare alla maschera “Principale” 50°C 30°C 20°C 0 24h Z1 Z2 Z3 Z4 Configurando le fasce orarie “giornaliere” e di “set point variabile” é possibile programmare la produzione di vapore secondo le esigenze del gestore del bagno turco (es. rispettando i turni di chiusura) e con un andamento della temperatura personalizzato (disponendo di 4 soglie di set point). Sul display compare il simbolo in funzione). in caso di ventilatori Modalità manuale ventilatori La gestione manuale dei ventilatori, attraverso la maschera “Accesso rapido di ON/OFF”, è disponibile solo se la produzione di vapore è disabilitata (OFF). L’accensione manuale dei ventilatori durante la produzione di vapore è regolata esclusivamente attraverso il menù di gestione. Nota: • durante la fascia oraria di non funzionamento (detta “OFF”) l’umidificatore NON è spento, ma temporaneamente disabilitato alla produzione di vapore, anche da impostazione manuale; • le fasce orarie “giornaliere” hanno priorità rispetto quelle di “set point variabile”. Per esempio, impostando P4 di lunedì (bagno turco chiuso) i parametri Z1, Z2, Z3, Z4 (diversi valori di set point) non verranno rispettati, perchè l’umidificatore, in quel giorno non è programmato a funzionare. In questa modalità i ventilatori possono essere accesi attraverso la maschera “Accesso rapido ON/OFF” (ENTER dalla maschera “Principale”), fermando la produzione di vapore (vapore OFF). Con la produzione di vapore ON verranno fermati automaticamente. Per accendere e spegnere i ventilatori attraverso il menù di gestione (vapore ON) premere dal sotto-menù “Ventilatori”: Impostazione fasce giornaliere (“Programmi ON/OFF”): • ENTER per confermare ed accedere alla maschera V. Immissione e/o V. Dal sotto-menù “Utente” premere: • ENTER per confermare; • DOWN fino a visualizzare la maschera “Programmi”; • ENTER per confermare e spostare il cursore sul parametro “programmi ON/OFF”; • UP o DOWN per abilitare (SI) le fasce giornaliere; • ENTER (2 volte) per tornare ad inizio maschera; • DOWN per accedere alla maschera “Programma”: per impostare l’ora di inizio e di fine fascia giornaliera (P1-1, P1-2 e P2). Utilizzare tasti: ENTER per spostare il cursore e UP o DOWN per modificare il valore; “Wellness” +030220571 - rel. 3.2 - 09.04.2009 (affiancato da Estrazione (a seconda del ventilatore abilitato); ENTER posizionare il cursore in Modo (manuale/automatico); UP o DOWN per impostare “Manuale”; ENTER posizionare il cursore in Produzione (ON/OFF); UP o DOWN per impostare “ON”; ENTER per confermare; UP o DOWN per ripetere la stessa operazione nell’altro ventilatore (se abilitato); • ESC più volte per tornare alla maschera “Principale”. • • • • • • 22 ITA Il funzionamento dei ventilatori è vincolato alla produzione di vapore: si accendono e si spengono solamente da menù di gestione (impostando produzione “OFF” nella maschera dei ventilatori). La modalità automatica dei ventilatori cambia a seconda che siano attivate o meno le fasce orarie di funzionamento. Modalità automatica secondo programmi: ventilatore di immissione Dal sotto-menù “Ventilatori” premere: • ENTER per confermare ed accedere alla maschera “V. Immissione”; • ENTER posizionare il cursore in “Modo” (manuale/automatico); • UP o DOWN per impostare “Automatico”; • ENTER posizionare il cursore in “Tipo” (setpoint/programmi); • UP o DOWN per impostare “Programmi”; • ENTER per confermare; • ESC più volte per tornare alla maschera “Principale”. Il ventilatore si accende nelle fasce orarie abilitate alla produzione di vapore Se le fasce orarie non sono attivate sarà selezionabile solo il modo di funzionamento “Automatico Set point”. Se invece le fasce orarie sono abilitate si può scegliere tra modalità “Automatico Set point” o “Automatico programmi”. Modo di funzionamento Automatico secondo Set point (o periodico per il solo v. di estrazione) Varia a seconda del tipo di ventilatore: • v. immissione: il ventilatore si spegne raggiunto il valore del set point (è collegato alla produzione di vapore); • v. estrazione: il ventilatore si accende raggiunto il valore del set point, oppure dopo un tempo prestabilito (funzionamento periodico, indipendente dalla produzione di vapore). Modalità automatica secondo programmi: ventilatore di estrazione Dal sotto-menù “Ventilatori” premere: • ENTER per confermare e DOWN per accedere alla maschera V. Estrazione; • ENTER per posizionare il cursore in “Modo” (manuale/automatico); • UP o DOWN per impostare “Automatico”; • ENTER per confermare e muovere il cursore su “tipo” (setpoint/ periodico/programmi);; • UP o DOWN per scegliere la modalità automatica “Programmi”; • ESC più volte per tornare alla maschera “Principale”. Il ventilatore si accende nelle fasce orarie abilitate alla produzione di vapore Modalità automatica secondo Set point: ventilatore di immissione Dal sotto-menù “Ventilatori” premere: • ENTER per confermare ed accedere alla maschera “V. Immissione”; • ENTER posizionare il cursore in “Modo” (manuale/automatico); • UP o DOWN per impostare “Automatico”; • ENTER posizionare il cursore in “Tipo” (set point/programmi); • UP o DOWN per impostare “Set point”; • ENTER per confermare; • ESC più volte per tornare alla maschera “Principale”. 7.7 Sanificazione Il ciclo di sanificazione consente di attivare alternativamente i due ventilatori: • fase T1 ventilatore di immissione; • fase T2 ventilatore di estrazione. Il ventilatore si accende fino al raggiungimento del set point di temperatura (è collegato alla produzione di vapore). Modalità automatica secondo set point o periodico: ventilatore di estrazione Dal sotto-menù “Ventilatori” premere: • ENTER per confermare e DOWN per accedere alla maschera V. Estrazione; • ENTER per posizionare il cursore in “Modo” (manuale/automatico); • UP o DOWN per impostare “Automatico”; • ENTER per confermare e muovere il cursore su “tipo” (setpoint/ periodico/programmi); • UP o DOWN per scegliere la modalità automatica “Set point/ Periodico”(*); • ESC più volte per tornare alla maschera “Principale”. Durante il funzionamento di ventilatori possibile attivare la produzione del vapore e la pompa di sanificazione (per l’erogazione del liquido disinfettante). L’attivazione del ciclo di sanificazione può essere manuale (attraverso la maschera “Accesso rapido di ON/OFF) o automatica (al termine dell’ultima fasca oraria di produzione di vapore). Nota: La modalità automatica è disponibile solo con fasce orarie abilitate Attenzione: prima di impostare il ciclo di sanificazione assicurarsi che la pompa/elettrovalvola esterna - utilizzata per iniettare il prodotto disinfettante nel tubo di vapore - sia correttamente collegata. (*) Set point: Il ventilatore si accende quando è raggiunto il set point temperatura e si è fermata la produzione di vapore. Periodico: Il ventilatore si accende e si spegne dopo un periodo di funzionamento (nella maschera “V. estrazione” impostare tempo di ON e tempo di OFF). Questa modalità non è collegata alla produzione di vapore o al raggiungimento del set point. Abilitazione sanificazione Dal sotto-menù “Manutenzione” premere: • ENTER per confermare; • DOWN per selezionale menù “Manutenzione Hardware”; • ENTER per confermare; • DOWN fino a selezionale maschera “Altre opzioni”; • ENTER per confermare e posizionare il cursore su “abilita sanificazione”; • UP o DOWN per abilitate (SI); • ENTER per confermare; • ESC più volte per tornare alla maschera “Principale”. Per accendere e spegnere i ventilatori attraverso la maschera “Accesso rapido di ON/OFF” (vapore OFF) premere dal sotto-menù “Ventilatori”: • ENTER per confermare ed accedere alla maschera V. Immissione e/o V. Estrazione (a seconda del ventilatore abilitato); • ENTER posizionare il cursore in “Modo” (manuale/automatico); • UP o DOWN per impostare “Manuale”; • ENTER per posizionare il cursore in Produzione (ON/OFF); • UP o DOWN per impostare “OFF”; • ENTER per confermare; • UP o DOWN per ripetere la stessa operazione nell’altro ventilatore (se abilitato); • ESC più volte per tornare alla maschera “Principale”. Modalità manuale sanificazione Dal sotto-menù “sanificazione” premere: • ENTER per confermare ed entrare nella maschera “Sanificazione”; • UP o DOWN per abilitare la sanificazione manuale; • ESC più volte per tornare alla maschera “Principale”, oppure ESC 2 volte per tornare al menù di gestione per impostare tempi e modalità del ciclo di sanificazione. 23 “Wellness” +030220571 - rel. 3.2 - 09.04.2009 utente Modalità automatica ventilatori assistenza Entrambe i ventilatori vengono accesi nelle fasce orarie in cui l’umidificatore è abilitato alla produzione di vapore. Tutte le condizioni di abilitazione devono essere verificate: • umidificatore è abilitato da tastiera • abilitazione remota (da supervisore o contatto remoto chiuso) • fascia oraria nel periodo di funzionamento ON (vedi par 7.5) installatore Modo di funzionamento Automatico Programmi utente installatore ITA • ENTER fino a posizionare il cursore sull’ultimo parametro “Scarico Modalità automatica sanificazione E’ disponibile solo con fasce orarie abilitate. Permette di attivare i cicli di sanificazione a “fine giornata”, ovvero al termine dell’ultima fascia oraria di produzione di vapore. Dal sotto-menù “sanificazione” premere: • ENTER per confermare ed entrare nella maschera “sanificazione”; • UP o DOWN per abilitare la sanificazione automatica; • ESC più volte per tornare alla maschera “Principale”, oppure ESC 2 volte per tornare al menù di gestione per impostare tempi e modalità del ciclo di sanificazione. periodico”; • UP o DOWN per impostare le ore di intervallo tra uno scarico e l’altro (default 24 h); • ESC più volte per tornare alla maschera “Principale”. Scarico senza tensione L’evaporazione dell’acqua favorisce l’accumulo di sali minerali all’interno del cilindro, causando un aumento della conducibilità interna. L’umidificatore esegue automaticamente brevi scarichi dell’acqua (scarichi per diluizione) per abbassare la conducibilità. Durante lo scarico il teleruttore viene aperto per evitare il percorso di acqua in tensione (e in questo breve periodo la produzione di vapore viene momentaneamente interrotta). Per mantenere chiuso il teleruttore durante lo scarico, dal sotto-menù “Manutenzione software” premere: • ENTER per entrare nella maschera “Funzioni speciali”; • ENTER fino a posizionare il cursore sul parametro “Scarico senza tensione”; • UP o DOWN per disabilitare (NO) o riabilitare (YES, default) la funzione; • ESC più volte per tornare alla maschera “Principale”. Impostazione tempi e fasi di sanificazione Dal sotto-menù “Sanificazione” premere: • ENTER per entrare nella maschera “Sanificazione”; • ENTER fino ai valori T1 e T2; • UP o DOWN per impostare i minuti di durata dei cicli; • ENTER fino a posizionare il cursore ad inizio maschera; • DOWN per accedere alla maschera “Sanific. Fase 1” (T1); • ENTER per abilitare le funzioni desiderate (con il tasti UP o DOWN) e premere ENTER per spostare il cursore nel parametro successivo; • ENTER fino a posizionare il cursore ad inizio maschera; • DOWN per accedere alla maschera “Sanific. Fase 2” (T2), e impostare il secondo ciclo di sanificazione ; • ESC più volte per tornare alla maschera “Principale”. Disabilitazione allarmi “Cilindro in via di esaurimento” e “Cilindro esaurito” Per disabilitare la segnalazione di questi due allarmi, premere: • ENTER per entrare nella maschera “Funzioni speciali”; • ENTER fino a posizionare il cursore sul parametro “Pre-all. cilindro”; • UP o DOWN per disabilitare (NO) o riabilitare (YES, default) la funzione; • ENTER per confermare; • ESC più volte per tornare alla maschera “Principale”. assistenza 7.8 Impostazioni avanzate (solo personale qualificato) Attenzione: queste impostazioni vanno effettuate esclusivamente da personale qualificato, utilizzi impropri potrebbero causare gravi danni. Scarico automatico dell’acqua Funzione “ritardo fermo vapore” Scarico per riduzione di set point L’umidificatore svuota una piccola parte d’acqua se c’è una richiesta di produzione di vapore inferiore del 33% rispetto quella precedente. Con meno acqua il cilindro raggiungerà più velocemente il nuovo set point di produzione vapore. Per disabilitare questa funzione, dal menù “Manutenzione software” premere: • ENTER per entrare nella maschera “Funzioni speciali”; • ENTER per posizionare il cursore sul parametro “Scarico per riduzione set point”; • UP o DOWN per disabilitate (NO) o riabilitare (YES, default) la funzione; • ENTER per confermare; • ESC più volte per tornare alla maschera “Principale”. Permette di posticipare l’interruzione di produzione vapore dopo una richiesta di arresto di vapore. Per impostare il tempo di ritardo (massimo 120 secondi), dal sotto-menù “Manutenzione software” premere: • ENTER fino ad accedere alla seconda maschera “Funzioni speciali”; • ENTER fino a posizionare il cursore sul parametro “tempo spegnimento” (default: 0 s); • UP o DOWN per impostare il tempo di ritardo per lo sperimento; • ENTER per confermare; • ESC più volte per tornare alla maschera “Principale”. Scarico per inattività In caso di prolungato inutilizzo dell’umidificatore è opportuno programmare lo scarico automatico dell’acqua presente nel cilindro, per evitare ristagni e rischi igienici. Per impostare questa funzione, dal sotto-menù “Manutenzione software” premere: • ENTER per entrare nella maschera “Funzioni speciali”; • ENTER fino a posizionare il cursore sul parametro “Scarico inattività”; • UP o DOWN per abilitare (YES, default) disabilitare (NO) la funzione; • ENTER fino a posizionare il cursore ad inizio maschera; • DOWN per accedere alla seconda maschera “Funzioni speciali”; • ENTER per posizionare il cursore sul parametro “Scarico inattività” ; • UP o DOWN per modificare il numero di giorni di non produzione di vapore dopo i quali si effettua lo scarico automatico (default 3 giorni); • ENTER per confermare ; • ESC più volte per tornare alla maschera “Principale”. Scarico periodico (in caso di acqua ricca di residui) L’utilizzo di acqua ricca di sostanze come humus, limo, detriti può compromettere efficienza e funzionamento dell’umidificatore. In questi casi si consiglia di impostare uno scarico automatico e periodico del cilindro al fine di non accumulare residui. Per impostare automaticamente lo scarico periodico, dal sotto-menù “Manutenzione software” premere: • ENTER per entrare nella maschera “Funzioni speciali”; • ENTER fino a posizionare il cursore sul parametro “Scarico periodico”; • UP o DOWN per abilitare (YES) disabilitare (NO, default) la funzione; Conducibilità forzata Per abilitare la conducibilità forzata, dal sotto-menù “Manutenzione software” premere: • ENTER per entrare nella seconda maschera “Funzioni speciali”; • ENTER fino a posizionare il cursore sul parametro “conducibilità forzata”; • UP o DOWN per impostare il valore di conducibilità (fino 2000 μS/ cm); • ENTER per confermare; • ESC più volte per tornare alla maschera “Principale”. “Wellness” +030220571 - rel. 3.2 - 09.04.2009 Conducibilità dell’acqua di alimentazione Allarmi alta conducibilità Per determinare le soglie di allarme alta conducibilità, dal menù “Manutenzione software” premere: • ENTER fino maschera “Soglia conducibilità”; • ENTER fino a posizionare il cursore sul parametro “Pre-allarme” (1.000 μS/cm); • UP o DOWN per impostare il valore di pre-allarme conducibilità (solo segnalazione); • ENTER per confermare e impostare il valore di allarme conducibilità (1.250 μS/cm; segnalazione e stop produzione vapore); • ENTER per confermare; • ESC più volte per tornare alla maschera “Principale”. 24 ITA 7.10 GSM (invio SMS in caso di allarme) Nota Gli allarmi non si attivano se la conducibilità forzata è abilitata. Durata e frequenza dello scarico per diluizione In base al tipo di acqua utilizzata è possibile impostare percentualmente la durata e la frequenza dello scarico automatico rispetto il valore nominale per diluizione. Dal sotto-menù “Manutenzione software” premere: • ENTER fino maschera “Soglia conducibilità”; • ENTER fino a posizionare il cursore sul parametro “Scarico dil.” (default 100%); • UP o DOWN per impostare la percentuale di durata; • ENTER per confermare e impostare la percentuale di frequenza tra uno scarico e l’altro (default: 100%); • ENTER per confermare; • ESC più volte per tornare alla maschera “Principale”. Attenzione: per inviare SMS è necessario dotare l’umidificatore della scheda elettronica PCO100MDM0, del kit modem GSM PLW0PGSM00 e di una scheda SIM da inserire nel modem (per l’installazione vedi par. “5.2” pag. 17). Esempio di SMS: “CAREL SPA STEAM BATH Nuovo allarme attivo Cilindro1 pieno 16:15 28/ 6/ 7(*) CAREL – humiSteam codice applicativo ....................... e versione .........................” installatore Impostando la funzione GSM in caso di allarme l’umidificatore invia un SMS (short message service) ad al numero di telefono cellulare configurato. 7.9 Copia delle impostazioni (back-up) Abilitazione invio SMS Dal sotto-menù “network”: • ENTER per visualizzare la maschera “Supervisore”; • ENTER per posizionare il cursore sul parametro “Numero identificativo per rete BMS”; • UP o DOWN per impostare il numero identificativo (*) (default: 1); • ENTER per confermare e spostare il cursore sul parametro “Baud rate”; • UP o DOWN per impostare il valore di baud rate (per gli SMS 9600BPS); • ENTER per confermare e spostare il cursore sul parametro “Protocollo”; • UP o DOWN per selezionare il protocollo GSM; • ENTER per confermare; • ESC più volte per tornare alla maschera “Principale”. Permette di salvare una copia delle impostazioni configurate (es.: nomi essenze, funzionamento ventilatori, impostazione fasce orarie,...). La copia salvata potrà essere ripristinata in caso di necessità, per esempio quando si commettono errori nelle impostazioni. Si raccomanda di salvare una copia delle impostazioni al termine di ogni configurazione che si desidera mantenere. Creare una copia delle impostazioni Dal sotto-menù “Manutenzione software” premere: • ENTER per confermare; • DOWN fino a visualizzare la maschera “Back-up”; • ENTER per posizionare il cursore sul SI/NO; • UP o DOWN per impostare SI; • ENTER per confermare; • ESC più volte per tornare alla maschera “Principale”. Impostazione invio SMS Dal sotto-menù “GSM” • ENTER per visualizzare la maschera “SMS”; • ENTER per posizionare il cursore sul parametro “Testo nella maschera”; • UP o DOWN per impostare il testo (vedi “Caratteri e simboli per nominare le essenze” pag. 21); • ENTER per impostare il numero di telefono cellulare (**); • DOWN per posizionare il cursore sulla maschera successiva “SMS”, dove è possibile visualizzare la percentuale di campo del segnale GSM e lo stato del modem; • ESC più volte per tornare alla maschera “Principale” Ripristinare l’ultima copia Dal sotto-menù “Manutenzione software” premere: • ENTER per confermare; • DOWN fino a visualizzare la maschera “Ripristino”; • ENTER per posizionare il cursore sul SI/NO; • UP o DOWN per impostare SI; • ENTER per confermare. • ESC più volte per tornare alla maschera “Principale”. Attenzione: Tutte le modifiche sucessive all’ultima copia salvata verranno annullate. (*) Attraverso questo parametro è possibile associare un numero identificativo ad ogni umidificatore. Questa funzione è necessaria per identificare ogni unità all’interno di una rete di supervisione. (**) • • • • Attenzione: utilizzare solo caratteri numerici; disabilitare il codice PIN dalla scheda SIM; non è possibile inviare messaggi diversi dal formato SMS; l’invio di SMS è soggetto a tariffe e condizioni dell’operatore della scheda SIM utilizzata. CAREL declina ogni responsabilità per mancati invii e ricezioni di SMS. 25 “Wellness” +030220571 - rel. 3.2 - 09.04.2009 assistenza Ora/data (e formato) corrispondono quelle dell’umidificatore Attenzione: l’umidificatore dispone di una sola linea (baude rate e protocollo). Abilitando l’invio di SMS non è più possibile creare una rete di supervisione (e viceversa). utente (*) ITA installatore 7.11 Abilitazione network di supervisione Dal sotto-menù “network”: • ENTER per visualizzare la maschera “Supervisore”; • ENTER per posizionare il cursore sul parametro “Numero identificativo per rete BMS”; • UP o DOWN per impostare il numero identificativo per ogni unità (*); • ENTER per confermare e spostare il cursore sul parametro “Baud rate”; • UP o DOWN per impostare il valore di baud rate relativo alla propria rete; • ENTER per confermare e spostare il cursore sul parametro “Protocollo”; • UP o DOWN per selezionare il tipo di protocollo; • ENTER per confermare; • ESC più volte per tornare alla maschera “Principale”. (*) utente Per esempio se si desidera collegare tre umidificatori ad una rete di supervisione è necessario associare un numero identificativo per ogni unità. Il PC di Supervisione riconoscerà i tre umidificatori attraverso il numero identificativo. ON/OFF da supervisore Per abilitare l’ ON/OFF dell’umidificatore da supervisore, dal sotto-menù “Network” premere: • ENTER per posizionare il cursore sul valore del parametro “Abilita ON/ OFF da supervisore” (SI/NO); • UP o DOWN per abilitare l’ON/OFF da supervisore (SI); • ESC più volte per tornare alla maschera “Principale”. assistenza 7.12 Procedura manuale (solo personale qualificato) Attenzione: questa procedura va effettuata esclusivamente da personale qualificato, utilizzi impropri potrebbero causare gravi danni. Permette di testare manualmente le principali funzioni ed utilizzi dell’umidificatore. Per abilitare la procedura manuale l’umidificatore non deve produrre vapore (impostare vapore OFF dalla maschera “Accesso rapido di ON/ OFF” ). Accedere alla procedura manuale: Dalla maschera “Manutenzione hardware” premere: • ENTER per confermare; • DOWN per selezionale maschera “Procedura Man.” ; • ENTER per confermare e posizionare il cursore sull’abilitazione della procedura (YES/NO); • UP o DOWN per abilitare (YES); • ENTER per confermare e posizionare il cursore su “contattore”; • UP o DOWN per testare il contattore (ON) e al termine del test UP o DOWN per disabilitare (OFF). Ripetere la stessa procedura per le altre funzioni che si dersidera testare (disposte in tre maschere consecutive); • al termine dei test ritornare alla prima maschera “Procedura Man.” e disabilitare la procedura (da YES a NO). L’umidificatore tornerà a funzionare normalmente; • ESC più volte per tornare alla maschera “Principale”. Funzioni di procedura manuale (distribuite in tre maschere consecutive): Contattore Carico Scarico Allarme Luce Reset contattore Ventilatore immissione Ventilatore emissione Essenza 1,2,3 Sanificazione Scarico cilindro (**) prelavaggio cilindro (**) (**) Maschera 1 Maschera 2 Maschera 3 Ripristino automatico dell’umidificatore al termine del test. “Wellness” +030220571 - rel. 3.2 - 09.04.2009 26 ITA 7.13 Visualizzazione allarmi Allarme: EP Bassa Produzione (cilindro OFF) Allarme: EF Mancanza acqua (cilindro OFF) eccessiva riduzione di produzione vapore, Provvedere alla manutenzione del clindro oppure eccessiva presenza di schiuma nel cilindro. manuale mancanza acqua nel cilindro automatico (procedura automatica rientro acqua) attivo stop produzione vapore manuale attivo stop produzione vapore Spegnere l’umidificatore sconnettendolo dalla rete elettrica, quindi verificare i collegamenti elettrici. manuale attivo stop produzione vapore 1. verificare il funzionamento dell’elettropompa di scarico; 2. verificare la tenuta dell’elettrovalvola di carico quando non è alimentata; scaricare parte dell’acqua e riavviare. manuale attivo stop produzione vapore attivo stop produzione vapore Allarme: Ed malfunzionamento dello scarico Allarme scarico (Cilindro OFF) Allarme: EL Bassa Corrente (Cilindro OFF) potenza elettrica non disponibile; produzione vapore abilitata ma non funzionante Allarme: EH Alta probabile guasto agli elettrodi o acqua Corrente temporaneamente troppo conduttiva (Cilindro OFF) (specialmente al riavvio dopo un breve arresto) soluzione reset 1. controllare che il tubo di alimentazione e i tubi interni non siano ostruiti o piegati, e che vi sia sufficiente pressione (0.1...0.8 MPa, 1…8 bar); 2. verificare il funzionamento dell’elettrovalvola di alimentazione; 3. verificare che tubo di mandata vapore non sia sottoposto a eccessiva contropressione, impedendo l’afflusso d’acqua nel cilindro per gravità; 4. verificare che il tubo di mandata vapore non sia strozzato o che non vi siano sacche di deposito condensa controllare i circuiti idraulici di scarico e il buon funzionamento dell’elettropompa di scarico relè conseguenza allarme attivo stop produzione vapore Allarme: EC Alta alta conducibilità acqua di alimentazione 1. verificare la soglia limite impostata; manuale conducibilità 2. spegnere la macchina e pulire gli elettrodi; se il problema (Cilindro OFF) persiste, cambiare l’origine dell’acqua d’alimentazione oppure inserire un idoneo sistema di trattamento (demineralizzazione parziale). Nota: il problema non può essere risolto con l’addolcimento dell’acqua d’alimentazione Pre-allarme: pre-allarme: alta conducibilità acqua di 1. verificare la conducibilità dell’acqua d’alimentazione se automatico Ec Alta alimentazione necessario inserire un idoneo sistema di trattamento conducibilità dell’acqua (demineralizzazione parziale). Nota: il problema non può essere risolto con l’addolcimento dell’acqua d’alimentazione automatico Allarme: E= pre-allarme: alta temperatura verificare il funzionamento della sonda ed il parametro di Alta Temp. alta temperatura non attivo solo segnalaz. non attivo solo segnalaz. Allarme: E_ Bassa Temp. pre-allarme: bassa temperatura verificare il funzionamento della sonda ed il parametro di bassa temperatura automatico non attivo solo segnalaz. Allarme: E3 Sonda 1 rotta o non connessa Allarme: E4 Sonda 2 rotta o non connessa Pre-allarme: EA Schiuma cilindro allarme 1° sonda sconnessa o danneggiata verificare il collegamento della sonda, ed il tipo di sonda selezionata nella maschera: “tipo di sonda” (sotto-menù “manutenzione hardware”) verificare il collegamento della sonda, ed il tipo di sonda selezionata nella maschera: “tipo di sonda” (sotto-menù “manutenzione hardware”) la formazione di schiuma è generalmente dovuta a presenza nell’acqua di tensioattivi (lubrificanti, solventi, detergenti, agenti di trattamento dell’acqua, addolcimento) o a eccessiva concentrazione di sali disciolti: 1. spurgare le linee d’alimentazione dell’acqua; 2. pulire il cilindro verificare la presenza di un addolcitore (in tal caso, utiizzare un altro tipo di acqua o ridurre l’addolcimento). effettuare la manutenzione e/o sostituire il cilindro automatico attivo automatico non attivo manuale non attivo stop produzione v stop produzione vapore solo segnalaz. manuale non attivo solo segnalaz. manuale attivo Stop produzione vapore allarme 2° sonda sconnessa sconnessa o danneggiata eccessiva schiuma nel cilindro in fase d’ebollizione Pre-allarme: CP preesaurimento cilindro pre-allarme: cilindro in via d’esaurimento Allarme: EU cilindro pieno (cilindro OFF) cilindro pieno con macchina ferma a macchina spenta: 1. verificare eventuali trafilature elettrovalvola di alimentazione o il ritorno condensa dalla condotta verificare la pulizia dei sensori di livello 27 “Wellness” +030220571 - rel. 3.2 - 09.04.2009 utente significato e causa assistenza allarme installatore Dal sotto-menù storico allarmi, premere ENTER per visualizzare gli allarmi (tipo di allarme, data e ora) L’umidificatore memorizza fino 200 allarmi. ITA utente installatore allarme significato e causa soluzione reset Pre-allarme: CL cilindro esaurito cilindro esaurito effettuare la manutenzione e/o sostituire il cilindro manuale Pre-allarme: CY Cilindro manutenzione consigliata manutenzione consigliata cilindro effettuare la manutenzione e/o sostituire il cilindro manuale (reset contatore) Allarme: Mn Cilindro manutenzione obbligatoria (cilindro OFF) manutenzione obbligata cilindro Sostituire il cilindro manuale (reset contatore) Allarme Scheda Errore Orologio Orologio batteria tampone completamente scarica oppure problemi generici all’orologio Allarme: scheda scheda utenze offline o guasta utenza 1 o 2 relè conseguenza allarme attivo stop produzione vapore non solo attivo segnalaz. attivo stop produzione vapore Controllo elettronico a microprocessore installato all’interno manuale della parte elettrica dell’umidificatore non attivo solo segnalaz. vapore - collegare la scheda mancante - disattivare funzioni utenze relative alla segnalazione di allarme attivo sola segnalaz. automatico Tab. 7.a Cilindro OFF= il cilindro non è in grado di produrre vapore assistenza Il tasto allarme consente effetture più azioni a seconda di quante volte viene premuto. Azione/Pressione Effetto tasto prima volta seconda volta terza volta quarta volta visualizzazione del codice di allarme; se sono presenti contemporaneamente più allarmi, la sequenza dei codici appare premendo UP o DOWN. se la causa di allarme è scomparsa, scompare la visulizzazione dell’allarme e il relativo relè si disattiva (se presente) se la causa di allarme è scomparsa, scompare la visulizzazione dell’allarme e il relativo relè si disattiva e sul display compare: 7.15 Scarico meccanico dell’acqua del cilindro ritorno alla maschera principale Tab. 7.b 7.14 Info-menù Scarico per gravità senza l’attivazione dell’umidificatore, consigliato in caso di: • umidificatore fuori servizio se è necessario svuotare il cilindro senza accendere l’umidificatore; • per eliminare il residuo d’acqua a seguito di uno scarico a mezzo di pompa. Serie di maschere che descrivono funzioni e utilità delle maschere del menù di gestione. Abilitando “info-menù” (di default è disabilitato), ogni accesso ai sottomenù sarà preceduto da una maschera descrittiva (per proseguire nella navigazione premere ENTER). Scarico meccanico: • assicurarsi che l’umidificatore non sia alimentato; • togliere il cofano (vedi par. “1.6” pag. 8); • azionare il dispositivo meccanico sotto il cilindro (vedi part. A Fig. 7.a). Modelli UE001…UE018 Abilitazione info-menù Dal sotto-menù “utenza” premere: • ENTER per confermare; • DOWN fino a visualizzare la maschera del parametro “abilita descrizioni info?” ; • ENTER per posizionare il cursore sul valore del parametro (SI/NO); • UP o DOWN per abilitare la funzione info-menù (SI); • ESC più volte per tornare alla maschera “Principale”; Modelli UE025…UE065 A A Fig. 7.a Altri tipi di scarico: • manuale (dalla maschera “Accesso rapido di ON/OFF, vedi pag. 19; e da procedura manuale, vedi par. “7.12” pag. 25); • automatico (vedi par. “Scarico automatico dell’acqua“pag. 23). “Wellness” +030220571 - rel. 3.2 - 09.04.2009 28 ITA 8. MANUTENZIONE E PARTI DI RICAMBIO 1 2 3 4 5 6 7 8 assistenza 9 10 11 12 13 14 15 16 17 18 vaschetta di carico kit tubi interni kit elettrovalvola di alimentazione cilindro collettore con pompa di scarico base in plastica cielo umidifcatore in plastica TAM (trasformatore amperometrico per la misurazione dell’intensità di corrente) trasformatore teleruttore base porta fusibili schede di espansione pCOe (espansione I/0 del controllo) controllo elettronico a microprocessore morsetti alimentazione morsettiera utenze base in plastica interruttore terminare con dispay a cristalli liquidi utente Legenda Figg. 8a e 8.b: installatore 8.1 Parti di ricambio modelli UE001…UE018 Fig. 8.a 7 8 9 10 11 12 13 14 15 16 17 18 Fig. 8.b 29 “Wellness” +030220571 - rel. 3.2 - 09.04.2009 ITA Tabella codici ricambio parte idraulica, elettrica ed elettronica UE001…018 UE001 UE003 UE005 posizione figura UE010 UE015 UE018 installatore utente Parte idraulica Vaschetta di carico + conduttimetro Kit elettrovalvola di alimentazione Kit tubi interni Base umidificatore in plastica Cielo umidificatore in plastica Collettore c/s assemblato + pompa Parte elettrica ed elettronica Terminale display TAM (trasformatore amperometrico) Contattore Trasformatore alimentazione: 230-400/24-24 V Controllo elettronico a microprocessore Scheda di espansione pCOe (espansione I/O del controllo) Base portafusibili F1 - F2 Fusibili alimentazione 230…400 Vac F4 Fusibile secondario trasformatore (F41) UEKVASC000 KITVC10006 UEKT10000S KITVC10011 UEKT10000M 18C565A019 18C476A011 18C565A018 HCT1EWF000 09C565A042 0203013AXX 09C565A016 HCA0EW0000 PCOE00TLN0 0203012AXX F5 - F6 Fusibile pCOe AP1 - AP2 Morsetto fusibile Cavo di collegamento tra terminale e controllo elettronico PF1 Fusibile controllo assistenza codice ricambio UE008 UE009 1 3 2 16 7 3 8.a 8.a 8.a e 8.c 8.b 8.b 8.a 11 8 8.b 8.b e 8.d 9 13 12 8.b e 8.d 8.b e 8.d 8.b 0606192AXX 0605321ALG 0605581AXX (F41) 0605620AXX (F42) 0605615AXX 0605595AXX S90CONN002 11 - 8.b e 8.d vedi schemi elettrici vedi schemi eletttrici - vedi schemi elettrici 0605604AXX - vedi schemi elettrici Tab. 8.a Tabella codici ricambio cilindri UE001…005 monofase, kit elettrodi e guarnizioni Modello Cilindri STANDARD non apribili Cilindri SPECIALI non apribili Cilindri SPECIALI apribili Kit elettrodi e guarnizioni 200/230 Vac 3~, conducibilità 350…1250 μS/cm 200/230 Vac 3~, conducibilità 125…350 μS/cm 200/230 Vac 3~, conducibilità 125…350 μS/cm 200/230 Vac 3~, conducibilità 350…1250 μS/cm 200/230 Vac 3~, conducibilità 125…350 μS/cm 200/230 Vac 3~, conducibilità 350…1250 μS/cm Kit guarnizioni elettrodi UE001 BL0S1F00H1 UE003 BL0S1F00H1 UE005 BL0S2F00H0 UE009 BL0S3F00H0 BL0S1E00H1 BLCS1E00W1 BLCS1F00W1 KITBLCS1E0 KITBLCS1F0 KITBLC1FG0 BL0S1E00H1 BLCS1E00W1 BLCS1F00W1 KITBLCS2E0 KITBLCS2F0 KITBLC2FG0 BL0S2E00H0 BLCS2E00W0 BLCS2F00W0 KITBLCS2E0 KITBLCS2F0 KITBLC2FG0 BL0S3E00H0 BLCS3E00W0 BLCS3F00W0 KITBLCS3E0 KITBLCS3F0 KITBLC3FG0 Tab. 8.b Tabella codici ricambio cilindri UE003…018 trifase, kit elettrodi e guarnizioni Modello Cilindri 200/230 VAC 3~, conducibilità 350…1250 STANDARD non μS/cm apribili 400 VAC 3~, conducibilità 350…750 μS/cm UE003 BL0T1B00H1 UE005 BL0T2B00H0 UE008 BL0T2B00H0 UE010 BL0T3B00H0 UE015 BL0T3A00H0 UE018 BL0T3B00H0 BL0T1C00H1 BL0T2C00H0 BL0T2C00H0 BL0T3C00H0 BL0T3B00H0 BL0T3B00H0 Cilindri SPECIALI 200/230 VAC 3~, conducibilità 125..350 μS/cm non apribili 400 VAC 3~, conducibilità 125…350 μS/cm 400 VAC 3~, conducibilità 750…1250 μS/cm Cilindri SPECIALI 200/230 VAC 3~, conducibilità 125..350 μS/cm apribili 400 VAC 3~, conducibilità 125…350 μS/cm 400 VAC 3~, conducibilità 350…750 μS/cm 400 VAC 3~, conducibilità 750…1250 μS/cm Kit elettrodi e Kit elettrodi 200/230 Vac 3~, 125/350 μS/cm guarnizioni Kit elettrodi 200/230 Vac 3~, 350/1250 μS/cm Kit elettrodi 400 Vac 3~, 125/350 μS/cm Kit elettrodi 400 Vac 3~, 350/750 μS/cm Kit elettrodi 400 Vac 3~, 750/1250 μS/cm Kit guarnizioni elettrodi BL0T1A00H1 BL0T1A00H1 BL0T1D00H1 BLCT1A00W1 BLCT1A00W1 BLCT1C00W1 BLCT1D00W1 KITBLCT1A0 KITBLCT1B0 KITBLCT1A0 KITBLCT1C0 KITBLCT1D0 KITBLC1FG0 BL0T2A00H1 BL0T2B00H0 BL0T2D00H0 BLCT2A00W1 BLCT2B00W0 BLCT2C00W0 BLCT2D00W0 KITBLCT2A0 KITBLCT2B0 KITBLCT2B0 KITBLCT2C0 KITBLCT2D0 KITBLC2FG0 BL0T2A00H1 BL0T2B00H0 BL0T2D00H0 BLCT2A00W1 BLCT2B00W0 BLCT2C00W0 BLCT2D00W0 KITBLCT2A0 KITBLCT2B0 KITBLCT2B0 KITBLCT2C0 KITBLCT2D0 KITBLC2FG0 BL0T3A00H1 BL0T3B00H0 BL0T3D00H0 BLCT3A00W1 BLCT3B00W0 BLCT3C00W0 BLCT3D00W0 KITBLCT3A0 KITBLCT3B0 KITBLCT3B0 KITBLCT3C0 KITBLCT3D0 KITBLC3FG0 BL0T3A00H1 BL0T3B00H0 BL0T3D00H0 BLCT3A00W1 BLCT3B00W0 BLCT3B00W0 BLCT3D00W0 KITBLCT3A0 KITBLCT3B0 KITBLCT3B0 KITBLCT3C0 KITBLCT3D0 KITBLC3FG0 BL0T3A00H1 BL0T3B00H0 BL0T3D00H0 BLCT3A00W1 BLCT3B00W0 BLCT3B00W0 BLCT3D00W0 KITBLCT3A0 KITBLCT3B0 KITBLCT3B0 KITBLCT3C0 KITBLCT3D0 KITBLC3FG0 Tab. 8.c “Wellness” +030220571 - rel. 3.2 - 09.04.2009 30 ITA 8.2 Parti di ricambio modelli UE025…UE065 9 10 11 12 13 14 15 16 17 18 19 1 7 2 3 circuito di drenaggio kit elettrovalvola di alimentazione kit tubi interni kit pompa di scarico collettore cilindro tubo pompa di scarico TAM (trasformatore amperometrico per la misurazione dell’intensità di corrente) teleruttore trasformatore schede di espansione pCOe (espansione I/0 del controllo) relè di comando pompa base portafusibili controllo elettronico a microprocessore morsetti alimentazione morsettiera utenza fermacavo interruttore terminale con display a cristalli liquidi (disposto sul cofano del vano elettrico) utente 1 2 3 4 5 6 7 8 6 installatore Legenda: 4 assistenza 5 Fig. 8.c 8 9 10 11 12 13 14 15 16 17 18 19 Fig. 8.d 31 “Wellness” +030220571 - rel. 3.2 - 09.04.2009 ITA Tabella codici ricambio parte idraulica, elettrica ed elettronica UE025…UE065 descrizione assistenza utente installatore UE025 Parte irdauilica Tubo pompa di scarico Collettore Kit pompa di scarico Kit tubi interni Kit double check valve Kit conduttimetro Kit elettrovalvola alimentazione Circuito di drenaggio Parte elettrica ed elettronica Terminale display Scheda di espansione pCOe (espansione I/O del controllo) TAM (trasformatore amperometrico) Contattore (V= 400) Trasformatore alimentazione: 230/400-24V Controllo elettronico a microprocessore Base portafusibili Relè di comando pompa F1 - F2 Fusibili alimentazione 230…400Vac UE035 codice ricambio UE045 400 V 230 V posizione figura UE065 13C479A001 18C499A001 KITPS00000 7 5 4 UEKT10000L UEKT1000XL 3 FWHDCV0000 KITCN00000 KITVC10058 KITVC10070 KITVC10070 KITVC10070 2 13C565A031 1 HCT1EWF000 PCOE00TLN0 09C565A042 0203014AXX 09C565A044 HCA0EW0000 0606193AXX 0102001AXX 0605319AXX 0203013AXX 8.c 8.c 8.c 8.a e 8.c 8.c 8.c 19 11 8.b 8.d 8 8.b e 8.d 10 14 13 12 - 8.b e 8.d 8.b e 8.d 8.b e 8.d 8.d vedi schemi elettrici vedi schemi elettrici vedi schemi elettrici vedi schemi elettrici 0203007AXX F3 Fusibile pompa 0605319AXX - F4 Fusibile secondario trasformatore 0605624AXX - F5 - F6 Fusibile pCOe 0605615AXX - AP1 - AP2 Morsetto fusibile 0605595AXX - Cavo di collegamento tra terminale e HHPC PF1 Fusibile controllo S90CONN002 0605604XXX - Vedi schemi elettrici vedi schemi elettrici Tab. 8.d Tabella ricambi cilindri standard e speciali UE025…UE065 Descrizione Cilindri STANDARD non apribili Cilindri SPECIALI non apribili Cilindri apribili SPECIALI Kit elettrodi e guarnizioni 200/230V 3ph cilindro conducibilità 350…1250 μS/cm 400V 3ph Cilindro conducibilità 350…1250 μS/cm 200/230V 3ph Cilindro conducibilità 125…350 μS/cm 400V 3ph Cilindro conducibilità 125…350 μS/cm 200/230V 3ph Cilindro conducibilità 125…350 μS/cm 200/230V 3ph Cilindro conducibilità 350…1250 μS/cm 400V 3ph Cilindro conducibilità 125…350 μS/cm 400V 3ph Cilindro conducibilità 350…1250 μS/cm 200/230V 3ph Cilindro conducibilità 125…350 μS/cm 200/230V 3ph Cilindro conducibilità 350…1250 μS/cm 400V 3ph Cilindro conducibilità 125…350 μS/cm 400V 3ph Cilindro conducibilità 350…1250 μS/cm Kit guarnizione “Wellness” +030220571 - rel. 3.2 - 09.04.2009 32 UE025 BL0T4C00H0 BL0T4C00H0 UE035 BL0T4B00H0 BL0T4D00H0 UE045 BL0T5A00H1 BL0T4C00H0 UE065 BL0T5C00H0 BL0T4B00H0 BL0T4C00H0 BLCT4B00W0 BLCT4C00W0 BLCT4C00W0 BLCT4C00W0 KITBLCT4B0 KITBLCT4C0 KITBLCT4C0 KITBLCT4D0 KITBLC4FG0 BL0T4B00H0 BL0T4C00H0 BLCT4B00W0 BLCT4B00W0 BLCT4C00W0 BLCT4D00W0 KITBLCT4B0 KITBLCT4C0 KITBLCT4C0 KITBLCT4D0 KITBLC4FG0 BL0T5A00H1 BL0T4B00H0 BLCT5A00W0 BLCT5A00W0 BLCT4B00W0 BLCT4C00W0 KITBLCT5A0 KITBLCT5A0 KITBLCT4B0 KITBLCT4C0 KITBLC4FG0 -BL0T5B00H0 --BLCT5B00W0 BLCT5C00W0 --KITBLCT5B0 KITBLCT5C0 KITBLC5FG0 Tab. 8.e ITA Sostituzione Attenzione: la sostituzione deve essere svolta solo da personale qualificato, e con umidificatore non alimentato. In normali condizioni, i cilindri usa e getta vanno sostituiti dopo un anno (o 2.500 ore di esercizio, se periodicamente puliti), mentre quelli apribili dopo 5 anni (o 10.000 ore di esercizio se periodicamente puliti). La sostituzione deve essere immediata – anche prima dei tempi previsti – al verificarsi di anomalie. Per esempio, quando le incrostazioni di calcare all’interno del cilindro impediscono un corretto passaggio di corrente elettrica. 65 A 3 3 3 E 2 D E D F C 3 F C A B A 2 1 B 2 1 1 Fig. 8.e 8.5 Pulizia e manutenzione altri componenti Attenzione: • per la pulizia dei componenti plastici non impiegare detergenti o solventi; • i lavaggi disincrostanti possono essere effettuati con una soluzione di Verifiche di manutenzione altre componenti: elettrovalvola di alimentazione (Fig. 8.a part. 3 e Fig. 8.c part. 2). Dopo avere scollegato i cavi e le tubazioni, rimuovere l’elettrovalvola e controllare lo stato di pulizia del filtro in ingresso pulendolo, se necessario, utilizzare acqua e una spazzola morbida; collettore con pompa di scarico (Fig. 8.a part. 5). Verificare che non siano presenti residui solidi nella sede di innesto del cilindro, rimuovendo le eventuali impurità. Controllare che la guarnizione di tenuta (O-Ring) non sia danneggiata o fessurata, se necessario sostituirla. Verificare che non vi siano residui solidi nel condotto di drenaggio; pompa di scarico (Fig. 8.c part. 4). Scollegare l’alimentazione elettrica, svitare le viti di fissaggio e rimuovere eventuali impurità (Fig. 8.a part. 6). Pulire la vasca da eventuali incrostazioni e verificare che l’acqua fluisca liberamente dalla vasca allo scarico (in corrispondenza della pompa di scarico); vaschetta di carico (Fig. 8.a part. 1). Controllare che non vi siano ostruzioni o particelle solide e che gli elettrodi di misura della conducibilità siano puliti, rimuovere eventuali impurità e risciacquare; kit tubi interni (Fig. 8.a part. 2 e Fig. 8.c part. 3). Controllare che siano liberi ed esenti da impurità, rimuovere eventuali impurità e risciacquare. Attenzione: dopo aver sostituito o controllato le parti idrauliche verificare che le connessioni siano collegate correttamente. Riavviare la macchina ed eseguire alcuni cicli di alimentazione e drenaggio (da 2 a 4), terminati i quali, applicando la procedura di sicurezza, verificare eventuali trafilamenti di acqua. Fusibili dei circuiti ausiliari Fusibili F1 e F2 F3 F41 (s 1) F42 (s 2) 8.4 Collegamento boiler modelli trifase UE025...UE065 alimentazione (V) 230 400 A B B B A B A B F5 e F6 AP1 e AP2 fusibile controllo PF1 33 UE001...018 4 A rapido, 10,3x38 5 A T ritardato 5x20 in ceramica 2 Amp. T ritardato 5x20 in ceramica 1 A T ritardato 5x20 in vetro 6,3 A T ritardato 5x20 in ceramica 2 A T ritardato 5x20 in vetro (sezione minima dei cavi da collegare di 1,5 mm2) UE 025...065 1 A rapido, 10,3x38 1 A rapido, 10,3x38 2,5 A T ritardato 5x20 in ceramica 1 A T ritardato 5x20 in vetro 6,3 A T ritardato 5x20 in ceramica 2 A T ritardato 5x20 in vetro (sezione minima dei cavi da collegare di 1,5 mm2) Tab. 8.f “Wellness” +030220571 - rel. 3.2 - 09.04.2009 assistenza acido acetico al 20%, sciacquando successivamente con acqua. Attenzione: In caso di perdita d’acqua togliere l’alimentazione dall’umidificatore perchè l’acqua potrebbe condurre corrente elettrica. 35 B 2 1 Dopo un impiego molto prolungato, oppure per l’utilizzo d’acqua ricca di sali, i depositi solidi che si formano naturalmente sugli elettrodi potrebbero crescere fino ad aderire alla parete interna cilindro. In caso di depositi particolarmente conduttivi lo sviluppo di calore potrebbe surriscaldare la parte in plastica fino a fonderla con rischio di fuoriuscite d’acqua ad alta temperatura. 125/350 μS/cm 350/1250 μS/cm 125/350 μS/cm 350/1250 μS/cm A B A B B Il fissaggio del capocorda con il dado superiore deve essere fatto con una coppia pari a 3 Newton • m. Controlli periodi • Dopo un’ora di funzionamento: controllare l’assenza di perdite d’acqua significative. • Ogni 15 giorni o non oltre 300 ore d’esercizio: controllare il funzionamento, l’assenza di perdite d’acqua significative, le condizioni generali del contenitore. Verificare che durante il funzionamento non si generino archi o scintille tra gli elettrodi. • Ogni 3 mesi o non oltre 1000 ore d’esercizio: - cilindri usa e getta: controllare il funzionamento, l’assenza di perdite d’acqua significative ed eventualmente effettuare la sostituzione del cilindro; - cilindri apribili: se ci sono zone sensibilmente annerite, controllare lo stato di incrostazione degli elettrodi e ripulire, con gli specifici kit elettrodi e guarnizioni (vedi Tab. 8.c). • Ogni anno o non oltre 2500 ore d’esercizio: - cilindri usa e getta: sostituzione; - cilindri apribili: se ci sono zone sensibilmente annerite, controllare lo stato di incrostazione degli elettrodi e ripulire, con gli specifici kit elettrodi e guarnizioni (vedi Tab. 8.c). • Dopo 5 anni o non oltre 10.000 ore di esercizio: sostituzione cilindro apribile. conducibilità (μS/cm) A A / / / Tab. 8.f Procedura di sostituzione: 1. svuotare tutta l’acqua contenuta (vedi par. “7.15” pag. 27); 2. spegnere l’umidificatore (interruttore “0”), e aprire il sezionatore di linea dell’alimentazione elettrica (procedura di sicurezza); 3. attendere che l’umidificatore e il cilindro si siano raffreddati; 4. togliere il cofano frontale (vedi par. “1.6” pag. 8); 5. sconnettere i cavi elettrici dal tetto del cilindro; 6. sbloccare il cilindro dal fissaggio e sollevarlo per estrarlo; 7. inserire il cilindro nuovo (assicurarsi che il modello e la tensione di alimentazione del cilindro in sostituzione corrispondano a quelli riportati nei dati di targa); 8. fissare il cilindro; 9. riconnettere i cavi elettrici dal tetto del cilindro; 10. mettere il cofano frontale; 11. accendere l’umidificatore. produzione (Kg/h) 25 125/350 μS/cm 350/1250 μS/cm 125/350 μS/cm 350/1250 μS/cm 350/1250 μS/cm installatore 45 utente 8.3 Pulizia e manutenzione cilindro Fig. 9.a 34 * PE N TB K POWER SUPPLY L TAM LS A DP STEAM BOILER UNIT E FV CS F1 F2 PS P 3P 2P 1V EVILPS P 3+ P 2+ P 1+ VE + VI+ L + TR X1 F42 F41 X2 SEC1 MS F5 G G0 24 Vac J1 F6 PCOE1 J6 VI dip switch ALARM RELAY G G0 GND sensor 1 GND + 15 V 10 mA sensor 2 T+ TLAN J3 J8 P1 J7 VE remote ON-OFF NO 1 C1 NC 1 NO 2 C2 NC 2 J5 luce NO 3 C3 NC 3 ingressi sonde SEC2 NO 4 C4 NC 4 GND “Wellness” +030220571 - rel. 3.2 - 09.04.2009 utente 1 1 .1 .2 .3 .1 .2 .1 .2 B M5. M1. M8. M7. PF1 PCOE2 M2. 2 2 .1 .2 .3 .4 .5 .6 .7 .8 .1 .2 .1 .2 3 A3 G G0 24 Vac J1 J6 P3 NO 1 C1 NC 1 NO 2 C2 NC 2 J5 P2 NO 3 C3 NC 3 M6. dip switch J7 PS T+ J20. J16. M3. M4. .1 .2 .3 .4 .5 .6 .1 .2 .3 .2 .1 .1 .2 .1 .2 .3 J17. .4 .5 NC 4 TLAN J3 NO 4 C4 GND assistenza AP 2 AP 1 P LAN PGD T LAN VIVI+ L L+ PS PS VE V E+ P3P 3+ P1P 1+ P2P 2+ installatore ITA 9. SCHEMI ELETTRICI 9.1 Schema modelli monofase UE001…UE009 utenze 35 * P OWE R S UP P LY P E L1 L2 L3 TB AP 2 AP 1 LS DP E A S T E AM B OILE R UNIT C FV CS F1 F2 TR X2 MS NO 1 G G0 24 Vac J1 assistenza X1 F42 F4 SEC1 F5 C1 F6 J5 luce C2 NO 2 NC 1 PCOE 1 J6 VI C3 NC 3 NC 4 G ND sensor 2 sensor 1 G ND + 15 V 10 mA T+ TLAN J3 J8 P1 C4 NO 3 ALAR M R E LAY G G0 remote ON-OF F dipswitch J7 VE NO 4 G ND NO 1 1 1 M5 M1. M8. M7. utente .1 .2 .3 .1 .2 .1 .2 B M2. 2 2 .1 .2 .3 .4 .5 .6 .7 .8 .1 .2 .1 .2 3 A3 G G0 24 Vac J1 C1 J5 P2 C2 NO 2 NC 2 NC 1 NO 3 M6 . PF1 PCOE 2 J6 P3 J7 PS C3 NC 3 dipswitch C4 NC 4 .1 .2 .1 .2 .3 .2 .1 .1 .2 P LAN PGD T LAN VIVI+ L L+ PS PS VE V E+ P 3P 3+ P1P 1+ P2P 2+ installatore .4 .5 .6 J20. .3 J16. M3. M4. .1 .2 .3 J17. .4 .5 T+ TLAN J3 NO 4 G ND NC 2 ingressi sonde SEC2 K TAM PS P 3P 2P 1V EVILPS P 3+ P 2+ P 1+ VE + VI+ L + ITA 9.2 Schema modelli trifase UE003…UE018 utenze Fig. 9.b “Wellness” +030220571 - rel. 3.2 - 09.04.2009 * TB Fig. 9.c 36 P OWE R S UP P LY LS DP S T E AM B OILE R UNIT CS FV RD F1 F2 F3 DP TR F4 MS F5 C1 J5 luce NO 1 G G0 24 Vac J1 C2 NO 2 NC 2 NC 1 F6 PCOE 1 J6 VI NC 3 dipswitch J7 VE C3 NO 3 NC 4 G ND G ND + 15 V 10 mA sensor 2 sensor 1 T+ TLAN J3 J8 P1 C4 ALAR M R E LAY G G0 remote ON-OF F ingressi sonde P E L1 L2 L3 K TAM PS P 3P 2P 1V EVILPS P 3+ P 2+ P 1+ VE + VI+ L + utente NO 4 G ND “Wellness” +030220571 - rel. 3.2 - 09.04.2009 NO 1 1 1 .1 .2 .3 .1 .2 .1 .2 J6 P3 C2 NO 2 NC 2 B M5. M1. M8. M7. J7 PS C3 NC 3 dipswitch PF1 NO 3 M6. PCOE 2 NC 1 M2. 2 2 .1 .2 .3 .4 .5 .6 .7 .8 .1 .2 .1 .2 3 A3 G G0 24 Vac J1 C1 J5 P2 NC 4 .1 .2 .3 .2 .1 .1 .2 .1 .2 .3 J20. .4 .5 .6 J16. M3. M4. .1 .2 .3 J17. .4 .5 T+ TLAN J3 C4 AP 2 AP 1 PLAN PGD T LAN RD VIVI+ L L+ PS PS VE V E+ P 3P 3+ P1P 1+ P2P 2+ installatore NO 4 G ND assistenza ITA 9.3 Schema modelli trifase UE025…UE065 utenze ITA UE001 UE003 UE005 UE008 UE009 UE010 UE015 UE018 UE025 UE035 UE045 UE065 alimentazione produzione potenza(2) codice tensione(1) di vapore (2; 4) (kW) (V - type) (kg/h) 1,5 1,1 D 230 - 1~N 3,0 2,2 D 230 - 1~N K 230 - 3~ L 400 - 3~ 5,0 3,7 D 230 – 1~N K 230 - 3~ L 400 - 3~ 8,0 6,0 K 230 – 3~ L 400 – 3~ 9,0 6,7 D 230 - 1~ 10,0 7,5 K 230 – 3~ L 400 – 3~ 15,0 11,2 K 230 – 3~ L 400 – 3~ 18 13,5 L 400 – 3~ 25 18,7 K 230 – 3~ L 400 – 3~ 35 26,2 K 230 – 3~ L 400 – 3~ 45 33,7 K 230 – 3~ L 400 – 3~ 65 48,7 L 400 – 3~ corrente(2) (A) 4,9 9,8 5,6 3,2 16,3 9,4 5,4 15,1 8,7 29,3 18,8 10,8 28,2 16,2 19,5 47,1 27,1 65,9 37,9 84,7 48,7 70,4 caratteristiche nominali configurazione TAM (5) 10.a 10.d 10.a 10.d 10.d 10.d 10.a 10.d 10.a 10.a 10.a 10.d 10.a 10.a 10.a 10.b 10.c 10.b 10.b 10.b 10.c 10.c * Versione 0 dove viene inserito nel TAM 1/2 fase (1) tolleranza ammessa sulla tensione nominale di rete: -15%, +10%; (2) tolleranza sui valori nominali: +5%, -10% (EN 60335-1); (3) valori consigliati riferiti alla posa del cavo in PVC o gomma in canala chiusa per una lunghezza di 20 m; (4) produzione di vapore istantanea nominale max: la produzione media di vapore può essere influenzata da fattori esterni quali: temperatura ambiente, qualità dell’acqua, sistema di distribuzione del vapore; (5) fare riferimento agli schemi elettrici per la verifica. 100 300 100 100 500 300 100 500 100 500 300 300 500 300 300 500 500 500 300 700 700 700 cavo(3) (mm2) linea-fusibili(3) (A / type) 1,5 2,5 2,5 1,5 6,0 2,5 1,5 6,0 2,5 10,0 6,0 2,5 10,0 6,0 6,0 25 16 35 16 50 25 35 10 A / rapido 16 A / rapido 16 A / rapido 10 A / rapido 32 A / rapido 16 A / rapido 10 A / rapido 32 A / rapido 16 A / rapido 40 A / rapido 32 A / rapido 16 A / rapido 40 A / rapido 32 A / rapido 32 A / rapido 63 A / rapido 50 A / rapido 100 A / rapido 60 A / rapido 125 A / rapido 80 A / rapido 100 A / rapido schema elettrico (Fig.) 9.1 9.1 9.2 9.2 9.1 9.2 9.2 9.2 9.2 9.1 9.2 9.2 9.2 9.2 9.2 9.3 9.3 9.3 9.3 9.3 9.3 9.3 Tab. 10.a Attenzione: i dati non sono assoluti e in caso di difformità con le Normative locali, queste ultime devono prevalere; Configurazioni e collegamenti TAM (trasformatore amperometrico per la misurazione dell’intensità di corrente) Attenzione: configurazioni e collegamenti sono già eseguiti da CAREL, e non richiedono nessun intervento. Gli schemi che seguono rappresentano possibili modalità di collegamento e possono essere utili in caso di grave malfunzionamento elettrico dell’umidificatore. Ogni intervento deve essere eseguito esclusivamente da personale qualificato, utilizzi impropri possono causare gravi danni. Fig. 10.a passaggio di due cavi della stessa fase passaggio di un cavo in modalità “doppia spira” 100 300 500 700 100 300 500 700 passaggio di uno dei due cavi della stessa fase 100 300 500 700 100 300 500 700 passaggio di un cavo Fig. 10.b Fig.10.c Fig.10.d Attenzione: per evitare interferenze separare i cavi di alimentazione da quelli delle sonde. 37 “Wellness” +030220571 - rel. 3.2 - 09.04.2009 utente modello assistenza 10.1 Modelli humiSteam Wellness e caratterische elettriche installatore 10. CARATTERISTICHE GENERALI E MODELLI ITA 10.2 Caratteristiche tecniche modelli UEW UE001* UE003* UE003** UE005* UE005** UE008** UE009* UE010** UE015** UE018** UE025** UE035** UE045** UE065** vapore connessione (ø mm) 230 V 400 V limiti della pressione di mandata (Pa) acqua d’alimentazione connessione limiti di temperatura (°C) limiti di pressione (MPa) limiti di durezza (°fH) portata istantanea (l/min) intervallo di conducibilità (μS/cm) acqua di drenaggio connessione (ø mm) temperatura tipica (°C) portata istantanea (l/min) condizioni ambientali temperat. ambiente di funzionam. (°C) umidità ambiente di funzionam. (% rH) temperatura di immagazzinamento (°C) umidità di immagazzinamento (% rH) grado di protezione controllo elettronico wellness tensione/frequenza degli ausiliari (V - Hz) potenza massima ausiliari (VA) ingressi sonde (caratteristiche generali) alimentazioni sonde attive (caratteristiche generali) uscite relè d’allarme (caratteristiche generali) ingresso di abilitazione remota (caratteristiche generali) potenzialità produzione istantanea di vapore(1) (kg/h) potenza assorbita a tens. nominale (kW) 22/30 22/30 0/1500 30 30 1x40 0/1300 0/1350 3/4” G 1…40 0,1…0,8 (1…8 bar) ≤ 40 1,1 125...1250 0,6 2x40 1x40 0/2000 5,85 (7 per UE045 A 230Vac) -2x40 7 40 ≤100 7 22,5 1T40 10…60 -10T70 5… 95 IP20 HCA0EW0000 24 / 50/60 180 40 selezionabili per segnali: 0…1 Vdc, 0…10 Vdc, 2…10 Vdc, 0…20 mA, 4…20 mA, NTC impedenza di ingresso: 60 kΩ con segnali: 0…1 Vdc, 0…10 Vdc, 2…10 Vdc 50 Ω con segnali: 0…20 mA, 4…20 mA 15 Vdc, 100 mA, protetti corto circuito +1 Vdc con carico 135 Ω 250 V 5 A (2 A) - tipo di azione microinterruzione 1C contatto pulito; resistenza max. 50 Ω; Vmax= 24 Vdc; Imax= 6 mA 1,5 3,0 3,0 5,0 5,0 8,0 9 10,0 15,0 18,0 25 35 45 65 1,12 2,25 2,5 3,75 3,75 6,0 6,75 7,5 11,25 13,5 18,75 26,25 33,75 48,75 Tab. 10.b * monofase, ** trifase. (1) = la produzione media di vapore viene influenzata da fattori quali: temperatura ambiente, qualità dell’acqua, sistema di distribuzione del vapore 10.3 Modelli tubi condotta vapore “Wellness” +030220571 - rel. 3.2 - 09.04.2009 UE009W UE010W UE015W UE018W UE025W UE035W UE045W UE065W Ø interno (mm) 22 30 40 UE008W Tubi condotta vapore CAREL cod. 1312360AXX 1312365AXX 1312367AXX UE005W Ø uscita vapore (mm) capacità max. (kg/h) UE003W modelli UEW cod. UE001W assistenza utente installatore caratteristiche tecniche 22 1/1,5 22 3 30 5 30 8 30 9 30 10 30 15 30 18 40 25 40 35 40 45 2x40 65 √ - √ - √ - √ - √ - √ - √ - √ - √ √ √ √ Tab. 10.c 38 ITA 10.4 Modelli distributori di vapore a getto concentrato UE003W UE005W UE008W UE009W UE010W UE015W UE018W UE025W UE035W UE045W UE065W Ø uscita vapore (mm) capacità max. (kg/h) 22 1/1,5 22 3 30 5 30 8 30 9 30 10 30 15 30 18 40 25 40 35 40 45 2x40 65 Distributori lineari CAREL SD cod. Ø ingresso vapore (mm) SDPOEM0012 22/30 SDPOEM0022 30 SDPOEM0000 30 capacità max. kg/h 3 18 18 (con foro di 30 mm) 1 1 1 1 1 1 1 1 1 1 1 1 1 1 1 1 1 1 (2)* (2)* (4)** (4)** Tab. 10.d utente 1 = l’umidificatore si collega ad un solo distributore (2) = l’umidificatore si collega a due distributori (attraverso il kit a “Y”, quale: UEKY000000) 2 = l’umidificatore è dotato di due uscite collegabili a due distributori (4) = l’umidificatore è dotato di due uscite collegabili fino a quattro distributori (attraverso due kit a “Y”) * = utilizzare kit CAREL a “Y” cod. UEKY000000 (ingresso 40 mm e 2 uscite 30 mm) ** = utilizzare 2 kit CAREL a “Y” cod. UEKY000000 (ingresso 40 mm e 2 uscite 30 mm) installatore UE001W modelli UEW cod. 10.5 Modelli distributori lineari UE005W UE008W UE009W UE010W UE015W UE018W UE025W UE035W UE045W UE065W Ø uscita vapore (mm) capacità max. kg/h 22 22 30 30 30 30 30 30 40 40 40 2x40 1/1,5 3 5 8 9 10 15 18 25 35 45 65 1 1 1 1 - 1 1 1 1 - 1 1 1 1 1 1 1 1 1 1 1 1 1 (2)* (2)* (2)* 1 1 1 - - - - (2)** 1 1 1 1 (2)** (2)** 1 1 1 (4)** 2 2 2 Tab. 10.e capacità max. kg/h lunghezza in mm 4 6 9 9 5 8 12 18 18 18 25 35 45 45 45 332 438 597 835 343 427 596 850 1048 1245 834 1015 1222 1636 2025 - - 1 1 - 1 1 - 1 1 - 1 1 - 1 1 - 1 1 - 1 = l’umidificatore si collega ad un solo distributore lineare (2) = l’umidificatore si collega a due distributori lineari (attraverso il kit a “Y”, quale: UEKY000000 o UEKY000400??) 2 = l’umidificatore è dotato di due uscite collegabili a due distributori lineari (4) = l’umidificatore è dotato di due uscite collegabili fino a quattro distributori lineari (attraverso due kit a “Y”) * = utilizzare kit CAREL a “Y” cod. UEKY000000 (ingresso 40 mm e 2 uscite 30 mm) ** = utilizzare kit CAREL a “Y” cod. UEKY40400 (ingresso 40 mm e 2 uscite 30 mm) CAREL si riserva la possibilità di apportare modifiche o cambiamenti ai propri prodotti senza alcun preavviso. 39 “Wellness” +030220571 - rel. 3.2 - 09.04.2009 assistenza UE003W Distributori lineari CAREL DP cod. Ø ingresso vapore (mm) DP035D22R0 22 DP045D22R0 22 DP060D22R0 22 DP085D22R0 22 DP035D30R0 30 DP045D30R0 30 DP060D30R0 30 DP085D30R0 30 DP105D30R0 30 DP125D30R0 30 DP085D40R0 40 DP105D40R0 40 DP125D40R0 40 DP165D40R0 40 DP205D40R0 40 UE001W modelli UEW cod. ENG WARNINGS exemplary, special or consequential damage of any kind whatsoever, whether contractual, extra-contractual or due to negligence, or any other liabilities deriving from the installation, use or impossibility to use the product, even if CAREL S.p.A. or its subsidiaries are warned of the possibility of such damage. The CAREL S.p.A. humidifiers are advanced products, whose operation is specified in the technical documentation supplied with the product or can be downloaded, even prior to purchase, from the website www.carel.com. Each CAREL S.p.A. product, in relation to its advanced level of technology, requires setup/configuration/programming/commissioning to be able to operate in the best possible way for the specific application. The failure to complete such operations, which are required/indicated in the user manual, may cause the final product to malfunction; CAREL S.p.A. accepts no liability in such cases. The customer (manufacturer, developer or installer of the final equipment) accepts all liability and risk relating to the configuration of the product in order to reach the expected results in relation to the specific final installation and/or equipment. CAREL S.p.A. may, based on specific agreements, acts as a consultant for the installation/commissioning/use of the unit, however in no case does it accept liability for the correct operation of the humidifier and the final installation if the warnings or suggestions provided in this manual or in other product technical documents are not heeded. In addition to observing the above warnings and suggestions, the following warnings must be heeded for the correct use of the product: DISPOSAL The humidifier is made up of metal parts and plastic parts. In reference to European Union directive 2002/96/EC issued on 27 January 2003 and the related national legislation, please note that: 1. WEEE cannot be disposed of as municipal waste and such waste must be collected and disposed of separately; 2. the public or private waste collection systems defined by local legislation must be used. In addition, the equipment can be returned to the distributor at the end of its working life when buying new equipment; 3. the equipment may contain hazardous substances: the improper use or incorrect disposal of such may have negative effects on human health and on the environment; 4. the symbol (crossed-out wheeled bin) shown on the product or on the packaging and on the instruction sheet indicates that the equipment has been introduced onto the market after 13 August 2005 and that it must be disposed of separately; 5. in the event of illegal disposal of electrical and electronic waste, the penalties are specified by local waste disposal legislation. • DANGER OF ELECTRIC SHOCK The humidifier contains live electrical components. Disconnect the mains power supply before accessing inside parts or during maintenance and installation. • DANGER OF WATER LEAKS The humidifier automatically and constantly fills/drains certain quantities of water. Malfunctions in the connections or in the humidifier may cause leaks. • DANGER OF BURNS The humidifier contains high temperature components and delivers steam at 100°C/ 212°F. Warranty on the materials: 2 years (from the date of production, excluding consumables). Approval: the quality and safety of CAREL S.P.A. products are guaranteed by the ISO 9001 certified design and production system, as well as by the mark. Important: • • • • • • • • • • • • The installation of the product must include an earth connection, using the special yellow-green terminal available in the humidifier. The environmental and power supply conditions must conform to the values specified on the product rating labels. The product is designed exclusively to humidify rooms either directly or through distribution systems (ducts). Only qualified personnel who are aware of the necessary precautions and able to perform the required operations correctly may install, operate or carry out technical service on the product. Only water with the characteristics indicated in this manual must be used for steam production. All operations on the product must be carried out according to the instructions provided in this manual and on the labels applied to the product. Any uses or modifications that are not authorised by the manufacturer are considered improper. CAREL S.p.A. declines all liability for any such unauthorised use. Do not attempt to open the humidifier in ways other than those specified in the manual. Observe the standards in force in the place where the humidifier is installed. Keep the humidifier out of the reach of children and animals. Do not install and use the product near objects that may be damaged when in contact with water (or condensate). CAREL S.p.A. declines all liability for direct or indirect damage following water leaks from the humidifier. Do not use corrosive chemicals, solvents or aggressive detergents to clean the inside and outside parts of the humidifier, unless specifically indicated in the user manual. Do not drop, hit or shake the humidifier, as the inside parts and the linings may be irreparably damaged. CAREL S.p.A. adopts a policy of continual development. Consequently, CAREL reserves the right to make changes and improvements to any product described in this document without prior warning. The technical specifications shown in the manual may be changed without prior warning. The liability of CAREL S.p.A. in relation to its products is specified in the CAREL S.p.A. general contract conditions, available on the website www. carel.com and/or by specific agreements with customers; specifically, to the extent where allowed by applicable legislation, in no case will CAREL S.p.A., its employees or subsidiaries be liable for any lost earnings or sales, losses of data and information, costs of replacement goods or services, damage to things or people, downtime or any direct, indirect, incidental, actual, punitive, 3 “Wellness” +030220571 - rel. 3.2 - 09.04.2009 ENG Content 1. INTRODUCTION AND ASSEMBLY 7 8.3 Cleaning and maintenance of the cylinder ................................................32 8.4 Cylinder connection, three-phase models UE025 to UE065 .................32 8.5 Cleaning and maintenance of the other components.............................32 1.1 humiSteam Wellness (UEW*) ......................................................................... 7 1.2 Dimensions and weights .................................................................................. 7 1.3 Opening the packaging .................................................................................. 7 1.4 Positioning on the wall ................................................................................... 7 1.5 Wall-mounting..................................................................................................... 7 1.6 Removing the front cover ................................................................................. 8 1.7 Fitting the front cover ........................................................................................ 8 1.8 Components and accessories ....................................................................... 9 2. WATER CONNECTIONS 9. WIRING DIAGRAMS 9.1 Diagram of single-phase models UE001 to UE009 ................................33 9.2 Diagram of three-phase models UE003 to UE018 .................................34 9.3 Diagram of three-phase models UE025 to UE065...................................35 10. CARATTERISTICHE GENERALI E MODELLI 36 10.1 humiSteam Wellness models and electrical specifications ..............36 10.2 Technical specifications ............................................................................. 37 10.3 Models of steam hoses ................................................................................. 37 10.4 Models of concentrated jet steam distributors .......................................38 10.5 Models of linear distributors .......................................................................38 10 2.1 Supply water .................................................................................................... 11 2.2 Drain water ........................................................................................................ 11 3. STEAM DISTRIBUTION 33 12 3.1 CAREL jet distributors (SDPOEM00**) ....................................................... 12 3.2 CAREL linear distributors (DP***DR0) ....................................................... 12 3.3 Steam hose ........................................................................................................ 12 3.4 Condensate drain hose ................................................................................ 13 4. ELECTRICAL CONNECTIONS 14 4.1 Preparing the electric cableways ................................................................. 14 4.2 Power cable connection ................................................................................ 14 4.3 Temperature probe connection (M2.1- M2.8)........................................... 14 4.5 Alarm contact (M6.1 - M6.3) ......................................................................... 15 4.6 Utility connections (light, fans, sanitisation, essences) ............................ 15 5. REMOTE TERMINAL, GSM MODEM AND SUPERVISORY NETWORK 17 5.1 Remote display terminal ..................................................................................17 5.2 GSM network connection (send SMS).........................................................17 5.3 Supervisory network (J19) ..............................................................................17 6. STARTING AND USER INTERFACE 18 6.1 Starting ................................................................................................................ 18 6.2 Stopping ............................................................................................................. 18 6.3 User interface .................................................................................................. 18 6.4 Management menu ........................................................................................ 19 7. MAIN CONFIGURATIONS 21 7.1 Language............................................................................................................. 21 7.2 Date and time .................................................................................................... 21 7.3 Temperature probes ................................................................................... 21 7.4 Essences .............................................................................................................. 21 7.5 Time bands .......................................................................................................22 7.6 Fans ......................................................................................................................22 7.7 Sanitisation .........................................................................................................23 7.8 Advanced settings (qualified personnel only)............................................23 7.9 Copying the settings (backup) ......................................................................24 7.10 GSM (send SMS on alarms) .........................................................................25 7.11 Enable supervisor network............................................................................25 7.12 Manual procedures (qualified personnel only) .......................................25 7.13 Displaying the alarms .....................................................................................26 7.14 Info-menu .........................................................................................................27 7.15 Mechanically draining the water in the cylinder ......................................27 8. MAINTENANCE AND SPARE PARTS 28 8.1 Spare parts for models UE001 to UE018 .....................................................28 8.2 Spare parts, models UE025 to UE065.........................................................30 5 “Wellness” +030220571 - rel. 3.2 - 09.04.2009 ENG 1. INTRODUCTION AND ASSEMBLY 1.1 humiSteam Wellness (UEW*) Range of CAREL isothermal immersed electrode humidifiers with liquid crystal display for the control and distribution of steam in steam baths. Models UE001 to UE018 Models available (identifiable from the code shown on the product): • UE001, UE003, UE005, UE008, UE009, UE010, UE015, UE018: smaller models with steam production capacity up to 18 kg/h, water connections under the base of the humidifier; • UE025, UE035, UE045, UE065: larger models with steam production capacity from 25 to 65 kg/h, water connections on the side of the humidifier. Models UE025 to UE065 ≥ 200 ≥ 200 installer Distance from the walls ≥ 200 ≥ 200 ≥ 500 ≥ 200 ≥ 700 ≥ 700 <0,5° 1.2 Dimensions and weights A B Fig. 1.b A C 1.5 Wall-mounting C Fit the humidifier on the wall using the support bracket and the screw kit supplied (for the dimensions in mm see Fig. 1.d). Assembly instructions: 1. unscrew the wall bracket from the humidifier bracket; 2. fasten the wall bracket (see Fig. 1.c), checking horizontal position with a spirit level; if installed on a masonry wall, the plastic anchor plugs (dia. 8 mm) and screws (dia. 5 mm x L= 50 mm) supplied can be used; 3. hang the appliance to the bracket using the slot on the top edge of the rear of the appliance; 4. secure the appliance to the wall through the hole in the centre on the rear of the unit. For the weights and dimensions see Tab.1.a. Fig. 1.a dimensions A (mm) B C weights packaged (kg) empty installed* user B Models UE025 to UE065 UE001… UE008 365 275 620 16 13.5 19 UE009… UE018 365 275 712 20 17 27 UE025… UE045 545 375 815 39 34 60.5 UE045**… UE065 635 465 890 51 44 94 Table 1.a Models UE001 to UE018 *= in operating conditions filled with water; **= 230 Vac model X bracket 1.3 Opening the packaging make sure the humidifier is intact upon delivery and immediately notify the transporter, in writing, of any damage that may be due to careless or improper transport; move the humidifier to the site of installation before removing from the packaging, grasping the neck only from underneath the base; open the cardboard box, remove the protective material and remove the humidifier, keeping it vertical at all times. Models UE025 to UE065 X bracket 1.4 Positioning on the wall • the unit is designed to be mounted on a wall that is strong enough to support the weight in normal operating conditions (see Wall-mounting below). Models UE025 to UE065 can stand on the floor; • to ensure correct steam distribution, position the humidifier near the point of steam distribution; • make sure the humidifier is level, allowing the minimum clearances (see Fig. 1.b) for maintenance operations. Fig. 1.c Important: during operation the metal casing heats up and the rear part resting against the wall may reach temperatures in excess of 60 °C. 7 “Wellness” +030220571 - rel. 3.2 - 09.04.2009 service Models UE001 to UE018 ≥ 400 ENG Modelli UE025…UE065: Spacing of the holes on the wall Models UE001 to UE018 Models UE025 to UE065 X X = installer = = = 1 4 Y Y = = 3 Z Fig. 1.d user distance (mm) X Y Z UE001…UE018 270 360 - 2 Models UE025…UE045 310 655 250 UE045*…UE065 400 730 315 Fig. 1.f * 230 Vac models only 1. remove the screws from the top of the humidifier using a screwdriver; 2. hold the cover from the top and lift it around 200 mm; 3. remove the cover by moving it forwards; 4. remove the protective film (from all the outside surfaces of the 1.6 Removing the front cover humidifier). service Models UE001 to UE018: 1 2 1.7 Fitting the front cover 5 Models UE001 to UE018: 1 3 4 4 3 2 Fig. 1.e 1. turn oval-shaped label with the Carel logo, revealing the head of the earth screw below; 2. remove the screw using a screwdriver; 3. hold the cover by the sides and lift it around 200 mm, releasing it from the protruding edges of the humidifier; Fig. 1.g 4. remove the cover by moving it forwards; 5. remove the protective film. 1. turn the red oval-shaped plate with the CAREL logo, revealing the fastening hole below; 2. slip the cover onto the frame (keeping it slightly raised and tilted), until it rests on the rear edges; 3. tighten the earth screw using a screwdriver; 4. turn the red oval-shaped plate with the CAREL logo until covering the fastening holes. “Wellness” +030220571 - rel. 3.2 - 09.04.2009 8 ENG Models UE025 to UE065: 1.8 Components and accessories Once having opened the packaging and removed the front cover of the humidifier, make sure the following are included: installer 2 1 kit code 98C565P009 of connectors for the electronic board kit code 98C565P012 of connector with label and cable gland for the connection of the utility cables (light, fans, essences and sanitisation pump) filter code 98C565P016 for fill solenoid valve kit code 98C565P018 of connectors for terminals with voltage-free contacts models UE025 to UE065 only: code FWHDCV0000 nonreturn valve with connection pipe user kit of screws with plugs for wall-mounting; Fig. 1.h 1. slip the cover onto the frame (keeping it slightly raised and tilted), until it rests on the rear edges; 2. tighten the screws on the top of the humidifier using a screwdriver. Fig. 1.i UE025 to UE065 only: angular plastic hose (drain water connection). 9 “Wellness” +030220571 - rel. 3.2 - 09.04.2009 service Important: in models UE025 to UE065 open the electrical compartment on the humidifier using the lock with slot. ENG 2. WATER CONNECTIONS Important: before proceeding, disconnect the power supply. Models UE025 to UE065 installer Models UE001 to UE018 4 2 1 2 3 user 1 3 7 4 4 5 5 6 service 6 Fig. 2.a Water connections: 1. install a manual valve upstream of the installation (to be able to cut off the water supply); 2. connect the humidifier to the water supply, and fit the filter supplied (code 98C565P016) to the inlet of the fill solenoid valve.. On models UE001 to UE0018, use a hose with 3/4’’G fittings (see par. “10.2 Technical specifications” page 37, compatible CAREL hose: code FWH3415000). On models UE025 to UE065 connect the hose with the non-return valve supplied (code FWHDCV0000) to prevent the water inside the humidifier from coming into contact with the mains water; 3. install a mechanical filter to trap any solid impurities (to be connected downstream of the tap); 4 connect a section of non-conductive pipe or hose for draining (resistant to temperatures of 100 °C and with a minimum inside diameter of 40 mm); 5 prepare a funnel to interrupt continuity in the drain line; 6 connect a drain trap to prevent the return of bad odours (minimum inside diameter 40 mm); 7 in models UE025 to UE065: connect a drain hose from the bottom tank of the humidifier (this can run into the drain funnel). Important: when installation is completed, flush the supply hose for around 30 minutes by piping water directly into the drain, without sending it into the humidifier. This will eliminate any scale or processing residues that may block the drain pump and cause foam when boiling. Fittings provided for the water connections: Models UE001 to UE018 Models UE025 to UE065 Key: A. B. C. A B B A C Fig. 2.b “Wellness” +030220571 - rel. 3.2 - 09.04.2009 10 supply water inlet drain water outlet bottom tank drain water outlet (models UE025 to UE065 only) ENG 2.1 Supply water Hydrogen ions (pH) Specific conductivity at 20°C (σR, 20 °C) Total dissolved solids (cR) Dry residue at 180°C (R180) Total hardness (TH) Temporary hardness Iron + Manganese Chlorides Silica Residual chlorine Calcium sulphate Metallic impurities Solvents, thinners, detergents, lubricants unit of measure μS/cm normal water min. max. 7 8.5 350 1250 mg/l (1) mg/l (1) mg/l CaCO3 100 (2) mg/l CaCO3 60 (3) mg/l Fe+Mn = ppm Cl = = mg/l SiO2 mg/l Cl= mg/l CaSO4 = mg/l 0 mg/l 0 (1) (1) 400 300 0.2 30 20 0.2 100 0 0 water with low salt content min. max. 7 8.5 125 350 (1) (1) 50 (2) 30 (3) = = = = = 0 0 (1) (1) 160 100 0.2 20 20 0.2 60 0 0 user supply water characteristics installer Only use mains water with: • pressure between 0.1 and 0.8 MPa (1 and 8 bars), temperature between 1 and 40 °C and an instant flow-rate no lower than the rated flow of the fill solenoid valve, the connection is G3/4M (see par. “10.2 Technical specifications” page 37); • hardness no greater than 40°fH (equal to 400 ppm of CaCO3), conductivity: 125 to 1250 μS/cm; • no organic compounds. Tab. 3.a (1) service = values depend on the specific conductivity; in general: CR ≅0.65 * σR, 20 °C; R180 ≅0.93 * σR, 20 °C (2) = not less than 200% of the chloride content in mg/l CL (3) = not less than 300% of the chloride content in mg/l CL There is not reliable relationship between hardness and conductivity of the water Important: • do not treat the water with softeners, this may cause the entrainment of foam, affecting the operation of the unit; • do not add disinfectants or anticorrosive compounds to the water, as these are potential irritants; • the use of well water, industrial water or water from cooling circuits and, in general, any potentially chemically or bacteriologically contaminated water is not recommended. 2.2 Drain water • this contains the same substances dissolved in the supply water, however in larger quantities; • it may reach a temperature of 100 °C; • it is not toxic and can be drained into the sewerage system. 11 “Wellness” +030220571 - rel. 3.2 - 09.04.2009 ENG installer 3. STEAM DISTRIBUTION For the correct delivery of steam, a steam distributor must be used, sized according to output of the humidifier. In addition, the distributor must be installed in a part of the steam bath that is easily reached by the hoses running from the humidifier (see Fig. 3.a as an installation example). These can be fitted horizontally or vertically (hole facing upwards). See par. “10.4” page 38 for the models of distributors that are compatible with the humidifiers. Assembly instructions (see Fig.3.b): • make a series of holes on the wall according to the distributor drilling template; • insert the distributor; • fasten the flange using 4 screws. 50 31,5 1 A B Y 50 3 X 2 dimens 4 100 D X 6 5 C service Y B A C 8 °2 X A 57,5 31,5 50 Fig. 3.a 31,5 31,5 user 3.1 CAREL jet distributors (SDPOEM00**) 7 Fig. 3.c Key: B “L”-shaped mounting support (where featured) flange gasket steam inlet (ØA) condensate drain (ØB) fastening screws (see the instruction sheet supplied with the distributor) 6 length (depending on the model of distributor, see par. “10.5” page 38) 7 angle (around 2°) for draining the condensate. 8 diameter of the hole on the wall (ØY) 1 2 3 4 5 B A Fig. 3.b Key: A. steam inlet B. condensate drain C. steam outlet. the dimensions of the hole vary depending on the models of distributor: model SDPOEM0000: hole made manually, up to 30 mm in diameter); model SDPOEM0012: diameter of the hole 12 mm; model SDPOEM0022: diameter of the hole 22 mm. D drilling template Dimensions in mm ØA ØB ØY Ø X Note: if steam hoses with an inside diameter of 30 mm are used, remove the 22 mm steam inlet section. DP***D22R0 22 10 58 35 68 CAREL linear distributors DP***D30R0 DP***D40R0 30 40 10 10 68 89 45 60 77 99 Tab. 3.a Important: 3.2 CAREL linear distributors (DP***DR0) 1. fit the distributor at a slight incline (at least 2°, to prevent the return These can be fitted horizontally. See par. “10.5” page 38 for the models of distributors that are compatible with the humidifiers. 2. the “L”-shaped mounting support (see part 1 Fig. 3.c) is supplied with of condensate); steam distributor models from DP085* to DP025*. For shorter lengths, the support can be supplied as an option (code 18C478A088). Assembly instructions (see Fig.3.c): • make a series of holes on the wall according to the distributor drilling template (included in the packaging with the distributor); • insert the distributor with the steam holes facing upward; • fasten the flange using 4 screws. 3.3 Steam hose • use CAREL hoses (max. 4 m long, see par. “10.3” page 37). Rigid pipes may break and cause steam leaks; • avoid the formation of pockets or traps (causes of condensate); • avoid choking the hose due to tight bends or twisting. • fasten the end of the hose to the connectors on the humidifier and the steam distributor using metal clamps, so that these do not detach due to the high temperature. “Wellness” +030220571 - rel. 3.2 - 09.04.2009 12 ENG 3.4 Condensate drain hose installer During the operation of the humidifier some of the steam may condense, causing a decline in efficiency and noise (gurgling). To drain the condensate, connect a drain hose with a drain trap and a minimum slope of 5° to the bottom of the humidifier (see Fig. 3.d). CAREL condensate drain hoses: code 1312353APG Important: the drain trap in the condensate drain hose the humidifier must be filled with water before starting. Example of correct and incorrect installation of the steam hose and condensate drain hose: user YES NO service NO NO Fig. 3.d Verifiche finali the steam outlet hoses run upwards and the distributor has a minimum incline of 2° upwards (see Fig. 3.c); the ends of the hose are tightened to the fittings with metal clamps; the curves in the tubing are sufficiently wide (radius > 300 mm) so as to not cause bending or choking; the steam hose has no pockets or traps for condensate to form; the paths of the steam and condensate hoses are as described in this chapter (see Fig. 3.d); the length of the steam hose is no greater than 4 metres; the incline of the steam hose is sufficient to allow correct draining of the condensate (> 20° for the upward sections, > 5° for the downward sections); the incline of the condensate hose is at least 5° at every point; the condensate hose always follows a downwards path and features a drain trap (filled with water before starting operation) to avoid steam being released. 13 “Wellness” +030220571 - rel. 3.2 - 09.04.2009 ENG 4. ELECTRICAL CONNECTIONS 4.1 Preparing the electric cableways 4.2 Power cable connection Single-phase models inside unit, top view Three-phase models am iSte humness ll We user AP1 AP2 GND outside unit, bottom view am iSte humness ll We AP1 AP2 GND installer Models UE001 to UE018 L N L1 L2 L3 Fig. 4.c (view inside unit, electrical compartment) Important: connect the yellow-green cable to the earth point (GND). Fig. 4.a Models UE025 to UE065 outside unit, side view 4.3 Temperature probe connection (M2.1M2.8) service • the humidifier can be connected to up to two probes for measuring and controlling the temperature inside the steam bath. The connection with two probes allows an “average” temperature reading (with the possibility to attribute a different “weight” to each probe, see par. “7.3 Temperature probes”, page 21); • active probes (voltage or current signal, CAREL code: ASET030001) or NTC probes (variable resistance) can be connected. For connection, use the “eight pin” connection kit (supplied in the packaging) and run the cables out of the humidifier through the “cable opening” (Figs. 4.a or 4.b). 1 3 2 Active CAREL probe connections: Fig. 4.b Key to Figs. 4.a and 4.b: 1. 2. 3. power cable inlet; utility cable inlet (after having drilled the plastic part): sanitisation pump, essences, fans, light. probe cable inlet. On models UE001 to UE018, remove the plastic “tab” and use it to secure the cable (held in place by the screws provided). M.2 M.7 M.8 M.2.1 M.2.2 M.2.3 M2.4 M.2.5 M.2.6 M.2.7 M.2.8 OUT T GND +G OUT T GND +G 3 1 2 Fig. 4.d (detail of electronic board, humidifier electrical compartment) “Wellness” +030220571 - rel. 3.2 - 09.04.2009 14 ENG CAREL NTC probe connections: Note: in industrial environments (IEC EN61000-6-2), the cables leaving the unit must not exceed 30 m in length, except for the room probe (terminals M2 pin 1-2-3-4-5-6), the remote on/off digital input (terminal M2 pin 7-8) and cable shields for RS485 communication. M.7 M.8 4.5 Alarm contact (M6.1 - M6.3) M.2.1 M.2.2 M.2.3 M2.4 M.2.5 M.2.6 M.2.7 M.2.8 Contact available for the remote signalling of one or more alarms. installer M.2 3 NTC NTC NO F US E NTC NTC NC C M.5 1 M.6 2 Fig. 4.g (detail of utilities board, humidifier electrical compartment) user 1 probe CAREL 1 2 CAREL probe 2 (if available) 3 remote ON/OFF (contact closed= humidifier enabled; contact open= humidifier disabled, in standby) M.6.3 Key to Figs. 4.d and 4.e: M.6.2 M.6.1 Fig. 4.e (detail of electronic board, humidifier electrical compartment) Electrical specifications: 250 Vac; Imax: 2 A resistive 2 A inductive. If non-CAREL probes are used, check: • voltage signal: 0 to 1 Vdc, 0 to 10 Vdc, 2 to 10 Vdc, terminal M2.1 (GND: M2.2); • current signal: 4 to 20, 0 to 20 mA, terminal M2.4 (GND: M2.6). In addition, depending on the type of power supply: • +15 V, terminal M2.3; • + 1 Vdc 135 ohm, terminal M2.4. 4.6 Utility connections (light, fans, sanitisation, essences) The humidifier features of a terminal block for connecting the utilities, located under the electronic board (see the following figure for the connections). Input probe configuration (pin strip connectors JS5, JS6) Depending on the type of connection, the required voltage is made available for the outputs to the utilities (12 V, 24 V, 230 V or voltage-free contact). P1+ G P1- P2- F P2+ P3- PS E P3+ D VE- C PS L- L+ JS5 B VI+ A VI- JS6 VE+ M.2 Fig. 4.f (detail of electronic board, in the humidifier electrical compartment) pin strip configuration 0 to 10 Vdc 2 to 10Vdc JS5 probe 1 JS6 probe 2 Fig. 4.h (detail of utilities board, humidifier electrical compartment) position 0 to 1 Vdc, 4 to 20/0 to 20 mA, NTC probes Legenda: A B C D E F G basic configuration basic configuration light (L+ L-); supply fan (VI+ VI-); exhaust fan (VE+ VE-); sanitisation pump (PS PS); essence pump 3 (P3+ P3-); essence pump 2 (P2+ P2-); essence pump 1 (P1+ P1-). Important: • to avoid unbalanced control, the earth of the probes or the external control devices must be connected to the earth of the appliance’s controller. • For the operation of the humidifier, M2.7 and M2.8 must be connected to the “remote ON/OFF” via an enabling contact or alternatively jumpered (default solution). If these terminals are not connected, all the internal and external devices managed by the controller will be disabled, with the exception of the drain pump for emptying the unit after extended periods. 15 “Wellness” +030220571 - rel. 3.2 - 09.04.2009 service Note: use clamps on the signal terminal blocks (alarm, utilities) to prevent the cables from being detached. ENG ♦ “Utilities powered at different voltages” The humidifier activates but does not supply power to the utilities. The utilities are thus powered externally and at different voltages. Types of utility connection installer ♦ “Utilities powered at the same voltage” The humidifier supplies power to and activates the utilities connected at the same voltage. This is done by applying a 12 V, 24 V or 230 V power supply to terminals AP1 and AP2. Procedure: 1. remove the terminal block (2 pieces) from connector B and disconnect the L, N cables; Insert the terminal block supplied (code 98C565P018) into connector B and reconnect the cables, L (terminal 1) & N (terminal 8); 2. jumper terminals AP1 and AP2; 3. insert the terminal block supplied (code 98C565P012) into connector A and connect the utilities (see the following figure). Procedure: insert the terminal block supplied (code 98C565P012) into connector A and connect the utilities (see the following figure). Note: • maximum load for each utility: 2 A; • AP1 and AP2 are protected by 6.3 A fuses. Note: • maximum load for each utility: 2 A; • AP1 and AP2 are protected by 6.3 A fuses; • the utilities must be suitably protected against overloads and short- B from pCOe 14 13 12 11 10 9 8 7 6 5 4 3 2 1 P3P 3+ P1P 1+ P2P 2+ PS PS VE V E+ VIVI+ L L+ A to pCOe B from pCOe 14 13 12 11 10 9 8 7 6 5 4 3 2 1 P3P 3+ P1P 1+ P2P 2+ PS PS VE V E+ VIVI+ L L+ service 12/24/230 Vac Imax= 6 A AP1 AP2 A AP1 AP2 user circuits. 3 2 to pCOe 1 external power supply Fig. 4.i Fig. 4.j Final checks the rated voltage of the appliance corresponds to the rated supply voltage; the fuses installed are suitable for the line and the power supply voltage; a mains disconnect switch has been installed to disconnect power to the humidifier when required; the humidifier has been correctly earthed; the power cable is fastened using the tear-proof cable gland; terminals M2.7 and M2.8 are connected by jumper or connected to an enable-operation contact; if non-CAREL probes are used: the earth of the probes is electrically connected to the humidifier board earth; if the humidifier is controlled by an external control device, the earth of the signal is electrically connected to the controller earth. “Wellness” +030220571 - rel. 3.2 - 09.04.2009 16 ENG 5.1 Remote display terminal 5.2 GSM network connection (send SMS) The display terminal can be detached from the humidifier and moved to another place. Depending on the distance required, the following are necessary: • up to 50 metres: 6-wire telephone cable and two ferrites (code 0907858AXX) (see Fig. 5.a); • up to 200 metres: two CAREL TCONN6J000 boards, 6-wire telephone cables and an AWG20-22 shielded cable with 3 twisted pairs (for the connection of the two boards, Fig. 5.b). The humidifier can be configured to send SMS message for alarms and malfunctions (see par. “7.10”, page 25). humiSteam Wellness J19 installer 5. REMOTE TERMINAL, GSM MODEM AND SUPERVISORY NETWORK 2b 1 Note: to fill the empty space left by the display terminal on the humidifier, use CAREL kit code HCTREW0000. Remote connection of the terminal up to max 50 m 2c humiSteam Wellness 2a MODEM 3 user 2 1 J18 2 3 2d Fig. 5.c (inside humidifier, electrical compartment) Key: 1 2 telephone cable (up to 50 m distance); two ferrites (code 0907858AXX) to be applied to the ends of the telephone cable; remote display terminal. 3 Remote connection of the terminal up to 200 m 1 electronic board PCOI00MDM0 (to be connected to connector J19 on the humidifier board) 2 • • • • • 3 SIM card to be inserted in the modem. Make sure that the access password (PIN number) is not enabled CAREL GSM kit PLW0P65M00, made up of: 2.a modem 2.b antenna (with magnetic base) 2.c serial cable 2.d power supply humiSteam Wellness 1 5.3 Supervisory network (J19) J18 2 The humidifier can be connected to the following optional boards: SC A J14 C B J15 optional cards 1 2 3 1 2 3 3 2 PCO10000F0 SC A J14 C 5 B J15 1 2 3 1 2 3 3 Fig. 5.b Key: 1 2 3 4 5 characteristics supported used for the direct interface of the controller to an RS485 network used to interface of the controller to an FTT10 LON network, when suitably programmed PCOS004850 4 telephone cable (up to 0.8 m distance); CAREL TCONN6J000 board; pin strip J14 and J15 in position 1-2 (power supply available on the telephone connectors A, B and C and screw SC); AWG20-22 shielded cable with 3 twisted pairs to move the display terminal up to 200 m away. Connection to the TCONN6J00 board: terminal SC function 0 EARTH (shield) 1 +VRL 2 GND 3 RX/TX4 RX/TX+ 5 GND 6 +VRL remote display terminal protocols CAREL, modbus® Winload LON-Echelon PCO1000WB0 provides BACnet 8802.3 Ethernet, BACnet/IP and MS/TP connectivity BACnet PCO1000BA0 Provides BACnet MS/TP over RS485 BACnet PCO100MDM0 used for the direct interface of the CAREL for remote controller to an RS232 network with an connections external modem J19 M.2 M.7 M.8 Fig. 5.d (detail of the electronic board, humidifier electrical compartment) Important: for the tLAN and pLAN connections in residential household (IEC EN 55014-1) and residential (IEC EN 61000-6-3) environments, use shielded cable (with shield connected to GND). This warning also applies to the cables leaving the unit. 17 “Wellness” +030220571 - rel. 3.2 - 09.04.2009 service Key: Fig. 5.a ENG installer 6. STARTING AND USER INTERFACE Before starting the humidifier, check: types of screens are available: water connections: Fig. 2.a page 10. In the event of water leaks do not start the humidifier before having resolved the problem; steam distribution: Fig. 3.d page 13; electrical connections chap. “4” page 14. “Simple”: with the possibility to modify the set point and the type of essences; “Main”: with the possibility to modify the set point, the type of essences and access the “ON/OFF quick access” and “Management menu” screens. “Simple” screen 6.1 Starting 1 2 3 1 1 ON 0 4 if the cylinder is new, run a pre-wash cycle (the cylinder is filled and emptied three times, cleaning the inside walls from impurities, see par. “7.12” page 25). user 2 5 Fig. 6.b Key : symbol 6.2 Stopping 1 1 2 empty the water in the cylinder to avoid stagnation (manual drain by “ON/OFF quick access” screen, see the following page, or par. “7.15” page 27); 3 2 4 5 1 service 0 6 OFF 6 Essence (e.g. Mint) function day and month set point temperature (can be modified using the UP or DOWN button) temperature inside the steam bath (measured by the probe/probes) hour and minutes time bands set (when flashing indicates that a time band is in progress) light on inside the steam bath essence enabled (delivered when the humidifier produces steam) 6.3 User interface “Main” screen 1 4 2 5 3 6 1 2 8 7 6 5 3 4 Fig. 6.a Key to the keypad: button function list active alarms 1 alarm access the “Management menu” screen (password 2 PRG 3 4 5 6 ESC UP ENTER DOWN Fig. 6.c Key : symbol 1 = 77) return to “Simple” or “Main” screen increase the set point from “Main” screen: open “ON/OFF quick access” screen from “Simple” screen: select type of essence ENTER and PRG: move from “Simple” to “Main” screen (and vice-versa). decrease the set point 2 3 4 5 6 7 8 The humidifier produces steam when the temperature recorded (displayed in the centre of the screen in large characters) is less than the set point (at the top in smaller characters). Essence (e.g. Mint) Set point: maximum temperature threshold above which the humidifier no longer produces steam (can be changed using the UP and DOWN buttons). The following screens can be accessed from the “Main” screen: • ENTER button: “ON/OFF quick access” • PRG button: “Configuration menu”. To display the temperature inside the steam bath and the set point, two “Wellness” +030220571 - rel. 3.2 - 09.04.2009 function set point temperature (can be modified using the UP or DOWN button) temperature inside the steam bath (measured by the probe/probes) light on inside the steam bath time bands set (when flashing indicates that a time band is in progress) steam production (without “cloud” steam production in standby) supply fan (fan 1) on exhaust fan (fan 2) on to when moving indicates the operation of the fans, when still indicates fans enabled but in standby essence enabled (delivered when the humidifier produces steam) 18 ENG “Alarms” screen installer “ON/OFF quick access” screen Fig. 6.d Used to: • enable steam production (ON) and activate the manual drain function (**); • select the type of essence (1, 2, 3); • enable the sanitisation function (ON); • switch on the light (ON/OFF/AUTO). Fig. 6.e Function buttons: • ENTER: move the cursor inside the screen; • UP or DOWN: enable/disable. “Management menu” screen user Indicates an alarm is active, press to display. NOTE: the light is managed by the controller only if the function is enabled. To enable the light from the submenu “Maint hardware” submenu press: • ENTER to confirm; • DOWN until displaying the “other options” screen • ENTER to move the cursor to the value of the “enable light” parameter (YES/NO); • UP or DOWN to enable the light (YES); • ESC repeatedly to return to the main screen Fig. 6.f To access press: • PRG from the “Main” screen; • ENTER to move the cursor to the “0”; • UP or DOWN to enter the password “77”; • ENTER to confirm and enter the management submenu: 1. User; 2. Essence; 3. Fan management; 4. Maintenance (info, software, hardware); 5. Sanitisation; 6. Alarm log; 7. Network; 8. GSM. (**) Manually drain the water in the cylinder: • access the “ON/OFF quick access” screen, • position the cursor on “steam”; • press the UP and DOWN buttons together for a few seconds. The same procedure can be repeated to stop the drain cycle in progress. Important: • the “ON/OFF quick access” screen only displays the functions enabled The management menu, the submenu and the screens are cyclical, and follow the same path also in the opposite direction. in configuration phase. • with steam production disabled (OFF) the supply and exhaust fans can be enabled manually; • if the humidifier is enabled but not producing steam, check the following possible causes: possible cause solution the temperature of the steam bath is higher than the set point alarms are active that stop steam production (ALARM button flashing). The humidifier is set to “manual” wait for the temperature of the bath to fall below the set point check and resolve the error (see par. “7.13” page 26) deactivate the manual procedure (submenu par. “7.12”, see page 25) disable the time band (see par. “7.5“ page 22), or modify as required. Tab. 6.a time bands are active (CLOCK icon flashing on the display); 19 “Wellness” +030220571 - rel. 3.2 - 09.04.2009 service (*) In AUTO mode, the light is on if steam production is enabled from all the available sources (keypad, remote contact or BMS). If the time bands are enabled, the light remains on (if all sources are enabled) only during the time band ON periods (see par 7.5). ENG Function of the keypad in the management menu 6.4 Management menu installer 1 User 2 Essences 3 Fans service user 4 Maintenance 5 Sanitisation 6 Alarm log 7 Network 8 GSM (*) button alarm Clock Scheduler Schedule (*) Week sch. (*) T. setpoint (*) Enable descriptions (i) Essence 1 (*) Essence 2 (*) Essence 3 (*) Supply fan (*) Exhaust fan (*) 1 Maint info SW outputs (**) Nom. values (**) Cylinder status (**) Sys info (**) 2 Maint SW Additional features Additional features Disable emptying Conductivity threshold Control parameters SW Input/output Backup Recovery 3 Maint HW Setup Essences Essences Fans Temperature probe 1 Temperature probe 2 Other options Man. procedure Manual proc. Manual procedure San. (*) San. Phase 1 (*) San. Phase 2 (*) Log (**) Supervision SMS 1 (*) SMS 2 (*) (**) PRG ESC UP e DOWN ENTER (*) To reset an alarm in progress, press the ALARM button again. Important: before pressing the ESC button, press the ENTER button to save the last change made. (**) Installer’s notes Names chosen for the essences Essence 1: …………………………………. Essence 2: …………………………………. Essence 3: …………………………………. Tab. 6.b (*) screens available if the functions (user, essences, fans, maintenance, sanitisation, network, GSM) have been enabled. For example: the screens in the “fans” submenu are only visible if enabled in the “Maint HW” submenu; (**) read-only values. “Wellness” +030220571 - rel. 3.2 - 09.04.2009 function access the alarm screen, displaying any alarms in progress (the button flashes)(*) from the “Main” screen: access the management menu return to the previous screen(**) • in the “management menu”: navigate the submenus, screens, parameters cyclically (also in the opposite direction) • inside a screen: modify the values of the parameters (YES/NO, ON/OFF, temperature range,…) • select a submenu, screen, parameter • save the changes to the parameters and move the cursor to the next parameter 20 ENG 7. MAIN CONFIGURATIONS The display terminal can be configured in: Italian, French, Spanish, English, German. Tm= (Ts1*W1/100) + (Ts2*W2/100) To change the language, from the “Main” screen press: • PRG; • ENTER; • UP or DOWN to enter the password “77”; • ENTER; • DOWN (3 times) until displaying the “Maintenance” submenu; • ENTER; • DOWN (once) until displaying the “Maint SW” submenu; • ENTER; • DOWN (5 times) until displaying “SW Input/output” screen; • ENTER (twice) to move the cursor to the parameter “language”; • UP or DOWN to change the language; • ENTER to confirm the language selected and return to the “Main” screen Tm= temperature shown on the display Ts1 & Ts2= temperatures read by the two probes W1 & W2= weights attributed to the two probes, percentage value (W1+W2=100) For example, with the following values: Ts1= 42° W1= 60% Ts2= 44° W2= 40% 7.4 Essences The essences are delivered into the steam bath when the humidifier is producing steam and the temperature reaches 70% of the set point. For example: if the set point is 50°C, the essence will be delivered when the humidifier is producing steam and the temperature measured exceeds 35°C. 7.2 Date and time Important: make sure that the external essence pump is correctly connected. To set the date and time, access the “User” submenu and press: • ENTER to display the “clock” screen; • ENTER to move the cursor to the first digit of the hour; • UP or DOWN to modify the first digit of the hour; • ENTER confirm and move the cursor to the second digit of the hour; • continue with the UP/DOWN buttons and ENTER to set the minutes, day (number), month, year, weekday (from Monday to Sunday); service Enabling the essences From the “Maint HW” submenu press: • ENTER to confirm; • DOWN to select the “Essences” screen (essences 1 and 2); • ENTER to confirm; • UP or DOWN to enable (YES) essence 1; • ENTER to confirm; • UP or DOWN to enable (YES) essence 2; • ENTER to confirm; • DOWN to select the “Essences” screen (essence 3); • ENTER to confirm; • UP or DOWN to enable (YES) output essence 3; • ENTER to confirm; • ESC twice to return to the management menu. 7.3 Temperature probes The humidifier can manage up to two temperature probes: • with one probe, the value read is shown directly on the display; • with two probes, the values saved are “averaged” by the humidifier, and the result is shown on the display (**). • The “Temperature probe” screen (“Maint HW” submenu) can be accessed to set the relevance of one probe compared the other in percentage terms (“weigh probes” parameter). In addition, for each probe the minimum and maximum of the scale and the offset can be set. Setting the essence operating times From the “Essences” submenu press: • ENTER to select the “Essence 1” screen; • ENTER to confirm and move the cursor to the “Time ON” parameter; • UP or DOWN to modify the ON seconds for essence 1; • ENTER to confirm and move the cursor to the “Time OFF” parameter; • UP or DOWN to modify the OFF seconds for essence 1; • ENTER to confirm and move the cursor to the “name” parameter; • UP or DOWN to modify the name of the essence, e.g.: Menthol (*); • repeat the same procedure (ON, OFF times and essence name) for the other essences enabled; • at the end press ESC repeatedly to return to the “Main” screen. Probe settings From the “Maint HW ” submenu press: probe 1 user Tm= (42*60/100) + (44*40/100)= 42.8 °C Note: in the “SW Input/output” screen, the unit of measure can also be selected, °C-kg/h (default) or °F-lbs/hr. probe 2 installer (**) to achieve a temperature value measured with two probes, the humidifier carries out the following calculation: 7.1 Language • ENTER to confirm • DOWN to reach the “Temperature probe 1” screen • ENTER to confirm and move the cursor to the “type of probe” parameter • UP or DOWN to select the type of probe (*) • ENTER to save and move the cursor to “enable probe 2”; • UP or DOWN to enable the second probe (YES); • ENTER to move the cursor to “weigh probes” (**) (UP and DOWN to modify the weights of the 2 probes and ENTER to save and move the cursor); • ENTER to return to the start of the screen; • DOWN to access the screen “Temperature probe 1”; • ENTER to move the cursor to the min. and max. scale and offset values (UP and DOWN to modify the value and ENTER to save and move the cursor); • ESC until displaying the “Main” screen. (*) Characters and symbols available for naming the essences: A M Y + B N Z - C O 0 * D P 1 : E Q 2 ; F R 3 , G S 4 ( H T 5 ) I U 6 / J V 7 # K W 8 L X 9 Function buttons: • UP or DOWN to modify the characters; • ENTER to save and move the cursor to the next character. Up to 10 characters can be used. Write the names of the essences in the “Installer’s notes” on page 20. (*) Possible probe configurations: NTC, 0 to 1 V, 2 to 10 V, 0 to 10 V, 0 to 20 mA, 4 to 20 mA, 0 to 135 ohm, 135 to 1000 ohm 21 “Wellness” +030220571 - rel. 3.2 - 09.04.2009 installer ENG Up to until three essences can be set, and selected from the “ON/OFF quick access” screen or the “Simple” screen. The display will show the name or number of the chosen essence. • DOWN to access the following screen, “Week sch.”: this screen can be 7.5 Time bands The display shows the are active). These are used to switch the humidifier on/off and change the set point at set times. Two types of time bands are available: Setting the variable set point bands (“Temp. scheduler”): used to assign the type of time band (P1, P2, P3, P4) to each day of the week. Use ENTER to move the cursor and UP or DOWN to modify the value; • ESC repeatedly to return to the “Main” screen. From the “User” submenu press: • ENTER to confirm; • DOWN until accessing the “Scheduler” screen; • ENTER (twice) to confirm and move the cursor to “Temp. scheduler”; • UP or DOWN to enable (YES) the “Temp. scheduler” parameter; • ENTER to return to the start of the screen; • DOWN until accessing the “T. setpoint” screen: this screen can be used to customise up to four set point values per day (Z1, Z2, Z3, Z4). Use ENTER to move the cursor and UP or DOWN to modify the value; • ESC repeatedly to return to the “Main” screen. 1. Daily bands (“ON/OFF scheduler” parameters): set how many times to start/stop steam production over a period of 24h: • 2 daily operating periods (parameters P1-1 and P1-2) OFF user 0 ON OFF ON P1-1 OFF 24h P1-2 • 1 daily operating period (parameter P2) OFF ON 0 symbol (that flashes when the time bands OFF The display shows the are active). 24h P2 symbol (that flashes when the time bands • Humidifier enabled all day (parameter P3) ON 0 24h • Humidifier disabled all day (parameter P4) 7.6 Fans OFF service 0 The use of the supply and exhaust fans: • guarantee air change; • perform the sanitisation cycles; • create the “mist effect”. 24h The operating mode (P1, P2, P3, P4) can be associated with each day of the week (from Monday to Sunday). Enabling the fans From the “Maint HW” submenu press: • DOWN until accessing the “Fans” screen • ENTER to move the cursor to “supply fan” • UP or DOWN to enable (YES) the supply fan • ENTER to move the cursor to exhaust fan • UP or DOWN to enable (YES) the exhaust fan • ESC repeatedly to return to the “Main” screen 2. “Variable set point” bands (“Temp. scheduler” parameters): four different temperature set points that vary throughout the day (parameters Z1, Z2, Z3, Z4). 50°C 30°C 20°C 0 24h Z1 Z2 Z3 Z4 The display shows the symbol (next to if the fans are on). Manual fan mode The “daily” and “variable set point” time bands can be programmed to set steam production according to the requirements of the operator of the steam bath (e.g. based on closing times) and with a customised temperature trend (using the 4 set point threshold). The manual management of the fans, from the “ON/OFF quick access” screen, is only available if steam production is disabled (OFF). The manual activation of the fans during steam production is exclusively controlled from the management menu. Note: In this way, the fans can be started using the “ON/OFF quick access” screen (ENTER from the “Main” screen), stopping steam production (steam OFF). When steam production is ON they will be stopped automatically. • during the time band without operation (“OFF”), the humidifier is NOT actually off, but rather steam production is temporarily disabled, including manually; • the “daily” time bands have priority over the “variable set point”. For example, setting P4 on Monday (steam bath closed), parameters Z1, Z2, Z3, Z4 (different set point values) will be ignored, because the humidifier is not programmed to operate on that day. To switch the fans on and off using the management menu (steam ON), from the “Fans” submenu press: • ENTER to confirm and access the Supply fan and/or Exhaust fan screen (depending on the fan enabled); ENTER to move the cursor to Mode (manual/automatic); UP or DOWN to set “Manual”; ENTER to move the cursor to Production (ON/OFF); UP or DOWN to set “ON”; ENTER to confirm; UP or DOWN to repeat the same operation for the other fan (if enabled); • ESC repeatedly to return to the “Main” screen • • • • • • Setting the daily bands (“ON/OFF scheduler”): From the “User” submenu press: • ENTER to confirm; • DOWN until displaying the “Scheduler” screen; • ENTER to confirm and move the cursor to the “ON/OFF scheduler” parameter; • UP or DOWN to enable (YES) the daily bands; • ENTER (twice) to return to the start of the screen; • DOWN to access the “Scheduler” screen: to set the daily band start and end time (P1-1, P1-2 and P2). Use: ENTER to move the cursor and UP or DOWN to modify the value; • ENTER until move the cursor to the start of the screen; “Wellness” +030220571 - rel. 3.2 - 09.04.2009 22 The operation of the fans is bound by steam production: this is switched on and off only from the management menu (setting production “OFF” on the fans screen). Programmed automatic mode: supply fan From the “Fans” submenu press: • ENTER to confirm and access the Supply fan screen; • ENTER to move the cursor to “Mode” (manual/automatic); • UP or DOWN to set “Automatic”; • ENTER to move the cursor to “Type” (setpoint/programmed); • UP or DOWN to set “Programmed”; • ENTER to confirm;ESC repeatedly to return to the “Main” screen. The fan starts in the time bands enabled for steam production Automatic fan mode Automatic fan mode changes depending on whether the time bands are activated. If the time bands are not activated, only the “Set point automatic” operating mode will be available. If, on the other hand, the time bands are enabled, “Automatic set point” or “Programmed automatic” can be chosen. Programmed automatic mode: exhaust fan From the “Fans” submenu press: • ENTER to confirm and DOWN to access the Exhaust fan screen; • ENTER to move the cursor to “Mode” (manual/automatic); • UP or DOWN to set “Automatic”; • ENTER to confirm and move the cursor to “type” (setpoint/periodic/ programmed); • UP or DOWN to choose “Programmed” automatic mode; • ESC repeatedly to return to the “Main” screen. The fan starts in the time bands enabled for steam production user Setpoint automatic mode (or periodic for exhaust fan only) This varies depending on the type of fan: • supply fan: the fan stops when reaching the set point (related to steam production); • exhaust fan: the fan starts when reaching the set point, or alternatively after a set time (periodical operation, independent of steam production). installer ENG Setpoint automatic mode: supply fan From the “Fans” submenu press: • ENTER to confirm and access the “Supply fan” screen; • ENTER to move the cursor to “Mode” (manual/automatic); • UP or DOWN to set “Automatic”; • ENTER to move the cursor to “Type” (setpoint/programmed); • UP or DOWN to set “Set point”; • ENTER to confirm; • ESC repeatedly to return to the “Main” screen. 7.7 Sanitisation The sanitisation cycle is used to alternately activate the two fans: • phase T1 supply fan; • phase T2 exhaust fan. The fan runs until reaching the temperature set point (related to steam production). The activation of the sanitisation cycle can be manual (using the “ON/ OFF quick access” screen) or automatic (at the end of the last steam production time band). Setpoint or periodical automatic mode: exhaust fan From the “Fans” submenu press: • ENTER to confirm and DOWN to access the Exhaust fan screen; • ENTER to move the cursor to “Mode” (manual/automatic); • UP or DOWN to set “Automatic”; • ENTER to confirm and move the cursor to “type” (setpoint/periodic/ programmed); • UP or DOWN to choose the automatic “Setpoint/Periodic”(*) mode; • ESC repeatedly to return to the “Main” screen. Note: Automatic mode is only available when the time bands are enabled. Important: before setting the sanitisation cycle, make sure that the external pump/solenoid valve - used to inject the disinfectant in the steam hose - is connected correctly. (*) Setpoint: The fan starts when reaching the temperature set point and steam production stops. Periodic: The fan starts and stops after a certain operating time (in the “Exhaust fan” screen, set ON time and OFF time). This mode is not related to steam production or the set point. Enabling sanitisation From the “Maintenance” submenu press: • ENTER to confirm; • DOWN to select the “Maint HW” menu; • ENTER to confirm; • DOWN until selecting the “Other options” screen; • ENTER to confirm and move the cursor to “enable sanificat.”; • UP or DOWN to enable (YES); • ENTER to confirm; • ESC repeatedly to return to the “Main” screen. To switch the fans on and off using the “ON/OFF quick access” screen (steam OFF), from the “Fans” submenu press: • ENTER to confirm and access the Supply fan and/or Exhaust fan screen (depending on the fan enabled); • ENTER to move the cursor to “Mode” (manual/automatic); • UP or DOWN to set “Manual”; • ENTER to move the cursor to Production (ON/OFF); • UP or DOWN to set “OFF”; • ENTER to confirm; • UP or DOWN to repeat the same operation for the other fan (if enabled); • ESC repeatedly to return to the “Main” screen. Manual sanitisation mode From the “sanification” submenu press: • ENTER to confirm and open the “sanification” screen; • UP or DOWN to enable manual sanitisation; • ESC repeatedly to return to the “Main” screen, or alternatively ESC twice to return to the management menu to set the sanitisation cycle times and mode. Programmed automatic operating mode Automatic sanitisation mode Available only when the time bands are enabled. Used to activate the sanitisation cycles at the “end of the day”, that is, at the end of the last steam production time band. From the “sanification” submenu press: • ENTER to confirm and open the “sanification” screen; • UP or DOWN to enable automatic sanitisation; • ESC repeatedly to return to the “Main” screen, or alternatively ESC twice to return to the management menu to set the sanitisation cycle times and mode. Both fans are on in the time bands when the humidifier is enabled for steam production. All enabling conditions must be true: • humidifier is enabled from the keypad • remote enabling signal (from the supervisor or remote contact closed) • time band in the ON period (see par 7.5) 23 “Wellness” +030220571 - rel. 3.2 - 09.04.2009 service During the operation of the fans, steam production and the sanitisation pump can be activated (to deliver the disinfecting liquid). • installer ENG Setting the sanitisation times and phases From the “sanification” submenu press: • ENTER to enter the “sanification” screen; • ENTER values for T1 and T2; • UP or DOWN to set the duration of the cycles in minutes; • ENTER until moving the cursor to the start of the screen; • DOWN to access the “San. phase 1” (T1) screen; • ENTER to enable the desired functions (with the UP or DOWN button) and press ENTER to move the cursor to the next parameter; • ENTER until moving the cursor to the start of the screen; • DOWN to access the “San. phase” (T2) screen, and set the second sanitisation cycle; • ESC repeatedly to return to the “Main” screen. Drain without power The evaporation of the water causes an accumulation of salts inside the cylinders, leading to an increase in conductivity. The humidifier thus automatically runs a short drain cycle (drain to dilute) to lower the conductivity. During the drain cycle the contactor is open, so that the water drained does not conduct current (in this short period, in fact, steam production is momentarily stopped). To perform the drain cycle with the contactor closed, from the “Maint SW” submenu press: : • ENTER to access the “Additional features” screen; • ENTER to move the cursor to the “Unpowered drain” parameter; • UP or DOWN to disable (NO) or enable (YES, default) the function; • ESC repeatedly to return to the “Main” screen. Disabling the “Cylinder pre-exhaustion” and “Cylinder exhaustion” alarms To disable these two alarm signals, press: • ENTER to access the “Additional features” screen; • ENTER to move the cursor to the “Cylinder warning” parameter; • UP or DOWN to disable (NO) or enable (YES, default) the function; • ENTER to confirm; • ESC repeatedly to return to the “Main” screen. user 7.8 Advanced settings (qualified personnel only) Important: these settings should only be made by qualified personnel, improper uses may cause serious damage. service Automatic water drain Drain due to set point reduction The humidifier empties a small quantity of water if the requested production is decreased by more than 33%. With less water the humidifier can reach the new steam production set point more quickly. To disable this function, from the “Maint SW” menu press: • ENTER to access the “Additional features” screen; • ENTER to move the cursor to the “Drain by low setp” parameter; • UP or DOWN to disable (NO) or enable (YES, default) the function; • ENTER to confirm; • ESC repeatedly to return to the “Main” screen. “Delay stop steam” function Used to delay the interruption of steam production after a steam off request. To set the delay time (maximum 120 seconds), from the “Maint SW” submenu press: • ENTER to enter the second “Additional features” screen; • ENTER to move the cursor to the “force cond.” parameter; • UP or DOWN to set the conductivity value (up to 2000 μS/cm); • ENTER to confirm; • ESC repeatedly to return to the “Main” screen. Drain due to inactivity If the humidifier not used for an extended period, the water in the cylinder should be drained to prevent stagnation and hygiene risks. To set this function, from the “Maint SW” submenu press: • ENTER to access the “Additional features” screen; • ENTER to move the cursor to the “Inactivity drain” parameter; • UP or DOWN to enable (YES, default) disable (NO) the function; • ENTER until moving the cursor to the start of the screen; • DOWN to access the second “Additional features” screen; • ENTER to move the cursor to the “Inactivity drain” parameter ; • UP or DOWN to modify the number of days without steam production after which the automatic drain cycle is activated (default 3 days); • ENTER to confirm ; • ESC repeatedly to return to the “Main” screen. Conductivity of the supply water Forced conductivity setting To enable the forced conductivity setting, from the “Maint SW” submenu press: • ENTER to enter the second “Additional features” screen; • ENTER to move the cursor to the “force cond.” parameter; • UP or DOWN to set the conductivity value (up to 2000 μS/cm); • ENTER to confirm; • ESC repeatedly to return to the “Main” screen. High conductivity alarms To determine the high conductivity alarm thresholds, from the “Maint SW” menu press: • ENTER until reaching the “Thresholds conduct.” screen; • ENTER to move the cursor to the “Warning” parameter (1,000 μS/cm); • UP or DOWN to set the conductivity pre-alarm value (signal only); • ENTER to confirm and set the conductivity alarm value (1250 μS/cm; signal and stop steam production); • ENTER to confirm; • ESC repeatedly to return to the “Main” screen. Note The alarms are not activated if the forced conductivity setting is enabled. Periodical drain (for water rich in residues) Operation with water containing considerable traces of humus, lime, debris, may affect the efficiency and the operation of the humidifier. In these cases a periodical complete drain cycle of the water contained in the cylinders may be useful in helping to discharge the sediments. To automatically set the periodical drain cycle, from the “Maint SW” submenu press: • ENTER to access the “Additional features” screen; • ENTER to move the cursor to the “Periodic flushing” parameter; • UP or DOWN to enable (YES) disable (NO, default) the function; • ENTER to move the cursor to the last “Periodic flushing” parameter; • UP or DOWN to set the number of hours between one drain cycle and the next (default 24 h); • ESC repeatedly to return to the “Main” screen. “Wellness” +030220571 - rel. 3.2 - 09.04.2009 Duration and frequency of the drain to dilute cycle Based on the type of water used, the duration and the frequency of the automatic drain cycle can be set as a percentage of the rated value. From the “Maint SW” submenu press: • ENTER until reaching the “Thresholds conduct.” screen; • ENTER to move the cursor to the “Drain duration” parameter (default 100%); • UP or DOWN to set the percentage of the duration; • ENTER to confirm and set the percentage of the frequency between one drain cycle and the next (default: 100%); • ENTER to confirm; • ESC repeatedly to return to the “Main” screen. 24 ENG 7.9 Copying the settings (backup) 7.10 GSM (send SMS on alarms) This function is used to save a copy of the settings (e.g.: names of the essences, fan operation, time band settings,...). The copy saved can be restored when needed, for example when errors are made in the settings. A copy of the settings should be made for each required configuration. Important: to send an SMS, the humidifier must be fitted with the electronic board PCO100MDM0, the GSM modem kit PLW0PGSM00 and a SIM card inserted in the modem (for installation see par. “5.2” page 17). Creating a copy of the settings From the “Maint SW” submenu press: • ENTER to confirm; • DOWN until displaying the “Backup” screen; • ENTER to move the cursor to YES/NO; • UP or DOWN to set YES; • ENTER to confirm; • ESC repeatedly to return to the “Main” screen. installer By setting the GSM function, when alarms are activated the humidifier sends an SMS (short message service) to the mobile phone number configured. Example of an SMS: “CAREL SPA STEAM BATH New active alarm Cylinder full 16:15 28/ 6/ 7(*) CAREL – humiSteam code application ....................... and version .........................” (*) Enabling the SMS function From the “network” submenu: • ENTER to display the “Supervisor” screen; • ENTER to move the cursor to the “Ident. number for BMS net” parameter; • UP or DOWN to set the identifier number (*) (default: 1); • ENTER to confirm and move the cursor to the “Baud rate” parameter; • UP or DOWN to set the baud rate (for SMS 9600BPS); • ENTER to confirm and move the cursor to the “Protocol” parameter; • UP or DOWN to select the GSM protocol; • ENTER to confirm; • ESC repeatedly to return to the “Main” screen. Important: All the changes made since the last copy was saved will be lost. SMS settings From the “GSM” submenu • ENTER to display the “SMS” screen; • ENTER to move the cursor to the “Text on SMS mask” parameter; • UP or DOWN to set the text (see “Characters and symbols for naming the essences” page 21); • ENTER to set the mobile phone number (**); • DOWN to move the cursor to the following “SMS” screen, to display the strength of the GSM signal and the status of the modem; • ESC repeatedly to return to the “Main” screen. (*) This parameter can be used to associate an identifier to each humidifier. This function is required to identify each unit within a supervisory network. (**) • • • • Important: only use numeric characters; disable the PIN code on the SIM card; the messages can only be sent in SMS format; the SMS messages are subject to the fees and conditions of the operator providing the SIM card. CAREL declines all responsibility for the failure to send and receive SMS messages. 25 “Wellness” +030220571 - rel. 3.2 - 09.04.2009 service Restoring the last copy From the “Maint SW” submenu press: • ENTER to confirm; • DOWN until displaying the “Restore” screen; • ENTER to move the cursor to the YES/NO; • UP or DOWN to set YES; • ENTER to confirm. • ESC repeatedly to return to the “Main” screen. user Time/date (and format) correspond to the humidifier data Important: the humidifier only has one data line (baud rate and protocol). Enabling the SMS function disables the supervisory network (and vice-versa). ENG installer 7.11 Enable supervisor network From the “network” submenu: • ENTER to display the “Supervisor” screen; • ENTER to move the cursor to the “Ident. number for BMS net” parameter; • UP or DOWN to set the identifier for each unit (*); • ENTER to confirm and move the cursor to the “Baud rate” parameter; • UP or DOWN to set the baud rate for the network in question; • ENTER to confirm and move the cursor to the “Protocol” parameter; • UP or DOWN to select the type of protocol; • ENTER to confirm; • ESC repeatedly to return to the “Main” screen. (*) user For example, to connect three humidifiers to a supervisory network, an identifier must be assigned to each unit. The supervisor PC will recognise the three humidifiers using this number. ON/OFF from supervisor To enable the humidifier to be switched ON/OFF from the supervisor, from the “Network” submenu press: • ENTER to move the cursor to the value of the “Enable supervisory ON/ OFF” parameter; • UP or DOWN to enable ON/OFF from the supervisor (YES); • ESC repeatedly to return to the “Main” screen. service 7.12 Manual procedures (qualified personnel only) Important: these procedures should only be carried out by qualified personnel, improper use may cause serious damage. These procedures are used to manually test the main functions and the operation of the humidifier. To enable the manual procedures, the humidifier must not be producing steam (steam OFF from “ON/OFF quick access” screen). Accessing the manual procedures: From the “Maint HW” screen press: • ENTER to confirm; • DOWN to select the “Man. procedure” screen; • ENTER to confirm and move the cursor to field the enable the procedure (YES/NO); • UP or DOWN to enable (YES); • ENTER to confirm and move the cursor to “contactor”; • UP or DOWN to test the contactor (ON) and at the end of the test, UP or DOWN to disable (OFF). Repeat the same procedure for the other functions that to be tested (on the three consecutive screens); • at the end of the test return to the first “Man. procedure” screen and disable the procedure (from YES to NO). The humidifier will return to normal operation; • ESC repeatedly to return to the “Main” screen. Manual procedure functions (distributed over three consecutive screens): Contactor Fill Drain Alarm Light Reset hour count Supply fan Exhaust fan Essence 1,2,3 Health Emptying cylinder (**) Pre-cleaning cylinder (**) (**) Screen 1 Screen 2 Screen 3 Humidifier automatically reset at the end of the test. “Wellness” +030220571 - rel. 3.2 - 09.04.2009 26 ENG 7.13 Displaying the alarms solution reset alarm relay active consequence Alarm: EP excessive reduction in steam production, Perform maintenance on the cylinder Low Production or excessive foam in the cylinder. (cylinder OFF) manual Alarm: EF Lack of water (cylinder OFF) no water in the cylinder automatic (automatic water return procedure) active stop steam production Alarm: Ed Drain alarm(Cylinder OFF) drain malfunction manual active stop steam production Alarm: EL Low urrent (Cylinder OFF) Alarm: EH High current (Cylinder OFF) power not available; when the unit is activated no steam is produced with the unit off and disconnected from the mains, check the electrical connections. manual active stop steam production probable fault in the electrodes or water temporarily too conductive(especially when restarting after a short stop) 1. check the operation of the electric drain pump; manual 2. check the seal of the fill solenoid valve when not energised; drain some of the water and re-start. active stop steam production Alarm: EC High conductivity (Cylinder OFF) high supply water conductivity manual active stop steam production automatic not active signal only automatic not active signal only Warning: Ec High conductivity Alarm: E= High temp. 1. check that the supply hose and the internal hoses are not blocked or choked and that there is sufficient pressure (0.1 to 0.8 MPa, 1 to 8 bars); 2. check the operation of the fill solenoid valve; 3. check that the steam outlet is not operating with excessive backpressure, preventing the flow of water into the cylinder by gravity; 4. check that the steam outlet hose is not choked and that there are no pockets of condensate check the water drain circuits and the correct operation of the electric drain pump 1. check the limit threshold set; 2. switch the unit off and clean the electrodes that measure of the conductivity of the water; if the problem persists, change the origin of the supply water or use a suitable treatment system (partial demineralisation). Note: the problem is not resolved by softening the supply water pre-alarm: high supply water conductivity 1. check the conductivity of the supply water, if necessary use a suitable treatment system (partial demineralisation). Note: the problem is not resolved by softening the supply water pre-alarm: high temperature check the operation of the probe and the high temperature parameter stop steam production Alarm: E_ Low temp. pre-alarm: low temperature check the operation of the probe and the low temperature parameter automatic not active signal only Alarm: E3 Probe 1 fault or offline Alarm: E4 Probe 2 fault or offline Warning: EA Foam cylinder 1st probe disconnectedor faulty alarm check the connection of the probe, and the type of probe selected on the: “type of probe” screen (“Maint HW” submenu) check the connection of the probe, and the type of probe selected on the: “type of probe” screen (“Maint HW” submenu) the entrainment of foam is generally due to the presence of surfactants in the water (lubricants, solvents, detergents, water treatment agents, softeners) or an excessive concentration of dissolved salts: 1. drain the water supply lines; 2. clean the cylinder make sure a softener is not used (if so, use another source of water or reduce the softening). perform maintenance and/or replace the cylinder automatic active stop steam production automatic not active stop steam production manual not active signal only manual not active signal only manual active stop steam production Warning: CP Preexhaustion cylinder Alarm: EU full cylinder (cylinder OFF) 2nd probe disconnectedor faulty alarm excessive foam in the cylinder during boiling pre-alarm: cylinder being depleted cylinder full with unit off with the unit off : 1. check for any leaks from the fill solenoid valve or the condensate return from the hose, check that the level sensors are clean 27 “Wellness” +030220571 - rel. 3.2 - 09.04.2009 user meaning and cause service alarm installer From the alarm log submenu, press ENTER to display the alarms (type of alarm, date and time) The humidifier saves up to 200 alarms. user installer ENG alarm meaning and cause solution Warning: CL Exhaustion cylinder Warning: CY Cylinder maintenance recommended cylinder depleted perform maintenance and/or replace the cylinder manual alarm relay active cylinder maintenance recommended perform maintenance and/or replace the cylinder manual (reset counter) not active signal only Alarm: Mn Cylinder maintenance mandatory (cylinder OFF) cylinder maintenance required Replace the cylinder manual (reset counter) active stop steam production Clock board fault Clock error Electronic microprocessor controller installed backup battery completely inside the humidifier electrical compartment discharged or general problems with the clock utilities board offline or faulty - connect the board - deactivate the utility functions relating to the alarm signal manual not active signal only automatic active signal only Alarm: utility board 1 or 2 reset consequence stop steam production Tab. 7.a Cylinder OFF= the cylinder is not able to produce steam The alarm button performs a number of actions, depending on how many times it is pressed. Action/Pressing Effect the button service first time second time third time fourth time display the alarm code; if more than one alarm is active at the same time, the codes are displayed in sequence by pressing UP or DOWN. if the cause of the alarm has been resolved, the alarm is no longer displayed and the corresponding relay is deactivated (if fitted) the cause of the alarm has been resolved, the alarm is no longer displayed, the corresponding relay is deactivated and the display shows: 7.15 Mechanically draining the water in the cylinder return to the main screen Tab. 7.b Drain due to gravity without activating the humidifier, recommended if: • the humidifier is decommissioned, to empty the cylinder without switching on the humidifier; • to eliminate the residual water following a drain cycle by pump. 7.14 Info-menu Mechanical drain: • make sure that the humidifier is not powered; • remove the cover (see par. “1.6” page 8); • activate the mechanical device under the cylinder (see part. A Fig. 7.a). Series of screens that describe the functions and the use of the screens in the management menu. Enabling “info-menu” (disabled by default), all access to the submenus will be preceded by a descriptive screen (to continue navigating, press ENTER). Models UE001 to UE018 Enabling info-menu From the “utility” submenu press: • ENTER to confirm; • DOWN until displaying the screen with the “enable info?” parameter; • ENTER to move the cursor to the value of the parameter (YES/NO); • UP or DOWN to enable the info-menu function (YES); • ESC repeatedly to return to the “Main” screen; Models UE025 to UE065 A A Fig. 7.a Other types of drains: • manual (from “ON/OFF quick access” screen, see page 19; and manual procedure, see par. “7.12” page 25); • automatic (see par. “Automatic water drain“ page 23. “Wellness” +030220571 - rel. 3.2 - 09.04.2009 28 ENG 8. MAINTENANCE AND SPARE PARTS tank internal pipe kit fill solenoid valve kit cylinder manifold with drain pump plastic base plastic humidifier top TAM (transformer for measuring the current) transformer contactor fuse carrier pCOe expansion board (controller I/O expansion) microprocessor electronic controller power terminals utility terminal block plastic base switch terminal with liquid crystal display service 1 2 3 4 5 6 7 8 9 10 11 12 13 14 15 16 17 18 user Key to Figs. 8a and 8.b: installer 8.1 Spare parts for models UE001 to UE018 Fig. 8.a 7 8 9 10 11 12 13 14 15 16 17 18 Fig. 8.b 29 “Wellness” +030220571 - rel. 3.2 - 09.04.2009 ENG Table of water circuit, electrical and electronic spare parts, UE001 to 018 UE001 UE003 UE005 spare part code UE008 UE009 UE010 UE015 position figure 1 3 2 16 7 3 8.a 8.a 8.a e 8.c 8.b 8.b 8.a 11 8 8.b 8.b e 8.d 9 13 12 8.b e 8.d 8.b e 8.d 8.b UE018 user installer Water circuit Fill tank + conductivity meter Fill solenoid valve kit Internal pipe kit Plastic humidifier base Plastic humidifier top Assembled f/d manifold + pump Electrical and electronics Display terminal TAM (current transformer) Contactor Power transformer: 230-400/24-24 V Microprocessor electronic controller pCOe expansion board (Controller I/O expansion) Fuse carrier F1 - F2 230 to 400 Vac power fuses F4 Transformer secondary fuse (F41) UEKVASC000 KITVC10006 UEKT10000S 18C565A019 18C476A011 18C565A018 HCT1EWF000 09C565A042 0203013AXX 09C565A016 HCA0EW0000 PCOE00TLN0 0203012AXX F5 - F6 pCOe fuse AP1 - AP2 Terminal fuse Connection cable between terminal and electronic controller PF1 Controller fuse service KITVC10011 UEKT10000M 0606192AXX 0605321ALG 0605581AXX (F41) 0605620AXX (F42) 0605615AXX 0605595AXX S90CONN002 11 - 8.b e 8.d see wiring diagrams see wiring diagrams - see wiring diagrams 0605604AXX - see wiring diagrams Tab. 8.a Table of spare part codes, single-phase cylinders UE001 to 005, electrode and gasket kit Model STANDARD disposable cylinders SPECIAL disposable cylinders SPECIAL openable cylinders Electrode and gasket kit 200/230 Vac 3~, conductivity 350 to 1250 μS/cm 200/230 Vac 3~, conductivity 125 to 350 μS/cm 200/230 Vac 3~, conductivity 125 to 350 μS/cm 200/230 Vac 3~, conductivity 350 to 1250 μS/cm 200/230 Vac 3~, conductivity 125 to 350 μS/cm 200/230 Vac 3~, conductivity 350 to 1250 μS/cm Electrode gasket kit UE001 BL0S1F00H1 UE003 BL0S1F00H1 UE005 BL0S2F00H0 UE009 BL0S3F00H0 BL0S1E00H1 BLCS1E00W1 BLCS1F00W1 KITBLCS1E0 KITBLCS1F0 KITBLC1FG0 BL0S1E00H1 BLCS1E00W1 BLCS1F00W1 KITBLCS2E0 KITBLCS2F0 KITBLC2FG0 BL0S2E00H0 BLCS2E00W0 BLCS2F00W0 KITBLCS2E0 KITBLCS2F0 KITBLC2FG0 BL0S3E00H0 BLCS3E00W0 BLCS3F00W0 KITBLCS3E0 KITBLCS3F0 KITBLC3FG0 Tab. 8.b Table of spare part codes, three-phase cylinders UE003 to 018, electrode and gasket kit Model STANDARD disposable cylinders SPECIAL disposable cylinders SPECIAL openable cylinders Electrode and gasket kit 200/230 VAC 3~, conductivity 350 to 1250 μS/cm 400 VAC 3~, conductivity 350 to 750 μS/cm 200/230 VAC 3~, conductivity 125..350 μS/cm 400 VAC 3~, conductivity 125 to 350 μS/cm 400 VAC 3~, conductivity 750 to 1250 μS/cm 200/230 VAC 3~, conductivity 125..350 μS/cm 400 VAC 3~, conductivity 125 to 350 μS/cm 400 VAC 3~, conductivity 350 to 750 μS/cm 400 VAC 3~, conductivity 750 to 1250 μS/cm Electrode kit 200/230 Vac 3~, 125/350 μS/cm Electrode kit 200/230 Vac 3~, 350/1250 μS/cm Electrode kit 400 Vac 3~, 125/350 μS/cm Electrode kit 400 Vac 3~, 350/750 μS/cm Electrode kit 400 Vac 3~, 750/1250 μS/cm Electrode gasket kit “Wellness” +030220571 - rel. 3.2 - 09.04.2009 UE003 BL0T1B00H1 UE005 BL0T2B00H0 UE008 BL0T2B00H0 UE010 BL0T3B00H0 UE015 BL0T3A00H0 UE018 BL0T3B00H0 BL0T1C00H1 BL0T2C00H0 BL0T2C00H0 BL0T3C00H0 BL0T3B00H0 BL0T3B00H0 BL0T1A00H1 BL0T1A00H1 BL0T1D00H1 BLCT1A00W1 BLCT1A00W1 BLCT1C00W1 BLCT1D00W1 KITBLCT1A0 KITBLCT1B0 KITBLCT1A0 KITBLCT1C0 KITBLCT1D0 KITBLC1FG0 BL0T2A00H1 BL0T2B00H0 BL0T2D00H0 BLCT2A00W1 BLCT2B00W0 BLCT2C00W0 BLCT2D00W0 KITBLCT2A0 KITBLCT2B0 KITBLCT2B0 KITBLCT2C0 KITBLCT2D0 KITBLC2FG0 BL0T2A00H1 BL0T2B00H0 BL0T2D00H0 BLCT2A00W1 BLCT2B00W0 BLCT2C00W0 BLCT2D00W0 KITBLCT2A0 KITBLCT2B0 KITBLCT2B0 KITBLCT2C0 KITBLCT2D0 KITBLC2FG0 BL0T3A00H1 BL0T3B00H0 BL0T3D00H0 BLCT3A00W1 BLCT3B00W0 BLCT3C00W0 BLCT3D00W0 KITBLCT3A0 KITBLCT3B0 KITBLCT3B0 KITBLCT3C0 KITBLCT3D0 KITBLC3FG0 BL0T3A00H1 BL0T3B00H0 BL0T3D00H0 BLCT3A00W1 BLCT3B00W0 BLCT3B00W0 BLCT3D00W0 KITBLCT3A0 KITBLCT3B0 KITBLCT3B0 KITBLCT3C0 KITBLCT3D0 KITBLC3FG0 BL0T3A00H1 BL0T3B00H0 BL0T3D00H0 BLCT3A00W1 BLCT3B00W0 BLCT3B00W0 BLCT3D00W0 KITBLCT3A0 KITBLCT3B0 KITBLCT3B0 KITBLCT3C0 KITBLCT3D0 KITBLC3FG0 Tab. 8.c 30 ENG 8.2 Spare parts, models UE025 to UE065 1 7 2 3 drain circuit fill solenoid valve kit internal pipe kit drain pump kit manifold cylinder drain pump hose TAM (transformer for measuring the current) contactor transformer pCOe expansion board (controller I/O expansion) pump control relay fuse carrier microprocessor electronic controller power terminals utility terminal block cable clamp switch terminal with liquid crystal display (fitted on the cover of the electrical compartment) user 1 2 3 4 5 6 7 8 9 10 11 12 13 14 15 16 17 18 19 6 installer Key: 4 5 service Fig. 8.c 8 9 10 11 12 13 14 15 16 17 18 19 Fig. 8.d 31 “Wellness” +030220571 - rel. 3.2 - 09.04.2009 ENG Table of water circuit, electrical and electronic spare parts, UE025 to UE065 description service user installer UE025 Water circuit Drain pump hose Manifold Drain pump kit Internal pipe kit Double check valve kit Conductivity meter kit Fill solenoid valve kit Drain circuit Electrical and electronics Display terminal pCOe expansion board (controller I/O expansion) TAM (current transformer) Contactor (V= 400) Power transformer: 230/400-24V Microprocessor electronic controller Fuse carrier Pump control relay F1 - F2 230 to 400Vac power fuses UE035 spare part code UE045 400 V 230 V position 13C479A001 18C499A001 KITPS00000 7 5 4 UEKT10000L UEKT1000XL 3 FWHDCV0000 KITCN00000 KITVC10058 KITVC10070 KITVC10070 KITVC10070 2 13C565A031 1 HCT1EWF000 PCOE00TLN0 09C565A042 0203014AXX 09C565A044 HCA0EW0000 0606193AXX 0102001AXX 0605319AXX 0203013AXX figure UE065 8.c 8.c 8.c 8.a e 8.c 8.c 8.c 19 11 8 8.b 8.d 8.b e 8.d 10 14 13 12 - 8.b e 8.d 8.b e 8.d 8.b e 8.d 8.d see wiring diagrams see wiring diagrams see wiring diagrams see wiring diagrams 0203007AXX F3 Pump fuse 0605319AXX - F4 Transformer secondary fuse 0605624AXX - F5 - F6 pCOe fuse 0605615AXX - AP1 - AP2 Terminal fuse 0605595AXX - Connection cable between terminal and HHPC PF1 Controller fuse S90CONN002 0605604XXX - see wiring diagrams see wiring diagrams Tab. 8.d Table of spare parts for standard and special cylinders UE025 to UE065 Description STANDARD disposable cylinders SPECIAL disposable cylinders SPECIAL openable cylinders Electrode and gasket kit 200/230V 3ph cylinder, conductivity 350 to 1250 μS/cm 400V 3ph Cylinder, conductivity 350 to 1250 μS/cm 200/230V 3ph Cylinder, conductivity 125 to 350 μS/cm 400V 3ph Cylinder, conductivity 125 to 350 μS/cm 200/230V 3ph Cylinder, conductivity 125 to 350 μS/cm 200/230V 3ph Cylinder, conductivity 350 to 1250 μS/cm 400V 3ph Cylinder, conductivity 125 to 350 μS/cm 400V 3ph Cylinder, conductivity 350 to 1250 μS/cm 200/230V 3ph Cylinder, conductivity 125 to 350 μS/cm 200/230V 3ph Cylinder, conductivity 350 to 1250 μS/cm 400V 3ph Cylinder, conductivity 125 to 350 μS/cm 400V 3ph Cylinder, conductivity 350 to 1250 μS/cm Gasket kit “Wellness” +030220571 - rel. 3.2 - 09.04.2009 32 UE025 BL0T4C00H0 BL0T4C00H0 UE035 BL0T4B00H0 BL0T4D00H0 UE045 BL0T5A00H1 BL0T4C00H0 UE065 BL0T5C00H0 BL0T4B00H0 BL0T4C00H0 BLCT4B00W0 BLCT4C00W0 BLCT4C00W0 BLCT4C00W0 KITBLCT4B0 KITBLCT4C0 KITBLCT4C0 KITBLCT4D0 KITBLC4FG0 BL0T4B00H0 BL0T4C00H0 BLCT4B00W0 BLCT4B00W0 BLCT4C00W0 BLCT4D00W0 KITBLCT4B0 KITBLCT4C0 KITBLCT4C0 KITBLCT4D0 KITBLC4FG0 BL0T5A00H1 BL0T4B00H0 BLCT5A00W0 BLCT5A00W0 BLCT4B00W0 BLCT4C00W0 KITBLCT5A0 KITBLCT5A0 KITBLCT4B0 KITBLCT4C0 KITBLC4FG0 -BL0T5B00H0 --BLCT5B00W0 BLCT5C00W0 --KITBLCT5B0 KITBLCT5C0 KITBLC5FG0 Tab. 8.e ENG 8.3 Cleaning and maintenance of the cylinder The cable ends must be tightened with the top nut to 3 Newton • m. A 65 F C A B A 2 1 B 1 1 2 8.5 Cleaning and maintenance of the other components Important: user Fig. 8.e • when cleaning the plastic components do not use detergents or solvents; • scale can be removed using a solution of 20% acetic acid and then Maintenance checks on other components: fill solenoid valve (Fig. 8.a part. 3 and Fig. 8.c part. 2). After having disconnected the cables and the tubing, remove the solenoid valve and make sure the inlet filter is clean; if necessary, clean with water and a soft brush; manifold with drain pump (Fig. 8.a part. 5). Check that there are no solid residues in the cylinder attachment, remove any impurities. Check that the gasket (o-ring) is not damaged or cracked, replace if necessary. Check that there are no solid residues in the drain hose; drain pump (Fig. 8.c part. 4). Disconnect the power supply, unscrew the fastening screws and remove any impurities (Fig. 8.a part. 6). Clean the tank from any deposits and check that the water flows freely from the tank to the drain (corresponding to the drain pump); tank (Fig. 8.a part. 1). Check that there are no obstructions or solid particles and that the conductivity measuring electrodes are clean, remove any impurities and rinse; internal pipe kit (Fig. 8.a part. 2 and Fig. 8.c part. 3). Check that the pipes and hoses are free and clear of impurities, remove any impurities and rinse. Important: after having replaced or checked the water circuit, make sure that the connections are tight. Restart the unit and run a number of fill and drain cycles (from 2 to 4), after which, applying the safety procedure, check for any water leaks. Fuses in the auxiliary circuits Fuses F1 & F2 F3 F41 (s 1) F42 (s 2) power supply (V) 230 400 A B B B A B A B A A A B / A / B / B Tab. 8.f F5 & F6 AP1 & AP2 controller fuse PF1 33 UE001 to 018 4 A fast-blow. 10.3x38 5 A T slow-blow 5x20 ceramic 2 Amp. T slow-blow 5x20 ceramic 1 A T slow-blow 5x20 glass 6.3 A T slow-blow 5x20 ceramic 2 A T slow-blow 5x20 glass (minimum size of connection cables 1.5 mm2) UE 025 to 065 1 A fast-blow. 10.3x38 1 A fast-blow. 10.3x38 2.5 A T slow-blow 5x20 ceramic 1 A T slow-blow 5x20 glass 6.3 A T slow-blow 5x20 ceramic 2 A T slow-blow 5x20 glass (minimum size of connection cables 1.5 mm2) Tab. 8.f “Wellness” +030220571 - rel. 3.2 - 09.04.2009 service rinsing with water. 8.4 Cylinder connection, three-phase models UE025 to UE065 45 E D F C 3 Important: In the event of water leaks, disconnect the power supply from the humidifier as the water may conduct electricity. 35 2 D After extended operation, or when using water rich in salts, the solid deposits that naturally form on the electrodes may grow until attaching to the inside wall of the cylinder. If these deposits are conductive the heat generated may overheat the plastic until it melts, with the risk of very hot water being released. 125/350 μS/cm 350/1250 μS/cm 125/350 μS/cm 350/1250 μS/cm 125/350 μS/cm 350/1250 μS/cm 125/350 μS/cm 350/1250 μS/cm 350/1250 μS/cm 3 E 1 Periodical checks • After one hour of operation: check for any significant water leaks. • Every 15 days or no more than 300 operating hours: check operation, the absence of significant water leaks, the general conditions of the casing. Check that during operation there are no arcs or sparks between the electrodes. • Every 3 months or no more than 1000 operating hours: - disposable cylinders: check operation, the absence of significant water leaks and if necessary replace the cylinder; - openable cylinders: if there are significantly blackened areas, check the deposits on the electrodes and clean them, using the specific electrode and gasket kit (see Tab. 8.c). • Every year or no more than 2500 operating hours: - disposable cylinders: replace; - openable cylinders: if there are significantly blackened areas, check the deposits on the electrodes and clean them, using the specific electrode and gasket kit (see Tab. 8.c). • After 5 years or no more than 10,000 operating hours: replace the openable cylinder. conductivity (μS/cm) 3 3 Replacement procedure: 1. empty all the water (see par. “7.15” page 27); 2. turn off the humidifier (switch “0”), and open the mains disconnect switch on the power supply (safety procedure); 3. wait for the humidifier and the cylinder to cool down; 4. remove the front cover (see par. “1.6” page 8); 5. disconnect the electrical cables from the top of the cylinder; 6. release the cylinder from its fastening device and lift it up to remove it; 7. insert the new cylinder (make sure that the model and the power supply of the new cylinder correspond to the rated data); 8. fasten the cylinder; 9. reconnect the electrical cables to the top of the cylinder; 10. replace the front cover; 11. switch on the humidifier. production (kg/h) 25 B 2 installer Replacement Important: the cylinder must be only be replaced by qualified personnel, and with the humidifier unplugged from the power supply. In normal conditions, the disposable cylinders should be replaced after one year (or 2500 hours of operation, if cleaned periodically), while the openable cylinders last 5 years (or 10,000 hours of operation, if cleaned periodically). They must be replaced immediately – even before the specified intervals – if any anomalies occur. For example, when the lime scale inside the cylinder prevents the correct flow of electric current. Fig. 9.a 34 * PE N TB K POWER SUPPLY L TAM LS A DP STEAM BOILER UNIT E FV CS F1 F2 PS P 3P 2P 1V EVILPS P 3+ P 2+ P 1+ VE + VI+ L + TR X1 F42 F41 X2 SEC1 MS F5 G G0 24 Vac J1 F6 PCOE1 J6 VI dip switch ALARM RELAY G G0 GND sensor 1 GND + 15 V 10 mA sensor 2 T+ TLAN J3 J8 P1 J7 VE remote ON-OFF NO 1 C1 NC 1 NO 2 C2 NC 2 J5 luce NO 3 C3 NC 3 probe inputs SEC2 NO 4 C4 NC 4 GND “Wellness” +030220571 - rel. 3.2 - 09.04.2009 user 1 1 .1 .2 .3 .1 .2 .1 .2 B M5. M1. M8. M7. PF1 PCOE2 M2. 2 2 .1 .2 .3 .4 .5 .6 .7 .8 .1 .2 .1 .2 3 A3 G G0 24 Vac J1 J6 P3 NO 1 C1 NC 1 NO 2 C2 NC 2 J5 P2 NO 3 C3 NC 3 M6. dip switch J7 PS T+ J20. J16. M3. M4. .1 .2 .3 .4 .5 .6 .1 .2 .3 .2 .1 .1 .2 .1 .2 .3 J17. .4 .5 NC 4 TLAN J3 NO 4 C4 GND service AP 2 AP 1 P LAN PGD T LAN VIVI+ L L+ PS PS VE V E+ P3P 3+ P1P 1+ P2P 2+ installer ENG 9. WIRING DIAGRAMS 9.1 Diagram of single-phase models UE001 to UE009 utilities 35 * P OWE R S UP P LY P E L1 L2 L3 TB AP 2 AP 1 LS DP E A S T E AM B OILE R UNIT C FV CS F1 F2 TR X1 F42 F4 MS service X2 SEC1 F5 C1 NO 1 G G0 24 Vac J1 F6 J5 luce C2 NO 2 NC 1 PCOE 1 J6 VI C3 NC 3 NC 4 G ND sensor 2 sensor 1 G ND + 15 V 10 mA T+ TLAN J3 J8 P1 C4 NO 3 ALAR M R E LAY G G0 remote ON-OF F dipswitch J7 VE NO 4 G ND NO 1 1 1 M5 M1. M8. M7. user .1 .2 .3 .1 .2 .1 .2 B M2. 2 2 .1 .2 .3 .4 .5 .6 .7 .8 .1 .2 .1 .2 3 A3 G G0 24 Vac J1 C1 J5 P2 C2 NO 2 NC 2 NC 1 NO 3 M6 . PF1 PCOE 2 J6 P3 J7 PS C3 NC 3 dipswitch C4 NC 4 .1 .2 .1 .2 .3 .2 .1 .1 .2 .4 .5 .6 J20. .3 J16. M3. M4. .1 .2 .3 J17. .4 .5 T+ TLAN J3 NO 4 G ND NC 2 probe inputs SEC2 K TAM PS P 3P 2P 1V EVILPS P 3+ P 2+ P 1+ VE + VI+ L + installer P LAN PGD T LAN VIVI+ L L+ PS PS VE V E+ P 3P 3+ P1P 1+ P2P 2+ ENG 9.2 Diagram of three-phase models UE003 to UE018 utilities Fig. 9.b “Wellness” +030220571 - rel. 3.2 - 09.04.2009 * TB Fig. 9.c 36 P OWE R S UP P LY LS DP S T E AM B OILE R UNIT CS FV RD F1 F2 F3 DP TR F4 MS F5 C1 J5 luce NO 1 G G0 24 Vac J1 C2 NO 2 NC 2 NC 1 F6 PCOE 1 J6 VI C3 NC 3 dipswitch J7 VE NO 4 user NC 4 J8 P1 C4 NO 3 ALAR M R E LAY G G0 remote ON-OF F G ND G ND + 15 V 10 mA sensor 2 sensor 1 T+ TLAN J3 G ND NO 1 1 1 .1 .2 .3 .1 .2 .1 .2 J6 P3 C2 NO 2 NC 2 B M5. M1. M8. M7. J7 PS C3 NC 3 dipswitch PF1 NO 3 M6. PCOE 2 NC 1 M2. 2 2 .1 .2 .3 .4 .5 .6 .7 .8 .1 .2 .1 .2 3 A3 G G0 24 Vac J1 C1 J5 P2 NC 4 .1 .2 .3 .2 .1 .1 .2 .1 .2 .3 J20. .4 .5 .6 J16. M3. M4. .1 .2 .3 J17. .4 .5 T+ PLAN PGD T LAN installer C4 TLAN J3 NO 4 G ND “Wellness” +030220571 - rel. 3.2 - 09.04.2009 probe inputs P E L1 L2 L3 K TAM PS P 3P 2P 1V EVILPS P 3+ P 2+ P 1+ VE + VI+ L + service RD VIVI+ L L+ PS PS VE V E+ P 3P 3+ P1P 1+ P2P 2+ ENG 9.3 Diagram of three-phase models UE025 to UE065 utilities AP 2 AP 1 ENG 10. CARATTERISTICHE GENERALI E MODELLI UE005 UE008 UE009 UE010 UE015 UE018 UE025 UE035 UE045 UE065 current(2) (A) 4.9 9.8 5.6 3.2 16.3 9.4 5.4 15.1 8.7 29.3 18.8 10.8 28.2 16.2 19.5 47.1 27.1 65.9 37.9 84.7 48.7 70.4 rated specifications TAM configuration(5) 10.a 10.d 10.a 10.d 10.d 10.d 10.a 10.d 10.a 10.a 10.a 10.d 10.a 10.a 10.a 10.b 10.c 10.b 10.b 10.b 10.c 10.c * Version 0 with 1/2 phase in TAM (1) tolerance allowed on the rated mains voltage: -15%, +10%; (2) tolerance on the rated values: +5%, -10% (EN 60335-1); (3) recommended values refer to laying PVC or rubber cables in closed conduits, 20 m long; (4) rated max instant steam production: the average steam production may be affected by external factors, such as: ambient temperature, water quality, steam distribution system; (5) cablr(3) (mm2) line fuses(3) (A / type) wiring diagram (Fig.) 1.5 2.5 2.5 1.5 6.0 2.5 1.5 6.0 2.5 10.0 6.0 2.5 10.0 6.0 6.0 25 16 35 16 50 25 35 10 A / fast-blow 16 A / fast-blow 16 A / fast-blow 10 A / fast-blow 32 A / fast-blow 16 A / fast-blow 10 A / fast-blow 32 A / fast-blow 16 A / fast-blow 40 A / fast-blow 32 A / fast-blow 16 A / fast-blow 40 A / fast-blow 32 A / fast-blow 32 A / fast-blow 63 A / fast-blow 50 A / fast-blow 100 A / fast-blow 60 A / fast-blow 125 A / fast-blow 80 A / fast-blow 100 A / fast-blow 9.1 9.1 9.2 9.2 9.1 9.2 9.2 9.2 9.2 9.1 9.2 9.2 9.2 9.2 9.2 9.3 9.3 9.3 9.3 9.3 9.3 9.3 Tab. 10.a 100 300 100 100 500 300 100 500 100 500 300 300 500 300 300 500 500 500 300 700 700 700 refer to the wiring diagrams to verify.. Important: the data are not absolute and if these differ from local standards, the latter must prevail; TAM configurations and connections (transformer for measuring the current) Important: the configurations and connections are already made by CAREL, and no changes are required. The following diagrams represent possible connection modes and may be useful in the event of serious electrical malfunctions on the humidifier. All operations must only be performed by qualified personnel, improper use may cause serious damage. Fig. 10.a two cable turns of the same phase one cable in “double turn” mode 100 300 500 700 100 300 500 700 one turn of the two cables of the same phase 100 300 500 700 100 300 500 700 one cable turn Fig. 10.b Fig.10.c Fig.10.d Important: to avoid interference, separate the power cables from the probe cables. 37 “Wellness” +030220571 - rel. 3.2 - 09.04.2009 user UE001 UE003 power supply steam power(2) code voltage(1) production (2; (kW) (V - type) 4) (kg/h) 1.5 1.1 D 230 - 1~N 3.0 2.2 D 230 - 1~N K 230 - 3~ L 400 - 3~ 5.0 3.7 D 230 – 1~N K 230 - 3~ L 400 - 3~ 8.0 6.0 K 230 – 3~ L 400 – 3~ 9.0 6.7 D 230 - 1~ 10.0 7.5 K 230 – 3~ L 400 – 3~ 15.0 11.2 K 230 – 3~ L 400 – 3~ 18 13.5 L 400 – 3~ 25 18.7 K 230 – 3~ L 400 – 3~ 35 26.2 K 230 – 3~ L 400 – 3~ 45 33.7 K 230 – 3~ L 400 – 3~ 65 48.7 L 400 – 3~ service model installer 10.1 humiSteam Wellness models and electrical specifications ENG 10.2 Technical specifications steam connection (dia. mm) UEW model UE001* UE003* UE003** UE005* UE005** UE008** UE009* UE010** UE015** UE018** UE025** UE035** UE045** UE065** 230 V 22/30 400 V outlet pressure limits (Pa) supply water connection temperature limits (°C) pressure limits (MPa) hardness limits (°fH) instant flow-rate (l/min) conductivity range (μS/cm) drain water connection (dia. mm) typical temperature (°C) instant flow-rate (l/min) environmental conditions ambient operating temp. (°C) ambient operating humidity (% rH) storage temperature (°C) storage humidity (% rH) index of protection electronic controller wellness auxiliary voltage/frequency (V - Hz) maximum auxiliary power (VA) probe inputs (general features) active probe power supply (general features) alarm relay outputs(general features) remote enable input (general features) output instant steam production(1) (kg/h) power input at rated voltage (kW) 30 22/30 0/1500 1x40 30 0/1300 1x40 0/2000 0/1350 3/4” G 1 to 40 0.1 to 0.8 (1 to 8 bars) ≤ 40 1.1 125 to 1250 0.6 2x40 -2x40 5.85 (7 for UE045 A 230Vac) 7 40 ≤100 7 22.5 1T40 10 to 60 -10T70 5 to 95 IP20 HCA0EW0000 24 / 50/60 180 40 can be selected for the following signals: 0 to 1 Vdc. 0 to 10 Vdc. 2 to 10 Vdc. 0 to 20 mA. 4 to 20 mA. NTC input impedence: 60 kΩ with: 0 to 1 Vdc. 0 to 10 Vdc. 2 to 10 Vdc signals 50 Ω with: 0 to 20 mA. 4 to 20 mA signals 15 Vdc. 100 mA. protected against short-circuits +1 Vdc with 135 Ω load 250 V 5 A (2 A) - type of action-microswitching 1C voltage-free contact; max. resistance 50 Ω; Vmax= 24 Vdc; Imax= 6 mA 1.5 3.0 3.0 5.0 5.0 8.0 9 10.0 15.0 18.0 25 35 45 65 1.12 2.25 2.5 3.75 3.75 6.0 6.75 7.5 11.25 13.5 18.75 26.25 33.75 48.75 Tab. 10.b * single-phase, ** three-phase. (1) = the average steam production is affected by factors such as: ambient temperature, water quality, steam distribution system 10.3 Models of steam hoses “Wellness” +030220571 - rel. 3.2 - 09.04.2009 UE009W UE010W UE015W UE018W UE025W UE035W UE045W UE065W inside dia. (mm) 22 30 40 UE008W CAREL steam hoses code 1312360AXX 1312365AXX 1312367AXX UE005W steam outlet dia. (mm) max. capacity (kg/h) UE003W UEW model code UE001W service user installer technical specifications 22 1/1,5 22 3 30 5 30 8 30 9 30 10 30 15 30 18 40 25 40 35 40 45 2x40 65 √ - √ - √ - √ - √ - √ - √ - √ - √ √ √ √ Tab. 10.c 38 ENG 10.4 Models of concentrated jet steam distributors UE003W UE005W UE008W UE009W UE010W UE015W UE018W UE025W UE035W UE045W UE065W steam outlet dia. (mm) max. capacity (kg/h) 22 1/1.5 22 3 30 5 30 8 30 9 30 10 30 15 30 18 40 25 40 35 40 45 2x40 65 CAREL SD steam distributors code steam inlet dia. (mm) SDPOEM0012 22/30 SDPOEM0022 30 SDPOEM0000 30 1 1 1 1 1 1 1 1 1 1 1 1 1 1 1 1 1 1 (2)* (2)* (4)** (4)** Tab. 10.d max. capacity kg/h 3 18 18 (with 30 mm opening) user 1 = the humidifier is connected to just one distributor (2) = the humidifier is connected to two distributors (using the “Y” kit: UEKY000000) 2 = the humidifier is fitted with two outlets and can be connected to two distributors (4) = the humidifier is fitted with two outlets and can be connected to up to four distributors (using two “Y” kits) * = use CAREL “Y” kit code UEKY000000 (40 mm inlet and 2 x 30 mm outlets) ** = use CAREL “Y” kit code UEKY000000 (40 mm inlet and 2 x 30 mm outlets) installer UE001W UEW model code 10.5 Models of linear distributors UE005W UE008W UE009W UE010W UE015W UE018W UE025W UE035W UE045W UE065W steam outlet dia. (mm) max. capacity kg/h 22 22 30 30 30 30 30 30 40 40 40 2x40 1/1.5 3 5 8 9 10 15 18 25 35 45 65 1 1 1 1 - 1 1 1 1 - 1 1 1 1 1 1 1 1 1 1 1 1 1 (2)* (2)* (2)* 1 1 1 - - - - (2)** 1 1 1 1 (2)** (2)** 1 1 1 (4)** 2 2 2 Tab. 10.e max. capacity kg/h length in mm 4 6 9 9 5 8 12 18 18 18 25 35 45 45 45 332 438 597 835 343 427 596 850 1048 1245 834 1015 1222 1636 2025 - - 1 1 - 1 1 - 1 1 - 1 1 - 1 1 - 1 1 - 1 = the humidifier is connected to just one distributor (2) = the humidifier is connected to two distributors (using the “Y” kit: UEKY000000) or UEKY000400) 2 = the humidifier is fitted with two outlets and can be connected to two linear distributors (4) = the humidifier is fitted with two outlets and can be connected to up to four linear distributors (using two “Y” kits) * = use CAREL “Y” kit code UEKY000000 (40 mm inlet and 2 x 30 mm outlets) ** = use CAREL “Y” kit code UEKY40400 (40 mm inlet and 2 x 30 mm outlets) CAREL reserves the right modify or change its products without prior warning. 39 “Wellness” +030220571 - rel. 3.2 - 09.04.2009 service UE003W CAREL DP linear distributors code steam inlet dia. (mm) DP035D22R0 22 DP045D22R0 22 DP060D22R0 22 DP085D22R0 22 DP035D30R0 30 DP045D30R0 30 DP060D30R0 30 DP085D30R0 30 DP105D30R0 30 DP125D30R0 30 DP085D40R0 40 DP105D40R0 40 DP125D40R0 40 DP165D40R0 40 DP205D40R0 40 UE001W UEW model code CAREL S.p.A. Via dell’Industria, 11 - 35020 Brugine - Padova (Italy) Tel. (+39) 049.9716611 - Fax (+39) 049.9716600 e-mail: [email protected] - www.carel.com “Wellness” +030220571 - rel. 3.2 - 09.04.2009 Agency: