1
DVR1C1161
Installation Instructions
EN
Digital Recorder
Installatiehandleiding
NL
Manuel d’installation
FR
Enregistreur numérique
Istruzioni sull’installazione
IT
Installationshandbuch
DE
Digital Recorder
Grabador digital
Registratore digitale
Instruções de Instalação
PT
Manual de instalación
ES
Digital Recorder
Gravador Digital
Instrukcja instalacji
PL
&\IURZ\PDJQHWRZLG
ENGLISH......................................................................................................................................................................................... 3
FRANÇAIS .................................................................................................................................................................................. 25
DEUTSCH.................................................................................................................................................................................... 53
ESPAGÑOL ................................................................................................................................................................................ 77
NEDERLANDS ....................................................................................................................................................................... 103
ITALIANO .................................................................................................................................................................................. 127
PORTUGUÊS ......................................................................................................................................................................... 153
POLISH .......................................................................................................................................................................................177
DVR1C1161 | Installation Manual | Table of Contents
1.
2.
3.
4.
SAFETY PRECAUTIONS .........................................................................................................................................................5
1.1
IMPORTANT SAFEGUARDS .......................................................................................................................5
1.2
FCC INFORMATION ......................................................................................................................................6
INTRODUCTION .........................................................................................................................................................................6
2.1
FEATURES ........................................................................................................................................................6
2.2
FRONT PANEL ................................................................................................................................................7
2.3
REAR PANEL ...................................................................................................................................................8
2.3.1 Power .....................................................................................................................................................8
2.3.2 RS232 serial connector ....................................................................................................................8
2.3.3 IR remote control eye connector .....................................................................................................8
2.3.4 LAN connector ....................................................................................................................................8
2.3.5 Alarm connections ..............................................................................................................................8
2.4
INTERCONNECTIONS ..................................................................................................................................9
2.4.1 Multiplexers ...........................................................................................................................................9
2.4.2 Quads ................................................................................................................................................. 10
2.4.3 Single camera ................................................................................................................................... 11
2.5
REMOTE CONTROL UNIT ........................................................................................................................ 12
2.6
NETWORKS .................................................................................................................................................. 12
OPERATION ............................................................................................................................................................................... 13
3.1
QUICK INSTALL ........................................................................................................................................... 13
3.2
INSTANT RECORDING .............................................................................................................................. 13
3.3
ALARM RECORDING ................................................................................................................................. 13
3.3.1 Pre-alarm recording ......................................................................................................................... 13
3.4
NORMAL PLAYBACK ................................................................................................................................. 13
3.5
SEARCH PLAYBACK ................................................................................................................................. 14
3.6
COPY .............................................................................................................................................................. 14
3.6.1 Still image copy ................................................................................................................................ 14
3.6.2 Copy to movie file ............................................................................................................................ 14
3.7
SECURITY LOCK SETTING ..................................................................................................................... 14
MENU SET-UP .......................................................................................................................................................................... 15
4.1
MAIN MENU ................................................................................................................................................... 15
4.2
CLOCK/LANGUAGE MENU ..................................................................................................................... 15
4.3
NORMAL RECORD MENU ....................................................................................................................... 15
4.4
ALARM RECORD MENU ........................................................................................................................... 15
4.5
TIMER MENU ................................................................................................................................................. 16
Bosch Security Systems | 2004-6
EN | 3
DVR1C1161 | Installation Manual | Table of Contents
4.6
BUZZER MENU ............................................................................................................................................ 16
4.7
ARCHIVE MENU ........................................................................................................................................... 17
4.8
NETWORK MENU ....................................................................................................................................... 17
4.9
SYSTEM SETTING MENU ......................................................................................................................... 18
4.10 PASSWORD MENU .................................................................................................................................... 18
5.
6.
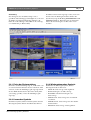
VIEW VIA INTERNET/INTRANET ..................................................................................................................................... 19
5.1
LOGIN ............................................................................................................................................................. 19
5.2
MAIN SCREEN ............................................................................................................................................. 19
5.2.1 Status message color ..................................................................................................................... 20
5.2.2 Live mode icons ............................................................................................................................... 20
5.2.3 Playback mode icons ...................................................................................................................... 20
5.2.4 Search ................................................................................................................................................ 20
SPECIFICATIONS ................................................................................................................................................................... 21
6.1
RS-232 INTERFACE ................................................................................................................................... 21
6.1.1 RS-232 control protocol ................................................................................................................ 21
6.2
RECORDING TIME ...................................................................................................................................... 22
6.3
TECHNICAL SPECIFICATIONS .............................................................................................................. 23
Display abbreviations
II
A.REC
BASIC
HIGH
LOW
LOWER
MENU
PAUSE
P.END
PLAY
P.END
P.RPT
REC
SRCH
STDRD
SUPER
SYSLD
T.REC
*REC
P.BEG
R.REC
Pause
Alarm record
Basic quality
High quality
Low quality
Lowest quality
Menu
Pause
Pause end
Play
Play end
Play repeat
Record
Search
Standard quality
Superior quality
System loading
Timer recording
Lock record
Play begin
Remote record
Bosch Security Systems | 2004-6
EN | 4
DVR1C1161 | Installation Manual | Chapter 1
1
SAFETY PRECAUTIONS
Danger
The lightning flash with arrowhead symbol,
within an equilateral triangle, is intended to alert
the user to the presence of an uninsulated
“dangerous voltage” within the product's
enclosure that may be of sufficient magnitude to
constitute a risk of electric shock to persons.
Warning
The exclamation mark within an equilateral
triangle is intended to alert the user to the
presence of important operating and
maintenance (servicing) instructions in the
literature accompanying the appliance.
EN | 5
b. The equipment has been exposed to moisture.
c. The equipment has not work well or you can not
get it work according to user's manual.
d. The equipment has dropped and damaged.
e. If the equipment has obvious sign of breakage.
9. Do not leave this equipment in an environment
unconditioned, storage temperature above 50°C, it
may damage the equipment.
10. Operation Ambient 40°C
11. Power cords : Use the proper power cord with
correct attachment plug type. If the power source is
120 V AC, use a power cord that has UL and CSA
approvals. If the power source is a 240 V AC supply,
use the tandem (T blade) type attachment plug with
ground conductor power cord that meets the
respective European country's safety regulations,
such as VDE for Germany. Plug need approval with
VDE 0620, connector approval by VDE 0625,
minimum 10A, power cord H05VV-F or VW-1,0.75
mm2 x 3G should be used.
12.
Caution
To reduce the risk of electric shock, do not
remove cover (or back). No user-serviceable
parts inside. Refer servicing to qualified service
personnel.
1.1 IMPORTANT SAFEGUARDS
1. Please read these safety instructions carefully.
2. Please keep this User's Manual for later reference.
3. Please disconnect this equipment from connecter
before cleaning. Don't use liquid or sprayed
detergent for cleaning. Use moisture sheet or cloth
for cleaning.
4. Make sure the voltage of the power source when
connect the equipment to the power outlet.
5. All cautions and warnings on the equipment should
be noted.
6. Never pour any liquid into opening, this could cause
fire or electrical shock.
7. Never open the equipment. For safety reason, the
equipment should only be opened by qualified
service personnel.
8. If one of the following situations arises, get the
equipment checked by a service personnel :
a. Liquid has penetrated into the equipment.
Bosch Security Systems | 2004-6
Warning
To reduce the risk of fire or electric shock, this
apparatus should not be exposed to rain or
moisture and objects filled with liquids,such as
vases, should not be placed on this apparatus.
13. The back of the recorder should only be removed by
qualified maintenance and service personnel.
14. Danger of explosion if battery is incorrectly
replaced. A lithium battery is located inside the
enclosure of this recorder. Replace only with the
same or equivalent type. Dispose of the replaced
battery in an environmentally friendly way.
15. Keep ventilation openings free to avoid the recorder
for overheating.
16. Do not place the recorder in the immediate vicinity
of a heating source.
17. Do not install this equipment in a confined space
such as a bookcase or similar unit.
Cleaning
You can clean the unit with a moist fluff-free cloth or
shammy leather cloth.
Bosch has a strong commitment towards the
environment. This unit has been designed to respect the
environment as much as possible.
DVR1C1161 | Installation Manual | Chapter 2
1.2 FCC INFORMATION
This equipment has been tested and found to comply
with the limits for a Class B digital device, pursuant to
part 15 of the FCC Rules. These limits are designed to
provide reasonable protection against harmful
interference in a residential installation. This equipment
generates, uses and can radiate radio frequency energy
and, if not installed and used in accordance with the
instructions, may cause harmful interference to radio
communications. However, there is no guarantee that
interference will not occur in a particular installation. If
this equipment does cause harmful interference to radio
or television reception, which can be determined by
turning the equipment off and on, the user is
encouraged to try to correct the interference by one or
more of the following measures:
• Reorient or relocate the receiving antenna.
• Increase the separation between the equipment and
receiver.
• Connect the equipment into an outlet on a circuit
different from that to which the receiver is
connected.
• Consult the dealer or an experienced radio/ TV
technician for help.
Note
Any change or modification not expressly approved by
Bosch of the equipment authorization could void the
user's authority to operate the equipment. For additional
information or to speak to a representative, please
contact the Bosch Security Systems location nearest you
or visit our web site at www.boschsecuritysystems.com
Warning
This device is intended for use in public areas
only. Surreptitious recording of oral
communications is strictly prohibited by U.S.
Federal law.
EN | 6
2
The DVR1C1161 Digital Video Recorder provides
advanced recording and playback technology for
CCTV systems. The DVR allows uninterrrupted
recording in either continuous or time-lapse modes for
as long as a week or more. There are no video tapes to
change or store, and frequent, costly VCR maintenance
is eliminated.
The DVR can record at speeds up to 50/60 images per
second with PAL/NTSC formats and replay events
instantly. The DVR incorporates all the benefits of
digital video recording, is simple to install, and operates
just like a VCR. The highly efficient compression
technology, as well as the superior clarity and detail of
recorder images, make the DVR ideally suited for
integration with a wide range of multiplexers.
2.1 Features
•
•
•
•
•
•
•
•
•
•
•
•
•
•
•
•
Bosch Security Systems | 2004-6
Introduction
Provides superior quality images
Pre-Alarm image recording
Time lapse and real time recording
Refresh rate up to 50 images for PAL and 60 images
for NTSC
Quick Search by date/time, alarm events, and
recording list
Fast and slow playback of recorded video in various
speeds
On-screen setup menu and system timer
Password protection
RS-232 communication port
Built-in M-JPEG compression/decompression with
configurable quality
Audio recording capability
Programmed with various time-lapse speeds
Data can be stored on Compact Flash Card
Remote control
Remote view recordings and live pictures with
Web-based browser
Compatible with Bosch and various other types of
multiplexers.
DVR1C1161 | Installation Manual | Chapter 2
EN | 7
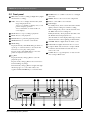
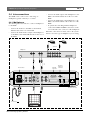
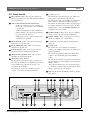
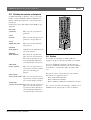
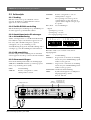
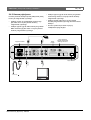
2.2 Front panel
9 ENTER: Press to confirm a selection or a changed
data value.
1 REC: Press to start recording (red light in key lights
when unit is recording).
10 MENU: Press to enter or leave the setup menu.
11 Remote control IR receiver window.
2 OSD: - Press once to display the time/date, disk
usage and playback rate.
- Press a second time to display size, record
position and play position.
- Press a third time to switch off the onscreen display.
12 LCD display
In standby mode, shows current date/time and the
quality and rate setting for normal recording.
In Recording mode, shows current date/time and
the REC and current recording rate.
In Playback mode, shows playback date/time and
the PLAY and current playback rate.
(For information on the displayed messages see the
abbreviations list at the beginning of this manual.)
3 STOP: Press to stop recording or playback.
4 PLAY: Press to start playback.
5 PAUSE: Press to pause the playback picture.
6 SEARCH: Press to enter the search menu.
13 ALARM: Indicator lights when an alarm occurs.
7 Shuttle Ring:
14 LAN: Indicator lights when network is accessed.
In playback mode, turn Shuttle Ring clockwise to
speed up or counterclockwise to slow down the
forward or reverse play of the picture.
In pause mode, turn Shuttle Ring to move the
picture slowly forward or reverse.
15 Compact Flash card slot: Insert a Compact Flash
Card. Press the black button beside the slot to
remove the card.
16 COPY: Press to copy still picture or video stream
onto Compact Flash card.
8 Jog Dial:
In playback mode, turn Jog Dial to select the
playback speed.
In pause mode, turn Jog Dial to move forward or
backward image by image.
In menu mode, turn Jog Dial to navigate through
the menu pages or to select data values. Use
together with the ENTER key to set menu values.
1
16
15
Bosch Security Systems | 2004-6
14 13
2
3
12
4
5
6
11
10
7
8
9
DVR1C1161 | Installation Manual | Chapter 2
EN | 8
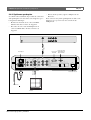
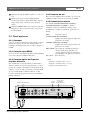
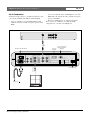
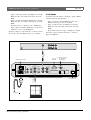
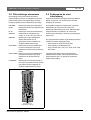
2.3 Rear panel
REC:
A high level external recording request
signal* applied to this pin starts
recording. When the signal drops to low,
recording stops.
No connections.
2.3.1 Power
Connect the power suppy cable to the power socket at
the rear of the unit. Use the power switch to switch the
unit ON or OFF.
NC1, NC2:
* Signal
- switching voltage High: > 2 Vdc
2.3.2 RS232 serial connector
- switching voltage Low: < 0.5 Vdc
Connect D-Sub 9-pin connector to the RS232 port if
you want to control the unit remotely.
If the remote control IR receiver window at the front is
hidden from view (if the unit is mounted in a cupboard),
connect the optionally available extension IR cable to
the remote control connector. Position the receiver eye
so that it is in line-of-sight of the remote control unit.
2.3.4 LAN connector
To connect the unit to a network use the RJ-45 LAN
connector at the rear of the unit.
2.3.5 Alarm connections
The ALM-IN and ALM-RST inputs can be set to
Normally Open (N.O.) or Normally Closed (N.C.) in
the Alarm record menu.
GND:
ALM-IN:
ALM-RST:
Ground connection.
Apply a signal* here to start alarm
recording.
Apply a signal* here to stop alarm
recording.
Alarm outputs
Alarm inputs
The alarm output signals are:
GND:
ALM-NC**:
Ground connection.
When an alarm occurs, the connection
between this pin and ALM-COM is
open. Otherwise it is closed.
ALM-NO**: When an alarm occurs, the connection
between this pin and ALM-COM is
closed. Otherwise it is open.
ALM-COM**: Alarm common contact.
VEXT:
Synchronization signal for multiplexer.
Output voltage: 5 Vdc
Output current: 100mA
DISKFULL: Disk full alarm output signal.
Output voltage: 5 Vdc
Output current: 100mA
NC3, NC4:
No connections.
* * contact voltage max: 24 Vdc
max. switching current: 2A dc
RS-232
connector
Power switch
RS 232
Out2
Monitor Out
Out
Out 1
Remote Control
Alarm connector
Bosch Security Systems | 2004-6
GND
NC4
NC3
LAN
Out 2
GND
100-240 Vac
DISKFULL
VEXT
ALM-CO
ALM-NO
ALM-NC
GND
GND
AC 100-240
Out1
IR remote
control eye
connector
Looping out
GND
Video
In
NC2
S-Video
In
NC1
Mux main
Monitor In
In2
REC
In1
ALM-RST
Audio
Off
ALM-IN
Power
GND
NC4
NC3
DISKFULL
VEXT
ALM-CO
ALM-NO
ALM-NC
GND
GND
NC2
NC1
REC
ALM-IN
GND
2.3.3 IR remote control eye connector
ALM-RST
- max. input voltage: 12 Vdc
VEXT
Network connector
DVR1C1161 | Installation Manual | Chapter 2
EN | 9
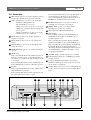
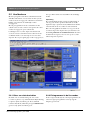
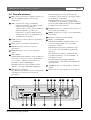
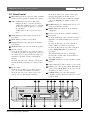
2.4 Interconnections
•
Connect the VCR output of the multiplexer to the
BNC socket marked Video In on the rear of the
DVR.
• Connect the VCR input of the multiplexer to the
BNC socket marked Video Out on the rear of the
DVR.
• To synchronise switching with the multiplexer
connect the VEXT and GND connections on the
rear of the unit to the connector of the multiplexer.
When the connections are made, refer to the system
menu to select the type of multiplexer you are using.
The DVR can be connected to a wide range of
multiplexers, quads or directly to a camera.
2.4.1 Multiplexers
The drawing below shows how to connect a multiplexer
to the DVR.
•
•
Connect the monitor to the BNC socket marked
Monitor Out on the rear of the DVR.
Connect the main monitor output of the multiplexer
to the BNC socket marked Monitor In on the rear of
the DVR.
Cameras
Multiplexer
1
VCR IN VCR OUT
2
3
Power switch
Out2
Monitor Out
Out
Out 1
Remote Control
Monitor Out
Monitor
Bosch Security Systems | 2004-6
GND
NC4
NC3
DISKFULL
VEXT
ALM-CO
LAN
Out 2
GND
100-240 Vac
ALM-NO
ALM-NC
GND
GND
AC 100-240
Out1
RS 232
Looping out
GND
Video
In
NC2
S-Video
In
NC1
Mux main
Monitor In
In2
6
IR remote
control eye
connector
REC
In1
5
RS-232
connector
ALM-RST
Audio
Off
ALM-IN
Power
4
VCR
Monitor
MON B MON A
VEXT
Network connector
DVR1C1161 | Installation Manual | Chapter 2
EN | 10
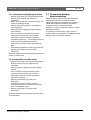
2.4.2 Quads
•
Connect the video output of the multiplexer to the
BNC socket marked Video In on the rear of the
DVR.
• In the system menu set the multiplexer item to Off.
To connect a quad with a VCR output, refer to the
multiplexer connections.
The drawing below shows how to connect a quad
without a VCR output to the DVR.
•
Connect the monitor to the BNC socket marked
Monitor Out on the rear of the DVR.
Quad
1
2
3
4
Video
Video OUT
RS 232
Out2
Monitor Out
Out
Out 1
Monitor Out
Monitor
Bosch Security Systems | 2004-6
GND
NC4
NC3
DISKFULL
VEXT
ALM-CO
LAN
Out 2
GND
100-240 Vac
ALM-NO
ALM-NC
GND
GND
GND
AC 100-240
Out1
Remote Control
Looping out
NC2
Video
In
NC1
S-Video
In
REC
Mux main
Monitor In
In2
ALM-RST
Audio
In1
ALM-IN
Power
Off
IR remote
control eye
connector
RS-232
connector
Power switch
VEXT
Network connector
DVR1C1161 | Installation Manual | Chapter 2
EN | 11
2.4.3 Single camera
•
The drawing below shows how to connect a single to
the DVR.
•
•
•
Connect the monitor to the BNC socket marked
Video Out on the rear of the DVR.
Connect the video output of the camera to the BNC
socket marked Video In on the rear of the DVR.
•
Connect the audio output of the camera to the socket
marked Audio In on the rear of the DVR.
Connect the socket marked Audio Out on the rear of
the DVR to an audio amplifier.
In the system menu set the multiplexer item to Off.
Video
In
RS 232
Out2
Monitor Out
Out
Out 1
GND
NC4
NC3
DISKFULL
VEXT
ALM-CO
ALM-NO
ALM-NC
GND
GND
GND
AC 100-240
Out1
Remote Control
Looping out
NC2
S-Video
In
NC1
Mux main
Monitor In
In2
REC
Audio
In1
ALM-RST
Power
IR remote
control eye
connector
RS-232
connector
ALM-IN
Audio In
Power switch
Off
Video In
Camera
LAN
Out 2
GND
VEXT
Video Out
Audio Out
Network connector
100-240 Vac
Monitor
Bosch Security Systems | 2004-6
DVR1C1161 | Installation Manual | Chapter 2
EN | 12
2.5 Remote control unit
2.6 Networks
The remote control unit is an accessory that makes it
easy to control the DVR from a distance. You can carry
out the main operations using the remote control unit.
The network connection uses the 10BaseT standard.
Make sure that your network card supports this
standard.
The keypad functions for the DVR are as follows:
RECORD:
STOP:
PLAY:
SEARCH:
Press to start recording.
Press to stop recording or playback.
Press to start playback.
Increase the speed by 2x, 4x, 8x, 16x,
32x, 640x, 2x . . .
REWIND:
In playback mode, press to reverse
playback (Search key increases reverse
speed).
STEP REW.: Press to stop playback. Press again to
step backward image by image.
STEP FORW.:Press to stop playback. Press again to
step forward image by image.
FORWARD: In reverse playback, press for forward
playback (Search key increases forward
speed).
0
BOSCH
DVR control keys
Bosch Security Systems | 2004-6
If you connect the DVR directly to a PC, use a crossover CAT5 network cable. If you connect the DVR to a
router or hub, use a straight-through CAT5 cable.
The following ports must be open for the remote
software to operate correctly:
• TCP port 80:Web Server
• TCP port 6666:Commands
• TCP ports 1111, 2222, 3333, 4444:Video data
If you are connecting via a firewall, check with your
network administrator to ensure that you can access the
unit.
DVR1C1161 | Installation Manual | Chapter 3
3
Operation
3.1 Quick Install
In the quick install mode you can quickly change the
date, time, recording quality and IPS setting using the
LCD display and the Jog Dial.
• Press the MENU key for 5 seconds to enter the quick
install mode. The Year flashes on the LCD display.
• Turn the Jog Dial to change the Year value and then
press the ENTER key. The Month flashes on the
LCD.
• Continue using the Jog Dial and ENTER key to set
all the values shown on the LCD display. When the
last value is set, the DVR returns to its normal mode.
• To escape from the quick install menu, press the
SEARCH key.
3.2 Instant recording
Press the Record key to start the recording immediately
- the images are recorded on the hard disk.
• The recording rate and recording quality are set in
the Normal record and Alarm record menus.
• REC (record) appears in the LCD display.
Press the Stop key to stop recording.
• Stop key can only be activated in recording mode.
• When the hard disk is full, the DVR stops recording
automatically or overwrites from the beginning of
the hard disk depending on the setting in the System
Settngs menu.
3.3 Alarm recording
The monitor image is recorded automatically when an
alarm occurs and stops recording at the end of the alarm
duration period. Instant recording and timer recording
stop when an alarm occurs. If the unit is already
recording then the recording quality does not change for
alarm recording. Set the options for alarm recording in
the Alarm record menu.
3.3.1 Pre-alarm recording
A 220-image buffer (for example, 9 sec. at 25 IPS or
220 sec. at 1 IPS) is used to pre-capture video for
recording images just before an alarm is triggered.
Pre-alarm recording only occurs if the unit is not already
recording during the pre-alarm period. The recording
quality in the pre-alarm period is the same as the
recording quality before the alarm occurs. If the
Bosch Security Systems | 2004-6
EN | 13
recorder is not recording before the alarm occurs, the
recording quality in the pre-alarm period is the same as
normal recording quality.
3.4 Normal playback
Playback
• Press PLAY key to start playing back the stored
image/audio from the last segment.
• Press STOP key to stop playing back.
Fast Forward
• Press PLAY key to start playing back.
• Turn the Shuttle Ring clockwise and fast forward
playback starts. The speed is shown on the display
(normal play speed, 2x, 4x, 8x, 16x, 32x, 640x).
Reverse Playback
• Press PLAY key to start playing back.
• Turn the Shuttle Ring counterclockwise and fast
reverse playback starts. The speed is shown on the
display (normal play speed, 2x, 4x, 8x, 16x, 32x,
640x).
Slow Forward Playback
• Press Pause key to freeze the playing back picture.
• Turn the Shuttle Ring clockwise and slow forward
playback starts. The speed is shown on the display
(>1/2, 1/4, 1/8, 1/16, 1/32, 1/64).
Slow Reverse Playback
• Press Pause key to freeze the playing back picture.
• Turn the Shuttle Ring counterclockwise to start slow
reverse playback. The speed is shown on the display
(<1/2, 1/4, 1/8, 1/16, 1/32, 1/64).
Lock displayed speed
• To lock the displayed speed, press the Enter key and
then release the Shuttle Ring. If you turn the Shuttle
Ring again, the speed returns to normal play speed.
Image advance Forward/Reverse
• Press Pause key to freeze the picture.
• Turn the Jog Dial clockwise to advance the picture
image by image.
• Turn the Jog Dial counterclockwise to rewind the
picture image by image.
• The image speed increases if the Jog Dial is turned
quickly.
DVR1C1161 | Installation Manual | Chapter 3
3.5 Search playback
Segment Search Playback
• Press the Search key to enter the Search menu.
• Move the cursor to BY SEGMENT LIST and press
the Enter key to select file search.
• Move the cursor to the segment you want to
playback (pAlarm: Pre-alarm record, Timer: Timer
record).
• If the selection list is full, turn the Jog Dial clockwise
to select the next page list.
• Press Enter to start playing back.
Alarm Search Playback
• Press Search key to enter the Search menu.
• Move the cursor to BY EVENT LIST and press the
Enter key to select alarm search.
• Move the cursor to select the alarm image to be
played back.
• If the selection list is full, turn the Jog Dial clockwise
to select the next page list.
• Press Enter to start playing back the alarm images.
• The alarm image is played back from the pre-alarm
period and stops at the end of alarm duration.
Date/Time Search Playback
• Press Search key to enter the Search menu.
• Move the cursor to BY DATE/TIME and press the
Enter key to select file search.
• Move the cursor to the value you wish to select and
press the Enter key.
• Turn the Jog Dial to increase or decrease the value
and press the Enter key.
• Move the cursor to START SEARCH AND PLAY
and press the Enter key and the playback starts from
the date/time set in the menu.
If there is no image stored in the date/time specified
then the unit automatically starts playing back from the
nearest set time.
EN | 14
Note
To improve the legibility of the copy messages, press
the OSD key. Press the OSD key again to switch off the
background.
3.6.1 Still image copy
•
•
•
•
•
•
•
•
Press the Play key to start playing back.
Press the Pause key to freeze the picture.
Turn the Jog Dial clockwise or counterclockwise to
move to the desired image.
Press the Copy key to enter the copy mode.
Turn the Jog Dial to select the desired camera image.
While the image is displayed, press the Copy key
again. The message "Copying …" appears on the
screen during the process. The message "Success"
and the file identification appears on the screen after
the file is copied.
Press the STOP key to cancel copy.
Press the Play key to continue playback.
Copied images are stored as a single picture in a JPG
file format.
3.6.2 Copy to movie file
•
•
•
•
•
•
•
Press the Play key to start playing back.
Press the Copy key to enter the copy mode.
Turn the Jog Dial to select the desired camera.
While the image is displayed, press the Copy key
again. The message "Copying …" appears on the
screen during the process.
Press STOP key to end copy.
The message "Success" and the file identification
appears on the screen after the file is copied.
Press the Play key to continue playback.
Copied images are stored as a movie picture in a MOV
file format.
3.7 Security lock setting
3.6 Copy
Insert a Compact Flash card (type I or II) into the
Compact Flash slot on the front panel. When inserting
the Compact Flash card, make sure that the direction of
insertion is correct. Use only a Compact Flash card with
a capacity of 16MB or higher.
The Compact Flash copy function is designed for
copying short clips. A long clip can take quite a long
time to copy.
Bosch Security Systems | 2004-6
Press the REC key for more than 5 seconds while in the
record mode to lock all the keys on the front panel.
(Password must be set in System Setting Menu to enable
this feature.)
Press Stop key, the system asks for the password. If you
enter the correct password, the locked keys are released.
DVR1C1161 | Installation Manual | Chapter 4
4
Menu set-up
EN | 15
4.3 Normal record menu
When system has been connected as described:
• Switch power on
• The display lights if power is normal.
• Allow some time for the system to load.
• Press the MENU key to enter the MAIN MENU.
When the main menu is displayed you see the different
submenus where the settings can be changed.
1250$/5(&25'0(18
5(&25'63(('
5(&25'48$/,7<
,36
67$1'$5'
5(&25'7,0(
+56
0$,10(18!
To navigate through these menus, turn the Jog Dial
clockwise or counterclockwise to scroll through the
submenus. Press the ENTER key to open a submenu. In
the submenus, continue using the Jog Dial and ENTER
key to scroll through items and values and select them.
To return to the main menu, scroll to the bottom of each
submenu to the MAIN MENU item and select it by
using the ENTER key.
SPEED : Select the record speed from 0.1 to 25/30 IPS.
QUALITY: There are six quality levels for recording
LOWER 15 KB
LOW: 20 KB
BASIC: 25 KB
STANDARD: 30 KB
HIGH: 35 KB
SUPERIOR: 40 KB
RECORD TIME: Shows an estimate of the recording time available on
disk for the selected speed and quality.
4.1 Main menu
4.4 Alarm record menu
0$,10(18
$/$505(&25'0(18
&/2&./$1*8$*(!
1250$/5(&25'!
$/$505(&25'!
7,0(5!
%8==(5!
$5&+,9(!
1(7:25.!
6<67(06(77,1*!
$/$5023(5$7,21
5(&25'63(('
5(&25'48$/,7<
$/$50,17<3(
$/$505(6(77<3(
$/$50'85$7,217,0(
21
,36
67$1'$5'
12
12
6(&6
35($/$5023(5$7,21
5(&25'63(('
21
,36
0$,10(18
!
4.2 Clock/Language menu
&/2&./$1*8$*(0(18
'$7(
7,0(
'$7()250$7
0(18/$1*8$*(
<<<<00''
(1*/,6+
0$,10(18!
DATE: Year: 2000~2099 Month: 01~12 Date: 01~31
TIME: Hour: 00~23 Minute : 00~59 Second: 00~59
DATE FORMAT: Set the display order for Year (YYYY), Month (MM)
and Day (DD)
MENU LANGUAGE: English, German, French, Spanish, Italian,
Portuguese, Dutch or Polish.
MAIN MENU: Return to the main menu.
Bosch Security Systems | 2004-6
ALARM OPERATION:
ON : Record when alarm occurs.
OFF : Do not record when alarm occurs.
RECORD SPEED: Recording speed for the duration of the alarm.
The max. recording speed is 50/60 IPS (PAL/NTSC).
The min. recording speed is 0.1 IPS.
RECORD QUALITY: Recording picture quality when alarm occurs.
LOWER: 15 KB
LOW: 20 KB
BASIC: 25 KB
STANDARD: 30 KB
HIGH: 35 KB
SUPERIOR: 40 KB
ALARM-IN TYPE:
N.O. : Normally Open
N.C. : Normally Closed
ALARM-RESET TYPE:
N.O. : Normally Open
N.C. : Normally Closed
DVR1C1161 | Installation Manual | Chapter 4
ALARM DURATION TIME: Alarm recording starts from the beginning
of alarm and stops at the end of the duration or when alarm
reset is activated. The max. duration is non-stop, the min.
duration is 10 seconds.
PRE-ALARM OPERATION:
ON: Record the picture in pre-alarm recording speed in prealarm period.
OFF: No pre-alarm recording before alarm occurs.
RECORD SPEED: The recording speed in the pre-alarm period.
The max. recording speed is 50/60 IPS (PAL/NTSC).
The min. recording speed is 0.1 IPS.
Note
If the alarm occurs in standby or normal recording
mode, the recording quality is the same as the normal
recording quality. If the alarm occurs in timer recording
mode, the recording quality is the same as the value set
in timer recording quality.
4.5 Timer menu
The monitored image can be recorded automatically by
setting the start and end times in the TIMER MENU.
There are 15 entries where a recording schedule for a
particular day or set of days can be set for the week.
Move to an entry and press enter to select the day.
If you program for example the following:
START 09:00, STOP 23:59
Than recording starts at 09:00:00 and stops at 23:59:59.
To stop a timed recording while it is recording, press
the STOP key to enter the TIMER MENU and change
the SET value to OFF.
7,0(50(18
:((.67$57672363(('48$/,7<6(7
681+567$1'$5'2))
021+567$1'$5'2))
:'$<+567$1'$5'2))
:(1'+567$1'$5'2))
'/<+567$1'$5'2))
021+567$1'$5'2))
78(+567$1'$5'2))
)5,+567$1'$5'2))
7+8+567$1'$5'2))
:('+567$1'$5'2))
6$7+567$1'$5'2))
681+567$1'$5'2))
0$,10(18!
WEEK: Selects the day or set of days for the timer.
DLY: every day
WDAY: Monday to Friday
WEND: Saturday and Sunday
Individual days of the week
Bosch Security Systems | 2004-6
EN | 16
START: Enter the start time for timer recording.
STOP: Enter the end time for timer recording.
STOP time needs to be later than the START time.
(e.g. START 16.00, STOP 03.00 is not correct
START 16.00, STOP 00.00 is not correct
START 16.00, STOP 23.59 is correct
SPEED: When SPEED FORMAT set by HOUR, the recording speed
can be set from 4/6 (NTSC/PAL) HR to 960HR.
When SPEED FORMAT set by IPS, the recording speed can
be set from 0.1~30/0.1~25(NTSC/PAL)IPS.
QUALITY: There are six recording picture quality levels
LOWER: 15 KB
LOW: 20 KB
BASIC: 25 KB
STANDARD: 30 KB
HIGH: 35 KB
SUPERIOR: 40 KB
SET:
Set ON when using timer recording.
Set OFF when not using timer recording.
In Timer Recording mode, the display shows the Timer
date/time and the Timer recording rate appears under
T.REC.
You cannot change the quality level for continuous
recording. For example:
Seg 1 08:30~17:00
Seg 2 17:00~23:59
Seg 1 and Seg 2 are treated as the continuous recording
08:30~23:59.
If you need to set different quality level, set as follows:
Seg 1 08:30~16:59
Seg 2 17:00~23:59
4.6 Buzzer menu
%8==(50(18
%8==(523(5$7,21
$/$50,1
5(&25',1
',6.)8//
9,'(2/266
7,0(5
(1$%/(
21
21
21
21
2))
0$,10(18
!
BUZZER OPERATION:
ENABLE: Select buzzer to be on.
DISABLE: Select buzzer to be off.
Note: Press Enter button to enable/disable in Record/Playback
mode.
ALARM-IN: ON - the buzzer sounds when the alarm occurs.
RECORD-IN: ON - the buzzer sounds when Record-IN signal is
applied on the Record-IN terminal.
DISK FULL: ON - the buzzer sounds when disk is nearly full 99.7%
VIDEO LOSS: ON - the buzzer sounds when the video signal is lost.
TIMER: ON - the buzzer sounds when timer record occurs.
DVR1C1161 | Installation Manual | Chapter 4
EN | 17
4.7 Archive menu
6(78386(5
$5&+,9(0(18
3,&785(6,=(
7,0(67$03
7,0(67$03326,7,21
:$7(50$5.
:$7(50$5.326,7,721
;
21
%27720
21
%27720
0$,10(18
!
PICTURE SIZE: Select picture size for copying image to CF card
Big size: 720x576 (PAL), 720x480 (NTSC)
Small size: 352x288 (PAL), 352x240 (NTSC)
TIME STAMP:
ON: Time stamp appears on the picture when copying image
to CF card.
OFF: Time stamp does not appear on the picture when
copying image to CF card.
TIME STAMP POSITION:
BOTTOM: Time stamp appears at the bottom
TOP: Time stamp appears at the top
WATER MARK:
ON: Water mark appears on the picture when copying image
to CF card.
OFF: Water mark does not appear on the picture when
copying image to CF card.
WATER MARK POSITION:
BOTTOM: Water mark appears at the bottom
TOP: Water mark appears at the top.
4.8 Network menu
1(7:25.0(18
,3$''5(66
1(70$6.$''5(66
*$7(:$<$''5(66
6(78386(5
6(78386(5
6(78386(5
!
!
!
0$,10(18
!
IP ADDRESS: Fill in the IP address of the unit in the network system.
NETMASK ADDRESS: Fill in the Netmask of the unit in the network
system.
GATEWAY ADDRESS: Fill in the Gateway address of the unit in the
network system.
SETUP USER: Three user names and passwords can be set up. A
setup menu is available for each of the three users.
Bosch Security Systems | 2004-6
86(51$0(
86(53$66:25'
86(5/(9(/
$'0,1BBB
$'0,1BBB
683(5
1(7:25.0(18
0$,10(18
!
!
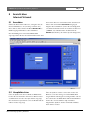
The DVR Login page appears on the PC screen when
you connect a PC via a network to the DVR. The Setup
User menu allows the administrator to set the login User
name and password, and the access level. The system
has three different access levels:
• SUPER access can view live/playback video and
control DVR operation.
• GENERAL access can view live and playback video.
• GUEST access can only view live video.
A maximum of four connections can be made at the
same time (1 user name and password shared).
DVR1C1161 | Installation Manual | Chapter 4
4.9 System setting menu
6<67(06(77,1*0(18
3$66:25'(1$%/(
3$66:25'
12
9,'(2,1387
5(&25':,7+$8',2
3/$<:,7+$8',2
3/$<:,7+$8',2
08/7,3/(;(5
),(/'&2'(/,1(
',6.)8//
63((')250$7
9,'(26<67(0
&20326,7(
2))
21
21
%RVFK/7&
5(:5,7(
%<,36
3$/
(5$6(',6.
6<67(083'$7(
/2$''()$8/7
&)5(1(:
!
!
!
!
0$,10(18
!
PASSWORD ENABLE:
YES: PASSWORD required to enter the menu.
NO: PASSWORD not required to enter the menu.
PASSWORD :
When YES is set for PASSWORD ENABLE, a password is
required to enter the menu. The code is six digits long and
can be any digit from 1 to 5.
If you have activated the password, whenever you press the
menu button in live mode or stop button in record mode the
system asks you to enter the password. Therefore, be sure to
make a note of the password.
VIDEO INPUT:
COMPOSITE: Select the video input from BNC connector.
S-VIDEO: Select the S-VIDEO from S-VIDEO connector.
RECORD WITH AUDIO: ON/OFF: Record with or without audio.
PLAY WITH AUDIO 1 / PLAY WITH AUDIO 2:
ON/OFF: Playback with or without audio.
Audio recording and playback is only possible in realtime
mode with a speed of 1IPS or higher. (Playback at the same
rate you record.)
MULTIPLEXER:
Select the make of multiplexer connected to the DVR. If your
multiplexer is not listed, set to UNKNOWN.
When a multiplexer is selected, the video input from the MUX
MAIN MONITOR connector at the rear panel is looped
through to the MONITOR OUT when the recorder is not in
MENU mode.
If only one camera is connected to the DVR, set to OFF. Now
the main monitor output is same as the video out connector
all the time.
FIELD CODE LINE:
Bosch Security Systems | 2004-6
EN | 18
If you set the multiplexer make to UNKNOWN, you can
adjust the field code line of the connected multiplexer
between 0 and 20. The default (13) is suitable for most
multiplexers. If the field code line appears at the top of the
playback channels, decrease the value. If multiplexers do not
playback correctly, increase the value.
DISK FULL:
STOP : When disk is full, the machine stops recording.
REWRITE : When disk is full, the current video overwrites the
existing video from the beginning of the hard disk.
SPEED FORMAT: Select recording speed by IPS (Images per
second) or Hour
VIDEO SYSTEM: Select the video system NTSC or PAL (requires
power reset to activate).
ERASE DISK:
Press Enter to erase all recording from the hard disk.
The confirmation dialog box appears on the screen.
Select Yes or No and then press ENTER.
SYSTEM UPDATE:
Press Enter to update the system or not.
YES: Copy the update file onto the Compact Flash card on
the PC and then insert the Compact Flash card into the slot.
Press ENTER key to update the system. After the system is
updated successfully, be sure to reset the power to activate.
LOAD DEFAULT:
Press Enter to load the factory default or not.
YES: The confirmation dialog box appears on the screen.
Select Yes or No and then press ENTER.
CF RENEW:
YES: will format the Compact Flash card.
NO: will not format the Compact Flash card.
4.10 Password menu
When password protection is enabled, a password menu
appears on the screen when you try to open a menu or
stop recording. You must enter the password using the
following keys:
REC : 1
OSD : 2
STOP : 3
PLAY : 4
PAUSE : 5
DVR1C1161 | Installation Manual | Chapter 5
5
EN | 19
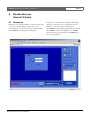
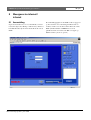
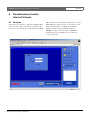
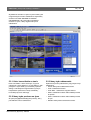
View via Internet/Intranet
5.1 Login
Open your internet browser and enter the network IP
address (for example, http://192.168.10.5). This must be
the same IP address as set in the DVR Network Menu.
5.2 Main Screen
The icon at the bottom of the screen is for logging out.
Information regarding the status of the system is also
shown at the bottom of the screen. The present system
status and the date and time are shown.
The icons on the right select the cameras and determine
how these are displayed on the screen. Playback
controls are also located on the right. The search
function allows you to select a clip for playback. If an
icon is shaded, it means that the specific function is not
accessible in the current mode.
Bosch Security Systems | 2004-6
The DVR Login page appears on the screen. You must
enter the correct user-name and password as are set in
the DVR Network Menu. (As default, enter ADMIN for
user name and ADMIN for password and then click on
Submit to enter to system.)
Note
Update rate of live images is dependent on the selected
recording speed when the unit is in Record (e.g.
recording in 0.5 IPS gives an update of 2 seconds per
camera image.
It is not possible to display live images when the
recorder is in playback. The system status shows the
message SERVER IN PLAYBACK. To view live
images first stop playback on the recorder itself.
DVR1C1161 | Installation Manual | Chapter 5
EN | 20
5.2.1 Status message color
•
The color of the status message indicates whether you
are working locally or remotely. If you are working
locally, the messages are colored yellow. If you are
controlling the DVR directly (you have selected the
CONTROL icon), the messages are colored green.
CONTROL: Press this icon to switch to direct
remote control mode (only allowed with access level
SUPER). You can now directly start or stop playback
and recording on the DVR remotely.
•
Control for playback speed.
5.2.2 Live mode icons
5.2.4 Search
The camera icons, the camera view icons and the Play
icon are enabled in the view mode.
The system gives you three ways to search for video for
playback:
• Play video selected by segment list.
• Play video selected by alarm list.
• Play video selected by date/time.
An item shown in the list can be selected by a mouse
click. Click PLAY to play the selected video.
5.2.3 Playback mode icons
Select the PLAY icon to switch to the playback mode.
• STOP: Press this icon to stop video display.
• PLAY: Play back the video display.
• PLAY REV. : Reverse video display.
• STEP Forward the video display.
• STEP Backward the video display.
• PAUSE: Press this icon to pause the video display.
Bosch Security Systems | 2004-6
DVR1C1161 | Installation Manual | Chapter 6
6
EN | 21
Specifications
6.1 RS-232 interface
The DVR can be controlled by a computer or a
terminal via the standard D-SUB 9-pin RS-232
connector.
$6&,, )81&7,21
&2'(
.H\SDGLQ
IURQWSDQHO
.
6WDUW5HFRUGLQJ
5(&
.
6WRS5HFRUGLQJDQG 6723
3OD\LQJEDFN
.
3OD\LQJEDFN
3LQ
'95&
1&
7;'
3LQ
+267
1&
5;'
.
3DXVHWKHSOD\EDFN 3$86(
SLFWXUH
5;'
7;'
.
6HDUFKSOD\EDFN
6($5&+
1&
*5281'
'75
*5281'
.
&RS\SLFWXUHLQWR
&)FDUG
&23<
1&
1&
1&
9
'65
576
&76
1&
.
2QVFUHHQGLVSOD\
',63/$<
.
&RQILUPWKH
VHOHFWLRQ
(17(5
.
(QWHU6HWWLQJ0HQX
0(18
The transmission setting is 9600 baud rate, 8 data bits, 1
start bit, 1stop bit and no parity.
6.1.1 RS-232 control protocol
A computer or a terminal can be used to control the unit
by sending three character ASCII commands through
the RS232 connector, these ASCII commands are
started with 'K' or 'k'. There are 30 ASCII commands
mapped to the 30 keypads in the front panel. The 30
ASCII commands are shown on the following table.
Bosch Security Systems | 2004-6
. )DVWUHYHUVH
. SOD\EDFNVSHHG
3/$<
;
. )DVWSOD\EDFNVSHHG !!;
.
.
5HZLQGWKHVWLOO
LPDJH
-2*5(:
.
$GYDQFHWKHVWLOO
LPDJH
-2*))
DVR1C1161 | Installation Manual | Chapter 6
EN | 22
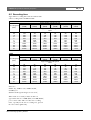
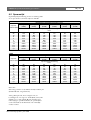
6.2 Recording time
Approximate recording times in hours without audio
when recording with a 160-GB hard disk.
PAL
Recording Rate
(IPS)
50
25
12
8
5
2
1.6
1.0
0.5
0.2
0.1
Lower
(15KB)
Low
(20KB)
60
120
240
360
590
1420
1900
3000
5900
14800
29600
44
90
180
270
440
1070
1420
2200
4400
11100
22200
Lower
(15KB)
Low
(20KB)
50
100
150
300
590
1480
1980
3000
5900
14800
29600
37
74
110
220
440
1110
1480
2200
4400
11100
22200
Picture Quality (average file size)
Basic
Standard
(25KB)
(30KB)
Approximate Recording Time
Hours
36
30
70
60
140
120
210
180
360
300
850
710
1140
950
1800
1500
3600
3000
8900
7400
17800
14800
High
(35KB)
Superior
(40KB)
25
50
100
150
250
610
810
1300
2500
6300
12700
22
44
90
130
220
530
710
1100
2200
5600
11100
High
(35KB)
Superior
(40KB)
21
42
60
130
250
630
850
1300
2500
6300
12700
19
37
56
110
220
560
740
1100
2200
5600
11100
NTSC
Recording Rate
(IPS)
60
30
20
10
5
2
1.5
1.0
0.5
0.2
0.1
Picture Quality (average file size)
Basic
Standard
(25KB)
(30KB)
Approximate Recording Time
Hours
30
25
60
50
90
70
180
150
360
300
890
740
1190
990
1800
1500
3600
3000
8900
7400
17800
14800
Reference:
24H=1 day, 168H=1 week, 720H=1 month,
8760H=1year
(Estimated with typical image-low noise level)
When audio is recorded you must calculate an
approximate file size of 18KB (PAL) or 21.6KB (NTSC)
per second of audio. This can reduce the recording
times, especially for the lower recording rates, given in
the above tables significantly.
Bosch Security Systems | 2004-6
DVR1C1161 | Installation Manual | Chapter 6
EN | 23
6.3 Technical specifications
Video
Format
Input
Output
Compression
Resolution
Display
General
PAL/NTSC
1 camera input (BNC), 1Vpp,
75Ohm
1 video output (BNC) for main
monitor, 1Vpp, 75Ohm
M-JPEG
720 x 576 (PAL) /
720 x 484 (NTSC)
Full display for live and playback
Audio
Connections
2 mono inputs, 1.6Vpp
±200mV@10K
2 mono outputs, 1.6Vpp
±200mV@10K
Video loss detection Yes
Power loss detectionYes
Alarm log
Yes
User interface
Menu-driven
Setup
By on-screen display menu
User input device Front panel keypad, remote control
(IR with wired receiver) optional
Image export
Built-in Compact Flash slot for
Type I and Type II cards
Security
Password protection
Power supply
100 - 240 Vac, 50/60 Hz
Power consumption < 40 W
Timer
Weekly timer, built-in real time clock
Network connection 10Base-T, TCP/IP via Ethernet,
RJ-45 connector
Control connection RS-232, 9-pin D-Sub connector
Alarm
Input
Output
Switching voltage High: > 2 Vdc
Switching voltage Low: < 0.5 Vdc
One relay output:
Contact voltage max.: 24 Vdc
Switching current max.: 2A dc
Storage
Hard disk
Mechanical
Weight
approx. 5.5 kg / 11.5 lbs
Dimensions (WxHxD)346 x 88 x 269 mm
13.6 x 3.5 x 10.5 inches
Ambient temperature
Operating
+0°C … +40°C
+32°F . . . +104°F
160 Gb
Approvals
Recording
Mode
Rate
Continuous, time-lapse, schedule or
event recording
Max. 50 images per sec. (PAL)
Max. 60 images per sec. (NTSC)
Safety
Europe
USA
Australia
EN60950
UL60950 UL & cUL listed
C-Tick
Electro Magnetic Compatibility (EMC)
Playback
Rate
Search
Max. 50 images per sec. (PAL)
Max. 60 images per sec. (NTSC)
Date/time, segment list or event
(alarm)
Europe
USA
Australia
EN55022 Class B, EN50130-4
FCC part 15, class B
AS/NZS 3548
Specifications may change without notice. If you have
any problems, contact your dealer.
Bosch Security Systems | 2004-6
DVR1C1161 | Installation Manual | Chapter 6
Bosch Security Systems | 2004-6
EN | 24
DVR1C1161 | Manuel d’installation | Table des matières
1.
MESURES DE SÉCURITÉ ................................................................................................................................................... 27
1.1
2.
3.
4.
FR | 25
CONSIGNES DE SÉCURITÉ IMPORTANTES .................................................................................... 27
INTRODUCTION ...................................................................................................................................................................... 29
2.1
CARACTÉRISTIQUES ................................................................................................................................ 29
2.2
PANNEAU AVANT ....................................................................................................................................... 30
2.3
PANNEAU ARRIÈRE ................................................................................................................................... 31
2.3.1 Alimentation ....................................................................................................................................... 31
2.3.2 Connecteur série RS-232 .............................................................................................................. 31
2.3.3 Connecteur pour capteur IR de la télécommande ................................................................... 31
2.3.4 Connecteur LAN .............................................................................................................................. 31
2.3.5 Connexions d'alarme ....................................................................................................................... 31
2.4
IRACCORDEMENT ..................................................................................................................................... 33
2.4.1 Multiplexeurs ..................................................................................................................................... 33
2.4.2 Systèmes quadruplex ...................................................................................................................... 34
2.4.3 Caméra ............................................................................................................................................... 35
2.5
TÉLÉCOMMANDE ....................................................................................................................................... 36
2.6
RÉSEAUX ....................................................................................................................................................... 36
FONCTIONNEMENT .............................................................................................................................................................. 37
3.1
INSTALLATION RAPIDE ............................................................................................................................ 37
3.2
ENREGISTREMENT INSTANTANÉ ......................................................................................................... 37
3.3
ENREGISTREMENT DES ALARMES ..................................................................................................... 37
3.3.1 Enregistrement pré-alarme ............................................................................................................. 37
3.4
LECTURE NORMALE ................................................................................................................................. 37
3.5
LECTURE PAR RECHERCHE .................................................................................................................. 38
3.6
COPIE ............................................................................................................................................................. 38
3.6.1 Copie d'une image figée ................................................................................................................ 38
3.6.2 Copie d'un fichier vidéo .................................................................................................................. 39
3.7
VERROUILLAGE DE SÉCURITÉ ............................................................................................................. 39
CONFIGURATION DES MENUS ...................................................................................................................................... 40
4.1
MENU PRINCIPAL ....................................................................................................................................... 40
4.2
MENU HORLOGE/LANGUE .................................................................................................................... 40
4.3
MENU ENREGISTREMENT NORMAL ................................................................................................... 40
4.4
MENU ENREGISTREMENT ALARME .................................................................................................... 41
4.5
MENU PROGRAMMATEUR ...................................................................................................................... 41
4.6
MENU SONNERIE ....................................................................................................................................... 42
4.7
MENU ARCHIVES ........................................................................................................................................ 42
Bosch Security Systems | 06-2004
DVR1C1161 | Manuel d’installation | Table des matières
FR | 26
4.8
MENU RÉSEAU ............................................................................................................................................ 43
4.9
MENU CONFIGURATION SYSTÈME .................................................................................................... 44
4.10 FENÊTRE MOT DE PASSE ....................................................................................................................... 45
5.
6.
VISUALISATION PAR INTERNET/INTRANET ........................................................................................................... 46
5.1
CONNEXION ................................................................................................................................................ 46
5.2
ÉCRAN PRINCIPAL ..................................................................................................................................... 47
5.2.1 Couleur du message de statut ..................................................................................................... 47
5.2.2 Icônes du mode temps réel ........................................................................................................... 47
5.2.3 Icônes du mode lecture .................................................................................................................. 48
5.2.4 Recherche ......................................................................................................................................... 48
CARACTÉRISTIQUES TECHNIQUES ........................................................................................................................... 49
6.1
INTERFACE RS-232 ................................................................................................................................... 49
6.1.1 Protocole de contrôle RS-232 ..................................................................................................... 49
6.2
DURÉE D'ENREGISTREMENT ................................................................................................................. 50
6.3
CARACTÉRISTIQUES TECHNIQUES ................................................................................................... 51
Messages affichés
II
A.REC
BASIC
HIGH
LOW
LOWER
MENU
PAUSE
P.END
PLAY
P.END
P.RPT
REC
SRCH
STDRD
SUPER
SYSLD
T.REC
*REC
P.BEG
R.REC
Pause
Enregistrement alarme
Qualité de base
Qualité haute
Qualité basse
Qualité très basse
Menu
Pause
Fin pause
Lecture
Fin lecture
Lecture continue
Enregistrement
Recherche
Qualité standard
Qualité supérieure
Chargement du système
Enregistrement programmé
Verrou enregistrement
Début lecture
Enregistrement à distance
Bosch Security Systems | 06-2004
DVR1C1161 | Manuel d’installation | Chapitre 1
1
MESURES DE SÉCURITÉ
Danger
Un triangle équilatéral comportant un éclair à
extrémité fléchée signale que le produit
renferme une « tension potentiellement
dangereuse » non isolée, de puissance
suffisante pour provoquer une électrocution.
Avertissement
Un triangle équilatéral comportant un point
d'exclamation signale la présence d'instructions
d'utilisation et d'entretien (dépannage)
importantes dans la documentation qui
accompagne l'appareil.
Attention
Pour éviter tout risque d'électrocution,
n'essayez pas de retirer le capot (ou le panneau
arrière). Cet appareil ne contient aucun
composant susceptible d'être réparé par
l'utilisateur. Confiez la réparation de l'appareil à
du personnel qualifié.
1.1 CONSIGNES DE SÉCURITÉ
IMPORTANTES
1 Lisez attentivement les instructions ci-après.
2 Conservez ces instructions pour référence ultérieure.
3 Conformez-vous aux différents avertissements
fournis.
4 Suivez l'ensemble de ces instructions.
5 Évitez d'utiliser l'appareil à proximité d’une source
d’humidité.
6 Pour nettoyer l'appareil, utilisez uniquement un
chiffon sec.
7 N'obstruez en aucun cas les orifices d’aération.
Installez l'appareil conformément aux instructions
du fabricant.
8 Évitez d'installer l'appareil à proximité de sources de
chaleur telles qu'un radiateur, une bouche d’air
chaud, un four ou tout autre dispositif générant de la
chaleur (amplificateurs, etc.).
Bosch Security Systems | 06-2004
FR | 27
9 Ne retirez en aucun cas le dispositif de sécurité de la
fiche polarisée ou de la fiche de terre. La fiche
polarisée se compose de deux broches, dont l'une est
plus large que l'autre. La fiche de terre est formée de
deux broches et d'une borne de mise à la terre. La
broche la plus large et la borne de mise à la terre
sont toutes deux conçues pour assurer votre sécurité.
Si la fiche fournie n’entre pas dans la prise que vous
souhaitez utiliser, demandez à un électricien de
remplacer la prise.
10 Placez le cordon d’alimentation de sorte qu'il ne soit
ni piétiné ni comprimé, en particulier au niveau de la
fiche de connexion, de la prise de courant et du
point de sortie de l'appareil.
11 Utilisez exclusivement les fixations/accessoires
indiqués par le fabricant.
12 Débranchez l'appareil en cas d'orage ou si vous
n'avez pas l'intention de l'utiliser pendant une
période prolongée.
13 Confiez la réparation de l'appareil à du personnel
qualifié. Une réparation s'impose lorsque l’appareil a
été endommagé : détérioration du cordon
d’alimentation ou de la fiche, infiltration de liquide,
introduction d'objets, exposition à la pluie ou à
l’humidité, fonctionnement anormal, chute, etc.
14
Avertissement
Pour éviter tout risque d'incendie ou
d'électrocution, n'exposez pas l'appareil à la
pluie ni à l’humidité. Ne placez aucun objet
contenant du liquide sur l'appareil (vases, etc.).
15 Seuls le personnel qualifié et le personnel du service
après-vente sont autorisés à démonter la partie
arrière de l'appareil.
16 Le remplacement incorrect de la pile risque de
provoquer une explosion. Une pile au lithium est
située dans le boîtier de l'appareil. Remplacez les
piles exclusivement par des piles identiques ou de
type équivalent. Veillez à vous débarrasser de la pile
en respectant l'environnement.
17 Pour éviter toute surchauffe de l'appareil, ne bouchez
pas les orifices d’aération.
18 Maintenez l'appareil à l'écart des sources de chaleur.
19 N’installez pas l'appareil dans un espace confiné tel
qu'une bibliothèque ou une unité similaire.
DVR1C1161 | Manuel d’installation | Chapitre 1
Nettoyage
Pour nettoyer l'appareil, utilisez un chiffon humide non
pelucheux ou une peau de chamois.
Remarque
Forte d’un engagement inébranlable en faveur de
l’environnement, la société Bosch a conçu cet appareil
de sorte qu’il respecte au mieux l’environnement.
Bosch Security Systems | 06-2004
FR | 28
DVR1C1161 | Manuel d’installation | Chapitre 2
2
Introduction
La technologie d'enregistrement et de lecture avancée
de l'enregistreur numérique DVR1C1161 vient
compléter les systèmes de télévision en circuit fermé.
Cet enregistreur numérique offre des capacités
d'enregistrement sans interruption en mode temps réel
ou en mode « time lapse » pendant une semaine ou
davantage. Grâce à ce système, il n'est plus nécessaire
de manipuler ou de stocker des cassettes vidéo, ni de
procéder à des entretiens fréquents et coûteux, comme
c'était le cas avec les magnétoscopes.
Cet enregistreur numérique peut atteindre des vitesses
d'enregistrement de 50 à 60 images par seconde aux
formats PAL et NTSC, et permet de visualiser
instantanément les séquences enregistrées. Il présente
tous les avantages de l'enregistrement numérique,
s'installe facilement et fonctionne comme un
magnétoscope. Grâce à sa technologie de compression
hautement performante, à la qualité supérieure et aux
détails des images enregistrées, l'enregistreur numérique
s'intègre parfaitement à de nombreux multiplexeurs.
2.1 Caractéristiques
•
•
•
•
•
•
•
•
•
•
•
•
•
•
•
Images de qualité supérieure
Enregistrement d'images pré-alarme
Enregistrement en mode « time lapse » et en temps
réel
Fréquence d'actualisation jusqu'à 50 images au
format PAL et 60 images au format NTSC
Recherche rapide par date/heure, par alarmes et par
liste d'enregistrements
Lecture accélérée ou au ralenti des séquences
enregistrées à des vitesses différentes
Affichage à l'écran du menu de configuration et du
programmateur
Protection par mot de passe
Port de communication RS-232
Système de compression/décompression M-JPEG
intégré avec qualité réglable
Enregistrement de séquences audio
Plusieurs vitesses d'enregistrement en mode « time
lapse » programmées
Possibilité de stockage de données sur une carte
Compact Flash
Télécommande
Visualisation à distance des enregistrements et des
images en temps réel avec le navigateur Web
Bosch Security Systems | 06-2004
FR | 29
•
Compatible avec les multiplexeurs Bosch et de
nombreux autres modèles
DVR1C1161 | Manuel d’installation | Chapitre 2
FR | 30
2.2 Panneau avant
En mode lecture, tournez le bouton rotatif pour
sélectionner la vitesse de lecture.
En mode pause, tournez le bouton rotatif pour faire
défiler les images une par une, vers l'avant ou vers
l'arrière.
En mode menu, tournez le bouton rotatif pour vous
déplacer dans les pages du menu ou pour
sélectionner des valeurs. Combiné à la touche
ENTER, il permet de définir des valeurs du menu.
1 REC : Appuyez sur cette touche pour commencer
l'enregistrement (le voyant rouge de la touche
s'allume lorsque l'appareil est en cours
d'enregistrement).
2 OSD : - Appuyez sur cette touche pour afficher
l'heure, la date, le taux d'utilisation du disque
et la vitesse de lecture.
- Appuyez une deuxième fois sur OSD pour
afficher la taille du disque, la position
d'enregistrement et la position de lecture.
- Appuyez une troisième fois sur OSD pour
désactiver l'affichage à l'écran.
9 ENTER : Appuyez sur cette touche pour confirmer
une sélection ou la modification d'une valeur.
10 MENU : Appuyez sur cette touche pour afficher ou
quitter le menu de configuration.
3 STOP : Appuyez sur cette touche pour interrompre
11 Capteur IR de la télécommande.
l'enregistrement ou la lecture.
12 Afficheur à cristaux liquides
4 PLAY : Appuyez sur cette touche pour commencer
En mode veille, il affiche la date et l'heure, ainsi que
la qualité et la vitesse d'enregistrement normal.
En mode enregistrement, il affiche la date et
l'heure, le message REC, ainsi que la vitesse
d'enregistrement courante.
En mode lecture, il affiche la date et l'heure de
lecture, le message PLAY et la vitesse de lecture
courante.
(Pour plus d'informations sur les messages affichés,
reportez-vous à la liste d'abréviations figurant au
début du présent manuel.)
la lecture.
5 PAUSE : Appuyez sur cette touche pour figer
l'image pendant la lecture.
6 SEARCH : Appuyez sur cette touche pour afficher
le menu Recherche.
7 Anneau de sélection :
En mode lecture, tournez l'anneau de sélection dans
le sens horaire pour augmenter la vitesse de lecture
avant ou arrière, et dans le sens anti-horaire pour la
réduire.
En mode pause, tournez l'anneau de sélection pour
faire défiler les images lentement vers l'avant ou
vers l'arrière.
13 ALARM : le voyant s'allume lorsqu'une alarme est
déclenchée.
14 LAN : le voyant s'allume en cas de connexion au
réseau.
8 Bouton rotatif :
1
16
15
Bosch Security Systems | 06-2004
14 13
2
3
12
4
5
6
11
10
7
8
9
DVR1C1161 | Manuel d’installation | Chapitre 2
FR | 31
2.3.4 Connecteur LAN
Dans le menu Enregistrement alarme, les entrées
ALM-IN et ALM-RST peuvent être réglées sur
normalement ouvert (N.O.) ou normalement fermé (N.F.).
GND :
ALM-IN :
Mise à la terre.
Appliquez un signal* sur cette broche
pour commencer l'enregistrement des
alarmes.
Appliquez un signal* sur cette broche
pour interrompre l'enregistrement des
alarmes.
Appliquez un signal* d'enregistrement
externe niveau haut sur cette broche
pour commencer l'enregistrement. Si le
signal passe au niveau bas,
l'enregistrement s'arrête.
Aucune connexion.
2.3.1 Alimentation
ALM-RST :
REC :
Raccordez le connecteur D-Sub à 9 broches au port
RS-232 si vous souhaitez contrôler l'appareil à distance.
* Signal
- tension de commutation haute : > 2 Vcc
- tension de commutation basse : < 0,5 Vcc
- tension d'entrée max. : 12 Vcc
Connecteur
RS-232
Interrupteur
RS 232
GND
AC 100-240
Out1
Out2
Monitor Out
Out
Out 1
Remote Control
Looping out
GND
Video
In
NC2
S-Video
In
NC1
Mux main
Monitor In
In2
REC
In1
ALM-RST
Audio
Off
ALM-IN
Power
Connecteur pour
capteur IR de la
télécommande
VEXT
Connecteur d'alarme
Bosch Security Systems | 06-2004
LAN
Out 2
GND
100-240 Vac
GND
Si le capteur IR de la télécommande situé sur le
panneau avant est occulté (lorsque l'appareil est installé
dans une armoire, par exemple), raccordez le câble
d'extension IR (disponible en option) au connecteur
prévu à cet effet à l'arrière de l'appareil. Positionnez le
capteur de manière à ce qu'il soit dans le champ de la
télécommande.
NC1, NC2 :
NC4
2.3.3 Connecteur pour capteur IR de la
télécommande
NC3
2.3.2 Connecteur série RS-232
DISKFULL
Branchez le câble d'alimentation sur la prise du panneau
arrière de l'appareil. Utilisez l'interrupteur pour allumer
et éteindre l'appareil.
VEXT
2.3 Panneau arrière
ALM-CO
image figée ou une séquence vidéo sur une carte
Compact Flash.
2.3.5 Connexions d'alarme
ALM-NO
16 COPY : Appuyez sur cette touche pour copier une
Utilisez le connecteur LAN RJ-45 situé sur le panneau
arrière pour raccorder l'appareil à un réseau.
ALM-NC
d'insérer une carte Compact Flash. Appuyez sur le
bouton noir situé à côté de la fente pour extraire la
carte.
GND
15 Fente pour carte Compact Flash : elle permet
Connecteur réseau
Entrées d'alarme
GND
FR | 32
NC4
NC3
DISKFULL
VEXT
ALM-CO
ALM-NO
ALM-NC
GND
GND
NC2
NC1
REC
ALM-RST
ALM-IN
GND
DVR1C1161 | Manuel d’installation | Chapitre 2
Sorties d'alarme
Parmi les signaux de sortie d'alarme, citons :
GND :
ALM-NC** :
Mise à la terre.
Lorsqu'une alarme se déclenche, la
connexion entre cette broche et la
broche ALM-COM est ouverte. Le
reste du temps, elle est fermée.
ALM-NO** : Lorsqu'une alarme se déclenche, la
connexion entre cette broche et la
broche ALM-COM est fermée. Le reste
du temps, elle est ouverte.
ALM-COM** : Contact commun d'alarme.
VEXT :
Signal de synchronisation pour
multiplexeur.
Tension de sortie : 5 Vcc
Courant de sortie : 100 mA
DISKFULL : Signal de sortie d'alarme en cas de
disque saturé.
Tension de sortie : 5 Vcc
Courant de sortie : 100 mA
NC3, NC4 :
Pas de connexions.
** tension de contact max. : 24 Vcc
courant de commutation max. : 2 A cc
Bosch Security Systems | 06-2004
DVR1C1161 | Manuel d’installation | Chapitre 2
FR | 33
2.4 IRaccordement
•
Raccordez la sortie magnétoscope du multiplexeur
au connecteur BNC Video In situé à l'arrière de
l'appareil.
• Raccordez l'entrée magnétoscope du multiplexeur au
connecteur BNC Video Out situé à l'arrière de
l'appareil.
• Pour synchroniser la commutation avec le
multiplexeur, raccordez les connecteurs VEXT et
GND situés à l'arrière de l'appareil au connecteur
du multiplexeur.
Une fois les connexions établies, reportez-vous au menu
système pour sélectionner le type de multiplexeur que
vous utilisez.
Vous pouvez connecter l'enregistreur numérique à un
large éventail de multiplexeurs, systèmes quadruplex ou
directement à une caméra.
2.4.1 Multiplexeurs
Le schéma ci-dessous illustre la procédure de connexion
d'un multiplexeur à l'enregistreur numérique.
•
•
Branchez le moniteur sur le connecteur BNC
Monitor Out situé à l'arrière de l'appareil.
Raccordez la sortie moniteur principale du
multiplexeur au connecteur BNC Monitor In situé à
l'arrière de l'appareil.
Caméras
Multiplexeur
1
VCR IN VCR OUT
2
4
5
RS 232
Out2
Monitor Out
Out
Out 1
Remote Control
Monitor Out
moniteur
Bosch Security Systems | 06-2004
GND
NC4
NC3
DISKFULL
VEXT
ALM-CO
LAN
Out 2
GND
100-240 Vac
ALM-NO
ALM-NC
GND
GND
AC 100-240
Out1
Connecteur pour
capteur IR de la
télécommande
Looping out
NC2
Video
In
NC1
S-Video
In
REC
Mux main
Monitor In
In2
ALM-RST
Audio
In1
ALM-IN
Power
6
GND
moniteur
Connecteur
RS-232
Interrupteur
Off
3
Magnétoscope
MON B MON A
VEXT
Connecteur réseau
DVR1C1161 | Manuel d’installation | Chapitre 2
FR | 34
2.4.2 Systèmes quadruplex
•
Dans le menu système, réglez le multiplexeur sur
Désactivé.
Pour connecter un système quadruplex doté d'une sortie
magnétoscope, reportez-vous aux connexions du
multiplexeur.
Le schéma ci-dessous illustre la procédure de connexion
d'un quadruplex non doté d'une sortie magnétoscope à
l'enregistreur numérique.
•
•
Branchez le moniteur sur le connecteur BNC
Monitor Out situé à l'arrière de l'appareil.
Raccordez la sortie vidéo du multiplexeur au
connecteur BNC Video In situé à l'arrière de
l'appareil.
Quadravision
1
2
3
4
Vidéo
Video OUT
Connecteur pour
Connecteur capteur IR de la
télécommande
RS-232
Interrupteur
RS 232
Out2
Monitor Out
Out
Out 1
Monitor Out
moniteur
Bosch Security Systems | 06-2004
GND
NC4
NC3
DISKFULL
VEXT
ALM-CO
LAN
Out 2
GND
100-240 Vac
ALM-NO
ALM-NC
GND
GND
GND
AC 100-240
Out1
Remote Control
Looping out
NC2
Video
In
NC1
S-Video
In
REC
Off
Mux main
Monitor In
In2
ALM-RST
Audio
In1
ALM-IN
Power
VEXT
Connecteur réseau
DVR1C1161 | Manuel d’installation | Chapitre 2
FR | 35
2.4.3 Caméra
•
Le schéma ci-dessous illustre la procédure de connexion
d'une caméra à l'enregistreur numérique.
•
•
•
Raccordez le moniteur au connecteur BNC
Video Out situé à l'arrière de l'appareil.
Raccordez la sortie vidéo de la caméra au
connecteur BNC Video In situé à l'arrière de
l'appareil.
•
Raccordez la sortie audio de la caméra au
connecteur Audio In situé à l'arrière de l'appareil.
Raccordez le connecteur Audio Out situé à l'arrière
de l'appareil à un amplificateur audio.
Dans le menu système, réglez le multiplexeur sur
Désactivé.
Video
In
RS 232
Out2
Monitor Out
Out
Out 1
GND
NC4
NC3
DISKFULL
VEXT
ALM-CO
ALM-NO
ALM-NC
GND
GND
GND
AC 100-240
Out1
Remote Control
Looping out
NC2
S-Video
In
NC1
Mux main
Monitor In
In2
REC
Audio
In1
ALM-RST
Power
Connecteur pour
capteur IR de la
télécommande
Connecteur
RS-232
ALM-IN
Audio In
Interrupteur
Off
Video In
Caméra
LAN
Out 2
GND
VEXT
Sortie vidéo
Audio Out
Connecteur réseau
100-240 Vac
moniteur
Bosch Security Systems | 06-2004
DVR1C1161 | Manuel d’installation | Chapitre 2
FR | 36
2.5 Télécommande
Grâce à la télécommande, vous pouvez facilement
contrôler l'enregistreur numérique à distance. Elle
permet d'effectuer les opérations principales.
Voici un descriptif des touches permettant de
commander l'enregistreur numérique :
RECORD :
Appuyez sur cette touche pour
commencer l'enregistrement.
STOP :
Appuyez sur cette touche pour
interrompre l'enregistrement ou la
lecture.
PLAY :
Appuyez sur cette touche pour
commencer la lecture.
SEARCH :
Cette touche permet d'augmenter la
vitesse par 2x, 4x, 8x, 16x, 32x, 640x,
2x, etc.
REWIND :
En mode lecture, appuyez sur cette
touche pour commencer la lecture
arrière (la touche SEARCH permet
d'augmenter la vitesse).
STEP REW. : Appuyez sur cette touche pour
interrompre la lecture. Appuyez de
nouveau sur cette touche pour faire
défiler les images une par une vers
l'arrière.
STEP FORW. : Appuyez sur cette touche pour
interrompre la lecture. Appuyez de
nouveau sur cette touche pour faire
défiler les images une par une vers
l'avant.
FORWARD : En mode lecture arrière, appuyez sur
cette touche pour repasser au mode
lecture avant (la touche SEARCH
permet d'augmenter la vitesse).
0
BOSCH
Touches de commande de
l'enregistreur numérique
2.6 Réseaux
La connexion réseau utilise la norme 10BaseT. Assurezvous que votre carte réseau la prend en charge.
Pour connecter l'enregistreur numérique directement
au PC, utilisez un câble réseau simulateur de modem
CAT 5. Pour connecter l'enregistreur numérique à un
routeur ou à un concentrateur, utilisez un câble réseau
intermédiaire CAT 5.
Pour que le logiciel distant fonctionne correctement, les
ports suivants doivent être ouverts :
• Port TCP 80 :Serveur Web
• Port TCP 6666 :Commandes
• Ports TCP 1111, 2222, 3333, 4444 :Données vidéo
Si vous vous connectez via un pare-feu, vérifiez que
vous pouvez accédez à l'appareil auprès de votre
administrateur réseau.
Bosch Security Systems | 06-2004
DVR1C1161 | Manuel d’installation | Chapitre 3
3
Fonctionnement
3.1 Installation rapide
En mode d'installation rapide, vous pouvez rapidement
modifier la date, l'heure, la qualité et la vitesse
d'enregistrement à l'aide de l'afficheur à cristaux
liquides et du bouton rotatif.
• Appuyez sur la touche MENU pendant 5 secondes
pour activer le mode d'installation rapide. L'année
clignote sur l'afficheur.
• Tournez le bouton rotatif pour modifier l'année, puis
appuyez sur la touche ENTER. Le mois clignote sur
l'afficheur.
• Servez-vous du bouton rotatif et de la touche ENTER
pour paramétrer toutes les valeurs affichées. Une fois
la dernière valeur définie, l'enregistreur numérique
repasse en mode normal.
• Pour quitter le menu d'installation rapide, appuyez
sur la touche SEARCH.
3.2 Enregistrement instantané
Appuyez sur la touche REC pour commencer aussitôt
l'enregistrement ; les images sont enregistrées sur le
disque dur.
• Il est possible de régler la vitesse et la qualité
d'enregistrement dans les menus Enregistrement
normal et Enregistrement alarme.
• Le message REC (enregistrement) apparaît sur
l'afficheur.
Appuyez sur la touche STOP pour interrompre
l'enregistrement.
• La touche STOP fonctionne uniquement en mode
enregistrement.
• Lorsque le disque est saturé, l'enregistreur
numérique interrompt automatiquement
l'enregistrement ou écrase les fichiers enregistrés au
début du disque dur, selon les réglages effectués dans
le menu Paramètres système.
3.3 Enregistrement des alarmes
Lorsqu'une alarme se déclenche, l'image affichée sur le
moniteur est automatiquement enregistrée, et ce, jusqu'à
la fin de la durée de l'alarme. Les modes
d'enregistrement instantané et d'enregistrement
programmé sont désactivés lorsqu'une alarme est
déclenchée. Si l'appareil est déjà en cours
d'enregistrement, il n'est pas possible de modifier la
Bosch Security Systems | 06-2004
FR | 37
qualité d'enregistrement pour enregistrer une alarme.
Définissez les options d'enregistrement des alarmes dans
le menu Enregistrement alarme.
3.3.1 Enregistrement pré-alarme
Grâce à une mémoire tampon pouvant contenir
220 images (par exemple, 9 s à 25 IPS ou 220 s à 1 IPS),
il est possible de capturer et d'enregistrer des images
juste avant qu'une alarme ne se déclenche. Le mode
d'enregistrement pré-alarme ne s'active que si l'appareil
n'est pas en cours d'enregistrement juste avant le
déclenchement de l'alarme. S'il est déjà en cours
d'enregistrement, la qualité de l'enregistrement préalarme est identique à celle définie pour
l'enregistrement en cours. Si l'appareil n'est pas en cours
d'enregistrement avant le déclenchement de l'alarme, la
qualité de l'enregistrement pré-alarme sera identique à
la qualité d'enregistrement normal.
3.4 Lecture normale
Lecture
• Appuyez sur la touche PLAY pour commencer la
lecture des séquences vidéo ou audio enregistrées à
partir du dernier segment.
• Appuyez sur la touche STOP pour interrompre la
lecture.
Avance rapide
• Appuyez sur la touche PLAY pour commencer la
lecture.
• Tournez l'anneau de sélection dans le sens horaire
pour faire défiler les images rapidement. L'afficheur
indique la vitesse (vitesse de lecture normale 2x, 4x,
8x, 16x, 32x, 640x).
Lecture arrière
• Appuyez sur la touche PLAY pour commencer la
lecture.
• Tournez l'anneau de sélection dans le sens antihoraire pour faire défiler les images rapidement vers
l'arrière. L'afficheur indique la vitesse (vitesse de
lecture normale 2x, 4x, 8x, 16x, 32x, 640x).
Lecture au ralenti
• Appuyez sur la touche PAUSE pour figer l'image en
cours de lecture.
• Tournez l'anneau de sélection dans le sens horaire
pour faire défiler les images au ralenti. L'afficheur
indique la vitesse (>1/2, 1/4, 1/8, 1/16, 1/32, 1/64).
DVR1C1161 | Manuel d’installation | Chapitre 3
FR | 38
Lecture arrière au ralenti
• Appuyez sur la touche PAUSE pour figer l'image en
cours de lecture.
• Tournez l'anneau de sélection dans le sens antihoraire pour faire défiler les images au ralenti vers
l'arrière. L'afficheur indique la vitesse (<1/2, 1/4,
1/8, 1/16, 1/32, 1/64).
•
Maintien de la vitesse affichée
• Pour maintenir la vitesse affichée, appuyez sur la
touche ENTER, puis relâchez l'anneau de sélection.
Si vous tournez à nouveau l'anneau de sélection, la
vitesse normale est rétablie.
Lecture par recherche date/heure
• Appuyez sur la touche SEARCH pour accéder au
menu Recherche.
• Déplacez le curseur sur l'option PAR DATE ET
HEURE, puis appuyez sur la touche ENTER pour
sélectionner la recherche par fichier.
• Déplacez le curseur sur la valeur souhaitée, puis
appuyez sur la touche ENTER.
• Tournez le bouton rotatif pour augmenter ou
diminuer la valeur, puis appuyez sur ENTER.
• Déplacez le curseur sur l'option LANCER LA
RECHERCHE ET LA LECTURE, puis appuyez sur
la touche ENTER. La lecture commence à partir de
la date et de l'heure définies dans le menu.
Défilement des images vers l'avant et vers l'arrière
• Appuyez sur la touche PAUSE pour figer l'image.
• Tournez le bouton rotatif dans le sens horaire pour
faire défiler les images une à une vers l'avant.
• Tournez le bouton rotatif dans le sens anti-horaire
pour faire défiler les images une à une vers l'arrière.
• Tournez le bouton rotatif rapidement pour
augmenter la vitesse.
3.5 Lecture par recherche
Lecture par recherche de segment
• Appuyez sur la touche SEARCH pour accéder au
menu Recherche.
• Déplacez le curseur sur l'option PAR LISTE DE
SEGMENTS, puis appuyez sur la touche ENTER
pour sélectionner la recherche par fichier.
• Déplacez le curseur sur le segment que vous
souhaitez visualiser (Pré-alarme : enregistrement préalarme, Programmateur : enregistrement
programmé).
• Si le segment souhaité ne se trouve pas dans la liste,
tournez le bouton rotatif dans le sens horaire pour
passer à la page suivante.
• Appuyez sur ENTER pour commencer la lecture.
Lecture par recherche d'alarme
• Appuyez sur la touche SEARCH pour accéder au
menu Recherche.
• Déplacez le curseur sur l'option PAR LISTE
D'ÉVÉNEMENTS, puis appuyez sur la
touche ENTER pour sélectionner la recherche par
alarme.
• Déplacez le curseur pour sélectionner l'image
d'alarme que vous souhaitez visualiser.
Bosch Security Systems | 06-2004
•
•
Si l'image souhaitée ne se trouve pas dans la liste,
tournez le bouton rotatif dans le sens horaire pour
passer à la page suivante.
Appuyez sur ENTER pour commencer la lecture des
images d'alarme.
L'appareil commence par lire les images pré-alarmes
et s'arrête à la fin de la durée de l'alarme.
Si aucune image ne correspond à la date et à l'heure
définies, l'appareil commence automatiquement la
lecture à partir de l'image la plus proche.
3.6 Copie
Insérez une carte Compact Flash (de type I ou II) dans
la fente prévue à cet effet sur le panneau avant. Veillez à
insérer la carte dans le bon sens. Utilisez uniquement
des cartes Compact Flash d'une capacité de 16 Mo ou
supérieure.
La fonction de copie de la carte Compact Flash vous
permet de copier des clips vidéo courts. La copie d'un
clip long peut donc prendre un certain temps.
Remarque
Pour améliorer la lisibilité des messages de copie,
appuyez sur la touche OSD. Appuyez de nouveau sur la
touche OSD pour désactiver l'arrière-plan.
3.6.1 Copie d'une image figée
•
•
•
Appuyez sur la touche PLAY pour commencer la
lecture.
Appuyez sur la touche PAUSE pour figer l'image.
Tournez le bouton rotatif dans le sens horaire ou
anti-horaire pour accéder à l'image souhaitée.
DVR1C1161 | Manuel d’installation | Chapitre 3
•
•
•
•
•
Appuyez sur la touche COPY pour passer en mode
copie.
Tournez le bouton rotatif pour sélectionner une
image filmée par la caméra.
Une fois l'image affichée à l'écran, appuyez de
nouveau sur COPY. Le message « Copie en cours... »
s'affiche à l'écran. Une fois le fichier copié, le
message « Opération terminée » et les données
relatives au fichier s'affichent à l'écran.
Appuyez sur la touche STOP pour annuler la copie.
Appuyez sur la touche PLAY pour reprendre la
lecture.
Les images copiées sont enregistrées en tant qu'image
unique au format de fichier JPG.
3.6.2 Copie d'un fichier vidéo
•
•
•
•
•
•
•
Appuyez sur la touche PLAY pour commencer la
lecture.
Appuyez sur la touche COPY pour passer en mode
copie.
Tournez le bouton rotatif pour sélectionner la
caméra souhaitée.
Une fois l'image affichée à l'écran, appuyez de
nouveau sur COPY. Le message « Copie en cours... »
s'affiche à l'écran.
Appuyez sur la touche STOP pour interrompre la
copie.
Une fois le fichier copié, le message « Opération
terminée » et les données relatives au fichier
s'affichent à l'écran.
Appuyez sur la touche PLAY pour reprendre la
lecture.
Les images copiées sont enregistrées en tant que vidéo
unique au format de fichier MOV.
3.7 Verrouillage de sécurité
En mode d'enregistrement, appuyez sur la touche REC
pendant plus de 5 secondes pour verrouiller les touches
du panneau avant.
(Cette fonction nécessite la définition d'un mot de passe
dans le menu Configuration système.)
Si vous appuyez sur la touche STOP, le système vous
invite à saisir le mot de passe. Saisissez le mot de passe
correct pour déverrouiller les touches.
Bosch Security Systems | 06-2004
FR | 39
DVR1C1161 | Manuel d’installation | Chapitre 4
4
Configuration des menus
Une fois le système raccordé comme décrit
précédemment dans ce manuel :
• Mettez l'appareil sous tension.
• L'afficheur s'allume si l'alimentation est correcte.
• Attendez quelques instants que le système se charge.
• Appuyez sur la touche MENU pour accéder au
MENU PRINCIPAL.
Le menu principal donne accès à plusieurs sous-menus,
dans lesquels vous pouvez modifier des paramètres.
Pour parcourir les sous-menus, tournez le bouton rotatif
dans le sens horaire ou anti-horaire. Appuyez sur la
touche ENTER pour ouvrir un sous-menu. Une fois le
sous-menu affiché, tournez le bouton rotatif pour
parcourir les différentes options et valeurs, et appuyez
sur la touche ENTER pour effectuer une sélection. Pour
revenir au menu principal, placez-vous sur l'option
MENU PRINCIPAL à la fin du sous-menu, puis
appuyez sur la touche ENTER.
4.1 Menu principal
0(1835,1&,3$/
+25/2*(/$1*8(!
(15(*,675(0(171250$/!
(15(*,675(0(17$/$50(!
352*5$00$7(85!
6211(5,(!
$5&+,9(6!
5e6($8!
&21),*85$7,216<67Ê0(!
4.2 Menu Horloge/langue
0(18+25/2*(/$1*8(
'$7(
+(85(
)250$7'$7(
/$1*8(0(18
--00$$$$
)5$1d$,6
0(1835,1&,3$/!
Bosch Security Systems | 06-2004
FR | 40
DATE : année : 2000 à 2099 mois : 01 à 12 jour : 01 à 31.
HEURE : heures : 00 à 23 minutes : 00 à 59 secondes : 00 à 59.
FORMAT DATE : définit l'ordre d'affichage de l'année (AAAA), du
mois (MM) et du jour (JJ).
LANGUE MENU : anglais, allemand, français, espagnol, italien,
portugais, néerlandais ou polonais.
MENU PRINCIPAL : revient au menu principal.
4.3 Menu Enregistrement normal
0(18(15(*,675(0(171250$/
9,7(66(
(15(*,675(0(17
48$/,7e
(15(*,675(0(17
,36
7(03
'
(15(*,675(0(17
+(85(6
67$1'$5'
0(1835,1&,3$/!
VITESSE : définit la vitesse d'enregistrement de 0,1 à 25/30 IPS.
QUALITÉ : six niveaux de qualité d'enregistrement sont disponibles :
TRÈS BASSE : 15 Ko
BASSE : 20 Ko
DE BASE : 25 Ko
STANDARD : 30 Ko
HAUTE : 35 Ko
SUPÉRIEURE : 40 Ko
TEMPS ENREGISTREMENT : affiche une estimation du temps
d'enregistrement disponible sur le disque en fonction de la
vitesse et de la qualité d'enregistrement sélectionnée.
DVR1C1161 | Manuel d’installation | Chapitre 4
4.4 Menu Enregistrement alarme
0(18(15(*,675(0(17$/$50(
)21&7,211(0(17$/$50(
9,7(66(
(15(*,675(0(17
48$/,7e
(15(*,675(0(17
7<3((175e($/$50(
7<3(5e,1,7,$/,6$7,21
$/$50(
'85e($/$50(
$&7,9e
,36
)21&7,211(0(1735e
$/$50(
9,7(66(
(15(*,675(0(17
$&7,9e
0(1835,1&,3$/
!
67$1'$5'
12
12
6
,36
FONCTIONNEMENT ALARME :
ACTIVÉ : enregistre lorsqu'une alarme se déclenche.
DÉSACTIVÉ : n'enregistre pas lorsqu'une alarme se
déclenche.
VITESSE ENREGISTREMENT : vitesse d'enregistrement pendant la
durée de l'alarme.
La vitesse d'enregistrement maximale est de 50/60 IPS
(PAL/NTSC).
La vitesse d'enregistrement minimale est de 0,1 IPS.
QUALITÉ ENREGISTREMENT : qualité d'enregistrement lorsqu'une
alarme se déclenche.
TRÈS BASSE : 15 Ko
BASSE : 20 Ko
DE BASE : 25 Ko
STANDARD : 30 Ko
HAUTE : 35 Ko
SUPÉRIEURE : 40 Ko
TYPE ENTRÉE ALARME :
N.O. : normalement ouvert
N.F. : normalement fermé
TYPE RÉINITIALISATION ALARME
N.O. : normalement ouvert
N.F. : normalement fermé
DURÉE ALARME : les images d'alarme sont enregistrées du
déclenchement de l'alarme à la fin de la durée de celle-ci, ou
jusqu'à ce que l'alarme soit réinitialisée. La durée maximale
est infinie et la durée minimale est de 10 s.
FONCTIONNEMENT PRÉ-ALARME
ACTIVÉ : enregistre les images précédant une alarme à la
vitesse d'enregistrement pré-alarme.
DÉSACTIVÉ : aucune image pré-alarme n'est enregistrée.
VITESSE ENREGISTREMENT : vitesse d'enregistrement avant le
déclenchement d'une alarme.
La vitesse d'enregistrement maximale est de 50/60 IPS
(PAL/NTSC).
La vitesse d'enregistrement minimale est de 0,1 IPS.
Bosch Security Systems | 06-2004
FR | 41
Remarque
Lorsqu'une alarme se déclenche et que l'appareil est en
mode veille ou en mode enregistrement normal, la
qualité d'enregistrement correspond à la qualité définie
dans le menu Enregistrement normal. Lorsqu'une alarme
se déclenche et que l'appareil est en mode enregistrement
programmé, la qualité d'enregistrement correspond à la
qualité définie dans le menu Programmateur.
4.5 Menu Programmateur
Il est possible d'enregistrer automatiquement l'image
affichée sur le moniteur en définissant le début et la fin
de l'enregistrement dans le MENU
PROGRAMMATEUR. L'appareil peut programmer
jusqu'à 15 enregistrements sur un jour ou sur plusieurs
jours d'une semaine. Placez le curseur sur le jour de
votre choix, puis appuyez sur ENTER pour confirmer la
sélection.
Si, par exemple, vous entrez les paramètres suivants :
DÉBUT 09:00, FIN 23:59
L'enregistrement commence à 09:00:00 et se termine à
23:59:59.
Pour arrêter un enregistrement programmé en cours,
appuyez sur la touche STOP pour accéder au MENU
PROGRAMMATEUR, puis modifiez la valeur de la
colonne DÉF. sur DÉSACTIVÉ.
0(18352*5$00$7(85
-285'e%87),19,7(66(48$/,7ee7$7
',0 +67$1'$5''e6
/81 +67$1'$5''e6
6(0 +67$1'$5''e6
:(1' +67$1'$5''e6
4827 +67$1'$5''e6
/81 +67$1'$5''e6
0$5 +67$1'$5''e6
9(1 +67$1'$5''e6
-(8 +67$1'$5''e6
0(5 +67$1'$5''e6
6$0 +67$1'$5''e6
',0 +67$1'$5''e6
0(1835,1&,3$/!
JOUR : le ou les jour(s) où l'enregistrement est programmé.
QUOT : tous les jours
SEM : lundi à vendredi
WEND : samedi et dimanche
Différents jours de la semaine
DVR1C1161 | Manuel d’installation | Chapitre 4
DÉBUT : heure de début de l'enregistrement programmé.
FIN : heure de fin de l'enregistrement programmé.
L'heure de fin doit être ultérieure à l'heure de début de
l'enregistrement.
ex. DÉBUT 16:00, FIN 03:00 est incorrect
DÉBUT 16:00, FIN 00:00 est incorrect
DÉBUT 16:00, FIN 23:59 est correct
VITESSE : lorsque le FORMAT VITESSE est défini PAR HEURE, la
vitesse d'enregistrement peut être réglée entre 4 H (NTSC)
ou 6 H (PAL) et 960 H.
Lorsque le FORMAT VITESSE est défini PAR IPS, la
vitesse d'enregistrement peut être réglée entre 0,1 et
30 IPS (NTSC) ou entre 0,1 et 25 IPS (PAL).
QUALITÉ : six niveaux de qualité d'enregistrement sont disponibles :
TRÈS BASSE : 15 Ko
BASSE : 20 Ko
DE BASE : 25 Ko
STANDARD : 30 Ko
HAUTE : 35 Ko
SUPÉRIEURE : 40 Ko
ÉTAT : Réglez l'état sur ACTIVÉ si vous souhaitez programmer
l'enregistrement.
Réglez l'état sur DÉS. si vous ne souhaitez pas programmer
l'enregistrement.
En mode d'enregistrement programmé, l'afficheur
indique la date et l'heure du programmateur, ainsi que
la vitesse d'enregistrement sous T.REC.
Il n'est pas possible de changer le niveau de qualité
lorsque l'enregistrement est continu. Par exemple :
Segment 1 : 08:30 à 17:00
Segment 2 : 17:00 à 23:59
Les segments 1 et 2 sont considérés comme un
enregistrement continu de 08:30 à 23:59.
Si vous souhaitez définir un autre niveau de qualité,
procédez comme suit :
Segment 1 : 08:30 à 16:59
Segment 2 : 17:00 à 23:59
4.6 Menu Sonnerie
0(186211(5,(
)21&7,211(0(17
6211(5,(
(175e($/$50(
(175e(
(15(*,675(0(17
',648(6$785e
3(57(9,'e2
352*5$00$7(85
$&7,9(5
0(1835,1&,3$/
!
$&7,9e
$&7,9e
$&7,9e
$&7,9e
'e6$&7,9e
Bosch Security Systems | 06-2004
FR | 42
FONCTIONNEMENT SONNERIE :
ACTIVER : active la sonnerie.
DÉSACTIVER : désactive la sonnerie.
Remarque : en mode enregistrement ou lecture, appuyez sur la
touche ENTER pour activer ou désactiver la sonnerie.
ENTRÉE ALARME : ACTIVÉ - la sonnerie retentit lorsque l'alarme se
déclenche.
ENTRÉE ENREGISTREMENT : ACTIVÉ - la sonnerie retentit lorsque
le signal RECORD-IN est appliqué à la borne RECORD-IN.
DISQUE SATURÉ : ACTIVÉ - la sonnerie retentit lorsque le disque
arrive à saturation (99,7 %).
PERTE VIDÉO : ACTIVÉ - la sonnerie retentit lorsque l'appareil perd
le signal vidéo.
PROGRAMMATEUR : ACTIVÉ - la sonnerie retentit lorsqu'un
enregistrement programmé est lancé.
4.7 Menu Archives
0(18$5&+,9(6
7$,//(,0$*(
+252'$7(85
326,7,21+252'$7(85
),/,*5$1(
326,7,21),/,*5$1(
; $&7,9e
%$6
$&7,9e
%$6
0(1835,1&,3$/
!
TAILLE IMAGE : définit la taille de l'image à copier sur la carte CF.
Grande taille : 720 x 576 (PAL), 720 x 480 (NTSC)
Petite taille : 352 x 288 (PAL), 352 x 240 (NTSC)
HORODATEUR :
ACTIVÉ : l'horodateur apparaît sur l'image lorsqu'elle est
copiée sur la carte CF.
DÉSACTIVÉ : l'horodateur n'apparaît pas sur l'image
lorsqu'elle est copiée sur la carte CF.
POSITION HORODATEUR :
BAS : l'horodateur apparaît en bas de l'image.
HAUT : l'horodateur apparaît en haut de l'image.
FILIGRANE :
ACTIVÉ : le filigrane apparaît sur l'image lorsqu'elle est
copiée sur la carte CF.
DÉSACTIVÉ : le filigrane n'apparaît pas sur l'image
lorsqu'elle est copiée sur la carte CF.
POSITION FILIGRANE :
BAS : le filigrane apparaît en bas de l'image.
HAUT : le filigrane apparaît en haut de l'image.
DVR1C1161 | Manuel d’installation | Chapitre 4
4.8 Menu Réseau
FR | 43
Quatre utilisateurs maximum peuvent se connecter en
même temps (en partageant un nom d'utilisateur et un
mot de passe).
0(185e6($8
$'5(66( ,3
0$648(62865e6($8
3$66(5(//(
&21),*85$7,21
87,/,6$7(85 &21),*85$7,21
87,/,6$7(85 &21),*85$7,21
87,/,6$7(85 !
0(1835,1&,3$/
!
!
!
ADRESSE IP : introduisez l'adresse IP de l'appareil dans le système
de réseau.
MASQUE SOUS RÉSEAU : introduisez le masque de réseau de
l'appareil dans le système de réseau.
PASSERELLE : introduisez l'adresse de la passerelle de l'appareil
dans le système de réseau.
CONFIGURATION UTILISATEUR : il est possible de définir
trois noms d'utilisateur et trois mots de passe. Chaque
utilisateur dispose de son propre menu de configuration.
&21),*85$7,21
87,/,6$7(85 12087,/,6$7(85
027'(3$66(
87,/,6$7(85
1,9($887,/,6$7(85
$'0,1BBB
$'0,1BBB
0(185e6($8
0(1835,1&,3$/
!
!
683(5
Lorsque vous connectez un PC à l'enregistreur
numérique via un réseau, la fenêtre de connexion de
l'enregistreur apparaît sur l'écran du PC. Le menu de
configuration utilisateur permet à l'administrateur de
définir le nom d'utilisateur, le mot de passe, ainsi que le
niveau d'accès. Il existe trois niveaux d'accès différents :
• L'utilisateur SUPER peut visualiser des vidéos
enregistrées et en temps réel, et gérer le
fonctionnement de l'enregistreur numérique.
• L'utilisateur GÉNÉRAL peut visualiser des vidéos
enregistrées et en temps réel.
• L'utilisateur INVITÉ peut uniquement visualiser des
vidéos en temps réel.
Bosch Security Systems | 06-2004
DVR1C1161 | Manuel d’installation | Chapitre 4
4.9 Menu Configuration système
0(18&21),*85$7,216<67Ê0(
$&7,9(5027'(
3$66(
027'(3$66(
121
(175e(9,'e2
(15(*,675(0(17
$9(&621
/(&785($9(&621 /(&785($9(&621 08/7,3/(;(85
/,*1(&2'(&+$03
',648(6$785e
)250$79,7(66(
6<67Ê0(9,'e2
&20326,7(
'e6$&7,9e
())$&(5/(',648(
0,6(1,9($8
6<67Ê0(
&+$5*(0(173$5$0
3$5'e)$87
)250$7$*(&$57(&)
!
!
0(1835,1&,3$/
!
$&7,9e
$&7,9e
%RVFK/7&
5ee&5,785(
3$5,36
3$/
!
!
ACTIVER MOT DE PASSE :
OUI : mot de passe nécessaire pour accéder au menu.
NON : pas de mot de passe nécessaire pour accéder au
menu.
MOT DE PASSE :
Lorsque l'option ACTIVER MOT DE PASSE est définie sur OUI,
l'utilisateur doit saisir un mot de passe pour accéder au menu.
Le mot de passe compte six chiffres, compris entre 1 et 5.
Si vous avez activé la protection par mot de passe, lorsque
vous appuyez sur la touche MENU en mode temps réel ou
sur la touche STOP en mode enregistrement, le système
vous invite à saisir le mot de passe. Dès lors, n'oubliez pas de
conserver votre mot de passe à portée de main.
ENTRÉE VIDÉO :
COMPOSITE : définit l'entrée vidéo sur le connecteur BNC.
S-VIDÉO : définit l'entrée S-Vidéo sur le connecteur S-VIDÉO.
ENREGISTREMENT AVEC SON : ACTIVÉ/DÉSACTIVÉ :
enregistrement avec ou sans son.
LECTURE AVEC SON 1 / LECTURE AVEC SON 2 :
ACTIVÉ/DÉSACTIVÉ : lecture avec ou sans son.
Les séquences audio ne peuvent être enregistrées et lues
qu'en mode temps réel à une vitesse minimale de 1 IPS (la
vitesse de lecture doit être la même que la vitesse
d'enregistrement).
Bosch Security Systems | 06-2004
FR | 44
MULTIPLEXEUR :
Sélectionnez la marque du multiplexeur connecté à
l'enregistreur numérique. Si votre multiplexeur n'est pas
repris dans la liste, réglez ce paramètre sur INCONNU.
Une fois le multiplexeur sélectionné, l'entrée vidéo
MUX MAIN MONITOR IN (panneau arrière) est reliée en
boucle à la sortie MONITOR OUT lorsque l'appareil n'est pas
en mode MENU.
Si vous n'avez raccordé qu'une caméra à l'enregistreur
numérique, réglez ce paramètre sur DÉSACTIVÉ. Ainsi, la
sortie principale MONITOR OUT sera toujours le connecteur
VIDEO OUT.
LIGNE CODE CHAMP:
Si vous réglez la marque du multiplexeur sur INCONNU, vous
pouvez définir la ligne de code du champ du multiplexeur
connecté sur une valeur comprise entre 0 et 20. La valeur
par défaut (13) convient à la plupart des multiplexeurs. Si la
ligne de code du champ apparaît au-dessus des canaux de
lecture, choisissez une valeur moins élevée. Si les
multiplexeurs ne fonctionnent pas correctement, choisissez
une valeur plus élevée.
DISQUE SATURÉ :
ARRÊT : lorsque le disque est saturé, l'appareil interrompt
l'enregistrement.
RÉÉCRITURE : lorsque le disque est saturé, l'appareil écrase
les vidéos enregistrées au début du disque dur.
FORMAT VITESSE : définit la vitesse d'enregistrement par IPS
(images par seconde) ou par heure.
SYSTÈME VIDÉO : sélectionne le système vidéo NTSC ou PAL (le
système doit être réinitialisé pour changer de système).
EFFACER LE DISQUE :
Appuyez sur la touche ENTER pour effacer les données
enregistrées sur le disque dur.
Une boîte de dialogue de confirmation s'affiche à l'écran.
Sélectionnez OUI ou NON, puis appuyez sur ENTER.
MISE À NIVEAU SYSTÈME :
Appuyez sur la touche ENTER pour mettre à niveau le
système.
OUI : Copiez le fichier de mise à niveau sur la carte
Compact Flash, puis insérez la carte dans la fente prévue à
cet effet. Appuyez sur ENTER pour mettre à niveau le
système. Une fois le système mis à niveau, n'oubliez pas de
le réinitialiser.
CHARGEMENT PARAM. PAR DÉFAUT :
Appuyez sur la touche ENTER pour rétablir les paramètres
par défaut.
OUI : Une boîte de dialogue de confirmation s'affiche à
l'écran.
Sélectionnez OUI ou NON, puis appuyez sur ENTER.
FORMATAGE CARTE CF :
OUI : le système procède au formatage de la carte
Compact Flash.
NON : le système ne procède pas au formatage de la carte
Compact Flash.
DVR1C1161 | Manuel d’installation | Chapitre 4
4.10 Fenêtre Mot de passe
Si vous avez activé la protection par mot de passe, une
fenêtre MOT DE PASSE s'affiche à l'écran lorsque vous
essayez d'accéder à un menu ou d'interrompre
l'enregistrement. Saisissez le mot de passe à l'aide des
touches suivantes :
REC : 1
OSD : 2
STOP : 3
PLAY : 4
PAUSE : 5
Bosch Security Systems | 06-2004
FR | 45
DVR1C1161 | Manuel d’installation | Chapitre 5
5
FR | 46
Visualisation par
Internet/Intranet
5.1 Connexion
Démarrez votre navigateur Web et saisissez l'adresse IP
réseau (par exemple, http://192.168.10.5). Cette
adresse IP doit correspondre à l'adresse définie dans le
menu RÉSEAU de l'enregistreur numérique.
Bosch Security Systems | 06-2004
La fenêtre de connexion de l'enregistreur numérique
s'affiche à l'écran. Vous devez y introduire le nom
d'utilisateur et le mot de passe définis dans le
menu RÉSEAU de l'enregistreur numérique (par défaut,
tapez ADMIN comme nom d'utilisateur et ADMIN
comme mot de passe, puis cliquez sur SUBMIT pour
entrer dans le système).
DVR1C1161 | Manuel d’installation | Chapitre 5
5.2 Écran principal
L'icône au bas de l'écran permet de se déconnecter. Des
informations concernant l'état du système s'affichent
également au bas de l'écran, notamment l'état actuel du
système, la date et l'heure.
Les icônes situées à droite de l'écran permettent de
sélectionner les caméras et de choisir leur mode
d'affichage à l'écran. Les commandes de lecture se
trouvent également à droite de l'écran. La fonction de
recherche permet de sélectionner une séquence à
visualiser. Une icône grisée signifie que la fonction en
question n'est pas disponible dans le mode utilisé.
FR | 47
Remarque
Le taux de rafraîchissement des images en temps réel
dépend de la vitesse d'enregistrement sélectionnée en
mode d'enregistrement (par exemple, un taux de
rafraîchissement de 2 secondes pour chaque image
filmée correspond à une vitesse de 0,5 IPS).
Il est impossible d'afficher les images en temps réel
lorsque l'enregistreur est en mode lecture. L'état du
système affiche le message SERVEUR EN LECTURE.
Pour afficher les images en temps réel, vous devez
arrêtez la lecture à l'aide des touches de l'appareil.
5.2.1 Couleur du message de statut
5.2.2 Icônes du mode temps réel
La couleur du message de statut indique si vous
travaillez en local ou à distance. Lorsque vous travaillez
en local, les messages apparaissent en jaune. Si vous
pilotez directement l'enregistreur numérique (après
avoir sélectionné l'icône CONTROL), les messages
apparaissent en vert.
Les icônes des caméras, de l'affichage des caméras et
l'icône de lecture peuvent être utilisées en mode
visualisation.
Bosch Security Systems | 06-2004
DVR1C1161 | Manuel d’installation | Chapitre 5
5.2.3 Icônes du mode lecture
Sélectionnez l'icône PLAY pour passer en mode lecture.
• STOP : cliquez sur cette icône pour interrompre la
lecture des vidéos à l'écran.
• PLAY : lance la lecture des vidéos à l'écran.
• PLAY REV. : lance la lecture des vidéos vers
l'arrière.
• STEP avant : fait défiler les images vidéo une par
une vers l'avant.
• STEP arrière : fait défiler les images vidéo une par
une vers l'arrière.
• PAUSE : cliquez sur cette icône pour figer l'image
vidéo.
• CONTROL : cliquez sur cette icône pour passer en
mode télécommande (uniquement pour les
utilisateurs SUPER). Vous pouvez à présent
directement lancer et interrompre à distance la
lecture ou l'enregistrement sur l'enregistreur
numérique.
• PLAYBACK SPEED : règle la vitesse de lecture.
5.2.4 Recherche
Le système propose trois manières de rechercher les
vidéos à visualiser :
• SEGMENT : vidéos sélectionnées par liste de
segments.
• ALARM : vidéos sélectionnées par liste d'alarmes.
• DATE/TIME : vidéos sélectionnées par date et
heure.
Les éléments de la liste peuvent être sélectionnés à l'aide
de la souris. Cliquez sur le bouton PLAY pour visualiser
la vidéo sélectionnée.
Bosch Security Systems | 06-2004
FR | 48
DVR1C1161 | Manuel d’installation | Chapitre 6
6
FR | 49
Caractéristiques techniques
6.1 Interface RS-232
L'enregistreur numérique peut être contrôlé par un
ordinateur ou par un terminal via le connecteur
standard RS-232 D-Sub à 9 broches.
%URFKH
'95&
1&
7;'
%URFKH
+Ð7(
1&
5;'
5;'
7;'
1&
*5281'
'75
*5281'
1&
1&
1&
9
'65
576
&76
1&
&2'( )21&7,21
$6&,,
7RXFKHVGX
SDQQHDXDYDQW
.
&RPPHQFHU
O
HQUHJLVWUHPHQW
5(&
.
,QWHUURPSUH
6723
O
HQUHJLVWUHPHQWHW
ODOHFWXUH
.
/HFWXUH
3/$<
.
)LJHUO
LPDJH
SHQGDQWODOHFWXUH
3$86(
.
/HFWXUHSDU
UHFKHUFKH
6($5&+
.
&RSLHUO
LPDJHVXU &23<
ODFDUWH &)
.
$IILFKDJHjO
pFUDQ ',63/$<
.
&RQILUPHUOD
VpOHFWLRQ
(17(5
La transmission est réglée sur un débit de 9 600 bauds,
8 bits de données, 1 bit de départ, 1 bit d'arrêt et pas de
bit de parité.
.
$FFpGHUDXPHQX
&RQILJXUDWLRQ
0(18
6.1.1 Protocole de contrôle RS-232
. /HFWXUHDUULqUH
. UDSLGH
;
. /HFWXUHDYDQW
.
UDSLGH
!!;
L'appareil peut être contrôlé par un ordinateur ou un
terminal grâce à l'envoi de commandes ASCII via le
connecteur RS-232. Ces commandes ASCII
commencent par « K » ou « k ». Les trente
commandes ASCII correspondent aux 30 touches du
panneau avant de l'appareil. Ces 30 commandes ASCII
figurent dans le tableau ci-dessous.
Bosch Security Systems | 06-2004
.
'pILOHPHQWGH
%RXWRQ
O
LPDJHILJpHYHUV URWDWLIVHQV
O
DUULqUH
DQWLKRUDLUH
.
'pILOHPHQWGH
%RXWRQ
O
LPDJHILJpHYHUV URWDWLIVHQV
O
DYDQW
KRUDLUH
DVR1C1161 | Manuel d’installation | Chapitre 6
FR | 50
6.2 Durée d'enregistrement
Vous trouverez ci-dessous les temps d'enregistrement
approximatifs (en heures, sans le son) pour un disque
dur de 160 Go.
PAL
Vitesse
d'enregistrement (IPS)
Très basse
(15KB)
50
25
12
8
5
2
1,6
1,0
0,5
0,2
0,1
60
120
240
360
590
1420
1900
3000
5900
14800
29600
Qualité d'image (Taille de fichier moyenne)
De base
Standard
Haute
(25KB)
(30KB)
(35KB)
Temps d'enregistrement approximatif
Heures
44
36
30
25
90
70
60
50
180
140
120
100
270
210
180
150
440
360
300
250
1070
850
710
610
1420
1140
950
810
2200
1800
1500
1300
4400
3600
3000
2500
11100
8900
7400
6300
22200
17800
14800
12700
Basse
(20KB)
Supérieur
(40KB)
22
44
90
130
220
530
710
1100
2200
5600
11100
NTSC
Vitesse
d'enregistrement (IPS)
Très basse
(15KB)
60
30
20
10
5
2
1,5
1,0
0,5
0,2
0,1
50
100
150
300
590
1480
1980
3000
5900
14800
29600
Qualité d'image (Taille de fichier moyenne)
De base
Standard
Haute
(25KB)
(30KB)
(35KB)
Temps d'enregistrement approximatif
Heures
37
30
25
21
74
60
50
42
110
90
70
60
220
180
150
130
440
360
300
250
1110
890
740
630
1480
1190
990
850
2200
1800
1500
1300
4400
3600
3000
2500
11100
8900
7400
6300
22200
17800
14800
12700
Basse
(20KB)
Référence :
24 h = 1 jour, 168 h = 1 semaine, 720 h = 1 mois,
8 760 h = 1 an
(Estimation effectuée avec des images types et un niveau
de bruit faible)
Bosch Security Systems | 06-2004
Supérieur
(40KB)
19
37
56
110
220
560
740
1100
2200
5600
11100
Lorsque vous effectuez un enregistrement avec son,
vous pouvez estimer la taille du fichier sonore sur la
base de 18 Ko (PAL) ou de 21,6 Ko (NTSC) par
seconde de son enregistré. L'enregistrement de son peut
considérablement réduire le temps d'enregistrement
disponible, notamment si vous utilisez une vitesse
d'enregistrement basse ; les temps d'enregistrement sont
indiqués dans les tableaux ci-dessus.
DVR1C1161 | Manuel d’installation | Chapitre 6
6.3 Caractéristiques techniques
Vidéo
Format
Entrée
Sortie
Compression
Résolution
Affichage
PAL/NTSC
1 entrée caméra (BNC), 1 Vcàc,
75 Ohm
1 sortie vidéo (BNC) pour moniteur
principal, 1 Vcàc, 75 Ohm
M-JPEG
720 x 576 (PAL) /
720 x 484 (NTSC)
plein écran en vue directe et
relecture
Audio
Connexions
2 entrées mono, 1,6 Vcàc ±200 mV
à 10 K
2 sorties mono, 1,6 Vcàc ±200 mV
à 10 K
Alarme
Entrée
Sortie
tension de commutation haute :
> 2 Vcc
tension de commutation basse :
< 0,5 Vcc
1 sortie de relais :
tension de contact max. : 24 Vcc
courant de commutation max. :
2 A cc
FR | 51
Généralités
Détection de perte vidéo
Oui
Détection de coupure d'alimentation Oui
Journal d'alarmes
Oui
Interface utilisateur Pilotée par menus
Configuration
Par menus affichés à l'écran
Périphérique
d'entrée utilisateur Commandes du panneau avant,
télécommande (IR avec capteur
raccordé) en option
Exportation d'images Fente intégrée pour cartes
Compact Flash de type I et II.
Sécurité
Protection par mot de passe
Alimentation
100 à 240 Vcc, 50/60 Hz
Consommation
< 40 W
Programmateur
Hebdomadaire, horloge temps réel
intégrée
Connexion réseau 10Base-T, TCP/IP via Ethernet,
connecteur RJ-45
Connexion de
contrôle
connecteur RS-232, D-Sub à
9 broches
Caractéristiques mécaniques
Poids
environ 5,5 kg/11,5 livres
Dimensions (l x H x P) 346 x 88 x 269 mm
13,6 x 3,5 x 10,5 pouces
Température ambiante
Fonctionnement
+0 °C … +40 °C
+32 °F . . . +104°F
Stockage
Disque dur
160 Go
Sécurité
Enregistrement
Mode
Vitesse
Temps réel, « time lapse »,
programmé ou par événement
Max. 50 images par seconde (PAL)
Max. 60 images par seconde
(NTSC)
Lecture
Vitesse
Recherche
Homologations
Max. 50 images par seconde (PAL)
Max. 60 images par seconde
(NTSC)
Par date/heure, par listes de
segments ou d'événements
(alarmes)
Bosch Security Systems | 06-2004
Europe
États-Unis
Australie
EN60950
UL60950 (UL et cUL)
C-Tick
Compatibilité électromagnétique
Europe
États-Unis
Australie
EN55022 Classe B, EN50130-4
FCC section 15, classe B
AS/NZS 3548
Les caractéristiques sont susceptibles d'être modifiées
sans notification préalable. En cas de problème,
contactez votre revendeur.
DVR1C1161 | Manuel d’installation | Chapitre 6
Bosch Security Systems | 06-2004
FR | 52
DVR1C1161 | Installationshandbuch | Inhaltsangabe
1.
SICHERHEITSHINWEISE .................................................................................................................................................... 55
1.1
2.
3.
4.
DE | 53
WICHTIGE SICHERHEITSMAßNAHMEN ............................................................................................. 55
EINFÜHRUNG ........................................................................................................................................................................... 56
2.1
MERKMALE ................................................................................................................................................... 56
2.2
GERÄTEVORDERSEITE ............................................................................................................................ 57
2.3
RÜCKSEITE ................................................................................................................................................... 58
2.3.1 Netzstrom ........................................................................................................................................... 58
2.3.2 Serieller RS-232-Anschluss .......................................................................................................... 58
2.3.3 Anschluss für zusätzlichen Infrarotempfänger ........................................................................... 58
2.3.4 LAN-Anschluss ................................................................................................................................. 58
2.3.5 Alarm-Anschlüsse ............................................................................................................................ 58
2.4
ANSCHLUSSMÖGLICHKEITEN ............................................................................................................. 59
2.4.1 Multiplexer .......................................................................................................................................... 59
2.4.2 Vierfach-Bildschirme ....................................................................................................................... 60
2.4.3 Einzelne Kamera ............................................................................................................................... 61
2.5
FERNBEDIENUNG ...................................................................................................................................... 62
2.6
NETZWERKE ................................................................................................................................................ 62
BETRIEB ...................................................................................................................................................................................... 63
3.1
SCHNELLINSTALLATION ......................................................................................................................... 63
3.2
SOFORTIGE AUFZEICHNUNG ............................................................................................................... 63
3.3
ALARMAUFZEICHNUNG .......................................................................................................................... 63
3.3.1 Aufzeichnung vor dem Alarm ........................................................................................................ 63
3.4
NORMALE WIEDERGABE ........................................................................................................................ 63
3.5
WIEDERGABE IM SUCHMODUS .......................................................................................................... 64
3.6
KOPIEREN ..................................................................................................................................................... 64
3.6.1 Standbildkopie .................................................................................................................................. 64
3.6.2 Kopieren in Filmdatei ....................................................................................................................... 65
3.7
EINSTELLUNG DER SICHERHEITSSPERRE ...................................................................................... 65
MENÜ EINRICHTEN ............................................................................................................................................................... 66
4.1
HAUPTMENÜ ................................................................................................................................................ 66
4.2
MENÜ „UHR/SPRACHE“ ........................................................................................................................... 66
4.3
MENÜ „NORMALE AUFZEICHNUNG“ .................................................................................................. 66
4.4
MENÜ „ALARMAUFZEICHNUNG“ .......................................................................................................... 66
4.5
MENÜ „TIMER“ ............................................................................................................................................. 67
4.6
MENÜ „SIGNALTON“ ................................................................................................................................. 68
4.7
MENÜ „ARCHIV“ .......................................................................................................................................... 68
4.8
MENÜ „NETZWERK“ .................................................................................................................................. 68
Bosch Security Systems | 2004-06
DVR1C1161 | Installationshandbuch | Inhaltsangabe
4.9
DE | 54
MENÜ „SYSTEMEINSTELLUNG“ ............................................................................................................ 69
4.10 MENÜ „PASSWORT“ ................................................................................................................................. 70
5.
6.
ANSICHT ÜBER INTERNET/INTRANET ...................................................................................................................... 71
5.1
ANMELDEN ................................................................................................................................................... 71
5.2
HAUPTBILDSCHIRM .................................................................................................................................. 71
5.2.1 Farbe der Statusmeldung .............................................................................................................. 72
5.2.2 Livemodus-Symbole ........................................................................................................................ 72
5.2.3 Wiedergabemodus-Symbole ........................................................................................................ 72
5.2.4 Suchen ............................................................................................................................................... 73
TECHNISCHE DATEN ........................................................................................................................................................... 74
6.1
RS-232-SCHNITTSTELLE ......................................................................................................................... 74
6.1.1 RS-232-Steuerungsprotokoll ........................................................................................................ 74
6.2
AUFZEICHNUNGSZEIT ............................................................................................................................. 75
6.3
TECHNISCHE DATEN ................................................................................................................................ 76
Abkürzungen in der Bildschirmanzeige
II
A-AUFZ.
EINFACH
HOCH
NIEDRIG
NIEDRIGER
MENÜ
PAUSE
P.END
WIEDERGABE
P.END
P.RPT
REC
SRCH
STDRD
SUPER
SYSLD
T.REC
*REC
P.BEG
R.REC
Pause
Alarmaufzeichnung
Mittlere Qualität
Hohe Qualität
Geringe Qualität
Geringste Qualität
Menü
Pause
Pause Ende
WIEDERGABE
WIEDERGABE ENDE
Wiedergabe wiederholen
Aufzeichnung
Suche
Standardqualität
Optimale Qualität
System wird geladen
Timer-Aufzeichnung
Aufzeichnung sperren
Wiedergabe starten
Fernaufzeichnung
Bosch Security Systems | 2004-06
DVR1C1161 | Installationshandbuch | Kapitel 1
1
SICHERHEITSHINWEISE
Gefahr
Das Blitzsymbol im gleichseitigen Dreieck soll
den Benutzer auf nicht isolierte
„Hochspannung“ im Gehäuse aufmerksam
machen, die eventuell stark genug ist, um einen
elektrischen Schlag zu verursachen.
Warnung
Das Ausrufezeichen in einem gleichseitigen
Dreieck soll den Benutzer auf wichtige
Anweisungen für die Bedienung und
Instandhaltung (Wartung) in den begleitenden
Unterlagen aufmerksam machen.
Vorsicht
Entfernen Sie nicht die Abdeckung (oder
Rückseite), um Stromschläge zu vermeiden.
Geräteinnenteile können vom Benutzer nicht
gewartet werden. Lassen Sie Wartungsarbeiten
nur von qualifiziertem Wartungspersonal
ausführen.
DE | 55
9 Beeinträchtigen Sie die Schutzfunktion des
polarisierten oder geerdeten Steckers nicht durch
Manipulation am Stecker. Ein polarisierter Stecker
hat zwei Kontakte unterschiedlicher Breite. Ein
geerdeter Stecker hat zwei Kontakte und einen
dritten Erdungsanschluss. Der längere Kontakt
beziehungsweise der Erdungsanschluss dienen Ihrer
Sicherheit. Wenn der mitgelieferte Stecker nicht zur
Steckdose am Einsatzort passt, lassen Sie die
entsprechende Steckdose durch einen Elektriker
ersetzen.
10 Achten Sie insbesondere im Bereich von Steckern,
Steckdosen und am Geräteausgang darauf, dass nicht
auf das Netzkabel getreten oder dass das Kabel nicht
eingeklemmt werden kann.
11 Verwenden Sie nur vom Hersteller empfohlene
Zusatzgeräte/Zubehörteile.
12 Trennen Sie das Gerät vom Stromnetz, wenn ein
Gewitter aufkommt oder Sie es für längere Zeit nicht
benutzen möchten.
13 Lassen Sie Wartungsarbeiten nur von qualifiziertem
Wartungspersonal ausführen. Die Instandhaltung ist
notwendig, wenn die Anlage beschädigt wurde,
beispielsweise bei einer Beschädigung des
Netzkabels oder -steckers, wenn Flüssigkeiten auf die
Anlage geflossen oder Gegenstände hineingefallen
sind, das Gerät Regen oder Nässe ausgesetzt war, es
nicht einwandfrei funktioniert oder wenn es
fallengelassen wurde.
14
1.1 WICHTIGE SICHERHEITSMAßNAHMEN
1 Lesen Sie diese Anweisungen bitte sorgfältig durch.
2 Bewahren Sie die Anweisungen für die spätere
Verwendung auf.
3 Beachten Sie alle Warnungen.
4 Befolgen Sie die Anweisungen.
5 Vermeiden Sie direkten Kontakt mit Wasser.
6 Reinigen Sie das Gerät nur mit einem trockenen
Tuch.
7 Achten Sie darauf, dass die Ventilationsöffnungen
nicht abgedeckt werden. Bei der Installation sind die
Anweisungen des Herstellers zu beachten.
8 Stellen Sie das Gerät nicht in unmittelbarer Nähe
von Wärmequellen wie Heizkörpern,
Wärmespeichern, Öfen oder anderen Anlagen
(einschließlich Verstärkern) auf, die Wärme
erzeugen.
Bosch Security Systems | 2004-06
Warnung
Setzen Sie das Gerät nicht Regen oder Nässe
aus, um die Gefahr eines Brands oder
Stromschlags zu verringern; stellen Sie auch
keine Behälter mit Flüssigkeit, wie
beispielsweise Vasen, auf dem Gerät ab.
15 Die Rückseite des Recorders sollte nur von
qualifiziertem Fachpersonal entfernt werden.
16 Falsch eingelegte Batterien können eine Explosion
verursachen. Eine Lithium-Batterie befindet sich im
Inneren des Recorders. Tauschen Sie leere Batterien
stets mit Batterien des gleichen oder eines
gleichwertigen Typs aus. Entsorgen Sie
ausgewechselten Batterien unter Einhaltung von
Umweltrichtlinien.
DVR1C1161 | Installationshandbuch | Kapitel 2
17 Sorgen Sie dafür, dass die Ventilationsöffnungen frei
bleiben, damit der Recorder nicht überhitzt.
18 Stellen Sie den Recorder nicht in unmittelbarer
Nähe einer Wärmequelle auf.
19 Installieren Sie dieses Gerät nicht in einem Raum
mit eingeschränkter Belüftung, wie in einem
Bücherregal oder etwas Ähnlichem.
Reinigung
20 Das Gerät kann mit einem feuchten, flusenfreien
Tuch oder einem Fensterleder gereinigt werden.
Hinweis
Bosch engagiert sich sehr für den Umweltschutz. Beim
Entwurf dieses Geräts wurde der Umweltverträglichkeit
größte Aufmerksamkeit gewidmet.
DE | 56
2
Einführung
Der DVR1C1161 Digital Video Recorder erweitert
CCTV-Systeme um hoch entwickelte Aufzeichnungsund Wiedergabetechnologie. Der DVR ermöglicht
ununterbrochene Aufzeichnungen von mehr als einer
Woche im Echtzeit- und Zeitraffer-Modus. Das
Wechseln oder Lagern von Videobändern ist nicht
mehr notwendig, und die aufwändige Wartung der
Videorecorder entfällt.
Der DVR kann bis zu 50/60 Bilder pro Sekunde im
PAL/NTSC-Format aufzeichnen und die Aufzeichnungen
sofort wiedergeben. Er bietet alle Vorteile der digitalen
Videoaufzeichnung, ist einfach zu installieren und lässt
sich wie ein Videorecorder bedienen. Durch seine höchst
effiziente Komprimierungstechnologie sowie die
überragende Qualität und Detailtreue der
Aufzeichnungen ist der DVR für die Integration mit einer
Vielzahl an Multiplexern ideal geeignet.
2.1 Merkmale
•
•
•
•
•
•
•
•
•
•
•
•
•
•
•
•
Bosch Security Systems | 2004-06
Optimale Bildqualität
Bildaufzeichnung vor dem Alarm
Zeitrafferaufzeichnung sowie Echtzeitaufzeichnung
Bildwiedergabe von bis zu 50 Bildern pro Sekunde
für PAL und 60 Bildern pro Sekunde für NTSC
Schnellsuche nach Datum/Zeit, Alarmereignis und
Aufzeichnungsliste
Schnelle und langsame Wiedergabe von
Aufzeichnungen in verschiedenen
Geschwindigkeiten
Bildschirmsteuerung für Systemeinstellungen und
Timer
Kennwortschutz
RS-232-Anschluss
Integrierte Komprimierung/Dekomprimierung von
M-JPEGs in konfigurierbarer Qualität
Aufnahme von Ton möglich
Programmierung mit verschiedenen
Geschwindigkeiten zur Zeitraffer-Aufzeichnung
Speicherung der Daten auf einer Compact FlashKarte (CF-Karte)
Fernbedienung
Anzeige von Aufzeichnungen und Livebildern an
einem entfernten Standort mit
internetbasiertem Browser
Kompatible mit Multiplexern von Bosch und verschiedenen anderen Herstellern.
DVR1C1161 | Installationshandbuch | Kapitel 2
DE | 57
2.2 Gerätevorderseite
Menümodus: Durch Drehen des Jog Dials werden
Menüseiten aufgerufen oder Datenwerte
ausgewählt. Zusammen mit der Enter-Taste werden
Menüwerte eingerichtet.
1 REC (Aufzeichnung): Startet die Aufzeichnung
(Taste leuchtet bei Aufnahme rot).
2 OSD (Bildschirmanzeige):
9 ENTER (Eingabe): Durch Drücken der Taste wird
- Einmal drücken: Anzeige von Zeit/Datum,
Festplattenbelegung und
Wiedergabegeschwindigkeit.
- Zweimal drücken: Anzeige von Festplattengröße,
Aufzeichnungsposition und Wiedergabeposition.
- Dreimal drücken: Ausschalten der
Bildschirmanzeige.
eine Auswahl oder veränderte Datenwerte bestätigt.
10 MENU (Menü): Durch Drücken wird das Menü
Systemeinrichtung aufgerufen oder wieder
geschlossen.
11 Infrarot-Empfänger für die Fernbedienung.
12 LC-Display
3 STOP (Stopp): Die Aufzeichnung oder Wiedergabe
Standby-Modus: Anzeige des aktuellen Datums und
der aktuellen Zeit, sowie der Qualität und
Geschwindigkeitsrate für die normale Aufzeichnung.
Aufzeichnungsmodus: Anzeige des aktuellen
Datums und der aktuellen Zeit, der Abkürzung
„REC“ sowie der aktuellen
Aufzeichnungsgeschwindigkeit.
Wiedergabemodus: Anzeige des Datums und der
Zeit der Wiedergabe, des Wortes „PLAY“ sowie der
aktuellen Wiedergabegeschwindigkeit.
(Informationen zu den angezeigten Meldungen
finden Sie in der Liste mit Abkürzungen am Anfang
dieses Handbuchs.)
wird beendet.
4 PLAY (Wiedergabe): Die Wiedergabe wird
gestartet.
5 PAUSE: Wiedergabe wird angehalten.
6 SEARCH (Suchen): Öffnet das Menü Suchen.
7 Shuttle-Ring:
Wiedergabemodus: Durch Drehen des ShuttleRings im Uhrzeigersinn wird die Wiedergabe oder
Rückwärtswiedergabe beschleunigt, durch Drehen
gegen den Uhrzeigersinn verlangsamt.
Pausemodus: Durch Drehen des Shuttle-Rings wird
das Video langsam vor- oder zurückgespult.
13 ALARM: Anzeige leuchtet, wenn ein Alarm auftritt.
8 Jog Dial:
14 LAN: Anzeige leuchtet, wenn auf das Netzwerk
Wiedergabemodus: Durch Drehen des Jog Dials
wird die Wiedergabegeschwindigkeit gewählt.
Pausemodus: Durch Drehen des Jog Dials wird das
Video Bild für Bild vor- und zurückgeschaltet.
1
16
15
Bosch Security Systems | 2004-06
14 13
zugegriffen wird.
15 Compact Flash-Steckplatz Mit dem schwarzen
Auswurfknopf neben dem Steckplatz kann die
Karte entfernt werden.
2
3
12
4
5
6
11
10
7
8
9
DVR1C1161 | Installationshandbuch | Kapitel 2
DE | 58
16 COPY (Kopieren): Standbilder oder Videostreams
werden auf die Compact Flash-Karte kopiert.
2.3 Rückseite
2.3.1 Netzstrom
Schließen Sie das Netzkabel an die Netzsteckdose an.
Über den Netzschalter kann das Gerät ein- und
ausgeschaltet werden (ON/OFF).
2.3.2 Serieller RS-232-Anschluss
GND:
ALM-IN:
Masse
Bei Eingang eines Signals* beginnt die
Alarmaufzeichnung.
ALM-RST:
Bei Eingang eines Signals* stoppt die
Alarmaufzeichnung.
REC (Aufzeichnung): Bei Eingang eines externen
Signals* auf diesem Pin beginnt die
Aufzeichnung. Bei Abfall des Signals
stoppt die Aufzeichnung.
NC1, NC2:
Keine Anschlüsse.
* Signal
Schließen Sie den 9-poligen D-Sub-Stecker an den
RS-232-Anschluss an, wenn Sie das Gerät über die
Fernbedienung steuern möchten.
- hohe Schaltspannung: > 2 VDC
- niedrige Schaltspannung: < 0,5 VDC
2.3.4 LAN-Anschluss
Verwenden Sie ein RJ-45 LAN-Kabel, um das Gerät mit
dem Netzwerk zu verbinden.
2.3.5 Alarm-Anschlüsse
Die Alarmeingänge ALM-IN und ALM-RST können im
Menü Alarmaufzeichnung als Schließer oder
Öffner eingestellt werden.
Es gibt folgende Alarmausgangssignale:
GND:
ALM-NC**:
Masse
Bei Eingang eines Alarmsignals wird der
Kontakt zwischen diesem Pin und dem
Alarmausgang ALM-COM geöffnet. Er
ist normalerweise geschlossen.
ALM-NO**: Bei Eingang eines Alarmsignals wird der
Kontakt zwischen diesem Pin und dem
Alarmausgang ALM-COM geschlossen.
Er ist normalerweise offen.
ALM-COM**: Allgemeiner Alarmanschluss.
RS 232
Out2
Monitor Out
Out
Out 1
Alarmanschluss
Bosch Security Systems | 2004-06
GND
NC4
NC3
DISKFULL
LAN
Out 2
GND
100-240 Vac
VEXT
ALM-CO
ALM-NO
ALM-NC
GND
GND
NC2
GND
AC 100-240
Out1
Remote Control
Looping out
NC1
Video
In
REC
S-Video
In
ALM-RST
Mux main
Monitor In
In2
ALM-IN
Audio
In1
GND
Alarmausgänge
Anschluss für
zusätzlichen
RS-232Anschluss Infrarotempfänger
Power
NC4
NC3
DISKFULL
VEXT
ALM-CO
ALM-NO
ALM-NC
GND
GND
NC2
NC1
Alarmeingänge
Netzschalter
Off
REC
ALM-IN
GND
Schließen Sie das optional erhältliche
IR-Verlängerungskabel an die Buchse Remote Control
(Fernbedienung) an, falls der IR-Empfänger auf der
Vorderseite des Geräts verdeckt sein sollte (wenn sich
das Gerät beispielsweise in einem Schrank befindet).
Der zusätzliche IR-Empfänger muss so positioniert sein,
dass der Kontakt mit der Fernbedienung hergestellt
werden kann.
ALM-RST
- max. Eingangsspannung: 12 VDC
2.3.3 Anschluss für zusätzlichen
Infrarotempfänger
VEXT
Netzwerkanschluss
DVR1C1161 | Installationshandbuch | Kapitel 2
VEXT:
DISKFULL:
NC3, NC4:
DE | 59
2.4 Anschlussmöglichkeiten
Synchronisierungssignal für den
Multiplexer.
Ausgangsspannung: 5 VDC
Ausgangsstrom: 100 mA
Alarmausgangssignal bei voller
Festplatte.
Ausgangsspannung: 5 VDC
Ausgangsstrom: 100 mA
Keine Anschlüsse.
Der DVR kann an eine Vielzahl von Multiplexern,
Vierfach-Bildschirmen oder direkt an einer Kamera
angeschlossen werden.
2.4.1 Multiplexer
In der Abbildung unten ist dargestellt, wie ein
Multiplexer an den DVR angeschlossen wird.
•
Schließen Sie den Monitor an die BNC-Buchse
Monitor Out an der Rückseite des DVR an.
Schließen Sie den Hauptmonitorausgang des
Multiplexers an die BNC-Buchse Monitor In an der
Rückseite des DVR an.
* * max. Kontaktspannung: 24 VDC
max. Schaltstrom: 2 ADC
•
Kameras
Multiplexer
1
VCR IN VCR OUT
2
3
5
RS-232Anschluss
Netzschalter
RS 232
Out2
Monitor Out
Out
Out 1
Anschluss für
zusätzlichen
Infrarotempfänger
Remote Control
Monitor Out
Monitor
Bosch Security Systems | 2004-06
GND
NC4
NC3
DISKFULL
VEXT
ALM-CO
LAN
Out 2
GND
100-240 Vac
ALM-NO
ALM-NC
GND
GND
GND
AC 100-240
Out1
6
Looping out
NC2
Video
In
NC1
S-Video
In
REC
Mux main
Monitor In
In2
ALM-RST
Audio
In1
ALM-IN
Power
Off
4
Recorder
Monitor
MON B MON A
VEXT
Netzwerkanschluss
DVR1C1161 | Installationshandbuch | Kapitel 2
DE | 60
2.4.2 Vierfach-Bildschirme
•
Schließen Sie den VCR-Ausgang des Multiplexers an
die BNC-Buchse Video In an der Rückseite des
DVR an.
• Schließen Sie den VCR-Eingang des Multiplexers an
die BNC-Buchse Video Out an der Rückseite des
DVR an.
• Zum Synchronisieren der Umschaltung mit einem
Multiplexer verbinden Sie die Anschlüsse VEXT
und GND an der Rückseite der Einheit mit dem
anschluss des Multiplexers.
Sind die Verbindungen hergestellt, wählen Sie im
Systemmenü den verwendeten Multiplexertyp aus.
In der Abbildung unten ist dargestellt, wie ein VierfachBildschirm an den DVR angeschlossen wird.
•
Schließen Sie den Monitor an die BNC-Buchse
Monitor Out an der Rückseite des DVR an.
• Schließen Sie den Videoausgang des Multiplexers an
die BNC-Buchse Video In an der Rückseite des
DVR an.
• Legen Sie im Systemmenü für den Multiplexer die
Option Aus fest.
Informationen zum Anschließen eines VierfachBildschirms finden Sie im Abschnitt zu MultiplexerVerbindungen.
Quad-Ansicht
1
2
3
4
Video
Video OUT
RS-232Anschluss
Netzschalter
RS 232
Out2
Monitor Out
Out
Out 1
Monitor Out
Monitor
Bosch Security Systems | 2004-06
GND
NC4
NC3
DISKFULL
VEXT
ALM-CO
LAN
Out 2
GND
100-240 Vac
ALM-NO
ALM-NC
GND
GND
GND
AC 100-240
Out1
Remote Control
Looping out
NC2
In2
Video
In
NC1
In1
S-Video
In
REC
Off
Mux main
Monitor In
ALM-RST
Audio
ALM-IN
Power
Anschluss für
zusätzlichen
Infrarotempfänger
VEXT
Netzwerkanschluss
DVR1C1161 | Installationshandbuch | Kapitel 2
DE | 61
2.4.3 Einzelne Kamera
•
In der Abbildung unten ist dargestellt, wie eine einzige
Kamera an den DVR angeschlossen wird.
•
•
Schließen Sie den Monitor an die BNC-Buchse
Video Out an der Rückseite des DVR an.
Schließen Sie den Videoausgang der Kamera an die
BNC-Buchse Video In an der Rückseite des DVR
an.
•
•
Schließen Sie den Audioausgang der Kamera an die
BNC-Buchse Audio In an der Rückseite des DVR
an.
Schließen Sie die Buchse Audio Out an der
Rückseite des DVR an einen Audioverstärker an.
Legen Sie im Systemmenü für den Multiplexer die
Option Aus fest.
Video
In
RS 232
Out2
Monitor Out
Out
Out 1
GND
NC4
NC3
DISKFULL
VEXT
ALM-CO
ALM-NO
ALM-NC
GND
GND
GND
AC 100-240
Out1
Remote Control
Looping out
NC2
S-Video
In
NC1
Mux main
Monitor In
In2
REC
Audio
In1
ALM-RST
Power
Anschluss für
zusätzlichen
Infrarotempfänger
RS-232Anschluss
ALM-IN
Audio In
Netzschalter
Off
Video In
Kamera
LAN
Out 2
GND
VEXT
Video aus
Audio Out
Netzwerkanschluss
100-240 Vac
Monitor
Bosch Security Systems | 2004-06
DVR1C1161 | Installationshandbuch | Kapitel 2
DE | 62
2.5 Fernbedienung
2.6 Netzwerke
Mit der Fernbedienung lässt sich der DVR auch einfach
aus einiger Entfernung bedienen. Die Hauptfunktionen
können über die Fernbedienung ausgeführt werden.
Die Netzwerkverbindung verwendet den
10BaseT-Standard. Stellen Sie sicher, dass Ihr Netzwerk
diesen Standard unterstützt.
Es gibt folgende Tastaturfunktionen für den DVR:
RECORD (Aufzeichnung): Die Aufzeichnung wird
gestartet.
STOP (Stopp): Die Aufzeichnung oder Wiedergabe
wird beendet.
PLAY (Wiedergabe): Die Wiedergabe wird gestartet.
SEARCH (Suchen): Erhöhung der Geschwindigkeit um
den Faktor 2, 4, 8, 16, 32, 640. . .
REWIND (Zurückspulen): Im Wiedergabemodus wird
die Rückwärtswiedergabe gestartet (die
Suchtaste erhöht die
Rückspulgeschwindigkeit).
STEP REW. (Schritt zurück): Einmal drücken stoppt
die Wiedergabe. Durch erneutes
Drücken wird rückwärts von Bild zu Bild
geschaltet.
STEP FORW. (Schritt vorwärts):Einmal drücken stoppt
die Wiedergabe. Durch erneutes
Drücken wird vorwärts von Bild zu Bild
geschaltet.
FORWARD (Vorwärts): Bei der Rückwärtswiedergabe
wird durch Drücken dieser Taste der
normale Wiedergabemodus aktiviert (die
Suchtaste erhöht die
Wiedergabegeschwindigkeit).
0
DVR Steuertasten
BOSCH
Bosch Security Systems | 2004-06
Wenn Sie den DVR direkt an einen PC anschließen,
verwenden Sie ein Crossover-CAT5-Netzwerkkabel.
Wenn Sie den DVR an einen Router oder ein Hub
anschließen, verwenden Sie ein Straight-Through
CAT5-Kabel.
Folgende Ports müssen für ein problemloses
Funktionieren der Remote-Software geöffnet sein:
• TCP-Port 80:Web-Server
• TCP-Port 6666:Befehle
• TCP-Ports 1111, 2222, 3333, 4444:Videodaten
Wenn Ihr Internetanschluss über eine Firewall verfügt,
wenden Sie sich an Ihren Netzwerkadministrator, um
sicherzustellen, dass Sie auf die Einheit zugreifen
können.
DVR1C1161 | Installationshandbuch | Kapitel 3
3
Betrieb
3.1 Schnellinstallation
Im Schnellinstallationsmodus können Sie Datum,
Uhrzeit, Aufzeichnungsqualität und BPS-Einstellungen
mit dem LC-Display und dem Jog Dial schnell ändern.
• Drücken Sie die Menütaste 5 Sekunden lang, um den
Schnellinstallationsmodus aufzurufen. Die Anzeige
„Jahr“ blinkt auf dem LC-Display.
• Ändern Sie durch Drehen des Jog Dials das
anzuzeigende Jahr, und drücken Sie anschließend
die Enter-Taste. Die Anzeige „Monat“ blinkt auf dem
LC-Display.
• Verwenden Sie weiterhin den Jog Dial und die
Enter-Taste, um alle auf dem LC-Display angezeigten
Werte auszuwählen. Wenn der letzte Wert eingestellt
ist, kehrt der DVR zum Normalmodus zurück.
'UFNHQ6LHGLH6XFKWDVWHXPGDV6FKQHOOLQ
VWDOODWLRQVPHQ]XEHHQGHQ
3.2 Sofortige Aufzeichnung
Drücken Sie die Aufzeichnungstaste, um die
Aufzeichnung sofort zu starten – die Bilder werden auf
der Festplatte aufgezeichnet.
• Aufzeichnungsrate und -qualität können Sie in den
Menüs Normale Aufzeichnung und
Alarmaufzeichnung einstellen.
• Auf dem LC-Display wird „REC“ (Aufzeichnen)
angezeigt.
Mit der Stopptaste beenden Sie die Aufzeichnung.
• Die Stopptaste kann nur im Aufzeichnungsmodus
aktiviert werden.
• Wenn die Festplatte voll ist, wird der DVR je nach
Einstellung im Menü Systemeinstellungen entweder
automatisch die Aufzeichnung beenden oder zum
Anfang der Festplatte zurückspringen und
vorhandene Aufzeichnungen überschreiben.
3.3 Alarmaufzeichnung
Wenn ein Alarm auftritt, wird das Monitorbild bis zum
Ende des Alarms automatisch aufgezeichnet. Die
sofortige Aufzeichnung und die Timer-Aufzeichnung
werden abgebrochen, wenn ein Alarm auftritt. Falls das
Gerät bereits aufzeichnet, wird die
Aufzeichnungsqualität für die Alarmaufzeichnung nicht
geändert. Die Optionen für die Alarmaufzeichnung
können Sie im Menü Alarmaufzeichnung einstellen.
Bosch Security Systems | 2004-06
DE | 63
3.3.1 Aufzeichnung vor dem Alarm
Mithilfe eines Bildpuffers mit einer Kapazität von 220
Bildern (z. B. 9 Sek. bei 25 Bildern pro Sekunde (BPS)
oder 220 Sekunden bei 1 BPS) können bereits
unmittelbar vor Auslösung eines Alarms Videobilder
aufgezeichnet werden. Die Aufzeichnung vor dem
Alarm wird nur eingesetzt, wenn das Gerät zu diesem
Zeitpunkt nicht ohnehin aufzeichnet. Wenn das Gerät
zu diesem Zeitpunkt aufzeichnet, wird die aktuelle
Aufzeichnungsqualität für die Aufzeichnung vor dem
Alarm übernommen. Wenn das Gerät zu diesem
Zeitpunkt nicht aufzeichnet, ist die Qualität der
Aufzeichnung vor dem Alarm identisch mit der
normalen Aufzeichnungsqualität.
3.4 Normale Wiedergabe
Wiedergabe
• Drücken Sie die Wiedergabetaste, um die
Wiedergabe des gespeicherten Video-/
Audiomaterials aus dem letzten Segment zu starten.
• Drücken Sie die Stopptaste, um die Wiedergabe zu
beenden.
Schnellvorlauf
• Drücken Sie die Wiedergabetaste, um die
Wiedergabe zu starten.
• Drehen Sie den Shuttle-Ring im Uhrzeigersinn, um
die Wiedergabe zu beschleunigen. Die
Geschwindigkeit wird auf dem Display angezeigt
(normale Wiedergabegeschwindigkeit, 2x, 4x, 8x,
16x, 32x, 640x).
Schnellrücklauf
• Drücken Sie die Wiedergabetaste, um die
Wiedergabe zu starten.
• Drehen Sie den Shuttle-Ring gegen den
Uhrzeigersinn, um den Schnellrücklauf zu starten.
Die Geschwindigkeit wird auf dem Display angezeigt
(normale Wiedergabegeschwindigkeit, 2x, 4x, 8x,
16x, 32x, 640x).
Zeitlupe
• Drücken Sie die Pausetaste, um ein Standbild zu
erhalten.
• Drehen Sie den Shuttle-Ring im Uhrzeigersinn, um
die Zeitlupe zu starten. Die Geschwindigkeit wird auf
dem Display angezeigt (>1/2, 1/4, 1/8, 1/16, 1/32,
1/64).
DVR1C1161 | Installationshandbuch | Kapitel 3
DE | 64
Rückwärtszeitlupe
• Drücken Sie die Pausetaste, um ein Standbild zu
erhalten.
• Drehen Sie den Shuttle-Ring gegen den
Uhrzeigersinn, um die Rückwärtszeitlupe zu starten.
Die Geschwindigkeit wird auf dem Display angezeigt
(<1/2, 1/4, 1/8, 1/16, 1/32, 1/64).
•
Feste Einstellung der Anzeigegeschwindigkeit
• Um die Anzeigegeschwindigkeit fest einzustellen,
drücken Sie die Enter-Taste, und lassen Sie den
Shuttle-Ring los. Wenn Sie den Shuttle-Ring erneut
drehen, wird das Video wieder mit normaler
Geschwindigkeit wiedergegeben.
Wiedergabe nach Datum/Zeit
• Drücken Sie die Suchtaste, um das Suchmenü
aufzurufen.
• Bewegen Sie den Cursor auf NACH DATUM/ZEIT,
und drücken Sie die Enter-Taste, um die Dateisuche
auszuwählen.
• Bewegen Sie den Cursor auf den gewünschten Wert,
und drücken Sie die Enter-Taste.
• Stellen Sie den Wert mit dem Jog Dial ein, und
drücken Sie die Enter-Taste.
• Bewegen Sie den Cursor auf SUCHE STARTEN
UND WIEDERGEBEN, und drücken Sie die EnterTaste. Die Wiedergabe beginnt ab dem ausgewählten
Datum/der ausgewählten Zeit.
Bildweiterschaltung Vorwärts/Rückwärts
• Drücken Sie die Pausetaste, um ein Standbild zu
erhalten.
• Drehen Sie den Jog Dial im Uhrzeigersinn, um das
Video Bild für Bild weiterzuschalten.
• Drehen Sie den Jog Dial gegen den Uhrzeigersinn,
um das Video Bild für Bild rückwärts
weiterzuschalten.
• Die Geschwindigkeit erhöht sich, wenn Sie den Jog
Dial schnell drehen.
3.5 Wiedergabe im Suchmodus
Wiedergabe von Segmenten
• Drücken Sie die Suchtaste, um das Suchmenü
aufzurufen.
• Bewegen Sie den Cursor auf NACH
SEGMENTLISTE, und drücken Sie die Enter-Taste,
um die Dateisuche auszuwählen.
• Bewegen Sie den Cursor auf das gewünschte
Segment („pAlarm“: Aufzeichnung vor dem Alarm,
„Timer“: Timer-Aufzeichnung).
• Wenn die Auswahlliste voll ist, drehen Sie den Jog
Dial im Uhrzeigersinn, um die nächste Seite der
Liste auszuwählen.
• Drücken Sie die Enter-Taste, um die Wiedergabe zu
starten.
Wiedergabe von Alarmsuchen
• Drücken Sie die Suchtaste, um das Suchmenü
aufzurufen.
• Bewegen Sie den Cursor auf NACH
EREIGNISLISTE, und drücken Sie die Enter-Taste,
um die Alarmsuche auszuwählen.
• Wählen Sie mit dem Cursor das gewünschte
Alarmbild aus.
Bosch Security Systems | 2004-06
•
•
Wenn die Auswahlliste voll ist, drehen Sie den Jog
Dial im Uhrzeigersinn, um die nächste Seite der
Liste auszuwählen.
Drücken Sie die Enter-Taste, um die Wiedergabe der
Alarmbilder zu starten.
Das Alarmbild wird vom Zeitraum vor dem Alarm
bis zum Ende des Alarms wiedergegeben.
Wenn für das angegebene Datum/die angegebene Zeit
kein gespeichertes Bild vorhanden ist, startet das Gerät
die Wiedergabe automatisch von dem Zeitpunkt, der
der gewünschten Zeit am nächsten ist.
3.6 Kopieren
Stecken Sie eine Compact Flash-Karte (Typ I oder II) in
den entsprechenden Steckplatz an der Vorderseite des
Geräts. Achten Sie beim Einstecken der Compact FlashKarte auf die korrekte Ausrichtung. Verwenden Sie nur
Compact Flash-Karten mit einer Kapazität von
mindestens 16 MB.
Die Kopierfunktion der Compact Flash-Karte dient zum
Kopieren von kurzen Videoclips. Das Kopieren eines
langen Videoclips kann viel Zeit in Anspruch nehmen.
Anmerkung
Drücken Sie für eine bessere Lesbarkeit der kopierten
Videoclips auf die OSD-Taste. Drücken Sie die OSDTaste erneut, um den Hintergrund auszuschalten.
3.6.1 Standbildkopie
•
•
Drücken Sie die Wiedergabetaste, um die
Wiedergabe zu starten.
Drücken Sie die Pausetaste, um ein Standbild zu
erhalten.
DVR1C1161 | Installationshandbuch | Kapitel 3
•
•
•
•
•
•
Wählen Sie durch Drehen des Jog Dials das
gewünschte Bild aus.
Drücken Sie die Kopiertaste, um den Kopiermodus
aufzurufen.
Wählen Sie durch Drehen des Jog Dials das
gewünschte Kamerabild aus.
Drücken Sie erneut die Kopiertaste, während das
Bild angezeigt wird. Während des Vorgangs wird auf
dem Display die Meldung „Kopieren ...“ angezeigt.
Nach dem Kopieren der Datei wird auf dem Display
die Meldung „Erfolgreich“ und die Dateikennung
angezeigt.
Drücken Sie die Stopptaste, um den Kopiervorgang
abzubrechen.
Drücken Sie die Wiedergabetaste, um die
Wiedergabe fortzusetzen.
Die kopierten Bilder werden als einzelne Bilder im
JPG-Format gespeichert.
3.6.2 Kopieren in Filmdatei
•
•
•
•
•
•
•
Drücken Sie die Wiedergabetaste, um die
Wiedergabe zu starten.
Drücken Sie die Kopiertaste, um den Kopiermodus
aufzurufen.
Wählen Sie mit dem Jog Dial die gewünschte
Kamera aus.
Drücken Sie erneut die Kopiertaste, während das
Bild angezeigt wird. Während des Vorgangs wird auf
dem Display die Meldung „Kopieren ...“ angezeigt.
Drücken Sie die Stopptaste, um den Kopiervorgang
abzubrechen.
Nach dem Kopieren der Datei wird auf dem Display
die Meldung „Erfolgreich“ und die Dateikennung
angezeigt.
Drücken Sie die Wiedergabetaste, um die
Wiedergabe fortzusetzen.
Die kopierten Bilder werden als Film im MOV-Format
gespeichert.
Bosch Security Systems | 2004-06
DE | 65
3.7 Einstellung der
Sicherheitssperre
Drücken Sie die Aufzeichnungstaste im
Aufzeichnungsmodus mehr als 5 Sekunden lang, um
alle Tasten an der Vorderseite des Geräts zu sperren.
(Zur Aktivierung dieser Funktion muss im Menü
Systemeinstellung ein Passwort festgelegt sein.)
Wenn Sie die Stopptaste drücken, werden Sie zur
Eingabe des Passworts aufgefordert. Wenn Sie das
korrekte Passwort eingeben, werden die gesperrten
Tasten freigegeben.
DVR1C1161 | Installationshandbuch | Kapitel 4
4
Menü einrichten
Nachdem Sie das System wie beschrieben
angeschlossen haben:
• Schalten Sie die Stromversorgung ein.
• Bei normaler Stromversorgung leuchtet das Display
auf.
• Warten Sie einige Zeit, bis das System vollständig
geladen ist.
• Drücken Sie die Menütaste, um das HAUPTMENÜ
aufzurufen.
Wenn das Hauptmenü angezeigt wird, sehen Sie die
verschiedenen Untermenüs, in denen Sie die
Einstellungen ändern können.
Durch Drehen des Jog Dials im oder gegen den
Uhrzeigersinn können Sie sich durch die Menüstruktur
bewegen. Mit der Enter-Taste rufen Sie das gewünschte
Untermenü auf. In den Untermenüs verwenden Sie
weiterhin den Jog Dial und die Enter-Taste, um
zwischen den Menüpunkten zu navigieren und sie
auszuwählen. Um zum Hauptmenü zurückzukehren,
markieren Sie den Menüpunkt HAUPTMENÜ am
Ende des Untermenüs, und drücken Sie die Enter-Taste.
4.1 Hauptmenü
+$8370(1h
DATUM: Jahr: 2000–2099 Monat: 01–12 Datum: 01–31
ZEIT: Stunde: 00–23 Minute: 00–59 Sekunde: 00–59
DATUMSFORMAT: Stellen Sie die gewünschte Reihenfolge für Jahr
(JJJJ), Monat (MM) und Tag (TT) ein.
MENÜSPRACHE: Englisch, Deutsch, Französisch, Spanisch,
Italienisch, Portugiesisch, Niederländisch oder Polnisch.
HAUPTMENÜ: Zum Hauptmenü zurückkehren.
4.3 Menü „Normale Aufzeichnung“
0(1h1250$/($8)=(,&+181*
$8)=*(6&+:
$8)=48$/,7b7
%36
67$1'$5'
$8)1$+0(=(,7
6781'(1
+$8370(1h!
GESCHW.: Wählen Sie eine Aufzeichnungsgeschwindigkeit zwischen
0,1 und 25/30 BPS.
QUALITÄT: Es gibt sechs Qualitätsstufen für die Aufzeichnung.
NIEDRIGER 15 KB
NIEDRIG: 20 KB
EINFACH: 25 KB
STANDARD: 30 KB
HOCH: 35 KB
OPTIMAL: 40 KB
AUFNAHMEZEIT: Zeigt die auf der Festplatte verbleibende
Aufnahmezeit zur ausgewählten Geschwindigkeit und
Qualität an.
4.4 Menü „Alarmaufzeichnung“
8+5635$&+(!
1250$/($8)=(,&+181*!
$/$50$8)=(,&+181*!
7,0(5!
6,*1$/721!
$5&+,9!
1(7=:(5.!
6<67(0(,167(//81*!
4.2 Menü „Uhr/Sprache“
0(1h8+5635$&+(
'$780
=(,7
'$7806)250$7
0(1h635$&+(
DE | 66
7700----
'(876&+
+$8370(1h!
Bosch Security Systems | 2004-06
0(1h$/$50$8)=(,&+181*
$/$50
$8)=*(6&+:
$8)=48$/,7b7
$/$50(,1*7<3
$/$505(6(77<3
$/$50'$8(5
(,1
%36
67$1'$5'
6&+/,(66(5
6&+/,(66(5
6(.81'(1
%(75,(%925'(0$/$50
$8)=*(6&+:
(,1
%36
+$8370(1h
!
ALARM:
EIN: Aufzeichnung bei Eingang eines Alarmsignals.
AUS: Keine Aufzeichnung bei Eingang eines Alarmsignals.
DVR1C1161 | Installationshandbuch | Kapitel 4
AUFZ.GESCHW.: Aufzeichnungsgeschwindigkeit während des
Alarms.
Die höchste Aufzeichnungsgeschwindigkeit beträgt
50/60 BPS (PAL/NTSC).
Die niedrigste Aufzeichnungsgeschwindigkeit liegt bei
0,1 BPS.
AUFZ.QUALITÄT: Bildqualität der Aufzeichnung bei Eingang des
Alarmsignals.
NIEDRIGER: 15 KB
NIEDRIG: 20 KB
EINFACH: 25 KB
STANDARD: 30 KB
HOCH: 35 KB
OPTIMAL: 40 KB
ALARMEING.-TYP:
SCHLIESSER : Normalerweise offen
Öffner : Normalerweise geschlossen
ALARMRESET-TYP
SCHLIESSER : Normalerweise offen
Öffner : Normalerweise geschlossen
ALARMDAUER: Die Alarmaufzeichnung beginnt, sobald der Alarm
ausgelöst wird und stoppt, wenn der Alarm endet bzw.
zurückgesetzt wird. Die maximale Alarmdauer ist unbegrenzt,
die niedrigste Alarmdauer liegt bei 10 Sekunden.
BETRIEB VOR DEM ALARM:
EIN: Aufzeichnung vor dem Alarm mit den aktuellen
Aufzeichnungseinstellungen.
AUS: Keine Aufzeichnung vor dem Eingang eines
Alarmsignals.
AUFZ.GESCHW.: Die Aufzeichnungsgeschwindigkeit vor dem Alarm.
Die höchste Aufzeichnungsgeschwindigkeit beträgt
50/60 BPS (PAL/NTSC).
Die niedrigste Aufzeichnungsgeschwindigkeit liegt bei
0,1 BPS.
Anmerkung
Wenn der Alarm im Standby-Modus oder im Modus
Normale Aufzeichnung auftritt, entspricht die
Aufzeichnungsqualität der normalen Aufzeichnung.
Wenn der Alarm im Timer-Aufzeichnungsmodus auftritt,
entspricht die Aufzeichnungsqualität dem Wert, den Sie
für die Timer-Aufzeichnungsqualität eingestellt haben.
4.5 Menü „Timer“
Sie können das überwachte Bild automatisch
aufzeichnen, indem Sie im Menü TIMER die Start- und
Endzeit einstellen. Es gibt 15 Einträge, mit denen Sie
einen Aufzeichnungszeitplan für einen oder mehrere
Tage der Woche festlegen können. Markieren Sie einen
Eintrag, und drücken Sie die Enter-Taste, um den Tag
auszuwählen.
Programmieren Sie z. B. Folgendes:
START 09:00, STOP 23:59
Die Aufnahme beginnt um 09:00:00 Uhr und endet um
23:59:59 Uhr.
Drücken Sie die Stopptaste, um das Menü „Timer“
aufzurufen, und stellen Sie den Wert für
„EINSTELLEN“ auf „AUS“ ein, um eine TimerAufzeichnung während der Aufzeichnung abzubrechen.
Bosch Security Systems | 2004-06
DE | 67
0(1h7,0(5
:267$5767233)250$748$/(,167
6267'67$1'$5'$86
0267'67$1'$5'$86
:7$*67'67$1'$5'$86
:(1'67'67$1'$5'$86
7*/67'67$1'$5'$86
0267'67$1'$5'$86
',67'67$1'$5'$86
)567'67$1'$5'$86
'267'67$1'$5'$86
0,67'67$1'$5'$86
6$67'67$1'$5'$86
6267'67$1'$5'$86
+$8370(1h!
WO: Wählen Sie den oder die Tag(e) für den Timer.
TGL.: Täglich
WTAG: Montag bis Freitag
WEND: Samstag und Sonntag
Einzelne Wochentage
START: Geben Sie die Startzeit für die Timer-Aufzeichnung ein.
STOPP: Geben Sie die Endzeit für die Timer-Aufzeichnung ein.
Die Endzeit muss auf eine spätere Zeit als die Startzeit
eingestellt sein
(z. B. START 16.00, STOP 03:00 ist falsch
START 16:00, STOP 00:00 ist falsch
START 16:00, STOP 23:59 ist richtig).
FORMAT: Wenn das AUFZEICHNUNGSFORMAT auf STUNDE
eingestellt ist, können Sie eine Aufzeichnungsdauer
zwischen 4/6 (NTSC/PAL) STD. und 960 STD. wählen.
Wenn das AUFZEICHNUNGSFORMAT auf BPS eingestellt
ist, können Sie eine Aufzeichnungsrate von
0,1–30/0,1–25 (NTSC/PAL) BPS wählen.
QUAL: Es gibt sechs Qualitätsstufen für die Aufzeichnung.
NIEDRIGER: 15 KB
NIEDRIG: 20 KB
EINFACH: 25 KB
STANDARD: 30 KB
HOCH: 35 KB
OPTIMAL: 40 KB
EINST: Wählen Sie EIN, wenn Sie die Timer-Aufzeichnung
verwenden.
Wählen Sie AUS, wenn Sie die Timer-Aufzeichnung nicht
verwenden.
Im Timer-Aufzeichnungsmodus werden Datum/Zeit des
Timers im Display angezeigt, während die
Aufzeichnungsrate unter T-AUFZ. angegeben ist.
Bei Daueraufzeichnungen können Sie die Qualitätsstufe
nicht ändern. Beispiel:
Seg 1 08:30–17:00
Seg 2 17:00–23:59
DVR1C1161 | Installationshandbuch | Kapitel 4
Seg 1 und Seg 2 werden als Daueraufzeichnung von
08:30 bis 23:59 interpretiert.
Wenn Sie unterschiedliche Qualitätsstufen einstellen
möchten, gehen Sie wie folgt vor:
Seg 1 08:30–16:59
Seg 2 17:00–23:59
4.6 Menü „Signalton“
0(1h6,*1$/721
6,*1$/721
$/$50(,1*$1*
6,*1$/(,1*$1*
)(673/$77(92//
9,'(29(5/867
7,0(5
$.7,9,(5(1
(,1
(,1
(,1
(,1
$86
+$8370(1h
!
SIGNALTON:
AKTIVIEREN: Signalton aktivieren.
DEAKTIVIEREN: Signalton deaktivieren.
Hinweis: Drücken Sie die Enter-Taste, um den Signalton im
Aufzeichnungs- oder Wiedergabemodus zu aktivieren/
deaktivieren.
ALARMEINGANG: EIN – Der Signalton ertönt, wenn der Alarm
auftritt.
SIGNALEINGANG: EIN – Der Signalton ertönt, wenn ein Signal am
Eingangsanschluss anliegt.
FESTPLATTE VOLL: EIN – Der Signalton ertönt, wenn die Kapazität
der Festplatte nahezu erschöpft ist (99,7 %).
VIDEOVERLUST: EIN – Der Signalton ertönt, wenn das Videosignal
verloren geht.
TIMER: EIN – Der Signalton ertönt, wenn die Timer-Aufzeichnung
gestartet wird.
4.7 Menü „Archiv“
ZEITSTEMPEL:
EIN: Beim Kopieren des Bildes auf die CF-Karte wird ein
Zeitstempel eingefügt.
AUS: Beim Kopieren des Bildes auf die CF-Karte wird kein
Zeitstempel eingefügt.
POS. DES ZEITSTEMPELS:
UNTEN: Der Zeitstempel wird unten im Bild eingefügt.
OBEN: Der Zeitstempel wird oben im Bild eingefügt.
WASSERZEICHEN:
EIN: Beim Kopieren des Bildes auf die CF-Karte wird ein
Wasserzeichen eingefügt.
AUS: Beim Kopieren des Bildes auf die CF-Karte wird kein
Wasserzeichen eingefügt.
POS. DES WASSERZEICHENS:
UNTEN: Das Wasserzeichen wird unten im Bild eingefügt.
OBEN: Das Wasserzeichen wird oben im Bild eingefügt.
4.8 Menü „Netzwerk“
0(1h1(7=:(5.
,3$'5(66(
68%1(7=0$6.(
67$1'$5'*$7(:$<
%(187=(5(,15,&+7(1 !
%(187=(5(,15,&+7(1 !
%(187=(5(,15,&+7(1 !
+$8370(1h
!
IP-ADRESSE: Tragen Sie die IP-Adresse des Geräts im Netzwerk ein.
SUBNETZMASKE: Tragen Sie die Subnetzmaske des Geräts im
Netzwerk ein.
STANDARDGATEWAY: Tragen Sie das Standardgateway des Geräts
im Netzwerk ein.
BENUTZER EINRICHTEN: Sie können drei Benutzernamen und
Passwörter einrichten. Für die drei Benutzer steht jeweils ein
Setup-Menü zur Verfügung.
%(187=(5(,15,&+7(1
0(1h$5&+,9
%,/'*5g66(
=(,767(03(/
326'(6=(,767(03(/6
:$66(5=(,&+(1
326'(6
:$66(5=(,&+(16
;
(,1
817(1
(,1
817(1
+$8370(1h
!
BILDGRÖSSE: Wählen Sie eine Bildgröße für das Kopieren des
Bildes auf die CF-Karte.
Groß: 720x576 (PAL), 720x480 (NTSC)
Klein: 352x288 (PAL), 352x240 (NTSC)
Bosch Security Systems | 2004-06
DE | 68
%(187=(51$0(
%(187=(53$66:257
%(187=(5(%(1(
$'0,1BBB
$'0,1BBB
683(5
0(1h1(7=:(5.
+$8370(1h
!
!
DVR1C1161 | Installationshandbuch | Kapitel 4
Wenn Sie einen PC über ein Netzwerk an den DVR
anschließen, wird auf dem PC-Monitor der DVRAnmeldebildschirm angezeigt. Im Menü Benutzer
einrichten kann der Administrator den Benutzernamen,
das Passwort sowie die Zugriffsebene festlegen. Das
System verfügt über drei verschiedene Zugriffsebenen:
• Benutzer mit der Zugriffsebene SUPER können sich
Live-Videos und aufgezeichnete Videos ansehen und
den Betrieb des DVR steuern.
• Benutzer mit der Zugriffsebene ALLGEMEIN
können sich Live-Videos und aufgezeichnete Videos
ansehen.
• Benutzer mit der Zugriffsebene GAST können sich
lediglich Live-Videos ansehen.
Es können maximal vier Verbindungen gleichzeitig
hergestellt werden (dabei teilen sich zwei Benutzer
denselben Benutzernamen und dasselbe Passwort).
4.9 Menü „Systemeinstellung“
0(1h6<67(0(,167(//81*
3$66:257$.7,9,(5(1
3$66:257
1(,1
9,'(2(,1*$1*
:,('(5*$%(0,7$8',2
:,('(5*$%(0,7$8',2
:,('(5*$%(0,7$8',2
08/7,3/(;(5
+$/%%,/'&2'(=(,/(
)(673/$77(92//
$8)=(,&+181*6)250
9,'(26<67(0
&20326,7(
$86
(,1
(,1
%RVFK/7&
h%(56&+5(,%(1
1$&+%36
3$/
/$8):(5//g6&+(1
6<67(0$.78$/,6,(5(1
67$1'$5'/$'(1
&).$57(/g6&+(1
!
!
!
!
+$8370(1h
!
PASSWORT AKTIVIEREN:
JA: Es ist ein Passwort erforderlich, um das Menü aufzurufen.
NEIN: Es ist kein Passwort erforderlich, um das Menü
aufzurufen.
PASSWORT
Wenn Sie PASSWORT AKTIVIEREN auf JA stellen, ist ein
Passwort erforderlich, um das Menü aufzurufen. Für den
6-stelligen Code kann jede Zahl von 1 bis 5 verwendet werden.
Bosch Security Systems | 2004-06
DE | 69
Wenn Sie das Passwort aktiviert haben, werden Sie vom
System jedes Mal zur Eingabe des Passwortes aufgefordert,
wenn Sie im Live-Modus die Menütaste bzw. im
Aufzeichnungsmodus die Stopptaste drücken. Denken Sie
deshalb daran, das Passwort zu notieren.
VIDEOEINGANG:
COMPOSITE: Wählen Sie das Videosignal vom
BNC-Anschluss.
S-VIDEO: Wählen Sie das S-VIDEO-Signal vom S-VIDEOAnschluss.
WIEDERGABE MIT AUDIO: EIN/AUS: Wiedergabe mit oder ohne
Audio.
WIEDERGABE MIT AUDIO 1/WIEDERGABE MIT AUDIO 2:
EIN/AUS: Wiedergabe mit oder ohne Audio.
Die Audioaufzeichnung und -wiedergabe steht nur im
Livemodus bei einer Geschwindigkeit von mindestens 1 BPS
zur Verfügung. (Wiedergabegeschwindigkeit entspricht der
Aufzeichnungsgeschwindigkeit.)
MULTIPLEXER:
Wählen Sie den am DVR angeschlossenen Multiplexertyp
aus. Ist Ihr Multiplexer nicht in der Liste enthalten, wählen Sie
UNBEKANNT aus.
Ist ein Multiplexer ausgewählt, wird das Videosignal vom
MUX MAIN MONITOR-Anschluss an der Rückseite des
Geräts zum MONITOR OUT-Anschluss durchgeschleift,
wenn sich das Gerät nicht im Menümodus befindet.
Ist nur eine Kamera an den DVR angeschlossen, wählen Sie
die Option AUS. Der Hauptmonitorausgang ist jetzt mit dem
Videoausgang identisch.
HALBBILD-CODEZEILE:
Wenn Sie den Multiplexertyp UNBEKANNT ausgewählt
haben, können Sie zur Anpassung der Halbbild-Codezeile
des Multiplexers 0 bis 20 verwenden. Der Standard (13) ist
für die meisten Multiplexer geeignet. Wenn die HalbbildCodezeile im oberen Teil der Wiedergabekanäle angezeigt
wird, verringern Sie den Wert. Wenn Multiplexer Videos
fehlerhaft wiedergeben, erhöhen Sie den Wert.
FESTPLATTE VOLL:
STOPP: Wenn die Festplatte voll ist, beendet das Gerät die
Aufzeichnung.
ÜBERSCHREIBEN: Wenn die Festplatte voll ist, wird das alte
Video am Anfang der Festplatte überschrieben.
AUFZ.FORMAT: Wählen Sie das Aufzeichnungsformat nach BPS
(Bilder pro Sekunde) oder Stunden.
VIDEOSYSTEM: Wählen Sie als Videosystem NTSC oder PAL (zur
Aktivierung ist ein Neustart erforderlich).
LAUFWERK LÖSCHEN:
Drücken Sie die Enter-Taste, um alle Aufzeichnungen auf der
Festplatte zu entfernen.
Auf dem Display wird das Bestätigungs-Dialogfeld angezeigt.
Wählen Sie JA oder NEIN, und drücken Sie die Enter-Taste.
SYSTEM AKTUALISIEREN:
Drücken Sie die Enter-Taste, wenn Sie das System
aktualisieren möchten.
JA: Kopieren Sie die aktualisierte Datei vom PC auf die
Compact Flash-Karte, und stecken Sie die Compact FlashKarte in den Steckplatz. Drücken Sie die Enter-Taste, um das
System zu aktualisieren. Das System muss nach der
erfolgreichen Aktualisierung zur Aktivierung neu gestartet
werden.
DVR1C1161 | Installationshandbuch | Kapitel 4
STANDARD LADEN:
Drücken Sie die Enter-Taste, wenn Sie die werkseitigen
Standardeinstellungen laden möchten.
JA: Auf dem Display wird das Bestätigungs-Dialogfeld
angezeigt.
Wählen Sie JA oder NEIN, und drücken Sie die Enter-Taste.
CF-KARTE LÖSCHEN:
JA: Die Compact Flash-Karte wird formatiert.
NEIN: Die Compact Flash-Karte wird nicht formatiert.
4.10 Menü „Passwort“
Wenn der Passwortschutz aktiviert ist, wird auf dem
Display ein Passwort-Menü angezeigt, sobald Sie
versuchen, ein Menü aufzurufen oder die Aufzeichnung
zu stoppen. Sie müssen mithilfe der folgenden Tasten
das Passwort eingeben:
REC : 1
OSD : 2
STOP : 3
PLAY : 4
PAUSE : 5
Bosch Security Systems | 2004-06
DE | 70
DVR1C1161 | Installationshandbuch | Kapitel 5
5
DE | 71
Ansicht über
Internet/Intranet
5.1 Anmelden
Öffnen Sie Ihren Internet-Browser, und geben Sie die
Netzwerk IP-Adresse ein (z. B. http://192.168.10.5).
Diese Adresse muss mit der im Menü Netzwerk des
DVR festgelegten IP-Adresse übereinstimmen.
Die Anmeldungsseite wird auf dem Bildschirm
angezeigt. Geben Sie den korrekten Benutzername und
5.2 Hauptbildschirm
Über das Symbol am unteren Rand des Bildschirms
können Sie sich abmelden. Am unteren Rand werden
auch Informationen über den Systemstatus angezeigt.
Der momentane Systemstatus sowie das Datum und die
Uhrzeit werden angezeigt.
Bosch Security Systems | 2004-06
das korrekte Passwort ein. Benutzername und Passwort
müssen mit den im Menü Netzwerk festgelegten
Angaben übereinstimmen. (Geben Sie standardgemäß
sowohl für den Benutzername als auch für das Passwort
„ADMIN“ ein, und klicken Sie anschließend auf
Submit (Abschicken), um auf das System zuzugreifen.)
Über die Symbole auf der rechten Seite werden die
Kameras sowie ihre Anzeigeart auf dem Bildschirm
ausgewählt. Die Wiedergabesteuerung befindet sich auf
der rechten Seite des Bildschirms. Mit der Suchfunktion
können Sie einen bestimmten Clip auswählen.
Abgeblendete Symbole können im aktuellen Modus
nicht aktiviert werden.
DVR1C1161 | Installationshandbuch | Kapitel 5
DE | 72
Anmerkung
Die Anzeigerate der Livebilder hängt von der
gewählten Aufzeichnungsgeschwindigkeit ab, wenn sich
die Einheit im Aufzeichnungsmodus befindet (z. B.
führt eine Aufzeichnung von 0,5 BPS zu einer Anzeige
von 2 Sekunden pro Kamerabild).
Livebilder können nicht angezeigt werden, wenn sich
der Recorder im Wiedergabemodus befindet. Der
Systemstatus zeigt die Meldung WIEDERGABE VON
SERVER LÄUFT an. Zum Anzeigen der Livebilder
müssen Sie die Wiedergabe des Recorders zuerst
beenden.
5.2.1 Farbe der Statusmeldung
5.2.3 Wiedergabemodus-Symbole
Die Farbe der Statusmeldung zeigt an, ob Sie lokal oder
an einem entfernten Standort arbeiten. Wenn Sie lokal
arbeiten, werden die Meldungen gelb angezeigt. Wenn
Sie den DVR direkt bedienen (Sie haben das Symbol
„Steuerung“ gewählt), werden die Meldungen grün
angezeigt.
Wählen Sie das Wiedergabesymbol, um den
Wiedergabemodus zu aktivieren.
• STOP: Die Videoanzeige wird angehalten.
• PLAY: Wiedergabe der Videoanzeige.
• PLAY REV.: Rückwärtswiedergabe der
Videoanzeige.
• STEP Forward: Videoanzeige um einen Schritt
vorschalten.
• STEP Backward: Videoanzeige um einen Schritt
zurückschalten.
• PAUSE: Die Videoanzeige wird angehalten.
5.2.2 Livemodus-Symbole
Die Kamerasymbole, Kameraansichtssymbole und das
Wiedergabesymbol sind im Ansichtsmodus aktiviert.
Bosch Security Systems | 2004-06
DVR1C1161 | Installationshandbuch | Kapitel 5
•
•
CONTROL (Steuerung): Aktiviert den direkten
Fernbedienungsmodus (nur möglich auf der
Zugriffsebene SUPER). Wiedergabe und
Aufzeichnung können jetzt direkt über die
Fernbedienung des DVR gesteuert werden.
Steuerung der Wiedergabegeschwindigkeit.
5.2.4 Suchen
Das System bietet Ihnen drei Möglichkeiten zur Suche
der Videos, die Sie wiedergeben möchten:
• Nach Segmentliste ausgewähltes Video abspielen.
• Nach Alarmliste ausgewähltes Video abspielen.
• Nach Datum/Zeit ausgewähltes Video abspielen.
Ein in der Liste aufgeführtes Element kann durch
Mausklick ausgewählt werden. Klicken Sie auf PLAY
(Wiedergabe), um das ausgewählte Video abzuspielen.
Bosch Security Systems | 2004-06
DE | 73
DVR1C1161 | Installationshandbuch | Kapitel 6
6
DE | 74
Technische Daten
6.1 RS-232-Schnittstelle
$6&,, )81.7,21
&2'(
(LQJDEHDP
*HUlW
.
$XI]HLFKQXQJVWDUWHQ
5(&
.
$XI]HLFKQXQJXQG
:LHGHUJDEHEHHQGHQ
6723
.
:LHGHUJDEH
3/$<
1&
5;'
.
:LHGHUJDEHDQKDOWHQ
3$86(
.
:LHGHUJDEHYRQ6XFKHQ 6($5&+
%LOGDXI&).DUWH
NRSLHUHQ
&23<
Der DVR kann über den standardmäßigen 9-poligen DSUB-RS-232-Anschluss von einem Computer oder
einem Terminal aus gesteuert werden.
3LQ
'95&
1&
7;'
3LQ
+267
5;'
7;'
.
1&
*5281'
'75
*5281'
.
',63/$<
1&
1&
1&
9
'65
576
&76
1&
0HQDQ]HLJHDP
%LOGVFKLUP
.
$XVZDKOEHVWlWLJHQ
(17(5
.
0HQÄ(LQVWHOOXQJHQ´ 0(18
DXIUXIHQ
.
.
5FNODXIJHVFKZLQGLJ
NHLW
Übertragungseinstellungen: 9.600 Baud, 8 Datenbits,
1 Startbit, 1 Stoppbit, keine Parität.
6.1.1 RS-232-Steuerungsprotokoll
Sie können das Gerät von einem Computer oder einem
Terminal aus steuern, indem Sie ASCII-Befehle mit drei
Zeichen über den RS232-Anschluss senden. Diese
ASCII-Befehle beginnen mit „K“ oder „k“. Es gibt 30
ASCII-Befehle, die den 30 manuellen
Eingabemöglichkeiten an der Gerätevorderseite
entsprechen. Die 30 ASCII-Befehle sind in der
folgenden Tabelle aufgeführt.
Bosch Security Systems | 2004-06
;
. 9RUODXIJHVFKZLQGLJ
.
NHLW
!!;
.
%LOGZHLWHUVFKDOWXQJ
UFNZlUWV
-2*5(:
.
%LOGZHLWHUVFKDOWXQJ
YRUZlUWV
-2*))
DVR1C1161 | Installationshandbuch | Kapitel 6
DE | 75
6.2 Aufzeichnungszeit
Ungefähre Aufzeichnungszeiten in Stunden ohne Audio
bei Verwendung einer 160-GB-Festplatte.
PAL
Aufzeichnungsrate
(BPS)
Niedriger
(15KB)
50
25
12
8
5
2
1,6
1,0
0,5
0,2
0,1
60
120
240
360
590
1420
1900
3000
5900
14800
29600
Bildqualität (Durchschnittliche Dateigröße)
Einfach
Standard
Hoch
(25KB)
(30KB)
(35KB)
Aufnahmezeit ca.
Stunden
44
36
30
25
90
70
60
50
180
140
120
100
270
210
180
150
440
360
300
250
1070
850
710
610
1420
1140
950
810
2200
1800
1500
1300
4400
3600
3000
2500
11100
8900
7400
6300
22200
17800
14800
12700
Niedrig
(20KB)
Optimal
(40KB)
22
44
90
130
220
530
710
1100
2200
5600
11100
NTSC
Aufzeichnungsrate
(BPS)
Niedriger
(15KB)
60
30
20
10
5
2
1,5
1,0
0,5
0,2
0,1
50
100
150
300
590
1480
1980
3000
5900
14800
29600
Bildqualität (Durchschnittliche Dateigröße)
Einfach
Standard
Hoch
(25KB)
(30KB)
(35KB)
Aufnahmezeit ca.
Stunden
37
30
25
21
74
60
50
42
110
90
70
60
220
180
150
130
440
360
300
250
1110
890
740
630
1480
1190
990
850
2200
1800
1500
1300
4400
3600
3000
2500
11100
8900
7400
6300
22200
17800
14800
12700
Niedrig
(20KB)
Referenz:
24 Std. = 1 Tag, 168 Std. = 1 Woche,
720 Std. = 1 Monat, 8.760 Std. = 1 Jahr
(Schätzungen für normale Bilder mit niedrigem
Rauschpegel)
Bosch Security Systems | 2004-06
Optimal
(40KB)
19
37
56
110
220
560
740
1100
2200
5600
11100
Bei der Audio-Aufzeichnung müssen Sie eine ungefähre
Dateigröße von 18 KB (PAL oder 21,6 KB (NTSC) pro
Sekunde einplanen. Dies kann, wie oben in den
Tabellen dargestellt, besonders bei niedrigen
Aufnahmezeiten zu einer erheblichen Reduzierung der
Aufnahmezeit führen.
DVR1C1161 | Installationshandbuch | Kapitel 6
DE | 76
6.3 Technische Daten
Video
Format
Eingang
Ausgang
Komprimierung
Auflösung
Anzeige
Allgemein
PAL/NTSC
1 Kameraeingang (BNC), 1 Vpp,
75 Ohm
1 Videoausgang (BNC) für
Hauptmonitor, 1 Vpp, 75 Ohm
M-JPEG
720 x 576 (PAL) /
720 x 484 (NTSC)
Vollanzeige für Liveansicht und
Wiedergabe
Audio
Anschlüsse
2 Monoeingänge,
1,6 Vpp ± 200 mV bei 10 K
2 Monoausgänge,
1,6 Vpp ± 200 mV bei 10 K
Alarm
Eingang
Ausgang
Hohe Schaltspannung: > 2 VDC
Niedrige Schaltspannung:
< 0,5 VDC
Ausgang mit einem Relais:
Kontaktspannung max.: 24 VDC
Schaltstrom max.: 2 ADC
Speicher
Festplatte
160 GB
Erkennung eines Videoverlusts Ja
Erkennung eines Stromausfalls Ja
Alarmprotokoll
Ja
Benutzeroberfläche Menügesteuert
Einrichtung
Über OSD-Menüs
Benutzereingabe
Bedienfeld an der Vorderseite,
optionale Fernbedienung (Infrarot
mit integriertem Empfänger)
Bildexport
Integrierter Compact FlashSteckplatz für Karten des Typ I
und Typ II
Sicherheit
Passwortschutz
Stromversorgung
100 - 240 VAC, 50/60 Hz
Stromverbrauch
< 40 W
Timer
Wochentimer, eingebaute
Echtzeituhr
Netzwerkverbindung 10Base-T, TCP/IP über Ethernet,
RJ-45-Anschluss
Steuerungsanschluss RS-232, 9-poliger D-SubAnschluss
Mechanische Daten
Gewicht
ca. 5,5 kg/11,5 lbs
Abmessungen (BxHxT)346 x 88 x 269 mm
13,6 x 3,5 x 10,5 Zoll
Umgebungstemperatur
Betriebstemperatur
+0 °C ... +40 °C
+32 °F . . . +104°F
Aufzeichnung
Modi
Rate
Echtzeitaufzeichnung, ZeitrafferAufzeichnung, geplante
Aufzeichnung oder
Ereignisaufzeichnung
Max. 50 Bilder pro Sekunde (PAL)
Max. 60 Bilder pro Sekunde
(NTSC)
Wiedergabe
Rate
Suche
Max. 50 Bilder pro Sekunde (PAL)
Max. 60 Bilder pro Sekunde
(NTSC)
Datum/Zeit, Segmentliste oder
Ereignis (Alarm)
Bosch Security Systems | 2004-06
Zulassungen
Sicherheit
Europa
USA
Australien
EN60950
UL60950 UL & cUL
C-Tick
Elektromagnetische Verträglichkeit (EMV)
Europa
USA
Australien
EN55022 Klasse B, EN50130-4
FCC Teil 15, Klasse B
AS/NZS 3548
Die Angaben können ohne vorherige Mitteilung geändert
werden. Bei Problemen wenden Sie sich bitte an Ihren
Händler.
DVR1C1161 | Manual de instalación | Contenido
1.
PRECAUCIONES DE SEGURIDAD ................................................................................................................................ 79
1.1
2.
3.
4.
ES | 77
MEDIDAS IMPORTANTES ........................................................................................................................ 79
INTRODUCCIÓN ...................................................................................................................................................................... 80
2.1
CARACTERÍSTICAS ................................................................................................................................... 80
2.2
PANEL FRONTAL ........................................................................................................................................ 81
2.3
PANEL POSTERIOR ................................................................................................................................... 82
2.3.1 Consumo ............................................................................................................................................ 82
2.3.2 Conector serie RS232 ................................................................................................................... 82
2.3.3 Conector óptico de IR para el mando a distancia .................................................................... 82
2.3.4 Conector de red ............................................................................................................................... 82
2.3.5 Conexiones de alarma .................................................................................................................... 82
2.4
INTERCONEXIONES .................................................................................................................................. 84
2.4.1 Multiplexores ..................................................................................................................................... 84
2.4.2 Cuadrantes ........................................................................................................................................ 85
2.4.3 Una sola cámara ............................................................................................................................... 86
2.5
UNIDAD DE MANDO A DISTANCIA ....................................................................................................... 87
2.6
REDES ............................................................................................................................................................ 87
FUNCIONAMIENTO ................................................................................................................................................................ 88
3.1
INSTALACIÓN RÁPIDA .............................................................................................................................. 88
3.2
GRABACIÓN INSTANTÁNEA .................................................................................................................. 88
3.3
GRABACIÓN CON ALARMA ................................................................................................................... 88
3.3.1 Grabación previa a alarma ............................................................................................................. 88
3.4
REPRODUCCIÓN NORMAL .................................................................................................................... 88
3.5
REPRODUCCIÓN DE BÚSQUEDA ....................................................................................................... 89
3.6
COPIA ............................................................................................................................................................. 89
3.6.1 Copia de una imagen fija ................................................................................................................ 89
3.6.2 Copia en un archivo de película ................................................................................................... 90
3.7
AJUSTE DEL BLOQUEO DE SEGURIDAD .......................................................................................... 90
CONFIGURACIÓN DE MENÚ ............................................................................................................................................ 91
4.1
MENÚ PRINCIPAL ....................................................................................................................................... 91
4.2
MENÚ RELOJ/IDIOMA ................................................................................................................................ 91
4.3
MENÚ DE GRABACIÓN NORMAL ......................................................................................................... 91
4.4
MENÚ GRABACIÓN CON ALARMA ..................................................................................................... 91
4.5
MENÚ DE TEMPORIZADOR .................................................................................................................... 92
4.6
MENÚ ZUMBADOR .................................................................................................................................... 93
Bosch Security Systems | 2004-06
DVR1C1161 | Manual de instalación | Contenido
ES | 78
4.7
MENÚ ARCHIVO .......................................................................................................................................... 93
4.8
MENÚ DE RED ............................................................................................................................................. 93
4.9
MENÚ DE AJUSTE DEL SISTEMA .......................................................................................................... 94
4.10 MENÚ CONTRASEÑA ............................................................................................................................... 95
5.
6.
VISTA A TRAVÉS DE INTERNET/INTRANET ............................................................................................................ 96
5.1
INICIO DE SESIÓN ..................................................................................................................................... 96
5.2
PANTALLA PRINCIPAL .............................................................................................................................. 96
5.2.1 Color de los mensajes de estado ................................................................................................ 97
5.2.2 Iconos del modo en directo ........................................................................................................... 97
5.2.3 Iconos del modo de reproducción ............................................................................................... 97
5.2.4 Buscar ................................................................................................................................................ 98
ESPECIFICACIONES ............................................................................................................................................................. 99
6.1
INTERFAZ RS-232 ....................................................................................................................................... 99
6.1.1 Protocolo de control RS-232 ........................................................................................................ 99
6.2
TIEMPO DE GRABACIÓN ......................................................................................................................100
6.3
ESPECIFICACIONES TÉCNICAS .........................................................................................................101
Abreviaturas en pantalla
II
A.REC
BASIC
HIGH
LOW
LOWER
MENU
PAUSE
P.END
PLAY
P.END
P.RPT
REC
SRCH
STDRD
SUPER
SYSLD
T.REC
*REC
P.BEG
R.REC
Pausa
Grabación con alarma
Calidad básica
Alta calidad
Baja calidad
Calidad más baja
Menú
Pausa
Fin de la pausa
Reproducir
Fin de la reproducción
Repetir reproducción
Grabar
Buscar
Calidad estándar
Calidad superior
Sistema cargando
Temporizador en grabación
Bloquear grabación
Inicio de reproducción
Grabación remota
Bosch Security Systems | 2004-06
DVR1C1161 | Manual de instalación | Capítulo 1
1
ES | 79
PRECAUCIONES DE
SEGURIDAD
Peligro
El símbolo de un rayo con punta de flecha
dentro de un triángulo equilátero aparece para
alertar al usuario de que existen "puntos de
tensión peligrosos" sin aislamiento dentro de la
cubierta de la unidad que pueden ser lo
suficientemente altos como para representar un
riesgo para las personas.
10
11
12
Aviso
13
El signo de exclamación dentro de un triángulo
equilátero aparece para alertar al usuario de que
existen instrucciones de funcionamiento y
mantenimiento importantes que acompañan al
equipo.
Precaución
enchufe polarizado dispone de dos hojas, una más
ancha que la otra. Una clavija para conexión a tierra
dispone de dos hojas además de una tercera patilla
de conexión a tierra. La hoja ancha y la tercera
patilla cumplen una función de seguridad. Si la
clavija suministrada no encaja en la toma de
corriente, solicite a un electricista que cambie la
toma de corriente antigua.
Debe protegerse el cable de alimentación de manera
que no se pise ni quede pillado por otros objetos,
especialmente en los enchufes, las tomas de corriente
y los puntos de salida del equipo.
Únicamente se deben utilizar conexiones/accesorios
especificados por el fabricante.
Este equipo se debe desenchufar de la toma de
corriente durante las tormentas eléctricas o cuando
no se vaya a utilizar durante largos periodos.
Todas las reparaciones deben remitirse a un técnico
cualificado. Será necesario reparar este equipo
cuando sufra cualquier tipo de daño, como por
ejemplo cuando el cable de alimentación o el
enchufe estén dañados, cuando se haya derramado
líquido o hayan caído objetos en el interior del
equipo, si el equipo ha quedado expuesto a la lluvia
o la humedad, si no funciona normalmente, o
cuando se haya caído.
14
Para disminuir el riesgo de descarga eléctrica,
no extraiga la cubierta (o la parte posterior). No
hay piezas sustituibles por el usuario en el
interior. Las reparaciones debe realizarlas
personal cualificado.
Aviso
Para reducir el riesgo de descarga eléctrica,
este aparato no debe quedar expuesto a la lluvia
o humedad, y no deben posarse encima del
mismo objetos llenos de líquido, como floreros.
1.1 MEDIDAS IMPORTANTES
1
2
3
4
5
6
7
Lea estas instrucciones.
Guarde estas instrucciones.
Preste atención a todos los avisos.
Siga todas las instrucciones.
No utilice este equipo cerca del agua.
Límpielo sólo con un paño seco.
No obstruya las aberturas de ventilación. Este equipo
se debe instalar de acuerdo con las instrucciones del
fabricante.
8 No se debe instalar cerca de fuentes de calor como
radiadores, salidas de calor, estufas u otros equipos
(incluidos amplificadores) que produzcan calor.
9 No contravenga el objetivo de seguridad del enchufe
polarizado o provisto de conexión a tierra. Un
Bosch Security Systems | 2004-06
15 La parte posterior del grabador únicamente debe
retirarla personal cualificado de servicio y
mantenimiento.
16 Si la batería se sustituye de un modo inadecuado, se
puede producir una explosión. Hay una batería de
litio dentro de la carcasa del grabador. Sólo se debe
cambiar por otra del mismo tipo o equivalentes.
Deseche la batería sustituida de forma respetuosa
con el medio ambiente.
17 No obstruya las aberturas de ventilación, para evitar
que se sobrecaliente el grabador.
18 No coloque el grabador al lado de una fuente de
calor.
DVR1C1161 | Manual de instalación | Capítulo 2
19 Este equipo no se debe instalar en un espacio
cerrado, como una estantería o un lugar similar.
Limpieza
20 Puede limpiar la unidad con un paño húmedo que
no suelte pelusa o con una gamuza.
Observación
Bosch está firmemente comprometida con la protección
del medio ambiente. Esta unidad se ha diseñado para
ser lo más respetuosa posible con el medio ambiente.
ES | 80
2
Introducción
El videograbador digital DVR1C1161 ofrece funciones
de tecnología avanzada de grabación y reproducción
para sistemas CCTV. Este DVR proporciona una
grabación ininterrumpida en modo continuo o en modo
de lapso de tiempo durante una semana o más. Ya no
hay cintas de vídeo que cambiar ni guardar, y
desaparece el costoso y frecuente mantenimiento de los
aparatos de vídeo tradicionales.
Este DVR puede grabar a una velocidad de hasta 50/60
imágenes por segundo en formatos PAL/NTSC y
reproducir eventos inmediatamente. El DVR incorpora
todas las ventajas de la grabación en vídeo digital, se
instala fácilmente y funciona como un aparato de vídeo
tradicional. La tecnología de compresión altamente
eficaz y una claridad y nivel de detalle superiores de las
imágenes del grabador, hacen que el DVR se integre
perfectamente con una amplia gama de multiplexores.
2.1 Características
•
•
•
•
•
•
•
•
•
•
•
•
•
•
•
•
Bosch Security Systems | 2004-06
Proporciona imágenes de calidad superior.
Grabación de imágenes previa a alarma.
Grabación en tiempo real y por lapso de tiempo.
Velocidad de actualización de hasta 50 imágenes
para PAL y 60 imágenes para NTSC.
Quick Search (Búsqueda rápida) por fecha/hora,
eventos de alarma y lista de grabación.
Reproducción rápida y lenta del vídeo grabado en
varias velocidades.
Menú de configuración en pantalla y temporizador
del sistema.
Protección con contraseña.
Puerto de comunicación RS-232.
Compresión/descompresión de M-JPEG integrada
con calidad configurable.
Capacidad de grabación de sonido.
Programado con varias velocidades por lapso de
tiempo.
Los datos se pueden almacenar en una tarjeta
Compact Flash.
Mando a distancia.
Grabaciones de visualización remota e imágenes en
directo con un explorador basado en Web.
Compatible con multiplexores Bosch y de otras
marcas.
DVR1C1161 | Manual de instalación | Capítulo 2
ES | 81
2.2 Panel frontal
8 Jog Dial (selector):
En el modo de reproducción, gire este anillo para
seleccionar la velocidad de reproducción.
En el modo de pausa, gire el anillo para desplazarse
hacia adelante o hacia atrás imagen a imagen.
En el modo de menú, gire el anillo para navegar por
las páginas del menú o seleccionar valores de datos.
Utilícelo junto con la tecla ENTER (INTRO) para
configurar valores de menú.
1 REC (GRAB.): Pulse esta tecla para empezar la
grabación (la luz roja se enciende cuando la unidad
está en grabación).
2 OSD (VISUALIZACIÓN EN PANTALLA):
- Pulse esta tecla una vez para visualizar la
hora/fecha, el uso del disco y la velocidad de
reproducción.
- Púlsela una segunda vez para visualizar el
tamaño del disco, la posición de grabación y
la posición de reproducción.
- Púlsela una tercera vez para desactivar la
visualización en pantalla.
9 ENTER (INTRO): Pulse esta tecla para confirmar
una selección o un valor de dato modificado.
10 MENU (MENÚ): Pulse esta tecla para acceder al
menú de configuración o abandonarlo.
3 STOP (PARAR): Pulse esta tecla para detener la
11 Ventana del receptor de infrarrojos del mando a
distancia.
grabación o la reproducción.
4 PLAY (REPRODUCIR): Pulse esta tecla para
12 Pantalla LCD
En el modo de espera, muestra la fecha/hora
actuales y la calidad y el ajuste de velocidad para la
grabación normal.
En el modo de grabación, muestra la fecha/hora
actuales y la velocidad de grabación de REC y
actual.
En el modo de reproducción, muestra la fecha/hora
de reproducción y la velocidad de reproducción de
PLAY y actual.
(Para obtener información sobre los mensajes que
se visualizan, consulte la lista de abreviaturas que se
incluye al principio de este manual).
empezar la reproducción.
5 PAUSE (PAUSA): Pulse esta tecla para detener
momentáneamente la imagen reproducida.
6 SEARCH (BÚSQUEDA): Pulse esta tecla para
introducir el menú de búsqueda.
7 Shuttle Ring (anillo Shuttle):
En el modo de reproducción, gire este anillo a la
derecha para aumentar o a la izquierda para reducir
la velocidad de reproducción de avance o de
rebobinado de la imagen.
En el modo de pausa, gire el anillo para hacer
avanzar o retroceder la imagen lentamente.
13 Indicador de alarma: Se ilumina cuando se produce
una alarma.
1
16
15
Bosch Security Systems | 2004-06
14 13
2
3
12
4
5
6
11
10
7
8
9
DVR1C1161 | Manual de instalación | Capítulo 2
ES | 82
14 Indicador de red: Se ilumina cuando se accede a la
red.
2.3.4 Conector de red
Para conectar la unidad a una red, utilice el conector de
red RJ-45 situado en la parte posterior de la unidad.
15 Ranura para tarjeta Compact Flash: Permite
insertar una tarjeta Compact Flash. Pulse el botón
negro situado junto a la ranura para extraer la
tarjeta.
16 COPY (COPIAR): Pulse esta tecla para copiar una
imagen fija o una secuencia de vídeo en la tarjeta
Compact Flash.
2.3 Panel posterior
2.3.1 Consumo
Conecte el cable de alimentación a la toma de corriente
situada en la parte posterior de la unidad. Utilice el
interruptor de alimentación para encender y apagar la
unidad.
2.3.2 Conector serie RS232
Conecte el conector D-Sub de 9 patillas al puerto RS232
si necesita controlar la unidad a distancia.
2.3.3 Conector óptico de IR para el
mando a distancia
2.3.5 Conexiones de alarma
Las entradas ALM-IN (ENTRADA ALARMA) y
ALM-RST (RESTABL. ALARMA) se pueden
configurar en N.O. (normalmente abierta) o N.C.
(normalmente cerrada) en el menú de grabación con
alarma.
GND:
Conexión a tierra.
ALM-IN (ENTRADA ALARMA):
Aplique una señal* aquí para empezar la
grabación con alarma.
ALM-RST (RESTABL. ALARMA):
Aplique una señal* aquí para detener la
grabación con alarma.
REC (GRAB.): Una señal* de solicitud de grabación
externa de alto nivel aplicada a este
contacto inicia la grabación. Cuando la
señal disminuye, la grabación se detiene.
NC1, NC2:
Sin conexiones.
* Señal
- Voltaje de conmutación alto: > 2 Vcc
Si la ventana del receptor de infrarrojos del mando a
distancia situada en la parte frontal permanece oculta a
la vista (por ejemplo, si la unidad se ha instalado en un
armario), conecte el cable opcional de extensión de IR
al conector del mando a distancia. Sitúe el ojo del
receptor de forma que quede a la vista de la unidad de
mando a distancia.
- Voltaje de conmutación bajo: < 0,5 Vcc
- Voltaje de entrada máx.: 12 Vcc
Conector óptico
de IR para el
Conector
RS-232 mando a distancia
Interruptor de alimentación
RS 232
Out2
Monitor Out
Out
Out 1
GND
NC4
VEXT
Conector de alarma
Bosch Security Systems | 2004-06
LAN
Out 2
GND
100-240 Vac
NC3
DISKFULL
VEXT
ALM-CO
ALM-NO
ALM-NC
GND
GND
AC 100-240
Out1
Remote Control
Looping out
GND
Video
In
NC2
S-Video
In
NC1
Mux main
Monitor In
In2
REC
In1
ALM-RST
Audio
Off
ALM-IN
Power
Conector de red
Entradas de alarma
ES | 83
GND
NC4
NC3
DISKFULL
VEXT
ALM-CO
ALM-NO
ALM-NC
GND
GND
NC2
NC1
REC
ALM-RST
ALM-IN
GND
DVR1C1161 | Manual de instalación | Capítulo 2
Salidas de alarma
Las señales de salida de alarma son:
GND:
Conexión a tierra.
ALM-NC**
(ALARMA NORMALMENTE CERRADA):
Cuando se produce una alarma, la
conexión entre este contacto y
ALM-COM está abierta. De lo contrario,
estará cerrada.
ALM-NO**
(ALARMA NORMALMENTE ABIERTA):
Cuando se produce una alarma, la
conexión entre este contacto y
ALM-COM está cerrada. De lo
contrario, estará abierta.
ALM-COM**
(ALARMA COMPUESTA):
Contacto común de alarma.
VEXT:
Señal de sincronización para el
multiplexor.
Voltaje de salida: 5 Vcc
Corriente de salida: 100mA
DISK FULL
(DISCO LLENO):
Señal de salida de alarma de disco lleno.
Voltaje de salida: 5 Vcc
Corriente de salida: 100mA
NC3, NC4:
Sin conexiones.
* * voltaje de contacto máx.: 24 Vcc
corriente de conmutación máx.: 2A cc
Bosch Security Systems | 2004-06
DVR1C1161 | Manual de instalación | Capítulo 2
ES | 84
2.4 Interconexiones
•
Conecte la salida de VCR del multiplexor a la toma
BNC Video In (entrada de vídeo) situada en la parte
posterior del DVR.
• Conecte la entrada de VCR del multiplexor a la
toma BNC Video Out (salida de vídeo) situada en la
parte posterior del DVR.
• Para sincronizar la conmutación con el multiplexor,
conecte las tomas VEXT y GND situadas en la parte
posterior de la unidad al conector del multiplexor.
Una vez realizadas las conexiones, acceda al menú del
sistema para seleccionar el tipo de multiplexor utilizado.
El DVR se puede conectar a una amplia gama de
multiplexores o cuadrantes, o bien conectarse
directamente a una cámara.
2.4.1 Multiplexores
La ilustración que aparece a continuación muestra cómo
conectar un multiplexor al DVR.
•
•
Conecte el monitor a la toma BNC Monitor Out (salida
de monitor) situada en la parte posterior del DVR.
Conecte la salida de monitor principal del
multiplexor a la toma BNC Monitor In (entrada de
monitor) situada en la parte posterior del DVR.
Cámaras
Multiplexor
1
VCR IN VCR OUT
2
4
5
RS 232
Out2
Monitor Out
Out
Out 1
Monitor Out
Monitor
Bosch Security Systems | 2004-06
GND
NC4
NC3
DISKFULL
VEXT
ALM-CO
LAN
Out 2
GND
100-240 Vac
ALM-NO
ALM-NC
GND
GND
GND
AC 100-240
Out1
Remote Control
Looping out
NC2
Video
In
NC1
S-Video
In
REC
Mux main
Monitor In
In2
ALM-RST
Audio
In1
ALM-IN
Power
6
Conector óptico
de IR para el
mando a distancia
Conector
RS-232
Interruptor de alimentación
Off
3
VCR
Monitor
MON B MON A
VEXT
Conector de red
DVR1C1161 | Manual de instalación | Capítulo 2
ES | 85
2.4.2 Cuadrantes
•
Conecte la salida de vídeo del multiplexor a la toma
BNC Video In (entrada de vídeo) situada en la parte
posterior del DVR.
• Desactive el multiplexor en el menú del sistema.
Para conectar un cuadrante con salida de VCR,
compruebe las conexiones de multiplexor.
La ilustración que aparece a continuación muestra cómo
conectar un cuadrante sin salida de VCR al DVR.
•
Conecte el monitor a la toma BNC Monitor Out
(salida de monitor) situada en la parte posterior del
DVR.
Cuadrante
1
2
3
4
Vídeo
Video OUT
RS 232
Out2
Monitor Out
Out
Out 1
Monitor Out
Monitor
Bosch Security Systems | 2004-06
GND
NC4
NC3
DISKFULL
VEXT
ALM-CO
LAN
Out 2
GND
100-240 Vac
ALM-NO
ALM-NC
GND
GND
AC 100-240
Out1
Remote Control
Looping out
GND
Video
In
NC2
S-Video
In
NC1
Mux main
Monitor In
In2
REC
In1
ALM-RST
Audio
Off
ALM-IN
Power
Conector óptico de
IR para el mando a
distancia
Conector
RS-232
Interruptor de alimentación
VEXT
Conector de red
DVR1C1161 | Manual de instalación | Capítulo 2
ES | 86
2.4.3 Una sola cámara
•
La ilustración que aparece a continuación muestra cómo
conectar una sola cámara al DVR.
•
•
Conecte el monitor a la toma BNC Video Out (salida
de vídeo) situada en la parte posterior del DVR.
Conecte la salida de vídeo de la cámara a la toma
BNC Video In (entrada de vídeo) situada en la parte
posterior del DVR.
Conecte la salida de audio de la cámara a la toma
Audio In (entrada de audio) situada en la parte
posterior del DVR.
• Conecte la toma Audio Out (salida de audio) situada
en la parte posterior del DVR a un amplificador de
audio.
Desactive el multiplexor en el menú del sistema.
Video
In
RS 232
Out2
Monitor Out
Out
Out 1
GND
NC4
NC3
DISKFULL
VEXT
ALM-CO
ALM-NO
ALM-NC
GND
GND
GND
AC 100-240
Out1
Remote Control
Looping out
NC2
S-Video
In
NC1
Mux main
Monitor In
In2
REC
Audio
In1
ALM-RST
Power
Conector óptico
de IR para el
mando a distancia
Conector
RS-232
ALM-IN
Audio In
Interruptor de alimentación
Off
Video In
Cámara
LAN
Out 2
GND
VEXT
Video Out
Audio Out
Conector de red
100-240 Vac
Monitor
Bosch Security Systems | 2004-06
DVR1C1161 | Manual de instalación | Capítulo 2
ES | 87
2.5 Unidad de mando a distancia
La unidad de mando a distancia es un accesorio que
facilita el control del DVR a distancia. Mediante el
mando a distancia puede llevar a cabo las funciones
principales.
Las funciones del teclado numérico del DVR son las
siguientes:
0
RECORD
(GRABAR):
STOP
(PARAR):
PLAY
(REPRODUCIR):
SEARCH
(BÚSQUEDA):
REWIND
(REBOBINAR):
STEP REW.
(PASO ATRÁS):
Pulse esta tecla para iniciar la
grabación.
Pulse esta tecla para detener la
grabación o la reproducción.
Pulse esta tecla para iniciar la
reproducción.
BOSCH
Aumenta la velocidad x2, x4, x8,
x16, x32, x640, x2. . .
En el modo de reproducción,
pulse esta tecla para invertir la
dirección de reproducción (la
tecla de búsqueda aumenta la
velocidad en dirección inversa).
Pulse esta tecla para detener la
reproducción. Vuelva a pulsarla
para retroceder imagen a
imagen.
STEP FORW.
(PASO ADELANTE): Pulse esta tecla para detener la
reproducción. Vuelva a pulsarla
para avanzar imagen a imagen.
FORWARD
(HACIA ADELANTE):Durante la reproducción inversa,
pulse esta tecla para iniciar la
reproducción hacia adelante (la
tecla de búsqueda aumenta la
velocidad en dirección inversa).
Bosch Security Systems | 2004-06
Botones de control de DVR
2.6 Redes
La conexión de red utiliza el estándar 10BaseT.
Asegúrese de que la tarjeta de red admite este estándar.
Si conecta el DVR directamente a un PC, utilice un
cable de red CAT5 de transmisión. Si conecta el DVR a
un enrutador o concentrador, utilice un cable CAT5
recto.
Para que el software remoto funcione correctamente,
deben abrirse los siguientes puertos :
• Puerto TCP 80:Servidor Web
• Puerto TCP 6666:Comandos
• Puertos TCP 1111, 2222, 3333 y 4444:Datos de vídeo
Si se conecta a través de un cortafuegos, confirme con el
administrador de red si puede acceder a la unidad.
DVR1C1161 | Manual de instalación | Capítulo 3
3
Funcionamiento
3.1 Instalación rápida
En el modo de instalación rápida, puede cambiar
rápidamente la fecha, la hora, la calidad de grabación y
el ajuste de IPS mediante la pantalla LCD y el selector.
• Pulse la tecla de menú durante 5 segundos para
acceder al modo de instalación rápida. El año
parpadeará en la pantalla LCD.
• Gire el selector para cambiar el año y, a
continuación, pulse la tecla ENTER (INTRO). El
mes parpadeará en la pantalla LCD.
• Continúe utilizando el selector y la tecla ENTER
para establecer todos los valores que se visualizan en
la pantalla LCD. Cuando haya establecido el último
valor, el DVR volverá a su modo normal de
funcionamiento.
• Para salir del menú de instalación rápida, pulse la
tecla SEARCH (BÚSQUEDA).
3.2 Grabación instantánea
Pulse la tecla Record (Grabar) para iniciar la grabación
inmediatamente (las imágenes se grabarán en el disco
duro).
• La velocidad y la calidad de grabación se establecen
en los menús de grabación normal y grabación con
alarma.
• En la pantalla LCD aparece REC (GRAB.).
Pulse la tecla Stop (Parar) para detener la grabación.
• Esta tecla sólo se puede activar en el modo de
grabación.
• Cuando el disco duro está lleno, el DVR detiene la
grabación automáticamente o sobrescribe desde el
principio del disco duro en función del ajuste del
menú de ajuste del sistema.
3.3 Grabación con alarma
La imagen del monitor se graba automáticamente
cuando se produce una alarma y detiene la grabación al
final del período de duración de la alarma. Al
producirse una alarma, se detienen la grabación
instantánea y la grabación con temporizador. Si la
unidad está grabando en ese momento, la calidad de la
grabación no cambia para la grabación con alarma.
Establezca las opciones para grabación con alarma en el
menú de grabación de alarma.
Bosch Security Systems | 2004-06
ES | 88
3.3.1 Grabación previa a alarma
Un búfer de 220 imágenes (por ejemplo, 9 seg. a 25 IPS
o 220 seg. a 1 IPS) se utiliza para efectuar una captura
previa de vídeo para grabar imágenes antes de que se
dispare la alarma. La grabación previa a alarma sólo se
produce si la unidad no está grabando durante el
período previo a la alarma. La calidad de grabación en
el período previo a la alarma es la misma que la calidad
de grabación anterior a que se produzca la alarma. Si el
grabador no está grabando antes de que se produzca la
alarma, la calidad de grabación en el período previo a la
alarma es la misma que la calidad de grabación normal.
3.4 Reproducción normal
Reproducción
• Pulse la tecla PLAY (REPRODUCIR) para iniciar la
reproducción de la imagen/sonido guardados desde
el último segmento.
• Pulse la tecla STOP (PARAR) para detener la
reproducción.
Avance rápido
• Pulse la tecla PLAY (REPRODUCIR) para iniciar la
reproducción.
• Gire el anillo Shuttle a la derecha para iniciar la
reproducción de avance rápido. La velocidad
aparece en la pantalla (velocidad de reproducción
normal, x2, x4, x8, x16, x32, x640).
Reproducción inversa
• Pulse la tecla PLAY (REPRODUCIR) para iniciar la
reproducción.
• Gire el anillo Shuttle a la izquierda para iniciar la
reproducción inversa rápida. La velocidad aparece
en la pantalla (velocidad de reproducción normal,
x2, x4, x8, x16, x32, x640).
Reproducción lenta hacia adelante
• Pulse la tecla Pause (Pausa) para congelar la imagen
reproducida.
• Gire el anillo Shuttle a la derecha para iniciar la
reproducción de avance lento. La velocidad se
muestra en la pantalla (>1/2, 1/4, 1/8, 1/16, 1/32,
1/64).
Reproducción inversa lenta
• Pulse la tecla Pause (Pausa) para congelar la imagen
reproducida.
DVR1C1161 | Manual de instalación | Capítulo 3
•
Gire el anillo Shuttle a la izquierda para iniciar la
reproducción inversa lenta. La velocidad se visualiza
en la pantalla (<1/2, 1/4, 1/8, 1/16, 1/32, 1/64).
Bloqueo de la velocidad visualizada
• Para bloquear la velocidad que aparece, pulse la
tecla Enter (Intro) y, a continuación, suelte el anillo
Shuttle. Si vuelve a girar el anillo Shuttle, la
velocidad vuelve al estado de reproducción normal.
Avance de imagen hacia adelante/inverso
• Pulse la tecla Pause (Pausa) para congelar la imagen.
• Gire el selector a la derecha para hacer que la
imagen avance de una en una.
• Gire el selector a la izquierda para hacer que la
imagen retroceda de una en una.
• La velocidad de imagen aumenta si el selector se
gira rápidamente.
3.5 Reproducción de búsqueda
Reproducción de búsqueda por segmentos
• Pulse la tecla Search (Búsqueda) para acceder al
menú del mismo nombre.
• Mueva el cursor hasta POR LISTA SEGMENTO y
pulse la tecla Enter (Intro) para seleccionar la
búsqueda de archivos.
• Mueva el cursor hasta el segmento que desea
reproducir (pAlarm: grabación previa a alarma,
Temporizador: grabación con temporizador).
• Si la lista de selección está llena, gire el selector a la
derecha para elegir la lista de la página siguiente.
• Pulse Enter (Intro) para iniciar la reproducción.
Reproducción de búsqueda por alarmas
• Pulse la tecla Search (Búsqueda) para acceder al
menú del mismo nombre.
• Mueva el cursor hasta POR LISTA DE EVENTOS y
pulse la tecla Enter (Intro) para seleccionar la
búsqueda de alarmas.
• Mueva el cursor para seleccionar la imagen con
alarma que desea reproducir.
• Si la lista de selección está llena, gire el selector a la
derecha para elegir la lista de la página siguiente.
• Pulse Enter (Intro) para iniciar la reproducción de las
imágenes con alarma.
• La imagen con alarma se reproduce a partir del
período previo a la alarma y se detiene al final de la
duración de ésta.
Bosch Security Systems | 2004-06
ES | 89
Reproducción de búsqueda por fecha/hora
• Pulse la tecla Search (Búsqueda) para acceder al
menú del mismo nombre.
• Mueva el cursor hasta POR FECHA/HORA pulse la
tecla Enter (Intro) para seleccionar la búsqueda de
archivos.
• Mueva el cursor hasta el valor que desea seleccionar
y pulse la tecla Enter (Intro).
• Gire el selector para aumentar o reducir el valor y
pulse Enter (Intro).
• Mueva el cursor hasta INICIAR BÚSQUEDA Y
REPRODUCIR y pulse la tecla Enter (Intro) y la
reproducción se iniciará a partir de la fecha/hora
establecidas en el menú.
Si no hay ninguna imagen almacenada con la fecha/
hora especificadas, la unidad iniciará automáticamente
la reproducción desde la hora establecida más próxima.
3.6 Copia
Introduzca una tarjeta Compact Flash (del tipo I o II) en
su ranura del panel frontal. Al insertar la tarjeta
Compact Flash, asegúrese de hacerlo en la dirección
correcta. Utilice sólo tarjetas Compact Flash con una
capacidad de 16 MB o superior.
La función de copia de la tarjeta Compact Flash se ha
creado para copiar secuencias de vídeo cortas. Una
secuencia de vídeo de larga duración puede necesitar un
tiempo considerable para copiarse.
Nota
Para mejorar la legibilidad de los mensajes de copia,
pulse la tecla OSD (VISUALIZACIÓN EN
PANTALLA). Púlsela de nuevo si desea salir del
segundo plano.
3.6.1 Copia de una imagen fija
•
•
•
•
•
Pulse la tecla Play (Reproducir) para iniciar la
reproducción.
Pulse la tecla Pause (Pausa) para congelar la imagen.
Gire el selector a derecha o izquierda para
desplazarse hasta la imagen deseada.
Pulse la tecla Copy (Copiar) para acceder al modo
de copia.
Gire el selector para seleccionar la imagen de la
cámara deseada.
DVR1C1161 | Manual de instalación | Capítulo 3
•
•
•
Mientras se visualiza la imagen, pulse la tecla Copy
(Copiar) de nuevo. El mensaje "Copiando…"
aparecerá en la pantalla durante el proceso. El
mensaje "Correcto" y la identificación del archivo
aparecerán en la pantalla una vez que el archivo se
haya copiado.
Pulse la tecla STOP (PARAR) para cancelar la copia.
Pulse la tecla Play (Reproducir) para reanudar la
reproducción.
Las imágenes copiadas se guardan como una imagen
individual con formato de archivo JPG.
3.6.2 Copia en un archivo de película
•
•
•
•
•
•
•
Pulse la tecla Play (Reproducir) para iniciar la
reproducción.
Pulse la tecla Copy (Copiar) para acceder al modo
de copia.
Gire el selector para elegir la cámara deseada.
Mientras se visualiza la imagen, pulse la tecla Copy
(Copiar) de nuevo. El mensaje "Copiando…"
aparecerá en la pantalla durante el proceso.
Pulse la tecla STOP (PARAR) para finalizar la
operación de copia.
El mensaje "Correcto" y la identificación del archivo
aparecerán en la pantalla una vez que el archivo se
haya copiado.
Pulse la tecla Play (Reproducir) para reanudar la
reproducción.
Las imágenes copiadas se almacenarán como una
imagen de película con formato de archivo MOV.
3.7 Ajuste del bloqueo de
seguridad
Pulse la tecla REC (GRAB.) durante más de 5 segundos
en el modo de grabación para bloquear todas las teclas
del panel frontal. (Para que esta función se active, debe
establecerse una contraseña en el menú de ajuste del
sistema).
Al pulsar la tecla Stop (Parar), el sistema solicita la
contraseña. Si introduce la contraseña adecuada, se
liberarán las teclas bloqueadas.
Bosch Security Systems | 2004-06
ES | 90
DVR1C1161 | Manual de instalación | Capítulo 4
4
Configuración de menú
Una vez que el sistema se ha conectado de la forma
descrita:
• Encienda la unidad.
• La pantalla se iluminará si la alimentación es
normal.
• Espere unos instantes hasta que el sistema se cargue.
• Pulse la tecla de menú para acceder al MENÚ
PRINCIPAL.
Cuando el menú principal aparezca, verá los diferentes
submenús en los que puede modificar los ajustes.
Para navegar por estos menús, gire el selector a la
derecha o a la izquierda para poder desplazarse por los
submenús. Pulse la tecla ENTER (INTRO) para abrir
un submenú. Desde los submenús, continúe utilizando
el selector y la tecla ENTER (INTRO) para desplazarse
entre los elementos y los valores, y realizar selecciones.
Para volver al menú principal, desplácese a la parte
inferior de cada submenú hasta el elemento MENÚ
PRINCIPAL y selecciónelo con la tecla Intro.
4.1 Menú principal
0(1Ò35,1&,3$/
5(/2-,',20$!
*5$%$&,Ï11250$/!
*5$%$&,Ï1&21$/$50$!
7(0325,=$'25!
=80%$'25!
$5&+,92!
5('!
&21),*85$&,Ï1'(/6,67(0$!
4.2 Menú Reloj/idioma
0(1Ò5(/2-,',20$
)(&+$
+25$
)250$72'()(&+$
,',20$'(/0(1Ò
''00$$$$
,1*/e6
0(1Ò35,1&,3$/!
Bosch Security Systems | 2004-06
ES | 91
FECHA: Año: 2000~2099 Mes: 01~12 Fecha: 01~31
HORA: Hora: 00~23 Minuto : 00~59 Segundo: 00~59
FORMATO DE FECHA: Establece el orden de visualización para Año
(AAAA), Mes (MM) y Día (DD)
IDIOMA DEL MENÚ: Inglés, alemán, francés, español, italiano,
portugués, neerlandés y polaco.
MENÚ PRINCIPAL: Permite volver al menú principal.
4.3 Menú de grabación normal
0(1Ò*5$%$&,Ï11250$/
9(/2&,'$'
*5$%$&,Ï1
&$/,'$'*5$%$&,Ï1
,36
7,(032'(
*5$%$&,Ï1
+25$6
(67È1'$5
0(1Ò35,1&,3$/!
VELOCIDAD: Permite seleccionar la velocidad de grabación de 0,1 a
25/30 IPS.
CALIDAD: Existen cuatro niveles de calidad para grabar.
MÁS BAJA: 15 KB
BAJA: 20 KB
BÁSICA: 25 KB
ESTÁNDAR: 30 KB
ALTA: 35 KB
SUPERIOR: 40 KB
TIEMPO DE GRABACIÓN: Muestra una estimación del tiempo de
grabación disponible en el disco para la calidad y velocidad
seleccionadas.
4.4 Menú Grabación con alarma
0(1Ò*5$%$&,Ï1&21$/$50$
)81&,21$0,(172$/$50$
9(/2&,'$'*5$%$&,Ï1
&$/,'$'*5$%$&,Ï1
7,32(175$'$$/$50$
7,325(67$%/$/$50$
'85$&,Ï1$/$50$
$&7
,36
(67È1'$5
12
12
6(*
)81&,21$07235($/$50$ $&7
9(/2&,'$'*5$%$&,Ï1
,36
0(1Ò35,1&,3$/
!
FUNCIONAMIENTO ALARMA:
ACT: Graba cuando se produce una alarma.
DES : No graba cuando se produce una alarma.
DVR1C1161 | Manual de instalación | Capítulo 4
VELOCIDAD GRABACIÓN: Velocidad de grabación durante el tiempo
que dura la alarma.
La velocidad máxima de grabación es 50/60 IPS
(PAL/NTSC).
La velocidad mínima de grabación es 0,1 IPS.
CALIDAD GRABACIÓN: Calidad de grabación de la imagen cuando
se produce una alarma.
MÁS BAJA: 15 KB
BAJA: 20 KB
BÁSICA: 25 KB
ESTÁNDAR: 30 KB
ALTA: 35 KB
SUPERIOR: 40 KB
TIPO ENTRADA ALARMA:
N.O.: Normalmente abierta
N.C.: Normalmente cerrada
TIPO RESTABL. ALARMA:
N.O.: Normalmente abierta
N.C.: Normalmente cerrada
DURACIÓN ALARMA: La grabación con alarma se inicia cuando se
produce la alarma y se detiene al final de la misma o cuando
se activa el reajuste de alarma. La duración máxima es
ilimitada y la mínima es 10 segundos.
FUNCIONAMTO PRE-ALARMA:
ACT: Graba la imagen con velocidad de grabación previa a
alarma durante el período previo a alarma.
DES: No se produce ninguna grabación previa a alarma
antes de que se produzca la alarma.
VELOCIDAD GRABACIÓN: La velocidad de grabación durante el
período previo a alarma.
La velocidad máxima de grabación es 50/60 IPS
(PAL/NTSC).
La velocidad mínima de grabación es 0,1 IPS.
Nota
Si la alarma se produce en el modo de espera o el de
grabación normal, la calidad de grabación es la misma
que la calidad de grabación normal. Si la alarma se
produce en el modo de grabación con temporizador, la
calidad de grabación es la misma que el valor
establecido en la calidad de grabación con
temporizador.
4.5 Menú de temporizador
La imagen monitorizada puede grabarse
automáticamente estableciendo las horas de inicio y fin
en el MENÚ TEMPORIZADOR. Existen 15 entradas
que permiten realizar una planificación de la grabación
para un día determinado o un grupo de días de la
semana. Desplácese hasta una entrada y pulse Intro
para seleccionar el día.
Por ejemplo, si programa lo siguiente:
INICIO 09:00, FIN 23:59
La grabación se iniciará a las 09:00:00 horas y se
detendrá a las 23:59:59 horas.
Para detener una grabación con temporizador mientras
está en curso, pulse la tecla STOP (PARAR) para
Bosch Security Systems | 2004-06
ES | 92
acceder al MENÚ TEMPORIZADOR y establezca el
valor en DES.
0(1Ò7(0325,=$'25
',$,1,&),19(/2&&$/,'$''()
'20+(67È1'$5'(6
/81+(67È1'$5'(6
/9+(67È1'$5'(6
6'+(67È1'$5'(6
/'+(67È1'$5'(6
/81+(67È1'$5'(6
0$5+(67È1'$5'(6
9,(+(67È1'$5'(6
-8(+(67È1'$5'(6
0,e+(67È1'$5'(6
6È%+(67È1'$5'(6
'20+(67È1'$5'(6
0(1Ò35,1&,3$/!
DÍA: Permite seleccionar el día o grupo de días para el temporizador.
L-D: diario
L-V: de lunes a viernes
S-D: sábado y domingo
Días sueltos de la semana
INIC: Introduzca la hora de inicio para la grabación con temporizador.
FIN: Introduzca la hora de fin para la grabación con temporizador.
La hora de fin debe ser posterior a la hora de inicio.
(p.ej., INICIO 16.00, FIN 03.00 no es correcto
INICIO 16.00, FIN 00.00 no es correcto
INICIO 16.00, FIN 23.59 es correcto)
VELOC.: Cuando FORMATO VELOCIDAD se establece por horas, la
velocidad de grabación se puede establecer desde 4/6
(NTSC/PAL) HR hasta 960 HR.
Cuando FORMATO VELOCIDAD se establece en IPS, la
velocidad de grabación se puede establecer desde
0,1~30/0,1~25(NTSC/PAL) IPS.
CALIDAD: Existen seis niveles de calidad de la imagen de grabación.
MÁS BAJA: 15 KB
BAJA: 20 KB
BÁSICA: 25 KB
ESTÁNDAR: 30 KB
ALTA: 35 KB
SUPERIOR: 40 KB
DEF:
Se establece en ACT cuando se utiliza la grabación con
temporizador.
Se establece en DES cuando no se utiliza la grabación con
temporizador.
En el modo de grabación con temporizador, la pantalla
muestra la fecha/hora del temporizador y la velocidad
de grabación del temporizador aparecen debajo de
T.REC.
DVR1C1161 | Manual de instalación | Capítulo 4
No es posible cambiar el nivel de calidad de la
grabación continua. Por ejemplo:
Segmento 1 08:30~17:00
Segmento 2 17:00~23:59
Segmento 1 y Segmento 2 se tratan como grabación
continuada 08:30~23:59.
Si necesita establecer diferentes niveles de calidad,
defínalos de la forma siguiente:
Segmento 1 08:30~16:59
Segmento 2 17:00~23:59
4.6 Menú Zumbador
0(1Ò=80%$'25
)81&,21$0,(172
=80%$'25
(175$'$$/$50$
(175$'$*5$%$&,Ï1
',6&2//(12
3e5','$'(9Ë'(2
7(0325,=$'25
$&7
0(1Ò35,1&,3$/
!
$&7
$&7
$&7
$&7
'(6
FUNCIONAMIENTO ZUMBADOR:
ACT: Permite activar el zumbador.
DES: Permite desactivar el zumbador.
Nota: Pulse la tecla Intro para activar/desactivar en el modo de
grabación/reproducción.
ENTRADA ALARMA: ACT - El zumbador suena cuando se produce la
alarma.
ENTRADA GRABACIÓN: ACT - El zumbador suena cuando la señal
Record-IN se aplica al terminal Record-IN.
DISCO LLENO: ACT - El zumbador suena cuando el disco está casi
lleno (99,7%).
PÉRDIDA DE VÍDEO: ACT - El zumbador suena cuando la señal de
vídeo se pierde.
TEMPORIZADOR: ACT - El zumbador suena cuando se produce la
grabación con temporizador.
4.7 Menú Archivo
TAMAÑO IMAGEN: Permite seleccionar el tamaño de la imagen para
copiarla en una tarjeta CF.
Tamaño grande: 720x576 (PAL), 720x480 (NTSC)
Tamaño pequeño: 352x288 (PAL), 352x240 (NTSC)
VISUALIZAR HORA:
ACT: El sello de hora aparece en la imagen cuando ésta se
copia en una tarjeta CF.
DES: El sello de hora no aparece en la imagen cuando ésta
se copia en una tarjeta CF.
POSICIÓN HORA:
INFERIOR: El sello de hora aparece en la parte inferior
SUPERIOR: El sello de hora aparece en la parte superior
MARCA DE AGUA:
ACT: La marca de agua aparece en la imagen cuando ésta
se copia en una tarjeta CF.
DES: La marca de agua no aparece en la imagen cuando
ésta se copia en una tarjeta CF.
POSICIÓN MARCA DE AGUA:
INFERIOR: La marca de agua aparece en la parte inferior.
SUPERIOR: La marca de agua aparece en la parte superior.
4.8 Menú de red
0(1Ò5('
',5(&&,Ï1,3
',50È6&5('
',5*$7(:$<
&21),*85$5868$5,2 !
&21),*85$5868$5,2 !
&21),*85$5868$5,2 !
0(1Ò35,1&,3$/
!
DIRECCIÓN IP: Introduzca la dirección IP de la unidad en el sistema
de red.
DIR. MÁSC. RED: Introduzca la máscara de red de la unidad en el
sistema de red.
DIR. GATEWAY: Introduzca la dirección de la puerta de acceso de la
unidad en el sistema de red.
CONFIGURAR USUARIO: Se pueden configurar hasta tres nombres
de usuario y contraseñas. Hay un menú de configuración
para cada uno de los tres usuarios.
&21),*85$5868$5,2
0(1Ò$5&+,92
7$0$f2,0$*(1
9,68$/,=$5+25$
326,&,Ï1+25$
0$5&$'($*8$
326,&,Ï10$5&$'(
$*8$
;
$&7
,1)(5,25
$&7
,1)(5,25
0(1Ò35,1&,3$/
!
Bosch Security Systems | 2004-06
ES | 93
120%5('(868$5,2
&2175$6(f$'(
868$5,2
1,9(/'(868$5,2
$'0,1BBB
$'0,1BBB
0(1Ò5('
0(1Ò35,1&,3$/
!
!
683(5
DVR1C1161 | Manual de instalación | Capítulo 4
La página de inicio de sesión del videograbador digital
DVR aparecerá en la pantalla del PC cuando conecte
éste al videograbador. El menú Configurar usuario
permite al administrador establecer el nombre de
usuario y la contraseña de inicio, y el nivel de acceso. El
sistema dispone de tres niveles de acceso diferentes:
• El acceso SUPER permite ver vídeo de
reproducción/en directo y controlar el
funcionamiento de DVR.
• El acceso GENERAL permite ver vídeo en directo y
de reproducción.
• El acceso INVITADO sólo permite ver vídeo en
directo.
Es posible realizar hasta cuatro conexiones al mismo
tiempo (1 nombre de usuario y contraseña compartidos).
4.9 Menú de ajuste del sistema
0(1Ò&21),*85$&,Ï1'(/6,67(0$
$&7,9$5&2175$6(f$
&2175$6(f$
12
(175$'$9Ë'(2
*5$%$&,Ï1&21$8',2
5(352'&21$8',2
5(352'&21$8',2
08/7,3/(;25
/Ë1($'(/&Ï',*2
&$032
&2038(67$
'(6
$&7
$&7
%RVFK/7&
',6&2//(12
)250$729(/2&,'$'
6,67(0$'(9Ë'(2
5((6&5,%,5
(1,36
3$/
%255$5',6&2
$&78$/,=$&,Ï1'(/
6,67(0$
&$5*$59$/25(6
35('(7(50,1$'26
5(129$5&)
!
!
!
!
0(1Ò35,1&,3$/
!
ACTIVAR CONTRASEÑA:
SÍ: Se requiere contraseña para acceder al menú.
NO: No se requiere contraseña para acceder al menú.
CONTRASEÑA:
Cuando ACTIVAR CONTRASEÑA se establece en SÍ, se
requiere una contraseña para acceder al menú. El código
está formado por seis dígitos comprendidos del 1 al 5.
Bosch Security Systems | 2004-06
ES | 94
Si ha activado la contraseña, siempre que pulse el botón
Menú en el modo en directo o el botón Parar en el modo de
grabación, el sistema le solicitará que introduzca la
contraseña. Por tanto, asegúrese de anotar la contraseña.
ENTRADA VÍDEO
COMPUESTA: Permite seleccionar la entrada de vídeo del
conector BNC.
S-VÍDEO: Permite seleccionar la opción S-VÍDEO del
conector S-VÍDEO.
GRABACIÓN CON AUDIO: ACT/DES: Permite grabar con o sin
audio.
REPROD. CON AUDIO 1 / REPROD. CON AUDIO 2:
ACT/DES: Permite realizar la reproducción con o sin audio.
La grabación y reproducción de audio sólo es posible en el
modo de tiempo real con una velocidad de 1IPS o superior.
(La velocidad de reproducción es la misma que la de
grabación).
MULTIPLEXOR:
Seleccione el tipo de multiplexor conectado al DVR. Si no
aparece en la lista, seleccione DESCONOCIDO.
Cuando se selecciona un multiplexor, la entrada de vídeo del
conector MUX MAIN MONITOR situado en el panel posterior
se desvía a SALIDA MONITOR cuando el grabador no está
en el modo de menú.
Si sólo se ha conectado una cámara al DVR, seleccione DES.
Ahora la salida de monitor principal es la misma que el
conector de salida de vídeo en todo momento.
LÍNEA DEL CÓDIGO CAMPO:
Si configura el tipo de multiplexor como DESCONOCIDO,
puede ajustar el valor de la línea del código de campo del
multiplexor conectado entre 0 y 20. El valor predeterminado
(13) es adecuado para la mayoría de multiplexores. Si la línea
del código de campo aparece en la parte superior de los
canales de reproducción, reduzca el valor. Si los
multiplexores no reproducen correctamente, aumente el
valor.
DISCO LLENO:
DETENER: Cuando el disco está lleno, el equipo interrumpe
la grabación.
REESCRIBIR: Cuando el disco está lleno, el vídeo actual
reescribe el vídeo existente desde el principio del disco duro.
FORMATO VELOCIDAD: Seleccione la velocidad de grabación por
IPS (imágenes por segundo) o por horas.
SISTEMA DE VÍDEO: Seleccione el sistema de vídeo NTSC o PAL
(para activarlo es necesario reinicializar la unidad).
BORRAR DISCO:
Pulse Enter (Intro) para borrar todas las grabaciones del
disco duro.
El cuadro de diálogo de confirmación aparecerá en la pantalla.
Seleccione Sí o No y, a continuación, pulse ENTER (INTRO).
ACTUALIZACIÓN DEL SISTEMA:
Pulse Enter (Intro) para actualizar o no el sistema.
SÍ: Copie el archivo de actualización en la tarjeta Compact
Flash del PC y, a continuación, introduzca la tarjeta en la
ranura. Pulse la tecla Enter (Intro) para actualizar el sistema.
Una vez que el sistema se haya actualizado
satisfactoriamente, asegúrese de reinicializar la unidad para
activar los valores.
CARGAR VALORES PREDETERMINADOS:
Pulse Enter para cargar o no los valores predeterminados de
fábrica.
SÍ: El cuadro de diálogo de configuración aparece en la
pantalla.
Seleccione Sí o No y, a continuación, pulse ENTER (INTRO).
DVR1C1161 | Manual de instalación | Capítulo 4
RENOVAR CF:
SÍ: Formatea la tarjeta Compact Flash.
NO: No formatea la tarjeta Compact Flash.
4.10 Menú contraseña
Si la protección con contraseña está activa, al intentar
abrir un menú o detener la grabación aparecerá un
menú de contraseña en la pantalla. Debe introducir una
contraseña utilizando las siguientes teclas:
REC (GRAB) : 1
OSD
:2
PARAR
:3
REPRODUCIR : 4
PAUSA
:5
Bosch Security Systems | 2004-06
ES | 95
DVR1C1161 | Manual de instalación | Capítulo 5
5
Vista a través de
Internet/Intranet
5.1 Inicio de sesión
Abra su explorador de Internet e introduzca la dirección
IP de red (por ejemplo, http://192.168.10.5). Debe ser la
misma que ha establecido en el menú de red de DVR.
5.2 Pantalla principal
El icono que aparece en la parte inferior de la pantalla
permite salir del sistema. En la parte inferior de la
pantalla también aparece información relativa al estado
del sistema. Asimismo, se muestra el estado del sistema
y la fecha/hora actuales.
Los iconos de la derecha permiten seleccionar las
cámaras y determinan cómo aparecerán en la pantalla.
Los controles de reproducción también se sitúan a la
derecha. La función de búsqueda permite seleccionar
un clip para reproducir. Si un icono aparece atenuado,
Bosch Security Systems | 2004-06
ES | 96
La página de inicio de sesión de DVR aparecerá en la
pantalla. Debe introducir el nombre de usuario y
contraseña correctos tal y como se han establecido en el
menú de red de DVR. (De forma predeterminada,
introduzca ADMIN para el nombre de usuario y la
contraseña y, a continuación, haga clic en Submit
(Enviar) para acceder al sistema).
indica que la función específica a la que hace referencia
no es accesible desde el modo actual.
Nota
La velocidad de actualización de las imágenes en
directo dependerá de la velocidad de grabación que se
seleccione cuando la unidad está en modo de grabación
(p.ej., si la grabación se ha establecido en 0,5 IPS la
velocidad de actualización será de 2 segundos por
imagen de cámara).
DVR1C1161 | Manual de instalación | Capítulo 5
ES | 97
No es posible visualizar imágenes en directo cuando el
grabador está reproduciendo. El sistema mostrará el
mensaje de estado SERVIDOR EN
REPRODUCCIÓN. Para visualizar imágenes en
directo, primero debe detener la reproducción del
propio grabador.
5.2.1 Color de los mensajes de estado
•
El color de los mensajes de estado indica si está
trabajando local o remotamente. Si está trabajando
localmente, los mensajes serán de color amarillo. Si
controla el DVR directamente (es decir, ha seleccionado
el icono CONTROL), los mensajes serán de color verde.
•
•
•
5.2.2 Iconos del modo en directo
En el modo de visualización, los iconos de cámara,
visualización de cámara y el icono de reproducción
están activados.
•
•
5.2.3 Iconos del modo de reproducción
Seleccione el icono Play (Reproducción) para cambiar a
ese modo.
• STOP (PARAR): Pulse este icono para detener la
visualización de vídeo.
Bosch Security Systems | 2004-06
•
PLAY (REPRODUCIR): Reproduce la visualización
de vídeo.
PLAY REV. (REPRODUCCIÓN INVERSA):
Invierte la visualización de vídeo.
STEP Forward (PASO ADELANTE): Permite
avanzar la visualización de vídeo.
STEP Backward (PASO ATRÁS): Permite retroceder
la visualización de vídeo.
PAUSE (PAUSA): Pulse este icono para detener la
visualización de vídeo.
CONTROL: Pulse este icono para cambiar al modo
de control remoto directo (sólo disponible con el nivel
de acceso SUPER). A partir de ese momento puede
iniciar o detener directamente la reproducción y la
grabación en el DVR de forma remota.
Control para la velocidad de reproducción.
DVR1C1161 | Manual de instalación | Capítulo 5
5.2.4 Buscar
El sistema proporciona tres formas de buscar un vídeo
para reproducción:
• Reproducir el vídeo seleccionado por lista de
segmentos.
• Reproducir el vídeo seleccionado por lista de
alarmas.
• Reproducir el vídeo seleccionado por fecha/hora.
Los elementos que aparezcan en la lista se pueden
seleccionar con un clic del ratón. Haga clic en PLAY
(REPRODUCIR) para reproducir el vídeo
seleccionado.
Bosch Security Systems | 2004-06
ES | 98
DVR1C1161 | Manual de instalación | Capítulo 6
6
ES | 99
Especificaciones
6.1 Interfaz RS-232
El DVR se puede controlar a través de un ordenador o
terminal mediante un conector estándar RS-232 D-SUB
de 9 patillas.
&Ï',*2)81&,Ï1
$6&,,
7HFOD
QXPpULFDGHO
SDQHOIURQWDO
.
,QLFLDUJUDEDFLyQ
5(&
.
3DUDUODJUDEDFLyQ 6723
\ODUHSURGXFFLyQ
.
5HSURGXFLU
.
5HDOL]DUXQDSDXVD 3$86(
HQODLPDJHQ
UHSURGXFLGD
3DWLOOD
'95&
1&VLQ
FRQH[LyQ
7;'
3DWLOOD
+267
1&VLQ
FRQH[LyQ
5;'
5;'
7;'
1&VLQ
FRQH[LyQ
'75
.
*5281'
720$'(
7,(55$
1&VLQ
FRQH[LyQ
1&VLQ
FRQH[LyQ
1&VLQ
FRQH[LyQ
9
5HSURGXFFLyQGH
E~VTXHGD
.
&RSLDUODLPDJHQHQ &23<
XQDWDUMHWD&)
.
9LVXDOL]DFLyQHQ
SDQWDOOD
',63/$<
.
&RQILUPDU
VHOHFFLyQ
(17(5
.
$FFHGHUDOPHQ~GH 0(18
FRQILJXUDFLyQ
.
.
9HORFLGDGGH
UHSURGXFFLyQ
LQYHUVDUiSLGD
*5281'
720$'(
7,(55$
'65
576
&76
1&VLQ
FRQH[LyQ
El ajuste de transmisión es de 9600 baudios de
velocidad, 8 bits de datos, 1 bit de inicio, 1 bit de parada
y sin paridad.
6.1.1 Protocolo de control RS-232
Para controlar la unidad, puede utilizar un ordenador o
un terminal enviando comandos de tres caracteres
ASCII a través del conector RS232; estos comandos de
caracteres ASCII empiezan por 'K' o 'k'. Existen 30
comandos ASCII asignados a las 30 teclas numéricas
del panel frontal. Los 30 comandos ASCII se muestran
en la tabla siguiente.
Bosch Security Systems | 2004-06
3/$<
6($5&+
;
. 9HORFLGDGGH
.
UHSURGXFFLyQ
UiSLGD
!!;
.
5HERELQDUOD
LPDJHQILMD
-2*5(:
.
$YDQ]DUODLPDJHQ -2*))
ILMD
DVR1C1161 | Manual de instalación | Capítulo 6
ES | 100
6.2 Tiempo de grabación
Tiempos de grabación aproximados en horas, sin audio,
cuando se utiliza un disco duro de 160 GB.
PAL
Velocidad de
grabación (IPS)
50
25
12
8
5
2
1,6
1,0
0,5
0,2
0,1
Más baja
(15KB)
60
120
240
360
590
1420
1900
3000
5900
14800
29600
Calidad de la imagen (Promedio del tamaño de archivo)
Baja
Básica
Estándar
Alta
(20KB)
(25KB)
(30KB)
(35KB)
Tiempo de grabación aproximado
Horas
44
36
30
25
90
70
60
50
180
140
120
100
270
210
180
150
440
360
300
250
1070
850
710
610
1420
1140
950
810
2200
1800
1500
1300
4400
3600
3000
2500
11100
8900
7400
6300
22200
17800
14800
12700
Superior
(40KB)
22
44
90
130
220
530
710
1100
2200
5600
11100
NTSC
Velocidad de
grabación (IPS)
60
30
20
10
5
2
1,5
1,0
0,5
0,2
0,1
Más baja
(15KB)
50
100
150
300
590
1480
1980
3000
5900
14800
29600
Calidad de la imagen (Promedio del tamaño de archivo)
Baja
Básica
Estándar
Alta
(20KB)
(25KB)
(30KB)
(35KB)
Tiempo de grabación aproximado
Horas
37
30
25
21
74
60
50
42
110
90
70
60
220
180
150
130
440
360
300
250
1110
890
740
630
1480
1190
990
850
2200
1800
1500
1300
4400
3600
3000
2500
11100
8900
7400
6300
22200
17800
14800
12700
Referencia:
24H=1 día, 168H=1 semana, 720H=1 mes,
8760H=1 año
(Estimación realizada con el nivel de ruido bajo típico
de una imagen)
Bosch Security Systems | 2004-06
Superior
(40KB)
19
37
56
110
220
560
740
1100
2200
5600
11100
Cuando grabe audio, debe calcular un tamaño de
archivo de aproximadamente 18 KB (PAL) o 21,6 KB
(NTSC) por cada segundo de audio. Esto puede reducir
significativamente los tiempos de grabación,
especialmente con las velocidades más bajas, que se
proporcionan en la tabla anterior.
DVR1C1161 | Manual de instalación | Capítulo 6
ES | 101
6.3 Especificaciones técnicas
Vídeo
Formato
Entrada
Salida
Compresión
Resolución
Pantalla
Generales
PAL/NTSC
1 entrada de cámara (BNC), 1 Vpp,
75 Ohm
1 salida de vídeo (BNC) para el
monitor principal, 1 Vpp, 75 Ohm
M-JPEG
720 x 576 (PAL) /
720 x 484 (NTSC)
Visualización a toda pantalla para
imágenes en directo y reproducción
Sonido
Conexiones
2 entradas monoaural, 1,6 Vpp
±200 mV a 10K
2 salidas monoaural,
1,6 Vpp ±200 mV a 0K
Alarma
Entrada
Salida
Voltaje de conmutación alto:
> 2 Vdc
Voltaje de conmutación bajo:
< 0,5 Vcc
Una salida de relé:
Voltaje de contacto máx.: 24 Vdc
Corriente de conmutación máx.:
2A cc
Almacenamiento
Disco duro
160 Gb
Grabación
Modo
Velocidad
Búsqueda
Mecánicas
Peso
5,5 kg aprox./ 11,5 libras
Dimensiones (AnxAlxPr) 346 x 88 x 269 mm
13,6 x 3,5 x 10,5 pulgadas
Temperatura ambiente
Funcionamiento
+0°C … +40°C
+ 32°F . . . +104°F
Certificaciones
Grabación continua, por lapso de
tiempo, programada o de eventos
Máx. 50 imágenes por seg. (PAL)
Máx. 60 imágenes por seg. (NTSC)
Reproducción
Velocidad
Detección de pérdida de vídeo
Sí
Detección de pérdida de alimentación Sí
Registro de alarma
Sí
Interfaz de usuario
Basada en menús
Configuración
Mediante un menú de
visualización en pantalla
Dispositivo de entrada de usuario
Teclado numérico del panel
frontal, mando a distancia (de IR
con receptor cableado) opcional
Exportación de imagen Ranura para tarjeta integrada
Compact Flash de Tipo I y II
Seguridad
Protección con contraseña
Alimentación
100 - 240 Vca, 50/60 Hz
Consumo eléctrico
< 40 W
Temporizador
Temporizador semanal, reloj en
tiempo real integrado
Conexión de red
10 Base-T, TCP/IP a través de
Ethernet, Conector RJ-45
Conexión de control RS-232, conector D-Sub de
9 patillas
Seguridad
Europa
EE.UU.
Australia
EN60950
UL60950, lista UL y cUL
C-Tick
Compatibilidad electromagnética (EMC)
Máx. 50 imágenes por seg. (PAL)
Máx. 60 imágenes por seg. (NTSC)
Por fecha/hora, por lista de
segmentos o por eventos (alarmas)
Bosch Security Systems | 2004-06
Europa
EE.UU.
Australia
EN55022 Clase B, EN50130-4
FCC parte 15, Clase B
AS/NZS 3548
Las especificaciones pueden cambiar sin previo aviso. Si
surge algún problema, póngase en contacto con su
distribuidor.
DVR1C1161 | Manual de instalación | Capítulo 6
Bosch Security Systems | 2004-06
ES | 102
DVR1C1161 | Installatiehandleiding | Inhoudsopgave
1.
VEILIGHEIDSMAATREGELEN ........................................................................................................................................105
1.1
2.
3.
4.
NL | 103
BELANGRIJKE VOORZORGSMAATREGELEN ...............................................................................105
INLEIDING ...............................................................................................................................................................................106
2.1
EIGENSCHAPPEN ....................................................................................................................................106
2.2
VOORZIJDE .................................................................................................................................................107
2.3
ACHTERZIJDE ............................................................................................................................................108
2.3.1 Voeding ............................................................................................................................................108
2.3.2 Seriële RS232-aansluiting ...........................................................................................................108
2.3.3 Aansluitpunt extra IR ontvanger t.b.v. afstandsbediening .....................................................108
2.3.4 LAN-aansluiting ..............................................................................................................................108
2.3.5 Alarmaansluitingen .........................................................................................................................108
2.4
VERBINDINGEN .........................................................................................................................................109
2.4.1 Multiplexers ......................................................................................................................................109
2.4.2 Kwartschermen ...............................................................................................................................110
2.4.3 Eén camera ......................................................................................................................................111
2.5
AFSTANDSBEDIENING ...........................................................................................................................112
2.6
NETWERKEN ..............................................................................................................................................112
WERKING ..................................................................................................................................................................................113
3.1
SNEL INSTALLEREN ................................................................................................................................113
3.2
DIRECTE OPNAME ...................................................................................................................................113
3.3
ALARMOPNAME ........................................................................................................................................113
3.3.1 Pre-alarmopname ...........................................................................................................................113
3.4
NORMAAL AFSPELEN .............................................................................................................................113
3.5
ZOEKEN .......................................................................................................................................................114
3.6
KOPIËREN ...................................................................................................................................................114
3.6.1 Stilstaande beelden kopiëren ......................................................................................................114
3.6.2 Kopiëren naar een filmbestand ...................................................................................................114
3.7
TOETSVERGRENDELING .......................................................................................................................115
MENU-INSTELLINGEN .......................................................................................................................................................116
4.1
HOOFDMENU ............................................................................................................................................116
4.2
MENU TIJD/TAAL .......................................................................................................................................116
4.3
MENU NORMALE OPNAME ...................................................................................................................116
4.4
MENU ALARMOPNAME ..........................................................................................................................116
4.5
MENU TIMER ...............................................................................................................................................117
4.6
MENU ZOEMER .........................................................................................................................................118
4.7
MENU ARCHIVEREN ................................................................................................................................118
4.8
MENU NETWERK ......................................................................................................................................118
Bosch Security Systems | Juni 2004
DVR1C1161 | Installatiehandleiding | Inhoudsopgave
4.9
NL | 104
MENU SYSTEEMINSTELLING ...............................................................................................................119
4.10 MENU WACHTWOORD .........................................................................................................................120
5.
6.
WEERGAVE VIA INTERNET/INTRANET .....................................................................................................................121
5.1
AANMELDING .............................................................................................................................................121
5.2
HOOFDSCHERM ......................................................................................................................................122
5.2.1 Kleur van statusberichten .............................................................................................................122
5.2.2 Pictogrammen in de live-modus .................................................................................................122
5.2.3 Pictogrammen in de afspeelmodus ...........................................................................................123
5.2.4 Zoeken ..............................................................................................................................................123
SPECIFICATIES .....................................................................................................................................................................124
6.1
RS-232 INTERFACE .................................................................................................................................124
6.1.1 RS232-besturingsprotocol ..........................................................................................................124
6.2
OPNAMETIJD ..............................................................................................................................................125
6.3
TECHNISCHE SPECIFICATIES .............................................................................................................126
Afkortingen op het display
II
A.REC
BASIC
HIGH
LOW
LOWER
MENU
PAUSE
P.END
PLAY
P. END
P.RPT
REC
SRCH
STDRD
SUPER
SYSLD
T.REC
*REC
P.BEG
R.REC
Pauze
Alarmopname
Standaardkwaliteit
Hoge kwaliteit
Lage kwaliteit
Laagste kwaliteit
Menu
Pauze
Pauze beëindigen
Afspelen
Afspelen beëindigen
Afspelen herhalen
Opname
Zoeken
Standaardkwaliteit
Superieure kwaliteit
Systeem laden
Timeropname
Opnamevergrendeling
Afspelen starten
Opnemen op afstand
Bosch Security Systems | Juni 2004
DVR1C1161 | Installatiehandleiding | Hoofdstuk 1
1
VEILIGHEIDSMAATREGELEN
Gevaar
Een bliksemflits in een gelijkbenige driehoek
attendeert de gebruiker op de aanwezigheid van
ongeïsoleerde, gevaarlijke spanningen in het
apparaat. Deze spanningen zijn voldoende groot
om een risico op een elektrische schok te vormen.
Waarschuwing
Een uitroepteken in een gelijkbenige driehoek
attendeert de gebruiker op de aanwezigheid van
belangrijke bedienings- en onderhoudsinstructies
in de bij het apparaat behorende documentatie.
Pas op!
Verwijder nooit de klep (of achterzijde) om
elektrische schokken te voorkomen. Bevat geen
onderdelen die door de gebruiker dienen te
worden onderhouden. Laat service en onderhoud
door daartoe bevoegd personeel uitvoeren.
1.1 BELANGRIJKE
VOORZORGSMAATREGELEN
1
2
3
4
5
6
7
Lees deze handleiding.
Bewaar deze handleiding.
Houd rekening met alle waarschuwingen.
Volg alle instructies.
Gebruik dit apparaat niet in de buurt van water.
Maak het apparaat alleen met een droge doek schoon.
Zorg dat de ventilatieopeningen niet geblokkeerd
raken. Installeer dit apparaat zoals beschreven in de
handleiding van de fabrikant.
8 Installeer dit apparaat niet in de buurt van
warmtebronnen zoals radiatoren, ovens of andere
apparaten die hitte voortbrengen (zoals versterkers).
9 Verander nooit iets aan de aarding van de stekker.
Een gepolariseerde stekker heeft twee pennen, een
brede en een smallere. Een geaarde stekker heeft
twee pennen en een derde pin voor de aarding. Voor
uw veiligheid is het apparaat voorzien van een
geaarde netstekker. Neem bij problemen met de
aansluiting contact op met een elektricien.
10 Zorg dat er niet op de voedingskabel kan worden
gelopen en dat deze niet wordt afgeklemd, met name
Bosch Security Systems | Juni 2004
NL | 105
bij de stekkers, de stopcontacten en het punt waar de
kabel het apparaat verlaat.
11 Gebruik alleen toevoegingen/accessoires die door de
fabrikant zijn goedgekeurd.
12 Haal bij onweer of als u het apparaat een lange tijd
niet gebruikt de stekker uit het stopcontact.
13 Laat onderhoud en reparaties door daartoe bevoegd
personeel uitvoeren. Reparatie is noodzakelijk
wanneer het apparaat beschadigd is, zoals bij een
beschadigde netkabel of -stekker, wanneer er
vloeistof of voorwerpen in het apparaat zijn gevallen,
wanneer het apparaat is blootgesteld aan vocht of
regen, wanneer het apparaat niet normaal
functioneert of wanneer het is gevallen.
14
Waarschuwing
Om het risico op brand of elektrische schokken
te voorkomen, mag het apparaat niet worden
blootgesteld aan regen of vocht. Plaats nooit
voorwerpen die vloeistoffen bevatten, zoals
vazen, op het apparaat.
15 De achterklep van de recorder dient uitsluitend door
professionele onderhoudsmonteurs van het apparaat
te worden verwijderd.
16 Er bestaat explosiegevaar als de batterij onjuist wordt
geplaatst. Er bevindt zich een lithiumbatterij in de
behuizing van deze recorder. Vervang batterijen
alleen door batterijen van hetzelfde type. Deponeer
lege batterijen op een milieuvriendelijke manier.
17 Houd de ventilatieopeningen vrij om oververhitting
van de recorder te voorkomen.
18 Plaats de recorder niet in de buurt van een
warmtebron.
19 Installeer deze apparatuur niet in een kleine ruimte
zoals een boekenkast of dergelijke.
Reiniging
20 Maak de buitenkant van het apparaat schoon met
een bevochtigde, pluisvrije doek of een zeem.
Opmerking
Bosch is milieubewust. Bij het ontwerpen van dit apparaat
is zo veel mogelijk rekening gehouden met het milieu.
DVR1C1161 | Installatiehandleiding | Hoofdstuk 2
2
Inleiding
De DVR1C1161 digitale videorecorder biedt
geavanceerde technologische opties voor het opnemen
en afspelen voor CCTV-systemen. Met de DVR kunt u
gedurende een hele week of zelfs langer onafgebroken
opnamen maken in de continu- of timelapse-modus. U
hoeft geen videobanden te verwisselen of te bewaren en
ook het regelmatige en dure onderhoud van de
videorecorder behoort tot het verleden.
De DVR heeft een opnamesnelheid van maximaal
50/60 beelden per seconde in de indelingen PAL/
NTSC en kan gebeurtenissen onmiddellijk herhalen. De
DVR beschikt over alle mogelijke voordelen voor het
maken van digitale video-opnamen, is eenvoudig te
installeren en werkt net zoals een videorecorder.
Dankzij de uiterst efficiënte compressietechnologie en
de hoogstaande heldere en gedetailleerde opnamen kan
de DVR worden geïntegreerd met een groot aantal
multiplexers.
2.1 Eigenschappen
•
•
•
•
•
•
•
•
•
•
•
•
•
•
•
•
Levert beelden van een superieure kwaliteit
Beeldopname vóór het alarm
Opnemen in real-time en timelapse
Opnamesnelheid: maximaal 50 beelden voor PAL
en 60 beelden voor NTSC
Snel zoeken op datum/tijd, alarmen en opnamelijst
Video-opnamen versneld en vertraagd afspelen op
verschillende snelheden
Schermmenu Instellingen en systeemtimer
Wachtwoordbeveiliging
RS232-communicatiepoort
Ingebouwde M-JPEG-compressie/-decompressie met
regelbare kwaliteit
Geschikt voor het opnemen van geluid
Geprogrammeerd met verschillende timelapsesnelheden
Gegevens kunnen worden opgeslagen op een
Compact Flash-kaart
Afstandsbediening
Opnamen en live-beelden op afstand bekijken met
de webgestuurde browser
Geschikt voor multiplexers van Bosch en
verschillende andere typen multiplexers.
Bosch Security Systems | Juni 2004
NL | 106
DVR1C1161 | Installatiehandleiding | Hoofdstuk 2
NL | 107
2.2 Voorzijde
In de menumodus draait u aan de jog-dial om door
de menupagina's te bladeren of om waarden te
selecteren. Gebruik de jog-dial samen met de toets
ENTER om de menuwaarden in te stellen.
1 REC: Druk op deze toets om de opname te starten
(rood lampje brandt als het apparaat opneemt).
2 OSD: - Druk één keer op deze toets om de tijd/
datum, het schijfgebruik en de
afspeelsnelheid weer te geven.
- Druk een tweede keer op deze toets om de
schijfgrootte, opnamepositie en afspeelpositie
weer te geven.
- Druk een derde keer op deze toets om de
schermweergave uit te schakelen.
9 ENTER: Druk op deze toets om een selectie of
wijziging van een waarde te bevestigen.
10 MENU: Druk op deze toets om het menu
Instellingen te openen of te verlaten.
11 Ontvangstvenster IR-afstandsbediening.
12 LCD-display
In de stand-by modus geeft het LCD-display de
datum/tijd en de kwaliteit en snelheid van een
normale opname weer.
In de opnamemodus geeft het display de datum/
tijd, het bericht REC en de opnamesnelheid weer.
In de afspeelmodus geeft het display de datum/tijd,
het bericht PLAY en de afspeelsnelheid weer.
(Raadpleeg de lijst met afkortingen in het begin van
deze handleiding voor nadere informatie over de
weergegeven berichten.)
3 STOP: Druk op deze toets om het opnemen of
afspelen te stoppen.
4 PLAY: Druk op deze toets om een opname af te
spelen.
5 PAUSE: Druk op deze toets om het afgespeelde
beeld stil te zetten.
6 SEARCH: Druk op deze toets om het zoekmenu te
openen.
7 Shuttle-ring:
13 ALARM: Lampje brandt in geval van een alarm.
In de afspeelmodus draait u de shuttle-ring met de
klok mee om het vooruit of achteruit afspelen van
de opname te versnellen of tegen de klok in om dit
te vertragen.
In de pauzemodus draait u aan de shuttle-ring om
het beeld langzaam vooruit of achteruit te spoelen.
14 LAN: Lampje brandt als er verbinding is gemaakt
met het netwerk.
15 Compact Flash-kaartsleuf: Plaats een Compact
Flash-kaart. Druk op de zwarte toets naast de sleuf
om de kaart te verwijderen.
16 COPY: Druk op deze toets om een stilstaand beeld
8 Jog-dial:
of videostream te kopiëren naar de Compact Flashkaart.
In de afspeelmodus draait u aan de jog-dial om de
afspeelsnelheid te selecteren.
In de pauzemodus draait u aan de jog-dial om van
het ene beeld naar het andere te gaan.
1
16
15
Bosch Security Systems | Juni 2004
14 13
2
3
12
4
5
6
11
10
7
8
9
DVR1C1161 | Installatiehandleiding | Hoofdstuk 2
NL | 108
2.3 Achterzijde
ALM-RST:
2.3.1 Voeding
Pas hier een signaal* toe om een
alarmopname te stoppen.
De toepassing van een hoog extern
opnamesignaal* op deze pin start de
opname. Als het signaal te laag is, stopt
de opname.
Geen aansluitingen.
REC:
Sluit het netsnoer aan op de achterkant van het
apparaat. Gebruik de voedingsschakelaar om het
apparaat in of uit te schakelen.
NC1, NC2:
2.3.2 Seriële RS232-aansluiting
Sluit de D-Sub 9-pins aansluiting aan op de RS232-poort
als u het apparaat op afstand wilt bedienen.
* Signaal
- spanning hoog: > 2 Vdc
- spanning laag: < 0,5 Vdc
2.3.4 LAN-aansluiting
Gebruik de RJ-45 LAN-aansluiting aan de achterkant
van het apparaat als u dit op een netwerk wilt aansluiten.
2.3.5 Alarmaansluitingen
In het menu Alarmopname kunt u de alarmingangen
ALM-IN en ALM-RST instellen op normaal geopend
(N.O.) of op normaal gesloten (N.G.).
Aardaansluiting.
Pas hier een signaal* toe om de
alarmopname te starten.
GND:
ALM-NC**:
RS 232
Out2
Monitor Out
Out
Out 1
Alarm-aansluiting
Bosch Security Systems | Juni 2004
GND
NC4
NC3
LAN
Out 2
GND
100-240 Vac
DISKFULL
VEXT
ALM-CO
ALM-NO
ALM-NC
GND
GND
GND
AC 100-240
Out1
Remote Control
Looping out
NC2
Video
In
NC1
S-Video
In
REC
Mux main
Monitor In
In2
ALM-RST
Audio
In1
GND
Aardaansluiting.
In geval van een alarm is de aansluiting
tussen deze pin en ALM-COM geopend.
Anders is deze gesloten.
ALM-NO**: In geval van een alarm is de aansluiting
tussen deze pin en ALM-COM gesloten.
Anders is deze geopend.
ALM-COM**: Standaard alarmaansluiting.
VEXT:
Synchronisatiesignaal voor multiplexer.
Uitgangsspanning 5 V DC
Stroom: 100 mA
Aansluitpunt extra
IR ontvanger t.b.v.
RS232aansluiting afstandsbediening
Power
NC4
NC3
DISKFULL
VEXT
ALM-CO
ALM-NO
ALM-NC
GND
GND
NC1
NC2
Alarmuitgangen
Hieronder vindt u een overzicht van de alarmuitgangssignalen:
Voedingsschakelaar
Off
REC
ALM-IN
Alarmingangen
ALM-IN
GND:
ALM-IN:
GND
Als het ontvangstvenster voor de IR-afstandsbediening
niet zichtbaar is (bijvoorbeeld als het apparaat in een
kast staat), sluit u het IR-verlengsnoer (optioneel
verkrijgbaar) aan op de aansluiting voor de
afstandbediening. Zorg dat de afstandsbediening en het
ontvangstoog een zichtverbinding met elkaar hebben.
ALM-RST
- max. ingangsspanning: 12 Vdc
2.3.3 Aansluitpunt extra IR ontvanger
t.b.v. afstandsbediening
VEXT
IR-netwerkaansluiting
DVR1C1161 | Installatiehandleiding | Hoofdstuk 2
DISKFULL:
NL | 109
2.4.1 Multiplexers
Uitgangssignaal voor alarm bij volle
schijf.
Uitgangsspanning 5 V DC
Stroom: 100 mA
Geen aansluitingen.
NC3, NC4:
De onderstaande tekening laat zien hoe u een
multiplexer op de DVR aansluit.
•
•
* * max. spanning: 24 Vdc
max. stroom: 2 Adc
•
2.4 Verbindingen
De DVR kan worden aangesloten op een groot aantal
multiplexers en kwartschermen, maar ook rechtstreeks
op een camera.
Sluit de monitor aan op de BNC-connector Monitor
Out op de achterzijde van de DVR.
Sluit de hoofdmonitoruitgang van de multiplexer aan
op de BNC-connector Monitor In op de achterzijde
van de DVR.
Sluit de VCR-uitgang van de multiplexer aan op de
BNC-connector Video In op de achterzijde van de
DVR.
Camera's
Multiplexer
1
VCR IN VCR OUT
2
4
5
6
Aansluitpunt extra
RS232- IR ontvanger t.b.v.
aansluiting afstandsbediening
Voedingsschakelaar
RS 232
Out2
Monitor Out
Out
Out 1
Monitor Out
Monitor
Bosch Security Systems | Juni 2004
GND
NC4
NC3
DISKFULL
VEXT
ALM-CO
LAN
Out 2
GND
100-240 Vac
ALM-NO
ALM-NC
GND
GND
GND
AC 100-240
Out1
Remote Control
Looping out
NC2
Video
In
NC1
S-Video
In
REC
Mux main
Monitor In
In2
ALM-RST
Audio
In1
ALM-IN
Power
Off
3
VCR
Monitor
MON B MON A
VEXT
IR-netwerkaansluiting
DVR1C1161 | Installatiehandleiding | Hoofdstuk 2
NL | 110
2.4.2 Kwartschermen
•
Sluit de VCR-ingang van de multiplexer aan op de
BNC-connector Video Out op de achterzijde van de
DVR.
• Als u de multiplexerschakeling wilt synchroniseren,
sluit u de VEXT- en GND-verbindingen op de
achterzijde van de unit aan op de connector van de
multiplexer.
Raadpleeg, als de verbindingen zijn gemaakt, het
systeemmenu om het type multiplexer dat u gebruikt, te
selecteren.
De onderstaande tekening laat zien hoe u een
kwartscherm kunt aansluiten als de DVR geen
VCR-uitgang heeft.
•
Sluit de monitor aan op de BNC-connector Monitor
Out op de achterzijde van de DVR.
• Sluit de video-uitgang van de multiplexer aan op de
BNC-connector Video In op de achterzijde van de
DVR.
• Schakel in het systeemmenu de multiplexer uit.
Raadpleeg de multiplexerverbindingen als u een
kwartscherm wilt aansluiten op een VCR-uitgang.
Kwartscherm
1
2
3
4
Video
Video OUT
Aansluitpunt extra
RS232- IR ontvanger t.b.v.
afstandsbediening
aansluiting
Voedingsschakelaar
RS 232
Out2
Monitor Out
Out
Out 1
Monitor Out
Monitor
Bosch Security Systems | Juni 2004
GND
NC4
NC3
DISKFULL
VEXT
ALM-CO
LAN
Out 2
GND
100-240 Vac
ALM-NO
ALM-NC
GND
GND
AC 100-240
Out1
Remote Control
Looping out
GND
Video
In
NC2
S-Video
In
NC1
Mux main
Monitor In
In2
REC
In1
ALM-RST
Audio
Off
ALM-IN
Power
VEXT
IR-netwerkaansluiting
DVR1C1161 | Installatiehandleiding | Hoofdstuk 2
NL | 111
2.4.3 Eén camera
•
De onderstaande tekening laat zien hoe u één camera
op de DVR aansluit.
•
•
•
Sluit de monitor aan op de BNC-connector Video
Out op de achterzijde van de DVR.
Sluit de video-uitgang van de camera aan op de
BNC-connector Video In op de achterzijde van de
DVR.
•
Sluit de audio-uitgang van de camera aan op de
connector Audio In op de achterzijde van de DVR.
Sluit de connector Audio Out op de achterzijde van
de DVR aan op een versterker.
Schakel in het systeemmenu de multiplexer uit.
Video
In
RS 232
Out2
Monitor Out
Out
Out 1
GND
NC4
NC3
DISKFULL
VEXT
ALM-CO
ALM-NO
ALM-NC
GND
GND
GND
AC 100-240
Out1
Remote Control
Looping out
NC2
S-Video
In
NC1
Mux main
Monitor In
In2
REC
Audio
In1
ALM-RST
Power
Aansluitpunt extra
IR ontvanger t.b.v.
afstandsbediening
RS232aansluiting
ALM-IN
Audio In
Voedingsschakela
Off
Video In
Camera
LAN
Out 2
GND
VEXT
Video uit
Audio Out
IR-netwerkaansluiting
100-240 Vac
Monitor
Bosch Security Systems | Juni 2004
DVR1C1161 | Installatiehandleiding | Hoofdstuk 2
NL | 112
2.5 Afstandsbediening
2.6 Netwerken
Met de afstandsbediening kunt u de DVR gemakkelijk
op afstand bedienen. U kunt de belangrijkste acties
uitvoeren met de afstandsbediening.
De netwerkverbinding gebruikt standaard 10BaseT.
Zorg dat uw netwerkkaart deze standaard ondersteunt.
Hieronder vindt u een overzicht van de toetsen op de
DVR-afstandsbediening:
RECORD:
Druk op deze toets om de opname te
starten.
STOP:
Druk op deze toets om het opnemen of
afspelen te stoppen.
PLAY:
Druk op deze toets om een opname af te
spelen.
SEARCH:
Verhoog met deze toets de snelheid 2x,
4x, 8x, 16x, 32x, 640x, 2x . . .
REWIND:
Druk in de afspeelmodus op deze toets
om achteruit te spoelen (De toets Search
verhoogt de snelheid bij het
achteruitspoelen).
STEP REW.: Druk op deze toets om het afspelen te
stoppen. Druk nogmaals op deze toets
om achteruit door de beelden te
bladeren.
STEP FORW.:Druk op deze toets om het afspelen te
stoppen. Druk nogmaals op deze toets
om vooruit door de beelden te bladeren.
FORWARD: Druk tijdens het achteruitspoelen op
deze toets om vooruit te spoelen (De
toets Search verhoogt de snelheid bij het
vooruitspoelen).
0
DVRbesturingstoetsen
BOSCH
Bosch Security Systems | Juni 2004
Als u de DVR rechtstreeks op een pc aansluit, dient u
een crossover CAT5-netwerkkabel te gebruiken. Als u
de DVR aansluit op een router of op een hub, dient u
een 1-op-1 CAT5-kabel te gebruiken.
De software voor bediening op afstand werkt alleen als
de volgende poorten openstaan:
• TCP-poort 80:webserver
• TCP-poort 6666:opdrachten
• TCP-poorten 1111, 2222, 3333, 4444:beeldgegevens
Als u een verbinding maakt via een firewall, vraag dan
aan uw netwerkbeheerder of u toegang hebt tot de unit.
DVR1C1161 | Installatiehandleiding | Hoofdstuk 3
3
Werking
3.1 Snel installeren
In de modus voor snel installeren kunt u via het
LCD-display en met de jog-knop snel de datum, tijd,
opnamekwaliteit en IPS-instellingen wijzigen.
• Houd de toets MENU 5 seconden ingedrukt om
naar de modus voor snel installeren te gaan. De
aanduiding Jaar knippert op het LCD-display.
• Draai aan de jog-knop om de instelling Jaar te
wijzigen en druk vervolgens op de toets ENTER. De
aanduiding Maand knippert op het LCD-display.
• Gebruik de jog-knop en de toets ENTER om alle
onderdelen die op het LCD-display worden
weergegeven, in te stellen. De DVR keert terug naar
de normale modus zodra de laatste waarde is
ingesteld.
• Druk op de toets SEARCH om het menu voor snel
installeren te verlaten.
3.2 Directe opname
Druk op de opnametoets om de opname direct te
starten - de beelden worden opgenomen op de harde
schijf.
• De opnamesnelheid en -kwaliteit worden ingesteld in
de menu's Normale opname en Alarmopname.
• Het bericht REC (opnemen) wordt weergegeven op
het LCD-display.
Druk op stoptoets om de opname te stoppen.
• De stoptoets kan alleen worden ingeschakeld in de
opnamemodus.
• Als de harde schijf vol is, stopt de DVR automatisch
de opname of overschrijft deze de opname vanaf het
begin van de harde schijf, afhankelijk van de
instellingen in het menu Systeeminstelling.
3.3 Alarmopname
Het monitorbeeld wordt automatisch opgenomen
wanneer er een alarm optreedt. Na het alarm wordt de
opname gestopt. Directe opnamen en timeropnamen
worden stopgezet wanneer er een alarm optreedt. Als
het apparaat al aan het opnemen is, verandert de
kwaliteit niet bij alarmopnamen. Stel de opties voor
alarmopnamen in in het menu Alarmopname.
Bosch Security Systems | Juni 2004
NL | 113
3.3.1 Pre-alarmopname
Er wordt een buffer voor 220 beelden gebruikt om
videobeelden op te nemen voordat een alarm afgaat
(bijvoorbeeld 9 sec. met een snelheid van 25 IPS of
220 sec. met een snelheid van 1 IPS).
Pre-alarmopnamen vinden alleen plaats als het apparaat
niet aan het opnemen is voordat het alarm afgaat. De
opnamekwaliteit vóór het alarm blijft dezelfde. Als de
DVR niet opneemt voordat het alarm afgaat, is de
opnamekwaliteit vóór het alarm dezelfde als bij normale
opnamen.
3.4 Normaal afspelen
Afspelen
• Druk op de afspeeltoets om de opgeslagen beelden/
geluiden af te spelen vanaf het laatste segment.
• Druk op de stoptoets om het afspelen te stoppen.
Snel vooruit afspelen
• Druk op de afspeeltoets om de beelden af te spelen.
• Draai de shuttle-ring met de klok mee als u de
beelden versneld wilt afspelen. De snelheid wordt
weergegeven op het display (normale
afspeelsnelheid, 2x, 4x, 8x, 16x, 32x, 640x).
Achteruit afspelen
• Druk op de afspeeltoets om de beelden af te spelen.
• Draai de shuttle-ring tegen de klok in als u de
beelden versneld achteruit wilt afspelen. De snelheid
wordt weergegeven op het display (normale
afspeelsnelheid, 2x, 4x, 8x, 16x, 32x, 640x).
Langzaam vooruit afspelen
• Druk op de pauzetoets om het beeld stil te zetten.
• Draai de shuttle-ring met de klok mee als u de
beelden langzaam vooruit wilt afspelen. De snelheid
wordt weergegeven op het display (>1/2, 1/4, 1/8,
1/16, 1/32, 1/64).
Langzaam achteruit afspelen
• Druk op de pauzetoets om het beeld stil te zetten.
• Draai de shuttle-ring tegen de klok in als u de
beelden langzaam achteruit wilt afspelen. De
snelheid wordt weergegeven op het display (<1/2,
1/4, 1/8, 1/16, 1/32, 1/64).
Weergegavesnelheid vastleggen
• Als u de weergavesnelheid wilt vastleggen, drukt u
op de Enter-toets en laat u vervolgens de shuttle-ring
los. Als u opnieuw aan de shuttle-ring draait, wordt
er overgeschakeld naar de normale afspeelsnelheid.
DVR1C1161 | Installatiehandleiding | Hoofdstuk 3
Beeld per beeld vooruit/achteruit afspelen
• Druk op de pauzetoets om het beeld stil te zetten.
• Draai de jog-dial met de klok mee om de opname
beeld voor beeld af te spelen.
• Draai de jog-dial tegen de klok in om de opname
beeld voor beeld achteruit af te spelen.
• Als u snel aan de jog-dial draait, wordt de
beeldsnelheid verhoogd.
3.5 Zoeken
Zoeken op segmenten
• Druk op de zoektoets om het menu Zoeken te
openen.
• Verplaats de cursor naar OP SEGMENT en selecteer
de optie met de Enter-toets.
• Verplaats de cursor naar het segment dat u wilt
afspelen (pre-alarm: pre-alarmopname, timer:
timeropname).
• Als de selectielijst vol is, draait u de jog-dial met de
klok mee om naar de volgende pagina te gaan.
• Druk op de Enter-toets om het afspelen te starten.
Zoeken op alarm
• Druk op de zoektoets om het menu Zoeken te
openen.
• Verplaats de cursor naar OP GEBEURTENISLIJST
en selecteer de optie met de Enter-toets.
• Verplaats de cursor naar het alarmbeeld dat u wilt
afspelen.
• Als de selectielijst vol is, draait u de jog-dial met de
klok mee om naar de volgende pagina te gaan.
• Druk op Enter om de alarmbeelden af te spelen.
• Het alarmbeeld wordt afgespeeld van de prealarmperiode tot het einde van het alarm.
Zoeken op datum/tijd
• Druk op de zoektoets om het menu Zoeken te
openen.
• Verplaats de cursor naar OP DATUM/TIJD en
selecteer de optie met de Enter-toets.
• Verplaats cursor naar de gewenste waarde en
selecteer deze met de Enter-toets.
• Draai aan de jog-dial om de waarde te wijzigen en
druk op de Enter-toets.
• Verplaats de cursor naar ZOEKEN EN AFSPELEN
STARTEN en druk op de Enter-toets. Het afspelen
wordt gestart vanaf de datum en tijd die zijn
ingesteld in het menu.
Bosch Security Systems | Juni 2004
NL | 114
Als er geen beelden zijn opgeslagen onder de
aangegeven datum/tijd, begint het apparaat automatisch
met afspelen vanaf de aansluitend ingestelde tijd.
3.6 Kopiëren
Plaats een Compact Flash-kaart (type I of II) in de
Compact Flash-kaartsleuf aan de voorzijde. Plaats de
Compact Flash-kaart in de juiste richting. Gebruik
alleen Compact Flash-kaarten met een opslagcapaciteit
van 16 MB of hoger.
De Compact Flash-kopieerfunctie is bedoeld voor het
kopiëren van korte clips. Het kopiëren van een lange
clip kan erg lang duren.
Opmerking
Druk op de toets OSD om de kopieerberichten beter te
kunnen lezen. Druk nogmaals op de toets OSD om de
achtergrond uit te schakelen.
3.6.1 Stilstaande beelden kopiëren
•
•
•
•
•
•
•
•
Druk op de afspeeltoets om het afspelen te starten.
Druk op de pauzetoets om het beeld stil te zetten.
Draai de jog-dial met de klok mee of tegen de klok
in om naar het gewenste beeld te gaan.
Druk op de kopieertoets om de kopieermodus te
openen.
Draai aan de jog-dial om het gewenste beeld te
selecteren.
Als het beeld wordt weergegeven, drukt u nogmaals
op de kopieertoets. Het bericht "Bezig met
kopiëren …" wordt weergegeven op het scherm.
Nadat het bestand is gekopieerd, worden het bericht
"Voltooid" en de bestandsidentificatie weergegeven
op het scherm.
Druk op de toets STOP om het kopiëren te stoppen.
Druk op de afspeeltoets om het afspelen te
hervatten.
De gekopieerde beelden worden apart opgeslagen in
een JPG-bestand.
3.6.2 Kopiëren naar een filmbestand
•
•
•
Druk op de afspeeltoets om het afspelen te starten.
Druk op de kopieertoets om de kopieermodus te
openen.
Draai aan de jog-dial om de gewenste camera te
selecteren.
DVR1C1161 | Installatiehandleiding | Hoofdstuk 3
•
•
•
•
Als het beeld wordt weergegeven, drukt u nogmaals
op de kopieertoets. Het bericht "Bezig met
kopiëren …" wordt weergegeven op het scherm.
Druk op de stoptoets om het kopiëren te beëindigen.
Nadat het bestand is gekopieerd, worden het bericht
"Voltooid" en de bestandsidentificatie weergegeven
op het scherm.
Druk op de afspeeltoets om het afspelen te
hervatten.
Gekopieerde beelden worden als filmbeelden
opgeslagen in een MOV-bestand.
3.7 Toetsvergrendeling
Houd de toets REC langer dan 5 seconden ingedrukt in
de opnamemodus als u de toetsen op de voorzijde wilt
vergrendelen. (In het menu Systeeminstellingen
moet een wachtwoord zijn ingeschakeld om deze functie
te kunnen activeren.)
Druk op de toets STOP. U wordt gevraagd het
wachtwoord in te voeren. Als u het correcte
wachtwoord invoert, worden de toetsen ontgrendeld.
Bosch Security Systems | Juni 2004
NL | 115
DVR1C1161 | Installatiehandleiding | Hoofdstuk 4
4
Menu-instellingen
Als het systeem is aangesloten zoals beschreven, volgt u
de volgende stappen:
• Schakel het apparaat in.
• Het display gaat branden bij correcte voeding.
• Wacht totdat het systeem is geladen.
• Druk op de menutoets om het HOOFDMENU te
openen.
Als het hoofdmenu wordt weergegeven, ziet u de
verschillende submenu's waarin u de instellingen kunt
wijzigen.
Als u door de submenu's wilt bladeren, draait u aan de
jog-dial. Druk op de Enter-toets om een submenu te
openen. Gebruik de jog-dial en de Enter-toets in de
submenu's om door de opties en waarden te bladeren
en deze te selecteren. Als u naar het hoofdmenu wilt
terugkeren, selecteert u de laatste optie,
HOOFDMENU, met de Enter-toets.
4.1 Hoofdmenu
NL | 116
4.3 Menu Normale opname
0(181250$/(231$0(
231$0(61(/+(,'
231$0(.:$/,7(,7
231$0(7,-'
,36
67$1'$$5'
885
+22)'0(18!
SNELHEID : Selecteer de opnamesnelheid van 0,1 t/m 25/30 IPS.
KWALITEIT: Er zijn zes kwaliteitsniveaus voor opnamen
LAGER: 15 KB
LAAG: 20 KB
BASIS: 25 KB
STANDAARD: 30 KB
HOOG: 35 KB
SUPER: 40 KB
OPNAMETIJD: Toont de geschatte beschikbare tijd op de schijf voor
de geselecteerde snelheid en kwaliteit.
4.4 Menu Alarmopname
0(18$/$50231$0(
+22)'0(18
7,-'7$$/!
1250$/(231$0(!
$/$50231$0(!
7,0(5!
=2(0(5!
$5&+,9(5(1!
1(7:(5.!
6<67((0,167(//,1*!
4.2 Menu Tijd/Taal
0(187,-'7$$/
'$780
7,-'
'$780127$7,(
0(187$$/
''00----
1('(5/$1'6
+22)'0(18!
DATUM: jaar: 2000~2099 maand: 01~12 datum: 01~31
TIJD: uur: 00~23 minuten: 00~59 seconden: 00~59
DATUMNOTATIE: Stel de volgorde in op dag (DD), maand (MM) en
jaar (JJJJ).
MENUTAAL: Engels, Duits, Frans, Spaans, Italiaans, Portugees,
Nederlands of Pools.
HOOFDMENU: Keer terug naar het hoofdmenu.
Bosch Security Systems | Juni 2004
$/$50)81&7,(
231$0(61(/+(,'
231$0(.:$/,7(,7
7<3($/$50,1
7<3($/$505(6(7
7,-'6'885$/$50
$$1
,36
67$1'$$5'
12
12
6(&
35($/$50)81&7,(
231$0(61(/+(,'
$$1
,36
+22)'0(18
!
ALARMFUNCTIE
AAN : Opname bij alarm.
UIT: Geen opname bij alarm.
OPNAMESNELHEID: Opnamesnelheid tijdens de alarmduur.
De maximale opnamesnelheid bedraagt 50/60 IPS
(PAL/NTSC).
De minimale opnamesnelheid bedraagt 0,1 IPS.
OPNAMEKWALITEIT: Opnamekwaliteit bij alarm.
LAGER: 15 KB
LAAG: 20 KB
BASIS: 25 KB
STANDAARD: 30 KB
HOOG: 35 KB
SUPER: 40 KB
TYPE ALARM-IN:
N.O.: normaal open
N.G.: normaal gesloten
DVR1C1161 | Installatiehandleiding | Hoofdstuk 4
TYPE ALARM-RESET
N.O.: normaal open
N.G.: normaal gesloten
TIJDSDUUR ALARM: De alarmopname start bij het begin van het
alarm en stopt nadat het alarm is afgelopen of als alarmreset is ingeschakeld. Er is geen maximale duur vastgelegd
voor het alarm; de minimale duur bedraagt 10 seconden.
PRE-ALARMFUNCTIE
AAN: Beeldopname vóór het alarm met pre-alarmopnamesnelheid
UIT: Geen beeldopname voordat een alarm optreedt.
OPNAMESNELHEID: De opnamesnelheid vóór het alarm.
De maximale opnamesnelheid bedraagt 50/60 IPS
(PAL/NTSC).
De minimale opnamesnelheid bedraagt 0,1 IPS.
Let op!
Als het alarm optreedt in de stand-bymodus of normale
opnamemodus, is de opnamekwaliteit dezelfde als de
normale opnamekwaliteit. Als het alarm optreedt in de
modus timeropname, wordt de ingestelde waarde voor
de kwaliteit van de timeropname gebruikt.
4.5 Menu Timer
Het beeld op de monitor kan automatisch worden
opgenomen als u de begin- en eindtijd instelt in het
MENU TIMER. Er zijn 15 invoervelden waarin u
wekelijks een opnameschema voor een bepaalde dag of
dagen kunt instellen. Ga naar een invoerveld en
selecteer de dag met de Enter-toets.
U stelt bijvoorbeeld de volgende programmering in:
START 09:00, STOP 23:59
De opname begint nu om 09:00:00 en stopt om
23:59:59.
Als u een met de timer ingestelde opname wilt stoppen,
drukt u op STOP om terug te keren naar het MENU
TIMER en wijzigt u de waarde INGESTELD in UIT.
NL | 117
0(187,0(5
:((.67$57672361(/+(,'.:$/,7(,7
,167(//,1*
=2188567$1'$$5'8,7
0$$88567$1'$$5'8,7
:'$*88567$1'$$5'8,7
:(1'88567$1'$$5'8,7
'*/88567$1'$$5'8,7
0$$88567$1'$$5'8,7
',188567$1'$$5'8,7
95,88567$1'$$5'8,7
'2188567$1'$$5'8,7
:2(88567$1'$$5'8,7
=$788567$1'$$5'8,7
=2188567$1'$$5'8,7
+22)'0(18!
WEEK: Selecteer de dag of dagen voor de timer.
DGL: dagelijks
WDAG: maandag t/m vrijdag
WEND: zaterdag en zondag
Afzonderlijke dagen van de week
START: Voer de starttijd in voor de timeropname.
STOP: Voer de eindtijd in voor de timeropname.
De STOP-tijd moet later zijn dan de START-tijd.
(bijv.. START 16.00, STOP 03.00 is niet juist
START 16.00, STOP 00.00 is niet juist
START 16.00, STOP 23.59 is juist
SNELHEID: Als de SNELHEIDSINDELING is ingesteld op UUR, kunt
u de opnamesnelheid instellen van 4/6 UUR (NTCS/PAL)
t/m 960 UUR.
Als de SNELHEIDSINDELING is ingesteld op IPS, kunt u de
opnamesnelheid instellen van 0,1~30/0,1~25 IPS
(NTSC/PAL).
KWALITEIT: Er zijn zes kwaliteitsniveaus voor opnamen.
LAGER: 15 KB
LAAG: 20 KB
BASIS: 25 KB
STANDAARD: 30 KB
HOOG: 35 KB
SUPER: 40 KB
INSTELLEN: Stel in op AAN als u de timeropname wilt gebruiken.
Stel in op UIT als u de timeropname niet wilt gebruiken.
In de modus Timeropname wordt op het display de
datum/tijd van de timer weergegeven. De opnamesnelheid
van de timer verschijnt onder T.REC.
U kunt de opnamekwaliteit voor continue opnamen niet
wijzigen. Bijvoorbeeld:
Seg 1 08:30~17:00
Seg 2 17:00~23:59
Bosch Security Systems | Juni 2004
DVR1C1161 | Installatiehandleiding | Hoofdstuk 4
Seg 1 en Seg 2 worden beschouwd als een continue
opname van 08:30~23:59.
Als u verschillende instellingen voor de
opnamekwaliteit wilt gebruiken, stelt u de segmenten als
volgt in:
Seg 1 08:30~16:59
Seg 2 17:00~23:59
4.6 Menu Zoemer
0(18=2(0(5
=2(0(5)81&7,(
$/$50,1
231$0(,1
6&+,-)92/
%((/'9(5/,(6
7,0(5!
,16&+$.(/(1
$$1
$$1
$$1
$$1
8,7
+22)'0(18
!
ZOEMERFUNCTIE
INSCHAKELEN: De zoemer is ingeschakeld.
UITSCHAKELEN: De zoemer is uitgeschakeld.
Opmerking: Druk op de Enter-toets als u de opname-/afspeelmodus
wilt in-/uitschakelen.
ALARM-IN: AAN - de zoemer klinkt als er een alarm optreedt.
OPNAME-IN: AAN - de zoemer klinkt als het OPNAME-IN-signaal
wordt toegepast op de OPNAME-IN-terminal.
SCHIJF VOL: AAN - de zoemer klinkt als de schijf bijna vol is (99,7%)
BEELDVERLIES: AAN - de zoemer klinkt als het videosignaal
wegvalt.
TIMER: AAN - de zoemer klinkt als de timeropname plaatsvindt.
4.7 Menu Archiveren
0(18$5&+,9(5(1
%((/'*52277(
7,-'67(03(/
326,7,(7,-'67(03(/
:$7(50(5.
326,7,(:$7(50(5.
;
$$1
21'(5
$$1
21'(5
+22)'0(18
!
BEELDGROOTTE: Selecteer de grootte van het beeld dat naar de
CF-kaart moet worden gekopieerd.
Groot: 720x576 (PAL), 720x480 (NTSC)
Klein: 352x288 (PAL), 352x240 (NTSC)
TIJDSTEMPEL:
AAN: Het tijdstempel wordt op het beeld weergegeven bij het
kopiëren naar de CF-kaart.
Bosch Security Systems | Juni 2004
NL | 118
UIT: Het tijdstempel wordt niet op het beeld weergegeven bij
het kopiëren naar de CF-kaart.
POSITIE TIJDSTEMPEL:
ONDER: De tijdstempel wordt onderin het beeld
weergegeven.
BOVEN: De tijdstempel wordt bovenin het beeld
weergegeven.
WATERMERK:
AAN: Het watermerk wordt op het beeld weergegeven bij het
kopiëren naar de CF-kaart.
UIT: Het watermerk wordt niet op het beeld weergegeven bij
het kopiëren naar de CF-kaart.
POSITIE WATERMERK:
ONDER: Het watermerk wordt onderin het beeld
weergegeven.
BOVEN: Het watermerk wordt bovenin het beeld
weergegeven.
4.8 Menu Netwerk
0(181(7:(5.
,3$'5(6
68%1(70$6.(5
*$7(:$<$'5(6
*(%58,.(5
,167(//(1
*(%58,.(5
,167(//(1
*(%58,.(5
,167(//(1
!
+22)'0(18
!
!
!
IP-ADRES: Voer het IP-adres van het apparaat in in het netwerk.
SUB-NET MASKER: Voer het sub-net masker van het apparaat in in
het netwerk.
GATEWAY-ADRES: Voer het gateway-adres van het apparaat in in
het netwerk.
GEBRUIKER INSTELLEN: U kunt drie gebruikersnamen en
wachtwoorden instellen. Iedere gebruiker beschikt over een
apart menu Instellingen.
*(%58,.(5,167(//(1
*(%58,.(561$$0
*(%58,.(56:$&+7:225'
*(%58,.(561,9($8
$'0,1BBB
$'0,1BBB
683(5
0(181(7:(5.
+22)'0(18
!
!
DVR1C1161 | Installatiehandleiding | Hoofdstuk 4
De aanmeldingspagina van de DVR wordt weergegeven
op het computerscherm als u een computer aansluit op
de DVR via een netwerk. In het menu Gebruiker
instellen kan de beheerder de aanmeldingsgegevens
(gebruikersnaam, wachtwoord en toegangsniveau)
aangeven. Het systeem beschikt over drie verschillende
toegangsniveaus:
• SUPER: De gebruiker kan opgeslagen beelden en
livebeelden bekijken en de DVR bedienen.
• ALGEMEEN: De gebruiker kan opgeslagen beelden
en livebeelden bekijken.
• GAST: De gebruiker kan alleen livebeelden
bekijken.
Er kunnen maximaal vier verbindingen tegelijkertijd
worden gemaakt (1 gedeelde gebruikersnaam en
wachtwoord).
4.9 Menu Systeeminstelling
0(186<67((0,167(//,1*
:$&+7:225'
,16&+$.(/(1
:$&+7:225'
1((
9,'(2,1*$1*
231(0(10(7*(/8,'
$)63(/(10(7$8',2
$)63(/(10(7$8',2
08/7,3/(;(5
),(/'&2'(/,1(
6&+,-)92/
61(/+(,'6,1'(/,1*
9,'(26<67((0
&20326,(7
8,7
$$1
$$1
%RVFK/7&
231,(8:6&+5,-9(1
9,$,36
3$/
6&+,-):,66(1
6<67((0%,-:(5.(1
67$1'$$5'/$'(1
&)9(51,(8:(1
!
!
!
!
+22)'0(18
!
WACHTWOORD INSCHAKELEN:
JA: WACHTWOORD vereist om menu te openen.
NEE: WACHTWOORD niet vereist om menu te openen.
WACHTWOORD:
Als voor WACHTWOORD INSCHAKELEN de waarde JA is
ingeschakeld, is een wachtwoord vereist om het menu te
openen. De zescijferige code kan uit een willekeurige
combinatie van de cijfers 1 t/m 5 bestaan.
Bosch Security Systems | Juni 2004
NL | 119
Als u het wachtwoord hebt ingeschakeld, dan dient u elke
keer dat u in de live-modus op de menutoets drukt of in de
opnamemodus op de stoptoets, het wachtwoord in te voeren.
Noteer het wachtwoord dan ook op een veilige plaats.
VIDEO-INGANG:
COMPOSIET: Selecteer de video-ingang van de
BNC-aansluiting.
S-VIDEO: Selecteer de S-VIDEO van de
S-VIDEO-aansluiting.
OPNEMEN MET GELUID: AAN/UIT: Opnemen met of zonder geluid.
AFSPELEN MET AUDIO 1/AFSPELEN MET AUDIO 2:
AAN/UIT: Afspelen met of zonder geluid.
Het opnemen en afspelen van geluiden is alleen mogelijk in
de real-timemodus met een snelheid van 1 IPS of hoger.
(Speel af met dezelfde snelheid als waarmee u opneemt.)
MULTIPLEXER
Selecteer het type multiplexer dat u op de DVR hebt
aangesloten. Als uw multiplexer niet in de lijst staat,
selecteert u ONBEKEND.
Het video-ingangssignaal van de MUX MAIN MONITORaansluiting op de achterzijde wordt "doorgelust" naar
MONITOR OUT als de videorecorder niet in de menumodus
staat.
Als er maar een camera is aangesloten op de DVR,
selecteert u UIT. Het uitgangssignaal van de hoofdmonitor is
altijd hetzelfde als dat van de VIDEO OUT-aansluiting.
FIELDCODE LINE:
Als u het type multiplexer instelt op ONBEKEND, kunt u de
fieldcode line van de aangesloten multiplexer instellen tussen
0 en 20. De standaardinstelling (13) is geschikt voor de
meeste multiplexers. Verminder de waarde als de fieldcode
line boven in de afspeelkanalen wordt weergegeven.
Verhoog de waarde als de multiplexer niet goed afspeelt.
SCHIJF VOL:
STOP: Als de schijf vol is, stopt het apparaat de opname.
OPNIEUW SCHRIJVEN: Als de schijf vol is, worden de
bestaande videobeelden overschreven vanaf het begin van
de harde schijf.
SNELHEIDSINDELING: Selecteer de opnamesnelheid via IPS
(beelden per seconde) of in Uur.
VIDEOSYSTEEM: Selecteer het videosysteem NTSC of PAL (het
apparaat dient in- en uitgeschakeld te worden om het
systeem te activeren).
SCHIJF WISSEN:
Druk op Enter om alle opnamen van de harde schijf te
wissen.
Op het scherm wordt een bevestigingsvenster weergegeven.
Selecteer Ja of Nee en druk vervolgens op Enter.
SYSTEEM BIJWERKEN:
Druk op Enter om het systeem al dan niet bij te werken.
JA: Kopieer het bijgewerkte bestand naar de Compact Flashkaart en plaats de Compact Flash-kaart vervolgens in de
kaartsleuf. Druk op Enter om het systeem bij te werken.
Nadat het systeem is bijgewerkt, dient u het apparaat uit en
opnieuw in te schakelen om de wijzigingen te activeren.
STANDAARD LADEN:
Druk op Enter om de fabriekswaarden al dan niet te laden.
JA: Op het scherm wordt een bevestigingsvenster
weergegeven.
Selecteer Ja of Nee en druk vervolgens op Enter.
CF VERNIEUWEN:
JA: De Compact Flash-kaart wordt geformatteerd.
NEE: De Compact Flash-kaart wordt niet geformatteerd.
DVR1C1161 | Installatiehandleiding | Hoofdstuk 4
4.10 Menu Wachtwoord
Als de wachtwoordbeveiliging is ingeschakeld, wordt
het menu Wachtwoord weergegeven op het scherm
wanneer u een menu probeert te openen of de opname
wilt stoppen. Voer het wachtwoord in met de volgende
toetsen:
REC : 1
OSD : 2
STOP : 3
PLAY : 4
PAUSE : 5
Bosch Security Systems | Juni 2004
NL | 120
DVR1C1161 | Installatiehandleiding | Hoofdstuk 5
5
NL | 121
Weergave via internet/
intranet
5.1 Aanmelding
Open de internetbrowser en voer het IP-adres van het
netwerk in (bijvoorbeeld http://192.168.10.5). Dit moet
hetzelfde IP-adres zijn als in het menu Netwerk van de
DVR.
Bosch Security Systems | Juni 2004
De aanmeldingspagina van de DVR wordt weergegeven
op het scherm. U moet dezelfde gebruikersnaam en
wachtwoord invoeren als in het menu Netwerk van de
DVR. (Standaard kunt u ADMIN invoeren als
gebruikersnaam en wachtwoord. Klik vervolgens op
Submit om het systeem te openen.)
DVR1C1161 | Installatiehandleiding | Hoofdstuk 5
5.2 Hoofdscherm
Met het pictogram onder in het scherm kunt u uzelf
afmelden. Informatie over de status van het systeem
wordt eveneens weergegeven onderin het scherm. De
huidige systeemstatus en datum/tijd worden
weergegeven.
Met de pictogrammen aan de rechterkant van het
scherm selecteert u de camera's en bepaalt u hoe deze
worden weergegeven op het scherm. De
besturingstoetsen voor het afspelen bevinden zich
eveneens aan de rechterkant van het scherm. Via de
zoekfunctie kunt u een videoclip selecteren en deze
afspelen. Als een pictogram grijs wordt weergegeven, is
NL | 122
deze specifieke functie niet beschikbaar in de huidige
modus.
Opmerking
De vernieuwingsfrequentie van live-beelden hangt af
van de geselecteerde opnamesnelheid in de modus
Opnemen (bijv. opnemen met 0,5 IPS betekent dat het
camerabeeld om de 2 seconden wordt vernieuwd.
Het is niet mogelijk live-beelden weer te geven als de
recorder bezig is met afspelen. De systeemstatus toont
de melding SERVER IN AFSPEELMODUS. Als u livebeelden wilt weergeven, moet u eerst op de recorder
zelf het afspelen stopzetten.
5.2.1 Kleur van statusberichten
5.2.2 Pictogrammen in de live-modus
De kleur van een statusbericht geeft aan of u de
recorder ter plaatse of op afstand bedient. Bij bediening
ter plaatse zijn de berichten geel. Als u de DVR
rechtstreeks bedient (u hebt het pictogram BEDIENING
geselecteerd), zijn de berichten groen.
In de weergavemodus zijn de camerapictogrammen, de
cameraweergavepictogrammen en het pictogram
Afspelen geactiveerd.
Bosch Security Systems | Juni 2004
DVR1C1161 | Installatiehandleiding | Hoofdstuk 5
5.2.3 Pictogrammen in de afspeelmodus
Selecteer het pictogram AFSPELEN om over te
schakelen naar de afspeelmodus.
• STOP: Druk op dit pictogram om het afspelen van
derecorder te stoppen.
• AFSPELEN: De recorder afspelen.
• TERUGSPELEN: Achteruit afspelen.
• STAP: Vooruit door de beelden te bladeren.
• STAP: Achteruit door de beelden te bladeren.
• PAUZE: Druk op dit pictogram om de recorder te
pauzeren
• BEDIENING: Druk op dit pictogram om over te
schakelen op de modus directe afstandsbediening
(alleen mogelijk bij toegangsniveau SUPER). U kunt
nu op afstand rechtstreeks het afspelen of opnemen
op de DVR starten of stoppen.
• Instellen van de afspeelsnelheid.
5.2.4 Zoeken
U kunt de video die u wilt afspelen op drie manieren
zoeken:
• Video afspelen die is geselecteerd op segment.
• Video afspelen die is geselecteerd op alarm.
• Video afspelen die is geselecteerd op datum/tijd.
U kunt een item in de lijst selecteren met een
eenvoudige muisklik. Klik op PLAY om de
geselecteerde video af te spelen.
Bosch Security Systems | Juni 2004
NL | 123
DVR1C1161 | Installatiehandleiding | Hoofdstuk 6
6
NL | 124
Specificaties
6.1 RS-232 interface
De DVR kan worden bestuurd vanaf een computer of
vanaf een terminal via de standaard D-SUB 9-pins
RS232-aansluiting.
$6&,, )81&7,(
&2'(
.QRSRSKHW
YRRUSDQHHO
.
2SQDPHVWDUWHQ
5(&
.
2SQHPHQHQDIVSHOHQ
VWRSSHQ
6723
.
$IVSHOHQ
3/$<
$IJHVSHHOGHEHHOG
SDX]HUHQ
3$86(
6($5&+
3LQ
'95&
1*
7;'
3LQ
*$67
1*
5;'
.
5;'
7;'
.
=RHNHQ
1*
$$5',1*
'75
$$5',1*
.
%HHOGNRSLsUHQQDDU
&)NDDUW
&23<
1*
1*
1*
9
'65
576
&76
1*
.
6FKHUPZHHUJDYH
.
6HOHFWLHEHYHVWLJHQ (17(5
.
0HQX,QVWHOOLQJHQ
RSHQHQ
De transmissie is ingesteld op 9600 baud, 8 databits,
1 startbit, 1stopbit en geen pariteit.
6.1.1 RS232-besturingsprotocol
U kunt een computer of een terminal gebruiken om het
apparaat te bedienen. Verzend ASCII-opdrachten van
drie tekens via de RS232-aansluiting; deze ASCIIopdrachten beginnen met 'K' of 'k'. Er zijn 30 ASCIIopdrachten die overeenkomen met de 30 knoppen op
het voorpaneel. In de volgende tabel vindt u een
overzicht van de 30 ASCII-opdrachten.
Bosch Security Systems | Juni 2004
',63/$<
0(18
. 6QHODFKWHUXLW
. DIVSHOHQ
;
. 9HUVQHOGDIVSHOHQ
.
!!;
.
1DDUYRULJH
VWLOVWDDQGEHHOG
JDDQ
1DDUYROJHQGH
VWLOVWDDQGEHHOG
JDDQ
.
-2*5(:
-2*))
DVR1C1161 | Installatiehandleiding | Hoofdstuk 6
NL | 125
6.2 Opnametijd
Opnametijd (bij benadering) in uren en zonder geluid
als u opneemt met een harde schijf van 160 GB.
PAL
Opnamesnelheid (IPS)
50
25
12
8
5
2
1,6
1,0
0,5
0,2
0,1
Lager
(15KB)
60
120
240
360
590
1420
1900
3000
5900
14800
29600
Beeldkwaliteit (gemiddeld bestandsformaat)
Laag
Basis
Standaard
Hoog
(20KB)
(25KB)
(30KB)
(35KB)
Opnametijd bij benadering
Uren
44
36
30
25
90
70
60
50
180
140
120
100
270
210
180
150
440
360
300
250
1070
850
710
610
1420
1140
950
810
2200
1800
1500
1300
4400
3600
3000
2500
11100
8900
7400
6300
22200
17800
14800
12700
Super
(40KB)
22
44
90
130
220
530
710
1100
2200
5600
11100
NTSC
Opnamesnelheid (IPS)
60
30
20
10
5
2
1,5
1,0
0,5
0,2
0,1
Lager
(15KB)
50
100
150
300
590
1480
1980
3000
5900
14800
29600
Beeldkwaliteit (gemiddeld bestandsformaat)
Laag
Basis
Standaard
Hoog
(20KB)
(25KB)
(30KB)
(35KB)
Opnametijd bij benadering
Uren
37
30
25
21
74
60
50
42
110
90
70
60
220
180
150
130
440
360
300
250
1110
890
740
630
1480
1190
990
850
2200
1800
1500
1300
4400
3600
3000
2500
11100
8900
7400
6300
22200
17800
14800
12700
Referentie:
24u=1 dag, 168u=1 week, 720u=1 maand, 8760u=1 jaar
(Standaardbeeld - laag ruisniveau)
Als u geluid opneemt, moet u uitgaan van een
bestandsgrootte van ongeveer 18 kB (PAL) of 21,6 kB
(NTSC) per seconde geluid. Hierdoor kunnen, met
name bij lagere opnamesnelheden, de opnametijden
zoals vermeld in de tabellen hierboven aanzienlijk
worden verkort.
Bosch Security Systems | Juni 2004
Super
(40KB)
19
37
56
110
220
560
740
1100
2200
5600
11100
DVR1C1161 | Installatiehandleiding | Hoofdstuk 6
NL | 126
6.3 Technische specificaties
Video
Formaat
Ingang
Uitgang
Compressie
Resolutie
Display
Algemeen
PAL/NTSC
1 camera-ingang (BNC), 1 Vtt,
75 Ohm
1 video-uitgang (BNC) voor
hoofdmonitor, 1 Vtt, 75 Ohm
M-JPEG
720 x 576 (PAL) /
720 x 484 (NTSC)
Volledige weergave in live- en
afspeelmodus
Geluid
Aansluitingen
2 mono-ingangen,
1,6 Vtt ±200m V@10K
2 mono-uitgangen,
1,6 Vtt ±200m V@10K
Alarm
Ingang
Uitgang
Gelijkspanning hoog: > 2 Vdc
Gelijkspanning laag: < 0.5 Vdc
Eén relaisuitvoer:
Max. schakelspanning: 24 Vdc
Max. schakelstroom: 2A dc
Opslag
Harde schijf
160 Gb
Opname
Modus
Snelheid
Continu, timelapse,
geprogrammeerd of event-opname
Max. 50 beelden per sec. (PAL)
Max. 60 beelden per sec. (NTSC)
Detectie beeldverlies
Detectie stroomstoring
Alarmlogboek
Gebruikersinterface
Instellen
Gebruikersinvoer
Ja
Ja
Ja
Menubesturing
Via menu's op de display
Toetsen op voorpaneel,
afstandsbediening (IR met
bekabeld ontvangstoog optioneel)
Exporteren
Ingebouwde Compact Flashkaartsleuf Type I- en Type IIkaarten
Beveiliging
Wachtwoordbeveiliging
Voeding
100 - 240 Vac, 50/60 Hz
Stroomverbruik
< 40 W
Timer
Wekelijkse timer,
ingebouwde real-time klok
Netwerkverbinding
10Base-T, TCP/IP via
Ethernet,
RJ-45-aansluiting
Aansluiting voor besturing RS-232, 9-pins D-Subaansluiting
Mechanische specificaties
Gewicht
ongeveer 5,5 kg/11,5 lbs
Afmetingen (B x H x D) 346 x 88 x 269 mm
13,6 x 3,5 x 10,5 inches
Omgevingstemperatuur
In bedrijf
+0°C - +40°C
+32°F . . . +104°F
Normen
Veiligheid
Afspelen
Snelheid
Zoeken
Max. 50 beelden per sec. (PAL)
Max. 60 beelden per sec. (NTSC)
Datum/tijd, segment of alarm
Europa
V.S.
Australië
EN60950
UL60950 UL en cUL listed
C-Tick
Electro Magnetic Compatibility (EMC)
Europa
EN55022 klasse B, EN50130-4
Amerikaanse norm FCC deel 15, klasse B
Australië
AS/NZS 3548
Gegevens kunnen zonder voorafgaande kennisgeving
worden gewijzigd. Neem bij problemen contact op met
uw leverancier.
Bosch Security Systems | Juni 2004
DVR1C1161 | Manuale d'installazione | Indice
1.
PRECAUZIONI PER LA SICUREZZA ...........................................................................................................................129
1.1
2.
3.
4.
IT | 127
PRECAUZIONI IMPORTANTI .................................................................................................................129
INTRODUZIONE .....................................................................................................................................................................130
2.1
CARATTERISTICHE ..................................................................................................................................130
2.2
PANNELLO ANTERIORE .........................................................................................................................131
2.3
PANNELLO POSTERIORE ......................................................................................................................132
2.3.1 Alimentazione ..................................................................................................................................132
2.3.2 Connettore seriale RS232 ...........................................................................................................132
2.3.3 Connettore ottico del telecomando a infrarossi ......................................................................132
2.3.4 Connettore LAN .............................................................................................................................132
2.3.5 Connessioni di allarme ..................................................................................................................132
2.4
INTERCONNESSIONI ..............................................................................................................................134
2.4.1 Multiplexer ........................................................................................................................................134
2.4.2 Quadranti .........................................................................................................................................135
2.4.3 Telecamera singola ........................................................................................................................136
2.5
TELECOMANDO ........................................................................................................................................137
2.6
RETI ................................................................................................................................................................137
USO DELL'UNITÀ ..................................................................................................................................................................138
3.1
INSTALLAZIONE RAPIDA .......................................................................................................................138
3.2
REGISTRAZIONE IMMEDIATA ..............................................................................................................138
3.3
REGISTRAZIONE IN MODALITÀ ALLARME ......................................................................................138
3.3.1 Registrazioni pre-allarme ..............................................................................................................138
3.4
RIPRODUZIONE NORMALE ..................................................................................................................138
3.5
RICERCA DELLE RIPRODUZIONI ........................................................................................................139
3.6
COPIA ...........................................................................................................................................................139
3.6.1 Copia di immagini fisse .................................................................................................................139
3.6.2 Copia di filmati ................................................................................................................................140
3.7
IMPOSTAZIONE DEL BLOCCO DI SICUREZZA .............................................................................140
IMPOSTAZIONE DEI MENU ............................................................................................................................................141
4.1
MENU PRINCIPALE ...................................................................................................................................141
4.2
MENU OROLOGIO/LINGUA ..................................................................................................................141
4.3
MENU REGISTRAZIONE NORMALE ...................................................................................................141
4.4
MENU REGISTRAZIONE ALLARME ....................................................................................................141
4.5
MENU TIMER ...............................................................................................................................................142
4.6
MENU SEGNALE ACUSTICO ................................................................................................................143
4.7
MENU ARCHIVIO .......................................................................................................................................143
4.8
MENU RETE ................................................................................................................................................143
Bosch Security Systems | 2004-06
DVR1C1161 | Manuale d'installazione | Indice
4.9
IT | 128
MENU IMPOSTAZIONI SISTEMA .........................................................................................................144
4.10 MENU PASSWORD ..................................................................................................................................145
5.
6.
VISUALIZZAZIONE TRAMITE INTERNET/INTRANET ........................................................................................146
5.1
ACCESSO ...................................................................................................................................................146
5.2
SCHERMATA PRINCIPALE ....................................................................................................................147
5.2.1 Colori dei messaggi di stato ........................................................................................................147
5.2.2 Icone della modalità Live ..............................................................................................................147
5.2.3 Icone della modalità di riproduzione ..........................................................................................148
5.2.4 Ricerca .............................................................................................................................................148
SPECIFICHE ............................................................................................................................................................................149
6.1
INTERFACCIA RS-232 .............................................................................................................................149
6.1.1 Protocollo di controllo RS-232 ...................................................................................................149
6.2
TEMPI DI REGISTRAZIONE ....................................................................................................................150
6.3
SPECIFICHE TECNICHE .........................................................................................................................151
Abbreviazioni del display
II
A.REC
BASIC
HIGH
LOW
LOWER
MENU
PAUSE
P.END
PLAY
P.END
P.RPT
REC
SRCH
STDRD
SUPER
SYSLD
T.REC
*REC
P.BEG
R.REC
Pausa
Registrazione allarme
Qualità media
Qualità alta
Qualità bassa
Qualità scarsa
Menu
Pausa
Fine pausa
Riproduci
Fine riproduzione
Ripetizione riproduzione
Registra
Ricerca
Qualità standard
Qualità ottima
Caricamento del sistema in corso
Registrazione con timer
Blocco registrazione
Inizio riproduzione
Registrazione remota
Bosch Security Systems | 2004-06
DVR1C1161 | Manuale d'installazione | Capitolo 1
1
IT | 129
PRECAUZIONI PER LA
SICUREZZA
10
Pericolo
La freccia a forma di fulmine all'interno di un
triangolo equilatero segnala la presenza nel
prodotto di "tensione pericolosa" non isolata, di
intensità tale da poter provocare scosse
elettriche a persone.
11
12
13
Avvertenza
Il punto esclamativo all'interno di un triangolo
equilatero segnala importanti istruzioni d'uso e
manutenzione (assistenza) nella
documentazione allegata al prodotto.
Attenzione
Per ridurre il rischio di scosse elettriche, si
consiglia di non rimuovere il coperchio (o il
pannello posteriore). All'interno non vi sono parti
riparabili dall'utente. Richiedere assistenza a
personale tecnico qualificato.
1.1 PRECAUZIONI IMPORTANTI
1
2
3
4
5
6
7
8
9
Leggere attentamente queste istruzioni.
Conservare queste istruzioni.
Attenersi a tutte le avvertenze.
Seguire tutte le istruzioni.
Non utilizzare quest'attrezzatura in prossimità di
acqua.
Pulire solo con un panno asciutto.
Non bloccare le aperture di aerazione. Installare in
conformità alle istruzioni del produttore.
Non installare l'unità in prossimità di fonti di calore
come radiatori, termoconvettori, fornelli o altri
apparecchi (inclusi amplificatori) che producono
calore.
Non danneggiare il polo di sicurezza della spina
polarizzata o dotata di messa a terra. Una spina
polarizzata presenta due poli a lama, uno più largo
dell'altro. La spina dotata di messa a terra ha due
poli più un terzo polo per la messa a terra. Il polo a
Bosch Security Systems | 2004-06
lama più grande e il terzo polo sono misure di
sicurezza. Se la spina in dotazione non è adatta alla
presa, rivolgersi ad un elettricista per sostituire la
vecchia presa con una nuova.
Proteggere il cavo di alimentazione evitando che
venga calpestato o pizzicato, prestando particolare
attenzione alle spine, alle scatole di derivazione e al
punto in cui fuoriescono dall'apparecchio.
Utilizzare esclusivamente connessioni/accessori
specificati dal produttore.
Scollegare l'apparecchio in caso di temporali o
quando rimane inutilizzato per lunghi periodi di
tempo.
Richiedere sempre l'intervento di personale tecnico
qualificato. Gli interventi di riparazione sono
necessari quando l'apparecchio è stato danneggiato
in qualsiasi modo, ossia se il cavo di alimentazione o
la spina sono danneggiati, se nell'apparecchio è stato
versato del liquido o è penetrato un oggetto, se
l'apparecchio è stato esposto a pioggia o umidità, se
non funziona correttamente o se è caduto.
14
Avvertenza
Per ridurre il rischio di incendio o di scosse
elettriche, non esporre questo prodotto a
pioggia o umidità ed evitare di porvi sopra
oggetti contenenti liquidi, come i vasi per piante.
15 Per interventi di manutenzione o riparazione, la
parte posteriore del registratore deve essere smontata
esclusivamente da personale qualificato.
16 Pericolo di esplosione in caso di sostituzione errata
della batteria. Una batteria al litio è situata all'interno
della scatola del registratore. Sostituirle solo con
batterie identiche o equivalenti. Smaltire le batterie
usate in modo da evitare danni ambientali.
17 Non ostruire le aperture di ventilazione per evitare il
surriscaldamento del registratore.
18 Non porre il registratore nelle immediate vicinanze
di fonti di calore.
19 Non installare questo prodotto in spazi chiusi, quali
librerie o simili.
Pulizia
20 Pulire l'unità con un panno compatto e leggermente
inumidito o una pelle di daino.
DVR1C1161 | Manuale d'installazione | Capitolo 2
Commento
Bosch tiene in particolare considerazione gli aspetti
legati all'inquinamento ambientale. Questa unità è stata
progettata nel maggiore rispetto dell'ambiente possibile.
IT | 130
2
Introduzione
Il videoregistratore digitale DVR1C1161 offre una
tecnologia di registrazione e riproduzione avanzata ai
sistemi TVCC. Il DVR consente una registrazione
ininterrotta nelle modalità continua o a intervalli per
una settimana e oltre. In tal modo, non è più necessario
sostituire e archiviare le videocassette o ricorrere a una
frequente e costosa manutenzione del videoregistratore.
Il DVR può registrare fino a 50/60 immagini al secondo
nei formati PAL/NTSC e riprodurre gli eventi
immediatamente. Il DVR offre tutti i benefici della
registrazione digitale video, è facile da installare e
funziona come un normale videoregistratore. Grazie alla
tecnologia di compressione d'avanguardia e
all'eccezionale nitidezza e definizione delle immagini
registrate, il DVR è ideale per un'ampia gamma di
sistemi multiplexer.
2.1 Caratteristiche
•
•
•
•
•
•
•
•
•
•
•
•
•
•
•
•
Bosch Security Systems | 2004-06
Immagini di qualità superiore
Registrazione delle immagini pre-allarme
Registrazione a intervalli e in tempo reale
Frequenza di aggiornamento fino a 50 immagini per
il formato PAL e 60 immagini per quello NTSC
Ricerca rapida per data/ora, eventi di allarme ed
elenco di registrazioni
Riproduzione lenta e veloce dei video registrati a
diverse velocità
Menu di impostazione e timer di sistema su schermo
Protezione tramite password
Porta di comunicazione RS-232
Funzione di compressione/decompressione M-JPEG
incorporata con qualità configurabile
Funzione di registrazione audio
Programmato con diverse velocità/intervalli
I dati possono essere memorizzati su schede
Compact Flash
Telecomando
Registrazioni in visualizzazione remota e immagini
in diretta con browser basato sul Web
Compatibile con i multiplexer Bosch e con altri tipi
di multiplexer.
DVR1C1161 | Manuale d'installazione | Capitolo 2
IT | 131
2.2 Pannello anteriore
In modalità di pausa, ruotare la manopola di
avanzamento per far avanzare o riavvolgere il video
fotogramma per fotogramma.
In modalità di menu, ruotare la manopola di
avanzamento per spostarsi tra le pagine del menu o
selezionare dati. Utilizzarla insieme al tasto ENTER
per impostare i valori dei menu.
1 REC: premere per iniziare a registrare (la spia rossa
sul tasto si illumina quando è in corso una
registrazione).
2 OSD: - Premere una volta per visualizzare
informazioni su data e ora, sull'uso del disco
e sulla velocità di riproduzione.
- Premere una seconda volta per visualizzare
dimensioni del disco, posizione di
registrazione e posizione di riproduzione.
- Premere una terza volta per disattivare la
visualizzazione su schermo.
9 ENTER: premere per confermare una selezione o il
valore di un dato modificato.
10 MENU: premere per accedere o uscire dal menu di
impostazione.
11 Ricevitore a infrarossi del telecomando.
3 STOP: premere per interrompere la registrazione o
12 Display a cristalli liquidi
la riproduzione.
In modalità di standby, visualizza la data e l'ora
correnti nonché la qualità e la velocità della
registrazione normale.
In modalità di registrazione, visualizza la data e
l'ora correnti e la velocità REC di registrazione
impostata.
In modalità di riproduzione, visualizza la data e
l'ora della riproduzione e la velocità PLAY e di
riproduzione corrente.
Per informazioni sui messaggi visualizzati,
consultare l'elenco delle abbreviazioni all'inizio di
questo manuale.
4 PLAY: premere per iniziare la riproduzione.
5 PAUSE: premere per mettere in pausa la
riproduzione.
6 SEARCH: premere per accedere al menu di
ricerca.
7 Ghiera Shuttle
Nella modalità di riproduzione, ruotare la ghiera in
senso orario o in senso antiorario, rispettivamente
per accelerare o rallentare l'avanzamento o la
riproduzione inversa dell'immagine.
In modalità di pausa, ruotare la ghiera per far
avanzare o riavvolgere lentamente l'immagine.
13 ALARM: la spia si accende quando si verifica un
allarme.
8 Manopola di avanzamento
14 LAN: la spia si accende quando si accede alla rete.
In modalità di riproduzione, ruotare la manopola di
avanzamento per selezionare la velocità di
riproduzione.
1
16
15
Bosch Security Systems | 2004-06
14 13
2
3
12
4
5
6
11
10
7
8
9
DVR1C1161 | Manuale d'installazione | Capitolo 2
IT | 132
2.3.5 Connessioni di allarme
GND:
ALM-IN:
ALM-RST:
REC:
2.3.2 Connettore seriale RS232
* Segnale
- Tensione di commutazione a livello alto: > 2 V CC
Se il ricevitore a infrarossi del telecomando sul pannello
anteriore non è visibile (se l'unità è installata in un
armadio), collegare la prolunga a infrarossi opzionale al
connettore per il telecomando. Posizionare l'occhio del
ricevitore in modo che sia in direzione del telecomando.
- Tensione di commutazione a livello basso: < 0,5 V CC
2.3.4 Connettore LAN
Per collegare l'unità a una rete, usare il connettore
RJ-45 LAN sul retro dell'unità.
Input di allarme
Connettore ottico
Connettore del telecomando
a infrarossi
RS-232
Interruttore di accensione
RS 232
Out2
Monitor Out
Out
Out 1
GND
NC4
VEXT
Connettore allarme
Bosch Security Systems | 2004-06
LAN
Out 2
GND
100-240 Vac
NC3
DISKFULL
VEXT
ALM-CO
ALM-NO
ALM-NC
GND
GND
AC 100-240
Out1
Remote Control
Looping out
GND
Video
In
NC2
S-Video
In
NC1
Mux main
Monitor In
In2
REC
In1
ALM-RST
Audio
Off
ALM-IN
Power
Output di allarme
Connettore di rete
GND
NC4
NC3
DISKFULL
REC
GND
VEXT
- Tensione d'ingresso massima: 12 V CC
ALM-RST
2.3.3 Connettore ottico del telecomando
a infrarossi
NC1, NC2:
ALM-IN
Per il controllo remoto dell'unità, collegare il connettore
D-Sub a 9 piedini alla porta RS232.
ALM-CO
Collegare il cavo dell'alimentazione alla presa di
alimentazione sul retro dell'unità. Per accendere e
spegnere l'unità, usare l'interruttore di accensione.
ALM-NO
2.3.1 Alimentazione
ALM-NC
2.3 Pannello posteriore
connessione messa a terra.
applicare un segnale* qui per avviare la
registrazione in modalità allarme.
applicare un segnale* qui per
interrompere la registrazione in modalità
allarme.
un segnale di richiesta di registrazione
esterna di alto livello* applicato a questo
piedino avvia la registrazione. Quando il
livello del segnale diventa basso, la
registrazione si interrompe.
nessuna connessione.
GND
video sulla scheda Compact Flash.
GND
16 COPY: premere per copiare un'immagine fissa o un
Gli ingressi ALM-IN e ALM-RST possono essere
impostati su Normalmente aperto (N.A.) o
Normalmente chiuso (N.C.) nel menu Registrazione
allarme.
NC2
estrarre la scheda, premere il pulsante nero accanto
allo slot.
NC1
15 Slot per inserimento scheda Compact Flash. Per
DVR1C1161 | Manuale d'installazione | Capitolo 2
I segnali di uscita allarme sono:
GND:
ALM-NC**:
connessione messa a terra.
quando si attiva un allarme, la
connessione tra questo pin e
l'ALM-COM è aperta. In tutti gli altri
casi, è chiusa.
ALM-NO**: quando si attiva un allarme, la
connessione tra questo pin e
l'ALM-COM è chiusa. In tutti gli altri
casi, è aperta.
ALM-COM**: contatto comune allarme.
VEXT:
segnale di sincronizzazione per il
multiplexer.
Tensione di uscita: 5 V CC
Corrente di uscita: 100 mA
DISKFULL: segnale in uscita allarme disco pieno.
Tensione di uscita: 5 V CC
Corrente di uscita: 100 mA
NC3, NC4:
nessuna connessione.
* * Tensione di contatto massima: 24 V CC
Corrente di commutazione massima: 2 A CC
Bosch Security Systems | 2004-06
IT | 133
DVR1C1161 | Manuale d'installazione | Capitolo 2
IT | 134
2.4 Interconnessioni
•
È possibile collegare il DVR a un'ampia gamma di
multiplexer, ai quadranti o direttamente alla telecamera.
2.4.1 Multiplexer
L'illustrazione riportata di seguito mostra come
collegare un multiplexer a un DVR.
•
•
Collegare il monitor alla presa BNC con
l'indicazione Monitor Out (Uscita monitor) sul retro
del DVR.
Collegare l'uscita del monitor principale del
multiplexer alla presa BNC con l'indicazione
Monitor In (Ingresso monitor) sul retro del DVR.
Collegare l'uscita VCR del multiplexer alla presa
BNC con l'indicazione Video In (Ingresso video) sul
retro del DVR.
• Collegare l'ingresso VCR del multiplexer alla presa
BNC con l'indicazione Video Out (Uscita video) sul
retro del DVR.
• Per sincronizzare la commutazione con un
multiplexer, collegare i connettori VEXT e GND
situati sul retro dell'unità al connettore del
multiplexer.
Una volta effettuati i collegamenti, utilizzare il menu di
sistema per selezionare il tipo di multiplexer in uso.
Telecamere
Multiplexer
1
VCR IN VCR OUT
2
4
5
6
Connettore ottico
Connettore del telecomando
a infrarossi
RS-232
Interruttore di accensione
RS 232
Out2
Monitor Out
Out
Out 1
Monitor Out
Monitor
Bosch Security Systems | 2004-06
GND
NC4
NC3
DISKFULL
VEXT
ALM-CO
LAN
Out 2
GND
100-240 Vac
ALM-NO
ALM-NC
GND
GND
GND
AC 100-240
Out1
Remote Control
Looping out
NC2
Video
In
NC1
S-Video
In
REC
Mux main
Monitor In
In2
ALM-RST
Audio
In1
ALM-IN
Power
Off
3
VCR
Monitor
MON B MON A
VEXT
Connettore di rete
DVR1C1161 | Manuale d'installazione | Capitolo 2
IT | 135
2.4.2 Quadranti
•
Nel menu di sistema, impostare la voce relativa al
multiplexer su Off.
Per collegare un quadrante tramite un'uscita VCR, fare
riferimento alle istruzioni per i collegamenti del
multiplexer.
L'illustrazione riportata di seguito mostra come
collegare al DVR un quadrante senza uscita VCR.
•
•
Collegare il monitor alla presa BNC con
l'indicazione Monitor Out (Uscita monitor) sul retro
del DVR.
Collegare l'uscita video del multiplexer alla presa
BNC con l'indicazione Video In (Ingresso video) sul
retro del DVR.
Quadrante
1
2
3
4
Video
Video OUT
Connettore ottico
Connettore del telecomando a
infrarossi
RS-232
Interruttore di accensione
RS 232
Out2
Monitor Out
Out
Out 1
Monitor Out
Monitor
Bosch Security Systems | 2004-06
GND
NC4
NC3
DISKFULL
VEXT
ALM-CO
LAN
Out 2
GND
100-240 Vac
ALM-NO
ALM-NC
GND
GND
GND
AC 100-240
Out1
Remote Control
Looping out
NC2
Video
In
NC1
S-Video
In
REC
Off
Mux main
Monitor In
In2
ALM-RST
Audio
In1
ALM-IN
Power
VEXT
Connettore di rete
DVR1C1161 | Manuale d'installazione | Capitolo 2
IT | 136
2.4.3 Telecamera singola
•
L'illustrazione riportata di seguito mostra come
collegare una telecamera singola a un DVR.
•
•
•
Collegare il monitor alla presa BNC con
l'indicazione Video Out (Uscita video) sul retro del
DVR.
Collegare l'uscita video della telecamera alla presa
BNC con l'indicazione Video In (Ingresso video) sul
retro del DVR.
•
Collegare l'uscita audio della telecamera alla presa
con l'indicazione Audio In (Ingresso audio) sul retro
del DVR.
Collegare la presa con l'indicazione Audio Out
(Uscita audio) situata sul retro del DVR a un
amplificatore audio.
Nel menu di sistema, impostare la voce relativa al
multiplexer su Off.
RS 232
Out2
Monitor Out
Out
Out 1
GND
NC4
NC3
DISKFULL
VEXT
ALM-CO
ALM-NO
ALM-NC
GND
GND
AC 100-240
Out1
Remote Control
Looping out
GND
Video
In
NC2
S-Video
In
NC1
Mux main
Monitor In
In2
REC
Audio
In1
ALM-RST
Power
Connettore ottico
del telecomando
a infrarossi
Connettore
RS-232
ALM-IN
Audio In
Interruttore di
accensione
Off
Video in
Telecamera
LAN
Out 2
GND
VEXT
Uscita
Video
Audio Out
Connettore di rete
100-240 Vac
Monitor
Bosch Security Systems | 2004-06
DVR1C1161 | Manuale d'installazione | Capitolo 2
IT | 137
2.5 Telecomando
2.6 Reti
Il telecomando è un accessorio che consente il controllo
a distanza del DVR. Il telecomando consente di
controllare le funzioni principali dell'apparecchio.
La connessione di rete utilizza lo standard 10BaseT.
Accertarsi che tale standard sia supportato dalla scheda
di rete.
Le funzioni dei tasti del telecomando sono le seguenti:
RECORD:
STOP:
premere per iniziare la registrazione.
premere per interrompere la
registrazione o la riproduzione.
PLAY:
premere per iniziare la riproduzione.
SEARCH:
aumenta la velocità di 2x, 4x, 8x, 16x,
32x, 640x, 2x . . .
REWIND:
nella modalità di riproduzione, premere
per avviare la riproduzione inversa (il
tasto Search aumenta la velocità di
riavvolgimento).
STEP REW.: premere per interrompere la
riproduzione. Premere di nuovo per
riavvolgere immagine per immagine.
STEP FORW.:premere per interrompere la
riproduzione. Premere una seconda volta
per avanzare immagine per immagine.
FORWARD: durante la riproduzione inversa, premere
per avviare la riproduzione in avanti (il
tasto Search aumenta la velocità di
avanzamento).
0
BOSCH
Tasti per il controllo del
DVR
Bosch Security Systems | 2004-06
Se il DVR è collegato direttamente al PC, utilizzare un
cavo di rete CAT5 incrociato (cross-over). Se il DVR è
collegato a un router o a un hub, utilizzare un cavo di
rete CAT5 diretto (straight-through).
Per garantire il corretto funzionamento del software
remoto, è necessario aprire le porte elencate di seguito:
• porta TCP 80:server Web
• porta TCP 6666:comandi
• porte TCP 1111, 2222, 3333, 4444:dati video
Se si utilizza una connessione tramite firewall, verificare
con l'amministratore di rete di disporre
dell'autorizzazione per accedere all'unità.
DVR1C1161 | Manuale d'installazione | Capitolo 3
3
Uso dell'unità
3.1 Installazione rapida
Nella modalità di installazione rapida è possibile
modificare rapidamente data, ora, qualità di
registrazione e impostazione IPS utilizzando il display a
cristalli liquidi e la manopola di avanzamento.
• Tenere premuto il tasto MENU per 5 secondi per
attivare la modalità di installazione rapida. L'anno
visualizzato sul display a cristalli liquidi lampeggia.
• Ruotare la manopola di avanzamento per modificare
il valore relativo all'anno, quindi premere il tasto
ENTER (Invio). Il mese visualizzato sul display
lampeggia.
• Continuare a utilizzare la manopola di avanzamento
e il tasto ENTER (Invio) per impostare tutti i valori
visualizzati sul display a cristalli liquidi. Una volta
impostati tutti i valori, il DVR torna in modalità
normale.
• Per uscire dal menu di installazione rapida, premere
il tasto SEARCH (Ricerca).
3.2 Registrazione immediata
Premere il tasto Record per iniziare immediatamente la
registrazione: le immagini vengono registrate sul disco
rigido.
• La velocità e la qualità di registrazione vengono
impostate nei menu Registrazione normale e
Registrazione allarme.
• Sul display LCD viene visualizzato REC
(registrazione).
Per interrompere la registrazione, premere il tasto Stop.
• Il tasto Stop funziona solo nella modalità di
registrazione.
• Quando il disco fisso è pieno, il DVR arresta
automaticamente la registrazione o comincia a
sovrascrivere dall'inizio del disco rigido, a seconda
dell'impostazione selezionata nel menu Impostazioni
sistema.
3.3 Registrazione in modalità
allarme
Le immagini sul monitor vengono registrate
automaticamente quando si verifica un allarme e la
registrazione si arresta alla fine della fase di allarme. La
registrazione corrente e quella programmata si arrestano
quando si verifica un allarme. Se l'unità sta già
Bosch Security Systems | 2004-06
IT | 138
registrando, la qualità della registrazione non cambia
nella modalità allarme. Le opzioni per la registrazione in
modalità di allarme vengono impostate nel menu
Registrazione allarme.
3.3.1 Registrazioni pre-allarme
Viene utilizzato un buffer di 220 immagini (ad esempio,
9 sec. a 25 IPS o 220 sec. a 1 IPS) che consente la
registrazione delle immagini nella fase che precede
l'allarme. La registrazione pre-allarme si verifica solo se
l'unità non sta già registrando durante il periodo di
tempo che precede l'allarme. La qualità di registrazione
del periodo precedente l'allarme è la stessa impostata
prima dell'allarme. Se quando si verifica l'allarme l'unità
non sta registrando, la qualità di registrazione del
periodo precedente l'allarme è la stessa di quella della
registrazione normale.
3.4 Riproduzione normale
Riproduzione
• Premere il tasto PLAY per avviare la riproduzione di
immagini/audio dall'ultimo segmento.
• Premere il tasto STOP per interrompere la
riproduzione.
Avanzamento veloce
• Premere il tasto PLAY per avviare la riproduzione.
• Ruotare la ghiera Shuttle in senso orario per avviare
la riproduzione veloce. Sul display è visualizzata la
velocità (velocità di riproduzione normale, 2x, 4x,
8x, 16x, 32x, 640x).
Riproduzione inversa
• Premere il tasto PLAY per iniziare la riproduzione.
• Ruotare la ghiera Shuttle in senso antiorario per
avviare la riproduzione inversa veloce. Sul display è
visualizzata la velocità (velocità di riproduzione
normale, 2x, 4x, 8x, 16x, 32x, 640x).
Riproduzione lenta
• Premere il tasto Pause per bloccare l'immagine.
• Ruotare la ghiera Shuttle in senso orario per avviare
la riproduzione lenta. Sul display è visualizzata la
velocità (>1/2, 1/4, 1/8, 1/16, 1/32, 1/64).
Riproduzione inversa lenta
• Premere il tasto Pause per bloccare l'immagine.
• Ruotare la ghiera Shuttle in senso antiorario per
avviare la riproduzione inversa lenta. Sul display è
visualizzata la velocità (<1/2, 1/4, 1/8, 1/16, 1/32,
1/64).
DVR1C1161 | Manuale d'installazione | Capitolo 3
Blocco velocità visualizzata
• Per bloccare la velocità visualizzata, premere il tasto
Enter e rilasciare la ghiera Shuttle. Ruotando
nuovamente la ghiera Shuttle, viene reimpostata la
velocità normale.
Avanzamento/riavvolgimento di singole immagini
• Premere il tasto Pause per bloccare l'immagine.
• Ruotare la manopola di avanzamento in senso orario
per avviare l'avanzamento immagine per immagine.
• Ruotare la manopola di avanzamento in senso
antiorario orario per avviare il riavvolgimento
immagine per immagine.
• Ruotando velocemente la manopola di avanzamento
si aumenta la velocità delle immagini.
IT | 139
•
•
•
•
Spostare il cursore su PER DATA/ORA e premere il
tasto Enter per selezionare la ricerca di file.
Spostare il cursore sul valore da selezionare e
premere il tasto Enter.
Ruotare la manopola di avanzamento per
posizionarsi su un altro valore e premere il tasto
Enter.
Spostare il cursore su AVVIA RICERCA E
RIPRODUCI e premere il tasto Enter per avviare la
riproduzione dalla data/ora impostate nel menu.
Se non vengono trovate immagini registrate con la data
e l'ora specificate, l'unità avvierà automaticamente la
riproduzione delle immagini con l'ora più vicina.
3.6 Copia
3.5 Ricerca delle riproduzioni
Ricerca per segmenti
• Premere il tasto Search per accedere al menu
Ricerca.
• Spostare il cursore su PER ELENCO SEGMENTI e
premere il tasto Enter per selezionare la ricerca di
file.
• Spostare il cursore sul segmento da riprodurre
(pAlarm: registrazione pre-allarme, Timer:
registrazione programmata).
• Se l'elenco di selezione è a pagina piena, ruotare la
manopola di avanzamento in senso orario per
selezionare l'elenco della pagina successiva.
• Premere Enter per avviare la riproduzione.
Ricerca per allarmi
• Premere il tasto Search per accedere al menu
Ricerca.
• Spostare il cursore su ELENCO PER EVENTI e
premere il tasto ENTER (Invio) per selezionare la
ricerca per allarmi.
• Spostare il cursore per selezionare le immagini
relative all'allarme da riprodurre.
• Se l'elenco di selezione è a pagina piena, ruotare la
manopola di avanzamento in senso orario per
selezionare l'elenco della pagina successiva.
• Premere Enter per avviare la riproduzione delle
immagini relative all'allarme.
• Le immagini relative all'allarme vanno dalla fase preallarme all'arresto dell'allarme.
Ricerca per data/ora
• Premere il tasto Search per accedere al menu
Ricerca.
Bosch Security Systems | 2004-06
Inserire una scheda Compact Flash (tipo I o II)
nell'apposito alloggiamento sul pannello anteriore.
Quando si inserisce una scheda Compact Flash,
assicurarsi che il verso di inserimento sia corretto. Usare
esclusivamente schede Compact Flash con una capacità
di almeno 16 MB.
La funzione di copia delle schede Compact Flash è
progettata per copiare brevi clip. La copia di un clip
lungo potrebbe richiedere molto tempo.
Nota
Per migliorare la leggibilità dei messaggi di copia,
premere il tasto OSD. Premere ancora il tasto OSD per
disattivare lo sfondo.
3.6.1 Copia di immagini fisse
•
•
•
•
•
•
•
•
Premere il tasto Play per iniziare la riproduzione.
Premere il tasto Pause per bloccare l'immagine.
Ruotare la manopola di avanzamento in senso orario
o antiorario per spostarsi all'immagine desiderata.
Premere il tasto Copy per accedere alla modalità di
copia.
Ruotare la manopola di avanzamento per
selezionare l'immagine della telecamera desiderata.
Quando l'immagine è visualizzata, premere
nuovamente il tasto Copy. Durante questa
procedura, sullo schermo viene visualizzato il
messaggio "Copia in corso...". Al termine
dell'operazione, vengono visualizzati sullo schermo il
messaggio "Riuscita" e l'identificativo del file.
Premere il tasto STOP per annullare la copia.
Premere il tasto Play per proseguire la riproduzione.
DVR1C1161 | Manuale d'installazione | Capitolo 3
Le immagini copiate vengono memorizzate come
singola immagine in formato JPG.
3.6.2 Copia di filmati
•
•
•
•
•
•
•
Premere il tasto Play per iniziare la riproduzione.
Premere il tasto Copy per accedere alla modalità di
copia.
Ruotare la manopola di avanzamento per
selezionare la telecamera desiderata.
Quando l'immagine è visualizzata, premere
nuovamente il tasto Copy. Durante questa
procedura, sullo schermo viene visualizzato il
messaggio "Copia in corso...".
Premere il tasto STOP per terminare la copia.
Al termine dell'operazione, vengono visualizzati
sullo schermo il messaggio "Riuscita" e
l'identificativo del file.
Premere il tasto Play per proseguire la riproduzione.
Le immagini copiate vengono memorizzate come filmati
in formato MOV.
3.7 Impostazione del blocco di
sicurezza
Premere il tasto REC per più di 5 secondi nella
modalità di registrazione per bloccare tutti i tasti del
pannello anteriore. (Per attivare questa funzione, è
necessario impostare una password nel menu
Impostazioni sistema.)
Premendo il tasto Stop, il sistema richiede l'immissione
di una password. Se la password immessa è corretta, i
tasti vengono sbloccati.
Bosch Security Systems | 2004-06
IT | 140
DVR1C1161 | Manuale d'installazione | Capitolo 4
4
Impostazione dei menu
Dopo aver collegato il sistema come indicato:
• Premere l'interruttore di accensione.
• Il display si illumina se riceve alimentazione.
• Attendere il caricamento del sistema.
• Premere il tasto MENU per accedere al MENU
PRINCIPALE.
Il menu principale comprende diversi sottomenu che
consentono di modificare le impostazioni.
Ruotare la manopola di avanzamento in senso orario
per spostarsi tra i menu e in senso antiorario per
scorrere i sottomenu. Per aprire un sottomenu, premere
il tasto ENTER. Usare la manopola di avanzamento e il
tasto ENTER per scorrere le voci e i valori dei
sottomenu e selezionarli. Per ritornare al menu
principale, spostarsi alla voce MENU PRINCIPALE
nella parte inferiore di ciascun sottomenu e selezionarla
usando il tasto ENTER.
4.1 Menu principale
0(1835,1&,3$/(
252/2*,2/,1*8$!
5(*,675$=,21(1250$/(!
5(*,675$=,21($//$50(!
7,0(5!
6(*1$/($&867,&2!
$5&+,9,2!
5(7(!
,03267$=,21,6,67(0$!
4.2 Menu Orologio/Lingua
4.3 Menu Registrazione normale
0(185(*,675$=,21(1250$/(
9(/2&,7
5(*,675$=,21(
48$/,7
5(*,675$=,21(
7(032
5(*,675$=,21(
,36
67$1'$5'
25(
0(1835,1&,3$/(
VELOCITÀ: selezionare la velocità di registrazione tra 0,1 e
25/30 IPS.
QUALITÀ: sono disponibili sei livelli di qualità per la registrazione.
SCARSA: 15 KB
BASSA: 20 KB
MEDIA: 25 KB
STANDARD: 30 KB
ALTA: 35 KB
OTTIMA: 40 KB
TEMPO REGISTRAZIONE: mostra una stima del tempo di
registrazione disponibile sul disco in base alla velocità e alla
qualità selezionate.
4.4 Menu Registrazione allarme
0(185(*,675$=,21($//$50(
)81=,21$0(172$//$50(
9(/2&,75(*,675$=,21(
48$/,75(*,675$=,21(
&217$772,1$//$50(
&217$7725(6(7$//$50(
'85$7$$//$50(
21
,36
67$1'$5'
1$
1$
6(&
)81=,21$0(17235($//$50( 21
9(/2&,75(*,675$=,21(
,36
0(18252/2*,2/,1*8$
'$7$
25$
)250$72'$7$
/,1*8$0(18
IT | 141
$$$$00**
,7$/,$12
0(1835,1&,3$/(
DATA: Anno: 2000~2099 Mese: 01~12 Data: 01~31
ORA: Ora: 00~23 Minuti: 00~59 Secondi: 00~59
FORMATO DATA: impostare l'ordine del display per Anno (AAAA),
Mese (MM) e Giorno (GG).
LINGUA MENU: Inglese, Tedesco, Francese, Spagnolo, Italiano,
Portoghese, Olandese o Polacco.
MENU PRINCIPALE: ritorna al menu principale.
Bosch Security Systems | 2004-06
0(1835,1&,3$/(
!
FUNZIONAMENTO ALLARME:
ON: registra quando si attiva l'allarme.
OFF: non registra quando si attiva l'allarme.
VELOCITÀ REGISTRAZIONE: velocità di registrazione per la durata
dell'allarme.
La velocità di registrazione massima è 50/60 IPS
(PAL/NTSC).
La velocità di registrazione minima è 0,1 IPS.
QUALITÀ REGISTRAZIONE: qualità delle immagini registrate quando
si attiva l'allarme.
SCARSA: 15 KB
BASSA: 20 KB
DVR1C1161 | Manuale d'installazione | Capitolo 4
MEDIA: 25 KB
STANDARD: 30 KB
ALTA: 35 KB
OTTIMA: 40 KB
CONTATTO IN ALLARME:
N.A. : Normalmente aperto
N.C. : Normalmente chiuso
CONTATTO RESET ALLARME:
N.A. : Normalmente aperto
N.C. : Normalmente chiuso
DURATA ALLARME: la registrazione in modalità allarme inizia
dall'attivazione dell'allarme e finisce al termine della fase di
allarme o quando è attivato il ripristino allarme. La durata
massima è illimitata, mentre quella minima è di 10 secondi.
FUNZIONAMENTO PRE-ALLARME:
ON: registra le immagini nel periodo che precede l'allarme
alla velocità di registrazione pre-allarme.
OFF: nessuna registrazione nel periodo di tempo che
precede l'allarme.
VELOCITÀ REGISTRAZIONE: la velocità di registrazione nella fase di
pre-allarme.
La velocità di registrazione massima è 50/60 IPS
(PAL/NTSC).
La velocità minima di registrazione è 0,1 IPS.
Nota
Se l'allarme si verifica in modalità di standby o di
registrazione normale, la qualità della registrazione sarà
la stessa della registrazione normale. Se l'allarme si
attiva in modalità di registrazione programmata, la
qualità di registrazione sarà quella impostata nel menu
di registrazione programmata.
4.5 Menu Timer
Le immagini possono essere registrate automaticamente
impostando l'inizio e la fine della registrazione nel
MENU TIMER. Per impostare il programma di
registrazione per un determinato giorno o per una serie
di giorni della settimana sono disponibili 15 voci
configurabili. Posizionarsi su una voce e premere Enter
per selezionare il giorno.
Esempio:
AVVIO 09:00, ARRESTO 23:59
La registrazione inizierà alle 09:00:00 e si interromperà
alle 23:59:59.
Per interrompere una registrazione programmata in
corso, premere il tasto STOP per entrare nel MENU
TIMER e spostare il valore SET su OFF.
IT | 142
0(187,0(5
6(77$9967239(/2&,748$/,767$72
'2025(67$1'$5'2))
/8125(67$1'$5'2))
*6(725(67$1'$5'2))
)6(725(67$1'$5'2))
*,2525(67$1'$5'2))
/8125(67$1'$5'2))
0$525(67$1'$5'2))
9(125(67$1'$5'2))
*,225(67$1'$5'2))
0(525(67$1'$5'2))
6$%25(67$1'$5'2))
'2025(67$1'$5'2))
0(1835,1&,3$/(
SETT: consente di selezionare il giorno o una serie di giorni per il
timer.
GIOR: ogni giorno.
GSET: dal lunedì al venerdì.
FSET: sabato e domenica.
Singoli giorni della settimana.
AVV: immettere l'ora di inizio della registrazione programmata.
STOP: immettere l'ora prevista per la fine della registrazione
programmata.
L'ora di arresto della registrazione deve necessariamente
essere successiva all'ora di avvio.
Ad esempio AVVIO 16:00, ARRESTO 03:00 non è corretto
AVVIO 16:00, ARRESTO 00:00 non è corretto
AVVIO 16:00, ARRESTO 23:59 è corretto
VELOCITÀ: quando il FORMATO VELOCITÀ è impostato su ORE, la
velocità di registrazione può essere impostata da
4/6 (NTSC/PAL) ORE a 960 ORE.
Quando il FORMATO VELOCITÀ è impostato su IPS, la
velocità di registrazione può essere impostata da 0,1~30/
0,1~25 (NTSC/PAL) IPS.
QUALITÀ: sono disponibili sei livelli di qualità delle immagini
registrate.
SCARSA: 15 KB
BASSA: 20 KB
MEDIA: 25 KB
STANDARD: 30 KB
ALTA: 35 KB
OTTIMA: 40 KB
STATO: Impostare su ON quando si usa la registrazione
programmata.
Impostare su OFF quando non si usa la registrazione
programmata.
Nella modalità di registrazione programmata, la
data/ora e la velocità di registrazione del timer sono
indicate alla voce T.REC.
Bosch Security Systems | 2004-06
DVR1C1161 | Manuale d'installazione | Capitolo 4
Non è possibile cambiare il livello di qualità di una
registrazione continua. Ad esempio:
Segm. 1 08:30~17:00
Segm. 2 17:00~23:59
Segm. 1 e Segm. 2 sono considerati una registrazione
continua (08:30~23:59).
Se è richiesto un livello di qualità diverso, impostare
come indicato:
Segm. 1 08:30~16:59
Segm. 2 17:00~23:59
4.6 Menu Segnale acustico
0(186(*1$/(
$&867,&2
6(*1$/$=,21(
$&867,&$
,1*5(662$//$50(
,1*5(662
5(*,675$=,21(
',6&23,(12
3(5',7$9,'(2
7,0(5
$77,9$
0(1835,1&,3$/(
!
21
21
21
21
2))
SEGNALE ACUSTICO:
ATTIVA: attiva il segnale acustico.
DISATTIVA: disattiva il segnale acustico.
Nota: premere il tasto Enter per attivare/disattivare nella modalità
di registrazione/riproduzione.
INGRESSO ALLARME: ON - In caso di allarme, il segnale acustico
viene attivato.
INGRESSO REGISTRAZIONE: ON - Il segnale acustico si attiva
quando il segnale Ingresso registrazione viene inviato al
terminale Ingresso registrazione.
DISCO PIENO: ON - Il segnale acustico si attiva quando il disco è
quasi pieno (99,7%).
PERDITA DI SEGNALE VIDEO: ON - Il segnale acustico di attiva in
caso di perdita del segnale video.
TIMER: ON - Il segnale acustico si attiva quando si avvia la
registrazione programmata.
IT | 143
4.7 Menu Archivio
0(18$5&+,9,2
',0(16,21,,00$*,1(
,1',&$725(25$
326,=,21(,1',&$725(
25$
),/,*5$1$
326,=,21(),/,*5$1$
;
21
,1%$662
0(1835,1&,3$/(
!
21
,1%$662
DIMENSIONI IMMAGINE: selezionare le dimensioni dell'immagine da
copiare sulla scheda CF.
Grande: 720x576 (PAL), 720x480 (NTSC)
Piccola: 352x288 (PAL), 352x240 (NTSC)
INDICATORE ORA:
ON: l'indicatore dell'ora viene visualizzato sull'immagine
durante la copia sulla scheda CF.
OFF: l'indicatore dell'ora non viene visualizzato sull'immagine
durante la copia sulla scheda CF.
POSIZIONE INDICATORE ORA:
IN BASSO: l'indicatore dell'ora appare in basso.
IN ALTO: l'indicatore dell'ora appare in alto.
FILIGRANA:
ON: la filigrana viene visualizzata sull'immagine durante la
copia sulla scheda CF.
OFF: la filigrana non viene visualizzata sull'immagine durante
la copia sulla scheda CF.
POSIZIONE FILIGRANA:
IN BASSO: la filigrana viene visualizzata in basso.
IN ALTO: la filigrana viene visualizzata in alto.
4.8 Menu Rete
0(185(7(
,1',5,==2,3
,1',5,==21(70$6.
,1',5,==2*$7(:$<
&21),*85$87(17(
&21),*85$87(17(
&21),*85$87(17(
!
!
!
0(1835,1&,3$/(
!
INDIRIZZO IP: immettere l'indirizzo IP dell'unità nel sistema di rete.
INDIRIZZO NETMASK: immettere il netmask dell'unità nel sistema di
rete.
INDIRIZZO GATEWAY: immettere l'indirizzo gateway dell'unità nel
sistema di rete.
CONFIGURA UTENTE: è possibile impostare tre nomi utente e
password. I tre utenti possono accedere a un proprio menu di
impostazione.
Bosch Security Systems | 2004-06
DVR1C1161 | Manuale d'installazione | Capitolo 4
&21),*85$87(17(
120(87(17(
3$66:25'87(17(
/,9(//287(17(
$'0,1BBB
$'0,1BBB
683(5
0(185(7(
0(1835,1&,3$/(
!
!
Quando si collega un PC al DVR tramite rete, sullo
schermo del PC viene visualizzata la pagina di accesso
del DVR. Il menu di configurazione utente consente
all'amministratore di impostare il nome utente e la
password di accesso nonché il livello di accesso. Il
sistema dispone di tre diversi livelli di accesso:
• L'accesso SUPER consente di vedere immagini in
tempo reale/registrate e di controllare il
funzionamento del DVR.
• L'accesso GENERALE consente di vedere immagini
in tempo reale e registrate.
• L'accesso OSPITE consente di vedere solo immagini
in tempo reale.
È possibile effettuare un massimo di quattro connessioni
alla volta (un nome utente e una password condivisi).
4.9 Menu Impostazioni sistema
0(18,03267$=,21,6,67(0$
3$66:25'$77,9$7$
3$66:25'
12
,1*5(6629,'(2
5(*,675$&21$8',2
5,352'8&,&21$8',2
5,352'8&,&21$8',2
08/7,3/(;(5
/,1($&2',&(48$'52
',6&23,(12
)250$729(/2&,7
6,67(0$9,'(2
&20326,72
2))
21
21
%RVFK/7&
5,6&5,9,
,36
3$/
&$1&(//$',6&2
$**,251$0(1726,67(0$
&$5,&$35('(),1,72
)250$77$&)
!
!
!
!
0(1835,1&,3$/(
!
Bosch Security Systems | 2004-06
IT | 144
PASSWORD ATTIVATA:
SÌ: per accedere al menu è necessario immettere una
PASSWORD.
NO: per accedere al menu non è necessario immettere una
PASSWORD.
PASSWORD:
Quando PASSWORD ATTIVATA è impostata su SÌ, è
necessario immettere una PASSWORD per accedere al
menu. Il codice è di sei cifre e può includere qualsiasi
numero da 1 a 5.
Quando la password è attivata, ogni volta che si preme il
pulsante Menu nella modalità live o il tasto Stop nella
modalità di registrazione, il sistema richiede l'immissione della
password. Assicurarsi pertanto di annotare la password scelta.
INGRESSO VIDEO:
COMPOSITO: selezionare l'ingresso video dal connettore
BNC.
S-VIDEO: selezionare l'S-VIDEO dal connettore S-VIDEO.
REGISTRA CON AUDIO: ON/OFF: consente di registrare con o
senza audio
RIPRODUCI CON AUDIO 1/RIPRODUCI CON AUDIO 2:
ON/OFF: riproduzione con o senza audio.
La registrazione e la riproduzione dell'audio sono possibili
solo nella modalità in tempo reale a una velocità di 1 IPS o
superiore (riprodurre alla stessa velocità usata per la
registrazione).
MULTIPLEXER:
Selezionare la marca del multiplexer collegato al DVR. Se la
marca desiderata non è inclusa nell'elenco, scegliere
SCONOSCIUTA.
Quando si seleziona un multiplexer, l'ingresso video dal
connettore MUX MAIN MONITOR (Monitor principale
multiplexer) sul pannello posteriore viene reindirizzato
all'uscita MONITOR OUT (Uscita monitor) quando il
registratore non è nella modalità MENU.
Se al DVR è collegata una sola telecamera, impostare OFF.
L'uscita del monitor principale corrisponde ora al connettore
di uscita video.
LINEA CODICE QUADRO:
Se si imposta la marca del multiplexer su SCONOSCIUTA, è
possibile regolare la linea del codice quadro del multiplexer
collegato tra 0 e 20. Il valore predefinito (13) è adatto alla
maggior parte dei multiplexer. Se la linea del codice quadro
appare all'estremità superiore dei canali di riproduzione,
diminuire il valore. Se la riproduzione del multiplexer non è
soddisfacente, aumentare il valore.
DISCO PIENO:
STOP: quando il disco è pieno, l'unità interrompe la
registrazione.
RISCRIVI: quando il disco è pieno, il video attualmente in
registrazione sovrascrive il video esistente dall'inizio del disco
fisso.
FORMATO VELOCITÀ: selezionare la velocità di registrazione in IPS
(immagini al secondo) o in ore.
SISTEMA VIDEO: selezionare il sistema video NTSC o PAL (per
attivarlo è necessario riavviare il sistema).
CANCELLA DISCO:
Premere ENTER (Invio) per cancellare tutte le registrazioni
dal disco fisso.
Sullo schermo viene visualizzata una finestra di dialogo di
conferma.
Selezionare Sì o No e premere ENTER.
DVR1C1161 | Manuale d'installazione | Capitolo 4
AGGIORNAMENTO SISTEMA:
Premere Enter per aggiornare o non aggiornare il sistema.
SÌ: copiare il file di aggiornamento sulla scheda Compact
Flash nel PC, quindi inserire la scheda Compact Flash
nell'apposito slot. Per aggiornare il sistema, premere il tasto
ENTER. Al termine della procedura di aggiornamento,
assicurarsi di riavviare il sistema per implementare le
modifiche.
CARICA PREDEFINITO:
Premere Enter per caricare o meno i valori predefiniti di
fabbrica.
SÌ: sullo schermo viene visualizzata una finestra di dialogo di
conferma.
Selezionare Sì o No e premere ENTER.
FORMATTA CF:
SÌ: formatta la scheda Compact Flash.
NO: non formatta la scheda Compact Flash.
4.10 Menu Password
Quando è attivata la protezione tramite password, viene
visualizzato un menu Password ogni volta che si tenta di
aprire un menu o di interrompere la registrazione.
Immettere la password utilizzando i seguenti tasti:
REC : 1
OSD : 2
STOP : 3
PLAY : 4
PAUSE : 5
Bosch Security Systems | 2004-06
IT | 145
DVR1C1161 | Manuale d'installazione | Capitolo 5
5
IT | 146
Visualizzazione tramite
Internet/intranet
5.1 Accesso
Aprire il browser Internet e immettere l'indirizzo IP di
rete (ad esempio, http://192.168.10.5). L'indirizzo IP
deve essere lo stesso impostato nel menu Rete del DVR.
Bosch Security Systems | 2004-06
Sullo schermo viene visualizzata la pagina di accesso del
DVR. Immettere il nome utente e la password corretti,
impostati nel menu Rete del DVR. Se si desidera
utilizzare le impostazioni predefinite, immettere
ADMIN nel campo del nome utente e ADMIN in
quello della password, quindi fare clic su Invia per
accedere al sistema.
DVR1C1161 | Manuale d'installazione | Capitolo 5
5.2 Schermata principale
L'icona nella parte inferiore dello schermo consente di
disconnettersi. Nella parte inferiore della schermata
sono inoltre visualizzate informazioni sullo stato del
sistema. Sono indicati lo stato corrente del sistema, la
data e l'ora.
Le icone a destra consentono di selezionare le
telecamere e di scegliere la loro disposizione sullo
schermo. Nella parte destra sono inoltre disponibili i
controlli per la riproduzione. La funzione di ricerca
consente di selezionare un clip da riprodurre. Se
un'icona è grigia, significa che la funzione
corrispondente non è attiva nella modalità corrente.
IT | 147
Nota
La frequenza di aggiornamento delle immagini live
dipende dalla velocità di registrazione selezionata
quando l'unità è in modalità di registrazione (ad
esempio, la registrazione a 0,5 IPS fornisce un
aggiornamento di 2 secondi per immagine).
La visualizzazione di immagini live non è possibile se il
registratore è in fase di riproduzione. Lo stato del
sistema riporta il messaggio SERVER IN
RIPRODUZIONE. Per visualizzare immagini live, è
prima necessario interrompere la riproduzione del
registratore stesso.
5.2.1 Colori dei messaggi di stato
5.2.2 Icone della modalità Live
Il colore del messaggio di stato indica se si sta lavorando
in locale o in remoto. Se si sta lavorando in locale, i
messaggi vengono visualizzati in giallo. Se si sta
controllando direttamente il DVR ed è stata selezionata
l'icona CONTROLLO, i messaggi vengono visualizzati
in verde.
Nella modalità di visualizzazione sono attive le icone
della telecamera, le icone di visualizzazione telecamera
e l'icona Riproduci.
Bosch Security Systems | 2004-06
DVR1C1161 | Manuale d'installazione | Capitolo 5
5.2.3 Icone della modalità di
riproduzione
Selezionare l'icona RIPRODUCI per passare alla
modalità di riproduzione.
• ARRESTO: premere questa icona per interrompere
la riproduzione video.
• RIPRODUCI: consente di riprodurre il video.
• PLAY REV.: consente di riprodurre il video
all'indietro.
• STEP: manda avanti il video di un'immagine.
• STEP: manda indietro il video di un'immagine.
• PAUSA: premere questa icona per mettere in pausa
la riproduzione.
• CONTROL: premere questa icona per passare alla
modalità controllo remoto (a cui si può accedere
esclusivamente con il livello d'accesso SUPER). A
questo punto, è possibile avviare o interrompere
direttamente la riproduzione e la registrazione in
remoto sul DVR.
• Controllo della velocità di riproduzione.
5.2.4 Ricerca
Il sistema offre tre opzioni di ricerca del video da
riprodurre:
• Riproduzione del video selezionato per elenco
segmenti.
• Riproduzione del video selezionato per elenco
allarmi.
• Riproduzione del video selezionato per data/ora.
Per scegliere una voce dell'elenco, selezionarla con un
clic del mouse. Per riprodurre il video selezionato, fare
clic su PLAY.
Bosch Security Systems | 2004-06
IT | 148
DVR1C1161 | Manuale d'installazione | Capitolo 6
6
IT | 149
Specifiche
6.1 Interfaccia RS-232
Il DVR può essere controllato con un computer o un
terminale tramite il connettore RS-232 D-SUB a 9
piedini.
3LHGLQR
'95&
1&
7;'
3LHGLQR
+267
1&
5;'
5;'
7;'
1&
*5281'
'75
*5281'
1&
1&
1&
9
'65
576
&76
1&
L'impostazione della velocità di trasmissione è
9600 baud, 8 bit di dati, 1 bit di inizio, 1 bit di stop e
nessuna parità.
6.1.1 Protocollo di controllo RS-232
È possibile utilizzare un computer o un terminale per
controllare l'unità inviando comandi ASCII a tre
caratteri tramite il connettore RS232; questi comandi
ASCII iniziano con 'K' o 'k'. Sono disponibili 30
comandi ASCII abbinati ai 30 tasti sul pannello
anteriore. I 30 comandi ASCII sono elencati nella
tabella riportata di seguito.
Bosch Security Systems | 2004-06
&20$1',)81=,21(
$6&,,
7DVWLGHO
SDQQHOOR
DQWHULRUH
.
$YYLRUHJLVWUD]LRQH 5(&
.
$UUHVWR
UHJLVWUD]LRQHH
ULSURGX]LRQH
6723
.
5LSURGX]LRQH
3/$<
.
3DXVDULSURGX]LRQH
3$86(
.
5LFHUFD
ULSURGX]LRQH
6($5&+
.
&RSLDLPPDJLQHVX
VFKHGD&)
&23<
.
9LVXDOL]]D]LRQHVX ',63/$<
VFKHUPR
.
&RQIHUPDVHOH]LRQH
(17(5
.
$FFHVVRPHQX
LPSRVWD]LRQL
0(18
.
.
5LSURGX]LRQH
LQYHUVDYHORFH
;
.
.
5LSURGX]LRQHYHORFH !!;
.
5LDYYROJLPHQWR
LPPDJLQHILVVD
-2*5(:
.
$YDQ]DPHQWR
LPPDJLQHILVVD
-2*))
DVR1C1161 | Manuale d'installazione | Capitolo 6
IT | 150
6.2 Tempi di registrazione
Tempi di registrazione approssimativi in ore senza
audio quando si registra su un disco fisso da 160 GB.
PAL
Velocità
registrazione
(IPS)
Scarsa
(15KB)
Bassa
(20KB)
50
25
12
8
5
2
1,6
1,0
0,5
0,2
0,1
60
120
240
360
590
1420
1900
3000
5900
14800
29600
44
90
180
270
440
1070
1420
2200
4400
11100
22200
Velocità
registrazione
(IPS)
Scarsa
(15KB)
Bassa
(20KB)
60
30
20
10
5
2
1,5
1,0
0,5
0,2
0,1
50
100
150
300
590
1480
1980
3000
5900
14800
29600
37
74
110
220
440
1110
1480
2200
4400
11100
22200
Qualità immagine (Dimensioni file medie)
Media
Standard
(25KB)
(30KB)
Tempo di registrazione approssimativo
Ore
36
30
70
60
140
120
210
180
360
300
850
710
1140
950
1800
1500
3600
3000
8900
7400
17800
14800
Alta
(35KB)
Ottima
(40KB)
25
50
100
150
250
610
810
1300
2500
6300
12700
22
44
90
130
220
530
710
1100
2200
5600
11100
Alta
(35KB)
Ottima
(40KB)
21
42
60
130
250
630
850
1300
2500
6300
12700
19
37
56
110
220
560
740
1100
2200
5600
11100
NTSC
Qualità immagine (Dimensioni file medie)
Media
Standard
(25KB)
(30KB)
Tempo di registrazione approssimativo
Ore
30
25
60
50
90
70
180
150
360
300
890
740
1190
990
1800
1500
3600
3000
8900
7400
17800
14800
Riferimento:
24 ore=1 giorno, 168 ore=1 settimana, 720 ore=1 mese,
8760 ore=1 anno
(calcolo basato su un'immagine tipica-basso livello di
disturbo)
Bosch Security Systems | 2004-06
Per la registrazione audio è necessario calcolare una
dimensione file approssimativa di 18 KB (PAL) o di
21,6 KB (NTSC) per secondo di audio. Ciò consente di
ridurre i tempi di registrazione, specialmente per le
velocità di registrazione inferiori riportate nelle tabelle
precedenti.
DVR1C1161 | Manuale d'installazione | Capitolo 6
6.3 Specifiche tecniche
Video
Formato
Ingresso
Uscita
Compressione
Risoluzione
Schermo
PAL/NTSC
1 ingresso telecamera (BNC),
1 Vp-p, 75 Ohm
1 uscita video (BNC) per il monitor
principale, 1 Vp-p, 75 Ohm
M-JPEG
720 x 576 (PAL) /
720 x 484 (NTSC)
Schermo intero per immagini in
tempo reale e registrate
Audio
Connessioni
2 ingressi mono, 1,6 Vp-p ±200 mV
a 10 K
2 uscite mono, 1,6 Vp-p ±200 mV a
10 K
Allarme
Ingresso
Uscita
Tensione di commutazione a livello
alto: > 2 V CC
Tensione di commutazione a livello
basso: < 0,5 V CC
1 uscita relè:
Tensione di contatto massima:
24 V CC
Corrente di commutazione
massima: 2 A CC
Memorizzazione
Disco rigido
160 GB
Registrazione
Modalità
Frequenza
Ricerca
Generali
Rilevazione perdita di segnale video Sì
Rilevazione perdita di potenza
Sì
Registrazione allarmi
Sì
Interfaccia utente
Basata su menu
Impostazione
Tramite menu su schermo
Dispositivo di input utente
Tasti del pannello anteriore,
telecomando (a infrarossi con
ricevitore con cavo) opzionale
Esportazione immagini
Slot per Compact Flash incorporato
per schede Tipo I e Tipo II
Sicurezza
Protezione tramite password
Alimentazione
100 - 240 V CA, 50/60 Hz
Consumo di energia < 40 W
Timer
Timer settimanale, orologio in
tempo reale incorporato
Connessione di rete 10Base-T, TCP/IP via Ethernet,
connettore RJ-45
Connessione di
Connettore RS-232, D-Sub a
controllo
9 piedini
Meccaniche
Peso
circa 5,5 kg/11,5 libbre
Dimensioni (LxAxP) 346 x 88 x 269 mm
13,6 x 3,5 x 10,5 pollici
Temperatura ambiente
Di esercizio
+0 °C … +40 °C
+32 °F. . . +104 °F
Certificazioni
Sicurezza
Registrazione continua, a intervalli,
programmata o per eventi
Fino a 50 immagini al secondo
(PAL)
Fino a 60 immagini al secondo
(NTSC)
Riproduzione
Frequenza
IT | 151
Fino a 50 immagini al secondo
(PAL)
Fino a 60 immagini al secondo
(NTSC)
Data/ora, elenco segmenti o eventi
(allarmi)
Bosch Security Systems | 2004-06
Europa
USA
Australia
EN60950
Omologazioni UL60950 UL e cUL
C-Tick
Compatibilità elettromagnetica (EMC)
Europa
USA
Australia
EN55022 Classe B, EN50130-4
FCC articolo 15, Classe B
AS/NZS 3548
Le specifiche possono variare senza preavviso. In caso di
problemi, contattare il rivenditore.
DVR1C1161 | Manuale d'installazione | Capitolo 6
Bosch Security Systems | 2004-06
IT | 152
DVR1C1161 | Manual de instalação | Índice
1.
PRECAUÇÕES DE SEGURANÇA ..................................................................................................................................155
1.1
2.
3.
4.
PT | 153
MEDIDAS DE SEGURANÇA IMPORTANTES ...................................................................................155
INTRODUÇÃO .........................................................................................................................................................................156
2.1
FUNCIONALIDADES ................................................................................................................................156
2.2
PAINEL FRONTAL .....................................................................................................................................157
2.3
PAINEL TRASEIRO ....................................................................................................................................158
2.3.1 Power ................................................................................................................................................158
2.3.2 Conector de série RS232 ...........................................................................................................158
2.3.3 Conector do olho receptor do comando à distância IV ........................................................158
2.3.4 Conector LAN .................................................................................................................................158
2.3.5 Ligações do alarme .......................................................................................................................158
2.4
INTERLIGAÇÕES ......................................................................................................................................159
2.4.1 Multiplexers ......................................................................................................................................159
2.4.2 Quads ...............................................................................................................................................160
2.4.3 Câmara única ..................................................................................................................................161
2.5
UNIDADE DE COMANDO À DISTÂNCIA ...........................................................................................162
2.6
REDES ..........................................................................................................................................................162
FUNCIONAMENTO ...............................................................................................................................................................163
3.1
INSTALAÇÃO RÁPIDA .............................................................................................................................163
3.2
GRAVAÇÃO INSTANTÂNEA ..................................................................................................................163
3.3
GRAVAÇÃO COM ALARME ..................................................................................................................163
3.3.1 Gravação com pré-alarme ...........................................................................................................163
3.4
REPRODUÇÃO NORMAL .......................................................................................................................163
3.5
PESQUISAR REPRODUÇÃO ................................................................................................................164
3.6
COPIAR ........................................................................................................................................................164
3.6.1 Copiar imagem parada .................................................................................................................164
3.6.2 Copiar para ficheiro de filme .......................................................................................................165
3.7
DEFINIÇÃO DE BLOQUEIO DE SEGURANÇA ................................................................................165
CONFIGURAÇÃO DO MENU ...........................................................................................................................................166
4.1
MENU PRINCIPAL .....................................................................................................................................166
4.2
MENU RELÓGIO/IDIOMA .......................................................................................................................166
4.3
MENU GRAVAÇÃO NORMAL ...............................................................................................................166
4.4
MENU GRAVAÇÃO COM ALARME .....................................................................................................166
4.5
MENU TEMPORIZADOR .........................................................................................................................167
4.6
MENU AVISO SONORO .........................................................................................................................168
4.7
MENU ARQUIVO ........................................................................................................................................168
4.8
MENU REDE ................................................................................................................................................168
Bosch Security Systems | 2004-06
DVR1C1161 | Manual de instalação | Índice
4.9
PT | 154
MENU DEFINIÇÃO DO SISTEMA .........................................................................................................169
4.10 MENU PALAVRA-PASSE .........................................................................................................................170
5.
6.
VER PELA INTERNET/INTRANET .................................................................................................................................171
5.1
INICIAR SESSÃO ......................................................................................................................................171
5.2
ECRÃ PRINCIPAL ......................................................................................................................................171
5.2.1 Cor da mensagem de estado .....................................................................................................172
5.2.2 Ícones do modo Directo ...............................................................................................................172
5.2.3 Ícones do modo Reprodução .....................................................................................................172
5.2.4 Pesquisar .........................................................................................................................................173
ESPECIFICAÇÕES ................................................................................................................................................................174
6.1
INTERFACE RS-232 .................................................................................................................................174
6.1.1 Protocolo de controlo do RS-232 .............................................................................................174
6.2
TEMPO DE GRAVAÇÃO .........................................................................................................................175
6.3
ESPECIFICAÇÕES TÉCNICAS .............................................................................................................176
Abreviaturas do visor
II
A.REC
BASIC
HIGH
LOW
LOWER
MENU
PAUSE
P.END
PLAY
P.END
P.RPT
REC
SRCH
STDRD
SUPER
SYSLD
T.REC
*REC
P.BEG
R.REC
Pausa
Gravação com alarme
Qualidade básica
Alta qualidade
Baixa qualidade
A qualidade mais baixa
Menu
Pausa
Terminar pausa
Reproduzir
Terminar reprodução
Repetição da reprodução
Gravação
Pesquisa
Qualidade normal
Qualidade superior
A carregar sistema
Gravação com temporizador
Bloqueio de gravação
Ínicio de reprodução
Gravação remota
Bosch Security Systems | 2004-06
DVR1C1161 | Manual de instalação | Capítulo 1
1
PRECAUÇÕES DE
SEGURANÇA
Perigo
O relâmpago com o símbolo da seta, dentro de
um triângulo equilátero, destina-se a alertar o
utilizador para a presença de “tensão perigosa”
não isolada dentro da estrutura do produto, que
pode ser de magnitude suficiente para constituir
risco de choque eléctrico para as pessoas.
Aviso
O ponto de exclamação dentro de um triângulo
equilátero destina-se a alertar o utilizador para a
presença de instruções importantes de
funcionamento e manutenção (assistência) na
literatura que acompanha o aparelho.
Atenção
Para reduzir o risco de choques eléctricos, não
retire a cobertura (ou a parte de trás). No
interior do equipamento, não existem quaisquer
peças que possam ser reparadas pelo utilizador.
Remeta todas as reparações para técnicos
qualificados.
1.1 MEDIDAS DE SEGURANÇA
IMPORTANTES
1
2
3
4
5
6
7
Leia estas instruções.
Guarde estas instruções.
Tenha em atenção todos os avisos.
Siga todas as instruções.
Não utilize este equipamento junto da água.
Limpe-o apenas com um pano seco.
Não obstrua os orifícios de ventilação. Proceda à
instalação, de acordo com as instruções do
fabricante.
8 Não instale o aparelho junto de fontes de calor
como, por exemplo, aquecedores, fogões, nem de
outro tipo de equipamento (incluindo
amplificadores) que produza calor.
Bosch Security Systems | 2004-06
PT | 155
9 Não danifique a ficha de ligação à terra ou
polarizada dado que é uma protecção. Uma ficha
polarizada tem duas lâminas, uma maior do que a
outra. Uma ficha de ligação à terra tem duas lâminas
e um perno para ligação à terra. A lâmina grande e o
terceiro contacto são importantes para a sua
segurança. Se a ficha fornecida não encaixar na
tomada, contacte um electricista para que substitua a
tomada obsoleta.
10 Proteja o cabo de alimentação de modo a que não
seja pisado nem entalado, em especial nas fichas,
tomadas e no ponto de saída do equipamento.
11 Utilize apenas acessórios especificados pelo
fabricante.
12 Desligue o equipamento se houver trovoadas ou se
não tencionar utilizá-lo durante um longo período de
tempo.
13 Remeta todas as reparações para técnicos
qualificados. Tem de recorrer à assistência técnica
quando o equipamento tiver sido de alguma forma
danificado, como nos seguintes casos: a ficha ou o
cabo de alimentação está danificado; derramou
líquido ou caiu algum objecto dentro do
equipamento; este foi exposto à chuva ou humidade;
não funciona correctamente ou caiu.
14
Aviso
Para reduzir os riscos de incêndios ou choques
eléctricos, não deve expor este aparelho à
chuva ou humidade nem deve colocar objectos
com líquidos, como vasos, sobre o aparelho.
15 O painel traseiro do gravador só deverá ser
removido por pessoal qualificado de manutenção e
assistência.
16 Perigo de explosão se a bateria for incorrectamente
substituída. A bateria de lítio está localizada no
interior da estrutura deste gravador. Substitua-a
apenas pelo mesmo tipo ou equivalente. Desfaça-se
da bateria substituída de forma ecológica.
17 Mantenha as aberturas de ventilação desimpedidas,
para evitar o sobreaquecimento do gravador.
18 Não coloque o gravador perto de fontes de calor.
19 Não instale este equipamento num local com pouca
abertura como, por exemplo, uma estante ou algo
semelhante.
DVR1C1161 | Manual de instalação | Capítulo 2
Limpeza
20 Pode limpar a unidade com um pano húmido sem
pêlo ou com um pano em pele de camurça.
Comentário
A Bosch tem um dever importante para com o meio
ambiente. Esta unidade foi concebida de forma a
respeitar o mais possível o ambiente.
PT | 156
2
Introdução
O gravador de vídeo digital DVR1C1161 oferece uma
tecnologia avançada de gravação e reprodução para
sistemas CCTV. O DVR permite a gravação
ininterrupta em modo contínuo ou em modo de
intervalos de tempo, por períodos de uma semana ou
mais. Não existem videocassetes a mudar ou guardar e,
frequentemente, a dispendiosa manutenção do
videogravador é eliminada.
O DVR consegue gravar até 50/60 imagens por
segundo nos formatos PAL/NTSC e reproduzir
instantaneamente os eventos. O DVR incorpora todas
as vantagens da gravação vídeo digital, é fácil de instalar
e funciona tal como um videogravador. A tecnologia de
compressão altamente eficaz, assim como a nitidez
superior e o pormenor das imagens do gravador,
tornam o DVR ideal para integração com uma grande
variedade de multiplexers.
2.1 Funcionalidades
•
•
•
•
•
•
•
•
•
•
•
•
•
•
•
•
Bosch Security Systems | 2004-06
Proporciona imagens de qualidade superior
Gravação de imagem com pré-alarme
Gravação com intervalos de tempo e em tempo real
Velocidade de actualização de até 50 imagens para
PAL e de 60 imagens para NTSC
Pesquisa rápida por data/hora, eventos de alarme e
lista de gravações
Reprodução rápida ou lenta do vídeo gravado a
várias velocidades
Menu de configuração no ecrã e temporizador do
sistema
Protecção por palavra-passe
Porta de comunicação RS-232
Compressão/descompressão M-JPEG incorporada
com qualidade configurável
Capacidade de gravação áudio
Programado com várias velocidades de intervalo de
tempo
Os dados podem ser guardados num cartão
Compact Flash
Comando à distância
Gravações de visualização remota e imagens ao vivo
com Navegador na Web
Compatível com multiplexers Bosch e de outras
marcas.
DVR1C1161 | Manual de instalação | Capítulo 2
PT | 157
2.2 Painel frontal
No modo de menu, rode o Botão rotativo para
navegar pelas páginas dos menus ou para
seleccionar valores de dados. Utilize em conjunto
com a tecla ENTER para definir os valores dos
menus.
1 REC: Prima para iniciar a gravação (a luz vermelha
da tecla acende-se quando a unidade está a gravar).
2 OSD: - Prima uma vez para ver a hora/data,
utilização do disco e taxa de reprodução.
- Prima uma segunda vez para ver o tamanho
do disco, a posição de gravação e a posição
de reprodução.
- Prima uma terceira vez para desactivar o
visor.
9 ENTER: Prima para confirmar uma selecção ou a
alteração de um valor de dados.
10 MENU: Prima para entrar ou sair do menu de
configuração.
11 Janela receptora de IV do comando à distância.
3 STOP: Prima para interromper a gravação ou a
12 Visor LCD
reprodução.
No modo standby, apresenta a data/hora actuais e a
qualidade e velocidade definidas para a gravação
normal.
No modo de Gravação, apresenta a data/hora
actuais e GRA e a actual taxa de gravação.
No modo de Reprodução, apresenta a data/hota
actuais e REPRODUÇÃO e a actual taxa de
reprodução.
(Para mais informações sobre as mensagens
apresentadas, consulte a lista de abreviaturas no
início deste manual.)
4 PLAY: Prima para iniciar a reprodução.
5 PAUSE: Prima para fazer uma pausa na imagem
reproduzida.
6 SEARCH: Prima para entrar no menu de pesquisa.
7 Anel de controlo:
No modo de reprodução, rode o Anel de controlo
no sentido dos ponteiros do relógio para acelerar ou
no sentido oposto ao dos ponteiros do relógio para
abrandar a reprodução normal ou invertida da
imagem.
No modo de pausa, rode o Anel de controlo para
mover lentamente a imagem para a frente ou para
trás.
13 ALARME: O indicador acende-se quando o alarme
dispara.
14 LAN: O indicador acende-se durante o acesso à rede.
15 Ranhura para cartão Compact Flash: Introduza um
8 Botão rotativo:
cartão Compact Flash. Prima o botão preto ao lado
da ranhura para retirar o cartão.
No modo de reprodução, rode o Botão rotativo
para seleccionar a velocidade de reprodução.
No modo de pausa, rode o Botão rotativo para
avançar ou retroceder imagem a imagem.
1
16
15
Bosch Security Systems | 2004-06
14 13
16 COPIAR: Prima para copiar uma imagem
congelada ou uma sequência de vídeo para o cartão
Compact Flash.
2
3
12
4
5
6
11
10
7
8
9
DVR1C1161 | Manual de instalação | Capítulo 2
PT | 158
2.3 Painel traseiro
ALM-IN:
2.3.1 Power
ALM-RST:
Ligue o cabo de alimentação de corrente à entrada
Power (corrente) na parte de trás desta unidade. Utilize
o interruptor de alimentação para ligar (ON) ou desligar
(OFF) a unidade.
REC:
2.3.2 Conector de série RS232
NC1, NC2:
Ligue o conector de 9 pinos D-Sub à porta RS232, se
quiser controlar a unidade à distância.
Aplique um sinal* aqui para iniciar a
gravação com alarme.
Aplique um sinal* aqui para interromper
a gravação com alarme.
Um sinal* de pedido de gravação
externo de alto nível aplicado neste pino
inicia a gravação. Quando o sinal
diminui para baixo, a gravação pára.
Sem ligações.
* Sinal
- tensão de comutação Alta: > 2 V CC
2.3.3 Conector do olho receptor do
comando à distância IV
- tensão de comutação Baixa: < 0,5 V CC
Entradas de alarme
GND
NC4
NC3
DISKFULL
VEXT
ALM-CO
ALM-NO
ALM-NC
GND
GND
NC2
NC1
REC
GND
ALM-IN
ALM-RST
- tensão máx. de entrada: 12 V CC
Se a janela receptora de IV do comando à distância na
parte frontal estiver ocultada (se a unidade estiver
montada num armário), ligue a extensão IV, disponível
como opção, ao conector do comando à distância.
Posicione o olho receptor, de forma a que esteja dentro
do campo de visão da unidade do comando à distância.
Saídas de alarme
2.3.4 Conector LAN
Os sinais de saída do alarme são:
Para ligar a unidade a uma rede, utilize o conector
LAN RJ-45 à parte de trás da unidade.
GND:
ALM-NC**:
Ligação à terra.
Quando dispara um alarme, a ligação
entre este pino e ALM-COM é aberta.
Caso contrário, está fechada.
ALM-NO**: Quando dispara um alarme, a ligação
entre este pino e ALM-COM é fechada.
Caso contrário, está aberta.
ALM-COM**: Contacto normal do alarme.
2.3.5 Ligações do alarme
As entradas ALM-IN e ALM-RST podem ser
configuradas como Normalmente aberta (N.A.) ou
Normalmente fechada (N.F.) no menu de Gravação
com alarme.
Ligação à terra.
Conector Conector do receptor do
comando à distância IV
RS-232
Interruptor de corrente
RS 232
Out2
Monitor Out
Out
Out 1
GND
NC4
VEXT
Conector de alarme
Bosch Security Systems | 2004-06
LAN
Out 2
GND
100-240 Vac
NC3
DISKFULL
VEXT
ALM-CO
ALM-NO
ALM-NC
GND
AC 100-240
Out1
Remote Control
Looping out
GND
Video
In
GND
S-Video
In
NC2
Mux main
Monitor In
In2
NC1
In1
REC
Audio
Off
ALM-RST
Power
ALM-IN
GND:
Conector de rede
DVR1C1161 | Manual de instalação | Capítulo 2
VEXT:
DISKFULL:
NC3, NC4:
PT | 159
2.4 Interligações
Sinal de sincronização do multiplexer.
Tensão de saída: 5 V CC
Corrente de saída: 100 mA
Sinal de saída do alarme de disco cheio.
Tensão de saída: 5 V CC
Corrente de saída: 100 mA
Sem ligações.
O DVR pode ser ligado a uma grande variedade de
multiplexers, quads ou directamente a uma câmara.
2.4.1 Multiplexers
O desenho em baixo ilustra como ligar o multiplexer ao
DVR.
•
* * tensão contacto máx: 24 V CC
corrente comutação máx.: 2 A CC
•
Ligue o monitor à entrada BNC marcada como
Monitor Out na parte de trás do DVR.
Ligue a saída do monitor principal do multiplexer à
entrada BNC marcada como Monitor In na parte de
trás do DVR.
Câmaras
Multiplexer
1
VCR IN VCR OUT
2
4
5
RS 232
Out2
Monitor Out
Out
Out 1
Monitor Out
Monitor
Bosch Security Systems | 2004-06
GND
NC4
NC3
DISKFULL
VEXT
ALM-CO
LAN
Out 2
GND
100-240 Vac
ALM-NO
ALM-NC
GND
GND
AC 100-240
Out1
Remote Control
Looping out
NC2
Video
In
NC1
S-Video
In
REC
Mux main
Monitor In
In2
ALM-RST
Audio
In1
ALM-IN
Power
6
Conector do receptor
do comando à
distância IV
GND
Monitor
Conector
RS-232
Interruptor de corrente
Off
3
Videogravador
MON B MON A
VEXT
Conector de rede
DVR1C1161 | Manual de instalação | Capítulo 2
PT | 160
2.4.2 Quads
•
Ligue a saída do gravador do multiplexer à entrada
BNC marcada como Vídeo In na parte de trás do
DVR.
• Ligue a entrada do VCR do multiplexer à entrada
BNC marcada como Video Out na parte de trás do
DVR.
• Para sincronizar a comutação com o multiplexer,
ligue as ligações VEXT e GND da parte de trás da
unidade ao conector do multiplexer.
Quando as ligações estiverem feitas, escolha no menu
de sistema o tipo de multiplexer que está a utilizar.
O desenho em baixo ilustra como ligar o quad ao DVR
sem uma saída de videogravador.
•
Ligue o monitor à entrada BNC marcada como
Monitor Out na parte de trás do DVR.
• Ligue a saída de vídeo do multiplexer à entrada
BNC marcada como Video In na parte de trás do
DVR.
• No menu de sistema coloque o multiplexer em Off.
Para ligar o quad com uma saída vídeo, consulte as
ligações multiplexer.
Quad
1
2
3
4
Vídeo
Video OUT
RS 232
Out2
Monitor Out
Out
Out 1
Monitor Out
Monitor
Bosch Security Systems | 2004-06
GND
NC4
NC3
DISKFULL
VEXT
ALM-CO
LAN
Out 2
GND
100-240 Vac
ALM-NO
ALM-NC
GND
GND
GND
AC 100-240
Out1
Remote Control
Looping out
NC2
Video
In
NC1
S-Video
In
REC
Mux main
Monitor In
In2
ALM-RST
Audio
In1
ALM-IN
Power
Off
Conector do receptor
do comando à
distância IV
Conector
RS-232
Interruptor de corrente
VEXT
Conector de rede
DVR1C1161 | Manual de instalação | Capítulo 2
PT | 161
2.4.3 Câmara única
•
O desenho em baixo ilustra como ligar uma câmara
única ao DVR.
•
•
•
Ligue o monitor à entrada BNC marcada como
Video Out na parte de trás do DVR.
Ligue a saída de vídeo da câmara à entrada BNC
marcada como Video In na parte de trás do DVR.
•
Ligue a saída de áudio da câmara à entrada marcada
como Audio In na parte de trás do DVR.
Ligue a entrada marcada como Audio Out da parte
de trás do DVR a um amplificador áudio.
No menu de sistema coloque o multiplexer em Off.
Video
In
RS 232
Out2
Monitor Out
Out
Remote Control
Out 1
GND
NC4
NC3
DISKFULL
VEXT
ALM-CO
ALM-NO
ALM-NC
GND
GND
GND
AC 100-240
Out1
Conector do receptor
do comando à
distância IV
Looping out
NC2
In2
S-Video
In
NC1
In1
Mux main
Monitor In
REC
Audio
ALM-RST
Power
Conector
RS-232
ALM-IN
Audio In
Interruptor de
Off
Video In
Câmara
LAN
Out 2
GND
VEXT
Saída Vídeo
Audio Out
Conector de rede
100-240 Vac
Monitor
Bosch Security Systems | 2004-06
DVR1C1161 | Manual de instalação | Capítulo 2
2.5 Unidade de comando à
distância
A unidade de comando à distância é um acessório que
facilita o controlo do DVR à distância. Pode levar a
cabo as principais operações utilizando a unidade de
comando à distância.
As funções do teclado do DVR são as seguintes:
RECORD:
STOP:
Prima para iniciar a gravação.
Prima para interromper a gravação ou a
reprodução.
PLAY:
Prima para iniciar a reprodução.
SEARCH:
Aumente a velocidade em 2x, 4x, 8x,
16x, 32x, 640x, 2x . . .
REWIND:
No modo de reprodução, prima para
inverter a reprodução (a tecla Search
aumenta a velocidade de inversão).
STEP REW.: Prima para interromper a reprodução.
Prima novamente para retroceder
imagem a imagem.
STEP FORW.:Prima para interromper a reprodução.
Prima novamente para avançar imagem
a imagem.
FORWARD: Na reprodução inversa, prima para
reproduzir normalmente (a tecla Search
aumenta a velocidade da reprodução
normal).
0
BOSCH
Teclas de controlo do DVR
Bosch Security Systems | 2004-06
PT | 162
2.6 Redes
A ligação de rede usa a norma 10BaseT. Certifique-se
de que a sua placa de rede suporta esta norma.
Se ligar o DVR directamente a um PC, use um cabo de
rede cruzado CAT5. Se ligar o DVR a um router ou a
um hub, use um cabo directo CAT5.
As seguintes portas devem estar abertas para que o
software remoto funcione correctamente:
• Porta TCP 80:Servidor Web
• Porta TCP 6666:Comandos
• Portas TCP 1111, 2222, 3333, 4444:Dados vídeo
Se estiver a ligar através de um firewall, verifique junto
do seu administrador de rede se consegue aceder à
unidade.
DVR1C1161 | Manual de instalação | Capítulo 3
3
Funcionamento
3.1 Instalação Rápida
No modo de instalação rápida pode alterar a data, hora,
qualidade de gravação e definição do ISP rapidamente
usando o visor LCD e o Botão rotativo.
• Prima a tecla MENU durante 5 segundos para entrar
no modo de instalação rápida. O Ano pisca no visor
LCD.
• Rode o Botão rotativo para alterar o valor do Ano e
depois prima a tecla ENTER. O Mês pisca no LCD.
• Continue a usar o Botão rotativo e a tecla ENTER
para definir todos os valores exibidos no visor LCD.
Quando é definido o último valor, o DVR volta para
o modo normal.
• Para sair do menu de instalação rápida, prima a tecla
SEARCH.
3.2 Gravação instantânea
Prima a tecla Gravar para iniciar a gravação
imediatamente - as imagens são gravadas no disco
rígido.
• A taxa de gravação e a qualidade de gravação são
definidas nos menus Gravação normal e Gravação
com alarme.
• GRA (gravação) aparece no visor LCD.
Prima a tecla Parar para interromper a gravação.
• A tecla Parar apenas pode ser activada no modo de
gravação.
• Quando o disco rígido estiver cheio, o DVR
interrompe automaticamente a gravação, ou grava
por cima, desde o início do disco rígido, consoante a
definição no menu Definições do Sistema.
3.3 Gravação com alarme
A imagem do monitor é gravada automaticamente
quando o alarme dispara e é interrompida no final da
duração do alarme. A gravação instantânea e a gravação
com temporizador param quando o alarme dispara. Se a
unidade já estiver a gravar, a qualidade da gravação não
é alterada para a gravação com alarme. Defina as
opções da gravação com alarme no menu Gravação
com alarme.
Bosch Security Systems | 2004-06
PT | 163
3.3.1 Gravação com pré-alarme
Um depósito de 220 imagens (por exemplo, 9 seg. a
25 IPS ou 220 seg. a 1 IPS) é utilizado para pré-captar
vídeo para a gravação de imagens mesmo antes de o
alarme disparar. A gravação com pré-alarme apenas
ocorre se a unidade não estiver já a gravar durante o
período de pré-alarme. A qualidade da gravação no
período de pré-alarme é idêntica à qualidade de
gravação antes de o alarme disparar. Se o gravador não
estiver a gravar antes de o alarme disparar, a qualidade
de gravação no período de pré-alarme é idêntica à
qualidade da gravação normal.
3.4 Reprodução normal
Reprodução
• Prima a tecla PLAY para iniciar a reprodução das
imagens/áudio guardados a partir do último
segmento.
• Prima a tecla STOP para interromper a reprodução.
Avanço rápido
• Prima a tecla PLAY para iniciar a reprodução.
• Rode o Anel de controlo no sentido dos ponteiros do
relógio e o avanço rápido da reprodução tem início.
A velocidade é apresentada no visor (velocidade
normal, 2x, 4x, 8x, 16x, 32x, 640x).
Reprodução invertida
• Prima a tecla PLAY para iniciar a reprodução.
• Rode o Anel de controlo no sentido oposto ao dos
ponteiros do relógio e o retrocesso rápido da
reprodução tem início. A velocidade é apresentada
no visor (velocidade normal, 2x, 4x, 8x, 16x, 32x,
640x).
Câmara lenta
• Prima a tecla Pausa para congelar a imagem
reproduzida.
• Rode o Anel de controlo no sentido dos ponteiros do
relógio e a reprodução em câmara lenta tem início.
A velocidade é apresentada no visor (>1/2, 1/4, 1/8,
1/16, 1/32, 1/64).
Retrocesso em câmara lenta
• Prima a tecla Pausa para congelar a imagem
reproduzida.
• Rode o Anel de controlo no sentido oposto ao dos
ponteiros do relógio para iniciar o retrocesso em
câmara lenta. A velocidade é apresentada no visor
(<1/2, 1/4, 1/8, 1/16, 1/32, 1/64).
DVR1C1161 | Manual de instalação | Capítulo 3
Bloquear velocidade apresentada
• Para bloquear a velocidade apresentada, prima a
tecla Enter e depois solte o Anel de controlo. Se
rodar novamente o Anel de controlo, a velocidade
regressa à velocidade de reprodução normal.
Avançar/retroceder imagem por imagem
• Prima a tecla Pausa para congelar a imagem.
• Rode o Botão rotativo no sentido dos ponteiros do
relógio para avançar imagem a imagem na
reprodução.
• Rode o Botão rotativo no sentido oposto ao dos
ponteiros do relógio para retroceder imagem a
imagem na reprodução.
• A velocidade da imagem aumenta se o Botão
rotativo for rodado rapidamente.
3.5 Pesquisar reprodução
Pesquisar reprodução por segmentos
• Prima a tecla Search para entrar no menu Pesquisa.
• Mova o cursor para POR LISTA DE SEGMENTOS
e prima a tecla Enter para seleccionar a pesquisa de
ficheiros.
• Mova o cursor para o segmento que pretende
reproduzir (pAlarme: Gravação com pré-alarme,
Temporizador: Gravação com temporizador).
• Se a lista de selecção estiver cheia, rode o Botão
rotativo no sentido dos ponteiros do relógio para
seleccionar a lista da página seguinte.
• Prima a tecla Enter para iniciar a reprodução.
Pesquisar reprodução por alarme
• Prima a tecla Pesquisa para entrar no menu Pesquisa.
• Mova o cursor para POR LISTA DE EVENTOS e
prima a tecla Enter para seleccionar a pesquisa de
alarmes.
• Mova o cursor para seleccionar a imagem de alarme
a ser reproduzida.
• Se a lista de selecção estiver cheia, rode o Botão
rotativo no sentido dos ponteiros do relógio para
seleccionar a lista da página seguinte.
• Prima Enter para iniciar a reprodução das imagens
de alarme.
• A imagem de alarme é reproduzida desde o período
de pré-alarme e pára no final da duração do alarme.
Pesquisar reprodução por data/hora
• Prima a tecla Pesquisa para entrar no menu Pesquisa.
• Mova o cursor para POR DATA HORA e prima a
tecla Enter para seleccionar a pesquisa de ficheiros.
Bosch Security Systems | 2004-06
PT | 164
•
•
•
Mova o cursor para o valor que pretende seleccionar
e prima a tecla Enter.
Rode o Botão rotativo para aumentar ou diminuir o
valor e prima a tecla Enter.
Mova o cursor para INICIAR PESQUISA E
REPRODUZIR e prima a tecla Enter; a reprodução
tem início a partir da data/hora definida no menu.
Se não houver qualquer imagem guardada na data/hora
especificada, a unidade inicia automaticamente a
reprodução a partir da hora definida mais próxima.
3.6 Copiar
Introduza um cartão Compact Flash (tipo I ou II) na
ranhura para Compact Flash, no painel frontal. Quando
introduzir o cartão Compact Flash, certifique-se de que
a direcção de introdução está correcta. Utilize apenas
um cartão Compact Flash com uma capacidade de
16 MB ou superior.
A função de cópia do Compact Flash está concebida
para copiar vídeos curtos. Um vídeo longo pode
demorar bastante tempo a copiar.
Nota
Para melhorar a legibilidade das mensagens de cópia,
prima a tecla OSD. Prima a tecla OSD novamente para
desactivar o fundo do ecrã.
3.6.1 Copiar imagem parada
•
•
•
•
•
•
•
•
Prima a tecla Reprodução para iniciar a reprodução.
Prima a tecla Pause para congelar a imagem.
Rode o Botão rotativo no sentido dos ponteiros do
relógio ou no sentido oposto ao dos ponteiros do
relógio para passar para a imagem pretendida.
Prima a tecla Copiar para entrar no modo de cópia.
Rode o Botão rotativo para seleccionar a imagem da
câmara pretendida.
Enquanto a imagem é apresentada, prima
novamente a tecla Copiar. A mensagem
"A copiar …" aparece no ecrã durante o processo.
A mensagem "Sucesso" e a identificação do ficheiro
aparecem no ecrã depois de o ficheiro ser copiado.
Prima a tecla STOP para cancelar a cópia.
Prima o botão Reprodução para continuar com a
reprodução.
As imagens copiadas são guardadas como uma imagem
individual num formato de ficheiro JPG.
DVR1C1161 | Manual de instalação | Capítulo 3
3.6.2 Copiar para ficheiro de filme
•
•
•
•
•
•
•
Prima a tecla Reprodução para iniciar a reprodução.
Prima a tecla Copiar para entrar no modo de cópia.
Rode o Botão rotativo para seleccionar a câmara
pretendida.
Enquanto a imagem é apresentada, prima
novamente a tecla Copiar. A mensagem
"A copiar …" aparece no ecrã durante o processo.
Prima a tecla STOP para terminar a cópia.
A mensagem "Sucesso" e a identificação do ficheiro
aparecem no ecrã depois de o ficheiro ser copiado.
Prima o botão Reprodução para continuar com a
reprodução.
As imagens copiadas são guardadas como um filme
num formato de ficheiro MOV.
3.7 Definição de bloqueio de
segurança
Prima a tecla REC durante mais de 5 segundos no
modo de gravação para bloquear todas as teclas do
painel frontal. (A palavra-passe tem de ser definida no
Menu Definição do Sistema para activar esta
funcionalidade.)
Prima a tecla STOP e o sistema solicita-lhe a palavrapasse. Se introduzir a palavra-passe correcta, as teclas
bloqueadas são libertadas.
Bosch Security Systems | 2004-06
PT | 165
DVR1C1161 | Manual de instalação | Capítulo 4
4
Configuração do menu
PT | 166
4.3 Menu Gravação normal
Quando o sistema tiver sido ligado da forma descrita:
• Ligue a corrente
• O visor acende-se se a alimentação for normal.
• O sistema demora algum tempo a carregar.
• Prima a tecla MENU para entrar no MENU
PRINCIPAL.
Quando o menu principal for apresentado, verá os
diferentes submenus onde as definições podem ser
alteradas.
0(18*5$9$d®21250$/
Para navegar por estes menus, rode o Botão rotativo no
sentido dos ponteiros do relógio ou no sentido oposto
ao dos ponteiros do relógio para percorrer os submenus.
Prima a tecla ENTER para abrir um submenu. Nos
submenus, continue a utilizar o Botão rotativo e a tecla
ENTER para percorrer os itens e os valores, e
seleccioná-los. Para regressar ao menu principal, avance
até ao final de cada submenu até ao item MENU
PRINCIPAL e seleccione-o, utilizando a tecla ENTER.
0(1835,1&,3$/!
4.1 Menu principal
0(1835,1&,3$/
,36
7(032'(*5$9$d®2
+25$6
1250$/
VELOCIDADE: Seleccione a velocidade de gravação entre 0,1 e
25/30 IPS.
QUALIDADE: Existem seis níveis de qualidade para a gravação
MAIS BAIXO: 15 KB
BAIXO: 20 KB
BÁSICO: 25 KB
NORMAL: 30 KB
ALTO: 35 KB
SUPERIOR: 40 KB
TEMPO DE GRAVAÇÃO: Mostra uma estimativa do tempo de
gravação disponível no disco para a velocidade e qualidade
seleccionadas.
4.4 Menu Gravação com alarme
5(/Ï*,2,',20$!
*5$9$d®21250$/!
*5$9$d®2&20$/$50(!
7(0325,=$'25!
$9,62621252!
$548,92!
5('(!
'(),1,d®2'26,67(0$!
4.2 Menu Relógio/Idioma
0(185(/Ï*,2,',20$
'$7$
+25$
)250$72'$'$7$
,',20$'20(18
9(/2&,'$'('(
*5$9$d®2
48$/,'$'('(
*5$9$d®2
$$$$00''
(1*/,6+
0(1835,1&,3$/!
DATA: Ano: 2000~2099 Mês: 01~12 Data: 01~31
HORA: Hora: 00~23 Minuto : 00~59 Segundo: 00~59
FORMATO DA DATA: Defina a ordem de apresentação para Ano
(YYYY), Mês (MM) e Dia (DD)
IDIOMA DO MENU: Inglês, Alemão, Francês, Espanhol, Italiano,
Português, Holandês ou Polaco.
MENU PRINCIPAL: Regressar ao menu principal.
Bosch Security Systems | 2004-06
0(18*5$9$d®2&20$/$50(
)81&,21$0(172'2$/$50(
9(/2&,'$'('(*5$9$d®2
48$/,'$'('(*5$9$d®2
7,32(175$'$$/$50(
7,325(326,d®2$/$50(
'85$d®2'2$/$50(
$&7,9$'2
,36
1250$/
1$
1$
6(*6
)81&,21$0(172'2
35e$/$50(
9(/2&,'$'('(*5$9$d®2
$&7,9$'2
,36
0(1835,1&,3$/
!
FUNCIONAMENTO DO ALARME:
ACTIVADO: Grava quando o alarme dispara.
DESACTIVADO: Não grava quando o alarme dispara.
VELOCIDADE DE GRAVAÇÃO: A velocidade de gravação durante o
funcionamento do alarme.
A velocidade máx. de gravação é 50/60 IPS (PAL/NTSC).
A velocidade mín. de gravação é 0,1 IPS.
QUALIDADE DA GRAVAÇÃO: A qualidade da imagem gravada
quando o alarme dispara.
MAIS BAIXO: 15 KB
BAIXO: 20 KB
BÁSICO: 25 KB
DVR1C1161 | Manual de instalação | Capítulo 4
NORMAL: 30 KB
ALTO: 35 KB
SUPERIOR: 40 KB
TIPO ENTRADA ALARME:
N.A. : Normalmente aberto
N.F. : Normalmente fechado
TIPO REPOSIÇÃO ALARME:
N.A. : Normalmente aberto
N.F. : Normalmente fechado
DURAÇÃO DO ALARME: A gravação com alarme começa desde o
início do alarme e pára no final da duração ou quando a
reposição do alarme for activada. A duração máx. é imparável,
a duração mín. é de 10 segundos.
FUNCIONAMENTO DO PRÉ-ALARME:
ACTIVADO: Grava a imagem na velocidade de gravação com
pré-alarme no período de pré-alarme.
DESACTIVADO: Sem gravação com pré-alarme antes de o
alarme disparar.
VELOCIDADE DE GRAVAÇÃO: A velocidade de gravação no período
de pré-alarme.
A velocidade máx. de gravação é 50/60 IPS (PAL/NTSC).
A velocidade mín. de gravação é 0,1 IPS.
Nota
Se o alarme disparar no modo de gravação standby ou
normal, a qualidade de gravação é idêntica à qualidade
da gravação normal. Se o alarme disparar no modo de
gravação com temporizador, a qualidade de gravação é
idêntica ao valor definido na qualidade da gravação
com temporizador.
4.5 Menu Temporizador
A imagem monitorizada pode ser gravada
automaticamente, definindo as horas de início e de fim
no MENU TEMPORIZADOR. Existem 15 entradas
onde uma agenda de gravação para um determinado
dia ou conjunto de dias pode ser definida para a
semana. Avance para uma entrada e prima Enter para
seleccionar o dia.
Se programar o seguinte, por exemplo:
INICIAR 09:00, PARAR 23:59
Então a gravação inicia às 09:00:00 e pára às 23:59:59.
Para parar uma gravação com tempo definido enquanto
está a gravar, prima a tecla STOP para entrar no
MENU TEMPORIZADOR e alterar o valor DEFINIR
para OFF.
PT | 167
0(187(0325,=$'25
6(0$1$,1Ë&,2),09(/2&,'$'(48$/,'$'('(),1,5
'20+51250$/'(6$&7,9$'2
6(*+51250$/'(6$&7,9$'2
'6(0+51250$/'(6$&7,9$'2
)6(0+51250$/'(6$&7,9$'2
',È5+51250$/'(6$&7,9$'2
6(*+51250$/'(6$&7,9$'2
7(5+51250$/'(6$&7,9$'2
6(;+51250$/'(6$&7,9$'2
48,+51250$/'(6$&7,9$'2
48$+51250$/'(6$&7,9$'2
6È%+51250$/'(6$&7,9$'2
'20+51250$/'(6$&7,9$'2
0(1835,1&,3$/!
SEMANA: Selecciona o dia ou o conjunto de dias para o
temporizador.
DIÁR: Todos os dias
DSEM: De segunda-feira a sexta-feira
FSEM: Sábado e domingo
Dias individuais da semana
INÍCIO: Introduza a hora inicial da gravação com temporizador.
PARAR: Introduza a hora final da gravação com temporizador.
A hora de PARAR tem de ser posterior à hora de INICIAR.
(ex. INICIAR 16.00, PARAR 03.00 não está correcto
INICIAR 16.00, PARAR 00.00 não está correcto
INICIAR 16.00, PARAR 23.59 está correcto
VELOCIDADE: Quando o FORMATO DA VELOCIDADE está definido
para HORA, a velocidade de gravação pode ser definida
entre 4/6 (NTSC/PAL) HR e 960 HR.
Quando o FORMATO DA VELOCIDADE está definido para
IPS, a velocidade de gravação pode ser definida entre
0,1~30/0,1~25 (NTSC/PAL) IPS.
QUALIDADE: Existem seis níveis de qualidade da imagem gravada
MAIS BAIXO: 15 KB
BAIXO: 20 KB
BÁSICO: 25 KB
NORMAL: 30 KB
ALTO: 35 KB
SUPERIOR: 40 KB
DEFINIR: Defina ACTIVADO quando utilizar a gravação com
temporizador.
Defina DESACTIVADO quando não utilizar a gravação com
temporizador.
No modo Gravação com temporizador, o visor
apresenta a data/hora do temporizador e a taxa de
gravação com temporizador aparece sob GRA.T.
Não lhe é possível alterar o nível de qualidade da
gravação contínua. Por exemplo:
Seg 1 08:30~17:00
Seg 2 17:00~23:59
Bosch Security Systems | 2004-06
DVR1C1161 | Manual de instalação | Capítulo 4
Seg 1 e Seg 2 são tratados como a gravação contínua
08:30~23:59.
Se precisar de definir um nível de qualidade diferente,
faça o seguinte:
Seg 1 08:30~16:59
Seg 2 17:00~23:59
4.6 Menu Aviso sonoro
0(18$9,62621252
)81&,21$0(172'2
$9,62621252
(175$'$$/$50(
(175$'$*5$9$d®2
',6&2&+(,2
3(5'$'(9Ë'(2
7(0325,=$'25
$&7,9$5
0(1835,1&,3$/
!
$&7,9$'2
$&7,9$'2
$&7,9$'2
$&7,9$'2
'(6$&7,9$'2
FUNCIONAMENTO DO AVISO SONORO:
ACTIVAR: Active o aviso sonoro.
DESACTIVAR: Desactive o aviso sonoro.
Nota: Prima o botão Enter para activar/desactivar no modo
Gravação/Reprodução.
ENTRADA ALARME: ACTIVADO - o aviso sonoro funciona quando o
alarme dispara.
ENTRADA GRAVAÇÃO: ACTIVADO - o aviso sonoro funciona
quando o sinal Record-IN é aplicado no terminal Record-IN.
DISCO CHEIO: ACTIVADO - o aviso sonoro funciona quando o disco
estiver quase cheio (99,7%).
PERDA DE VÍDEO: ACTIVADO - o aviso sonoro funciona quando se
perde o sinal de vídeo.
TEMPORIZADOR: ACTIVADO - o aviso sonoro funciona quando a
gravação com temporizador ocorre.
4.7 Menu Arquivo
0(18$548,92
7$0$1+2'$,0$*(0
0$5&$'(+25$
326,d®2'$0$5&$'(
+25$
0$5&$'(È*8$
326,d®2'$0$5&$'(
È*8$
;
$&7,9$'2
,1)(5,25
$&7,9$'2
,1)(5,25
0(1835,1&,3$/
!
Bosch Security Systems | 2004-06
PT | 168
TAMANHO DA IMAGEM: Seleccione o tamanho da imagem para
copiar a imagem para o cartão CF
Tamanho grande: 720x576 (PAL), 720x480 (NTSC)
Tamanho pequeno: 352x288 (PAL), 352x240 (NTSC)
MARCA DE HORA:
ACTIVADO: A marca de hora aparece na imagem ao copiar a
imagem para o cartão CF.
DESACTIVADO: A marca de hora não aparece na imagem
ao copiar a imagem para o cartão CF.
POSIÇÃO DA MARCA DE HORA:
INFERIOR: A marca de hora aparece na parte inferior
SUPERIOR: A marca de hora aparece na parte superior
MARCA DE ÁGUA:
ACTIVADO: A marca de água aparece na imagem ao copiar
a imagem para o cartão CF.
DESACTIVADO: A marca de água não aparece na imagem
ao copiar a imagem para o cartão CF.
POSIÇÃO DA MARCA DE ÁGUA:
INFERIOR: A marca de água aparece na parte inferior
SUPERIOR: A marca de água aparece na parte superior
4.8 Menu Rede
0(185('(
(1'(5(d2,3
(1'(5(d20È6&$5$
'(5('(
(1'(5(d23257$'(
/,*$d®2
&21),*85$5
87,/,=$'25
&21),*85$5
87,/,=$'25
&21),*85$5
87,/,=$'25
!
!
!
0(1835,1&,3$/
!
ENDEREÇO IP: Preencha o Endereço IP da unidade do sistema de
rede.
ENDEREÇO MÁSCARA DE REDE: Preencha a Máscara de rede da
unidade do sistema de rede.
ENDEREÇO PORTA DE LIGAÇÃO: Preencha o Endereço da porta
de ligação da unidade do sistema de rede.
CONFIGURAR UTILIZADOR: Pode definir três nomes de utilizador e
palavras-passe. Está disponível um menu de configuração
para cada um dos três utilizadores.
DVR1C1161 | Manual de instalação | Capítulo 4
PT | 169
4.9 Menu Definição do sistema
&21),*85$587,/,=$'25
120('(87,/,=$'25
3$/$95$3$66('2
87,/,=$'25
1Ë9(/'287,/,=$'25
$'0,1BBB
$'0,1BBB
683(5
0(185('(
0(1835,1&,3$/
!
!
Aparece a página Iniciar sessão do DVR no ecrã do PC
ao ligar um PC por rede ao DVR. O menu Configurar
utilizador permite ao administrador definir o Nome de
utilizador e Palavra-passe de início de sessão, assim
como o nível de acesso. O sistema tem três níveis de
acesso diferentes:
• O acesso SUPER permite ver vídeo em directo/
reprodução e controlar o funcionamento do DVR.
• O acesso GERAL permite ver vídeo em directo e
reprodução.
• O acesso CONVIDADO apenas permite ver vídeo
em directo.
Pode fazer no máximo quatro ligações ao mesmo tempo
(1 nome de utilizador e palavra-passe partilhados).
0(18'(),1,d®2'26,67(0$
3$/$95$3$66(
$&7,9$'$
3$/$95$3$66(
1®2
(175$'$9Ë'(2
*5$9$5&20$8',2
5(352'8=,5&20
È8',2
5(352'8=,5&20
È8',2
08/7,3/(;(5
/,1+$'(&Ï',*2'2
&$032
',6&2&+(,2
)250$72'$
9(/2&,'$'(
6,67(0$9Ë'(2
&2032672
'(6$&7,9$'2
$&7,9$'2
$&7,9$'2
%RVFK/7&
$3$*$5',6&2
$&78$/,=$56,67(0$
&$55(*$5
35('(),1,d®2
5(129$d®2'(&)
!
!
!
!
0(1835,1&,3$/
!
5(*5$9$5
325,36
3$/
PALAVRA-PASSE ACTIVADA:
SIM: PALAVRA-PASSE necessária para entrar no menu.
NÃO: PALAVRA-PASSE desnecessária para entrar no menu.
PALAVRA-PASSE:
Quando SIM está definido em PALAVRA-PASSE
ACTIVADA, é necessária uma palavra-passe para entrar no
menu. O código tem seis dígitos de comprimentos e pode ser
constituído por qualquer dígito entre 1 e 5.
Se activou uma palavra-passe, sempre que premir o botão do
menu no modo directo ou o botão parar no modo de
gravação, o sistema solicita-lhe que introduza a palavrapasse. Portanto, certifique-se de que anota a palavra-passe.
ENTRADA VÍDEO:
COMPOSTO: Seleccione a entrada de vídeo do conector
BNC.
S-VIDEO: Seleccione S-VIDEO no conector S-VIDEO.
GRAVAR COM ÁUDIO: ACTIVADO/DESACTIVADO: Gravar com ou
sem áudio.
REPRODUZIR COM ÁUDIO 1 / REPRODUZIR COM ÁUDIO 2:
ACTIVADO/DESACTIVADO: Reprodução com ou sem áudio.
A gravação e reprodução de áudio apenas é possível no
modo de tempo real com uma velocidade de 1 IPS ou
superior. (Reproduza à mesma velocidade que grava.)
Bosch Security Systems | 2004-06
DVR1C1161 | Manual de instalação | Capítulo 4
MULTIPLEXER:
Seleccione a marca do multiplexer ligada ao DVR. Se o seu
multiplexer não aparecer na lista, seleccione
DESCONHECIDO.
Quando o multiplexer é seleccionado, a entrada de vídeo do
conector MUX MAIN MONITOR no painel traseiro está
associada a MONITOR OUT quando o gravador não está no
modo MENU.
Se está apenas uma câmara ligada ao DVR, defina como
OFF. Agora a saída do monitor principal é sempre idêntica à
do conector de vídeo.
LINHA DE CÓDIGO DO CAMPO:
Se definir a marca do multiplexer como DESCONHECIDO,
pode ajustar a linha de código do campo do multiplexer entre
0 e 20. O valor predefinido (13) é adequado à maioria dos
multiplexers. Se a linha de código do campo aparecer na
parte superior do canal de reprodução, diminua o valor. Se os
multiplexers não reproduzirem correctamente, aumente o
valor.
DISCO CHEIO:
PARAR: Quando o disco está cheio, a unidade pára de
gravar.
REGRAVAR: Quando o disco está cheio, o vídeo actual grava
por cima do vídeo existente desde o início do disco rígido.
FORMATO DA VELOCIDADE: Seleccione a velocidade de gravação
por IPS (imagens por segundo) ou Hora
SISTEMA VÍDEO: Seleccione o sistema de vídeo NTSC ou PAL
(requer a reiniciação da unidade para activar).
APAGAR DISCO:
Prima Enter para apagar todas as gravações do disco rígido.
A caixa de diálogo de confirmação aparece no ecrã.
Seleccione Sim ou Não e depois prima ENTER.
ACTUALIZAR SISTEMA:
Prima Enter para actualizar o sistema ou não.
SIM: Copie o ficheiro de actualização para o cartão Compact
Flash no PC e depois introduza o cartão Compact Flash na
ranhura. Prima a tecla ENTER para actualizar o sistema.
Depois de o sistema ser actualizado com sucesso, certifiquese de que reinicia a unidade para activar.
CARREGAR PREDEFINIÇÃO:
Prima Enter para carregar a predefinição de fábrica ou não.
SIM: A caixa de diálogo de confirmação aparece no ecrã.
Seleccione Sim ou Não e depois prima ENTER.
RENOVAÇÃO DE CF:
SIM: Formatará o cartão Compact Flash.
NÃO: Não formatará o cartão Compact Flash.
4.10 Menu Palavra-passe
Quando a protecção por palavra-passe está activada,
aparece o menu da palavra-passe no ecrã quando tentar
abrir um menu ou parar de gravar. Tem de introduzir a
palavra-passe utilizando as seguintes teclas:
REC : 1
OSD : 2
STOP : 3
PLAY : 4
PAUSE : 5
Bosch Security Systems | 2004-06
PT | 170
DVR1C1161 | Manual de instalação | Capítulo 5
5
PT | 171
Ver pela Internet/Intranet
5.1 Iniciar sessão
Abra o programa de navegação da Internet e introduza
o endereço IP de rede (por exemplo,
http://192.168.10.5). Tem de ser idêntico ao endereço
IP definido no Menu Rede do DVR.
5.2 Ecrã Principal
O ícone localizado na parte inferior do ecrã serve para
terminar a sessão. As informações relativas ao estado do
sistema são também apresentadas na parte inferior do
ecrã. O estado actual do sistema, a data e a hora são
apresentados.
Os ícones da direita seleccionam as câmaras e
determinam a forma como são visualizadas no ecrã. Os
comandos de reprodução também estão localizados à
direita. A função de pesquisa permite-lhe seleccionar
um vídeo a ser reproduzido. Se um dos ícones estiver
Bosch Security Systems | 2004-06
Aparece a página Iniciar sessão do DVR no ecrã. Tem
de introduzir o nome de utilizador e a palavra-passe tal
como foram definidos no Menu Rede do DVR. (Como
predefinição, introduza ADMIN no nome do utilizador
e ADMIN na palavra-passe, e clique Submeter para
entrar no sistema.)
sombreado, isso significa que essa determinada função
não está acessível no modo actual.
Nota
A taxa de actualização de imagens em directo está
dependente da velocidade de gravação seleccionada
quando a unidade está em Gravação (ex. a gravação em
0,5 IPS actualiza a imagem da câmara de 2 em
2 segundos.
Não é possível exibir imagens em directo quando o
gravador está em reprodução. O estado do sistema
DVR1C1161 | Manual de instalação | Capítulo 5
PT | 172
mostra a mensagem SERVIDOR EM REPRODUÇÃO.
Para ver imagens em directo, primeiro pare a
reprodução no próprio gravador.
5.2.1 Cor da mensagem de estado
A cor da mensagem de estado indica se está a trabalhar
localmente ou à distância. Se estiver a trabalhar
localmente, as mensagens são coloridas a amarelo. Se
estiver a controlar o DVR directamente (seleccionou o
ícone CONTROLO), as mensagens são coloridas a
verde.
•
•
•
•
•
•
5.2.2 Ícones do modo Directo
Neste modo, os ícones da câmara, os ícones da
perspectiva de câmara e o ícone Reproduzir estão
activados.
•
5.2.3 Ícones do modo Reprodução
Seleccione o ícone REPRODUÇÃO para alterar para
modo reprodução.
Bosch Security Systems | 2004-06
•
PARAR: Prima esteícone para interromper a
reprodução do vídeo.
REPRODUÇÃO: Reproduz o vídeo.
REPRODUZIR REC: Inverter a reprodução do
vídeo.
AVANÇAR na reprodução do vídeo.
RETROCEDER na reprodução do vídeo.
PAUSA: Prima esteícone para fazer uma pausa na
reprodução do vídeo.
CONTROLO: Prima este ícone para passar para o
modo de comando à distância directo (apenas
permitido no nível de acesso SUPER). Agora pode
iniciar directamente ou interromper a reprodução e
a gravação no DVR à distância.
Controlo da velocidade de reprodução.
DVR1C1161 | Manual de instalação | Capítulo 5
5.2.4 Pesquisar
O sistema proporciona-lhe três formas de procurar um
vídeo para reproduzir:
• Reproduzir vídeo seleccionado por lista de
segmentos.
• Reproduzir vídeo seleccionado por lista de alarmes.
• Reproduzir vídeo seleccionado por data/hora.
Os elementos visualizados na lista podem ser
seleccionados clicando com o rato. Clique em
REPRODUÇÃO para reproduzir o vídeo seleccionado.
Bosch Security Systems | 2004-06
PT | 173
DVR1C1161 | Manual de instalação | Capítulo 6
6
Especificações
6.1 Interface RS-232
O DVR pode ser controlado por um computador ou
terminal através do conector RS-232 de 9 pinos
D-SUB.
3LQR
'95&
PT | 174
1&
7;'
5;'
1&
*5281'
1&
1&
1&
9
3LQR
$1),7
5,®2
1&
5;'
7;'
'75
*5281'
'65
576
&76
1&
A transmissão definida é de uma taxa de bauds de 9600,
8 bits de dados, 1 bit inicial, 1 bit final e sem paridade.
&Ï',*2)81d®2
$6&,,
7HFODGR
SDLQHO
IURQWDO
.
,QLFLDUJUDYDomR
5(&
.
3DUDUJUDYDomRH
UHSURGXomR
6723
.
5HSURGXomR
3/$<
.
)D]HUSDXVDQD
LPDJHPUHSURGX]LGD
3$86(
.
3HVTXLVDU
UHSURGXomR
6($5&+
.
&RSLDULPDJHPSDUD &23<
FDUWmR&)
.
9LVRU
',63/$<
.
&RQILUPDUD
VHOHFomR
(17(5
.
(QWUDUHPPHQXGH
GHILQLomR
0(18
.
.
9HORFLGDGHGH
UHWURFHVVRUiSLGR
;
6.1.1 Protocolo de controlo do RS-232
Um computador ou terminal pode ser utilizado para
controlar a unidade, enviando comandos ASCII de três
caracteres através do conector RS-232; estes comandos
ASCII começam por 'K' ou 'k'. Existem 30 comandos
ASCII mapeados nas 30 teclas do painel frontal. Os 30
comandos ASCII são apresentados na tabela seguinte.
Bosch Security Systems | 2004-06
. 9HORFLGDGHGH
.
DYDQoRUiSLGR
!!;
.
5HWURFHGHUDLPDJHP -2*5(:
SDUDGD
.
$YDQoDUDLPDJHP
SDUDGD
-2*))
DVR1C1161 | Manual de instalação | Capítulo 6
PT | 175
6.2 Tempo de gravação
Tempos aproximados de gravação em horas sem áudio
numa gravação com um disco rígido de 160 GB.
PAL
Taxa de
gravação (IPS)
50
25
12
8
5
2
1,6
1,0
0,5
0,2
0,1
Mais baixo
(15KB)
60
120
240
360
590
1420
1900
3000
5900
14800
29600
Qualidade da imagem (tamanho méd. ficheiro)
Baixo
Básico
Normal
Alto
(20KB)
(25KB)
(30KB)
(35KB)
Tempo Aproximado de Gravação
Horas
44
36
30
25
90
70
60
50
180
140
120
100
270
210
180
150
440
360
300
250
1070
850
710
610
1420
1140
950
810
2200
1800
1500
1300
4400
3600
3000
2500
11100
8900
7400
6300
22200
17800
14800
12700
Superior
(40KB)
22
44
90
130
220
530
710
1100
2200
5600
11100
NTSC
Taxa de
gravação (IPS)
60
30
20
10
5
2
1,5
1,0
0,5
0,2
0,1
Mais baixo
(15KB)
50
100
150
300
590
1480
1980
3000
5900
14800
29600
Qualidade da imagem (tamanho méd. ficheiro)
Baixo
Básico
Normal
Alto
(20KB)
(25KB)
(30KB)
(35KB)
Tempo Aproximado de Gravação
Horas
37
30
25
21
74
60
50
42
110
90
70
60
220
180
150
130
440
360
300
250
1110
890
740
630
1480
1190
990
850
2200
1800
1500
1300
4400
3600
3000
2500
11100
8900
7400
6300
22200
17800
14800
12700
Referência:
24 H=1 dia, 168 H=1 semana, 720 H=1 mês,
8760 H=1 ano
(Estimado com o normal nível de ruído de imagem
baixo)
Bosch Security Systems | 2004-06
Superior
(40KB)
19
37
56
110
220
560
740
1100
2200
5600
11100
Quando é gravado áudio, tem de calcular um tamanho
de ficheiro aproximado de 18KB (PAL) ou 21,6KB
(NTSC) por segundo de áudio. Isso pode reduzir
significativamente os tempos de gravação, sobretudo
para as taxas de gravação mais baixas, apresentadas na
tabela em cima.
DVR1C1161 | Manual de instalação | Capítulo 6
PT | 176
6.3 Especificações técnicas
Vídeo
Formato
Entrada
Saída
Compressão
Resolução
Visor
Geral
PAL/NTSC
1 entrada de câmara (BNC), 1 Vpp,
75 Ohm
1 saída de vídeo (BNC) para
monitor principal, 1 Vpp, 75 Ohm
M-JPEG
720 x 576 (PAL) /
720 x 484 (NTSC)
Visor completo para directos e
reproduções
Áudio
Ligações
2 entradas mono, 1,6 Vpp
±200 mV@10 K
2 saídas mono, 1,6 Vpp
±200 mV@10 K
Alarme
Entrada
Saída
Tensão de comutação Alta:
> 2 V CC
Tensão de comutação Baixa:
< 0,5 V CC
Uma saída de relé:
Tensão contacto máx: 24 V CC
Corrente comutação máx.: 2 A CC
Temperatura
Disco rígido
160 Gb
Gravação
Modo
Taxa
Gravação contínua, com intervalos
de tempo, com agenda ou de
eventos
Máx. 50 imagens por seg. (PAL)
Máx. 60 imagens por seg. (NTSC)
Reprodução
Taxa
Pesquisa
Máx. 50 imagens por seg. (PAL)
Máx. 60 imagens por seg. (NTSC)
Data/hora, lista de segmentos ou
eventos (alarme)
Detecção de perda de vídeo
Sim
Detecção de perda de corrente Sim
Registo de alarmes
Sim
Interface do utilizador
Por menus
Configuração
Através do visor
Dispositivo de entrada do utilizador
Teclado do painel frontal, comando
à distância (IV com cabos do
receptor) opcional
Exportação de imagens
Ranhura para Compact Flash
incorporada para cartões do Tipo I
e Tipo II
Segurança
Protecção por palavra-passe
Alimentação de
corrente
100 - 240 V CA, 50/60 Hz
Consumo de energia < 40 W
Temporizador
Temporizador semanal, relógio em
tempo real incorporado
Ligação de rede
Conector RJ-45, TCP/IP por
Ethernet, 10 Base-T
Ligação de controlo Conector D-Sub de 9 pinos,
RS-232
Especificações mecânicas
Peso
aprox. 5,5 kg
Dimensões (LxAxP) 346 x 88 x 269 mm
13,6 x 3,5 x 10,5 pol.
Temperatura ambiente
Funcionamento
+0° C … +40° C
+32°F . . . +104°F
Aprovações
Segurança
Europa
E.U.A.
Austrália
EN60950
Listado em UL60950 UL e cUL
C-Tick
Compatibilidade electromagnética (EMC)
Europa
E.U.A.
Austrália
EN55022 classe B, EN50130-4
FCC artigo 15.º, classe B
AS/NZS 3548
As características podem ser alteradas sem aviso prévio.
Se tiver qualquer tipo de problemas, contacte o
revendedor.
Bosch Security Systems | 2004-06
'95&_3RGUĊF]QLNLQVWDODFML_6SLVWUHĞFL
8:$*,'27<&=Ą&(%(=3,(&=(ē67:$ 3/_
,VWRWQHLQIRUPDFMHGRW\F]ąFHEH]SLHF]HĔVWZD
:67ĉ3
)XQNFMH 3DQHOSU]HGQL 3DQHOW\OQ\ =DVLODQLH =áąF]HV]HUHJRZH56 =áąF]HRGELRUQLNDV\JQDáyZSRGF]HUZLHQL]GDOQHJRVWHURZDQLD =áąF]H/$1
:HMĞFLDLZ\MĞFLDV\JQDáyZDODUPRZ\FK 0RĪOLZRĞFLZVSyáSUDF\]LQQ\PLXU]ąG]HQLDPL 0XOWLSOHNVHU\ 8U]ąG]HQLDW\SXTXDG .DPHUDSRMHG\QF]D
3LORW]GDOQHJRVWHURZDQLD 3RGáąF]DQLHGRVLHFLLQWHUQHWRZHM
2%6á8*$
6]\ENDLQVWDODFMD 1DJU\ZDQLHQDW\FKPLDVWRZH 1DJU\ZDQLHDODUPRZH 1DJU\ZDQLHSU]HGDODUPHP 6WDQGDUGRZHRGWZDU]DQLH 2GWZDU]DQLH]Z\V]XNLZDQLHP .RSLRZDQLH .RSLRZDQLHSRMHG\QF]\FKNODWHN
.RSLRZDQLHGRSOLNXZLGHR 8VWDZLHQLDEORNDG\EH]SLHF]HĔVWZD 0(18867$:,(ē
0HQXJáyZQH
0HQX=HJDU-Ċ]\N 0HQX1DJU\ZDQLHVWDQGDUGRZH 0HQXQDJU\ZDQLDDODUPRZHJR 0HQXVWHURZQLNDF]DVRZHJR
0HQXV\JQDáXGĨZLĊNRZHJR %RVFK6HFXULW\6\VWHPV_
'95&_3RGUĊF]QLNLQVWDODFML_6SLVWUHĞFL
3/_
0HQXDUFKLZXP
0HQXVLHü
0HQXXVWDZLHQLDV\VWHPX
0HQXKDVáR '267ĉ335=(=,17(51(7,175$1(7
/RJRZDQLH
(NUDQJáyZQ\ .RORUNRPXQLNDWyZRVWDQLH ,NRQ\WU\EXSU]HND]XQDĪ\ZR ,NRQ\WU\EXRGWZDU]DQLD :\V]XNLZDQLH
'$1(7(&+1,&=1( ,QWHUIHMV56 3URWRNyáVWHURZDQLDSU]H]LQWHUIHMV56 &]DVQDJU\ZDQLD 'DQHWHFKQLF]QH 6NUyW\QDZ\ĞZLHWODF]X
,,
$5(&
%$6,&
+,*+
/2:
/2:(5
0(18
3$86(
3(1'
3/$<
3(1'
3537
5(&
65&+
67'5'
683(5
6<6/'
75(&
5(&
3%(*
55(&
3DX]D
1DJU\ZDQLHDODUPRZH
-DNRĞüSRGVWDZRZD
:\VRNDMDNRĞü
1LVNDMDNRĞü
1DMQLĪV]DMDNRĞü
0HQX
3DX]D
.RQLHFSDX]\
2GWZDU]DQLH
.RQLHFRGWZDU]DQLD
3RZWDU]DQLHRGWZDU]DQLD
1DJU\ZDQLH
:\V]XNLZDQLH
6WDQGDUGRZDMDNRĞü
1DMOHSV]DMDNRĞü
àDGRZDQLHV\VWHPX
1DJU\ZDQLHF]DVRZH
%ORNDGDQDJU\ZDQLD
5R]SRF]ĊFLHRGWZDU]DQLD
1DJU\ZDQLH]GDOQH
%RVFK6HFXULW\6\VWHPV_
'95&_3RGUĊF]QLNLQVWDODFML_5R]G]LDá
8:$*,'27<&=Ą&(
%(=3,(&=(ē67:$
1LHEH]SLHF]HĔVWZR
6\PEROEá\VNDZLF\]HVWU]DáNąZWUyMNąFLH
UyZQRERF]Q\PPDQDFHOXRVWU]HĪHQLH
XĪ\WNRZQLNDRQLHL]RORZDQ\FKHOHPHQWDFK
ZHZQąWU]XU]ąG]HQLDQDNWyU\FKZ\VWĊSXMH
QLHEH]SLHF]QHQDSLĊFLHPRJąFHJUR]Lü
SRUDĪHQLHPHOHNWU\F]Q\P
2VWU]HĪHQLH
:\NU]\NQLNZWUyMNąFLHUyZQRERF]Q\PPDQD
FHOX]ZUyFHQLHXZDJLXĪ\WNRZQLNDQDZDĪQH
LQVWUXNFMHGRW\F]ąFHREVáXJLLNRQVHUZDFML
VHUZLVRZDQLD]QDMGXMąFHVLĊZGRNXPHQWDFML
GRáąF]RQHMGRXU]ąG]HQLD
8ZDJD
$E\]PQLHMV]\üU\]\NRSRUDĪHQLD
HOHNWU\F]QHJRQLHQDOHĪ\]GHMPRZDüSRNU\Z\
JyUQHMDQLW\OQHM8U]ąG]HQLHQLH]DZLHUD
HOHPHQWyZSU]H]QDF]RQ\FKGRVDPRG]LHOQHM
QDSUDZ\SU]H]XĪ\WNRZQLND6HUZLVQDOHĪ\
]OHFDüZ\NZDOLILNRZDQ\PSUDFRZQLNRP
REVáXJL
,VWRWQHLQIRUPDFMHGRW\F]ąFH
EH]SLHF]HĔVWZD
3U]HF]\WDMSRQLĪV]HLQVWUXNFMH
=DFKRZDMSRQLĪV]HLQVWUXNFMH
6WRVXMVLĊGRZV]\VWNLFKRVWU]HĪHĔ
3U]HVWU]HJDMZV]\VWNLFKLQVWUXNFML
1LHNRU]\VWDM]XU]ąG]HQLDZSREOLĪXZRG\
'RF]\V]F]HQLDXĪ\ZDMW\ONRVXFKHMĞFLHUHF]NL
1LH]DVáDQLDMRWZRUyZZHQW\ODF\MQ\FK
3U]HSURZDGĨLQVWDODFMĊ]JRGQLH]LQVWUXNFMDPL
SURGXFHQWD
1LHLQVWDOXMXU]ąG]HQLDZSREOLĪXĨUyGHáFLHSáD
WDNLFKMDNJU]HMQLNLSLHFHOXELQQHXU]ąG]HQLD
UyZQLHĪZ]PDFQLDF]HZ\WZDU]DMąFHFLHSáR
%RVFK6HFXULW\6\VWHPV_
3/_
=ZUyüXZDJĊQDSRODU\]DFMĊLX]LHPLHQLHZW\F]NL
:W\F]NDVSRODU\]RZDQDSRVLDGDGZDEROFHSU]\
F]\PMHGHQMHVWV]HUV]\RGGUXJLHJR:W\F]ND]
X]LHPLHQLHPSRVLDGDGZDEROFHF]\QQHRUD]ZW\N
X]LHPLDMąF\=DVWRVRZDQLHVW\NXV]HURNLHJRL
ZW\NXX]LHPLDMąFHJR]DSHZQLDEH]SLHF]HĔVWZR
XĪ\WNRZQLND-HĞOLZW\F]NDQLHSDVXMHGRJQLD]GND
VLHFLRZHJRVNRQWDNWXMVLĊ]HOHNWU\NLHPZFHOX
Z\PLDQ\SU]HVWDU]DáHJRJQLD]GND
=DEH]SLHF]SU]HZyG]DVLODMąF\SU]HG
QDGHSQLĊFLHPOXE]DJLĊFLHPV]F]HJyOQLHSU]\
ZW\F]FHJQLD]GNXSU]HGáXĪDF]DLZPLHMVFX
Z\SURZDG]HQLD]XU]ąG]HQLD
8Ī\ZDMZ\áąF]QLHDNFHVRULyZF]ĊĞFLRNUHĞORQ\FK
SU]H]SURGXFHQWD
2GáąF]XU]ąG]HQLHRG]DVLODQLDZF]DVLHEXU]\OXE
ZSU]\SDGNXQLHNRU]\VWDQLD]XU]ąG]HQLDSU]H]
GáXĪV]\F]DV
6HUZLVQDOHĪ\]OHFDüZ\NZDOLILNRZDQ\P
SUDFRZQLNRPREVáXJL6HUZLVXU]ąG]HQLDMHVW
NRQLHF]Q\SU]\MDNLPNROZLHNXV]NRG]HQLXQS
XV]NRG]HQLXSU]HZRGX]DVLODMąFHJRZ\ODQLX
FLHF]\QDXU]ąG]HQLHOXEZU]XFHQLXGRMHJR
ZQĊWU]DFLDáREF\FKZ\VWDZLHQLXXU]ąG]HQLDQD
G]LDáDQLHGHV]F]XOXEZLOJRFLZ\VWąSLHQLX]DNáyFHĔ
ZSUDF\OXEXSXV]F]HQLXXU]ąG]HQLD
2VWU]HĪHQLH
:FHOX]PQLHMV]HQLDQLHEH]SLHF]HĔVWZD
SRUDĪHQLDSUąGHPHOHNWU\F]Q\PXU]ąG]HQLD
QLHQDOHĪ\Z\VWDZLDüQDG]LDáDQLHGHV]F]XDQL
ZLOJRFL1LHQDOHĪ\UyZQLHĪVWDZLDüQDQLP
QDF]\ĔZ\SHáQLRQ\FKSá\QDPLQSZD]RQyZ
7\OQąSRNU\ZĊXU]ąG]HQLDPRJą]GHMPRZDü
Z\áąF]QLHZ\NZDOLILNRZDQLSUDFRZQLF\REVáXJLOXE
VHUZLVX
1LHSUDZLGáRZDZ\PLDQDEDWHULLJUR]LZ\EXFKHP
/LWRZDEDWHULD]QDMGXMHVLĊZHZQąWU]REXGRZ\
PDJQHWRZLGX=DVWRVXMEDWHULĊWHJRVDPHJRW\SX
OXEUyZQRZDĪQą=XĪ\WHEDWHULHQDOHĪ\XVXZDüZ
VSRVyEQLH]DJUDĪDMąF\ĞURGRZLVNXQDWXUDOQHPX
1LH]DVáDQLDMRWZRUyZZHQW\ODF\MQ\FKDE\QLH
GRSURZDG]LüGRSU]HJU]DQLDXU]ąG]HQLD
1LHVWDZLDMXU]ąG]HQLDZSREOLĪXĨUyGHáFLHSáD
1LHLQVWDOXMXU]ąG]HQLDZPLHMVFDFKREXGRZDQ\FK
WDNLFKMDNSyáNLQDNVLąĪNLOXESRGREQ\FK
'95&_3RGUĊF]QLNLQVWDODFML_5R]G]LDá
&]\V]F]HQLH
8U]ąG]HQLHPRĪQDF]\ĞFLü]ZLOĪRQą
QLHSRVWU]ĊSLRQąĞFLHUHF]NąOXELUFKą
.RPHQWDU]
)LUPD%RVFK]ZUDFDV]F]HJyOQąXZDJĊQDRFKURQĊ
ĞURGRZLVND8U]ąG]HQLH]RVWDáR]DSURMHNWRZDQHWDN
DE\ZPRĪOLZLHMDNQDMZLĊNV]\PVWRSQLXE\áR
SU]\MD]QHGODĞURGRZLVND
3/_
:VWĊS
:G]LDáDQLXIXQNFMLRGWZDU]DQLDLQDJU\ZDQLD
PDJQHWRZLGXF\IURZHJR'95&Z\NRU]\VWDQR
QRZRF]HVQąWHFKQRORJLĊ]DSURMHNWRZDQąQDSRWU]HE\
V\VWHPyZ&&790DJQHWRZLGXPRĪOLZLD
QLHSU]HUZDQHQDJU\ZDQLHSU]H]RNUHVW\JRGQLDOXE
GáXĪHMWDNĪHZWU\ELHSRNODWNRZ\P1LHWU]HED
]PLHQLDüDQLSU]HFKRZ\ZDüĪDGQ\FKNDVHW8QLNDVLĊ
UyZQLHĪF]ĊVW\FKLNRV]WRZQ\FKF]\QQRĞFL
NRQVHUZDF\MQ\FK
0DJQHWRZLGPRĪHQDJU\ZDü]SUĊGNRĞFLąGR
NODWHNQDVHNXQGĊZVWDQGDUGDFK3$/L176&]
PRĪOLZRĞFLąQDW\FKPLDVWRZHJRRGWZDU]DQLD
8U]ąG]HQLHSRVLDGDZV]\VWNLH]DOHW\F\IURZHM
UHMHVWUDFMLZLGHRMHVWáDWZHGR]DLQVWDORZDQLDDMHJR
REVáXJDMHVWLGHQW\F]QDMDNWUDG\F\MQHJR
PDJQHWRZLGX'XĪDHIHNW\ZQRĞüWHFKQRORJLL
NRPSUHVMLRUD]]QDNRPLWDF]\VWRĞüL RGZ]RURZDQLH
V]F]HJyáyZREUD]XF]\QLą] PDJQHWRZLGXF\IURZHJR
LGHDOQHXU]ąG]HQLHGRZVSyáSUDF\] V]HURNąJDPą
PXOWLSOHNVHUyZ
)XQNFMH
%RVFK6HFXULW\6\VWHPV_
'RVNRQDáDMDNRĞüREUD]X
1DJU\ZDQLHREUD]XSU]HGDODUPHP
1DJU\ZDQLHSRNODWNRZHLZF]DVLHU]HF]\ZLVW\P
&]ĊVWRWOLZRĞüRGĞZLHĪDQLD50REUD]yZZV\VWHPLH
3$/L6REUD]yZZV\VWHPLH176&
6]\ENLHZ\V]XNLZDQLHZHGáXJGDW\JRG]LQ\
]GDU]HĔDODUPRZ\FKLOLVW\QDJUDĔ
6]\ENLHLZROQHRGWZDU]DQLHQDJUDĔZUyĪQ\FK
V]\ENRĞFLDFK
:\ĞZLHWODQHQDHNUDQLHPHQXNRQILJXUDFMLL
Z\áąF]QLNDF]DVRZHJR
2FKURQDKDVáHP
3RUWNRPXQLNDF\MQ\56
:EXGRZDQ\PHFKDQL]PNRPSUHVMLGHNRPSUHVML
0-3(*RUHJXORZDQHMMDNRĞFL
)XQNFMDQDJU\ZDQLDGĨZLĊNX
3URJUDPRZDQLHUyĪQ\FKV]\ENRĞFLQDJU\ZDQLD
SRNODWNRZHJR
=DSLVGDQ\FKQDNDUFLHSDPLĊFL&RPSDFW)ODVK
3LORW]GDOQHJRVWHURZDQLD
1DJU\ZDQLH]H]GDOQ\PSRGJOąGHPRUD]
SU]HND]\ZDQLHREUD]XL GĨZLĊNXQDĪ\ZRG]LĊNL
SU]HJOąGDUFHRSDUWHMQDVLHFLLQWHUQHWRZHM
=JRGQRĞü]PXOWLSOHNVHUDPLPDUNL%RVFKRUD]
ZLHORPDLQQ\PLXU]ąG]HQLDPLWHJRW\SX
'95&_3RGUĊF]QLNLQVWDODFML_5R]G]LDá
3/_
3DQHOSU]HGQL
ZDUWRĞFLSDUDPHWUyZ:UD]]SU]\FLVNLHP(17(5
VáXĪ\GRXVWDZLDQLDRSFMLZPHQX
1 5(&5R]SRF]\QDQDJU\ZDQLHODPSNDZ
SU]\FLVNXĞZLHFLZWUDNFLHQDJU\ZDQLD
9 (17(51DFLĞQLĊFLHSRWZLHUG]DZ\EyUOXE]PLDQĊ
2 26' 1DFLĞQLMMHGHQUD]ZFHOXZ\ĞZLHWOHQLD
SDUDPHWUX
GDW\L JRG]LQ\LORĞüPLHMVFDQDG\VNXL
V]\ENRĞüRGWZDU]DQLD
'UXJLHQDFLĞQLĊFLHZ\ĞZLHWODSRMHPQRĞü
G\VNXSR]\FMĊQDJU\ZDQLDSR]\FMĊ
RGWZDU]DQLD
7U]HFLHQDFLĞQLĊFLHZ\áąF]DPHQX
HNUDQRZH
3 6723=DWU]\PXMHQDJU\ZDQLHOXERGWZDU]DQLH
10 0(181DFLĞQLĊFLHRWZLHUDOXE]DP\NDPHQX
NRQILJXUDF\MQH
11 2GELRUQLNV\JQDáyZSRGF]HUZLHQL]GDOQHJR
VWHURZDQLD
12 :\ĞZLHWODF]/&'
:WU\ELHJRWRZRĞFLZ\ĞZLHWODELHĪąFąGDWĊ
JRG]LQĊRUD]XVWDZLHQLDMDNRĞFLLV]\ENRĞFL
QRUPDOQHJRQDJU\ZDQLD
:WU\ELHQDJU\ZDQLDZ\ĞZLHWODELHĪąFąGDWĊ
JRG]LQĊQDSLV5(&RUD]ELHĪąFąV]\ENRĞü
QDJU\ZDQLD
:WU\ELHRGWZDU]DQLDZ\ĞZLHWODGDWĊJRG]LQĊ
QDJUDQLDQDSLV3/$<RUD]ELHĪąFąV]\ENRĞü
RGWZDU]DQLD
,QIRUPDFMHQDWHPDWZ\ĞZLHWODQ\FKNRPXQLNDWyZ
PRĪQDX]\VNDü]OLVW\VNUyWyZ]DPLHV]F]RQHMQD
SRF]ąWNXLQVWUXNFML
4 3/$<5R]SRF]\QDRGWZDU]DQLH
5 3$86(:VWU]\PXMHRGWZDU]DQLHWU\ESDX]\
6 6($5&+2WZLHUDPHQXZ\V]XNLZDQLD
7 3RNUĊWáRZLHORIXQNF\MQH
:WU\ELHRGWZDU]DQLDREUyWSRNUĊWáD
ZLHORIXQNF\MQHJRZSUDZRSRZRGXMH
SU]\VSLHV]HQLHDZOHZR²]ZROQLHQLH
RGWZDU]DQLDREUD]X]DUyZQRZSU]yGOXEZW\á
:WU\ELHSDX]\REUyWSRNUĊWáDZLHORIXQNF\MQHJR
SRZRGXMHSRZROQHSU]HVXZDQLHREUD]XZSU]yG
OXEZW\á
13 $/$50:VNDĨQLN]DSDODVLĊJG\Z\VWąSLDODUP
14 /$1:VNDĨQLNĞZLHFLZWUDNFLHNRPXQLNDFML]
8 7DUF]DQDZLJDF\MQD
VLHFLą
:WU\ELHRGWZDU]DQLDREUDFDMąFWDUF]ą
QDZLJDF\MQąZ\ELHUDVLĊV]\ENRĞüRGWZDU]DQLD
:WU\ELHSDX]\REUDFDMąFWDUF]ąQDZLJDF\MQą
SU]HVXZDVLĊREUD]ZSU]yGOXEZW\áNODWNDSR
NODWFH
:WU\ELHPHQXREUDFDMąFWDUF]ąQDZLJDF\MQą
SU]HFKRG]LVLĊSU]H]VWURQ\PHQXOXEZ\ELHUD
1
16
15
%RVFK6HFXULW\6\VWHPV_
14 13
15 *QLD]GRNDUW\&RPSDFW)ODVK:áyĪNDUWĊ
&RPSDFW)ODVK1DFLĞQLMF]DUQ\SU]\FLVNRERN
JQLD]GDDE\Z\MąüNDUWĊ
16 &23<1DFLĞQLMDE\VNRSLRZDüVWRSNODWNĊOXE
VWUXPLHĔZLGHRQDNDUWĊ&RPSDFW)ODVK
2
3
12
4
5
6
11
10
7
8
9
'95&_3RGUĊF]QLNLQVWDODFML_5R]G]LDá
3/_
$/0567
1&1&
Out2
Monitor Out
Out
Out 1
]áąF]HP$ODUP
%RVFK6HFXULW\6\VWHPV_
GND
NC4
NC3
DISKFULL
VEXT
ALM-CO
ALM-NO
LAN
Out 2
GND
100-240 Vac
ALM-NC
GND
GND
Remote Control
GND
GND
AC 100-240
Out1
NC2
REC
RS 232
Looping out
GND
Video
In
NC2
S-Video
In
NC1
Mux main
Monitor In
In2
REC
Audio
In1
ALM-IN
Power
Off
=áąF]HRGELRUQLND
V\JQDáyZSRGF]HUZLHQL
]GDOQHJRVWHURZDQLD
=áąF]H
56
:\áąF]QLN]DVLODQLD
NC4
0DVD
3RGDQLHV\JQDáXQDWRZHMĞFLH
XUXFKDPLDQDJU\ZDQLHDODUPRZH
0DVD
*G\Z\VWąSLDODUPSRáąF]HQLHPLĊG]\
W\PVW\NLHPDVW\NLHP$/0&20
]RVWDMHRWZDUWH1RUPDOQLHMHVW
]DPNQLĊWH
$/012 *G\Z\VWąSLDODUPSRáąF]HQLHPLĊG]\
W\PVW\NLHPDVW\NLHP$/0&20
]RVWDMH]DPNQLĊWH1RUPDOQLHMHVW
RWZDUWH
$/0&20 :VSyOQ\VW\NZ\MĞFLRZ\DODUPyZ
ALM-RST
*1'
$/0,1
*1'
$/01&
NC3
:HMĞFLD$/0,1L$/0567PRJąE\üQRUPDOQLH
RWZDUWH12OXEQRUPDOQLH]DPNQLĊWH1=Z
]DOHĪQRĞFLRGXVWDZLHQLDZPHQXQDJUDQLHDODUPRZH
6\JQDá\Z\MĞFLRZHDODUPyZ
DISKFULL
:HMĞFLDLZ\MĞFLDV\JQDáyZ
DODUPRZ\FK
:\MĞFLDV\JQDáyZDODUPRZ\FK
VEXT
$E\SU]\áąF]\üXU]ąG]HQLHGRVLHFLQDOHĪ\SRGáąF]\ü
SU]HZyGGR]áąF]D/$1JQLD]GR5-]W\áX
XU]ąG]HQLD
:HMĞFLDV\JQDáyZ
DODUPRZ\FK
ALM-CO
=áąF]H/$1
ALM-RST
-HĪHOLRGELRUQLNSRGF]HUZLHQL]GDOQHJRVWHURZDQLD
MHVW]DVáRQLĊW\QSMHĞOLXU]ąG]HQLHMHVWLQVWDORZDQHZ
V]DILHQDOHĪ\SRGáąF]\üRSFMRQDOQ\SU]HGáXĪDF]
RGELRUQLNDV\JQDáyZSRGF]HUZLHQLGR]áąF]D]GDOQHJR
VWHURZDQLD&]XMQLNRGELRUQLNDQDOHĪ\XVWDZLüWDNDE\
]QDMGRZDáVLĊZSROXZLG]HQLDSLORWD]GDOQHJR
VWHURZDQLD
ALM-IN
=áąF]HRGELRUQLNDV\JQDáyZ
SRGF]HUZLHQL]GDOQHJRVWHURZDQLD
6\JQDá
QDSLĊFLHSU]HáąF]DQLD:\VRNLH!9'&
QDSLĊFLHSU]HáąF]DQLD1LVNLH9'&
PDNV\PDOQHQDSLĊFLHZHMĞFLRZH9'&
GND
:FHOX]GDOQHJRVWHURZDQLDXU]ąG]HQLHPQDOHĪ\
SRGáąF]\üVW\NRZH]áąF]H'VXEGRSRUWX56
ALM-NO
=áąF]HV]HUHJRZH56
5(&
ALM-NC
3U]HZyG]DVLODQLDQDOHĪ\SRGáąF]\üGRJQLD]GD
]DVLODQLD]W\áXXU]ąG]HQLD:\áąF]QLN]DVLODQLDVáXĪ\
GRZáąF]DQLDLZ\áąF]DQLDXU]ąG]HQLD
NC1
=DVLODQLH
3RGDQLHV\JQDáXQDWRZHMĞFLH
]DWU]\PXMHQDJU\ZDQLHDODUPRZH
3RGDQLHZ\VRNLHJRV\JQDáXĪąGDQLD
QDJUDQLD]HZQĊWU]QHJRQDWRZHMĞFLH
XUXFKDPLDQDJU\ZDQLH*G\QDSLĊFLH
V\JQDáX]PLHQLVLĊQDQLVNLH
QDJU\ZDQLH]RVWDQLH]DWU]\PDQH
%UDNSRáąF]HĔ
GND
3DQHOW\OQ\
VEXT
=áąF]HVLHFLRZH
'95&_3RGUĊF]QLNLQVWDODFML_5R]G]LDá
9(;7
',6.)8//
1&1&
3/_
0RĪOLZRĞFLZVSyáSUDF\]
LQQ\PLXU]ąG]HQLDPL
6\JQDáV\QFKURQL]DF\MQ\GR
PXOWLSOHNVHUD
1DSLĊFLHZ\MĞFLRZH9'&
1DWĊĪHQLHSUąGXZ\MĞFLRZHJRP$
6\JQDáZ\MĞFLRZ\DODUPXREUDNX
PLHMVFDQDG\VNX
1DSLĊFLHZ\MĞFLRZH9'&
1DWĊĪHQLHSUąGXZ\MĞFLRZHJRP$
%UDNSRáąF]HĔ
0DJQHWRZLGF\IURZ\PRĪHE\üSRGáąF]DQ\GR
V]HURNLHMJDP\PXOWLSOHNVHUyZXU]ąG]HĔW\SXTXDG
OXEEH]SRĞUHGQLRGRNDPHU\
0XOWLSOHNVHU\
3RQLĪV]\VFKHPDWLOXVWUXMHVSRVyESRGáąF]DQLD
PXOWLSOHNVHUDGRPDJQHWRZLGXF\IURZHJR
PDNV\PDOQHQDSLĊFLHVW\NX9'&
PDNV\PDOQHQDWĊĪHQLHSUąGXSU]HáąF]DQLD$'&
3RGáąF]PRQLWRUGRJQLD]GD%1&R]QDNRZDQHJR
0RQLWRU 2XWZ W\OQHMF]ĊĞFLPDJQHWRZLGX
.DPHU\
0XOWLSOHNVHU
1
VCR IN VCR OUT
2
3
5
RS 232
Out2
Monitor Out
Out
Out 1
0RQLWRU 2XW
0RQLWRU
%RVFK6HFXULW\6\VWHPV_
GND
NC4
NC3
DISKFULL
VEXT
ALM-CO
LAN
Out 2
GND
100-240 Vac
ALM-NO
ALM-NC
GND
GND
GND
AC 100-240
Out1
Remote Control
Looping out
NC2
Video
In
NC1
S-Video
In
REC
Mux main
Monitor In
In2
ALM-RST
Audio
In1
ALM-IN
Power
6
=áąF]HRGELRUQLND
V\JQDáyZSRGF]HUZLHQL
]GDOQHJRVWHURZDQLD
=áąF]H
56
:\áąF]QLN]DVLODQLD
Off
4
9&5
0RQLWRU
MON B MON A
VEXT
=áąF]HVLHFLRZH
'95&_3RGUĊF]QLNLQVWDODFML_5R]G]LDá
3/_
3RáąF]Z\MĞFLHJáyZQHJRPRQLWRUDPXOWLSOHNVHUD
GR JQLD]GD%1&R]QDF]RQHJRMDNR0RQLWRU ,Q
QD W\OQHMĞFLDQLHREXGRZ\PDJQHWRZLGXF\IURZHJR
3RGáąF]Z\MĞFLHPDJQHWRZLGXNDVHWRZHJR
PXOWLSOHNVHUDGR JQLD]GD%1&R]QDF]RQHJRMDNR
9LGHR ,QQD W\OQHMĞFLDQLHREXGRZ\PDJQHWRZLGX
F\IURZHJR
3RGáąF]ZHMĞFLHPDJQHWRZLGXNDVHWRZHJR
PXOWLSOHNVHUDGR JQLD]GD%1&R]QDF]RQHJRMDNR
9LGHR 2XWQD W\OQHMĞFLDQLHREXGRZ\PDJQHWRZLGX
F\IURZHJR
:FHOX]DSHZQLHQLDV\QFKURQLF]QHJRSU]HáąF]DQLD
PDJQHWRZLGXF\IURZHJR] PXOWLSOHNVHUHPSRáąF]
]áąF]D9(;7L*1'QD W\OQHMĞFLDQLHPDJQHWRZLGX
]H ]áąF]HPPXOWLSOHNVHUD
3R]HVWDZLHQLXZV]\VWNLFKSRáąF]HĔRWZyU]PHQX
V\VWHPRZHL ]GHILQLXMW\SXĪ\ZDQHJRPXOWLSOHNVHUD
8U]ąG]HQLDW\SXTXDG
3RQLĪV]\VFKHPDWLOXVWUXMHVSRVyESRGáąF]HQLDGR
PDJQHWRZLGXF\IURZHJRXU]ąG]HQLDW\SXTXDGEH]
JQLD]GDV\JQDáXZ\MĞFLRZHJRGRPDJQHWRZLGX
NDVHWRZHJR
3RGáąF]PRQLWRUGRJQLD]GD%1&R]QDNRZDQHJR
0RQLWRU 2XWZ W\OQHMF]ĊĞFLPDJQHWRZLGX
3RGáąF]Z\MĞFLHV\JQDáXZLGHRPXOWLSOHNVHUD
GR JQLD]GD%1&R]QDF]RQHJRMDNR9LGHR ,Q
QD W\OQHMĞFLDQLHREXGRZ\PDJQHWRZLGXF\IURZHJR
:PHQXV\VWHPRZ\PXVWDZZ SR]\FML
PXOWLSOHNVHUDRSFMĊ:\áąF]
6SRVyESRGáąF]HQLDXU]ąG]HQLDW\SXTXDG
Z\SRVDĪRQHJRZ JQLD]GRZ\MĞFLRZHV\JQDáXZLGHR
]RVWDáRSLVDQ\Z F]ĊĞFLGRW\F]ąFHMZVSyáSUDF\
PDJQHWRZLGX] PXOWLSOHNVHUHP
7U\ETXDG
1
2
3
4
:LGHR
Video OUT
RS 232
Out2
Monitor Out
Out
Out 1
0RQLWRU 2XW
0RQLWRU
%RVFK6HFXULW\6\VWHPV_
GND
NC4
NC3
DISKFULL
VEXT
ALM-CO
LAN
Out 2
GND
100-240 Vac
ALM-NO
ALM-NC
GND
GND
GND
AC 100-240
Out1
Remote Control
Looping out
NC2
Video
In
NC1
S-Video
In
REC
Mux main
Monitor In
In2
ALM-RST
Audio
In1
ALM-IN
Power
Off
=áąF]HRGELRUQLND
V\JQDáyZSRGF]HUZLHQL
]GDOQHJRVWHURZDQLD
=áąF]H
56
:\áąF]QLN]DVLODQLD
VEXT
=áąF]HVLHFLRZH
'95&_3RGUĊF]QLNLQVWDODFML_5R]G]LDá
3/_
.DPHUDSRMHG\QF]D
3RQLĪV]\VFKHPDWLOXVWUXMHVSRVyESRGáąF]HQLDMHGQHM
NDPHU\GR PDJQHWRZLGXF\IURZHJR
3RGáąF]PRQLWRUGRJQLD]GD%1&R]QDF]RQHJR
MDNR9LGHR 2XWQDW\OQHMĞFLDQLHREXGRZ\
PDJQHWRZLGXF\IURZHJR
3RGáąF]Z\MĞFLHV\JQDáXZLGHRNDPHU\GR JQLD]GD
%1&R]QDF]RQHJRMDNR9LGHR ,QQD W\OQHMĞFLDQLH
REXGRZ\PDJQHWRZLGXF\IURZHJR
3RGáąF]Z\MĞFLHV\JQDáXDXGLRNDPHU\GR JQLD]GD
R]QDF]RQHJR$XGLR ,QQD W\OQHMĞFLDQLHREXGRZ\
PDJQHWRZLGXF\IURZHJR
3RGáąF]JQLD]GR9LGHR 2XWQDW\OQHMĞFLDQLH
REXGRZ\PDJQHWRZLGXF\IURZHJRGRZ]PDFQLDF]D
GĨZLĊNX
:PHQXV\VWHPRZ\PXVWDZZ SR]\FML
PXOWLSOHNVHUDRSFMĊ:\áąF]
Video
In
RS 232
Out2
Monitor Out
Out
Out 1
GND
NC4
NC3
DISKFULL
VEXT
ALM-CO
ALM-NO
ALM-NC
GND
GND
GND
AC 100-240
Out1
Remote Control
Looping out
NC2
S-Video
In
NC1
Mux main
Monitor In
In2
REC
Audio
In1
ALM-RST
Power
=áąF]HRGELRUQLND
V\JQDáyZSRGF]HUZLHQL
]GDOQHJRVWHURZDQLD
=áąF]H
56
ALM-IN
$XGLR,Q
:\áąF]QLN]DVLODQLD
Off
9LGHR,Q
.DPHUD
LAN
Out 2
GND
VEXT
9LGHR2XW
$XGLR2XW
=áąF]HVLHFLRZH
100-240 Vac
0RQLWRU
%RVFK6HFXULW\6\VWHPV_
'95&_3RGUĊF]QLNLQVWDODFML_5R]G]LDá
3LORW]GDOQHJRVWHURZDQLD
3LORW]GDOQHJRVWHURZDQLDXáDWZLDVWHURZDQLH
PDJQHWRZLGHPF\IURZ\PQDRGOHJáRĞü=DSRPRFą
SLORWDPRĪQDZ\NRQ\ZDüQDMZDĪQLHMV]HRSHUDFMH
)XQNFMHSU]\FLVNyZSLORWDPDJQHWRZLGXF\IURZHJR
5(&25'
6723
1DFLĞQLĊFLHUR]SRF]\QDQDJU\ZDQLH
1DFLĞQLĊFLH]DWU]\PXMHQDJU\ZDQLHOXE
RGWZDU]DQLH
3/$<
1DFLĞQLĊFLHUR]SRF]\QDRGWZDU]DQLH
6($5&+
2GWZDU]DQLHZSU]\VSLHV]RQ\P
WHPSLH[[[[[[[
5(:,1'
1DFLĞQLĊFLHZWU\ELHRGWZDU]DQLD
ZáąF]DRGWZDU]DQLHGRW\áX
SU]\FLVNLHP6HDUFK]ZLĊNV]DVLĊ
V]\ENRĞüRGWZDU]DQLDGRW\áX
67(35(: 1DFLĞQLĊFLH]DWU]\PXMHRGWZDU]DQLH
3RQRZQHQDFLĞQLĊFLHUR]SRF]\QD
RGWZDU]DQLHREUD]yZGRW\áXNODWNDSR
NODWFH
67(3)25: 1DFLĞQLĊFLH]DWU]\PXMHRGWZDU]DQLH
3RQRZQHQDFLĞQLĊFLHUR]SRF]\QD
RGWZDU]DQLHGRSU]RGXNODWNDSR
NODWFH
)25:$5' 1DFLĞQLĊFLHSRGF]DVRGWZDU]DQLDGR
W\áXUR]SRF]\QDRGWZDU]DQLHGRSU]RGX
SU]\FLVNLHP6HDUFK]ZLĊNV]DVLĊ
V]\ENRĞüRGWZDU]DQLDGRSU]RGX
0
BOSCH
3U]\FLVNLVWHUXMąFH
PDJQHWRZLGHPF\IURZ\P
%RVFK6HFXULW\6\VWHPV_
3/_
3RGáąF]DQLHGRVLHFL
LQWHUQHWRZHM
3RáąF]HQLHVLHFLRZHZ\NRU]\VWXMHVWDQGDUG%DVH7
1DOHĪ\VLĊXSHZQLüF]\XĪ\ZDQDNDUWDVLHFLRZD
REVáXJXMHWHQVWDQGDUG
:SU]\SDGNXSRGáąF]HQLDPDJQHWRZLGXF\IURZHJR
EH]SRĞUHGQLRGRNRPSXWHUD3&QDOHĪ\XĪ\ü
NU]\ĪRZHJRNDEODVLHFLRZHJR&$71DWRPLDVWMHĞOL
PDJQHWRZLGPDE\üSRGáąF]RQ\GRURXWHUDOXE
NRQFHQWUDWRUDVLHFLRZHJRQDOHĪ\XĪ\üSU]HORWRZHJR
NDEOD&$7
$E\RSURJUDPRZDQLH]GDOQHPRJáRG]LDáDüSRSUDZQLH
PXV]ąE\üRWZDUWHQDVWĊSXMąFHSRUW\
SRUWSURWRNRáX7&3VHUZHUVLHFLRZ\
SRUWSURWRNRáX7&3SROHFHQLD
SRUW\SURWRNRáX3RUW\7&3
GDQHZLGHR
-HĞOLSRáąF]HQLHRGE\ZDVLĊ]DSRĞUHGQLFWZHP
]DEH]SLHF]HQLDILUHZDOOQDOHĪ\VLĊVNRQVXOWRZDü]
DGPLQLVWUDWRUHPVLHFLF]\GRVWĊSGRXU]ąG]HQLD
EĊG]LHZWHG\PRĪOLZ\
'95&_3RGUĊF]QLNLQVWDODFML_5R]G]LDá
2EVáXJD
6]\ENDLQVWDODFMD
:WU\ELHV]\ENLHMLQVWDODFMLPRĪQDV]\ENR]PLHQLü
GDWĊJRG]LQĊMDNRĞüQDJUDQLDLXVWDZLHQLDV]\ENRĞFL
QDJU\ZDQLD,36]DSRPRFąZ\ĞZLHWODF]D/&'L
WDUF]\QDZLJDF\MQHM
1DFLĞQLMLSU]\WU]\PDMSU]\FLVN0(18SU]H]
VHNXQGDE\SU]HMĞüGRWU\EXV]\ENLHMLQVWDODFML
1DZ\ĞZLHWODF]X/&']DF]QLHPLJDüQDSLV<HDU
URN
3RNUĊüWDUF]ąQDZLJDF\MQąDE\]PLHQLüZDUWRĞü
URNXDQDVWĊSQLHQDFLĞQLMSU]\FLVN(17(51D
Z\ĞZLHWODF]X/&']DF]QLHPLJDüQDSLV0RQWK
PLHVLąF
3RQRZQLHXĪ\MWDUF]\QDZLJDF\MQHMDE\XVWDZLü
SR]RVWDáHZ\ĞZLHWORQHZDUWRĞFLLQDFLĞQLMSU]\FLVN
(17(53RXVWDZLHQLXRVWDWQLHMZDUWRĞFL
PDJQHWRZLGSRZUyFLGRSUDF\ZWU\ELHQRUPDOQ\P
$E\RSXĞFLüPHQXV]\ENLHMLQVWDODFMLQDFLĞQLM
SU]\FLVN6($5&+
1DJU\ZDQLHQDW\FKPLDVWRZH
1DFLĞQLĊFLHSU]\FLVNX5HFRUGQDJU\ZDMSR]ZDODRG
UD]XUR]SRF]ąüQDJU\ZDQLH²REUD]\EĊGą
UHMHVWURZDQHQDG\VNXWZDUG\P
6]\ENRĞüLMDNRĞüQDJUDQLDXVWDZLDVLĊZPHQX
1DJU\ZDQLHVWDQGDUGRZHL1DJU\ZDQLHDODUPRZH
1DZ\ĞZLHWODF]X/&'SRMDZLVLĊQDSLV5(&
QDJU\ZDQLH
$E\]DWU]\PDüQDJU\ZDQLHQDOHĪ\QDFLVQąüSU]\FLVN
6WRS
=SU]\FLVNX6WRSPRĪQDNRU]\VWDüW\ONRZWU\ELH
QDJU\ZDQLD
*G\G\VNWZDUG\MHVWSHáQ\PDJQHWRZLGF\IURZ\
DXWRPDW\F]QLHSU]HVWDMHQDJU\ZDüOXEQDGSLVXMH
QDJUDQLDRGSRF]ąWNXG\VNXWZDUGHJRZ
]DOHĪQRĞFLRGXVWDZLHQLDZPHQX8VWDZLHQLD
V\VWHPRZH
1DJU\ZDQLHDODUPRZH
2EUD]]PRQLWRUDMHVWQDJU\ZDQ\DXWRPDW\F]QLHJG\
Z\VWąSLDODUP1DJU\ZDQLHNRĔF]\VLĊZFKZLOL
]DNRĔF]HQLDRNUHVXWUZDQLDDODUPX3RZ\VWąSLHQLX
DODUPXQDJU\ZDQLHQDW\FKPLDVWRZHLF]DVRZHMHVW
SU]HU\ZDQH-HĞOLXU]ąG]HQLHQDJU\ZDáRZFKZLOL
Z\VWąSLHQLDDODUPXWRMDNRĞüQDJUDQLDDODUPRZHJR
%RVFK6HFXULW\6\VWHPV_
3/_
SR]RVWDQLHEH]]PLDQ2SFMHQDJU\ZDQLDDODUPRZHJR
XVWDZLDVLĊZPHQX1DJU\ZDQLHDODUPRZH
1DJU\ZDQLHSU]HGDODUPHP
%XIRUQDREUD]yZQSVHNXQGSU]\NODWNDFK
QDVHNXQGĊOXEVHNXQGSU]\NODWFHQDVHNXQGĊ
XPRĪOLZLDQDJUDQLHWHJRFRVLĊZ\GDU]\áRWXĪSU]HG
Z\VWąSLHQLHPDODUPX1DJU\ZDQLHSU]HGDODUPHPMHVW
GRVWĊSQHW\ONRMHĪHOLXU]ąG]HQLHQLHQDJU\ZDáRZ
RNUHVLHSU]HGZ\VWąSLHQLHPDODUPX-DNRĞü
QDJU\ZDQLDZRNUHVLHSU]HGDODUPHPMHVWWDNDVDPD
MDNMDNRĞüQDJU\ZDQLDSU]HGZ\VWąSLHQLHPDODUPX
-HĞOLZFKZLOLZ\VWąSLHQLDDODUPXREUD]QLHE\á
QDJU\ZDQ\MDNRĞüQDJU\ZDQLDSU]HGDODUPHPMHVW
WDNDVDPDMDNVWDQGDUGRZDMDNRĞüQDJU\ZDQLD
6WDQGDUGRZHRGWZDU]DQLH
2GWZDU]DQLH
1DFLĞQLMSU]\FLVN3/$<RGWZDU]DMDE\UR]SRF]ąü
RGWZDU]DQLHQDJUDQHJRREUD]XGĨZLĊNXRG
RVWDWQLHJRVHJPHQWX
$E\]DWU]\PDüRGWZDU]DQLHQDFLĞQLMSU]\FLVN
6723
3U]HZLMDQLHGRSU]RGX
$E\UR]SRF]ąüRGWZDU]DQLHQDFLĞQLMSU]\FLVN
3/$<
2EUyüSRNUĊWáRZLHORIXQNF\MQHZSUDZRĪHE\
UR]SRF]ąüRGWZDU]DQLHGRSU]RGX]H]ZLĊNV]RQą
V]\ENRĞFLą6]\ENRĞüMHVWSRGDQDQDZ\ĞZLHWODF]X
QRUPDOQDV]\ENRĞüRGWZDU]DQLD[[[[
[[
2GWZDU]DQLHGRW\áX
$E\UR]SRF]ąüRGWZDU]DQLHQDFLĞQLMSU]\FLVN3/$<
RGWZDU]DM
2EUyüSRNUĊWáRZLHORIXQNF\MQHZOHZRĪHE\
UR]SRF]ąüRGWZDU]DQLHGRW\áX]H]ZLĊNV]RQą
V]\ENRĞFLą6]\ENRĞüMHVWSRGDQDQDZ\ĞZLHWODF]X
QRUPDOQDV]\ENRĞüRGWZDU]DQLD[[[[
[[
2GWZDU]DQLHGRSU]RGXZ]ZROQLRQ\PWHPSLH
1DFLĞQLMSU]\FLVNSDX]\DE\ZVWU]\PDü
RGWZDU]DQLH
2EUyüSRNUĊWáRZLHORIXQNF\MQHZSUDZRĪHE\
UR]SRF]ąüRGWZDU]DQLHGRSU]RGXZ]ZROQLRQ\P
WHPSLH6]\ENRĞüMHVWSRGDQDQDZ\ĞZLHWODF]X
!
'95&_3RGUĊF]QLNLQVWDODFML_5R]G]LDá
2GWZDU]DQLHGRW\áXZ]ZROQLRQ\PWHPSLH
1DFLĞQLMSU]\FLVNSDX]\DE\ZVWU]\PDü
RGWZDU]DQLH
2EUyüSRNUĊWáRZLHORIXQNF\MQHZOHZRĪHE\
UR]SRF]ąüRGWZDU]DQLHGRW\áXZ]ZROQLRQ\P
WHPSLH6]\ENRĞüMHVWSRGDQDQDZ\ĞZLHWODF]X
3/_
-HĞOLOLVWDZ\ERUXQLHPLHĞFLVLĊQDHNUDQLHREUyü
WDUF]ĊQDZLJDF\MQąZSUDZRDE\Z\ĞZLHWOLü
QDVWĊSQąVWURQĊOLVW\
$E\UR]SRF]ąüRGWZDU]DQLHREUD]yZDODUPX
QDFLĞQLMSU]\FLVN(QWHU
2EUD]MHVWRGWZDU]DQ\RGRNUHVXSU]HGDODUPHP
GR]DNRĔF]HQLDRNUHVXWUZDQLDDODUPX
%ORNRZDQLHZ\ĞZLHWORQHMV]\ENRĞFL
$E\]DEORNRZDüZ\ĞZLHWODQąV]\ENRĞüQDFLĞQLM
SU]\FLVN(QWHUDQDVWĊSQLH]ZROQLMSRNUĊWáR
ZLHORIXQNF\MQH3RSRQRZQ\PSU]HNUĊFHQLX
SRNUĊWáDZLHORIXQNF\MQHJR]RVWDQLHSU]\ZUyFRQD
QRUPDOQDV]\ENRĞüRGWZDU]DQLD
2GWZDU]DQLHGRSU]RGXGRW\áXNODWNDSRNODWFH
1DFLĞQLMSU]\FLVNSDX]\DE\]DWU]\PDüREUD]
2EUyüWDUF]ĊQDZLJDF\MQąZSUDZRDE\RGWZDU]Dü
QDJUDQLHGRSU]RGXNODWNDSRNODWFH
2EUyüWDUF]ĊQDZLJDF\MQąZOHZRDE\RGWZDU]Dü
QDJUDQLHGRW\áXNODWNDSRNODWFH
6]\ENRĞüSU]HJOąGDQLDNODWHNMHVWW\PZLĊNV]DLP
V]\EFLHMREUDFDVLĊWDUF]ąQDZLJDF\MQą
2GWZDU]DQLH]Z\V]XNLZDQLHP
2GWZDU]DQLH]Z\V]XNLZDQLHPZHGáXJVHJPHQWyZ
1DFLĞQLMSU]\FLVN6HDUFKZ\V]XNDMDE\RWZRU]\ü
:\V]XNLZDQLH
3U]HVXĔNXUVRUGRRSFML:('à8*/,67<
6(*0(17Ï:LQDFLĞQLMSU]\FLVN(QWHUDE\
SU]HMĞüGRZ\V]XNLZDQLDSOLNyZ
3U]HVXĔNXUVRUGRVHJPHQWXNWyU\FKFHV]
RWZRU]\üS$ODUPQDJUDQLHSU]HGDODUPHP7LPHU
QDJUDQLHF]DVRZH
-HĞOLOLVWDZ\ERUXQLHPLHĞFLVLĊQDHNUDQLHREUyü
WDUF]ĊQDZLJDF\MQąZSUDZRDE\Z\ĞZLHWOLü
QDVWĊSQąVWURQĊOLVW\
$E\UR]SRF]ąüRGWZDU]DQLHQDFLĞQLMSU]\FLVN
(QWHU
2GWZDU]DQLH]Z\V]XNLZDQLHPZHGáXJDODUPyZ
1DFLĞQLMSU]\FLVN6HDUFKDE\RWZRU]\üPHQX
:\V]XNLZDQLH
3U]HVXĔNXUVRUGRRSFML:('à8*/,67<
='$5=(ēL QDFLĞQLMSU]\FLVN(QWHUDE\SU]HMĞü
GR Z\V]XNLZDQLDDODUPyZ
3U]HVXĔNXUVRUGRREUD]XDODUPXNWyU\PDE\ü
RGWZDU]DQ\
%RVFK6HFXULW\6\VWHPV_
2GWZDU]DQLH]Z\V]XNLZDQLHPZHGáXJGDW\JRG]LQ\
1DFLĞQLMSU]\FLVN6HDUFKDE\RWZRU]\üPHQX
:\V]XNLZDQLH
3U]HVXĔNXUVRUGRRSFML:('à8*'$7<,
*2'=,1<LQDFLĞQLMSU]\FLVN(QWHUDE\SU]HMĞüGR
Z\V]XNLZDQLDSOLNyZ
3U]HVXĔNXUVRUGRĪąGDQHMZDUWRĞFLLQDFLĞQLM
SU]\FLVN(QWHU
=PQLHMV]OXE]ZLĊNV]ZDUWRĞüREUDFDMąF
RGSRZLHGQLRWDUF]ĊQDZLJDF\MQąDQDVWĊSQLH
QDFLĞQLMSU]\FLVN(QWHU
3U]HVXĔNXUVRUGRRSFML:<6=8.,:$1,(,
2'7:$5=$1,(LQDFLĞQLMSU]\FLVN(QWHU
2GWZDU]DQLHUR]SRF]QLHVLĊRGZ\EUDQHMZPHQX
GDW\JRG]LQ\
-HĞOLQLHPDĪDGQHJRQDJUDQLD]Z\EUDQHMGDW\
JRG]LQ\XU]ąG]HQLHDXWRPDW\F]QLHUR]SRF]QLH
RGWZDU]DQLHQDJUDQLD]QDMEOLĪV]ąGDWąJRG]LQą
.RSLRZDQLH
1DOHĪ\ZáRĪ\üNDUWĊ&RPSDFW)ODVKW\SX ,OXE ,,GR
JQLD]GDQDSDQHOXSU]HGQLP1DOHĪ\]ZUyFLüXZDJĊ
QDSUDZLGáRZ\NLHUXQHNZNáDGDQLDNDUW\&RPSDFW
)ODVK1LHQDOHĪ\VWRVRZDüNDUW&RPSDFW)ODVKR
SRMHPQRĞFLPQLHMV]HMQLĪ0%
)XQNFMDNRSLRZDQLDQDNDUWĊ&RPSDFW)ODVKMHVW
SU]H]QDF]RQDGR NRSLRZDQLDNUyWNLFKVHNZHQFML
ZLGHR6NRSLRZDQLHGáXĪV]\FKIUDJPHQWyZZLGHR
PRĪH]DMąüGXĪRZLĊFHMF]DVX
8ZDJD
:FHOXSROHSV]HQLDF]\WHOQRĞFLNRPXQLNDWyZ
NRSLRZDQLDQDFLĞQLMSU]\FLVN26'3RQRZQLHQDFLĞQLM
SU]\FLVN26'L Z\áąF]]DGDQLDZWOH
'95&_3RGUĊF]QLNLQVWDODFML_5R]G]LDá
.RSLRZDQLHSRMHG\QF]\FKNODWHN
1DFLĞQLMSU]\FLVN3OD\DE\UR]SRF]ąüRGWZDU]DQLH
1DFLĞQLMSU]\FLVN3DXVHDE\ZVWU]\PDü
RGWZDU]DQLH
2EUyüWDUF]ĊQDZLJDF\MQąZSUDZROXEZOHZRDE\
SU]HMĞüGRĪąGDQHJRREUD]X
1DFLĞQLMSU]\FLVN&RS\NRSLXMDE\SU]HMĞüGR
WU\EXNRSLRZDQLD
2EUDFDMąFWDUF]ĊQDZLJDF\MQąZ\ELHU]ĪąGDQ\
REUD]]NDPHU\
*G\QDPRQLWRU]HSRMDZLVLĊZáDĞFLZ\REUD]
QDFLĞQLMSRQRZQLHSU]\FLVN&RS\:WUDNFLH
NRSLRZDQLDQDHNUDQLH]RVWDQLHZ\ĞZLHWORQ\
NRPXQLNDWÄ.RSLRZDQLH´3RVNRSLRZDQLXSOLNXQD
HNUDQLH]RVWDQLHZ\ĞZLHWORQ\NRPXQLNDW
Ä=DNRĔF]RQHSRP\ĞOQLH´ZUD]]LGHQW\ILNDWRUHP
SOLNX
$E\DQXORZDüNRSLRZDQLHQDFLĞQLMSU]\FLVN6723
1DFLĞQLMSU]\FLVN3OD\DE\NRQW\QXRZDü
RGWZDU]DQLH
6NRSLRZDQHNODWNLVąSU]HFKRZ\ZDQHMDNRSRMHG\QF]H
REUD]\ZIRUPDFLH-3*
.RSLRZDQLHGRSOLNXZLGHR
1DFLĞQLMSU]\FLVN3OD\DE\UR]SRF]ąüRGWZDU]DQLH
1DFLĞQLMSU]\FLVN&RS\DE\XDNW\ZQLüWU\E
NRSLRZDQLD
2EUDFDMąFWDUF]ĊQDZLJDF\MQąZ\ELHU]ĪąGDQą
NDPHUĊ
*G\QDPRQLWRU]HSRMDZLVLĊZáDĞFLZ\REUD]
QDFLĞQLMSRQRZQLHSU]\FLVN&RS\:WUDNFLH
NRSLRZDQLDQDHNUDQLH]RVWDQLHZ\ĞZLHWORQ\
NRPXQLNDWÄ.RSLRZDQLH´
1DFLĞQLMSU]\FLVN6723DE\]DNRĔF]\ü
NRSLRZDQLH
3RVNRSLRZDQLXSOLNXQDHNUDQLH]RVWDQLH
Z\ĞZLHWORQ\NRPXQLNDWÄ=DNRĔF]RQHSRP\ĞOQLH´
ZUD]]LGHQW\ILNDWRUHPSOLNX
1DFLĞQLMSU]\FLVN3OD\DE\NRQW\QXRZDü
RGWZDU]DQLH
6NRSLRZDQHNODWNLVąSU]HFKRZ\ZDQHMDNRSOLNLZLGHR
ZIRUPDFLH029
%RVFK6HFXULW\6\VWHPV_
3/_
8VWDZLHQLDEORNDG\
EH]SLHF]HĔVWZD
1DOHĪ\SU]HáąF]\üPDJQHWRZLGZ WU\EQDJU\ZDQLD
QDFLVQąüSU]\FLVN5(&L SU]\WU]\PDüSU]H]FR
QDMPQLHMSLĊüVHNXQGSR XSá\ZLHNWyU\FKQDVWĊSXMH
]DEORNRZDQLHG]LDáDQLDZV]\VWNLFKSU]\FLVNyZ
QD SU]HGQLPSDQHOX=WHMIXQNFMLPRĪQD
NRU]\VWDüRLOHZPHQX8VWDZLHQLDV\VWHPX]RVWDáR
ZSURZDG]RQHKDVáR
3RQDFLĞQLĊFLXSU]\FLVNX6WRSV\VWHPSRSURVLR
SRGDQLHKDVáD3RZSURZDG]HQLXSUDZLGáRZHJRKDVáD
EORNDGDSU]\FLVNyZ]RVWDQLH]ZROQLRQD
'95&_3RGUĊF]QLNLQVWDODFML_5R]G]LDá
3/_
0HQXXVWDZLHĔ
3RSRGáąF]HQLXV\VWHPXZRSLVDQ\ZF]HĞQLHMVSRVyE
:áąF]]DVLODQLH
-HĞOL]DVLODQLHMHVWZáDĞFLZHZ\ĞZLHWODF]]DĞZLHFL
VLĊ
3RF]HNDMDĪV\VWHPVLĊ]DáDGXMH
1DFLĞQLMSU]\FLVN0(18DE\RWZRU]\ü0(18
*àÏ:1(
:JáyZQ\PPHQXVąZLGRF]QHUyĪQHSRGPHQXZ
NWyU\FKPRĪQD]PLHQLDüXVWDZLHQLD
2EUDFDMąFWDUF]ĊQDZLJDF\MQąZSUDZROXEZOHZR
PRĪQDSRUXV]DüVLĊSRPLĊG]\SRV]F]HJyOQ\PL
SRGPHQX1DFLĞQLĊFLHSU]\FLVNX(17(5RWZLHUD
Z\EUDQHSRGPHQX7DNĪHZSRGPHQXSRPLĊG]\
RSFMDPLSU]HFKRG]LVLĊ]DSRPRFąWDUF]\QDZLJDF\MQHM
LSU]\FLVNX(17(5$E\ZUyFLüGRPHQXJáyZQHJR
QDOHĪ\Z\EUDüRSFMĊ0(18*àÏ:1(XGRáXOLVW\L
QDFLVQąüSU]\FLVN(17(5
0HQXJáyZQH
0(18*àÏ:1(
=(*$5-ĉ=<.
1$*5<:$1,(67$1'$5'2:(
1$*5<:$1,($/$502:(
67(52:1,.&=$62:<
6<*1$à'B:,ĉ.2:<
$5&+,:,=$&-$
6,(û
867$:,(1,$6<67(08
!
!
!
!
!
!
!
!
0HQX=HJDU-Ċ]\N
0(18=(*$5-ĉ=<.
'$7$
*2'=,1$
)250$7'$7<
-ĉ=<.0(18
555500''
$1*,(/6.,
0(18*àÏ:1(
!
'$7$ 5RNa0LHVLąFa']LHĔa
*2'=,1$*RG]LQDa0LQXWDa6HNXQGDa
)250$7'$7<8VWDZNROHMQRĞüZ\ĞZLHWODQLDURNX5555
PLHVLąFD00LGQLD''
%RVFK6HFXULW\6\VWHPV_
-ĉ=<.0(18DQJLHOVNLQLHPLHFNLIUDQFXVNLKLV]SDĔVNLZáRVNL
SRUWXJDOVNLKROHQGHUVNLOXESROVNL
0(18*àÏ:1(3RZUyWGRPHQXJáyZQHJR
0HQX1DJU\ZDQLH
VWDQGDUGRZH
0(181$*5<:$1,(67$1'$5'2:(
6=<%.2ĝû1$*5$1,$
-$.2ĝû1$*5$1,$
,36
67$1'$5'2:$
&=$61$*5<:$1,$
*2'=,1
0(18*àÏ:1(
!
6=<%.2ĝû:\ELHU]V]\ENRĞüQDJU\ZDQLDRGGR
NODWHNQDVHNXQGĊ
-$.2ĝû'RZ\ERUXMHVWV]HĞüSR]LRPyZMDNRĞFLQDJU\ZDQLD
1,ĩ6=$.%
1,6.$.%
32'67.%
67$1'$5'2:$.%
:<62.$.%
1$-:<ĩ.%
&=$61$*5<:$1,$3RND]XMHV]DFXQNRZ\SR]RVWDá\F]DV
QDJU\ZDQLDQDSRGVWDZLHVWRSQLDZ\NRU]\VWDQLD
WZDUGHJRG\VNXZ\EUDQHMV]\ENRĞFLL MDNRĞFL
QDJU\ZDQLD
0HQXQDJU\ZDQLDDODUPRZHJR
0(181$*5<:$1,($/$502:(
'=,$à$1,($/$508
6=<%.2ĝû1$*5$1,$
-$.2ĝû1$*5$1,$
7<3:(-$/$508
7<35(6$/$508
&=$675:$/$508
:à
,36
67$1'$5'2:$
12
12
6(.
'=35=('$/$50(0
6=<%.2ĝû1$*5$1,$
:à
,36
0(18*àÏ:1(
!
'=,$à$1,($/$508
:à:áąF]DQDJU\ZDQLHSRZ\VWąSLHQLXDODUPX
:<à:\áąF]DQDJU\ZDQLHSRZ\VWąSLHQLXDODUPX
'95&_3RGUĊF]QLNLQVWDODFML_5R]G]LDá
6=<%.2ĝû1$*5$1,$6]\ENRĞüQDJU\ZDQLDZWUDNFLHWUZDQLD
DODUPX
0DNV\PDOQDV]\ENRĞüQDJU\ZDQLDZ\QRVLNODWHN
QDVHNXQGĊ3$/176&
0LQLPDOQDV]\ENRĞüQDJU\ZDQLDZ\QRVLNODWNLQD
VHNXQGĊ
-$.2ĝû1$*5$1,$-DNRĞüQDJU\ZDQLDREUD]XZWUDNFLH
WUZDQLDDODUPX
1,ĩ6=$.%
1,6.$.%
32'67.%
67$1'$5'2:$.%
:<62.$.%
1$-:<ĩ.%
7<3:(-$/$508
121RUPDOQLHRWZDUW\
1=1RUPDOQLH]DPNQLĊW\
7<35(6$/$508
121RUPDOQLHRWZDUW\
1=1RUPDOQLH]DPNQLĊW\
&=$675:$/$5081DJU\ZDQLHDODUPRZHUR]SRF]\QDVLĊ
ZUD]]UR]SRF]ĊFLHPDODUPXDNRĔF]\SRXSá\ZLHF]DVX
WUZDQLDDODUPXOXESRRWU]\PDQLXV\JQDáXZ\áąF]HQLD
DODUPX0DNV\PDOQ\F]DVWUZDQLDDODUPXWRQRQVWRSD
PLQLPDOQ\²VHNXQG
'=35=('$/$50(0
:à1DJU\ZDQLHREUD]X]V]\ENRĞFLąQDJU\ZDQLDSU]HG
DODUPHPZRNUHVLHSU]HGDODUPHP
:<à2EUD]SU]HGDODUPHPQLHMHVWQDJU\ZDQ\
6=<%.2ĝû1$*5$1,$6]\ENRĞüQDJU\ZDQLDZRNUHVLHSU]HG
DODUPHP
0DNV\PDOQDV]\ENRĞüQDJU\ZDQLDZ\QRVLNODWHN
QDVHNXQGĊ3$/176&
0LQLPDOQDV]\ENRĞüQDJU\ZDQLDZ\QRVLNODWNLQD
VHNXQGĊ
8ZDJD
-HĞOLDODUPZ\VWąSLZWU\ELHJRWRZRĞFLOXEZWU\ELH
VWDQGDUGRZHJRQDJU\ZDQLDMDNRĞüQDJU\ZDQLD
EĊG]LHWDNDVDPDMDNQDJU\ZDQLDVWDQGDUGRZHJR
-HĞOLDODUPZ\VWąSLZWU\ELHQDJU\ZDQLDF]DVRZHJR
MDNRĞüQDJU\ZDQLDEĊG]LH]JRGQD]Z\EUDQ\P
XVWDZLHQLHPMDNRĞFLQDJU\ZDQLDF]DVRZHJR
0HQXVWHURZQLNDF]DVRZHJR
0RQLWRURZDQ\REUD]PRĪHE\üUHMHVWURZDQ\
DXWRPDW\F]QLHSU]H]XVWDZLHQLHJRG]LQUR]SRF]ĊFLDL
]DNRĔF]HQLDQDJU\ZDQLDZ0(1867(52:1,.$
&=$62:(*2'RVWĊSQ\FKMHVWSR]\FML
XPRĪOLZLDMąF\FK]DSURJUDPRZDQLHQDJU\ZDQLDQD
NRQNUHWQ\G]LHĔOXEGQLW\JRGQLD:\VWDUF]\SU]HMĞüGR
Z\EUDQHMSR]\FMLLQDFLVQąüSU]\FLVN(QWHUDE\Z\EUDü
G]LHĔ
-HĞOLQDSU]\NáDG]RVWDQą]DSURJUDPRZDQH
QDVWĊSXMąFHXVWDZLHQLDF]DVXQDJUDQLD
32&=.21,(&
ZyZF]DVPDJQHWRZLGUR]SRF]QLHQDJU\ZDQLHR
JRG]LQLHL ]DNRĔF]\MHR %RVFK6HFXULW\6\VWHPV_
3/_
$E\]DWU]\PDü]DSURJUDPRZDQHQDJU\ZDQLHSRGF]DV
MHJRWUZDQLDQDOHĪ\QDFLVQąüSU]\FLVN6723ZFHOX
SU]HMĞFLDGR0(1867(52:1,.$&=$62:(*2L
]PLDQ\ZDUWRĞFL867QD:<à
0(1867(52:1,.$&=$62:(*2
7<'=
1,(
321
52%
:2/
'/<
321
:72
3,Ą
&=:
ĝ52
62%
1,(
32&=
.21,(& 6=<%.
*
*
*
*
*
*
*
*
*
*
*
*
0(18*àÏ:1(
-$.2ĝû
67$1'$5'
67$1'$5'
67$1'$5'
67$1'$5'
67$1'$5'
67$1'$5'
67$1'$5'
67$1'$5'
67$1'$5'
67$1'$5'
67$1'$5'
67$1'$5'
867
:<à
:<à
:<à
:<à
:<à
:<à
:<à
:<à
:<à
:<à
:<à
:<à
!
7<'=2NUHĞODG]LHĔOXEGQLW\JRGQLDZNWyUHEĊG]LH
XUXFKDPLDQHQDJU\ZDQLHF]DVRZH
&2'FRG]LHQQLH
52%RGSRQLHG]LDáNXGRSLąWNX
:2/VRERWDLQLHG]LHOD
3RV]F]HJyOQHGQLW\JRGQLD
32&=*RG]LQDUR]SRF]ĊFLDQDJU\ZDQLDF]DVRZHJR
.21,(&*RG]LQD]DNRĔF]HQLDQDJU\ZDQLDF]DVRZHJR
&]DV.2ē&$QDJU\ZDQLDPXVLE\üSyĨQLHMV]\QLĪF]DV
MHJR32&=Ą7.8
QS 32&=.21,(&QLHMHVWSRSUDZQ\P
XVWDZLHQLHP
32&=.21,(&QLHMHVWSRSUDZQ\P
XVWDZLHQLHP
32&=.21,(&MHVWSRSUDZQ\P
XVWDZLHQLHP
6=<%.-HĞOL)250$76=<%.2ĝ&,MHVWZ\UDĪRQ\Z
*2'=,1$&+WRPRĪQDXVWDZLüV]\ENRĞüRG
176&3$/GR*JRG]LQ
-HĞOL)250$76=<%.2ĝ&,MHVWZ\UDĪRQ\Z,36
NODWNDFKQDVHNXQGĊWRPRĪQDXVWDZLüV]\ENRĞüRG
GRGR176&3$/,36NODWHNQDVHNXQGĊ
-$.2ĝû'RVWĊSQ\FKMHVWV]HĞüSR]LRPyZMDNRĞFLQDJU\ZDQLD
REUD]X
1,ĩ6=$.%
1,6.$.%
32'67.%
67$1'$5'2:$.%
:<62.$.%
1$-:<ĩ.%
867 :FHOXZáąF]HQLDQDJU\ZDQLDF]DVRZHJRQDOHĪ\XVWDZLü
ZDUWRĞü:à
:FHOXZ\áąF]HQLDQDJU\ZDQLDF]DVRZHJRQDOHĪ\
XVWDZLüZDUWRĞü:<à
'95&_3RGUĊF]QLNLQVWDODFML_5R]G]LDá
:WU\ELHQDJU\ZDQLDF]DVRZHJRQDZ\ĞZLHWODF]XMHVW
SRGDZDQDGDWDLJRG]LQDQDJUDQLDF]DVRZHJRRUD]
V]\ENRĞüQDJU\ZDQLDNWyUDMHVWZLGRF]QDSRG
NRPXQLNDWHP75(&
1LHPRĪQD]PLHQLüSR]LRPXMDNRĞFLZWUDNFLHWUZDQLD
QDJU\ZDQLDFLąJáHJRQS
6HJ±
6HJ±23:59
6HJPHQW\LVąWUDNWRZDQHMDNRQDJUDQLHFLąJáH
±
:FHOXXVWDZLHQLDUyĪQ\FKSR]LRPyZMDNRĞFL
VWHURZQLNF]DVRZ\QDOHĪ\XVWDZLüZQDVWĊSXMąF\
VSRVyE
6HJ±16:59
6HJ±23:59
0HQXV\JQDáXGĨZLĊNRZHJR
0(186<*1$à8
'B:,ĉ.2:(*2
'=,$à$1,(6<*1$à8
:(-ĝ&,($/$508
:(-ĝ&,(1$*5<:
'<6.3(à1<
875$7$6<*1$à8
67(52:1,.
&=$62:<
:à
:à
:à
:à
:à
:<à
0(18*àÏ:1(
!
'=,$à$1,(6<*1$à8
:à:áąF]DV\JQDáGĨZLĊNRZ\
:<à:\áąF]DV\JQDáGĨZLĊNRZ\
8ZDJD :WU\ELHQDJU\ZDQLDRGWZDU]DQLDZFHOXZáąF]HQLD
Z\áąF]HQLDQDOHĪ\QDFLVQąü(QWHU
:(-ĝ&,($/$508:à²Z\VWąSLHQLHDODUPXMHVW
V\JQDOL]RZDQHGĨZLĊNLHP
:(-ĝ&,(1$*5<::à²SRGDQLHV\JQDáXZáąF]DMąFHJR
QDJU\ZDQLHQDVW\N5HFRUG,1MHVWV\JQDOL]RZDQH
GĨZLĊNLHP
'<6.3(à1<:à²]DSHáQLHQLHG\VNXZMHVW
V\JQDOL]RZDQHGĨZLĊNLHP
875$7$6<*1$à8:à²XWUDWDV\JQDáXZLGHRMHVW
V\JQDOL]RZDQDGĨZLĊNLHP
67(52:1,.&=$62:<:à²QDJU\ZDQLHF]DVRZHMHVW
V\JQDOL]RZDQHGĨZLĊNLHP
%RVFK6HFXULW\6\VWHPV_
3/_
0HQXDUFKLZXP
0(18$5&+,:80
52=0,$52%5$=8
=1$&=1,.&=$68
32=<&-$=1$&=1,.$&=
=1$.:2'1<
32=<&-$=1$.8
:2'1(*2
;
:à
'Ïà
:à
'Ïà
0(18*àÏ:1(
!
52=0,$52%5$=82NUHĞODUR]PLDUREUD]yZNRSLRZDQ\FKQD
NDUWĊSDPLĊFL&)
'XĪ\UR]PLDU[3$/[176&
0Dá\UR]PLDU[3$/[176&
=1$&=1,.&=$68
:à=QDF]QLNF]DVXEĊG]LHGRGDZDQ\GRREUD]X
NRSLRZDQHJRQDNDUWĊSDPLĊFL&)
:<à=QDF]QLNF]DVXQLHEĊG]LHGRGDZDQ\GRREUD]X
NRSLRZDQHJRQDNDUWĊSDPLĊFL&)
32=<&-$=1$&=1,.$&=
'Ïà=QDF]QLNF]DVXEĊG]LHXPLHV]F]RQ\QDGROH
*Ï5$=QDF]QLNF]DVXEĊG]LHXPLHV]F]RQ\QDJyU]H
=1$.:2'1<
:à=QDNZRGQ\EĊG]LHQDNáDGDQ\QDREUD]NRSLRZDQ\
QDNDUWĊSDPLĊFL&)
:<à=QDNZRGQ\QLHEĊG]LHQDNáDGDQ\QDREUD]
NRSLRZDQ\QDNDUWĊSDPLĊFL&)
32=<&-$=1$.8:2'1(*2
'Ïà=QDNZRGQ\EĊG]LHXPLHV]F]RQ\QDGROH
*Ï5$=QDNZRGQ\EĊG]LHXPLHV]F]RQ\QDJyU]H
0HQXVLHü
0(186,(û
$'5(6,3
0$6.$6,(&,
$'5(6%5$0<
8678ĩ<7.2:1,.$
8678ĩ<7.2:1,.$
8678ĩ<7.2:1,.$
!
!
!
0(18*àÏ:1(
!
$'5(6,36áXĪ\GRZSLVDQLDDGUHVX,3XU]ąG]HQLDZV\VWHPLH
VLHFLRZ\P
0$6.$6,(&,6áXĪ\GRZSLVDQLDPDVNĊVLHFLZNWyUHMSUDFXMH
XU]ąG]HQLH
$'5(6%5$0<6áXĪ\GRZSLVDQLDDGUHVXEUDP\ZVLHFLZ
NWyUHMSUDFXMHXU]ąG]HQLH
8678ĩ<7.2:1,.$8PRĪOLZLDZSURZDG]HQLHWU]HFKQD]Z
XĪ\WNRZQLNyZZUD]]KDVáDPL'ODNDĪGHJR]WU]HFK
XĪ\WNRZQLNyZMHVWGRVWĊSQHRVREQHPHQXNRQILJXUDFML
'95&_3RGUĊF]QLNLQVWDODFML_5R]G]LDá
3/_
0HQXXVWDZLHQLDV\VWHPX
8678ĩ<7.2:1,.$
0(18867$:,(1,$6<67(08
1$=:$8ĩ<7.2:1,.$
+$6à28ĩ<7.2:1,.$
32=,208ĩ<7.
$'0,1BBB
$'0,1BBB
683(5
0(186,(û
0(18*àÏ:1(
!
!
3RSRáąF]HQLXVLĊSU]H]VLHüNRPSXWHUD]
PDJQHWRZLGHPQDHNUDQLHNRPSXWHUD3&
Z\ĞZLHWODQDMHVWVWURQDORJRZDQLDPDJQHWRZLGX
F\IURZHJR:PHQXXVWDZLHĔXĪ\WNRZQLNyZ
DGPLQLVWUDWRUPRĪHRNUHĞOLüKDVáRQD]ZĊORJRZDQLD
XĪ\WNRZQLNyZRUD]SR]LRPGRVWĊSX7U]\SR]LRP\
GRVWĊSX
'RVWĊS683(5XPRĪOLZLDZ\ĞZLHWODQLHREUD]XQD
Ī\ZRRGWZDU]DQLHREUD]XRUD]VWHURZDQLH
PDJQHWRZLGHPF\IURZ\P
'RVWĊS2*Ï/1<XPRĪOLZLDZ\ĞZLHWODQLHREUD]X
QDĪ\ZRRUD]RGWZDU]DQLHJR
'RVWĊS*2ĝûXPRĪOLZLDW\ONRZ\ĞZLHWODQLHREUD]X
QDĪ\ZR
:GDQ\PPRPHQFLHPRJąE\üXĪ\ZDQHPDNV\PDOQLH
F]WHU\SRáąF]HQLDLVWQLHMHPRĪOLZRĞü
ZVSyáXĪ\WNRZDQLDMHGQHMQD]Z\XĪ\WNRZQLNDLKDVáD
+$6à2:à
+$6à2
1,(
:(-ĝ&,(:,'(2
1$*5<:=$8',2
2'7:=$8',2
2'7:=$8',2
08/7,3/(.6(5
/,1,$.2'832/$
'<6.3(à1<
)250$76=<%.2ĝ&,
6<67(0:,'(2
.2032=<72:(
:<à
:à
:à
%RVFK/7&
321=$3,6
:*,36
3$/
.$62:$1,('<6.8
$.78$/,=$&-$
6<67(08
867$:,(1,$
'20<ĝ/1(
)250$72:$1,(
.$57<&)
!
!
0(18*àÏ:1(
!
!
!
+$6à2:à
7$.+$6à2MHVWZ\PDJDQHDE\RWZRU]\üPHQX
1,(+$6à2QLHMHVWZ\PDJDQHDE\RWZRU]\üPHQX
+$6à2
-HĞOLZRSFML+$6à2:àZ\EUDQD]RVWDQLHZDUWRĞü7$.
QLHEĊG]LHPRĪQDZHMĞüGRPHQXGRSyNLQLHSRGDVLĊ
KDVáD.RGVNáDGDVLĊ]V]HĞFLXF\IURGGR
2GPRPHQWXZáąF]HQLDKDVáDSRNDĪG\PQDFLĞQLĊFLX
SU]\FLVNXPHQXZWU\ELHRGWZDU]DQLDQDĪ\ZROXE
SU]\FLVNXVWRSZWU\ELHQDJU\ZDQLDV\VWHPEĊG]LHĪąGDá
SRGDQLDKDVáD=WHJRZ]JOĊGXKDVáRQDOHĪ\]DSDPLĊWDü
:(-ĝ&,(:,'(2
.2032=<72:(:\ELHUDV\JQDáZHMĞFLRZ\ZLGHR
SRFKRG]ąF\]H]áąF]D%1&
69,'(2:\ELHUDV\JQDá69,'(2]H]áąF]D69,'(2
1$*5<:=$8',2:à:<à1DJU\ZDQLH]GĨZLĊNLHPOXEEH]
2'7:=$8',22'7:=$8',2
:à:<à2GWZDU]DQLH]GĨZLĊNLHPOXEEH]
1DJU\ZDQLHLRGWZDU]DQLHGĨZLĊNXMHVWPRĪOLZHW\ONRZ
WU\ELHF]DVXU]HF]\ZLVWHJRSU]\V]\ENRĞFLNODWNLQD
VHNXQGĊOXEZ\ĪV]HMSRGZDUXQNLHPĪHQDJUDQLHEĊG]LH
RGWZDU]DQH]WDNąVDPąV]\ENRĞFLą]MDNDE\áR
QDJU\ZDQH
%RVFK6HFXULW\6\VWHPV_
'95&_3RGUĊF]QLNLQVWDODFML_5R]G]LDá
08/7,3/(.6(5
1DOHĪ\Z\EUDüPDUNĊPXOWLSOHNVHUDSRGáąF]RQHJRGR
PDJQHWRZLGXF\IURZHJR-HĞOLSRGáąF]RQ\PXOWLSOHNVHU
QLHMHVWZLGRF]Q\QDOLĞFLHQDOHĪ\Z\EUDüRSFMĊ
1,(=1$1<
3RZ\EUDQLXPXOWLSOHNVHUDLZ\áąF]HQLDWU\EX0(18Z
PDJQHWRZLG]LHV\JQDáZHMĞFLRZ\ZLGHR]H]áąF]D
08; 0$,1 021,725QDW\OQ\PSDQHOXMHVW
SU]HND]\ZDQ\GRZ\MĞFLD021,725 287
-HĞOLGRPDJQHWRZLGXMHVWSRGáąF]RQDW\ONRMHGQD
NDPHUDRSFMĊQDOHĪ\XVWDZLüQDZDUWRĞü:<à3U]\
WDNLPXVWDZLHQLXV\JQDáZ\MĞFLRZ\PRQLWRUDSR]RVWDMH
FDá\F]DVWDNLVDPMDNQDZ\MĞFLXZLGHR
/,1,$.2'832/$
-HĞOLGODPDUNLPXOWLSOHNVHUDZ\EUDQRRSFMĊ1,(=1$1<
ZyZF]DVZDUWRĞüOLQLLNRGXSRODSRGáąF]RQHJR
PXOWLSOHNVHUDPRĪQDZ\EUDü] ]DNUHVXRG GR 'RP\ĞOQHXVWDZLHQLHZDUWRĞü MHVWRGSRZLHGQLH
Z SU]\SDGNXZLĊNV]RĞFLPXOWLSOHNVHUyZ-HĞOLOLQLDNRGX
SRODMHVWZ\ĞZLHWODQDQDGNDQDáDPLRGWZDU]DQLDQDOHĪ\
]PQLHMV]\üWĊZDUWRĞü-HĞOLPXOWLSOHNVHU\QLHRGWZDU]DMą
SRSUDZQLHREUD]XQDOHĪ\Mą]ZLĊNV]\ü
'<6.3(à1<
=$75=<0$-3R]DSHáQLHQLXG\VNXPDJQHWRZLG
SU]HVWDQLHQDJU\ZDü
321=$3,63R]DSHáQLHQLXG\VNXELHĪąFHQDJUDQLD
EĊGąQDGSLV\ZDQHZPLHMVFHLVWQLHMąF\FKSRF]ąZV]\RG
SRF]ąWNXWZDUGHJRG\VNX
)250$76=<%.2ĝ&,:\ELHUDV]\ENRĞüQDJU\ZDQLDZ\UDĪRQą
Z,36NODWNDFKQDVHNXQGĊOXEJRG]LQDFK
6<67(0:,'(2:\ELHUDV\VWHPZLGHR176&OXE3$/]PLDQD
Z\PDJDZ\áąF]HQLDLZáąF]HQLD]DVLODQLD
.$62:$1,('<6.8
$E\VNDVRZDüZV]\VWNLHQDJUDQLD]WZDUGHJRG\VNX
QDOHĪ\QDFLVQąüSU]\FLVN(QWHU
1DHNUDQLH]RVWDQLHZ\ĞZLHWORQHRNQRGLDORJRZH
SRWZLHUG]HQLD
:RNQLHGLDORJRZ\PQDOHĪ\Z\EUDüRSFMH7DNOXE1LHL
QDFLVQąüSU]\FLVN(17(5
$.78$/,=$&-$6<67(08
3RQDFLĞQLĊFLXSU]\FLVNX(QWHUUR]SRF]QLHVLĊSURFHGXUD
DNWXDOL]DFMDV\VWHPX
7$.3OLN]XDNWXDOQLHQLHPQDOHĪ\VNRSLRZDü]
NRPSXWHUDQDNDUWĊSDPLĊFL&)DQDVWĊSQLHZáRĪ\üMąGR
JQLD]GDNDUW\ZPDJQHWRZLG]LH3RQDFLĞQLĊFLXSU]\FLVNX
(QWHUUR]SRF]QLHVLĊDNWXDOL]DFMDV\VWHPX3R
]DNRĔF]HQLXDNWXDOL]DFMLQDOHĪ\Z\áąF]\üLZáąF]\ü
]DVLODQLHDE\]DWZLHUG]Lü]PLDQ\
867$:,(1,$'20<ĝ/1(
3RQDFLĞQLĊFLXSU]\FLVNX(QWHUUR]SRF]QLHVLĊSURFHGXUD
SU]\ZUDFDQLDXVWDZLHĔGRP\ĞOQ\FK
7$.1DHNUDQLH]RVWDQLHZ\ĞZLHWORQHRNQRGLDORJRZH
SRWZLHUG]HQLD
:RNQLHGLDORJRZ\PQDOHĪ\Z\EUDüRSFMH7DNOXE1LHL
QDFLVQąüSU]\FLVN(17(5
)250$72:$1,(.$57<&)
7$..DUWD&RPSDFW)ODVK]RVWDQLHVIRUPDWRZDQD
1,(.DUWD&RPSDFW)ODVKQLH]RVWDQLHVIRUPDWRZDQD
%RVFK6HFXULW\6\VWHPV_
3/_
0HQXKDVáR
-HĞOL]DEH]SLHF]HQLHKDVáHPMHVWZáąF]RQHSU]\
SUyELHRWZDUFLDPHQXOXE]DWU]\PDQLDQDJU\ZDQLDQD
HNUDQLHEĊG]LHZ\ĞZLHWODQHĪąGDQLHZSURZDG]HQLD
KDVáD1DOHĪ\ZWHG\ZSURZDG]LüKDVáRNRU]\VWDMąF]
QDVWĊSXMąF\FKSU]\FLVNyZ
5(& 26' 6723 3/$< 3$86( '95&_3RGUĊF]QLNLQVWDODFML_5R]G]LDá
'RVWĊSSU]H],QWHUQHW
LQWUDQHW
/RJRZDQLH
2WZyU]SU]HJOąGDUNĊLQWHUQHWRZąLZSURZDGĨDGUHV,3
VLHFLQSKWWS0XVLWRE\üWHQVDP
DGUHV,3NWyU\]RVWDáXVWDZLRQ\Z0HQXVLHü
PDJQHWRZLGXF\IURZHJR
(NUDQJáyZQ\
,NRQDQDGROHHNUDQXXPRĪOLZLDZ\ORJRZDQLH VLĊ1D
GROHHNUDQXVąUyZQLHĪSRGDQHLQIRUPDFMHRVWDQLH
V\VWHPX:\ĞZLHWORQDMHVWWDNĪHGDWDLJRG]LQD
,NRQ\SRSUDZHMVWURQLHXPRĪOLZLDMąZ\EyUNDPHUL
VSRVREXLFKSUH]HQWDFMLQDHNUDQLH3RSUDZHMVWURQLH
VąXPLHV]F]RQHSU]\FLVNLXPRĪOLZLDMąFHVWHURZDQLH
RGWZDU]DQLHP)XQNFMDZ\V]XNLZDQLDSR]ZDODQD
Z\EyUIUDJPHQWXNWyU\PD]RVWDüRGWZRU]RQ\-HĞOL
%RVFK6HFXULW\6\VWHPV_
3/_
1DHNUDQLH]RVWDQLHZ\ĞZLHWORQDVWURQDORJRZDQLD
PDJQHWRZLGXF\IURZHJR:SURZDGĨSRSUDZQHKDVáRL
QD]ZĊXĪ\WNRZQLND]JRGQLH]XVWDZLHQLDPLZ0HQX
6LHüPDJQHWRZLGXF\IURZHJR3U]\XVWDZLHQLDFK
GRP\ĞOQ\FKQDOHĪ\ZSLVDü$'0,1MDNRQD]ZĊ
XĪ\WNRZQLNDL$'0,1MDNRKDVáRDQDVWĊSQLHNOLNQąü
SU]\FLVN6XEPLWDE\ZHMĞüGRV\VWHPX
LNRQDMHVWSU]\FLHPQLRQDGDQDIXQNFMDQLHMHVW
GRVWĊSQDZELHĪąF\PWU\ELH
8ZDJD
:VSyáF]\QQLNRGĞZLHĪDQLDREUD]XRJOąGDQHJRQD
Ī\ZR]DOHĪ\RGZ\EUDQHMV]\ENRĞFLQDJU\ZDQLDNLHG\
XU]ąG]HQLHMHVWZWU\ELHQDJU\ZDQLDQSQDJU\ZDQLH]
V]\ENRĞFLąNODWNLQDVHNXQGĊ]DSHZQLD
RGĞZLHĪDQLHRF]ĊVWRWOLZRĞFLVHNXQGQDREUD]]
NDPHU\
'95&_3RGUĊF]QLNLQVWDODFML_5R]G]LDá
:\ĞZLHWODQLHREUD]yZQDĪ\ZRQLHMHVWPRĪOLZHMHĞOL
PDJQHWRZLGMHVWZWUDNFLHRGWZDU]DQLD:\ĞZLHWORQ\
]RVWDQLHNRPXQLNDW6(5:(5:75$.&,(
2'7:$5=$1,$$E\UR]SRF]ąüZ\ĞZLHWODQLH
REUD]yZQD Ī\ZRQDOHĪ\QDMSLHUZ]DWU]\PDü
RGWZDU]DQLH
3/_
.RORUNRPXQLNDWyZRVWDQLH
,NRQ\WU\EXRGWZDU]DQLD
.RORUNRPXQLNDWXRVWDQLHLQIRUPXMHF]\SUDFD
RGE\ZDVLĊZWU\ELHORNDOQ\PF]\WHĪ]GDOQ\P-HĞOL
SUDFXMHV]ZWU\ELHORNDOQ\PNRPXQLNDW\VąNRORUX
ĪyáWHJR-HĞOLVWHUXMHV]PDJQHWRZLGHPF\IURZ\P
EH]SRĞUHGQLR]D]QDF]RQRLNRQĊ&21752/
NRPXQLNDW\VąNRORUX]LHORQHJR
:\ELHU]LNRQĊ3/$<2GWZDU]DQLHDE\SU]HMĞüZWU\E
RGWZDU]DQLD
6723=DWU]\PDQLHRGWZDU]DQLDREUD]X
3/$<2GWZDU]DQLHREUD]X
3/$<5(92GWZDU]DQLHQDJUDQLDZVWHF]
67(32GWZDU]DQLHREUD]XZLGHRNODWNDSRNODWFH
GRSU]RGX
67(32GWZDU]DQLHREUD]XZLGHRNODWNDSRNODWFH
GRW\áX
3$86(:VWU]\PDQLHRGWZDU]DQLDREUD]X
,NRQ\WU\EXSU]HND]XQDĪ\ZR
:WU\ELHSU]HJOąGDQLDG]LDáDMąLNRQ\NDPHU\LNRQ\
SRODZLG]HQLDLLNRQDRGWZDU]DQLD
%RVFK6HFXULW\6\VWHPV_
'95&_3RGUĊF]QLNLQVWDODFML_5R]G]LDá
&21752/3U]HMĞFLHGRWU\EX]GDOQHJR
VWHURZDQLDGR]ZRORQHW\ONRQDSR]LRPLHGRVWĊSX
683(58PRĪOLZLDEH]SRĞUHGQLH]GDOQH
XUXFKDPLDQLHRGWZDU]DQLDLQDJU\ZDQLDQD
PDJQHWRZLG]LHF\IURZ\P
8VWDZLDQLHSUĊGNRĞFLRGWZDU]DQLD
:\V]XNLZDQLH
'RVWĊSQHVąWU]\PHWRG\Z\V]XNLZDQLDQDJUDQLD
GR RGWZDU]DQLD
2GWZRU]HQLHQDJUDQLDZ\EUDQHJR]OLVW\
VHJPHQWyZ
2GWZRU]HQLHQDJUDQLDZ\EUDQHJR]OLVW\DODUPyZ
2GWZRU]HQLHQDJUDQLDZ\EUDQHJRZHGáXJGDW\L
JRG]LQ\
3R]\FMĊ]OLVW\Z\ELHUDVLĊNOLNQLĊFLHPP\V]NL
.OLNQLĊFLHSU]\FLVNX3/$<RGWZDU]DMUR]SRF]\QD
RGWZDU]DQLHZ\EUDQHJRQDJUDQLD
%RVFK6HFXULW\6\VWHPV_
3/_
'95&_3RGUĊF]QLNLQVWDODFML_5R]G]LDá
3/_
'DQHWHFKQLF]QH
,QWHUIHMV56
0DJQHWRZLGHPF\IURZ\PPRĪQDVWHURZDü]
NRPSXWHUDOXEWHUPLQDOX]DSRPRFąVWDQGDUGRZHJR
]áąF]DVW\NRZH56'VXE
6W\N
'95&
1&
7;'
6W\N
NRPSXWHUD
1&
5;'
5;'
7;'
1&
0$6$
'75
0$6$
1&
1&
1&
9
'65
576
&76
1&
8VWDZLHQLDWUDQVPLVMLVąQDVWĊSXMąFHEV
ELWyZGDQ\FKELWVWDUWELWVWRSLEUDNSDU]\VWRĞFL
3URWRNyáVWHURZDQLDSU]H]LQWHUIHMV
56
=NRPSXWHUDOXEWHUPLQDOXPRĪQDVWHURZDü
XU]ąG]HQLHPZ\V\áDMąFSROHFHQLDVNáDGDMąFHVLĊ]
WU]HFK]QDNyZ$6&,,SU]H]]áąF]H56:V]\VWNLH
WHSROHFHQLD]DF]\QDMąVLĊRG]QDNX
.
OXE
N
,VWQLHMH
SROHFHĔ$6&,,RGSRZLDGDMąF\FKSU]\FLVNRPQD
SDQHOXSU]HGQLP3ROHFHQLDWHSU]HGVWDZLRQRZ
SRQLĪV]HMWDEHOL
%RVFK6HFXULW\6\VWHPV_
.2'
$6&,,
)81.&-$
3U]\FLVNSDQHOX
SU]HGQLHJR
.
5R]SRF]ĊFLHQDJU\ZDQLD 5(&
.
=DWU]\PDQLHQDJU\ZDQLDL 6723
RGWZDU]DQLD
.
2GWZDU]DQLH
.
:VWU]\PDQLHRGWZDU]DQLD 3$86(
.
2GWZDU]DQLH]
Z\V]XNLZDQLHP
6($5&+
.
.RSLRZDQLHREUD]XQD
NDUWĊ&)
&23<
.
0HQXHNUDQRZH
',63/$<
.
3RWZLHUGĨZ\EyU
(17(5
.
2WZyU]PHQXXVWDZLHĔ
0(18
3/$<
. 6]\ENRĞüRGWZDU]DQLDGR ±;
. W\áX]H]ZLHNV]RQą
±
SUĊGNRĞFLą
. 6]\ENRĞüRGWZDU]DQLDGR !!±;
.
SU]RGX]H]ZLHNV]RQą
±
SUĊGNRĞFLą
.
2GWZDU]DQLHNODWNDSR
NODWFHGRW\áX
-2*5(:
.
2GWZDU]DQLHNODWNDSR
NODWFHGRSU]RGX
-2*))
'95&_3RGUĊF]QLNLQVWDODFML_5R]G]LDá
3/_
&]DVQDJU\ZDQLD
3U]\EOLĪRQHF]DV\QDJU\ZDQLDEH]GĨZLĊNXZ
JRG]LQDFKSU]\QDJU\ZDQLXQDG\VNWZDUG\R
SRMHPQRĞFL *%
PAL
6]\ENRĞü
QDJU\ZDQLD
,36NODWNLQD
VHNXQGĊ
1LĪV]D
.%
1LVND
.%
50
25
12
8
5
2
1,6
1,0
0,5
0,2
0,1
60
120
240
360
590
1420
1900
3000
5900
14800
29600
44
90
180
270
440
1070
1420
2200
4400
11100
22200
6]\ENRĞü
QDJU\ZDQLD
,36NODWNLQD
VHNXQGĊ
1LĪV]D
.%
1LVND
.%
60
30
20
10
5
2
1,5
1,0
0,5
0,2
0,1
50
100
150
300
590
1480
1980
3000
5900
14800
29600
37
74
110
220
440
1110
1480
2200
4400
11100
22200
-DNRĞüREUD]XĝUHGQLDZLHONRĞüSOLNX
3RGVWDZRZD 6WDQGDUGRZD
:\VRND
.%
.%
.%
3U]\EOLĪRQ\&]DV1DJU\ZDQLD
*RG]LQ\
36
30
25
70
60
50
140
120
100
210
180
150
360
300
250
850
710
610
1140
950
810
1800
1500
1300
3600
3000
2500
8900
7400
6300
17800
14800
12700
1DMZ\ĪV]D
.%
22
44
90
130
220
530
710
1100
2200
5600
11100
NTSC
-DNRĞüREUD]XĝUHGQLDZLHONRĞüSOLNX
3RGVWDZRZD 6WDQGDUGRZD
:\VRND
.%
.%
.%
3U]\EOLĪRQ\&]DV1DJU\ZDQLD
*RG]LQ\
30
25
21
60
50
42
90
70
60
180
150
130
360
300
250
890
740
630
1190
990
850
1800
1500
1300
3600
3000
2500
8900
7400
6300
17800
14800
12700
:RSDUFLXRQDVWĊSXMąFHSDUDPHWU\
JRG]LQ\ G]LHĔJRG]LQ W\G]LHĔ
JRG]LQ PLHVLąFJRG]LQ URN
SU]\EOLĪHQLHGODW\SRZHJRQLVNLHJRSR]LRPX]DNáyFHĔ
REUD]X
%RVFK6HFXULW\6\VWHPV_
1DMZ\ĪV]D
.%
19
37
56
110
220
560
740
1100
2200
5600
11100
:SU]\SDGNXQDJU\ZDQLD]GĨZLĊNLHPQDOHĪ\REOLF]\ü
SU]\EOLĪRQ\UR]PLDUSOLNXQDSRGVWDZLHQDVWĊSXMąF\FK
GDQ\FK .%3$/OXE .%176&QDVHNXQGĊ
GĨZLĊNX0RĪHWRVSRZRGRZDü]QDF]QH]PQLHMV]HQLH
F]DVXQDJU\ZDQLDV]F]HJyOQLHZSU]\SDGNX
ZROQLHMV]\FKV]\ENRĞFLQDJU\ZDQLDZ\PLHQLRQ\FK
Z SRZ\ĪV]\FKWDEHODFK
'95&_3RGUĊF]QLNLQVWDODFML_5R]G]LDá
'DQHWHFKQLF]QH
:LGHR
6\VWHP
:HMĞFLH
:\MĞFLH
.RPSUHVMD
5R]G]LHOF]RĞü
:\ĞZLHWODQLH
'ĨZLĊN
3RáąF]HQLD
$ODUP
:HMĞFLH
:\MĞFLH
3$/176&
ZHMĞFLH]NDPHU\%1& 9SS
RPyZ
Z\MĞFLHZLGHR%1&QDJáyZQ\
PRQLWRU 9SS RPyZ
0-3(*
[3$/
[176&
3HáQRHNUDQRZHSU]\SU]HND]LHQD
Ī\ZRLRGWZDU]DQLX
ZHMĞFLDPRQRIRQLF]QH 9SS
P9SU]\ .
Z\MĞFLDPRQRIRQLF]QH 9SS
P9SU]\ .
1DSLĊFLHSU]HáąF]DQLD:\VRNLH
! 9'&
1DSLĊFLHSU]HáąF]DQLD1LVNLH
9'&
-HGQRZ\MĞFLHSU]HNDĨQLNRZH
0DNV\PDOQHQDSLĊFLHVW\NX
9'&
0DNV\PDOQ\SU]HáąF]DQ\SUąG
$ '&
1RĞQLNLSDPLĊFL
'\VNWZDUG\
1DJU\ZDQLH
7U\E
6]\ENRĞü
2GWZDU]DQLH
6]\ENRĞü
:\V]XNLZDQLH
*%
&LąJá\SRNODWNRZ\
SURJUDPRZDQ\OXEDODUPRZ\
0DNVNODWHNQDVHNXQGĊ3$/
0DNVNODWHNQDVHNXQGĊ
176&
0DNVNODWHNQDVHNXQGĊ3$/
0DNVNODWHNQDVHNXQGĊ
176&
'DWDJRG]LQDOLVWDVHJPHQWyZOXE
]GDU]HQLHDODUP
%RVFK6HFXULW\6\VWHPV_
3/_
3DUDPHWU\RJyOQH
:\NU\ZDQLHXWUDW\V\JQDáXZLGHR 7DN
:\NU\ZDQLH]DQLNX]DVLODQLD
7DN
']LHQQLNDODUPyZ
7DN
,QWHUIHMVXĪ\WNRZQLND
0HQX
.RQILJXUDFMD
=DSRPRFąPHQXHNUDQRZHJR
8U]ąG]HQLHZHMĞFLRZH
GRREVáXJL
3U]\FLVNLQDSDQHOXSU]HGQLP
RSFMRQDOQ\SLORW]GDOQHJR
VWHURZDQLDQDSRGF]HUZLHĔ]
SU]HZRGRZ\PRGELRUQLNLHP
(NVSRUWREUD]yZ
:EXGRZDQHJQLD]GRNDUW\
&RPSDFW)ODVKW\SX ,L,,
=DEH]SLHF]HQLH
1DKDVáR
=DVLODQLH
± 9 +]
=XĪ\FLHHQHUJLL
:
6WHURZQLNF]DVRZ\ 7\JRGQLRZ\Z\áąF]QLNF]DVRZ\
ZEXGRZDQ\]HJDUF]DVX
U]HF]\ZLVWHJR
.RPXQLNDFMD]VLHFLą %DVH77&3,3SU]H]VLHü
(WKHUQHW
]áąF]H5-
,QWHUIHMVVWHURZDQLD =áąF]HVW\NRZH56'VXE
3DUDPHWU\IL]\F]QH
&LĊĪDU
RNRáRNJ
:\PLDU\V]HURNRĞü[Z\VRNRĞü[GáXJRĞü
[[PP
[[FDOL
7HPSHUDWXUDRWRF]HQLD
(NVSORDWDFML
&«4&
)04)
1RUP\
%H]SLHF]HĔVWZR
(XURSD
(1
6WDQ\=MHGQRF]RQH 8/8/LF8/
$XVWUDOLD
&7LFN
=JRGQRĞüHOHNWURPDJQHW\F]QD
(XURSD
(1NODVD%(1
6WDQ\=MHGQRF]RQH )&&F]ĊĞüNODVD%
$XVWUDOLD
$61=6
=DVWU]HJDVLĊSUDZRGR]PLDQ\GDQ\FKWHFKQLF]Q\FK
EH]SRZLDGRPLHQLD:UD]LHSUREOHPyZQDOHĪ\VLĊ
VNRQWDNWRZDü]HVSU]HGDZFą
Bosch Sicherheitssysteme GmbH
Bosch Security Systems B.V.
Ludwig-Bölkow-Allee
P.O. Box 80002
85521 Ottobrunn
5600 JB Eindhoven
Germany
The Netherlands
www.bosch-sicherheitssysteme.de
www.boschsecuritysystems.com
3122 165 22902 05-01
© 2004 Bosch Security Systems B.V.
Subject to change. Printed in Taiwan.