1
Connevans.info
e
Offering you choic
se
Helping you choo
Solutions to improve the quality of life
This product may be purchased from Connevans Limited
secure online store at www.DeafEquipment.co.uk
DeafEquipment.co.uk
SICHERHEITSHINWEISE / TELEFON IN BETRIEB NEHMEN
BigTel 280
User manual
DE
GB
Gebruikershandleiding
GB
NL
Manual de instrucciones
ES
FR
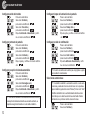
TABLE OF CONTENTS
Safety Information . . . . . . . . . . . . . . . . . . . . . . . . . . . . . . . . . . .1
Preparing the Telephone . . . . . . . . . . . . . . . . . . . . . . . . . . . . . .3
Operating Elements . . . . . . . . . . . . . . . . . . . . . . . . . . . . . . . . . .5
Preliminary Information . . . . . . . . . . . . . . . . . . . . . . . . . . . . . .6
Telephoning . . . . . . . . . . . . . . . . . . . . . . . . . . . . . . . . . . . . . . . .8
Other features . . . . . . . . . . . . . . . . . . . . . . . . . . . . . . . . . . . . .10
Call list / Redial . . . . . . . . . . . . . . . . . . . . . . . . . . . . . . . . . . . .11
Phone book / Direct call keys . . . . . . . . . . . . . . . . . . . . . . . . .12
Setting the telephone . . . . . . . . . . . . . . . . . . . . . . . . . . . . . . .14
Answering machine . . . . . . . . . . . . . . . . . . . . . . . . . . . . . . . . .19
Registering/de-registering handsets . . . . . . . . . . . . . . . . . . .24
PBX / Supplementary Services . . . . . . . . . . . . . . . . . . . . . . .25
Appendix . . . . . . . . . . . . . . . . . . . . . . . . . . . . . . . . . . . . . . . . . .26
In case of problems . . . . . . . . . . . . . . . . . . . . . . . . . . . . . . . . .26
Helpline UK 0844 800 6503
(See page 26 for costs and hours of operation)
1
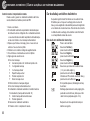
SAFETY INFORMATION
Safety Information
Please read this operating instruction manual thoroughly.
Intended use
The telephone is suitable for telephoning within a public telephone network system. Any other use is considered unintended
use. Unauthorised modification or reconstruction is not permitted. Under no circumstances open the device or complete any
repair work yourself.
Installation location
Prevent excessive exposure to smoke, dust, vibration, chemicals, moisture, heat and direct sunlight.
Do not use the handset in potentially explosive areas.
Power adapter plug
Medical equipment
a Attention: Never use the telephone in the vicinity of medical
equipment. Effects on such equipment cannot be fully ruled out.
It is recommended that if you have a pacemaker fitted you check
with a medical expert or your health adviser before using this
product.
DECT1 telephones can cause an unpleasant humming sound in
hearing aids.
Earpiece Volume
a Attention: Only use the power adapter plug supplied
because other power supplies could damage the telephone.
The socket outlet should be installed near the equipment and you
should ensure access to the power adapter plug is not obstructed
by furniture or such.
Rechargeable batteries
a Attention: Never throw batteries into a fire.
Only use batteries of the same type. Pay attention to the correct
polarity. Incorrect polarity of the batteries represents a risk of
explosion during charging.
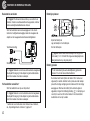
Your telephone has an amplifying key, which amplifies the earpiece volume significant if it is pressed. In the display “Boost
On“ is flashing. To switch off the activated amplification press
the key again. “Boost On“ disappears. The activated amplification will be switched off automatically whenever the present call
is finished.
In the menu (Handset / Boost On -> On) you can switch on the
amplification permanently. “BOOST ON” will replace the handset name on stand-by screen. By pressing the amplifying key
you can switch off the amplification for the present call. For the
next call it will be on again.
1
Power failure
The telephone cannot be used to make calls in the event of a
2
power failure. Always keep a cord connected telephone which
operates without an external power supply available in case of
emergency situations.
DECT: Digital Enhanced Cordless Telecommunication =
Standard for cordless telephones
Helpline UK 0844 800 6503
(See page 26 for costs and hours of operation)
SAFETY INFORMATION / PREPARING THE TELEPHONE
Caution: This telephone is capable of producing very high
volume levels when the amplification is turned on (ampification key + earpiece volume setting level 5 = +30 dB).
Extreme caution should be taken if the handset is to be
shared between users with normal hearing and those with
hearing impairment.
Disposal
In order to dispose of your device, take it to a collection point provided by your local public waste authorities (e.g. recycling centre). According to laws on the
disposal of electronic and electrical devices, owners are obliged to dispose of old electronic and electrical devices in a separate waste container.
The adjacent symbol indicates that the device must
not be disposed of in normal domestic waste!
Batteries represent a hazard to both health and
the environment! Never open, damage or swallow
batteries, nor allow them to get into the environment.
They may contain toxic and ecologically hazardous
heavy metals. You are legally obliged to dispose of
batteries at the point of sale or at appropriate collection points provided by your local public waste authorities. Disposal is free of charge. The adjacent symbols
indicate that batteries must not be disposed of in normal domestic waste and but at authorised collection
points.
Packaging materials must be disposed of according
to local regulations.
Preparing the Telephone
Safety information
a Attention: It is essential to read the Safety Information in
Chapter 1 before starting up.
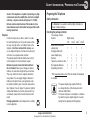
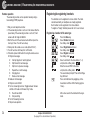
Checking the package contents
The package contains:
Content
Base station with power
adapter plug
Charging station with
power adapter plug
Handset
Telephone connection cable
Rechargeable batteries
Operating instructions
BigTel model
280
280-21 280-31 280-41
1
1
1
1
1
1
3
1
1
2
1
6
1
2
3
1
9
1
3
4
1
12
1
1
Visit www.amplicomms.com to find out whether this telephone
is available.
Helpline UK 0844 800 6503
(See page 26 for costs and hours of operation)
The power adapter plugs supplied fulfils the
eco−design directive of the European Council
(Directive 2005/32/EC).
This means that power consumption is considerably lower than power adapter plugs of an earlier
design both in operating and idling modes.
3
PREPARING THE TELEPHONE
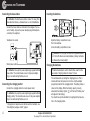
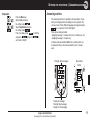
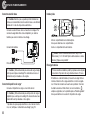
Connecting the base station
Inserting the batteries
a Attention: Position the base station at least 1 m away from
other electronic devices, otherwise there is a risk of interference.
Connect the base station as illustrated in the diagram. For reasons of safety, only use the power adapter plug and telephone
connection line supplied.
Telephone line socket
Open the battery compartment cover.
Put in the batteries.
Close the battery compartment cover.
a Attention: Use only type AAA NiMH rechargeable batteries,
1.2 V, 600 mAh. Never use normal batteries / primary cell batteries. Observe the correct polarity!
Mains power outlet
Charging the batteries
a Attention: Use only the power adapter plug supplied with the
base station ! You should ensure access to the power adapter
plug is not obstructed by furniture or such.
Connecting the charging station2
Connect the charging station to a mains power outlet.
a Attention: Use only the power adapter plug supplied with the
charging station ! You should ensure access to the power adapter
plug is not obstructed by furniture or such.
☞ Before the handset is used for the first time, insert it in the
base station / charging station for at least 16 hours.
The handset warms up during the charging process. This is
normal and does not represent a risk. Use only the adapter
plug unit provided for the charging station. The battery status is
shown on the display. When the battery capacity is nearly
exhausted, the battery symbol ( ) will flash and “Battery Low“
will appear in the display).
You should now put the handset for charging into the base station or the charging station.
2
Only applies to telephone sets with at least two handsets, see
“Checking the package content“, page 3.
4
Helpline UK 0844 800 6503
(See page 26 for costs and hours of operation)
PREPARING THE TELEPHONE / OPERATING ELEMENTS
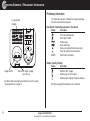
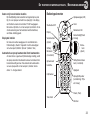
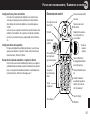
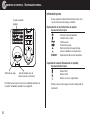
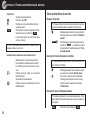
Operating Elements
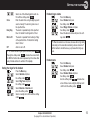
Setting the time and date on the handset
☞ If you subscribe to Caller Display, with your network operator,
the time will be set automatically when receiving a call bearing
caller display information.
Setting the display language
The display language is available in different languages. The
default setting is “English“. Set the language using the menu
item “Handset / Language“.
Auto Answer
If this function is activated, an incoming call is taken when the
handset is removed from the base station. The automatic
answering function is activated and deactivated using the menu
item “Handset / Auto Talk“.
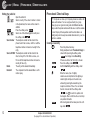
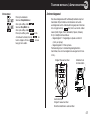
Flashing LED
Earpiece
Direct call key M1
8
At initial operation the handset does not have the correct time
(e.g. for entries in the call list). The display shows “12:00“
underneath the handset’s name.
Date and time are set through the menu item “Time / Date and
Time“. In the case of mains failure these settings will be lost.
Direct call key M2
Display
Redial key /
“Up“ key
Amplification key
(on side of
handset)
Volume
keys
(on side of
handset)
Softkey /
Menu key
(in idle state)
Softkey /
Phonebook key
(in idle state)
Off Hook button /
Handsfree
On Hook button
Digit keys
Call list / Equalizer
(tone setting) /
“Down“ key
Aa
R-key
Internal
Microphone
Helpline UK 0844 800 6503
(See page 26 for costs and hours of operation)
5
OPERATING ELEMENTS / PRELIMINARY INFORMATION
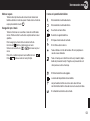
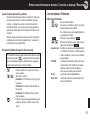
Preliminary Information
This chapter provides basic information on using the operating
instruction manual and the telephone.
Locate handset
(Paging)
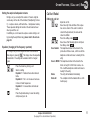
Description of operating sequences in the manual
Display
Description
NAME?
Press the button depicted.
Enter digits or letters.
Handset rings.
Base station rings.
Remove the handset from the base station.
Place the handset in the base station.
Depicts text in the display.
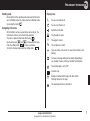
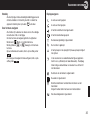
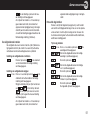
Battery capacity (display)
Display
Charge contacts
Indicator for ringing, charging
and active call
Batteries 100% charged
Batteries approx. 50% charged
Batteries need charging / Charge the batteries
For details of the answering machine buttons refer to the chapter
“Answering machine” on page 19.
6
Description
During the charging of the battery the icon is animated.
Helpline UK 0844 800 6503
(See page 26 for costs and hours of operation)
PRELIMINARY INFORMATION
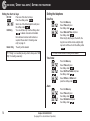
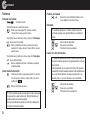
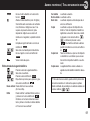
Standby mode
Display icons
All descriptions in this operating manual assume that the handset is in Standby mode. The system switches to Standby mode
by pressing the button
.
Navigating in the menu
All the functions can be accessed via the various menus. The
entire menu structure can be found in the appendix.
The menu is opened in idle mode with the key
.
Use the arrow keys
and
to move within the menu
Press the softkey under
to open a sub menu.
To return to the main menu press the softkey under
.
You are in an external call.
You are in an internal call.
Handsfree is activated.
The phonebook is open.
The keypad is locked.
The microphone is muted.
There are entries in the call list. In case of new calls the icon is
flashing.
You have a message waiting on the network (depending on
your provider). Please contact your provider for information.
The handset ringer is set to “Off“.
An alarm is set.
Steady on: handset within range of the base station.
Flashing: handset out of range.
The answering machine is switched on.
Helpline UK 0844 800 6503
(See page 26 for costs and hours of operation)
7
TELEPHONING
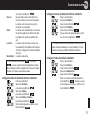
Telephoning
Ending a call
/
Taking a call
Your phone is ringing.
If the handset is not in the base station:
Press the Off Hook button. To activate Handsfree press
the Off Hook button once again.
If the handset is in the base station and Auto Talk is not activated:
Press the Off Hook button. To activate Handsfree press
the Off Hook button once again.
If the handset is in the base station and Auto Talk is activated:
Remove the handset from the base - the call will be
taken automatically.
Making a call
Enter the telephone number.
Delete wrong characters by pressing the softkey under
.
The telephone number is being dialled.
Redial
☞ Your handset saves the last 10 dialled telephone numbers. If
a caller is stored in your phone book, the name will be displayed.
/
Open the redial list.
Select an entry.
Press the Off Hook button.
Making a call from the call list
☞ Your handset saves the numbers of the last 30 incoming calls
in the call list. If a caller is stored in your phone book, the name
will be displayed.
Saving can only take place if the function “Phone number transmission (CLIP)” is available at your connection and caller ID is not
suppressed by the caller or was not transmitted for any other reason.
/
☞ You can also press the Off Hook button and you will hear the
dialling tone.
The entered number will be dialled immediately. It is not possible
to correct wrong digits individually using this dialling procedure.
8
Press the On Hook button or replace the
handset in the base station.
Helpline UK 0844 800 6503
(See page 26 for costs and hours of operation)
Open the call list.
Select an entry.
Press the Off Hook button.
TELEPHONING
Making a call from the phone book
Internal calls
☞ You can store up to 50 entries in the phone book.
☞ Internal calls, transfers and conference calls are only possible
For creating entries see section “Phone book“, page 12.
if multiple handsets are registered.
/
Making an internal call
Press the INT key. Enter the internal number
of the desired handset.
Open the telephone book.
Select an entry.
Press the Off Hook button.
Making a call using the direct call keys
☞ Your phone provides two direct call keys M1 und M2. For storing and editing entries see section “Direct call keys“, page 14.
M1 / M2
Press one of the direct call keys.
Press the Off Hook button.
Call timer
Your handset automatically times the duration of every call in
minutes and seconds.
Muting the microphone
During a call you can switch your handset’s microphone off.
Press the softkey under
.
To unmute press the softkey under
Off
Transferring an external call to another handset
During an external call . . .
Press the INT key.
Enter the internal number of the desired handset.
The external call is put on hold. When the
called handset answers you can announce the
call transfer.
Press the On-Hook key. The call will be transferred.
☞ If the called handset does not answer you will get back to the
external call by pressing the
key.
.
Helpline UK 0844 800 6503
(See page 26 for costs and hours of operation)
9
TELEPHONING / OTHER FEATURES
3-Party Conference
During an external call . . .
Press the INT key.
Enter the internal number of the desired handset.
Conf.
When the called handset answers press the
softkey under Conf. .
The 3-party conference is established.
☞ If any handset hangs up during a conference call will leave
Other features
Key lock
☞ The key lock prevents functions assigned to buttons being
activated inadvertently. Incoming calls can still be taken in the normal way even when the key lock function is activated.
Unlock
the other handset still in connection with the external call.
External call during an internal connection
When you are on an internal call the base ringer will announce an incoming external call. In
addition you will hear an attention tone in the
earpiece.
Press the On-Hook key. The internal call will
be ended.
The external call will be signalled.
Press the Off Hook key to take the external
call.
Press and hold down the #-key until Keypad
Locked appears in the display.
For unlocking the keypad again press the softkey under Unlock (
)and subsequently
the #-key briefly. Keypad Unlocked appears
in the display.
Switching the handset ringer on/off
☞ You can turn off the ringer via the menu item “Handset /
Ringer Volume“ as well.
Press and hold down the star-key until Ringer
Off appears in the display.
For turning the ringer on again press and hold
down the star-key until Ringer Off disappears.
Muting the handset ringer for an incoming call
☞ In case of an incoming call you can mute the handset ringer.
Nevertheless, you will be able to take the call as long as the caller
did not hang up.
Silent
10
Helpline UK 0844 800 6503
(See page 26 for costs and hours of operation)
Press the softkey under Silent .
OTHER FEATURES / CALL LIST / REDIAL
Setting the earpiece/loudspeaker volume
Call list / Redial
During a call you can adjust the volume in 5 levels using the
volume keys on the side of the handset (if telephoning “normally“ -> earpiece volume, with hands-free -> loudspeaker volume).
These seperate settings will remain at the last selected level
when you end the call.
In addition you can increase the earpiece volume during a call
by pressing the amplification key; please refer to the note on
page 2/3.
Equalizer (changing of the frequency spectrum)
☞ During a call, you can change the sound of the handset in
three stages by pressing
. The display shows the respective
characteristics. The setting will be retained until it is changed
again.
/
Press the shown key during a call.
Select a setting.
Equalizer 1 = Reduced bass and enhanced
treble.
Equalizer 2 = Flat – no increase or decrease
in bass or treble frequencies.
Equalizer 3 = Increased bass and reduced
treble.
Press the phonebook key to save the setting
and proceed your call.
Editing the call list
Open the call list.
Select an entry. Date and time of the respective call are shown. If the caller’s number is
stored in the phonebook, the name will be
shown in addition.
Option
Press the softkey under Option .
/
Select one of the following options and press
the softkey under
.
Save Number The telephone number will be stored in the
phone book. Enter a name, confirm or edit the
telephone number and select a melody for the
entry.
Save to M1/M2 The telephone number will be stored to the
direct call key M1 or M2. Enter a name, confirm or edit the telephone number and select a
melody for the entry.
Delete
The entry will be deleted immediately.
Delete All
The complete list will be deleted after a confirmation query.
/
Helpline UK 0844 800 6503
(See page 26 for costs and hours of operation)
11
CALL LIST / REDIAL / PHONE BOOK / DIRECT CALL KEYS
Editing the redial list
Open the redial list.
/
Select an entry. If the caller’s number is stored
in the phonebook, the name will be shown in
addition.
Option
Press the softkey under Option .
/
Select one of the following options and press
the softkey under
.
Save Number The telephone number will be stored in the
phone book. Enter a name, confirm or edit the
telephone number and select a melody for the
entry.
Save to M1/M2 The telephone number will be stored to the
direct call key M1 or M2. Enter a name, confirm or edit the telephone number and select a
melody for the entry.
Delete
The entry will be deleted immediately.
Delete All
The complete list will be deleted after a confirmation query.
Phone book / Direct call keys
☞ Your phone can store up to 50 private phonebook entries with
names and numbers. You can assign each entry to a group.
These groups can signal incoming calls with different melodies.
Always enter the phone numbers with the area code; this enables
a correct display of the respective caller for whom there is an
existing entry and whose phone number transmission to your connection is available.
Creating a new entry
Option
Save
12
Helpline UK 0844 800 6503
(See page 26 for costs and hours of operation)
Press the phone book key.
Empty telephone book: Phonebook Empty is
shown. After pressing the softkey under
Option the display shows New Entry.
If there are entries: the first entry is shown.
Press the softkey under Option .
Confirm New Entry with the softkey under
.
Enter the name (max. 16 digits).
Letters are also imprinted on the digit keys.
Letters, digits and special characters are
entered by pressing the relevant key the
respective number of times. You can delete
the last character with the softkey under
. Use
to switch to capitals and
back again. After a short time the cursor skips
one position forwards.
After having entered the name press the softkey under Save .
PHONE BOOK / DIRECT CALL KEYS
Save
/
Save
Enter the telephone number (max. 24 digits). If
your telephone is connected to a PBX start the
telephone number with the access code. If a
dialling pause is needed, press after the
access code the 0 key for approx. 2 sec. A P
appears in the display.
After having entered the telephone number
press the softkey under Save .
Select a melody for this entry.
Having done this press the softkey under
Save .
Back to standby mode.
New Entry
Edit Entry
Show Details
Delete Entry
Delete All
The entry is being copied to another suitable
registered handset. All registered handsets will
be shown. Select the desired handset using
the arrow keys
and
and press
the softkey under
. Press the softkey
under
on the respective handset to
allow the operation.
Copy All
All entries will be copied to another suitable
handset. By this all entries on the other handset will be deleted.
Copy Append All entries will be added to the other suitable
handset’s phonebook.
☞ You can enter the first letter of the desired name using the
Editing telephone book entries
/
Option
/
Copy Entry
Press the phone book key.
Select an entry.
Press the softkey under Option .
Select one of the following options and press
the softkey under
.
You can create a new entry.
You can edit the entry. Use the softkey under
to delete characters and numbers
then add new characters and numbers as
required. Please refer to “Creating a new
entry“.
The entry is shown.
The entry will be deleted.
The complete list will be deleted after a confirmation query.
alphanumerical keypad. The first matching entry is shown. Scroll
to the desired entry using the arrow keys
and
.
Helpline UK 0844 800 6503
(See page 26 for costs and hours of operation)
13
PHONE BOOK / DIRECT CALL KEYS / SETTING THE TELEPHONE
Setting the telephone
Editing the direct call keys
M1 / M2
Option
/
Edit Entry
Delete Entry
Press one of the direct call keys.
Press the softkey under Option .
Select one of the following options and press
the softkey under
.
You can edit the entry. Use the softkey under
to delete characters and numbers
then add new characters and numbers as
required. Please refer to “Creating a new
entry“ on page 12.
The entry will be deleted.
Date/Time
/
/
☞ If “Empty“ is shown after pressing a direct call key select “Edit
Entry“ for creating a new entry.
Press the Menu key.
Select Time and press
the softkey under
.
Select Date and Time and press
the softkey under
.
Enter step by step the year, the month, the
day, the hour and the minute using the digit
keys and confirm each with the softkey under
Save .
☞ In case of mains failure this setting will be deleted.
Time format
/
/
/
Press the Menu key.
Select Time and press
the softkey under
.
Select Set Time Format and press
the softkey under
.
Select 12Hour or 24Hour and
press the softkey under
.
Alarm
/
/
14
Helpline UK 0844 800 6503
(See page 26 for costs and hours of operation)
Press the Menu key.
Select Time and press
the softkey under
.
Select Set Alarm and press
the softkey under
.
SETTING THE TELEPHONE
/
Once
Every Day
Mon to Fri
Off
Select one of the following options and confirm with the softkey under Save .
Enter the alarm time using the digit keys and
select a melody. The alarm is given once at
the specified time.
The alarm is repeated daily at the specified
time. For details for setting refer to “Once“.
The alarm is repeated from monday to friday
at the specified time. For details for setting
refer to “Once“.
Alarm is set to off.
☞ To confirm the alarm signal, press the softkey under
Stop .
Pressing the softkey under Zzz.. activates the snooze function. With this function the alarm is repeated up to five times after
every 5 minutes before it is switched off completely.
/
/
/
/
/
/
Press the Menu key.
Select Handset and press
the softkey under
.
Select Ring Tone and press
the softkey under
.
Select External or Internal and
press the softkey under
.
Select a melody and confirm with the softkey
under Save .
Press the Menu key.
Select Handset and press
the softkey under
.
Select Ringer Volume and press
the softkey under
.
Select the desired volume and press the softkey under Save .
☞ When the handset is on the base, the base will not ring during
an incoming call. So when the handset ring volume is turned off
and the handset is inside the base, your phone will not ring anymore.
Handset name
/
Setting the ringer for the handset
/
Handset ringer volume
/
Helpline UK 0844 800 6503
(See page 26 for costs and hours of operation)
Press the Menu key.
Select Handset and press
the softkey under
.
Select Handset Name and press
the softkey under
.
Use the softkey under
to delete characters. Enter a name using the digit keys and
confirm with the softkey under Save .
15
SETTING THE TELEPHONE
Keypad beep
/
/
/
Backlight Time
Press the Menu key.
Select Handset and press
the softkey under
.
Select Keypad Beep and press
the softkey under
.
Select On or Off and press the softkey under
.
Display contrast
/
/
/
/
/
/
/
/
/
/
Press the Menu key.
Select Handset and press
the softkey under
.
Select Confirm Beep and press
the softkey under
.
Select On or Off and press the softkey under
.
☞ For every kind of setting, a long beep is generated to alert
Press the Menu key.
Select Handset and press
the softkey under
.
Select Auto Talk and press
the softkey under
.
Select On or Off and press the softkey under
.
☞ If Auto Talk is on an incoming call will immediately be taken
user the setting saved.
Selecting the base station
☞ If your handset is subscribed to several base stations you can
select a base station to operate with the handset (“Manual“).
When “Auto“ is activated, the handset will automatically choose
the closest base unit in standby. During a call there will be no
changing of the base station.
when the handset is taken from the base.
/
16
Press the Menu key.
Select Handset and press
the softkey under
.
Select Backlight Time and press
the softkey under
.
Select the desired setting and press the softkey under
.
Confirmation Beep
Press the Menu key.
Select Handset and press
the softkey under
.
Select Contrast and press
the softkey under
.
Select the desired setting and press the softkey under
.
Auto Answer
/
/
Helpline UK 0844 800 6503
(See page 26 for costs and hours of operation)
Press the Menu key.
Select Handset and press
SETTING THE TELEPHONE
/
/
the softkey under
.
Select Select Base and press
the softkey under
.
Select Auto or Manual and confirm with the
softkey under
.
If you choose Manual select one of the base
stations from the list and press the softkey
under
.
Display language
/
/
/
/
/
/
/
/
Press the Menu key.
Select Base Settings and press
the softkey under
.
Select Ring Tone and press
the softkey under
.
Select a melody and confirm with the softkey
under Save .
Base ringer volume
Press the Menu key.
Select Handset and press
the softkey under
.
Select Language and press
the softkey under
.
Select the desired language and press the
softkey under
.
Setting Boost on permanently
/
Setting the ringer for the base station
/
/
/
Dial mode
Press the Menu key.
Select Handset and press
the softkey under
.
Select Boost On and press
the softkey under
.
Select On or Off and press the softkey under
.
☞ If Boost On is set to ON “BOOST ON” will replace the handset name on stand-by screen.
Press the Menu key.
Select Base Settings and press
the softkey under
.
Select Ringer Volume and press
the softkey under
.
Select the desired volume and press the softkey under Save .
/
/
/
Press the Menu key.
Select Base Settings and press
the softkey under
.
Select Dial Mode and press
the softkey under
.
Select Tone or Pulse and confirm with the
softkey under Save .
☞ In most situations the “Tone“ option should be selected.
Recall Time
Press the Menu key.
Helpline UK 0844 800 6503
(See page 26 for costs and hours of operation)
17
SETTING THE TELEPHONE
/
/
/
Select Base Settings and press
the softkey under
.
Select Recall and press
the softkey under
.
Select Short or Long and confirm with the
softkey under Save .
☞ The typical setting for access to analogue telephone networks
in the UK is “Short”.
/
Press the Menu key.
Select Base Settings and press
the softkey under
.
Select System PIN and press
the softkey under
.
Enter the relevant PIN (default 0 0 0 0) and
press the softkey under
.
Enter the new PIN and press the softkey
under
.
Enter the new PIN again and press the softkey
under
.
☞ The four digit PIN protects some settings against unauthorized changes.
If you have forgotten your PIN please call our service hotline.
18
☞ You can set up to five appointments or reminders which you
can give a name and an alarm by date and time.
/
/
/
Changing the PIN
/
Appointment
/
Press the Menu key.
Select Tools and press
the softkey under
.
Select Appointment and press
the softkey under
.
Select an entry and press
the softkey under
.
Select Edit and press
the softkey under
.
Use the softkey under
to delete characters. Enter a name using the alphanumeric
keys and confirm with the softkey under
Save . Enter the date using the digit keys
and confirm with the softkey under Save .
Enter the time using the digit keys and confirm
with the softkey under Save .
Select a melody and confirm with the softkey
under Save .
☞ To delete an appointment select “Delete“. The appointment
will be deleted after a confirmation query.
Helpline UK 0844 800 6503
(See page 26 for costs and hours of operation)
SETTING THE TELEPHONE / ANSWERING MACHINE
Answering machine
Stopwatch
/
/
Press the Menu key.
Select Tools and press
the softkey under
.
Select Stop Watch and press
the softkey under
.
Press the softkey under Start to start the
stop watch, Stop to stop it or Reset to
set it back to “00:00“.
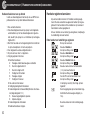
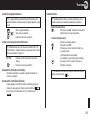
The answering machine is operated on the base station. It supports you during operation and settings via voice prompts. You
can select one of three different languages by long pressing the
key. i.e. German, French and English.
There are two modes possible:
- Outgoing message 1 = Answer and record (2 minutes per call)
- Outgoing message 2 = Answer only.
In delivery state two standard OGMs are recorded, which can
be replaced with your own announcements (max. 2 minutes
each).
Flashing: “New messages”
Base station
bottom
Number of messages
Flashing: New messages
Steady on: Old messages
Helpline UK 0844 800 6503
(See page 26 for costs and hours of operation)
19
ANSWERING MACHINE
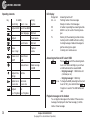
Operating elements
Key
LED display
In standby
Press briefly
Press > 2 sec.
During
playback
HS
oo
Playback OGM Record new OGM
Select language
Playback
Skip back
Pause/resume
Record memo
Volume
voice + ringer
Answer.-mach. Select Answer
On/Off
mode
Playback time
settings
Set time
Playback remote
access code
Set remote
access code
Playback
Set
no. of ring tones no. of ring tones
FL
Skip next
Playback
volume
Delete all mess.
Display dark
00 … xx
-A
Answering machine off
Flashing: number of new messages
Steady on: number of old messages
A handset is operating the answering machine
OGM 2 is set, no record of incoming messages
Memory full, the answering machine will automatically switch to OGM 2 without recording
incoming messages. Delete old messages to
get free memory space again.
Incoming call or remote access.
Answering machine on/off / select OGM
Delete message
or OGM
Presse
to switch the answering machine on or off. When switching on you will hear
an information about the selected OGM.
- Outgoing message 1 = OGM and record
(2 minutes per call)
- Outgoing message 2 = OGM only
> 2 sec. To change the OGM (answering machine must
be set to “On”), press and hold down
for approx. 2 seconds. The OGM will be switched.
Playback messages on the handset
You can playback messages on the handset. If there are new
messages, the display will show “New message(s)” and the
number of new messages.
20
Helpline UK 0844 800 6503
(See page 26 for costs and hours of operation)
ANSWERING MACHINE
Playback new messages
Press the softkey under
.
A voice prompt plays how many new messages are recorded. It then plays new messages
from first recorded to last one by one.
For more information in operating refer to the
next chapter “Playback all messages”.
Playback all messages
Press the menu key.
/
Select Ans Machine and press
the softkey under
.
/
Select Play New Msgs or Play All Msgs
and press the softkey under
.
A voice prompt plays how many messages are
recorded. It then plays new messages from
first recorded to last one by one.
If you want to hear the messages via the loudspeaker press
.
To switch back press
.again.
To skip to the next message during playback,
press the softkey under
.
Delete
To delete the current message during playback, press the softkey under Delete .
Call screening / Interception
Once the answering machine has taken a call you can listen to
the caller.
Press
. The answering machine continues recording.
If you want to intercept the call and speak to the caller, press
. The answering machine will stop recording.
Playback messages on the base
Press
.
The messages are played one at a time. If
there are new messages, only the new messages (those that have not been heard) are
played.
During playback, you can:
- go to the beginning of the current message.
- skip back to previous message.
- stop playback.
- interrupt playback, for restart playback
press
once again.
- skip forward to next message.
Deleting messages on the base
During playback
Press and hold down
for approx. 2
seconds. The current message will be deleted.
Deleting all old messages
Only old messages (already heard) are deleted.
Helpline UK 0844 800 6503
(See page 26 for costs and hours of operation)
21
ANSWERING MACHINE
In standby press and hold down
for
approx. 2 seconds. The display shows dL. All
old messages are deleted.
Outgoing message (OGM)
Playback / delete current outgoing message
Press
briefly. The answering machine
will playback the current OGM.
Stop playback with
.
Press and hold down
for approx. 2
seconds to delete the OGM (you will hear a
voice prompt). The standard OGM cannot be
deleted.
Recording a personal OGM
Select an OGM you want to replace (refer to
“Answering machine on/off / select OGM”,
page 20).
> 2 sec. Press and hold down
for approx. 2
seconds. Follow the spoken user interface.
To stop the recording press
.
The answering machine will playback the
recorded OGM.
Recording a memo
You can record memos for other users. These memos are considered an incoming message that can be picked up later by
the user. The max. recording time for a memo is 2 minutes.
22
> 2 sec. Press and hold down
for approx. 2
seconds. Speak your memo.
To stop the recording press
.
Answer delay settings
Select the delay for answering the call: select 2…9 rings or
“Toll saver”. If “Toll saver” is set, a call will be taken after 5
rings, if no new messages are available. If new messages are
available, the answering machine will answer after two rings.
Therefore you can check remotely whether or not new messages are available without having to make a connection.
Checking the answer delay setting
Press
on the bottom of the base briefly. The current setting will be announced.
Changing the answer delay setting
> 2 sec Press and hold down
on the bottom of
the base for approx. 2 seconds. The current
setting will be announced.
Change the setting with the keys
/
and press
briefly
to store the settings. The new setting will be
announced.
If you do not press any keys for 10 seconds,
the machine will revert back to the answering
machine menu, without changing the settings.
If there is a loss of power in the base, the
number of rings will revert to 3 rings again.
Helpline UK 0844 800 6503
(See page 26 for costs and hours of operation)
ANSWERING MACHINE
Remote access code settings
Clock setting
The remote access code is a 3-digit code used to operate the
machine remotely (refer to “Remote Operation”). The remote
access code is set to '0 0 0' by default.
Checking the Remote access code
Press
on the bottom of the base briefly. The current setting will be announced.
Changing the Remote access code
> 2 sec Press
on the bottom of the base for
approx. 2 seconds. The current setting will be
announced.
Change the setting digit by digit with the keys
/
and press
briefly for
storing and skipping to the next digit. The new
setting will be announced.
If you do not press any keys for 10 seconds,
the machine will revert back to the answering
machine menu, without changing the settings.
After the system clock set by user (see page 14), all recorded
messages will then be stamped with date and time. When playing the message, the answering machine will announce day of
week and time in front of the recorded message.
You can also enter time and day with the following procedure. If
there is a loss of power in the base, the settings will be lost.
Setting time and day
> 2 sec Press and hold down
for approx. 2
seconds. The current day will be announced.
/
Use the buttons depicted to set the current
day (will be voice prompted).
Press
briefly.
/
Use the buttons depicted to set the current
hour (will be voice prompted).
Press
briefly.
/
Use the buttons depicted to set the current
minute (will be voice prompted).
Press
briefly.
The answering machine plays the current day
of week and time.
Helpline UK 0844 800 6503
(See page 26 for costs and hours of operation)
23
ANSWERING MACHINE / REGISTERING/DE-REGISTERING HANDSETS
Registering/de-registering handsets
Remote operation
The answering machine can be operated remotely using a
tone-dialling (DTMF) telephone.
1. Dial your own telephone number.
2. If the answering machine is set to on it will answer after the
preset delay. If the answering machine is set to off, it will
answer after 20 rings with OGM 2.
3. Wait for the end of the announcement and then press the
star key 2 times. You will hear a beep.
4. Slowly enter the remote access code (default “0 0 0”).
5. You will hear two short beeps for confirmation.
6. Follow the spoken information for using the remote access.
2 Playback messages
2 Interrupt playback / restart playback
3 Skip forward to next message
1 Skip back to previous message
1 Repeat the current message
6 Stop playback
7 Delete current message
0 Delete all old messages
4 Playback current OGM
9 Turn on answering machine / Toggle between “Answer
and Record” mode and “Answer Only” mode
5 Record new OGM
6 Stop recording
8 Turn off answering machine
6 Stop remote operation.
24
Five handsets can be registered to a base station. The handsets delivered with your telephone are already registered.
Each handset can be registered to four base stations.
To register a “foreign“ handset please refer to it’s user manual.
Registering a handset of the same type
/
/
/
/
Helpline UK 0844 800 6503
(See page 26 for costs and hours of operation)
Press the Menu key.
Select Handset and press
the softkey under
.
Select Registration and press
the softkey under
.
Select Register and press
the softkey under
.
Select a number for the base station (1 - 4)
and press the softkey under
.
Enter the relevant PIN for the base
and press the softkey under
.
The new handset prompts "Press & Hold Page
Key On Base".
Press and hold down the paging key on the
base station until the LED is flashing (approx.
10 sec).
After a few seconds the handset will be registered.
REGISTERING/DE-REGISTERING HANDSETS / PBX / SUPPLEMENTARY SERVICES
PBX / Supplementary Services
Deleting a handset
/
/
/
Press the Menu key.
Select Handset and press
the softkey under
.
Select Registration and press
the softkey under
.
Select De-register and press
the softkey under
.
Enter the relevant PIN for the base
and press the softkey under
.
Enter the internal number of the handset, that
should be de-registered
and press the softkey under
.
☞ You can only cancel subscription of another handset, not the
handset you are using to do the remove procedure.
PBX
If the telephone is connected to a private branch exchange,
functions such as transferring calls and automatic call back can
be used via the R button.
Refer to the operating manual provided with your private branch
exchange as to which Flash time must be set in order to use
these functions. The sales outlet where you purchased the
exchange can provide information as to whether the telephone
will work properly with the exchange.
Please remember to enter the access code and a neccessary
dialling pause (longpress “0“) when creating phone book
entries.
Supplementary services
Your telephone supports supplementary services provided by
your telephone network provider, such as brokering, call waiting
and conference facilities. These supplementary services can be
used via the R-button.
Please contact your telephone network provider regarding
which Flash time must be set to use the supplementary services. Contact your telephone network provider with regard to
enabling supplementary services.
Helpline UK 0844 800 6503
(See page 26 for costs and hours of operation)
25
APPENDIX
Appendix
Help and support / Troubleshooting guide
Menu Structure
Ans Machine
Play New Msgs
Play All Msgs
Phonebook
Handset
Ring Tone
External
Internal
Ringer Volume
Handset Name
Keypad Beep
Contrast
Auto Talk
Backlight Time
Confirm Beep
Select Base
Language
Registration
Boost On
Base Settings
Ring Tone
Ringer Volume
Dial Mode
Recall
System PIN
Time
Set Alarm
Date and Time
Set Time Format
Tools
Appointment
Stop Watch
26
Helpline
If you need some help and you’re in the UK, please first check
and see if your problem can be solved using the troubleshooting guide below. If it can’t , please call us on 0844 800 6503
(using a UK landline, at the time of going to print: calls cost 6p
for connection charge and then 5p a minute. Mobile costs may
vary). Lines are open Monday to Friday, 9am to 5pm, excluding
public holidays. If you’ve a claim on your 2-year guarantee,
please contact your supplier.
In case of problems
☞ Some issues may simply be resolved by disconnecting the
power to the unit. In such instances the power to the main base
station should be switched off and batteries in the handset should
also be removed for about 20 minutes. After which reconnect
everything to determine if this has resolved the issue.
Tone / Pulse
Short / Long
I can’t make phone calls
• Make sure the phone cable is connected properly. If it is,
there may be a fault. Please make sure you’re using the
phone cable that came with your phone.
• Check power’s plugged in, switched on and working.
• Make sure you aren’t too far from the base (in ideal conditions, it should work up to 300 metres outdoors and up to 50
metres indoors).
• Test the phone line and socket by using another phone.
Helpline UK 0844 800 6503
(See page 26 for costs and hours of operation)
APPENDIX
I keep losing my connection
• Make sure you aren’t too far from the base station (in ideal
conditions, it should work up to 300 metres outdoors and up
to 50 metres indoors).
• The base station may not be in an ideal location – consider
moving it.
My handset keeps switching off
• It may need recharging. So it can charge fully, place your
handset on its charger base for at least 16 hours (make sure
the power socket is switched on!).
• Replace the rechargeable batteries. Any replacement batteries should be the same type as those provided.
Caller’s identification (Call Line ID) isn’t working
• Check you have this service on your phone line. Please call
your network provider.
• The caller may have withheld their phone number.
My handset or base doesn’t ring
• Check that the ringer is on. See pages 15 and 17.
When I am using an automated telephone service and I am
asked to press a button, there is no response.
• The dialling mode may be set to PULSE instead of TONE.
Check and change this if necessary. (See page 17).
When a caller leaves a message it is not registered on my
answering machine.
• It is possible that you are subscribed to your network
provider’s voice mail service, (Call minder) which is answering before your BigTel 280 can. You can usually check this
by dialling 1571. Call your network provider if you wish to
cancel this service.
When a caller tries to leaves a message an announcement
says that my “mail box” is full, even though there are no
messages on my answering machine.
• It is possible that you are subscribed to your network
provider’s voice mail service (Call minder), which is answering before your BigTel 280 can. You can usually check this
by dialling 1571. Call your network provider if you wish to
cancel this service.
I’ve got a buzzing noise on my radio, TV or computer
• We suggest you use your cordless handset at least one
metre away from electrical equipment and mobile phones.
There is interference in the earpiece and/or internet connection is very slow when using the phone
• You must plug the phone into the wall socket via an ADSL filter if you have broadband internet on your phone line.
Helpline UK 0844 800 6503
(See page 26 for costs and hours of operation)
27
APPENDIX
Technical data
Declaration of Conformity
Standard: DECT / GAP
Number of channels: 120 duplex channels
Frequencies: 1880 MHz to 1900 MHz
Duplex mode: Time division multiplex, 10ms frame length
Channel spacing: 1728 kHz
Bit rate: 1152 kBit / s
Modulation: GFSK
Voice encoding: 32 kBit / s
Transmitter power: 10 mW (average power per channel)
Range: up to 300 m outside, up to 50 m inside buildings
Electricity supply base station:
100~240 V AC, 7 V / 420 mA DC
Handset: Operating time: Stand-by time / Talk time
600 mAh = up to 100 h / up to 10 h
Charging time: approx. 16 hours
Operating temperature for handset operation:
5°C to 45°C ; 20 % to 75 % rel. humidity
Operating temperature for base station operation:
5°C to 45°C ; 20 % to 75 % rel. humidity
Storage temperature: -10°C to +60°C
Maximum earpiece volume: +30 dB (distortion < 2%)
Dial mode: Tone / Pulse
R-key: Flash (short/long)
Base station dimensions (mm):
L / B / H = 140 x 115 x 63
Handset dimensions (mm):
L / B / H = 55 x 28 x 170
Telephone line cord:
TSV on Pin 3 and 4 according to CTR 37 (Euro)
Adapter plug: European-type mains connector
28
This device fulfils the requirements stipulated in the EU directives:
- 1999/5/EU directive on radio equipment and telecommunications terminal equipment and the mutual recognition of
their conformity.
- 2005/32/EU directive “Energy-using products“.
Conformity with the above mentioned directives is confirmed by
the CE symbol on the device.
To view the complete Declaration of Conformity, please refer to
the free download available on our
web site www.amplicomms.com
Maintenance
Clean the housing surfaces with a soft, fluff-free cloth.
Do not use any cleaning agents or solvents.
Guarantee
AMPLICOMMS equipment is produced and tested according to
the latest production methods. The implementation of carefully
chosen materials and highly developed technologies ensure
trouble free functioning and a long service life. The terms of the
guarantee do not apply where the cause of the equipment malfunction is the fault of the telephone network operator or any
interposed private branch extension system. The terms of the
guarantee do not apply to the rechargeable batteries or power
packs used in the products. The period of guarantee is 24
months from the date of purchase.
All deficiencies resulting from material of production faults
which occur during the period of guarantee will be eliminated
Helpline UK 0844 800 6503
(See page 26 for costs and hours of operation)
INHOUDSOPGAVE
free of charge. Rights to claims under the terms of guarantee
are annulled following intervention by the purchaser or third
parties. Damage caused as a result of improper handling or
operation, incorrect positioning or storing, improper connection
or installation, Acts of God or other external influence are not
covered by the terms of guarantee.
In the case of complaints, we reserve the right to repair or
replace defect parts or provide a replacement device. Replacement parts or devices become our property.
Rights to compensation in the case of damage are excluded
where there is no evidence or intent or gross negligence by the
manufacturer.
If your equipment shows signs of defect during the period of
guarantee, please return to the sales outlet in which you purchased the AMPLICOMMS equipment together with the purchase receipt. All rights to claims under the terms of guarantee
in accordance with this agreement must be asserted exclusively
with regard to your sales outlet.
Two years after the purchase of our products, claims under the
terms of guarantee can no longer be asserted.
Veiligheidsinformatie . . . . . . . . . . . . . . . . . . . . . . . . . . . . . . . .30
De telefoon in werking stellen . . . . . . . . . . . . . . . . . . . . . . . .31
Bedieningselementen . . . . . . . . . . . . . . . . . . . . . . . . . . . . . . .33
Inleidende informatie . . . . . . . . . . . . . . . . . . . . . . . . . . . . . . . .34
Telefoneren . . . . . . . . . . . . . . . . . . . . . . . . . . . . . . . . . . . . . . .36
Overige functies . . . . . . . . . . . . . . . . . . . . . . . . . . . . . . . . . . . .38
Oproeplijst/Kiesherhaling . . . . . . . . . . . . . . . . . . . . . . . . . . . .39
Telefoonboek/Snelkiestoetsen . . . . . . . . . . . . . . . . . . . . . . . .40
Telefoon instellen . . . . . . . . . . . . . . . . . . . . . . . . . . . . . . . . . .42
Antwoordapparaat . . . . . . . . . . . . . . . . . . . . . . . . . . . . . . . . . .47
Handsets registreren/annuleren . . . . . . . . . . . . . . . . . . . . . . .52
Gebruik op een telefooncentrale / Aanvullende functies . .53
Bijlage . . . . . . . . . . . . . . . . . . . . . . . . . . . . . . . . . . . . . . . . . . . .54
29
SICHERHEITSHINWEISE
V
EILIGHEIDSINFORMATIE
Veiligheidsinformatie
Lees beslist deze gebruikershandleiding zorgvuldig.
Bedoeld gebruik
Deze analoge telefoon is bedoeld voor aansluiting op een
openbaar telefoonnetwerk of een goedgekeurd privé-telefoonsysteem. Ieder ander gebruik wordt beschouwd als onjuist
gebruik. Onbevoegde aanpassing of constructieveranderingen
zijn niet toegestaan. Open het toestel niet en probeer zelf geen
reparatiewerkzaamheden te verrichten.
Locatie
Voorkom belast door rook, stof, trillingen, chemische stoffen,
vochtigheid, hitte of direct zonlicht. Gebruik de handset niet in
gebieden met explosiegevaar.
Adapter
a Opgelet: Gebruik enkel de meegeleverde adapter, omdat
andere adapters de telefoon kunnen beschadigen.
Zorg ervoor dat het stopcontact in de buur van het apparaat is
geïnstalleerd en dat de toegang tot de adapter niet worden belemmerd door meubels of andere voorwerpen.
Batterijen
a Opgelet: Werp batterijen nooit in het vuur. Gebruik enkel batterijen van hetzelfde type! Let op de juiste poling! Bij verkeerde
poling van de batterijen ontstaat er ontploffingsgevaar bij het opladen ervan.
Stroomuitval
Bij een stroomuitval kan niet worden getelefoneerd met de telefoon. Houd voor noodgevallen een bedrade telefoon klaar die
zonder externe stroomvoorziening kan worden gebruikt.
Medische apparaten
a Opgelet: Gebruik de telefoon niet in de omgeving van medi-
sche apparaten. Dan kan namelijk een interferentie niet volledig
worden uitgesloten. Wanneer u een pacemaker draagt, dient u uw
arts te raadplegen voordat u dit product gebruikt.
DECT1-telefoons kunnen in gehoorapparaten een onaangenaam brommend geluid veroorzaken.
Hoornvolume
Uw telefoon beschikt over een versterkertoets, die wanneer
ingedrukt het volume in de hoon voor het lopende gesprek sterk
verhoogt. In de display knippert „Boost aan“. Om de versterking uit te schakelen drukt u nogmaals op de toets. „ Boost
aan “ verdwijnt.
U kunt via het menu (Handset/ Boost aan-> Aan) de versterking
permanent inschakelen. In de display verschijnt dan in plaats
van de naam van de handset het bericht „ Boost aan“. Met de
versterkertoets kunt u dan voor het lopende gesprek de versterking uitschakelen. Bij het volgende gesprek wordt de versterking opnieuw ingeschakeld.
Voorzichtig: Wanneer u op de versterkertoets drukt, wordt
1
DECT: Digital Enhanced Cordless Telecommunication =
standaard voor draadloze telefoons.
30
VEILIGHEIDSINFORMATIE
SICHERHEITSHINWEISE
/ DE TELEFOON
/ TELEFONIN
INWERKING
BETRIEB NEHMEN
STELLEN
een heel hoog volume bereikt (versterkertoets + instelling
van het hoornvolume op niveau 5 = +30 dB).
Voorzichtigheid is geboden wanneer de handset wordt
gebruikt zowel door personen met normaal gehoor als door
personen met gehoorstoringen.
De telefoon in werking stellen
Veiligheidsaanwijzingen
a Opgelet: Lees voordat u de telefoon in werking stelt de veiligheidsaanwijzingen in hoofdstuk 1.
Afvalverwijdering
Wanneer u het apparaat wilt afvoeren, brengt u het naar
een verzamelpunt van uw plaatselijke afvalverwerkingsbedrijf (bv. een containerpark). Krachtens de wetgeving
betreffende afgedankte elektrische en elektronische apparaten zijn eigenaars van afgedankte apparaten wettelijk
verplicht oude elektrische en elektronische apparaten
apart af te voeren. Het symbool hiernaast betekent dat het
apparaat in geen geval bij het huisvuil mag worden
geworpen!
Gevaar voor de gezondheid en voor het milieu door
accu's en batterijen!
Accu's en batterijen nooit openen, beschadigen, inslikken
of in het milieu introduceren. Ze kunnen giftige en milieuschadelijke zware metalen bevatten.
U bent wettelijk verplicht om accu's en batterijen op een
veilige manier af te voeren via een handelaar die batterijen verkoopt of via een inzamelpunt voor batterijen, waar
geschikte containers ter beschikking staan. Het afvoeren
gebeurt kosteloos. De symbolen hiernaast betekenen dat
u accu's en batterijen in geen geval in het huisvuil mag
werpen en dat u ze naar een geschikt inzamelpunt moet
brengen. De verpakkingsmaterialen moeten worden afgevoerd in overeenstemming met de lokale voorschriften.
Inhoud van de verpakking controleren
Inhoud
Basisstation met adapter
Laadstation met adapter
Handset
Telefoonaansluitingskabel
Batterijen
Bedieninghandleiding
280
1
1
1
3
1
BigTel-Modell
280-21 280-31 280-41
1
1
1
1
2
3
2
3
4
1
1
1
6
9
12
1
1
1
1
Op www.amplicomms.com ontdekt u of deze telefoonset al
beschikbaar is.
De meegeleverde adapters voldoen aan de normen van de Europese Unie betreffende Ecodesign (Richtlijn 2005/32/EG). Dit betekent dat
zowel tijdens gebruik als in ruststand het stroomverbruik in vergelijking met oudere modellen
adapters aanzienlijk lager is.
31
DE TELEFOON IN WERKING STELLEN
Basisstation aansluiten
Batterijen plaatsen
a Opgelet: Positioneer het basisstation op een afstand van
minstens 1 meter van andere elektronische apparaten, omdat er
anders wederzijdse interferentie kan ontstaan.
Sluit het basisstation aan zoals weergegeven in de schets.
Gebruik uit veiligheidsoverwegingen enkel de meegeleverde
adapter en de meegeleverde telefoonaansluitingskabel.
Telefoonaansluiting
Open het batterijvak.
Leg de batterijen in het batterijvak.
Sluit het batterijvak.
a Opgelet: Gebruik enkel NiMH-batterijen van het type AAA
(microcellen) 1,2 V / 600 mAh! Nooit gewone batterijen/primaire
cellen gebruiken! Let op de juiste poling!
Wandstopcontact
a Opgelet: Gebruik voor het basisstation enkel de meegeleverde adapter! De toegang tot de adapter mag niet worden belemmerd door meubels of andere voorwerpen.
Het laadstation aansluiten 2
Sluit het laadstation aan op een stopcontact.
a Opgelet: Gebruik voor het laadstation enkel de meegeleverde adapter! De toegang tot de adapter mag niet worden belemmerd door meubels of andere voorwerpen.
2
Geldt enkel voor telefoonsets met minstens twee handsets,
zie „Verpakkingsinhoud controleren", pagina 27.
32
Batterij opladen
☞ Zet de handset bij de eerste inbedrijfneming gedurende
minstens 16 uur in het basisstation/laadstation.
De handset wordt warm tijdens het laden. Dit is normaal en
ongevaarlijk. Laad de handset nooit op met een ander laadapparaat. De huidige voortgang van het laden wordt in de display
weergegeven. Wanneer de batterij tot de onderste grens is
opgeladen, knippert het batterijsymbooltje ( ) in de display en
verschijnt er een bericht. Zet de handset in het basisstation/
laadstation om hem op te laden.
DE TELEFOON IN WERKING STELLEN / BEDIENINGSELEMENTEN
Datum en tijd van de telefoon instellen
Displaytaal instellen
Het menu kan worden weergegeven in verschillende talen.
Fabrieksmatig is „Deutsch“ ingesteld. U kunt de taal wijzigen
via het menupunt „Mobilteil / Sprache“ (Handset / Taal).
Automatisch een oproep beantwoorden/ direct beantwoorden
Als deze functie is geactiveerd (fabrieksmatige instelling), wordt
de oproep automatisch beantwoord wanneer de handset uit het
basisstation wordt genomen. Het automatische beantwoorden
van een oproep wordt via het menupunt „ Handset / Autom.
Aanne.“ in- of uitgeschakeld.
Bedieningselementen
Oproepweergave (LED)
Hoorn
Snelkiestoets M1
8
Bij inbedrijfstelling staat de telefoon niet ingesteld op de juiste
tijd (bv. voor oproepen vermeld in de oproeplijst). In de display
wordt onder de naam van de handset "12:00" weergegeven.
De datum en tijd stelt u in via het menupunt „Alarm/klok“. Als de
stroomvoorziening naar het basisstation wordt onderbroken,
wordt deze instelling gewist.
Snelkiestoets M2
Display
Kiesherhaling/Pijltoets
'omhoog'
Versterkertoets
(zijkant)
Volumetoets
(zijkant)
Softkey/
Menutoets
(in ruststand)
Softkey/Telefoonboektoets (in ruststand)
Opneemtoets/
handsfree
Oplegtoets
Cijfertoetsen
Oproeplijst/Equalizer
(tooninstelling) / Pijltoets 'omlaag'
Aa
R-toets (Flash)
Toets Intern
Microfoon
33
BEDIENINGSELEMENTEN / INLEIDENDE INFORMATIE
Inleidende informatie
Handset zoeken
(paging)
In dit hoofdstuk vindt u basisinformatie over het hanteren van
de bedieningshandleiding en telefoon.
Weergave in de bedieningshandleiding
Weergave
Beschrijving
NAME?
Op de afgebeeld toets drukken
Cijfers of letters invoeren
Handset rinkelt
Basisstation rinkelt
Handset uit basisstation nemen
Handset in het basisstation zetten
Weergave van de display-teksten
Batterijcapaciteit (displayweergave)
Weergave
Laadcontact
Oproepweergave, batterijlaadstand,
gespreksweergave
De toetsen voor het bedienen van het antwoordapparaat worden
beschreven in het hoofdstuk "Antwoordapparaat" op pagina 47.
34
Beschrijving
Batterij 100% vol
Batterij ca. 50% vol
Batterij bijna leeg / Batterij laden
Tijdens het laden is het batterijsymbool 'in beweging'.
INLEIDENDE INFORMATIE
Stand-by
Alle beschrijvingen in deze bedieningshandleiding gaan ervan
uit dat de handset zich in stand-by bevindt. U schakelt het
apparaat in stand-by door op de toets
te drukken.
Door het menu navigeren
Alle functies zijn te bereiken via diverse menu's. De volledige
menustructuur vindt u in de bijlage.
Om door het menu te navigeren gebruikt u de pijltoetsen.
Met de toets
opent u in ruststand het menu.
Met de pijltoetsen
en
beweegt u zich doorheen
het menu.
Op een ondermenu te bereiken, drukt u op de softkey onder
.
Als u terug een bovengeschikt menu wilt gaan, drukt u op de
softkey onder
.
Displayweergaven
U voert een extern gesprek.
U voert een intern gesprek.
U hebt de handsfree-functie ingeschakeld.
U hebt het telefoonboek geopend.
De toetsenvergrendeling is ingeschakeld.
De microfoon is gedempt.
U hebt oproepen in de oproeplijst. Bij nieuwe oproepen knippert
het symbool.
In de voicemail van uw netwerkbeheerder ligt een gesproken
bericht voor u (afhankelijk van netwerkbeheerder). Raadpleeg
indien nodig uw netwerkbeheer om te weten hoe u dit bericht
kunt beluisteren.
De beltoon van de handset is uitgeschakeld.
De wekker is ingeschakeld.
Brandt ononderbroken: handset binnen het bereik van het
basisstation
Knippert: handset buiten het bereik van het basisstation.
Het antwoordapparaat is ingeschakeld.
35
TELEFONEREN
Telefoneren
Een gesprek beëindigen
Een oproep beantwoorden
/
Uw telefoon rinkelt.
Als de handset zich niet op de basis bevindt:
Druk op de opneemtoets. Als u de "handsfree" wilt
inschakelen, drukt dan nogmaals op de toets.
Als de handset zich niet op de basis bevindt en Autom. Aanne.
is niet ingeschakeld:
Neem de handset uit de basis en druk op de opneemtoets. Als u de "handsfree" wilt inschakelen, drukt dan
nogmaals op de toets.
Als de handset zich niet op de basis bevindt en Autom. Aanne.
is ingeschakeld:
Neem gewoon de handset uit de basis - het gesprek
wordt automatisch aangenomen.
Telefoneren met kiesvoorbereiding
Voer het telefoonnummer in. Als u een fout maakt bij
het invoeren van het nummer, kunt u dit verbeteren
met de softkey onder
.
Het telefoonnummer wordt gekozen.
☞ U kunt ook eerst op de opneemtoets drukken, u hoort dan de
kiestoon. De ingevoerde cijfers van het telefoonnummer worden
onmiddellijk gekozen. Als het gesprek op deze manier tot stand
wordt gebracht, kunnen de individuele cijfers van het telefoonnummer niet worden gecorrigeerd.
36
Op de oplegtoets drukken of de handset in het
basisstation zetten.
Kiesherhaling
☞ Uw telefoon slaat de 10 laatst gekozen telefoonnummers op.
Als het telefoonnummer is opgeslagen in het telefoonboek, dan
wordt de naam weergegeven.
/
Open de kiesherhalingslijst.
Selecteer een telefoonnummer.
Druk op de opneemtoets.
Een nummer bellen vanuit de oproeplijst
☞ Uw telefoon slaat de laatste 30 oproepen op in de oproeplijst.
Als het telefoonnummer is opgeslagen in het telefoonboek, dan
wordt de naam weergegeven.
Het opslaan gebeurt enkel als de functie "Oproepnummerweer–
gave (CLIP)" beschikbaar is in uw telefoonnetwerk en het telefoonnummer van de beller niet verborgen is of om andere redenen niet wordt overdragen.
/
Open de oproeplijst.
Selecteer een telefoonnummer.
Druk op de opneemtoets.
TELEFONEREN
Een nummer bellen vanuit het telefoonboek
Intern telefoneren
☞ Het telefoonboek kan 50 contactpersonen bevatten. Om
☞ Interne gesprekken, doorverbindingen en conferentiegesprek-
contactpersonen op te slaan, raadpleegt u hoofdstuk "Telefoonboek" op pagina 40.
ken zijn enkel mogelijk als meerdere handsets zijn geregistreerd.
/
Open het telefoonboek.
Selecteer een telefoonnummer.
Druk op de opneemtoets.
Een nummer bellen met de snelkiestoetsen
☞ De telefoon is voorzien van twee snelkiestoetsen, M1 en M2.
Om de telefoonnummer op te slaan, raadpleegt u hoofdstuk
"Snelkiestoetsen" op pagina 42.
M1 / M2
Druk op een van de snelkiestoetsen.
Druk op de opneemtoets.
Weergave van de gespreksduur
Tijdens een gesprek wordt de gespreksduur in minuten en
seconden weergegeven.
Microfoon uitschakelen (mute)
U kunt tijdens een gesprek de microfoon uitschakelen, zodat
uw gesprekspartner u niet kan horen. Druk op de softkey onder
.
Om de microfoon terug in te schakelen, drukt u op de softkey
onder Uit .
Intern gesprek voeren
Druk op de toets INT. Voer het interne nummer van de gewenste handset in.
Extern gesprek doorverbinden
Tijdens een extern gesprek . . .
Druk op de toets INT.
Voer het interne nummer van de gewenste
handset in.
Het externe gesprek wordt op 'hold' gezet.
Wanneer de opgeroepen handset wordt ingeschakeld kunt u indien gewenst het gesprek
aankondigen.
Druk op de oplegtoets. Het gesprek is doorverbonden.
☞ Als de opgeroepen handset zich niet meldt, kan u teruggaan
naar het externe gesprek door op de toets
te drukken.
37
TELEFONEREN / OVERIGE FUNCTIES
Conferentiegesprek
Tijdens een extern gesprek . . .
Druk op de toets INT.
Voer het interne nummer van de gewenste
handset in.
Conf.
Zodra de opgeroepen handset wordt ingeschakeld, drukt u op de softkey onder
Conf. . Alle drie gesprekspartners zijn nu
met elkaar verbonden.
☞ Als een van de gesprekspartners oplegt, dan blijven de beide
Overige functies
Toetsenvergrendeling
☞ De toetsenvergrendeling voorkomt een ongewenste bediening
van de toetsen. Binnenkomende gesprekken worden zoals
gebruikelijk opgenomen.
Vrij
anderen met elkaar verbonden.
Externe oproep tijdens een intern gesprek
Terwijl u intern telefoneert, meldt het basisstation een binnenkomend extern gesprek Ook in
de hoorn hoort u een signaal.
Druk op de oplegtoets. Het interne gesprek
wordt beëindigd.
Het externe gesprek wordt gesignaleerd.
Druk op de opneemtoets om het externe
gesprek aan te nemen.
Houd de hekjestoets ingedrukt tot Toetsen
geblokkeerd in de display verschijnt.
Om de toetsen te ontgrendelen, drukt u op de
softkey onder Vrij en vervolgens kort op
de hekjestoets drukken. Klavier Vrijgegeven
verschijnt in de display.
De beltoon in de handset uitschakelen
☞ U kunt de beltoon ook via het menu „Handset / Belvolume“
uitschakelen.
Houd de sterretjestoets ingedrukt tot in de display Belvolume Uit verschijnt.
Om de beltoon opnieuw in te schakelen houdt
u de sterretjestoets ingedrukt tot in de display
Belvolume Uit verschijnt.
Beltoon bij binnenkomende oproepen uitschakelen
☞ Bij een binnenkomende oproep kunt u de beltoon uitschakelen. U kunt ongewijzigd het gesprek opnemen, zolang de beller
niet heeft opgelegd.
Stil
38
Druk op de softkey onder
Stil
.
OVERIGE FUNCTIES / OPROEPLIJST/KIESHERHALING
Volume van hoorn/luidspreker instellen
U kunt tijdens een gesprek met de volumetoets op de zijkant de
volume instellen in 5 niveaus (bij gebruik van hoorn -> volume
van hoorn, bij handsfree bellen -> volume van luidspreker). De
twee volumes zijn apart in te stellen en blijven opgeslagen tot
het einde van het gesprek.
Bovendien kunt u bij gebruik van de hoorn het volume van het
lopende gesprek verhogen met behulp van de versterkertoets,
zie daarvoor de aanwijzingen op pagina 30/31.
Equalizer (verandering van frequentiespectrum)
☞ Tijdens een gesprek kunt u met de toets
de klak van
de hoorn in drie trappen wijzigen. De display geeft de huidige
instellingen weer. De instelling wordt behouden voor volgende
gesprekken, tot ze opnieuw gewijzigd worden.
/
Druk tijdens een gesprek op de afgebeelde
toets.
Selecteer een instelling.
Equalizer 1 = Verzwakt de bastonen en verhoogt de hoge tonen.
Equalizer 2 = Lineaire weergave van alle frequenties.
Equalizer 3 = Versterkt de bastonen en verzwakt de hoge tonen.
Druk op de telefoonboektoets om de instelling
te selecteren en zet het gesprek voort.
Oproeplijst/Kiesherhaling
Oproeplijst bewerken
Open de oproeplijst.
Selecteer een telefoonnummer. De datum en
tijd van de oproep worden weergegeven. Als
het telefoonnummer is opgeslagen in het telefoonboek, wordt bovendien de naam weergegeven.
Optie
Druk op de softkey onder Optie .
/
Kies uit de volgende opties en druk op de softkey onder
.
Sla nr. op
Het telefoonnummer wordt opgeslagen in het
telefoonboek. Voer een naam in, bevestig of
bewerk het telefoonnummer en kies een melodie voor deze contactpersoon.
Bewaren in geh1 / 2 Het telefoonnummer wordt opgeslagen
onder de snelkiestoetsen M1 of M2. Voer een
naam in, bevestig of bewerk het telefoonnummer en kies een melodie voor deze contactpersoon.
Wis
De contactpersoon wordt onmiddellijk gewist.
Wis alles
De hele lijst wordt, na een vraag om bevestiging, gewist.
/
39
OPROEPLIJST/KIESHERHALING / TELEFOONBOEK/SNELKIESTOETSEN
Kiesherhaling bewerken
Open de kiesherhalingslijst.
/
Selecteer een telefoonnummer. Als het telefoonnummer is opgeslagen in het telefoonboek, wordt de naam weergegeven.
Optie
Druk op de softkey onder Optie .
/
Kies uit de volgende opties en druk op de softkey onder
.
Sla nr. op
Het telefoonnummer wordt opgeslagen in het
telefoonboek. Voer een naam in, bevestig of
bewerk het telefoonnummer en kies een melodie voor deze contactpersoon.
Bewaren in geh1 / 2 Het telefoonnummer wordt opgeslagen
onder de snelkiestoetsen M1 of M2. Voer een
naam in, bevestig of bewerk het telefoonnummer en kies een melodie voor deze contactpersoon.
Wis
De contactpersoon wordt onmiddellijk gewist.
Wis alles
De hele lijst wordt, na een vraag om bevestiging, gewist.
40
Telefoonboek/Snelkiestoetsen
☞ In het telefoonboek kunnen 50 telefoonnummers en namen
worden opgeslagen. U kunt elke contactpersoon in een groep
onderverdelen, waarvoor u telkens een ander melodie kunt kiezen. Voer de telefoonnummers altijd in samen met de regiocode.
Op die manier kan de beller correct worden weergegeven op
voorwaarde dan zijn/haar gegevens zijn opgeslagen in uw telefoonboek en de weergave van het zijn/haar nummer geactiveerd
is door de beller.
Nieuwe contactpersoon aanmaken in het telefoonboek
Optie
Druk op de telefoonboektoets.
Als er nog geen contactpersoon is opgeslagen, verschijnt Telefoonboek Leeg. Nach
Druk op de softkey onder Optie en Nieuwe
Invoer verschijnt.
Als er al contactpersonen zijn opgeslagen,
wordt de eerste contactpersoon weergegeven.
Druk op de softkey onder Optie .
Bevestig Nieuwe Invoer met de softkey onder
.
Voer de naam in (maximaal 16 tekens). De
cijfertoetsen zijn voorzien van letters. Door
meermaals op een toets te drukken, kunnen
de letters en cijfers worden ingevoerd. Wis het
laatste teken met de softkey onder
.
Tussen hoofd- en kleine letters schakelen doet
u met
. Na korte tijd springt de cursor verder.
TELEFOONBOEK/SNELKIESTOETSEN
Opsl.
Opsl.
/
Opsl.
Sluit het invoeren van de naam af door op de
softkey onder Opsl. te drukken.
Voer het telefoonnummer in (maximaal 24
cijfers). Als de telefoon is aangesloten op een
telefooncentrale, voer dan het toestelnummer
ook in. Als een spatie nodig is, drukt u na het
toestelnummer gedurende 2 seconden op de
toets 0, in de display verschijnt dat P.
Sluit het invoeren van het telefoonnummer af
door op de softkey onder Opsl. te drukken.
Kies een melodie uit voor deze contactpersoon.
Sluit het invoeren af door op de softkey onder
Opsl. te drukken.
Schakel terug naar stand-by.
Contactgegevens bewerken
Druk op de telefoonboektoets.
Selecteer een telefoonnummer.
Druk op de softkey onder Optie .
Kies uit de volgende opties en druk op de softkey onder
op uw keuze te bevestigen.
Nieuwe Invoer U kunt een nieuwe contactpersoon aanmaken
(zie boven).
Bewerk Invoer U kunt de contactgegevens wijzigen. Wis letters en cijfers met de softkey onder
,
en voer met de cijfertoetsen nieuwe letters en
cijfers in. Details daarover vindt u onder "Nieu/
Optie
/
we contactpersoon aanmaken".
Een contactpersoon wordt weergegeven.
Een contactpersoon wordt gewist.
De hele lijst wordt, na een vraag om bevestiging, gewist.
Kopie Invoer De contactpersoon wordt in een andere
geschikte handset gekopieerd. Alle geregistreerde handsets worden weergegeven.
Selecteer de gewenste handset met de pijltoetsen
en
en druk op de softkey
onder
. Op de handset in kwestie
moet de overdracht worden toegestaan door
op de softkey onder
te drukken.
Kopieer Alles Kopieert alle contactpersonen naar een andere, geschikte handset. De daar opgeslagen
contactpersonen worden daardoor gewist.
Kopieer&Voeg to Het hele telefoonboek wordt toegevoegd aan
het telefoonboek van de gewenste, geschikte
handset.
Toon Details
Wis Invoer
Wis Alles
☞ Om een contactpersoon te selecteren kunt u de beginletter
ervan invoeren met behulp van de cijfertoetsen. De eerste overeenkomende contactpersoon wordt weergegeven. Overige contactpersonen bereikt u met de pijltoetsen
en
.
41
TELEFOONBOEK/SNELKIESTOETSEN / TELEFOON INSTELLEN
Snelkiesttoetsen bewerken
M1 / M2
Optie
/
Druk op een van de snelkiestoetsen.
Druk op de softkey onder Optie .
Kies uit de volgende opties en druk op de softkey onder
op uw keuze te bevestigen.
Bewerk Invoer U kunt de contactgegevens wijzigen. Wis letters en cijfers met de softkey onder
en voer met de cijfertoetsen nieuwe letters en
cijfers in. Meer daarover vindt u in het hoofdstuk "Nieuwe contactpersoon aanmaken in telefoonboek" op pagina 40.
Wis Invoer
Een contactpersoon wordt gewist.
☞ Als u bij het indrukken van de snelkiestoets „Leeg“ wordt
weergegeven, gebruik dan het menupunt „ Bewerk Invoer“ om
een nieuwe contactpersoon aan te maken.
Telefoon instellen
Datum/tijd instellen
/
/
Druk op de menutoets.
Selecteer Alarm/Klok en
druk op de softkey onder
.
Selecteer Dag & Tijd en
druk op de softkey onder
.
Voer met de cijfertoetsen achtereenvolgens
het jaar, de maand, de dag, het uur en de
minuten in. Bevestig telkens met de softkey
onder Opsl. .
☞ Als de stroomvoorziening naar het basisstation wordt onderbroken, wordt deze instelling gewist.
Tijdformaat instellen
/
/
/
Druk op de menutoets.
Selecteer Alarm/Klok en
druk op de softkey onder
Selecteer Tijdformaat en
druk op de softkey onder
Selecteer 12h of 24h en
druk op de softkey onder
.
.
.
Wekker
/
/
42
Druk op de menutoets.
Selecteer Alarm/Klok en
druk op de softkey onder
Selecteer Zet Alarm en
druk op de softkey onder
.
.
TELEFOON INSTELLEN
/
Eén keer
Dagelijks aan
Ma tot Vr
Uit
Kies uit de volgende opties en bevestig met
de softkey onder Opsl. :
Voer met de cijfertoetsen de wektijd in en
selecteer een melodie. De wekker zal eenmalig op het ingevoerde tijdsstip afgaan.
De wekker zal dagelijks op het ingevoerde
tijdsstip afgaan.
De wekker gaat van maandag tot vrijdag af op
het ingevoerde tijdsstip. Meer
De wekker is uitgeschakeld.
☞ Om de wekker uit te schakelen drukt u op de softkey onder
Stop . Met de softkey onder Zzz.. wordt de snooze-functie
geactiveerd. Deze herhaalt het alarm om de 5 minuten, en dit
maximaal vijf keer. Daarna wordt de wekker uitgeschakeld.
Belmelodieën instellen voor de handset
/
/
/
/
Druk op de menutoets.
Selecteer Handset en
druk op de softkey onder
.
Selecteer Beltoon en
druk op de softkey onder
.
Selecteer Extern of Intern en
druk op de softkey onder
.
Selecteer een melodie en bevestig uw keuze
met de softkey onder Opsl. .
Het volume van de beltoon instellen voor de handset
/
/
/
Druk op de menutoets.
Selecteer Handset en
druk op de softkey onder
.
Selecteer Belvolume en
druk op de softkey onder
.
Selecteer het gewenste volume en bevestig
uw keuze met de softkey onder Opsl. .
☞ Als de handset in het basisstation staat, rinkelt bij een binnenkomende oproep enkel de handset. Houd daar rekening mee
wanneer u de beltoon van de handset uitschakelt.
Namen van handsets instellen
/
/
Druk op de menutoets.
Selecteer Handset en
druk op de softkey onder
.
Selecteer Handset Naam en
druk op de softkey onder
.
Wis de aanwezige tekens met de softkey
onder
, voer met de cijfertoetsen een
naam in en bevestig deze met de softkey
onder Opsl. .
43
TELEFOON INSTELLEN
Toetstoon instellen
/
/
/
Verlichtingstijd van display instellen
Druk op de menutoets.
Selecteer Handset en
druk op de softkey onder
.
Selecteer Toetstoon en
druk op de softkey onder
.
Selecteer Aan of Uit en bevestig uw keuze
met de softkey onder
.
Contrast van de display instellen
/
/
/
Druk op de menutoets.
Selecteer Handset en
druk op de softkey onder
.
Selecteer Contrast en
druk op de softkey onder
.
Selecteer een instelling en bevestig uw keuze
met de softkey onder
.
Automatische opname van oproep instellen
/
/
/
Druk op de menutoets.
Selecteer Handset en
druk op de softkey onder
.
Selecteer Autom. Aanne. en
druk op de softkey onder
.
Selecteer Aan of Uit en bevestig uw keuze
met de softkey onder
.
☞ Als de automatische opname van oproepen is ingeschakeld,
wordt een oproep onmiddellijk opgenomen wanneer de handset
uit de basis wordt genomen.
/
/
/
Bevestigingstoon instellen
/
/
/
Druk op de menutoets.
Selecteer Handset en
druk op de softkey onder
.
Selecteer Confirmatietoon en
druk op de softkey onder
.
Selecteer Aan of Uit en bevestig uw keuze
met de softkey onder
.
☞ De bevestigingstoon geeft aan dat de programmering of
instelling correct is uitgevoerd.
Basisstation selecteren
☞ Als uw handset is geregistreerd op meerdere basisstations,
kunt u selecteren op welk basisstation u uw handset wilt gebruiken (menupunt: „Manueel“). In de modus „Auto “ zoekt de handset, terwijl het in ruststand is, automatisch het basisstation met de
beste ontvangst. Tijdens een gesprek wordt het basisstation niet
gewijzigd.
/
44
Druk op de menutoets.
Selecteer Handset en
druk op de softkey onder
.
Selecteer Verlichtingtijd en
druk op de softkey onder
.
Selecteer een instelling en bevestig uw keuze
met de softkey onder
.
Druk op de menutoets.
Selecteer Handset en
TELEFOON INSTELLEN
/
/
druk op de softkey onder
.
Selecteer Kies Basis en
druk op de softkey onder
.
Selecteer Auto of Manueel en bevestig uw
keuze met de softkey onder
.
Als u Manueel hebt geselecteerd, markeer dan
een van de weergegeven basisstations en druk
op de softkey onder
.
Displaytaal instellen
/
/
/
/
/
/
/
/
Druk op de menutoets.
Selecteer Basis inst. en
druk op de softkey onder
.
Selecteer Beltoon en
druk op de softkey onder
.
Selecteer een melodie en bevestig uw keuze
met de softkey onder Opsl. .
Beltoonvolume instellen voor basis
Druk op de menutoets.
Selecteer Handset en
druk op de softkey onder
.
Selecteer Taal en
druk op de softkey onder
.
Selecteer een taal en bevestig uw keuze met
de softkey onder
.
Geluidsversterking permanent inschakelen
/
Belmelodie voor de basis instellen.
Druk op de menutoets.
Selecteer Handset en
druk op de softkey onder
.
Selecteer Boost Aan en
druk op de softkey onder
.
Selecteer Aan of Uit en bevestig uw keuze
met de softkey onder
.
☞ Als de geluidsversterking permanent is ingeschakeld, verschijnt in de display in ruststand “Boost Aan “ in plaats van de naam
van de handset.
/
/
/
Druk op de menutoets.
Selecteer Basis inst. en
druk op de softkey onder
.
Selecteer Belvolume en
druk op de softkey onder
.
Selecteer het gewenste volume en bevestig
uw keuze met de softkey onder Opsl. .
Kiesmodus instellen
/
/
/
Druk op de menutoets.
Selecteer Basis inst. en
druk op de softkey onder
.
Selecteer Kiesmode en
druk op de softkey onder
.
Selecteer Tonen of Puls en bevestig uw keuze met de softkey onder Opsl. .
☞ Voor de meeste aansluitingen in „ Tonen“ de juiste instelling.
45
TELEFOON INSTELLEN
Flashtijd instellen
/
/
/
Afspraak instellen
Druk op de menutoets.
Selecteer Basis inst. en
druk op de softkey onder
.
Selecteer Recall en
druk op de softkey onder
.
Selecteer Kort of Lang en bevestig uw keuze
met de softkey onder Opsl. .
☞ De gebruikelijke instelling om functies in analoge telefoonnetwerken te kunnen gebruiken is „Kort“.
invoeren.
/
/
/
/
PIN wijzigen
/
/
Druk op de menutoets.
Selecteer Basis inst. en
druk op de softkey onder
.
Selecteer Systeem PIN en
druk op de softkey onder
.
Voer de huidige PIN in (fabrieksmatig ingesteld op 0 0 0 0) en druk op de softkey onder
.
Voer een nieuwe PIN in en druk op de softkey
onder
.
Voer de nieuwe PIN nogmaals in en druk op de
softkey onder
.
☞ De PIN van vier cijfers beveiligt bepaalde instellingen tegen
onbevoegde toegang. Wanneer u de PIN bent vergeten, neem
dan contact op met uw handelaar.
46
☞ U kunt tot vijf afspraken (datum/uur) met namen en melodie
Druk op de menutoets.
Selecteer Hulpmiddelen en
druk op de softkey onder
.
Selecteer Afspraak en
druk op de softkey onder
.
Selecteer een afspraak en
druk op de softkey onder
.
Selecteer Bewerk en
druk op de softkey onder
.
Wis de aanwezige tekens met de softkey
onder
, voer met de cijfertoetsen een
naam in en bevestig deze met de softkey
onder Opsl. .
Voer met de cijfertoetsen de gewenste datum
in. Bevestig de datum met de softkey onder
Opsl. .
Voer met de cijfertoetsen de gewenste tijd in.
Bevestig de datum met de softkey onder
Opsl. .
Selecteer een melodie en bevestig uw keuze
met de softkey onder Opsl. .
☞ Om een afspraak te wissen, selecteert u minpunt „Wis“. De
afspraak wordt, na een vraag om bevestiging, gewist.
TELEFOON INSTELLEN / ANTWOORDAPPARAAT
Antwoordapparaat
Chronometer
/
/
Druk op de menutoets.
Selecteer Hulpmiddelen en
druk op de softkey onder
.
Selecteer Stop Watch en
druk op de softkey onder
.
Druk op de softkey onder Start om de
chronometer te starten, druk op Stop om
hem te stoppen of druk op Reset om hem
terug op nul te zetten.
Het antwoordapparaat wordt hoofdzakelijk bediend vanop het
basisstation. Bij het instellen en het bedienen van het antwoordapparaat wordt u ondersteund door gesproken instructies.
Als u lang op de knop
drukt, kunt u een van de 6 talen
kiezen (Duits, Engels, Frans, Nederlands, Spaans, Italiaans).
Er zijn 2 bedrijfsmodi beschikbaar:
- Begroetingtekst 1 = Begroeting en opname van bericht
(2 min. per oproep)
- Begroetingstekst 2 = Enkel opname.
Fabrieksmatig zijn er 2 standaard begroetingsberichten
beschikbaar, die u kunt vervangen door een eigen bericht max.
2 min.).
Knippert: Nieuwe berichten
Onderkant van
het basisstation
Aantal berichten
Knippert: nieuwe berichten
Brandt ononderbroken: oude berichten
47
ANTWOORDAPPARAAT
Bedieningselementen
Toets
Displayweergaven
In ruststand
Tijdens
Kort indrukken Ca. 2 s indrukken de weergave
Begroeting
horen
Nieuwe begroeting
spreken
Taal kiezen
Bericht horen
Stop/Start
Memo inspreken
Volume
Tekst+Beltoon
Antwoordapp.
Aan/uit
Begroeting
selecteren
Tijd instellen
Veiligheidscode Veiligheidscode
horen
wijzigen
Belvertraging
horen
48
Volgend bericht
Volume van de
weergave
Alle berichten
wissen
Ingestelde
tijd horen
Vorig bericht
Belvertraging
instellen
Display donker Antwoordapparaat uitgeschakeld
00 … xx
Knippert: Aantal nieuwe berichten
Brandt ononderbroken: Aantal oude berichten
HS
Toegang tot antwoordapparaat via handset
oo
Begroetingstekst 2 ingesteld, geen berichten
opgenomen
FL
Geheugen vol, het antwoordapparaat schakelt
automatisch op Begroetingtekst 2, er kunnen
geen berichten worden achtergelaten. Verwijder alle berichten om geheugenruimte
vrij te maken.
-A
Binnenkomend gesprek of externe toegang tot
het antwoordapparaat
Antwoordapparaat in-/uitschakelen/Bedrijfsmodus selecteren
Bericht of begroeting wissen
Druk op de knop
om het antwoordapparaat in of uit te schakelen. Bij het inschakelen hoort u informatie over de ingeschakelde
bedrijfsmodus:
- Begroetingstekst 1 = Begroetingsbericht
en opname
- Begroetingstekst 2 = Enkel begroetingsbericht
> 2 sec. Om de bedrijfsmodus te wijzigen (het antwoordapparaat moet ingeschakeld zijn), drukt
u ca. 2 seconden op de toets
. De
bedrijfsmodus is nu gewijzigd.
ANTWOORDAPPARAAT
Berichten beluisteren via de handset
U kunt via de handset berichten beluisteren. Als er nieuwe
berichten zijn opgenomen, verschijnt in de display een mededeling met het aantal nieuwe berichten.
Nieuwe berichten beluisteren
Druk op de softkey onder
.
Een stem meldt u het aantal nieuwe berichten.
De nieuwe berichten worden achtereenvolgens afgespeeld. Meer details over de bediening vindt u in het volgende hoofdstuk "Alle
berichten beluisteren".
Alle berichten beluisteren
Druk op de menutoets.
/
Selecteer Beantwoorder en druk op
de softkey onder
.
/
Selecteer Nieuwe Boodsch. of Alle Boodsch.
en druk op de softkey onder
.
Een stem meldt u het aantal nieuwe berichten.
De berichten worden achtereenvolgens afgespeeld.
Om de berichten via de luidspreker op de
handset te horen, drukt u op de opneemtoets
.
Om de luidspreker terug uit te schakelen,
drukt u opnieuw op de opneemtoets
.
Om tijdens de weergave van een bericht naar
een volgende bericht te schakelen, drukt u op
de softkey onder
.
Wis
Om tijdens de weergave van een bericht het
bericht te wissen, drukt u op de softkey onder
Wis .
Binnenkomende berichten mee beluisteren/overnemen via
de handset
Als het antwoordapparaat een gesprek heeft aangenomen, kunt
u via de handset meeluisteren.
Druk daarvoor op de opneemtoets
. De opname van het
bericht door het antwoordapparaat gaat voort.
Als u het gesprek wilt overnemen en zelf met de beller spreken,
drukt u op de toets
. De opname wordt dan onderbroken.
Berichten beluisteren via het basisstation
Druk op de toets
.
Wanneer er nieuwe berichten zijn, worden
deze nu achtereenvolgens afgespeeld.
Wanneer er geen nieuwe berichten zijn, worden alle berichten achtereenvolgens afgespeeld.
Tijdens de weergave kunt u:
- terug naar het begin van het huidige bericht.
- naar het vorige bericht
- de weergave afbreken.
- de weergave pauzeren; om voor te gaan,
drukt u opnieuw op
.
- naar het volgende bericht.
49
ANTWOORDAPPARAAT
Berichten wissen via het basisstation
Tijdens de weergave
Druk ca. 2 seconden op de toets
huidige bericht wordt gewist.
Memo opnemen
. Het
Alle oude berichten wissen
Er worden enkel al beluisterde berichten gewist.
Druk in rusttoestand 2 seconden op de knop
. In de display verschijnt dL. Alle oude
berichten worden gewist.
Begroetingsbericht
Huidig begroetingsbericht beluisteren/wissen
Druk kort op de toets
. Het huidige
begroetingsbericht wordt afgespeeld.
Stop de weergave met
. Wis indien
gewenst het begroetingsbericht door ca. 2
seconden op
te drukken (u hoort een
bericht). Het standaard begroetingsbericht kan
niet worden gewist.
Eigen begroetingsbericht opnemen
Selecteer de bedrijfsmodus waarvoor u een
eigen begroetingsbericht wilt inspreken (zie
"Antwoordapparaat in-/uitschakelen/Bedrijfsmodus selecteren", pagina 48).
> 2 sec. Druk ca. 2 seconden op de toets
. Volg
de gesproken instructies.
Beëindig de opname met
.
Het nieuwe begroetingsbericht wordt opnieuw
afgespeeld ter controle.
50
U kunt een memo (gesproken nota) achterlaten op uw antwoordapparaat (max. 2 minuten lang). Deze memo wordt zoals
een 'normaal' bericht gesignaliseerd en behandeld.
> 2 sec. Druk ca. 2 seconden op de toets
Spreek uw memo in.
Beëindig de opname met
.
.
Het aantal rinkelingen instellen
U kunt instellen na hoeveel beltonen/rinkelingen de antwoordapparaat een oproep moet beantwoorden. Kies uit 2tot 9 beltonen en 'Spaarmodus'. Bij de instelling 'Spaarmodus' wordt een
oproep na 5 beltonen opgenomen als er geen nieuwe berichten
zijn achtergelaten. Als er nieuwe berichten aanwezig zijn, wordt
de oproep al na 2 beltonen opgenomen. U kunt daardoor bij het
op afstand beluisteren van de berichten controleren of nieuwe
berichten zijn achtergelaten zonder dat een telefoonverbinding
tot stand wordt gebracht.
Instelling van beltonen controleren
Druk kort op de knop
op de onderkant
van het basisstation. De huidige instelling
wordt weergegeven.
Instelling van beltonen wijzigen
> 2 sec. Druk ca. 2 seconden op de knop
op de
onderkant van het basisstation. De huidige
instelling wordt weergegeven.
Wijzig de instelling met de toetsen
/
en druk opnieuw kort op
ANTWOORDAPPARAAT
om de instelling op te slaan. De nieuwe instelling wordt weergegeven.
Als u tijdens het instellen ca. 10 seconden op
geen enkele toets drukt, dan schakelt het
apparaat zonder wijzigingen terug in de beginstand. Bij een stroomuitval van het basisstation wordt de instelling teruggeschakeld naar de
fabrieksmatige instelling (3 beltonen).
De veiligheidscode instellen
De veiligheidscode is een nummer met drie cijfers (fabrieksmatig ingesteld als 0 0 0) die u dient in te voeren bij het beluisteren/bedienen van het antwoordapparaat van op afstand.
Instelling van veiligheidscode controleren
Druk kort op de knop
op de onderkant
van het basisstation. De huidige instelling
wordt weergegeven.
Instelling van veiligheidscode wijzigen
> 2 sec. Druk ca. 2 seconden op de knop
op de
onderkant van het basisstation. De huidige
instelling wordt weergegeven.
Wijzig de instelling cijfer per cijfer met de toetsen
/
en druk kort op de toets
om het cijfer op te slaan en naar het
volgende cijfer te gaan. De nieuwe instelling
wordt weergegeven.
Als u tijdens het instellen ca. 10 seconden op
geen enkele toets drukt, dan schakelt het
apparaat zonder wijzigingen terug in de beginstand.
Het uur/de dag instellen
Wanner u de tijd hebt ingesteld (zie pagina 42), wordt voordat
een bericht wordt afgespeeld de dag en het uur van de opname
ervan vermeld. U kunt de tijd en de dag ook hier invoeren. Als
de stroomvoorziening naar het basisstation wordt onderbroken,
wordt deze instelling gewist.
Tijd en dag instellen
> 2 sec. Druk ca. 2 seconden op de toets
. De
weekdag wordt weergegeven.
/
Stel met de afgebeelde toetsen de huidige
weekdag in (wordt weergegeven).
Druk kort op de toets
.
/
Stel met de afgebeelde toetsen het huidige
uur in (wordt weergegeven).
Druk kort op de toets
.
/
Stel met de afgebeelde toetsen de huidige
minuten in (wordt weergegeven).
Druk kort op de toets
.
De ingestelde tijd wordt weergegeven.
51
ANTWOORDAPPARAAT / HANDSETS REGISTREREN/ANNULEREN
Bedienen/beluisteren van op afstand
U kunt uw antwoordapparaat met behulp van een MFVV-compatibele telefoon van op stand bedienen/beluisteren.
1. Bel uw telefoonnummer.
2. Het antwoordapparaat neemt up oproep na het ingestelde
aantal beltonen op. Als het antwoordapparaat is ingeschakeld, neemt hij de oproep na ca. 20 beltonen op met begroetingsbericht 2.
3. Wacht tot het einde van het begroetingsbericht en drukt dan
2x op de sterretjestoets. U hoort een pieptoon.
4. Voer langzaam de actuele veiligheidscode in.
5. Bij correcte invoer hoort u 2 pieptonen.
6. Volg de gesproken instructies.
2 Berichten beluisteren
2 Weergave onderbreken/weergave voortzetten
3 Naar het volgende bericht
1 Naar het vorige bericht
1 Huidige bericht herhalen
6 Weergave stoppen
7 Huidig bericht wissen
0 Alle oude berichten wissen
4 Huidig begroetingsbericht beluisteren
9 Antwoordapparaat inschakelen/Bedrijfsmodus omschakelen (Begroetingstekst 1 / 2)
5 Nieuwe begroetingstekst opnemen
6 Opname stoppen
8 Antwoordapparaat uitschakelen
6 Bedienen/beluisteren stoppen.
52
Handsets registreren/annuleren
Op een basisstation kunnen tot 5 handsets worden geregistreerd. De met uw telefoon meegeleverde handset zijn al geregistreerd in het basisstation. Elke handset kan op maximaal 4
basisstations worden geregistreerd.
Om een handset van een ander type te registeren, raadpleegt u
de handleiding van deze handset.
Extra handset van hetzelfde type registeren
/
/
/
/
Druk op de menutoets.
Selecteer Handset en
druk op de softkey onder
.
Selecteer Aanmelden en
druk op de softkey onder
.
Selecteer Handset Anm. en
druk op de softkey onder
.
Selecteer welke nummer het basisstation
(1 - 4) moet weerhouden en
druk op de softkey onder
.
Voer de PIN van het basisstation in en
druk op de softkey onder
.
In de display verschijnt „Hou Page op basis
ingedrukt“.
Houd de paging-toets op de basisstation ingedrukt totdat het led-weergave knippert (ca.
10 s).
Na enkele momenten is de handset geregistreerd.
HANDSETS REGISTREREN/ANNULEREN / GEBRUIK OP EEN TELEFOONCENTRALE/AANVULLENDE FUNCTIES
Handset annuleren
/
/
/
Druk op de menutoets.
Selecteer Handset en
druk op de softkey onder
.
Selecteer Aanmelden en
druk op de softkey onder
.
Selecteer Handset Afm. en
druk op de softkey onder
.
Voer de PIN van het basisstation in en
druk op de softkey onder
.
Voer het interne nummer van de te
verwijderen handset in en
druk op de softkey onder
.
☞ De handset die u op dat moment gebruikt, kan niet worden
geannuleerd.
Gebruik op een telefooncentrale / Aanvullende
functies
Gebruik op een bedrijfscentrale
Als uw telefoon is aangesloten op een telefooncentrale, dan
kunt u via de R-toets functies gebruiken zoals het doorverbinden van oproepen en automatisch terugbellen. Raadpleeg de
bedieningshandleiding van uw telefooncentrale om te weten
welke flash-tijd moet worden ingesteld om deze functies te kunnen gebruiken. Raadpleeg de handelaar waar u de centrale
hebt gekocht, om te weten of uw telefoon compatibel is met uw
telefooncentrale.
Vergeet niet bij het aanmaken van contactpersonen in het telefoonboek het toestelnummer en indien nodig een spatie ("0"
ingedrukt houden) toe te voegen.
Aanvullende services van uw netwerkbeheerder
Uw telefoon ondersteunt aanvullende services van uw netwerkbeheerder, zoals schakelen tussen gesprekken, aankloppen en
conferentiegesprekken. U kunt deze aanvullende services
gebruiken via de R-toets. Raadpleeg uw netwerkbeheerder om
te weten welke flash-tijd u dient in te stellen om deze aanvullende services te kunnen gebruiken. Voor het activeren van de
aanvullende services neemt u contact op met uw netwerkbeheerder.
53
BIJLAGE
Bijlage
Hulpgids
Als u problemen ondervindt me uw telefoon, volg dan eerst de
volgende instructies op. Bij technische problemen en garantieclaims neemt u contact op met uw handelaar. De garantie is 2
jaar geldig.
Menustructuur
Beantwoorder
Nieuwe Boodsch.
Alle Boodsch.
Telefoonboek
Handset
☞ Sommige problemen kunt u eenvoudig oplossen door de
Beltoon
Extern
Intern
Belvolume
Handset Naam
Toetstoon
Contrast
Autom. Aanne.
Verlichtingstijd
Confirmatietoon
Kies Basis
Taal
Aanmelden
Boost aan
Basis inst.
Beltoon
Belvolume
Kiesmode
Recall
Systeem PIN
Alarm/Klok
Zet Alarm
Dag & Tijd
Tijdformaat
Hulpmiddelen
Afspraak
Stop Watch
54
Tonen / Puls
Kort / Lang
stroomtoevoer te verbreken. In dergelijke gevallen moet u de
stroomtoevoer naar het basisstation 20 minuten uitschakelen en
de batterijen uit de handset even lang verwijderd laten. Vervolgens herstelt u de stroomtoevoer weer en plaatst u de batterijen
terug.
Ik kan niet bellen
1. Controleer of de telefoonkabel goed is aangesloten. Als dat
zo is, kan er een storing zijn. Controleer of u de meegeleverde telefoonkabel gebruikt.
2. Controleer of alle voedingen zijn aangesloten, zijn ingeschakeld en werken.
3. Controleer of u zich niet te ver van het basisstation / de lader
bevindt (in ideale omstandigheden moet het tot 300 meter
buiten werken en tot 50 meter binnen).
4. Test de telefoonlijn en het telefoonstopcontact met een andere telefoon.
Ik verlies steeds de verbinding.
1. Controleer dan of u zich niet te ver van het basisstation / de
lader bevindt (in ideale omstandigheden moet het tot 300
meter buiten werken en tot 50 meter binnen).
BIJLAGE
2. Misschien bevindt de basis zich niet op de ideale plaats,
overweeg haar te verplaatsen.
Mijn handset schakelt steeds uit.
1. Misschien moet u het opnieuw laden. Zorg ervoor dat de
handset goed oplaadt: laat de handset minimaal 16 uur in
het basisstation / lader zitten (controleer of de wandcontactdoos stroom levert!).
2. Vervang de oplaadbare batterijen. Vervangende batterijen
moeten van hetzelfde type zijn als de meegeleverde batterijen.
Nummerweergave (identificatie van de beller) werkt niet.
1. Controleer dat uw netbeheerder deze dienst biedt. Bel uw
netbeheerder.
2. De beller heeft misschien een geheim nummer.
De handset of het basisstation rinkelt niet.
1. Controleer of de bel is ingeschakeld. Zie de pagina’s 43 en
45.
Ik krijg een zoemend geluid op mijn radio, tv of computer.
1. We adviseren u met de handset minimaal een meter afstand
te houden tot elektrische apparatuur en mobiele telefoons.
U gebruikt de telefoon en er treedt interferentie op in het
luidsprekertje en / of de internetverbinding is erg langzaam
1. Wanneer u breedbandinternet op de telefoonlijn hebt, moet u
een ADSL-filter tussen de telefoon en het wandstopcontact
plaatsen.
Technische gegevens
Standaard:
Aantal kanalen:
Frequenties:
Duplexproces:
Kanaalrooster:
Bitrate:
Modulatie:
Spraakcodering:
Zendvermogen:
Reikwijdte:
DECT / GAP
120 duplexkanalen
1880 MHz tot 1900 MHz
tijdmultiplex, 10ms framelengte
1728 kHz
1152 kBit / s
GFSK
32 kBit / s
10 mW (gemiddeld vermogen per kanaal)
tot 300 meter in de open lucht,
tot 50 meter binnen in gebouwen
Voeding basisstation:
100~240 V AC, 7 V / 420 mA DC
Bedrijfsduur handset:
in stand-by/in gesprek
600 mAh = ca. 100 u / ca. 10 u
Laadtijd van de batterijen: ca. 16 uur
Toegestane omgevingscondities voor gebruik van de handset:
5°C tot 45°C ; relatieve vochtigheid 20% tot 75%
Toegestane omgevingscondities voor gebruik van het basisstation:
5°C tot 45°C ; relatieve vochtigheid 20% tot 75%
Toegestane opslagtemperatuur: -10°C tot +60°C
Maximaal hoornvolume: +30dB (vervorming < 2 %)
Kiesmodus:
MFV / IWV
R-toets:
Flash (kort/lang)
Afmetingen basisstation (mm): L / B / H = 115 x 115 x 63
Afmetingen handset (mm): L / B / H = 55 x 28 x 170
Telefoonaansluitingskabel:
TSV op pin 3 en 4 volgens CTR 37 (Euro-formaat)
Stekker: Eurostekker
55
BIJLAGE
Conformiteitverklaring
Dit toestel voldoet aan de eisen uit de volgende EU-richtlijnen:
- 1999/5/EG Richtlijn betreffende radioapparatuur en telecommunicatieeindapparatuur en de wederzijdse erkenning
van hun conformiteit.
- 2005/32/EG Richtlijn betreffende energieverbruikende
producten.
Het CE-symbool op het toestel bevestigt de conformiteit met de
bovengenoemde richtlijn. De volledige conformiteitverklaring
kunt u gratis van onze website www.amplicomms.com halen.
Onderhoud
• Reinig de buitenzijde van de apparatuur met een zachte,
pluisvrije doek.
• Gebruik nooit reinigings- of oplosmiddelen.
Garantie
AMPLICOMMS-apparatuur is vervaardigd en getest volgens de
laatste productiemethoden. Zorgvuldig gekozen materialen en
hoogontwikkelde technologieën garanderen een storingsvrij
functioneren en een lange levensduur. De garantievoorwaarden
gelden niet wanneer een fout van de netbeheerder of een eventuele bedrijfscentrale de oorzaak is voor de apparaatstoring. De
garantievoorwaarden gelden niet voor oplaadbare batterijen of
accupakketten die in de producten worden gebruikt. De garantieperiode bedraagt 24 maanden vanaf de aankoopdatum.
Alle gebreken tengevolge van materiaal- of productfouten die
tijdens de garantieperiode ontstaan, verhelpen we gratis. Het
aanspraakrecht volgens de garantievoorwaarden vervalt na
interventie van de koper of derde partijen. De garantie dekt
56
geen schade tengevolge van onvakkundige hantering of
gebruik, onjuiste plaatsing of opslag, ondeskundige aansluiting
of installatie, overmacht of andere externe invloeden.
Bij klachten behouden we ons het recht voor defecte onderdelen te repareren of te vervangen, of een vervangend apparaat
te leveren. Vervangen onderdelen of apparaten worden ons
eigendom.
Restitutierechten zijn in schadegevallen uitgesloten, wanneer er
geen bewijzen van opzet of grove nalatigheid aan de zijde van
de fabrikant aanwezig zijn.
Wanneer uw AMPLICOMMS-apparaat binnen de garantieperiode een defect laat zien, brengt u het samen met het aankoopbewijs terug naar de winkelier waar u het hebt gekocht. Alle
aanspraakrechten op garantie volgens deze overeenkomst mag
u uitsluitend doen gelden tegenover uw leverancier.
Twee jaar na aankoop en overdracht van onze producten kunt
u geen aanspraakrechten op garantie meer doen gelden.
CONTENIDO
Información de seguridad . . . . . . . . . . . . . . . . . . . . . . . . . . . .58
Puesta en funcionamiento . . . . . . . . . . . . . . . . . . . . . . . . . . .59
Elementos de control . . . . . . . . . . . . . . . . . . . . . . . . . . . . . . .61
Información previa . . . . . . . . . . . . . . . . . . . . . . . . . . . . . . . . . .62
Telefonear . . . . . . . . . . . . . . . . . . . . . . . . . . . . . . . . . . . . . . . . .64
Otras características de servicio . . . . . . . . . . . . . . . . . . . . . .66
Lista de llamadas / Rellamada . . . . . . . . . . . . . . . . . . . . . . . .67
Agenda telefónica / Tecla de marcación directa . . . . . . . . .68
Configurar teléfono . . . . . . . . . . . . . . . . . . . . . . . . . . . . . . . . .70
Contestador automático . . . . . . . . . . . . . . . . . . . . . . . . . . . . .75
Dar de alta/baja un teléfono inalámbrico . . . . . . . . . . . . . . .80
Funcionamiento en la instalación telefónica/
Servicios adicionales . . . . . . . . . . . . . . . . . . . . . . . . . . . . . . .81
Apéndice . . . . . . . . . . . . . . . . . . . . . . . . . . . . . . . . . . . . . . . . . .82
57
INFORMACIÓN DE SEGURIDAD
Información de seguridad
Por favor, lea atentamente estas instrucciones.
Uso previsto
Este teléfono ha sido fabricado para llamar por teléfono dentro
de una red telefónica. Cualquier otro uso se considera inapropiado. Los cambios o modificaciones no están permitidos. No
abra el dispositivo bajo ninguna circunstancia y no trate de
repararlo.
Lugar de instalación
Evite la exposición al humo, polvo, vibraciones, productos químicos, humedad, calor y luz directa del sol. No utilice el teléfono en zonas con peligro de explosión.
Fuente de alimentación
a Cuidado: Use sólo el adaptador que se incluye en la entrega, otros adaptadores pueden dañar el teléfono.
Asegúrese de que el enchufe se encuentre cerca del aparato y
que el adaptador no se encuentre obstruido por muebles u otros
objetos.
Baterías
a Cuidado: No tire las baterías al fuego. ¡Utilice únicamente
baterías del mismo tipo! ¡Asegúrese de que la polaridad sea la
correcta! Si la polaridad de la batería se encuentra al revés a la
hora de cargar el aparato existe peligro de explosión.
Caída de corriente
En caso de una caída de corriente no se puede utilizar el teléfono. Para los casos de emergencia, asegúrese de tener un
teléfono con cable que funcione sin fuente de alimentación
externa.
Aparatos Médicos
a Cuidado: No utilice el teléfono cerca de equipos médicos.
No se puede descartar por completo la existencia de un efecto.
En caso de llevar un marcapasos debe consultar con su médico
antes de usar este producto.
Los teléfonos DECT1 pueden producir un zumbido desagradable en aparatos auditivos.
Volumen auricular
Su teléfono dispone de una tecla de amplificación que, si se
presiona durante una conversación, aumenta el volumen del
auricular. En la pantalla se muestra „Activar Amp“. Para
desactivar la amplificación vuelva a pulsar la tecla. „Activar
Amp“ desaparece.
A través del menú (Terminal / Activar Amp -> Activado) puede
activar la amplificación de forma permanente. En la pantalla
aparecerá en vez del nombre del teléfono „ Activar Amp “. Con
la tecla de amplificación puede desactivar la amplificación de la
conversación actual. Se volverá a encender en la próxima conversación.
1
DECT: Digital Enhanced Cordless Telecommunication =
Estándar para teléfonos inalámbricos.
58
INFORMACIÓN DE SEGURIDAD / PUESTA EN FUNCIONAMIENTO
Cuidado: Si pulsa la tecla de amplificación se puede alcanzar un volumen muy alto (Amplificación + Ajuste del volumen del auricular a nivel 5 = +30 dB).
Se debe tener mucho cuidado cuando el teléfono sea utilizado por usuarios con audición normal y audición limitada.
Puesta en funcionamiento
Información de seguridad
a Cuidado: Antes de la utilización del producto lea las indicaciones de seguridad en el apartado 1.
Eliminación
Si quiere deshacerse del aparato, llévelo a los puntos
de recogida autorizados por sus autoridades locales.
De acuerdo con la Ley de aparatos eléctricos y electrónicos, los dueños de los aparatos están obligados por
ley a deshacerse de los viejos equipos eléctricos y
electrónicos en una recogida selectiva de residuos. El
símbolo que aparece al lado significa que está totalmente prohibido deshacerse del aparato depositándolo
junto a la basura doméstica. ¡Riesgos para la salud y
el medio ambiente por pilas y baterías!
Nunca abra, dañe, ingiera o abandone en el medio
ambiente las baterías y pilas. Pueden contener metales
pesados tóxicos y dañar el medio ambiente. Está legalmente obligado a deshacerse de las baterías y/o pilas en
la empresa que las comercialice y en los puntos de recogida destinados para ello en sus correspondientes contenedores para que sean eliminadas de forma segura. La
eliminación es gratuita. El símbolo que aparece al lado
significa que está totalmente prohibido deshacerse de
las pilas y baterías junto a la basura doméstica y que
deben deshacerse en los puntos de recogida destinados
para ello. Siga las regulaciones locales para la eliminación del material de embalaje.
Verifique el contenido de la entrega
Contenido
BigTel
280
280-21 280-31 280-41
Estación base / Fuente de
alimentación
Estación de carga / Fuente
de alimentación
Teléfono inalámbrico
Cable de conexión telefónica
Pilas
Manual de instrucciones
1
1
1
1
1
1
3
1
1
2
1
6
1
2
3
1
9
1
3
4
1
12
1
1
Podrá saber en www.amplicomms.com si este teléfono ya se
encuentra disponible.
La fuente de alimentación que se incluye en la
entrega cumple con los requisitos de diseño ecológico de la UE para productos alimentados por
energía (Directiva 2005/32/CE). El consumo de
energía, tanto en funcionamiento como en espera, resulta claramente más bajo que en las fuentes de alimentación de modelos más antiguos.
59
PUESTA EN FUNCIONAMIENTO
Conectar estación base
Instalar pilas
a Cuidado: Debido a que se pueden producir interferencias
mutuas es recomendable colocar la estación base a una distancia
mínima de 1 m de otros dispositivos electrónicos.
Conecte la estación base como se muestra en la imagen. Por
razones de seguridad utilice sólo el adaptador y el cable de
teléfono que vienen incluidos en la entrega.
Conexión de teléfono
Abra el compartimento de las baterías/pilas.
Coloque las baterías en el compartimento.
Cierre el compartimento de las baterías.
a Cuidado: Utilice solamente baterías NiMH del tipo AAA
¡(Microcélulas) 1,2 V / 600 mAh! ¡Nunca utilice baterías o células
primarias! ¡Fíjese en la polaridad!
Enchufe de red
a Cuidado: ¡Utilice únicamente para la base de carga el adaptador que se incluye en la entrega! No obstaculice el acceso al
enchufe de red por muebles u otros objetos.
Conectar dispositivo de carga2
Conecte el dispositivo de carga a un enchufe de red.
a Cuidado: ¡Utilice únicamente para el dispositivo de carga el
adaptador que se incluye en la entrega! No obstaculice el acceso
al enchufe de red por muebles u otros objetos.
2
Aplicable sólo para equipos telefónicos con al menos 2 teléfonos, ver „Verifique el contenido de la entrega", pág. 59.
60
Recargar baterías
☞ Antes de utilizar el teléfono portátil por primera vez recárguelo
en la estación / dispositivo de carga durante al menos 16 horas.
El teléfono se calienta durante el proceso de recarga. Esto es
normal e inofensivo. No cargue el teléfono con otros cargadores. El nivel de la batería se muestra en la pantalla. Si el nivel
de batería alcanza el límite inferior, el icono de batería ( )
empieza a parpadear, en la pantalla aparece "Batería agotada".
Coloque el teléfono en la estación / dispositivo de carga.
PUESTA EN FUNCIONAMIENTO / ELEMENTOS DE CONTROL
Configurar fecha y hora del teléfono
Al iniciar el funcionamiento del teléfono no se indica la hora
correcta (por ejemplo, para las entradas en la lista de llamadas). Debajo del nombre del teléfono en la pantalla aparece
"12:00".
La fecha y hora se ajustan a través de la opción de menú „Alarma/Reloj / Fecha&Hora“. Si se produce un fallo del suministro
eléctrico en la estación base se puede perder dicha información.
Configurar idioma de la pantalla
El menú está disponible en diferentes idiomas. La opción que
aparece por defecto es “español”. Puede cambiar el idioma a
través del menú „Terminal / Idioma“.
Recepción de llamada automática / aceptación directa
Si la función se encuentra habilitada (por defecto) se aceptará
automáticamente la llamada al retirar el teléfono de la estación
base. La recepción de llamada automática se activa/desactiva
a través del menú „Terminal / Descuelgue aut.“
Elementos de control
Aviso de llamada (LED)
Auricular
Tecla de marcación
directa M1
Tecla de marcación
directa M2
Repetición de marcación / tecla de flecha
„hacia arriba“
Pantalla
Amplificador
(lateral)
Teclas de
volumen
(lateral)
Tecla multifución /
tecla de menú
(en modo reposo)
Tecla multifunción /
tecla agenda telefónica
(en modo reposo)
Tecla de
recepción /
tecla de manos
libres
Teclas
numéricas
Tecla de finalizar llamada
Aa
Lista de llamadas /
ecualizador (ajuste de
sonido) / tecla de flecha "hacia abajo"
Tecla R (flash)
Tecla interna
Micrófono
61
ELEMENTOS DE CONTROL / INFORMACIÓN PREVIA
Información previa
Tecla de localizador
(paging)
En este capítulo encontrará información básica sobre cómo
usar las instrucciones de empleo y el teléfono.
Representación en las instrucciones de empleo
Representación Descripción
NOMBRE?
Presionar la tecla representada
Introducir número o letra
Teléfono suena
Estación base suena
Retirar el teléfono de la estación base
Colocar el teléfono en la estación base
Representación de los textos en pantalla
Capacidad de la batería (Visualización en pantalla)
Representación Descripción
Terminales de carga
Aviso de llamada, aviso de
batería, aviso de conversación
Encontrará las teclas para el servicio de contestador automático en
el capítulo "Contestador automático" en la página 75.
62
Batería 100%
Batería al 50%
Batería casi vacía / cargar batería
Durante el proceso de recarga el icono de la batería está “en
movimiento”.
INFORMACIÓN PREVIA
Modo en espera
Todas las descripciones de este manual hacen referencia al
teléfono estando en modo de espera. Puede activar el modo de
espera presionando la tecla
.
Navegación por el menú
Todas las funciones son accesibles a través de los diferentes
menús. Podrá encontrar la estructura completa del menú en el
apéndice.
Para navegar por el menú utilice las teclas de flecha.
Con la tecla
abrirá en modo reposo el menú.
Utilice las teclas de flecha
y
para moverse por el
menú.
Para abrir un submenú pulse la tecla multifunción con
.
Pulse
si desea volver al menú principal.
Iconos en la pantalla del teléfono
Está realizando una llamada externa.
Está realizando una llamada interna.
Ha activado el manos libres.
Ha abierto la agenda telefónica.
El bloqueo del teclado está activado.
El micrófono está en silencio.
Tiene entradas en la lista de llamadas. El icono parpadea en
caso de nuevas llamadas.
Tiene un mensaje en el buzón de voz de su proveedor (dependiente del proveedor de red). Pregunte a su proveedor de red
cómo puede escuchar el mensaje.
El timbre del teléfono está apagado.
La alarma del despertador está encendida.
Luz permanente: teléfono al alcance de la estación base
Luz intermitente: teléfono fuera del alcance de la estación base
El contestador automático está activado.
63
TELEFONEAR
Telefonear
Finalizar una llamada
/
Contestar una llamada
Su teléfono suena.
Si el teléfono no se encuentra en la base:
Pulse la tecla de aceptación. Si quiere activar el
“manos libres” vuelva a pulsar la tecla.
Si el teléfono se encuentra en la base y la opción “Descuelgue
aut.” no se encuentra activada:
Retire el teléfono de la base y presione la tecla de
aceptación. Si quiere activar el “manos libres” vuelva a
pulsar la tecla.
Si el teléfono se encuentra en la base y la opción “Descuelgue
aut.” se encuentra activada:
Retire el teléfono de la base; la llamada se aceptará
automáticamente .
Llamar mediante marcación
Introduzca el número al que desea llamar. En caso de
error al marcar el número, corrija el fallo con la tecla
multifunción
.
Número de llamada se marca.
☞ Si desea también puede presionar primero la tecla de aceptación para recibir la señal de marcación. El dígito del número al
que desea llamar se marcará enseguida.
Esta opción de llamada no permite una corrección individual de
los dígitos del número de teléfono.
64
Presione la tecla de finalizar llamada o coloque el teléfono en la estación base.
Rellamada
☞ Su teléfono almacena los 10 últimos números marcados.
Si el número aparece en la agenda telefónica se visualizará el
nombre.
/
Abra la lista de rellamadas.
Seleccione una entrada.
Presione la tecla de aceptación.
Llamar de la lista de llamadas
☞ Su teléfono almacena las últimas 30 llamadas en la lista de
llamadas.Si el número aparece en la agenda telefónica se visualizará el nombre.
El almacenamiento sólo es posible si la función CLIP (aparición
en pantalla del número de teléfono entrante) está habilitada en su
línea o si el número telefónico de la persona que llama no se
encuentra oculto o si por otras razones no se ha transferido.
/
Abra la lista de llamadas.
Seleccione una entrada.
Presione la tecla de aceptación.
TELEFONEAR
Llamar de la agenda telefónica
Llamada interna
☞ La agenda telefónica puede almacenar 50 entradas. Para
☞ Transferir llamadas internas y realizar conferencias sólo es
introducir entradas consulte el apartado “Agenda telefónica”, página 68.
posible si existen varias terminales inalámbricas registradas.
/
Abra la agenda telefónica.
Seleccione una entrada.
Presione la tecla de aceptación.
Llamar con la tecla de marcación directa
☞ El teléfono tiene dos teclas de marcación directa M1 y M2.
Para introducir y configurar entradas consulte el apartado “Teclas
de marcación directa”, página 70.
M1 / M2
Presione una de las teclas de marcación
directa.
Presione la tecla de aceptación.
Visualización del tiempo de llamada
Durante las llamadas se visualiza el tiempo de llamada en
minutos y segundos.
Realizar llamada interna
Presione la tecla INT. Introduzca el número de
teléfono interno al que desea llamar.
Transferir llamada externa
Durante una llamada externa…
Presione la tecla INT.
Introduzca el número de teléfono interno al
que desea llamar.
La llamada externa se mantiene.
Si el teléfono al que llama acepta la llamada.
Presione la tecla de “colgar” para que se
transfiera la llamada.
☞ Si el teléfono al que llama no responde, vuelva a la llamada
externa pulsando la tecla
.
Desconectar el micrófono (Silencio)
Puede apagar el micrófono durante una llamada para que el
interlocutor no pueda oírle. Pulse la tecla multifunción
.
Para activar el micrófono pulse la tecla multifunción en
Desac. .
65
TELEFONEAR / OTRAS CARACTERÍSTICAS DE SERVICIO
Otras características de servicio
Conferencia
Conf.
Durante una llamada externa. . .
Presione la tecla INT.
Introduzca el número de teléfono interno al
que desea llamar.
Si el teléfono al que llama responde la llamada presione la tecla multifunción Conf. .
Los tres interlocutores de conversación aparecerán en conexión.
☞ Si uno de los interlocutores abandona la conversación, per-
Bloqueo del teclado
☞ El bloqueo del teclado evita la activación involuntaria de las teclas.
Las llamadas entrantes pueden ser aceptadas de forma normal.
Desblo
manecen en línea los otros dos.
Llamada externa durante una conversación interna
Mientras está en conversación la estación
base señaliza las llamadas externas entrantes. También oirá un tono de aviso en el auricular.
Presione la tecla de “colgar”. La conversación
interna finalizará.
Se señaliza la llamada externa.
Presione la tecla de aceptación para recibir la
llamada externa.
Mantenga presionada la tecla de almohadilla
hasta que aparezca en pantalla “Teclado bloqueado”.
Para desbloquear el teclado presione la tecla
multifunción Desblo y a continuación la tecla
de almohadilla. En pantalla aparecerá “Teclado desbloqueado”.
Desconectar tono de llamada en el teléfono
☞ También puede desconectar el tono de llamada a través del
menú „Terminal / Vol timbre“.
Mantenga pulsada la tecla de asterisco hasta
que aparezca en pantalla “Sonido desac.”.
Para volver a conectar el tono de llamada
mantenga presionada de nuevo la tecla de
asterisco hasta que aparezca en pantalla
“Sonido desac.”.
Desconectar tono en llamadas entrantes
☞ Puede desconectar el tono en las llamadas entrantes. Podrá
seguir aceptando la llamada siempre que el usuario que llama no
haya colgado.
Silenc
66
Presione la tecla multifunción Silenc .
OTRAS CARACTERÍSTICAS DE SERVICIO / LISTA DE LLAMADAS / RELLAMADA
Ajustar volumen del auricular y altavoz
Durante una llamada puede ajustar el volumen a 5 niveles con
las teclas que aparecen en el lateral del teléfono (en modo
auricular -> volumen del auricular, en modo manos libres ->
volumen del altavoz). Los ajustes se encuentran separados y
permanecen almacenados incluso después de finalizar la conversación.
Además, puede aumentar en el modo auricular el volumen de
la llamada actual con la tecla de amplificación; vea para ello
las indicaciones de la página 58/59.
Ecualizador (Cambio del espectro de frecuencias)
Lista de llamadas / Rellamada
Editar lista de llamadas
/
Opción
/
Guardar num
☞ Durante una llamada puede cambiar en tres niveles el sonido
del auricular pulsando
. La pantalla muestra las características más relevantes. El ajuste se mantendrá en las siguientes
conversaciones hasta que se vuelvan a cambiar.
/
Presione durante una conversación la tecla
que se muestra.
Seleccione un ajuste.
Ecualizador 1 = Disminuye los bajos y mejora
los agudos.
Ecualizador 2 = Aumento lineal de todas las
frecuencias.
Ecualizador 3 = Aumenta los bajos y disminuye los agudos.
Presione la tecla de la agenda telefónica para
aceptar los ajustes y continúe con la conversación.
A M1/M2
Borrar
Borrar todo
Abra la lista de llamadas.
Seleccione una entrada. La fecha y hora de la
llamada aparecerán en pantalla.
Si el número aparece en la agenda telefónica
se visualizará el nombre.
Presione la tecla multifunción Opción .
Elija entre las opciones que le aparecen y presione la tecla multifunción
.
El número se almacena en la agenda telefónica. Introduzca un nombre o confirme y edite el
número de teléfono y seleccione una melodía
para la entrada.
La entrada se almacena en la tecla de marcación directa M1 o M2. Introduzca un nombre,
confirme o edite el número de teléfono y
seleccione una melodía para la entrada.
La entrada se borra inmediatamente.
La entrada completa se borra después de un
aviso de confirmación.
67
LISTA DE LLAMADAS / RELLAMADA / AGENDA TELEFÓNICA / TECLA DE MARCACIÓN DIRECTA
Editar rellamada
/
Opción
/
Guardar num
A M1/M2
Borrar
Borrar todo
68
Abra la rellamada.
Seleccione una entrada. Si el número aparece
en la agenda telefónica se visualizará el nombre.
Presione la tecla multifunción Opción .
Elija entre las opciones que le aparecen y presione la tecla multifunción
.
El número se almacena en la agenda telefónica. Introduzca un nombre o confirme y edite el
número de teléfono y seleccione una melodía
para la entrada.
La entrada se almacena en la tecla de marcación directa M1 o M2. Introduzca un nombre,
confirme o edite el número de teléfono y
seleccione una melodía para la entrada.
La entrada se borra inmediatamente.
La entrada completa se borra después de un
aviso de confirmación.
Agenda telefónica / Tecla de marcación directa
☞ En la agenda telefónica puede almacenar hasta 50 números
con sus correspondientes nombres. Puede asignar a cada entrada un grupo diferente con su propia melodía. Introduzca los
números de teléfono con el código de área, esto permite una correcta visualización de la persona que llama, siempre que tenga
una entrada en su agenda y disponga de una línea de transferencia de número compatible con su línea.
Crear una nueva entrada en la agenda telefónica
Opción
Presione la tecla de la agenda telefónica.
Si no existe ninguna entrada aparecerá
“Agenda vacía”. Después de pulsar la tecla
multifunción Opción aparecerá “Nueva
entrada”.
En caso de que existan entradas se mostrará
la primera entrada.
Presione la tecla multifunción Opción .
Confirme la “Nueva entrada” con la tecla multifunción
.
Introduzca el nombre (máx. 16 caracteres).
Las teclas numéricas están inscritas con
letras. Pulsando varias veces la tecla correspondiente se introducen las letras y los números. Borre el último carácter con la tecla multifunción
. Cambie entre mayúsculas y
minúsculas con
. Después de un breve
periodo de tiempo el cursor pasa al siguiente
espacio.
AGENDA TELEFÓNICA / TECLA DE MARCACIÓN DIRECTA
guarda
guarda
/
guarda
Cierre el nombre añadido con la tecla multifunción guarda .
Añada el número telefónico (máx. 24 dígitos).
Si el teléfono está conectado a una red telefónica, introduzca el código de acceso. Si se
requiere una pausa de marcación, pulse
después del código de acceso la tecla 0
durante unos 2 segundos, la pantalla mostrará
“P”.
Complete el registro del número con la tecla
multifunción guarda .
Seleccione una melodía para dicha entrada.
Cierre el registro con la tecla multifunción
guarda .
Volver al modo de espera.
Editar entradas de la agenda telefónica
Presione la tecla de la agenda telefónica.
Seleccione una entrada.
Presione la tecla multifunción Opción .
Elija entre las opciones que le aparecen y presione la tecla multifunción
.
Nueva entrada Puede añadir una nueva entrada.
(Ver más arriba).
Editar
Puede modificar la entrada. Elimine las letras
y números con la tecla multifunción
,
introduzca con las teclas numéricas nuevas
letras y números. Consulte los demás detalles
en "Crear una nueva entrada".
/
Opción
/
Ver detalles
La entrada se muestra.
Borrar entrada La entrada se borra.
Borrar todo
La entrada completa se borra después de un
aviso de confirmación.
Copiar
La entrada se copia en otro dispositivo inalámbrico. Todos los dispositivos inalámbricos
registrados se muestran. Seleccione el teléfono deseado con las teclas de flecha
y
a continuación presione la tecla
. En el teléfono solicitado se deberá
permitir la transferencia con la tecla multifunción
.
Copiar todo
Todas las entradas se copian en otro dispositivo inalámbrico. Las entradas que se encuentran en dicho dispositivo inalámbrico se eliminarán.
Copiar anexo La agenda telefónica entera se añade a la
agenda actual del teléfono inalámbrico deseado.
☞ Para seleccionar una entrada, puede escribir la primera letra
con las teclas numéricas. A continuación, aparece la primera
entrada coincidente. Se puede llegar a las entradas restantes con
las teclas de flecha
y
.
69
AGENDA TELEFÓNICA / TECLA DE MARCACIÓN DIRECTA / CONFIGURAR TELÉFONO
Editar teclas de marcación directa
M1 / M2
Opción
/
Editar
Borrar entra
Pulse una de las teclas de marcación directa.
Presione la tecla multifunción Opción .
Elija entre las opciones que le aparecen y presione la tecla multifunción
.
Puede cambiar la entrada. Elimine las letras y
números con la tecla multifunción
,
introduzca con las teclas numéricas nuevas
letras y números. Consulte los demás detalles
en el apartado “Crear una nueva entrada en la
agenda telefónica“ en la pág. 68.
La entrada se elimina.
☞ Si al pulsar una de las teclas de marcación rápida aparece
„Vacio“, utilice el menú “Editar entrada” para crear una entrada
nueva.
Configurar teléfono
Ajustar fecha y hora
/
/
Pulse la tecla de Menú.
Seleccione Alarma/Reloj y
pulse la tecla multifunción
.
Seleccione Fecha&Hora y
pulse la tecla multifunción
.
Introduzca con las teclas numéricas el año,
mes, día, hora y minuto. Confirme con la tecla
multifunción guarda .
☞ En caso de caída del suministro eléctrico en la estación base
se perderán los ajustes.
Ajustar formato de hora
/
/
/
Pulse la tecla de Menú.
Seleccione Alarma/Reloj y
pulse la tecla multifunción
Seleccione Formato hora y
pulse la tecla multifunción
Elija entre 12H o 24H y
pulse la tecla multifunción
.
.
.
Despertador
/
/
/
70
Pulse la tecla de Menú.
Seleccione Alarma/Reloj y
pulse la tecla multifunción
.
Seleccione Config alarma y
pulse la tecla multifunción
.
Elija entre las opciones que le aparecen y pre-
CONFIGURAR TELÉFONO
Una vez
Diario
Lun a Vie
Desactivada
sione la tecla multifunción guarda :
Use el teclado numérico para introducir la
hora de la alarma y seleccione una melodía.
La alarma se iniciará una única vez en la
fecha más cercana posible.
La alarma se inicia diariamente a la hora establecida. Para obtener más información sobre
la configuración consulte el apartado "Una
vez".
La alarma se inicia de lunes a viernes a la
hora establecida. Para obtener más información sobre la configuración consulte el apartado
"Una vez".
La alarma se desactiva.
☞ Para confirmar la alarma pulse
Configurar volumen de llamada del teléfono inalámbrico
/
/
/
☞ Si el teléfono inalámbrico se encuentra en la estación base
durante una llamada entrante sólo sonará el teléfono. Por favor,
recuerde cuando apaga el timbre del teléfono inalámbrico.
Configurar nombre del teléfono inalámbrico
Stop . Con la tecla
Zzz.. (snooze) se activa la función de repetición de alarma.
/
De esta manera, la alarma se repite hasta 5 veces en 5 minutos.
Pasados los 5 minutos se desactiva la alarma.
/
Configurar melodía de llamada del teléfono inalámbrico
/
/
/
/
Pulse la tecla de Menú.
Seleccione Terminal y
pulse la tecla multifunción
.
Seleccione Timbre y
pulse la tecla multifunción
.
Seleccione Externa o Interna y
pulse la tecla multifunción
.
Elija la melodía deseada y confirme con la
tecla multifunción guarda .
Pulse la tecla de Menú.
Seleccione Terminal y
pulse la tecla multifunción
.
Seleccione Vol timbre y
pulse la tecla multifunción
.
Elija el volumen de llamada deseado y confirme con la tecla multifunción guarda .
Pulse la tecla de Menú.
Seleccione Terminal y
pulse la tecla multifunción
.
Seleccione Nombre term. y
pulse la tecla multifunción
.
Borre los caracteres existentes utilizando la
tecla multifunción
, introduzca con las
teclas numéricas un nombre y confirme con la
tecla multifunción guarda .
71
CONFIGURAR TELÉFONO
Configurar sonido del teclado
/
/
/
Pulse la tecla de Menú.
Seleccione Terminal y
pulse la tecla multifunción
.
Seleccione Tono tecla y
pulse la tecla multifunción
.
Elija entre Activado o Desactivado y confirme con la tecla multifunción
.
Configurar contraste de pantalla
/
/
/
Pulse la tecla de Menú.
Seleccione Terminal y
pulse la tecla multifunción
.
Seleccione Contraste y
pulse la tecla multifunción
.
Elija un ajuste y confirme con la tecla multifunción
.
Configurar recepción de llamada automática
/
/
/
Pulse la tecla de Menú.
Seleccione Terminal y
pulse la tecla multifunción
.
Seleccione Descuelgue aut. y
pulse la tecla multifunción
.
Elija entre Activado o Desactivado y confirme con la tecla multifunción
.
☞ Si el teléfono inalámbrico se encuentra en la estación base y
la recepción de llamada automática se encuentra activada, se
aceptará enseguida la llamada en cuanto retire el teléfono.
Configurar tiempo de iluminación de la pantalla
/
/
/
Configurar sonido de confirmación
/
/
/
Pulse la tecla de Menú.
Seleccione Terminal y
pulse la tecla multifunción
.
Seleccione Conf. sonido y
pulse la tecla multifunción
.
Elija entre Activado o Desactivado y confirme con la tecla multifunción
.
☞ El sonido de confirmación le indica que un programa o ajuste
se ha realizado correctamente.
Seleccionar estación base
☞ Si su teléfono inalámbrico se encuentra asociado a varias estaciones base, puede seleccionar la estación base con la que desea
operar el teléfono (apartado de menú: "Manual"). En el modo "Auto"
el teléfono inalámbrico busca automáticamente mientras está en
estado de reposo la señal de estación base más fuerte. Durante
una llamada no se producen cambios de estación base.
/
72
Pulse la tecla de Menú.
Seleccione Terminal y
pulse la tecla multifunción
.
Seleccione Tiempo ilum. y
pulse la tecla multifunción
.
Elija un ajuste y confirme con la tecla multifunción
.
Pulse la tecla de Menú.
Seleccione Terminal y
CONFIGURAR TELÉFONO
/
/
pulse la tecla multifunción
.
Seleccione Selec. base y
pulse la tecla multifunción
.
Elija entre Auto o Manual y confirme con la
tecla multifunción
.
Si ha seleccionado Manual, seleccione una
de las estaciones base disponibles y presione
la tecla multifunción
.
Configurar idioma en pantalla
/
/
/
Pulse la tecla de Menú.
Seleccione Terminal y
pulse la tecla multifunción
.
Seleccione Idioma y
pulse la tecla multifunción
.
Elija el idioma deseado y confirme con la tecla
multifunción
.
Configurar amplificación permanente
/
/
/
Pulse la tecla de Menú.
Seleccione Terminal y
pulse la tecla multifunción
.
Seleccione Activar Amp y
pulse la tecla multifunción
.
Elija entre Activado o Desactivado y confirme con la tecla multifunción
.
☞ Si la amplificación se encuentra activada permanentemente,
Configurar melodía de llamada de la estación base
/
/
/
Pulse la tecla de Menú.
Seleccione Config base y
pulse la tecla multifunción
.
Seleccione Timbre y
pulse la tecla multifunción
.
Elija la melodía deseada y confirme con la
tecla multifunción guarda .
Configurar volumen de llamada de la estación base
/
/
/
Pulse la tecla de Menú.
Seleccione Config base y
pulse la tecla multifunción
.
Seleccione Vol timbre y
pulse la tecla multifunción
.
Elija el volumen de llamada deseado y confirme con la tecla multifunción guarda .
Configurar modo de marcación
/
/
/
Pulse la tecla de Menú.
Seleccione Config base y
pulse la tecla multifunción
.
Seleccione Marcación y
pulse la tecla multifunción
.
Elija entre Tonos o Pulsos y confirme con la
tecla multifunción guarda .
☞ Para la mayoría de conexiones el ajuste correcto es „Tonos“.
aparece en pantalla en estado reposo " Activar Amp " en lugar del
nombre del teléfono.
73
CONFIGURAR TELÉFONO
Configurar tiempo de flash
/
/
Pulse la tecla de Menú.
Seleccione Config base y
pulse la tecla multifunción
.
Seleccione Tecla R y
pulse la tecla multifunción
.
Elija entre Corto o Largo y confirme con la
tecla multifunción guarda .
Configurar cita
☞ Puede configurar hasta cinco citas (fecha/hora) con nombre y
melodía.
☞ El PIN de cuatro dígitos sirve para proteger ciertos accesos
Pulse la tecla de Menú.
Seleccione Herramientas y
pulse la tecla multifunción
.
Seleccione Cita y
pulse la tecla multifunción
.
Seleccione una entrada y
presione la tecla multifunción
.
Seleccione Editar y
presione la tecla multifunción
.
Borre los caracteres existentes utilizando la
tecla multifunción
, introduzca con las
teclas numéricas un nombre y confirme con la
tecla multifunción guarda .
Introduzca con las teclas numéricas la fecha
deseada. Confirme con la tecla multifunción
guarda .
Introduzca con las teclas numéricas la hora
deseada. Confirme con la tecla multifunción
guarda .
Seleccione una melodía y confirme con la
tecla multifunción guarda .
no autorizados. En caso de olviar su PIN, póngase en contacto
con su distribuidor.
☞ Para eliminar una cita, seleccione en el menú la opción “Bor-
/
☞ La configuración normal para los servicios complementarios
en las redes analógicas es "Corto".
/
/
/
/
Cambiar PIN
/
/
Pulse la tecla de Menú.
Seleccione Config base y
pulse la tecla multifunción
.
Seleccione PIN Sistema y
pulse la tecla multifunción
.
Introduzca el PIN actual (por defecto 0 0 0 0)
y presione la tecla multifunción
.
Introduzca un PIN nuevo y presione la tecla
multifunción
.
Repita el PIN nuevo y presione la tecla multifunción
.
rar". La cita se elimina después de un aviso de confirmación.
74
CONFIGURAR TELÉFONO / CONTESTADOR AUTOMÁTICO
Contestador automático
Cronómetro
/
/
Pulse la tecla de Menú.
Seleccione Herramientas y
pulse la tecla multifunción
.
Seleccione Cronómetro y
pulse la tecla multifunción
.
Presione la tecla multifunción Com. para
iniciar el cronómetro, Parar para pararlo o
Reinic para ponerlo a cero.
El contestador automático se controla principalmente desde la
estación base. Durante su configuración y manejo recibirá ayuda
a través de una guía de usuario de voz. Al mantener presionada
la tecla
podrá elegir entre uno de los 6 idiomas disponibles (inglés, alemán, francés, holandés, español, italiano).
Existen 2 modos de funcionamiento
- Mensaje de bienvenida 1 = aviso y grabación
(2 min. por llamada)
- Mensaje de bienvenida 2 = sólo aviso.
Se incluyen de forma preestablecida 2 avisos que puede reemplazar por sus propios avisos (máx. 2 min. cada uno).
Parpadea: aviso “mensajes nuevos“
parte inferior de
la estación base
Número de mensajes
Parpadea: mensajes nuevos
Parpadea continuamente: mensajes antiguos
75
CONTESTADOR AUTOMÁTICO
Los elementos de control
Tecla
Visualizaciones de pantalla
En modo reposo
Presione
presione
brevemente
aprox. 2 s
Escuchar
bienvenida
Durante la
reproducción
Grabar nueva
bienvenida
Selecc. de idioma Mens. anterior
Escuchar mens.
Pausa/Continuar
Grabar nota
Volumen idioma
+ tono d. llamada
Siguiente mens.
Volumen
reproducción
Contestador aut. Seleccionar
On/Off
bienvenida
Eliminar todos
mens.
Escuchar la
hora editada
Editar hora
Escuchar código Modificar código
de seguridad
de seguridad
Escuchar retraso Editar retraso
de llamada
de llamada
76
Eliminar mens.
o bienvenida
Pantalla oscura Contestador automático apagado
00 ... xx
Parpadea: Número de mensajes nuevos
Parpadea continuamente: Número de mensajes antiguos
HS
Acceso al contestador automático con un teléfono inalámbrico
oo
Mensaje de bienvenida 2 editado se establece, sin grabación de mensajes
FL
Memoria llena, el contestador automático
cambia automáticamente al mensaje de bienvenida 2, no se puede dejar ningún mensaje.
Borre los mensajes antiguos para volver a
tener espacio libre.
-A
Llamada entrante o acceso remoto al contestador automático
Activar/desactivar contestador automático / seleccionar
modo de funcionamiento
Pulse la tecla
para activar y desactivar
el contestador automático. Al activarlo oirá
información sobre el modo de funcionamiento
activado:
- Mensaje de bienvenida 1 = aviso y grabación
- Mensaje de bienvenida 2 = sólo aviso.
> 2 seg. Para cambiar el modo de funcionamiento (el
contestador automático debe estar encendido), presione
durante unos 2 segundos. El modo de funcionamiento se cambia.
CONTESTADOR AUTOMÁTICO
Escuchar mensajes en el teléfono inalámbrico
Puede escuchar los mensajes desde el teléfono inalámbrico. Si
hay mensajes nuevos, la pantalla muestra un aviso con el
número de mensajes nuevos.
Cómo escuchar los mensajes nuevos
Pulse la tecla multifunción en
.
Un aviso le comunicará el número de mensajes nuevos. Los nuevos mensajes se irán
reproduciendo en secuencia.
Para obtener más información sobre el funcionamiento, consulte el aparatado "Escuchar
todos los mensajes".
Escuchar todos los mensajes
Pulse la tecla de menú.
/
Seleccione Contestador y pulse
la tecla multifunción en
.
/
Seleccione Rep. Mens.Nuevo o Rep. Todos
Mens y pulse la tecla multifunción en
Un aviso le comunicará el número de mensajes nuevos. Los mensajes se irán reproduciendo en secuencia.
Para escuchar los mensajes a través del altavoz del teléfono, pulse la tecla de aceptación
.
Para volver desactivar el altavoz, pulse de
nuevo la tecla de aceptación
.
Para avanzar al siguiente mensaje durante la
Borrar
reproducción, pulse la tecla multifunción en
.
Para borrar un mensaje durante la reproducción, pulse la tecla multifunción en Borrar .
Escuchar/aceptar los mensajes entrantes en el teléfono inalámbrico
Si el contestador automático ha aceptado una llamada, puede
escuchar desde el teléfono el mensaje y así sabrá quién desea
dejarle un mensaje.
Para ello presione la tecla de aceptación
. La grabación
en el contestador automático se continua.
Si desea hacerse con la conversación y quiere hablar con la
persona que llama, pulse la tecla
. La grabación se cancelará.
Escuchar mensajes en la estación base
Pulse la tecla
.
Si hay nuevos mensajes, sólo se reproducirán
los nuevos mensajes en secuencia.
Si no hay mensajes nuevos se reproducen
todos los mensajes en secuencia.
Durante la reproducción puede:
- volver al comienzo del mensaje actual.
- ir al mensaje anterior.
- cancelar la reproducción.
- pausar la reproducción, para continuar
reproduciendo pulse
.
- ir al siguiente mensaje.
77
CONTESTADOR AUTOMÁTICO
Eliminar mensajes en la estación base
Durante la reproducción
Presione
durante unos 2 segundos. El
mensaje actual se borrará.
Eliminar todos los mensajes antiguos
Sólo se eliminarán los mensajes que ya han sido escuchados.
Presione en el modo reposo la tecla
durante unos 2 segundos. En la pantalla aparece dL. Se eliminan todos los mensajes antiguos.
Mensaje de bienvenida
Escuchar/eliminar el mensaje de bienvenida actual
Presione la tecla
brevemente. El mensaje de bienvenida actual se reproduce.
Detenga la reproducción mediante
. Si
es necesario, elimine el mensaje de bienvenida pulsando
durante unos 2 segundos
(escuchará un aviso). El mensaje de bienvenida estándar no se puede eliminar.
Grabar un mensaje de bienvenida propio
Seleccione el modo de funcionamiento para el
que desea grabar su propio mensaje de bienvenida (ver "Activar/desactivar contestador
automático / seleccionar modo de funcionamiento", página 76).
> 2 seg Presione la tecla
durante unos 2
segundos. Siga la guía de usuario de voz.
78
Detenga la grabación con
.
El mensaje de bienvenida nuevo vuelve a
reproducirse para su comprobación.
Grabar una nota
Es posible grabar en su contestador automático una nota (aviso de voz) (longitud máxima de unos 2 minutos). Esta nota se
indica y se trata como un mensaje "normal".
> 2 seg Presione la tecla
durante unos 2
segundos. Reproduzca su nota.
Detenga la grabación con
.
Configuración del número de tonos de llamada
Puede establecer después de cuántos tonos de llamada el contestador automático debe contestar una llamada. Puedes elegir
entre 2 ... 9 tonos de llamada y "Ahorro de tarifa". En la configuración "Ahorro de tarifa" se acepta una llamada después de
5 tonos de llamada si no hay mensajes nuevos. Si hay nuevos
mensajes la llamada será contestada después de 2 tonos de
llamada. Puede controlar si existen mensajes nuevos a través
de una comprobación remota sin necesidad de realizar una
conexión.
Comprobar la configuración del tono de llamada
Pulse la tecla
en la parte inferior de la
estación base. Se muestra la configuración
actual.
Cambiar la configuración del tono de llamada actual
> 2 seg Presione la tecla
en la parte inferior de
CONTESTADOR AUTOMÁTICO
la estación base durante unos 2 segundos. Se
muestra la configuración actual.
Cambie el ajuste con las teclas
/
y presione la tecla
brevemente para
guardar el cambio. El nuevo ajuste se mostrará.
Si durante el ajuste no presiona ninguna tecla
durante unos 10 segundos, el teléfono volverá
sin que se produzca ningún cambio a su estado
original. En caso de que se produzca un corte
de corriente en la estación base, la configuración se restablecerá en su estado inicial (3 tonos
de llamada).
Configuración del código de seguridad
El código de seguridad es un número de tres dígitos (por defecto
0 0 0) que debe introducir si desea realizar una comprobación o
un control remoto.
Comprobar la configuración del código de seguridad
Pulse la tecla
en la parte inferior de la
estación base. Se muestra la configuración
actual.
Cambiar la configuración del código de seguridad
> 2 seg Presione la tecla
en la parte inferior de
la estación base durante unos 2 segundos. Se
muestra la configuración actual.
Cambie la configuración del código dígito a dígito mediante las teclas
/
y presione la tecla
para guardar y avanzar al
siguiente dígito. El nuevo ajuste se mostrará.
Si durante el ajuste no presiona ninguna tecla
durante unos 10 segundos, el teléfono volverá
sin que se produzca ningún cambio a su estado original.
Configuración de la hora / día
Si ha configurado la hora (ver página 70) antes de la reproducción un mensaje se indicará el día y la hora de su entrada.
También puede realizar por aquí la entrada de la hora y el día.
En caso de un fallo eléctrico en la estación base se pierde la
configuración.
Configuración de la hora y día
> 2 seg Presione la tecla
durante unos 2
segundos. Se mostrará el día.
/
Utilice las teclas que se muestran para introducir el día actual (se visualizará).
Presione brevemente la tecla
.
/
Utilice las teclas que se muestran para introducir la hora actual (se visualizará).
Presione brevemente la tecla
.
/
Utilice las teclas que se muestran para introducir los minutos actuales (se visualizará).
Presione brevemente la tecla
.
Se muestra la hora configurada.
79
CONTESTADOR AUTOMÁTICO / DAR DE ALTA/BAJA UN TELÉFONO INALÁMBRICO
Control remoto / comprobación remota
Puede acceder y operar su contestador automático de forma
remota utilizando un teléfono provisto de MFV.
1. Llame a su número.
2. El contestador automático responderá la llamada después
del número de tonos configurado. Si el contestador automático se encuentra desconectado responderá la llamada después de unos 20 tonos con el mensaje de bienvenida 2.
3. Espere a que finalice el mensaje y pulse 2 veces la tecla
asterisco. Se escuchará un pitido.
4. Introduzca con cuidado el código de seguridad actual.
5. Si se introduce correctamente escuchará 2 pitidos.
6. Siga la guía de usuario de voz.
2 Escuchar mensajes
2 Cancelar reproducción / Continuar reproducción
3 Ir al siguiente mensaje
1 Ir al mensaje anterior
1 Repetir mensaje actual
6 Finalizar reproducción
7 Borrar mensaje actual
0 Eliminar todos los mensajes antiguos
4 Escuchar mensaje de bienvenida actual
9 Contestador contestador automático / Cambiar modo de
funcionamiento (mensaje de bienvenida 1/2)
5 Grabar mensaje de bienvenida nuevo
6 Finalizar grabación
8 Desconectar contestador automático
6 Finalizar control / comprobación remota.
80
Dar de alta/baja un teléfono inalámbrico
Se pueden registrar hasta 5 terminales en una estación base.
El teléfono que se incluye en la entrega junto a la estación
base ya viene registrado. Cada teléfono puede estar registrado
en un máximo de 4 estaciones base. Para dar de alta un teléfono diferente al de la entrega, utilice también como información
su correspondiente manual de usuario.
Dar de alta otro teléfono del mismo tipo
/
/
/
/
Pulse la tecla de Menú.
Seleccione Terminal y
pulse la tecla multifunción
.
Seleccione Registro y
pulse la tecla multifunción
.
Seleccione Registrar y
pulse la tecla multifunción
.
Seleccione qué número de la estación base
(1 - 4) se le debe asignar y
presione la tecla multifunción
.
Introduzca el PIN actual de la estación base y
presione la tecla multifunción
.
En la pantalla aparece „Mantenga tecla busq
de la base“.
Mantenga presionada la tecla de paging (búsqueda de la estación base) hasta que el indicador luminoso parpadee (apróx. 10 s).
Después de un breve periodo de tiempo el
teléfono se registra.
DAR DE ALTA/BAJA UN TELÉFONO INALÁMBRICO / FUNCIONAM. EN LA INSTAL. TEL./ SERVICIOS ADICIONALES
Dar de baja un teléfono inalámbrico
/
/
/
Pulse la tecla de Menú.
Seleccione Terminal y
pulse la tecla multifunción
.
Seleccione Registro y
pulse la tecla multifunción
.
Seleccione Dar de baja y
pulse la tecla multifunción
.
Introduzca el PIN actual de la estación base y
presione la tecla multifunción
.
Introduzca el número interno del teléfono inalámbrico que debe ser dado de baja y
presione la tecla multifunción
.
☞ El teléfono que está utilizando en este momento no puede
ser dado de baja.
Funcionamiento en la instalación telefónica/ Servicios adicionales
Funcionamiento en la instalación telefónica
Si su teléfono está conectado a una instalación telefónica puede realizar, mediante la tecla R, funciones de transferencia de
llamadas o de rellamada automática. Consulte en el manual de
instrucciones de su instalación el ajuste del tiempo de flash
(función de consulta) para que pueda utilizar dicha función.
Averiguará a través del distribuidor donde compró el producto
si su teléfono funciona sin problemas en su instalación telefónica.
Por favor, recuerde que en las entradas de su agenda debe
introducir, en caso necesario, el código de acceso y/o la pausa
de marcación (mantener presionado el número “0”).
Servicios adicionales de su proveedor de red
Su teléfono es compatible con los servicios adicionales ofrecidos por su proveedor de red, tales como función de llamada en
espera, y conferencia. A través de la tecla R puede utilizar
dichos servicios adicionales. Por favor, consulte con su operador de red cuál debe ser el tiempo de flash configurado para
poder utilizar los servicios adicionales. Para la activación de
servicios adicionales, por favor póngase en contacto con su
operador de red.
81
APÉNDICE
Apéndice
Búsqueda de problemas
Si tiene problemas con su teléfono, consulte primero la siguiente información. En caso de problemas técnicos y reclamaciones
de garantía, póngase en contacto con su distribuidor. El período de garantía es de 2 años.
Estructura del menú
Contestador
Rep. Mens.Nuevo
Rep. todos Mens
Agenda
Terminal
☞ Algunos problemas se pueden solventar desconectando el
Timbre
Externa
Interna
Vol timbre
Nombre term.
Tono tecla
Contraste
Descuelgue aut.
Tiempo ilum.
Conf. sonido
Selec. base
Idioma
Registro
Activar Amp
Config base
Timbre
Vol timbre
Marcación
Tecla R
PIN sistema
Alarma/Reloj
Config alarma
Fecha&Hora
Formato hora
Herramientas
Cita
Cronómetro
82
Tonos / Pulsos
Corto / Largo
equipo de la corriente. Mantenga unos 20 minutos la estación
base desconectada de la red eléctrica (tire de la unidad de alimentación) y retire las baterías del teléfono. Si después vuelve a
conectar el equipo y coloca las baterías en el teléfono, el problema posiblemente haya desaparecido.
No puedo realizar llamadas telefónicas
1. Compruebe que el cable telefónico está conectado correctamente. Si es así, tal vez el cable esté defectuoso. Asegúrese
de utilizar sólo el cable de línea telefónica que se le suministra.
2. Verifique que los cables de alimentación estén conectados y
que todos los dispositivos estén encendidos y que no exista
un corte de luz.
3. Tenga al alcance la estación de carga (en condiciones ideales exteriores a una distancia de máx. 300 m y 50 m en edificios).
4. Compruebe la funcionalidad del cable de teléfono y del
enchufe con otro teléfono.
Se interrumpe la conexión
1. Tenga al alcance la estación base (en condiciones ideales
exteriores a una distancia de máx. 300 m y 50 m en edificios).
APÉNDICE
2. Es posible que la estación base no esté colocada de forma
óptima – cámbiela de sitio.
El teléfono se apaga solo
1. Posiblemente el teléfono inalámbrico deba cargarse. Colóquelo al menos 16 horas en la estación de carga (¡comprobar la fuente de alimentación del cargador!).
2. Cambie las pilas. Asegúrese de tener siempre el mismo tipo
de batería.
El número de teléfono de la persona que llama (CLIP) no
se muestra
1. Comprobar si dicha función se encuentra activada. Consulte
con su operador de red.
2. Tal vez la persona que llama ha ocultado su número.
El teléfono o la estación base no suena
1. Compruebe que el tono de llamada esté encendido. Vea la
página 71 y 73.
La radio, televisión o computadora emiten un zumbido.
1. Manténgase con el teléfono inalámbrico a una distancia
superior a un metro de todos los aparatos eléctricos y teléfonos móviles.
Al utilizar el teléfono se oyen interferencias y/o la señal de
internet es muy lenta.
1. Conecte el teléfono a través de un filtro de ADSL a la toma
de pared si dispone de conexión de internet a banda ancha
en su línea telefónica.
Datos técnicos
Estándar: DECT / GAP
Número de canales: 120 canales dúplex
Frecuencias: 1880 MHz a 1900 MHz.
Modo dúplex: Multiplexado por división en el tiempo, longitud de trama
de 10 ms
Banda de canales: 1728 kHz
Bit rate: 1152 kBit / s
Modulación: GFSK
Codificación de voz: 32 kbit / s
Potencia de salida: 10 mW (potencia media por canal)
Alcance: hasta 300 metros al aire libre, en interiores hasta 50 metros
Alimentación estación base:
100 ~ 240V AC, 7 V / 420 mA DC
Tiempo de funcionamiento del producto:
Modo reposo / en conversación: 600 mAh = apróx. 100 h / apróx. 10 h
Tiempo de carga: aproximadamente 16 horas
Condiciones ambientales para el funcionamiento del teléfono inalámbrico: 5 °C a 45 °C, 20% a 75% de humedad relativa
Condiciones ambientales para el funcionamiento de la estación base:
5 °C a 45 °C, 20% a 75% de humedad relativa
Temperatura de almacenaje: -10 °C a +60 °C
Volumen máximo del auricular: 30 dB (distorsión <2%)
Marcación: Tonos / Pulsos
Tecla R: Flash (corto / largo)
Dimensiones de la estación base (mm): L / F / A = 140 x 115 x 63
Dimensiones del teléfono inalámbrico (mm): L / F / A = 55 x 28 x 170
Asignación cable de conexión telefónico:
TSV en pin 3 y 4 de acuerdo a CTR 37 (Euro asignación)
Aparato de conexión eléctrica: Euroconector
83
APÉNDICE
Declaración de conformidad
Este dispositivo cumple con los requisitos de la Directiva de la
UE:
- Directiva 1999/5/CE sobre equipos radioeléctricos y equipos
terminales de telecomunicación y reconocimiento mutuo de su
conformidad
- Directiva 2005/32/CE „Productos que utilizan energía“.
La conformidad con la directiva mencionada anteriormente se
confirma mediante el símbolo CE que aparece en el dispositivo.
Para obtener la declaración de conformidad completa utilice por
favor la descarga gratuita de nuestro sitio web
www.amplicomms.com
Mantenimiento
Limpie la superficie de la unidad, utilice siempre un paño suave
y sin pelusa. No utilice detergentes o disolventes.
Garantía
Los dispositivos AMPLICOMMS se fabrican utilizando los últimos procesos de producción y prueba. El uso de materiales
cuidadosamente seleccionados y la aplicación de avanzadas
tecnologías aseguran un funcionamiento sin problemas y de
larga vida. La garantía no será aplicable si la causa de una
avería en el dispositivo se debe al operador de red o a la posible instalación de una centralita privada. La garantía no se aplica a los productos utilizados para cargar la batería tales como
pilas, baterías recargables y pilas recargables. El período de
garantía es de 24 meses a partir de la fecha de adquisición.
Dentro del periodo de garantía todos los desperfectos materiales o de fabricación serán atendidos de forma gratuita. La
84
garantía quedará excluida si ha existido manipulación por parte
del comprador o de terceros. Los daños causados por el manejo y operación indebida, colocación o almacenamiento inadecuado, conexión o instalación defectuosa, actos de fuerza mayor o acciones de influencia externa no están cubiertos por la
garantía.
Dentro del periodo de garantía todos los defectos materiales o
de fábrica serán solventados de forma gratuita. La garantía
será nula si el comprador o terceras personas manipulan el
aparato. La garantía no se aplicará si se producen desperfectos o daños causados por el manejo inadecuado del aparato, la red de conexión y la instalación o por el desgaste natural
debido a un mantenimiento y almacenamiento incorrecto del
dispositivo o por causas de fuerza mayor o influencias externas.
En caso de reclamación nos reservamos el derecho a reparar
las piezas defectuosas, sustituirlas o reemplazar el dispositivo.
Las piezas o el dispositivo reemplazado deberán ser de nuestra propiedad. Las reclamaciones por daños y perjuicios quedan excluidas, a menos que se demuestre intencionalidad o
negligencia grave por parte del fabricante.
Si dentro del periodo de garantía el dispositivo sigue mostrando
defectos, póngase en contacto con su recibo de compra únicamente en la tienda donde compró su dispositivo AMPLICOMMS. Todas las reclamaciones de garantía conforme a
estas disposiciones sólo tendrán validez frente al distribuidor
del producto. Los derechos de garantía dejarán de tener validez una vez finalizado el plazo de garantía de 2 años.
4 250711 990824
Vertrieb: Audioline GmbH, D-41460 Neuss
Juli 2011 – Ausgabe 1.0