1
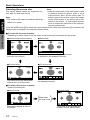
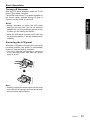
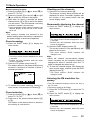
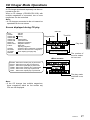
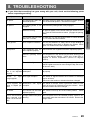
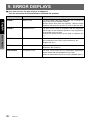
IN-DASH WIDE 5.8" COLOR LCD TV WITH CD CHANGER CONTROL
TÉLÉVISEUR COULEUR LCD 5,8" LARGE ENCASTRÉ DANS LE
TABLEAU DE BORD, AVEC COMMANDE DE CHANGEUR CD
TELEVISOR CON PANTALLA DE CRISTAL LÍQUIDO EN COLOR
PANORÁMICA DE 5,8" EMPOTRADO EN EL TABLERO DE
INSTRUMENTOS CON CONTROL DE CAMBIADOR DE DISCOS
COMPACTOS
TVX5653
Owner’s Manual & Installation
Mode d’emploi et manuel d’installation
Manual de instrucciones y de instalación
Thank you for purchasing the Clarion TVX5653.
Nous vous remercions d’avoir acheté le Clarion TVX5653.
Muchas gracias por la adquisición del TVX5653 Clarion.
Clarion Co., Ltd.
2000/2 (D• K)
All Rights Reserved. Copyright © 2000: Clarion Co., Ltd.
Printed in Japan / Imprimé au Japon / Impreso en Japón
QZ-6012B
280-7485-00
English
Owner’s Manual
Français
Mode d’emploi
Español
Manual de instrucciones
* Please read this Owner’s Manual & Installation
* Veuillez lire attentivement tout ce mode d'em-
in its entirety before proceeding with wire connection and installation.
* After reading this manual, be sure to keep it in
a handy place (e.g., glove compartment).
If you sell the motor vehicle, please leave the
manual in it so that the new owner can use it.
* Read the contents of the enclosed warranty
card and keep it with this manual.
* The section “CD Changer Mode Operations” of
this Owner’s Guide provides the operation procedure of a CD changer which is connected to
TVX5653 by C-BUS cable. (If you buy the CD
changer only, it is accompanied only by its
owner’s guide. The operation guide of the CD
changer is included in this Owner’s Guide.)
ploi et guide d'installation avant de procéder
aux connexions et à l'installation.
* Après avoir lu ce mode d’emploi, prenez soin
de le conserver dans un endroit pratique (par
ex: la boîte à gants).
Si vous vendez votre véhicule à moteur, laissez-y le manuel de façon que le nouveau propriétaire puisse l’utiliser.
* Lisez le contenu de la carte de garantie comprise et conservez-la avec ce manuel.
* La section “Fonctionnement du mode
changeur de CD” de ce mode d’emploi
explique le fonctionnement d’un changeur CD
connecté au TVX5653 par un câble C-BUS. (Si
vous achetez le changeur de CD indépendamment, il est seulement accompagné de son
propre mode d’emploi. Le guide de fonctionnement du changeur CD et compris dans ce
mode d’emploi.)
■ Contents
■ Table des matières
English
Français
1. PRECAUTIONS .........................................4
2. CONTROLS ...............................................5
3. BUTTON TERMINOLOGY ........................6
TV function buttons ....................................6
CD changer function buttons .....................6
4. FEATURES ................................................7
5. REMOTE CONTROL .................................8
Inserting the Battery ..................................8
Functions of Remote Control Unit Buttons.......9
6. CAUTIONS ON HANDLING ....................10
Cleaning ...................................................10
Concerning the wide screen ....................10
7. OPERATION ............................................11
Basic Operations......................................11
TV Mode Operations................................14
CD Changer Mode Operations ................17
8. TROUBLESHOOTING.............................19
9. ERROR DISPLAYS .................................20
10. SPECIFICATIONS ...................................21
• Installation/Wire Connection Guide .....23
1. PRÉCAUTIONS .......................................32
2. COMMANDES ...........................................5
3. NOMENCLATURE DES TOUCHES........33
Touches de fonctionnement du téléviseur .......33
Touches de fonctionnement du changeur CD .33
4. CARACTÉRISTIQUES ..............................7
5. TÉLÉCOMMANDE ..................................34
Insertion de la pile ...................................34
Fonctions des touches de la télécommande ..35
6. PRÉCAUTIONS DE MANIPULATION.....36
Nettoyage.........................................................36
A propos de l’écran large ................................36
7. FONCTIONNEMENT ...............................37
Opérations de base .................................37
Fonctionnement du mode TV ..................40
Fonctionnement du mode changeur CD..43
8. TROUBLESHOOTING.............................45
9. MESSAGES D’ERREUR .........................46
10. SPÉCIFICATIONS ...................................47
• Manuel d’installation et de connexion .......49
2
TVX5653
2. CONTROLS / COMMANDES / CONTROLES
Note: Be sure to spread this page and refer to the front diagrams when you read each chapter.
Remarque:
Veuillez déployer cette page et vous référez à ses schémas de la face avant
quand vous lisez chaque chapitre.
3. BUTTON TERMINOLOGY
Note: Be sure to read this chapter referring to the front diagrams of chapter “3. CONTOROLS” on
page 5 (spread).
1 OPEN button
2 TV/CD button
3 SHIFT button
Pressing the SHIFT button displays the menu screen and enables the preset channel number buttons and menu screen to be selected alternately. This screen shows the functions of the preset
channel buttons (4 to 9).
4. CARACTÉRISTIQUES
LCD panel
<Preset channel numbers>
4
4
5
6
8
9
0
~ 9 Preset channel button
DISP (display) button
PS (preset scan) button
AS (auto store) button
FM modulator frequency 2 button
FM modulator frequency 1 button
CH (channel) button
<Menu screen>
! WIDE button
@ VIDEO input terminal
# Joystick
A: Band selection (w z)
B: Tuning (Å Î)
C: Picture quality adjustment button
■ Panneau LCD couleur large (16:9), de 5,8", à entraînement de matrice
active TFT
■ 4 formats supportés : Cinéma, Large, Extra large et Normal
■ Panneau à angle de visionnement large, faible coefficient de réflexion et
haute luminosité
■ Mécanisme de chargement à coquille
■ Modes d'accord préréglé (12 stations au total), accord manuel et accord
automatique, pour accélérer la sélection des stations
■ Commande de changeur CD
Français
Français
Receiver for
remote control unit
* Available when the CD changer is connected
■ Very Easy and Functional Operation
■ Stereo VTR input Terminals are Provided on the Front Panel
■ Built-in 4-channel Diversity TV
Owner’s Manual
When the display is open
Lorsque l’afficheur est ouvert
Cuando el visualizador esté abierto
Owner’s Manual
■TV function buttons
■ 5.8” Wide (16:9) TFT Active Matrix Drive Type Color LCD Panel
■ 4 Modes Supported: Cinema, Wide, Full Wide and Normal
■ Wide Viewing Angle, Low Reflectance and High-brightness Panel
Employed
■ Shell Loading Mechanism
■ Preset Tuning (total of 12 stations), Manual Tuning and Automatic Tuning
Facilities for Speedy Selection of Any Broadcast Station
■ CD Changer Control Capabilitys
English
English
Nota: Cuando lea los capítulos, despliegue esta página para ver los diagramas de la parte frontal.
4. FEATURES
* Disponible si vous raccordez un changeur CD.
! 0 9 8 7 6 5 43
A
B
#
C
■CD changer function buttons
1 OPEN button
2 TV/CD button
3 SHIFT button
Pressing the SHIFT button displays the menu screen and enables the preset channel number buttons and menu screen to be selected alternately. This screen shows the functions of the disc
selector buttons (4 to 9).
<Disc numbers>
5
TVX5653
~ 9 Direct button
RPT (repeat) button
SCN (scan) button
RDM (random) button
D-RPT(disk repeat ) button
D-SCN (disk scan) button
D-RDM (disk random) button
1
6
TVX5653
<Menu screen>
# Joystick
A: Magazine selection (w z)
B: Program search (Å Î)
C: Play/pause button
■ Panel de cristal líquido en color de tipo matriz activa TFT con pantalla
panorámica (16:9) de 5,8"
■ 4 modos posibles: Cine, pantalla panorámica, pantalla panorámica completa, y pantalla normal
■ Utilización de un panel de amplio ángulo de visión, baja reflectancia, y
gran brillo
■ Mecanismo de carga estratiforme
■ Modos de sintonía de canales memorizados (12 canales en total), sintonía
manual, y sintonía automática para poder seleccionar rápidamente
cualquier canal de teledifusión
■ Funciones de control de cambiador de discos compactos
*Disponibles cuando haya conectado un cambiador de discos compactos
■ Operación muy fácil y funcional
■ Panel frontal provisto de tomas de entrada para una videograbadora
estéreo
■ Televisor con recepción en diversidad de 4 canales incorporado
TVX5653
7
Manual de instrucciones
Manual de instrucciones
4
4
5
6
7
8
9
4. CARACTERÍSTICAS
Español
Español
SOURCE UNIT / APPAREIL PILOTE / UNIDAD FUENTE
When the display is closed
Lorsque l’afficheur est fermé
Cuando el visualizador esté cerrado
2
■ Fonctionnement extrêmement simple et fonctionnel
■ Des prises d'entrée de magnétoscope stéréo sont prévues en façade.
■ Télévision en diversité 4 canaux intégrée
Mode d’emploi
Mode d’emploi
@
* Lea este Manual de instrucciones y de insta-
5. REMOTE CONTROL
Operating range: 30˚ in all directions
■ Índice
Español
@
$
Inserting the Battery
1. Turn the remote control unit upside down,
push the lock in the direction of the arrow, and
pull out the battery holder.
2. Insert the enclosed battery (CR2025) with the
“+” side facing up.
3. Push the battery holder back in securely until
a click is heard.
Notes:
Using batteries improperly can cause them to
explode. Take note of the following points:
• When replacing the battery, be sure to set the
new battery with the “+” side facing up.
• Do not short-circuit, disassemble or heat batteries.
• Do not dispose of batteries into fire or flames.
• Dispose of spent batteries properly.
8
TVX5653
1. This set is exclusively for use in motor vehicles with a 12V power supply, negative
ground.
2. Do not operate the set in ways other than
those described in this owner’s guide. In
addition, the LCD panel’s opening/ closing
mechanism is delicate, so do not operate
or use it with excessive force.
3. This unit uses a precision mechanism.
Even in the event that trouble arises, never
open the case, disassemble the unit, or
lubricate the rotating parts.
4. TV broadcast reception
When receiving the TV broadcasts, the
strength of the signals changes since the
car is moving, so in some cases it may not
be possible to receive clear pictures.
• TV signals are strongly linear, so reception is affected by buildings, mountains and
other obstacles.
• Such external factors such as electric
train lines, a high voltage lines, and signal
devices may disturb the picture or cause
noise.
* If the reception is poor, switch to a station
with good reception.
%
0
!
#
For your safety, the driver should not
watch the TV or operate the controls
while driving. Please note that watching
and operating the TV while driving are
prohibited by law in some countries.
Also, while driving, keep the volume to a
level at which external sounds can be
heard.
Remote control unit
Rear side
1.
Enclosed battery
(CR2025)
Lock
1. PRECAUCIONES ....................................58
2. CONTROLES.............................................5
3. NOMENCLATURA DE LOS BOTONES .59
Botones de función del televisor..............59
Botones de función del cambiador
de discos compactos ...............................59
4. CARACTERÍSTICAS.................................7
5. CONTROLADOR REMOTO ......................60
Inserción de la pila...................................60
Funciones de los botones del mando
a distancia................................................61
6. PRECAUCIONES DE MANEJO..............62
Limpieza...................................................62
Acerca de la pantalla panorámica ...........62
7. OPERACIÓN ...........................................63
Operaciones básicas ...............................63
Operaciones en el modo de televisor ......66
Operaciones en el modo de cambiador
de discos compactos ...............................69
8. SOLUCIÓN DE PROBLEMAS ................71
9. INDICACIONES DE ERROR ...................72
10. ESPECIFICACIONES ..............................73
• Manual de instalación y de
conexión de cables................................75
INFORMATION FOR USERS:
CHANGES OR MODIFICATIONS TO THIS
PRODUCT NOT APPROVED BY THE
MANUFACTURER WILL VOID THE WARRANTY AND WILL VIOLATE FCC
APPROVAL.
This equipment has been tested and
found to comply with the limits for a
Class B digital device, pursuant to Part
15 of the FCC Rules. These limits are
designed to provide reasonable protection against harmful interference in a
residential installation. This equipment
generates, uses, and can radiate radio
frequency energy and, if not installed
and used in accordance with the instructions, may cause harmful interference to
radio communications. However, there is
no guarantee that interference will not
occur in a particular installation. If this
equipment does cause harmful interference to radio or television reception,
which can be determined by turning the
equipment off and on, the user is
encouraged to consult the dealer or an
experienced radio/TV technician for
help.
MODEL
TVX5653
12V
GROUND
VHF 54-216MHz/UHF 470-806MHz
THIS DEVICE COMPLIES WITH PART 15 OF THE FCC RULES.
OPERATION IS SUBJECT TO THE FOLLOWING TWO CONDITIONS:
(1) THIS DEVICE MAY NOT CAUSE HARMFUL INTERFERENCE, AND
(2) THIS DEVICE MUST ACCEPT ANY INTERFERENCE RECEIVED,
INCLUDING INTERFERENCE THAT MAY CAUSE UNDESIRED
OPERATION.
MANUFACTURED:
SERIAL No.
QZ-6012B
MODEL
286-9013-20
Clarion Co.,Ltd.
MADE IN JAPAN
TVX5653
12V
GROUND
VHF 54-216MHz/UHF 470-806MHz
THIS DEVICE COMPLIES WITH PART 15 OF THE FCC RULES.
OPERATION IS SUBJECT TO THE FOLLOWING TWO CONDITIONS:
(1) THIS DEVICE MAY NOT CAUSE HARMFUL INTERFERENCE, AND
(2) THIS DEVICE MUST ACCEPT ANY INTERFERENCE RECEIVED,
INCLUDING INTERFERENCE THAT MAY CAUSE UNDESIRED
OPERATION.
MANUFACTURED:
SERIAL No.
QZ-6012B
286-9013-20
Clarion Co.,Ltd.
MADE IN JAPAN
2.
3.
Be sure to spread and read the next page.
Veuillez déployer et vous référer à la page suivante.
Cerciórese de desplegar y de leer la página siguiente.
Battery holder
TVX5653
3
TVX5653
4
Owner’s Manual
9
Signal transmitter
WARNING
English
Receiver for remote
control unit
Remote control unit
1. PRECAUTIONS
lación antes de pasar a la conexión de cables
y a la instalación.
* Después de haber leído este manual, guárdelo
a mano (p. ej., en la guantera).
Cuando venda su automóvil, deje en él el manual de instrucciones a fin de que pueda utilizarlo el nuevo usuario.
* Lea el contenido de la tarjeta de garantía
adjunta, y guárdela con este manual.
* En la sección “Operaciones en el modo de
cambiador de discos compactos” se indica el
procedimiento de operación de un cambiador
de discos compactos conectado al TVX5653
mediante el cable C-BUS. (Si usted adquiere
solamente el cambiador de discos compactos,
sólo se suministrará con su guía del usuario.
La guía de operación del cambiador de discos
compactos se incluye en esta guía del
usuario.)
Functions of Remote Control Unit Buttons
Mode
TV
Button
CD changer
0 CHANNEL
TRACK
( / )
Manual tuning UP/DOWN. Hold Track UP/DOWN. Hold down (for
down (for about half a second) to about 1 second) for Fasttune in the stations automatically. forward/fast-backward.
!
Hold down (for about 2 seconds) Play/pause
to adjust the picture quality.
@ PRESET
DIRECT
(1 to 6)
Preset channel tuning. Hold down Switching of disc inside magazine.
(for about 2 seconds) for manual
memory.
# CH
Received
ON/OFF.
$ PS
AS
Preset scan.
Hold down (for about 2 seconds)
for auto store.
% BAND
MAG
Receiving band selection and Magazine switching. Hold down
(for about 2 seconds) to lock/reswitching to VTR mode.
lease magazine.
channel
display
* Some of the corresponding buttons on the main unit and remote control unit have different functions.
TVX5653
9
Owner’s Manual
TV operation/CD changer control switching.
Hold down (for about 1 second) to turn the power ON or OFF.
English
9 FUNC
POWER
6. CAUTION ON HANDLING
English
For a longer service life, be sure to read the following cautions.
• Small black and shiny dots inside the LCD panel
• Be sure to store the LCD panel inside the source
• The LCD panel may stop temporarily when it is
unit when parking the car outdoors for long periods of time.
The LCD panel will operate properly in a temperature range of 0 to 60°C.
Don’t allow any liquids on the set from drinks,
umbrellas etc. Doing so may damage the internal
circuitry.
Do not disassemble or modify the set in any way.
Doing so may result in damage.
Do not draw the LCD panel out and use it as a tray.
Also, subjecting the LCD panel to shocks may
result in breakage, deformation or other damage.
Do not let cigarettes burn the display. Doing so
may damage or deform the cabinet.
If a problem should occur, have the set inspected
at your store of purchase.
Do not insert objects or poke in the space between
the LCD panel and the source unit when the panel
is tilted.
Do not place anything on the display when the
LCD panel is tilted.
In extremely cold weather, the movement of the
picture may be slow and the screen may be dark,
but this is not a malfunction. The set will work normally once the temperature increases.
opened or closed when the engine is stopped or
when it is cold. This is not a malfunction. If this
happens, repeat the operation.
The remote controller may not work if the remote
control sensor is exposed to direct sunlight.
Do not hold on the screen when adjusting the
angle of the LCD panel. Doing so may damage it.
Do not leave droplets of water on the LCD panel
since they can cause discoloration and stains. In
addition, entry of moisture inside the unit can
cause malfunctioning. Any drops of water on the
panel should be removed immediately using
absorbent cotton or a soft cloth.
Do not insert objects into the video input jack.
The fluorescent light used behind the screen eventually wears out. It should be replaced if the picture becomes extremely dark or flickers.
•
•
•
Owner’s Manual
•
•
•
•
•
Cleaning
• Cleaning the cabinet
Use a soft, dry cloth and gently wipe off the
dirt.
For tough dirt, apply some neutral detergent
diluted in water to a soft cloth, wipe off the dirt
gently, then wipe again with a dry cloth.
Do not use benzene, thinner, car cleaner, etc.,
as these substances may damage the cabinet
or cause the paint to peel. Also, leaving rubber
of plastic products in contact with the cabinet
for long periods of time may cause stains.
• Cleaning the LCD panel
The LCD panel tends to collect dust, so wipe
it off occasionally with a soft cloth.
The surface is easily scratched, so do not rub
it with hard objects.
10
TVX5653
are normal for LCD products.
•
•
•
•
•
Concerning the wide
screen
• A wide-screen TV comes with a function for selecting various screen modes. If you select a screen
mode that differs from the picture ratio of the TV
program or other software media, you will not be
able to view the original pictures as was originally
intended. Bear this point in mind when selecting
the screen mode.
7. OPERATION
Basic Operations
Note: Be sure to read this chapter referring to the front diagrams of
CAUTION
1) Start the engine running (set the key to ACC
or ON).
2) When the OPEN button 1 is pressed, the
LCD panel slides out.
* The LCD panel will be retracted if the OPEN
button 1 is pressed while the LCD panel is
extended. The LCD panel will be automatically retracted if about ten seconds are allowed to
elapse with the panel extended and no operation initiated.
Notes:
1) Turn the LCD panel upwards and set it at an
easy viewing angle.
Label
Turn the diplay upwards by
holding only the front edge from
the label.
CAUTION
When adjusting the angle, take care not to
catch your fingers between the LCD panel
and main unit or instrument panel. Do not
take hold of the area behind the label and
operate the unit.
Notes:
• Do not forcibly turn the LCD panel.
• The LCD panel can be turned upwards to a
maximum angle of 130 degrees (although this
may vary depending on the vehicle model).
Angle to which LCD
panel can be turned:
130 degrees
• Unless the LCD panel is fully extended, its
angle cannot be adjusted. Attempting to turn
the panel before it is fully extended will cause
malfunctioning.
• If the LCD panel stops when it is partially
extended, press the OPEN button 1 to retract
it, and then press the OPEN button 1 again so
that it is fully extended.
Car stereo adjustments
1) Set the car stereo’s radio frequency to the
modulator frequency.
* The factory set for the modulator frequency is
88.3 MHz. (Refer to the section on selecting
the FM modulator frequency on page 15, 16.)
2) Use the car stereo’s volume and tone controls
to adjust the volume and tone to the desired
levels.
Note:
• Adjust also the BASS (bass)/TREB (treble) and
BAL (left/right balance)/FAD (front/back balance) controls to the optimum positions.
TVX5653
11
Owner’s Manual
Sliding out the LCD panel
Adjusting the LCD panel angle
English
To prevent the battery from running down,
operate the unit while the engine is running
whenever possible.
When listening to the sound of TV programs
while driving, use a volume setting at which
you will still be able to hear sounds outside
the vehicle.
chapter “3. CONTROL” on page 5 (spread).
Basic Operations
Selecting the screen size
Four screen display modes are supported: normal, wide, full wide and cinema.
English
Note:
• The screen mode cannot be selected while the
vehicle is in motion.
Note:
• When the wide mode or full wide mode is used
to display a normal 4:3 picture which is not a
wide picture so that it fills the whole wide TV
screen, parts of the picture around the edges
will be off the screen or the picture will be distorted on the screen. To view original pictures
so as to respect the intentions of the producer,
use the normal mode.
Press the WIDE button ! to select the screen display mode. Each time this button ! is pressed, the
display mode is changed in the sequence shown below.
Owner’s Manual
■ For normal 4:3 picture reception
Depending on which mode is set, the shape of the picture will be distorted on the screen.
● Normal mode (normal screen)
● Wide mode
Black bands appear to the left
and right of the screen.
The picture at the left and right of the screen
is stretched in the sideways direction.
● Cinema mode
● Full wide mode
The picture at the top and bottom
of the screen is off the screen.
The whole picture is stretched in
the sideways direction.
■ For wide (16:9) picture reception
Use the cinema mode.
● Normal mode
● Cinema mode
Wide mode,
full wide mode
Black bands appear all around
the screen.
12
TVX5653
The picture is shown expanded
so that it fills the whole screen.
Basic Operations
Turning off the power
With the LCD panel extended, press the TV/CD
button 2 for about 1 second.
The picture seen during TV program reception or
the screen which appears during CD play is
cleared, and the power is turned off.
English
Owner’s Manual
Notes:
• Always remember to retract the LCD panel
back into the main unit if you do not intend to
operate the unit for a prolonged period of time
or when you are leaving the vehicle.
• When the LCD panel is turned until it locks into
its horizontal position, it will be retracted automatically.
Retracting the LCD panel
When the LCD panel is turned until it locks at its
horizontal position, the power is automatically
turned off, and the panel is retracted.
* The LCD is retracted automatically by returning it
to its horizontal position also when the ignition
switch is at OFF.
Note:
• Forcibly pushing the screen back into the main
unit without first locking it at its horizontal position will cause malfunctioning.
TVX5653
13
TV Mode Operations
WARNING
English
For your safety, the driver should not watch
the TV or operate the controls while driving.
Please note that watching and operating the
TV while driving is prohibited by law in some
countries. Also, while driving, keep the volume to a level at which external sounds can
be heard.
Watching TV
Owner’s Manual
1) Press the TV/CD button 2 to select the TV
mode.
2) Press the joystick # up (w) or down (z) to
select TV1 or TV2. Each time the joystick #is
pressed up (w) or down (z), the setting is
switched in the sequence shown below.
TV1
TV2
VTR
Preset memory function
The number of preset channels which can be
stored in the memory is:
• 6 stations for TV1
Total of 12 stations
• 6 stations for TV2
}
Any station can be stored in any preset channel.
Auto store function
The channels received automatically are automatically stored in the preset channels.
The setting procedure for the preset channels is
the same for TV1 and TV2.
1) Press the SHIFT button 3 to display the
menu screen.
* The menu screen remains displayed for about
5 seconds.
3) Press the joystick # to the left (Å) or right
(Î) to select the channel.
Seek tuning
Keep pressing the joystick # to the left (Å) or
right (Î) for about half a second.
The seek tuning mode is selected when you
keep pressing the joystick. Tuning will stop automatically at a channel where a broadcast is
received.
* When seek tuning has stopped before or after a
broadcast channel, press the channel button
again.
Manual tuning
Press the joystick # to the left (Å) or right (Î)
to select the channel.
The channel number appears at the top left of
the screen.
* Each time the joystick # is pressed, the channel
number is incremented or decremented by 1.
* The channel number remains on the screen for
about 5 seconds.
* To ensure that the channel number is displayed all
the time, refer to the section on permanently displaying the channel (page 15), and perform the
necessary settings.
14
TVX5653
* Perform the next operation while the menu
screen is displayed.
2) When the AS (auto store) button 6 is
pressed, the broadcast stations are automatically stored in the memory starting with the
one following the station now received.
Notes:
• The memory contents are returned to the
default settings when the battery is replaced or
the power supply is otherwise suspended.
• The signal conditions are sometimes such that
a channel without a station is stored in the
memory.
• Some stations may not be stored if their signals
are too weak in the reception area.
• When a station could not be stored or a channel without a station has been stored in the
memory, refer to the section on the manual
memory function which follows, and perform
the settings again.
TV Mode Operations
* Upon completion of the memory operation, the
channel display at the top left of the screen
turns red.
Preset scanning
1) Press the SHIFT button 3 to display the
menu screen.
1) Press the CH (channel) button 0.
The channel currently being received will be
displayed for about 5 seconds, together with
the number of the preset button and the
screen display mode.
Permanently displaying the channel
1) Press the SHIFT button 3 to display the
menu screen.
* The menu screen remains displayed for about
5 seconds.
* Perform the next operation while the menu
screen is displayed.
2) Press the DISP (display) button 4.
The current channel is now permanently displayed on the screen.
* The menu screen’s “DISP” indicator will
change to red.
* The menu screen remains displayed for about
5 seconds.
* Perform the next operation while the menu
screen is displayed.
2) Press the PS (preset scan) button 5.
The stations stored in the preset channels are
received in sequence at intervals of about 5
seconds per station.
Note:
• When the “channel non-permanent display
mode” has been set, the reception channel is
displayed for about 5 seconds when the TV
band is changed and when tuning.
3) To clear the channel display, first display the
menu screen again, and then press the DISP
(display) button 4.
* The menu screen’s “DISP” indicator will
change to white.
Selecting the FM modulator frequency
• The FM modulator frequency can be set only in
the TV mode.
3) To release the preset scanning, display the
menu screen, and press the PS button 5.
• The factory setting is 88.3 MHz.
Preset selection
1) Press the TV/CD button 2 to select the TV
mode.
2) Press the SHIFT button 3 to display the
menu screen.
1) Press the joystick # up (w) or down (z) to
select TV1 or TV2.
2) Press one of the preset channel buttons (4
to 9).
The station in the channel which is stored in
the memory is now tuned in.
* The menu screen remains displayed for about
5 seconds.
* Perform the next operation while the menu
screen is displayed.
TVX5653
15
Owner’s Manual
Note:
• The memory contents are returned to the
default settings when the battery is replaced or
the power supply is otherwise suspended.
Checking out the channels
English
Manual memory function
1) Press the joystick # up (w) or down (z) to
select TV1 or TV2.
2) Press the joystick # to the left (Å) or right
(Î) to select the channel to be preset.
3) Hold down for about 2 seconds the preset
channel button (4 to 9) in which the station
is to be stored. The new channel now being
received is stored in the memory.
TV Mode Operations
3) Press either the FM modulator frequency 1
button 9 or the FM modulator frequency 2
button 8.
* The FM modulator frequency is set as follows:
• FM modulator (FRQ1): 88.3 MHz
• FM modulator (FRQ2): 88.7 MHz
English
Adjusting the brightness and tone
of color
How to connect the unit with a VTR
Notes:
• Before proceeding with the connections, make
absolutely sure that the power of the unit and
VTR (or video camera) has been turned off.
• Before proceeding with the connections, refer
to the Instruction Manual of the unit which is to
be connected.
1) Hold down the center of the joystick # for
about 2 seconds.
The screen adjustment mode now appears.
Owner’s Manual
* Start the adjustments while the adjustment displays are on the screen. These displays will be
automatically cleared after about 5 seconds.
2) Press the joystick # up (w) or down (z) to
select what is to be adjusted, and then press
it to the left (Å) or right (Î) to make the
adjustment.
* The pointer which indicates the adjustment
position moves one scale increment when initially pushed once. It then moves one scale
increment when it is pushed 5 times.
Note:
• There is no hue adjustment for the PAL TV system.
Brightness adjustment
(BRIGHT)
Darker
Lighter
Hue adjustment (HUE)
More More
reddish greenish
Color intensity
adjustment (COLOR)
Lighter
Darker
VTR input
ternimal
Note:
• You will need an AV connecting cord (CCA357-500) purchased separately to convert the
RCA pin cord into a stereo mini jack in order to
connect an integrated camera/VTR unit to the
unit.
Watching a video tape
Refer to the Instruction Manual of the unit concerned for details on operating the video unit
connected.
1) Press the TV/CD button 2 to select the TV
mode.
2) Press the joystick # up (w) or down (z) to
select VTR.
Each time the joystick # is pressed up (w)
or down (z), the setting is switched in the
sequence shown below.
TVX5653
VTR
TV2
TV1
Note:
• When a VTR has been connected to the system expansion terminals on the unit’s rear
panel, the setting is switched in the sequence
shown below.
TV1
16
Audio output ternimal
Video output ternimal
TV2
VTR1
VTR2
CD Chager Mode Operations
English
A CD changer purchased separately can be connected to the unit.
When a CD changer (CDC635/CDC1235) with
multiple magazines is connected, two or more
magazines can be controlled.
Note:
• A CD changer connected to the unit cannot be
operated from the car stereo.
Screen displayed during CD play
Disc No.
CHECK
NO-DISC
HI-TEMP
ERROR
: Playing
: Pause
: Tuning
Magazine No.
Track No.
Fast-forward
Fast-backward
Switching magazine
Magazine locked
With CDs
Ejecting magazine
: Checking when magazine is installed
: When no discs are in the magazine
: Error display (see page 20)
:
:
:
:
:
Play time
<Menu screen>
The number of
the disc selected turns red.
D-RDM : When disc random play is performed
D-SCN : When disc scan play is performed
D-RPT : When disc repeat play is performed
T-RDM : When track random play is performed
T-SCN : When track scan play is performed
T-RPT : When track repeat play is performed
The play mode
selected turns
red.
Note:
• If the CD changer has multiple magazines,
those magazines which do not contain any
CDs are not displayed.
TVX5653
17
Owner’s Manual
PLAY
PAUSE
TRACK UP
TRACK DN
TRACK FF
TRACK FB
MAG UP
MAG LOCK
EJECT
CD Chager Mode Operations
English
Owner’s Manual
Listening to a CD
Random/Scan/Repeat play
1) Press the TV/CD button 2 to select the CD
changer mode.
2) Press the joystick # up (w) or down (z) to
select the magazine containing the disc to be
heard.
Disc play now commences.
Note:
• A magazine which does not contain any CDs is
not selected.
3) Press the joystick # to the left (Å) or right
(Î) to select the disc to be heard.
Play of the selected disc now commences.
Note:
• This operation is performed when a CD changer (CDC635/CDC1235) with multiple magazines has been connected.
4) Press the joystick # to the left (Å) or right
(Î) to select the track.
When right (Î) is pressed, the next track is
selected.
When left (Å) is pressed, the start of the
track now selected is located. If it is pressed
again, the previous track is selected.
1) Press the SHIFT button 3 to display the
menu screen.
Fast-forward and fast-backward
Keep pressing the joystick # to the left (Å) or
right (Î) for about one second during disc play.
When right (Î) is pressed, fast-forward is performed at 3 times the normal play speed; conversely, when left (Å) is pressed, fast-backward
is performed at 3 times the normal play speed.
When the the joystick # is kept pressed to the
left (Å) or right (Î) for about 5 seconds, fast-forward or fast-backward proceeds at 15 times the
normal play speed.
Pausing playback
1) Press the center of the joystick #. The disc
play pauses.
2) When the center of the joystick # is pressed
again, the pause is released.
18
TVX5653
* The menu screen remains displayed for about
5 seconds.
* Perform the next operation while the menu
screen is displayed.
Note:
• The remote control cannot be used for operation.
2) Select the play mode using one of the direct
buttons (4 to 9).
The selected play mode indicator changes to
red.
Button
Play mode
Disc random play
Disc scan play
Disc repeat play
Random play
Scan play
Repeat play
Operation
All the tracks on all the
discs are played in random order.
The first 10 seconds of
the first track on each
disc are played in turn.
The disc now playing is
played repeatedly.
The tracks on the disc
now playing are played in
random order.
The first 10 seconds of
all the tracks on each
disc are played in turn.
The track now playing is
played repeatedly.
Magazine lock
Note:
• This function is operated when a CD changer
(CDC635/CDC1235) with multiple magazines
has been connected.
1) Keep pressing the joystick # up (w) or down
(z) for about 2 seconds.
The key mark (
) now appears on the left of
the magazine number, and only the CDs in
the selected magazine are played.
2) To release the magazine lock, keep pressing
the joystick # up (w) or down (z) again for
about 2 seconds. This will release the lock.
8. TROUBLESHOOTING
■ If you think that something has gone wrong with your unit, check out the following points
before requesting servicing.
Symptom
Cause
Measure
The LCD panel is still in the The power comes on when the LCD panel is turned upwards
from its horizontal position. Check this out again.
horizontal position.
No picture.
The parking brake is not Check that the parking brake is fully engaged.
engaged.
No pictures appear on the screen while the vehicle is moving. Park the vehicle and then watch. (Engage the parking
brake.)
Vehicle is moving.
You may be situated in a valley, next to a high building or
near something else which is blocking the signals. Check
again in a location where the reception is better.
Fuzzy picture.
Poor reception conditions.
Dark picture.
The brightness has not Check whether the brightness has been adjusted properly.
been adjusted properly.
Adverse operating condi- The temperature in the vehicle may be below freezing point
or over 60 degrees Celsius. Check once it has risen or
tions.
dropped to normal temperature (around 25 degrees
Celsius).
The vehicle's lights are on. At night, the screen is darkened to prevent glare. (When the
vehicle’s lights are turned on even during the day, the screen
will become dark.)
Colors are too light or Color adjustments
hue is not adjusted inadequate.
properly.
Double
or
triple Poor signal reception.
images appear.
are Check whether the hue and color intensity have been adjusted properly.
The effects of signals reflected off mountains or buildings
may be to blame.
Check once the location or direction has been changed.
Picture appears with Interference with signal The effects of vehicles, trains, high-tension cables or neon
signs (all sources of interference) may be to blame. Check
spots or striped pat- reception.
once the location has been changed.
terns.
No sound.
The volume has not been The volume level may be at the lowest position. Check
again.
adjusted properly.
LCD is now automati- Foreign matter in the panel The LCD panel will not be retracted properly if there is foreign matter inside the area where it is housed. Remove the
cally retracted even housing.
foreign matter.
when it is set horizontally.
TVX5653
19
Owner’s Manual
The function has not been To watch the TV, use the function button to check whether
the TV screen has been selected.
set to the TV mode.
English
No power.
9. ERROR DISPLAYS
■ If an error occurs, the type of error is displayed.
Take the measures described below to eliminate the problem.
Error display
Name of error
Description
English
Owner’s Manual
ERROR 1
Memory error
This error occurs if the disc loading data, etc., is lost due to
wear of the CD auto changer’s battery.
(Remove all the discs from the magazine, insert the empty
magazine and press the eject key to return to the first disc.)
ERROR 2
Mechanical error
This error occurs if there is a problem with the mechanism
and the eject or disc selection operation is not completed in
the specified amount of time.
(Consult the nearest Clarion service shop or customer clinic.)
ERROR 3
Functional error
This error occurs if the pickup cannot focus after several tries
due to scratches on the disc, signal interference, etc.
(Replace the disc.)
ERROR 6
Disc error
This error occurs when the disc is loaded upside-down.
(Reload the disc properly.)
TEMP ERROR
Temperature error
This error occurs when the CD mechanism's temperature
sensor detects that the temperature is too high.
(When the temperature returns to normal, playback starts.)
20
TVX5653
10. SPECIFICATIONS
General
5.8-inch(127.2mm Width ✕
71.88mm Height)
Display method: Transmission type TN liquid
crystal display
Drive method: TFT(thin-film transistor) active
matrix driving
Pixels:
280800 (1200 ✕ 234)
Power source voltage:DC13.2 V
(10.8 to 15.6 V)
Ground:
Negative
Current consumption: Less than 2.0 A
Weight:
1.5 kg
Dimensions:
178 mm Width ✕
50 mm Height ✕
156 mm Depth
(7" Width ✕
1-15/16 " Height ✕
6-1/8" Depth)
TV Tuner
Owner’s Manual
Tuning system: PLL synthesizer system
Reception channels:
VHF:
2 to 13 ch (54 to 216 MHz)
UHF:
14 to 69 ch (470 to 806 MHz)
Intermediate frequency:
45.75 MHz for video
41.25 MHz for audio
Antenna input: 75 Ω unbalanced
156 mm
(6-1/8")
Screen size:
English
LCD Monitor
Video input:
1.0 ± 0.2 Vp-p (input impedance 75 Ω)
VTR video input: 3.5ømini-jack
Audio input:
130 ± 60 mVrms (input impedance 45 kΩ or
greater)
VTR audio input: 3.5ømini-jack
Video output:1.0 V ± 0.2 Vp-p(output impedance
75 Ω)
172 mm
(6-3/4")
178 mm
(7")
23 mm
(15/16")
Input/Output
50 mm
(1-15/16")
Note:
• Specifications and design are subject to
change widthout notice for further improvement.
TVX5653
21
22
TVX5653


![Fronius Interface [42,0410,1564]](http://vs1.manualzilla.com/store/data/006782084_1-53156ffbfd5260d22824ae9d59a957e6-150x150.png)