1
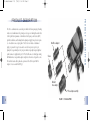
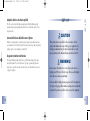
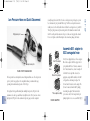
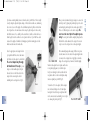
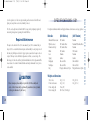
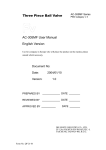
SS1 owner's manual 7-05
7/26/05
5:21 PM
Page 1
SS1
16742 Burke Lane, Huntington Beach, CA 92647
(714) 375-1433 • fax (714) 345-1435
www.atomicaquatics.com
MADE IN THE U.S.A.
7/05
Safe Second/Inflator
O W N E R ’ S
M A N U A L
SS1 owner's manual 7-05
7/26/05
5:21 PM
Page 3
Before Use - Warranty Registration .............................................................................. 4
Product Description .......................................................................................................... 6
Product Advantages .......................................................................................................... 8
Important New Features .................................................................................................. 9
Set-up ............................................................................................................................ 11
Dive Operation .............................................................................................................. 17
Post Dive Care ................................................................................................................ 19
Specifications .................................................................................................................. 21
Warranty ........................................................................................................................ 22
The SS1 integrates the functions of the safe second and power inflator
into one compact, low profile unit. The SS1 is the most advanced,
highest quality and best performing product of its’ type. It is the
first safe second/inflator with primary regulator performance. The
innovative design of the SS1 makes it both easy to use and easy to
maintain. The design is complimented by using only the finest
materials (titanium, 316 stainless steel, chrome plated brass
and various engineering polymers, and
silicone elastomers) resulting in
unsurpassed reliability
and trouble free
performance.
INTRODUCTION
Introduction .................................................................................................................... 3
INTRODUCTION
Thank you for choosing Atomic Aquatics. Our company is dedicated to creating and
manufacturing only the finest diving products. Since our first product release of the
world’s first titanium diving regulators, our regulators have received worldwide acclaim for
performance, ergonomics and quality.
2
©2005 ATOMIC AQUATICS, INC.
3
SS1 owner's manual 7-05
7/26/05
5:21 PM
Page 5
Warranty Registration
Please take a moment to locate, complete and return your warranty registration
card to Atomic Aquatics. This card is very important. It will help you obtain
warranty service and is our only way to contact you in the event of safety notices,
service updates, or changes regarding this product. You may also register your
warranty online at: www.atomicaquatics.com.
IMPORTANT SAFETY INFORMATION PLEASE READ CAREFULLY
WARNING!
This safe second/inflator is intended for use only by those competent,
trained and certified by a nationally recognized SCUBA training
agency. This manual is not a substitute for such training. Diving
without such training is extremely hazardous and could result in
serious personal injury or death.
4
WARNING!
NITROX (EAN) USE
IMPORTANT NOTICE - READ BEFORE YOU USE THIS REGULATOR
This safe second/inflator has been assembled, cleaned and made
compatible for enriched air Nitrox (EAN) to a maximum 50% oxygen
concentration at a maximum pressure of 3500 psi. They do not
require additional cleaning or servicing.
Do not under any circumstances use this regulator with pure oxygen
or any gas mixture exceeding 50% oxygen. Failure to comply with
the above warnings could cause serious personal injury or death from
fire or explosion.
WARRANTY REGISTRATION
BEFORE USE
Do not use silicone or petroleum based greases or oils in or around
regulators being used for EAN Nitrox or oxygen mixes.
5
SS1 owner's manual 7-05
7/26/05
5:21 PM
Page 7
PRODUCT DESCRIPTION
PRODUCT DESCRIPTION
The SS1 is a combination safe second and power inflator for back-up emergency breathing
in the event of a malfunction of the primary second stage or air sharing with another diver.
It offers push button pneumatic or oral inflation of the buoyancy control device (BCD),
push button deflation, and breathing from the primary air supply. It may be used in place
of, or in addition to an octopus regulator. The SS1 does not include a redundant air
supply or separate first stage. It is attached to one of the low-pressure ports of your
primary first stage normally used for your power inflator. A specially designed, high-flow
quick disconnect is supplied with your SS1. The SS1 will connect to virtually any existing
BCD inflation hose via specialized adapters configured to fit various corrugated hose sizes.
This exclusive feature allows quick and easy removal of the SS1 from your BCD for
transport or use on another BCD (Fig. 1).
Small hose adapter
Sleeve
Medium
hose adapter
1" Hose adapter assembly
6
FIGURE 1: SS1 AND ADAPTERS
7
SS1 owner's manual 7-05
7/26/05
5:21 PM
Page 9
When used in place of a conventional octopus set-up, the SS1 offers several advantages.
Built for performance.
Less gear, less weight, fewer hoses.
Typically, many octopus units and safe second/inflators don’t deliver the same performance
as a primary second stage. The SS1 brings you the same high quality performance, design
and workmanship Atomic Aquatics has become famous for. The breathing performance is
comparable to or exceeds that of many primary regulators.
The SS1 is only slightly larger than the inflator it replaces and uses a single low-pressure
hose routed the same as your standard inflator hose. It combines the functions of two
products into one. Less equipment means less weight and a more streamlined profile.
One less hose reduces snagging problems.
Familiarity of location.
The SS1 is placed in the same location on your BCD as your previous inflator. It is in a
fixed location where you always know where it is.
Familiarity through frequent use.
Since the inflator of the SS1 is used constantly throughout the dive, the diver becomes
intimately aware of its’ operation and condition. You know not only where it is, but how
it works, and that it works when you need it.
8
I M P O R TA N T N E W F E AT U R E S
Dependable: 2-year service interval.
Featuring the exclusive Atomic “seat saving orifice” (patent #5,803,073) and constructed
of the finest corrosion resistant materials, the SS1 features an unparalleled two- year
service interval and limited lifetime warranty.
A constant problem in second stage regulators of most other brands is the rubber valve
seat. In standard designs, this seat is pushed tight against a sharp edged orifice from the
day it leaves the factory, eventually making a deep impression in the seat resulting in
poor performance and annoying leaks. The orifice of the SS1 only contacts the seat when
pressurized. When not being used, the orifice automatically retracts away from the seat
just enough to prevent damage during storage. This dramatically increases the service life
and maintains like new performance.
ADVANTAGES/NEW FEATURES
P R O D U C T A D VA N TA G E S
9
SS1 owner's manual 7-05
7/26/05
5:21 PM
Page 11
The SS1 can be used with virtually any manufacturers BCD by utilizing specially
designed adapters (patent pending) that allow the SS1 to work with a variety of hose
designs and sizes.
Convenient: Exclusive Quick Disconnect System.
Exclusive to Atomic Aquatics, the quick disconnect adapter system allows quick and
easy detachment of the SS1 from your BCD for transport and storage with your primary
regulator system or even switching to another BCD.
Designed for Comfort and Function.
The low profile elliptical shape lies flatter on your BCD than existing designs and is
more hydrodynamic. The control buttons are very large, ergonomically placed and
surfaced by a soft, tactile elastomer. The entire front cover is flexible and can be used
to purge the regulator.
S E T- U P
S E T- U P
Adaptable: Attaches to almost any BCD.
CAUTION
These instructions are provided for the convenience of those
capable and familiar with set-up of this type of equipment. It is
strongly recommended that your professional retailer or scuba
repair technician do the final installation and check of the SS1.
WARNING!
Do not connect the inflator hose or any low-pressure hose to a
high-pressure (HP) port of the first stage. The hose could rupture
and could cause serious personal injury.
Do not assemble the high-pressure gauge to any of the low-pressure
(LP) ports or the gauge will not indicate tank pressure. Consult with
your dealer if you have any doubts about set up of this equipment.
10
11
SS1 owner's manual 7-05
7/26/05
5:21 PM
Page 13
High-pressure port
(usually a larger thread size 7/16-20). Choose the low-pressure port that gives you the
best orientation for your particular BCD set-up. The LP hose and quick disconnect is
usually routed over the left shoulder where it follows the corrugated hose of your BCD.
The LP port plug is removed by unscrewing with a 5/32 (4mm) hex wrench. Install
the LP hose with quick disconnect into the port of choice and snug up with a wrench.
Do not over tighten as this will not improve the seal and may damage the threads.
S E T- U P
Low Pressure Hose and Quick Disconnect
Assemble SS1 adapter to
BCD corrugated hose
Small hose adapter
Low-pressure ports
FIGURE 2: FIRST STAGE AND HOSE
The low-pressure hose with quick disconnect fitting installs into one of the low-pressure
ports of your first stage regulator. It is compatible with any conventional first stage
operating with an intermediate pressure of 125-145 psi.
12
Your regulator first stage will normally have multiple low-pressure (LP) ports for the
attachment of second stages and inflators (usually thread size 3/8-24), and one or more
high pressure (HP) ports for the attachment of pressure gauges and dive computers
Sleeve
Medium hose adapter
1" Hose adapter assembly
FIGURE 3: ADAPTERS
Your SS1 was shipped with a set of hose adapters.
One of these adapters will be the proper size for
your particular BCD hose. The most common is
the 1" inside diameter hose, found on nearly all
of the BCD’s used today. Once selected, the
appropriate adapter will be installed to the BCD
corrugated hose and clamped on place. The
SS1 can then be threaded onto the adapter. The
SS1 can be removed from the BCD by simply
unscrewing the adapter. This feature allows
you to remove the SS1 for transport with your
primary regulator or use on a second BCD (Fig 3).
13
SS1 owner's manual 7-05
7/26/05
5:21 PM
Page 15
Select the appropriate sized adapter that fits
your particular BCD hose. Insert and remove
the barbed end of the adapter to check the fit.
The correct adapter may fit snugly
but should never fit loosely. If you are
using one of the smaller adapters, slip the
threaded sleeve over the barbed end of the
adapter before connecting the cable or
installing into the corrugated hose (Fig. 4).
Adapters
Sleeve
FIGURE 4
14
Once you have determined the proper adapter, re-connect the
cable (if present) by placing the pin through loop of the cable
and inserting the pin though the holes in the adapter (Fig 5).
There are 3 different pins, one for each size adapter. Be
sure to use the correct pin for the adapter you are
using. The correct pin should fit completely through and be
flush with the outside diameter of the adapter. You are now
ready to secure the corrugated hose to the adapter nipple.
S E T- U P
If you have an existing inflator, remove it from the end of your BCD hose. This is usually
done by cutting the disposable plastic clamp, or if fitted with a reusable one, unthreading
the screws to loosen it. The nipple of the old inflator may then be pulled or twisted from
the corrugated hose. In some instances the hose may be glued in place for extra security
with rubber cement. If so, carefully work a screwdriver or suitable tool under the hose to
break the glue bond. Be careful not to cut or puncture the hose. If your BCD has a cable
attached to the nipple of the inflator for dumping air, push the retaining pin out of the
inflator and disconnect it from the cable.
We recommend placing a thin coating of rubber or neoprene
(wetsuit) cement on to the outside of the adapter nipple where
it connects to the corrugated hose. Apply glue to the inside
flange of the corrugated hose, then insert the barbed nipple.
FIG. 5: CABLE & PIN
Make sure the adapter sleeve is in place and the hose
is not pushed tight against it, or it will not spin
freely. Secure the nipple to the hose with either the
new plastic cable ties or the re-usable plastic clamp
that was originally on your BCD (Fig. 6).
To attach the SS1 to the adapter, slide the adapter
into the threaded fitting on the SS1 and tighten
hand tight. It should be snug enough that it will
not become unscrewed accidentally yet not so tight
as to damage the plastic parts (Fig 7).
FIG. 6: PLASTIC CLAMPS
15
SS1 owner's manual 7-05
7/26/05
5:21 PM
Page 17
FIG. 7: ATTACHING SS1 TO ADAPTER
Attach the Quick disconnect fitting to
the SS1 by sliding back the sleeve and
pushing it onto the metal nipple of the
SS1 (Fig. 8), then release the sleeve.
This may be done before or after the air
is turned on. Slowly turn on the air. Test
the SS1 for inflation of the BCD, and
deflation using the deflation button.
Fully inflate the BCD and leave inflated
for a few minutes to check for leaks
around the corrugated hose and fittings.
If there was a cable dump attached to the
SS1, fully inflate the BCD and pull the
corrugated hose to check for proper
operation. Lastly, check the breathing
operation of the SS1 regulator.
D I V E O P E R AT I O N
Oral inflate/deflate
Inflate
Regulator
purge
16
FIG. 8: ATTACHING QUICK DISCONNECT
FIGURE 9: SS1 CONTROLS
Operation of the SS1 is the same
as any conventional inflator.
Pneumatic inflation is done by
depressing the smaller, oval shaped
inflation button. Deflation is done
by holding the SS1 overhead and
partially depressing the larger
deflation button. The SS1 can be
manually (orally) inflated by fully
depressing the deflation button and
exhaling air into the mouthpiece.
Fully depressing the button seals
off the regulator exhaust valve and
directs the exhaled air into the BCD
to inflate it. Release the deflation
button to keep the air in the BCD
(Fig. 9).
If your BCD is fitted with a cable
type dump, it should function the
same as your old inflator.
S E T- U P / D I V E O P E R AT I O N
Final Check
17
SS1 owner's manual 7-05
7/26/05
5:21 PM
Page 19
The SS1 breathes like any conventional second stage. Clear the SS1 of water by first
exhaling or using the purge button (front cover), then breathe normally through the
mouthpiece. The SS1 is designed primarily for back up emergency breathing in the
event of a second stage malfunction or air sharing. Be aware that if the SS1 is installed
on your primary first stage regulator, it will not function in the event of first stage failure
or out of air condition.
WARNING!
In the event of air sharing with another diver, it is important that the SS1
is used by the donor and not given to the person out of air. The person out
of air is given the donors’ primary regulator. The corrugated BCD hose is
too short to allow proper use of the SS1 by another diver, and the donor
would be left without control of the inflator for control of his BCD. It is
strongly recommended that these skills be mastered and performed under
supervision of an instructor before attempting in open water.
18
CAUTION
Do’s and Don’ts
Do set up your equipment carefully before each dive and check your entire
system for signs of damage, loose hose fittings, or air leaks. Make sure the
yoke knob or DIN connection on your first stage is hand tight before turning your air supply on. Check your inflator for proper inflation and deflation. Purge the regulator and take a test breath before entering the water.
POST DIVE CARE
Back-up Breathing
Don’t use your SS1 if you notice any problems or malfunctions. Return it to
the factory or authorized dealer to have it checked or repaired.
Don’t pick up your tank by the hoses. You may damage them or work loose
a connection that could lead to loss of air.
Post Dive Care
A simple fresh water rinse after every dive to clean the SS1 of salt, sand or dirt is all that
is required. Rinse around the buttons through the mouthpiece. If the SS1 is soaked, it
should be pressurized, the inflation valve operated, and the regulator purged to blow out
any accumulated water before storage.
19
SS1 owner's manual 7-05
7/26/05
5:21 PM
Page 21
S P E C I F I C AT I O N S : S S 1
The SS1 can be easily removed from the BCD for storage with your primary regulator by
unscrewing the adapter and separating it from the BCD hose.
Description: Combination inflator and high performance downstream second stage regulator.
Materials:
Required Maintenance
The major service interval for the SS1 is semi-annual (2 years). We recommend that you
take your SS1 to an authorized Atomic Aquatics dealer annually for a safety inspection. At
this time, they will inspect and check for proper operation, and advise if a major service is
required. The major service will include replacement of all seals, seats and o-rings. The
labor charges for this service will vary with the individual dealer. Parts replacement will be
in accordance to the terms of the limited lifetime warranty in this manual. Factory service
is also available.
CAUTION
Do not attempt any disassembly or repair of the SS1. Disassembly and
service of the SS1 must only be performed by an authorized, factory trained
scuba repair technician or by the factory.
20
Inflation/Deflation stems
Quick disconnect
Demand valve body
Orifice
Lever
Springs
Diaphragm
Mouthpiece
Body
(SS1 Stainless)
(SS1 Titanium)
316 Stainless
316 Stainless/Brass
316 Stainless/Brass
316 Stainless
Titanium
Stainless
Silicone rubber
Silicone rubber
Fiberglass Reinforced Nylon
Titanium
Titanium/316Stainless/Brass
Titanium
316 Stainless
Titanium
Stainless
Silicone Rubber
Silicone rubber
Fiberglass Reinforced Nylon
Weights and dimensions:
SS1 w/o hose
LP hose/w disconnect
LP hose length (all)
Pressure rating (all)
200g (7 oz.)
200g (7oz.)
71 cm (28")
8.6-10 bar (125-145 psi)
180g (6.3 oz)
190g (6.7 oz.)
MAINTENANCE / SPECIFICATIONS
Store the regulator out of the sun to prevent fading and deterioration of the rubber and
plastic parts, away from excessive heat, humidity or insects.
21
SS1 owner's manual 7-05
7/26/05
5:21 PM
Page 23
Atomic Aquatics warrants the SS1 safe second/inflator against defects in materials and
workmanship for the lifetime of the original owner with the exception of mouthpieces,
hoses, o-rings, or valve seats, which are warranted for 2 years.
Atomic Aquatics will at its option repair or replace any components it finds defective.
This warranty does not cover any SS1 purchased from other than authorized Atomic
Aquatics dealers, or purchased via Internet or mail order sources. To activate this warranty
you must complete and return the warranty registration card within 30 days of purchase.
Warranty registration is also available at www.atomicaquatics.com.
All titanium or stainless steel components are warranted for the lifetime of the
original owner against the effects of corrosion. Chromed or plated brass components are
subject to corrosion and require as a minimum reasonable maintenance fresh water rinsing
after use in salt water and proper storage as described in this manual.
This warranty is not contingent upon proof of service and will maintain in effect for
the lifetime of the original owner. It is recommended however that maintenance include
an annual safety inspection to be performed by an authorized Atomic Aquatics dealer or
by the factory. Factory or authorized dealer servicing is required at intervals of 300 dive
hours or 2 years, whichever occurs first This service will include disassembly, cleaning,
replacement and lubrication of all o-rings and seals, and safety check.
To obtain warranty service, you must deliver the SS1 to Atomic Aquatics or one of
its authorized repair facilities. If you send the SS1 to the factory, you must pay the
22
shipping charges to the factory. If the SS1 is returned to the factory and it is determined
that the problem is due to material or manufacturing defect, there will be no charge for
parts, labor or return shipping within the continental USA.
This warranty does not cover damage or defect due to neglect, misuse, alteration, or
attempted repairs by someone other than an authorized dealer.
Atomic Aquatics shall not be liable for loss of use of this product or incidental or
consequential costs or damages incurred with the use of this SS1. Some states do not allow
this exclusion so the above may not apply to you.
This warranty gives you specific legal rights and you may have other rights, which
vary from state to state.
WARRANTY
WARRANTY
23