1
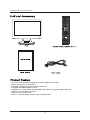
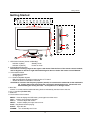
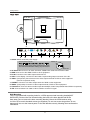
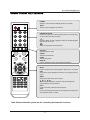
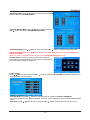
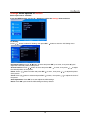
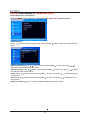
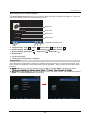
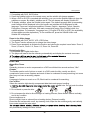
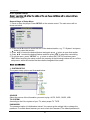
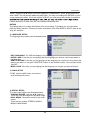
2
Contents
Caution
TV
information
Remote
control
Menu
operation
IPOD
operation
DVD
operation
Playing
Flash Media
Troubleshooting
Specification
1
Caution
2
Safety Information
3
Unit and Accessory
3
Product Feature
4
Getting Started-Front View
5
Getting Started-Rear View
6-7
Remote Control Key Functions
8-10
Basic operation
10-11
Picture menu options
11-12
Sound menu options
12-13
Channel menu options
13-15
Settings menu options
16
Settings menu options in VGA/PC
17
Settings menu options in Component
18
Parental Control
19-24
IPOD Operation
25-26
DVD basic operation
26
Disc Care
27-28
DVD System Setup
29-30
Playing Flash Media
31
Simple Troubleshooting
32
Technical Specification
Caution
Caution
3124140
This unit complies with FCC directive.
1
Safety Information
2
Unit and Accessory and Product Feature
INPUT
1
2
3
4
5
6
7
8
9
0
-/--
PICTURE SOUND
SLEEP
DISPLAY
NOW PLAYING
CH+
VOL+
MUTE
CH-
VOLEXIT
MENU
PG
UP
PG
DN
OK
MENU
AUDIO ONLY
SETUP
CC
MTS
EPG
FAV
LANGUAGE
ZOOM
SUBTITLE
SLOW
MENU
ANGLE
TITLE
GOTO
PROGRAM
INTRO
SHUFFLE
REPEAT
REPEAT
A-B
AAA
• 21.6” wide screen (measured diagonally) Full-HD 1080p LCD Television
• Built-in progressive scan DVD player
• iPod Dock for playback of music and video from iPod
• Integrated ATSC/NTSC/QAM TV tuner
• Integrated 3-in-1 Card Reader (SD, MS, MMC) and USB Port for playing digital media files
• HDMI input for true digital connection
• VGA port for connection to PC
• Built-in 2.1-channel speaker system with 20W output power
3
Getting Started
Getting Started
8
5
6
7
2
4
1
3
1. LED Power Indicator (Power on/Standby)
Indicator on(Red)
Standby mode
Indicator on(Green)
Power on mode
2. Infrared Remote Receiver
The effective receiving range for the signal is 5-8 metres from the front of the remote control window,
and 30 degrees to the left or right side and 20 degrees above or below the remote control Window.
3. Universal iPod Dock
- Audio/Video Playback
- Charging iPod
4. 2.1 Channel Speaker System
- Mid-range/tweeters located on upper section of TV stand
- Woofer located on underside of TV stand
CAUTION: A sensitive low-frequency speaker (woofer) is located on the underside of this multimedia
TV. Please remove the protective film covering the woofer before use. Please take care
when handling the unit by the base – do not press on or damage woofer.
5. Disc Slot
Insert a 12 cm disc with the label side facing back as indicated by the label next to the slot.
6. 3-in-1 Card Slot (SD/MMC/MS)
7. USB Port
8. The functions of the buttons:
MENU : Press to display the OSD menu, press again to exit the menu.
CH+/- : Press to scan through channels.
VOL+/- : Press to adjust the volume.
INPUT : Press to display the input source menu.
PLAY: Play/Pause the disc playing.
EJECT : Eject the disc.
POWER : Turn on/standby the TV set.
4
Getting Started
DVD
2
1
HDMI
PC-IN
VGA
3
4
5
Y
Pb
Pr
6
S-VIDEO VIDEO R
L
Audio in
7
8
9
RF
10
1. Switch: Switch on/off the power supply.
Power on
- To turn on the LCD TV
- Be sure to turn off the power and unplug both units
from the wall outlet before making any connections.
Power off
2. AC Power IN: Connect to an earth 100-240V, 50/60Hz AC outlet with the Power Cable.
3. HDMI: Connect it to the HDMI of DVD or other equipment.
4. PC-IN: Connect it to the audio output terminal of PC.
5. VGA: For PC display. Connect it to the D-Sub 15 pins analog output connector of the PC.
6. YPbPr: (Component) Connect them to the video output terminals of DVD or other equipment.
(used in Component mode).
7. S-VIDEO: Connect it to S-Video output terminal of DVD or other equipment.
8. VIDEO: (Composite) Connect it to video output terminal of DVD or other equipment.
9. L/R Audio in: Connenct them to audio output terminals(For Video-Composite/S-Video/YPbPr-Component).
10. RF: Connect antenna or cable 75 Ohm coaxial to receive TV signal.
Wall Mounting
The TV is provided with mounting holes for a VESA approved wall mounting bracket(NOT
SUPPLIED). Remove the Posi screws holding the base to the base bracket and lift the
base away (do not remove the base mounting bracket). Mount the VESA bracket using
4 x M4 x10 Iso metric threaded screws (not supplied). Do not use screws longer than 10 mm,
damage will occur to the internal parts. Fit the wall bracket securely following the manufacturers
instructions.
5
POWER
Switch on LCD TV when at standby mode or vice versa.
INPUT
Press to cycle through the input source.
INPUT
1
2
3
4
5
6
7
8
9
0
-/--
PICTURE SOUND
NUMBER BUTTONS
Press 0-9 to select a TV channel directly when you are watching
TV. Then press “OK” key to confirm.
Press this button to enter a program number for multiple program
channel such as 2-1,etc.
Return to the previous channel viewed.
SLEEP
DISPLAY
NOW PLAYING
CH+
VOL+
MUTE
CH-
VOL-
PG
UP
PG
DN
OK
AUDIO ONLY
MENU
SETUP
CC
MTS
EPG
FAV
LANGUAGE
ZOOM
SUBTITLE
SLOW
MENU
ANGLE
TITLE
GOTO
SHUFFLE
REPEAT
PROGRAM
INTRO
REPEAT
A-B
SOUND
Select the sound mode.
SLEEP
Time shutting down
DISPLAY
Press to display the source and channel’s information.
MENU
EXIT
PICTURE
Select the picture mode.
MUTE
Press to mute the sound. Press again or press VOL+/- to unmute.
EXIT
Clears all on-screen displays and returns to TV viewing from any
menu.
MENU
Brings up the main menu to the screen.
OK
Allows you to navigate the on-screen menus and adjust the
system setting to your preference.
VOL+/Press to increase / decrease the sound level.
CH+/Press to scan through channels. To scan quickly channels, press
and hold down either +/- button.
Note: Buttons labeled in yellow are for controlling iPod-specific functions
6
INPUT
1
2
3
4
5
6
7
8
9
0
-/--
PICTURE SOUND
SLEEP
CC
Press to display the closed caption.
MTS
Press to select the audio channels.
DISPLAY
NOW PLAYING
CH+
VOL+
EPG
Press to enter the EPG menu directly.
FAV
Press to add or remove favorite channel.
MUTE
Buttons for DVD operating
CH-
VOL-
MENU
EXIT
PG
UP
PG
DN
OK
MENU
AUDIO ONLY
SETUP
CC
MTS
EPG
FAV
LANGUAGE
ZOOM
SUBTITLE
SLOW
MENU
ANGLE
TITLE
GOTO
SHUFFLE
REPEAT
PROGRAM
INTRO
REPEAT
A-B
: Load/eject DVD disc.
: Play/pause DVD program.
: Stop DVD program.
SETUP: DVD system setup.
: DVD fast reverse.
: DVD fast forward.
: DVD previous chapter.
: DVD next chapter.
LANGUAGE: Select the DVD disc language.
ZOOM: Adjust picture size in DVD mode.
SUBTITLES: Turn on/off the DVD subtitle display.
SLOW: Play DVD program at slow speed.
MENU: DVD play list / Disc menu.
ANGLE: Select DVD picture angle.
TITLE: DVD title.
GOTO: Play your favorite title/chapter/track.
PROGRAM: Edit the DVD program and play.
INTRO: If you play CD, it will scan program with 3S.
REPEAT: Repeat playing the title or chapter.
A-B: Select and play the preferable paragraph of DVD program by
pressing this button twice at the beginning and end of it.
Note: Buttons labeled in yellow are for controlling iPod-specific functions
7
TURN ON LCD TV
1. Connecting to the AC intput cable, at this time the TV will enter standby mode and indicator show red.
2. Use the POWER button can turn ON LCD TV from standby mode.
TURN OFF LCD TV
Press the POWER button on TV or on the remote control to enter standby mode. The indicator is red.
Select on screen language
NOTE: If this is the first time you run the LCD TV, the Initial Setup Menu will appear in the picture,
and the items of this menu also exist in other menus, so you are able to change the values
after you set them up.
Language
Press / button to select this item, then press OK /
button to select the OSD language.
Tuning Band
Press OK / button to select Tuning Band mode. (Available tuning band mode: Air, Cable)
Auto Channel Search
Press / button to select this item, then press OK / button to enter the Auto Channel Search
Program.
1. Press the VOL+/- button to adjust the volume.
Volume
2. If you want to switch the sound OFF, press the MUTE
button.
You can cancel this function by pressing the MUTE or VOL+/- button.
8
- Press the MENU button to display the mains menu.
- Use / / / / OK buttons to operate the available menus.
1. Using the CH+/CH- button on the TV set or on the remote control.
- Press CH+ button to increase channel number.
- Press CH- button to decrease channel number.
2. Using 0-9 number buttons and -/-- button.
You can select the channel number by pressing 0 to 9 or -/-- button, and press OK button to confirm.
3. Example
- Select channel 5: press “5” button, then press OK button.
- Select channel 62: press “6” button, and press “2” button, then press OK button.
- Select channel 152: Press “1” button, and press “5” button, and press “2” button, then press OK
button.
- Select channel ‘5-1’: press “5” button, and “-/--”button, and “1” button, then press OK button.
Note: After select the number button, the number will be memorized.
9
You can select the input source by pressing the INPUT button on
the remote control or on the TV set.
Picture menu options
Press the MENU button, and use
/
button to select the Picture menu as below.
1. Use /
button to select what you want to
adjust in the Picture menu.
2. Press OK button, and adjust by / / /
/ OK buttons.
3. When you adjusted to your preference, press
MENU button to exit.
Picture Mode
Select the type of picture which best corresponds to your viewing requirements by selecting picture mode
in Picture menu. You may select the picture mode directly by pressing the PICTURE button on the remote
control, and change picture mode to User then you can adjust.
Brightness
Press / button to select and press OK/ button to enter, then press / button to adjust the
brightness of the picture.
Contrast
Press / button to select and press OK/
contrast of the picture.
button to enter, then press
/
button to adjust the
Color
Press / button to select and press OK/
saturation.
button to enter, then press
/
button to adjust the color
Tint
Press / button to select and press OK/
of the picture. (In NTSC mode only)
button to enter, then press
/
button to adjust the tint
Sharpness
Press / button to select and press OK/
sharpness level of the picture.
button to enter, then press
/
button to adjust the
10
Advanced Video
Press OK/ button to enter the submenu as below:
Aspect Ratio: Select the ratio of picture display.
Color Temperature: Press OK/ / button to select the color temperature from Cool/Normal/Warm.
Noise Reduction: Press OK/ / button to select the level of noise reduction from Off/Low/Medium/High.
3D Y/C: Press OK/ / button to set the 3D/YC on/off.
Gradient Enable: Press OK/ / button to set the Gradient Enable on/off.
Blue Screen: Press OK/ / button to set the Blue Screen on/off.
If the function is turned on, the TV will display blue screen when there’s no signal.
Sound menu options
Press the MENU button, and use
/
button to select the Sound menu as below.
1. Use /
button to select what you want to
adjust in the Sound menu.
2. Press OK button, and adjust by / / /
/ OK buttons.
3. When you adjusted to your preference, press
MENU button to exit.
Sound Mode
Select the Sound mode in Sound menu. You may select the Sound mode directly by pressing the
SOUND button on the remote control.
When you select “User” as the Sound mode, you could operate the Treble and Bass item.
Treble: High frequencies intensity.
Bass: Low frequencies intensity.
Balance
Press / button to select and press OK/ button to enter, then press / button to adjust the
sound balance.
Audio Channel
Press / button to select and press OK/
Stereo, SAP.
button to enter, and select the Audio channel mode: Mono
Audio Language
Press / button to select and press OK/ button to enter, and select the Audio language.
Note: The function will be unavailable if the program system does not provide the audio language.
11
Advanced Audio
Press / button to select and press OK/
Audio Only: Press OK /
power 3 sec. to restore.
/
button to enter the submenu.
button to set the video on/off. Select “YES”, the video will hide, hold down
Channels menu options
Press the MENU button, and use
/
button to select the Channels menu as below.
1. Use /
button to select what you want to
adjust in the Channels menu.
2. Press OK button, and adjust by / / /
/ OK buttons.
3. When you adjusted to your preference, press
MENU button to exit.
Tuning Band
Select Tuning Band mode.(Available tuning band mode: Air/Cable)
If select Air, the range of channel is 2-69, and if select Cable, the range of channel is 1-135.
Auto Channel Search
Press the OK / button on the item to start Auto Channel Search.
Note: 1. It will search all the channels include digital and analog
channels.
2. You could cancel the auto searching by pressing MENU
button.
12
Manual Add Channel
When the channels are found, use OK button to add it to the channel list.
Manual Channel Set
Press OK button to display a channel list that you can select
channel as below:
Favorite Channels
Press OK button to display the channel list that you can select
channel as below:
Channel Labels
Allows you to name the channel that is selected. Use /
button to move the cursor and use / button to input the
name and then press OK button to confirm.
Settings menu options
Press the MENU button, and use
/
button to select the Settings menu as below.
1. Use /
button to select what you want to
adjust in the Settings menu.
2. Press OK button, and adjust by / / /
/ OK buttons.
3. When you adjusted to your preference, press
MENU button to exit.
Parental Control Menu
You need to enter the password for the submenu. And the original password is 0000.
13
US Ratings Menu: Press / button to select and press OK /
button to enter the US Ratings Menu.
Canadian Ratings Menu: Press / button to select and press
OK /
button to enter the Canadian Ratings Menu.
Advanced Rating: Press / button to select and press OK /
button to set advanced rating on/off.
Advanced Rating Lock: Press / button to select and press OK /
button to enter the Advanced
Rating Lock Menu.
Note: You could not operate the menu if you turn the Advanced Rating function off.
Password Set: You need to enter the correct old password
before setting a new password, and after set the new password,
you need to enter it again to confirm it.
Time Set Menu
Press / button to select and press OK /
to set the time the TV will display.
button to enter the Time Set Menu as below that allows you
Time Set Mode: Press OK /
button to select the time set mode from AUTO and MANUAL.
You should set the Time Set Mode to “Manual” first if you want to change the value of Time Zone/Year/Date
/Time.
Time Zone: Press / button to select, and press OK /
button to select the time zone for your TV.
14
Closed Caption
Press / button to select and press OK /
button to enter the Closed Caption.
CC Mode: Press OK /
button to enter and select CC mode.
Analog CC: Press OK /
button to enter and select analog CC mode.
Digital CC: Press OK /
button to enter and select digital CC mode.
Advanced CC Settings: Press OK /
button to enter Advanced CC
Settings menu.
Style: Press
button to select CC style between Automatic and
custom. You need to set it to Custom first if you want to
change the value of items below.
Size: Normal/Large and Small.
Font: From Font 1 to Font 7.
Text Color: Red/Green/Blue/Yellow/Magenta/Cyan/Black/White.
Text Opacity: Solid/Flashing/Transparent/Translucent.
Background Color: Black/White/Red/Green/Blue/Yellow/Magenta/Cyan.
Background Opacity: Solid/Flashing/Transparent/Translucent.
Edge Effect: None/Raised/Depressed/Unifrom/Left Shadow/Right Shadow.
Edge Color: Black/White/Red/Green/Blue/Yellow/Magenta/Cyan.
Menu Setting
Press / button to select and press OK /
button to enter the Menu Setting submenu.
Language: To select language of the OSD.
Transparency: To select the transparency of the OSD.
Sleep Timer: Press OK /
button to select the number of minutes to set your TV sleeps automatically.
Reset
Press /
button to select and press OK /
button to reset all the settings above.
15
Settings menu options in VGA/PC
Select input source “VGA/PC”.
Press the MENU button, and use
/
button to select the Settings menu as below.
PC Setting
Press / button to select PC Setting, then press OK /
button to enter the PC Setting menu.
Horizontal Position: Press / button to select and press OK / to enter, then press / to
adjust the horizontal position of the picture.
Vertical Position: Press / button to select and press OK / to enter, then press / to adjust
the vertical position of the picture.
Phase: Press / button to select and press OK / to enter, then press / to adjust the phase
of the picture.
Clock: Press / button to select and press OK / to enter, then press
the picture.
Auto Adjustment: Press OK / to auto adjust the VGA settings.
Reset: Press OK /
to reset the VGA settings to factory default.
16
/
to adjust the clock of
Settings menu options in Component(YPbPr)
Select input source “Component”.
Press the MENU button, and use /
button to select the Settings menu as below.
Component Set
Press / button to select Component Set, then press OK /
menu.
button to enter the Component Set
Horizontal Position: Press / button to select and press OK / to enter, then press
adjust the horizontal position of the picture.
Vertical Position: Press / button to select and press OK / to enter, then press /
the vertical position of the picture.
Phase: Press
of the picture.
Clock: Press
of the picture.
/
/
Reset: Press OK /
button to select and press OK /
button to select and press OK /
to enter, then press
to enter, then press
/
/
button to reset the Component Settings to factory default.
17
/
to
to adjust
to adjust the phase
to adjust the clock
(page 13-14)
: 0,0,0,0.
“ok”
If used, this optional feature can “block” undesirable programming from appearing on the TV. Parental Control offers the user a wide variety of options
and settings that restrict or “block” the programming that can appear on the TV. Parental control allows the user the capability of defining which program
rating they consider accept-able, to the younger or more sensitive viewer. It can be preset and turned either on or off by the user who specifies the
secret 4-number code, the password. The number of hours blocked are specified. General audience and children viewer blocks should both be
programs into the TV’s memory. Viewer ratings are specified for both TV and the motion picture industry; both rating systems should be used, for
complete coverage.
The ratings are based on the ages of children.
Overview
To insure complete coverage for all TV programs, (movies and regular TV shows) choose a rating for MPAA, from the selections below. And choose
ratings from the TV Parental Guidelines Rating System below, using the Age Block option for General Audiences, and for Children. In addition
to those, you may wish to add additional restrictions from the Content Block menu. See the Parental Control menu, and submenus example below.
Things to Consider before Setting Up Parental Control
Determine which rating you consider acceptable to the viewer. (For example, if you choose TV-PG, all more restrictive ratings will be automatically
blocked; the viewer will not be able to see: TV-PG, TV-14, or TV-MA rated programming.)
Do you want to block the auxiliary video source entirely? (Blocks the signal sent by the equipment, such as a VCR, connected to the TV Audio/Video
input jacks) Or leave unblocked, then choose allowable ratings. Block program “Content” based on individual parameters such as: Strong Dialog,
Bad Language, Sex Scenes, Violence Scenes, or Fantasy Violence Scenes; in the Content Blk option.
Select a secret password; in the Set Password option. Use the number keys on the remote. Don’t forget the password, it is the only way you can
access the Parental Control menu and change rating selections, or turn Parental Control off.
Do you want Parental Control to be active all the time? If not, you can turn it on or off with the Lock On/Off option.
* You can set different Parental Control viewing restrictions for general audiences and for children both can be active at the same time.
* Simply specifying one content block such as Sex Scenes, will not automatically block another content in the programs from appearing.
* Even if you choose to leave the Aux inputs unblocked, the ratings you specify will automatically restrict the programming that appears
from the video sources.
* You can not disable Parental Control by disconnecting the TV from power. Block hours will automatically reset to the original block time setting
specified if power is disconnected.
Information
MOTION PICTURE ASSOCIATION OF USA (MPAA) RATING SYSTEM
Meaning
Grade
G
General Audiences
Content not offensive to most viewers
PG
Parental Guidance
Suggested
Content is such that parents may not want their children to
view the program.
PG-13
Parental Strongly
Cautioned
Program is inappropriate for preteens, with a greater degree
of offensive material Suggested than a PG rated program
R
Restricted viewing
Not for children under age 17.
Strong elements of sex and/or violence.
NC-17
No Children under
age 17
Not for children under age 17 under any circumstances.
Strong sexual content.
X
Hard Core Films
Same as NC-17 rating.
No Rating
No Rating
MPAA Not Rated
TV PARENTAL GUIDELINE RATING SYSTEM
Meaning
Grade
TV-Y
Young Children
Content not offensive to most viewers
TV-Y7
Children 7 and over
Considered suitable for children over 7, may contain
Fantasy Violence Scenes.
TV-G
Parental Audience
Considered suitable for all audiences; children
may watch unattended.
TV-PG
Parental Guidance
Suggested Unsuitable for younger children, may contain:
Suggestive Dialog, Bad Language, Sex, and Violence Scenes
TV-14
Parents Strongly
Cautioned
Unsuitable for children under 14, may contain: Strong
Dialog, Bad Language, Sex, and Violence Scenes.
TV-MA
Mature Audience
Only
Adults only, may contain: Strong Dialog, Bad Language, Sex, and
Violence Scenes.
Canadian Rating:
Canadian English is used throughout all of Englishspeaking Canada (E, C, C8+, G, PG, 14+, 18+).
Canadian French is used in Quebec (E, G, 8 ans +, 13 ans +, 16 ans +, 18 ans +).
Note
The V-Chip will automatically block certain categories that are ‘more restrictive’.
If you block TV-Y category, then TV-Y7 will be automatically blocked.
Similarly, if you block TV-G category, then all the categories in the ‘young adult’ will be
blocked(TV-G, TV-PG, TV-14 and TV-MA).
18
iPod Operation
iPod Operation
The following iPod models are supported by this TV for music playback. Certain models from the
below list can support video playback and photo viewing in addition to music playback. Please refer to
the following sections on playing videos and viewing photos for details.
1) Docking your iPod
the iPod before docking.
When connecting an iPod to this iPod Dock, please ensure that the correct adapter plate
is used. FAILURE TO DO SO MAY RESULT IN DAMAGE TO THE iPod.
iPod Adpater Plate
iPod Dock
NOTE: A docked iPod will charge when the TV is powered ON. When the TV is in standby mode
the iPod will not charge.
19
iPod Operation
2) iPod-specific keys on the remote control
INPUT
1
2
3
4
5
6
7
8
9
0
: Press to toggle between Manual Mode and iPod Mode
-/--
PICTURE SOUND
SLEEP
DISPLAY
NOW PLAYING
- iPod Mode: TV displays iPod menu. iPod is controlled via menu.
- Manual Mode: TV does not display iPod menu. Most iPod
functions are controlled using control keys on iPod.
NOW PLAYING: Press to return to the song or video you are playing.
CH+
VOL+
MUTE
EXIT: Exit the iPod menu.
CH-
VOL-
MENU
EXIT
PG
UP
PG
DN
OK
MENU
AUDIO ONLY
SETUP
CC
MTS
EPG
LANGUAGE
ZOOM
SUBTITLE
SLOW
MENU
ANGLE
TITLE
GOTO
REPEAT
INTRO
REPEAT
AUDIO ONLY: Press to blank the TV menu display while still playing
audio. Press any key to restore display.
MENU: Press to return to the previous menu or display/hide the iPod
menu.
FAV
SHUFFLE
PROGRAM
: Press to navigate through the menus
OK: Press to confirm your selection
PG UP/PG DN: Press to move one page up / Move one page down
A-B
SHUFFLE: Press to switch between Shuffle modes – Shuffle Off,
Shuffle Songs, Shuffle Albums.
REPEAT: Press to switch between Repeat modes – Repeat Off,
Repeat One, Repeat All.
20
iPod Operation
3) Getting Started – Playing Music and Videos
Main iPod menu
OK
Browse and play songs
Browse and play videos
Select next song/video according to
Shuffle settings
Access advanced settings
Access currently playing song or video
NOTES:
Playing Music
Music
Playlists Artists
OK
OK
Now Playing Screen
21
Music Menu
iPod Operation
Now Playing Screen – Music Playback
The Now Playing Screen allows you to see artist, album and track information at-a-glance. This is the
screen you will see most often when listening to music
Album Art
Agua Dulce, Agua Sal
Track Title
La Carretera
Album Title
Artist One
Artist Name
a bc
1:15/4:24
1/85
d e
f
Playback Information Bar
a. Playback state: Play
, Pause
, Fast forward
, Fast reverse
, Shuffle Songs
, Shuffle Albums
b. Shuffle Setting: Shuffle off
c. Repeat Setting: Repeat Off
, Repeat One
, Repeat All
.
.
d. Elapsed time.
e. Total track length
f. Track position on album or in playlist
Playing Video
Video playback is supported by certain iPod models including iPod touch 1st and 2nd generation, iPod
nano 3rd and 4th generation, iPod classic and iPod 5th generation. Other models do not support video
playback.
Video from the main iPod Menu and press OK. The Video Menu is displayed as below.
Movies, TV Shows etc, chose the series or movie you wish to watch. Press OK and playback
begins. The Now Playing Screen is displayed.
22
iPod Operation
Now Playing Screen – Video Playback
The Now Playing Screen gives you at-a-glance information about the video you are viewing. The
playback information bar shown at the bottom of the screen is the same as for music playback and
is described in detail above.
Video playback area
Playback Information Bar
HINT: Press EXIT to hide the playback information bar.
Shuffle Songs
Shuffle songs or videos according to the Shuffle settings.
Shuffle Songs from the main iPod Menu and press OK . The next song/video is played
according to the Shuffle settings.
Settings Menu
Allows you to adjust Shuffle and Repeat settings.
Settings from the main iPod Menu and press OK .
Shuffle and Repeat settings using the OK button.
Shuffle Off, Shuffle Songs, Shuffle Albums
Repeat Off, Repeat One, Repeat All
Now Playing
Allows you to quickly access the currently playing song or video on the Now Playing Screen.
Now Playing from the main iPod Menu and press OK . The Now Playing Screen
is displayed.
23
iPod Operation
4) Viewing Photoes
This TV can be used as a large screen for conveniently viewing photoes stored on your iPod. Photo
viewing is supported by certain iPod models including iPod touch 1st and 2nd generation, iPod nano
3rd and 4th generation, iPod classic and iPod 5th generation. Other models do not support photo
viewing. Photo viewing is supported in Manual Mode only. iPod functions can be controlled by using
the basic navigation and playback keys on the remote or directly via the control panel of the iPod.
NOTE: The steps in this section require navigation of iPod menus and control of iPod settings. Details
of menus and settings vary between iPod models. A degree of familiarity with the operation of your
particular iPod model is required. All slideshow parameters including accompanying music, speed,
transition style etc. are controlled by the iPod. Please refer to your iPod user manual for details.
To view photoes after docking your iPod:
Ź3UHVVRQWKHUHPRWHFRQWUROWRVHOHFWManual Mode. The screen displays “
Return to
iPod Mode”.
Ź(QDEOHWKH³TV Out´IXQFWLRQRQ\RXUL3RG(QVXUHWKDW³TV Signal” is set to “NTSC”. These
settings are usually located in the “Slideshow Settings” menu of your iPod. For best viewing, set
the TV out format to “Widescreen” if available or set the TV aspect ratio to “Normal” for viewing 4:3
photos.
Ź6HOHFWDSKRWRDOEXPIURP\RXUL3RGSKRWROLEUDU\$W\SLFDORSHUDWLQJVHTXHQFHLVVKRZQEHORZ
7KHVHTXHQFHPD\EHGLIIHUHQWIRU\RXUSDUWLFXODUL3RGPRGHO3OHDVHUHIHUWR\RXUL3RGXVHU
manual for details.
iPod
Musics
Photos
Videos
([WUDV
&ORFN
6WRSZDWFK
Games
6HWWLQJV
6KXIIOH6RQJV
$OEXPV
Photos
>
>
>
>
>
>
>
>
6OLGHVKRZ6HWWLQJV
Photo Library
>
>
Ź&KRRVHDSKRWRWRYLHZ6HOHFWWKHSKRWRRQFHWRYLHZLWRQWKHL3RGVFUHHQ6HOHFWWKHSKRWRDJDLQ
to start a slideshow. The photo is displayed on the TV screen. You may configure the accompanying
music, slideshow speed, transition styles etc. using the iPod menus. Please refer to your iPod user
manual for details.
$OEXPV
6LGHVKRZ
1 of 8
NOTE:
7RVWDUWDVOLGHVKRZRQL3RGWRXFKPRGHOVWDSWKHŹLFRQVKRZQDWWKHERWWRPRIWKHSKRWRRUDOEXP
\RXDUHFXUUHQWO\YLHZLQJ,I\RXGRQRWVHHWKHŹV\PEROWDSWKHSKRWRWRVKRZWKHFRQWUROV
- Press ZOOM button on the remote control to adjust the aspect radio for the picture display mode on
the screen.
24
DVD Operation
DVD Basic Operation
Turn on your TV then use the INPUT button on the remote control or on the TV to select DVD
mode. If there is no disc in the DVD players the screen will show “NO DISC”.
Place a disc
Insert a disc according to the silk.
Do not touch the playing surface.
automatically draw the disc into the player.
To "Eject" the disc, press the "
" (EJECT)button on the remote control or on the TV.
Play
The contents of each disc vary, as to how the disc was authored and what features are included.
Some discs start playing as soon as they have been read, some need "Play" selecting in the
Menu. Different play modes are offered, such as Menu Play, Sequence Play and other modes.
Using the Display Feature
1. Compatible with DVD, SVCD, VCD, CD, HD-CD, WMA, Digital Audio disc discs.
2. Loading and playing DVDs (two pages)
- "Disc Type, Title * / * (the playing title / total titles), Chapter * / * (the playing chapter / total
chapters), Elapsed Time of the Disc".
- Press the button again to show the second page:
- "Language */* (the serial number of playing language / the amount of optional languages) or
Off, Language Type, Audio Type, Subtitle * / * (the serial number of playing subtitle /the
amount of optional subtitles) or Off, Angle * / * (the serial number of playing angle / the amount
of optional angles) or Off".
- Press the button for the third time, the display menu fades out.
3. Loading and playing SVCD discs (two pages)
- "Disc Type, Track * / * (the playing track / total tracks), Mute, PBC, Repeat Mode, Elapsed
Time of the Playing Track".
- Press the button again to show the second page:
- "Language * / * (the serial number of playing language/ the amount of optional languages) or
Off, Language Type, Audio Type, Subtitle * / * (the serial number of playing subtitle / the
amount of optional subtitles) or Off".
- Press the button for the third time, the display menu fades out.
4. Loading and playing VCD
- "Disc Type, Track * / * (the playing track / total tracks), Mute, PBC, Repeat Mode, Elapsed
Time of the Playing Track".
- Press the button again, the display menu fades out.
5. Loading and playing CD, HD-CD, WMA, Digital Audio / JPEG discs
- "Disc Type, Track * / * (the playing track / total tracks), Mute, Repeat Mode, Elapsed Time of
the Playing Track".
- Press the button again, the display menu fades out.
25
DVD Operation
Subtitles
1. Compatible with DVD, SVCD discs.
2. Press the Subtitle button on the remote once, and the subtitle info banner appears
3. When a DVD or SVCD is recorded with subtitles, you can use the Subtitle feature to view the
subtitles on-screen. By default, subtitles are off. The info banner will display Subtitle Off.
4. To display subtitles, press the Subtitle button again. The default language with its responding
serial number will be displayed in the info banner and subtitles will be displayed in that
language. There are 8 supported subtitles: Chinese, English, Japanese, French, Spanish,
Portuguese, Germany and Latin. With each consecutive press of the Subtitle button, the
subtitle switches. For example, "Language Icon: [1 English DTS 6CH] or [Off]" (the availability
of the subtitles are disc-dependent). To turn subtitles off, press the Subtitle button until
Subtitle Off is displayed.
Zoom In the Video Image
1. Compatible with DVD, SVCD, VCD, JPEG discs.
2. The Zoom Function allows you to enlarge the video image.
3. Press Zoom repeatedly to activate the function and choose the required zoom factor: Zoom 2,
Zoom 3, Zoom 4, Zoom 1 /2, Zoom 1 /3, Zoom 1/4, Zoom Off.
Digital Audio Disc
1. Compatible with Digital Audio discs
2. The player will search the disc directory automatically and display the contents on screen.
4. To change directories use the direction buttons.
Disc Care
About Disc Terms
Title
Generally, pictures or music compressed on a DVD are divided into several sections, "title".
Chapter
The smaller section unit of picture or music in a DVD under the title, usually one title is
comprised of one or more chapters and each of them is numbered for easy searching, but some
discs may not have a recording chapter.
Track
A segment of picture or music on a CD, Each track is numbered for searching.
Care of Disc
Video disc contains high-density compressed data that needs proper handling.
indle hole. Do not touch the discs
surface.
2. Do not bend or press the disc.
3. Do not expose the disc to direct sunlight or heating sources, Stere discs in cabinet vertically,
and in dry condition.
Prevent exposure to:
Direct sunlight, Heat or exhaust from a heating device, Extreme humidity
Clean the disc surface with a soft, dry cleaning cloth, Wipe the disc surface gently and radically
from center toward the outer edge.
will permanently damage the disc surface.
26
DVD Operation
DVD System Setup
change them again.
General Steps of Setup Menu
1. Pause or Stop the player. Press SETUP on the remote control. The main menu will be
shown as below.
2. Press the Ÿź button to select the Icon of the desired section, e.g. “TV System" and press
button to open that section.
3. Press Ÿź to select the desired feature and again press
button to open that section.
4. Press Ÿź to select the desired feature and then press "OK" to select the new setting.
5 To exit the menu, press " SETUP " or
button to select EXIT SETUP and then press
"OK" When launching the setup routine, the pressing of the following buttons will turn off the
setup menu, while the choices that have been changed will be saved.
1. SYSTEM SETUP
The system setup options are illustrated below:
SOURCE
Select the source of the information you want to play: AUTO, DISC, CARD, USB
TV SYSTEM
According to the Color system of your TV, select proper TV TYPE.
PASSWORD
The password option is initialized as locked. You cannot set the ratings limit or change the
password. To enable these features you must unlock the Password. The default password is
27
DVD Operation
"0000". Using the Ÿź button, move the highlight to "PASSWORD", press the button and
enter "0000". You will see the padlock symbol open. You may now change the RATING or put in
a new password number. If the Lock symbol is BLUE you must press the button to enter the
Please remember or write down the new Password and keep safe.
RATING
The Rating feature is a rating limit feature, like movie ratings. This helps you to control what
DVD the family watches. There are 8 levels of selection, from KIDS SAFE to ADULT. Adult is the
"play all" selection.
2. LANGUAGE SETUP
The language setup options are illustrated below:
- OSD LANGUAGE: The OSD will display in the language you choose.
- AUDIO LANG: If the disc you are playing has the language you choose, it will output audio in
that language.
- SUBTITLE LANG: If the disc you are playing has the language you require you may select this
either in the Menu or using the "SUBTITLE" button on the Remote control. You may also switch
this OFF.
- MENU LANG: If the disc you are playing has the language you require you may select this.
3. AUDIO SETUP
-TONE: Use the Ÿź button to move the
scroll and adjust the tone.
4. DIGITAL SETUP
The video setup options are illustrated below:
- DYNAMIC RANGE: Use the Ÿź button to
move the scroll and adjust the dynamic range.
- DUAL MONO: Choose the mode of the audio
output.
There are four modes: STEREO, MONO L,
MONO R,MIX MONO.
28
Playing Flash Media
Playing media files from the USB and SD card slots
- The following files formats are supported by this TV: JPG, MP3, WMA, MP4 (DivX3.11-5.11,
Xvid), MPEG1 (DAT, MPG, MPEG), MPEG2 (mpeg, mpg).
- File formats including the following are not supported by this TV: BMP, PNG, AAC, DivX 6,
DivX HD, Vob, ts.
- The following cards are supported by this TV: SD, MMC, Memory Stick (MS).
- Only full-size card formats are supported. If you wish to use compact formats such as miniSD,
microSD, Memory Stick Duo etc., please be sure to use an adapter to convert to the full-size
format.
1) Insert your USB device or card.
SD/MMC/MS card reader
USB jack
2) Select DVD from the source menu. All card and USB functions are accessed from the DVD
source.
3) Enter the USB or CARD operation screen
Press SETUP button on the remote control to display the DVD setup menu on DVD mode as
the picture below:
Ź6HOHFWSYSTEM SETUPXVLQJŸźDQGSUHVVOK to select
Ź6HOHFWSOURCE and press OK to select
Ź6HOHFWUSB/CARD and press OK to enter the folder and file navigation screen as below.
29
Playing Flash Media
3) Play the Music, Video or view the Photos
2
1
3 4 5
Ź8VHŻŹWRVHOHFW(3) - Music, (4) - PhotoRU(5) - Movie7KHOLVWRIIROGHUVLVGLVSOD\HG
LQDUHD (1).
Ź6HOHFWDUHD(1) XVLQJWKHŻŹNH\VDQGVHOHFWWKHIROGHUXVLQJŸź7KHOLVWRIILOHVLV
GLVSOD\HGLQDUHD(2).
Ź6HOHFWDUHD(2)XVLQJWKHŻŹNH\VDQGVHOHFWWKHILOH\RXZLVKWRSOD\XVLQJŸź
Ź3UHVVOKEXWWRQWREHJLQSOD\EDFN
NOTE:
3OD\EDFNFRQWUROVDQGVHWWLQJVDUHVDPHDVIRU'9'SOD\EDFN
3UHVVLQJWKHSTOPEXWWRQRQWKHUHPRWHFRQWUROGXULQJSOD\EDFNZLOOKDOWSOD\EDFN
DQGUHWXUQWRWKHILOHDQGIROGHUQDYLJDWLRQVFUHHQ
7KHIROORZLQJNH\VKDYHVSHFLILFIXQFWLRQVGXULQJSKRWRSOD\EDFN
ŻŹ5RWDWHLPDJH
Ÿź)OLSLPDJH
'LVSOD\WKHQH[WSKRWR
'LVSOD\WKHSUHYLRXVSKRWR
30
Simple Troubleshooting
Simple Troubleshooting
Performs
SYMPTOM
DEALING METHOD
NO POWER
Check the power connection.
Pull the plug out, wait for 60 seconds, then reconnect the power
and run the set
NO PICTURE
NO SOUND
Check the antenna connection.
Try other TV channel due to the TV station problem.
Modify the brightness or contrast setting.
Increase the volume.
Check that if the set is on the mute state or not.
Check the voice setting condition.
Check the voice mode setting condition.
ABNORMAL COLOR
Check the antenna connection
NO RESPONSE OF THE
REMOTE CONTROL
Check the effect of the batteries, if needed, please replace the
batteries or clean the remote sensor window.
The distance between the set and the remote control should be
less than 6 meters.
The SCREEN FLASH IN
VGA MODE
The parameter is too big.
Please use safety mode when restart the PC, and set the
parameter of the monitor according to the instruction.
SOME INTERFERE IN THE
VGA MODE
Please modify parameter of the monitor according to the instruction.
CLEAN THE TV SET
Please pull the plug out when clean the LCD screen. Using soft,
clean cloth to wipe it off. If need to clean further, please use dry
cloth, don’t use naphtha or other thinner liquid.
COLOR SPOT
This product uses high definition LCD panel, and the panel
has its special character, there maybe existed some color
spots, so when the user find few color spots it's not a quality
problem.
The standard for inspecting this panel is the same which is
out of the scope to replace the product.
31
Technical Specification
Technical Specification
LCD Panel
Input Connector
Panel Size
22 inch(diagonal)
Brightness
300 cd/m2
Contrast
800:1
Resolution
1366X768
Video
1
S-Video
1
Audio(L/R)
1
VGA
1
PC Audio
1
HDMI
1
YPbPr
1
RF
1
Power Source
AC100-240V 50/60Hz
Power Consumption
60W
improving the performance.
32
VIORETM LIMITED WARRANTY
FLAT PANEL TELEVISION
This VIORE brand Product, as supplied and distributed by VIORE and delivered new in the original carton to the original purchaser is
warranted by VIORE against manufacturing defects in materials and workmanship for a limited warranty period of one (1) year on parts and
labor. However, there will be only a 90 day parts and labor limited warranty for commercial use.
This Limited Warranty does not apply to store display products and product sold as a “marked down” special, in “as is” condition, "open box",
products missing accessories, no fault found or damaged at time of delivery to Viore.
Proof of purchase within one year from date of purchase in the form of a Bill of Sale, Receipt or Receipted Invoice is evidence the Product is
within the limited warranty period. The Bill of Sale, Receipt or Receipted Invoice must be presented as a pre-condition to obtaining the limited
warranty service.
This limited warranty begins on the original date of purchase, and is valid only on Products purchased through VIORE authorized dealers and
used in the United States by the original purchaser. To receive warranty service, the purchaser must contact VIORE for problem determination
and service procedures. Warranty service may only be performed by a duly authorized VIORE service center. The original dated bill of sale,
receipt or receipted invoice must be presented upon request as proof of purchase to VIORE or VIORE's authorized service center.
VIORE will repair or if repairs cannot be made, VIORE will replace this Product at no charge if the Product is defective as specified in this
limited warranty during the limited warranty period. VIORE may use new, or remanufactured parts or products to repair or replace the Product
at its sole discretion. All replaced parts and Products become the property of VIORE and must be returned to VIORE. Replacement parts and
Products assume the remaining original limited warranty, or ninety (90) days, whichever is longer.
Product freight needs to be prepaid by original purchaser and shipped in either its original packaging or packaging affording an equal degree
of protection. VIORE shall not be responsible for or obligated to replace damaged goods. If you reside in California and you cannot transport
the television due to the size, weight, and method of attachment, VIORE will provide transportation for the television to the repair facility. If
you reside in a state other than California, you are responsible for the costs of transporting the television to a repair facility.
If the product is received damaged by VIORE, it is the responsibility of the consumer to file a claim against the carrier. VIORE will only store
the damaged product for 30 days and reserves the right, in its sole discretion, to dispose of the damaged product or ship it back to the
consumer at consumer’s expense after 30 days.
This limited warranty covers manufacturing defects in materials and workmanship encountered in normal, and except to the extent otherwise
expressly provided for in this statement, noncommercial use of this product, and shall not apply to the following, including, but not limited to:
damage which occurs in shipment; delivery and installation; applications and uses for which this product was not intended; altered product or
serial numbers; cosmetic damage or exterior finish; accidents, abuse, neglect, fire, water, lightning or other acts of nature; use of products,
equipment, systems, utilities, services, parts, supplies, accessories, applications, installations, repairs, external wiring or connectors not
supplied or authorized by VIORE which damage this product or result in service problems; incorrect electrical line voltage, fluctuations and
surges; customer adjustments and failure to follow operating instructions, cleaning, maintenance and environmental instructions that are
covered and prescribed in the instruction book; reception problems and distortion related to noise, echo, interference or other signal
transmission and delivery problems; burned-in images. VIORE does not warrant uninterrupted or error-free operation of the product.
THERE ARE NO EXPRESS WARRANTIES OTHER THAN THOSE LISTED AND DESCRIBED ABOVE, AND NO WARRANTIES
WHETHER EXPRESS OR IMPLIED, INCLUDING, BUT NOT LIMITED TO, ANY IMPLIED WARRANTIES OF MERCHANTABILITY OR
FITNESS FOR A PARTICULAR PURPOSE, SHALL APPLY AFTER THE EXPRESS WARRANTY PERIODS STATED ABOVE, AND NO
OTHER EXPRESS WARRANTY OR GUARANTY GIVEN BY ANY PERSON, FIRM OR CORPORATION WITH RESPECT TO THIS
PRODUCT SHALL BE BINDING ON VIORE. REPAIR OR REPLACEMENT AS PROVIDED UNDER THIS LIMITED WARRANTY IS THE
EXCLUSIVE REMEDY OF THE CONSUMER. VIORE SHALL NOT BE LIABLE FOR ANY INCIDENTAL, OR CONSEQUENTIAL
DAMAGES FOR BREACH OF ANY EXPRESS OR IMPLIED WARRANTY ON THIS PRODUCT; EXCEPT TO THE EXTENT PROHIBITED
BY APPLICABLE LAW, ANY IMPLIED WARRANTY OF MERCHANTIBILITY OR FITNESS FOR A PARTICULAR PURPOSE ON THIS
PRODUCT IS LIMITED IN DURATION TO THE DURATION OF THIS LIMITED WARRANTY. THIS LIMITED WARRANTY SHALL NOT
EXTEND TO ANYONE OTHER THAN THE ORIGINAL PURCHASER OF THIS PRODUCT, IS NONTRANSFERABLE AND STATES YOUR
EXCLUSIVE REMEDY.
Some states do not allow limitations on how long an implied warranty lasts, or the exclusion or limitation of incidental or consequential
damages, so the above limitations or exclusions may not apply to you. This warranty gives you specific legal rights, and you may also have
other rights which vary from state to state. Any provision contained herein which is found contrary to state or local laws shall be deemed null
and void and the remaining provisions shall continue in full force and effect.
To obtain warranty service, please contact VIORE at:
Phone: 1-877-777-1428
www.viore.com
Ver. 090729
© 2009 VIORE, Inc. All rights reserved. Reproduction in whole or in part without written permission is prohibited. “iPod” is a trademark of
Apple, Inc., registered in the U.S. and in other countries. “Made for iPod " means that an electronic accessory has been designed to
connect specifically to iPod and has been certified by the developer to meet Apple performance standards. Apple is not responsible for
the operation of this device or its compliance with safety and regulatory standards. HDMI, the HDMI logo and High-Definition Multimedia
Interface are trademarks of HDMI Licensing LLC. All other trademarks are trademarks of their respective owners. Features and
specifications are subject to change without notice.
VIORE, Inc. 7801 Hayvenhurst Avenue, Van Nuys, California 91406
Printed in China