1
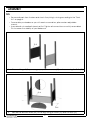
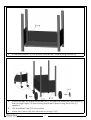
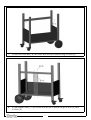
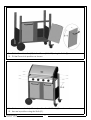
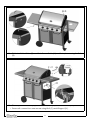
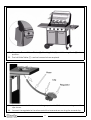
GAS BARBECUE
MODEL NO: BBQ4
PART NO: 6925305
USER GUIDE
2/11
INTRODUCTION
Thank you for purchasing this CLARKE product
Before attempting to use this product, please read this manual thoroughly and follow the
instructions carefully. In doing so you will ensure the safety of yourself and that of others around
you, and you can look forward to your purchase giving you long and satisfactory service.
GUARANTEE
This product is guaranteed against faulty manufacture for a period of 12 months from the date
of purchase. Please keep your receipt which will be required as proof of purchase.
This guarantee is invalid if the product is found to have been abused or tampered with in any
way, or not used for the purpose for which it was intended.
Faulty goods should be returned to their place of purchase, no product can be returned to us
without prior permission.
This guarantee does not effect your statutory rights.
SPECIFICATION
MODEL NUMBER
BBQ4
PART NUMBER
6925305
HEAT OUTPUT :
Grill
Side Burner
OPERATING PRESSURE
37 mbar
APPLIANCE CATEGORY
13+
DIMENSIONS (LxWxH)
1350 x 580 x 1220 mm
WEIGHT
34.8 kg
3 x 3.1 kw
1 x 3.1 kw
2
223g x hr
223g x hr
(Propane)
(Propane)
WARNING AND SAFETY POINTS
Please read the following points before using your barbecue.
1. Please follow all assembly instruction in this manual; failure to follow these instructions may
result in serious bodily injury and/or property damage.
2. This barbecue will become very hot when in use; care is to be taken especially when pets,
children or elderly people are present.
3. Do not use or store any flammable liquids or vapours in the vicinity when operating the
barbecue.
4. In the event of a gas leak, shut off the gas to the barbecue, extinguish any open flames and
open the lid, if the leak continues check for damage, poor connection etc.
5. Do not use a naked flame to check for gas leaks.
6. Do not operate barbecue if there is a gas leak.
7. Do not attempt to disconnect any gas fitting if your barbecue is being used, this includes the
Gas Hose and Regulator.
8. The barbecue should be cleaned on a regular basis. Take care not to enlarge burner ports
or any openings when cleaning the burner or valves.
9. Do not use this barbecue in an enclosed area.
10. We recommend keeping the barbecue at least 1.0 meter clear of any combustible
materials.
11. We would recommend that this barbecue should be serviced at least once a year by a
competent engineer. Do not attempt to service this appliance yourself.
12. Do not attempt to modify or make any adjustment of the main controls on this barbecue,
i.e. gas taps, injectors, valve etc.
13. Stand your barbecue on a safe, level surface, away from inflammable items such as
wooden fences or overhanging trees.
14. Never use your barbecue indoors.
15. Once alight do not move your barbecue or leave it unattended.
16. Keep children and pets at a safe distance from the barbecue.
17. Keep a fire extinguisher handy.
18. Remember that hot fat may drip out from the bottom of the barbecue. Make sure the hose
is clear of any fat.
19. The barbecue will become hot when in use, so wear oven gloves to handle the lid etc.
20. Ensure that the barbecue has completely cooled down before storing.
21. Never light a barbecue with gasoline or similar liquids.
22. Always turn off the gas supply after use.
23. Do not store the LPG bottle inside the barbeque.
3
PARTS LIST
NO
DESCRIPTION
PART NUMBER
NO
DESCRIPTION
PART NUMBER
1
2
3
4
5
6
7
8
9
10
11
12
13
14
15
16
17
18
19
20
Lid
Warming Rack
Cooking Grill
Flame Diffuser Plate
Main Burner
Side Burner Table
Left Side Table
Grill Body
Drip Tray
Leg A
Door Handle
Tray Handle
Back Panel
Leg B
Side Panel
Right Door
Middle Plate
Door Stop Bar
Left Door
Wheel
ELBBQ401
ELBBQ402
ELBBQ403
ELBBQ404
ELBBQ405
ELBBQ406
ELBBQ407
ELBBQ408
ELBBQ409
ELBBQ410
ELBBQ411
ELBBQ412
ELBBQ413
ELBBQ414
ELBBQ415
ELBBQ416
ELBBQ417
ELBBQ418
ELBBQ419
ELBBQ420
21
22
23
24
25
26
27
28
29
30
31
A
B
C
D
E
F
G
H
I
Wheel Cap
Bottom Shelf
Castor
Side Burner Grid
Side Burner
Spark Electrode
Knob
Side Burner Table
Side Burner Valve
Gas Hose
Clip on Regulator
Wheel Pin
M8×21 Bolt
R-clip
M5×60 Bolt
M5×10 Bolt
M4×8 Bolt
M5 Nut
Butterfly Nut
Washer
ELBBQ421
ELBBQ422
ELBBQ423
ELBBQ424
ELBBQ425
ELBBQ426
ELBBQ427
ELBBQ428
ELBBQ429
ELBBQ430
ELBBQ431
ELBBQ4FP
ELBBQ4FP
ELBBQ4FP
ELBBQ4FP
ELBBQ4FP
ELBBQ4FP
ELBBQ4FP
ELBBQ4FP
ELBBQ4FP
4
ASSEMBLY
TIPS
• Remove all parts from the box and check if anything is missing according to the “Parts
List” on page 4.
• To assemble your barbecue you will need: a screwdriver, pliers and an adjustable
wrench.
• Assemble all nuts and bolts loosely at first. Tighten all connections once fully assembled.
This increases the stability of your barbecue.
1.
Connect Legs A (10) and Leg B (14) to Side Panels (15) as shown using 8 x Bolts (E).
2.
Secure the Bottom Shelf (22) to the legs using 4 x Bolts (D) and 4 x Nuts (G).
5
3.
Fit the back panel (13) into position and secure in place using 4 x Bolts (E).
4.
Fit both Wheels, by sliding the Wheel Pin (A) through the wheel (20) and washer (I)
then through Leg B (14) and locking the wheel in place using the R-Clip (C)
supplied.
5.
Clip the Wheel Cap (21) into position.
6.
Screw the Castors (23) into the bottom of Leg A (10).
6
7.
Fit the Door Stop Bar (18) as shown and secure in place using 2 x Bolts (E).
8.
Fit the Middle Plate (17) as shown and secure in place using 4 x Nuts (G) and
4 x Bolts (E).
7
9.
Fit the Door Handles (11) to the Doors (16 & 19) using 4 x Bolts (E).
10. Fit the Doors into position as shown.
11. Get someone to help lift and position the Grill Body (8) as shown above.
12. Secure in position using 8 x Bolts (D).
8
13. Fit the Left Side Table (7) and Side Burner Table (6) and fix in place using 8 x Bolts
(B).
14. Fit the Spark Electrode (26), Side Burner Valve (29) and Side Burner (25) as shown.
• Ensure all connections are secure using Bolt (F) and Wingnut (H).
9
15. Place the Knob (27) and Side Burner Grid (24) into position.
16. Connect the Gas Hose (30) as shown.
17. Connect the Tray Handles (12) to the Drip Tray (9) and secure using 2 bolts (E).
18. Slide the Oil Tray into position as shown above.
10
19. Place the Flame Diffuser Plates (4), Cooking Grills (3) and Warming Rack (2) into
position.
20. The Left Side Table (7) can be lowered when required.
21. Connect one end of the hose onto the gas port on the BBQ and secure using one of the
clips shown.
22. Connect the regulator to the other end of the hose and secure using the second clip.
11
BEFORE USE
CONNECTING THE GAS BOTTLE
You will need to purchase a LPG (Liquid Propane Gas) bottle to operate this barbecue. This can
be obtained from your nearest gas retailer.
WARNING: NEVER LEAVE THE REGULATOR ATTACHED TO THE GAS BOTTLE IF
DISCONNECTED FROM THE GAS HOSE.
1. When changing your gas bottle, ensure that there are no sources of ignition close by i.e.
fires, cigarettes, naked flame etc. Make sure that the barbecue is switched off.
2. Make sure the regulator switch is in the off position (3 o’clock position) – there will be an
audible ‘click’.
3. Push the regulator down onto the cylinder valve and press downwards firmly until you hear
the regulator ‘click’ into place.
4. Position the gas bottle at the side of your barbecue, not underneath.
• The bottle must be kept away from heat.
• NEVER STORE THE GAS BOTTLE INSIDE THE COMPARTMENT.
• Ensure that the hose is free from any kinks or bends which will affect the gas flow.
• The hose must not have undue tension and must not touch any part of the barbecue
which may be hot.
5. Check for leaks (see below)
DISCONNECTING THE GAS BOTTLE
1. Turn the regulator switch clockwise to the off position.
2. Press the button beneath the regulator switch to remove the regulator from the gas bottle.
GAS LEAK TEST
WARNING: NEVER USE A NAKED FLAME TO DO THE LEAK TEST.
Always do a gas leak test before you use the barbecue. Test for leaks on all connections as
follows:
1. Connect the LPG bottle to the barbecue and close all the valves by turning the control
knobs to "OFF" position.
2. Put soapy water on all of the gas connections.
3. Open the gas valve on the LPG bottle.
4. Set the regulator switch to the on position (straight up).
• If bubbles are seen, tighten the connection, if the bubbles are still seen, goes to your
retailer for help. Never use a barbecue that is leaking gas.
5. Clear all soapy water on the connections after testing using a wet towel.
• This MUST be done when first connecting the barbecue and every time the gas bottle is
changed.
12
LIGHTING THE BBQ
WARNING: READ ALL SAFETY INFORMATION IN THIS MANUAL BEFORE LIGHTING THE
BARBECUE.
1. Turn all control knobs clockwise to the OFF position.
2. Open the gas valve on the LPG bottle.
3. Set the regulator switch to the on position (straight up).
4. Lift open the barbecue lid.
5. Push and turn the control knob anticlockwise to the spark position, it will generate a spark
and light the burner.
• Try several times if the burner does not light on the first occasion.
6. If the Burner does not light, turn the control knob to the OFF position and wait 5 minutes, then
repeat Step 3.
7. To adjust the flame, turn the control knob to LOW and HIGH position.
8. Turn the control knobs to the OFF position to shut down the burner.
9. The side burner control works in the same way.
NOTE:
• The lid must always be open when lighting the burner.
• Use oven gloves and sturdy, long handled barbecue tools when cooking on the grill.
• Be prepared if an accident or fire should occur. Know where your First Aid kit and fire
extinguishers are and how to use them correctly.
• Keep any electrical cables and the gas supply hose away from any hot surfaces.
• The gas bottle should only be changed by a competent person.
ENERGY SAVING TIPS
•
Turn the gas off as soon as you have finished cooking.
•
Preheat the barbecue for 5 to 10 minutes only.
•
Do not use a higher setting than required.
•
Do not cook with the lid down using the maximum heat settings.
STORAGE
Your gas bottle must be stored outdoors in a well-ventilated area and must be disconnected
from your barbecue when not being used. Ensure that you are outdoors and away from any
sources of ignition before attempting to disconnect your gas bottle from your barbecue.
When using your barbecue after a period of storage, check for gas leaks and for any
obstructions in the burner etc. before using. Also follow the cleaning instructions to ensure the
barbecue is safe. If the barbecue is stored outdoors check that the barbecue is free from any
obstruction (insects etc.) as this may affect the flow of air.
NEVER STORE THE GAS BOTTLE INSIDE THE COMPARTMENT.
13
MAINTENENCE
CLEANING INSTRUCTION
Your barbecue is easy to clean with minimum effort, just follow these helpful tips:
1. Turn the burner on to maximum for 5 to 10 minutes. Grease will be burned off from your grill
as well as your Flame Diffuser Plates.
2. Ensure the barbecue is cool before continuing. Grills should be cleaned periodically by
soaking and washing in soapy water. Use a wire brush, steel wool or a scouring pad to
remove stubborn spots.
3. The interior surfaces of the grill body should also be washed with hot soapy water.
4. Regularly clean the Drip Tray (10) of excess oil or fat.
5. Periodically check each burner to see that it is free from insects and spiders which may
block the gas system.
6. Clean each burner very carefully, checking to see it is free of obstructions. We recommend
that you use a pipe cleaner to clean the burner gas holes.
14
DELCLARATION OF CONFORMITY
15