1
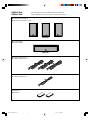
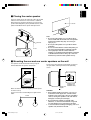
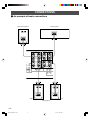
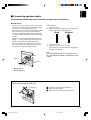
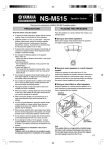
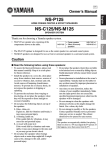
UGR
NS-P70
(NS-P70: NS-E56 + NS-C55)
HOME CINEMA CENTER & EFFECT SPEAKERS
SYSTEME D’ENCEINTES CENTRALE ET D’EFFETS AUDIO/VIDEO
OWNER’S MANUAL
MODE D’EMPLOI
NS-P70 PRE(02.2.22)c
1
02.2.27, 8:12 PM
UNPACKING
DEBALLAGE
After unpacking, check that the following items are contained.
Après le déballage, vérifier que les pièces suivantes sont incluses.
● Rear/rear center speakers
● Enceintes arrière/arrière centrale
<NS-E56>
● Center speaker
● Enceinte centrale
<NS-C55>
● Speaker cable (10m)⳯3
● Câble d’enceinte (10m)⳯3
● Speaker cable (4m)⳯1
● Câble d’enceinte (4m)⳯1
● Fastener⳯2
● Fixation⳯2
NS-P70 PRE(02.2.22)c
2
02.2.27, 8:12 PM
The speaker package “NS-P70” is designed for use in a
multi-channel audio system such as a home theater system.
The package includes three NS-E56 speaker systems and
one NS-C55 speaker system.
English
COMPONENTS OF THE PACKAGE
<NS-E56>
2-way acoustic-suspension speaker system used for
the rear and rear center speakers
<NS-C55>
2-way acoustic-suspension speaker system used for
the center speaker
CONTENTS
UNPACKING .................... Inside of Front Cover
COMPONENTS OF THE PACKAGE .............. 1
CONNECTIONS .............................................. 4
An example of basic connections .................... 4
Connecting speaker cables ............................ 5
PRECAUTIONS ............................................... 1
SPECIFICATIONS .......................................... 6
SETTING UP THE SPEAKERS ...................... 2
Placing the center speaker ............................. 3
Mounting the rear and rear center speakers
on the wall .................................................... 3
PRECAUTIONS
Read this before using the speakers.
• To assure the finest performance, please read this
manual carefully. Keep it in a safe place for future
reference.
• Install the speakers in a cool, dry, clean place – away
from windows, heat sources, sources of excessive
vibration, dust, moisture and cold. Avoid sources of
humming (transformers, motors). To prevent fire or
electrical shock, do not expose the speakers to rain or
water.
• To prevent the enclosure from warping or discoloring, do
not place the speakers where they will be exposed to
direct sunlight or excessive humidity.
• Do not place the following objects on the speakers:
Glass, chine, etc.
If glass etc. falls by vibrations and breaks, it may cause
personal injury.
A burning candle etc.
If the candle falls by vibrations, it may cause fire and
personal injury.
A vessel with water in it
If the vessel falls by vibrations and water spills, it may
cause damage to the speakers, and/or you may get an
electrical shock.
• Do not place the speakers where foreign objects such as
water drips might fall. It might cause a fire, damage to the
speakers, and/or personal injury.
• Do not place the speakers where they are liable to be
knocked over or struck by falling objects. Stable
placement will also ensure better sound performance.
• Placing the speakers on the same shelf or rack as the
turntable can result in feedback.
• Any time you note distortion, reduce the volume control
on your amplifier to a lower setting. Never allow your
amplifier to be driven into “clipping”. Otherwise the
speakers may be damaged.
• When using an amplifier with a rated output power higher
than the nominal input power of the speakers, care
should be taken never to exceed the speakers’ maximum
input.
• Do not attempt to clean the speakers with chemical
solvents as this might damage the finish. Use a clean, dry
cloth.
• Do not attempt to modify or fix the speakers. Contact
qualified YAMAHA service personnel when any service is
needed. The cabinet should never be opened for any
reasons.
• Secure placement or installation is the owner’s
responsibility.
YAMAHA shall not be liable for any accident caused
by improper placement or installation of speakers.
E-1
NS-P70 ENG(02.2.22)a
1
02.2.27, 8:12 PM
SETTING UP THE SPEAKERS
Before making connections, place all speakers in their respective positions. The positioning of the speakers is important
because it controls the whole sound quality of this system.
Place the speakers depending on your listening position by following the instructions below.
Speaker configuration
Placing speakers
The rear and rear center speakers are used for surround
sounds, and the center speaker is for center sounds (dialog
etc.).
Rear speakers:
Behind your listening position, facing
slightly inward. About 1.8 m (approx. 6
feet) from the floor.
Center speaker:
Precisely between the main speakers.
Note
In this speaker package, the same speakers (NS-E56)
are used for the rear and rear center speakers.
Main L
(not included)
Rear center speaker:
Precisely between the rear speakers
Main R
(not included)
Center
Subwoofer
(not included)
NS-C55
(Center)
Main R
Subwoofer
NS-E56
(Rear R)
Main L
TV-set
NS-E56
(Rear center)
Rear L
Rear center
Rear R
NS-E56
(Rear L)
Note
These speakers feature a magnetically shielded design,
but there is still a chance that placing them too close to
a TV set might impair picture color. Should this happen,
move the speakers away from the TV set.
E-2
NS-P70 ENG(02.2.22)a
2
02.2.27, 8:12 PM
English
䡵 Placing the center speaker
Place the speaker on the TV whose top is flat or on the floor
under the TV or inside the TV rack so that it is stabilized.
When placing the speaker on top of the TV, to prevent the
speaker from falling down, put the provided fasteners at two
points on both bottom of the speaker and top of the TV.
Fastener
TV set
Peel off
the seal
Screen
Notes
● Do not place the speaker on top of the TV whose
area is smaller than the bottom area of the speaker.
If placed, the speaker may drop out causing an
injury to you.
● Do not place the speaker on top of the TV with an
inclination.
● Do not touch the adhesive surface after peeling off
the seal as this will weaken its adhesive strength.
● Thoroughly wipe clean the surface where the
fastener is to be applied. Note that adhesive strength
is weakened if the surface is dirty, oily or wet and
that this may cause the center speaker to drop.
䡵 Mounting the rear and rear center speakers on the wall
The speakers can be mounted on a wall by using the
bracket attached to the speakers’ back panels.
Fasten screws into a firm wall or wall support as shown in
the figure below, and hang the holes on the protruding
screws.
Diam. 3.5 to 4 mm
Min.
20 mm
Pads
3 mm
Holes
Wall or wall
support
Make sure that the screws are caught by a narrow part of
the holes securely.
Put the screws into a wall according to the figure shown
below.
40 mm
Tapping screw
(available at a
hardware store)
WARNING
● Each speaker weights 2.3 kg (5 lbs. 2 oz.). Do not
mount them on thin plywood or soft wall surface
material, as the screws may come out of the flimsy
surface, causing the speakers to fall down and be
damaged, or result in personal injury.
● Do not fasten the speakers to wall with nails,
adhesives, or other unsound hardware. Long term
use and vibrations may cause them to fall down.
● To avoid accidents resulting from tripping over loose
speaker cords, fix them to the wall.
E-3
NS-P70 ENG(02.2.22)a
3
02.2.27, 8:12 PM
CONNECTIONS
䡵 An example of basic connections
Rear center speaker
Center speaker
MAIN
R
SPEAKERS
REAR CENTER
L
+
CENTER
+
+
–
–
A
–
–
–
VIDEO
/CB
B
Y
+
+
R
REAR
(SURROUND)
R
L
L
OUTPUT
R
MAIN
L
REAR
CENTER
CENT
R
REAR
(SURROUND)
L
Amplifier
Right
Left
Rear speakers
E-4
NS-P70 ENG(02.2.22)a
4
02.2.27, 8:12 PM
English
䡵 Connecting speaker cables
BEFORE MAKING CONNECTIONS, MAKE SURE THAT THE AMPLIFIER IS SWITCHED OFF.
■ CONNECTIONS
• Connect the screw-type input terminals at the rear of the
speakers to the speaker output terminals of the amplifier
(or receiver) with the provided speaker cables.
• One side of the speaker cable is red and the other side is
black. Connect the (+) terminals on the amplifier (or
receiver) and speakers using the red side. Connect the
(–) terminals on both components using the black side of
the cable.
• Connect each speaker making sure not to reverse the
polarity (+, –). If the speaker is connected with reversed
polarity, the sound will be unnatural and lack bass.
• For the rear speakers only, connect one speaker to the
left (marked L) terminals of your amplifier (or receiver),
and another to the right (marked R) terminals.
How to connect:
1 Loosen the knob.
2 Remove the insulation coating at the extremity of each
speaker cable by twisting the coating off.
Good
3
4
No good
Insert the bare wire.
Tighten the knob and secure the cable.
Test the firmness of the connection by pulling lightly on
the cable at the terminal.
Note
Do not let the bare speaker wires touch each other as
this could damage the speaker or the amplifier, or both
of them.
Loosen
Tighten
Black (–)
Red (+)
–
+
Red: positive (+)
Black: negative (–)
When using a banana plug
<U.S.A., China and General models only>
3
1
Banana plug
1 Remove the cover by pulling it toward you.
2 Tighten the terminal knob.
3 Simply insert the banana plug into the terminal.
2
E-5
NS-P70 ENG(02.2.22)a
5
02.2.27, 8:12 PM
SPECIFICATIONS
䡵 NS-E56
䡵 NS-C55
Type ............... 2-way acoustic-suspension speaker system
Magnetic shielding type
Type ............... 2-way acoustic-suspension speaker system
Magnetic shielding type
Driver .............................................. 10 cm (4”) cone woofer
2.2 cm (3/4”) dome tweeter
Driver ........................................ 10 cm (4”) cone woofer x 2
2.2 cm (3/4”) dome tweeter
Impedance ..................................................................... 6Ω
Impedance ..................................................................... 6Ω
Frequency Response ............................... 80 Hz to 30 kHz
Frequency Response ............................... 70 Hz to 30 kHz
Nominal Input Power ................................................. 50W
Nominal Input Power ................................................. 60W
Maximum Input Power ............................................. 150W
Maximum Input Power ............................................. 180W
Sensitivity ................................................... 90 dB/2.83V/m
Sensitivity ................................................... 91 dB/2.83V/m
Crossover Frequency .............................................. 5 kHz
Crossover Frequency .............................................. 5 kHz
Dimensions (W x H x D) ................. 150 x 265 x 156.3 mm
(5-7/8” x10-3/8” x 6-3/16”)
Dimensions (W x H x D) ................. 465 x 135 x 173.5 mm
(18-5/16” x5-5/16” x 6-13/16”)
Weight ............................................ 2.3 kg (5 lbs. 2 oz.) x 3
Weight ................................................ 3.5 kg (7 lbs. 11 oz.)
䡵 Accessories
Speaker cable (10 m) x 3
Speaker cable (4 m) x 1
Fastener x 2
* Specifications are subject to change without notice due
to product improvements.
E-6
NS-P70 ENG(02.2.22)a
6
02.2.27, 8:12 PM
YAMAHA
YAMAHA
YAMAHA
YAMAHA
YAMAHA
YAMAHA
YAMAHA
ELECTRONICS CORPORATION, USA 6660 ORANGETHORPE AVE., BUENA PARK, CALIF. 90620, U.S.A.
CANADA MUSIC LTD. 135 MILNER AVE., SCARBOROUGH, ONTARIO M1S 3R1, CANADA
ELECTRONIK EUROPA G.m.b.H. SIEMENSSTR, 22-34, 25462 RELLINGEN, BEI HAMBURG, F.R. OF GERMANY
ELECTRONIQUE FRANCE S.A. RUE AMBROISE CROIZAT BP70 CROISSY-BEAUBOURG 77312 MARNE-LA-VALLEE CEDEX02, FRANCE
ELECTRONICS (UK) LTD. YAMAHA HOUSE, 200 RICKMANSWORTH ROAD WATFORD, HERTS WD1 7JS, ENGLAND
SCANDINAVIA A.B. J A WETTERGRENS GATA 1, BOX 30053, 400 43 VASTRA FRÖLUNDA, SWEDEN
MUSIC AUSTRALIA PTY, LTD. 17-33 MARKET ST., SOUTH MELBOURNE, 3205 VIC., AUSTRALIA
NS-P70 FRE(02.2.27)b
8
02.2.27, 8:12 PM
Printed in Indonesia
V914930