1
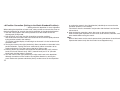
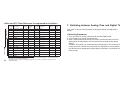
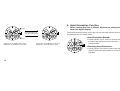
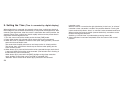
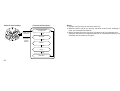
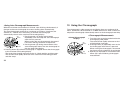
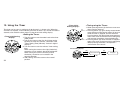
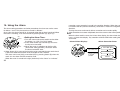
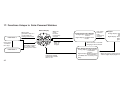
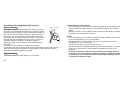
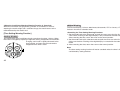
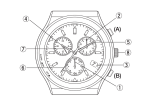
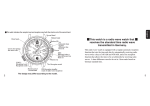
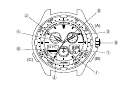
6
2
30
0
33
5
60
30
0
(A)
50
18
3
60
24
20
6
40
12
20
30
9
0
24
1
2
0
8
15
(C)
7
(B)
0
2
1
0
1
4
English
Please charge the watch fully before use
by exposing it to light.
When the watch does not operate according to the
instruction manual, it is insufficiently charged.
Charge the watch for at least 3 hours approximately
20 cm (8 in) away from a fluorescent or incandescent
lamp (30 W) as a light source. When charging, do
not place the watch too close to the light source to
prevent the watch from becoming too hot.
* When charging the watch under direct sunfight,
charge for at least 50 minutes.
1
Contents
1.
2.
3.
4.
5.
6.
7.
8.
9.
10.
11.
12.
13.
14.
2
Features ................................................................................................... 4
Before Using the Watch .......................................................................... 5
Names of Components and Major Functions ....................................... 6
Switching Modes (Display Functions) ................................................. 10
Checking 0-Position of Each Hand ...................................................... 11
Accessing Times and Dates of Major Cities around the World ........ 15
Switching between Analog Time and Digital Time ............................. 17
Hand Evacuation Function ................................................................... 19
Setting the Time .................................................................................... 20
Setting the Date ..................................................................................... 24
Using the Race timer ............................................................................ 27
Using the Chronograph ........................................................................ 31
Using the Timer ..................................................................................... 34
Using the Alarm ..................................................................................... 36
15. Using Zone Setting ............................................................................... 39
16. About All-Reset ..................................................................................... 40
17. Functions Unique to Solar Power Watches ........................................ 42
· Insufficient Charge Warning Function
· Time Setting Warning Function
· Overcharging Prevention Function
· Power Save 1
· Power Save 2
18. General Reference for Charging Times .............................................. 51
19. Notes Regarding Handling of this Watch ............................................ 53
20. Precautions ............................................................................................ 54
21. Specifications ........................................................................................ 60
3
1. Features
2. Before Using the Watch
This watch is a combination solar-powered watch that contains a solar cell in its
face that drives the watch hands, race timer, chronograph, alarm, and numerous
other functions by converting light energy into electrical energy.
It is also equipped with convenient functions including a power save mode that
reduces power consumption when light is not shining on the solar cell, UTC
(Coordinated Universal Time) and a world timer indicating the time and dates of
30 major cities around the world.
This watch is a solar-powered watch. Before using, allow light to shine
onto the watch so that it is sufficiently charged.
In this watch a secondary battery is used to store electrical energy. This
secondary battery is a clean energy battery that does not contain mercury or
other toxic substances. Once fully charged, the watch will continue to run for a
maximum of 4 years without additional charging (when in the power save 2
mode).
[Proper use of this watch]
To use this watch comfortably, make sure to recharge it before it stops running
completely. There is no risk of overcharging the watch no matter how often it is
recharged. (Overcharging Prevention Function).
It is recommended that the watch be recharged everyday.
4
5
3. Names of Components and Major Functions
Name/Mode
1. Mode hand
2. Hour hand
3. Minute hand
4. Second hand
5. 24-hour hand
6. Function hand
Time
Calendar
TME
CAL
Always indicates “hours”
Always indicates “minutes”
Chronograph
CHR
Indicates the remaining
race time (seconds)
Indicates the autochronograph measured
time display (seconds)
Indicates the
chronograph
measured time
(seconds)
Always indicates “24-hour time” in conjunction with hours and minutes
Indicates the remaining Indicates the
time (minutes)
Always stopped at 0-position race
chronograph
Indicates the auto(standard position)
chronograph measured measured time
(minutes)
time display (minutes)
Always indicates “seconds”
7. Digital display 1
Hours,
minutes,
seconds
8. Digital display 2
City name, SMT (when set to
daylight savings time)
6
Race timer
RACE
Month, date,
day
Timer
Alarm-1
TMR
AL-1
Always indicates “hours”
Always indicates “minutes”
Alarm-2
AL-2
Zone setting
SET
Always indicates “seconds”
Always indicates “24-hour time” in conjunction with hours and minutes
Always stopped at 0-position (standard position)
Indicates the remaining
race time (minutes,
seconds)
Indicates the autochronograph measured time
display (minutes, seconds)
Indicates the
chronograph
measured time
(minutes, seconds,
1/100 seconds)
Indicates the timer’s
remaining time
(minutes, seconds)
Race timer set time
(minutes)
Chronograph measured
time (hours)
Timer set time (minutes)
Hours, minutes, alarm (ON/OF)
City name (SET/OFF)
City name
7
Name/
Mode
Crown
position
Time
Calendar
Race timer
Chronograph
Normal
Mode switching
position
9. Crown
1st
click
Time correction
Calendar
correction
Switching location to be corrected
Normal
Changing between cities
position
B.
Button (B) 1st
click
Switching SMT (ON/OF)
Switching between
‘seconds’ correction and
‘24-hour time’
Normal
Hand evacuation
position
C.
Button (C) 1st
Hand evacuation
click
8
Alarm-1
Alarm-2
Zone setting
Mode switching
Normal
Changing between cities
position
A.
Button (A) 1st
click
Timer
Race Timer
set time
correction
Adjust to 0
position
Timer set time correction Alarm time correction
Start/stop
Start/stop
Start/stop
-----Return flight /
reset
------
------
Switching
location to be
corrected
Split/reset
------
Changing between cities
------
Return flight / reset
------
Switching location to be corrected
Changing city name
Changing city name
------
Changing between cities
Changing city name
Switching alarm (ON/OF)
Changing city name
(SET/OFF)
Hand evacuation
Hand evacuation
9
4. Switching Modes (Display Functions)
5. Checking 0-Position of Each Hand
In addition to the time and date modes, this
watch is also equipped with a race timer, a
chronograph and a timer mode and alarm-1
and 2 modes. Switch modes by turning the
crown. Check the current mode using the
mode hand.
Before using this watch perform the following procedure to check that the 0position (standard position of each hand) is set correctly to ensure that the
functions of the watch operate properly.
50
CAL
Calendar
20
6
40
12
20
30
< 0-Position Check>
Mode hand
< Switching the mode>
TME
Time
60
24
18
RACE
Race timer
CHR
Chronograph
1. While in the normal position, turn the crown to set the mode hand to the
chronograph [CHR] mode.
2. Pull the crown out to the first click (0-position
correction position)
· The second hand, minute hand, hour hand, 24hour hand and function hand rapidly advance to
the 0-position (12 o’clock position).
Note:
· When each hand is not at the 0-position,
perform the “0-position correction” procedure. If
this 0-position is out of alignment, each hand will
not indicate the correct position.
60
24
50
18
20
6
40
12
SET
Zone setting
10
AL-2
Alarm-2
AL-1
Alarm-1
TMR
Timer
20
30
11
< 0-Position Correction (Setting to the Watch Standard Position) >
... Setting when the 0-position is out of algnment
When setting the 0-position of each hand, always make sure to turn the crown to
the right (clockwise) to set each hand to its 0-position in the clockwise direction.
1. Turn the crown while in the normal position to set the mode hand to the
chronograph [CHR] mode.
2. Pull the crown out to the first click (0-position correction position).
· The second hand, minute hand, hour hand and 24-hour hand rapidly advance
to the position stored in the memory.
· “F-H” lights in digital display 2 indicating that the watch is in the function hand
correction state.
3. Turning the crown to the right (clockwise) allows corrections to be made in the
positive direction. Turning the crown continuously allows corrections to be
made continuously. Turn the crown to the left or right to stop.
4. Pressing button (A) switches the correction location between “HR” (24-hour
hand, hour hand, minute hand), “SEC” (second hand) and “F-H” (function
hand) each time the button is pressed.
5. Turn the crown to the right (clockwise) to align each hand at the 0-position.
Although correction can be made in the negative direction by turning the
crown backwards (counter-clockwise) always make sure to set the 0-position
12
by turning the crown in the right direction (clockwise) to ensure that the
standard position is set correctly.
· The 24-hour hand is corrected in conjunction with the hour hand and the
minute hand.
6. After performing correction, return the crown to the normal position.
· After correcting the 0-position of each hand, reset the time, calendar, and
other modes before using the watch.
Note:
· None of the buttons on the watch operate during movement of each hand.
Operate the buttons only after the hands have stopped moving.
13
<Normal Chronograph
Display>
<0-Position (Standard Position)
Correction State>
Crown
pulled out to
the first click
The time or date of major cities pre-registered in this watch can be easily
accessed by pressing the buttons.
Function hand
60
24
50
18
20
6
40
12
6. Accessing Times and Dates of Major Cities
around the World
20
<Access Procedure>
(A)
30
Crown
returned to
normal
position
1. Turn the crown to set the mode hand to the [TME] time or [CAL] calendar
mode.
2. When button (A) is pressed, the times or dates of major cities in the scrolling
UP direction are displayed each time the button is pressed.
3. When button (B) is pressed, the times or dates of major cities in the scrolling
DOWN direction are displayed each time the button is pressed.
· Pressing button (A) or (B) continuously causes scrolling to advance rapidly.
Minute hand/hour hand/
24-hour hand
(A)
Second hand
(A)
14
15
<Cities and UTC Time Differences Pre-registered in this Watch>
Display City name
on watch
Scrolling DOWN
Scrolling UP
16
Time
difference
UTC
Universal time constant
±0
LON
London
±0
PAR
Paris
+1
ROM
Rome
+1
CAI
Cairo
+2
IST
Istanbul
+2
MOW
Moscow
+3
KWI
Kuwait
+3
DXB
Dubai
+4
KHI
Karachi
+5
DEL
New Delhi
DAC
Dacca
+6
BKK
Bangkok
+7
+5.5
SIN
Singapore
+8
HKG
Hong Kong
+8
PEK
Beijing
+8
Daylight
savings
time
--K
K
K
K
K
K
M
M
M
M
M
M
M
M
M
Display City name
on watch
Time
difference
TYO
Tokyo
+9
SYD
Sydney
+10
NOU
Noumea
+11
AKL
Auckland
+12
HNL
Honolulu
-10
ANC
Anchorage
-9
LAX
Los Angeles
-8
DEN
Denver
-7
CHI
Chicago
-6
MEX
Mexico City
-6
NYC
New York
-5
YUL
Montreal
-5
CCS
Caracas
-4
RIO
Rio de Janeiro
-3
BUE
Buenos Aires
-3
Daylight
savings
time
M
K
M
K
M
K
K
K
K
M
K
K
M
K
M
* Cities (regions) in which daylight savings time is used, are indicated with the K mark, while those in
which it is not, are indicated with an M.
* The time difference and use of daylight savings time of each city are subject to change by each
individual country.
7. Switching between Analog Time and Digital Time
This watch is able to switch between analog time display and digital time
display.
<Switching Procedure>
1. Turn the crown to set the mode hand to the time [TME] mode.
2. Press buttons (A) and (B) simultaneously.
3. After a confirmation tone sounds, the watch switches the time of the city
displayed by analog display and the time of the city displayed by digital
display.
· If buttons (A) and (B) are simultaneously pressed when in the calendar [CAL]
mode, the watch switches the date of the city displayed by analog display and
the date of the city displayed by digital display (the times are switched at this
time as well).
17
8. Hand Evacuation Function
(When reading the time is difficult because the analog hands
cover the digital display)
Press
60
24
18
12
60
24
50
20
40
20
50
6
18
20
6
40
Pressing buttons (A)
and (B) simultaneously
30
12
20
30
The hand evacuation function allows the hour hand and the minute hand to be
evacuated to the 12 o’clock position.
<Hand Evacuation Method>
Press
60
24
Analog time: 10:10 AM (Tokyo: TYO)
Digital time: 8:10 PM (New York: NYC)
Analog time: 8:10 PM (New York: NYC)
Digital time: 10:10 AM (Tokyo: TYO)
50
18
20
6
40
12
20
1. Pressing button (C) for at least 2 seconds moves
the hour hand and the minute hand to the 12
o’clock position.
30
<Canceling Hand Evacuation>
1. Pressing button (C) moves the hour hand and the
minute hand back to the position for normal time
indication.
18
19
9. Setting the Time (Time is corrected by digital display)
When digital time is corrected, the second, minute, hour, and 24 hour hands of
the analog time are corrected automatically in conjunction with digital time. After
correcting the digital time, when the crown is returned to the normal position, the
second, minute, hour, and 24 hour hands rapidly advance to the present time in
conjunction with the digital time set.
1. Turn the crown and set the mode hand to the time [TME] mode.
2. Press either button (A) or button (B) to access the city to be corrected.
3. When the crown is pulled out to the first click (time setting position), the watch
enters the time correction state.
· The second hand rapidly advances to and stops at the 12 o’clock position.
· The minute, hour, and 24 hour hands stop at the time when pulling out the
crown to the first click.
4. When button (A) is pressed, the location to be corrected changes each time it
is pressed. Select the location to be corrected. (The location that is flashing is
the location that can be corrected.)
· When button (B) is pressed in the [SMT] daylight savings time correction
state, daylight savings time can be set (ON) or canceled (OF).
· “Seconds” return to zero when button (B) is pressed in the “seconds”
20
correction state.
· When the crown is turned to the right (clockwise) in the “hour” or “minute”
correction states, correction is made in the positive direction. Turning the
crown continuously allows “hours” or “minutes” to be corrected continuously.
When turning the crown to the left (counter-clockwise), correction can be
made in the negative direction.
· Switching “12H/24H time” is performed by pressing button (B).
5. After corrections have been completed, return the crown to the normal
position.
21
<Normal Time Display>
60
24
50
18
20
6
40
12
20
30
<Time Correction State>
Crown
pulled out to
first click
Notes:
1. Daylight savings time can be set for each city.
2. When the time is set for any one city, the times of other cities, including UTC
time, are corrected automatically.
3. When changing the time, the crown and buttons do not respond even if
operated. Ensure that the required operation is performed correctly by first
checking that the time has changed.
Switching daylight
savings time
(A)
Seconds
Crown
returned to
normal
position
(A)
Minutes
(A)
Hours
(A)
Switching 12H/24H time
indication
22
(A)
23
10. Setting the Date (Date is corrected by digital display)
1. Turn the crown and set the mode hand to the calendar [CAL] mode.
2. Press either button (A) or button (B) to access the city to be corrected.
3. When the crown is pulled out to the first click (date setting position), the watch
enters the date correction state.
4. When button (A) is pressed, the location to be corrected changes each time it
is pressed. Select the location to be corrected by making it flash.
· When the crown is turned to the right (clockwise), correction is made in the
positive direction. When the crown is turned to the left (counter-clockwise)
correction is made in the negative direction. Turning the crown continuously
allows corrections to be made rapidly.
5. After corrections have been completed, return the crown to the normal
position.
<Normal Date Display>
<Date Correction State>
Crown pulled
out to first
click
Month
60
24
50
18
20
6
40
12
20
30
(A)
Date
Crown
returned to
normal
position
(A)
Year
(A)
24
25
Notes:
1. When the date is set for any one city, the dates of other cities, including UTC time,
are corrected automatically.
2. The year can be set from 2001 to 2099.
3. The day is corrected automatically when the year, month and date are set.
4. Since this watch is equipped with an auto-calendar function, it is not necessary to
correct the date at the end of the month.
5. When the date has been set to a non-existent date, (for example February 30) the
watch automatically displays the 1st day of the following month when the watch is
returned to the normal display.
11. Using the Race timer
The race timer is able to set the time for 5 minute intervals for times between 60
and 10 minutes, and to 6, 5, 4, 3, and 2 minutes and 1 minute.
<Setting the Race Timer>
1. Turn the crown and set the mode hand to the [RACE] race timer.
2. When the crown is pulled out to the first click (race timer setting position), the
watch enters the minute correction state.
· The Race Timer Setting Time (minutes) flashes in digital display-2.
3. Turn the crown to set the Race Timer Setting
<Race Timer Set Display>
(minutes).
· When the crown is turned to the right,
correction is made in the positive direction.
When the crown is turned to the left correction
is made in the negative direction.
· The function hand moves automatically in
conjunction with the Race Timer Setting Time
(minutes).
4. After corrections have been completed, return
Race timer ‘minutes” flashes.
the crown to the normal position.
60
24
50
18
20
6
40
12
26
20
30
27
<Race Timer Initial
Setting Display>
<Timing Using the Race Timer>
1. When pressing button (A), the race timer starts
counting down from the time set while the
second hand starts moving counter clockwise.
(A)
2. When pressing button (A) during the countdown,
Press
the race timer stops. When pressing button (A)
once more while the race timer is stopped, the
race timer starts counting again.
· When pressing button (B) during the countdown,
the race timer is initialized and starts counting
(B)
down again from the beginning.
Press
3. When pressing button (B) while the race timer is
stopped, the race timer returns to the initial
setting time.
· When pressing buttons, the eration confirmation tone sounds to confirm
operation.
· After starting, a warning tone is sounded when 11, 10, 6, 5, 4, 3 or 2 minutes
or 1 minute remain or when 50, 40, 30, 20, 10, 5, 4, 3 or 2 seconds or 1
second remain.
However, when 11, 10, 6, 5, 4, 3 or 2 minutes or 1 minute are set, the warning
signal for the remaining time in question does not sound.
4. When timing of the set time is finished, the Time Up tone sounds, while
simultaneously the auto chronograph starts operating.
50
20
20
12
30
(A)
40
(A)
Race timer timing
display
20
6
12
28
50
40
6
60
24
18
(B)
60
24
18
20
Race timer stops
(A)
30
(B)
Time Up
(A)
(B)
Auto chronograph
timing
Auto chronograph
stops
(A)
* After the remaining time is finished, the watch
automatically switches to the auto chronograph.
(B)
29
<Using Auto Chronograph Measurement>
When the race timer measurement is finished, upon finishing simultaneously it
changes to the auto chronograph that starts counting down automatically.
The auto chronograph measures to a maximum of 23 hours, 59 minutes, 59
seconds in 1 second units. After timing is finished, the chronograph
automatically returns to the race timer initial setting display.
1. Pressing button (A) during measurement
(A)
Press
repeatedly starts and stops the auto chronograph
each time it is pressed.
· When starting the auto chronograph, the second
hand starts moving clockwise in conjunction.
2.
Pressing button (B) during measurement of the
(B)
auto chronograph returns the auto chronograph to
Press
the race timer initial display.
3. Pressing button (B) while the chronograph is stopped returns the chronograph
to the race timer initial setting display.
· The second hand rapidly advances to the 12 o’clock position and then stops.
· The function hand rapidly advances to the race timer initial setting position
and then stops.
60
24
50
18
The chronograph is able to measure and display time to a maximum of 23
hours, 59 minutes, 59.99 seconds in 1/100th second units. After 24 hours have
elapsed, the chronograph automatically returns to the chronograph reset display.
<Normal Chronograph
Display>
20
6
40
12
30
12. Using the Chronograph
20
30
(A)
Press
60
24
50
18
20
6
40
12
20
30
(B)
Press
<Chronograph Measurement>
1. Turn the crown to set the mode hand to the
chronograph [CHR] mode.
· The second hand rapidly advances to the 12
o’clock position and stops.
2. Pressing button (A) repeatedly starts and stops
the chronograph each time it is pressed.
· When starting the chronograph, the second
hand starts moving clockwise in conjunction.
3. Split time is displayed for 10 seconds when
button (B) is pressed during chronograph
measurement.
31
· The ‘SPL” mark flashes in digital display-1 during split time display. In addition
the second hand also stops moving.
4. Pressing button (B) while the chronograph is stopped, returns the
chronograph to the chronograph reset display.
· The second and function hand (used as the minute hand for the chronograph)
rapidly advance to and stops at the 12 o’clock position.
Chronograph reset
50
18
(A)
60
24
(A)
(B)
20
6
40
12
20
Measurement
30
*1
Stops
(A)
(B)
*2
Split time
*1
(A)
(B)
*1: Returns automatically after timing for 24 hours
*2: Returns automatically after 10 seconds
32
33
13. Using the Timer
60
24
50
18
20
6
40
12
34
20
30
1. Turn the crown to set the mode hand to the timer
[TMR] mode.
2. Pull out the crown to the first click (timer setting
position) to enter the “minutes” correction state.
· “Timer Setting Time (Minutes)” flashes in digital
display-2.
3. Turn the crown to set the “minutes” timer setting
time.
· When turning the crown to the right (clockwise),
correction can be made in the positive direction.
When turning the crown to the left (counter
clockwise), correction can be made in the
negative direction.
4. After setting, return the crown to the normal
position.
stops the timer and pressing button (A) once more
while the timer is stopped, restarts the timer.
· Pressing button (B) during timer measurement
returns the watch to the timer initial setting display
(B)
and resumes countdown from the beginning.
Press 3. Pressing button (B) when the timer is stopped
returns the watch to the timer initial setting display.
* When pressing the button, the operation
confirmation tone sounds.
60
24
18
<Setting the Timer>
1. When pressing button (A) the timer starts counting
(A)
down from the time set.
Press 2. Pressing button (A) again during measurement
The timer can be set to a maximum of 99 minutes in 1 minute units. When the
set time has elapsed, a tone indicating that the set time is up, sounds for about 5
seconds, after which the timer returns to the timer initial setting display.
<Timer Initial Setting
Display>
<Timing using the Timer>
<Timer Initial
Setting Display>
50
20
40
20
6
12
30
(B)
Initial setting display
(A)
60
24
50
18
20
6
40
12
20
(A)
Stopped
Measurement
30
(B)
(A)
35
14. Using the Alarm
The alarm setting procedure and other procedures for alarm use are the same
for Alarm 1 and 2. Only the tone that sounds is different.
Once a day, the alarm sounds for 15 seconds when the set time is reached. When
the alarm is sounding, it can be turned off by pressing button (A), (B) or (C).
(A)
Press
<Setting the Alarm Time>
1. Turn the crown and set the mode hand to either
the Alarm 1 or 2 [AL-1] or [AL-2] mode.
2. Press either button (A) or button (B) to access
the city to be corrected.
(B)
3.
When the crown is pulled out to the first click
Press
(alarm time setting position), the watch enters
the alarm correction state.
4. When button (A) is pressed, the location to be corrected changes each time it
is pressed. Select the location to be corrected so that it flashes.
· The alarm can be set (ON) or canceled (OF) by pressing button (B) when the
watch is in the alarm ON/OF correction state.
· When the crown is turned to the right (clockwise) in the “hours” or “minutes”
60
24
50
18
20
6
40
12
36
correction state, correction is made in the positive direction. When the crown
is turned to the left (counter-clockwise), correction is made in the negative
direction.
· Turning the crown continuously allows corrections to be made rapidly.
5. After corrections have been completed, return the crown to the normal position.
Note:
· When the time mode is set to the 12-hour time display, the alarm time also
uses a 12-hour time display. Pay attention to AM and PM when setting the
alarm time.
20
30
<Normal Alarm Display>
60
24
50
18
20
6
40
12
<Alarm Correction State>
20
30
Crown pulled
out to first click
Alarm ON / OF
(A)
Hours
Crown returned
to normal
position
(A)
Minutes
(A)
37
<Switching Alarm ON and OF>
1. The alarm can be switched ON and OF by pulling out the crown to the first
click when the alarm mode is on.
2. Pressing button (B) switches the alarm ON and OF each time it is pressed.
3. Return the crown to the normal position after the alarm has been set to ON or
OF.
<Alarm Monitor>
15. Using Zone Setting
The zone setting function enables only those cities for which ‘SET’ has been
selected to be easily accessed (displayed) in each mode.
<Using Zone Setting>
1. Turn the crown while in the normal position and set
the mode hand to the zone setting [SET] mode.
2. The city can be changed by pulling out the crown to
the first click (for changing cities between SET and
OFF and for setting the location for switching to
daylight savings time).
3. Turn the crown to access the city to be set.
· Turning the crown continuously causes the cities to
advance rapidly.
4. Press button (B) to set the city.
5. After setting, return the crown to the normal position.
60
24
50
18
20
6
40
1. Pressing buttons (A) and (B) simultaneously during the normal alarm display
causes the alarm to sound for confirmation for as long as they are pressed.
12
20
30
<Confirming Set Cities>
1. When button (A) or button (B) is pressed when the watch is in the zone
setting [SET] mode (with the crown in the normal position), the city name and
SET or OFF are displayed each time the button is pressed.
· Only those cities for which SET is displayed can be accessed from each mode.
38
39
16. About All-Reset
When this watch indicates an abnormal display or does not function properly (no
display, alarm continues to sound, etc.) as a result of being subjected to the
effects of static electricity or strong impact and so forth, perform the all-reset
procedure described below.
When performing the all-reset procedure, first make sure that the watch is
sufficiently charged.
<All-Reset Procedure>
60
24
50
18
20
6
40
12
40
20
30
1. Turn the crown to set the mode hand to the
chronograph [CHR] mode.
2. Pull out the crown to the first click (0-position
correction mode).
· The second hand, minute hand, hour hand, 24
hour hand, and function hand rapidly advance to
the 0-position stored in memory.
3. Press buttons (A), (B), and (C) simultaneously
and then release.
· All segments of the digital display are shown when any of the buttons is
released.
4. This fully lit display is canceled when the crown is returned to the normal
position.
· After canceling, a confirmation tone is sounded after which each of the hands
perform a demonstration movement in the order of the second hand, function
hand, and minute hand, to indicate that the all-reset procedure is finished.
· After the demonstration movement, pull the crown out to the first click to
switch the watch to the 0-position (base position) setting state.
Always make sure to set the 0-position (standard position) for the hour hand,
minute hand, second hand, 24-hour hand and function hand while referring to
“5. Checking 0-Position of Each Hand <0-Position Correction>”.
Note:
· After setting the 0 position (base position) for each hand, correctly reset the
time, calendar and other modes before using the watch.
41
17. Functions Unique to Solar-Powered Watches
Normal Display
When power
generation stops as a
result of light not
shining on the watch
Power Save
1 continues
for 3 days
60
24
50
18
Power Save 1
20
6
40
12
When power
generation resumes
as a result of light
shining on the watch
When the
watch
becomes
insufficiently
charged
20
30
When the
watch is
charged
Power Save 2
When the watch is
sufficiently charged
and the time and the
date are set
42
Insufficient Charging Warning
Analog display: Two-second
interval
Digital display: CHARGE mark
flashes
If the watch
continues
to be
insufficiently
charged
Stopped
Analog displays: Hands
stop
moving
Digital display: The entire
display
goes out
When the time is set while
charging is still insufficient
Time Setting Warning Function
Analog display: Hands stopped
at standard
position
Digital display: Display flashes in
all-reset display
(12:00:00, UTC or January 1 TU
UTC)
When the watch is exposed to light
and the digital display begins to flash
43
[Insufficient Charging Warning Function]
Analog Display
2sec
2sec
Regardless of the display (mode) of the watch at the time,
when the watch becomes insufficiently charged, the watch
changes to the time display and the second hand begins to
move at two-second interval movement. Although the 24
60
50
hour hand, hour hand and minute hand continue to keep
the correct time, the watch stops after about 1.5 days have
40
20
30
elapsed after the insufficient charging warning function is
activated. When this happens, charge the watch by
exposing to light so that it returns to one-second interval
movement.
However, after the watch has stopped due to being
insufficiently charged, it will not return to the normal display unless the time and
date are set during the Insufficient Charging Warning state after the watch is
sufficiently charged by exposing it to light.
20
Digital Display
“CHARGE” flashes on digital display 2 in all modes.
44
<Digital Display in Each Mode>
· The watch displays the normal time display regardless of the position of the
crown (pulled out to the first click) in each mode except for the calendar
mode.
· When the watch is in the calendar mode, the normal date display is displayed
regardless of the position of the crown.
Notes:
· Crown operations do not function (except for mode switching (with the crown
in the normal position)) in any of the modes.
· Button operations do not function, except for changing the city name
(UP/DOWN), in any of the modes.
· The alarm tone does not sound even if it is set.
· The chronograph is interrupted and reset even if measurement is in progress.
· Timing by the race timer is immediately interrupted even if timing is in
progress.
· In the case the watch switches to the insufficient charging warning
function as a result of being insufficiently charged, it takes a minimum
of 30 minutes for the watch to return to the normal operating state even
if sufficiently exposed to light.
45
<When the insufficient Charging Warning Function is Canceled>
When the insufficient charging warning function is canceled as a result of
exposing the watch to light and a sufficient charge, the watch returns to the
mode indicated by the mode hand.
[Time Setting Warning Function]
Analog Display
The watch stops when insufficient charging continues for about 1.5 days. When
the watch is charged by exposing to light after having stopped due to insufficient
charging, each hand is rapidly advanced to the
base position and stops. Each hand remains
stopped until the time is reset.
50
20
6
40
12
46
<Canceling the Time Setting Warning Function>
1. Set the mode hand to the time mode and pull the crown out to the first click to
set the time. Flashing of the digital display is only canceled in the time mode.
After correcting the time, return the crown to the normal position.
2. Set the mode hand to the calendar mode and pull the crown out to the first
click to set the date. Flashing of the digital display is canceled in the calendar
mode.
3. After correcting the date, return the crown to the normal position.
60
24
18
Digital Display
The all-reset display (12 hours, 00 minutes, 00 seconds, UTC or January 1 TU)
flashes in the time or calendar mode.
20
30
Note:
· The time setting warning function will not be canceled unless the time is first
set followed by setting the date.
47
[Overcharging Prevention Function]
The overcharging prevention function is activated when the secondary battery is
fully charged so that it is not charged further. This allows the user to charge the
watch without any risk of overcharging.
[Power Save 1]
When power is not generated as a result of the solar cell not being exposed to
light, the second hand stops when it reaches the 12 o’clock position and the
watch automatically enters the power save state to inhibit power consumption of
the secondary battery.
Analog Display
· The second hand stops at the standard position (12:00).
· Other hands continue to keep the correct time.
Digital Display
· In conjunction with the analog second hand stopping at the 12 o’clock
position, the entire digital display goes out. However, the race timer, alarm,
chronograph and other functions continue to measure time internally even
though there is no display.
48
<Canceling Power Save 1 >
Power Save 1 is canceled when power generation resumes as a result of
exposing the solar cell to light.
· The second hand rapidly advances to the current time and begins onesecond interval movement.
· The digital display reappears simultaneous to resumption of power
generation.
Note:
· During the time the secondary battery is fully charged and the overcharging
prevention function is activated, the power save function is not activated even
if power generation is interrupted as a result of the solar cell not being
exposed to light. In addition, the power save function is similarly not activated
when the solar cell is exposed to intense light and temporarily becomes fully
charged.
[Power Save 2]
When the watch reaches the first 12:00 AM position (when the 24 hour hand,
hour hand and minute hand all reach the standard position) after the Power
Save 1 state has continued for 3 days, it enters the Power Save 2 state.
49
Analog Display
· The 24 hour hand, hour hand, minute hand, second hand and function hand
stop at the standard position (12:00).
Digital Display
· The digital display remains completely out in continuation from the Power
Save 1 state.
Notes:
· Crown and button operations do not function in any mode.
· The alarm tone does not sound even if it is set.
<Canceling Power Save 2>
Similar to Power Save 1, Power Save 2 is canceled when power generation
resumes as a result of exposing the solar cell to light.
· Each hand rapidly advances to the current time and begins to move.
· The digital display reappears simultaneous to resumption of power
generation. However, the chronograph returns to the reset chronograph reset
display and the race timer and timer switch to the initial setting display.
50
18. General Reference for Charging Times
The time required for recharging varies according to the model of the watch (color of
the dial, etc.). The following times are shown below to serve only as a reference.
* Recharging time refers to the amount of time the watch is continuously exposed to
light.
Charging time
Illuminance
(lx)
Environment
Charging time
for 1 day of
operation
Charging time
Charging time from
the stopped state to from the stopped
state to fully
one-second interval
charged
movements
Inside an ordinary office
2.5 hours
24 hours
275 hours
1 hour
20 minutes
12 hours
132 hours
3,000
60-70 cm under
fluorescent light (30 W)
20 cm under fluorescent
light (30 W)
22 minutes
4.5 hours
42 hours
10,000
Outdoors cloudy weather
7 minutes
2 hours
13.5 hours
100,000
Outdoors, summer, under
direct sunlight
4 minutes
1 hour
10 minutes
7 hours
500
1,000
51
Full recharging time: Time required for recharging the watch from the stopped
state to the fully charged state.
Charging time for 1 day of operation: Time required for recharging the watch to
run for 1 day at one-second interval
movement.
19. Notes Regarding Handling of this Watch
<Try to keep the watch charged at all times.>
• Please note that if you routinely wear long sleeves, the watch can easily
become insufficiently charged as a result of it being concealed and unable to
be exposed to light.
• When you take the watch off, try to place it in as bright a location as possible
to ensure that it always keeps the correct time.
Notes: Charging Precautions
• Avoid recharging at high temperatures (over about 60°C / 140°F) since this
may result in damage to the watch as a result of reaching excessively high
temperatures.
Examples: Charging the watch in close proximity to an incandescent lamp,
halogen lamp or other light source that can easily reach high temperatures,
charging the watch in a location that reaches high temperatures such as on a
car dashboard.
• When charging the watch with an incandescent lamp, always make sure the
watch is at least 50 cm (20 in.) away from the lamp so that it does not reach
excessively high temperatures during charging.
52
53
For correct use within the design limits of the watch, confirm the level of waterresistance of your watch, as indicated on the dial and case, and consult the table.
20. Precautions
CAUTION: Water-resistance performance
Examples of use
There are several types of water-resistant watches, as
shown in the following table.
The unit "bar" is roughly equal to 1 atmosphere.
* WATER RESIST(ANT) xx bar may also be indicated
as W.R. xx bar.
Indication
Specification
Minor exposure to water
(washing face, rain, etc.)
Moderate exposure to
water (washing, kitchen
work, swimming, etc.)
Marine sports
(skin diving)
Scuba diving
(with air tank)
Operation of the
crown or button with
moisture visible
Dial
Case (Case back)
WATER RESIST or
no indication
WATER
RESIST(ANT)
Water-resistant to 3
atmospheres
OK
NO
NO
NO
NO
WR 50 or WATER
RESIST 50
WATER
RESIST(ANT) 5 bar or
WATER RESIST(ANT)
Water-resistant to 5
atmospheres
OK
OK
NO
NO
NO
WR 100/200 or
WATER RESIST 100/200
WATER RESIST(ANT)
10bar/20 bar or
WATER RESIST(ANT)
Water-resistant to
10 / 20 atmospheres
OK
OK
OK
NO
NO
54
55
• Water-resistance for daily use (to 3 atmospheres): This type of watch is waterresistant to minor exposure to water. For example, you may wear the watch
while washing your face; however, it is not designed for use underwater.
• Upgraded water-resistance for daily use (to 5 atmospheres): This type of
watch is water-resistant to moderate exposure to water. You may wear the
watch while swimming; however, it is not designed for use while skin diving.
• Upgraded water-resistance for daily use (to 10/20 atmospheres): This type of
watch may be used for skin diving; however, it is not designed for scuba or
saturated diving using helium gas.
• If moisture has entered the watch, or if the inside of the crystal is fogged up
and does not become clear within a day, immediately take the watch to your
dealer or Citizen Service Center for repair. Leaving the watch in such a state
will allow corrosion to form inside.
• If seawater enters the watch, place the watch in a box or plastic bag and
immediately take it in for repair. Otherwise, pressure inside the watch will
increase, and parts (crystal, crown, buttons, etc.) may come off.
CAUTION: Keep your watch clean.
• Dust and dirt tend to be deposited in gaps in the back of the case or band.
CAUTION
• Do NOT operate the crown or button with wet fingers or when the watch is
wet. Water may enter the watch and compromise water-resistance.
• If the watch is used in seawater, rinse with fresh water afterward and wipe with
a dry cloth.
56
Deposited dust and dirt may cause corrosion and soil your clothing. Clean the
watch occasionally.
Cleaning the Watch
• Use a soft cloth to wipe off dirt, perspiration and water from the case and
crystal.
• Use a soft, dry cloth to wipe off perspiration and dirt from the leather band.
• To clean a metal, plastic, or rubber watchband, wash away dirt with mild soap
and water. Use a soft brush to remove dust and dirt jammed in the gaps in the
57
metal band. If your watch is not water-resistant, take it to your dealer.
NOTE: Avoid using solvents (thinner, benzine, etc.), as they may mar the finish.
CAUTION: Operating environment
• Use the watch within the operating-temperature range specified in the
instruction manual.
Using the watch where temperatures are outside the specified range, may
result in deterioration of functions or even stoppage of the watch.
• Do NOT use the watch in places where it is exposed to high temperature,
such as in a sauna.
Doing so may result in a skin burn.
• Do NOT leave the watch in a place where it is exposed to high temperature,
such as the glove compartment or dash-board of a car.
Doing so may result in deterioration of the watch, such as deformation of
plastic parts.
• Do NOT place the watch close to a magnet.
Timekeeping will become inaccurate if you place the watch close to magnetic
health equipment such as a magnetic necklace or a magnetic latch of a
refrigerator door or handbag clasp or the earphone of a mobile phone. If this
58
has occurred, move the watch away from the magnet and reset the time.
• Do NOT place the watch close to household appliances that generate static
electricity.
Timekeeping may become inaccurate if the watch is exposed to strong static
electricity, such as is emitted from a TV screen.
• Do NOT subject the watch to a strong shock such as dropping it onto a hard
floor.
• Avoid using the watch in an environment where it may be exposed to
chemicals or corrosive gases.
If solvents, such as thinner and benzine, or substances containing such
solvents come in contact with the watch, discoloration, melting, cracking, etc.
may result. If the watch comes in contact with mercury used in thermometers,
the case, band or other parts may become discolored.
59
21. Specifications
1. Model No.: C660
2. Type: Combination solar-powered watch
3. Accuracy: Within ±15 seconds per month (when worn at normal
temperatures of +5°C to +35°C (41°F to 95°F)
4. Operating Temperature Range: Watch operating temperature range: 0°C to
+55°C (32°F to 131°F)
5. Display Functions:
Analog: Time: Seconds, minutes, hours, 24 hours, function, mode
Digital: * Time: Seconds, minutes, hours, city name, daylight savings time
* Calendar: Month, date, day, city name
* Race timer: Race timer remaining minutes, race timer remaining
seconds, set minutes (race timer setting range: 60 – 10 minutes
with 5 minute intervals and 6, 5, 4, 3, 2, and 1 minute settings)
* Chronograph: Chronograph hours, chronograph minutes,
chronograph seconds, chronograph 1/1 00 seconds, SPL, 24 hour
measurement
* Timer: Timer remaining minutes, timer remaining seconds, set
minutes (timer setting range: 99 minutes to 1 minute in 1 minute
units)
60
* Alarm 1: Hours, minutes, city name, ON/OF
* Alarm 2: Hours, minutes, city name, ON/OF
* Zone setting: Display setting (SET) and cancelation (OFF) for each
city
6. Additional Functions
* Switching between main time (analog) and sub-time (digital)
* Hands evacuation function (moving the minute and hour hands to the
12 o’clock position
* Power Save 1: Automatically stops second hand movement and liquid crystal
display
* Power Save 2: Automatically stops watch functions
* Insufficient charging warning function
* Time setting warning function
* Overcharging prevention function
7. Continuous running times:
Fully charged to stopped: Roughly 4 years (when Power Save 2 function is
operating)
Two-second interval movement to stopped: Roughly 1.5 days
8. Battery: Secondary battery
* Specifications are subject to change without notice.
61