1
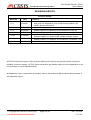
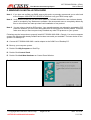
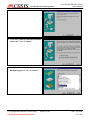
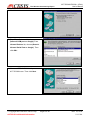
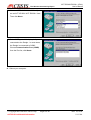
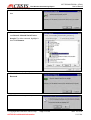
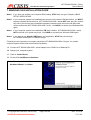
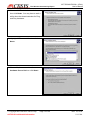
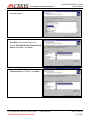
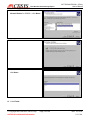
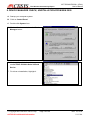
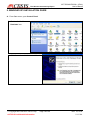
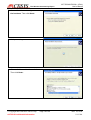
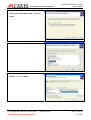
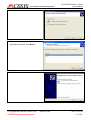
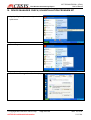
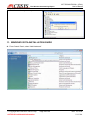
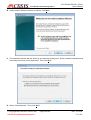
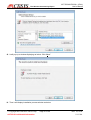
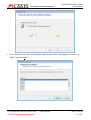
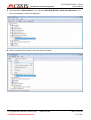
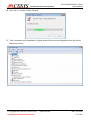
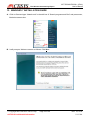
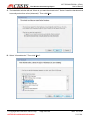
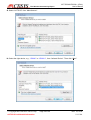
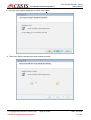
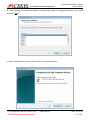
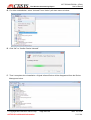
The Wireless Connectivity Expert
921 Corporate Way, Fremont, CA 94539, USA
Tel: +1-510-490-8024, Fax: +1-510-623-7268
Web: http://www.actisys.com, E-mail: [email protected]
ACT-IR200L/220L/220L+
®
IrDA PC RS232 ComPort Adapter
User’s Manual
NOVEMBER 16, 2010
Version 1.5.2.4
© Copyright 2001-2010 ACTiSYS Corporation
All Rights Reserved
<<<<<<< WARNING >>>>>>>
Please do NOT read this manual, NOR install IrDA driver from Windows, if the Windows application
software bundled with your equipment, uses ACT-IR220L+ as a “Raw IR”, instead of an “IrDA” dongle.
Please just plug in this IR dongle, install no driver, and ACT-IR220L+ will work well with your Windows
software! Otherwise, ACT-IR220L+ will not work with your Windows application software for Raw IR.
The Wireless Connectivity Expert
ACT-IR2x0L/IR220L+ (IrDA®)
User’s Manual
FCC Compliance Statement
This device complies with part 15 of the FCC Rules. Operation is
subject to the following two conditions:
(1)This device may not cause harmful interference and (2) this device must
accept any interference received, including interference that may cause
undesired operation.
WARNING-FCC Regulations state that any unauthorized changes or
modifications to this equipment not expressly approved by the manufacturer
could void the user authority to operate this equipment
NOTE: This equipment has been tested and found to comply with the limits
for Class B digital device, pursuant to Part 15 of the FCC Rules. This
equipment generates, uses, and can radiate radio frequency energy and, if
not installed and used in accordance with the instructions, may cause harmful
interference to radio communications. However, there is no guarantee that
interference will not occur in a particular installation. If this equipment does
cause harmful interference to radio or television reception, which can be
determined by turning the equipment off and on, the user is encouraged to try
to correct the interference by one or more of the following measures:
-Increase the separation between the equipment and receiver.
-Reorient or relocate the receiving antenna.
-Connect the equipment into an outlet on a circuit different from that to which
the receiver is connected.
-Consult the dealer or an experienced radio/TV technician for helps.
NOTE: Must be used with shielded cable only.
FOR YOU RECORDS
For your assistance in reporting this product in case of loss or theft, please
record the model and serial number that is located on the bottom of the case.
Please retain this information.
Model Number
.
Serial Number
.
Date of Purchase
.
Place of Purchase
.
All indicated copyrights and trademarks in the following pages are copyrights
and trademarks of their Respective corporations.
© Copyright 2001-2010 ACTiSYS Corp.
ACTiSYS Confidential Information
Page 2 of 44
Nov. 16, 2010
V 1.5.2.4
The Wireless Connectivity Expert
ACT-IR2x0L/IR220L+ (IrDA®)
User’s Manual
TABLE OF CONTENTS
REVISION HISTORY............................................................................................ 4
1.
OVERVIEW ........................................................................................................... 5
2.
PACKAGE CONTENT .......................................................................................... 5
3.
SYSTEM REQUIREMENTS................................................................................. 5
4.
BIOS SETUP VERIFICATION ............................................................................. 5
5.
WINDOWS 98 INSTALLATION GUIDE ............................................................ 6
6.
DEVICE MANAGER CHECK, UNINSTALLATION FROM WIN 98 ............ 10
7.
WINDOWS 2000 INSTALLATION GUIDE ...................................................... 12
8.
DEVICE MANAGER CHECK, UNISTALLATION FROM WIN 2000 ........... 16
9.
WINDOWS XP INSTALLATION GUIDE ......................................................... 18
10. DEVICE MANAGER CHECK, UN-INSTALLATION FROM WIN XP .......... 22
11. WINDOWS VISTA INSTALLATION GUIDE .................................................. 24
12. DEVICE MANAGER CHECK, UNINSTALLATION FROM VISTA.............. 30
13. WINDOWS 7 INSTALLATION GUIDE ............................................................ 33
14. DEVICE MANAGER CHECK, UNINSTALLATION FROM WIN 7 .............. 39
15. TROUBLE SHOOTING....................................................................................... 41
16. SPECIFICATIONS............................................................................................... 42
17. WARRANTY INFORMATION .......................................................................... 43
18. CONTACT INFORMATION............................................................................... 44
© Copyright 2001-2010 ACTiSYS Corp.
ACTiSYS Confidential Information
Page 3 of 44
Nov. 16, 2010
V 1.5.2.4
The Wireless Connectivity Expert
ACT-IR2x0L/IR220L+ (IrDA®)
User’s Manual
REVISION HISTORY
Revision History
Revision
Date
Comment
1.5.1
1/6/2006
•
•
1.5.1.1
7/08/2008
•
Overall Reformat. Rewrite some Chapters.
Add cross-out wheeled bin logo at the warranty chapter, per
WEEE directive, EN-50419.
Updated company address
1.5.2
9/25/2008
•
Added Chapters of Installation & Uninstallation in Vista OS
1.5.2.1
1/5/2009
1.5.2.2
8/19/2009
1.5.2.3
01/20/2010
•
•
•
•
Revised Chapter of System Requirement
Added Warning Note on cover page and re-write the Overview
Deleted chapters for Windows ME; update package content
Added Chapters of Installation & Uninstallation in Windows 7 OS
1.5.2.4
11/16/2010
•
Added Device Manager Check into uninstallation chapters
ACTiSYS reserves the right to make changes without prior notice to any products herein to improve
reliability, function or design. ACTiSYS does not assume any liability arising out of the application or use
of any product or circuit described herein.
All trademarks, logos, organization & company names, and product model names are the properties of
the respective owners
© Copyright 2001-2010 ACTiSYS Corp.
ACTiSYS Confidential Information
Page 4 of 44
Nov. 16, 2010
V 1.5.2.4
The Wireless Connectivity Expert
ACT-IR2x0L/IR220L+ (IrDA®)
User’s Manual
1. OVERVIEW
®
This manual provides instructions to install/uninstall the IrDA driver for ACT-IR200L/IR220L/IR220L+
from Windows 98/2000/XP/Vista.
[Note for ACT-IR220L+]: The driver we refer here is ONLY the IrDA driver which is already embedded in
Windows O.S. In addition to playing as an IrDA dongle, ACT-IR220L+ can also play as a raw IR. If your
application software bundled with your equipment, uses ACT-IR220L+ as a “Raw IR”, instead of an “IrDA”
dongle, do NOT install IrDA driver from Windows per this manual. Just plug in this IR dongle, install no
driver, and ACT-IR220L+ will work well with your software.
Otherwise it will not work with your Windows application software for Raw IR and you need to uninstall the
IrDA driver from your PC then.
2. PACKAGE CONTENT
When you unpack the package, the following items should be found:
A. ACT-IR200L. or ACT-IR220L or ACT-IR220Lplus
B. Printed manual for raw IR (No CD for this manual for IrDA. You can download this document from
ACTiSYS WEB site: http://www.actisys.com/Downloads.html).
3. SYSTEM REQUIREMENTS
To use ACT-IR200L/220L/220L+, your PC MUST meet the following minimum requirements:
A. Windows 98/ME/2000/XP, Win Vista and Win7 (32 & 64 bit).
B. One unoccupied Serial (RS232) COM port, or one unoccupied virtual COM port (COM 4)
4. BIOS SETUP VERIFICATION
Before installing the device driver, you MUST setup or verify your BIOS FIRST.
Below demonstrates an example of ACT-IR220L+ being installed on COM 2:
A. Choose PNP & PCI from BIOS SETUP:
PNP OS Installed:
Resource Controlled by:
NO
Manual
B. Choose Integrated Peripherals from BIOS SETUP:
Onboard UART2 Serial Port 2 : 2F8H/IRQ3
Onboard IR function:
Disable or
UART2:
Normal
© Copyright 2001-2010 ACTiSYS Corp.
ACTiSYS Confidential Information
Page 5 of 44
Nov. 16, 2010
V 1.5.2.4
The Wireless Connectivity Expert
ACT-IR2x0L/IR220L+ (IrDA®)
User’s Manual
5. WINDOWS 98 INSTALLATION GUIDE
Note 1: If you have not verified your BIOS setup at this point, we strongly recommend you to refer back
to the Chapter 4 BIOS SETUP VERIFICATION and verify your BIOS setup again.
Note 2: Verify that the COM port you will use to install ACT-IR200L/220L/220L+ has not been already
used or occupied by any hardware or software. We recommend users to completely delete any
files or drivers that can interrupt clean fresh installation of our product.
Note 3: You are trying to install an SIR product. Your operating system can always be upgraded to FIR
products. However you can never downgrade from an FIR product to an SIR product. Therefore
make sure that you have not previously installed any other FIR products on your system.
Followings are the instructions to properly install ACT-IR200L/220L/220L+ Dongle. You need a computer
system with Windows 98 already installed and at least one serial port available. The best choice for the
system is a desktop PC.
A. Connect ACT-IR200L/220L/220L+ serial adapter to the COM Port of Desktop PC.
B. Boot up your computer system.
C. Double Click My Computer on DeskTop.
D. Double Click Control Panel.
E. Double Click Add New Hardware on Control Panel Window.
F. Click Next>.
© Copyright 2001-2010 ACTiSYS Corp.
ACTiSYS Confidential Information
Page 6 of 44
Nov. 16, 2010
V 1.5.2.4
The Wireless Connectivity Expert
ACT-IR2x0L/IR220L+ (IrDA®)
User’s Manual
G. Click Next>.
H. Select No, I want to select the hardware
from a list. Then click Next>.
I.
Highlight Infrared Devices from the
Hardware types list, then click Next>.
© Copyright 2001-2010 ACTiSYS Corp.
ACTiSYS Confidential Information
Page 7 of 44
Nov. 16, 2010
V 1.5.2.4
The Wireless Connectivity Expert
ACT-IR2x0L/IR220L+ (IrDA®)
User’s Manual
J. Click Next>.
K. From Manufacturers list, choose
[Infrared COM port or dongle]. From
Infrared Devices list, choose (Generic
Infrared Serial Port or dongle). Then
click OK>.
L. Choose ACTiSYS IR-200L if you are an
ACT-IR 200L user. Then click Next.
© Copyright 2001-2010 ACTiSYS Corp.
ACTiSYS Confidential Information
Page 8 of 44
Nov. 16, 2010
V 1.5.2.4
The Wireless Connectivity Expert
ACT-IR2x0L/IR220L+ (IrDA®)
User’s Manual
M. Choose ACTiSYS IR-220L/ 220L+ if you
are an ACT-IR-220L/ ACT-IR220L+ User.
Then click Next>.
N. Select COM port which is physically
connected to the Dongle. In most cases,
the Dongle is connected to COM2.
Choose Communication Port (COM2)
from the Port list, click Next>.
O. Reboot your computer.
© Copyright 2001-2010 ACTiSYS Corp.
ACTiSYS Confidential Information
Page 9 of 44
Nov. 16, 2010
V 1.5.2.4
The Wireless Connectivity Expert
ACT-IR2x0L/IR220L+ (IrDA®)
User’s Manual
6. DEVICE MANAGER CHECK, UNINSTALLATION FROM WIN 98
A. Click Control Panel.
B. Double click System Icon.
C. Click Device Manager tab.
D. From Infrared devices folder, you can
see Infrared Communication Device.
E. For driver uninstallation, highlight it and
then click Remove.
© Copyright 2001-2010 ACTiSYS Corp.
ACTiSYS Confidential Information
Page 10 of 44
Nov. 16, 2010
V 1.5.2.4
The Wireless Connectivity Expert
ACT-IR2x0L/IR220L+ (IrDA®)
User’s Manual
F. Click OK in the Confirm Device Removal
box.
G. From Network adapter folder, you can
see Generic Infrared Serial Port or
dongle. For driver removal, highlight it
then click Remove.
H. Click OK in the Confirm Device
Removal.
I.
Click Yes to restart your computer.
© Copyright 2001-2010 ACTiSYS Corp.
ACTiSYS Confidential Information
Page 11 of 44
Nov. 16, 2010
V 1.5.2.4
The Wireless Connectivity Expert
ACT-IR2x0L/IR220L+ (IrDA®)
User’s Manual
7. WINDOWS 2000 INSTALLATION GUIDE
Note1.: If you have not verified your computer BIOS setting, STOP here and go to Chapter 4 BIOS
SETUP VERIFICATION.
Note2: If your computer system has installed some devices on the same COM port before, you MUST
properly uninstall the devices first. ACT-IR200L/220L/220L+ would NOT work with your system
any more if the devices are uninstalled improperly because some drivers are still there and
cause conflicts with ACT-IR200L/220L/220L+ driver. You HAVE to re-install your Windows 2000
again.
Note3: If your computer system has installed an FIR device before, ACT-IR200L/220L/220L+ would
NOT work with your system any more. You HAVE to re-install your Windows 2000 again.
Note4: If you want to use Virtual COM Port in your application, STOP here and change
ACT-IR200L/220L/220L+ to USB-IR Dongle.
Following are the instructions to properly install the ACT-IR200L/220L/220L+ Dongle. You need a
computer system with at least one serial port available.
A. Connect ACT-IR200L/220L/220L+ serial adapter to the COM Port of Desktop PC.
B. Startup your computer system
C. Click on Control Panel.
D. Double Click Add/Remove Hardware.
E. On Welcome to the Add/Remove
Hardware Wizard, click Next>.
© Copyright 2001-2010 ACTiSYS Corp.
ACTiSYS Confidential Information
Page 12 of 44
Nov. 16, 2010
V 1.5.2.4
The Wireless Connectivity Expert
ACT-IR2x0L/IR220L+ (IrDA®)
User’s Manual
F. Choose Add/Troubleshoot a device,
then click Next>. You may have to wait a
while when the wizard searches for Plug
and Play hardware.
G. Highlight ADD a new drive then click
Next>.
H. Choose No, I want to select the
hardware form a list then click Next>
© Copyright 2001-2010 ACTiSYS Corp.
ACTiSYS Confidential Information
Page 13 of 44
Nov. 16, 2010
V 1.5.2.4
The Wireless Connectivity Expert
I.
ACT-IR2x0L/IR220L+ (IrDA®)
User’s Manual
Select the Infrared device from the
Hardware types.
J. From Manufacturers list, choose
ACTiSYS, from Infrared Device list,
choose ACTiSYS IR-200L Serial Infrared
Device for IR200L; click Next>.
K. Choose ACTiSYS IR-220L Serial
Infrared Device for IR220L, click Next>.
© Copyright 2001-2010 ACTiSYS Corp.
ACTiSYS Confidential Information
Page 14 of 44
Nov. 16, 2010
V 1.5.2.4
The Wireless Connectivity Expert
ACT-IR2x0L/IR220L+ (IrDA®)
User’s Manual
L. Choose ACTiSYS IR-220L+ Serial
Infrared Device for IR220L+, click Next>.
M. Click Next>.
N. Choose COM2 in the most cases, then
click Next>.
O. Click Finish.
© Copyright 2001-2010 ACTiSYS Corp.
ACTiSYS Confidential Information
Page 15 of 44
Nov. 16, 2010
V 1.5.2.4
The Wireless Connectivity Expert
ACT-IR2x0L/IR220L+ (IrDA®)
User’s Manual
8. DEVICE MANAGER CHECK, UNISTALLATION FROM WIN 2000
A. Startup your computer system.
B. Click on Control Panel.
C. Double click System Icon.
D. Click on Hardware tab, then click Device
Manager button.
E. Click on Infrared devices folder, you can
see ACTiSYS IR-220L+Serial Infrared
Device.
F. For driver uninstallation, highlight it.
© Copyright 2001-2010 ACTiSYS Corp.
ACTiSYS Confidential Information
Page 16 of 44
Nov. 16, 2010
V 1.5.2.4
The Wireless Connectivity Expert
ACT-IR2x0L/IR220L+ (IrDA®)
User’s Manual
G. Click Action from the main and then click
Uninstall.
H. The device has then been uninstalled.
You need to close device manager and
restart your computer.
© Copyright 2001-2010 ACTiSYS Corp.
ACTiSYS Confidential Information
Page 17 of 44
Nov. 16, 2010
V 1.5.2.4
The Wireless Connectivity Expert
ACT-IR2x0L/IR220L+ (IrDA®)
User’s Manual
9. WINDOWS XP INSTALLATION GUIDE
A. From Start menu, open Control Panel.
B. Double click Add
Hardware icon.
C. Click Next> from Add Hardware Wizard.
© Copyright 2001-2010 ACTiSYS Corp.
ACTiSYS Confidential Information
Page 18 of 44
Nov. 16, 2010
V 1.5.2.4
The Wireless Connectivity Expert
ACT-IR2x0L/IR220L+ (IrDA®)
User’s Manual
D. Choose Yes. I have already connected
the hardware. Then click Next>.
E. Wait processing
F. Choose Add a new hardware device.
Then click Next>.
© Copyright 2001-2010 ACTiSYS Corp.
ACTiSYS Confidential Information
Page 19 of 44
Nov. 16, 2010
V 1.5.2.4
The Wireless Connectivity Expert
ACT-IR2x0L/IR220L+ (IrDA®)
User’s Manual
G. Choose install the hardware that I manually
select from a list (Advanced). Then click
Next>.
H. Choose Infrared devices. Then click Next>
I.
Choose respective ACT model from Infrared
Device. Then click Next>
© Copyright 2001-2010 ACTiSYS Corp.
ACTiSYS Confidential Information
Page 20 of 44
Nov. 16, 2010
V 1.5.2.4
The Wireless Connectivity Expert
ACT-IR2x0L/IR220L+ (IrDA®)
User’s Manual
J. Click Next>
K. Choose the Com port which the device
physically connected. Click Next>
L. Click Finish
© Copyright 2001-2010 ACTiSYS Corp.
ACTiSYS Confidential Information
Page 21 of 44
Nov. 16, 2010
V 1.5.2.4
The Wireless Connectivity Expert
ACT-IR2x0L/IR220L+ (IrDA®)
User’s Manual
10. DEVICE MANAGER CHECK, UN-INSTALLATION FROM WIN XP
A. Highlight My Computer, then right click for
quick menu.
B. Select Properties.
C. Click Device Manager from Hardware page.
© Copyright 2001-2010 ACTiSYS Corp.
ACTiSYS Confidential Information
Page 22 of 44
Nov. 16, 2010
V 1.5.2.4
The Wireless Connectivity Expert
ACT-IR2x0L/IR220L+ (IrDA®)
User’s Manual
D. Under Infrared device folfer, you can see
ACTiSYS IR220L+ Serial Infrared Device.
E. For driver uninstallation, highlight the item,
then right click for quick menu.
F. Click Uninstall from the quick menu.
G. Click OK. You have successfully uninstalled
the device on your system.
© Copyright 2001-2010 ACTiSYS Corp.
ACTiSYS Confidential Information
Page 23 of 44
Nov. 16, 2010
V 1.5.2.4
The Wireless Connectivity Expert
ACT-IR2x0L/IR220L+ (IrDA®)
User’s Manual
H. Click Yes to reboot your computer.
11. WINDOWS VISTA INSTALLATION GUIDE
A. From Control Panel, select “Add Hardware”.
© Copyright 2001-2010 ACTiSYS Corp.
ACTiSYS Confidential Information
Page 24 of 44
Nov. 16, 2010
V 1.5.2.4
The Wireless Connectivity Expert
ACT-IR2x0L/IR220L+ (IrDA®)
User’s Manual
B. It will prompt a Welcome screen as follows. Click Next.
C. The installation window will ask “What do you want the wizard to do?” Select “Install the hardware that
I manually select from a list (Advanced).” Then click Next.
D. Select “Infrared device”. Then click “Next”.
© Copyright 2001-2010 ACTiSYS Corp.
ACTiSYS Confidential Information
Page 25 of 44
Nov. 16, 2010
V 1.5.2.4
The Wireless Connectivity Expert
ACT-IR2x0L/IR220L+ (IrDA®)
User’s Manual
E. Select “ACTiSYS” from “Manufacturer”.
F. Select the right device, e.g., “IR220L+”, from “Infrared Device”. Then click “Next”.
© Copyright 2001-2010 ACTiSYS Corp.
ACTiSYS Confidential Information
Page 26 of 44
Nov. 16, 2010
V 1.5.2.4
The Wireless Connectivity Expert
ACT-IR2x0L/IR220L+ (IrDA®)
User’s Manual
G. It will pop up a window displaying as below: Click “Next”.
H. Then it will display installation process window as below.
© Copyright 2001-2010 ACTiSYS Corp.
ACTiSYS Confidential Information
Page 27 of 44
Nov. 16, 2010
V 1.5.2.4
The Wireless Connectivity Expert
I.
ACT-IR2x0L/IR220L+ (IrDA®)
User’s Manual
Then it will ask you to select the COM port. Select the port where you plugged your device, e.g.,
COM2. Then click “Next”.
© Copyright 2001-2010 ACTiSYS Corp.
ACTiSYS Confidential Information
Page 28 of 44
Nov. 16, 2010
V 1.5.2.4
The Wireless Connectivity Expert
ACT-IR2x0L/IR220L+ (IrDA®)
User’s Manual
J. Now it completes the process. Click “Finish” to end the installation.
© Copyright 2001-2010 ACTiSYS Corp.
ACTiSYS Confidential Information
Page 29 of 44
Nov. 16, 2010
V 1.5.2.4
The Wireless Connectivity Expert
ACT-IR2x0L/IR220L+ (IrDA®)
User’s Manual
12. DEVICE MANAGER CHECK, UNINSTALLATION FROM VISTA
A. From Control Panel, select “System”.
B. Select “Device Manager”.
© Copyright 2001-2010 ACTiSYS Corp.
ACTiSYS Confidential Information
Page 30 of 44
Nov. 16, 2010
V 1.5.2.4
The Wireless Connectivity Expert
ACT-IR2x0L/IR220L+ (IrDA®)
User’s Manual
C. Click the folder “Infrared device”, you can see “ACTiSYS IR 220L+ Serial Infrared Device”. For
driver uninstallation, select and highlight it.
D. Select “Uninstall” from “Action” pull down menu as below.
© Copyright 2001-2010 ACTiSYS Corp.
ACTiSYS Confidential Information
Page 31 of 44
Nov. 16, 2010
V 1.5.2.4
The Wireless Connectivity Expert
ACT-IR2x0L/IR220L+ (IrDA®)
User’s Manual
E. Click “OK” to “Confirm Device Uninstall”.
F. Then it completes the uninstallation. Original Infrared Device will be disappeared from the Device
Manager as below.
© Copyright 2001-2010 ACTiSYS Corp.
ACTiSYS Confidential Information
Page 32 of 44
Nov. 16, 2010
V 1.5.2.4
The Wireless Connectivity Expert
ACT-IR2x0L/IR220L+ (IrDA®)
User’s Manual
13. WINDOWS 7 INSTALLATION GUIDE
A. Click on Start and type “hdwwiz.exe” in the edit box of “Search programs and files” and press enter,
like below screen shot.
B. It will prompt a Welcome screen as follows. Click Next.
© Copyright 2001-2010 ACTiSYS Corp.
ACTiSYS Confidential Information
Page 33 of 44
Nov. 16, 2010
V 1.5.2.4
The Wireless Connectivity Expert
ACT-IR2x0L/IR220L+ (IrDA®)
User’s Manual
C. The installation window will ask “What do you want the wizard to do?” Select “Install the hardware that
I manually select from a list (Advanced).” Then click Next.
D. Select “Infrared device”. Then click “Next”.
© Copyright 2001-2010 ACTiSYS Corp.
ACTiSYS Confidential Information
Page 34 of 44
Nov. 16, 2010
V 1.5.2.4
The Wireless Connectivity Expert
ACT-IR2x0L/IR220L+ (IrDA®)
User’s Manual
E. Click on Have Disk.
F. Now browse and give the driver’s inf file (netirsir.inf) from proper location, where 32 bit O.S.or 64 bit
O.S. should be correctly selected from either
ACT-IR200L_IR220Lplus_Win7-32bit driver.cab or
ACT-IR200L_IR220Lplus_Win7-64bit driver.cab, respectively.
© Copyright 2001-2010 ACTiSYS Corp.
ACTiSYS Confidential Information
Page 35 of 44
Nov. 16, 2010
V 1.5.2.4
The Wireless Connectivity Expert
ACT-IR2x0L/IR220L+ (IrDA®)
User’s Manual
G. Select “ACTiSYS” from “Manufacturer”.
H. Select the right device, e.g., “IR200L” or “IR220L+”, from “Infrared Device”. Then click “Next”.
© Copyright 2001-2010 ACTiSYS Corp.
ACTiSYS Confidential Information
Page 36 of 44
Nov. 16, 2010
V 1.5.2.4
The Wireless Connectivity Expert
ACT-IR2x0L/IR220L+ (IrDA®)
User’s Manual
I. It will pop up a window displaying as below: Click “Next”.
J. Then it will display installation process window as below.
© Copyright 2001-2010 ACTiSYS Corp.
ACTiSYS Confidential Information
Page 37 of 44
Nov. 16, 2010
V 1.5.2.4
The Wireless Connectivity Expert
ACT-IR2x0L/IR220L+ (IrDA®)
User’s Manual
K. Then it will ask you to select the COM port. Select the port where you plugged your device, e.g., COM2.
Then click “Next”.
L. Now it completes the process. Click “Finish” to end the installation.
© Copyright 2001-2010 ACTiSYS Corp.
ACTiSYS Confidential Information
Page 38 of 44
Nov. 16, 2010
V 1.5.2.4
The Wireless Connectivity Expert
ACT-IR2x0L/IR220L+ (IrDA®)
User’s Manual
14. DEVICE MANAGER CHECK, UNINSTALLATION FROM WIN 7
A. Right Click on Computer icon and Select “Properties”.
B. Select “Device Manager” as arrow pointed below.
C. From the folder “Infrared device”, you can see “ACTiSYS IR 220L+ Serial Infrared Device” as
below.
© Copyright 2001-2010 ACTiSYS Corp.
ACTiSYS Confidential Information
Page 39 of 44
Nov. 16, 2010
V 1.5.2.4
The Wireless Connectivity Expert
ACT-IR2x0L/IR220L+ (IrDA®)
User’s Manual
D. For driver uninstallation, select “Uninstall” from “Action” pull down menu as below.
E. Click “OK” to “Confirm Device Uninstall”.
F. Then it completes the uninstallation. Original Infrared Device will be disappeared from the Device
Manager as below.
© Copyright 2001-2010 ACTiSYS Corp.
ACTiSYS Confidential Information
Page 40 of 44
Nov. 16, 2010
V 1.5.2.4
The Wireless Connectivity Expert
ACT-IR2x0L/IR220L+ (IrDA®)
User’s Manual
15. TROUBLE SHOOTING
For help on general and miscellaneous problems you may be experiencing with your printing, refer to the
following pages for possible solutions. Look up your problem and try the solution.
SYMPTOM
PROBLEM
SOLUTION
1. The two IR devices are 1. Properly align them again.
2. Move one device to a proper
not aligned properly.
2. Distance is too near or distance.
3. Activate it by IR monitor.
far.
3. The device is inactivated. 4. Refer to Un-installation Guide to
remove the device, then reinstall
4. The device is not
again.
installed properly
ACT-IR200L/220L/220L+ is The power-saving feature in Set the “Power Management” control
to “Advanced” or “Off” to enable power
the notebook computer
connected to and takes
supplied from computer serial port to
either stops or reduces
power only from the serial
ACT-IR200L/220L/220L+ devices.
power output from the
port of the notebook
signal lines of the serial port Go to Integrate Peripheral to set the
computer.
COM port to “Infrared”.
to the
ACT-IR200L/220L/220L+ Do not install more than one infrared
device on one computer.
devices.
The infrared communication Check to find out the source of
File Transfer between
is interfered. For example, interference and eliminate it before
IR-equipped PDA and
ACT-IR device-attached host something blocks out the trying again.
infrared beam or the burst If you were restoring data, simply try
computer stops before
of string light source, etc. again.
finishing up and an error
Software does not support If you were doing backup something
message appears.
the IrDA controller chip on the PDA does not reset its flags and
keeps stopping at the same position
the motherboard.
Serial port is occupied and unless you press the RESET button
once. Be very careful. DO NOT
not available for IR
initialize (press ON key and RESET
transmission.
button at the same time) your PDA.
Otherwise you may lose all your data.
Make proper model # selection in the
software as specified in your PC
system user`s manual.
Make sure to disconnect modem, etc.
from the serial port to make it available
for IR transmission.
Can not establish link
(General)
© Copyright 2001-2010 ACTiSYS Corp.
ACTiSYS Confidential Information
Page 41 of 44
Nov. 16, 2010
V 1.5.2.4
The Wireless Connectivity Expert
ACT-IR2x0L/IR220L+ (IrDA®)
User’s Manual
16. SPECIFICATIONS
Model:
Carrier:
Sub-Carrier:
Communication
Distance:
ACT-IR200L/220L/220L+
Infrared radiation (peak wavelength: 850 to 1050 nm)
500 KHz for SHARP ASK-IR and ASK(37KHz) for TV remote spec.(IR200L
only)
IR200L From 0 to 80 cm. For best results, from 20 to 60 cm (7.9 in to1 ft. 11.6 in)
IR220L From 0 to 250 cm. For best results, from 10 to 150 cm (3.95 in to 4 ft.
11.05 in)
Baud Rate:
Parity Bit:
Data:
Stop Bit:
Error Check:
SHARP ASK-IR:
IrDA-IR:
9600 bps to 38.4K bps (IR200L only)
Odd
8 bit
1 bit
Check Sum
9.6,19.2,(38.4),57.6,115.2K bps (IR200L/220L+)
None
8 bit
1 bit
CRC
Serial Interface:
Signal Level:
Connector:
Power Source:
Power Consumption:
Operating
temperature:
Dimensions:
Weight:
Accessories:
Optional
Accessories:
Cable Interface (to host computer)
RS-232 Standards
DB-9 female connector
PC RS-232 Serial Port
0.30mW (11mA max.)
0oC to 40oC (32oF to 104oF)
2.0 in. L x 1.63 in W x 0.62 in H (51mm x 41mm x 16mm)
2.0 oz (54 gr.)
User Manual
DB9/DB25 Converter ; IR Software for Windows 95/98/ME/2000
Pin Assignments of Serial Interface DB9 female connector
Pin
2
3
4
5
7
8
Name
Receive Data
Transmit Data
Data Terminal Ready
Signal Ground
Request to send
Clear to send
Symbol
RXD
TXD
DTR
GND
RTS
CTS
© Copyright 2001-2010 ACTiSYS Corp.
ACTiSYS Confidential Information
I/O
I
O
O
O
I
Function
Input signal
Output signal
For data link to build up and maintain
Reference ground (0V) for all signals
Output signal from host computer
Input signal to host computer
Page 42 of 44
Nov. 16, 2010
V 1.5.2.4
The Wireless Connectivity Expert
ACT-IR2x0L/IR220L+ (IrDA®)
User’s Manual
17. WARRANTY INFORMATION
THE FOLLOWING WARRANTY GIVES YOU SPECIFIC LEGAL RIGHTS. YOU MAY ALSO HAVE
THE OTHER RIGHTS WHICH VARY FROM STATE TO STATE:
ACTiSYS Corporation warrants the first end-user purchaser, for a period of one year from the date of
purchase, that this wireless interface (“the Product”) will be free from defective workmanship and
materials, and agrees that it will, at its option, either repair the defect or replace the defective Product or
part thereof at no charge to the purchaser for parts or for labor.
This warranty does not apply to any appearance items of the Product, any consumable items such as
paper, ink ribbon, or batteries supplied with the Product, or to any equipment or any hardware,
software, firmware, or peripheral other than the Product. This warranty does not apply to any Product
the exterior of which has been damaged or defected, which has been subjected to misuse, abnormal
service or handling, or which has been altered or modified in design, construction or interfacing.
Tampering With Label Voids Warranty.
In order to enforce the rights under this limited warranty, the purchaser should mail, ship, or carry the
Product, together with proof of purchase, to ACTiSYS.
The limited warranty described above is in addition to whatever implied warranties may be granted to
purchasers by law. To the extent permitted by applicable law, ALL IMPLIED WARRANTIES
INCLUDING THE WARRANTIES OF MERCHANT ABILITY AND FITNESS FOR USE ARE LIMITED
TO A PERIOD OF ONE YEAR FROM THE DATE OF PURCHASE. Some states do not allow
limitations on how long an implied warranty lasts, so the above limitation may not apply to you.
Neither the sales personnel of the seller nor any other person is authorized to make any warranties
other than those described above, nor to extend the duration of any warranties beyond the time period
described above on behalf of ACTiSYS Corporation.
The warranties described above shall be the sole and exclusive remedy available to the purchaser.
Correction of defects, in the manner and for the period of time described above, shall constitute full
satisfaction of all claims, whether based on contract, negligence, strict liability or otherwise. In no event
shall ACTiSYS Corporation be liable, or in any way responsible, for any damages or defects in the
Product which were caused by repairs or attempted repairs performed by anyone other than ACTiSYS
technician. Nor shall ACTiSYS Corporation be liable or in any way responsible for any incidental or
consequential economic or property damage. Some states do not allow the exclusion of incidental or
consequential damages, so the above exclusion may not apply for you.
© Copyright 2001-2010 ACTiSYS Corp.
ACTiSYS Confidential Information
Page 43 of 44
Nov. 16, 2010
V 1.5.2.4
The Wireless Connectivity Expert
ACT-IR2x0L/IR220L+ (IrDA®)
User’s Manual
18. CONTACT INFORMATION
ACTiSYS Corporation
921 Corporate Way
Fremont, CA 94539, USA
TEL: +1-510-490-8024, FAX: +1-510-623-7268
E-Mail: [email protected]
Web: http://www.actisys.com
© Copyright 2001-2010 ACTiSYS Corp.
ACTiSYS Confidential Information
Page 44 of 44
Nov. 16, 2010
V 1.5.2.4