1
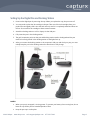
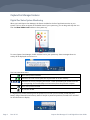
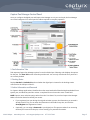
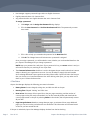
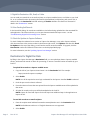
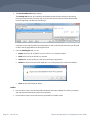
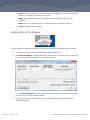
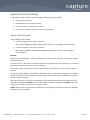
June 2012 Table of Contents The Digital Pen, Docking Station, and Capturx Pen Manager...........................................................................................1 Digital Pen Technical Specifications ........................................................................................................................................1 Changing Ink Cartridges...............................................................................................................................................................2 Installing Capturx Pen Manager ....................................................................................................................................................2 Setting Up the Digital Pen and Docking Station ....................................................................................................................3 Capturx Pen Manager Features......................................................................................................................................................4 Digital Pen Status System Monitoring....................................................................................................................................4 Capturx Pen Manager Control Panel.......................................................................................................................................5 Destinations for Digital Pen Data..................................................................................................................................................8 Opening XID Files ................................................................................................................................................................................9 Working with Pending Stored Ink Records ...............................................................................................................................9 Troubleshooting Digital Ink Processing Errors ..................................................................................................................... 11 Updating Capturx Pen Manager ................................................................................................................................................. 12 Appendix A: Security Settings...................................................................................................................................................... 13 Require Pen Passwords.............................................................................................................................................................. 13 Disable Bluetooth on Each Pen Docking ............................................................................................................................ 14 Disable Capturx Pen Manager Auto-update..................................................................................................................... 14 Set a Minimum Number of Characters for the Pen Password................................................................................... 15 i The Digital Pen, Docking Station, and Capturx Pen Manager The Capturx digital pen looks and feels like a regular ballpoint pen, yet it contains an integrated digital sensor, an advanced image microprocessor, and a mobile communications device for wireless connection. As you write, the digital pen scans your writing in conjunction with a digital watermark (dot pattern) that is printed by Capturx software along with the visual information in your form. With more than 75 snapshots per second, the Capturx digital pen determines what is written or drawn, and all this data is then stored in the pen’s memory until you download it to a PC, upload it to a server, or send it via email using Capturx Pen Manager or Capturx Mobile. The docking station is used to dock your pen and to connect your pen to a PC or laptop via the USB port. When your pen is docked, you can download data and charge the pen’s battery. The docking station consists of the base, insert, and the USB connector you use to connect the docking station to your computer. Capturx Pen Manager is an application used to manage settings for the digital pen and to process handwritten ink saved on the pen. Features and options include: Routing ink records directly from the pen to a server, email recipient, network location, or a desktop Capturx application. Getting updates about new versions of Capturx software. Viewing the docked and/or locked status of the pen. Assigning a password to the pen. Viewing the remaining time left on the battery of the pen. Choosing pen download options. Enabling/disabling the Bluetooth feature on the pen. Activating pen Installing additional pattern. Updating pen registration and personal information. For more information, visit http://www.adapx.com/support/capturx-pen-manager-digital-pen. Digital Pen Technical Specifications ©2012 Adapx The Capturx pen can be used with Fisher pressurized ink pen cartridges, filled with Rite in the ® Rain proprietary ink, enabling teams to write in any position and in any condition. The Capturx pen stays charged for five to seven days of typical use with built-in Lithium-ion rechargeable battery. Charging time approximately 2.5 hours (150 min), from 0% to 100% via the USB adapter. The digital pen can endure a standby time (without cap) of 10 hours. The Capturx pen can be used for 2 hours (120 minutes) continuously, and holds up to 50 pages of letter-sized paper completely filled with single-spaced writing. Model # AMP-1221. Weight 1.06 oz. Dimensions 6.02 x 0.75 x 0.6 inches without cap; 6.18 x 0.83 x 0.71 inches with cap. Data Communication: USB 1.1 standard (also supports USB 2.0 standard), Bluetooth available – supported only by Capturx Mobile with a smartphone. For use: 32 to 104 degrees Fahrenheit at relative humidity levels of 10-85% For storage: -4 to 113 degrees Fahrenheit at relative humidity levels of 10-90%. Ruggedness tested on “standard” 4-foot drop while capped. The pen can be used in inclement weather and rain, but it is not submersible. ® www.adapx.com [email protected] 877-232-7903 Page 1 Changing Ink Cartridges From time to time, you will need to change the ink cartridge of your digital pen. 1. To remove the ink cartridge from the pen, use small pliers or use the hole in the pen cap to grab the ink tip, angle the cap, and pull. 2. To place the cartridge in the pen, take one of the ink cartridges and gently slide it into the hole at the tip until it is completely seated and does not fall out. It’s normal for the cartridge to feel slightly loose. Installing Capturx Pen Manager Before you set up and use the digital pen, you must install the Capturx Pen Manager software. For Capturx Forms Service: 1. To download Capturx Pen Manager, go to the Capturx Forms Service Resource Center on your Capturx site. 2. In the Client Software section, click on Capturx Pen Manager. 3. At the prompt, select Open. Follow the instructions to complete installation. For other Capturx software products: Install Capturx Pen Manager from the product CD, register the Capturx software product, and activate the digital pen. For additional help, contact Adapx Technical Support at [email protected]. NOTE: Although the user interface is in U.S. English, Capturx Pen Manager can install and run on any Windows-supported locale. Page 2 Rev. 06-12 Capturx Pen Manager 3.5 and Digital Pen User Guide Setting Up the Digital Pen and Docking Station 1. Power on the digital pen by removing the cap. When you replace the cap, the pen turns off. 2. You may need to place the ink cartridge in the pen. Take one of the ink cartridges from your product box and gently slide it into the hole at the tip until it is completely seated and does not fall out. It’s normal for the cartridge to have some movement. 3. Attach the docking station to a PC or laptop via the USB port. 4. Fully insert the pen in the docking station. 5. The gold connection points on the pen and docking station need to be aligned and the pen needs to be firmly placed in the docking station so the lights face up. 6. After you connect the docking station to the computer’s USB port and dock your pen, you must initially keep the pen in the docking station for three hours to fully charge. NOTES: ©2012 Adapx When your pen is uncapped, it is using power. To prevent your battery from running low, do not leave the cap off the pen for extended periods of time. Keep the pen cap in a safe place. www.adapx.com [email protected] 877-232-7903 Page 3 Capturx Pen Manager Features Digital Pen Status System Monitoring When you install Capturx Pen Manager, the feature is added to the list of applications active on your system. If its icon does not appear in the default view of your system tray, you can drag-and-drop the icon from the Show hidden icons window to the system tray. To access Capturx Pen Manager, double-click the icon in your system tray. Status messages about its activity will be displayed as actions occur. Five icon states show status: One or more pens are docked. Animated icon: One or more pens have unprocessed ink in their memory. Animated icon: Pen is processing ink records – either downloading ink records from the pen or importing from an XID (Adapx Ink Document) file to the personal computer. One or more pens are locked. No pens are docked. If a digital pen is docked, hovering over the system tray icon with your mouse will provide the pen’s battery charge information and memory status. If the pen is password protected, it needs to be unlocked for the information to display. Page 4 Rev. 06-12 Capturx Pen Manager 3.5 and Digital Pen User Guide Capturx Pen Manager Control Panel Once you configure the digital pen and Capturx Pen Manager to suit your work style, the Pen Manager runs in the background. Its control panel is seldom required for everyday operation. 1. Pen Information Tabs Tabs separate Capturx Pen Manager options for each individual pen. Selecting a tab displays the options for that pen. The Close Tab button closes the particular tab. You can only close the tab for a pen that is not currently docked. 2. Docking Status Displays Docked or Undocked based on whether the digital pen is inserted in the docking station connected to the USB port of the PC. 3. Author Information and Password For Capturx desktop applications, identifies the author associated with all handwriting downloaded from a specific pen, and allows anyone who reviews a completed form to know who wrote in each field. NOTE: Capturx server solutions assign author from the “Pen Status” list, not from Capturx Pen Manager. Make sure the Pen Status list reflects pen owners. ©2012 Adapx If you registered your pen during the original activation process, the information you entered is already saved. If not, you can enter the information in the fields at any time, and click the Save/Register Pen Registration Control. Optionally, you can assign a Password to your digital pen. This prevents others from accessing the data you’ve stored on the pen, or from viewing your personal information. www.adapx.com [email protected] 877-232-7903 Page 5 Pen Manager supports password logins with non-English characters. English passwords have a 22-character limit. Any password with a non-English character has an 11-character limit. To assign a password: 1. Click Assign, and the Assign Pen Password dialog displays. 2. Fill in the New Password and Confirm New Password fields. The passwords you enter must match. 3. Fill in a hint to help you remember the password in the New Hint field. 4. Click OK. The Change button will activate once a password is assigned. Once you assign a password, you will be asked to enter it before you can download data from the pen. Capturx Pen Manager lets you change a password. NOTE: Keep your password in a safe place. If your password is lost, you cannot retrieve it and you will need to reset the pen, resulting in loss of pen data. The Customer Reference Pen checkbox is used to designate the pen serial number that is sent to Adapx to identify your organization’s account. You may be asked to supply this serial number when ordering additional Capturx products and dot pattern refills. Capturx will select the first pen that you dock as your Customer Reference Pen. After docking other pens, you may select one of them as your Customer Reference Pen. 4. Pen Status Capturx Pen Manager displays the following pen status information: Battery Status: Percent charged, writing time, and idle time left on the pen Running Time: Elapsed “Writing” and “Idle” time. Data on Pen: Percentage of free space left on the pen, pages remaining, and the number of current pages on the pen ready to download. You can also manually delete and download the current pages stored on the pen by selecting Delete in the window; this will permanently remove all pen data. Page Storage Estimate: Based on average data per page, an estimate of how many additional pages you can store on the pen before the next download. This information will fluctuate based on the ink you have stored thus far. If the pen is undocked, Capturx Pen Manager displays the data from the last docking. Page 6 Rev. 06-12 Capturx Pen Manager 3.5 and Digital Pen User Guide 5. Pen Download Settings You can select one of three download settings: Auto Download: Data is automatically downloaded as soon as Capturx Pen Manager detects a connected pen with stored data. Prompt for Download: When Capturx Pen Manager detects a connected pen with stored data, you are prompted by a dialog to download the data. Manual Download: With the pen connected, the system will wait for you to initiate download using the Download button on the Pen Status section of Capturx Pen Manager. 6. Pen Activation and Bluetooth Setting Capturx Pen Manager gives you the option to Activate online via the Internet, or Activate Offline using an offline key. The digital pen has the online key stored on it, so this is the recommended method. To activate offline by manually entering your software activation key, contact Adapx Technical Support for assistance. An activated pen is required to print unique pattern from Capturx applications, as well as export the pen’s ink data to other locations and other users. Unactivated pens can only be used with Capturx for Microsoft Office OneNote. Although activating the pen is part of the Adapx order fulfillment process, Capturx Pen Manager provides a way to manually activate a pen in case you want to activate additional enterprise pens or pens that initially were used for Capturx for Microsoft Office OneNote. By default, your digital pen is Bluetooth Enabled to support Capturx Mobile for Blackberry, and has a displayed Bluetooth Pin. The “Enable Bluetooth” checkbox option lets you pair your pen with a supported mobile device, and send ink data directly from the pen, through the mobile device, to an email recipient or server. For more information on Capturx Mobile, go to http://www.adapx.com/mobile. 7. Install Dot Pattern for Capturx Desktop Applications Although you may have received dot pattern when you first installed your pen, you may need additional pattern. The Install Pattern button is activated when there is pattern on your pen ready to be installed. NOTE: The Install Pattern feature cannot be used to add pattern to Capturx server solutions. 8. Save Settings/Register Pen Selecting the Save/Register button will save the changes you made and update the pen’s registration information sent to Adapx with the Author Information and Password. ©2012 Adapx www.adapx.com [email protected] 877-232-7903 Page 7 9. Digital Ink Destination: URL, Email, or Folder You can send your stored ink to an email recipient, to a Capturx-enabled server, to a folder on your local PC, or to a network location by entering the email recipient address, local directory path, server URL, or network URL in the Destination field and selecting the Enable checkbox. This feature is discussed in detail in the “Destinations” section. 10. View Pending Ink Records In the Stored Ink Dialog, ink records are available to view before being uploaded into the associated file and application. This feature also lets you view pen data associated with import errors – see the “Troubleshooting Digital Ink Processing Errors” section. 11. Check for Updates to Capturx Software. To check if Adapx has released a new version of Capturx Pen Manager, or any other Capturx software, click the arrow next to the version number in the bottom right corner, click Updates, and then click Check for Updates. At the top of the dialog, you will see the newest versions available. To upgrade, click the New Version number and follow the instructions on the displayed Web page. For more information, see the “Updating Capturx Pen Manager” section. Destinations for Digital Pen Data By filling in the Capturx Pen Manager’s Destination field, you can upload pen data to Capturx-enabled servers, send email ink records to others for processing, or save to a network location accessible by your local PC. To upload ink records to a Capturx-enabled server: 1. Copy the URL of your Capturx site and enter it in the Destination field. For example: https://oursitecfs.capturx.com/adapx 2. Select Enable. NOTE: You will be required to enter login credentials for the Capturx site after Enable is selected. 3. Dock the pen once the data is collected. 4. Records written on forms that were printed from the Capturx-enabled server will be uploaded to that server. 5. All other ink records on the pen will be downloaded to the local PC. NOTE: Capturx for Excel and Capturx for ArcGIS require an additional step in the application to import the ink. To send ink records to an email recipient: 1. Enter the recipient email address formatted as [email protected] in the Destination field. NOTE: Email addresses with non-U.S. English characters are not supported. 2. Page 8 Select Enable. Rev. 06-12 Capturx Pen Manager 3.5 and Digital Pen User Guide 3. Dock the pen once the data is collected. 4. Using your default email client, Capturx will create an email for the defined recipient. The ink records will be contained in an XID file attached to the email message. Each XID file follows this author/date file naming convention: <Pen Author Name>----YYYY-MM-DD-HH-MM-SS.XID To send ink records to a location on your computer network: 1. Enter a directory path in the Destination field. For example: \\company.network\network.share\company.forms 2. Select Enable. 3. Dock the pen once the data is collected. 4. All ink records will be saved as XID files in the folder you specified. To send ink records to a location on your local PC: 1. Enter a directory location on your local PC in the Destination field. For example: C:\username\directory\companyforms 2. Select Enable. 3. Dock the pen once the data is collected. 4. All ink records will be saved as XID files in the location you specified. Opening XID Files To open an XID file that is attached to an email or saved to a network location, you must have Capturx Pen Manager installed on your PC, the file or site that was the source of the printout, and the Capturx application that created the printout. For each pen download, there will be only one XID file, whether the person wrote on one page or multiple pages, one file or multiple files, or page(s) from one Capturx application or pages from multiple Capturx applications. To access digital ink in an XID file: 1. Double click on the XID file. Select Open when prompted. 2. Capturx Pen Manager will process the ink and make it available to the appropriate Capturx application. The Capturx software behavior is the same as if the pen had been physically docked to the computer. Working with Pending Stored Ink Records The Stored Ink button allows you to view unprocessed ink. Ink records that have not yet been processed by the target application may be viewed on the Pending Ink tab. Ink records that cannot be processed may be viewed on the Import Errors tab. To view pending records: 1. ©2012 Adapx After docking the digital pen and downloading the XID files, select Stored Ink. www.adapx.com [email protected] 877-232-7903 Page 9 2. The Stored Ink Records dialog displays. The Pending Ink tab lists all successfully downloaded records that are waiting for processing. Each unprocessed record is listed by user name, the date and time the record was downloaded from the digital pen, the filename, and file type. A preview of each unprocessed record is displayed, as well as the file path, file status, pen id/serial number, and the page address of the digital record. 3. From the Pending Ink tab, you can: Export: the record as an XID file to your local PC or to a network location. Email the record as an XID file to a recipient, Process the record, sending it to the associated Capturx application. Delete the file from the stored ink database. You will be prompted to confirm the deletion. Close the Stored Ink Records dialog. NOTES: Page 10 Ink records for Capturx for Microsoft Office OneNote and Capturx Markup for PDF are processed and imported automatically and cannot be previewed. Ink records for Capturx for ArcGIS must be processed from within ArcGIS. Rev. 06-12 Capturx Pen Manager 3.5 and Digital Pen User Guide Troubleshooting Digital Ink Processing Errors If ink records do not process successfully, you can still use Capturx Pen Manager to route their data or to remove the record from the digital pen. 1. If an error occurs while processing an ink record, a dialog will note the number of pages imported and the number of errors. To save unprocessed records into your local Capturx application, and optionally view all saved records, click OK. NOTE: Canceling leaves the records on the digital pen. 2. After you click OK, a system tray error message summarizes the status of the ink record processing. 3. The Stored Ink Records dialog displays. The Import Errors tab lists each unprocessed ink record by pen user name, the date and time the record was downloaded from the digital pen, and the error message. A preview of each unprocessed record is available to view, as well as the file path, file status, pen id/serial number, and the page address of the digital record. 4. ©2012 Adapx From the Import Errors tab, you can: Export: the XID file to your local PC or to a network location. Email the XID file to a recipient. www.adapx.com [email protected] 877-232-7903 Page 11 Process the record, sending it to the associated Capturx application. Try this after correcting the error, for example, by restoring the target file. NOTE: Processing an ink record for any PDF file will cause all pending PDF ink to be processed. Delete the file from the digital pen. You will be prompted to confirm the deletion. Close the Stored Ink Records dialog. Updating Capturx Pen Manager To check if Adapx has released a new version of Capturx Pen Manager, or any other Capturx software: Page 12 1. Click the arrow next to the version number in the bottom right corner. 2. Click Check for Updates. A message will confirm the status of your search, if you have the most current versions of Capturx software, or indicate new versions. 3. You can Check for Updates from this dialog, and schedule automatic checks. By default, Capturx will check every 7 days for available updates. 4. If there is a new version, click the New Version number and follow the instructions on the displayed Web page. Rev. 06-12 Capturx Pen Manager 3.5 and Digital Pen User Guide Appendix A: Security Settings Using registry settings, administrators can assign the following security settings: Require a pen password Disable Bluetooth on each pen docking Disable Capturx Pen Manager auto-update Set a minimum number of characters for the pen password Require Pen Passwords Add a DWORD registry setting: For 32-bit computers, the registry location is: HKEY_LOCAL_MACHINE\Software\Adapx\Adapx Capturx Pen Manager\ForcePassword For 64-bit computers, the registry location is: HKEY_LOCAL_MACHINE\SOFTWARE\Wow6432Node\Adapx\Adapx Capturx Pen Manager\ ForcePassword Purpose: The purpose of this setting is to allow IT administrators to prevent end users from using the pen without setting a password. If the key is set to 1, then each user will be required to set a password. Any value other than 1 is treated as false when interpreting whether to require a password. The prompt to enter a new password occurs automatically upon docking if a password has not already been set. The end user cannot delete the password or change the registry setting without administrator privileges, though passwords can still be changed. Limited privilege users will always have a password on any pens docked on their workstation. After the password is set, the Capturx Pen Manager user interface reflects that the password cannot be removed by disabling the Delete button. To allow password deletion and enable the Delete button, the registry key will need to be removed or set again to false. NOTE: Digital pens are not password-protected until a user assigns a password in Capturx Pen Manager while the user’s pen is docked. ©2012 Adapx www.adapx.com [email protected] 877-232-7903 Page 13 Disable Bluetooth on Each Pen Docking Add a DWORD registry key: For 32-bit computers, the registry location is: HKEY_LOCAL_MACHINE\Software\Adapx\Adapx Capturx Pen Manager\ForceDisableBluetooth For 64-bit computers, the registry location is: HKEY_LOCAL_MACHINE\SOFTWARE\Wow6432Node\Adapx\Adapx Capturx Pen Manager\ ForceDisableBluetooth Purpose: The purpose of this setting is to allow IT administrators to prevent end users from sending pen data via Bluetooth. If the key is set to 1, any pen that is docked has its Bluetooth radio disabled automatically without confirmation from the end user. Any value other than 1 is treated as false when interpreting whether to automatically disable Bluetooth. After disabling the radio, the Bluetooth Enabled checkbox is disabled on the Capturx Pen Manager user interface. To re-enable the Bluetooth radio and the Bluetooth checkbox, the registry key will need to be removed or set to 0. The end user cannot enable Bluetooth on their pen without administrator privileges on their client workstation. Limited privilege users will always have the Bluetooth radio disabled on any pens docked on their workstation. Disable Capturx Pen Manager Auto-update Add a DWORD registry setting: For 32-bit computers, the registry location is: HKEY_LOCAL_MACHINE\Software\Adapx\Adapx Capturx Pen Manager\ ForceDisableAutoUpdate For 64-bit computers, the registry location is: HKEY_LOCAL_MACHINE\SOFTWARE\Wow6432Node\Adapx\Adapx Capturx Pen Manager\ ForceDisableAutoUpdate Purpose: The purpose of this setting is to allow IT administrators to prevent Capturx Pen Manager from checking for updates. Any value other than 1 or not having the registry setting present is treaded as false when interpreting whether to disable Capturx Pen Manager auto-update.. When set, the menu next to the version at the bottom of Capturx Pen Manager window is disabled, and the end user will not be able to manually check for Capturx updates. Automated checking for updates is disabled as well. Page 14 Rev. 06-12 Capturx Pen Manager 3.5 and Digital Pen User Guide Set a Minimum Number of Characters for the Pen Password Add a DWORD registry setting: For 32-bit computers, the registry location is: HKEY_LOCAL_MACHINE\Software\Adapx\Adapx Capturx Pen Manager\ EnforcePasswordLength For 64-bit computers, the registry location is: HKEY_LOCAL_MACHINE\SOFTWARE\Wow6432Node\Adapx\Adapx Capturx Pen Manager\ EnforcePasswordLength Purpose: The purpose of this setting is to allow IT administrators to establish a minimum password length. The maximum number for the minimum length of the password is 22 if there are no non-English characters included. For passwords with at least one non-English character, the maximum password length is 11 characters. If the key is set to zero, then Capturx Pen Manager behaves as if no minimum has been set. If the key is set to a number greater than 22, then 22 will be used. NOTE: Passwords that exist prior to applying this setting will not be checked for length and will not be forced to change. ©2012 Adapx www.adapx.com [email protected] 877-232-7903 Page 15