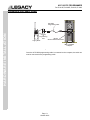
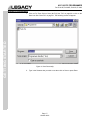
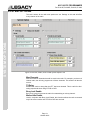
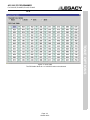
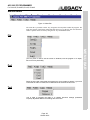
1
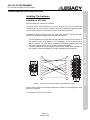
ACC-905
PROGRAMMING
MANUAL
For the
Legacy ProLine
Series Radios
Topaz3, LLC. 10828 N.W. Airworld Dr. Kansas City, MO 64153 Tel: 816-891-6320 Fax: 816-891-8815
Part Number: 680-110-2002
October 2001
ACC-905 PC PROGRAMMER
For PL2215P, PL2245P, PL2415, PL2445
TABLE OF CONTENTS
TABLE OF CONTENTS . . . . . . . . . . . . . . . . . . . . . . . . . . . . . . . . . . . . . . . . . . . . . . . . . . i
LIST OF FIGURES . . . . . . . . . . . . . . . . . . . . . . . . . . . . . . . . . . . . . . . . . . . . . . . . . . . . . . iii
INTRODUCTION . . . . . . . . . . . . . . . . . . . . . . . . . . . . . . . . . . . . . . . . . . . . . . . . . . . . . . . 1
System Requirements . . . . . . . . . . . . . . . . . . . . . . . . . . . . . . . . . . . . . . . . . . . . . . . 1
Hardware Accessories . . . . . . . . . . . . . . . . . . . . . . . . . . . . . . . . . . . . . . . . . . . . . . . 1
HARDWARE INSTALLATION . . . . . . . . . . . . . . . . . . . . . . . . . . . . . . . . . . . . . . . . . . . . . 2
Connecting the Legacy Radio . . . . . . . . . . . . . . . . . . . . . . . . . . . . . . . . . . . . . . . . . 3
SOFTWARE INSTALLATION . . . . . . . . . . . . . . . . . . . . . . . . . . . . . . . . . . . . . . . . . . . . . 4
Installing The Software from Floppy Disk . . . . . . . . . . . . . . . . . . . . . . . . . . . . . . . 4
Installing The Software from CD . . . . . . . . . . . . . . . . . . . . . . . . . . . . . . . . . . . . . . . 4
GETTING STARTED . . . . . . . . . . . . . . . . . . . . . . . . . . . . . . . . . . . . . . . . . . . . . . . . . . . . 5
Starting the ACC-905 . . . . . . . . . . . . . . . . . . . . . . . . . . . . . . . . . . . . . . . . . . . . . . . . 5
To Exit the ACC-905 . . . . . . . . . . . . . . . . . . . . . . . . . . . . . . . . . . . . . . . . . . . . . . . . . 5
Setting the Communications Port . . . . . . . . . . . . . . . . . . . . . . . . . . . . . . . . . . . . . . 5
Selecting the Model . . . . . . . . . . . . . . . . . . . . . . . . . . . . . . . . . . . . . . . . . . . . . . . . . 5
Radio Version . . . . . . . . . . . . . . . . . . . . . . . . . . . . . . . . . . . . . . . . . . . . . . . . . . . . . . 5
Opening a Personality . . . . . . . . . . . . . . . . . . . . . . . . . . . . . . . . . . . . . . . . . . . . . . . 6
Saving a Personality . . . . . . . . . . . . . . . . . . . . . . . . . . . . . . . . . . . . . . . . . . . . . . . . . 7
Programming a Radio . . . . . . . . . . . . . . . . . . . . . . . . . . . . . . . . . . . . . . . . . . . . . . . . 8
Printing a Personality . . . . . . . . . . . . . . . . . . . . . . . . . . . . . . . . . . . . . . . . . . . . . . . . 8
SYSTEM OPTIONS . . . . . . . . . . . . . . . . . . . . . . . . . . . . . . . . . . . . . . . . . . . . . . . . . . . . . 9
Scan . . . . . . . . . . . . . . . . . . . . . . . . . . . . . . . . . . . . . . . . . . . . . . . . . . . . . . . . . . . . . . 10
Time Out Timer . . . . . . . . . . . . . . . . . . . . . . . . . . . . . . . . . . . . . . . . . . . . . . . . . . . . . 10
Power Save . . . . . . . . . . . . . . . . . . . . . . . . . . . . . . . . . . . . . . . . . . . . . . . . . . . . . . . . 11
CHANNEL DATA . . . . . . . . . . . . . . . . . . . . . . . . . . . . . . . . . . . . . . . . . . . . . . . . . . . . . . . 12
TWO TONE . . . . . . . . . . . . . . . . . . . . . . . . . . . . . . . . . . . . . . . . . . . . . . . . . . . . . . . . . . . 14
TONE OPTIONS . . . . . . . . . . . . . . . . . . . . . . . . . . . . . . . . . . . . . . . . . . . . . . . . . . . . . . . 17
MENU BAR . . . . . . . . . . . . . . . . . . . . . . . . . . . . . . . . . . . . . . . . . . . . . . . . . . . . . . . . . . . 20
File . . . . . . . . . . . . . . . . . . . . . . . . . . . . . . . . . . . . . . . . . . . . . . . . . . . . . . . . . . . . . . . 20
Page -iOctober 2001
TABLE OF CONTENTS
Making A Backup Copy . . . . . . . . . . . . . . . . . . . . . . . . . . . . . . . . . . . . . . . . . . . . . . 4
ACC-905 PC PROGRAMMER
For PL2215P, PL2245P, PL2415, PL2445
Port . . . . . . . . . . . . . . . . . . . . . . . . . . . . . . . . . . . . . . . . . . . . . . . . . . . . . . . . . . . . . . . 20
Tool . . . . . . . . . . . . . . . . . . . . . . . . . . . . . . . . . . . . . . . . . . . . . . . . . . . . . . . . . . . . . . 20
TABLE OF CONTENTS
ICON BAR . . . . . . . . . . . . . . . . . . . . . . . . . . . . . . . . . . . . . . . . . . . . . . . . . . . . . . . . . . . . 21
Page -iiOctober 2001
ACC-905 PC PROGRAMMER
For PL2215P, PL2245P, PL2415, PL2445
LIST OF FIGURES
Figure 1. 25-pin to 9-pin RS-232 Serial Communications Cable. . . . . . . . . . . . 2
Figure 2. ACC-2004 Installation . . . . . . . . . . . . . . . . . . . . . . . . . . . . . . . . . . . . . . 3
Figure 3: Open File Screen. . . . . . . . . . . . . . . . . . . . . . . . . . . . . . . . . . . . . . . . . . 6
Figure 4: Save Personality . . . . . . . . . . . . . . . . . . . . . . . . . . . . . . . . . . . . . . . . . . 7
Figure 5: Program Screen . . . . . . . . . . . . . . . . . . . . . . . . . . . . . . . . . . . . . . . . . . 8
Figure 6: PL2215P, 2245P, 2415 & 2445 System Options Tab . . . . . . . . . . . . . 9
Figure 7: Channel Data Tab . . . . . . . . . . . . . . . . . . . . . . . . . . . . . . . . . . . . . . . . . 12
Figure 8: Two Tone Tab . . . . . . . . . . . . . . . . . . . . . . . . . . . . . . . . . . . . . . . . . . . . 14
Figure 10: CTCSS table. . . . . . . . . . . . . . . . . . . . . . . . . . . . . . . . . . . . . . . . . . . . . 17
Figure 11: DCS Table . . . . . . . . . . . . . . . . . . . . . . . . . . . . . . . . . . . . . . . . . . . . . . 18
Figure 12: IDCS Table . . . . . . . . . . . . . . . . . . . . . . . . . . . . . . . . . . . . . . . . . . . . . . 19
Figure 13: Menu Bar . . . . . . . . . . . . . . . . . . . . . . . . . . . . . . . . . . . . . . . . . . . . . . . 20
Figure 14: Icon Bar . . . . . . . . . . . . . . . . . . . . . . . . . . . . . . . . . . . . . . . . . . . . . . . . 21
Page -iiiOctober 2001
LIST OF FIGURES
Figure 9: Channel Tone Option . . . . . . . . . . . . . . . . . . . . . . . . . . . . . . . . . . . . . . 17
ACC-905 PC PROGRAMMER
For PL2215P, PL2245P, PL2415, PL2445
INTRODUCTION
The ACC-905 programming software is used in conjunction with the ACC-2004 programming cable to enable the parameters of the Legacy Proline series handheld
radios to be read, modified and printed.
The ACC-905 Software Assembly contains the following items:
3 1/2” Disk Version:
3 diskettes which include programming software and setup program or
1 ACC-905 programming manual (P/N: 680-110-2002)
CD-ROM Version:
1 CD-ROM that contains the programming software and setup program and the ACC905 programming manual.
INTRODUCTION
System Requirements
The ACC-905 programming software requires an IBM® or compatible computer running Windows® 95 or later.
Computer
486 processor or faster (recommended)
Operating System
Microsoft Windows® 95 environment (Release 2.0 or later)
RAM
8 MB or more (16 recommended)
Hard Disk Space
3 MB
Disk Drive
3.5-inch
Communication
Port
One available communications port (COM 1, 2, 3 or 4).
Hardware Accessories
The following Hardware Accessories are required for programming:
•
•
ACC-2004 Programming cable
25-pin to 9 pin adapter (if 9-pin port is not available)
Page -1October 2001
ACC-905 PC PROGRAMMER
For PL2215P, PL2245P, PL2415, PL2445
HARDWARE INSTALLATION
Installing The Hardware
Installing the ACC-2004
Make sure that your computer is turned off.
Locate the serial communications port on the computer. This port will usually be
located at the rear of the computer. However, since this is dependent upon the design
of your computer refer to the computer operator’s manual for directions.
•
•
The first standard is the 25 pin RS-232 output that has a DB-25 male connector at
the computer (used on the IBM-PC or PC Compatible). If your computer uses a
DB-25 connector, you will need to purchase a DB-9/DB-25 adapter cable from
your local computer dealer, but do not use a null-modem adapter.
The other standard is a 9 pin RS-232 output that has a DB-9 male connector at
the computer (used on the IBM-AT and many portable lap-top computers).
1
2
2
3
3
4
4
5
5
6
6
7
7
8
8
20
9
22
Figure 1. 25-pin to 9-pin RS-232 Serial Communications Cable
Once located, insert the ACC-2004 Programming Cable into the appropriate serial
port on the computer.
It is now safe to turn on your computer.
Page -2October 2001
HARDWARE INSTALLATION
The IBM® PC systems support up to four serial ports. There are two physical standards for the serial port configurations of personal computers;
ACC-905 PC PROGRAMMER
For PL2215P, PL2245P, PL2415, PL2445
Connecting the Legacy Radio
HARDWARE INSTALLATION
ACC-2004
Programming Cable
Close Up
of
Programming
Port
Legacy Radio
RS-232
Serial Communications Port
©
IBM Compatible
Computer
Figure 2. ACC-2004 Installation
Once the ACC-2004 programming cable is connected to the computer, the radio can
now be connected to the programming cable.
Page -3October 2001
ACC-905 PC PROGRAMMER
For PL2215P, PL2245P, PL2415, PL2445
SOFTWARE INSTALLATION
Making A Backup Copy
(Floppy disk versrion only)
Before installing the ACC-905 Programming Software on your computer, make a
backup copy of the disk. The software occupies approximately 5 MB on the disk and
can be copied onto four 1.44 MB disks.
To make a copy of a floppy disk using Windows® 95
Installing The Software from Floppy Disk
Installing Onto A Hard Disk
1. Insert the ACC-905 disk in the disk drive.
2. Click the Start Menu, then select Run... and type: “A:\Legacy PC Programmer.exe” (or appropriate drive).
3. Close the information box by either pressing return or clicking on the “OK” button.
4. The program will automatically install the ACC-905 program in the following directory: C:\Program Files\Programmer
Installing The Software from CD
1.
2.
3.
4.
5.
Insert the ACC-905 disk into the CD-ROM drive.
If the install program does not auto-start, then: goto the Start Menu
Click on Run
type D:\Legacy PC Programmer.exe (where D: is your CD-ROM drive)
Follow the on-screen instructions.
Page -4October 2001
SOFTWARE INSTALLATION
1. In My Computer, left click the 3 1/2 Floppy (A:) icon for the disk you want to copy.
2. On the File menu, click Copy Disk.
3. Click the drive you want to copy from and the drive you want to copy to, and then
click Start.
4. Note: Any existing information on the disk you copy to will be deleted.
5. Use the backup disk in the disk drive as the working disk; keep the original disk in
a safe place as a master copy.
ACC-905 PC PROGRAMMER
For PL2215P, PL2245P, PL2415, PL2445
GETTING STARTED
Starting the ACC-905
In order to use this program, you must be familiar with standard Windows® 95 procedures.
1. From the Windows Start Button, click Programs.
2. Select Programmer > Legacy ACC-905 PC Programmer.
3. The “Opening Window” will appear.
To Exit the ACC-905
GETTING STARTED
Click on the “X” Button located in the upper right corner.
Setting the Communications Port
1. Click on Ports (Alt-P) then select the communications port that you are using.
Selecting the Model
1. Click on the Model drop down box.
2. Click on the Model that you would like to program
Radio Version
The radio version indicates the software version inside the radio. This field is read
only.
Page -5October 2001
ACC-905 PC PROGRAMMER
For PL2215P, PL2245P, PL2415, PL2445
Opening a Personality
1. Click on File then click on Open (Alt-F-O) See “File” on page 20 or click on the
Open folder icon see “Open File” on page 21. The screen below will be shown.
Page -6October 2001
GETTING STARTED
Figure 3: Open File Screen
2. Now select the file or type in the name of the file that you would like to load and
click on Open or press Enter.
ACC-905 PC PROGRAMMER
For PL2215P, PL2245P, PL2415, PL2445
Saving a Personality
GETTING STARTED
1. Click on File Then Click on Save (Alt-F-S) See “File” on page 20 or click on the
Save Icon See “Save File” on page 21. The following screen will appear.
Figure 4: Save Personality
2. Type in the filename that you wish to use then click on Save or press Enter.
Page -7October 2001
ACC-905 PC PROGRAMMER
For PL2215P, PL2245P, PL2415, PL2445
Programming a Radio
1. Connect the radio to the computer as shown in “Installing The Hardware” on
page 2.
2. Click on Tool then click on Program (Alt-T-P). See “Tool” on page 20. Or click on
the program icon. See “Program Radio” on page 21.
3. Follow the instructions on the program screen as shown below.
GETTING STARTED
Figure 5: Program Screen
4. Once the radio is in Read or write mode, click on the read or write buttons.
Printing a Personality
A personality can be printed by either selecting File and then selecting Print (Alt-F-P)
on the menu bar. See “File” on page 20. Or by selecting the printer icon on the Icon
Bar. See “Print Personality” on page 21.
Page -8October 2001
ACC-905 PC PROGRAMMER
For PL2215P, PL2245P, PL2415, PL2445
SYSTEM OPTIONS
SYSTEM OPTIONS
This tab is where all the radio wide options are set. Settings on this tab will affect
every channel of the radio.
Figure 6: PL2215P, 2245P, 2415 & 2445 System Options Tab
Max Channels
Sets the maximum channels that will be used in the radio. For example, you have a 4
channel radio, but will only program two of those channels. This number will then be
set to 2.
TX Delay
Enables the carrier to hang after the PTT has been released. This is useful for eliminating squelch tail when using CTCSS or DCS.
Busy Lock Enable
Busy Lock is used to prevent the radio from transmitting on a busy channel.
Marked Idle Enable
Used in conjuction with Busy Lock Enable, this functions allows the radio to transmit
only if the correct carrier and CTCSS or DCS are received.
Page -9October 2001
ACC-905 PC PROGRAMMER
For PL2215P, PL2245P, PL2415, PL2445
Scan
The scan section allows for many features to be programmed to tailor the scanning to
your needs.
Scan Enable
Enable channel scanning in the radio
Scan Chan Number
The channel that the user selects to enable scanning.
Scan Speed
The amount of time that the radio looks at each channel. This value is set in milliseconds and the default is 50ms. Range is 50ms to 500ms.
Scan Delay
This is the amount of time the the radio will stay on a channel after the carrier has
dropped. This value is set in seconds and the default value is 4 seconds. Range 1 to
30 seconds.
This Enables the radio to scan to a predefined priority channel. All communications on
the priority channel will override any communications on any other channel.
•
Note: When using priority scan, the radio will look back to the priority channel periodically. The user may respond to a call while the TX delay has not expired (See
“TX Delay” on page 9). In order to initiate a call, the user must turn the scan function off by turning the channel selector.
Priority Scan Channel
This is the channel that will be given priority.
Lookback Time
How often the priority channel is looked at. This value is set in seconds and the default
is 4 seconds. Range is .5 to 10 seconds.
Time Out Timer
This is a timer that will limit the time that a user can transmit at any one time.
Time Out Timer Enable
This enables the Time Out Timer.
TX Time Out Time
The amount of time that the radio will enable the user to transmit before timing out and
turning off the transmitter. This value is set in seconds and the default is 180 seconds.
Range is 10 to 2000 seconds.
Time Out Timer Penalty Enable
Once the radio has timed out, this makes the radio wait for a set time before being
able to transmit again. This time is set in seconds and the default is 5 seconds. Range
is 1 to 100 seconds.
Page -10October 2001
SYSTEM OPTIONS
Priority Scan Enable
ACC-905 PC PROGRAMMER
For PL2215P, PL2245P, PL2415, PL2445
Power Save
This is a battery save feature that makes batteries last longer on a single charge.
Power Save Enable
Enables the Power Save Feature.
Save On Time
This is the amount of time that the receiver is on and looking for calls. This value is set
in milliseconds and the default is 400ms. Range is 50 to 2000ms.
Save Off Time
This is the amount of time that the receiver is off and not looking for a call. This value
is set in milliseconds and the default is 200ms. Range is 50 to 2000ms.
Save Delay Time
SYSTEM OPTIONS
This is the amount of time that the radio will wait after a call has been received before
going back into power save mode. Range is .5 to 10 seconds.
Page -11October 2001
ACC-905 PC PROGRAMMER
For PL2215P, PL2245P, PL2415, PL2445
CHANNEL DATA
RX
Frequency
The frequency that the radio will receive on. This value is set in MHz.
Tone Option
Allows a CTCSS, DCS or Inverted DCS to be applied to any channel. This enables the
user to only hear traffic that pertains to them.
IND
Individual Two Tone option.Allows a two tone option to be used as setup in the two
tone tab. See “TWO TONE” on page 14.
G
Group Two Tone option. Allows a group call to be received as setup in the two tone
tab. See “TWO TONE” on page 14.
S-G
Super Group Two Tone option. Allows the super group call to be received as setup in
the two tone tab. See “TWO TONE” on page 14.
Page -12October 2001
CHANNEL DATA
Figure 7: Channel Data Tab
ACC-905 PC PROGRAMMER
For PL2215P, PL2245P, PL2415, PL2445
TX
Frequency
The frequency that the radio will transmit on. This value is set in MHz.
Tone Option
Allows a CTCSS, DCS or Inverted DCS to be used during transmit. See “TONE
OPTIONS” on page 17.
Option
P-SC
Priority Scan Option. This works in conjunction with the Priority Scan Channel feature
in the System Option tab. In order for priority scan to work, this field should be set too
On for the channels that will lookback to the priority channel.
CHANNEL DATA
SC
Channel Scan. Setting this option to On will put the selected channel in the scan list.
B
Band Option. Setting this option to N will make the selected channel to 12.5KHz channel spacing. When this is set to S, the channels spacing will be 25KHz.
Page -13October 2001
ACC-905 PC PROGRAMMER
For PL2215P, PL2245P, PL2415, PL2445
TWO TONE
This tab is for setting up the two tone options for the radio.
Individual Tone 1
This is the first two tone sequence. This coincides with the Tone 1 on the Channel
Data Tab. See “IND” on page 12.
•
Note: When using two tone on a channel, the Tone Option should be set to ‘No
Option’. See “Tone Option” on page 12.
Tone 1 Frequency
This is the actual frequency of the first tone in hertz. Range is 300 to 3000 Hz.
Tone 1 Duration
How long tone 1 will be sent in milliseconds. Range is 100 to 10000ms.
Gap Time
Time between tone 1 and tone 2 in milliseconds.Range is 100 to 10000ms.
Tone 2 Disable
Disables tone 2.
Page -14October 2001
TWO TONE
Figure 8: Two Tone Tab
ACC-905 PC PROGRAMMER
For PL2215P, PL2245P, PL2415, PL2445
Tone 2 Frequency
This is the actual frequency of the second tone in hertz. Range is 300 to 3000Hz.
Tone 2 Duration
How long tone 2 will be sent in milliseconds. Range is 100 to 10000ms.
Individual Tone 2
This is the second two tone sequence. This coincides with the Tone 2 on the Channel
Data Tab. See “IND” on page 12.
Tone 1 Frequency
This is the actual frequency of the first tone in hertz. Range is 300 to 3000Hz.
Tone 1 Duration
How long tone 1 will be sent in milliseconds. Range is 100 to 10000ms.
Gap Time
Time between tone 1 and tone 2 in milliseconds. Range is 100 to 10000ms.
Tone 2 Disable
TWO TONE
Disables tone 2.
Tone 2 Frequency
This is the actual frequency of the second tone in hertz. Range is 300 to 3000Hz.
Tone 2 Duration
How long tone 2 will be sent in milliseconds. Range is 100 to 10000ms.
Group Tone
This is the group call feature to call a group of radios. This coincides with the group
call feature on the Channel Data Tab. See “G” on page 12.
Tone 1 Frequency
This is the actual frequency of the first tone in hertz. Range is 300 to 3000Hz.
Tone 1 Duration
How long tone 1 will be sent in milliseconds. Range is 100 to 10000ms.
Gap Time
Time between tone 1 and tone 2 in milliseconds. Range is 100 to 10000ms.
Tone 2 Disable
Disables tone 2.
Tone 2 Frequency
This is the actual frequency of the second tone in hertz. Range is 300 to 3000Hz.
Tone 2 Duration
How long tone 2 will be sent in milliseconds. Range is 100 to 10000ms.
Page -15October 2001
ACC-905 PC PROGRAMMER
For PL2215P, PL2245P, PL2415, PL2445
Super Group Tone
This is a second form of group call that will allow a group of radios to be called. This
coincides with the Super Group Feature on the Channel Data Tab. See “S-G” on
page 12.
Tone 1 Frequency
This is the actual frequency of the first tone in hertz. Range is 300 to 3000Hz.
Tone 1 Duration
How long tone 1 will be sent in milliseconds. Range is 100 to 10000Hz.
Gap Time
Time between tone 1 and tone 2 in milliseconds. Range is 100 to 10000Hz.
Tone 2 Disable
Disables tone 2.
Tone 2 Frequency
This is the actual frequency of the second tone in hertz. Range is 300 to 3000Hz.
Tone 2 Duration
How long tone 2 will be sent in milliseconds. Range is 100 to 10000Hz.
TWO TONE
Page -16October 2001
ACC-905 PC PROGRAMMER
For PL2215P, PL2245P, PL2415, PL2445
TONE OPTIONS
Tone Options can be set for Transmit and Receive on the Channel Data Screen. See
“CHANNEL DATA” on page 12.
When Tone Option is clicked on with the left mouse button or the Enter key is pressed
while in the Tone Option field the following screen is shown.
TONE OPTIONS
Figure 9: Channel Tone Option
The options allowed are:
• None- No tone or Carrier Squelch
• CTCSS - Continuous Tone Coded Squelch System
• DCS - Digital Coded Squelch
• IDCS - Inverted Digital Coded Squelch
CTCSS
Figure 10: CTCSS table
The CTCSS Table allows for 1 of 49 tones to be selected.
Page -17October 2001
ACC-905 PC PROGRAMMER
For PL2215P, PL2245P, PL2415, PL2445
DCS
Page -18October 2001
TONE OPTIONS
Figure 11: DCS Table
The DCS table allows for 1 of 104 DCS codes to be selected.
ACC-905 PC PROGRAMMER
For PL2215P, PL2245P, PL2415, PL2445
TONE OPTIONS
IDCS
Figure 12: IDCS Table
This table allows 1 of 104 Inverted-DCS codes to be selected.
Page -19October 2001
ACC-905 PC PROGRAMMER
For PL2215P, PL2245P, PL2415, PL2445
MENU BAR
Figure 13: Menu Bar
The menu bar is provided to allow easy navigation from anywhere within the program. The
menu bar consists of pull down menus that allow the user to go directly from one function to
another. Options can be selected by using the Alt- key combinations listed.
File
Port
When the ACC-905 is executed, the serial port is set to COM1 by default. If you have
connected the radio to COM2, then COM2 should be selected in this menu.
Tool
Tool is used to Program the radio or to change reference settings (Password
required). By default Reference Settings are set to auto.
Page -20October 2001
MENU BAR
The File menu is used to set the screen to Defaults, Exit the program or to Open,
Save or Print a personality.
ACC-905 PC PROGRAMMER
For PL2215P, PL2245P, PL2415, PL2445
ICON BAR
Figure 14: Icon Bar
The Icon bar allows for easy access to the most used functions.
Open File
Loads personality from disk.
Save File
Saves personality to disk.
Print Personality
ICON BAR
Prints current personality to the printer.
Program Radio
Reads personality from radio or writes personality to radio.
Page -21October 2001